How to Remove the Noindex Tag in WordPress: 4 Easy Ways

Is your WordPress site not appearing on Google? You might be facing an unseen struggle — the noindex tag. This one tiny meta tag tells search engines not to index your content, killing your visibility and traffic before your site can even rank.
Many users of WordPress unknowingly turn on this setting when they are switching around their SEO plugins or site visibility settings, and unless you know what to look for, it can be hard to see.
In this easy-to-follow article, you will learn exactly how to remove the noindex tag in WordPress with four different methods. So, whether you have been blogging for years or whether you’re more of a techy type, fixing this one thing can help you get your site seen — and clicked — in search results.
What is a Noindex Tag In WordPress?
Before you can learn how to remove the noindex tag in WordPress, it’s helpful to first understand what a noindex tag does and why it is relevant to SEO.
A noindex tag is an HTML meta tag that tells search engines to exclude a web page from their search index. If a noindex tag exists on a page, it looks like this:
<meta name="robots" content="noindex, follow">
In simple terms, this means the page will be crawled, but it won’t show up in search results via Google or any search engine. For many WordPress website owners, this can spell trouble for SEO, especially if meaningful content is hidden from search engines.
Common (intentional) use cases include:
- Pages under development or staging sites
- Duplicate content you don’t want indexed
- Thank you, pages or internal admin URLs
However, the trouble occurs when the noindex tag is accidentally added – often via a plugin, WordPress setting, or even in the code of a theme. That’s why knowing how to remove the noindex tag in WordPress is imperative to getting your website visible again and regaining organic website visitors.
Why You Should Remove the Noindex Tag in WordPress?
If your content isn’t indexed, it is essentially invisible to search engines – and that’s a serious SEO problem.
Many WordPress users only discover the noindex tag when they notice that their pages are not showing up in a Google search. The good news is that once you learn how to find noindex for your WordPress site, you can remove it and get your content the attention it deserves.
Here’s why removing a noindex tag is important:
- Increase your site’s visibility – Noindex tags mean your pages will not show up in any search results.
- Gain back lost traffic – Removing the noindex tag will allow your best content the chance to begin ranking quickly.
- Fix technical SEO issues – Tools like SEMrush, Ahrefs, and Google Search Console will all flag noindex as an indication of a problem with your SEO.
- Re-establish search engine trust – Indexable, high-quality content signals authority and improved crawlability.
If you have recently:
- Launched a new WordPress site
- Migrated content from one domain to another
- Changed SEO Plugins, i.e., Yoast SEO or Rank Math
- Changed the visibility of your pages during staging/development
Chances are, there are still pages with a noindex tag on.
Let’s fix that now by looking at how to remove the noindex tag in WordPress, step by step.
How To Remove The Noindex Tag In WordPress: 4 Effective Methods
If you’ve discovered that your site has a noindex tag that is affecting important pages from being indexed, it is time to remove it.
Below are 4 tried and true methods to remove the noindex tag in WordPress, whether you’re a beginner or more advanced. Pick one you’re comfortable with and that fits your configuration. For best results, we suggest that you check all these places to ensure that your pages are completely indexable.
Method 1: Use an SEO Plugin (Yoast SEO)
Yoast SEO is one of the most well-known WordPress plugins, and it frequently serves as the main reason for noindex tags or even the complete fix. The key benefit of Yoast SEO is the ability to control index settings for its content, both globally and at the individual page level.
Steps
- Go to your WordPress dashboard.

- Select the Advanced tab and confirm that Posts and Pages are checked to:
- Show Posts in search results? → YES
- Show Pages in search results? → YES
- Save Changes.
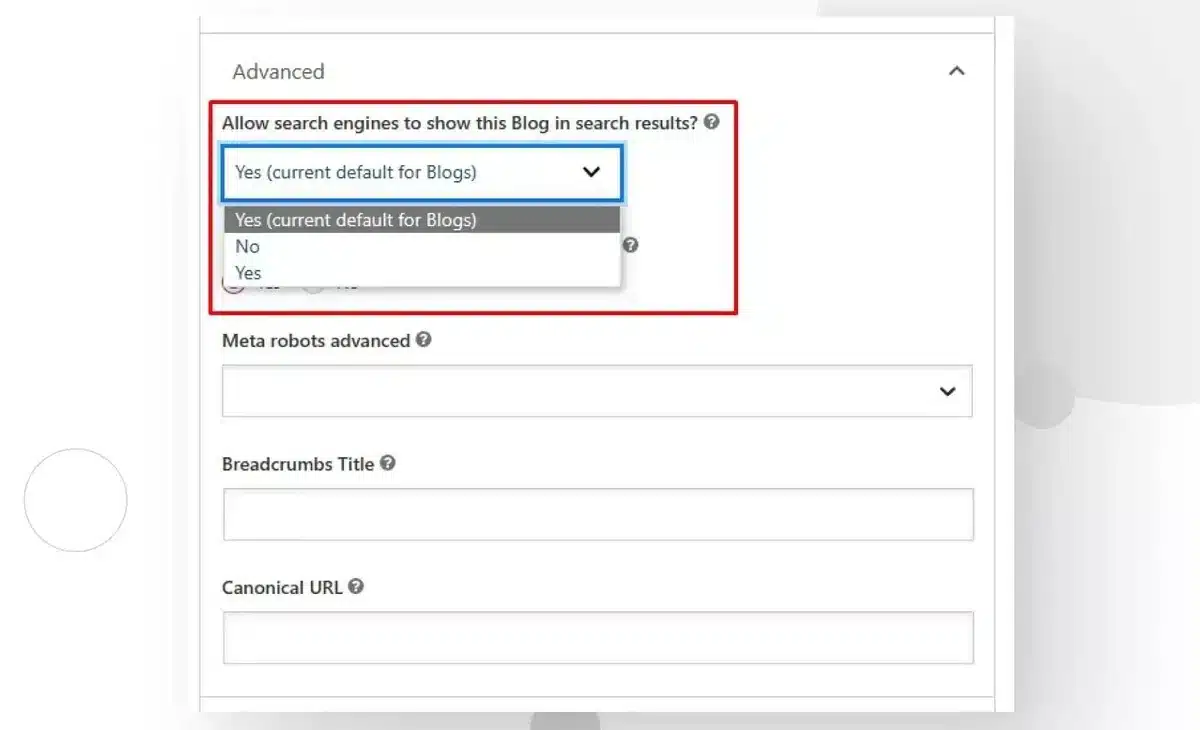
Check your page settings:
- Edit any blocked page or post.
- Scroll down to the Yoast SEO box, located below the Editor.
- Click on the Advanced tab.
- Confirm “Allow search engines to show this Page in search results?” is set to Yes.
Pros
- No coding
- Simple as either global or on a per-post basis
- User-friendly interface for any SEO beginner
Cons
- Some of your settings may still be overridden by themes or other plugins.
- It may take anywhere from a few days to weeks before anything is reflected on Google.
Best For
Newbies and users managing search engine optimization with Yoast
Pro Tip: After updating these settings, use Google Search Console’s URL Inspection Tool to request reindexing of important pages.
Method 2: Check WordPress Reading Settings
WordPress has a built-in option to discourage search engines from indexing the entire site, intended for a staging or under-construction website. If this box is checked, it will add a noindex tag sitewide.
Steps
- Log in to your WordPress dashboard.

- Go to Settings > Reading.

- Scroll down to Search Engine Visibility. Uncheck the box that says: “Discourage search engines from indexing this site”.
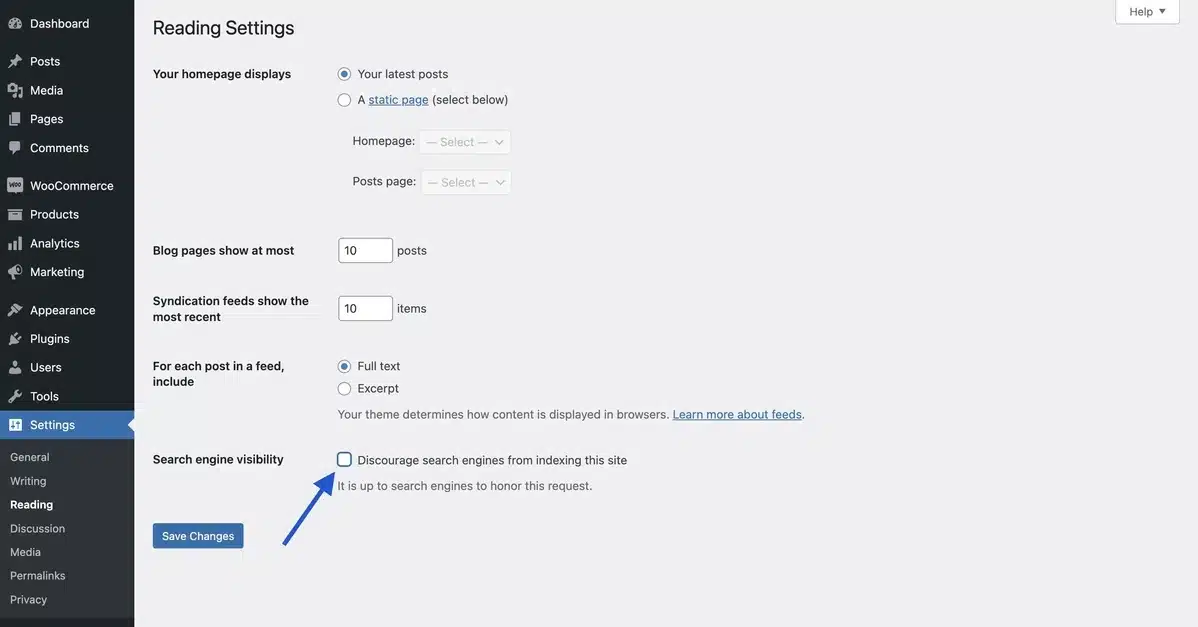
- Click Save Changes.

This setting adds a noindex directive across every page, so unchecking it is critical if you want to appear in search engines.
Pros
- Built-in and easy to find.
- Can fix a global issue in seconds.
Cons
- Often left on accidentally after launch.
- Still requires Google to recrawl your site.
Best For
Sites that launched very recently or are under development.
“I launched a client site and forgot this setting was still checked — their entire site was hidden from Google for a month. Don’t overlook it!” ~ Freelance SEO Consultant on Reddit
Method 3: Review and Edit the Robots.txt File
Your site’s robots.txt file tells search engine bots whether to crawl or not crawl which URLs. If this file is misconfigured, it could cause a block for indexing, which would defeat the course of action you’ve taken with your SEO plugin and theme configuration.
How to Access it
You can access it with two options:
- Option 1: Using a Plugin
- Option 2: Using FTP or cPanel
Option 1: Using a Plugin
- Use an SEO plugin like Yoast or Rank Math
- Go to SEO > Tools > File Editor
- Find the
robots.txtSection
Option 2 (FTP or cPanel)
- Access via FTP or cPanel > File Manager
- Go to your site’s root directory.
- Open or create a
robots.txtfile.
Look for lines like:
User-agent: *
Disallow: /
This line will disallow all bots from accessing your website to crawl.
You can change it to:
User-agent: *
Allow: /
Or you can just remove the line if you don’t need it at all.
Pros
- You have full control of how bots access your website.
- Great for advanced SEO configurations or actions.
Cons
- Leaving mistakes can block your whole site.
- Check the robots.txt Tester to confirm any changes you make.
Also, check that there should be noindex directives in the robots meta tag as well, and not just the robots.txt file!
Best For
Those comfortable with checking crawl directives
Method 4: Manually edit your theme’s header.php
Occasionally, you will encounter a noindex tag that is hardcoded into your theme’s header.php. Usually, this is a well-known thing with a custom theme, starter template, or staging build.
Steps
- Click on Appearance > Theme File Editor.

- In the file list on the right-hand side, open header.php.

- Search for this line of code:
<meta name="robots" content="noindex, follow">.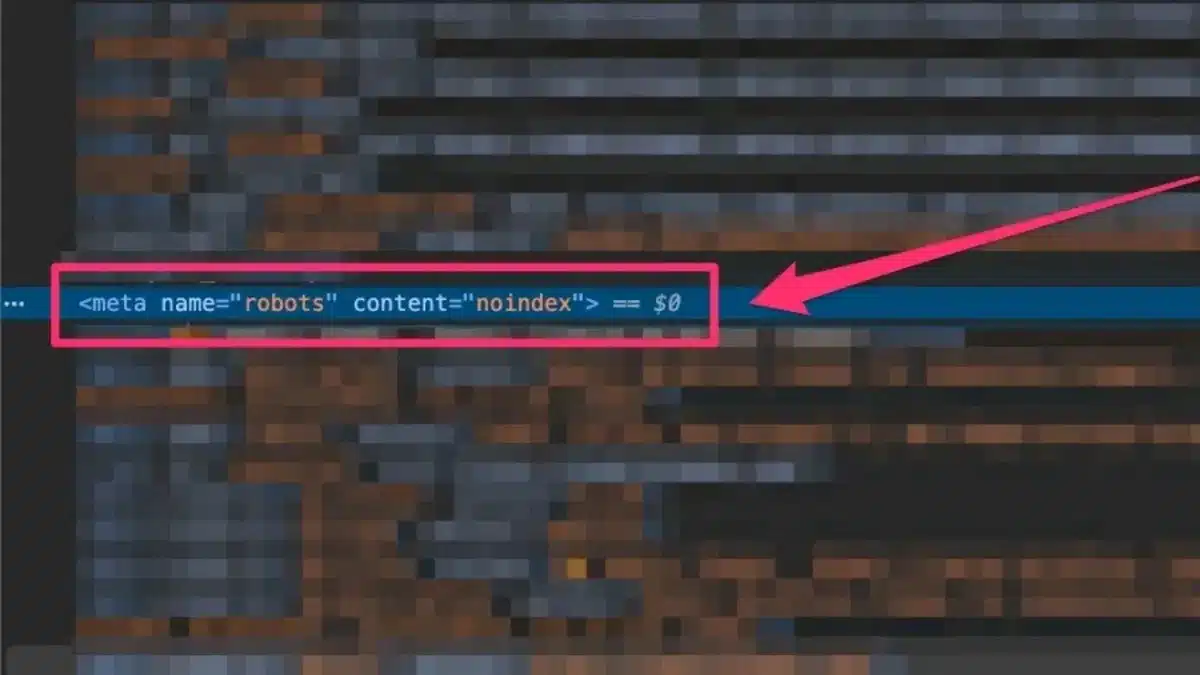
- And replace it with:
<meta name="robots" content="index, follow"> - Then click Update File.

Important: Always back up your site first. Or use a child theme, in which case you have to back it up or do anything.
Pros
- Repairs difficult noindex issues
- Gives you full control
Caution
- If you make too many mistakes, it can break the layout of the theme
- Will be overwritten during theme updates (use a child theme!)
Best for
Developers or advanced users who suspect hardcoded issues.
If you are uncertain of the appropriate next step, all of the suggestions here should be conducted in a staging environment, or consult the developer for help if possible.
Final Thoughts on Removing the Noindex Tag in WordPress
Removing that hidden noindex tag in WordPress may seem like a minor technical change, but it has a huge effect on your website’s visibility. Search engine indexing is not optional if you are working with a blog, an eCommerce site, or anything in between.
We’ve covered how to remove a noindex tag in WordPress by using four different, practical methods:
- Working within your Yoast SEO settings.
- Adjusting the WordPress Reading Settings.
- Adjusting the robots.txt file.
- Change the header.php file in your theme.
Are you still not seeing your pages indexed after you’ve made these adjustments? Just be patient – sometimes it can take Google a few days to recrawl and index any changes that were made. If you want the updates to show up faster, you can use the URL Inspection Tool inside Google Search Console.
Key Takeaways:
- Noindex tags can be useful – but dangerous if misused.
- Just one incorrect setting can block your whole site!
- Plugins like Yoast make it easy to fix.
- Check twice after launching a site, or after changing SEO settings.
After you have removed the noindex tag, your content can phase back in to compete for rankings and traffic.
Frequently Asked Questions (FAQs)
Q1. What does the Noindex tag do in WordPress?
The noindex tag tells search engines not to index a certain page from their search results, meaning users searching on Google or Bing will not be able to see it.
Q2. Why is my WordPress site not appearing in search engines?
The most common problem is that one or more pages of your site have the noindex tag applied to them, through a plugin, theme settings, or visibility settings in WordPress.
Q3. Can I remove the noindex tag without a plugin?
Yes, you can remove it either by changing your WordPress settings or editing your theme files directly, although plugins make these processes easier and safer for most people.
Q4. After I remove the noindex tag, how long does it take for my site to show in search results?
After you remove the noindex tag, it takes a few days to a few weeks for search engines to recrawl and reindex your pages, depending on their crawl schedule.
Q5. Do all pages need to be indexed in WordPress?
Not all pages need to be indexed. You want your important content indexed, but it is fine to keep pages like admin sections, thank you pages, or duplicate content to noindex.
Ekta Lamba
Ekta Lamba is a tech writer at DevDiggers focused on making WordPress and WooCommerce straightforward for non-developers. She covers plugin errors, platform updates, and WordPress basics, written so readers can follow along without a second tab open to translate the jargon.
Join thousands of readers getting smarter every week.
Leave a Reply