Your cart is currently empty!
If you want to add Facebook functionality to your website or application, creating a Facebook App ID is the first step.
It is an identifier that lets developers access Facebook’s APIs, allowing for easy integration of social login, analytics, or other Facebook tools into your project.
Here’s how to create a Facebook App ID step-by-step so that you can do it easily.
What is a Facebook App ID?
A Facebook App ID is a unique number that identifies your app whenever it interacts with Facebook services. This encompasses such functionality as the following:
- Facebook Login: seamless authentication for users
- Social Plugins: integration of Like or Share buttons
- Analytics Tools: tracking of user behavior
- Ad Optimization: optimizing your campaigns through Audience Network.
Why Do You Need a Facebook App ID?
Here are the advantages of having a Facebook App ID.
- User Authentication: Simple and secure logins using your Facebook credentials.
- Social Features: Like, Share, and Comments functionality in your app.
- Enhanced Insights: Analyze user actions through Facebook Analytics.
- Ad Monetization: Use an Audience Network for better revenue.
How to Create a Facebook App ID
Follow these simple steps to create your Facebook App ID:
Step 1: Visit the Facebook Developers Page

Go to the Facebook Developers page and log in with your Facebook account. If you’re new to the platform, register as a developer first by clicking Get Started and completing the verification process.
Step 2: Create a New App
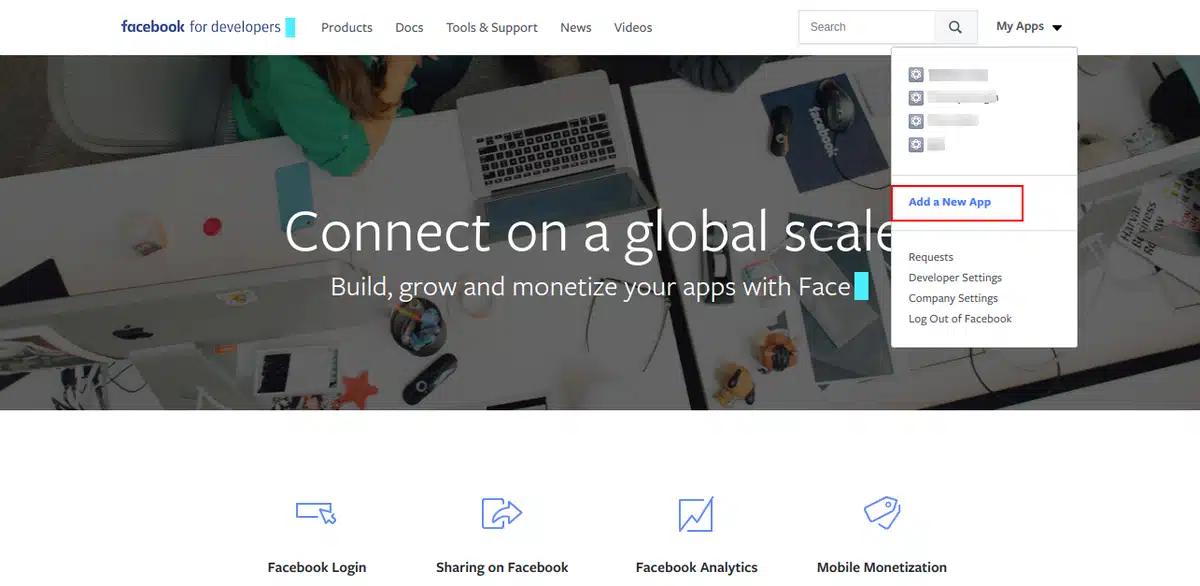
- Navigate to the My Apps section in the top-right menu.
- Click on Add a new App.
- Choose an app type based on your needs:
- Business: For managing ads, pages, or assets.
- Consumer: For public-facing apps.
- Gaming: For games on Facebook or other platforms.
- None: If your app doesn’t fit specific categories.
Step 3: Input Your New App’s Details
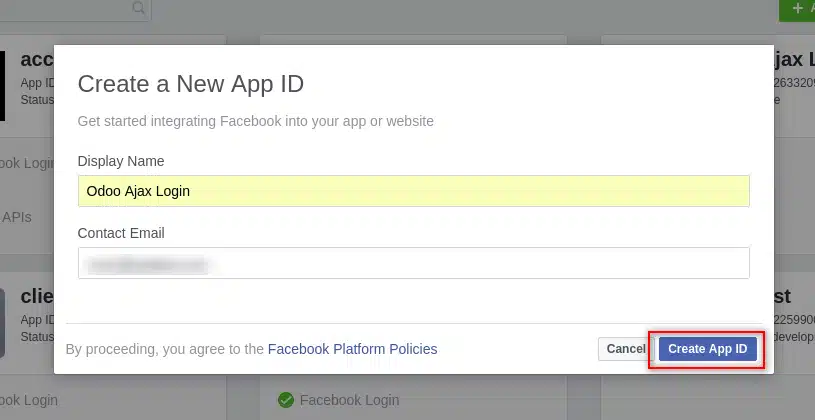
- Enter your App Name and Email Address.
- Then click Create App ID.
Step 4: Add Features to Your App
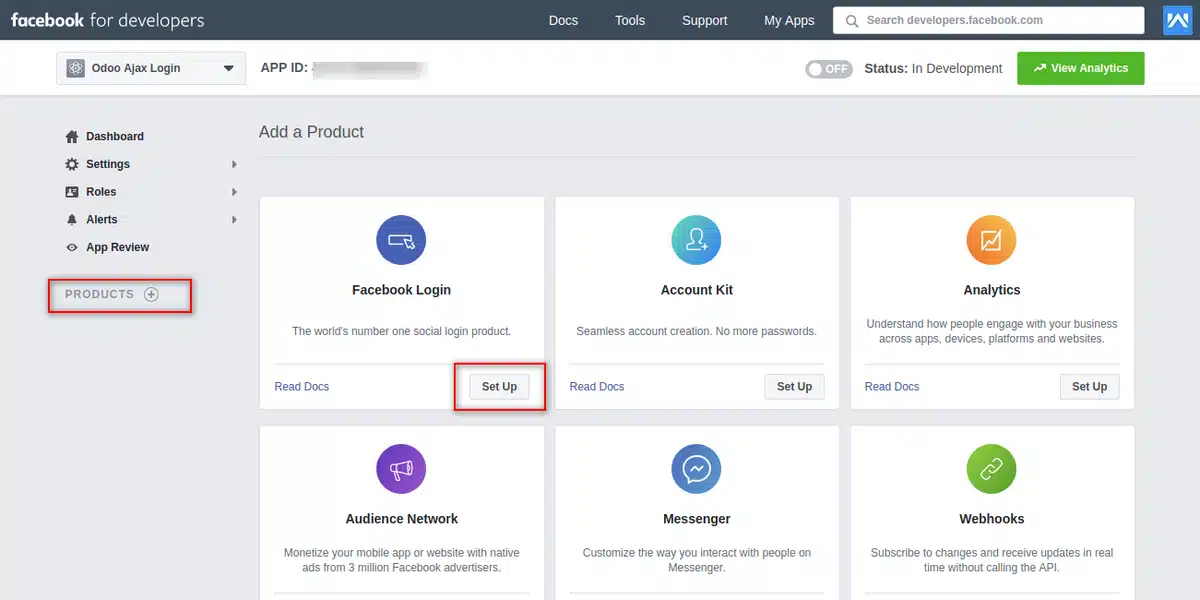
After creating the app, you’ll be redirected to the dashboard. Follow these steps to add features:
- Add Facebook Login:
- Click Add a Product from the left menu.
- Select Facebook Login and click Set Up.
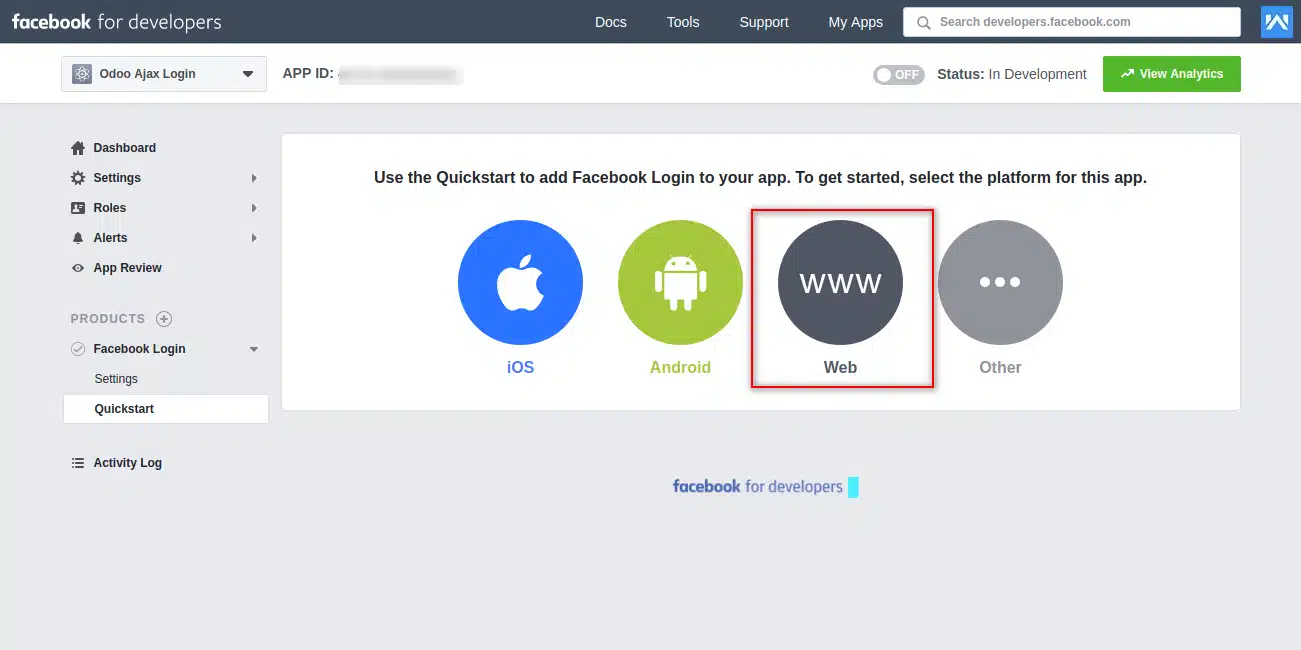
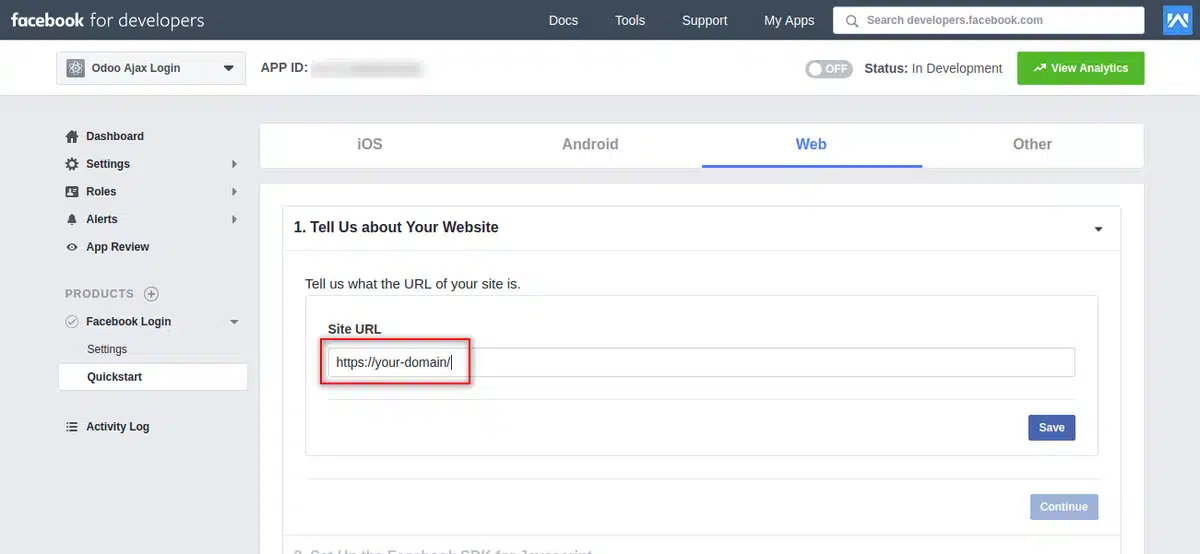
- After clicking on the Set Up button, you will be redirected to the Quickstart page.
- Choose the platform (e.g., Web) and follow the configuration prompts.
- Enable App Events: Use App Events to track user actions and engagement.
Step 5: Setup Your Product URL
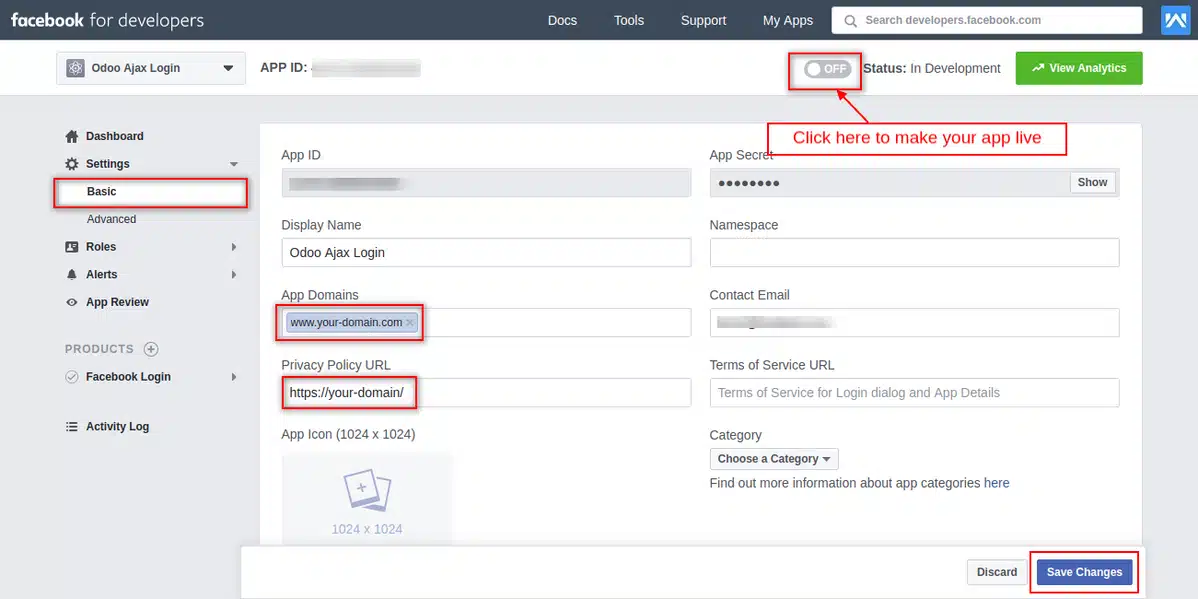
- Go to Settings → Basic from the left menu.
- Input the following:
- App Domains: your website’s domain.
- Privacy Policy URL: a link to your application’s privacy policy.
- Redirect URLs: provide the address where users will be redirected upon successful login (for example,
https://yourdomain.com/auth_oauth/signin).
- Click on Save Changes to save the configuration.
Step 6: Make Your App Live
By default, your app is in development mode. To make it public:
- Go to the App Review section.
- Complete the necessary permissions and verifications.
- Toggle the Live Mode switch at the top.
Step 7: Retrieve Your Facebook App ID
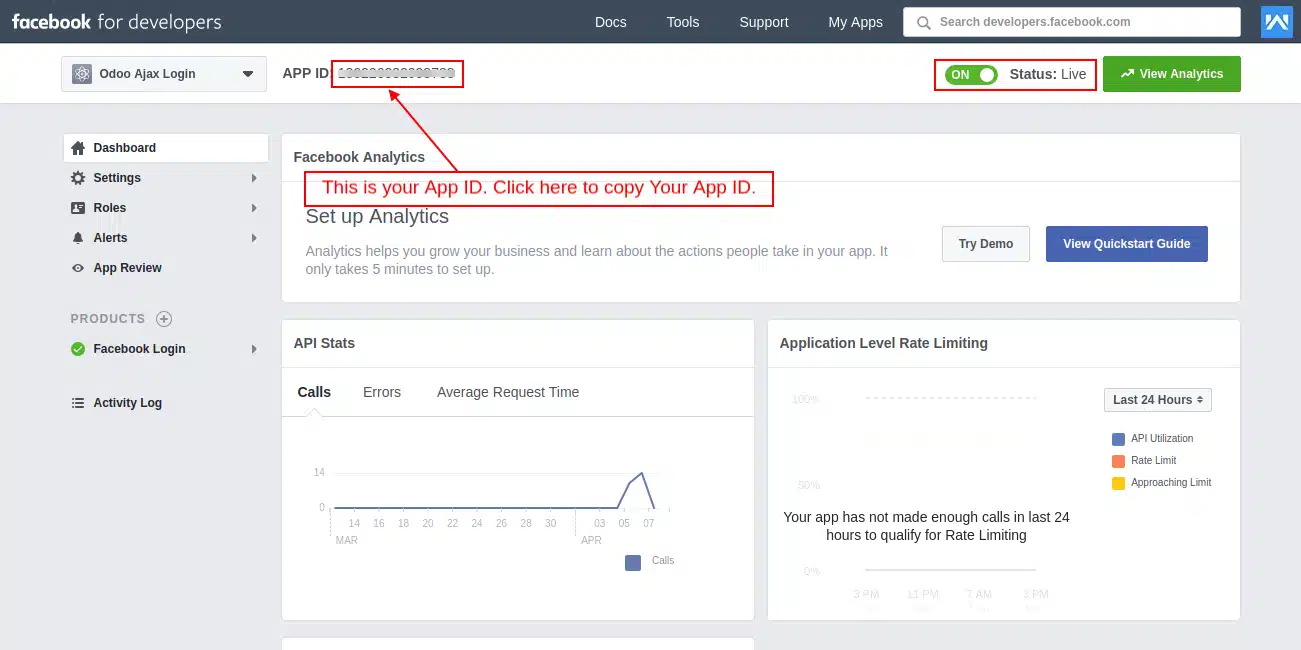
Once the app is live, your App ID will be displayed on the dashboard. Copy this number for integration into your website or app.
Common Issues When Creating a Facebook App ID
- Verification Problems: Ensure your Facebook account is verified with a valid email or phone number.
- Permission Errors: Only users with admin rights can create or manage apps.
- Delayed Reviews: If your app requires extended permissions, submit all requested documents promptly for approval.
- Invalid App Type: Choosing the wrong app type may limit features—ensure you select the correct one for your needs.
- App Not Live: Remember to make your app live by completing all required settings, like adding a Privacy Policy URL.
Pro Tips for Using Your Facebook App ID
- Secure Your App: Avoid sharing your App Secret publicly to prevent unauthorized access.
- Test Thoroughly: Use Facebook’s testing tools to ensure smooth functionality.
- Stay Compliant: Regularly review Facebook’s policies to avoid violations.
- Optimize Performance: Regularly monitor your app’s performance using Facebook Analytics and tweak settings for better engagement.
- Leverage Advanced Features: Explore additional tools like App Events to enhance user insights and improve advertising strategies.
Conclusion
You create your Facebook App ID through the Facebook Developer page. Increasing the functionality of your WordPress site has never been easier by following this guide on how to create a Facebook App ID.
You can unlock powerful social integrations and improve user engagement without much hassle. Remember to follow Facebook’s best practices and maintain your app for optimal performance.
Frequently Asked Questions (FAQs)
What is a Facebook App ID?
A Facebook App ID is a unique identifier provided by Facebook when you create an app on their developer platform. It enables integration with Facebook features like login and analytics.
Why do I need a Facebook App ID for WordPress?
You need a Facebook App ID to enable functionalities like Facebook Login, social sharing, tracking form submissions, and enhancing user engagement on your WordPress site.
How can I use my Facebook App ID in WordPress?
You can integrate your Facebook App ID using plugins like WPForms or manually by adding the SDK script to your theme’s header.
Do I need a developer account to create a Facebook App ID?
Yes, you must set up a Facebook Developer account to create and manage your Facebook App ID.
Can I use the same Facebook App ID for multiple websites?
Yes, a single App ID can be used for multiple websites, but ensure each site’s domain is added in the app settings for proper functionality.



Leave a Reply