How To Remove The Noindex Tag In WordPress

If you are looking to improve the visibility of your WordPress site in search engines, it is essential for you to learn how to remove the Noindex tag.
Follow this guide and learn how to remove the Noindex Tag In wordPress in a way that will ensure every search engine easily accesses your content, besides giving you more SEO juice.
No matter what level of experience you have with WordPress, mastering this method guarantees optimal accessibility to the audience you want to reach, thereby enhancing your brand presence on the internet.
What is a Noindex Tag In WordPress?
The Noindex tag in WordPress allows search engines to remove a specific webpage from their index.
This tag can be used on pages to prevent them from appearing in search engine results pages (SERPS).
While effective for hiding specific content, it could accidentally decrease the visibility of important pages.
Knowing how to delete the Noindex tag in WordPress is essential for controlling which pages are indexed and ensuring that your site’s content is discoverable by your intended audience.
Why Remove Noindex Tag In WordPress?
There may be several causes for removing the Noindex tag for your pages:
- Enhance Visibility: Noindex tags are meant for restricting page indexes, which makes them uncovered on search engines. Removing such tags ensures your website is easily searchable, which makes your contents searchable and visible to users who navigate search engines.
- Boost SEO: SEO alters the visibility of your website’s contents per time. Page indexing allows search engines to scrape your site’s data and classify it based on preset metadata. That action boosts its chances of getting viewed or clicked. Hence keeping the no index tags will destabilize SEO effectiveness as searching for an indexed page without finding it only serves to defeat the aim,set for visibility through that tag.
- Share Information: Use the noindex tags if you want less audience engagement compared to the created content. That way, only a small amount of clicks translates to lesser people grappling with the content making it less competitive.
- Transform Business Use: Noindex tags will inhibit any sales and higher organic traffic. For business websites, disabling the noindex tag will lead to more conversions and increased sales.
- Improve user engagement: Ordinarily, the noindex tags will hinder traffic which will increase the amount of content and services being offered. Removing that tag will broaden audience access leading to better user satisfaction. As boundless access to information enhances user experience and the information is relevant to their interests, this will foster high satisfaction.
Learning how to remove the Noindex tag in WordPress is crucial if you want your website to be visible and accessible to a broader audience through search engines.
How To Remove The Noindex Tag In WordPress
Removing the Noindex tag in WordPress can be done directly through your SEO plugin or WordPress settings. Here are the steps for both methods:
Method 1: Using an SEO Plugin (Yoast SEO)
The first method to understand how to remove the Noindex tag in WordPress is using the Yoast SEO plugin. Let’s know its steps in detail.
Step 1: Log in to your WordPress Dashboard
Head to the WordPress website and login to it with your credentials
Step 2: Locate to the Pages or Posts

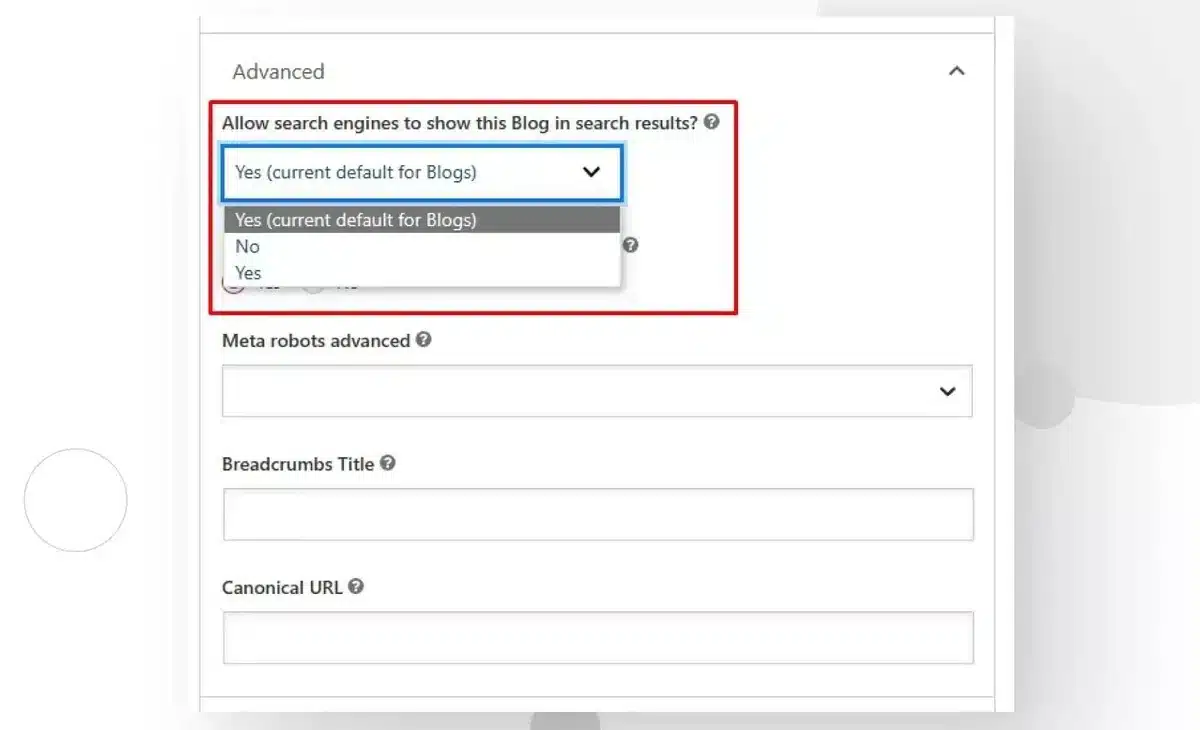
Head to WordPress Pages or Posts you want search engines to index, then scroll down and select the Advanced tab. Choose Yes to allow search engines to display this blog in search results. It’ll finally be indexed in search results.
Method 2: Using the Reading Settings in WordPress
The second method to learn how to remove the Noindex tag in WordPress is by Reading Settings in WordPress:
Step 1: Navigate to Reading Settings
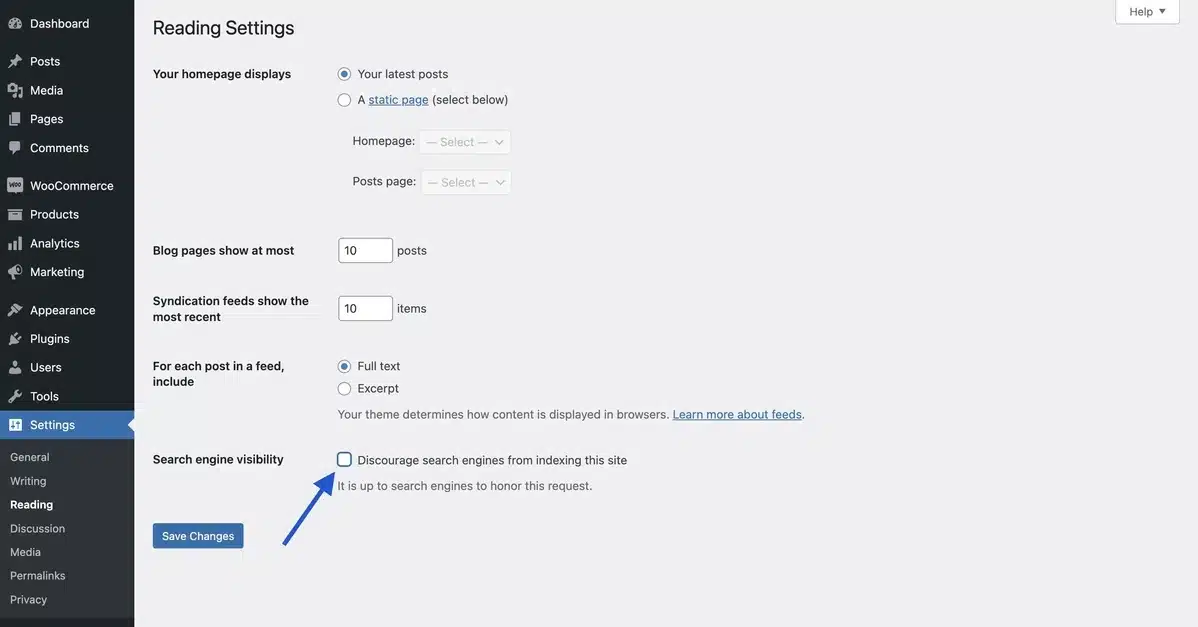
In the left-hand menu, go to Settings > Reading.
Step 2: Discourage Search Engines Setting
Find the option labeled “Discourage search engines from indexing this site.” Make sure this box is unchecked.

Step 3: Save Changes
Scroll down and click Save Changes.
Method 3: Editing the Robots.txt File
If the above methods don’t resolve the issue, you might need to check the robots.txt file in the process of how to remove the noindex tag in WordPress.
Step 1: Locate the robots.txt File
Find the robots.txt file in the root directory of your WordPress installation once you log into your WordPress dashboard.
Step 2: Edit the robots.txt File
Open the file and look for any lines that contain Disallow or Noindex for specific pages or the entire site. Remove those lines if necessary.
User-agent: *
Disallow:
Sitemap: http://example.co.uk/sitemap.xml
Step 3: Save and Upload the File
Save your changes and upload the file back to the root directory.
Method 4: Directly Edit the Theme’s header.php File
The last method when learning how to remove the Noindex tag in WordPress is by editing the theme’s header.php file:
Step 1: Go to the Theme Editor
From your WordPress Dashboard, head to Appearance > Theme Editor.
Step 2: Find the Header File
On the right side, find and click on the header.php file.
Step 3: Remove the Noindex Tag

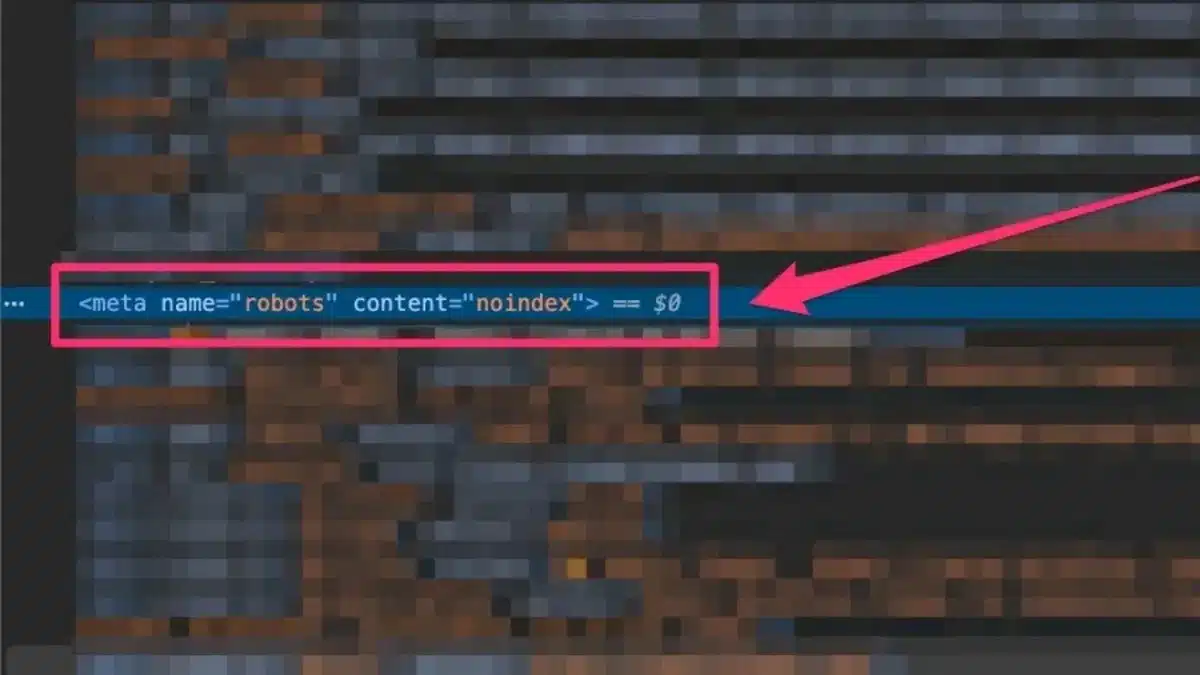
Look for the <meta name="robots" content="noindex"> Tag in the code. Remove this line if it exists.
Step 4: Save Changes
Select Update File to record your modifications.
Upon completion of any of the aforementioned options, you will be able to successfully understand how to eliminate the Noindex tag in WordPress, letting search engines crawl and index your website.
It’s important to create a copy of your website data before editing any of your files or settings.
Conclusion
In conclusion, know that grasping how to remove a Noindex tag in WordPress is imperative for improving the visibility of your website’s pages in search engines and the overall SEO efficiency.
Following this tutorial’s steps will remove the barriers that prevent search engines from crawling your content.
Therefore, your site stands a greater chance of being included in search results, exposed to a wider audience, and gaining increased organic page views.
This is important for all users of WordPress, whether beginners or seasoned, as understanding this facet of SEO will undoubtedly contribute to the performance and advancement of their websites.
FAQs
How Do I Know if a Page Has the Noindex Tag?
You can check if a page has the Noindex tag by inspecting its HTML code. Look for the meta robots tag with the “noindex” attribute. Alternatively, you can use SEO tools or plugins that provide insights into a page’s indexing status.
Will Removing the Noindex Tag Immediately Index My Page?
Removing the Noindex tag doesn’t guarantee search engines will immediately index it. Search engine crawlers may take some time to revisit and index the page. You can expedite the process by submitting the page URL to search engine webmaster tools for crawling.
Can I Remove the Noindex Tag Temporarily?
You can temporarily remove the Noindex tag if you want the page to be indexed for a specific period. After the desired indexing period, you can reapply the tag if necessary.
Are There Any SEO Considerations When Removing the Noindex Tag?
Yes, there are SEO considerations to remember when removing the Noindex tag. Ensure the page content is optimized for search engines and aligns with your SEO strategy to maximize its visibility and ranking potential.
What To Do After Removing the Noindex Tag?
After removing the Noindex tag, monitor the page’s performance in search engine results. Analyze its visibility, traffic, and ranking position to assess the impact of indexing. Additionally, continue optimizing the page for better SEO results.

Kartika Musle
A Tech enthusiast and skilled wordsmith. Explore the digital world with insightful content and unlock the latest in tech through my vision.

Leave a Reply