How to Hide the Featured Image in a WordPress Post – A Complete Guide


Featured images are essential in enhancing the visual appeal of a WordPress post, but there are times when you may want to hide them for various reasons. Understanding how to hide the featured image in a WordPress post is a valuable skill, whether for aesthetic purposes, to improve loading speed, or to meet specific design needs.
In this guide, we’ll walk you through different methods, from plugins to adding custom CSS, to ensure you’re equipped with the knowledge to hide the featured image in a WordPress post easily.
Why Learn to Hide the Featured Image in a WordPress Post?

Before diving into the methods, it’s essential to understand why you might want to hide the featured image in a WordPress post. Here are some common reasons:
- Aesthetic Uniformity: By learning how to hide the featured image in a WordPress post, you can maintain a cleaner, more professional layout, especially if the image doesn’t align with your content’s theme.
- Put Focus on Content: It might be the case that it is indeed the content that’s the main attraction. Hiding a featured image may make the focus on the written text instead of the image, encouraging it.
- Page Speed Optimization: Images, especially large ones, can slow down your page load times. Knowing how to hide the featured image in a WordPress post can help improve site speed by eliminating unnecessary visual elements, enhancing both user experience and SEO.
- Content-Specific Design: Not every post needs a featured image. Minimalistic content or certain types of posts, such as announcements, may benefit from hiding the image. Learning how to hide the featured image in a WordPress post allows you to control the look and feel of these posts more effectively.
- Avoiding Redundancy: If the featured image is also present within the content, you might want to hide it to avoid repetition. Mastering how to hide the featured image in a WordPress post ensures that your readers won’t see the same image multiple times.
Now that you have some reasons in mind, let’s move on to the methods.
How to Hide the Featured Image in a WordPress Post: Different Methods
There are several methods to hide the featured image in a WordPress post, and each offers its advantages depending on your skill level and requirements. Below are some detailed approaches.
Method 1: Using Custom CSS
1. Hide Featured Images on Specific Posts Using CSS
If you want to learn how to hide the featured image in a WordPress post without relying on plugins, custom CSS is a great alternative. This method doesn’t require any plugins or complex coding skills. Here’s how you can do it:
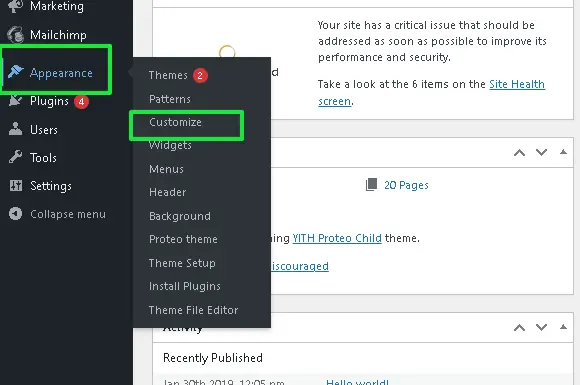
- Log into Your WordPress Dashboard: Log in to your WordPress admin area.
- Navigate to Customizer: Go to Appearance > Customize. This will open the WordPress Customizer, where you can change your theme.
- Add Custom CSS:
- In the Customizer, click on Additional CSS.
- Paste the following CSS code into the box:
.post-thumbnail {
   display: none;
}
- This CSS code targets WordPress’s class for featured images and hides them from view.
- Publish Changes: Click on Publish to save your changes.

Pros:
- No need for plugins.
- Highly customizable for specific posts or pages.
Cons:
- Requires basic knowledge of CSS.
- This applies site-wide unless you add conditional code for specific posts.
When customizing your WordPress posts, you might also need fresh visuals — check out Depositphotos stock vectors for high-quality, customizable design elements.
2. Hiding Featured Images for Specific Posts
You might only want to hide the featured image on particular posts. In this case, it is highly effective to know how to hide the featured image in a WordPress post using CSS targeted to specific posts.
Steps:
- Find the Post ID: Each WordPress post has a unique ID. You can find this ID by opening the post in the WordPress dashboard. Look at the URL bar, and you’ll see something like this:
post=123. The number 123 is the post ID. - Add Custom CSS for the Specific Post: Once you have the post ID, add the following CSS code to your theme’s Additional CSS section:
.postid-123 .post-thumbnail {
    display: none;
}
- Replace
123with the actual post ID. - Save and Publish: Publish the changes and verify that the featured image is hidden on the targeted post.
Pros:
- Specific to individual posts.
- Avoids installing plugins.
Cons:
- Requires manual intervention for each post.
3: Hiding Featured Images for Specific Categories
You may want to hide the featured image for certain categories to maintain a consistent look.
Steps:
- Identify Category Class: Use browser developer tools to find the category class (e.g.,
category-slug). - Add Custom CSS:
- Navigate to Appearance > Customize > Additional CSS.
- Use the following CSS:
.category-slug .post-thumbnail {
    display: none;
}
- Replace
category-slugwith the actual category name. - Click Publish to apply changes.
Pros:
- Selective Control: You can hide featured images for specific categories without affecting others.
- No Plugins Needed: This method relies on simple CSS and does not require additional plugins.
- Consistent Design: Helps maintain a uniform appearance across certain categories.
Cons:
- Requires Basic CSS Knowledge: Some familiarity with CSS and browser developer tools is necessary to implement this solution.
- Manual Effort: You must manually inspect and apply the CSS for each category where you want to hide the image.
Method 2: Using Plugins
If your theme doesn’t offer an option to hide featured images, using a plugin is another way to handle how to hide the featured image in a WordPress post.
Plugins like Hide Featured Image or Conditional Display Featured Image provide simple tools for hiding the image without altering your theme.
It makes featured images easy to manage and hide with just a few clicks. Here is how you can do that:
1. Install a Featured Image Hiding Plugin
Several plugins offer this functionality. Some popular ones include:
- Hide Featured Image: A simple plugin that adds an option to hide the featured image on posts and pages.
- Disable Featured Image: This plugin allows you to disable the featured image on selected posts or globally across your website.
2. Steps to Use the Plugin
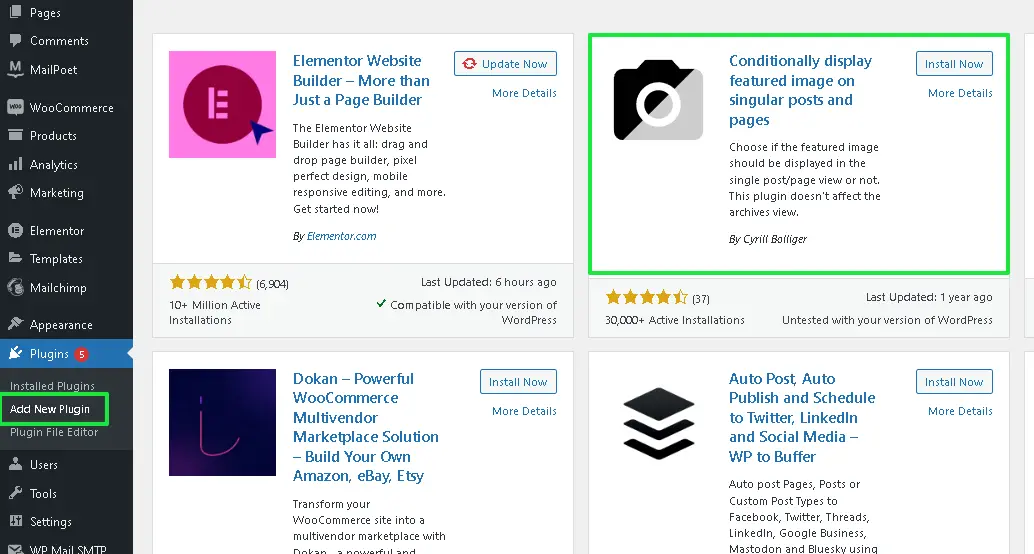
- Go to your WordPress dashboard.
- Navigate to
Plugins>Add New. - In the search bar, type conditionally display the featured image or Disable Featured Image.
- Install and activate the plugin of your choice.
3. Hide the Featured Image
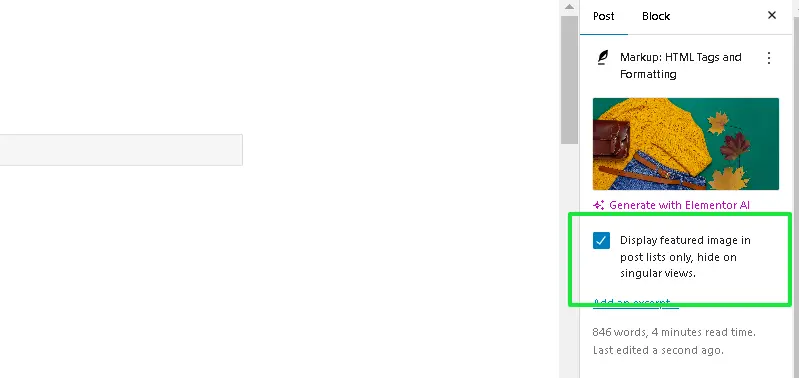
Once the plugin is activated:
- Edit the post or page where you want to hide the featured image.
- Scroll right to the new Hide Featured Image section (usually below the featured image section).
- Check the box to hide the featured image for that specific post or page.
- Save or update the post to apply the changes.
4. Advantages of Using Plugins
- No coding required: This method is ideal for beginners or those who don’t want to edit theme files or use custom CSS.
- Selective hiding: Most plugins allow you to selectively hide the featured image on specific posts or pages without affecting the entire site.
- Quick and easy: It only takes a few clicks to hide or show the featured image as needed.
Using plugins makes it incredibly simple to manage the visibility of your featured images, offering flexibility without the need for technical expertise.
Method 3: Using WordPress Theme Settings
Some WordPress themes offer built-in options for hiding featured images. If your theme supports this, it is the easiest way to learn how to hide the featured image in a WordPress post.
Steps:
- Open Post Editor: Go to Dashboard > Posts > All Posts. Open the desired post in the editor.
- Locate Theme-Specific Settings: Find the Hide Featured Image option in the post editor in the sidebar or below the featured image section.
- Toggle the Option: Check the Hide Featured Image or similar checkbox.
- Save or Update: Click Update or Publish to save changes.
- Preview: Ensure the image is hidden on the front end by previewing the post.
Note: Not all themes have this feature, so check your theme’s documentation for support or use a plugin if needed.
Pros:
- Straightforward.
- No additional plugins are required.
Cons:
- Limited to themes that support this option.
Method 4: Using a Child Theme to Hide Featured Image
For advanced users who are comfortable editing theme files, creating a child theme to hide the featured image is a more robust and customizable solution.
Steps:
- Create a Child Theme: If you haven’t already, create a child theme so that any changes you make aren’t lost during theme updates.
- Edit the single.php File: In your child theme, open the single.php file. Find the PHP code that displays the featured image, which typically looks something like this:
if ( has_post_thumbnail() ) {
   the_post_thumbnail();
}
- Remove or comment out this code to prevent the featured image from appearing.
- Save and Upload the File: After making the change, save it and upload it to your server via FTP or your WordPress file manager.
Pros:
- Permanent and theme-specific solution.
- Complete control over how and where the featured image is displayed.
Cons:
- Involves code editing.
- Any mistake could potentially break the site layout.
Best Practices for Hiding Featured Images
While learning to hide the featured image in a WordPress post is useful, it’s essential to follow best practices to ensure you don’t negatively impact your site’s performance or design.
- Use a Child Theme for Code Modifications: Always use a child theme when editing theme files to hide featured images. This ensures that any updates to the parent theme won’t overwrite your customizations.
- Test Across Different Devices and Browsers: After hiding the featured image, test your posts across multiple devices (desktop, tablet, mobile) and browsers to ensure the layout remains intact and the user experience is consistent.
- Preview the Post Before Publishing: Always preview the post after hiding the featured image to ensure the content and design flow seamlessly without the image, maintaining visual appeal and readability.
- Limit Plugin Usage: While plugins offer a quick way to hide featured images, using too many can slow down your website. Opt for lightweight plugins or alternative methods like CSS to maintain site performance.
- Use CSS for Targeted Hiding: If you want to hide the featured image for specific posts, use CSS targeting the post ID rather than hiding it site-wide. This allows greater control and customization over which posts display the image.
Conclusion: Choose What Fits Best
Knowing how to hide the featured image in a WordPress post can significantly improve your site’s aesthetics and functionality. Whether you choose a plugin, custom CSS, or edit your theme, you now have the tools to control when and where your featured images appear.
Hiding the featured image is a simple yet powerful way to enhance your WordPress posts, from improving page load times to creating a more cohesive design.
Whether you’re a beginner or an experienced developer, learning how to hide the featured image in a WordPress post gives you the flexibility to customize your site exactly the way you want.
Happy blogging!
FAQs
Q1. Why would I want to hide a featured image in a WordPress post?
You may want to hide the featured image in a WordPress post for design reasons, to reduce redundancy if the image appears in the content, or to improve page loading speed. Learning how to hide the featured image in a WordPress post helps you control your site’s layout and performance.
Q2. Does hiding the featured image affect SEO?
No, hiding the featured image doesn’t directly affect SEO, but make sure to keep relevant images within the content for better engagement.
Q3. Can I hide the featured image only on mobile?
Yes, page builders like Elementor allow you to hide the featured image on specific devices like mobile.
Q4. Will hiding the featured image slow down my website?
No, it may even speed up your site if the image is large, improving load times.
Q5. Can I hide the featured image without a plugin?
Yes, you can hide it by adding custom CSS or editing your theme files directly.
Abhijit Sarkar
Abhijit Sarkar is a content writer at DevDiggers covering WordPress setup, platform migration, and site security. He works through each process himself before writing about it, so his guides on topics like migrating from Blogger or locking down WordPress reflect what actually happens on screen, not just what the documentation describes.
Join thousands of readers getting smarter every week.
Leave a Reply