You can hide the featured image in a WordPress post using your theme settings, a free plugin, custom CSS, or a small PHP snippet. None of these methods takes more than a few minutes. Every WordPress theme handles this a little differently. Most guides only show you one option and leave you stuck if it doesn’t work for your setup.
This guide walks you through all four methods, one screenshot-sized step at a time. Skip the guesswork about which class name or setting applies to your theme. You’ll learn how to check your theme first, then hide the image with a plugin if you’re not comfortable with code. You’ll also see the CSS and PHP options, plus how to undo any of it if you change your mind later.
Why You Might Want to Hide the Featured Image in a WordPress Post?
Featured images help posts stand out on your blog page and in social shares. But there are real reasons to hide one on a specific post.
Aesthetic consistency is the most common reason. If a featured image doesn’t match the tone of a post, hiding it keeps your layout looking clean and intentional.
Page speed matters too. Large featured images add to your page weight. If you’re chasing faster load times, this is worth pairing with another guide. It covers how to optimise images in WordPress for faster load times and better SEO. The two problems often show up together.
Speed-conscious site owners often ask whether hiding alone is enough. It usually isn’t. A hidden image still downloads in the background on most methods. Pair any of the steps below with proper image compression for the biggest speed gain.
Some posts just don’t need one. Announcements, glossaries, or short FAQ-style posts often read better without a large image sitting at the top.
Avoiding repetition is the last big reason. If the same image already appears inside your post content, showing it again as the featured image just repeats it. Hiding the featured image on a specific post fixes that without deleting anything.
Here’s a common example we see in support. A store owner uploads a product photo as the featured image, then adds the same photo again inside the post body. The result is the same picture twice, stacked right on top of each other. Hiding the featured image on that one post solves it in under a minute, without touching the rest of the site.
You don’t need a technical reason to hide a featured image, either. Sometimes a post just looks better without one, and that’s reason enough.
Hide vs. Remove: What You Need to Know First
Before you pick a method, it helps to know there’s a difference between hiding a featured image and removing it.
- Hiding means the image is still set on the post and still loads in the background. CSS just tells the browser not to display it. This is reversible in seconds, but it carries a small, barely noticeable performance cost since the file still downloads.
- Removing means you remove the featured image entirely. Nothing loads. This is the better choice for page speed, but you’ll need to re-upload the image if you ever want it back.
Most people searching for how to hide the featured image in a WordPress post want the reversible option. That’s the CSS and plugin methods below.
If speed is your only goal, skip ahead to Method 1. Theme settings often remove the image from the layout entirely, rather than just hiding it visually. Either way, nothing here touches the original file sitting in your Media Library. You can always start over.
Method 1: Hide the Featured Image With Your Theme Settings (No Code)
Check this first. Many popular themes, including Astra, GeneratePress, and Genesis, let you turn off the featured image on a single post without touching any code.
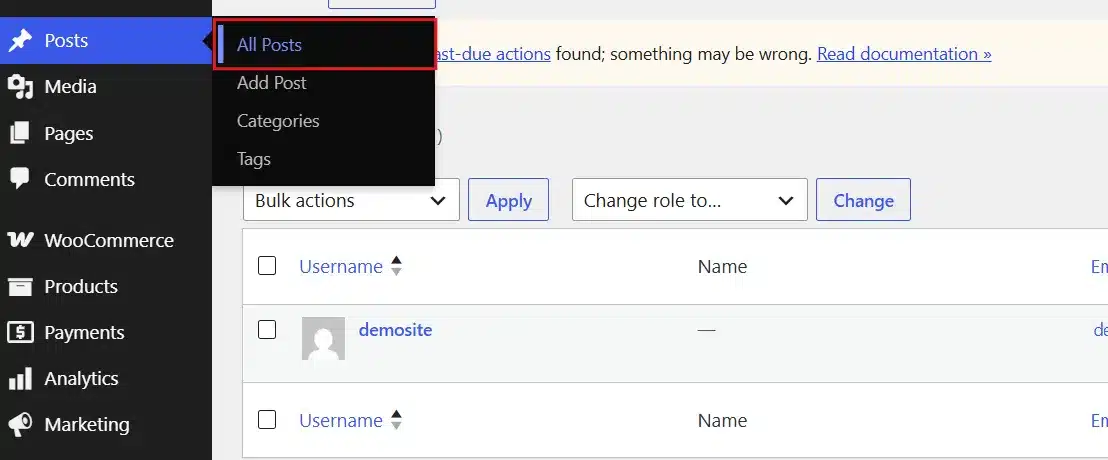
- Open the post you want to edit from Posts > All Posts in your WordPress dashboard.
- Look at the right-hand sidebar of the block editor. Click the Post tab if it isn’t already selected.
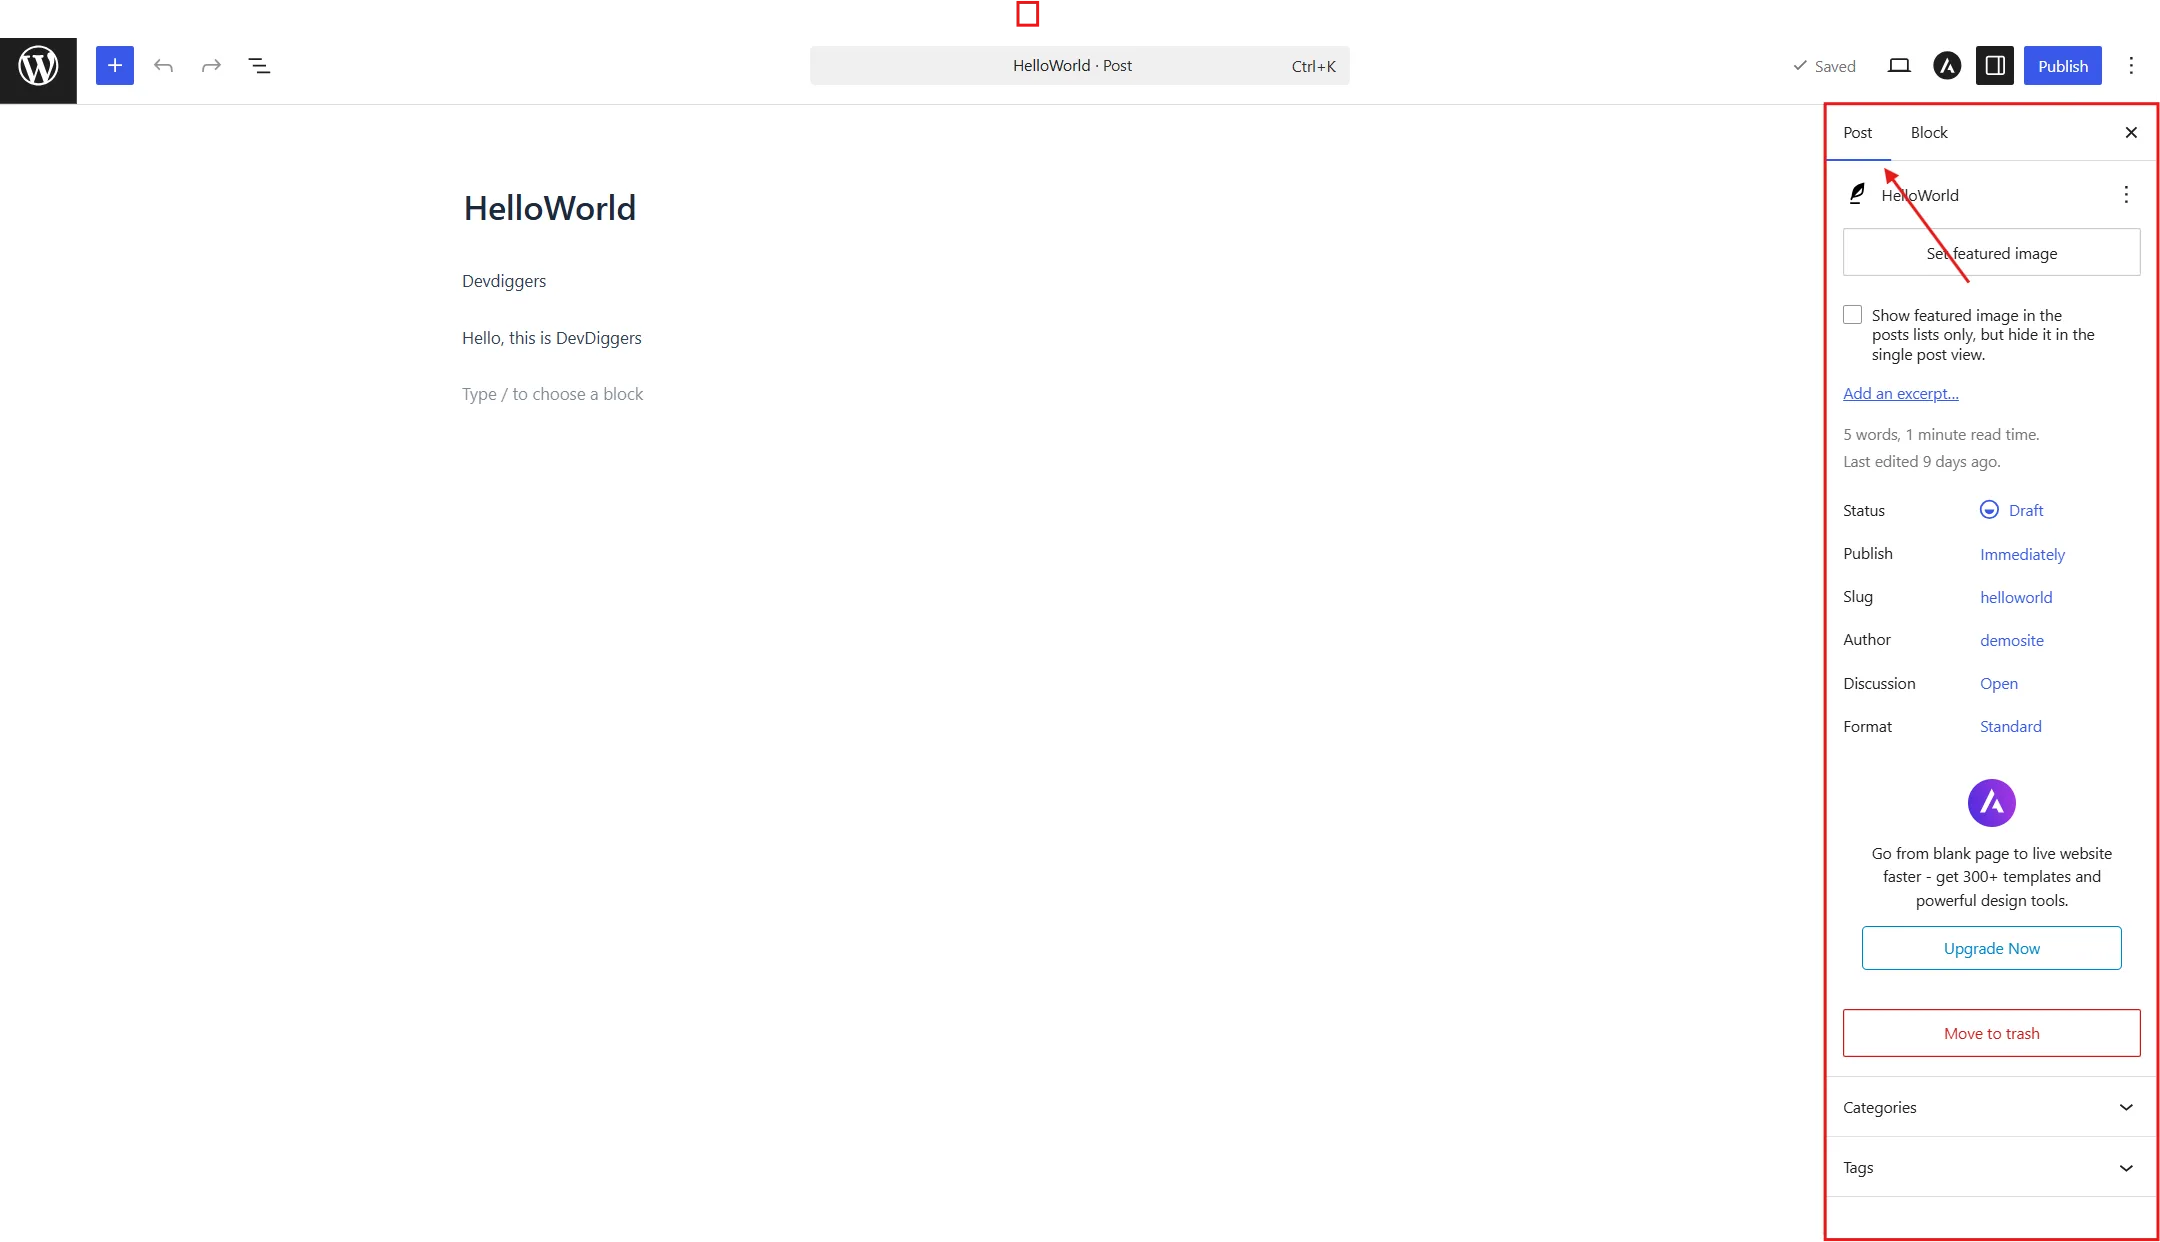
- Check the box next to Featured Image to disable it on this post only.
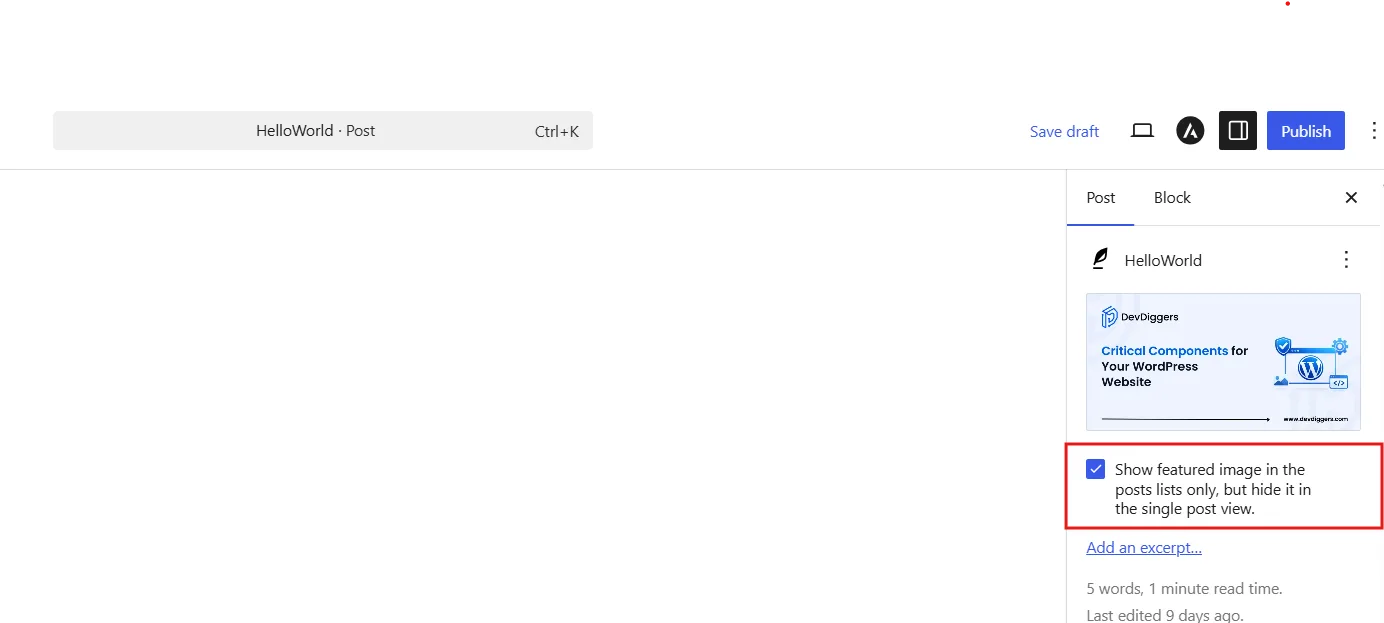
- Click Update to save your changes or Publish if the post is new.
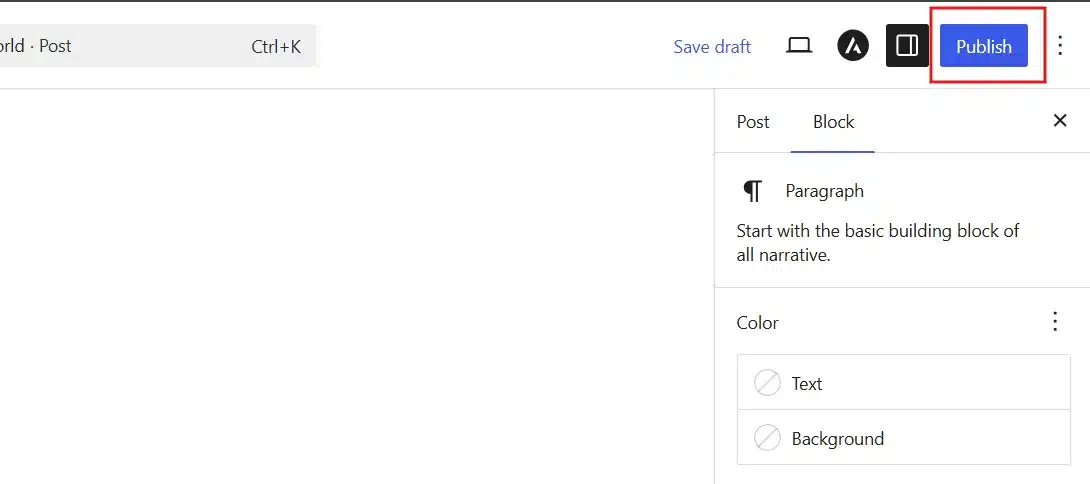
- Open the post in a new browser tab to confirm the image no longer shows.
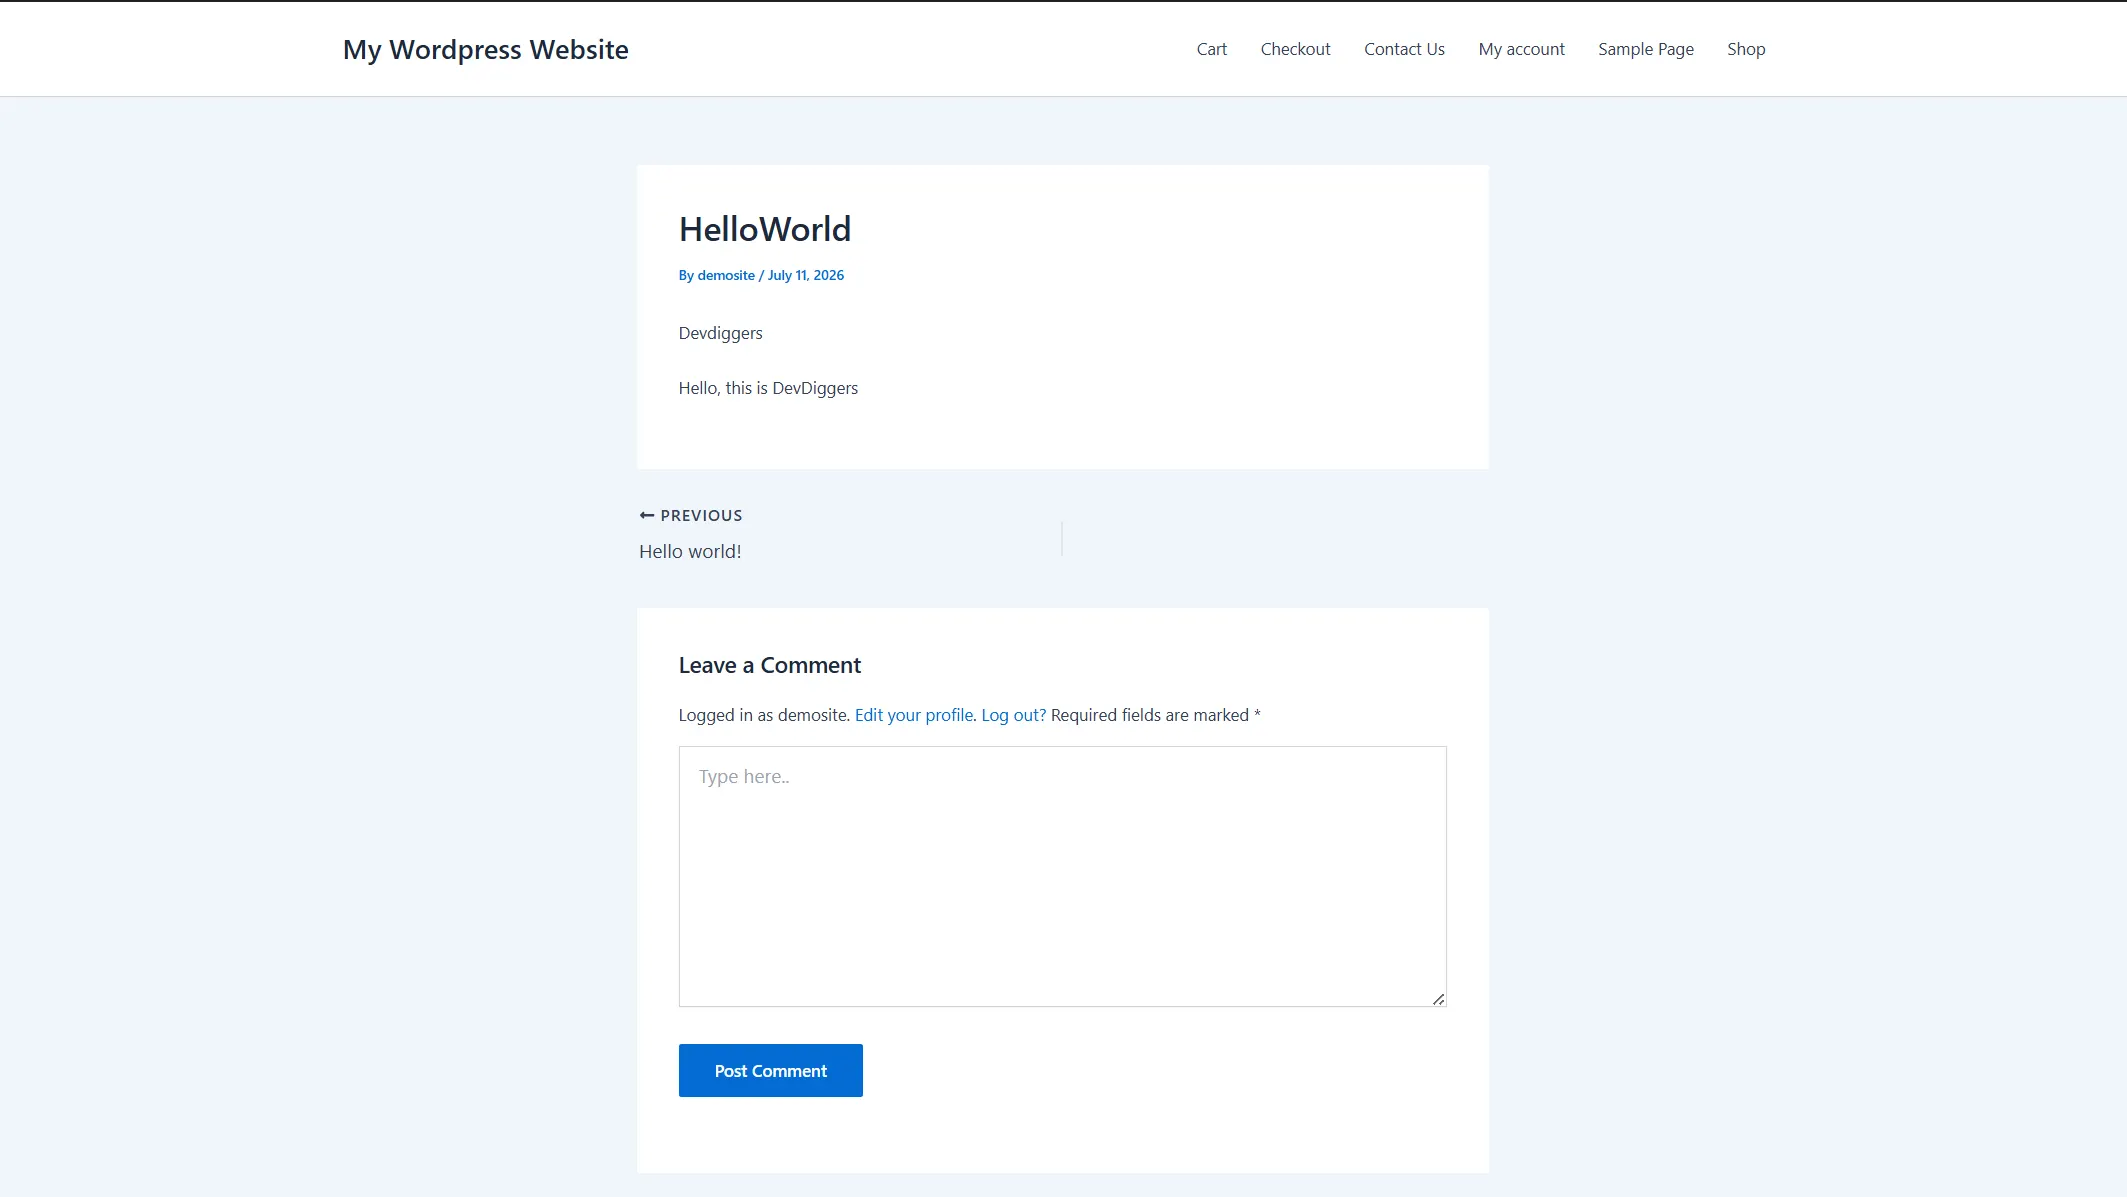
If you don’t see this option anywhere in your post settings, your theme doesn’t support per-post turning on/off. Move on to Method 2 or Method 3 below.
One honest limitation here: this setting usually lives in a different spot for every theme, and some free themes skip it entirely. If your theme is one of them, the plugin method below will work regardless of what theme you’re running.
A quick note on page builder themes. If you’re using Divi, Elementor, or a similar builder, look inside the builder’s own module settings first, not the standard WordPress sidebar. Check the module tied to your header or post title area. It’s usually labelled “Featured Image” or “Show Featured Image” inside the builder’s own settings panel, not the block editor sidebar covered above.
Method 2: Hide the Featured Image With a Plugin (Easiest for Beginners)
This is the method most beginners should start with. It works across almost every theme because it doesn’t depend on theme-specific settings, and it takes about two minutes.
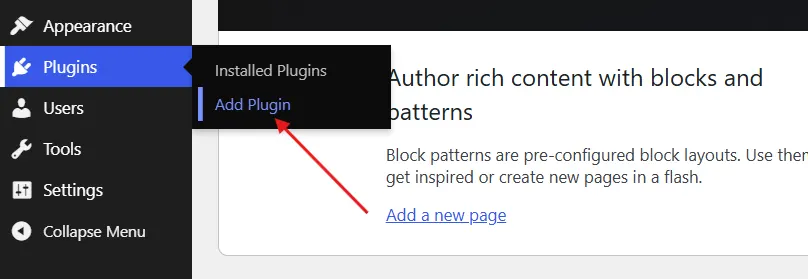
- From your WordPress dashboard, go to Plugins > Add New.
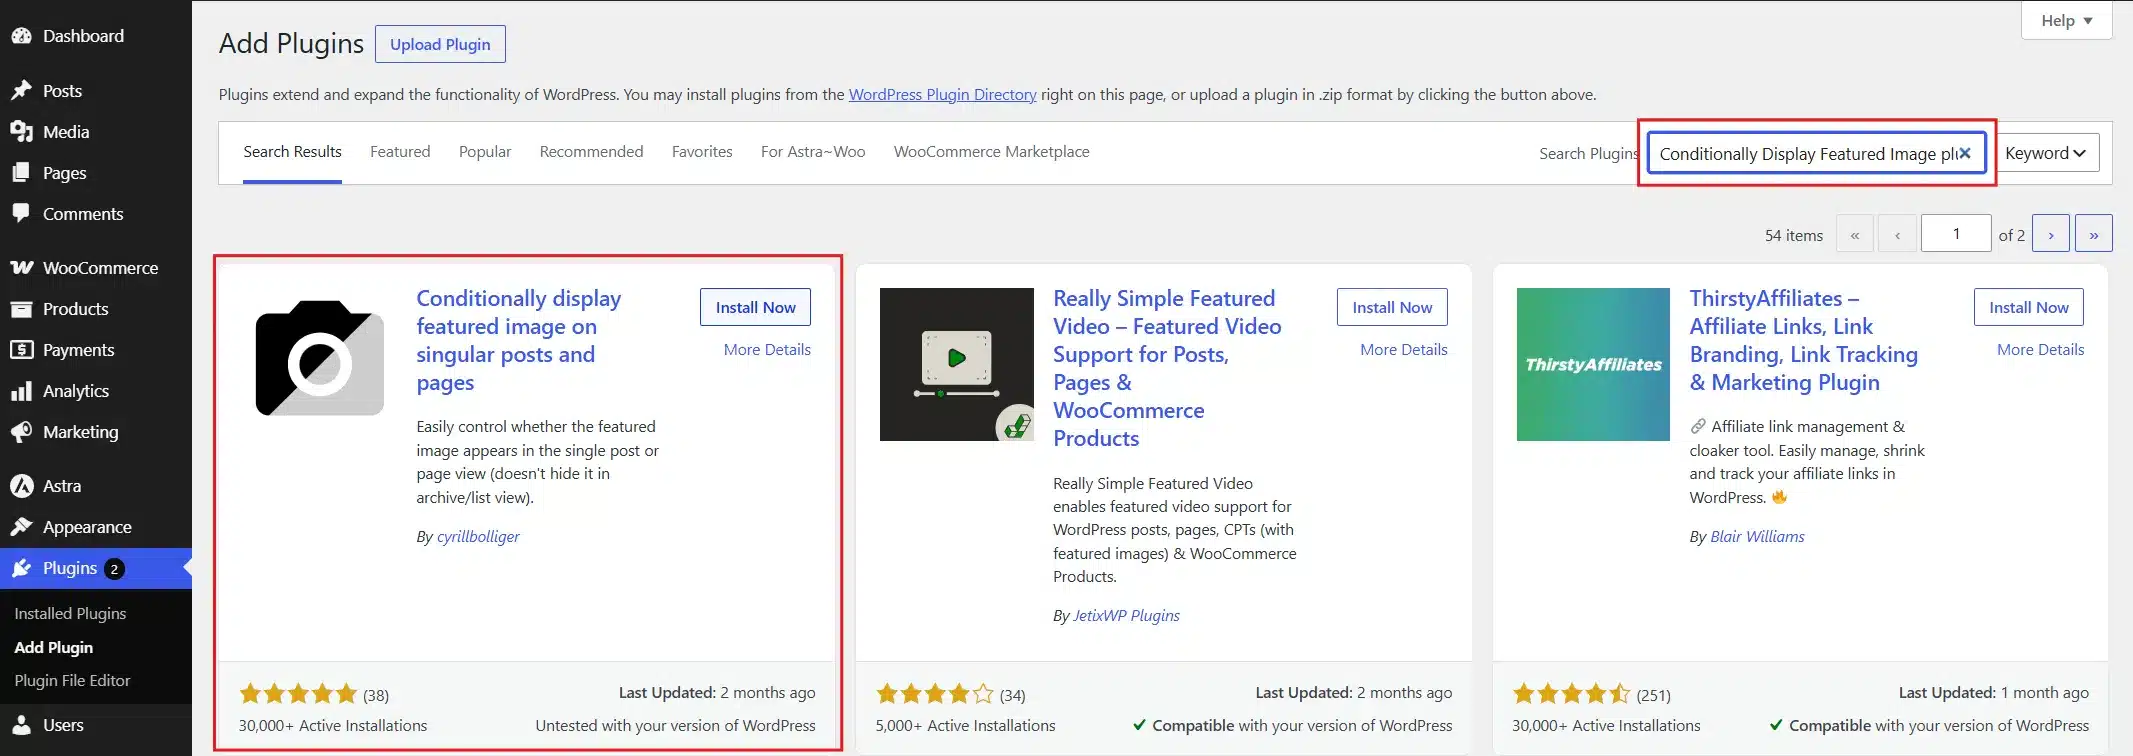
- In the search bar, type Conditionally Display Featured Image plugin. Then Click Install and Activate.
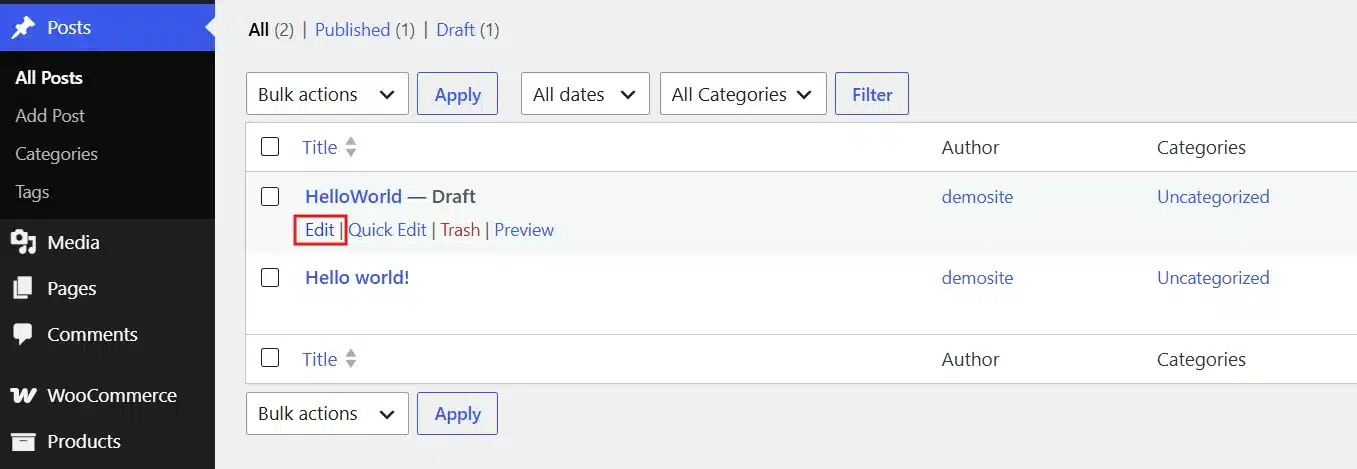
- Open the post where you want to hide the featured image. Go to Posts > All Posts, then click Edit on the post.
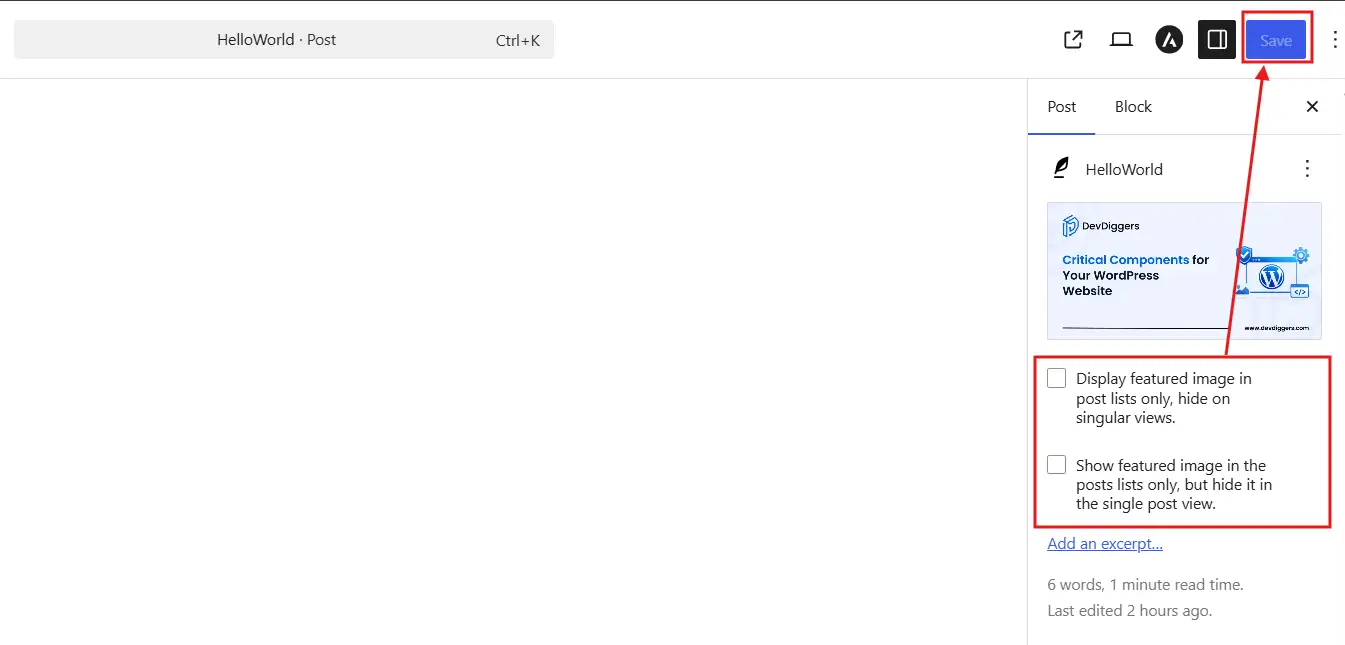
- In the Featured Image panel, check the box “Display featured image in post lists only, hide on singular views”.
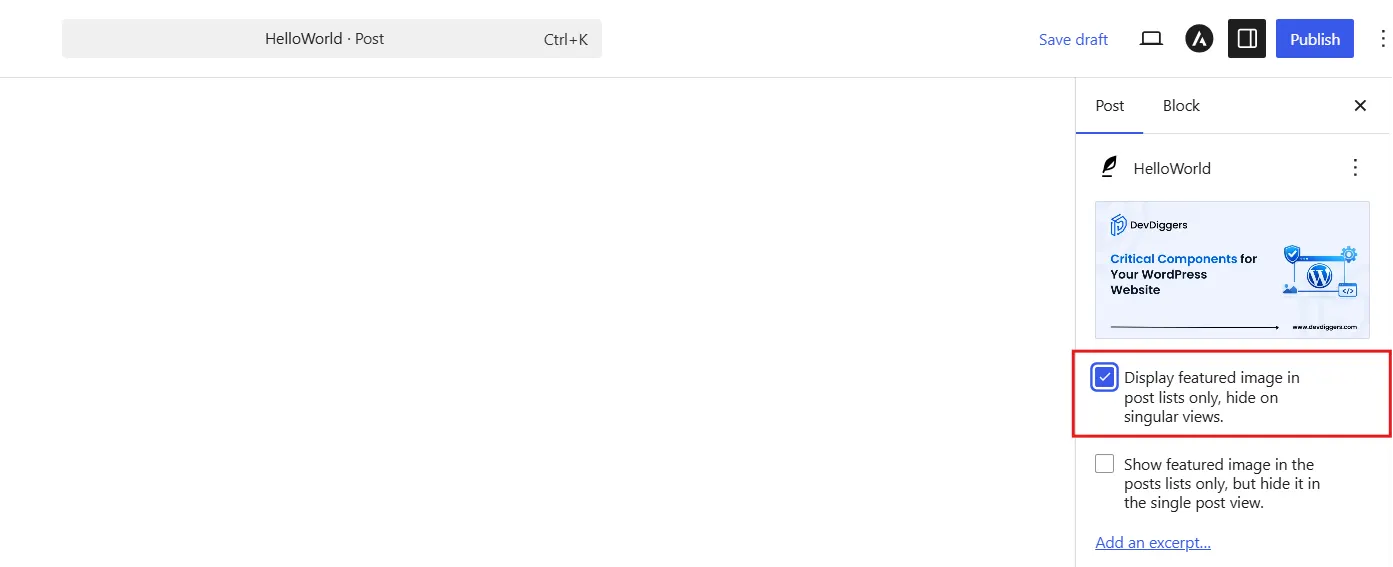
- Click Update to publish the change.
This plugin only affects the post you’re editing. Your blog archive, homepage, and category pages will still show the thumbnail as usual.
That’s exactly the behaviour most people searching for this want. If it doesn’t work as expected, your theme is likely pulling the featured image through a custom template file. That’s a rarer case, and we’ll cover it in the troubleshooting section further down.
Method 3: Hide the Featured Image Using Custom CSS
If you’d rather not install another plugin, custom CSS gives you the same result without any extra software. This method targets one specific post using its unique Post ID.
- Open the post in your dashboard and look at the browser’s address bar. You’ll see something like
post=142in the URL. The number afterpost=is your Post ID.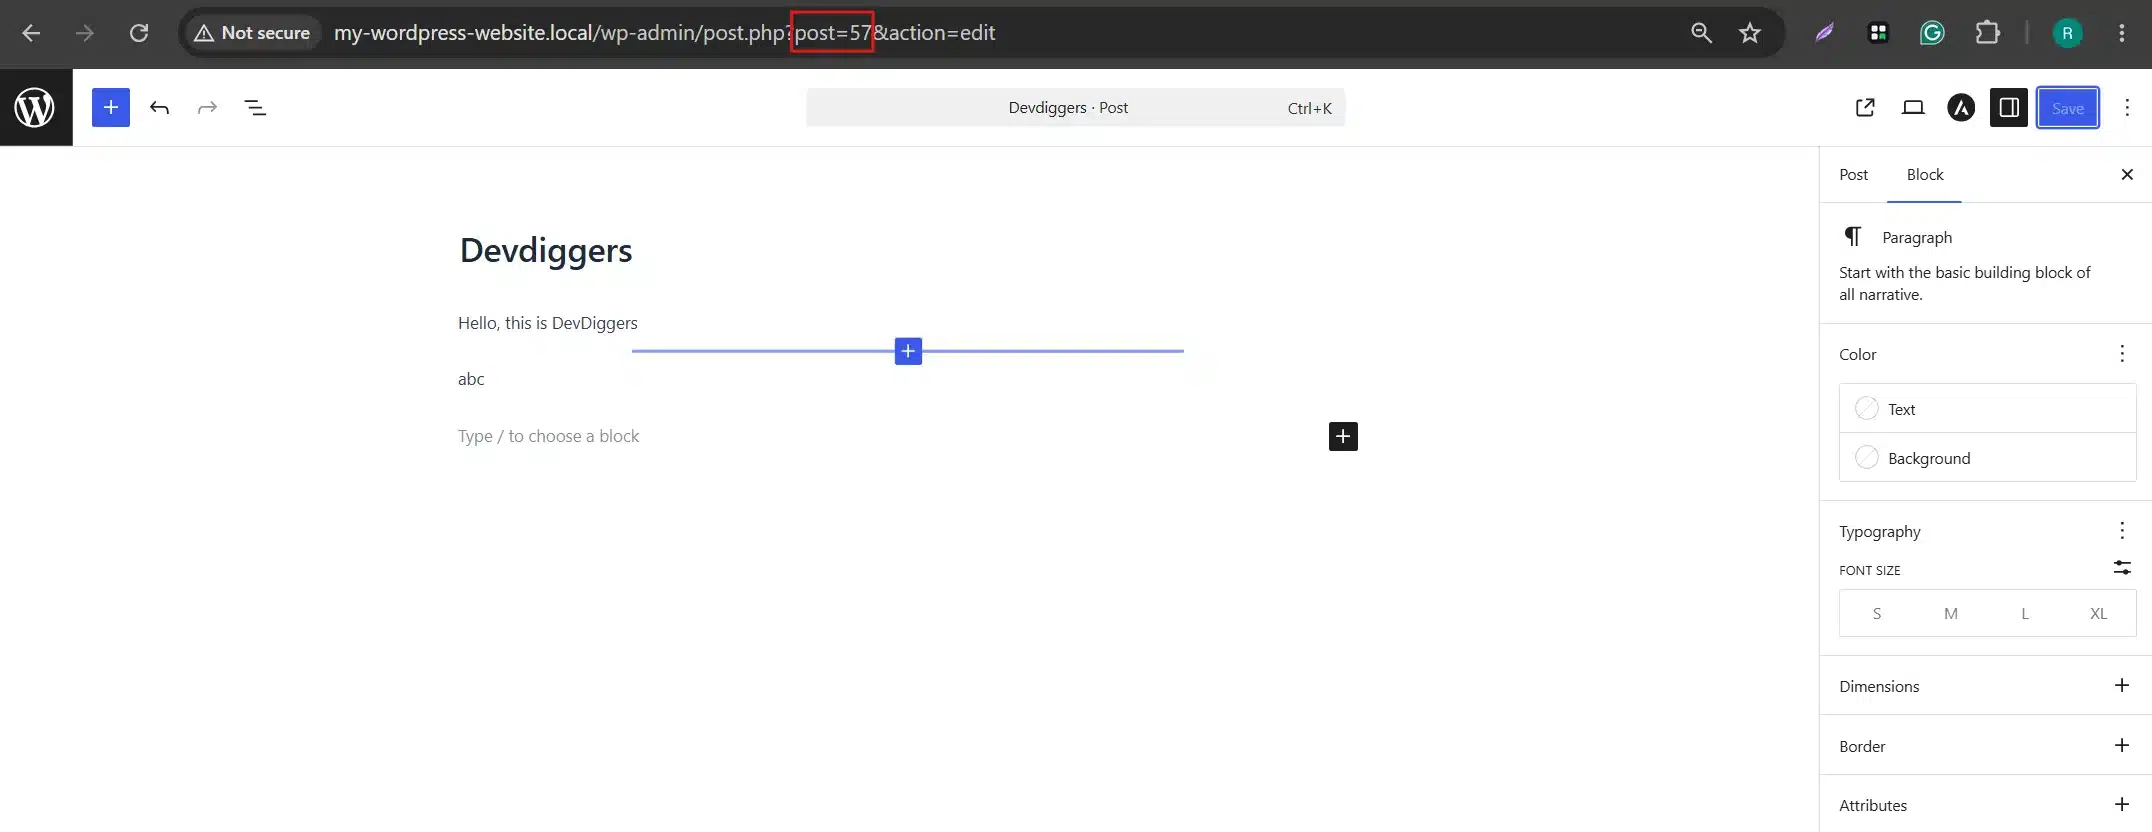
- Visit the live post in your browser. Right-click directly on the featured image and choose Inspect.
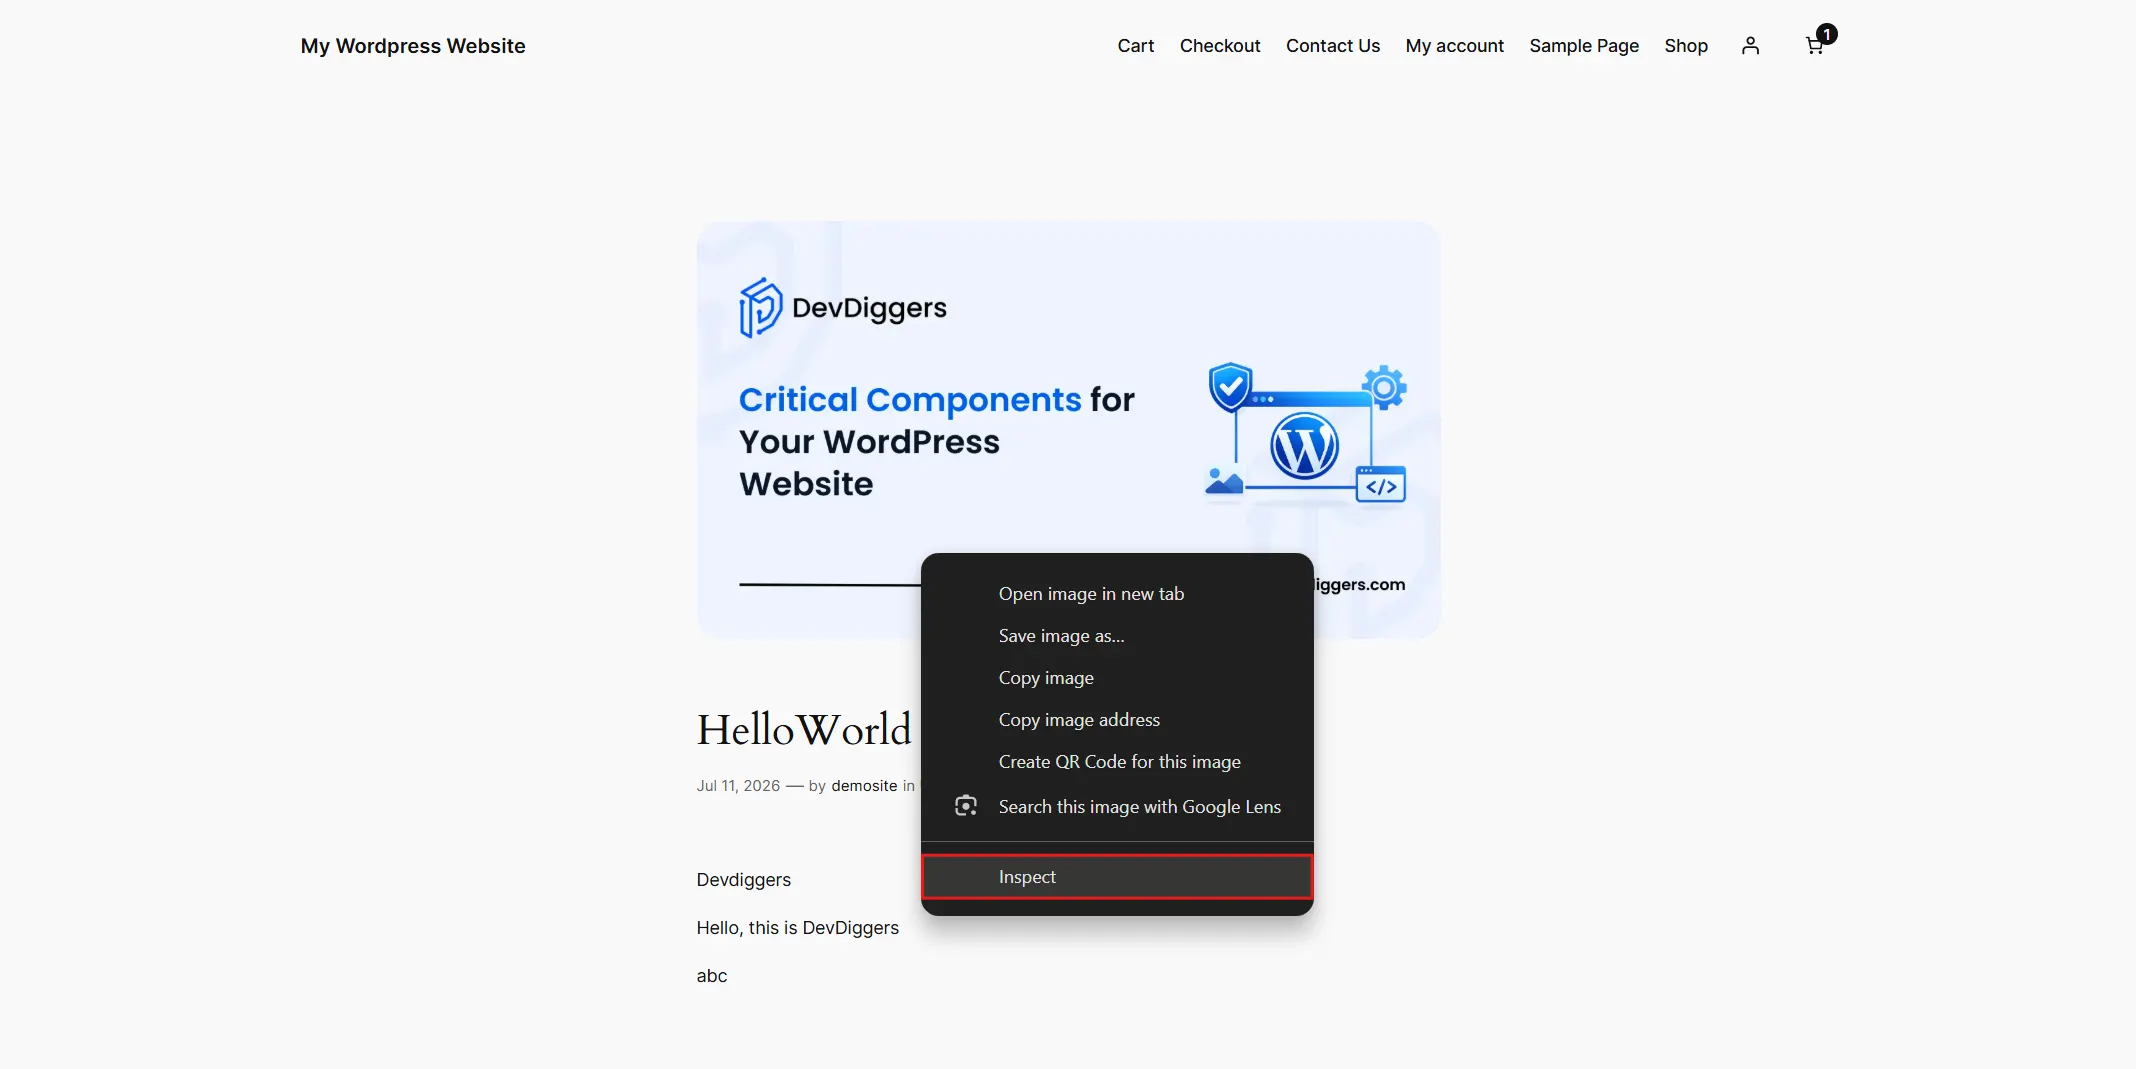
- Look through the highlighted HTML for a class name like
wp-post-imageorpost-thumbnailCopy that class name.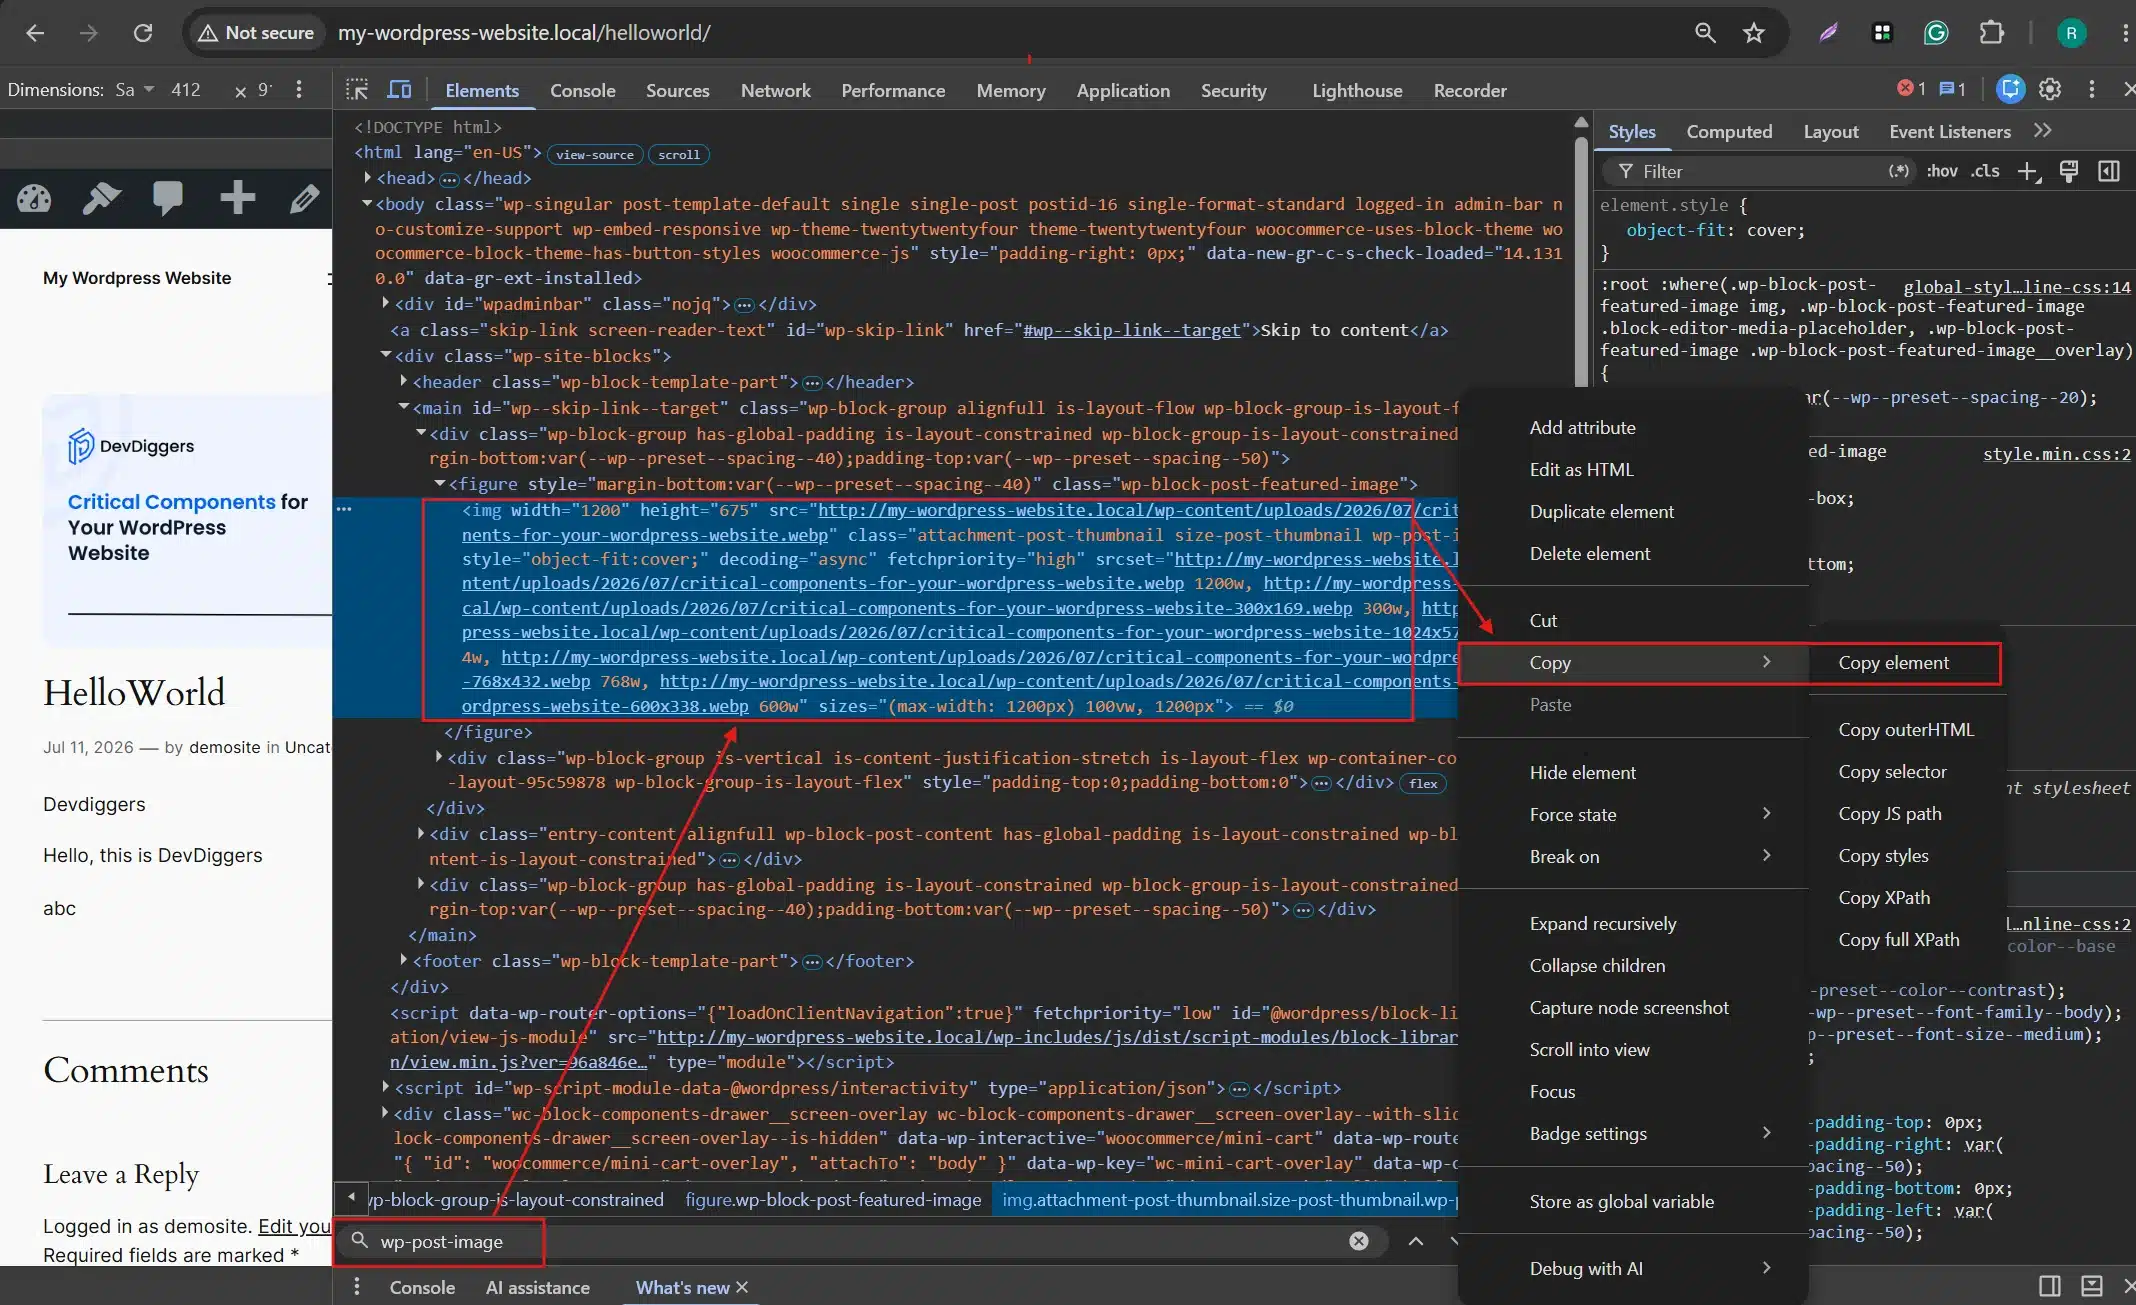
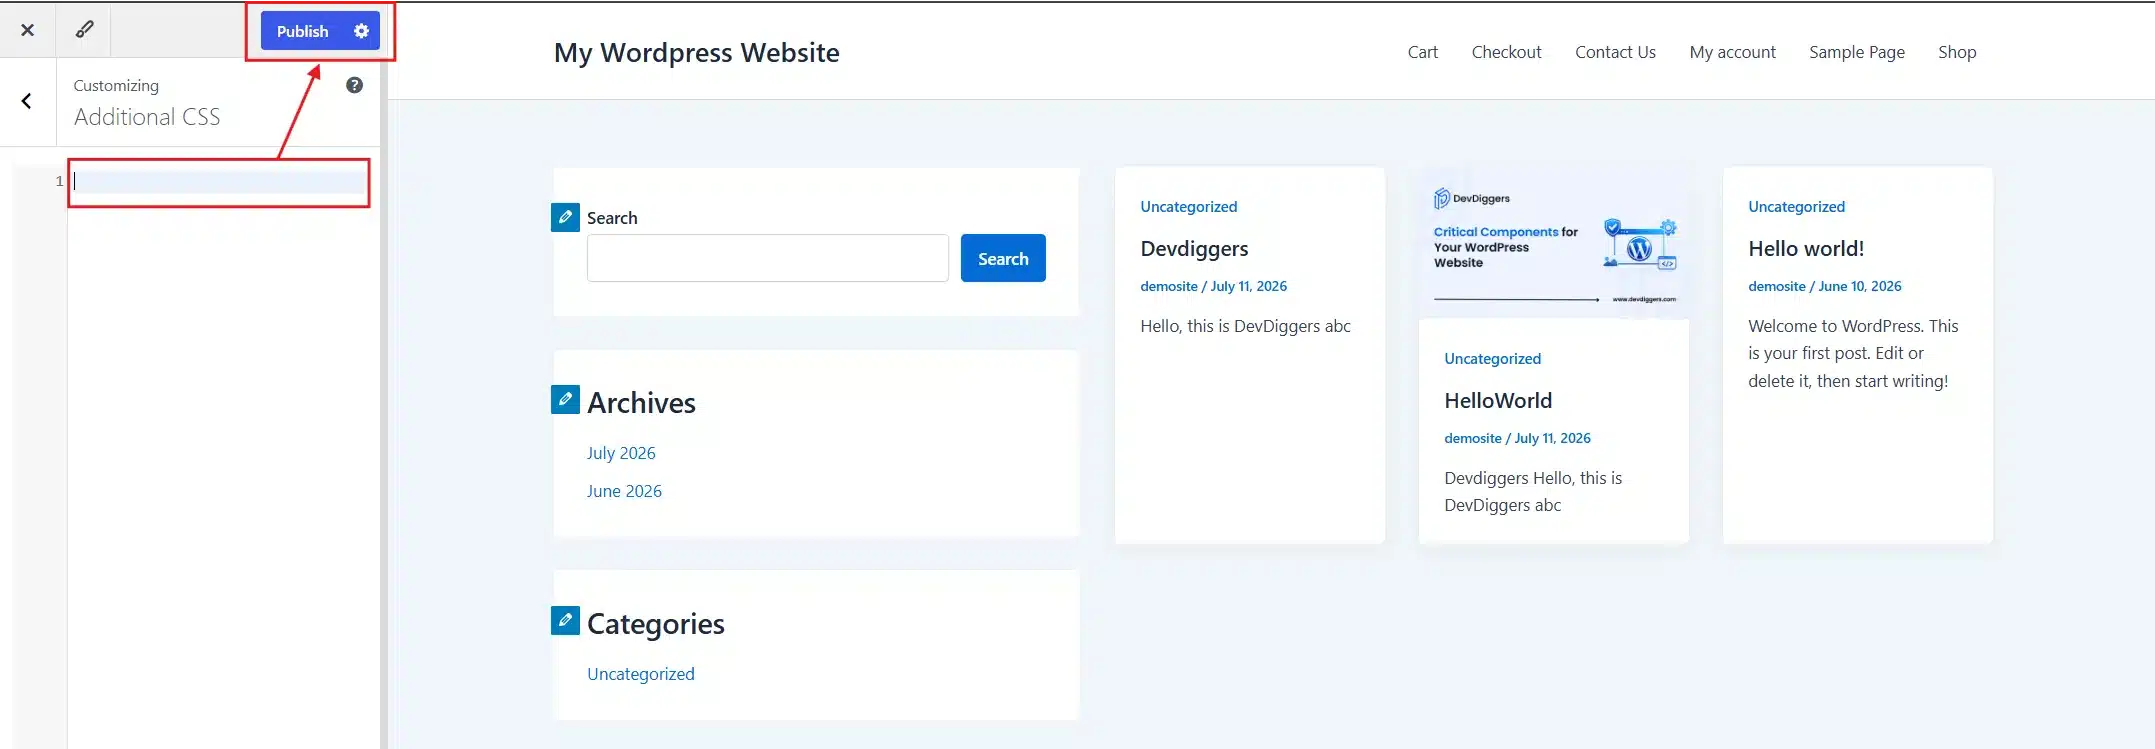
- From your dashboard, go to Appearance > Customise, then click Additional CSS. This is the same Additional CSS feature documented by WordPress.org, built into every theme since WordPress 4.7.
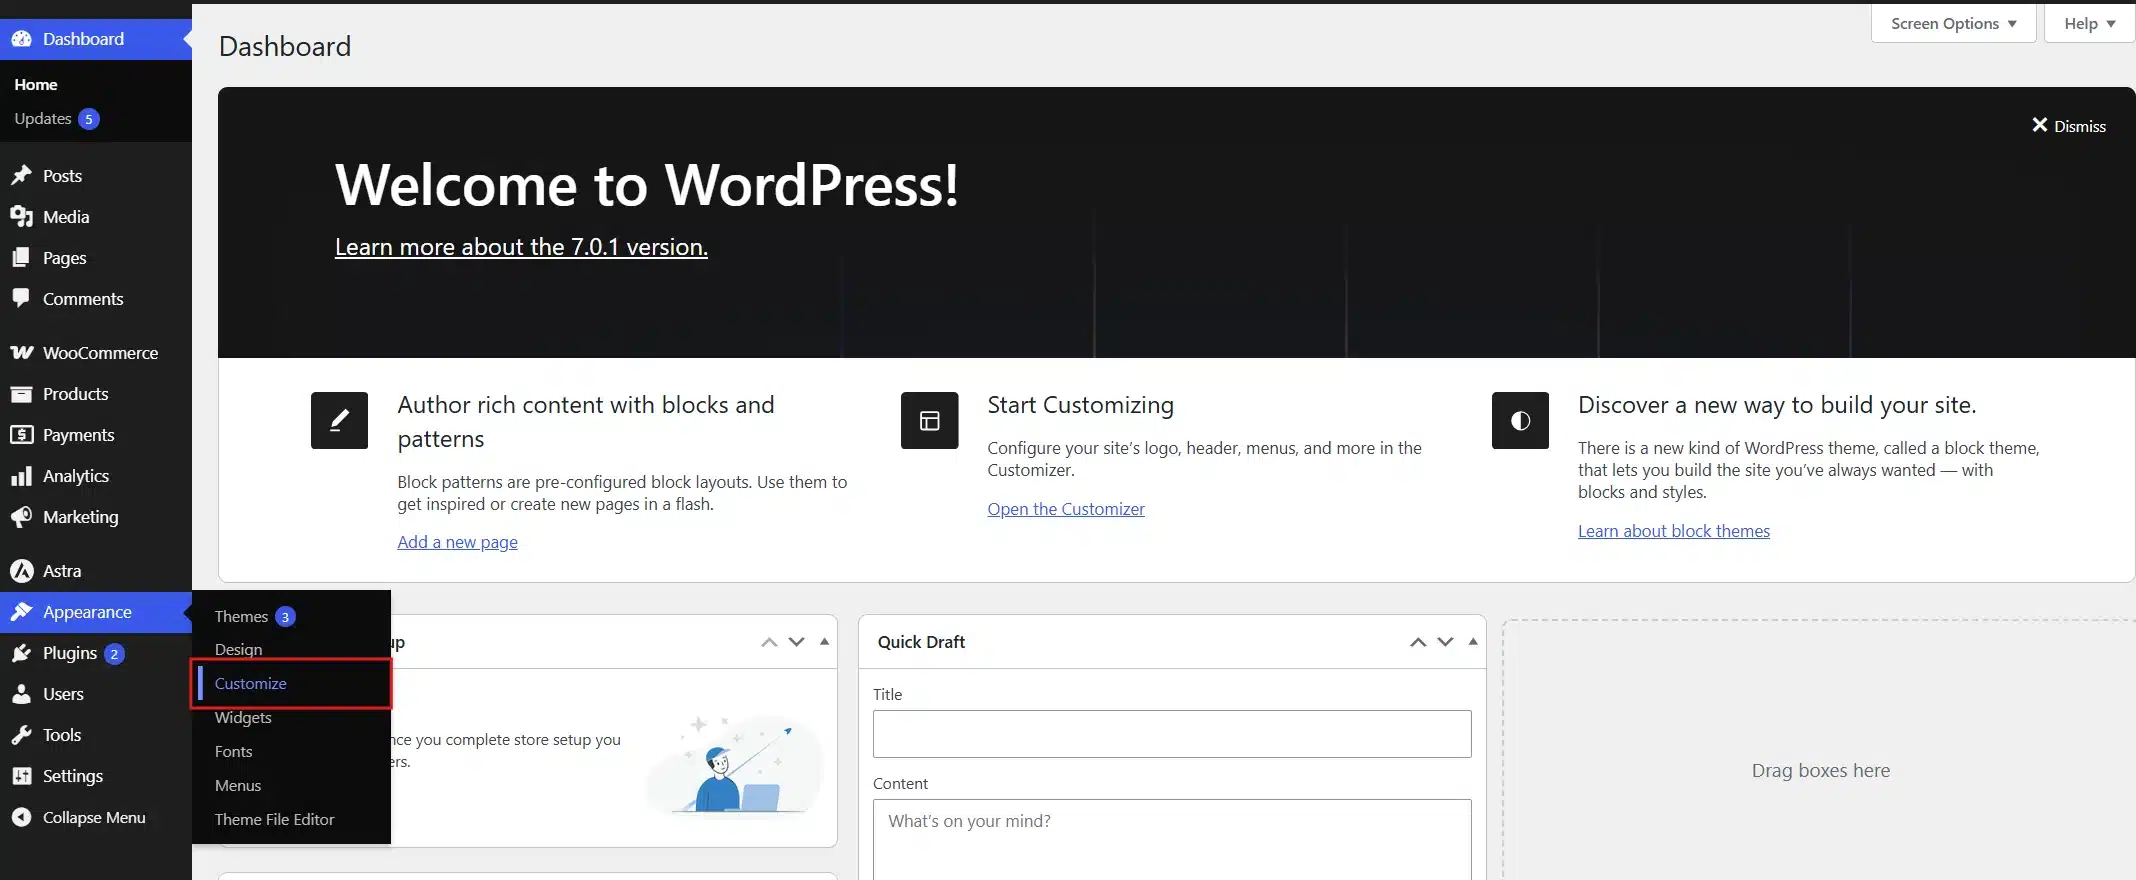
- Paste in a rule that combines your Post ID and the image class:
.postid-142 .wp-post-image {
  display: none;
}
- Replace
142with your actual Post ID andwp-post-imageWith the class you found in Step 3.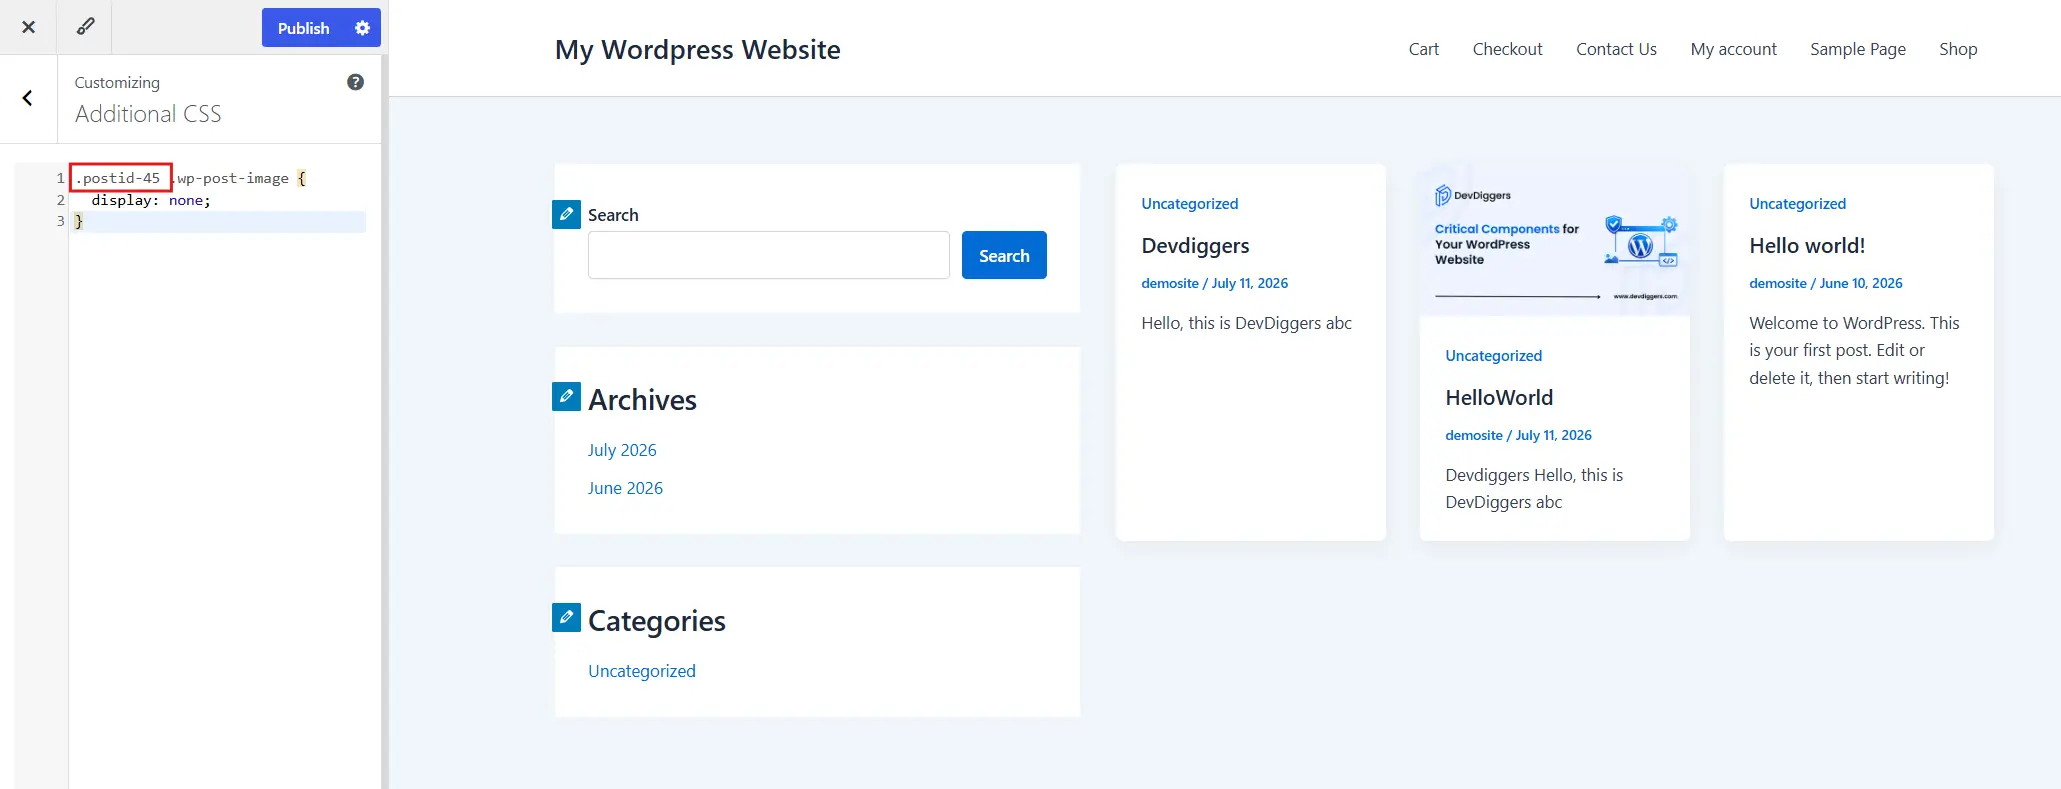
- Click Publish at the top of the Customizer panel.
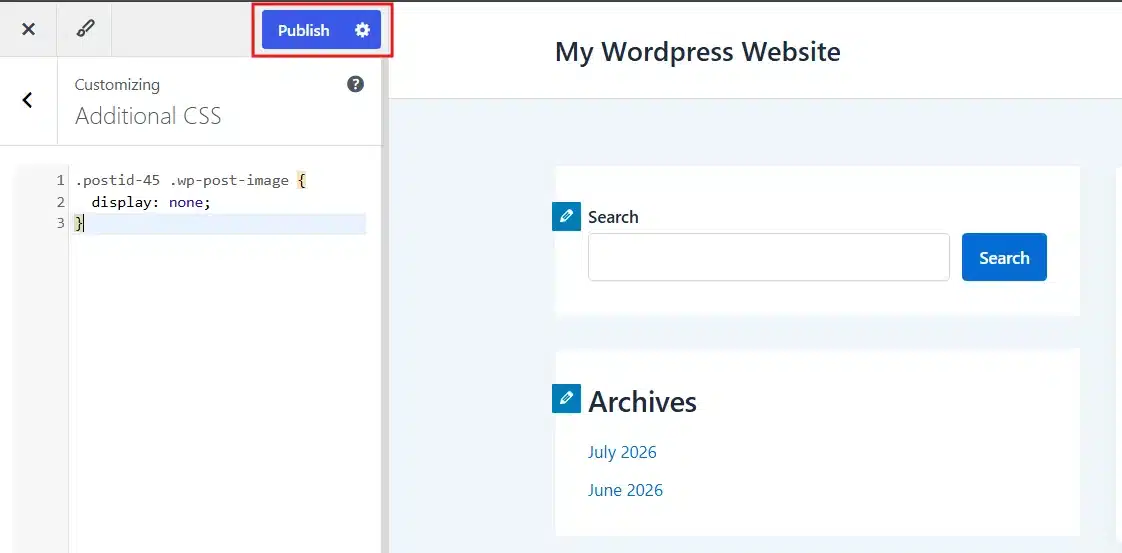
Note: The Customise tab(Step 4) is currently removed from default WordPress themes(twenty-twenty-four, twenty-twenty-five, etc). You first need to install and activate a Classical theme(Astra, etc.) to access this tab.
If you’re running a page-speed-sensitive site, Method 4 below or the theme’s native setting from Method 1 will serve you better. It also helps to resize WordPress images without breaking your site before you upload them in the first place. A smaller file loads faster, no matter which hiding method you pick.
Method 4: Hide the Featured Image With a PHP Snippet (Advanced)
This method is for anyone comfortable editing theme files. It fully unsets the featured image rather than just hiding it, so there’s no leftover file loading in the background.
Before editing any PHP, always work inside a child theme rather than your main theme. Our guide on how to create a WordPress child theme first walks through that setup in a few minutes. Skipping this step means your changes disappear the next time your theme updates.
- From your dashboard, go to Appearance > Theme File Editor. You can also connect with an FTP client if you prefer editing files directly.
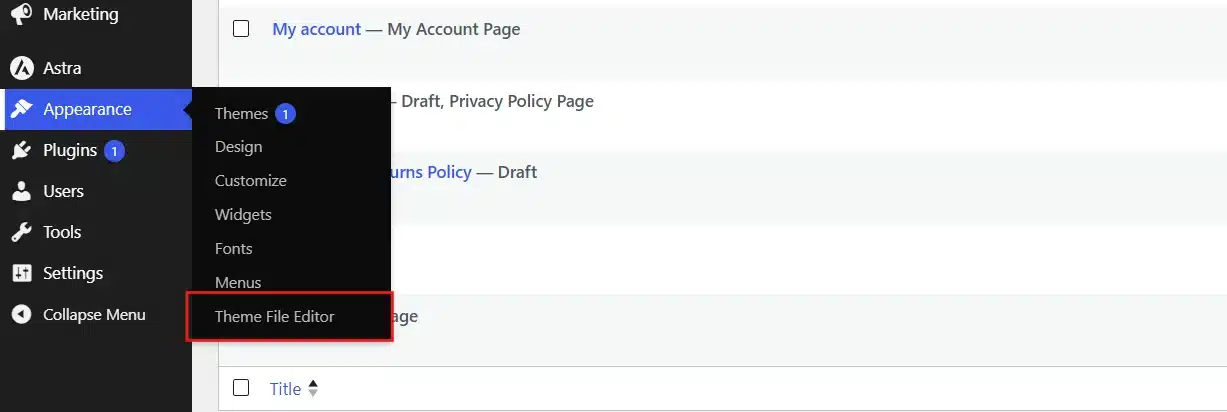
- Open your child theme’s
functions.phpfile.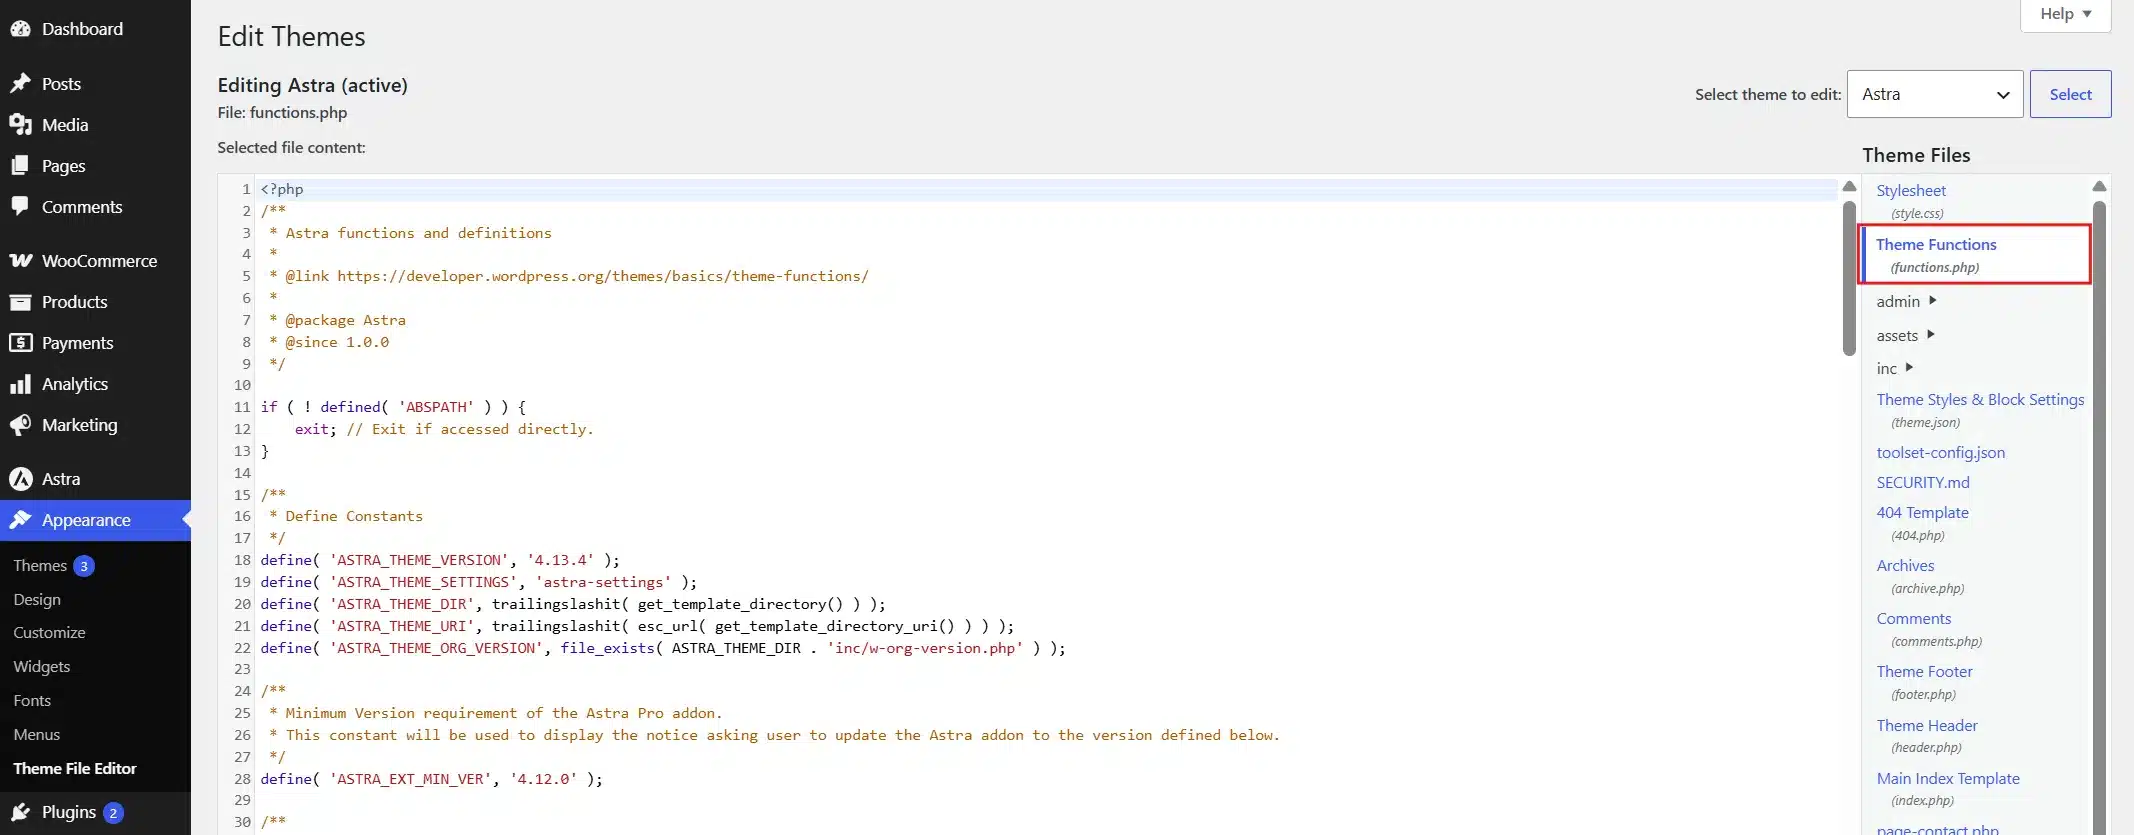
- Add the following code at the bottom of the file. It uses WordPress’s own
delete_post_thumbnail()function, documented on the official Developer Resources site:
function hide_featured_image_on_post( $id ) {
    if ( $id == 142 ) {
        delete_post_thumbnail( $id );
    }
}
add_action( 'wp', function() {
    if ( is_single() ) {
        hide_featured_image_on_post( get_the_ID() );
    }
});
- Replace
142With the Post ID you found earlier in Method 3.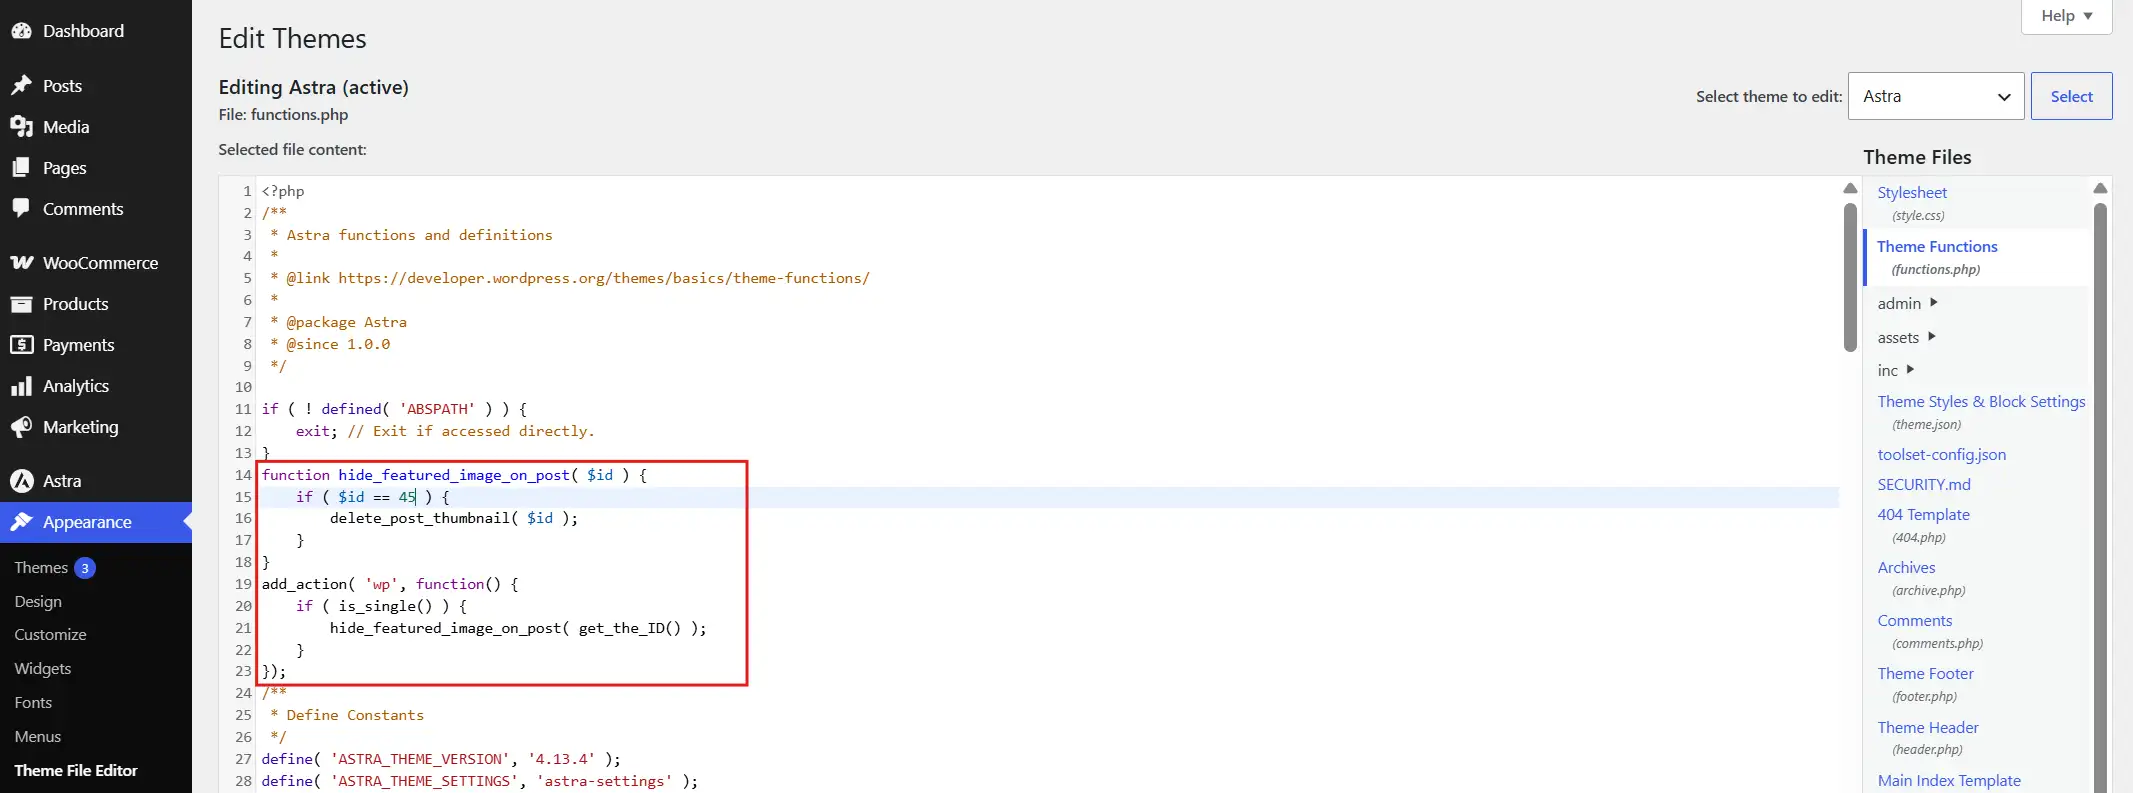
- Save the file.
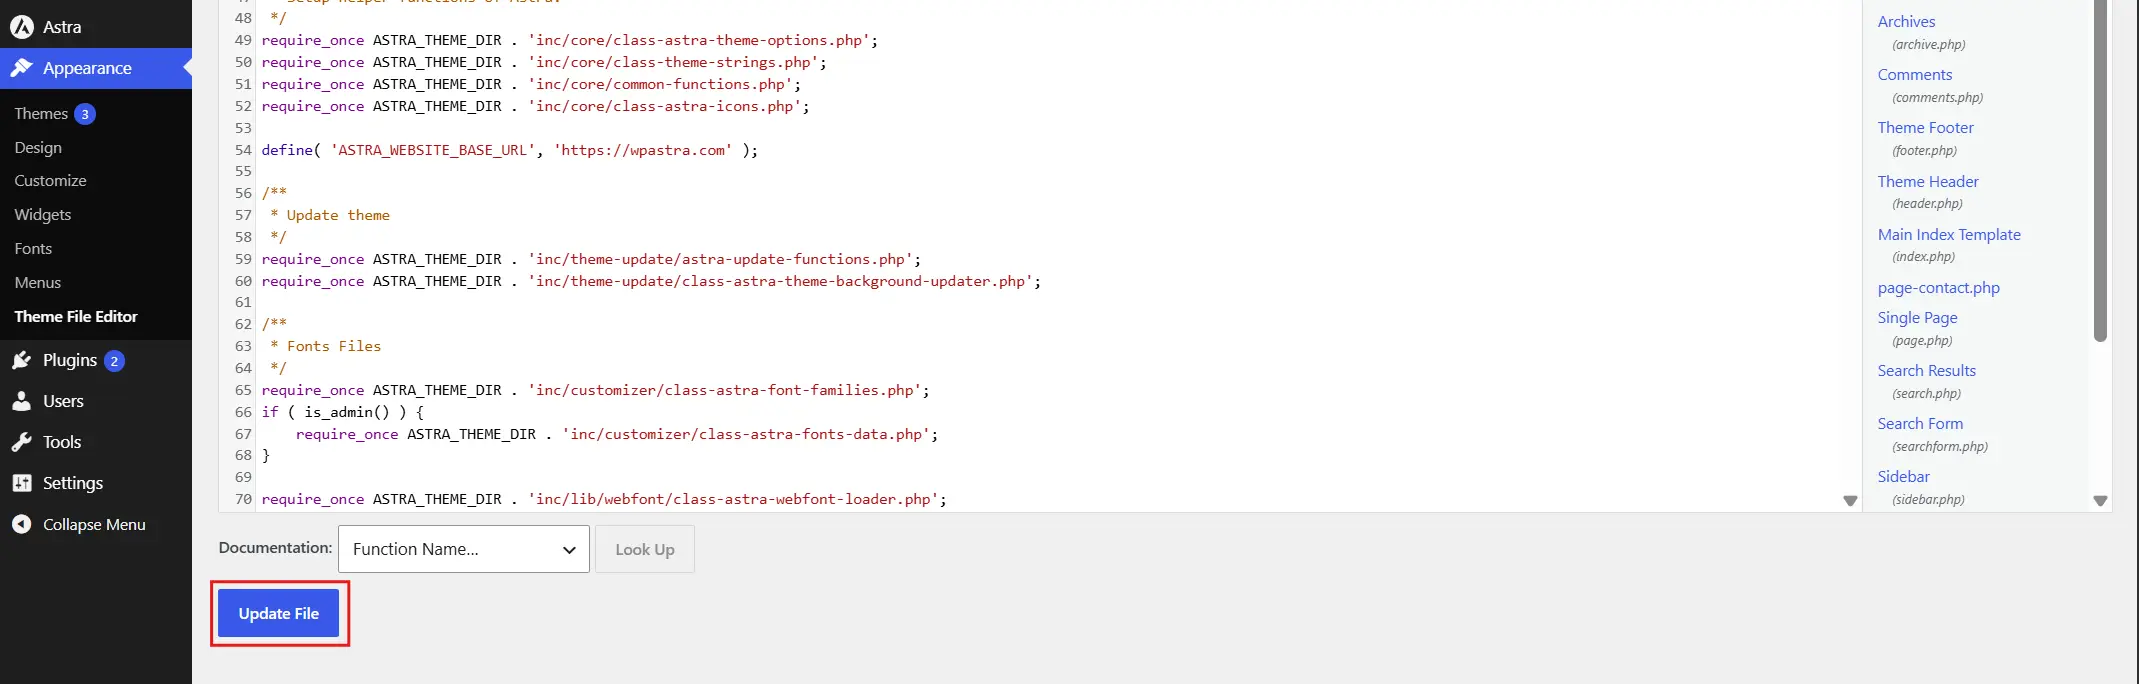
Trade-off: This method touches your theme’s core files, so a small typo can cause errors on your site. If you’re not confident editing PHP, Method 2’s plugin gives you nearly the same result with far less risk.
Which Method Should You Use?
Here’s a quick side-by-side to help you choose based on your comfort level and goals.
| Method | Skill Needed | Reversible | Removes File From Page |
|---|---|---|---|
| Theme Settings | None | Yes, instantly | Usually yes |
| Plugin | None | Yes, instantly | No, the image still loads |
| Custom CSS | Basic | Yes, edit the code | No, the image still loads |
| PHP Snippet | Advanced | Yes, edit the code | Yes |
If you just want the fastest, safest fix, start with the plugin. If page speed is your priority and you’re comfortable with code, the PHP snippet is the better long-term choice.
Think about how often you’ll need this, too. If you’re hiding the featured image on one or two posts a year, the plugin or CSS method is plenty. If it’s a regular part of your workflow across dozens of posts, the PHP snippet scales better. You can target a whole category instead of editing posts one by one.
There’s no wrong answer here. A beginner using the plugin method gets the same visible result as a developer writing a PHP snippet. The difference only shows up in load time and how the change is stored, not in what your visitors actually see.
How to Restore a Hidden Featured Image
Changed your mind? Restoring the image depends on which method you used.
- For the theme settings and plugin methods, simply uncheck the box you enabled earlier and click Update. The image reappears immediately, since nothing was deleted.
- For the CSS method, go back to Appearance > Customise> Additional CSS and delete the rule you added, then publish the change.
- For the PHP snippet, remove the code block you added to
functions.phpand save the file. The featured image will show again as soon as the page reloads.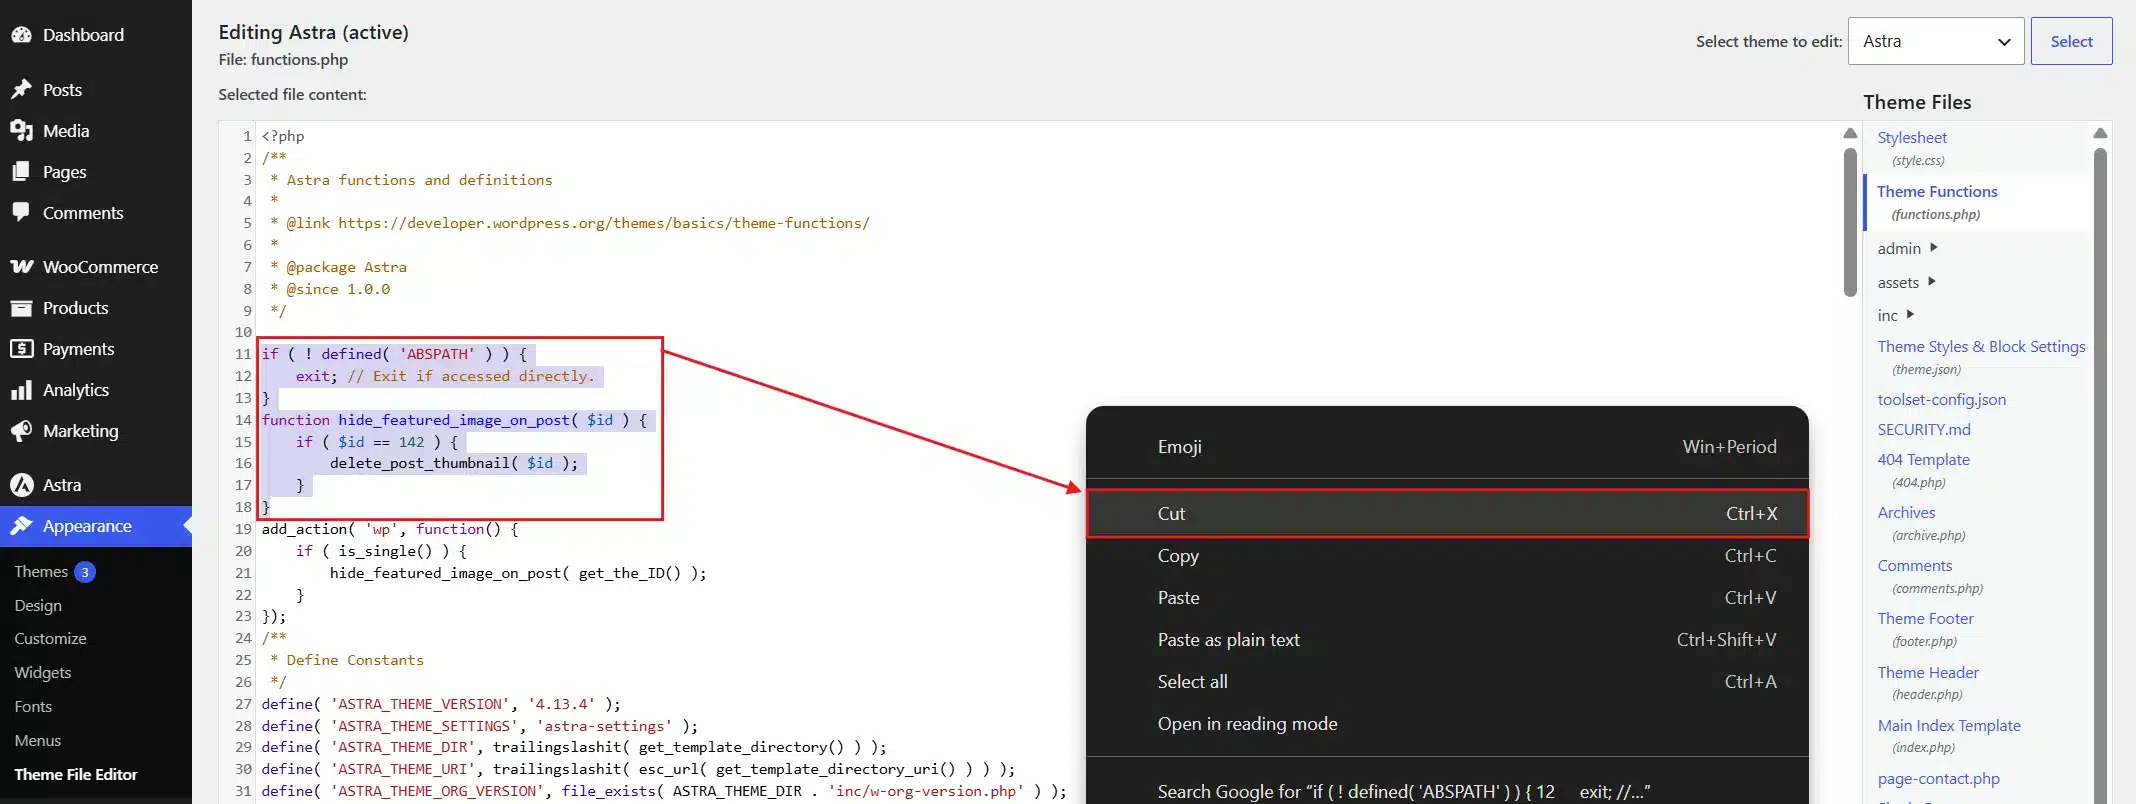
None of these methods touches your original image file in the Media Library. Whatever you used to set the featured image in the first place is still there, waiting to be shown again.
Troubleshooting: Why the Featured Image Won’t Hide
A few things trip people up here, and it’s worth checking them before assuming a method failed. Most of these issues take less than a minute to rule out once you know where to look.
- Caching plugins are the most common causes. If you’re using a caching plugin, clear the cache after making any change. You might just be looking at an old, cached version of the page.
- Custom templates can also override the standard hiding methods. If your theme uses a page builder like Elementor or Divi for that post, the featured image might be set inside the builder itself. It won’t respond to WordPress’s standard settings.
- RSS feeds are another place people forget to check. The CSS and plugin methods only hide the image on your website. If your featured image still shows up in an email newsletter or RSS reader, that’s expected. Those platforms pull the image directly from your feed, not from the rendered page.
If you’d rather have someone review the setup for you, our WordPress development services team handles this regularly. It’s a common request from clients who don’t want to dig through theme files themselves.
Conclusion
Hiding the featured image in a WordPress post doesn’t require picking one “right” method. Use your theme settings if your theme supports it, or a plugin if you want the fastest no-code option. Reach for CSS if you’re comfortable with basic code, or a PHP snippet if you want the image fully removed from the page.
Start with whichever one matches your comfort level, not the one that sounds most advanced. Whichever you choose, remember that nothing here is permanent. You can restore the image in under a minute using the steps above. Your original file stays untouched in the Media Library the entire time.
Frequently Asked Questions (FAQs)
Q1. Does hiding the featured image affect my site’s SEO?
No, hiding it visually doesn’t change your SEO on its own. Search engines still read your page content and meta tags normally. If you use the PHP method to fully remove it, double-check your Open Graph and social preview tags first. Make sure they’re not pulling from the same image.
Q2. Will hiding the featured image slow down or speed up my site?
It depends on the method. CSS and plugin methods hide the image but still load the file, so the speed impact is small. The PHP method stops the file from loading at all, which gives a slightly better speed result.
Q3. Can I hide the featured image on the single post but still show it on my blog page?
Yes, this is exactly what the plugin method in this guide is built for. It hides the image only on the single post view while keeping it visible in your blog archive and category pages.
Q4. Why doesn’t the plugin option show up in my post editor after I activate it?
Try refreshing the page or clearing your browser cache first. If it’s still missing, your theme may be using a custom post template that doesn’t include the standard featured image panel.
Q5. Will the featured image still show up when I share the post on social media?
Usually, yes, since most themes pull the Open Graph image from the same featured image field regardless of whether it’s visually hidden on the page. If you need it hidden everywhere, including social previews, you’ll need to set a separate Open Graph image through your SEO plugin.
Q6. Can I hide the featured image on multiple posts at once instead of doing this one at a time?
The plugin method supports this through WordPress’s bulk edit screen once it’s activated on each post. For dozens of posts at once, a short custom PHP snippet targeting a category or post type is usually faster than repeating the manual steps.