How to Create a WordPress Child Theme via 2 Easy Methods


Are you looking to customize your WordPress theme but afraid of losing all of your changes when you update the theme? This is one of the biggest problems WordPress users face.
Modifying the parent theme’s files may seem easy, but it can lead to complications, including broken designs, lost changes, and frustration with updates. That’s where a WordPress child theme comes in.
A child theme is going to allow you to make changes to the design and functionality safely without modifying the core files of the parent theme.
It takes everything from the parent theme and allows you to change or add your customizations separately. That way, you could update the parent theme at any time without worrying about losing your work!
In this step-by-step guide, we will show you how to create a WordPress child theme using two methods (one using a plugin and one manually). We will also touch on some prerequisites, advantages, and tips needed to ensure your child theme setup is clean (and potentially future-proof!).
By the end of this guide, you will have a fully functioning child theme to customize, regardless of whether you are a new beginner or a developer!
What Is a WordPress Child Theme and Why Do You Need It?
Before we jump into the steps of how to create a WordPress child theme, it’s important to first understand what a child theme is and why it is considered a best practice when customizing WordPress sites.
What Is a Child Theme?
A WordPress child theme is basically a theme that takes on all of the styling, layout, and functionality of a parent theme. The child theme acts as a “layer” above the parent theme. With a child theme, you can create custom styles, templates, and functions while adhering to the parent theme’s original files.
Think of it this way:
- Parent theme: The structure and bones of your house.
- Child theme: The paint, furniture, and decor you add to make the house your own.
This two-layered relationship means that any changes you make in the child theme will not impact the functionality of the parent theme.
Why is Using a Child Theme Important?
There are a couple of important reasons to create a child theme that should matter to both website owners and developers:
- Safe Updates to the Parent Theme: When you update a parent theme, WordPress will overwrite the entire parent theme and all of its files. If you made customizations to any or all of those files, they will be replaced. With a child theme, you keep your changes separate. Therefore, you can update the parent theme without losing any of your work.
- Better Maintainability: When you put your custom code in a child theme, you don’t clutter the parent theme. This helps you maintain and troubleshoot, and debug your site in a timely manner later.
- Experiment with Fearlessness: If you want to try out a new design or make a change to the functionality of a theme, a child theme gives you a place to do that. If you mess up, you can simply go back to the working parent theme and not risk messing up the core of your site.
- A Great Learning Tool for Customization: If you are learning to develop child themes is a great way to do that. Basically, you can play around with your site and see what happens without creating any of the problems you could create if you don’t know what you’re doing.
Example Scenario
Let’s say you’re using the popular Astra theme and you want to configure the header design. If you go ahead and edit the theme files, then if an update is released, you lose those changes or customizations. However, if you create a custom Astra Child Theme, then your changes will be safe, and Astra can continue to release updates and new features.
Key Takeaway: A child theme provides you the opportunity to customize your WordPress website without compromising the security, maintainability, or any future updates. If you seriously want to run a WordPress site professionally, a child theme is a must!
Prerequisites for Creating a WordPress Child Theme
Before we get into the steps on how to create a WordPress child theme, there are a few things to do first. In order to complete a child theme set up correctly, you want to consider these prerequisites to ensure you have the right equipment, access, and knowledge.
1. Access to Your WordPress Files
You will need to access your WordPress theme files to create a child theme, especially if you are going to proceed down the manual creation route. There are two generally accepted access routes:
- FTP/SFTP Access (use an FTP client like FileZilla to access your hosting server).
- Hosting File Manager (most hosting control panels, e.g., cPanel and Plesk) have a built-in hosting file manager that provides quick access.
Tip: If you are a beginner, consider using the file manager built into your hosting control panel, as it may be less complicated than configuring FTP software.
2. A Text/Code Editor
You will need to edit the files style.css and functions.php. While WordPress has a built-in editor in the Themes section of the Admin panel, it’s safer to do edits in an external text/code editor that includes error handling and syntax highlighting. Below you will find a list of popular free text/code editors:
- VS Code(recommended for developers)
- Sublime Text
- Notepad++
3. An Installed Parent Theme
A child theme attempts to work independently, but a child theme will always inherit styles and functionality from a parent theme. So, please ensure your active parent theme (like Astra, GeneratePress, or Twenty Twenty-Five) is installed and active before you get into creating the child theme.
4. Basic Understanding of WordPress Theme Structure
You do not need to be a master coder, but developing these basic files will bring you knowledge:
style.css– This file controls the styles in the child theme.functions.php– This file will help you enqueue styles and create your own custom functions.- Template Files like
header.phpandfooter.php– These are where we will override layouts.
5. Backup Your Website
Before we make the changes we need to make, it’s a good idea to back up your website data (files + database) first in case something goes wrong and you want to restore your website.
There are several different backup tools you can use:
- UpdraftPlus (plugin)
- Jetpack Backup
- Manual backup with your hosting panel
6. (Optional) Set Up Local Development
If you want to be able to experiment without affecting your live website, you can install WordPress locally using LocalWP or XAMPP. Local development is good for beginners who are learning customizations with child themes.
How to Create a Child Theme in WordPress: 2 Methods
There are two main ways to create a child theme:
- Using a plugin (easiest for beginners)
- Creating a child theme manually (for complete control)
Method 1: How to Create a WordPress Child Theme Using a Plugin
If you are not comfortable making edits to the actual theme files, the easiest and safest way to create a child theme is to use a plugin. While you will still need to do some setup, the plugin handles all of the folder creation, files needed, and setup for you, and no coding is required.
Step 1: Installing and Activating a Child Theme Plugin
There are several plugins that can create child themes, but the most popular and reliable is Child Theme Configurator. Here’s how to install it:
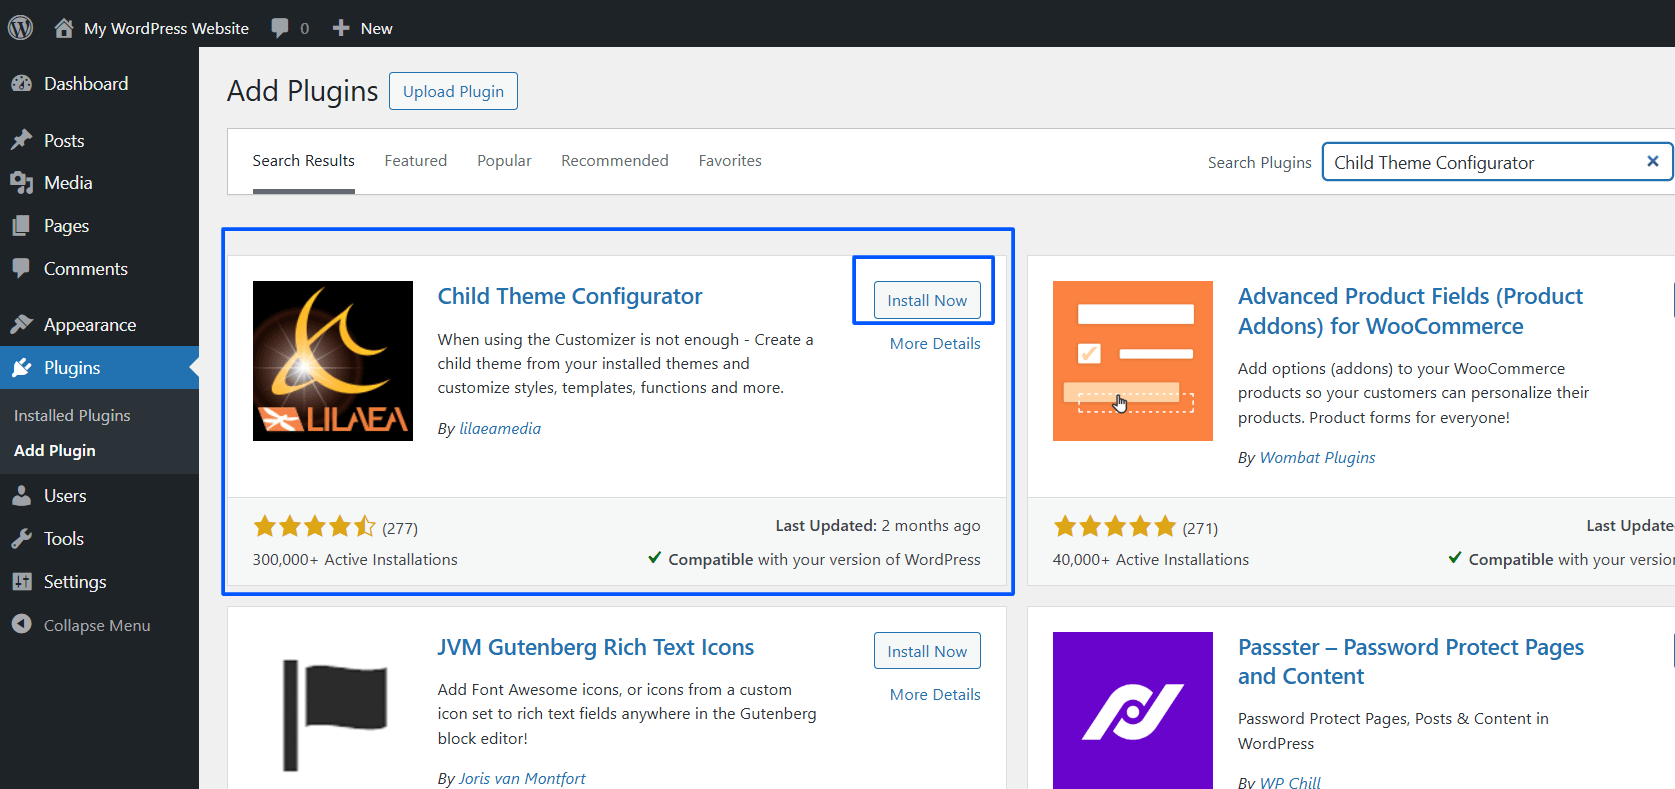
- Once logged into your WordPress Dashboard, go to Plugins > Add Plugin.

- Search for Child Theme Configurator.
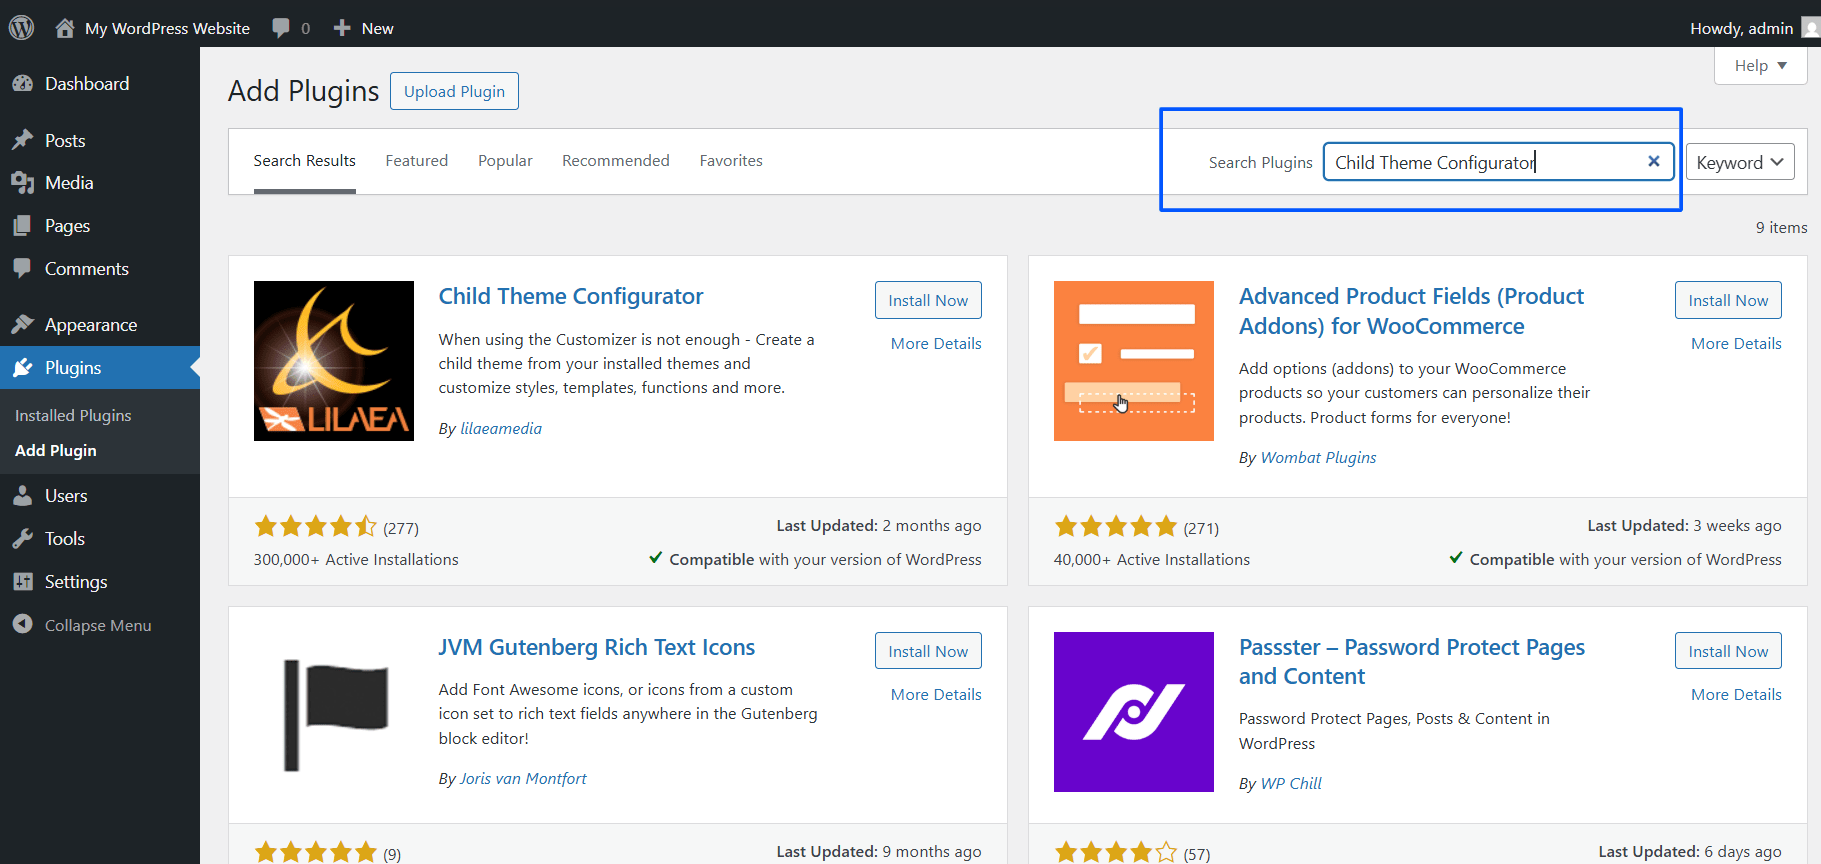
- Click on Install Now, then Activate the plugin.
Step 2: Create Your Child Theme
Once activated, the next step is to create your child theme. To do this in your dashboard:
- Go to Tools > Child Themes.
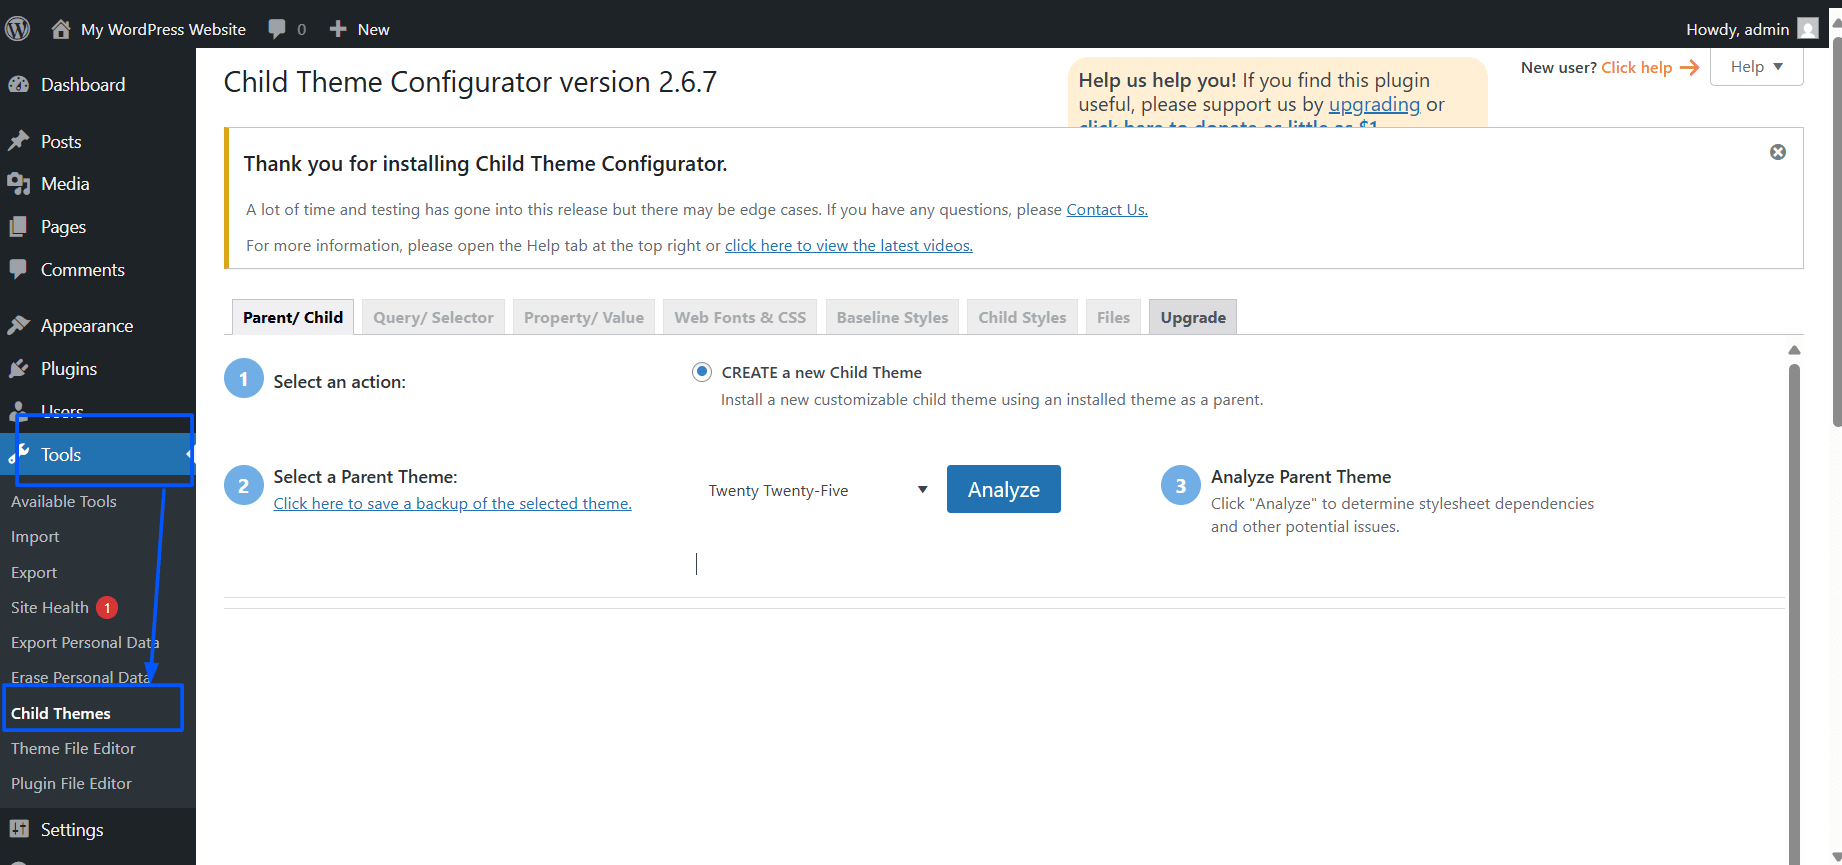
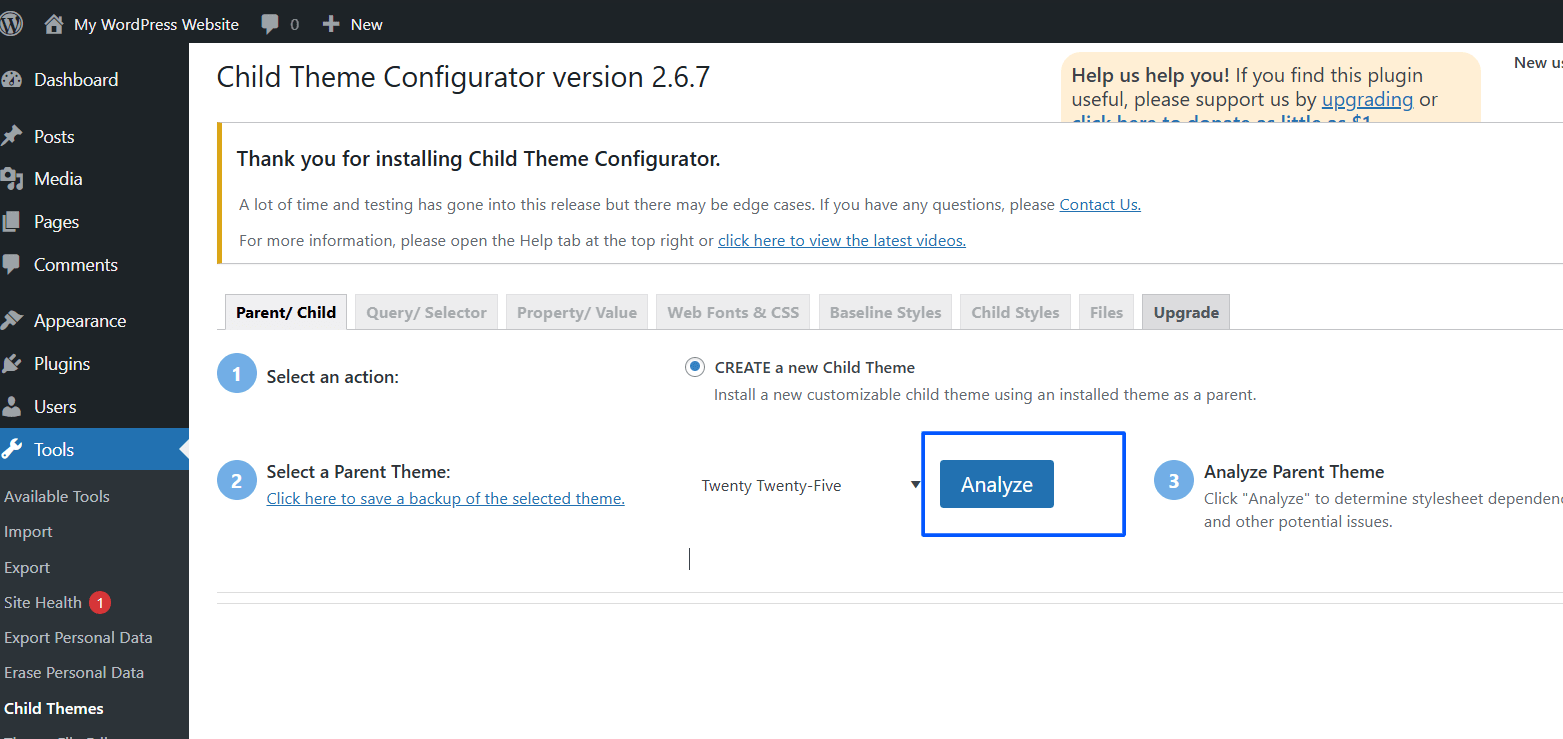
- In the “Parent/Child” tab, look for and select the parent theme you wish to customize.

- Click on Analyze — this will check for compatibility and ensure the parent can support a child theme.
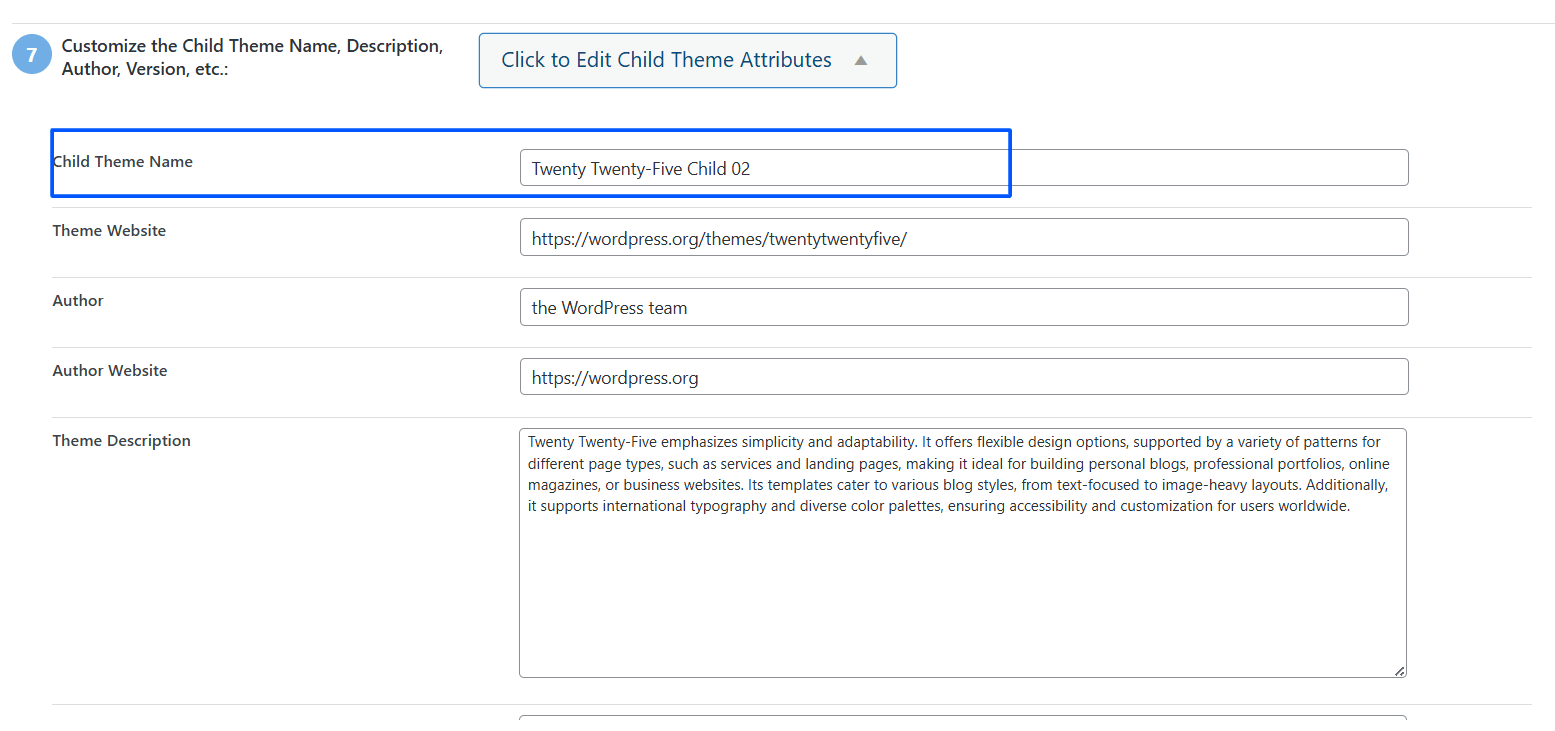
- Scroll down to the bottom to “Click to Edit Child Theme Attributes” and confirm the name of the child theme (you can name the child theme here).
- Click Create New Child Theme — at this point, the plugin will create the folder and files we need (
style.css,functions.php).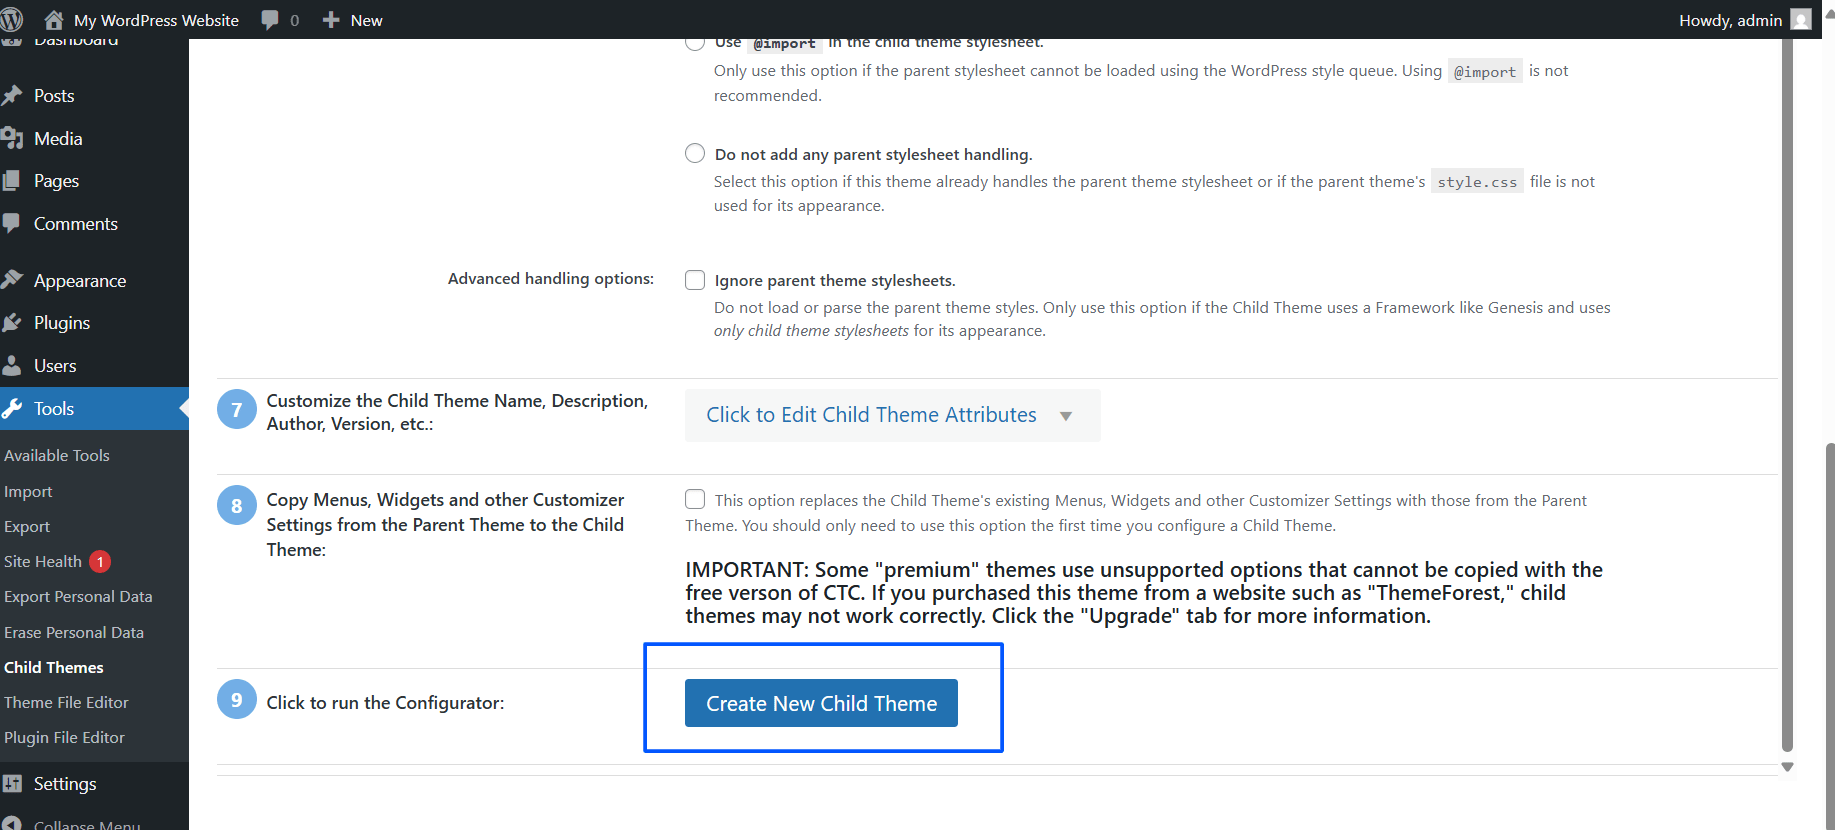
Step 3: Activate your Child Theme
- Go to Appearance > Themes.
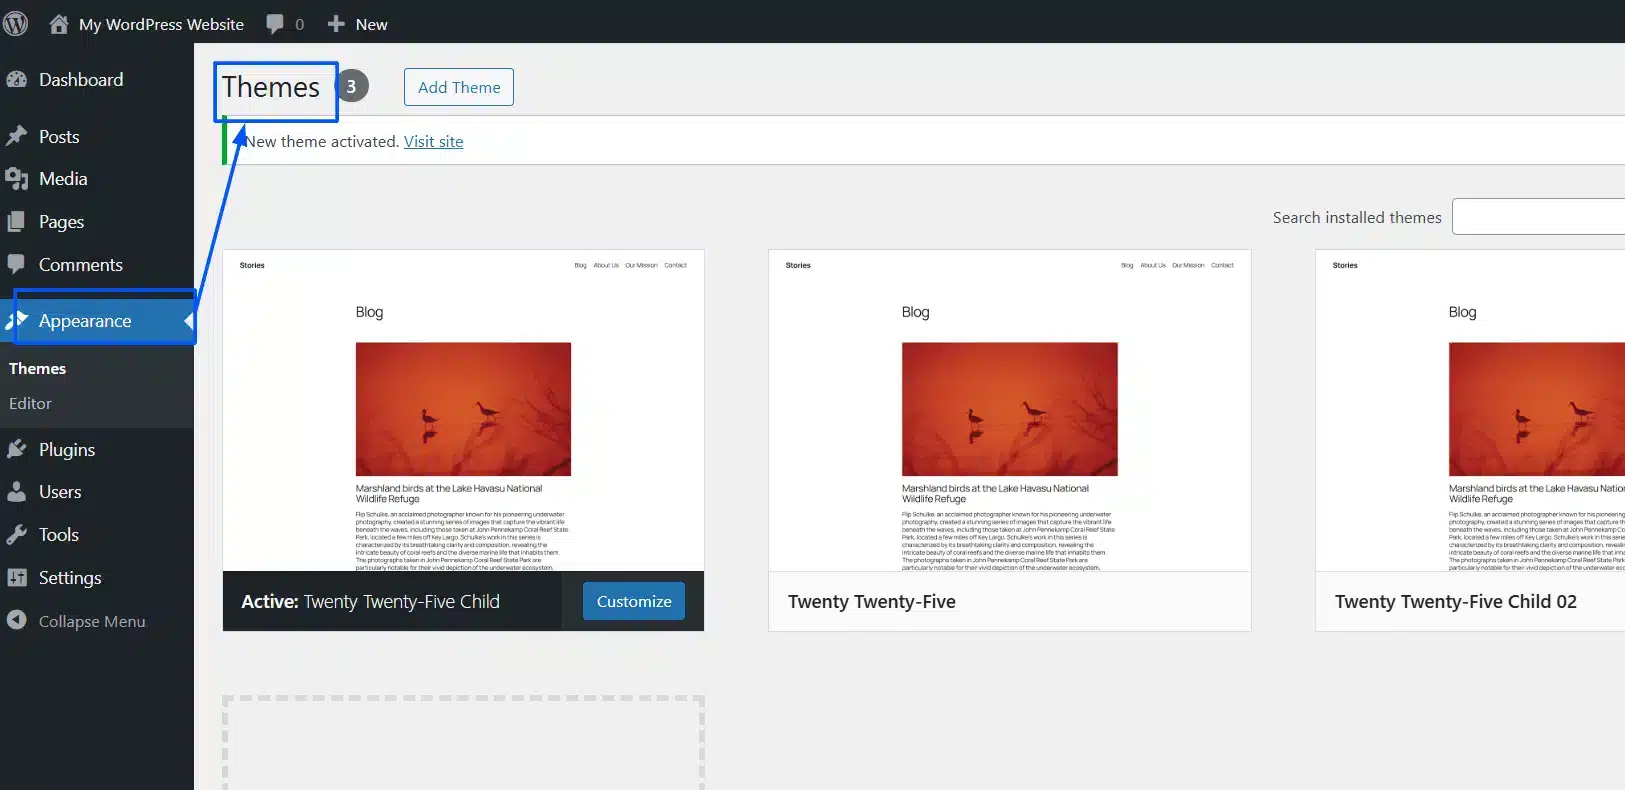
- You should see the new child theme listed (normally with the name “Parent Theme Child”).

- Click Activate, and you will have successfully activated the new child theme.

Your site will now make use of the child theme while inheriting all styles and functionality from the parent theme.
Step 4: Safely Customize
Now that you have activated the child theme, you can:
- Add custom CSS via Appearance > Theme File Editor or in
style.css.
- Copy the template files into the child theme folder and edit the templates.
- Add PHP functions to the child theme’s
functions.phpfile.
Pro Tip: Always test changes on a staging or local site or use a backup plugin to be sure you do not break your live site.
Method 2: How to Create a WordPress Child Theme Manually
Manually creating a child theme provides complete control over customization. It is also an excellent way to learn how WordPress themes function. Doing it this way means you will create two necessary files (style.css and functions.php) and activate them using the dashboard.
Step 1: Create a New Folder for the Child Theme
- Use FTP/SFTP (FileZilla) or the File Manager from your hosting provider to access your WordPress site files.
- Go to the /wp-content/themes/ directory.
- In this directory, make a new folder called your parent theme name with the suffix “-child”.
- Example: If your parent theme is
twentytwentyfive, name the foldertwentytwentyfive-child.
- Example: If your parent theme is
Tip: Always use lowercase and no spaces when naming the new folder, as this can cause conflicts.
Step 2: Create the style.css File

Inside the new folder, create a file called style.css. This file contains the information about your child theme and the way to load your own styles.
Add the following header comment to the file:
/*
 Theme Name:   Twenty Twenty-five Child
 Theme URI:    https://example.com/twentytwentyfive-child
 Description:  Child theme for the Twenty Twenty-Five theme
 Author:       DevDiggers
 Author URI:   https://devdiggers.com
 Template:     twentytwentyfive
 Version:      1.0.0
*/

/* Import the parent theme’s stylesheet */
@import url("../twentytwentyfive/style.css");

/* Add your custom styles below */
body {
    background-color: #f5f5f5;
}
Important Notes:
- The Template field matches the folder name of your parent theme exactly.
- Theme Name can be anything you find descriptive.
- The rest (URI, Author, Description) are optional but should be included for better clarity.
Step 3: Create the functions.php File

Instead of the outdated @import method of loading parent styles (and subsequently slowing performance), we will enqueue the styles using PHP.
In the child theme folder, create a file called .functions.php and put this code in it:
<?php
// Enqueue parent and child theme stylesheets
function dd_child_theme_enqueue_styles() {
    $parent_style = 'parent-style'; // This is 'twentytwentyfive-style' for the Twenty Twenty-Five theme.

    wp_enqueue_style( $parent_style, get_template_directory_uri() . '/style.css' );
    wp_enqueue_style( 'child-style',
        get_stylesheet_directory_uri() . '/style.css',
        array( $parent_style ),
        wp_get_theme()->get( 'Version' )
    );
}
add_action( 'wp_enqueue_scripts', 'dd_child_theme_enqueue_styles' );
?>
Why this method?
- It respects the best practices level for WordPress.
- It doesn’t cause render-blocking issues with
@import. - It ensures that the parent style and child style load in the correct order.
Step 4: Activating the Child Theme
- Open up your WordPress dashboard and click Appearance > Themes.
- Your new child theme should now be listed with the name you chose/added in
style.css. All that needs to be done now is click Activate, and this child theme is active.
At this point, your site is running on the child theme and is inheriting everything from the parent theme.
Step 5: Customize the Child Theme
Now that your child theme is active, you can start:
- Adding custom CSS rules to your
style.css. - Copying template files from the parent theme to the child theme folder (
header.php,single.php, etc.) and modifying the code inside them. - Adding new functions
functions.phpto extend the parent theme’s functionality.
Final Thoughts
Understanding how to create a WordPress child theme is one of the best skills you can have as a website owner/customer, or developer. By using a child theme, you allow your modifications to be safe and secure during any potential updates that could be made by the parent theme.
It does not matter whether you use the plugin method, for simplicity, or the manual method, for full control; both ways provide you with a safer approach when managing long-term modifications safely.
Key takeaways:
- A child theme includes the designs and functional output from the parent theme, its base documentation, and keeps your modifications completely separate.
- The child theme will protect and mitigate your modifications from being removed by a parent theme update.
- You can experiment with modifications in the design and functionality of your site without the chance of damaging your live site.
- When you use the manual method, you get to learn about the internal structure of theming; however, the plugin method may be slightly faster, especially for beginners.
Implementing child themes allows you to make design modifications without affecting the parent theme, which is essential for the flexibility, security, and maintainability of running your own professional WordPress website.
Now that you are familiar with what a child theme is and how to create one, I suggest you start with small modifications, like writing some custom CSS, and build up to advanced modifications (template overrides and custom functions).
You will be able to build your confidence and not make too many mistakes.
FAQs About Creating a WordPress Child Theme
Q1. What is a WordPress child theme?
A WordPress child theme is a theme that inherits all the features and design of a parent theme, allowing you to make custom changes without affecting the original theme.
Q2. Why should I use a child theme?
Using a child theme ensures that your customizations are safe and won’t be lost when the parent theme gets updated.
Q3. Can I create a child theme without coding?
Yes, you can use free WordPress plugins like Child Theme Configurator to create a child theme without writing any code.
Q4. Will activating a child theme change how my site looks?
No, your site will look the same as the parent theme until you add your own custom styles or modifications.
Q5. Can I switch back to the parent theme after using a child theme?
Yes, you can deactivate the child theme at any time and return to the parent theme or any other theme without breaking your site.
Ekta Lamba
Ekta Lamba is a tech writer at DevDiggers focused on making WordPress and WooCommerce straightforward for non-developers. She covers plugin errors, platform updates, and WordPress basics, written so readers can follow along without a second tab open to translate the jargon.
Join thousands of readers getting smarter every week.
Leave a Reply