How to Handle Redirects When Migrating Webflow to WordPress

To handle redirects when migrating Webflow to WordPress, you need to map every old Webflow URL to its new WordPress equivalent, then set up 301 redirects on WordPress using a plugin or your own .htaccess file before pointing your domain to the new server.
That sounds simple. But skipping any part of that sequence can cost you ranking positions you spent months building. According to Ahrefs research, sites that change URLs without proper 301 redirects lose an average of 38% of their organic traffic within 30 days, and roughly a quarter of that loss tends to be permanent.
Most Webflow-to-WordPress migration guides spend two paragraphs on redirects and move on. That’s exactly where migrations go wrong. This guide covers the full redirect process: building a URL map, choosing the right method, handling tricky URL structure differences, and verifying everything works before and after your DNS switch.
Why Redirects Matter More Than You Think?
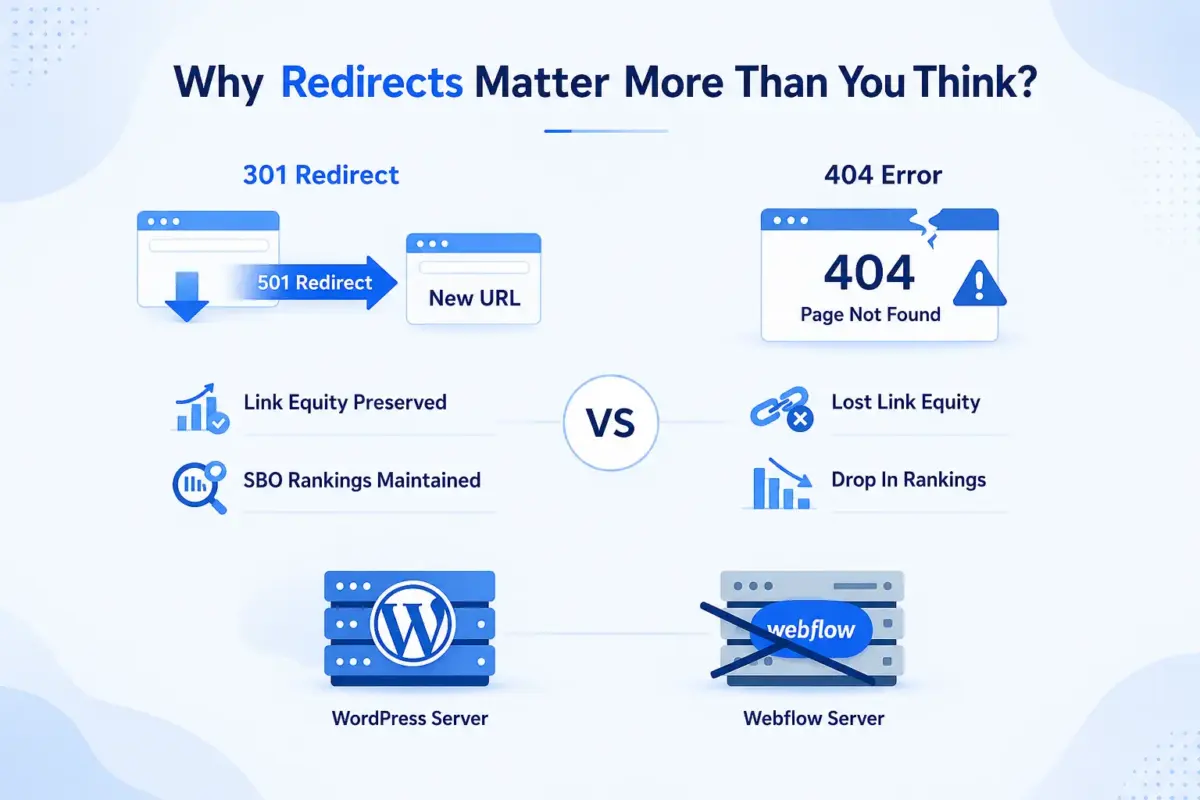
A 301 redirect tells search engines that a page has moved permanently. It passes the link equity from the old URL to the new one, which means Google keeps crediting your new page for backlinks and ranking signals built on your Webflow site.
Without it, every URL that changes becomes a dead end. Visitors hit a 404. Google stops treating the new page as a continuation of the old one and effectively starts from scratch. For a site with even modest organic traffic, that is a serious setback.
Moz research from 2025 confirms that a well-configured 301 redirect preserves 90 to 99% of link equity from the old URL. A 404 or soft redirect loses all of it. That gap is the entire argument for doing redirects properly.
Here is the part most people miss: the redirect work has to be done on your WordPress site, not in Webflow. When you switch your DNS to point at WordPress, Webflow is no longer serving your site. Any redirects you may have set up in Webflow’s dashboard become irrelevant. WordPress handles all requests from that point forward, so WordPress is where your 301 rules live.
Step 1: Build Your URL Map Before You Touch Anything
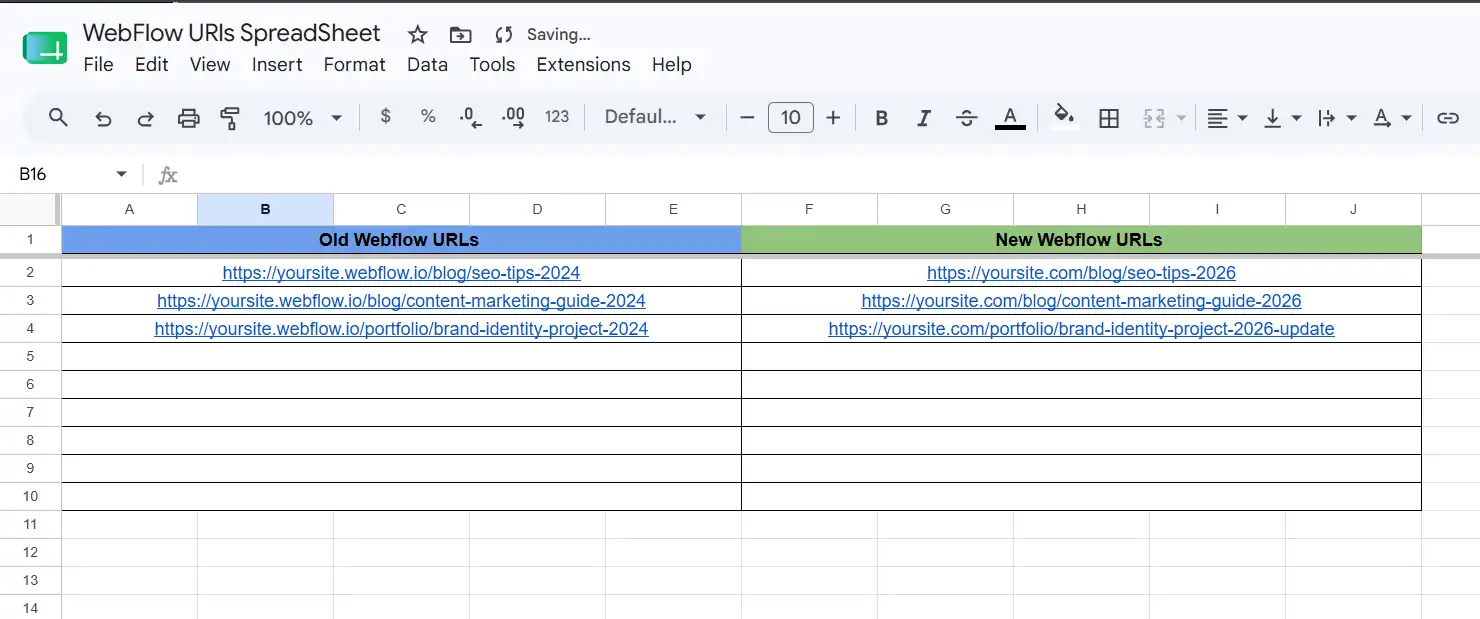
The URL map is a spreadsheet with two columns: every old Webflow URL in column A, and the corresponding new WordPress URL in column B. This document drives every redirect you create. Without it, you are guessing, and guessing causes gaps.
How to export your Webflow URLs:
- Log in to your Webflow project.
- Go to the CMS Collections panel and export each collection as a CSV.
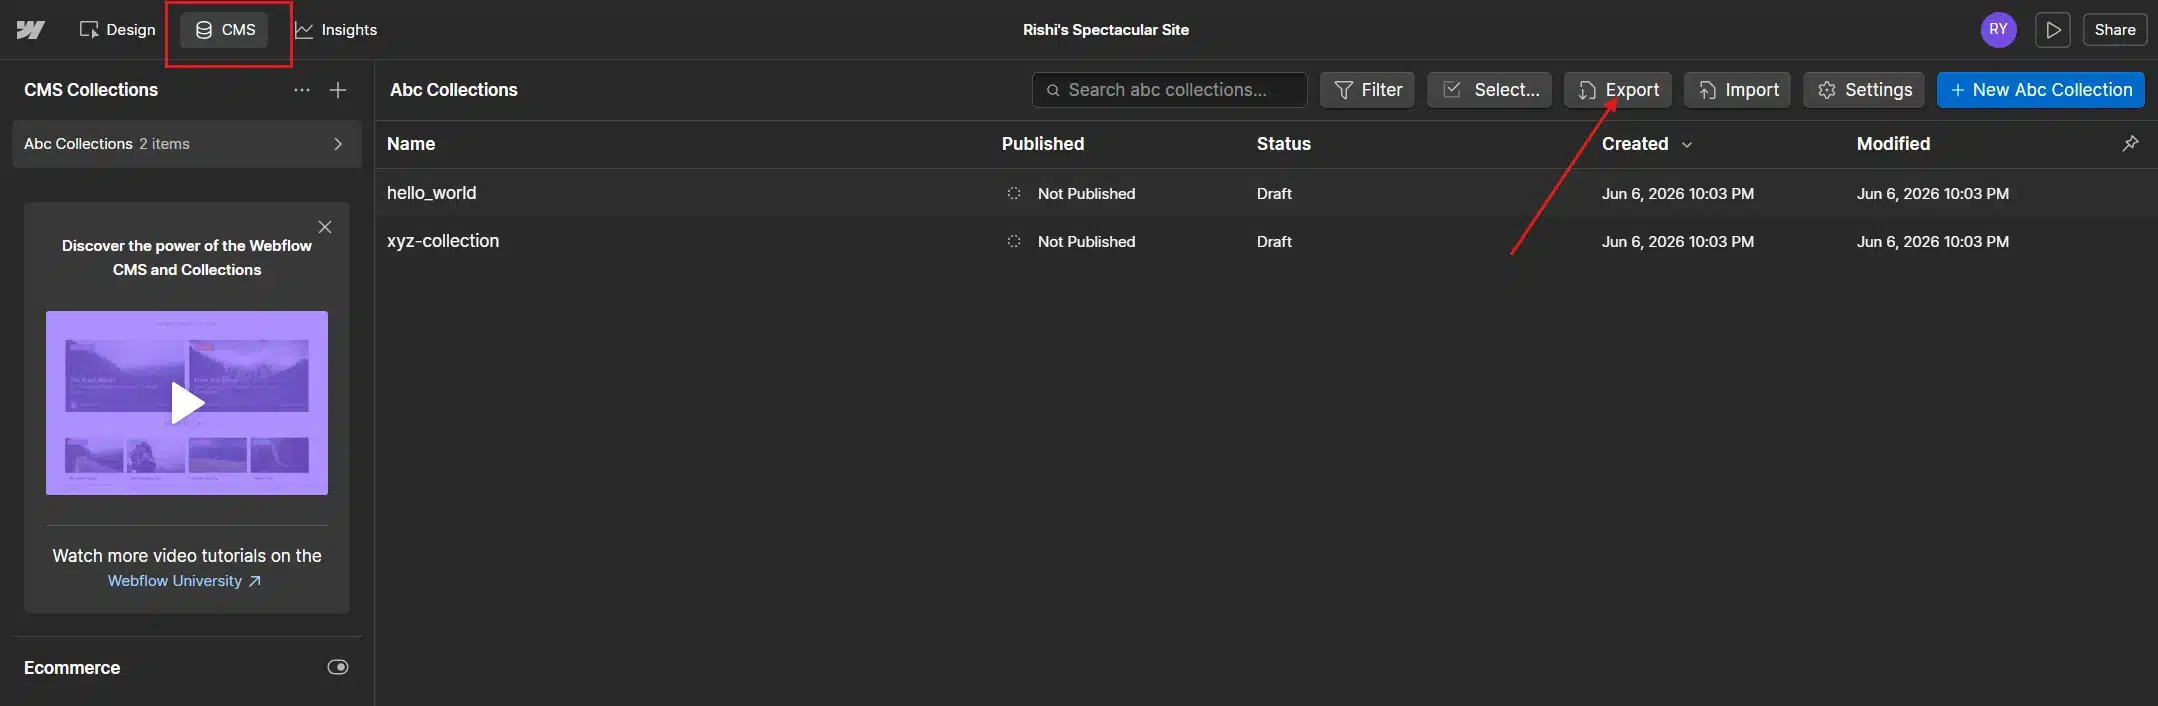
- For static pages, check your Webflow project’s Pages panel and note every page URL manually.
- Combine everything into a single spreadsheet. Include every URL, even pages with low traffic.
How to identify your WordPress URLs:
On the WordPress side, go to Settings > Permalinks and choose the “Post name” structure before you import any content. This gives you clean, SEO-friendly URLs in the format /your-post-title/.
Webflow typically uses a flat URL structure, too, but the path prefixes often differ. A Webflow blog post might live at /blog/your-post-title while WordPress puts it at /your-post-title/ or /blog/your-post-title/ depending on your permalink settings. That one-folder difference means every blog URL needs its own redirect rule.
Work through the spreadsheet systematically:
- Same slug, different folder:
/blog/post-name(Webflow) →/blog/post-name/(WordPress). A simple one-to-one redirect for each URL. - Different slug entirely:
/blog/old-title→/new-title/. Each needs its own rule. - Category and tag pages: Webflow collection pages often do not map cleanly to WordPress category archives. Decide whether to redirect them to the WordPress category page or to the blog index.
- Pages that no longer exist: If you are removing low-value pages in the migration, redirect them to the most relevant existing page, not to the homepage. Sending everything to the homepage is a common mistake that Google treats as a soft 404.
Step 2: Set Up 301 Redirects on WordPress
Once your URL map is ready and your WordPress site is built, you have three main methods for setting up redirects. Choose based on your comfort level and the size of your site.
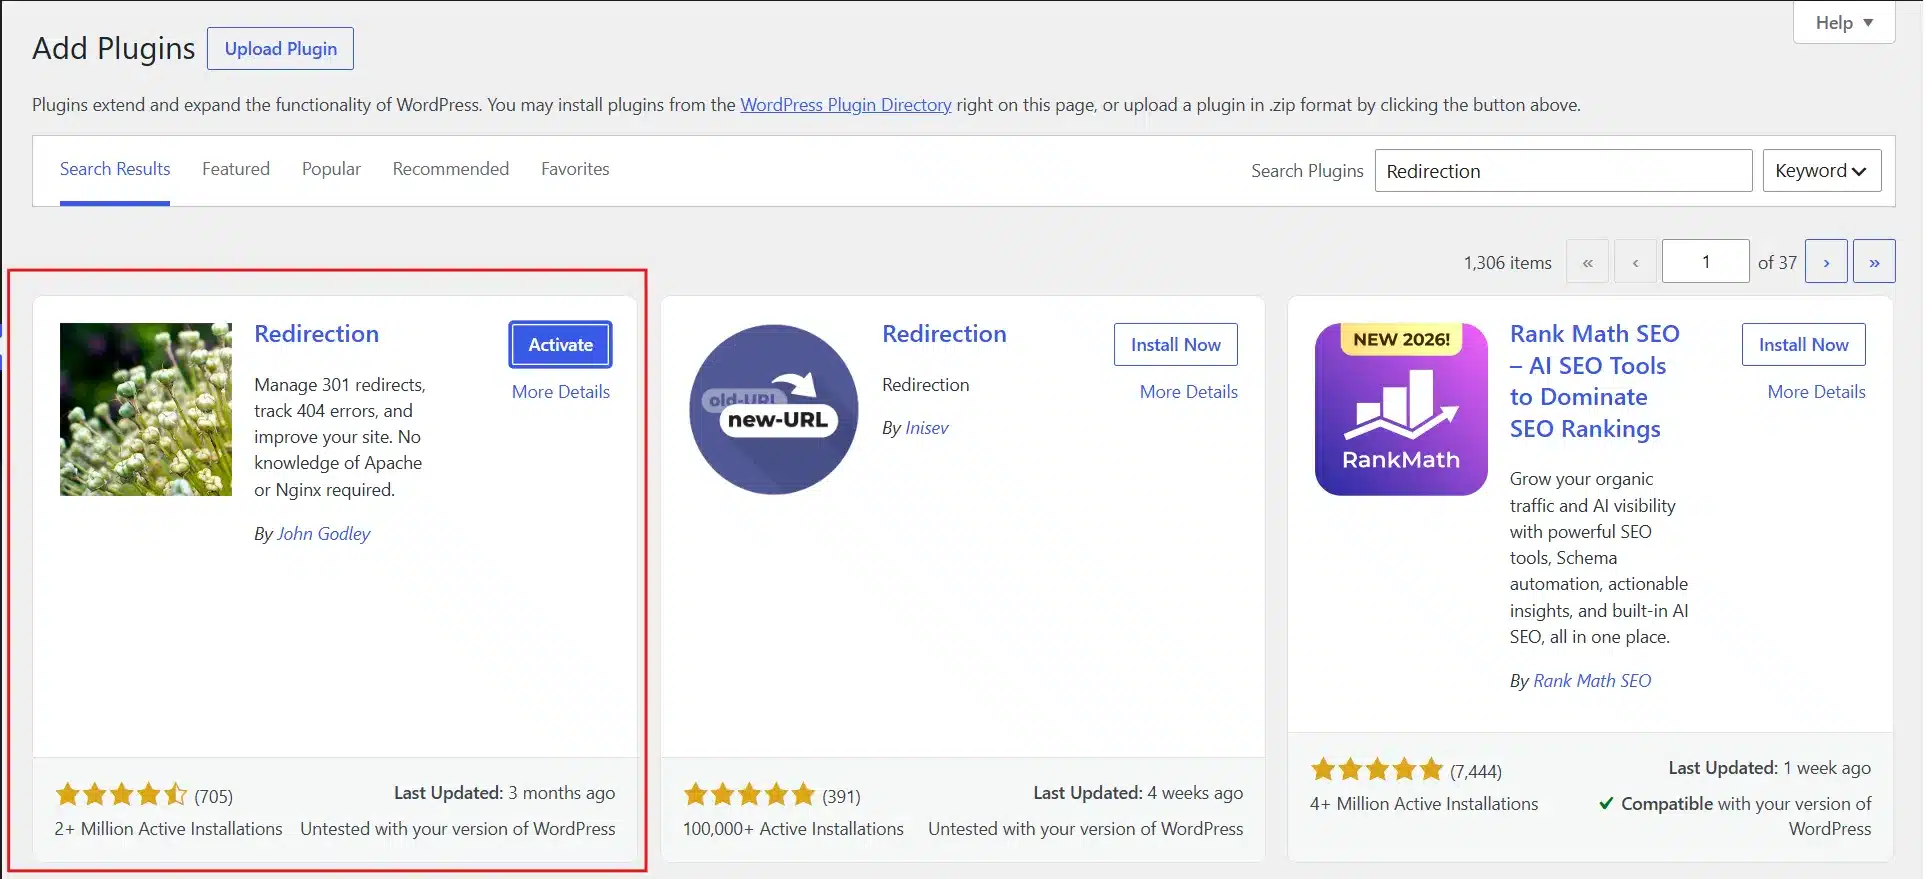
Method 1: Use the Redirection Plugin (Recommended for Most Sites)
The Redirection plugin by John Godley is a free, well-maintained plugin that handles 301 redirects from the WordPress admin. It also logs 404 errors, which is useful for catching any URLs you missed in your map.
To set it up:
- Go to Plugins > Add New.
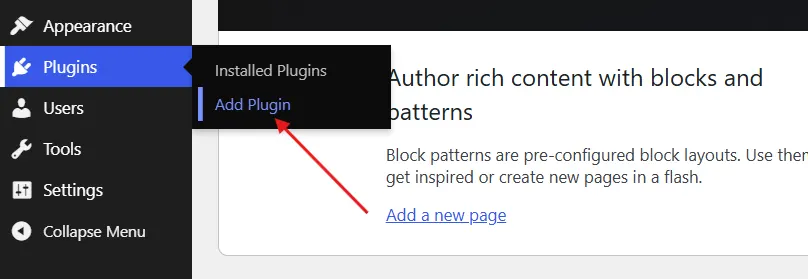
- Install and activate the Redirection plugin.
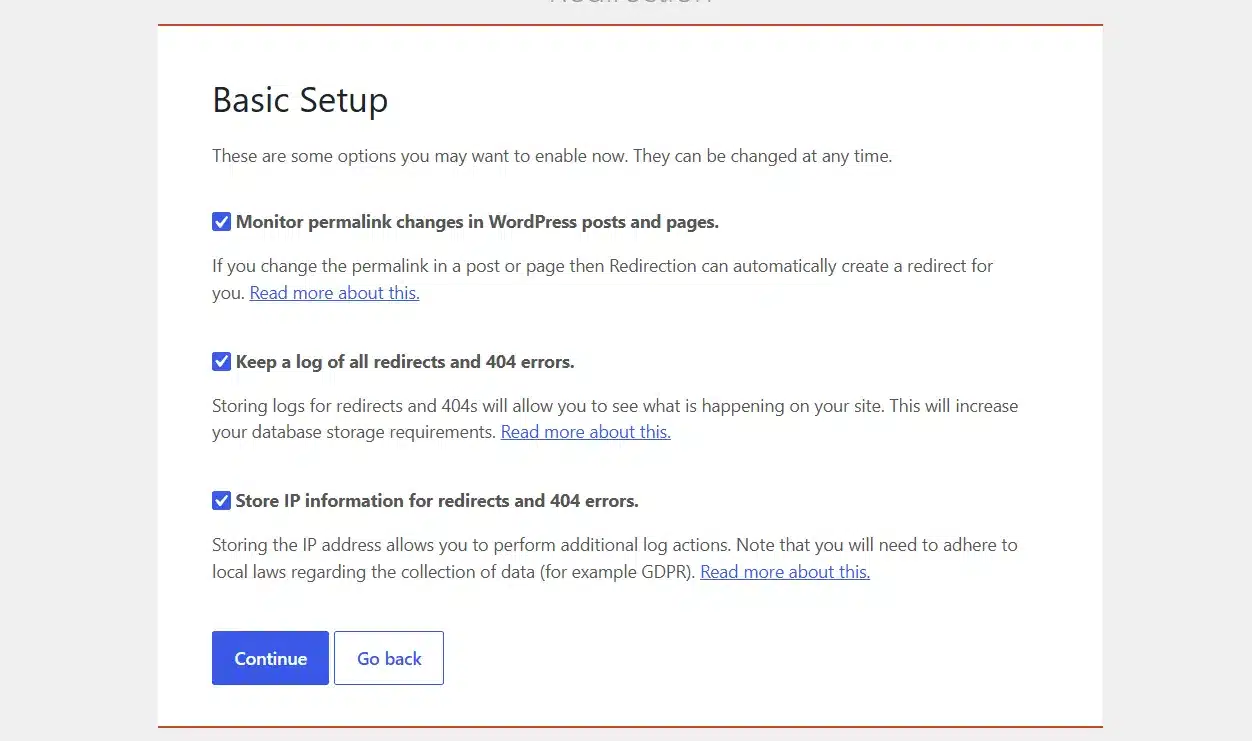
- Then go to Tools > Redirection.
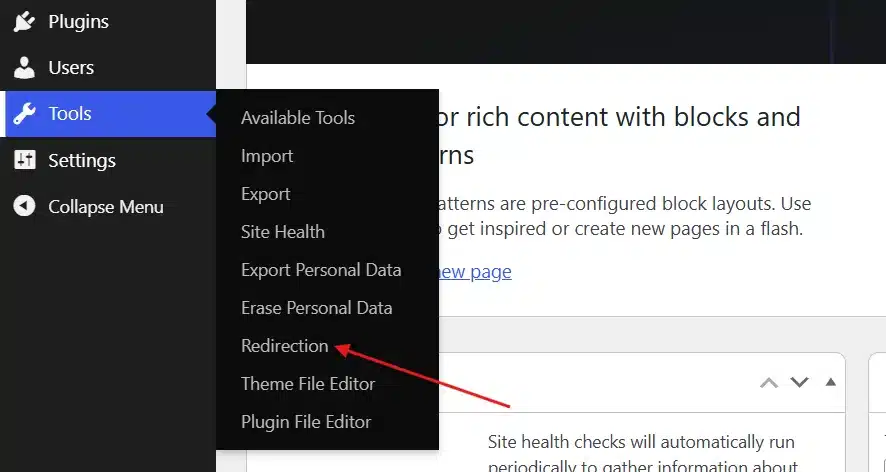
- Run through the short setup wizard. Enable permalink monitoring and 404 logging when prompted.
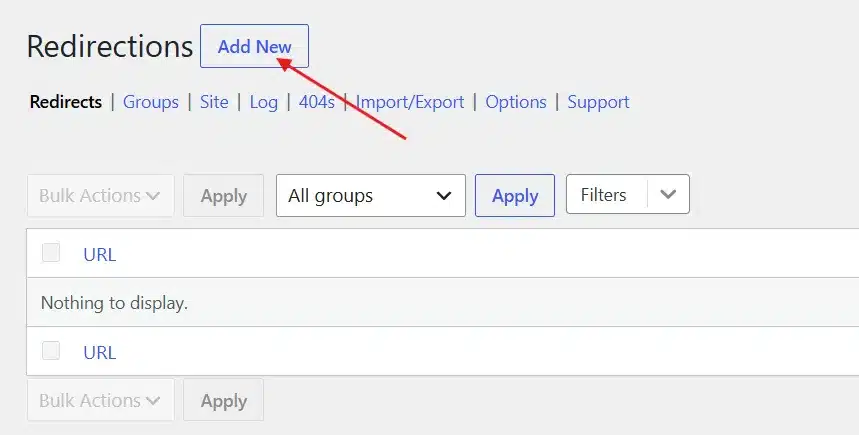
- Click Add New in the Redirects tab.
- Enter the old Webflow URL path in the Source URL field. Use the path only, not the full domain:
/blog/old-post-title.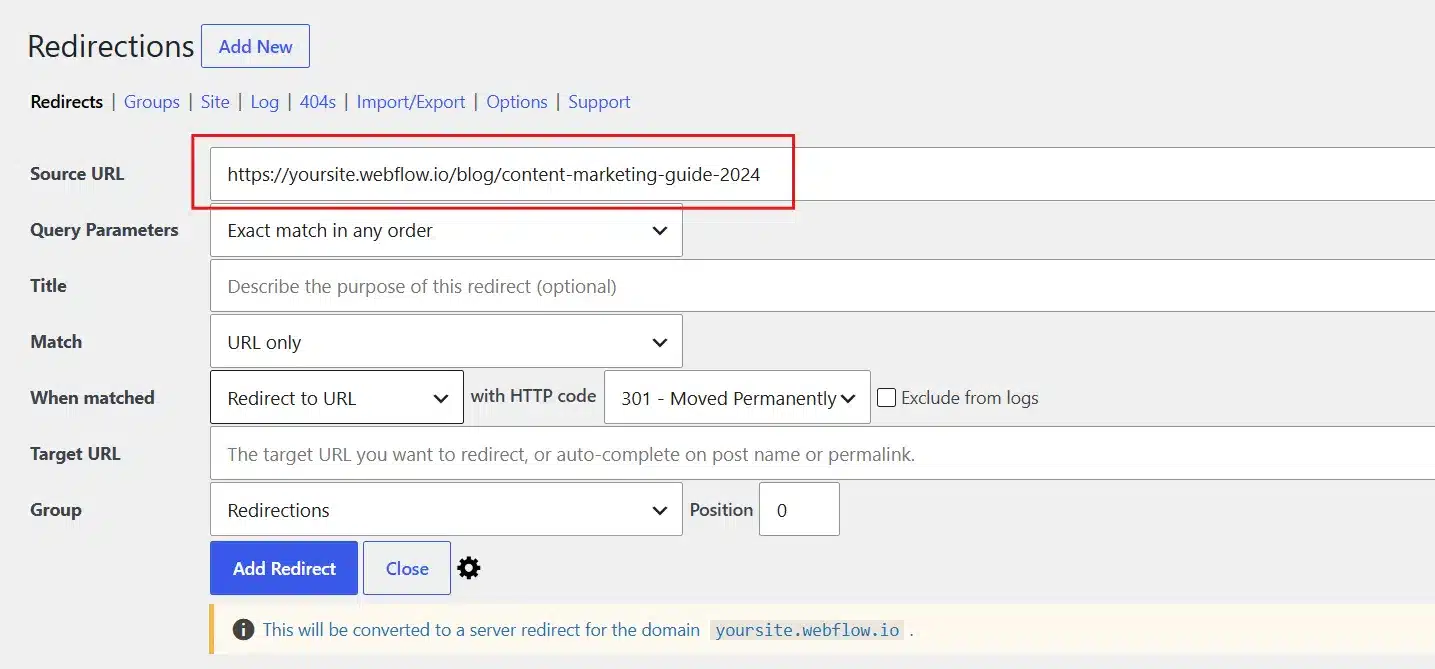
- Enter the new WordPress URL in the Target URL field:
/blog/new-post-title/.
- Set the HTTP code to 301 and then tap Add Redirect.
For sites with hundreds of URLs, Redirection supports CSV import. Export your URL map, format it as a two-column CSV with “source” and “target” headers, and import it through the plugin’s Import/Export section. This saves several hours of manual entry.
One thing we see often in support: people add redirects but forget to remove trailing slashes consistently. WordPress typically appends a trailing slash to post URLs. Make sure your target URLs match exactly what WordPress generates, or you end up with a redirect chain: old URL → redirect → WordPress URL without slash → WordPress auto-redirects to URL with slash. Two hops instead of one. Google accepts short chains, but it is cleaner to get it right from the start.
Method 2: Use Yoast SEO Redirects(Premium)
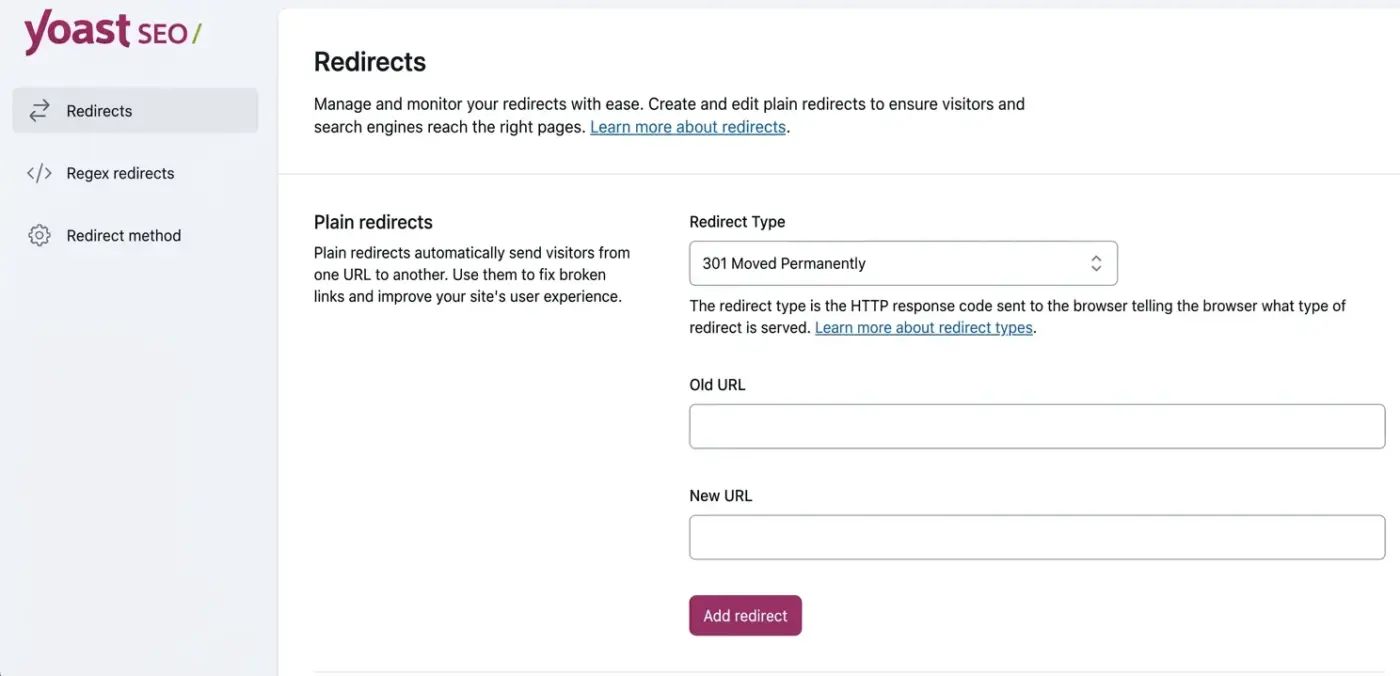
If you already have Yoast SEO installed, it also includes a redirects module.
Go to Yoast SEO > Redirects. Add the old path and the new path and save.
Yoast also auto-suggests redirects when you change a post’s slug directly in the editor, which is handy during the content migration phase.
The advantage of using your SEO plugin for redirects is that everything stays in one place. The disadvantage is that Rank Math and Yoast redirect management are less detailed than the Redirection plugin. For a large site, the Redirection plugin gives you better logging and bulk import tools.
Method 3: Edit Your .htaccess File Directly
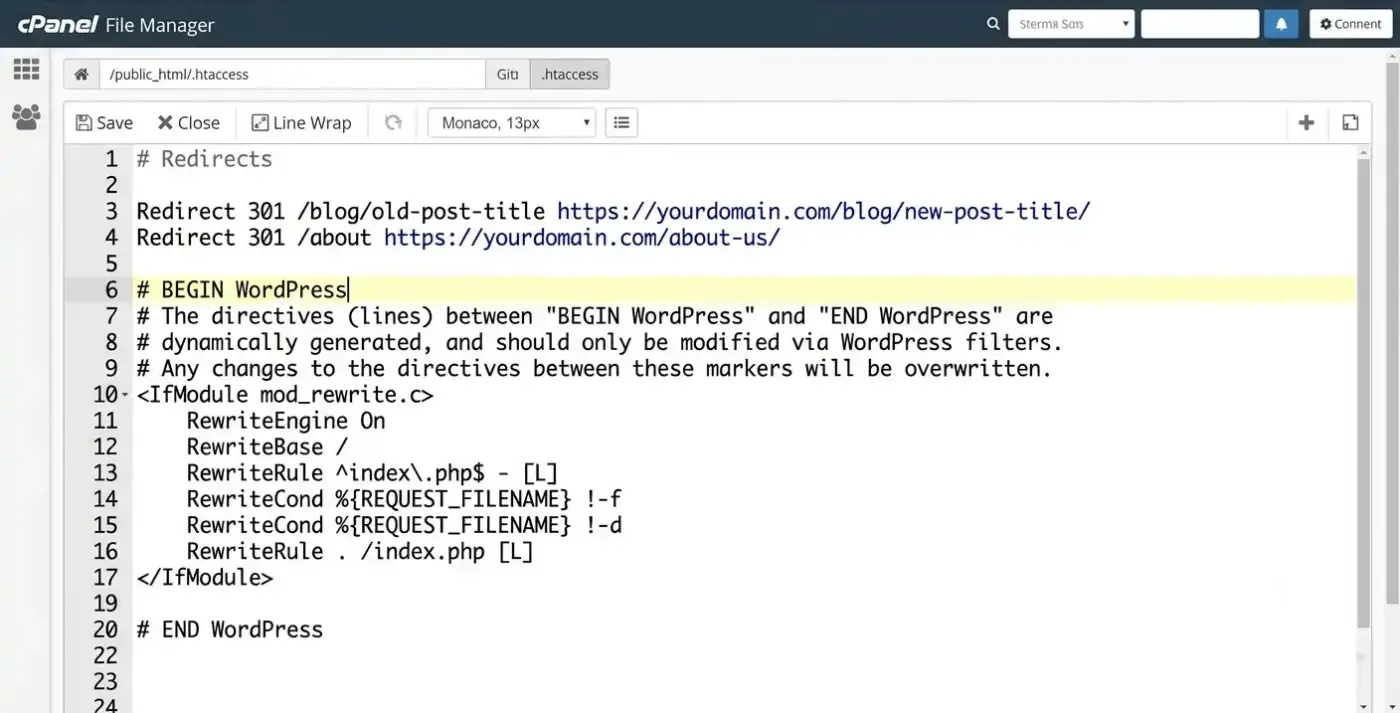
For Apache-hosted WordPress sites, you can add redirect rules directly to the .htaccess file in your WordPress root directory. This is faster than a plugin because redirects are processed at the server level before WordPress even loads.
Before editing anything, download a backup of your current .htaccess file. A syntax error can make your site inaccessible.
Connect to your server via FTP or cPanel File Manager. Open .htaccess and add your redirect rules before the # BEGIN WordPress line:
Redirect 301 /blog/old-post-title https://yourdomain.com/blog/new-post-title/
Redirect 301 /about https://yourdomain.com/about-us/
For bulk URL changes with a consistent pattern, you can use RedirectMatch with a regular expression. For example, if all your Webflow blog posts were at /posts/ And you want to move them to /blog/:
RedirectMatch 301 ^/posts/(.*)$ https://yourdomain.com/blog/$1
This single rule catches every URL under /posts/ and sends it to the matching path under /blog/. Use pattern-based redirects only when the slug itself stays the same between old and new URLs. If the slug changes, too, you need individual rules for each page.
Note: some managed WordPress hosts (Kinsta, WP Engine, Cloudways) use Nginx, not Apache, which does not have a .htaccess file. For Nginx servers, redirect rules go in the server configuration file, which usually requires contacting your host. In those cases, the Redirection plugin or your SEO plugin is the easier path.
Step 3: Handle the URL Structures That Always Cause Problems
Some URL differences between Webflow and WordPress are predictable. Knowing them in advance saves debugging time after launch.
- Webflow CMS slugs vs. WordPress post names: Webflow CMS collection items have slugs defined at the collection level. WordPress post slugs are set per post. They are usually identical after a content migration, but check them. If you used WP All Import or a CSV importer, verify that the WordPress slug matches the Webflow slug exactly before setting up redirects.
- Category archive pages: Webflow does not have category archive pages the way WordPress does. If your Webflow site had something like
/blog/category/news/, WordPress generates that URL automatically once you assign posts to a “News” category. If the paths match, no redirect is needed. If they differ, add a redirect from the Webflow path to the WordPress category archive. - Webflow subdomain to custom domain: If you were hosting your Webflow site on a
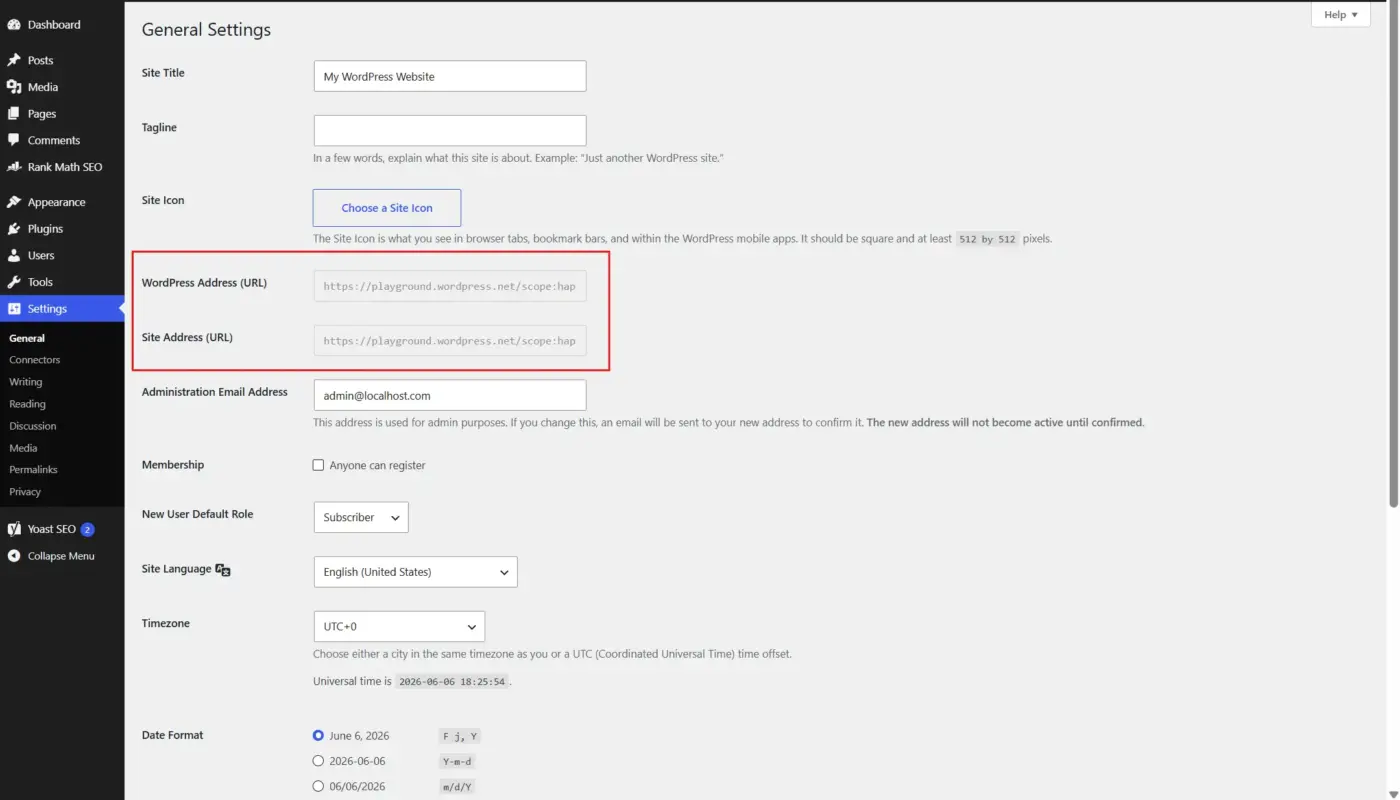
yoursite.webflow.iosubdomain during development and then migrated to a custom domain on WordPress, you do not need Webflow-side redirects. The domain switch handles it. Just make sure all your redirect rules use paths (not full URLs with the old domain) as the source. - www vs. non-www: WordPress handles the www/non-www preference in Settings > General. Set your preferred format there before adding any redirects. This prevents a situation where some redirects send traffic to,
www.yourdomain.com/new-page/while WordPress standardises toyourdomain.com/new-page/.
Step 4: Test Before You Switch DNS

This step gets skipped more than any other. Do not launch until you have tested redirects in a staging environment.
The cleanest way to test is to use a host file edit. Add a temporary line to your computer’s /etc/hosts file (Mac/Linux) or C:\Windows\System32\drivers\etc\hosts (Windows) That points your domain to your WordPress server’s IP address. This lets your browser see the new WordPress site while the rest of the world still sees Webflow.
With that in place, visit a sample of old Webflow URLs in your browser and confirm:
- The URL redirects to the correct WordPress page.
- The page content is correct.
- There is no redirect chain (one hop, not two or three).
- The final URL matches your WordPress permalink structure exactly.
For a more systematic check, use a tool like httpstatus.io or Screaming Frog. Both can crawl a list of URLs and report the redirect chain and final destination for each. Paste your full old URL list and let the tool run.
Pay attention to the HTTP status code at each step. You want 301 at the first hop and 200 at the destination. If you see 302 anywhere, check your Redirection plugin settings. A 302 is a temporary redirect and does not pass link equity.
Step 5: Post-Migration Checks in Google Search Console
After you switch DNS and your WordPress site goes live, the redirect work is not finished. Search Console is where you catch anything the pre-launch testing missed.
- Add and verify your WordPress site in Google Search Console if you have not already.
- Submit your new XML sitemap. In WordPress with Yoast or Rank Math installed, the sitemap is at
yourdomain.com/sitemap_index.xml. Go to Search Console > Sitemaps and submit it. - Check the Coverage report. Look for 404 errors and redirect errors. Any 404 that was previously a valid Webflow page means a missing redirect in your map.
- Use the URL Inspection tool to check specific old Webflow URLs. Google should show the old URL as redirecting to the new one.
- Monitor organic traffic daily for the first two weeks. A 10% to 20% fluctuation in the first two weeks is normal while Google scans again and re-indexes the site. If traffic drops more than 30%, investigate your redirect setup immediately.
According to Google’s documentation on site migrations, Google may take several weeks to fully process all the redirects on a large site. Keep your Webflow site’s domain pointing to WordPress for at least 6 to 12 months to avoid losing any remaining link equity from external links that have not been updated.
Common Mistakes That Kill Rankings After Migration
These show up consistently when migrations go wrong.
- Redirecting everything to the homepage: When in doubt, some teams redirect deleted pages to the homepage as a catch-all. Google flags this as a soft 404. Always redirect to the most topically relevant page or leave the URL returning a true 404 if the content is truly gone.
- Using 302 instead of 301: A 302 tells search engines the move is temporary. Google does not transfer ranking signals from a 302 the way it does from a 301. Check your Redirection plugin settings and confirm every redirect is set to 301.
- Redirect chains longer than two hops: If
/old-page/redirects to/intermediate-page/which then redirects to/new-page/You have a chain. Chains slow down load time and lose a small amount of link equity at each hop. Fix them by pointing the original URL directly to the final destination. - Adding redirects after DNS is already live: The cleanest approach is always to add all redirect rules to WordPress before you switch DNS. If you add them after, there is a window where some traffic hits 404 pages before the redirects are in place.
- Forgetting image and media URLs: If external sites link to images hosted on your Webflow site (for example, in posts that embed your images directly), those URLs break after migration. This is less common, but worth reviewing with a backlink tool to check for any high-value image links.
A Note on Redirect Performance
One thing worth knowing: redirects processed through a WordPress plugin run at the PHP/WordPress level, which is slightly slower than server-level redirects. For most sites, the difference is a few milliseconds and has no practical impact on rankings or user experience.
If you have a high-traffic site and performance is a priority, adding your most critical redirects directly to .htaccess (Apache) or your Nginx config handles them before WordPress even loads. You can run plugin-based redirects alongside server-level rules for any URLs added after initial setup.
For WooCommerce stores specifically, product URL changes during migration deserve special attention. Product page URLs often have backlinks from third-party review sites, comparison pages, and affiliate sites. These are among your highest-value pages for link equity. Map them first, test them individually, and monitor them closely in Search Console after launch.
Conclusion
To handle redirects when migrating Webflow to WordPress, the sequence is: build your URL map first, set up 301 redirects on WordPress before the DNS switch, test every redirect with a redirect checker tool, and monitor Google Search Console for 404 errors in the weeks after launch.
The redirect setup is two to four hours of careful work. Skipping it, or doing it carelessly, costs organic traffic that can take months to recover. Done right, your WordPress site picks up exactly where your Webflow site left off. If you need help with the migration itself, DevDiggers’ WordPress Development Services covers full migrations, including URL mapping and redirect configuration.
Frequently Asked Questions (FAQs)
Q1. Do I need to set up redirects if my WordPress URLs match my Webflow URLs exactly?
If the URLs are identical, including the same slugs and folder structure, then you do not need individual page-level redirects. You still need to make sure WordPress is handling the domain correctly and that www/non-www settings match. Run a Screaming Frog crawl after launch to confirm there are no unexpected 404 errors.
Q2. How long should I keep the 301 redirects in place?
Keep them forever. There is no technical cost to leaving redirects running, and removing them risks breaking any links built to the old URLs after the migration. The Redirection plugin adds minimal server overhead. There is no good reason to remove them.
Q3. What is the difference between a 301 and a 302 redirect for a Webflow to WordPress migration?
A 301 is a permanent redirect. It passes link equity and ranking signals to the new URL. A 302 is temporary and does not pass equity. For a migration, always use 301. If you see 302 in your redirect logs, update the rules in your Redirection plugin settings immediately.
Q4. Can I set up redirects from the Webflow side before launching WordPress?
No. Once you switch DNS to WordPress, Webflow stops serving your site entirely. Any redirects set up in Webflow’s dashboard stop working at that point. All redirect rules need to live on the WordPress side.
Q5. What tool is best for checking redirects after a Webflow to WordPress migration?
Screaming Frog’s redirect mode is the most thorough option for large sites; for quick spot-checks of individual URLs, httpstatus.io or redirect-checker.org works well. Google Search Console’s Coverage report catches any 404 errors that slip through after launch.
Q6. What happens to backlinks pointing at my old Webflow URLs after migration?
If you have 301 redirects in place, those backlinks still pass link equity to the new WordPress pages. Search engines follow the redirect and credit the destination. Over time, external sites may update their links directly to the new WordPress URLs, but the redirects preserve the SEO value in the meantime.
Rishi Yadav
Rishi Yadav is a content writer at DevDiggers who covers WooCommerce store management, WordPress performance, and security. He works through each topic in a test environment before writing about it, so his guides focus on the steps and settings that matter rather than the ones that sound good on paper.
Join thousands of readers getting smarter every week.
Leave a Reply