
A blog outline template is a fixed list of slots, from title to FAQs, that you fill in before you write a single paragraph. With it, every section of the draft that follows has a clear job before you start.
I built the outline shown in this guide in October 2026, inside the WordPress 7.1.3 block editor on a test site. The keyword came from our own Search Console data, and I counted the headings, words and images of the top three results by hand. The editor’s Outline panel also caught a heading mistake I made on purpose.
You get a template you can copy, the eight steps that fill it, and a real blog outline example. After that come outline shapes for how-to, list and comparison posts, plus the mistakes that break an outline before the draft starts.
What Is a Blog Post Outline?
A blog post outline is the skeleton of an article: the title, the intro notes, every H2 and H3, and bullets under each. It shows what each section answers, which facts and sources it needs, and where images go. Writers use it to plan the post before drafting full paragraphs.
Think of it as the table of contents plus notes. The headings set the order of the post. The bullets under them hold the raw material, such as a number, a source link or a screen to capture.
Here is what each part of an outline holds, in the order it appears on the page:
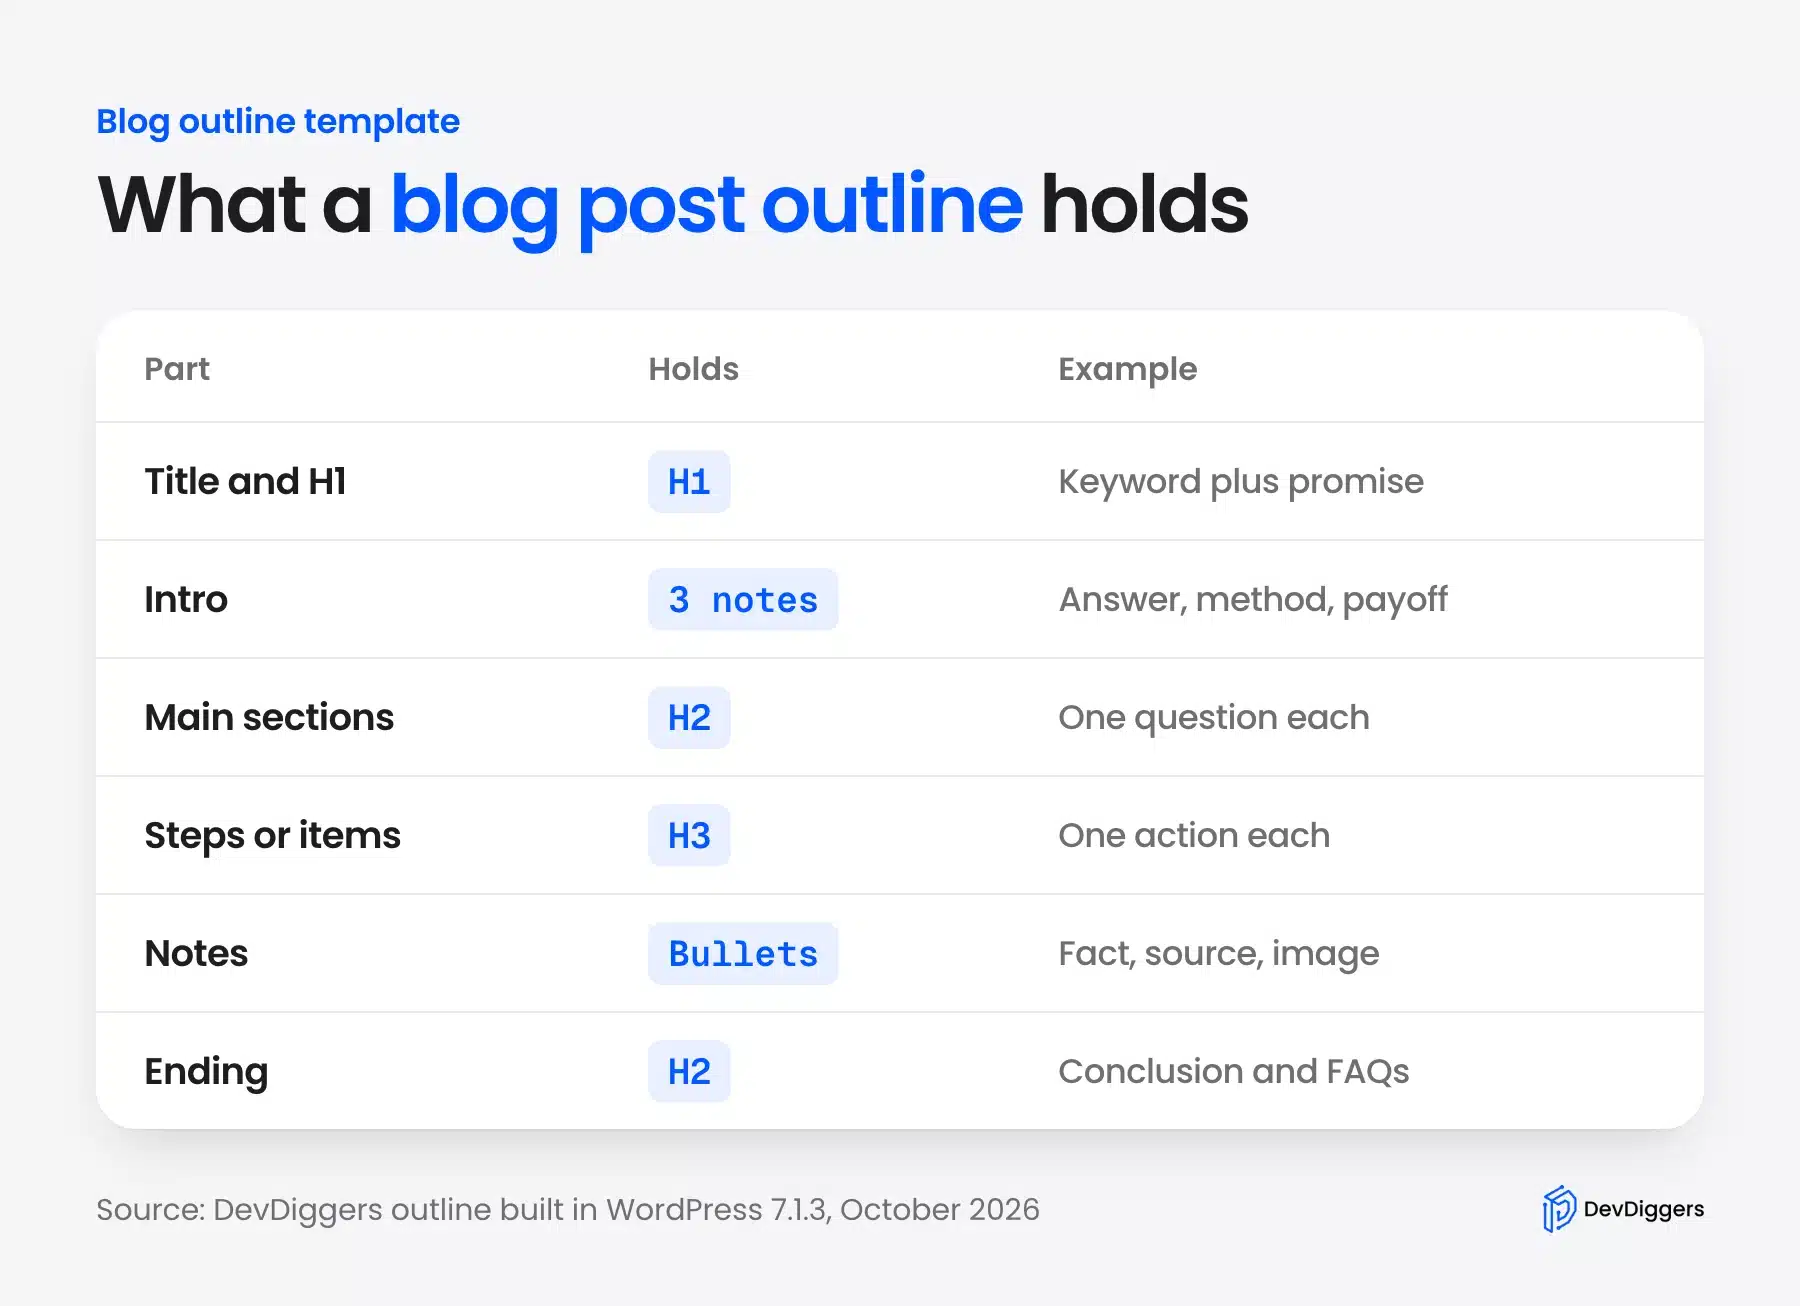
A good outline is short enough to read in two minutes. If someone else can read it and tell you what the post will argue, it has done its job.
Outlines matter most on long posts. A 3,000 word article holds 10 or more sections, and without a plan the same point tends to appear in two of them.
Long posts also benefit when you display reading time in WordPress. Readers know the length before they start.
An outline is not a draft with the sentences missing. It is a set of decisions you make once and do not repeat in the middle of a paragraph.
Google’s guide to creating helpful content asks whether a page provides a complete description of its topic. An outline is the cheapest place to answer that question, because a missing section costs one line to add there.
Blog Outline Template You Can Copy
The blog outline template below has nine slots, from keyword and reader to H1 and intro notes. Body H2s with H3s, notes, images, a conclusion and FAQs follow. Copy it into a document or the WordPress editor and replace every line in brackets.
Delete any slot the post does not need, such as the How to H2 on a definition post.
This is the same template I filled in for the example later in this guide:
Primary keyword: [one query, written the way people type it]
Reader: [who searches it and what they want to do next]

H1: [keyword + the promise of the post]

Intro
- Answer: [one sentence that answers the keyword]
- Method: [what you tested or checked, with the month and year]
- Payoff: [what the reader gets, naming the main sections]

H2: [first question the reader has]
- Answer block: [40 to 55 words that answer the heading]
- Fact: [number + source link]
- Image: [screen, result or diagram]

H2: How to [task]
  H3: [step 1]  Image: [screen]
  H3: [step 2]  Image: [screen]
  H3: [step 3]  Image: [screen]

H2: [comparison, example or mistakes]

H2: Conclusion
- [two takeaways + one soft call to action]

H2: Frequently Asked Questions (FAQs)
- Q1. [real question from search data]
- Q2. [real question from search data]
Keep the brackets until each one holds a real fact. A slot that is still empty when you start writing tells you exactly what research is missing.
Each slot exists for a reason. The keyword and reader lines come first because every later choice depends on them, from the H1 wording to the questions in the FAQs.
The three intro notes force you to know the answer before you write the opening. If you cannot fill the answer line in one sentence, the topic is still too broad for one post.
The answer block note under each H2 is the most useful line in the template. It is the paragraph a search snippet or an AI answer quotes. Plan its content before anything else in the section.
The FAQ slot works best when it is filled from data. Search Console queries phrased as questions, People Also Ask boxes and support emails are all better sources than guesses.
You can also save the template as a reusable block pattern in WordPress. Every new post then starts with the same slots. No writer skips the method note or the FAQs.
The image line keeps you honest about proof. A section with no screen, result or chart to show often means the claim in it has not been checked yet.
Blog Outline vs Content Brief
A blog outline lists the headings and notes of one post, while a content brief adds the research behind it. A brief holds the keyword data, search intent, competitor gaps, word target and links. The outline is the part of the brief a writer works from line by line.
On a small blog, the outline often is the whole brief. One person picks the keyword, studies the results and writes the post. The extra document adds little.
On a team, the two split. An editor writes the brief with the data, and the writer turns it into an outline before drafting, which catches gaps early.
The difference shows in what each document answers. The brief answers why this post exists and what it must cover, while the outline answers in what order and under which heading.
Either way, the outline is where structure gets decided. If a brief arrives without headings, building the outline is the first job, and the template above still fits.
Our own posts start from a brief that lists every Search Console query for the page. The outline then gives each of those queries a heading, a sentence or an FAQ. None is left out.
How to Write a Blog Post Outline
To write a blog post outline, pick one keyword and one reader. Then study the shape of the top three results. Write the H1, lay out H2s and H3s, and add notes under each heading. Plan images and links, add the ending and check the heading levels in the Outline panel.
Each step below fills one or two slots of the template above. The screenshots come from one real outline I built for the keyword “content decay identification”.
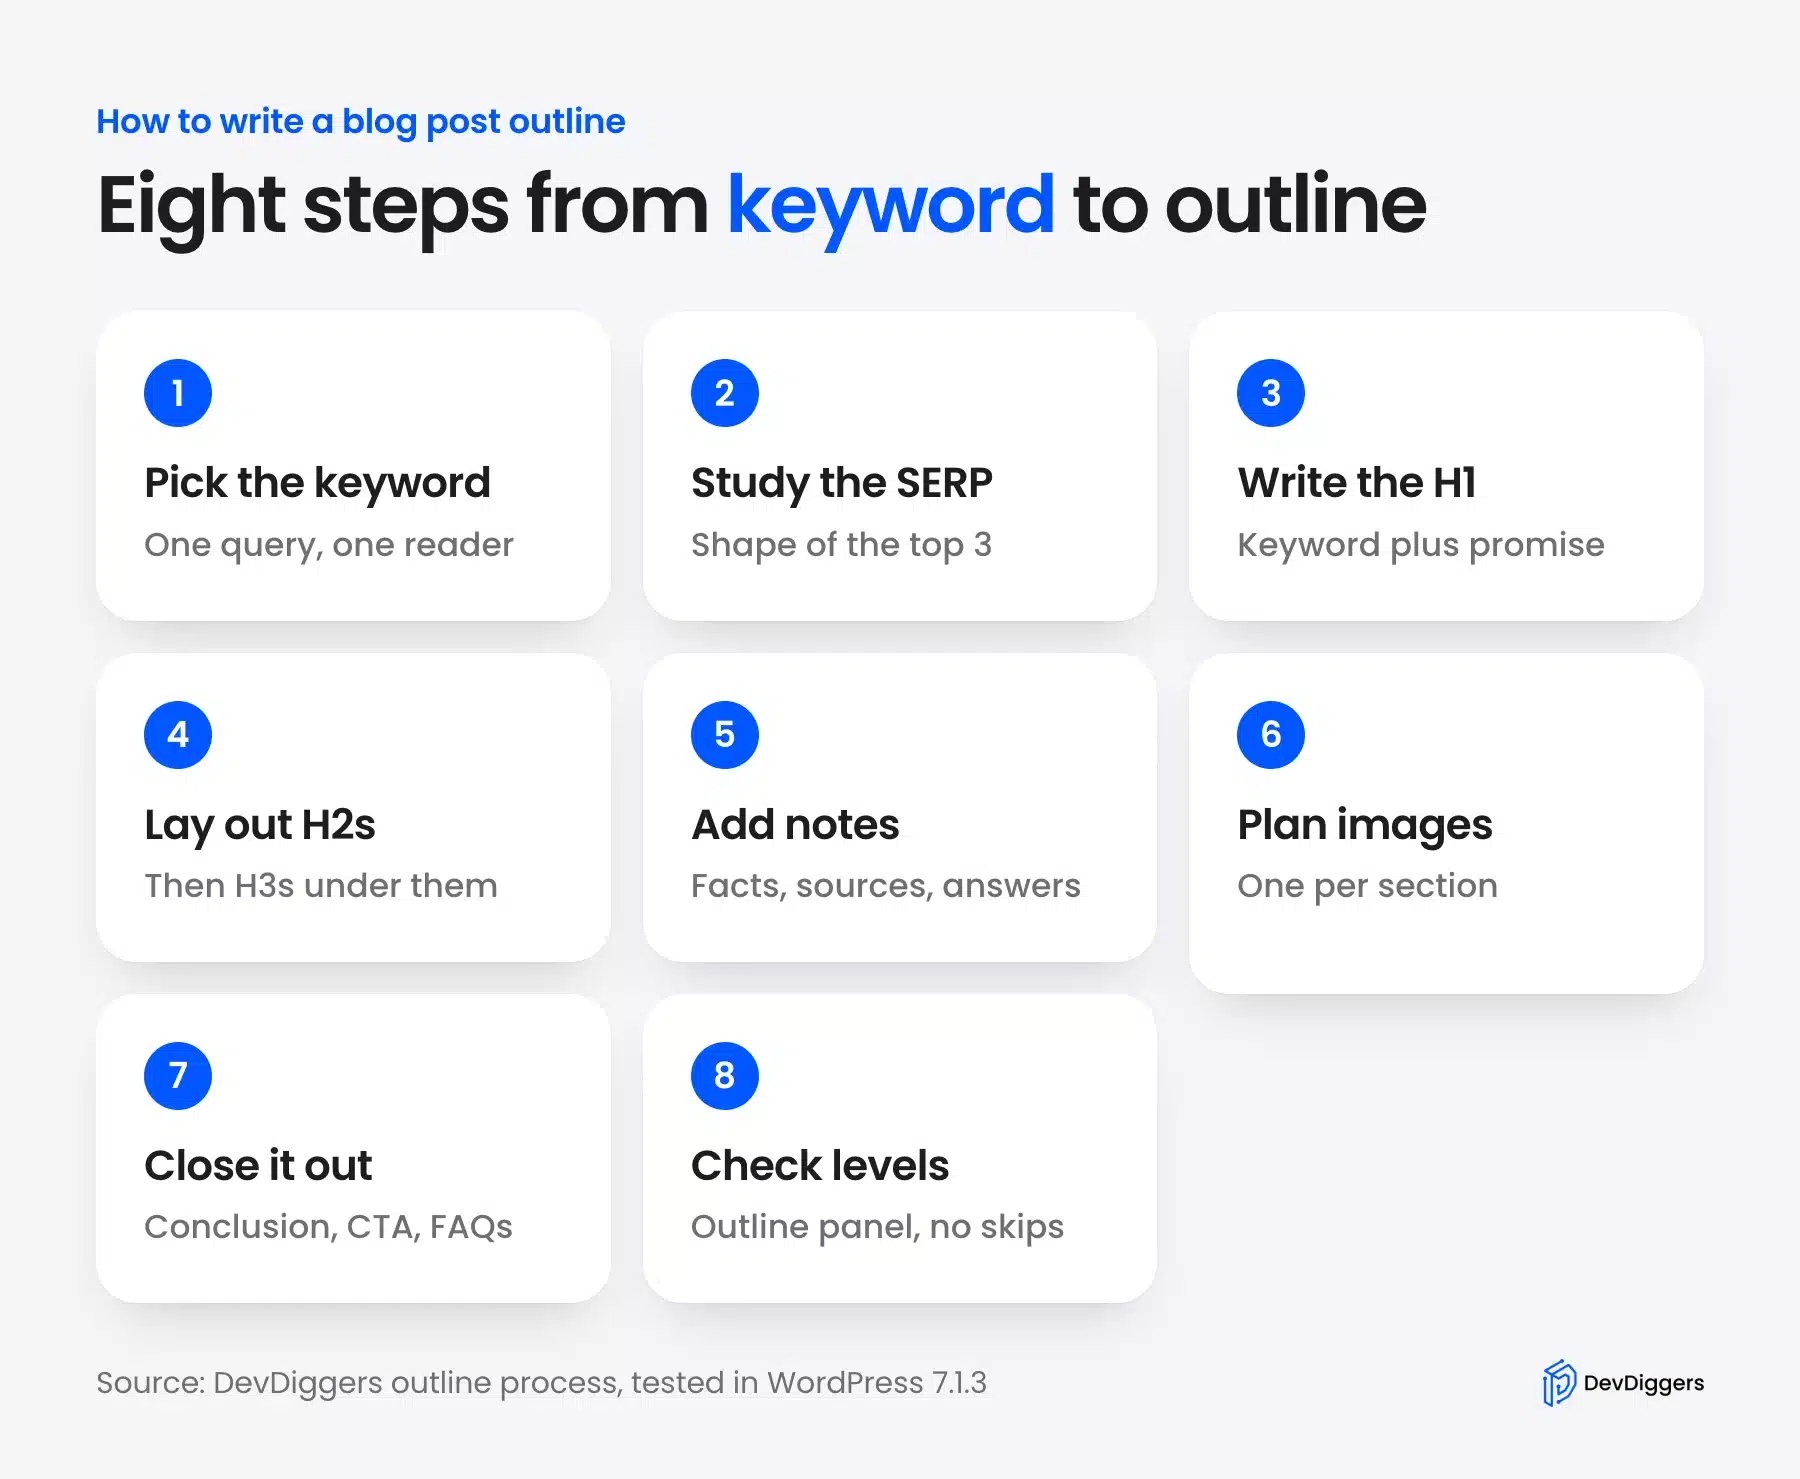
Step two takes the longest, because it means reading the top results with care. The rest is filling slots.
Step 1: Pick One Keyword and One Reader
Start with the query people already use to find the topic. The phrase you would like to rank for comes second. Search Console shows these queries for any page you already have, under Performance > Pages > Queries.
For this page, the data from May to September 2026 showed six queries worth covering. “Blog outline template” led with 49 impressions, and “blog outline example” had the best average position at 62.7:
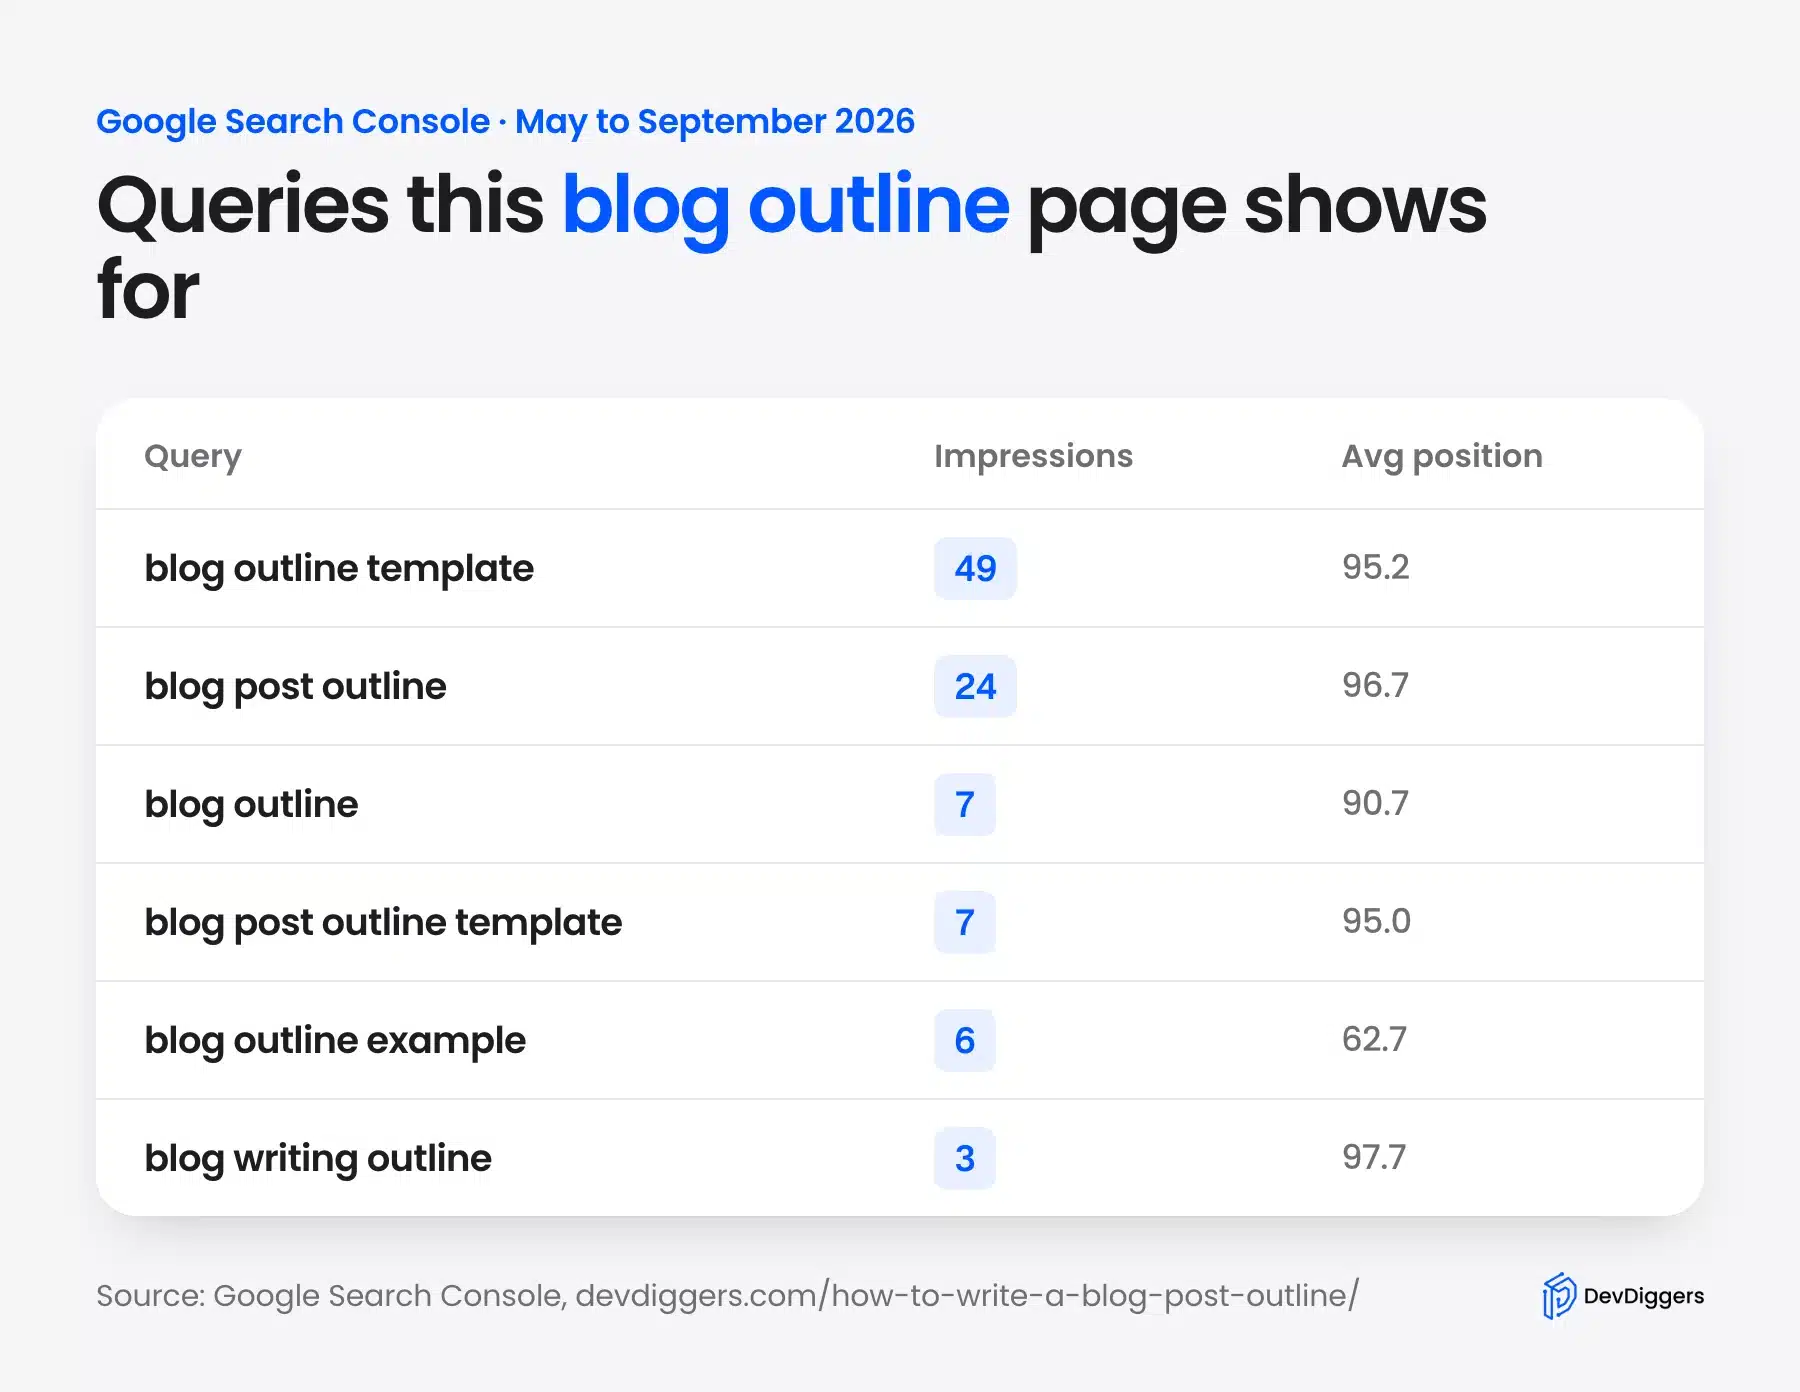
So the primary keyword became “blog outline template”, and the other five turned into headings or sentences. The Search Console Performance report help explains how impressions and position are counted.
A page with no data yet still has options. Type the topic into Google and read the autocomplete list and the related searches. Then pick the phrase that matches what you plan to write.
If you are unsure how many keywords to use for SEO, one primary phrase plus a few close variants is plenty.
Avoid picking two primary keywords for one post. If “blog outline template” and “how to write a blog outline” need different pages, the outline will try to serve both and do neither well.
Then write one line about the reader. “A blogger who wants a template to copy and the steps to fill it” is enough, because it decides what the intro must promise.
Step 2: Study the Top Results for Shape
Read the top three results for their structure. You are looking for shape. Leave their ideas alone.
Count their H2s, their steps and their images. Note any section all three share, because Google already treats that section as part of the topic.
I checked the three leading guides in October 2026 and counted each page’s text, headings and images. Siege Media ran 4,381 words across 15 H2s, Jasper 3,205 words across 18, and Writer 3,055 words across 10:
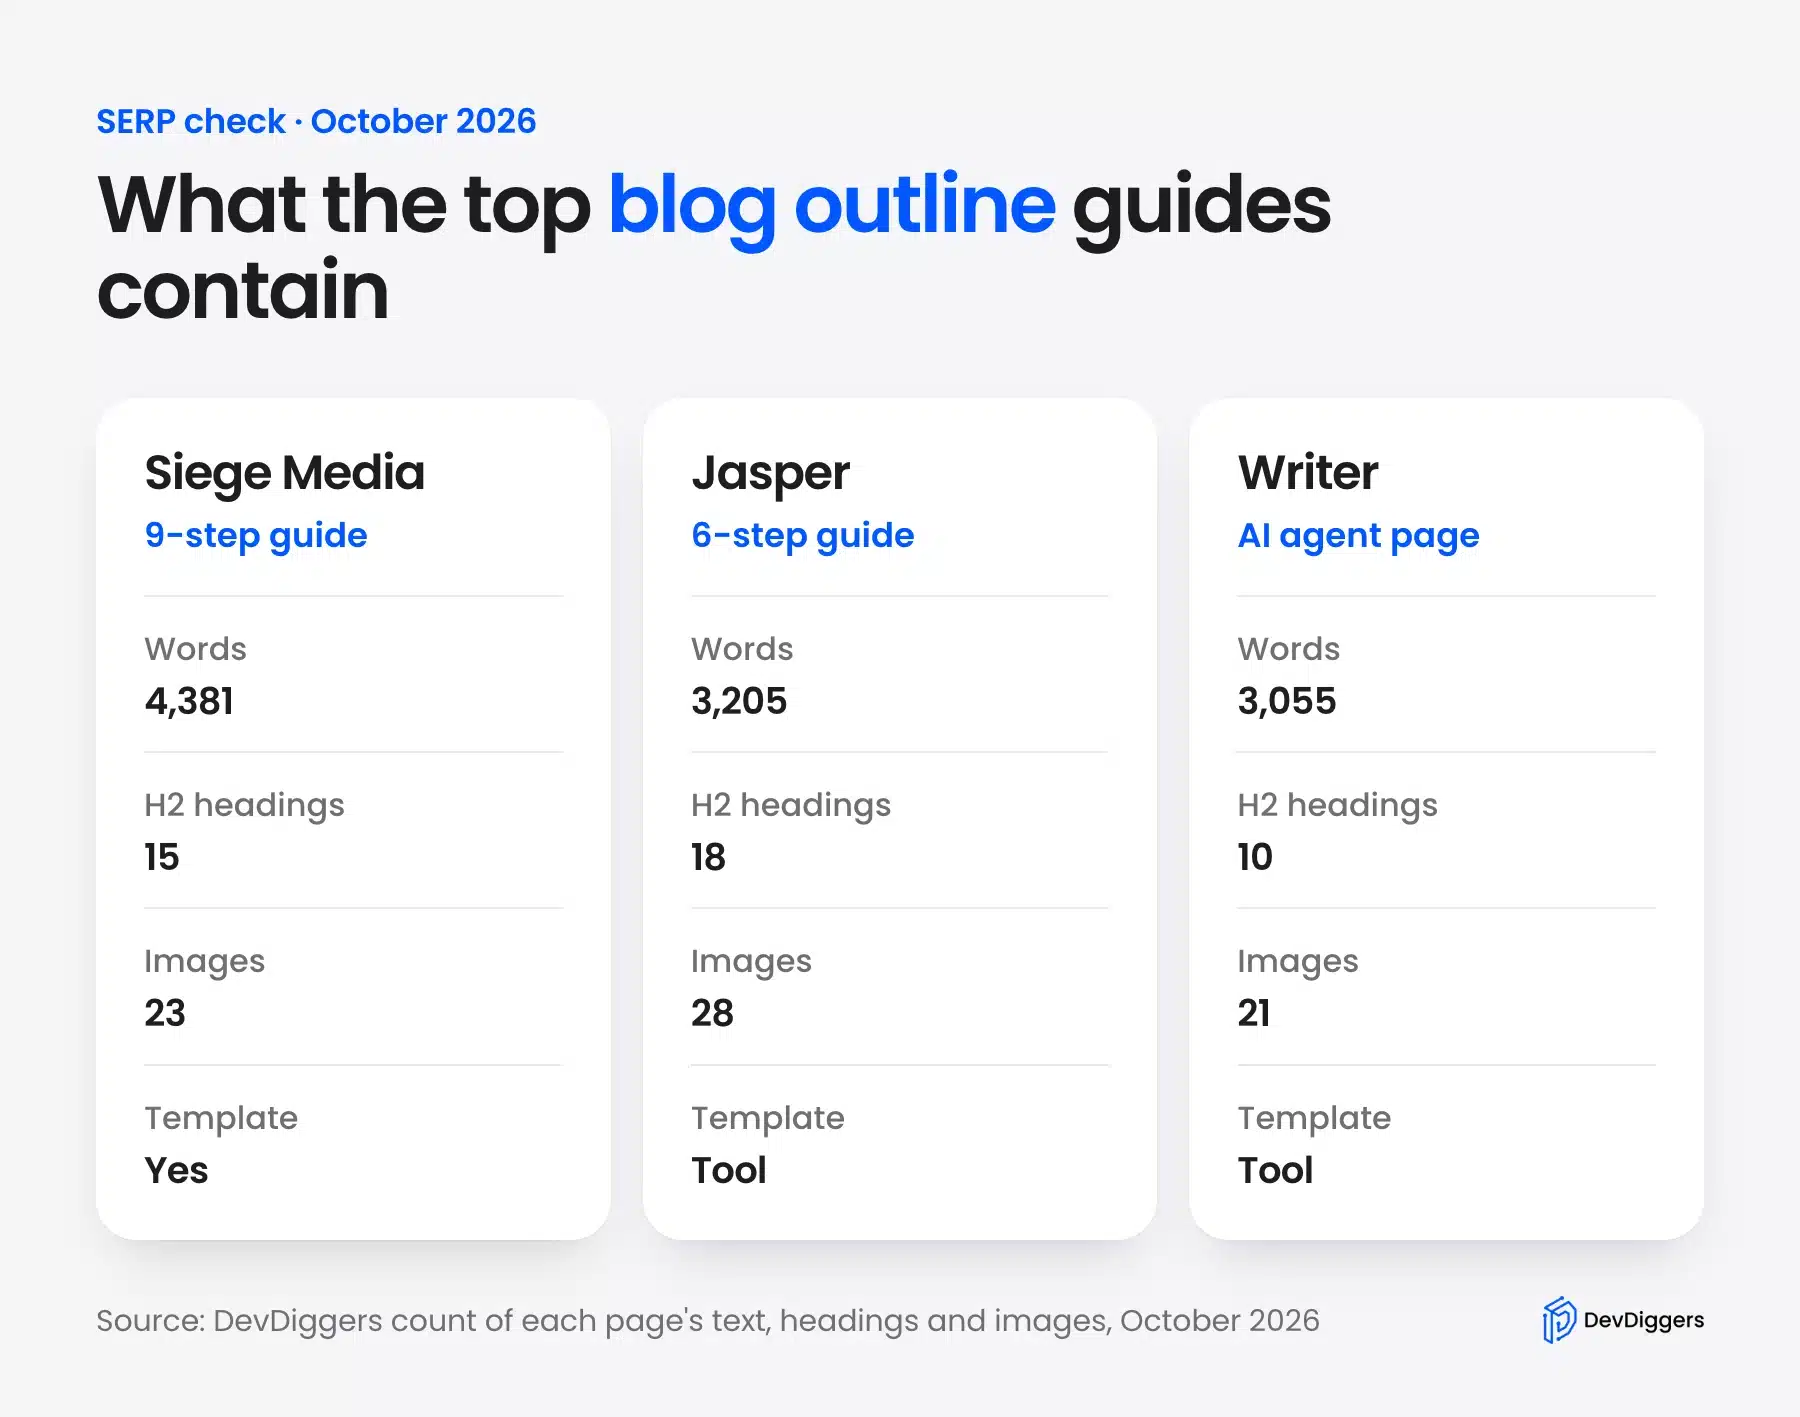
Two of them number their steps, nine and six, and all three include a template or a tool. That told me a numbered process and a copyable blog outline template were both required here.
Note what is missing as well. None of the three showed an outline being built in a real editor. That became this post’s angle.
Step 3: Write a Working Title and H1
Write the H1 next with the primary keyword near the front and the promise of the post after it. It is a working title that can change. It keeps every later heading on one subject.
In the WordPress editor, the H1 is the post title field at the top of the canvas. I typed the working title first and put the intro notes straight under it:
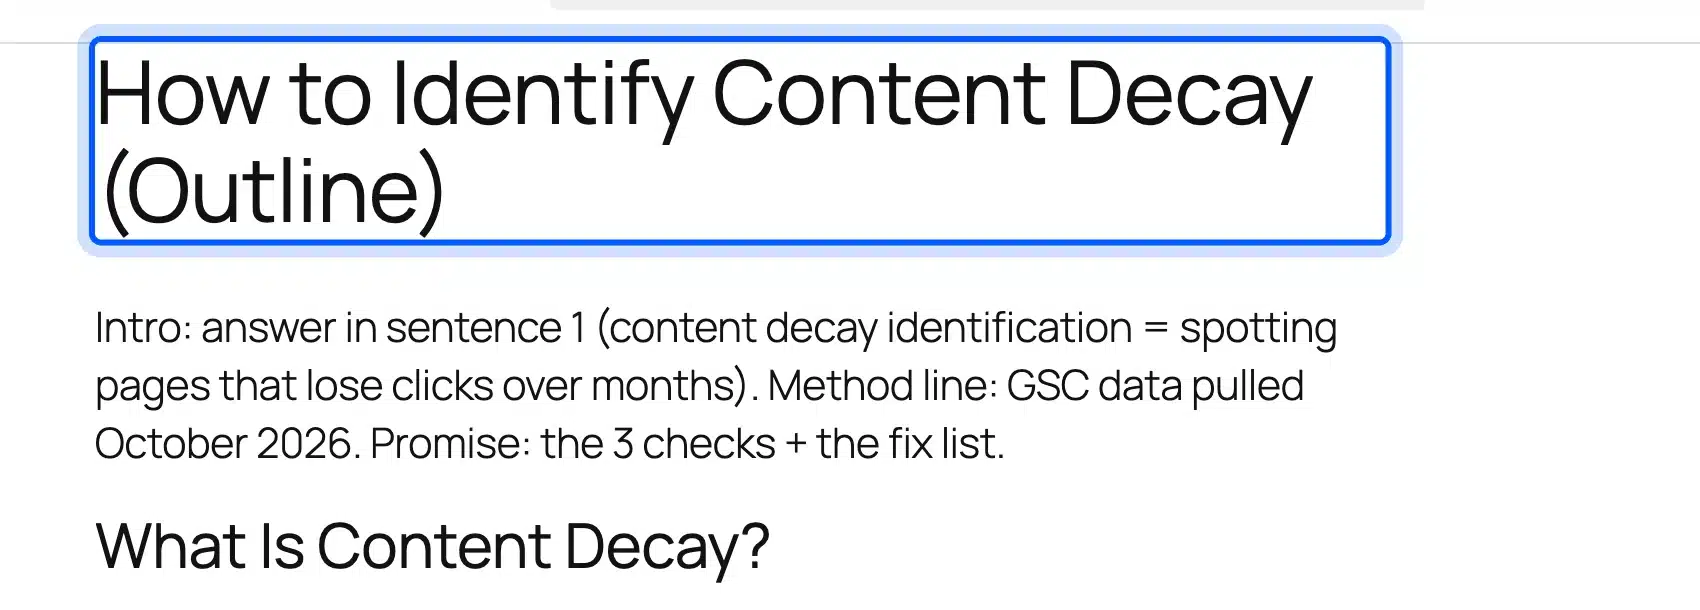
The intro notes follow the three-slot pattern from the template: answer, method and payoff. Each one is a single line. The intro can be written in five minutes later.
For the title tag, check the length in pixels, because Google cuts titles by width. Our on-page SEO checklist covers the title, the meta description and where the keyword goes.
Step 4: Lay Out H2s and H3s
Each H2 is one question the reader has, and each H3 is one part of the answer under it. Write all the H2s first, in reading order, and add H3s only where a section has steps, items or factors that need their own heading.
I typed the outline headings as Heading blocks. WordPress treated them as real H2s and H3s. The Outline tab in the Document Overview panel then showed the tree and a live count of 185 words:
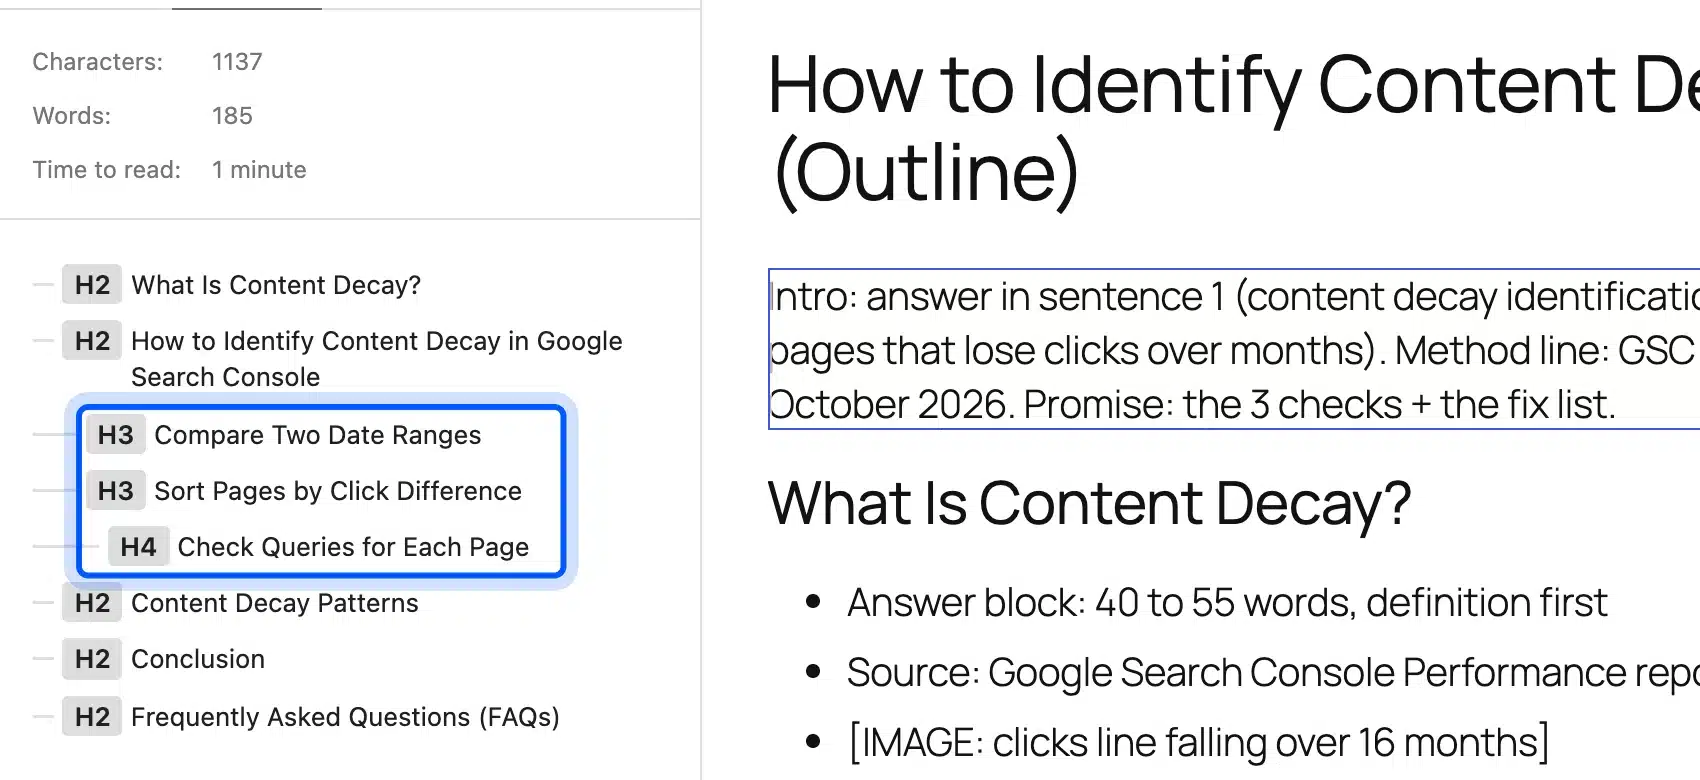
Open the panel from the icon with three lines at the top left of the editor. Then pick the Outline tab. The WordPress Heading block docs cover how levels are set.
Keep headings short and phrased the way people search. “Compare Two Date Ranges” beats “Leveraging Temporal Comparison”, and it reads better in the table of contents too.
Step 5: Add Answer Notes Under Each Heading
Under every H2, write the answer in one note. Then add the fact, source and image it needs. These bullets are the content of the section in compressed form. The draft becomes a job of expanding notes rather than inventing ideas.
Here is the first H2 of the example, with its two key notes boxed:
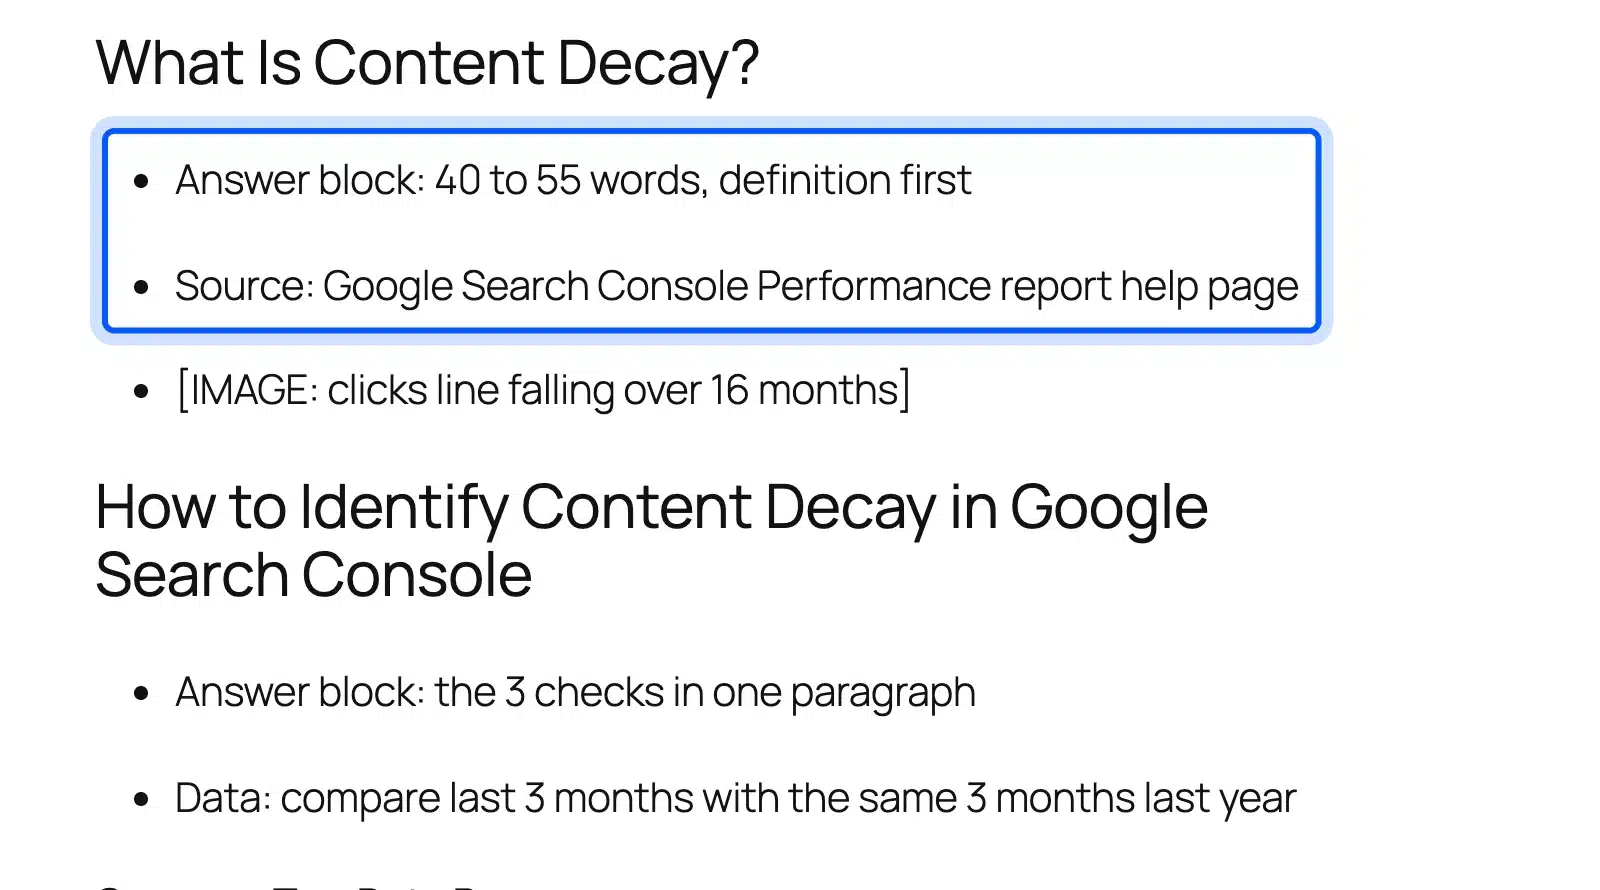
The first note always says what the answer block must do, such as “40 to 55 words, definition first”. That opening paragraph is what a featured snippet or an AI answer is most likely to quote.
The second note names the source before you write. If you cannot find one, the claim does not go in the post.
Step 6: Plan Images, Links and Data
Mark each image as a placeholder in the outline next to the heading it belongs to and name the exact screen or chart. Add the internal and external links the same way. Nothing is hunted for during the draft.
I wrote image placeholders in square brackets, one under each H3 step. The capture list was ready before the writing started:
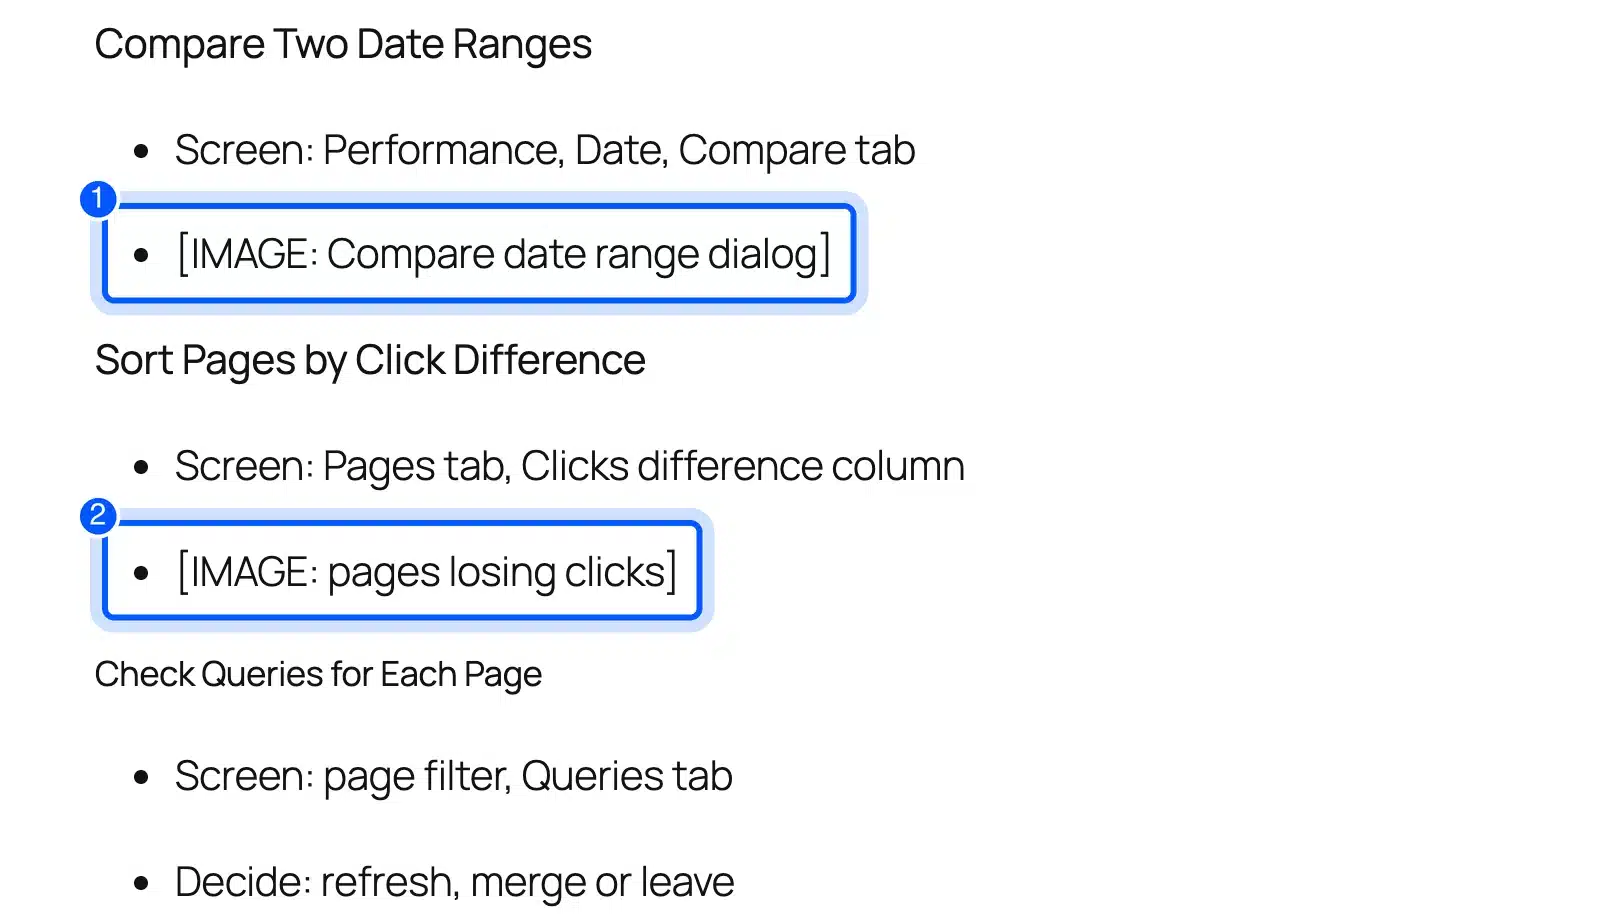
A how-to post needs a screenshot wherever the screen changes, and a concept post needs one image every 300 to 500 words. Plan the file names now, too, because naming images for SEO is easier before the files exist.
For data, write down where each number comes from and the date you pulled it. A note such as “GSC, May to September 2026” saves a second trip to the report while drafting.
Links follow one rule: link the source of a claim in the same paragraph as the claim. An outline that lists the source next to each fact makes that automatic.
Step 7: Add the Conclusion, CTA and FAQs
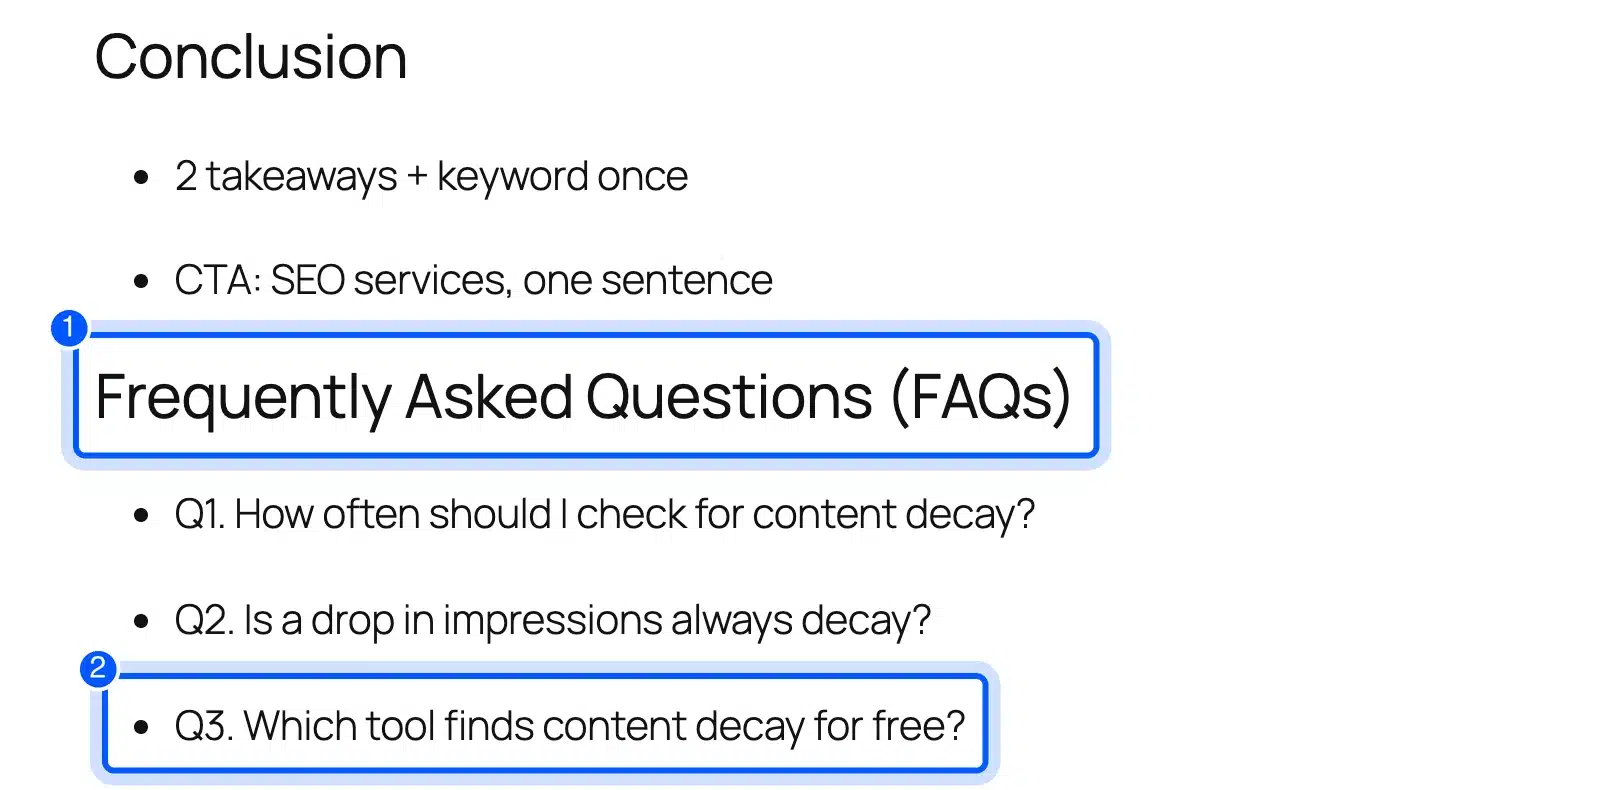
End the outline with two fixed sections: a conclusion and a Frequently Asked Questions block. The conclusion note holds two takeaways and one soft call to action, while the FAQ notes list real questions from search data.
In the example, the FAQ heading and its three questions went in last:
Take FAQ questions from Search Console queries, the People Also Ask box, or questions customers send you. Skip any question that already has its own H2 or H3 in the outline.
The call to action note should say which page it points to. One link in the body and one in the conclusion is the most a post needs.
Step 8: Check the Outline Before You Write
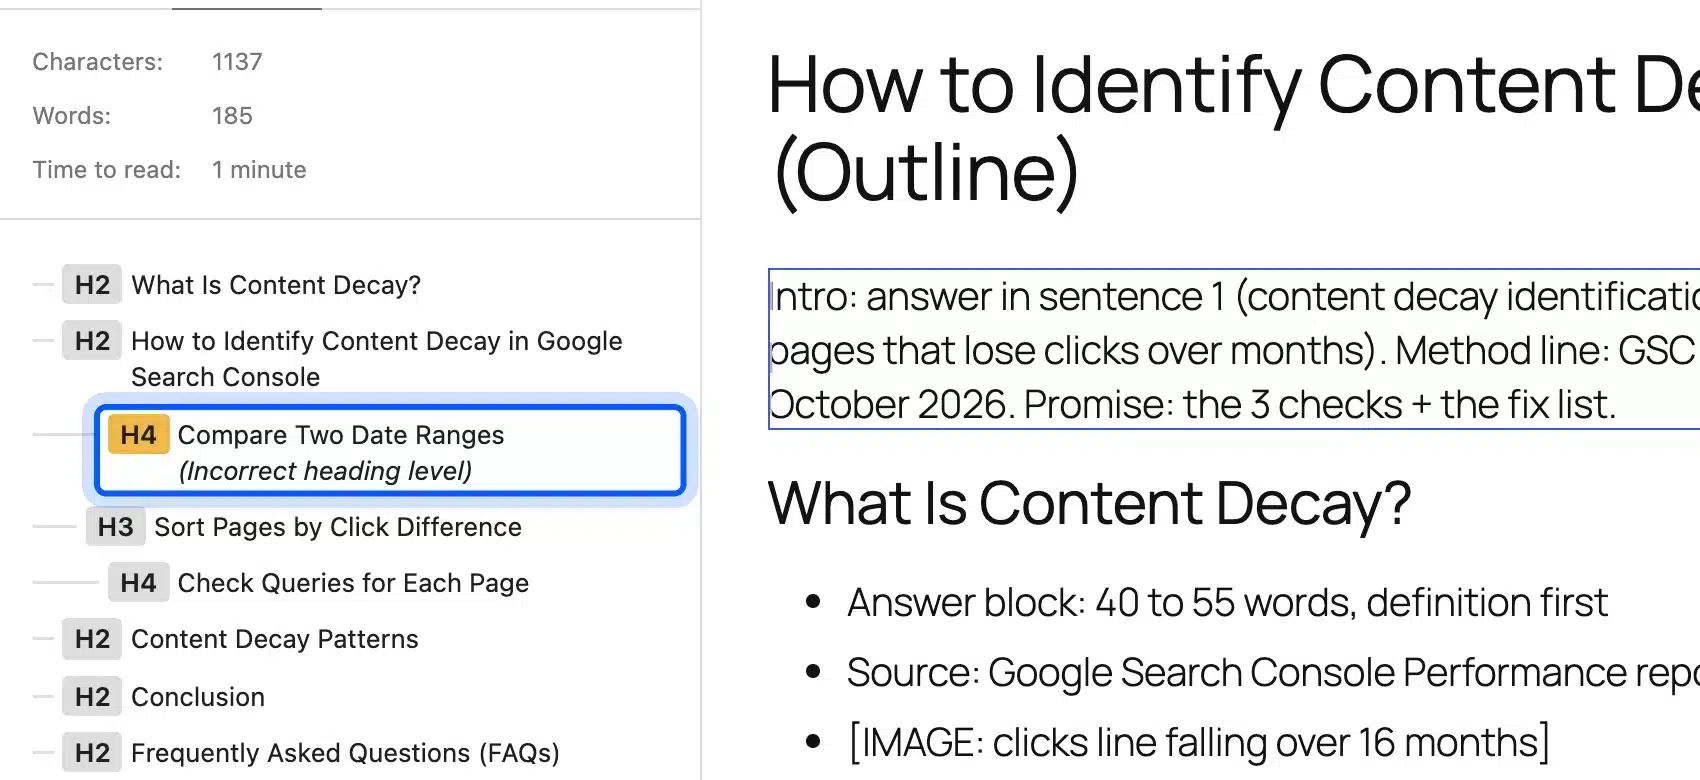
Check three things before drafting. Every slot is filled, no heading level is skipped, and each section has a source and an image noted. The WordPress Outline panel flags skipped levels for you, which takes seconds.
I tested it by changing one H3 into an H4 directly under an H2. WordPress 7.1.3 marked it in yellow with the label “Incorrect heading level”:
The W3C headings tutorial explains why skipped levels confuse screen reader users. They also make a table of contents look broken.
Next, match each FAQ note against the H2s and H3s. A question that already has its own heading should leave the FAQ list. The post never answers the same thing twice.
Then read the H2s alone, top to bottom. If they tell the story of the post without the notes, the outline is ready.
Blog Outline Example: A Real Outline Built in WordPress
This blog outline example plans a 2,600 word post on the keyword “content decay identification”. It holds an intro note, five H2s, three H3 steps with one H4, image placeholders and three FAQ questions, all in 185 words. Writing the full post from it is mostly expanding each note into paragraphs.
Here is the outline as the preview page shows it, before any sentence of the draft was written:
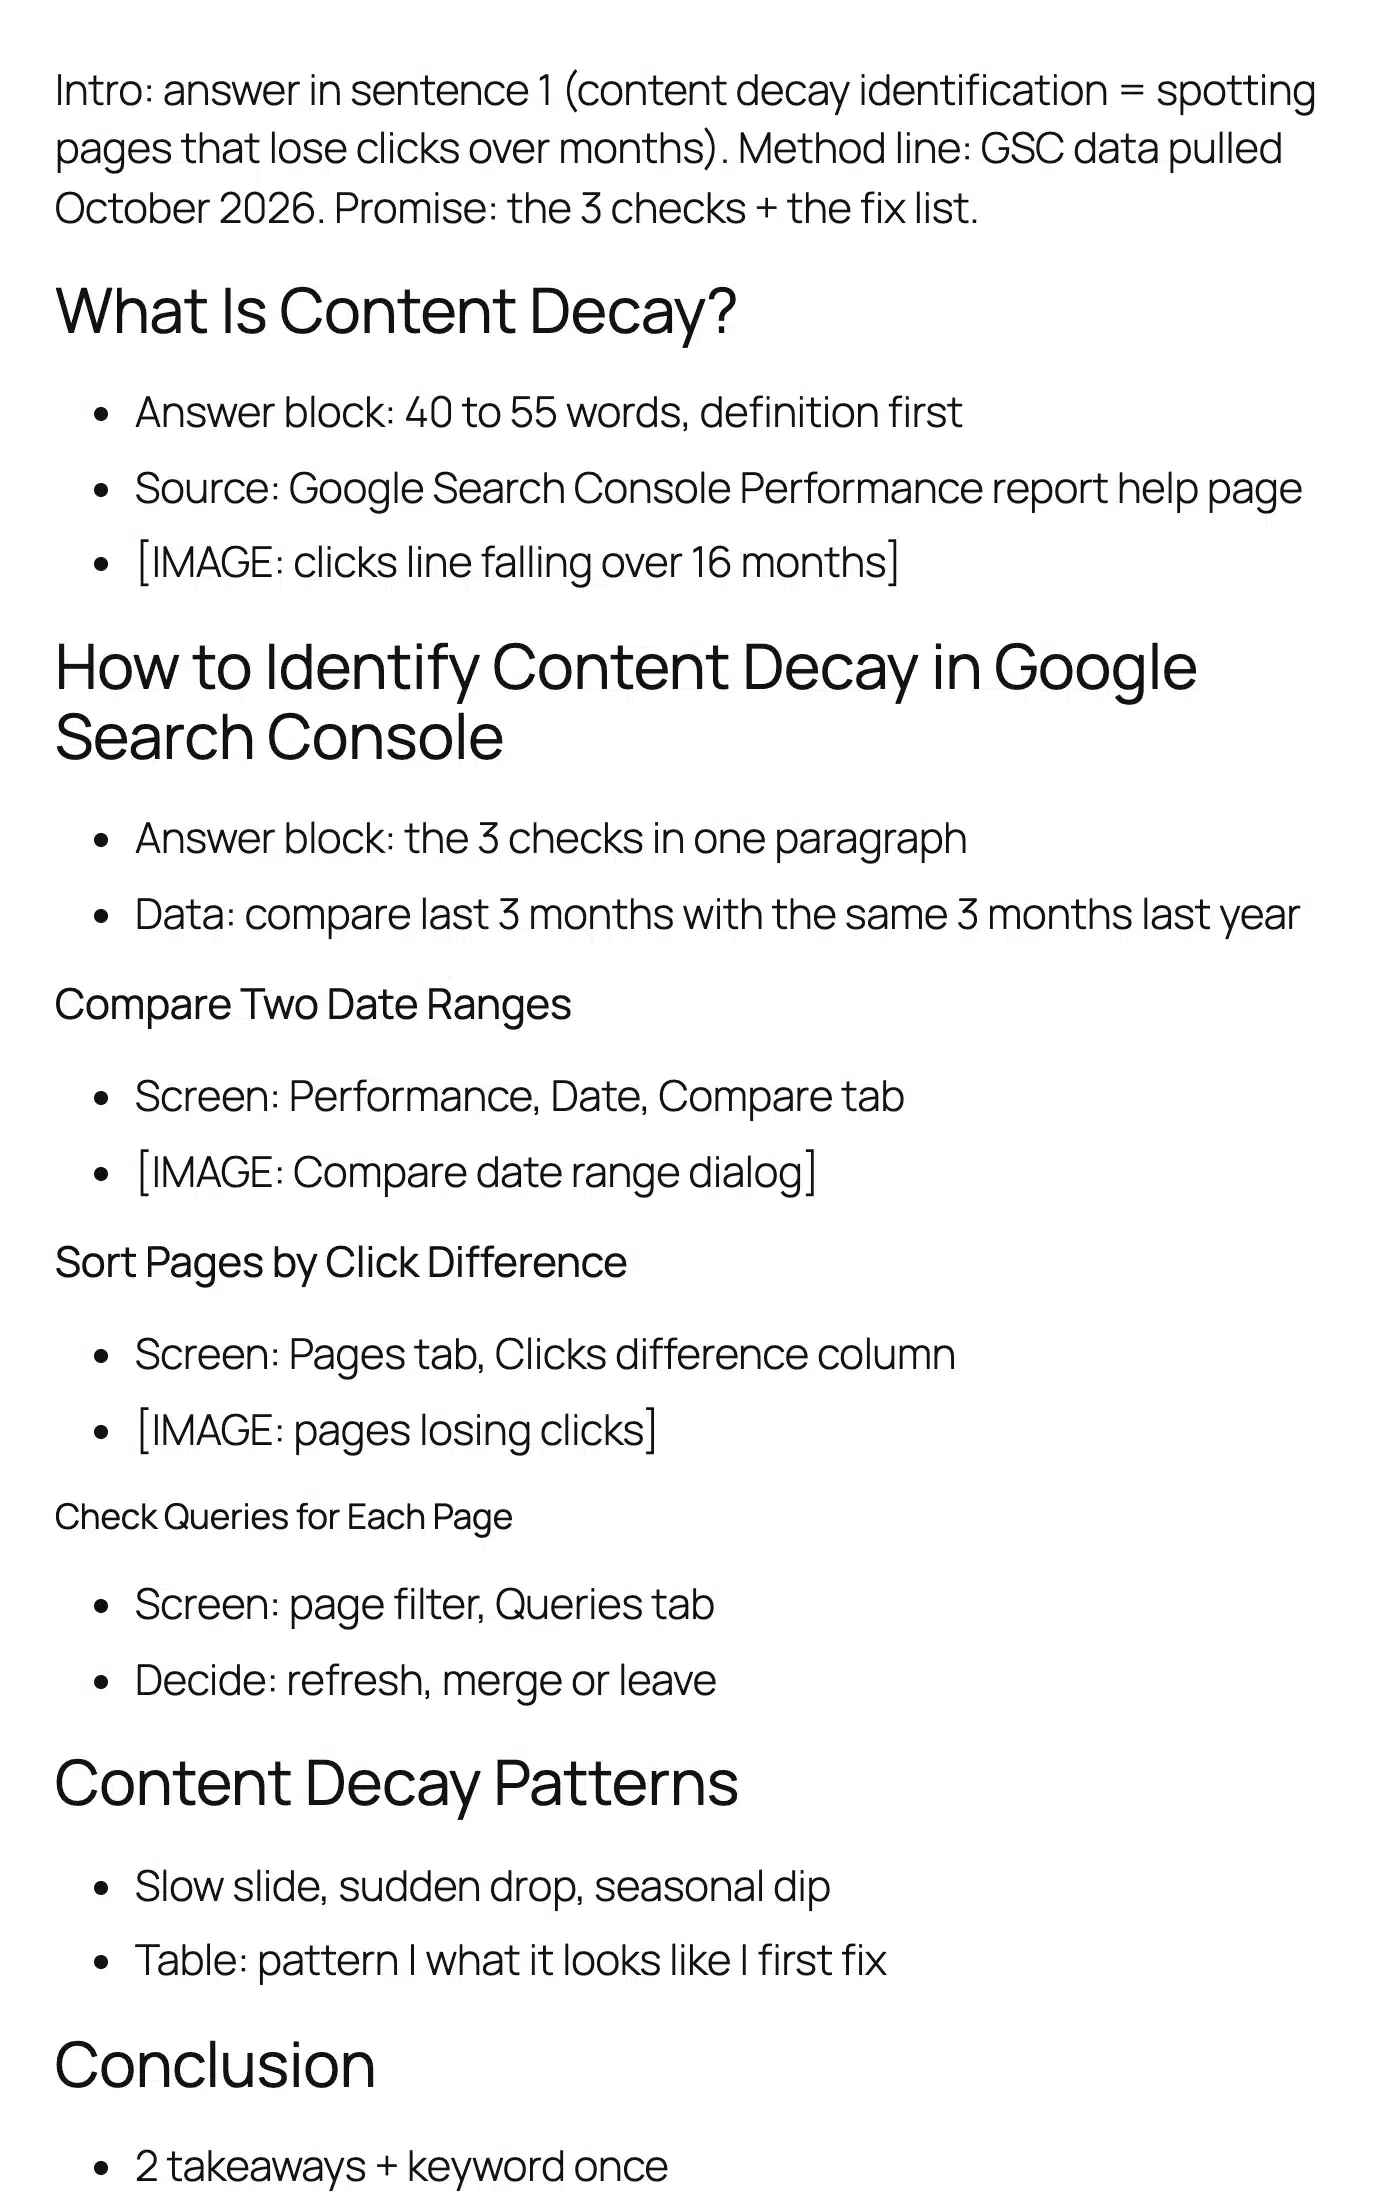
Notice what each line does. The intro note already states the answer, the method and the month. Writing the intro starts from three finished notes.
The H2 “How to Identify Content Decay in Google Search Console” holds the procedure, and the steps sit under it as H3s. That parent heading gets its own short answer listing the steps, which is the part a search snippet quotes.
The “Content Decay Patterns” section is a table plan and not prose. It names the three columns. The table can be built from data rather than written from memory.
The outline also shows what it leaves out. There is no history of SEO and no section on tools in general, because no query for that page asked for either.
Building it in the editor had one more benefit. When the draft started, the headings were already in place as blocks. I wrote straight under them instead of copying from a document.
Finally, the FAQ questions came from real queries for that page. One of them, “Is a drop in impressions always decay?”, answers a doubt the body leaves open.
Blog Post Outline Template by Post Type
A blog post outline template changes shape with the type of post. A how-to post needs one H3 per step, a list post one H3 per item, and a comparison one H3 per factor. The intro, the conclusion and the FAQs stay the same in all three.
Here are the three shapes side by side:
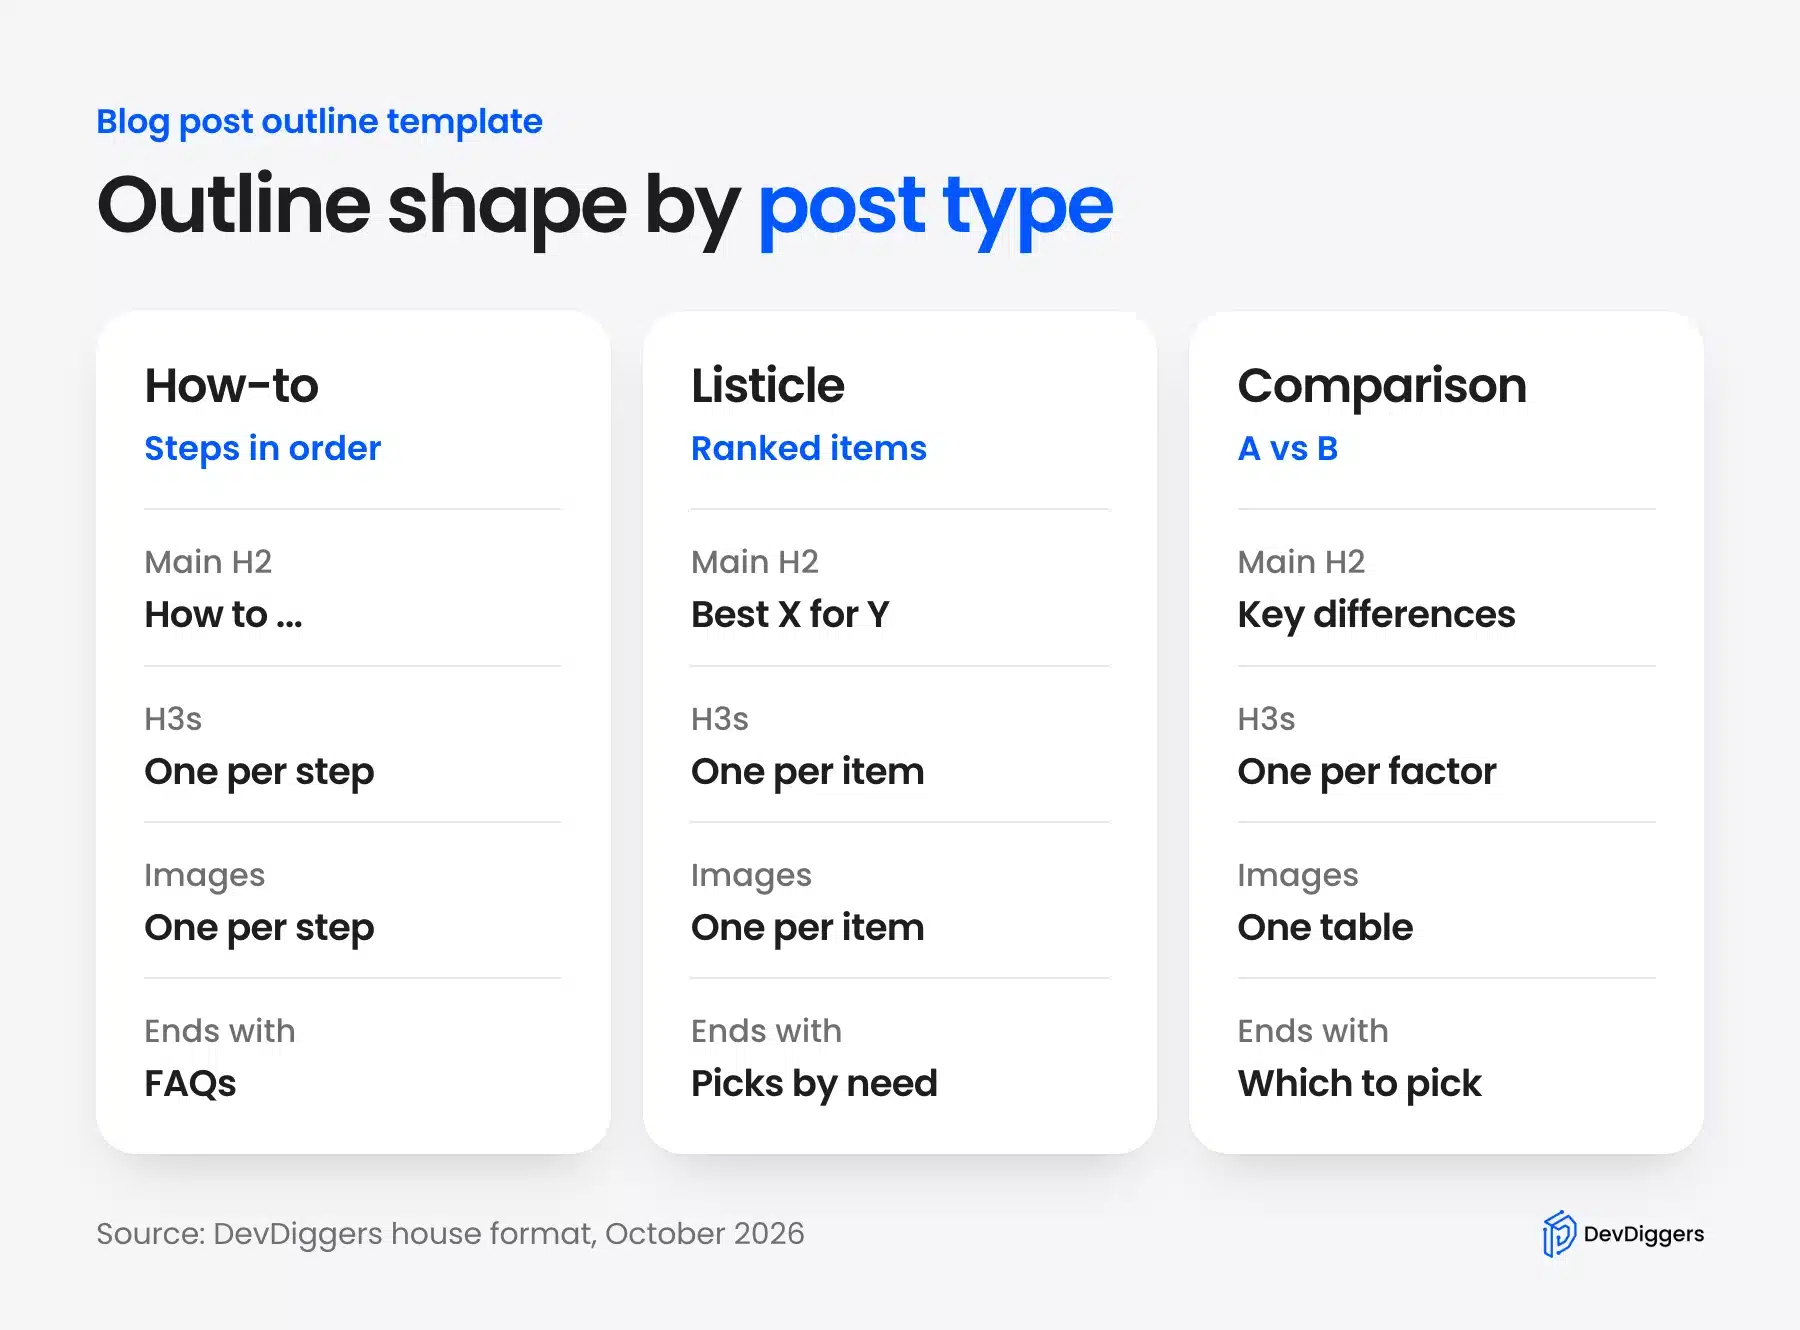
- Tutorial posts: The main H2 starts with “How to”, and its answer block lists the steps. Each step is an H3 with one screenshot showing the screen where the action happens.
- List posts: Each item is an H3 with the same three notes: what it is, what it costs, and who it suits. Keeping the same notes on every item makes the items easy to compare.
- Comparison posts: Open with the verdict and give each factor its own H3 such as price, speed or setup time. A single table near the top sums up the differences.
- Definition posts: Lead with a one paragraph definition and use H2s for causes, examples and how to spot the thing. These posts need fewer screenshots and more diagrams.
- Review posts: Use H2s for setup, features tested, price and verdict. Every claim needs a test result or a screenshot noted in the outline, or the review reads as a sales page.
Pick the shape by looking at the top results for your keyword. If all three rank list posts, a how-to outline will struggle, whatever its quality.
Blog Writing Outline Mistakes to Avoid
The most common blog writing outline mistakes are vague headings, skipped heading levels, empty notes and sections no one searches for. Each one costs more to fix in the draft than in the outline. A five minute review before writing catches nearly all of them.
These are the mistakes I see most often in outlines, including my own:
- Headings that hide the answer: “Getting Started” says nothing. “Compare Two Date Ranges in Search Console” tells the reader and the search engine what follows.
- Skipped levels: An H4 under an H2 breaks the tree. The WordPress Outline panel flags it. Check before you write.
- Notes without sources: A fact with no source in the outline turns into a vague claim in the draft. Find the source now or drop the fact.
- Sections nobody asked for: If no query, competitor or customer question points to a section, cut it. It adds words without adding answers.
- No image plan: Images added after writing rarely match the text. Name the screen in the outline, beside its heading.
- One heading per keyword variant: Five H2s for “blog outline”, “blog outlines” and “outline for a blog” read as stuffing. Close queries share one home.
- An ending with no job: A conclusion note that says “sum up” produces filler. Write the two takeaways into the note itself.
Most of these come from writing headings before the research. Doing steps one and two first prevents them.
If you would rather hand the planning and the on-page work to someone else, our SEO services for WordPress cover keyword research, outlines and page fixes. You still keep control of what gets published.
Conclusion
A blog outline template turns a blank page into a list of small, clear tasks. Fill its slots in order, from keyword to FAQs, and the draft that follows has a reason for every section.
Two habits matter most. Study the shape of the top three results before you write a single heading, and note a source and an image under every heading.
Then let the WordPress Outline panel check your heading levels before you start drafting. If you want more posts that rank and get quoted, our guide to AI search visibility covers what happens after you publish.
Frequently Asked Questions (FAQs)
Q1. How long should a blog post outline be?
Long enough to hold every heading and its notes, and no longer. The example in this guide was 185 words for a planned 2,600 word article, about a fourteenth of the draft. Once notes turn into full sentences, you are drafting inside the outline.
Q2. Is a blog outline template the same for every post?
The fixed parts stay the same: H1, three intro notes, conclusion and FAQs. The body changes with the post type, with steps for a how-to, items for a list and factors for a comparison.
Q3. Should I write the outline in Google Docs or in WordPress?
Either works, but WordPress has one advantage. Heading blocks become real H2s and H3s, and the Outline panel flags skipped levels. The structure is checked before you write.
Q4. Can AI write a blog post outline for me?
AI tools can draft a list of headings in seconds, but they cannot see your Search Console data or test anything. Use them for a first list and then check every heading against real queries and the top results.
Q5. How many H2 headings should a blog post have?
There is no fixed number. Use the top results as a guide. The three leading outline guides used 10 to 18 H2s each, while a short how-to may need only five or six.
Q6. What should go in the notes under each heading?
Write the answer to the heading in one line and then add the fact or number it needs with its source. Add the image you plan to show. The draft never stops for research.
Q7. Do I need keywords in every heading of the outline?
No, only one H2 needs the primary keyword. The rest should read as plain questions or steps, and related search terms can sit in a few of them where they fit naturally.