A Magento to WooCommerce migration takes one to three days of data transfer for a small store using an automated tool. Larger catalogs and custom extensions stretch that to weeks. The step most guides skip is the pre-migration audit, and skipping it leaves broken redirects and missing images to fix after launch.
We checked every version, date and security claim in this guide against Adobe and WooCommerce documentation in October 2026. WooCommerce is at version 11.2.1 as of October 2026. The real traps sit in customer passwords, extension replacement and SEO.
This guide walks through the pre-migration prep, the eight migration steps and the customer password problem. It ends with SEO protection and a pre-launch checklist to run before you switch DNS.
Why Stores Are Leaving Magento for WooCommerce
The cost argument has become hard to ignore. Magento Open Source is free to download, but running it isn’t. Dedicated hosting, ongoing developer support and the work of keeping a Magento environment secure add up fast.
WooCommerce has no platform license fee. You pay for hosting, a theme and whatever plugins your store needs. For small to medium stores that don’t need Magento’s enterprise catalog logic or B2B pricing engine, that’s a big change.
The security picture matters too. In September 2025 Adobe rated security bulletin APSB25-88 as critical. It fixed CVE-2025-54236, a REST API flaw that let attackers take over customer accounts on Adobe Commerce and Magento Open Source.
WooCommerce is not immune to security issues, but its updates install from the WordPress dashboard. That makes patching easier for store owners who are not developers. Our WooCommerce security checklist covers the core setup once you’re live.
There’s also the content angle. WooCommerce runs on WordPress. That means blog posts, landing pages, and product content all live in one system. For stores doing any kind of content marketing, that’s a genuine advantage over managing a separate CMS alongside a Magento install.
Magento 1 vs. Magento 2: What Changes for Your Migration
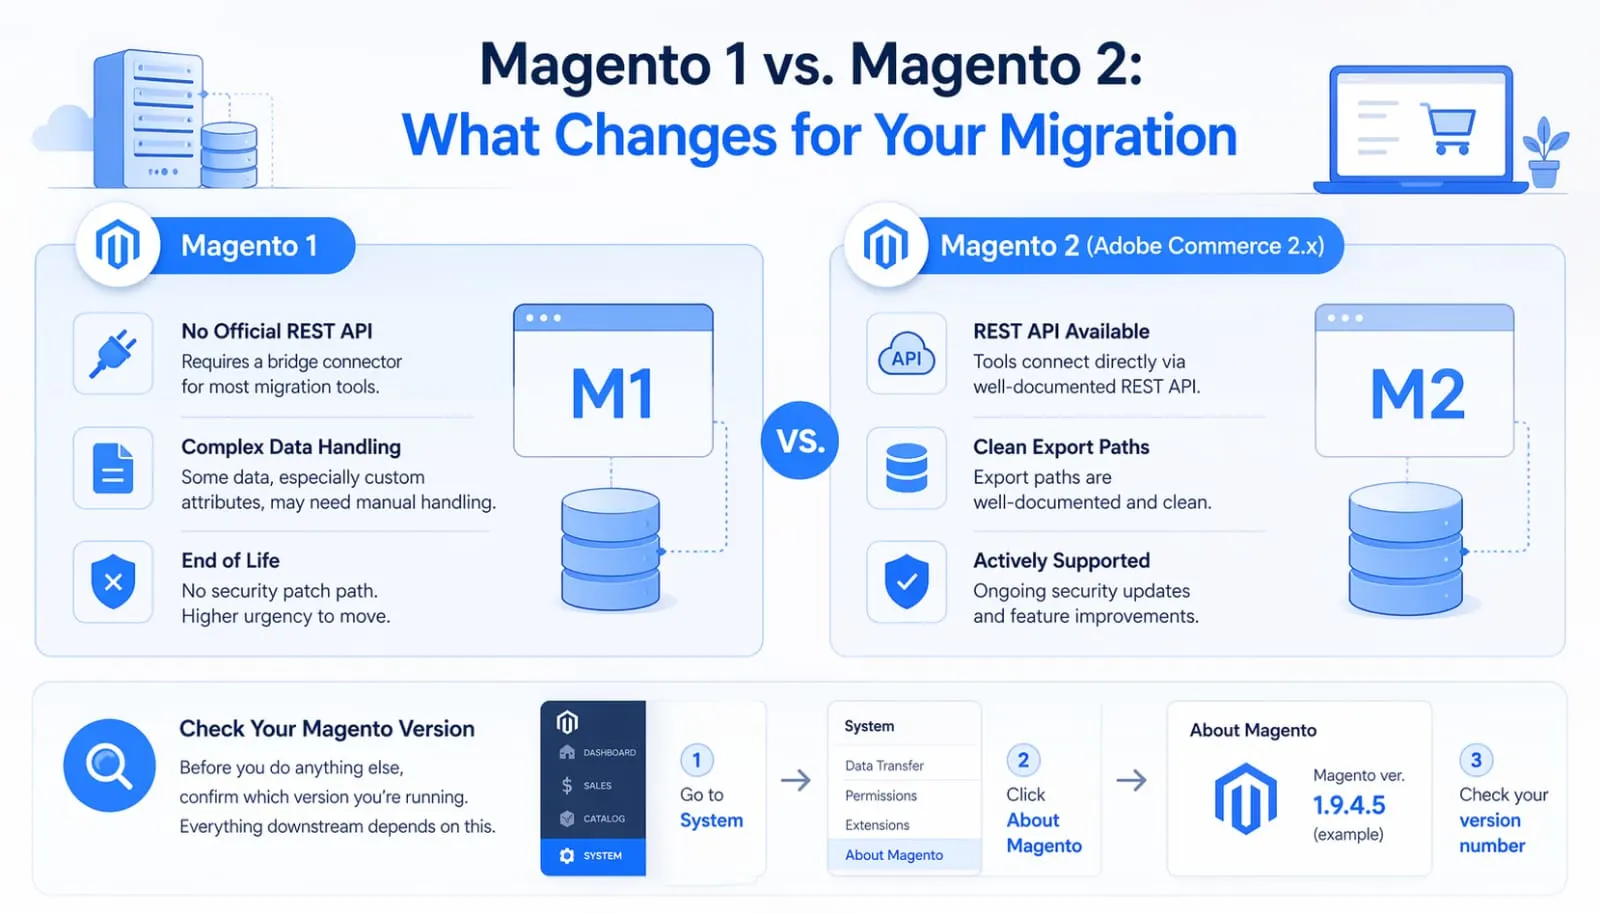
Your Magento version decides which migration tools work and how much manual work is left over.
If you’re on Magento 2 (Adobe Commerce 2.x), you have access to a REST API, and most automated migration tools connect to it directly. The export paths are well-documented, and the process is mostly clean.
If you’re on Magento 1 (which reached end of life in June 2020), things are different. Magento 1 has no official REST API in the same form. Most migration tools require you to install a bridge connector on the Magento 1 side, and some data (especially complex custom attributes) may need manual handling. You also have no security patch path on M1. The urgency to move is higher.
Before you do anything else, confirm which version you’re running. In your Magento admin panel, go to System > About Magento to check your version number. Everything downstream depends on this.
When Magento 2.4 Versions Lose Support
Adobe gives each Magento 2.4 release about three years of standard support. Version 2.4.6 lost that support on August 11, 2026, and 2.4.5 lost it in August 2025. Stores on 2.4.7 have until May 31, 2027, which leaves time to plan a calm move.
These dates come from Adobe’s lifecycle policy for Adobe Commerce. We checked them in October 2026:
- Magento 2.4.8: Released April 8, 2025. Standard support ends May 31, 2028.
- Magento 2.4.7: Released April 9, 2024. Standard support ends May 31, 2027.
- Magento 2.4.6: Released March 14, 2023. Standard support ended August 11, 2026.
- Magento 2.4.5: Released August 9, 2022. Standard support ended August 12, 2025.
- Magento 2.4.4: Released April 12, 2022. Standard support ended April 12, 2025.
Adobe also lists 2.4.9, released May 12, 2026, with support until May 31, 2029. A store on any older line has to upgrade Magento or leave it, and either job takes developer time.
Before You Start: Pre-Migration Checklist
A migration that goes wrong usually fails here and not in the data transfer. The preparation phase determines whether you end up with a clean store on launch day or spend a week fixing orphaned categories and broken image paths.
If you move the store again later, learn how to export WooCommerce products with images and variations.
Work through each item before touching any migration tool:
- Back up your entire Magento store: Adobe deprecated the built-in Magento 2 backup tool and ships it switched off, as its backup tutorial notes. Take a full backup of the database, the code and the pub/media folder through your host or over SSH. For Magento 1, use System > Tools > Backups or export directly via SSH. This backup is your restore point.
- Export your current URL structure for redirect mapping: Run a Screaming Frog crawl of your live Magento store or pull your Magento sitemap and export every product, category, and CMS page URL into a spreadsheet. You’ll use this to build your 301 redirect map later. Do this before you change anything.
- Audit your Magento extensions: List every active extension and what it does. Many Magento stores carry 20 to 40+ extensions, and not all have direct WooCommerce plugin equivalents. Some will need custom development. Knowing this upfront prevents nasty surprises mid-migration. If an extension handles something critical: custom pricing rules, B2B customer groups, complex shipping logic, budget time to find or build its replacement before you start.
- Choose your hosting environment: WooCommerce needs WordPress hosting. Managed WordPress hosts like Kinsta, WP Engine, or Cloudways handle the server configuration for you. For stores moving a large catalog (10,000+ SKUs), make sure your host can handle the import load; some shared hosts time out on bulk data transfers.
- Set a realistic timeline: Small stores under 500 products: one to three days using an automated tool. Medium stores with 500 to 10,000 SKUs and ERP connections: two to four weeks. Stores with heavy custom extensions or B2B workflows: two to three months minimum.
Set Up Your Staging Environment First
Never migrate directly to a live production site. Always build and test on a staging domain before switching DNS.
Most managed WordPress hosts provide a one-click staging environment. If yours doesn’t, install WordPress on a subdomain (e.g., staging.yourstore.com) and complete the full migration there. Test everything on staging, including products, checkout, redirects, payment gateways, and mobile display, before your domain ever points to the new store.
This one step prevents customer-facing downtime. It also gives you a safe place to discover the issues that always come up, and they will come up.
How to Migrate from Magento to WooCommerce: 8 Steps
A Magento to WooCommerce migration follows eight steps, from a fresh backup to a final test on staging. The method you pick in Step 3 decides most of the effort. Automated tools suit most stores, while CSV imports and agencies cover the very small and the very complex.
Step 1: Back Up Your Magento Store
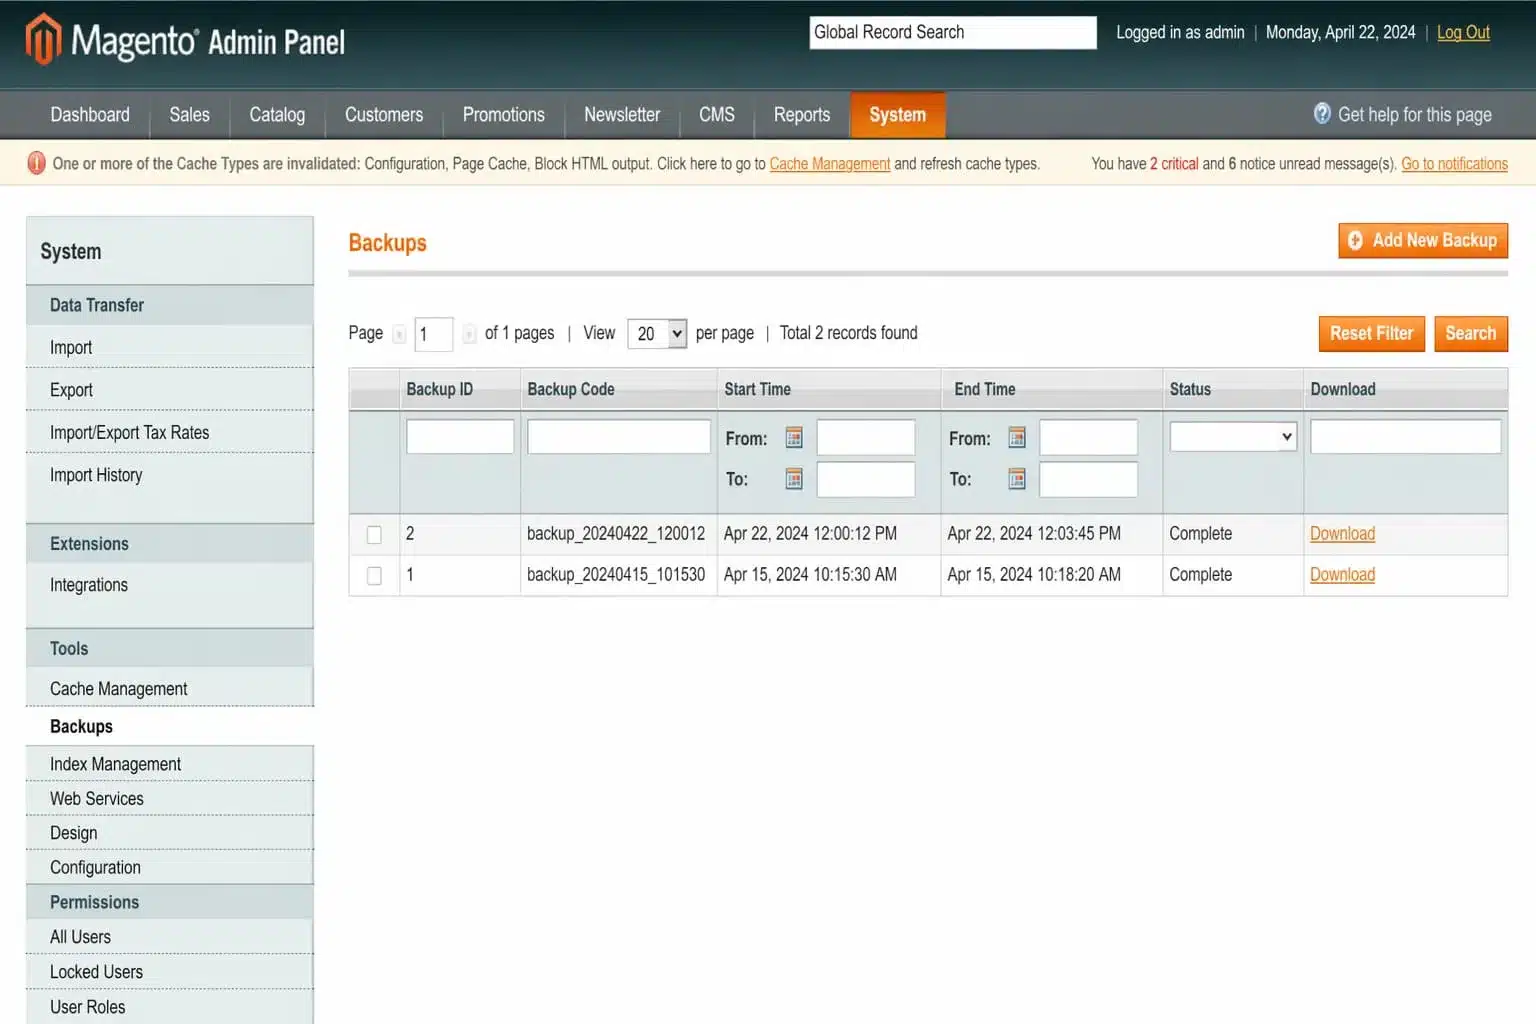
Already covered in the pre-migration checklist above, but worth repeating as its own step. Take a fresh backup on the day you start the migration and not a week earlier. Data changes daily in a live store as orders come in, inventory moves, and customers register.
Step 2: Set Up WordPress and Install WooCommerce
If you haven’t already, install WordPress on your staging host. Most hosts offer one-click WordPress installation from the control panel. Once WordPress is live:
- Go to Plugins > Add Plugin in the WordPress admin

- Search for “WooCommerce”

- Click Install Now and then Activate
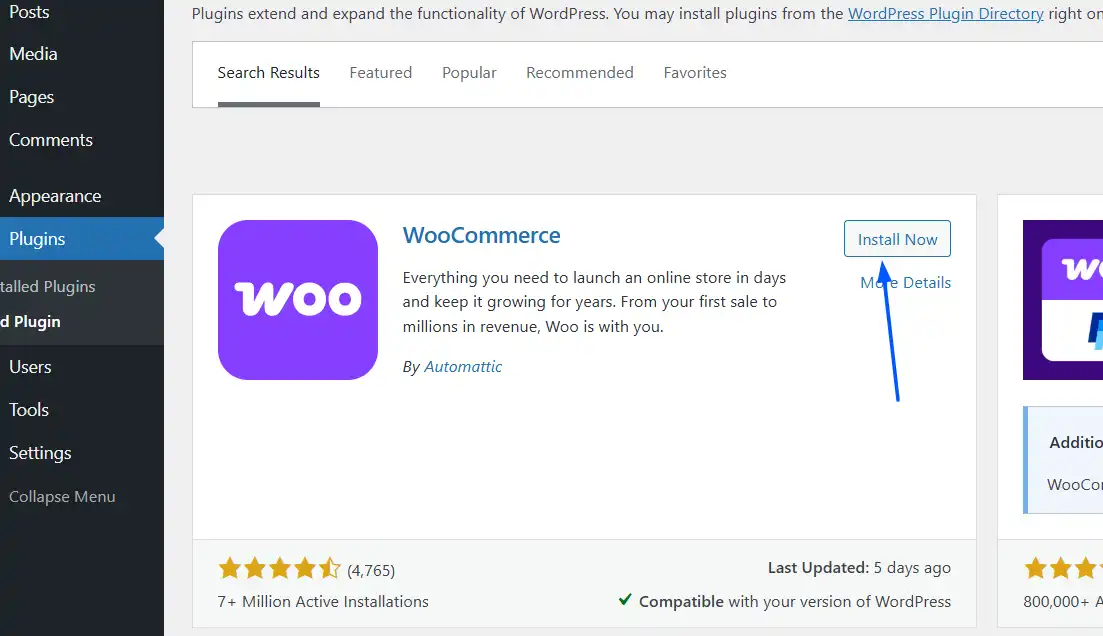
- Follow the WooCommerce setup wizard. It walks you through currency, shipping zones, tax settings and payment gateway basics
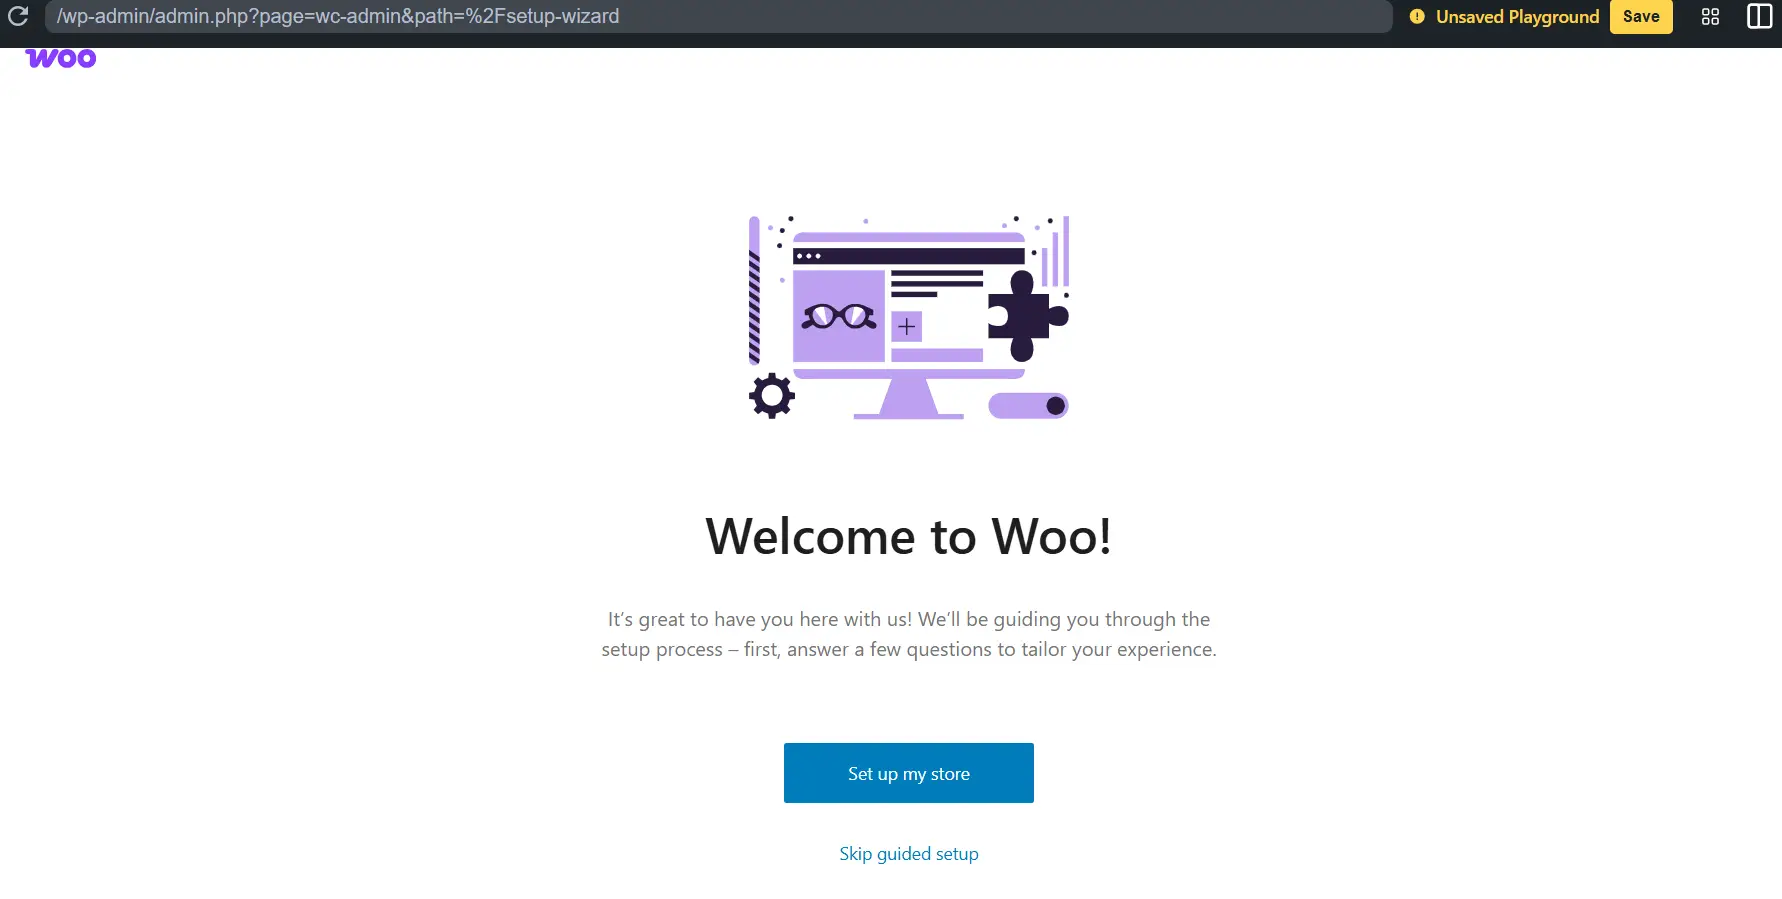
Don’t spend too long on design at this stage. Get the store functional first and then refine the theme.
Step 3: Choose Your Migration Method
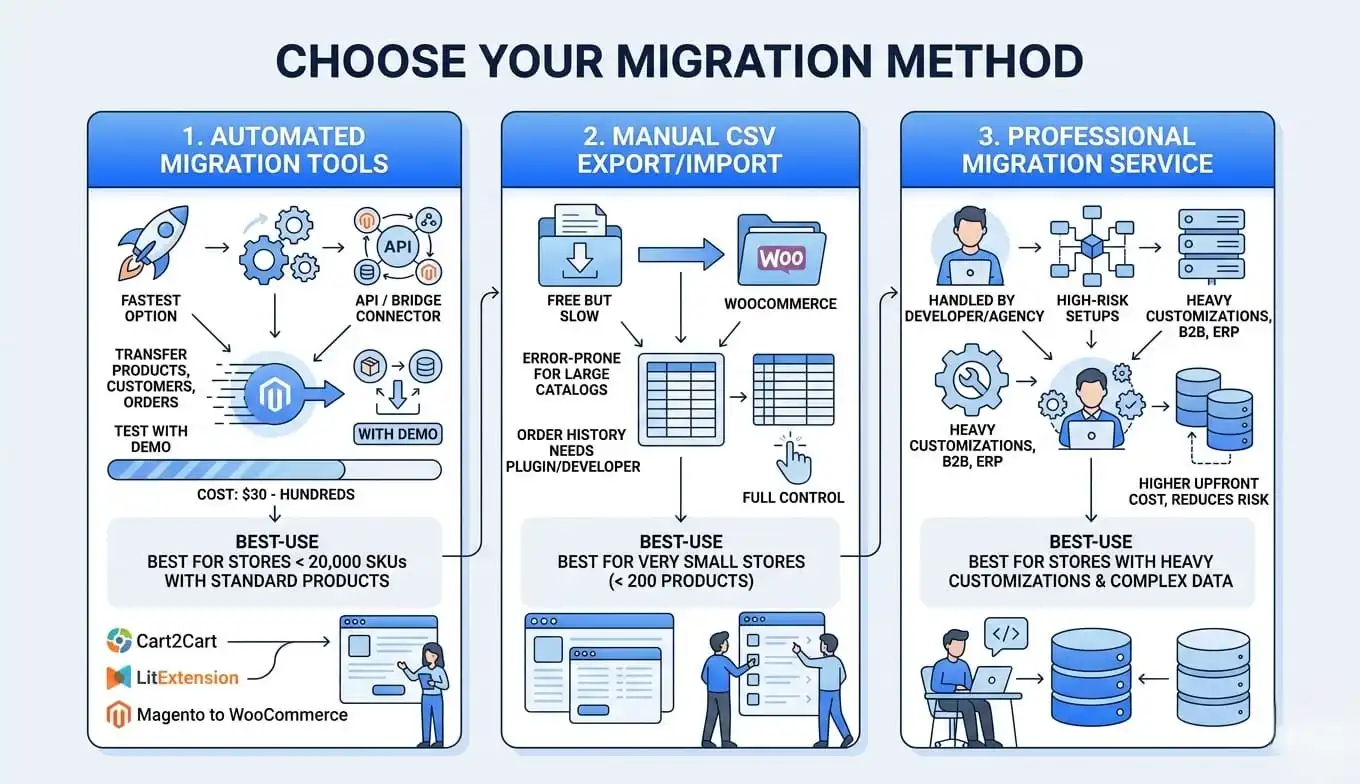
Three options exist. Pick the one that matches your store’s size and your team’s technical capacity.
- Automated migration tools (Cart2Cart, LitExtension, FG Magento to WooCommerce): The fastest option for most stores. These tools connect to your Magento store via API or a bridge connector and transfer products, customers, and orders directly into WooCommerce. A demo migration (free) lets you test with a subset of your data before committing. Cost ranges from $30 to a few hundred dollars depending on entity count and add-ons. Best for stores under 20,000 SKUs with standard product types.
- Manual CSV export/import: Export products, customers, and orders from Magento as CSV files and import them into WooCommerce using the built-in importer or a plugin like WP All Import. Free but slow and error-prone for large catalogs. Order history doesn’t import natively in WooCommerce via CSV; you’ll need a plugin or developer help for that. Best for very small stores (under 200 products) that want full control.
- Professional migration service: A developer or agency handles the full migration. Best for stores with heavy custom Magento extensions, B2B pricing rules, complex product attributes, or ERP integrations. Costs more upfront, but reduces risk on complex setups significantly. Our WooCommerce development services include migration support if you need a team with WooCommerce experience to handle it.
Step 4: Export Products, Customers and Orders
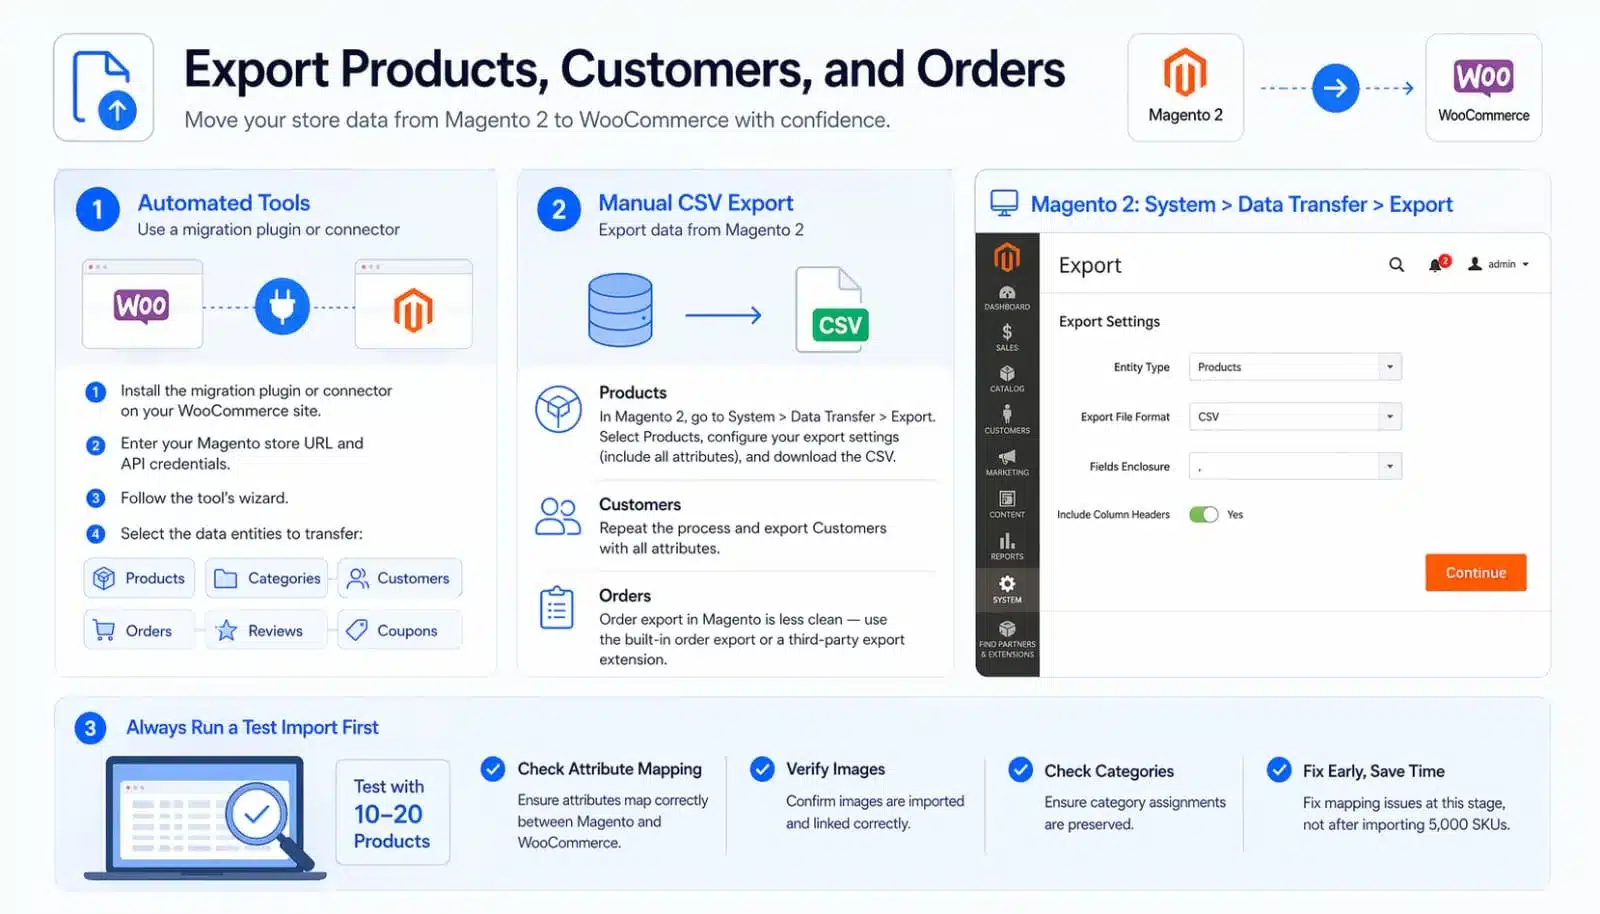
- For automated tools: Install the migration plugin or connector on your WooCommerce side, enter your Magento store URL and API credentials, and follow the tool’s wizard. You’ll select which data entities to transfer: products, categories, customers, orders, reviews, and coupons.
- For manual CSV: In Magento 2, go to System > Data Transfer > Export. Select Products, configure your export settings (include all attributes), and download the CSV. Repeat for Customers. Order export in Magento is less clean. Use the built-in order export or a third-party export extension.
Before running a full import, always run a test with 10 to 20 products first. Check how attributes map, whether images pull correctly, and whether category assignments survive the transfer. Fix mapping issues at this stage and not after importing 5,000 SKUs.
Step 5: Import Data into WooCommerce and Validate a Sample
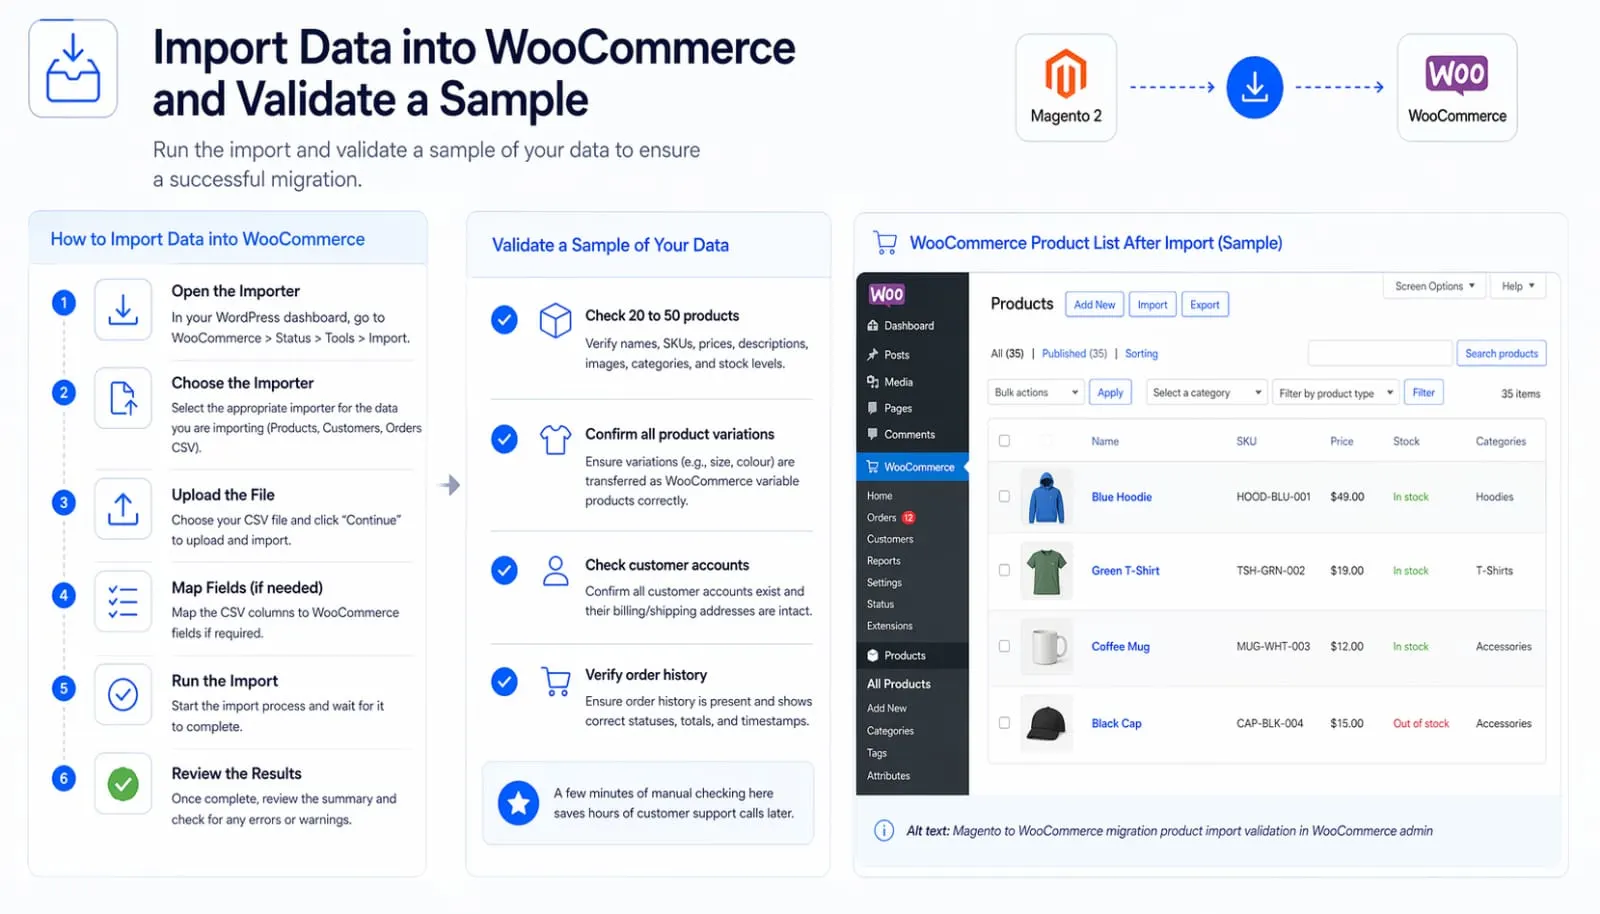
Run the import. Once it completes, don’t celebrate yet. Validate a sample of your data manually:
- Check 20 to 50 products: names, SKUs, prices, descriptions, images, categories, and stock levels
- Confirm all product variations (for example size or color) are transferred as WooCommerce variable products correctly
- Check that customer accounts exist and their billing/shipping addresses are intact
- Verify that order history is present and shows correct statuses, totals, and timestamps
A few minutes of manual checking here saves hours of customer support calls later.
Step 6: Rebuild Your Theme and Configure Store Settings
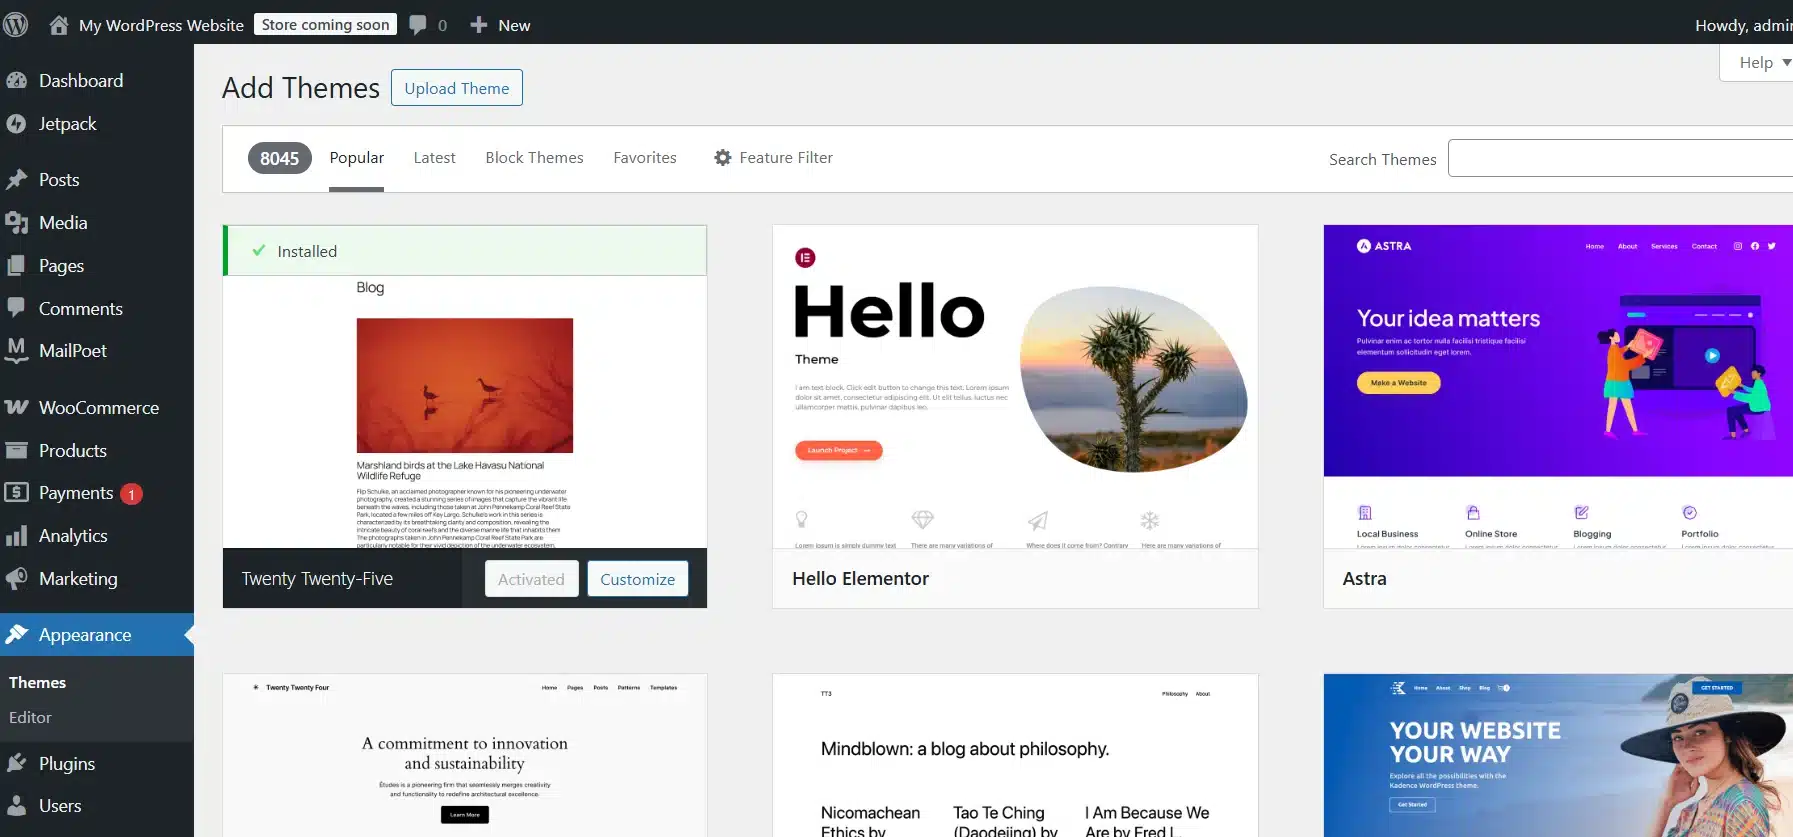
Magento themes don’t transfer to WooCommerce. The frontend needs to be rebuilt using a WooCommerce-compatible theme. If you’re working with a developer, this often runs in parallel with the data migration to save time.
Any theme that declares WooCommerce support will work, from Storefront, the free classic theme by WooCommerce, to block themes such as Twenty Twenty-Five. A fresh WooCommerce 11.2 install also uses HPOS (High-Performance Order Storage), which has been the default for new stores since version 8.2.
If you install a legacy order management plugin after migration, check that it’s HPOS compatible; otherwise, you’ll see conflicts in your orders dashboard.
Also configure: payment gateways, shipping zones and rates, tax settings, and your preferred SEO plugin (Yoast SEO or Rank Math).
Step 7: Map and Set Up 301 Redirects
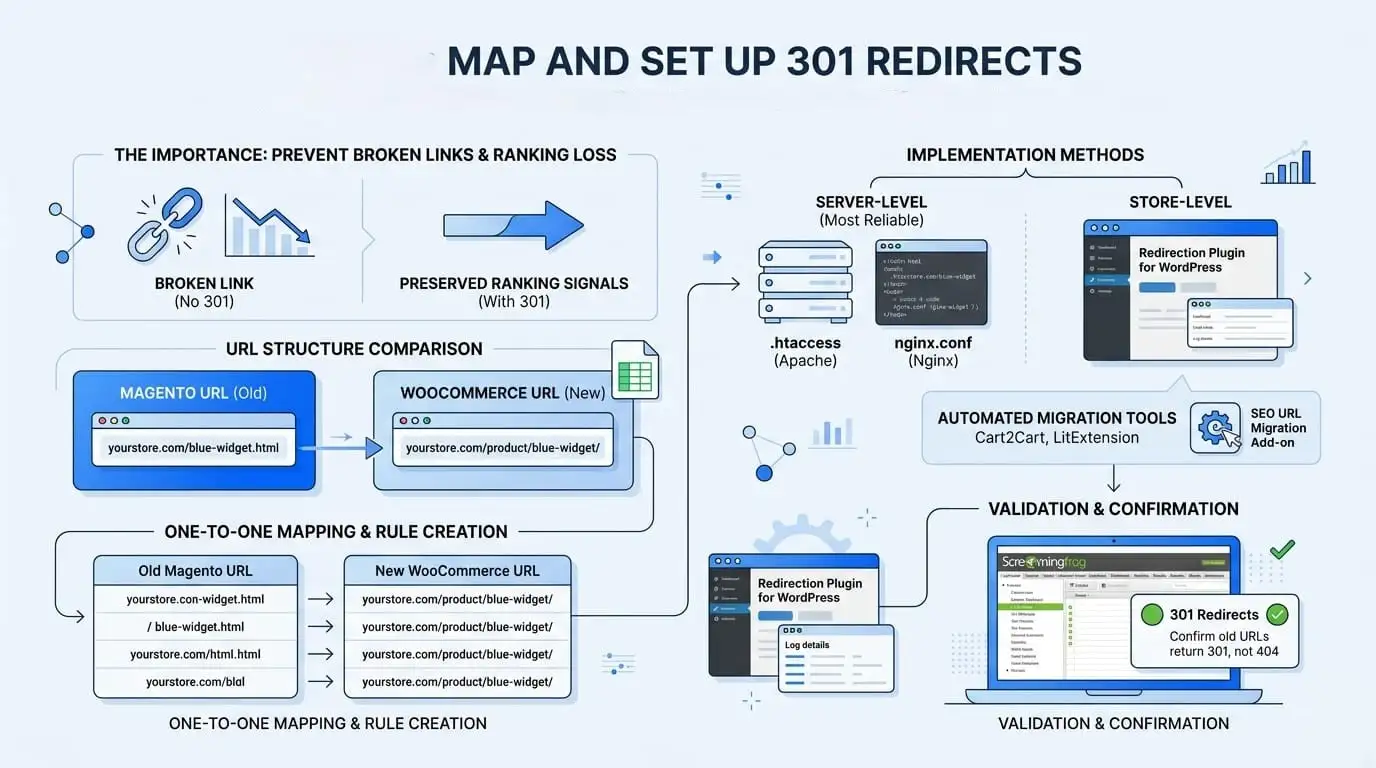
This is the step most stores either skip or do too late. Every Magento URL that changes without a 301 redirect becomes a broken link and a ranking signal that disappears.
Moving from any other platform needs the same redirect work, as the steps to migrate from Webflow to WordPress show.
Magento and WooCommerce use different URL structures by default. A Magento product URL might look like:
yourstore.com/blue-widget.html
The same product in WooCommerce usually becomes:
yourstore.com/product/blue-widget/
Take the URL spreadsheet you built in the pre-migration checklist and create a one-to-one mapping: old Magento URL on the left, new WooCommerce URL on the right. Then add the 301 redirect rules.
For server-level redirects (the most reliable method), add rules to your .htaccess file (Apache) or nginx.conf (Nginx). For stores without server access, the Redirection plugin for WordPress handles this cleanly and logs all redirected requests.
Some automated migration tools (Cart2Cart, LitExtension) offer SEO URL migration as a paid add-on. Worth considering for large catalogs with hundreds of product URLs.
After setting redirects, run a Screaming Frog crawl against your staging site to confirm every old Magento URL returns a 301 and not a 404. Fix any gaps before you go live.
Step 8: Test and Validate Before You Go Live
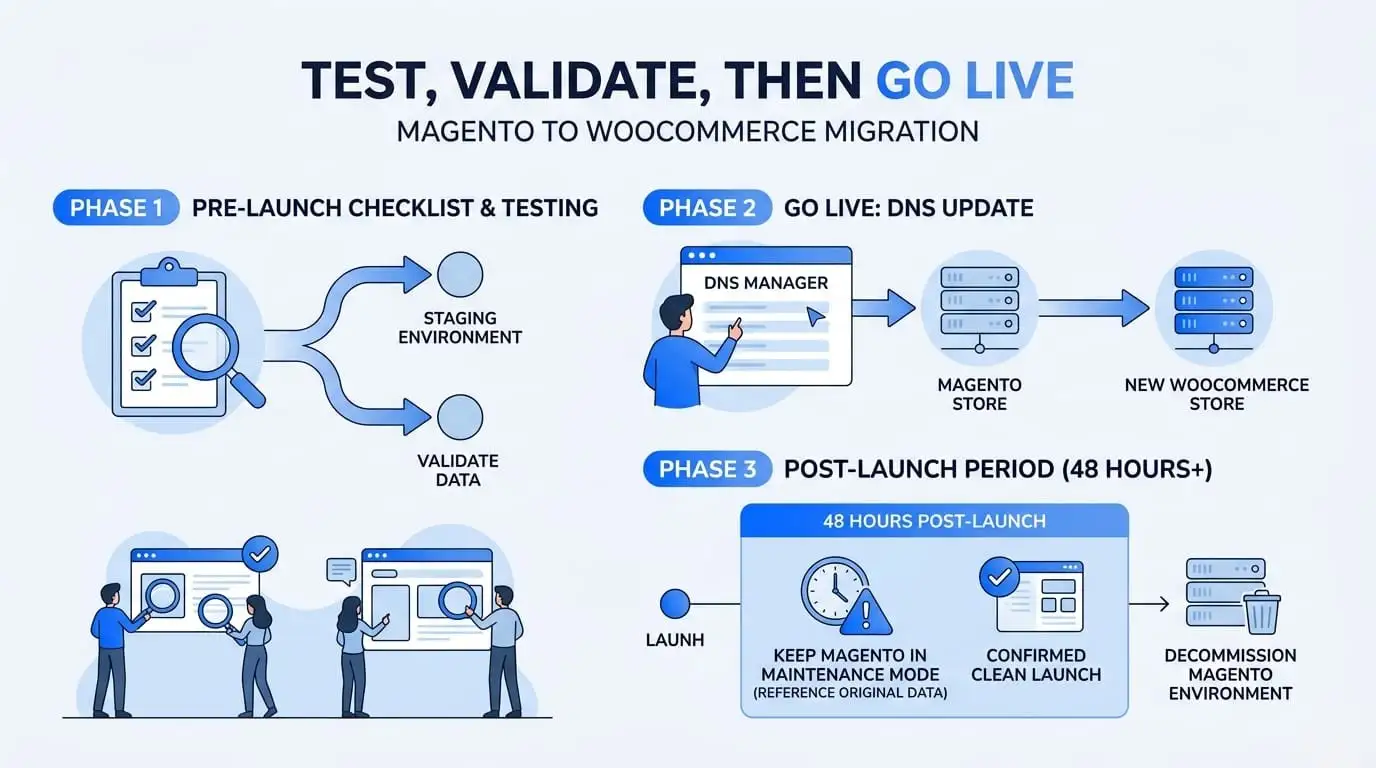
With everything in place on staging, run through the full pre-launch checklist in the next section. Once you’re satisfied, update your DNS to point to the new WooCommerce store.
Keep your Magento store in maintenance mode (not taken offline) for at least 48 hours post-launch, in case you need to reference original data. After 48 hours and a confirmed clean launch, you can decommission the old Magento environment.
The Customer Password Problem Nobody Warns You About
After a Magento to WooCommerce migration, customers often try to log in and find their old password no longer works.
The reason is a technical one. Magento’s API does not expose customer password data for security reasons. So even if your migration tool successfully imports all customer accounts, the passwords don’t come with them.
Some tools (Cart2Cart with their password migration add-on, LitExtension for select source carts) can migrate encrypted passwords if you install a specific module on the Magento side before running the migration. This is worth attempting, but it doesn’t work for all setups.
The honest fallback: send your customers a proactive password reset email before launch and not after they’ve already tried to log in and hit an error. Frame it as a security upgrade. Something like: “We’ve moved to a new platform with improved security. Please reset your password to continue.” Most customers accept this without frustration when the message arrives before the confusion.
If you’re using a professional migration service, raise this issue with them before the migration starts. Addressing it up front costs nothing. Dealing with it reactively costs customer trust.
Post-Migration SEO: How to Protect Your Rankings
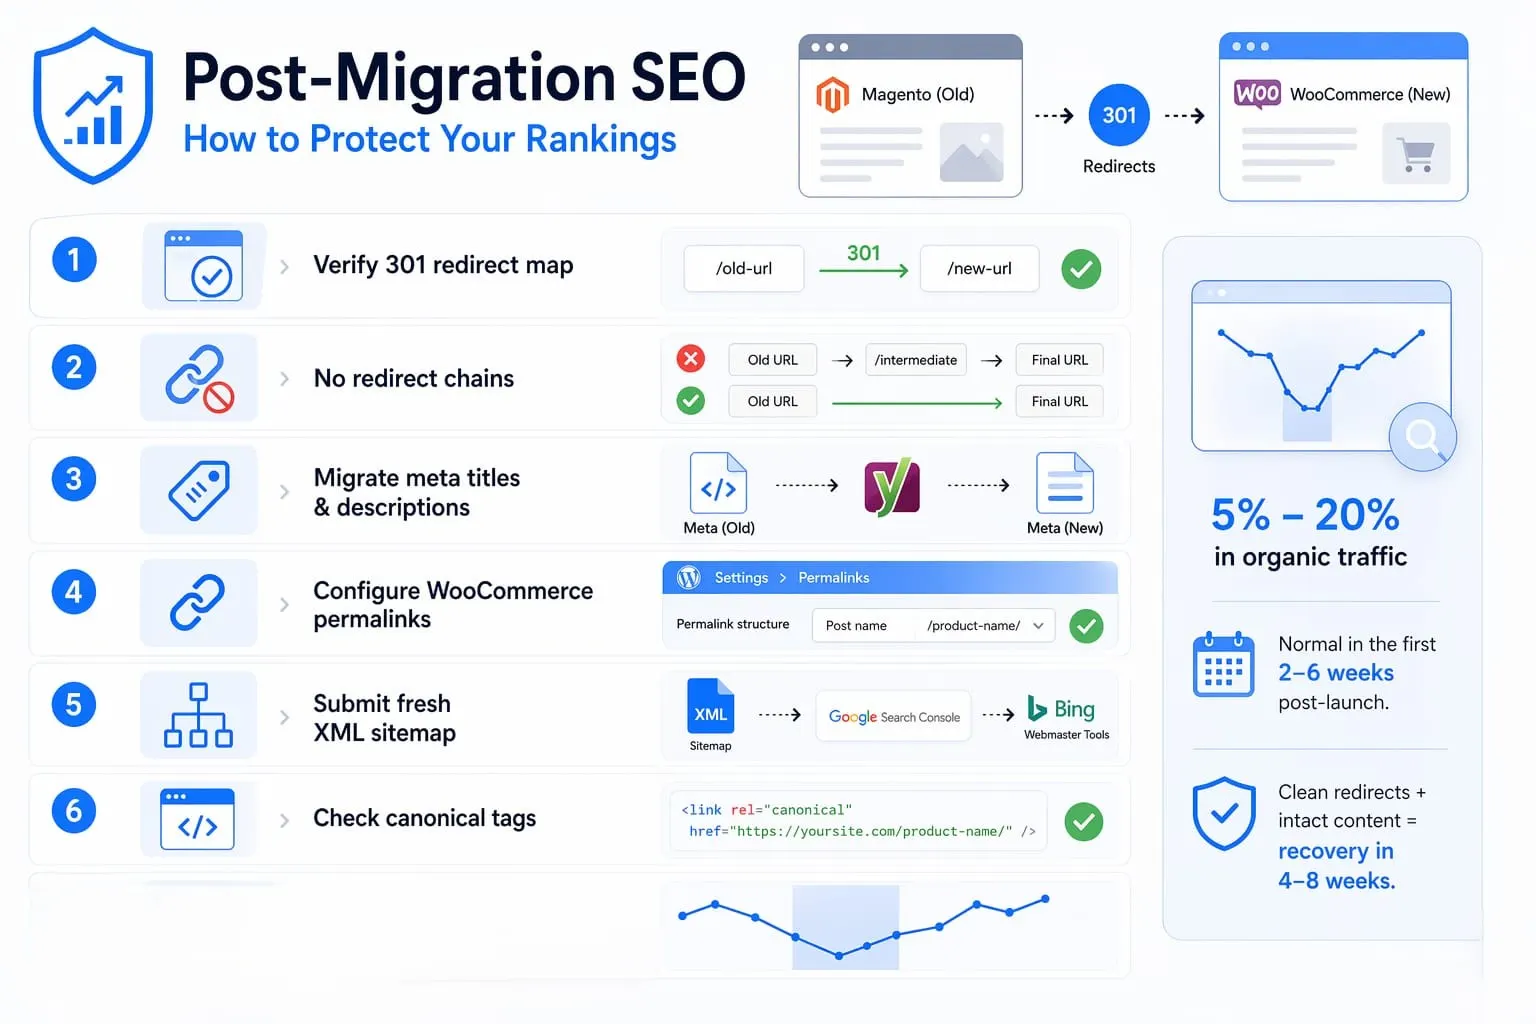
SEO is the biggest risk in a platform migration. Google’s site move guide warns that rankings fluctuate during any move. A small to medium site can take a few weeks for most pages to move. Clean 301 redirects are the part you control.
Here’s what to check, in order:
- Verify your 301 redirect map is complete: Every indexed Magento URL that changes without a redirect loses its accumulated PageRank. Use Screaming Frog to crawl your old Magento sitemap URLs against the new WooCommerce store and confirm each one returns a 301 (not a 302, not a 404). Fix any gaps before switching DNS.
- Avoid redirect chains: A chain sends an old Magento URL to an in-between URL before the final WooCommerce page. Google advises redirecting straight to the final destination, since each hop adds delay for visitors. Map each old URL directly to its WooCommerce page.
- Migrate your meta titles and descriptions: If your Magento store had SEO-optimized metadata on products and categories, bring it across. Most automated tools support metadata migration, but they often require the free Yoast SEO or similar plugin to be installed on the WooCommerce side before the migration runs. Install the SEO plugin first and then migrate.
- Configure WooCommerce permalinks immediately: Go to Settings > Permalinks in WordPress and choose your URL structure before importing any content. Changing permalinks after a large import can break internal links across the site. Post name (
/product-name/) is the cleanest choice for most stores. Check our WooCommerce SEO guide for detailed permalink and structured data setup. - Submit a fresh XML sitemap: Once WooCommerce is live, generate a new sitemap (Yoast and Rank Math both do this automatically) and submit it to Google Search Console and Bing Webmaster Tools. This tells search engines to crawl your new URL structure rather than relying on cached Magento URLs.
- Check canonical tags: On product, category and filter pages, confirm canonical tags point to the correct WooCommerce URL. They should never point to the old Magento URL or a duplicate.
Expect some ranking movement in the first few weeks while Google recrawls your new URLs. Google says rankings settle down over time once the redirects are in place and the content is intact.
What to Check Before You Go Live
Most migration problems don’t show up during the import. They show up during checkout, or when a customer tries to log in, or when Google crawls a URL that doesn’t exist anymore. A structured pre-launch check catches all of these before your customers find them.
Work through each item on staging before switching DNS:
- Product data (sample 20 to 50 products): Check product names, SKUs, descriptions, prices, images, stock levels, and category assignments. Pay particular attention to variable products, confirm that each variation (size, color or material) is transferred with the correct price and stock.
- Customer accounts: Log in as a sample of migrated customer accounts. Confirm billing and shipping addresses are present. If passwords didn’t migrate, confirm the reset email flow works end-to-end.
- Order history: Open a sample of migrated orders in the WooCommerce admin. Confirm order status, line items, totals, and timestamps are correct. Check that order history is visible in customer account pages.
- Checkout flow: Complete a full test purchase with a real payment method. Go from product page to cart to checkout to order confirmation. Check that the confirmation email fires correctly.
- SEO redirects: Run a Screaming Frog crawl against the list of Magento URLs from your pre-migration export. Every URL should return a 301 and not a 404.
- Core Web Vitals: Run PageSpeed Insights on your staging homepage, a product page, and a category page. Your WooCommerce store should match or beat your Magento Core Web Vitals scores before launch. LCP under 2.5 seconds and CLS under 0.1 are the minimum thresholds worth targeting.
- Mobile display: Test the entire shopping flow on iOS and Android: product browsing, cart and checkout. WooCommerce block themes handle mobile well by default, but custom theme work can introduce issues.
Three Mistakes That Derail Magento to WooCommerce Migrations
- Skipping the staging environment: Going straight from Magento to a live WooCommerce store is the fastest way to cause customer-facing downtime. Always test on staging first. The extra day it takes to set up staging saves you from a bad launch.
- Setting up 301 redirects after launch: Every day your old Magento URLs return 404 errors is a day of ranking signals disappearing. Build the redirect map during prep, implement it on staging, and verify it before DNS switches. Not after.
- Assuming WooCommerce reporting matches Magento out of the box: It doesn’t. WooCommerce’s native analytics are simpler than Magento’s. If your team relies on detailed operational reports, product performance by attribute, customer group revenue, and complex order filters you’ll need a plugin like WooCommerce Analytics, Metorik, or a Google Analytics 4 connection to replace what Magento provided. Plan for this before launch and not in week three when someone asks for the monthly report.
Conclusion
Migrating from Magento to WooCommerce is one of the more involved platform changes you can make, but it’s manageable when you work through it in order.
The most important things to get right: back up everything before you start, choose a migration method that matches your store’s actual complexity, build your 301 redirect map before you touch DNS, and validate a real sample of your data rather than assuming the import worked correctly.
Three things tend to catch people off guard: the customer password issue (address it proactively), the extension audit (more complex stores take longer than expected), and the post-migration SEO window (expect a short dip, and don’t panic if it happens).
If you’d rather hand the technical side to a team that’s done this before, our WooCommerce development services cover migrations of all sizes, from small catalogs to multi-thousand SKU stores with custom integrations.
Frequently Asked Questions (FAQs)
Q1. Will my Magento store stay live during the migration?
Yes. Run the full migration on a staging environment while your Magento store stays live and takes orders. Only switch DNS once everything is tested and confirmed on staging. This approach keeps downtime to zero for your customers during the transition period.
Q2. How long does a Magento to WooCommerce migration take?
It depends on store size and complexity. Small stores with under 500 products can complete the core data transfer in one to three days using an automated tool. Medium stores with ERP connections or custom extensions usually take two to four weeks. Stores with heavy custom Magento modules, B2B pricing logic, or a large catalog (10,000+ SKUs) should budget two to three months, including testing.
Q3. Can I migrate product reviews from Magento to WooCommerce?
Yes, most automated migration tools support product review transfer. Review data usually includes the rating, review text, reviewer name, and submission date. Verify this is included in your chosen tool’s data entities before running the migration. Some tools list it as a separate add-on.
Q4. Do I need a WooCommerce SEO plugin before starting the migration?
Yes. Install Yoast SEO or Rank Math on your WooCommerce store before you run the migration and not after. Many migration tools write meta titles and descriptions to the SEO plugin’s database fields during the import. If the plugin isn’t installed when the migration runs, that metadata won’t transfer, and you’ll need to redo it manually.
Q5. What’s the difference between migrating from Magento 1 and Magento 2?
Magento 2 has a REST API that most automated tools connect to directly. Magento 1 reached end-of-life in 2020 and has no equivalent native API. Migrating from Magento 1 requires installing a bridge connector on the Magento 1 side, and some complex data (custom product attributes, multi-store configurations) may need manual handling. The urgency is also higher on Magento 1, running an end-of-life platform with no security patch path is a real PCI compliance risk.