WooCommerce plugin development is the process of building a custom PHP plugin that adds new functionality to a WooCommerce store, and a working first version usually takes a weekend if you already know basic PHP. We’ve contributed over 20 patches to WooCommerce core, so we’ve seen what breaks a plugin on update day and what doesn’t.
Most tutorials stop at “here’s some code” and skip what the screen looks like at each stage. That’s exactly where beginners get stuck and give up.
This guide walks through nine steps, from setting up a local environment to publishing your plugin. Every step includes a screenshot suggestion, a working code snippet, and the exact WordPress screen you should be looking at when you’re done.
What Is WooCommerce Plugin Development?
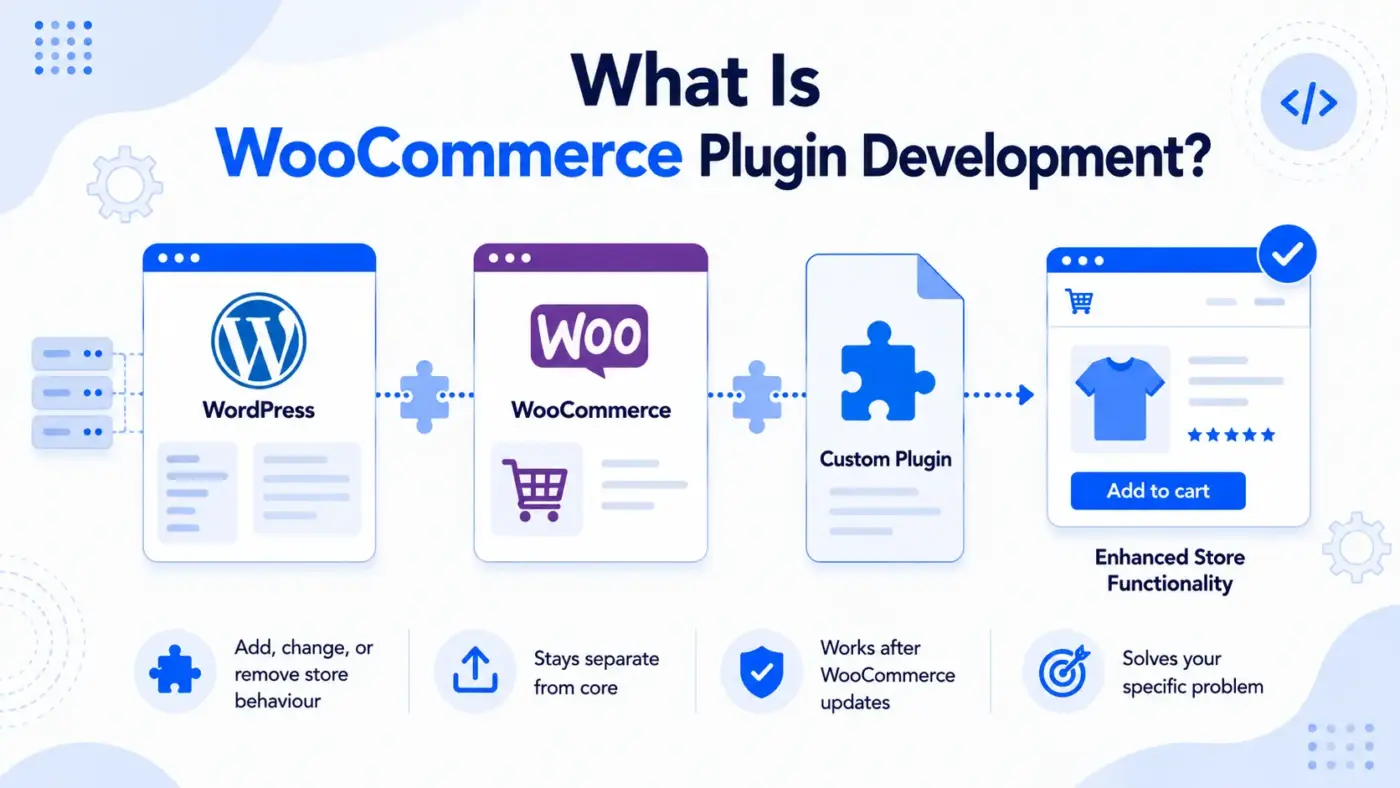
WooCommerce plugin development means writing a WordPress plugin that hooks into WooCommerce’s actions and filters to add, change, or remove store behaviour, without editing WooCommerce’s own files. The plugin stays separate from WooCommerce core, so it keeps working after WooCommerce updates.
WooCommerce already ships with thousands of free and paid extensions covering payments, shipping, and marketing. Check the WooCommerce extensions library before you write a single line of code. If nothing fits your exact workflow, that’s when custom development makes sense.
Store owners usually reach for a custom plugin for one of three reasons: a checkout rule nobody else needs, an integration with an internal system, or a feature so specific that a generic plugin would add more bloat than value. That’s the heart of WooCommerce plugin development: solving one specific problem WooCommerce doesn’t solve out of the box. None of it requires touching WooCommerce’s core files. Hooks and filters give you a way to inject your own logic at the exact point WooCommerce runs its own.
What do you need before you start?
Before you start WooCommerce plugin development, a few basics need to be in place. You don’t need to be a senior developer to build a working plugin, but you do need these covered first.
- PHP fundamentals: Variables, functions, classes, and arrays. WooCommerce runs on PHP, and your plugin will too.
- A local WordPress install: Never build directly on a live store. Tools like LocalWP, XAMPP, or Docker all work.
- Basic knowledge of WooCommerce’s admin screens: You should know where Products, Orders, and Settings live before you start adding to them.
- Awareness of HPOS: WooCommerce’s High-Performance Order Storage changed how orders are saved in the database. Plugins written before HPOS sometimes assume the old post-based storage. We’ll fix that in Step 8.
- WordPress hooks and filters: Actions let you run code at a specific moment, like after a product is added to the cart. Filters let you change a value before WordPress uses it, like adjusting a price before it displays. Nearly everything in this guide depends on one or the other. WooCommerce’s core concepts documentation covers plugin headers and lifecycle basics in more depth if you want the full reference.
The distinction trips up a lot of beginners. An action doesn’t hand anything back, it just runs. A filter always returns a value, even if that value is unchanged. Mix the two up and your code will either throw a fatal error or silently do nothing, which is worse because nothing tells you why.
One more thing. Have a code editor ready. VS Code with the PHP PHP helper extension extension catches typos before you ever load the page, which saves a surprising amount of debugging time later.
How to Develop a WooCommerce Plugin: Step-by-Step Guide
Here’s the process broken into nine parts. Each one ends with a screenshot suggestion so you can confirm you’re on track before moving to the next step.
Step 1: Set Up a Local Development Environment
The first step in WooCommerce plugin development is getting a safe place to build, and that means a local environment:
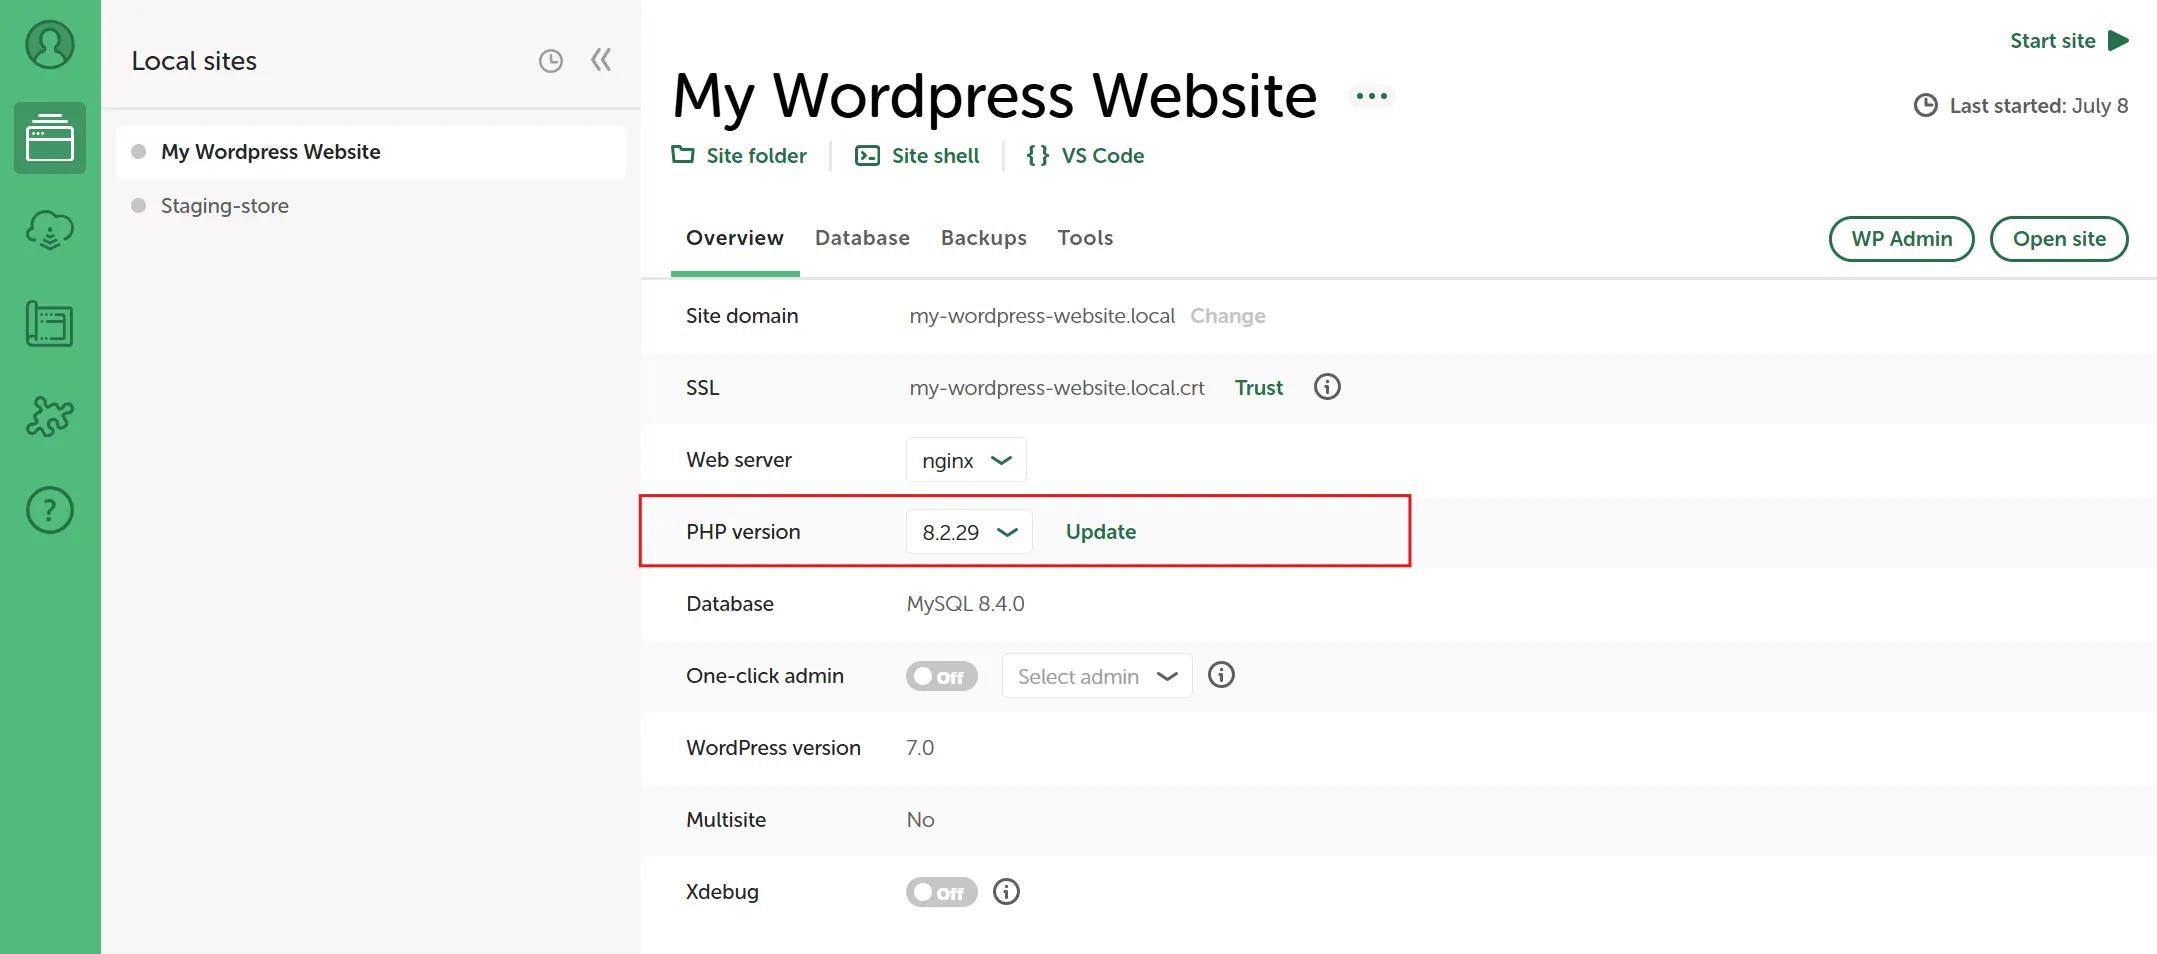
- Download and install LocalWP from the official source.
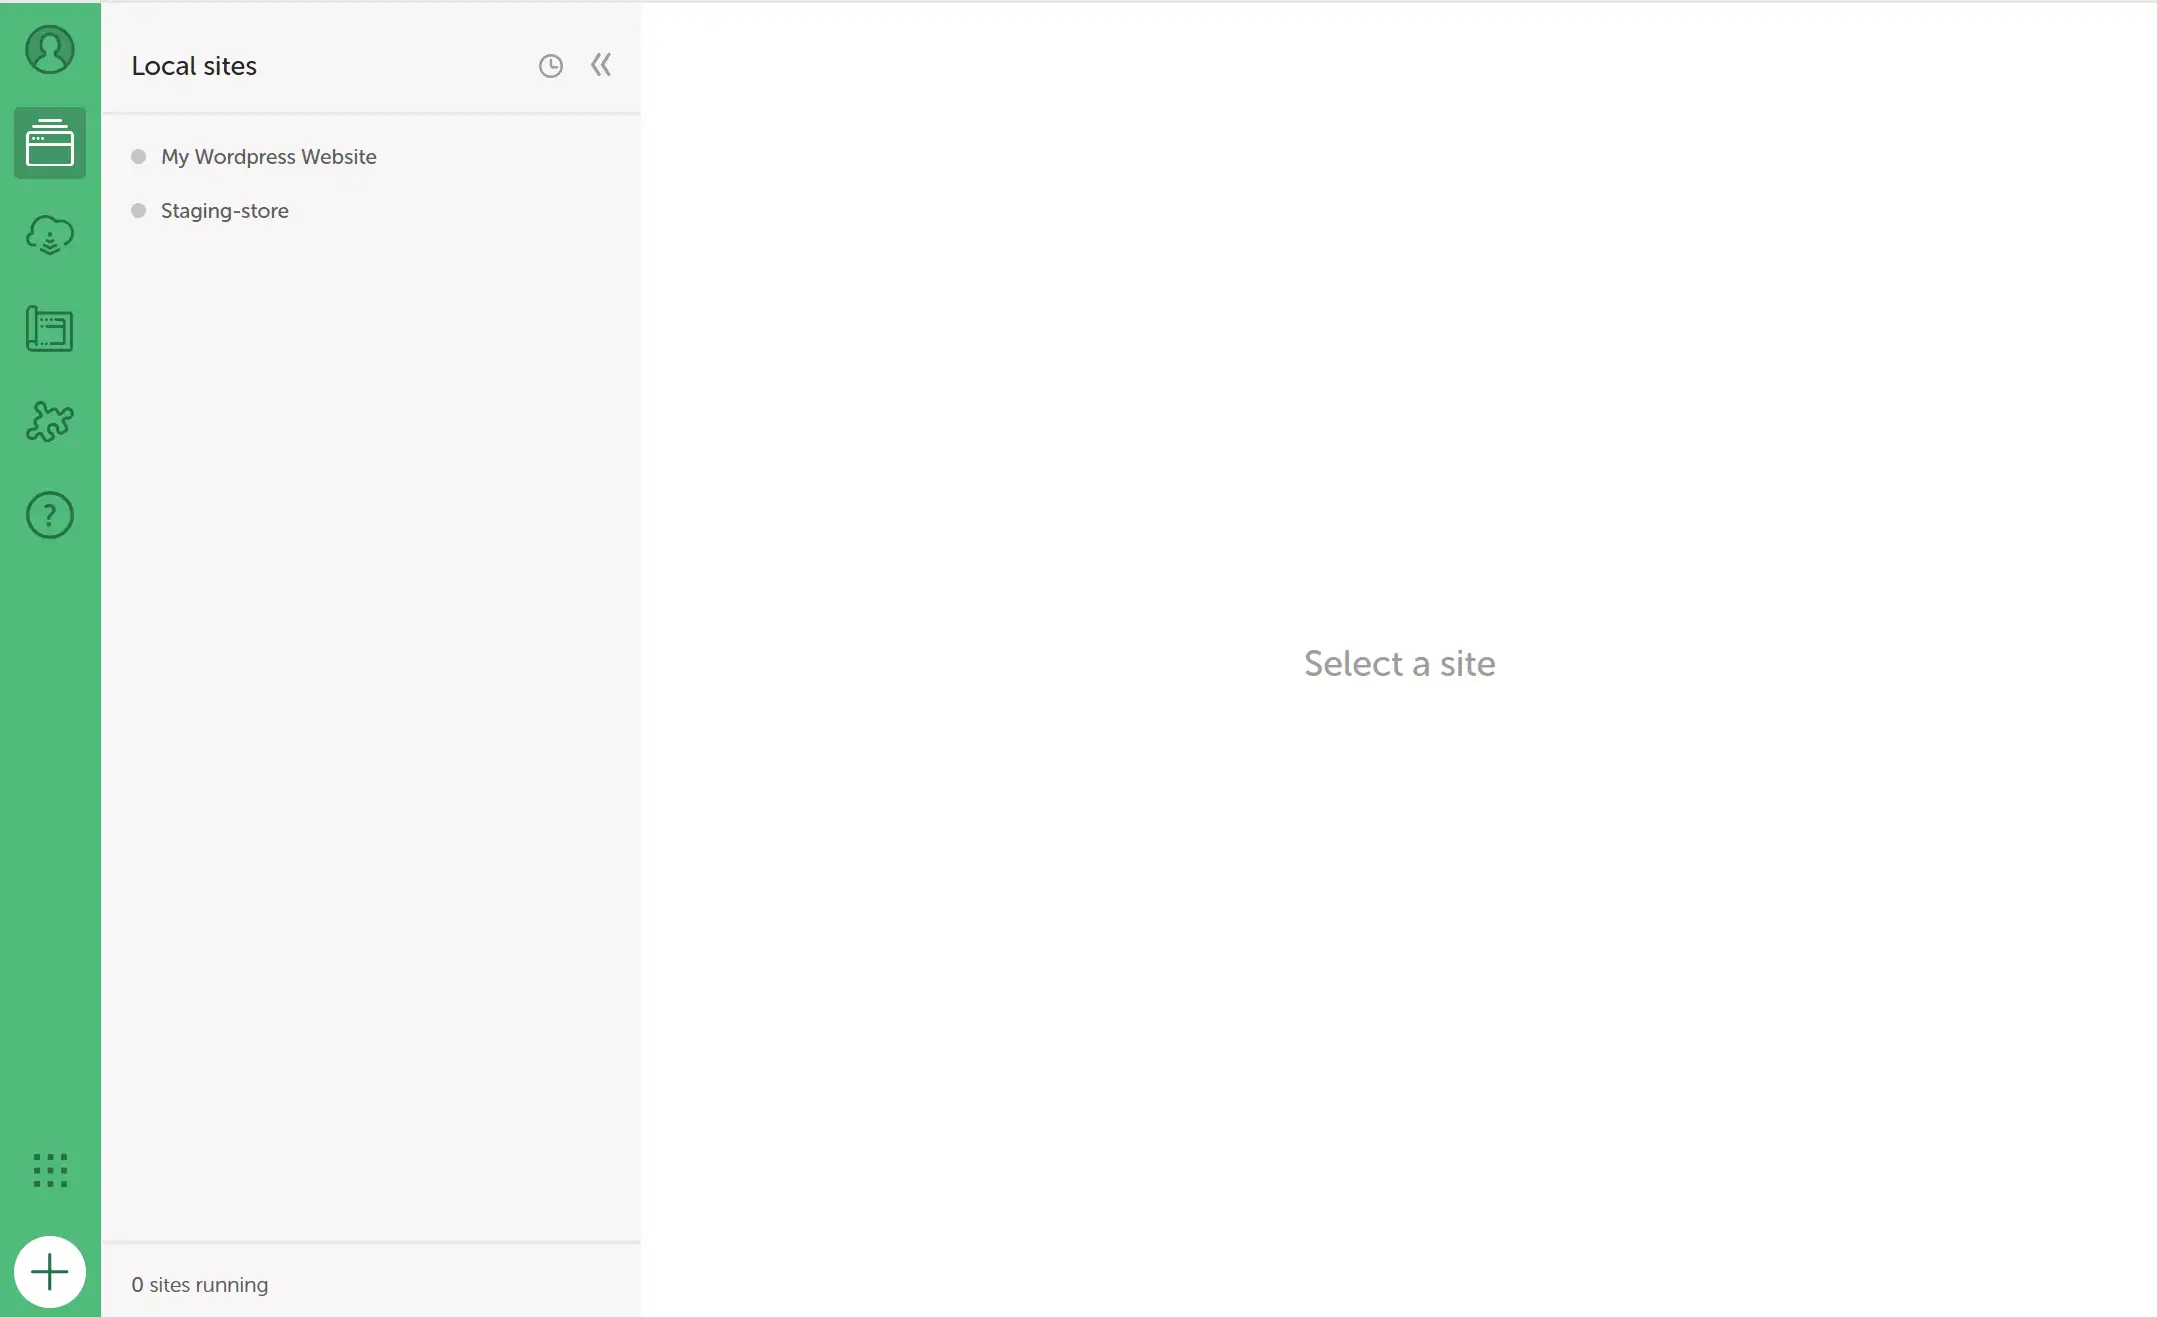
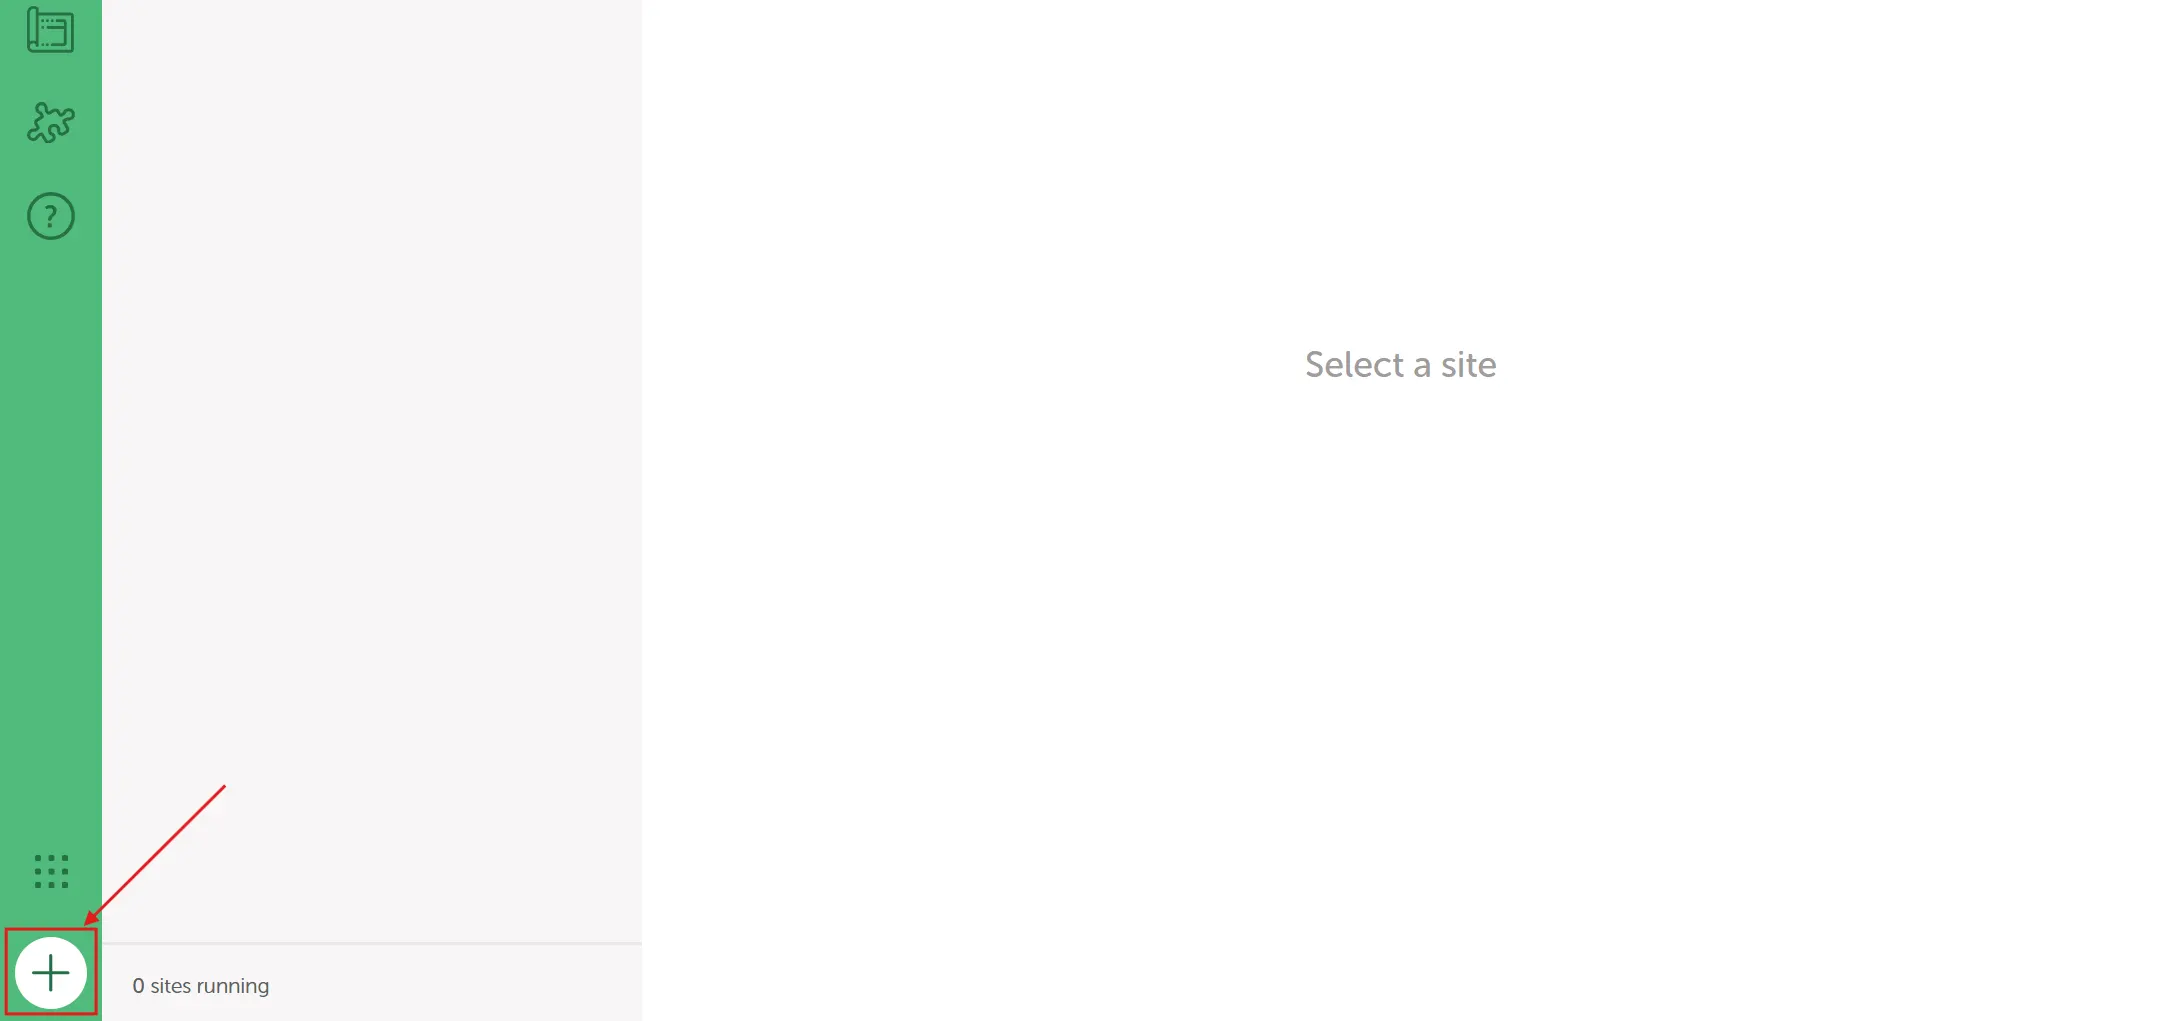
- Open and create a new site by clicking the ‘+’ icon.
- It auto-assigns PHP 8.2 or higher, since that’s what WordPress 7.0 recommends for best performance.
.
- Once the site is running, log in to wp-admin.
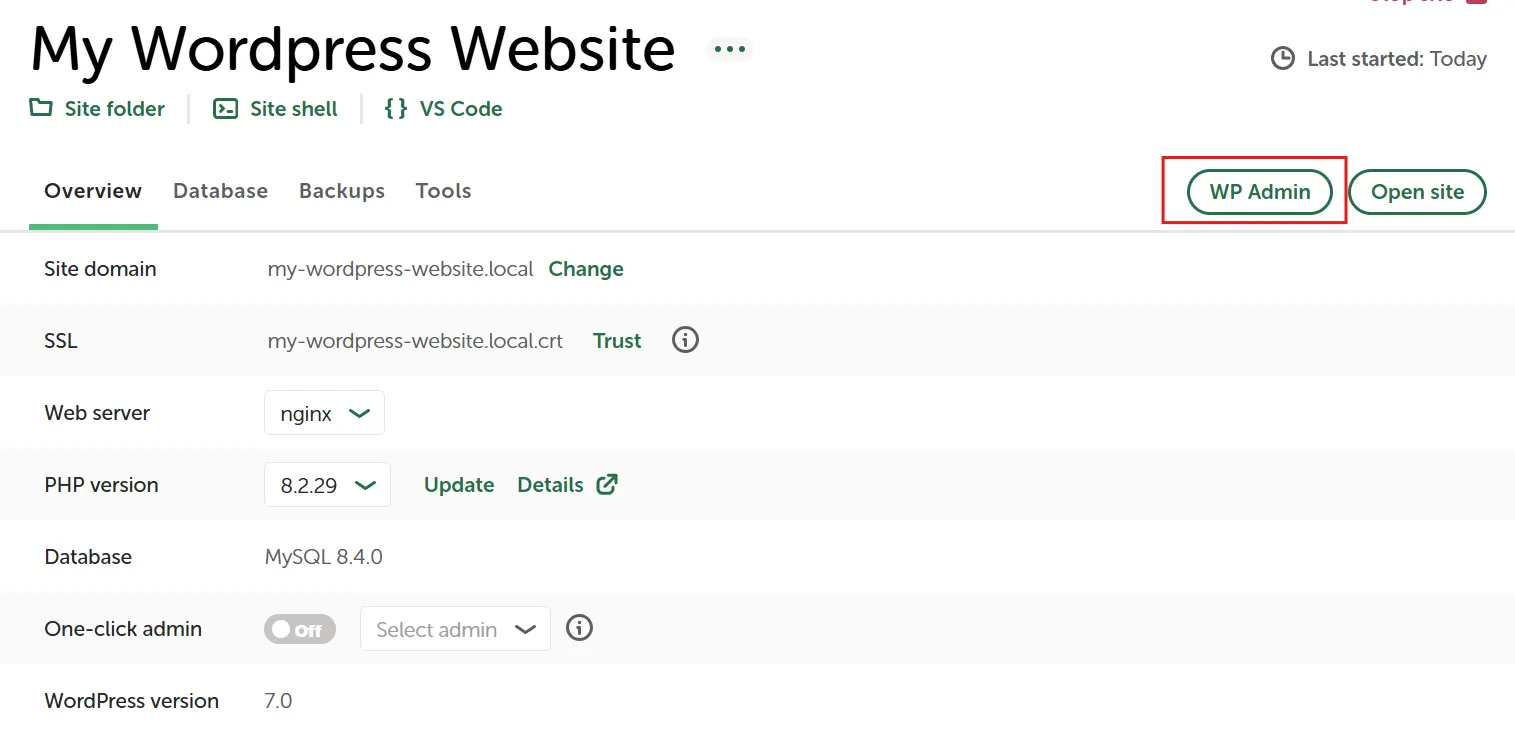
- Go to Plugins > Add New and install WooCommerce.
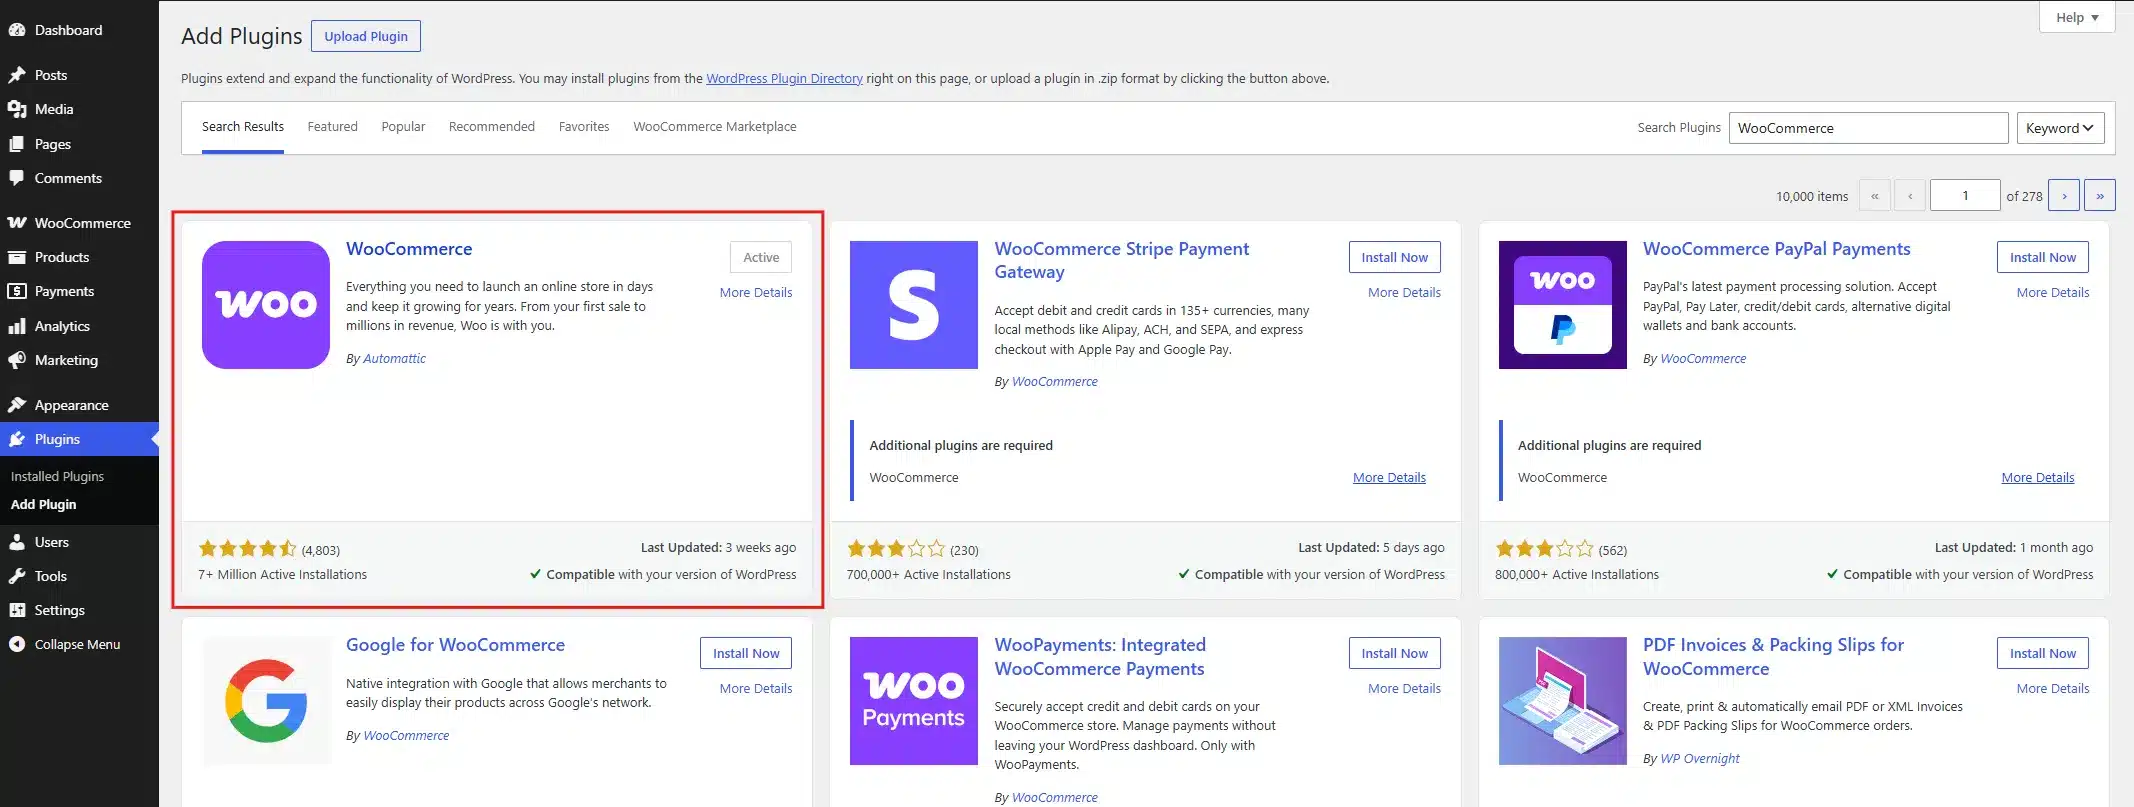
This is where most beginners lose an afternoon fighting their local server instead of writing code. Skip that. LocalWP handles the server, database, and SSL certificate in one click.
Step 2: Create the Plugin Folder and Main File
If you want to create your own plugin:
- Go to WpLocal and tap the site folder. It will redirect you to your site directory.
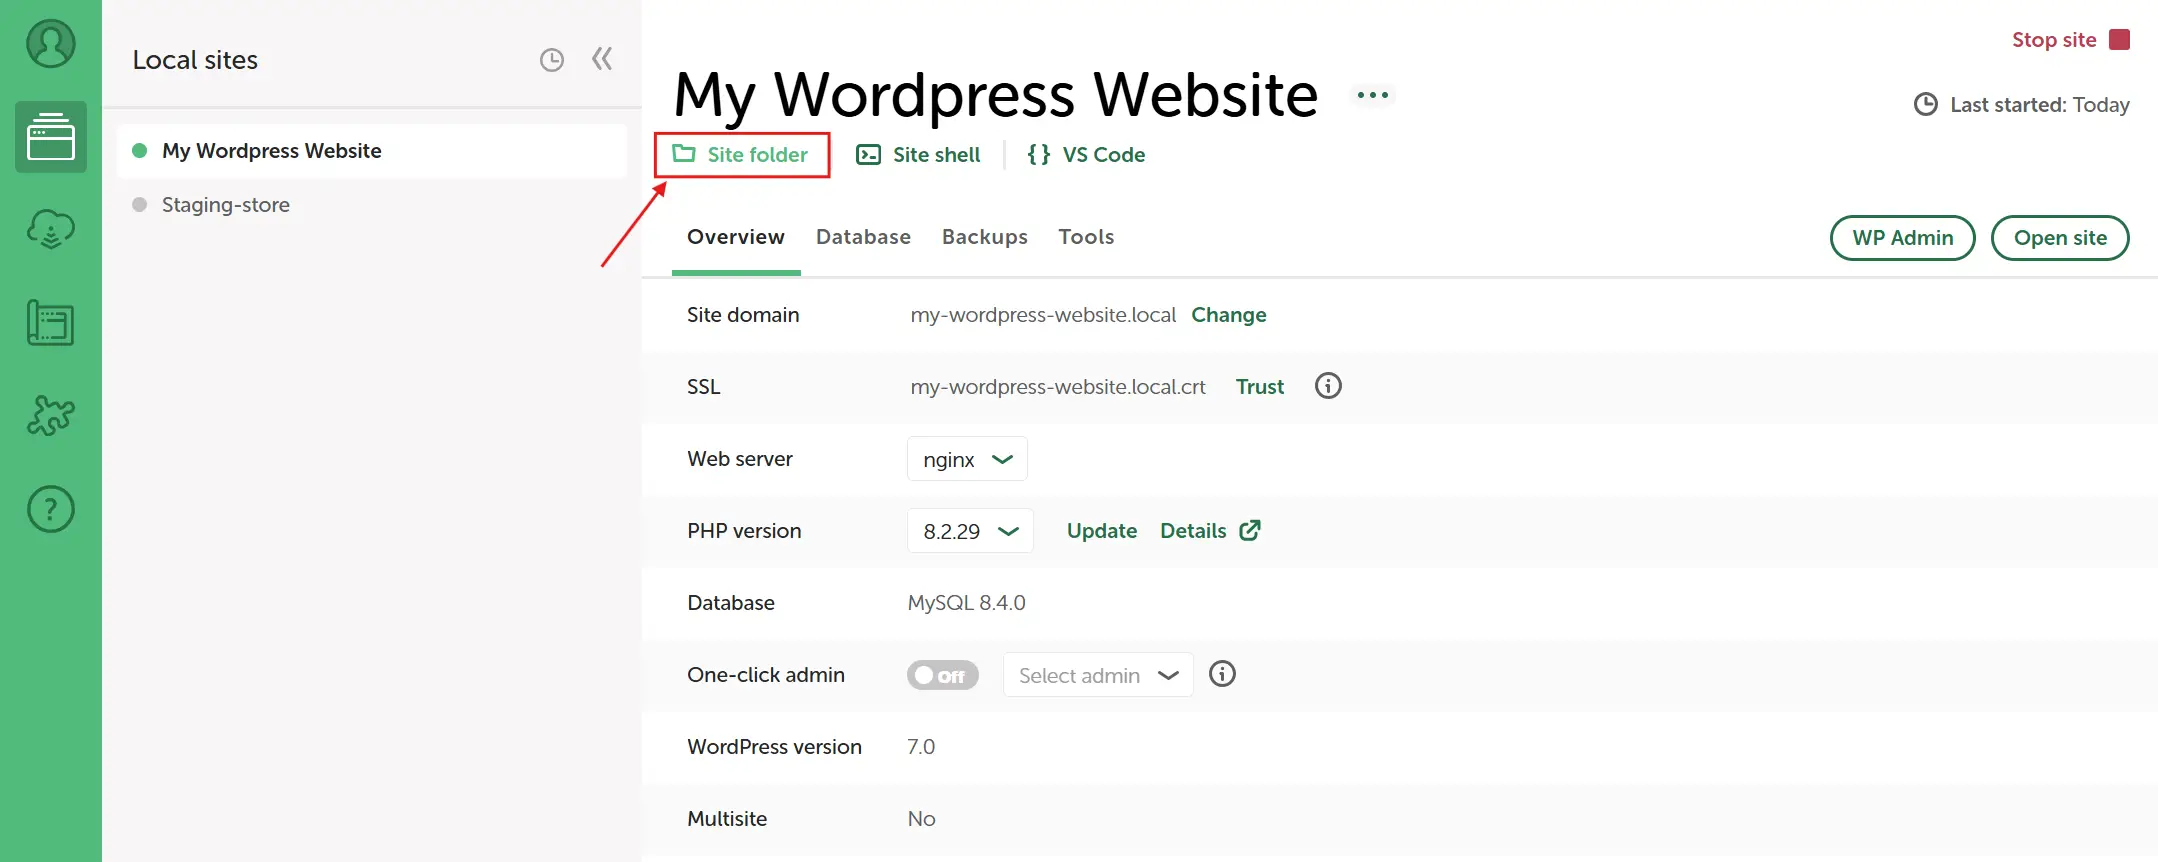
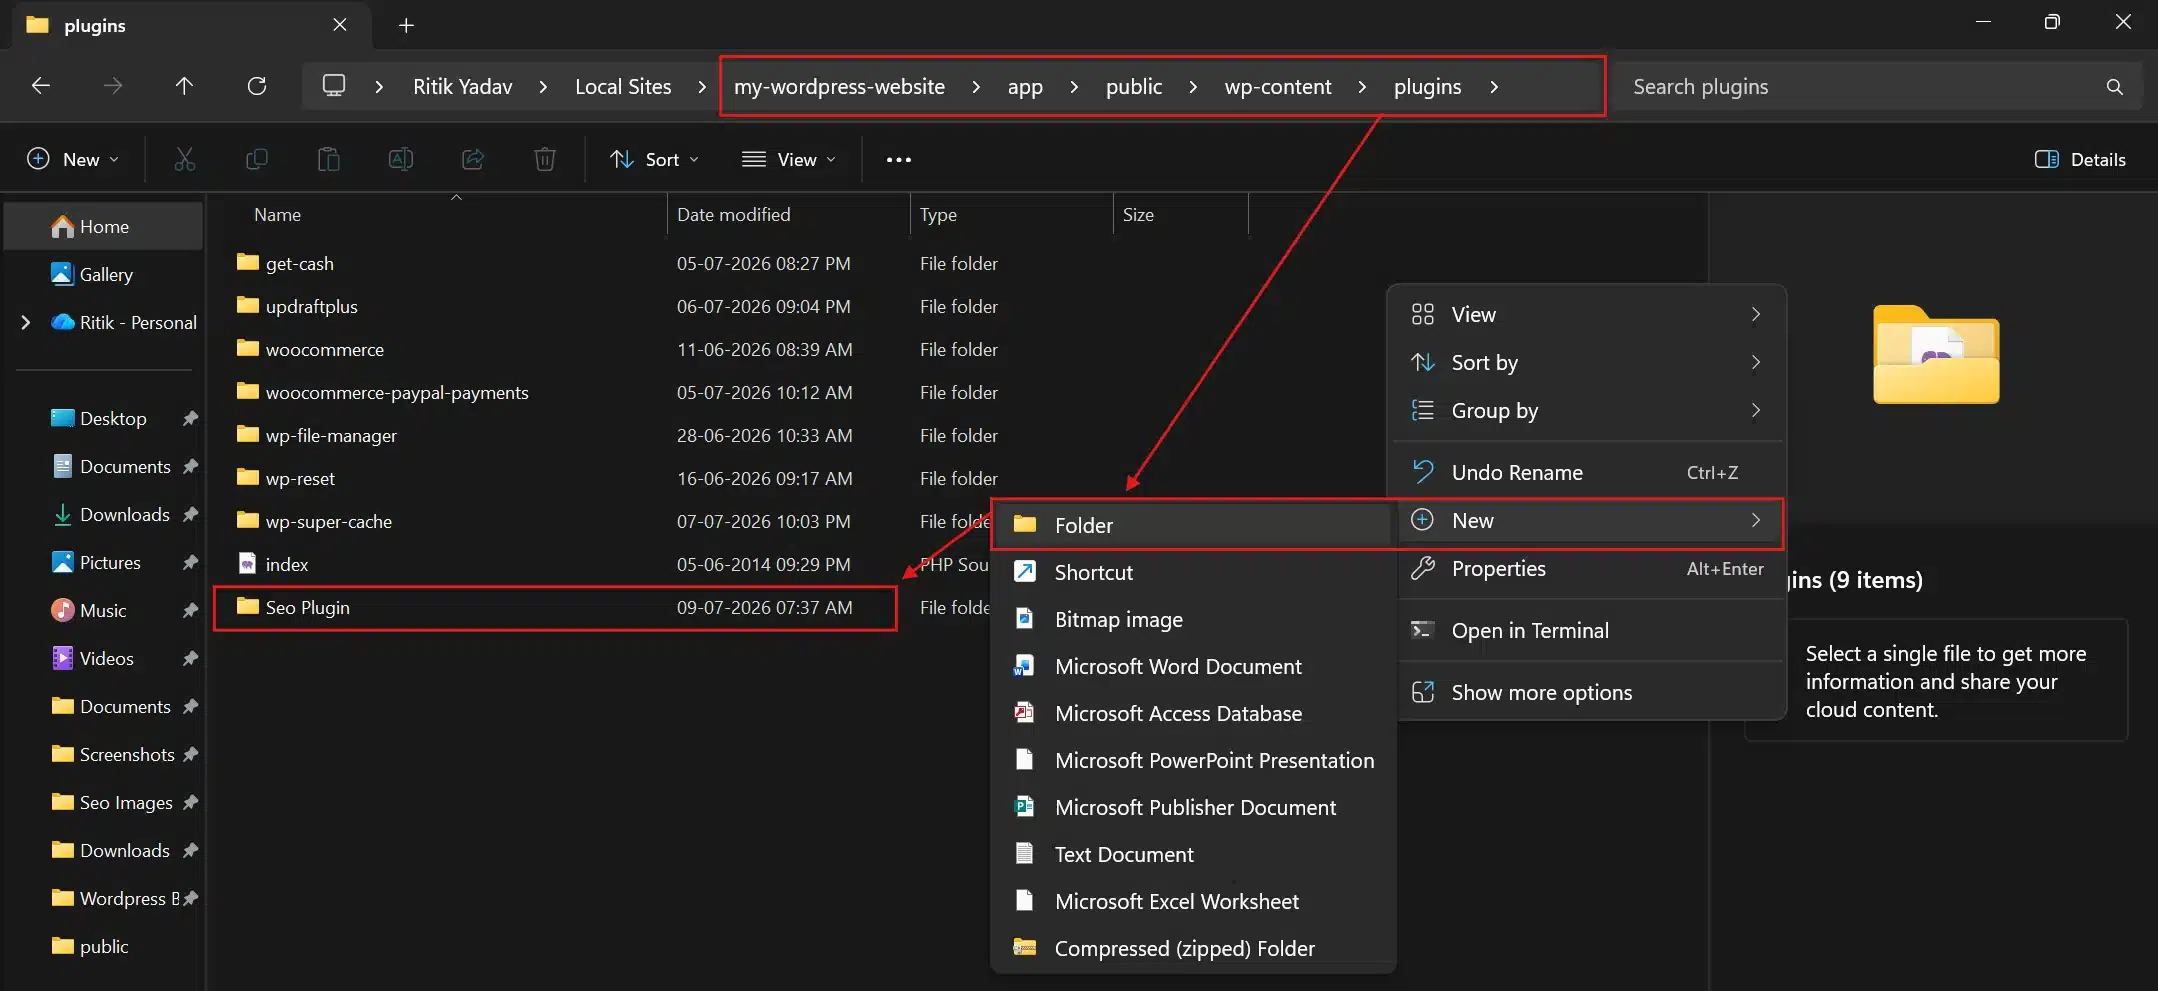
- Navigate to app>public>wp-content>plugins and create a new folder. Name it something specific to your plugin.
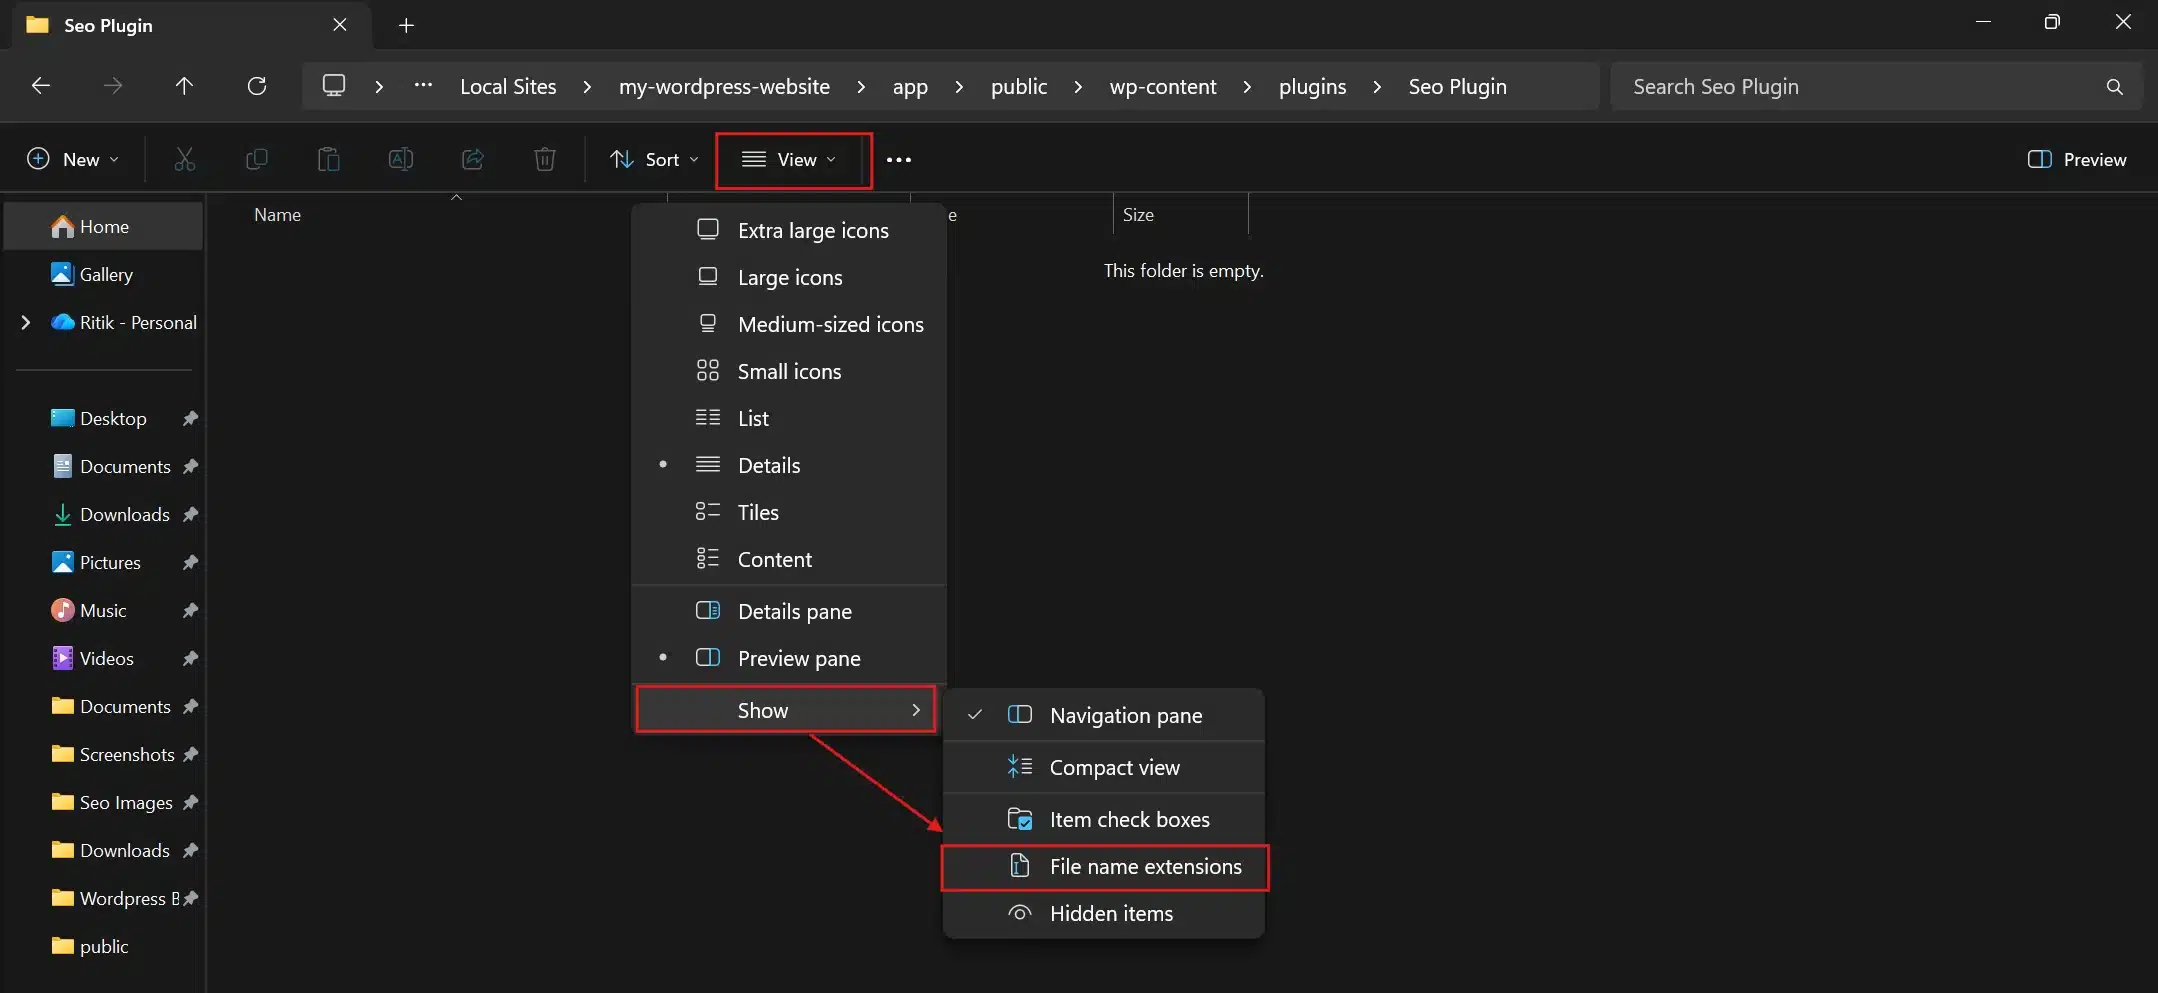
- Enable View>Show>File Name Extensions inside the folder.
- Create a
.txtFile with the same name and rename this.txtExtension to.php.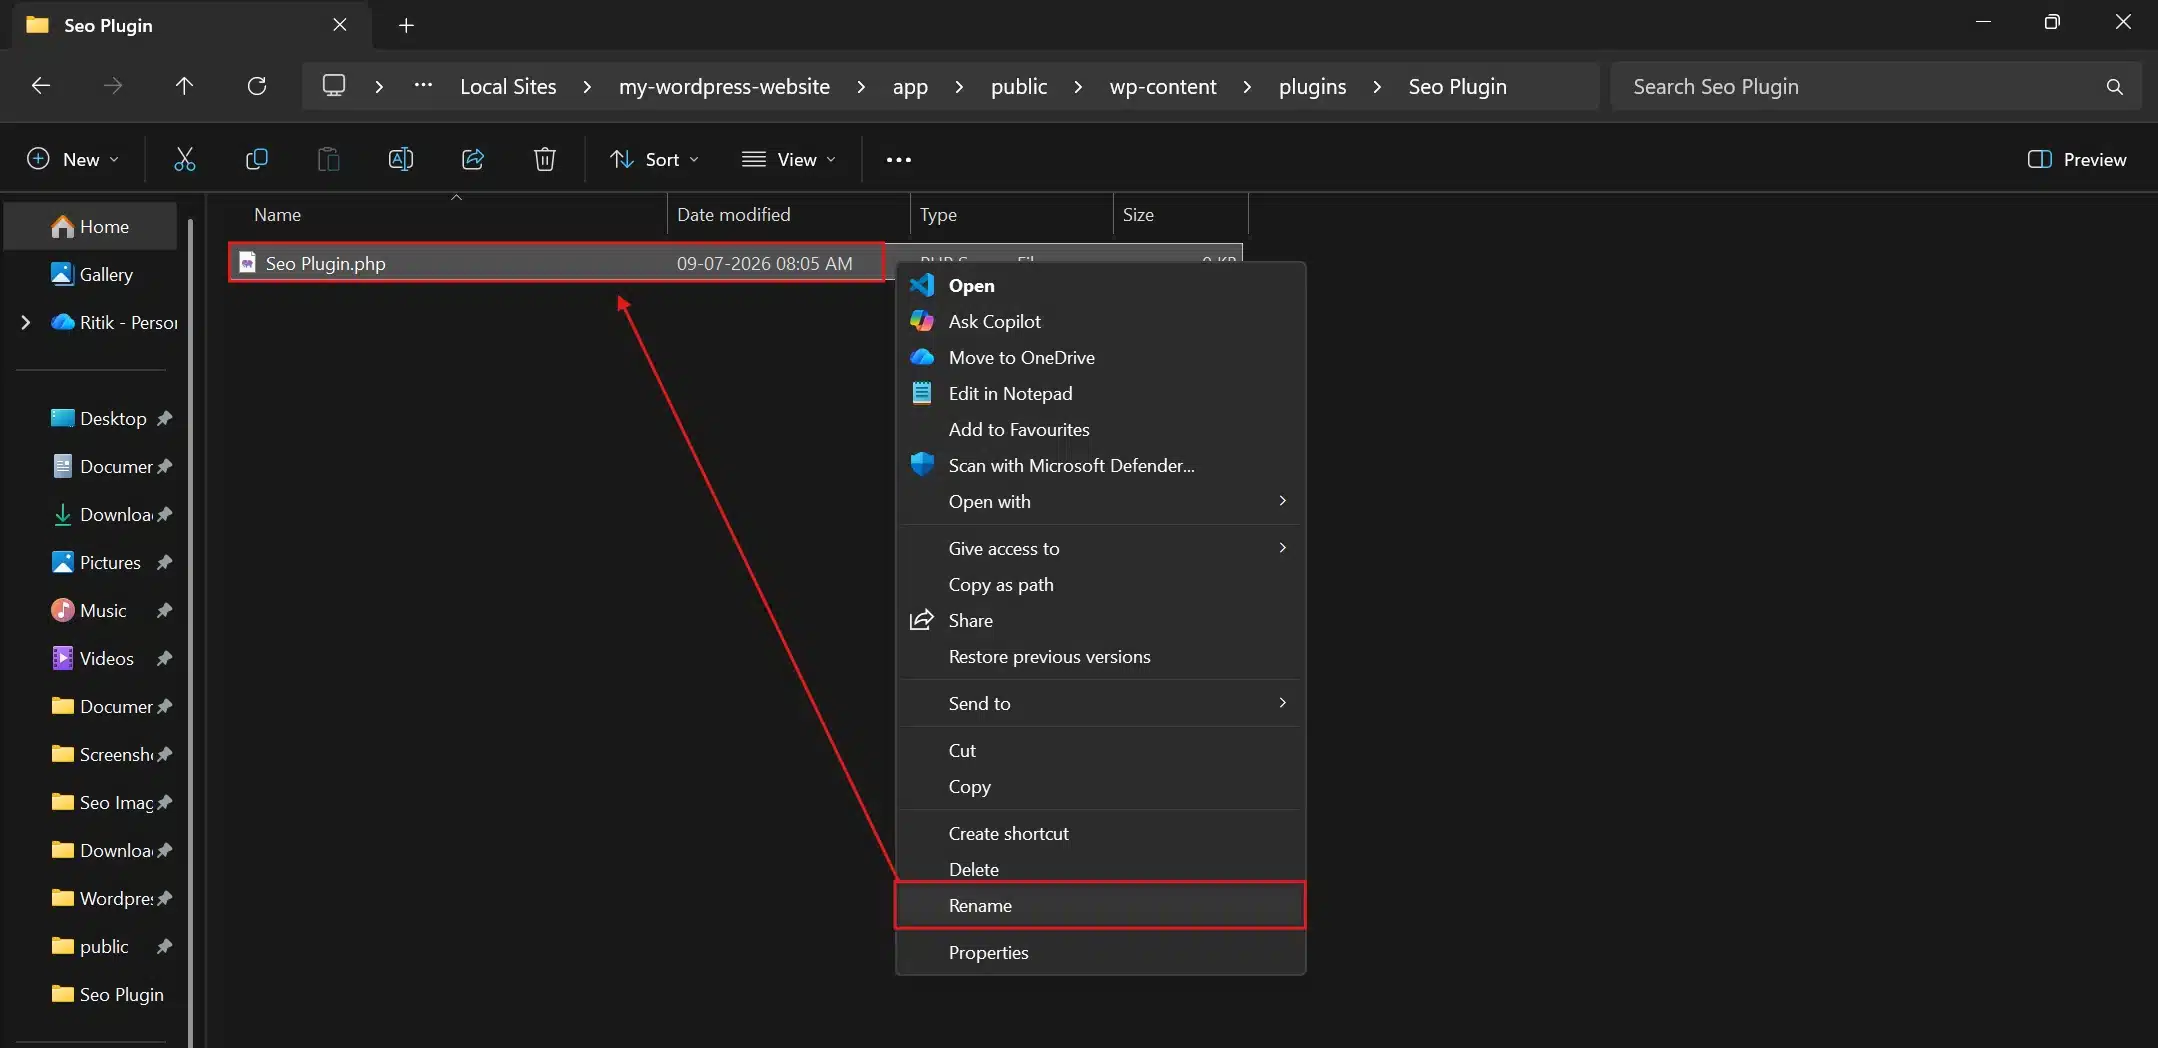
For this guide, we’ll build a simple plugin that adds a custom badge to products on sale. If you’d rather generate this automatically, WooCommerce’s create-woo-extension guide handles the starter code for you.
Step 3: Add the Plugin Header
<?php
/**
 * Plugin Name: Sale Badge for WooCommerce
 * Description: Adds a custom "On Sale" badge to product listings.
 * Version: 1.0.0
 * Author: Your Name
 * Text Domain: sale-badge-woo
 * Requires Plugins: woocommerce
 */

if ( ! defined( 'ABSPATH' ) ) {
    exit;
}
Getting the header right matters more than people expect in WooCommerce plugin development. The comment block at the top is what tells WordPress this file is a plugin. Without it, WordPress won’t show it in your plugin list at all.
The Requires Plugins line is a newer addition. It stops your plugin from activating if WooCommerce isn’t installed, so users don’t get a fatal error and a confused support ticket.
Step 4: Check That WooCommerce Is Active
add_action( 'plugins_loaded', 'sbw_check_woocommerce' );

function sbw_check_woocommerce() {
    if ( ! class_exists( 'WooCommerce' ) ) {
        add_action( 'admin_notices', 'sbw_missing_woo_notice' );
        return;
    }
}

function sbw_missing_woo_notice() {
    echo '<div class="notice notice-error"><p>Sale Badge for WooCommerce requires WooCommerce to be active.</p></div>';
}
This check runs before anything else in the plugin. If WooCommerce isn’t active, the plugin shows a friendly admin notice instead of a blank white screen. Small detail. It’s the difference between a support ticket and no ticket at all.
Step 5: Register Your First Hook
add_action( 'woocommerce_before_shop_loop_item_title', 'sbw_display_sale_badge', 15 );

function sbw_display_sale_badge() {
    global $product;

    if ( $product && $product->is_on_sale() ) {
        echo '<span class="sbw-badge">On Sale</span>';
    }
}
The woocommerce_before_shop_loop_item_title is an action that fires once per product on your shop page, right before the product title prints. is_on_sale() is a built-in WooCommerce method, so you’re not writing your own sale-detection logic from scratch.
This hook is the core of most WooCommerce plugin development work. Find the hook that fires where you want your change to happen, then attach a function to it.
Step 6: Build a Settings Page
add_action( 'admin_menu', 'sbw_add_settings_page' );

function sbw_add_settings_page() {
    add_submenu_page(
        'woocommerce',
        'Sale Badge Settings',
        'Sale Badge',
        'manage_woocommerce',
        'sbw-settings',
        'sbw_render_settings_page'
    );
}

function sbw_render_settings_page() {
    ?>
    <div class="wrap">
        <h1>Sale Badge Settings</h1>
        <p>Badge text and color options will go here.</p>
    </div>
    <?php
}
Settings pages are where WooCommerce plugin development starts to feel like a real product instead of a script. add_submenu_page Nest your settings under the main WooCommerce menu instead of cluttering the sidebar with a new top-level item.
Store owners expect plugin settings to live there. Reviewers on the WordPress repository will flag you if you don’t follow that convention.
Step 7: Test With WP_DEBUG and Query Monitor
Open wp-config.php and set WP_DEBUG to be true, and WP_DEBUG_LOG So errors are written to a file instead of appearing on the live page:
- Return to app>public inside the site folder directory and navigate to
.wp-config.php.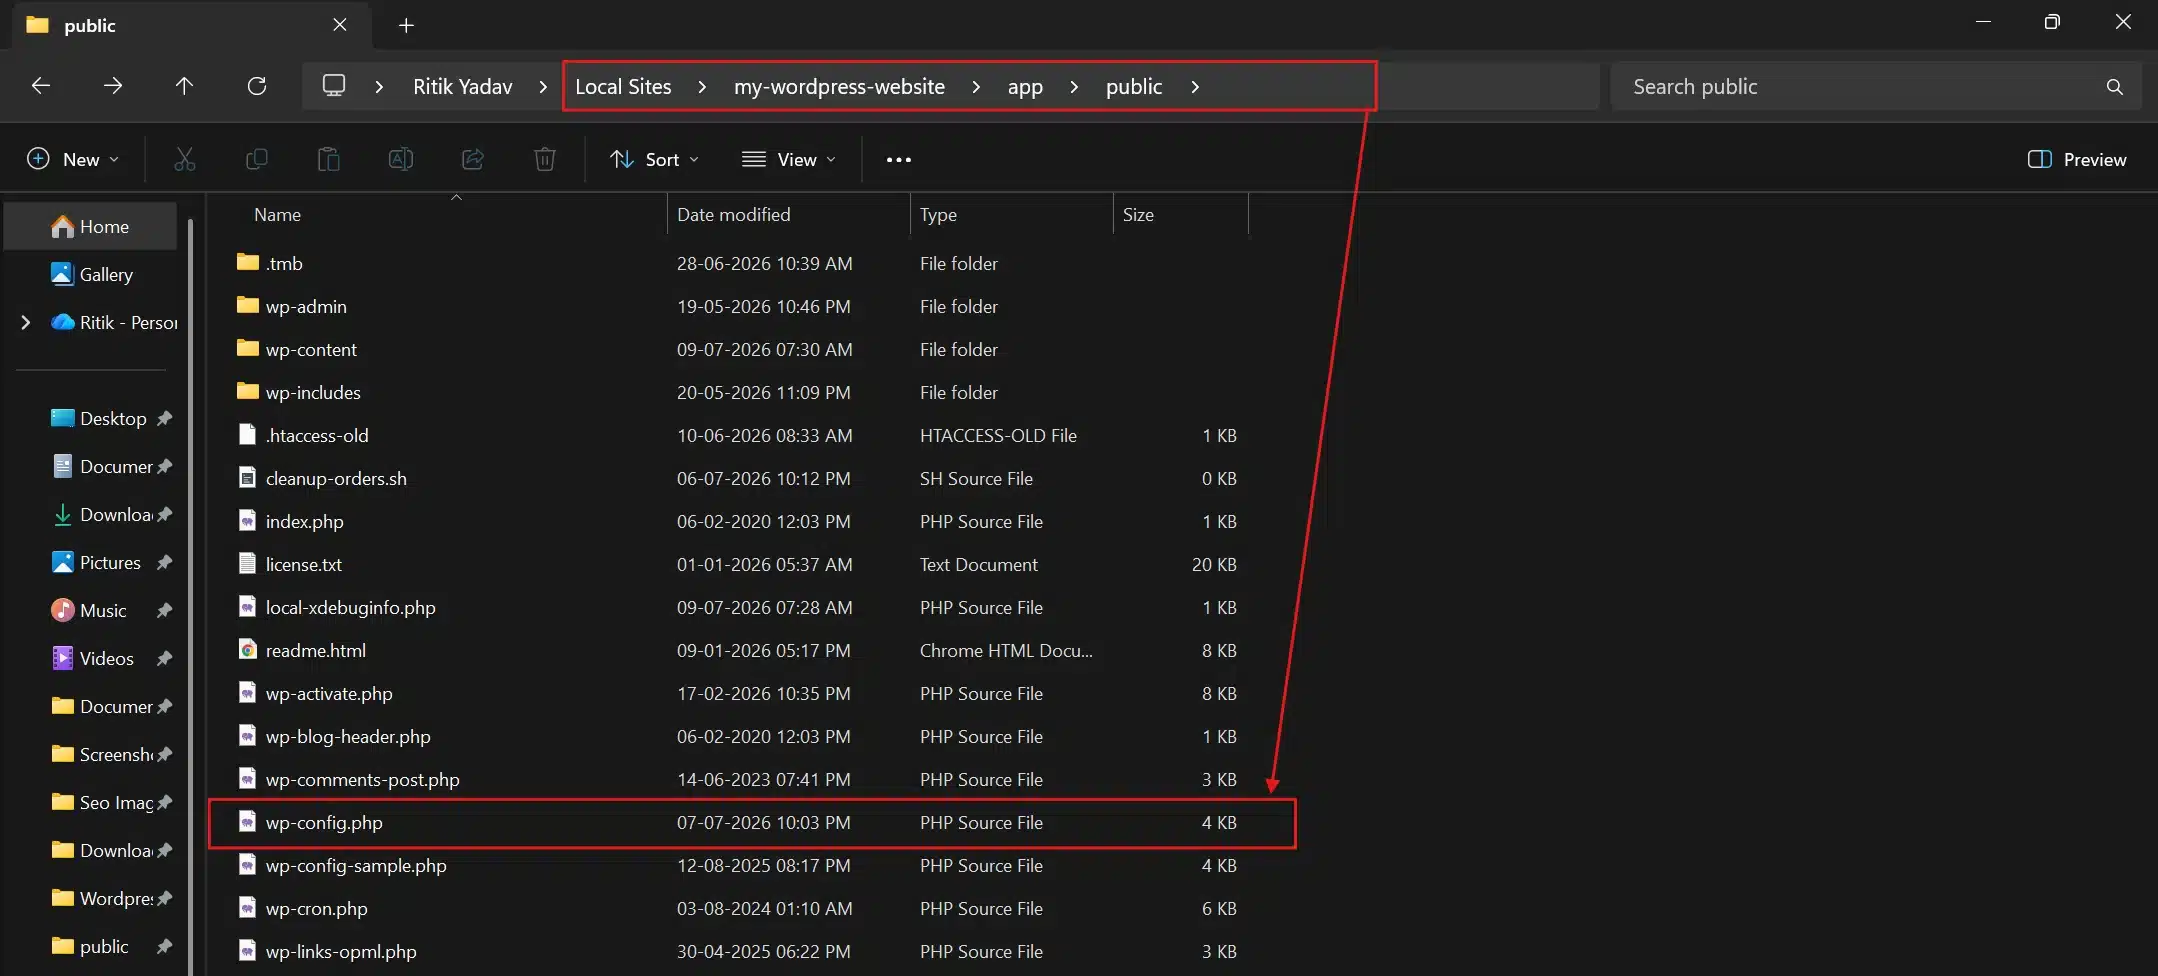
- Open
.wp-config.phpand set.WP_DEBUGto be true, along with.WP_DEBUG_LOGto true and.WP_DEBUG_DISPLAYto false, so errors are written to a log file instead of appearing on the live page.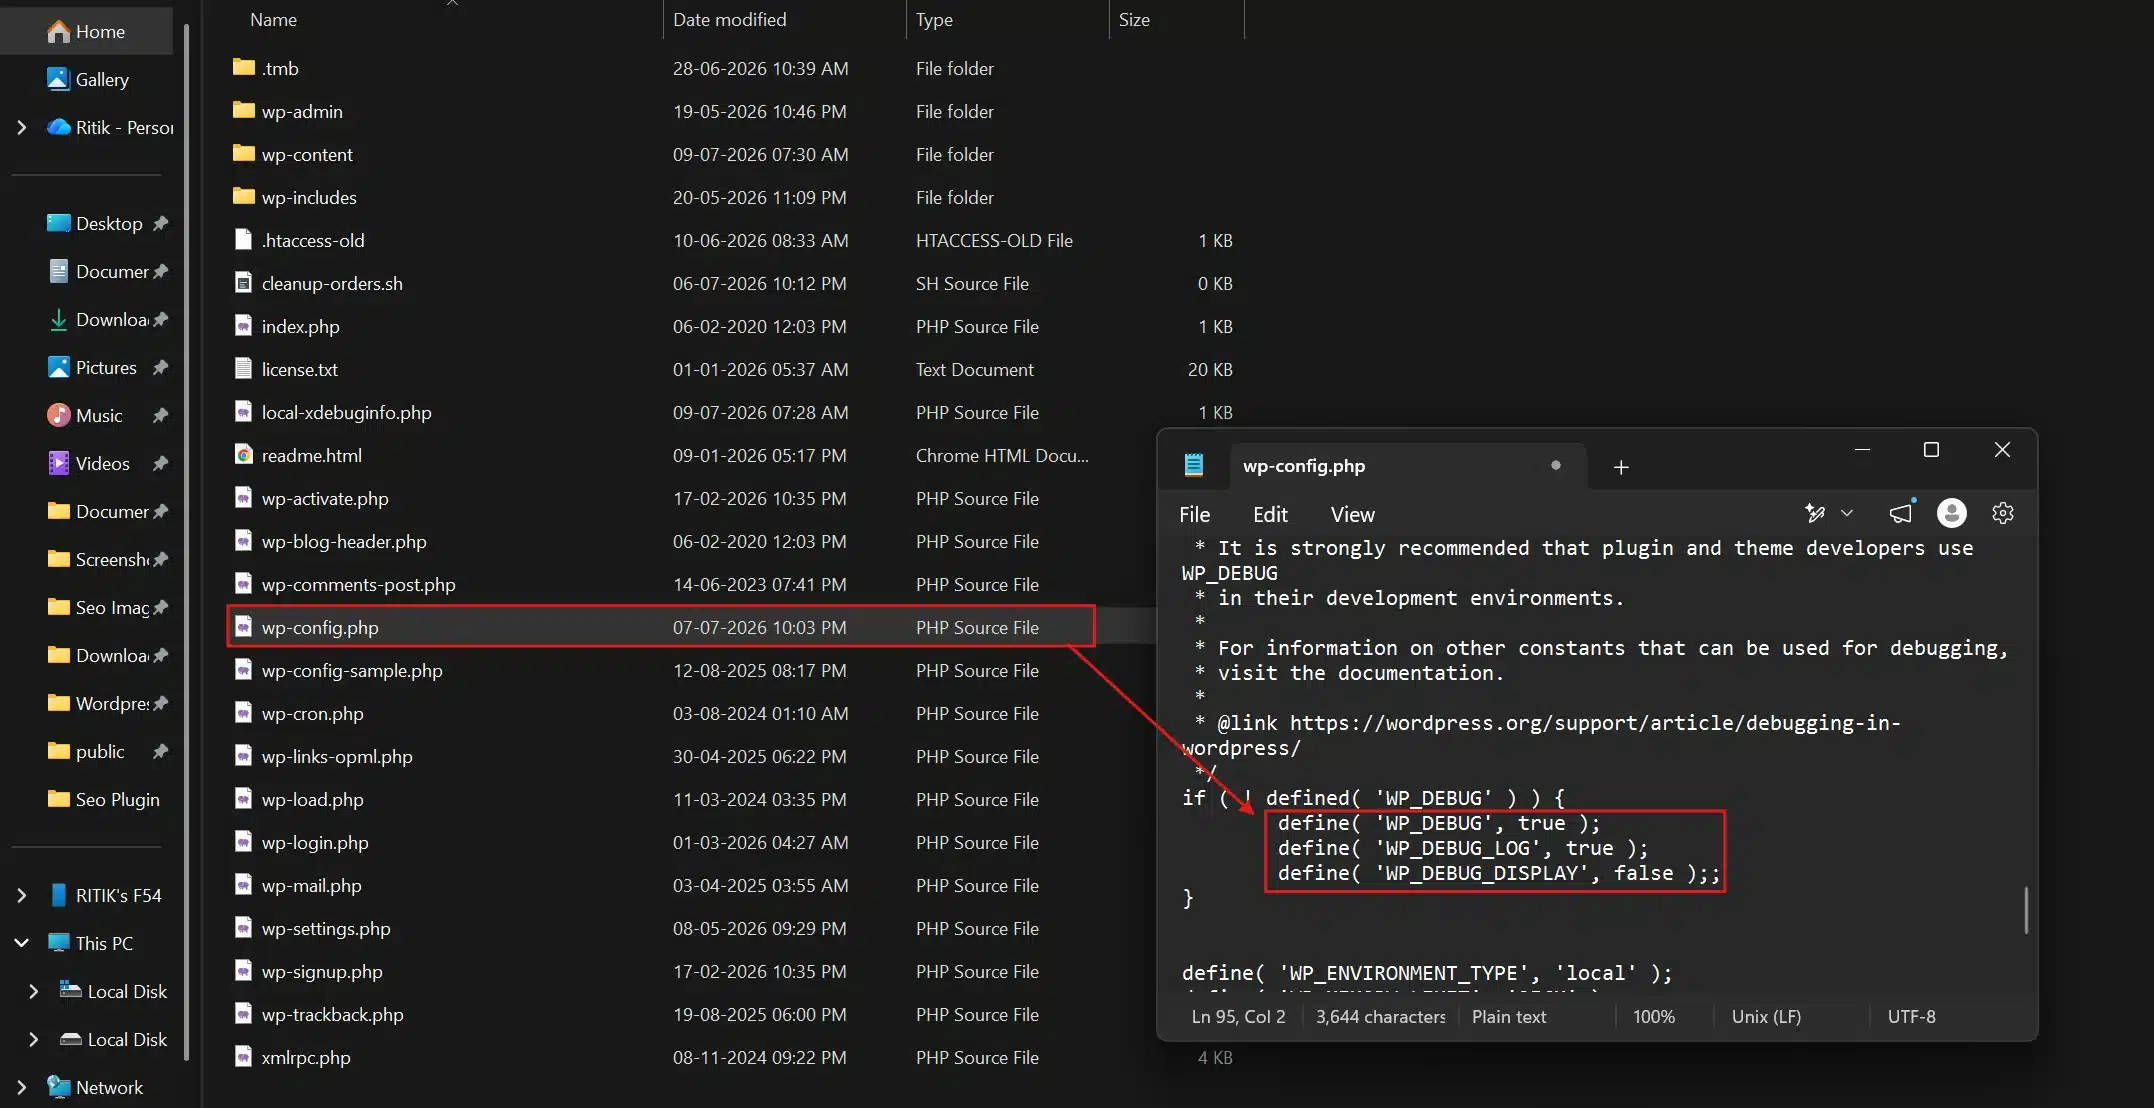
- Check
.wp-content/debug.logWhenever an error occurs, this is where WordPress now writes every PHP notice, warning, and fatal error.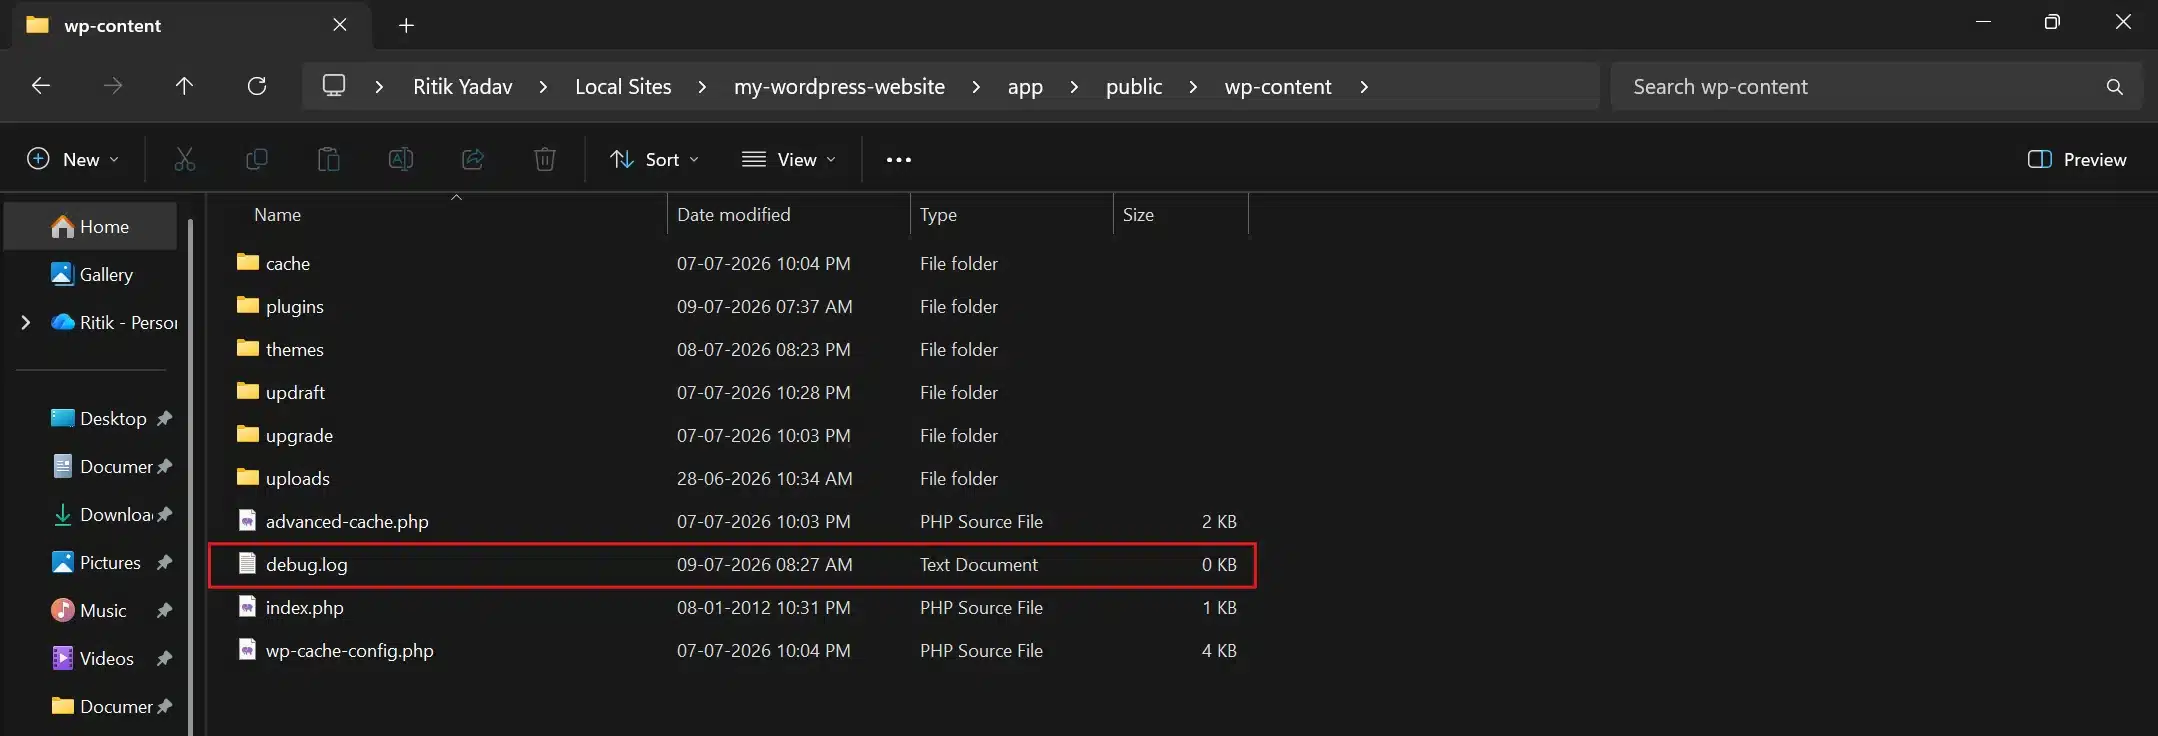
- Install Query Monitor from the plugin repository and activate it.
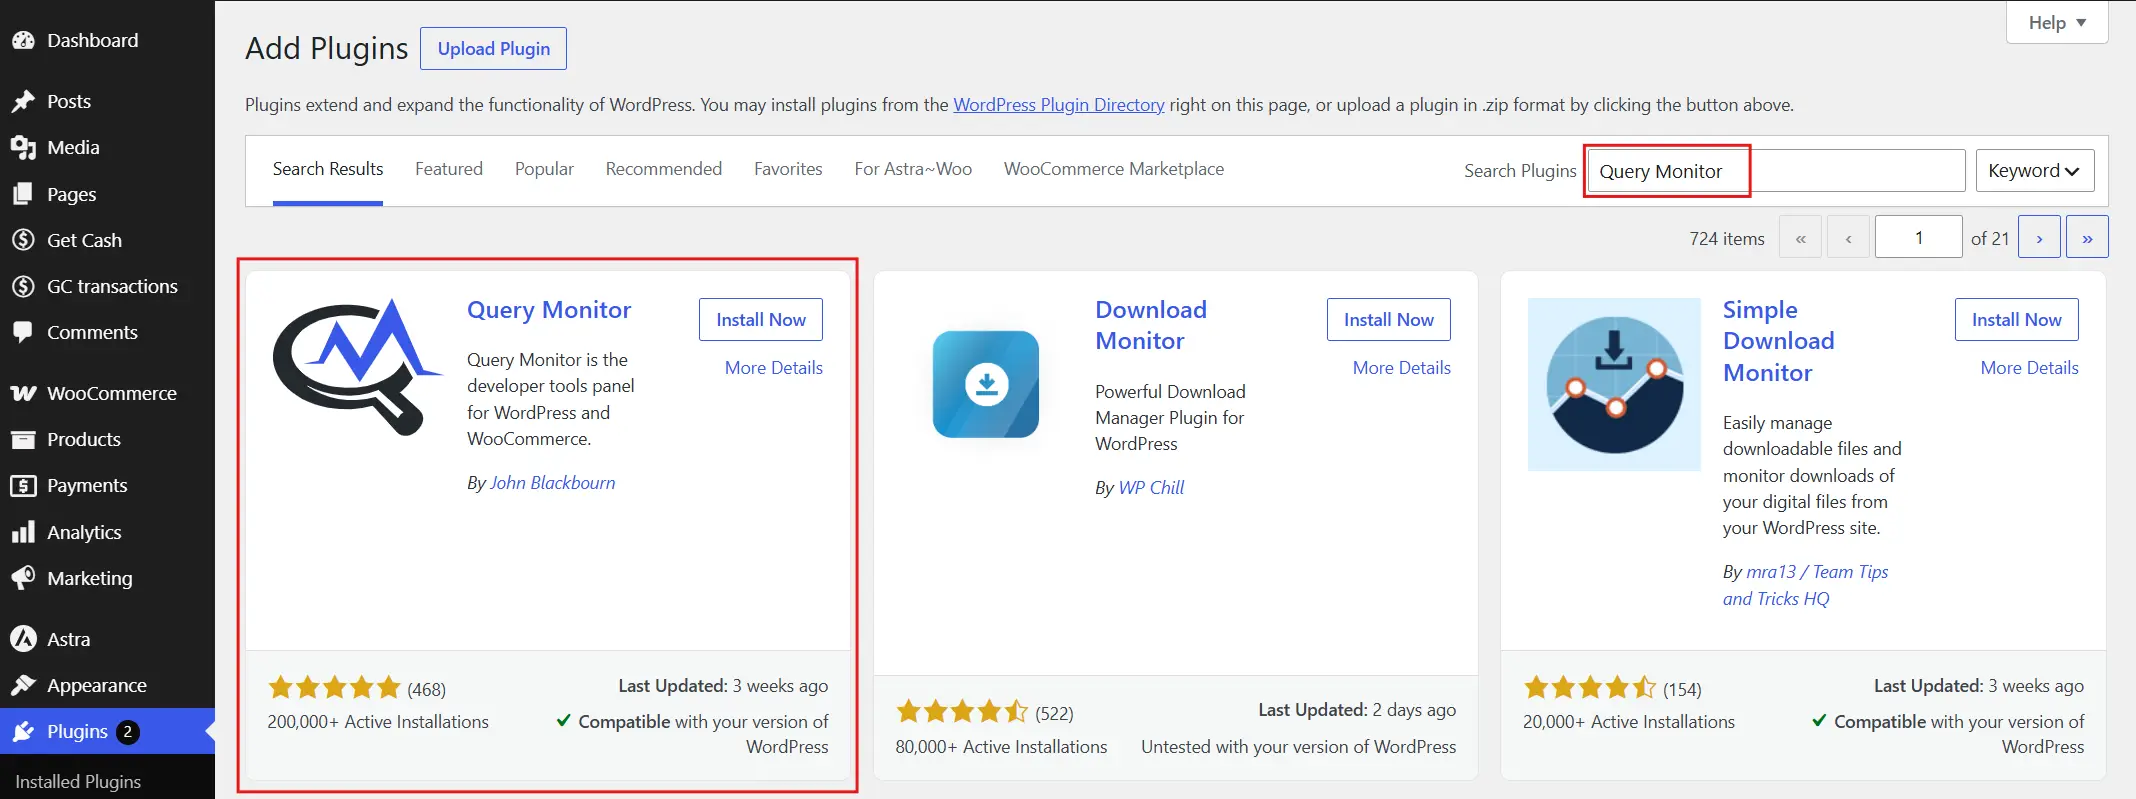
- Open the page you’re debugging, then click the Query Monitor icon in the admin toolbar to open its panel.
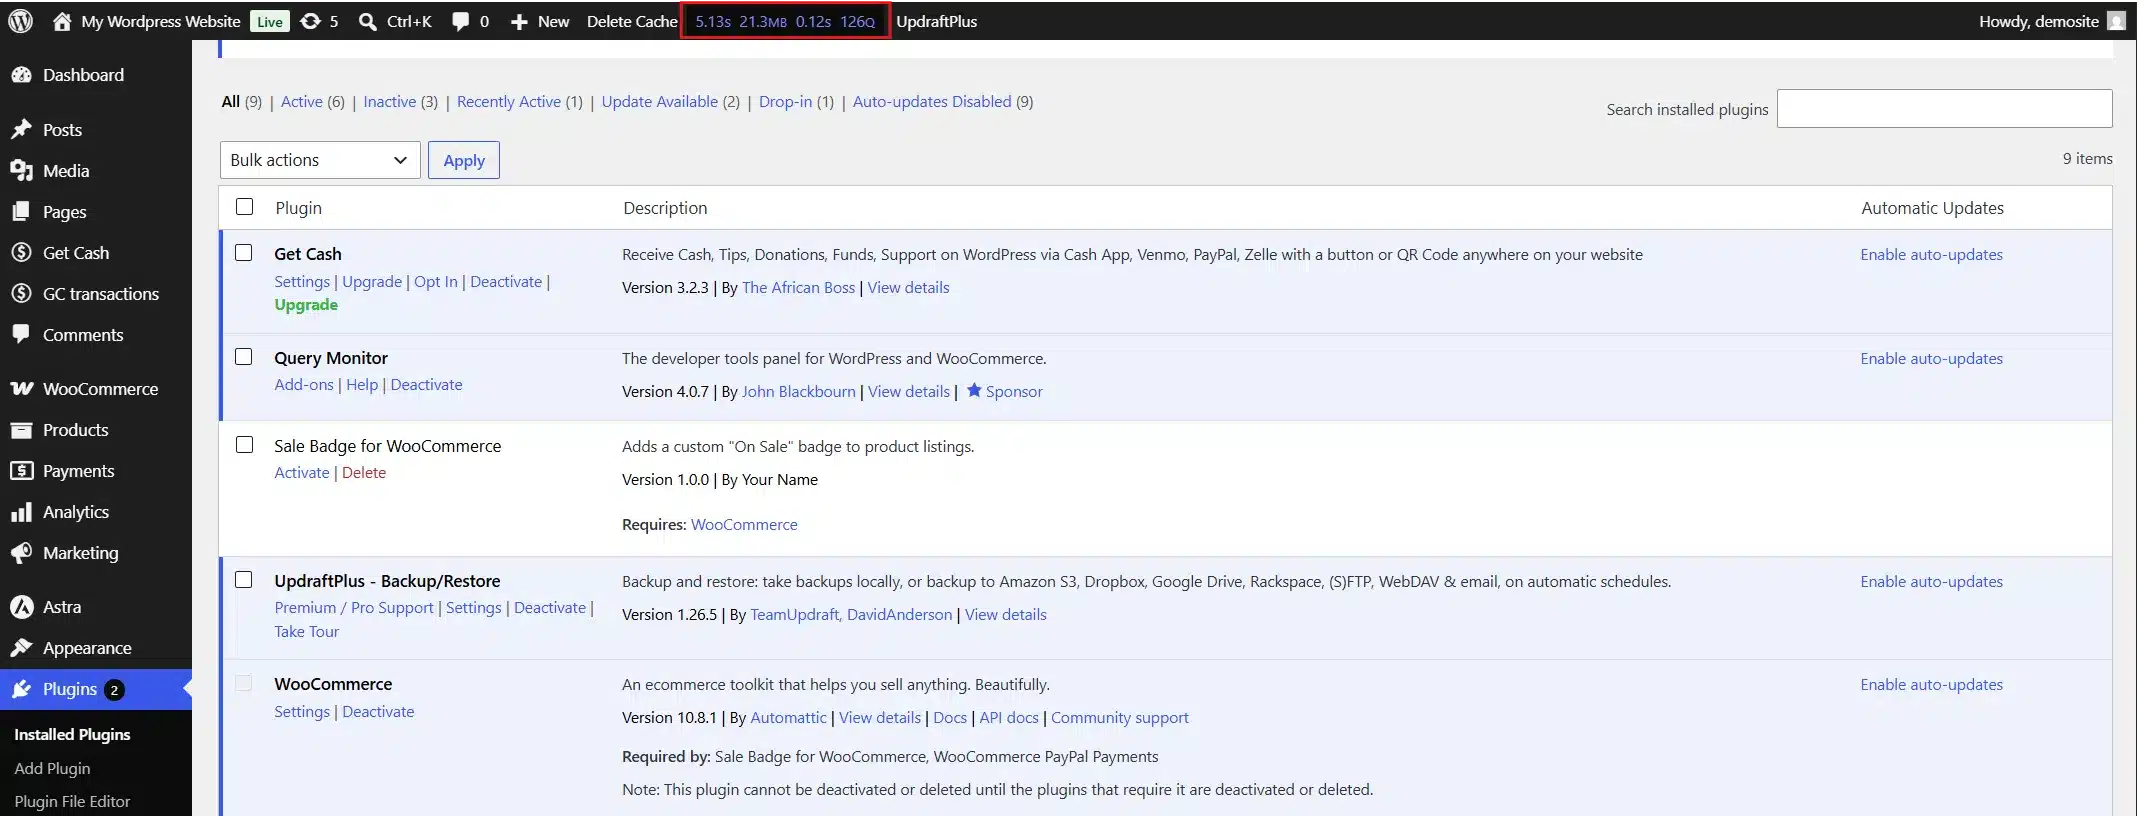
- Go to the Hooks & Actions tab to see every hook firing on that page, along with each callback function and its priority.
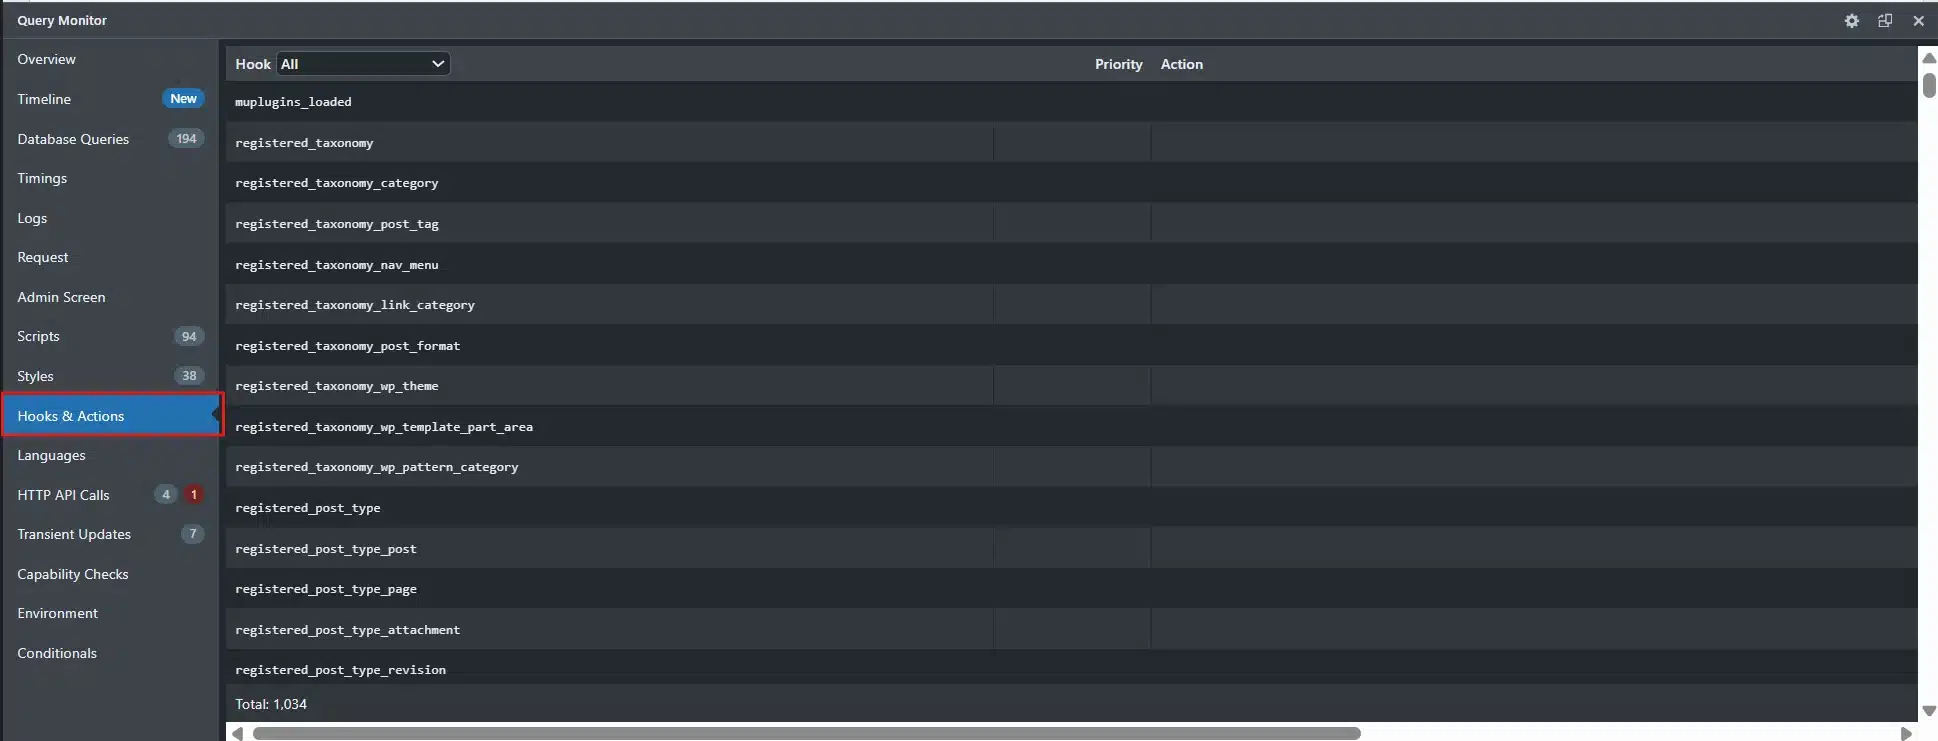
Confirm your custom function appears in that list. If it doesn’t, your hook never fired, usually because the priority is wrong, or the hook name was copied from an outdated tutorial.
Support-level insight: The single most common bug we see in custom WooCommerce plugins is a hook that never fires. Usually, it’s because the priority is wrong, or the hook name was copied from an outdated tutorial. Query Monitor shows you the fired hooks list, so you can confirm your function ran at all.
Step 8: Confirm HPOS and Block Checkout Compatibility
HPOS awareness is non-negotiable in WooCommerce plugin development now. WooCommerce’s High-Performance Order Storage changed where order data lives in the database. If your plugin reads or writes order data directly with old post-meta functions, it can silently fail on stores that have HPOS turned on.
Declare compatibility explicitly in your main plugin file:
add_action( 'before_woocommerce_init', function() {
    if ( class_exists( \Automattic\WooCommerce\Utilities\FeaturesUtil::class ) ) {
        \Automattic\WooCommerce\Utilities\FeaturesUtil::declare_compatibility(
            'custom_order_tables',
            __FILE__,
            true
        );
    }
} );
Trade-off worth naming: if your plugin queries orders directly with custom SQL against the old wp_posts Table, that’s a problem. You’ll need to rewrite those queries against the new order tables. There’s no shortcut around this one.
Also check that your plugin’s front-end elements render correctly on the block-based cart and checkout pages, not just the old shortcode versions. The WordPress 7.0 update pushes stores further toward block-based everything, so this step matters more now than it did two years ago.
Step 9: Package and Publish Your Plugin
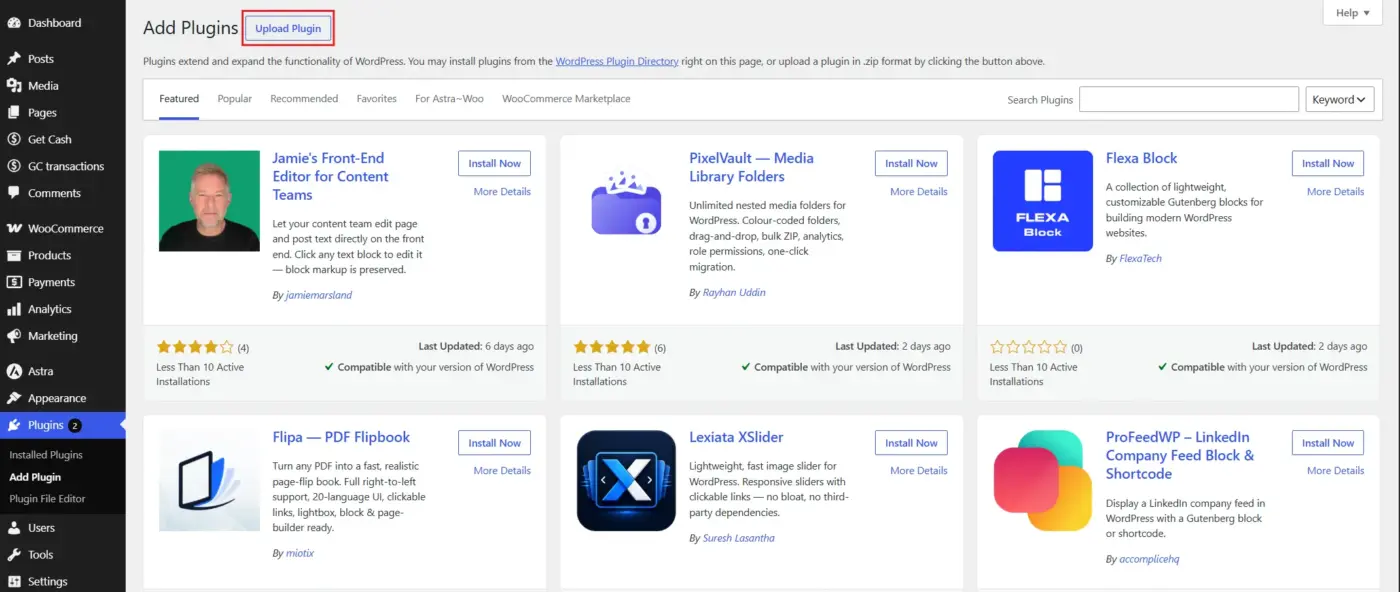
The publishing step is where WooCommerce plugin development turns into something real store owners can install. Zip your plugin folder, keeping the folder itself inside the zip rather than just the loose files. Test the zip by installing it on a fresh local site through Plugins > Add New > Upload Plugin, exactly the way a real user would.
From there, you have three paths. Submit to the WordPress Plugin Repository for free distribution and maximum reach. The WooCommerce Marketplace alone reaches over 3.6 million active stores, according to WooCommerce’s own developer documentation. Sell it directly through your own site if it’s built for a specific niche. Or keep it private if it only needs to work on one store.
Whichever path you pick, write a readme.txt file. It’s the first thing reviewers and users check, and a missing one is one of the most common reasons plugin submissions get bounced back.
Common Mistakes to Avoid in WooCommerce Plugin Development
A few mistakes show up in almost every WooCommerce plugin review we do for clients.
- Editing WooCommerce core files directly: Any change gets wiped the next time WooCommerce updates. Use hooks instead, every time, no exceptions.
- Function names without prefixes cause fatal errors fast: If two plugins both declare a function called
check_stock()WordPress crashes outright. Prefix every function and variable with something unique to your plugin, likesbw_in the examples above. - Sanitisation and escaping get skipped under deadline pressure: Any value coming from a form, a URL, or a database needs to be sanitised on the way in and escaped on the way out. Skipping this opens the door to SQL injection and cross-site scripting, and it’s also one of the fastest ways to fail a WordPress repository review.
- Reinventing what WooCommerce has already built: WooCommerce ships with methods like
is_on_sale(),get_price(), andget_stock_quantity()Precisely so you don’t have to query the WooCommerce REST API or write raw SQL for basic data. Reinventing them adds risk for no benefit. - Coding standards get treated as optional: Inconsistent indentation and naming might seem cosmetic, but it makes your plugin harder for anyone else, including future you, to maintain.
- Version checks are easy to skip: Declaring compatibility with WooCommerce and WordPress versions in your plugin header protects users from installing a plugin on a version it was never tested against.
- Staging sites get skipped under deadline pressure, too: Test on a local or staging copy first, always. A checkout bug on a live store costs real revenue, not just an afternoon of debugging.
Should You Build It Yourself or Hire a Developer?
WooCommerce plugin development doesn’t have to be all-or-nothing. Building it yourself makes sense when the logic is simple, you already know PHP, and you have time for testing. A badge, a small checkout tweak, or a basic settings page is a reasonable DIY project.
Hiring out makes more sense once you’re dealing with payment logic, HPOS-sensitive order data, or anything touching checkout at scale. A bug that miscalculates a discount is annoying. A bug that breaks checkout or miscalculates tax is a revenue problem.
The honest trade-off: DIY costs time, including fixing mistakes more than once. Hiring costs money upfront but shifts HPOS compatibility, security review, and long-term maintenance onto someone who does this daily.
Custom development has a reputation for being expensive, but pricing scales with complexity, not the “custom” label. A simple badge plugin costs far less than a multi-vendor marketplace integration.
If you’d rather hand it off, DevDiggers’ WooCommerce development services cover custom plugin builds, including HPOS compatibility and ongoing updates. We also maintain ready-made extensions, including a WooCommerce rewards plugin and a WooCommerce wallet system plugin, worth checking before committing to a custom build.
Conclusion
WooCommerce plugin development doesn’t require a computer science degree. It requires a local environment, an understanding of hooks and filters, and a willingness to test before you ship.
The nine steps above take you from an empty folder to a working, HPOS-compatible plugin ready for the WordPress repository or your own store. Screenshot each stage as you go, both to confirm you’re on track and to build your own reference for the next plugin you write.
Start with something small: a badge, a settings tweak, a single custom field. Get comfortable with hooks before you attempt anything that touches checkout or payment logic. Once the basics feel natural, WooCommerce plugin development stops being difficult and starts being just another part of running your store.
Frequently Asked Questions (FAQs)
Q1. Do I need to know JavaScript for WooCommerce plugin development?
Not for basic plugins. PHP and WordPress hooks cover most functionality changes. JavaScript becomes useful once you’re customising block-based checkout elements or building interactive admin settings, but it’s not a requirement to get started.
Q2. How long does WooCommerce plugin development take for a simple project?
A simple plugin, like the sale badge built in this guide, usually takes a few hours once your local environment is set up. Anything touching checkout, payments, or HPOS-sensitive order data can take days or weeks, depending on how much testing it needs.
Q3. Can I sell a WooCommerce plugin I built myself?
Yes. You can sell it through your own website, list it on a marketplace like CodeCanyon, or release it for free on the WordPress Plugin Repository. Each option has different review requirements, so check them before you commit to one.
Q4. Will my plugin break when WooCommerce updates?
It shouldn’t, as long as you built it using WooCommerce’s hooks and filters instead of editing core files directly. Plugins that hook in properly tend to survive updates. Plugins that hardcode assumptions about WooCommerce’s internal file structure are the ones that break.
Q5. What’s the difference between a WooCommerce plugin and a WordPress plugin?
A WooCommerce plugin is a specific type of WordPress plugin built to interact with WooCommerce’s hooks, functions, and data structures. A general WordPress plugin might have nothing to do with WooCommerce at all. Every WooCommerce plugin is a WordPress plugin, but not every WordPress plugin is a WooCommerce plugin.
Q6. Do I need a separate staging site once my plugin is live?
Yes, and it should stay separate from your local development site. A staging site mirrors your live store’s data and settings, so you can test plugin updates against real product catalogues and order history before pushing changes to customers. Skipping this step is how a working local build turns into a broken live checkout.