How to Change a Logo in WordPress

Updating your logo in WordPress is a very important task if you want to maintain your website’s visual identity as well as brand consistency. In the case of rebranding or refreshing your website’s appearance, a new logo can ensure that your presence on the web reflects what your business wants.
To WordPress users, updating their logo is straightforward and doesn’t necessarily require advanced technical capabilities. You can upload, customize, and test your new logo in no time by following a few simple steps.
This guide explains step-by-step how to change a logo in WordPress. It covers everything from the dashboard to changing its appearance. Whether you use a default or premium theme, you’ll get practical advice on ensuring that your logo looks good on every device.
So, let’s get started!
Why Updating Your Logo Is Important
Your logo defines your brand. It often is the very first thing visitors notice. It becomes a very key factor in establishing trust and recognition, especially if your site has a blog, eCommerce or even an online business portfolio.
An updated logo ensures the consistency of your digital presence. So, let’s get to the practical process of how to update a logo.
How to Change a Logo in WordPress: Step-by-Step Guide
Follow the below steps to change a logo in WordPress effectively and quickly.
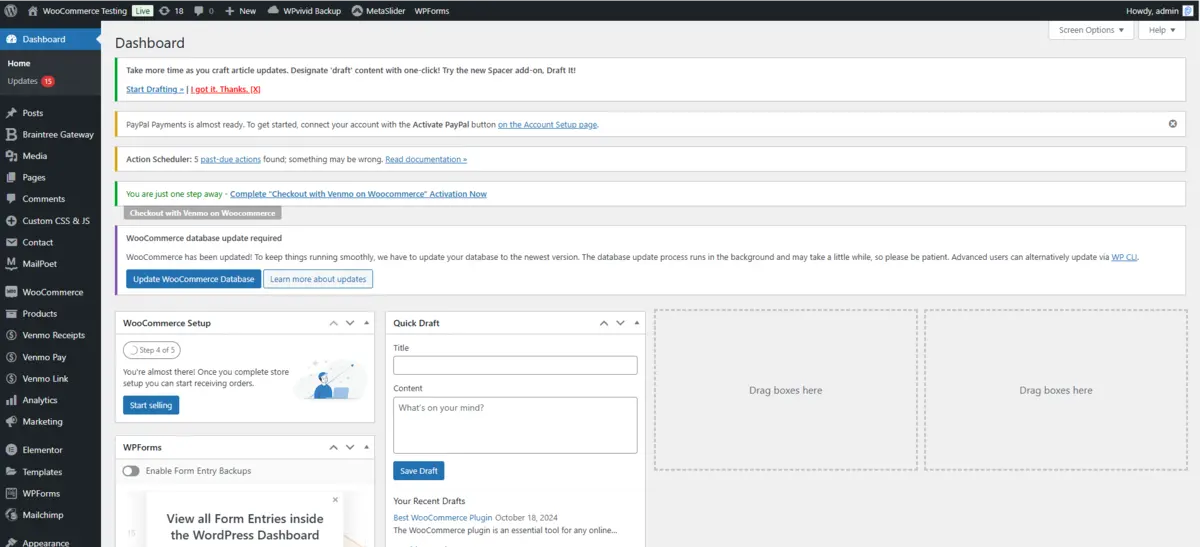
Step 1: Access the WordPress Dashboard

To change your logo, start by logging into your WordPress dashboard:
- Open your browser and go to your WordPress login page (usually
yourwebsite.com/wp-admin). - Enter your username and password to access the dashboard.
Once logged in, you’re ready to begin the process of changing your logo.
Step 2: Identify Your Theme’s Customization Options

WordPress has numerous themes and, therefore, has different settings to customize each of them. This is how you find those settings:
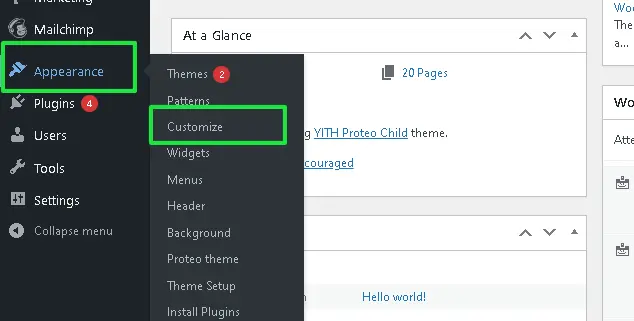
- Navigate to WordPress Dashboard → Appearance → Customize.
- This opens the WordPress Customizer, which is a very intuitive interface in which you can make changes on the fly.
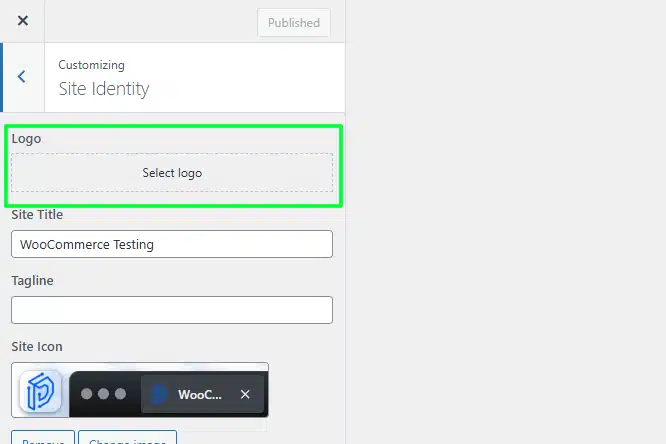
- Under the Site Identity or Header, most themes will have a logo settings option.
If you’re using a premium theme, the process might differ slightly, but the principle remains the same.
Step 3: Upload a New Logo

You need to follow these steps from when you have accessed your site’s customization options if you want to upload the new logo:
- In Site Identity, click the place that says Upload logo.
- On your screen, click on Select Logo.
- Then, The WordPress Media Library opens. You can use either an existing image from the Media Library or upload a new one using drag-and-drop capabilities on your uploader.
- You can crop the logo at will using WordPress’s own built-in cropping tool.
- Save your change by clicking the Publish button.
Pro Tip: Make sure your logo file is in a web-friendly format such as PNG or JPG and has the recommended dimensions specified by your theme.
Step 4: Customize the Logo Appearance

After uploading your logo, you might want to adjust its size, position, or alignment. Depending on your theme, you can:
- Resize the Logo: Use sliders or input fields to adjust the logo size.
- Adjust Padding and Margins: Fine-tune the spacing around your logo to ensure it fits perfectly with your site’s header.
- Change Logo Position: Some themes allow you to place the logo in different header locations, such as centred or aligned to the left.
Experiment with these options until you achieve the desired look.
Step 5: Use a Logo Plugin (Optional)

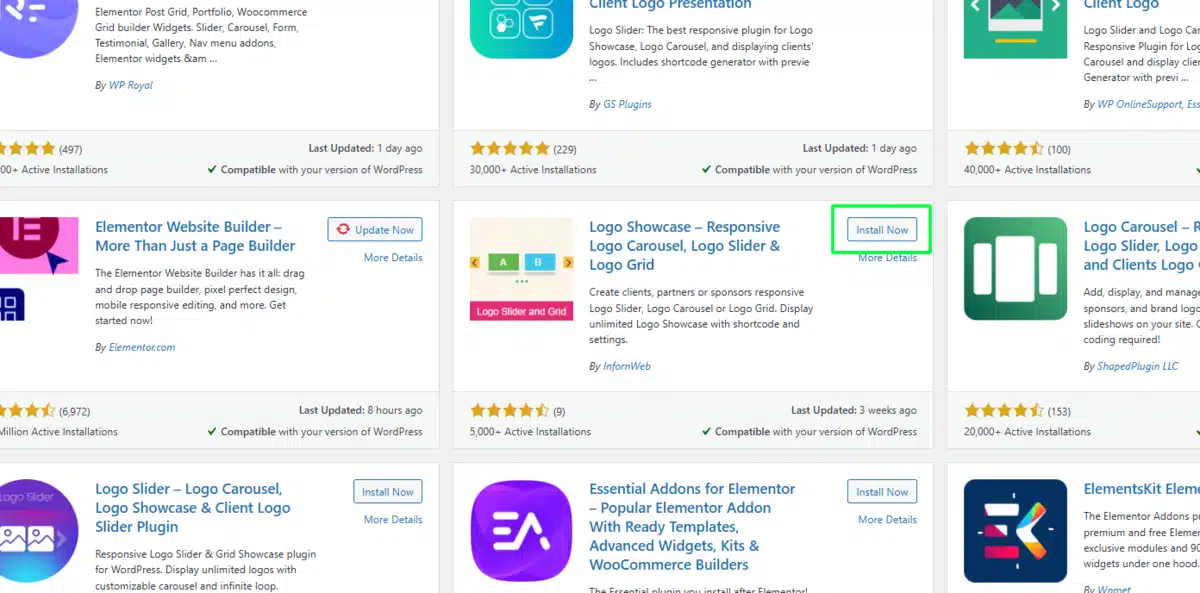
If your theme doesn’t offer the flexibility you need, consider using a plugin. Plugins like Custom Header and Footer or WP Logo Showcase provide additional customization options. Here’s how to install and use a plugin:
- Go to Plugins → Add New in your WordPress dashboard.
- Search for the logo customization plugin in the search bar.
- Install and activate the plugin of your choice.
- Follow the plugin’s instructions to modify and upload your logo.
Plugins can add functionality like animated logos, rotating images, or advanced placement settings.
Step 6: Preview and Test Your Logo
Preview your website before finalizing the changes to ensure that your logo appears correctly on all devices. Here are some tips for testing:
- Check the desktop, tablet, and mobile views within the WordPress Customizer.
- Go through different pages of your site to confirm the logo’s consistency.
- Test your logo’s loading speed to ensure it doesn’t slow down your website.
Step 7: Clear Your Cache
If you still cannot see the updated logo after trying the above steps, your browser’s cache may be the problem. Do the following to clean its cache:
- Use the above caching plugin, like W3 Total Cache or WP Super Cache.
- If you do not know a shortcut to do that either, go directly to your browser’s settings, where you can select Clear Browsing Data.
- Reload your website for confirmation.
Final Thoughts
Uploading the logo in WordPress is also an easy yet effective move to beautify your web page and maintain the company’s branding. It applies to either rebranding or simply giving a fresher look to your webpage.
The process is both straightforward and flexible to allow you to apply it to other themes and customization requirements for your site. Follow all the steps of this guide with confidence and upload, customize and test your logo on various gadgets.
Your logo is something more than a graphic image. It is a symbol of who you are and what you stand for. So be sure to choose a good design that really reflects what you stand for and also speaks well to your intended audience.
FAQs
Can I change my logo without knowing how to code it?
Yes, WordPress provides an easy-to-use Customizer where you can upload and edit your logo without needing any coding skills.
What is the recommended size for a WordPress logo?
The size depends on your theme, but most recommend dimensions around 250×100 pixels for optimal display.
Why isn’t my new logo showing up after updating?
This may be due to browser or website caching. Clear your browser cache, and if you are using a caching plugin, clear the site cache as well.
Can I upload a transparent logo?
Yes, WordPress supports transparent logo files in PNG format, which is ideal for maintaining a clean look on various backgrounds.
What should I do if my theme doesn’t support logo customization?
You can use a logo plugin like Custom Header and Footer to add and customize your logo or consider switching to a more flexible theme.

Abhijit Sarkar
I am deeply passionate about creating engaging content and exploring. My journey includes gaining valuable experience in content writing and creating useful resources for my readers.

Leave a Reply