How to Add Pages In WordPress – A Step-by-Step Guide

Want to know how to add pages in WordPress?
No worries! This blog gives you a step-by-step guide to starting as a beginner.
Pages are useful for details you don’t want to change, such as your business and account details or privacy.
WordPress ensures that you add pages smoothly, helping you organize your site. While blog posts change regularly and appear on your homepage, pages stay the same as initially.
Learning how to add pages in WordPress helps you build a strong foundation for your website.
What are WordPress Pages?
We add pages in WordPress to keep the foremost content, such as About Us, Contact, and Privacy Policy. Pages are not located in your blog feeds like the blog posts.
When you add pages to your WordPress site, it helps you keep everything organized.
You can easily switch to different URLs to meet your needs. You can also add pages to store your contact forms, legal notices, or special landing pages without even caring about your latest blog posts.
This step-by-step guide will take you all the way long to everything you need to get started!
How can you Add Pages In WordPress?
- To add pages in WordPress, first log in to your WordPress dashboard.
- Navigate to the left, click on Pages, and then hit Add New.
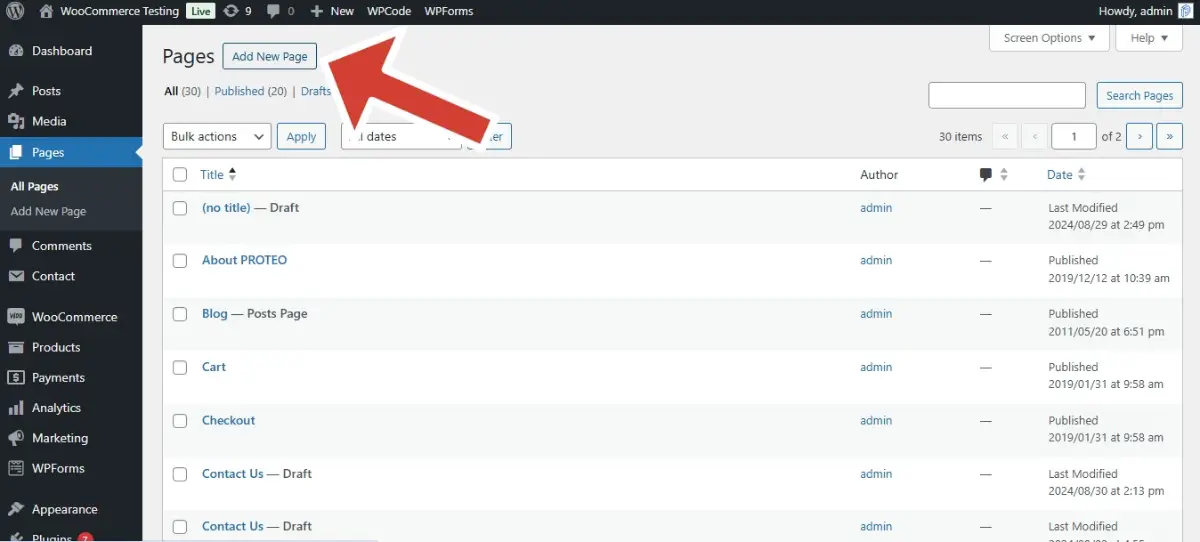
Now, depending on your WordPress version, you will be directed to either of the WordPress editors – Gutenberg or Classic. If your WordPress version is 5.0 or above, then you will have Gutenberg Editor and Classic Editor.
Add Pages In WordPress using Gutenberg Editor
After following the above instructions to add pages, if your WordPress version is 5.0 or above, you will have the interface of WordPress Gutenberg Editor.
Now, we will create a new page and can easily customize your page for you.
1. Add Title to Your Page
The title you add to your WordPress page will define your page name. You can change it anytime you want.
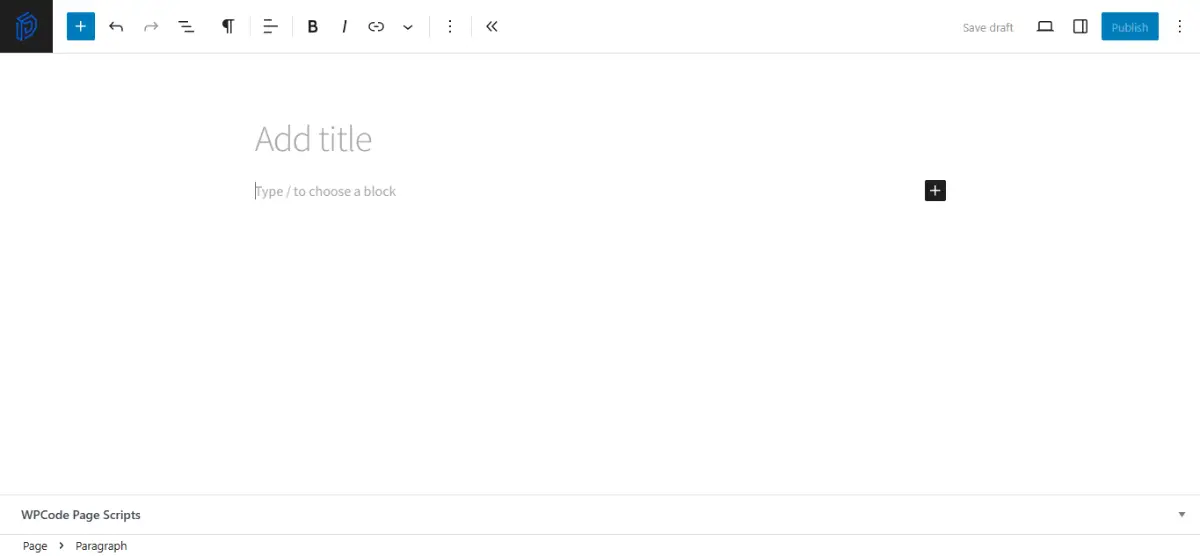
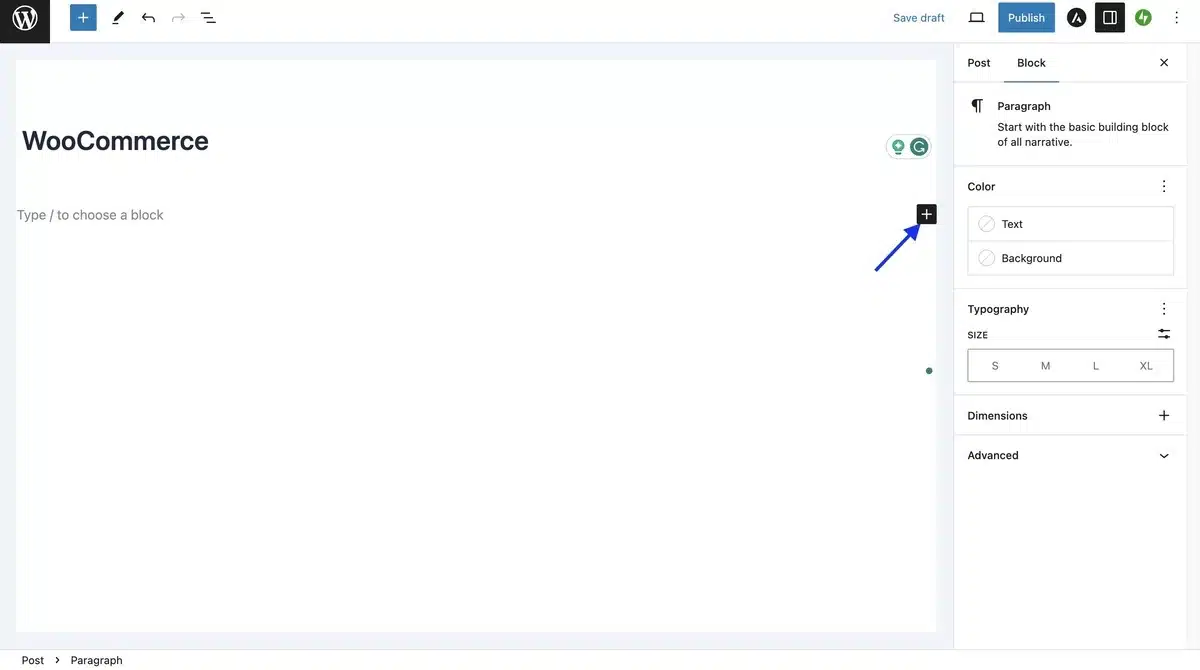
2. Include Content to Your Page
The Gutenberg Editor allows you to add pages with organized content to your WordPress.
It involves an interface of blocks where, at each block, you can enter any content as per your choice, be it a paragraph, heading, image, list, etc., by simply clicking on the + icon.
3. You can Edit the URL Slug of Your Page
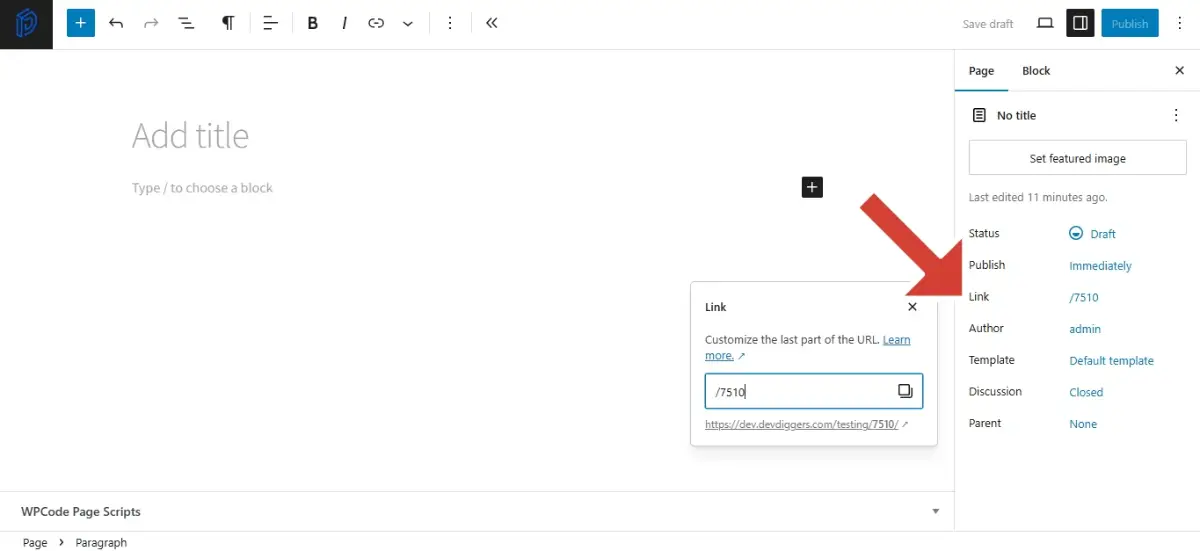
The URL slug is the last part of any URL. You can easily customize your page’s URL slug as per your choice. Here are the simple steps you need to follow.
- On the right, navigate to the Settings icon and click Page.
- Scroll below; you will find the Link.
- Click it and edit the current slug with another one of your choice after you add pages in WordPress.
4. Preview After You Add Pages to the WordPress Site
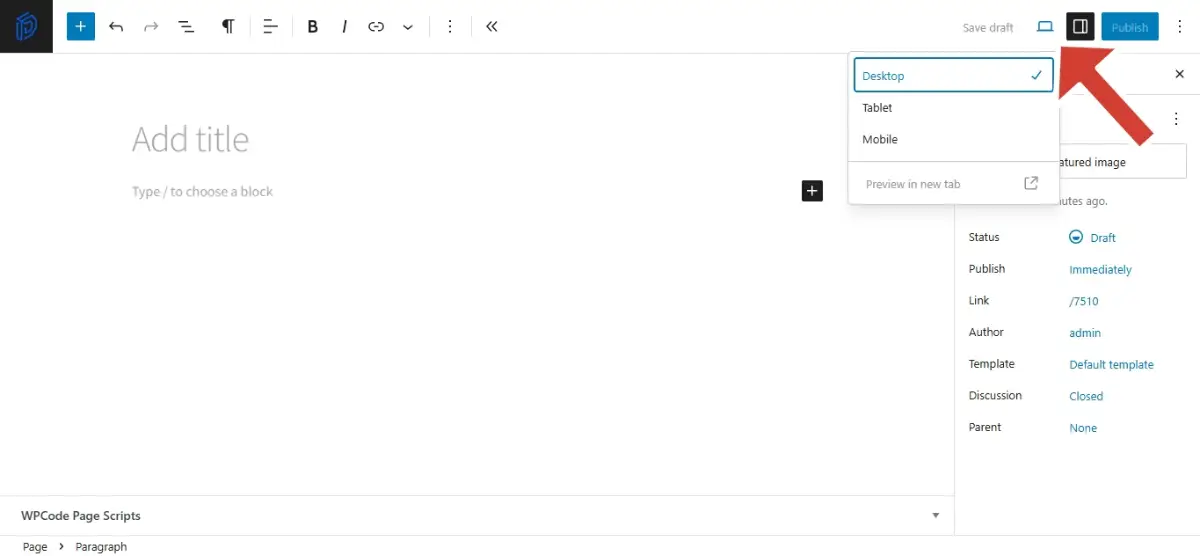
Simply hit Preview to see how your page looks. If you are not sure to publish at this point, you can also save it by clicking Save Draft.
5. Publish Your Page
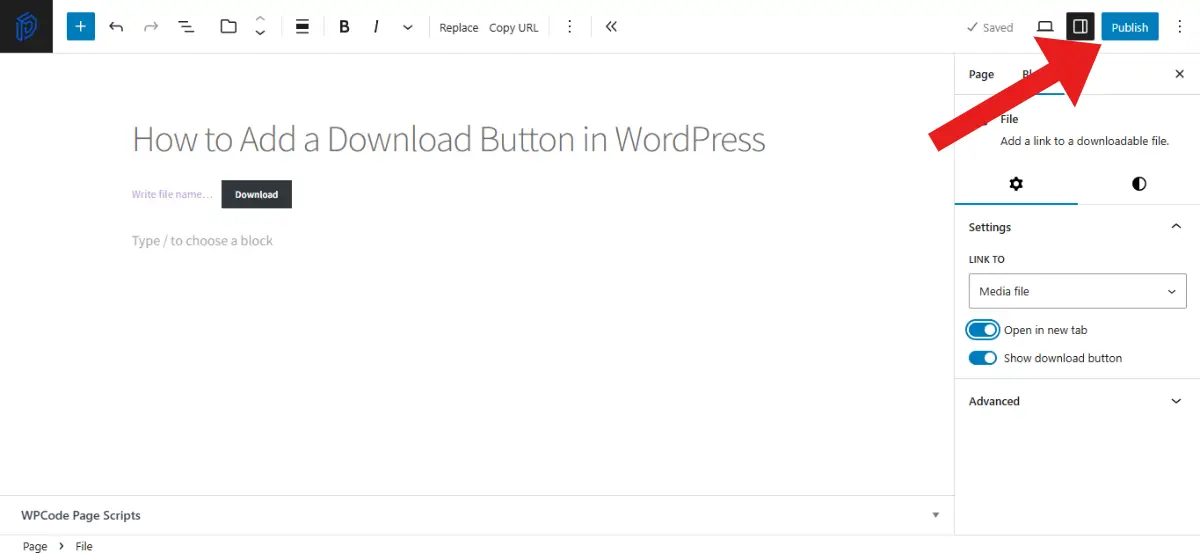
If you feel confident about starting your online presence, simply hit Publish to get the world to see your page in WordPress.
6. Add the Page You Add In WordPress to Your Menu
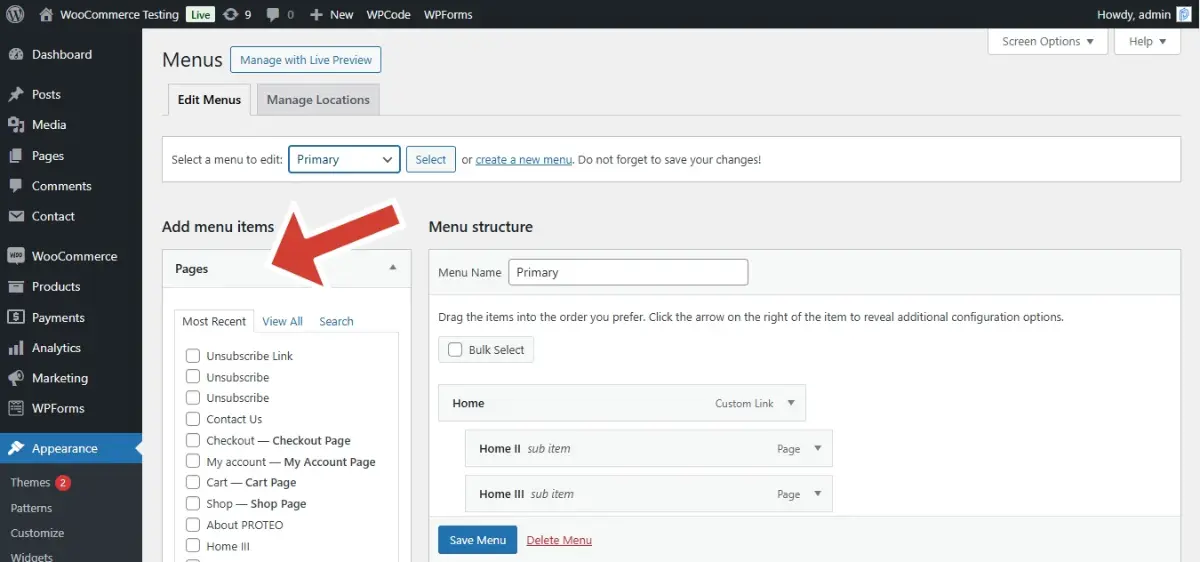
Now, this step is optional; if you want, you can also add your page to your WordPress navigation menu.
- Go back to your Dashboard.
- On the left, Go to Appearance, then Menus.
- Select the page you want to add to your WordPress navigation menu and hit Add to Menu.
Add Pages in WordPress using Classic Editor
If you are someone looking for a simple and traditional touch in your editing, you can use the Classic Editor to add pages to your WordPress site.
1. Install the Plugin for WordPress Classic Editor
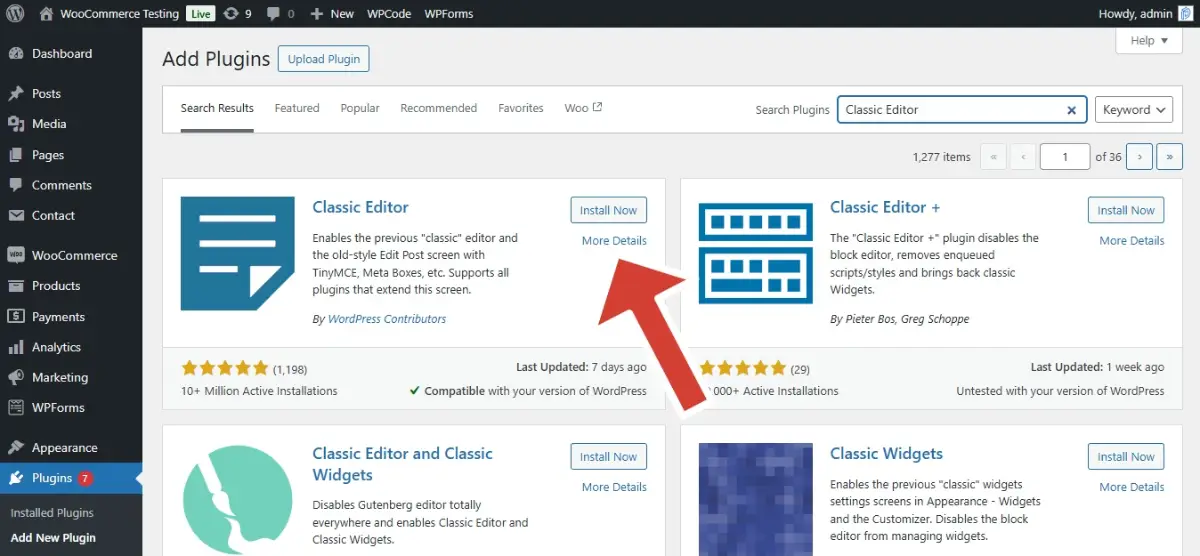
- In your WordPress Dashboard, navigate through Plugins.
- Click on Add New Plugin.
- You will have an interface where you can search for Classic Editor, then hit Install Now.
- Once gets installed in your WordPress Page, hit Activate.
2. Set Classic Editor Default to Add Pages In WordPress
After you add pages to your WordPress site, you can also set the Classic Editor as your default editor by simply walking through Settings from your Installed Plugins and then hitting Writing.
After that, select Classic Editor to set it as the default editor for adding pages to your WordPress.
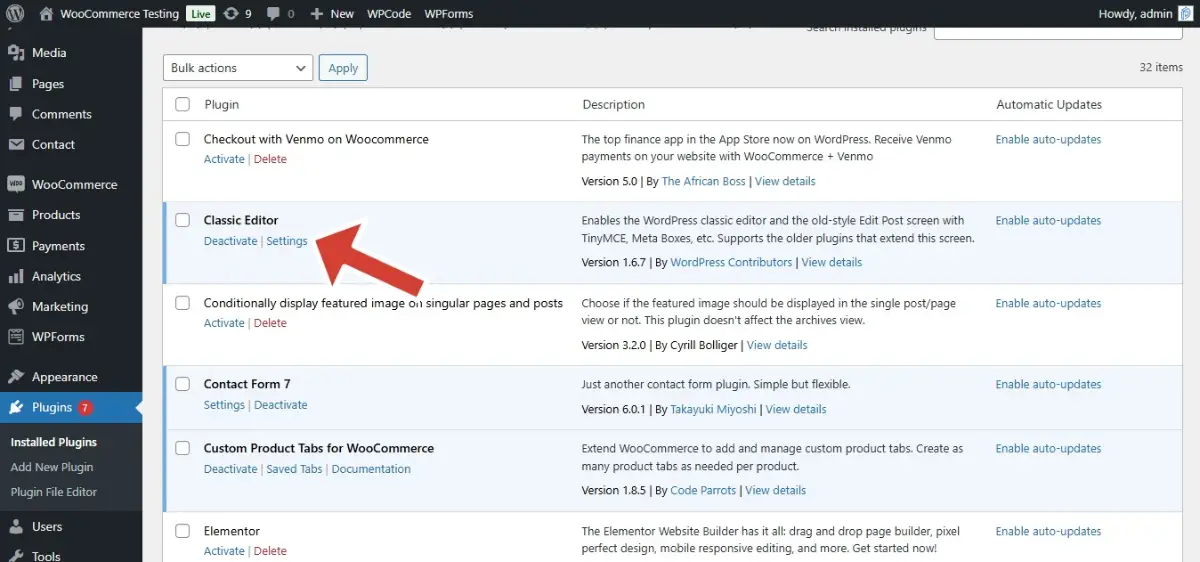
- Go to Plugins and click on Installed Plugins.
- Under Installed Plugins, you will see Classic Editor. Go to Settings.
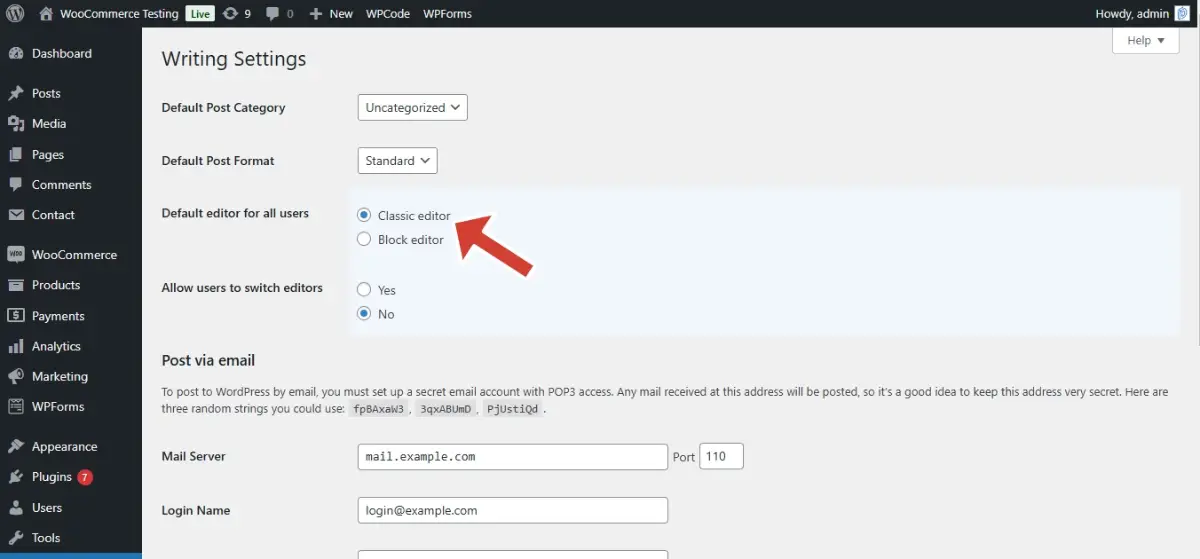
- You will be redirected to Writing Settings.
- Choose Classic Editor as the default editor for all users.
3. Add a New Page in WordPress Using Classic Editor
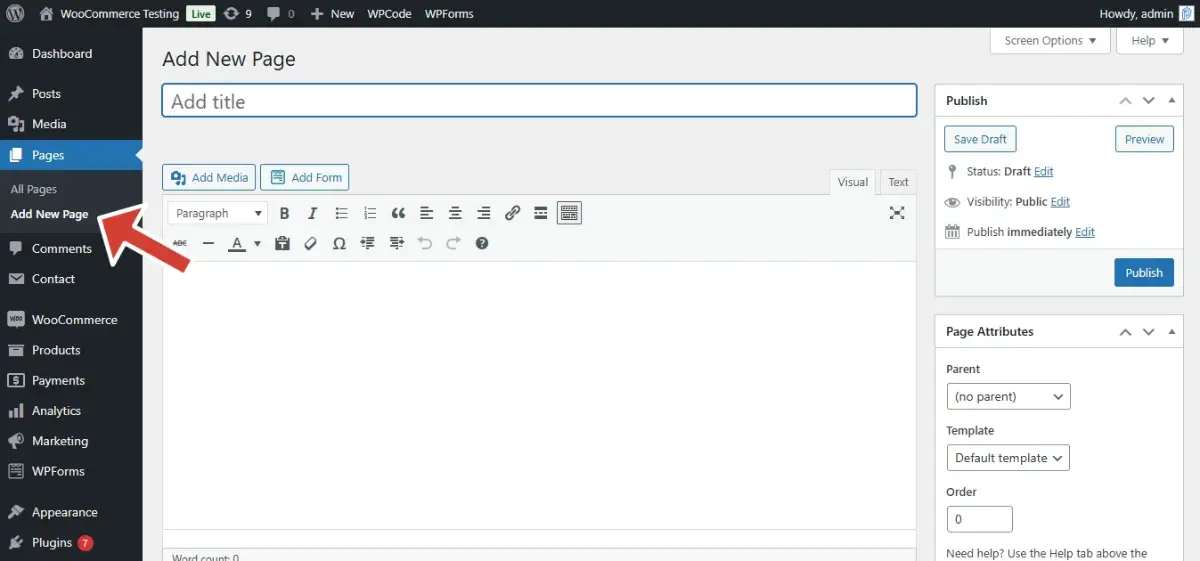
Navigate through Pages, then hit Add New Page to open the editor. Enter your page title at the top and use the large textbox to write your content.
You can also format your content in bold, italics or underline on your added page in WordPress using the toolbar above the text.
4. Add Images And Videos
To add any media to the page you add in WordPress, click Add Media. You can go for your new files or select from your existing library there.
5. Preview Your Page And Publish it
Hit Preview to see how your page looks. If you feel safe to be online, hit Publish to make it live.
Edit After You Add Pages In WordPress
Once you have finished having a published WordPress page, you can always go back and make changes after adding pages in WordPress whenever you need to. Here’s how you can go through it.
1. Log In to Your WordPress Dashboard
Go to your WordPress site and log in to your dashboard.
2. Navigate to the Pages Section
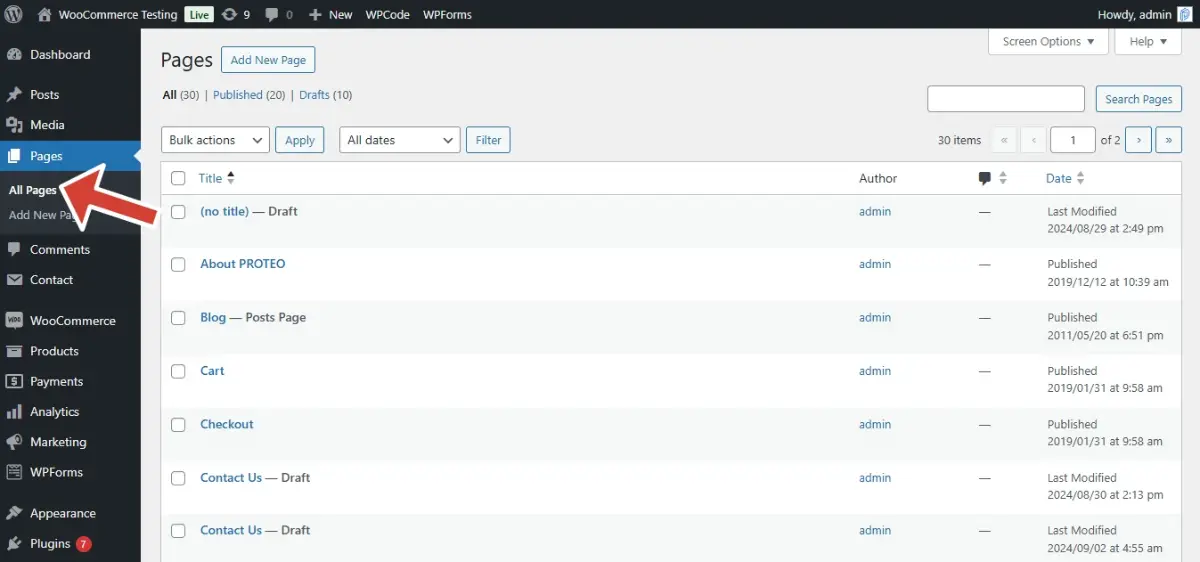
On the left of your dashboard, hit Pages, then All Pages.
3. Look for the Page You Want to Edit
Look for the pages you want to edit on your WordPress site, such as published, drafts, scheduled, or trashed.
4. Edit the Chosen Page In Your WordPress Site
Now, you can update text, modify images, or adjust the page layout. While browsing your site, you get to see an Edit Page link, which you can use to quickly open the page editor.
This link is only visible to the owners when they are logged in.
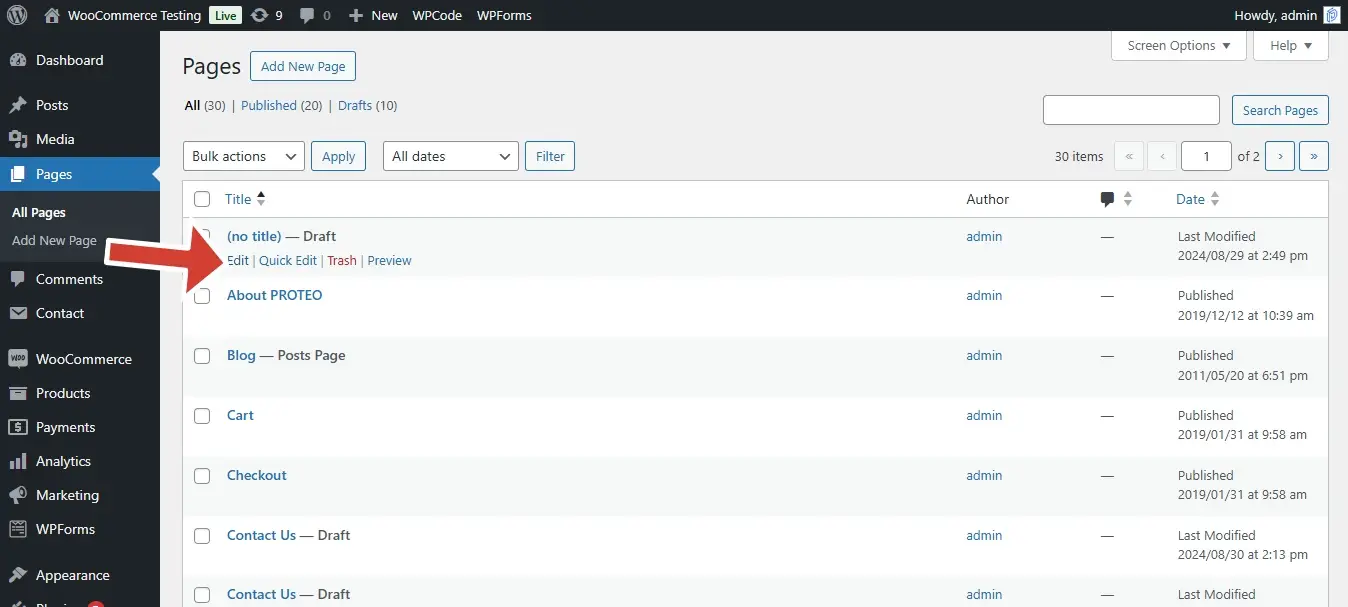
5. You also Get Quick Edit Options
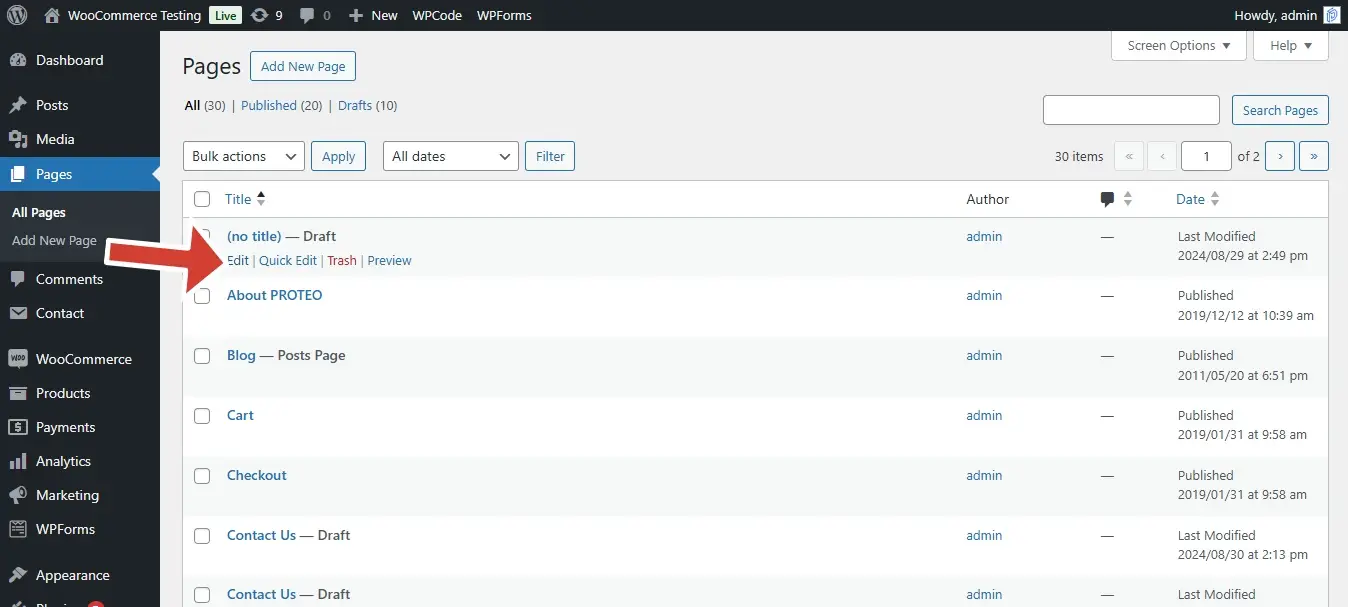
While hovering over a page title in the Pages list, you will have options like Edit, Quick Edit, Trash, and View. Edit opens the full editor to make changes to the page.
Quick Edit allows you to modify basic details like the title, URL, or publishing date. Trash throws the page into the trash bin if you don’t need it anymore.
View shows how your page looks to your visitors.
6. Search Pages And Sort it
You can search for a specific page after you add pages in WordPress by simply using the Search Pages bar in the right corner.
You can also sort your page by status, such as published, draft, or stamped.
7. Use a Page Builder after You Add Pages In WordPress
If you use a page builder like Elementor, you can edit the page directly through the builder instead of using the default editor.
Set Your Page Settings after You Add Pages In WordPress
When you work on your WordPress page, you can adjust your personalized settings. Here’s everything you need to get started with your pages’ settings.
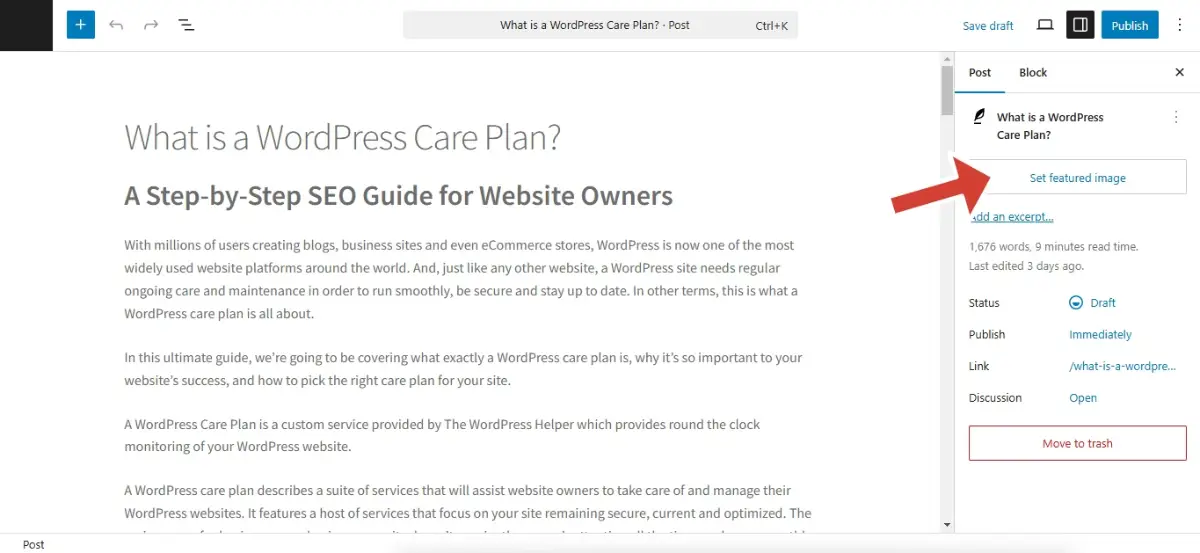
1. You can Set A Featured Image for Your Page
Featured Image represents your WordPress page. It may appear on your homepage, in social media previews, or in other parts of your WordPress site. You can set your site’s featured image by uploading an image here.
2. Settings that Tells Your Page Info
You get to see your page’s information below the title options, such as Word Count, which informs you about the total number of words being used.
Estimated Reading Time tells you how long it takes to read the entire page’s content, and Last Edited gives you information about when the page was last updated.
3. The Status of Your Page And Its Visibility
You can choose the way to make your make available under the Status such as Draft, Pending, Private, Published, Scheduled, and Password Protected.
Draft tells the page is still in progress, and Pending tells that the page is ready but waiting for approval. Private allows your page to be visible only to admins and editors in view mode.
Published is obvious that the page is now live. Scheduled means that the page will be published on a given date you specify.
Password Protected means only people with the password have access to the page.
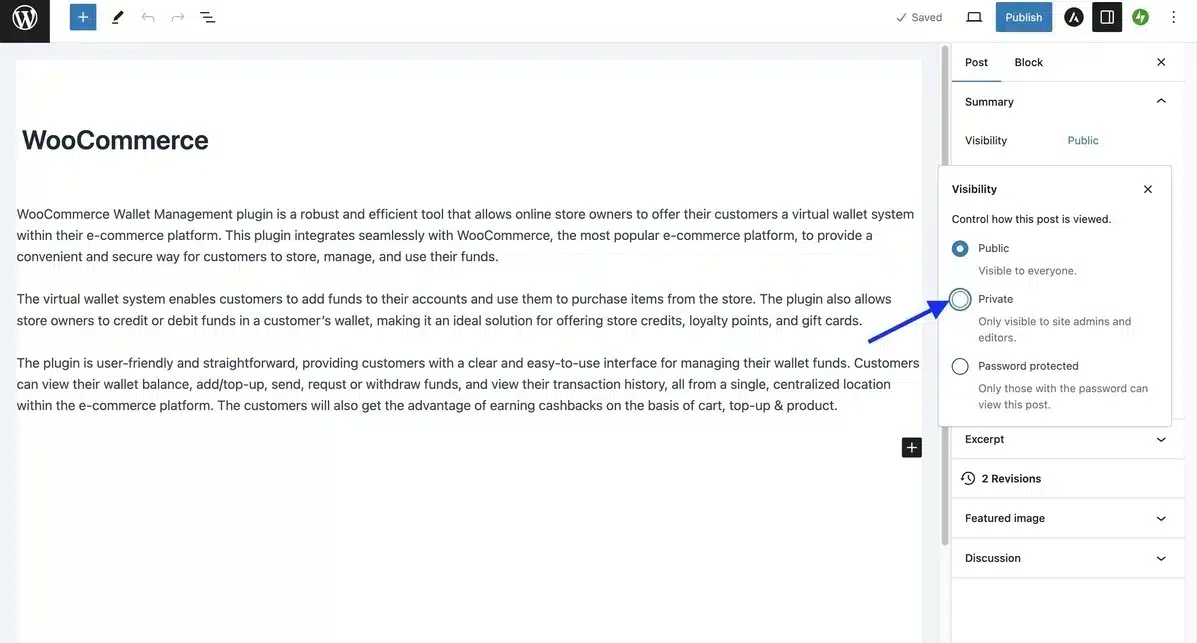
4. Visibility Settings for Your Page In WordPress
You can control who can view your page by using these visibility settings once you click Publish. The public allows anyone to view the page.
Private means only an editor can see your WordPress page. Password Protected requires a password to access your WordPress page.
5. Schedule Your WordPress Page
If you want to publish your WordPress page later, you can get an option to schedule it. Click on Immediately, select a date of your choice, and WordPress will automatically publish your page at the specified date.
6. Permalink or Your URL Slug
The Permalink is the unique URL for your WordPress page. You can customize this URL to make it brief or more meaningful. For SEO-optimized content, try to keep it simple.
7. You can Move Your Blog Posts to Your Blog Page
If you want your blog posts to appear on a separate page except for the homepage, you can set that up by navigating to Settings, then Reading. Choose a static page for your site’s homepage and a different one for your blog page.
Conclusion
You can add pages in WordPress in an organized way. Whether you have the WordPress Gutenberg or Classic editor, you are eligible to add a title and content and customize settings like the URL and visibility as you wish.
You can also schedule your page to publish, set a featured image, and control who can access it. Editing pages later is also very quick and easy. Overall, these steps help keep your WordPress site organized and up-to-date.
Frequently Asked Questions (FAQs)
How to add pages in WordPress?
Log in to your WordPress dashboard, navigate to Pages on the left, and hit Add New. You will get either the WordPress Gutenberg or Classic Editor to create and customize your site’s page.
How do pages differ from blog posts?
Add pages in your WordPress if you want certain elements that don’t often change. Blog posts are meant to be updated regularly on your site, and they often appear in your blog feed. On the other hand, the pages stay the same until you choose to update them.
How can you change the URL of your WordPress page?
After you add pages in WordPress and get your content ready, look for the URL Slug on the right and modify the web address to something brief or more relevant to your page.
How do I control who can view my page?
You can set your page’s visibility settings. Make it Public for everyone, Private for just you and your team, or Password Protected to limit access to your site’s page to only the people with a password.
How can you edit your page after being published?
Go to your WordPress dashboard, navigate to Pages, find the page you want to update, and click Edit to modify it. You can also use Quick Edit to modify your page’s title or URL.

Sagnika Goswami
Hi, I’m Sagnika Goswami. I am a tech enthusiast with a knack for content writing. Read my blogs for your daily insights.

Leave a Reply