You can create a WordPress contact form without a plugin using just an HTML form, a PHP handler, and a few lines of CSS inside your theme files. Most tutorials stop there. They hand you the code, call it done, and leave you to figure out later why the emails never arrived or why bots flooded your inbox with junk.
You will build a working contact form from scratch, fix the most common email delivery failure, and add spam protection before it becomes a problem. AJAX submission and a GDPR consent checkbox are covered at the end for anyone who wants to take it further.
Why Create a WordPress Contact Form Without a Plugin?
Skipping a plugin for something as small as a contact form makes sense more often than people expect. Here’s what you gain.
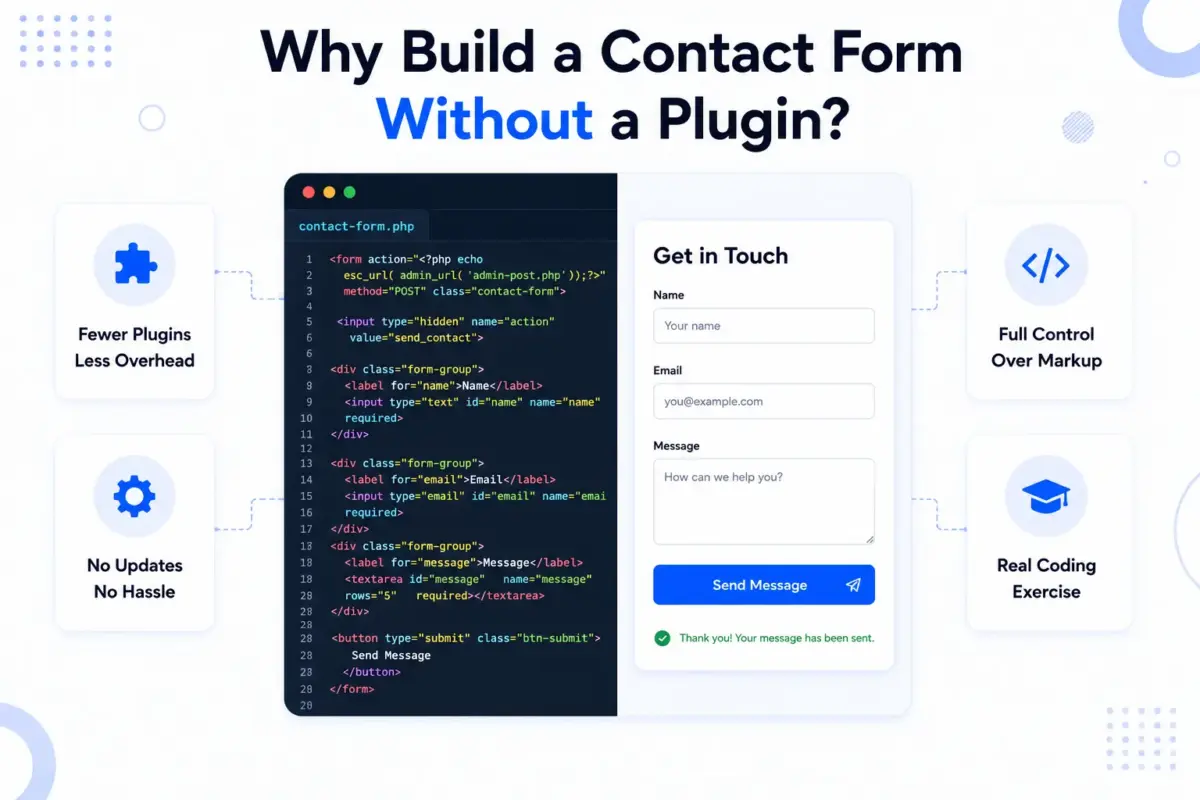
- Fewer plugins, less overhead: Every plugin adds its own CSS, JavaScript, and database queries. A contact form plugin might only need a fraction of what it loads on every page. Cutting that out helps with why WordPress sites slow down in the first place. This matters most on shared hosting, where every extra script competes for the same limited resources.
- One less thing to update: Plugins need updates, and updates occasionally break things or get abandoned by their developers. A form made of plain HTML, PHP, and CSS doesn’t have a changelog. It just sits in your theme and works.
- Full control over the markup: Plugin-generated forms wrap your fields in extra divs, classes, and inline styles that fight your theme’s design. Writing the HTML yourself means every element is exactly where you put it.
- A real coding exercise: If you’re learning WordPress development, building a form by hand teaches you how WordPress handles form submissions, Cleaning, and email. Those are skills that transfer directly to any custom feature you build later.
None of this means plugins are bad. A contact form is one of the rare cases where doing it yourself takes about the same effort as installing and configuring a plugin. The difference shows up later, in the long-term baggage you don’t have to carry.
What You Need Before You Start
You don’t need to be a developer for this, but you do need a few things ready first. Skipping this checklist is why a lot of people get partway through a tutorial and get stuck.
- Access to your theme files: Either through the WordPress dashboard’s Theme File Editor or, better, through FTP or your host’s file manager.
- A child theme, if you’re editing
functions.php: Editing the parent theme directly means losing your changes on the next theme update. If you don’t already have one, set up a child theme first, since most theme documentation covers this in a few steps. - A working email setup: WordPress sends mail using PHP’s built-in mail function by default, and on a lot of hosts, that function is unreliable. More on this in a dedicated section below, but it’s worth knowing now so you’re not surprised later.
- Basic comfort with copying and pasting code exactly as written: A single missing semicolon in PHP will throw a fatal error. Nothing here is hard, but precision matters.
With that out of the way, let’s build the form.
How to Create a WordPress Contact Form Without a Plugin (Step by Step)
Building a WordPress contact form without a plugin comes down to seven steps. Create a page, write the HTML, place it on the page, handle the submission in PHP, block spam, style it, and test it. None of these steps takes more than a few minutes on its own.
Step 1: Create a New Page for Your Contact Form
Start by setting up the page that will hold your form.
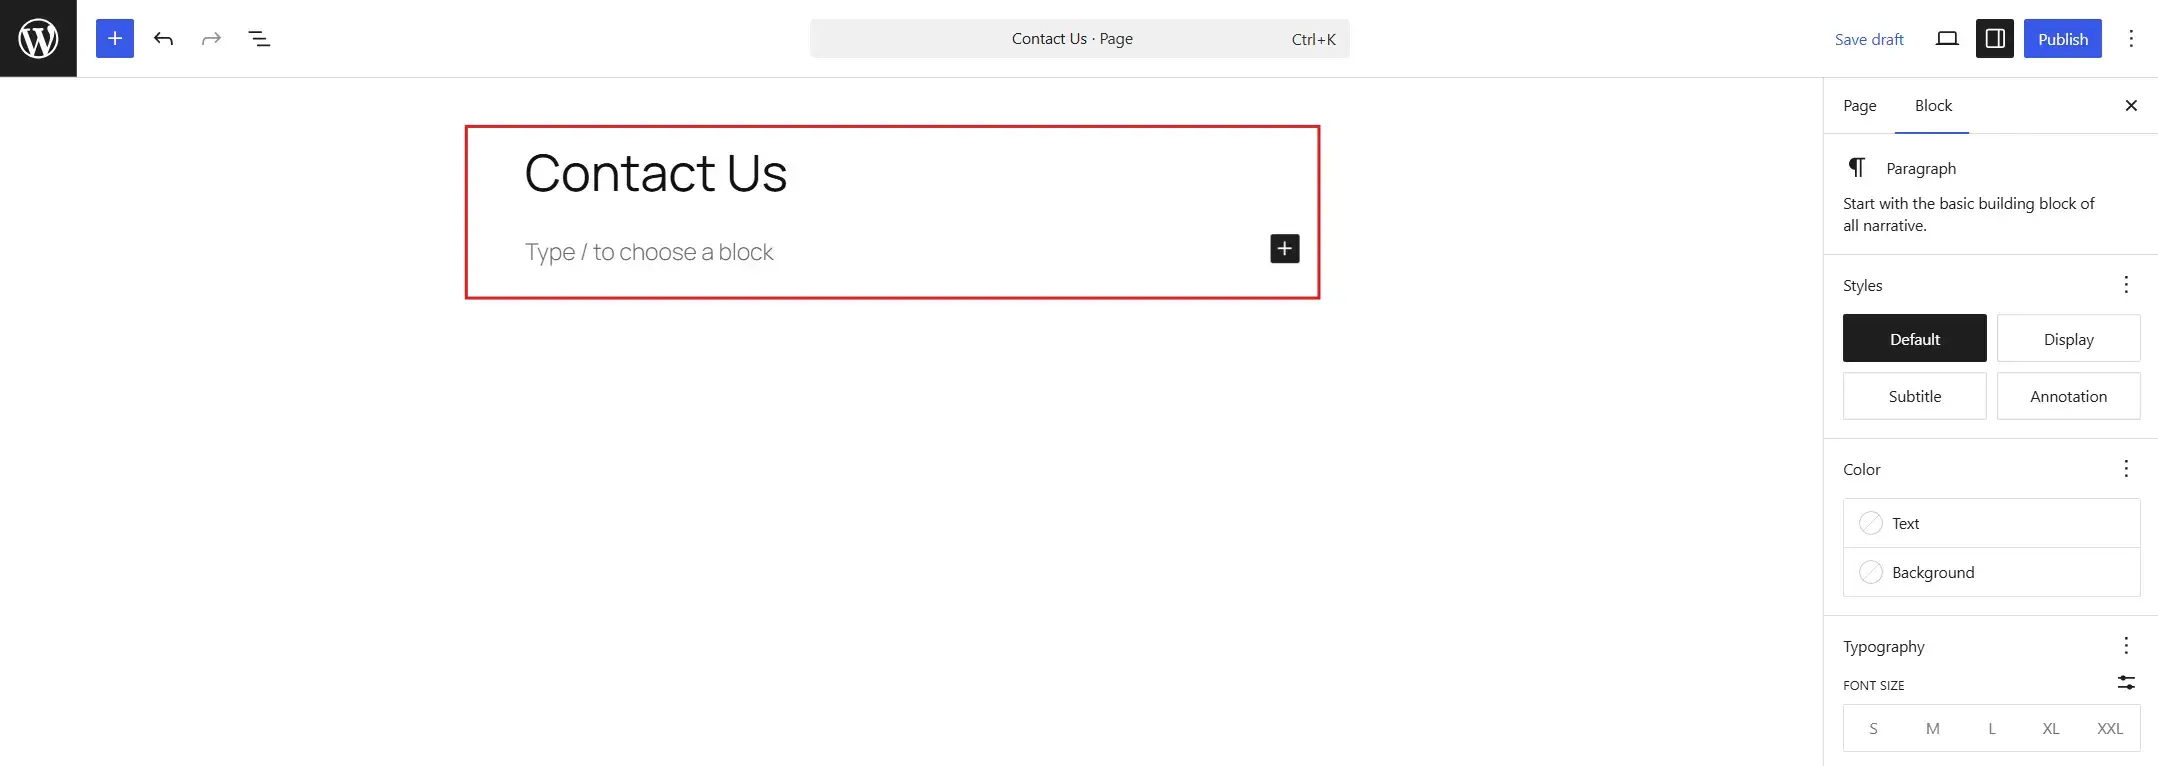
- Log in to your WordPress dashboard and go to Pages → Add New.
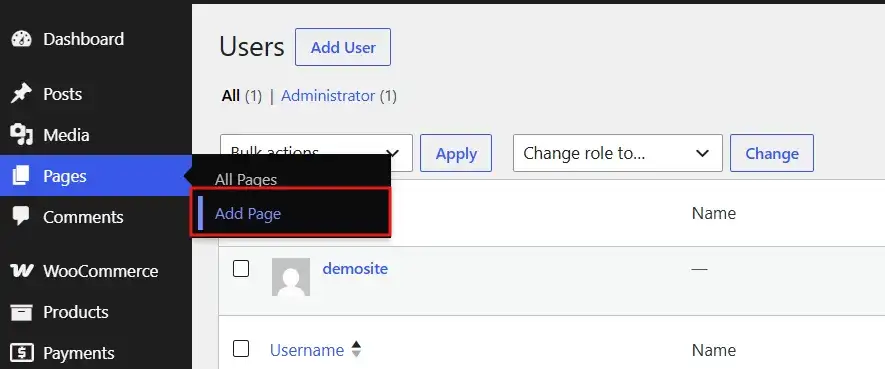
- Give the page a title like Contact or Contact Us, and leave it as it is.
Step 2: Write the HTML for Your Contact Form
Next, write the markup for the form itself. This example collects a name, email, subject, and message, which covers what most contact pages need.
<form id="contact-form" method="post" novalidate>
  <div class="form-row">
    <label for="cf-name">Name</label>
    <input type="text" id="cf-name" name="cf_name" required>
  </div>

  <div class="form-row">
    <label for="cf-email">Email</label>
    <input type="email" id="cf-email" name="cf_email" required>
  </div>

  <div class="form-row">
    <label for="cf-subject">Subject</label>
    <input type="text" id="cf-subject" name="cf_subject">
  </div>

  <div class="form-row">
    <label for="cf-message">Message</label>
    <textarea id="cf-message" name="cf_message" rows="5" required></textarea>
  </div>

  <button type="submit" name="cf_submit">Send Message</button>
</form>
A few things worth noting. Each <label> is tied to its input through the for and id attributes, which matter for screen readers. The required attribute gives you basic browser-level validation before the form even reaches PHP. And novalidate is there so the optional AJAX upgrade later in this guide can take over validation instead.
Step 3: Add the Form to Your WordPress Page
You have two options here, and which one you pick depends on your theme and how comfortable you are with code.
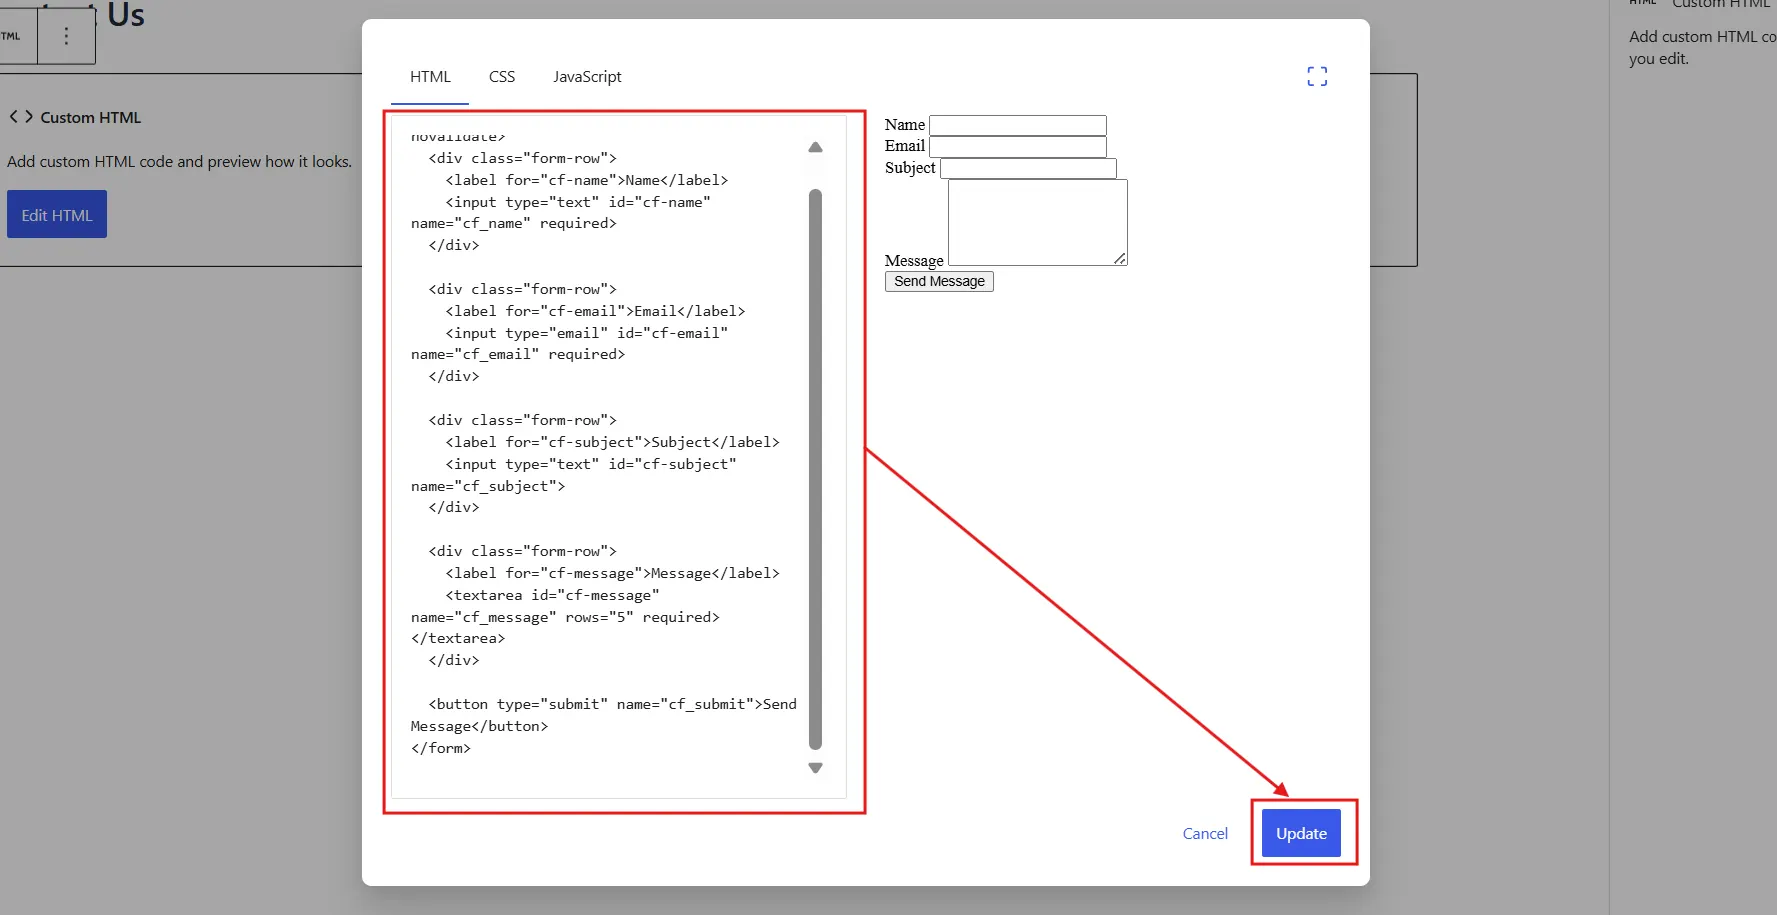
Method 1: Custom HTML block (block editor)
- Open the created Contact page.
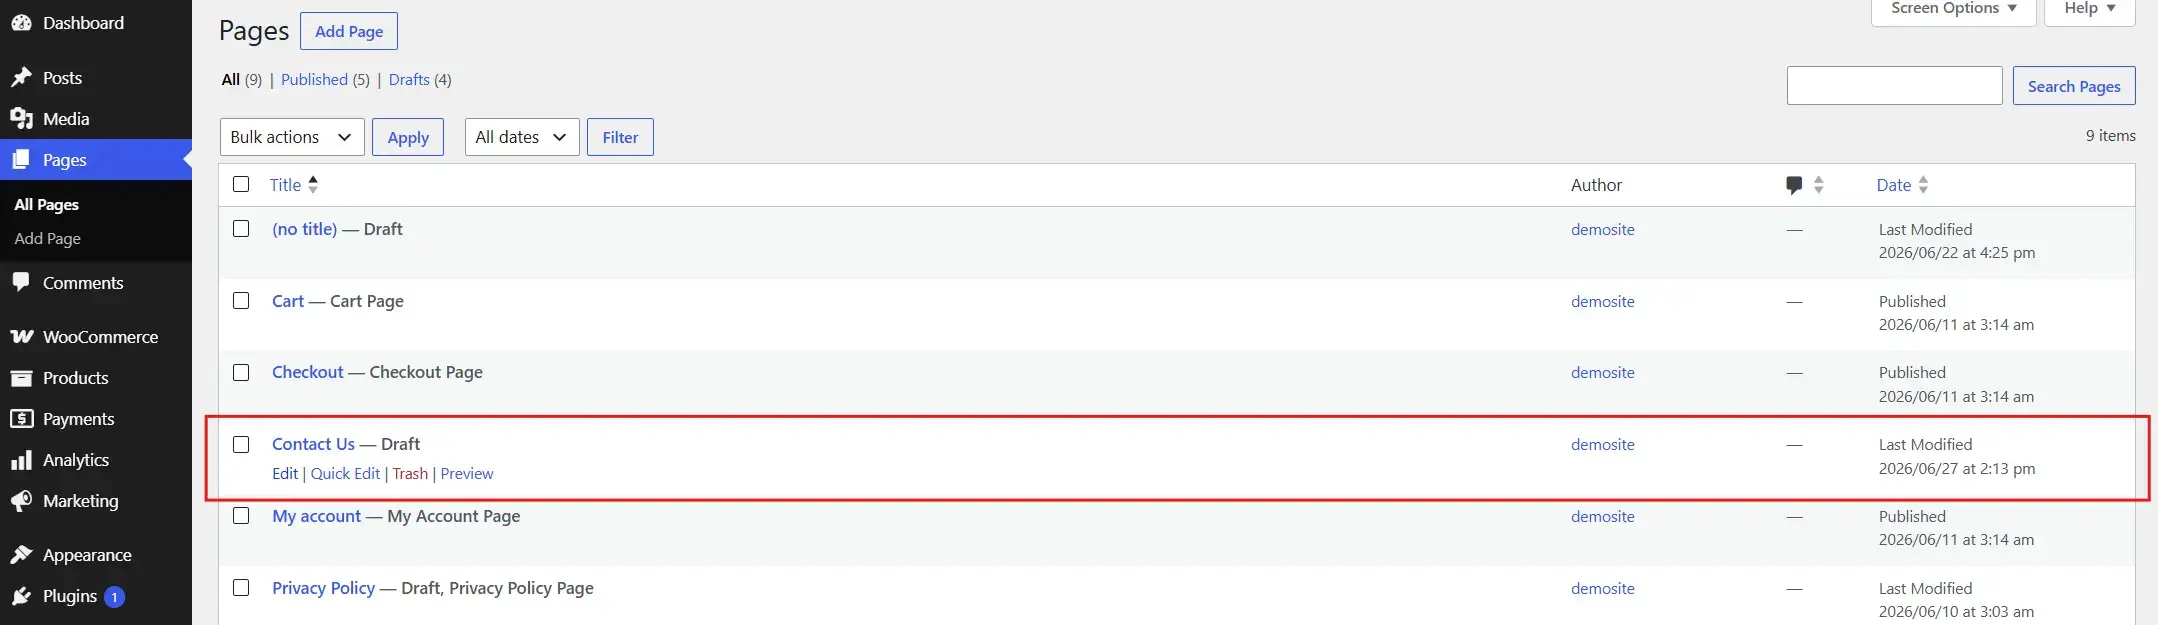
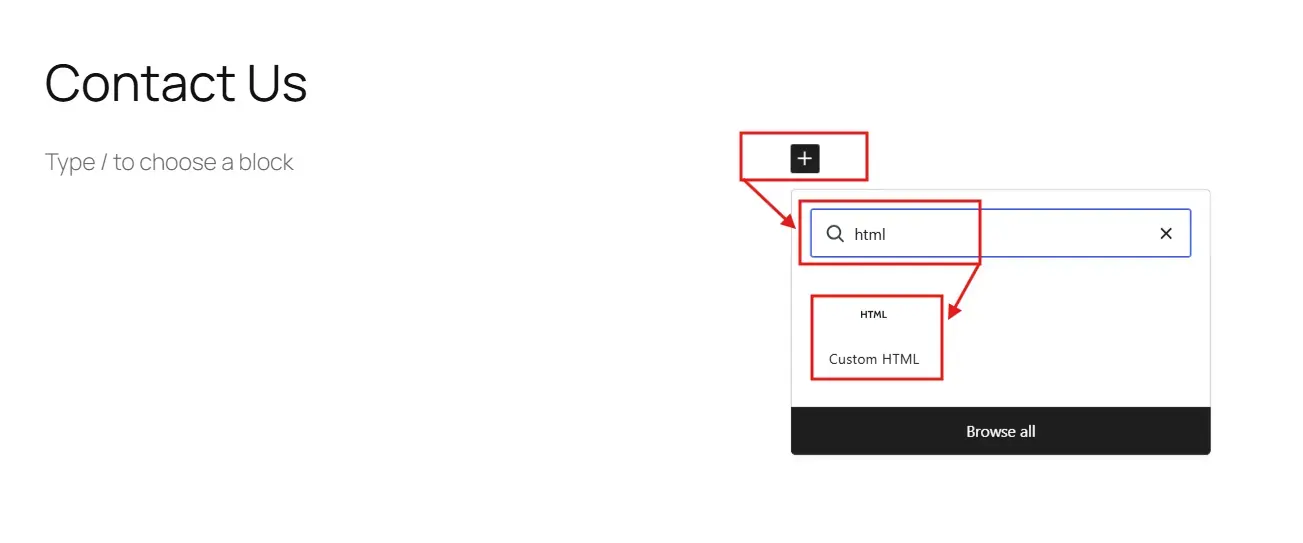
- Add a Custom HTML block.
- Once added, click on the Edit HTML button.
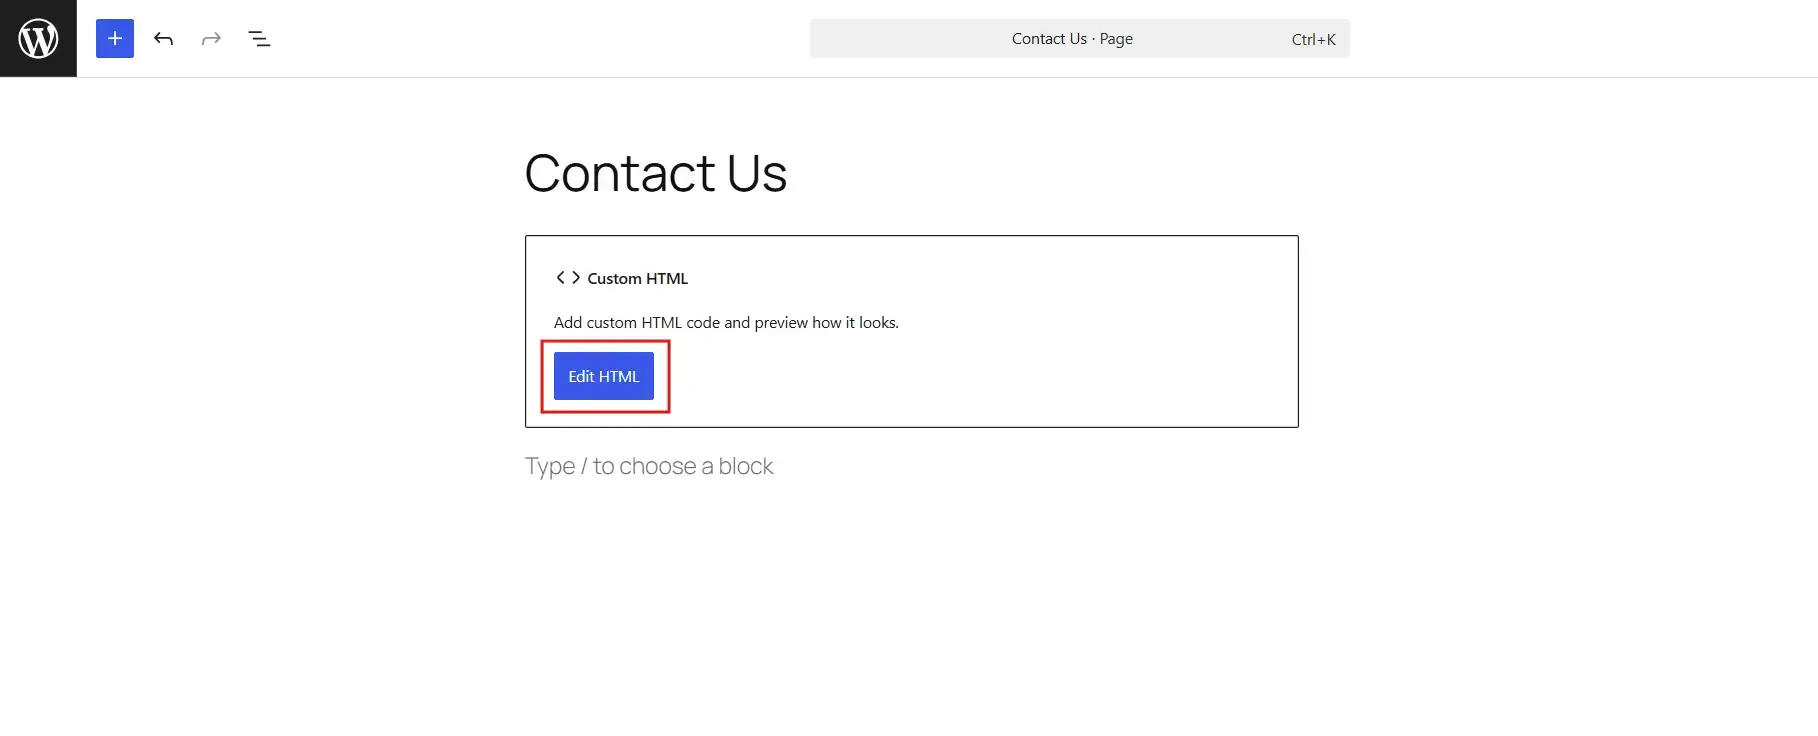
- Paste in the form markup from Step 2 and click Update.
Method 2: Create a page template file
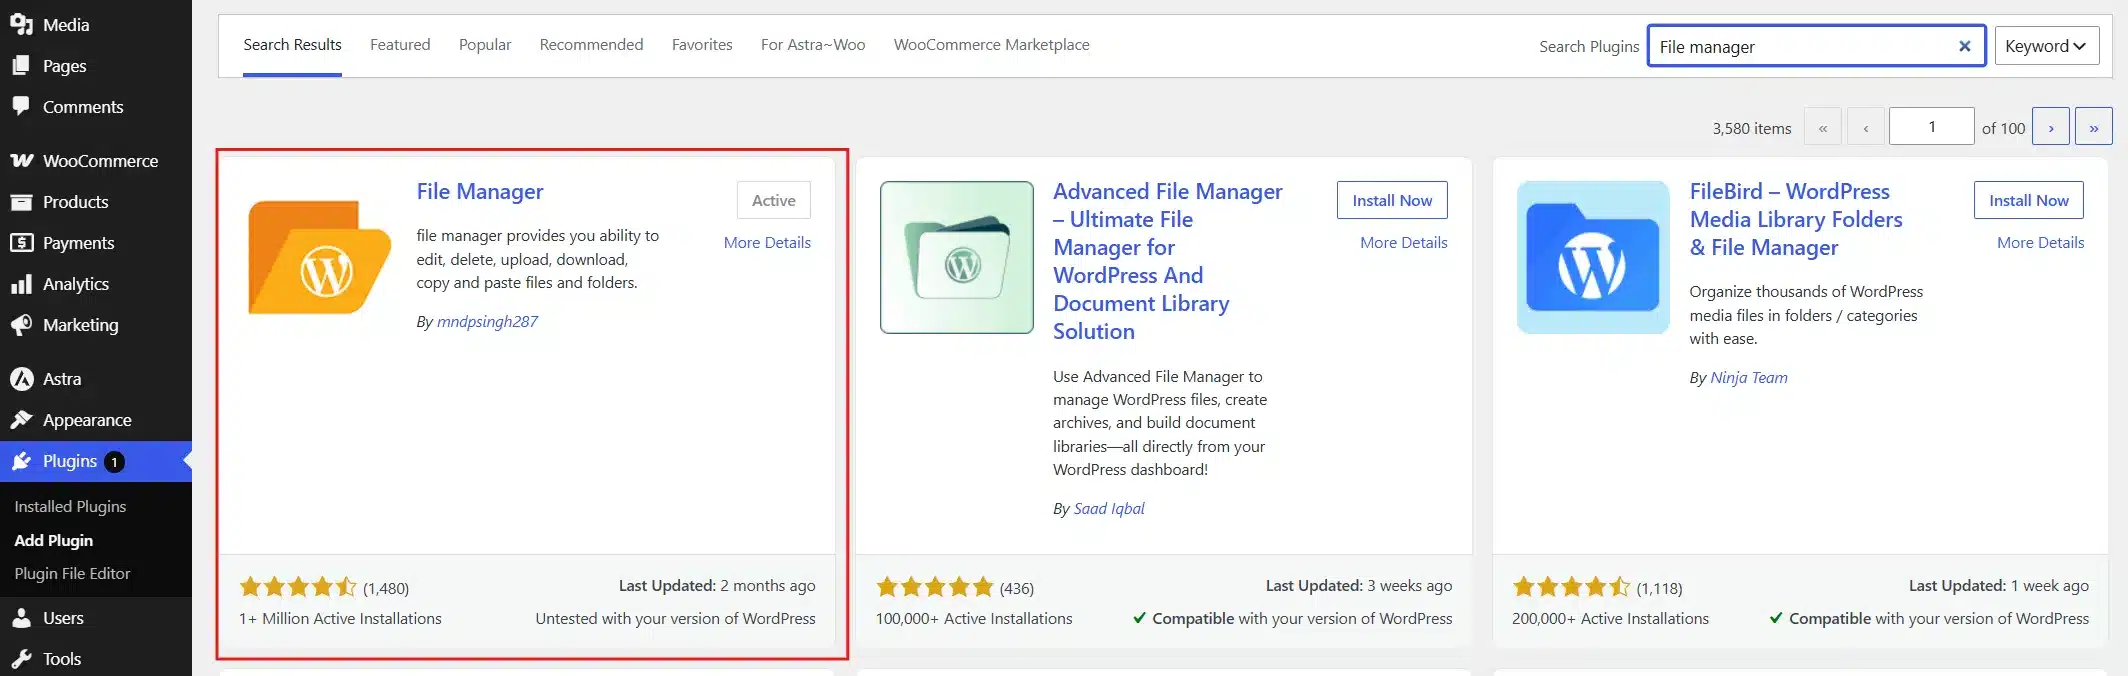
- Go to Plugins→ Add Plugin.
- Install and activate the WP File Manager Plugin.
- Go to WP File Manager and navigate to
wp-content/themes/your-child-theme/.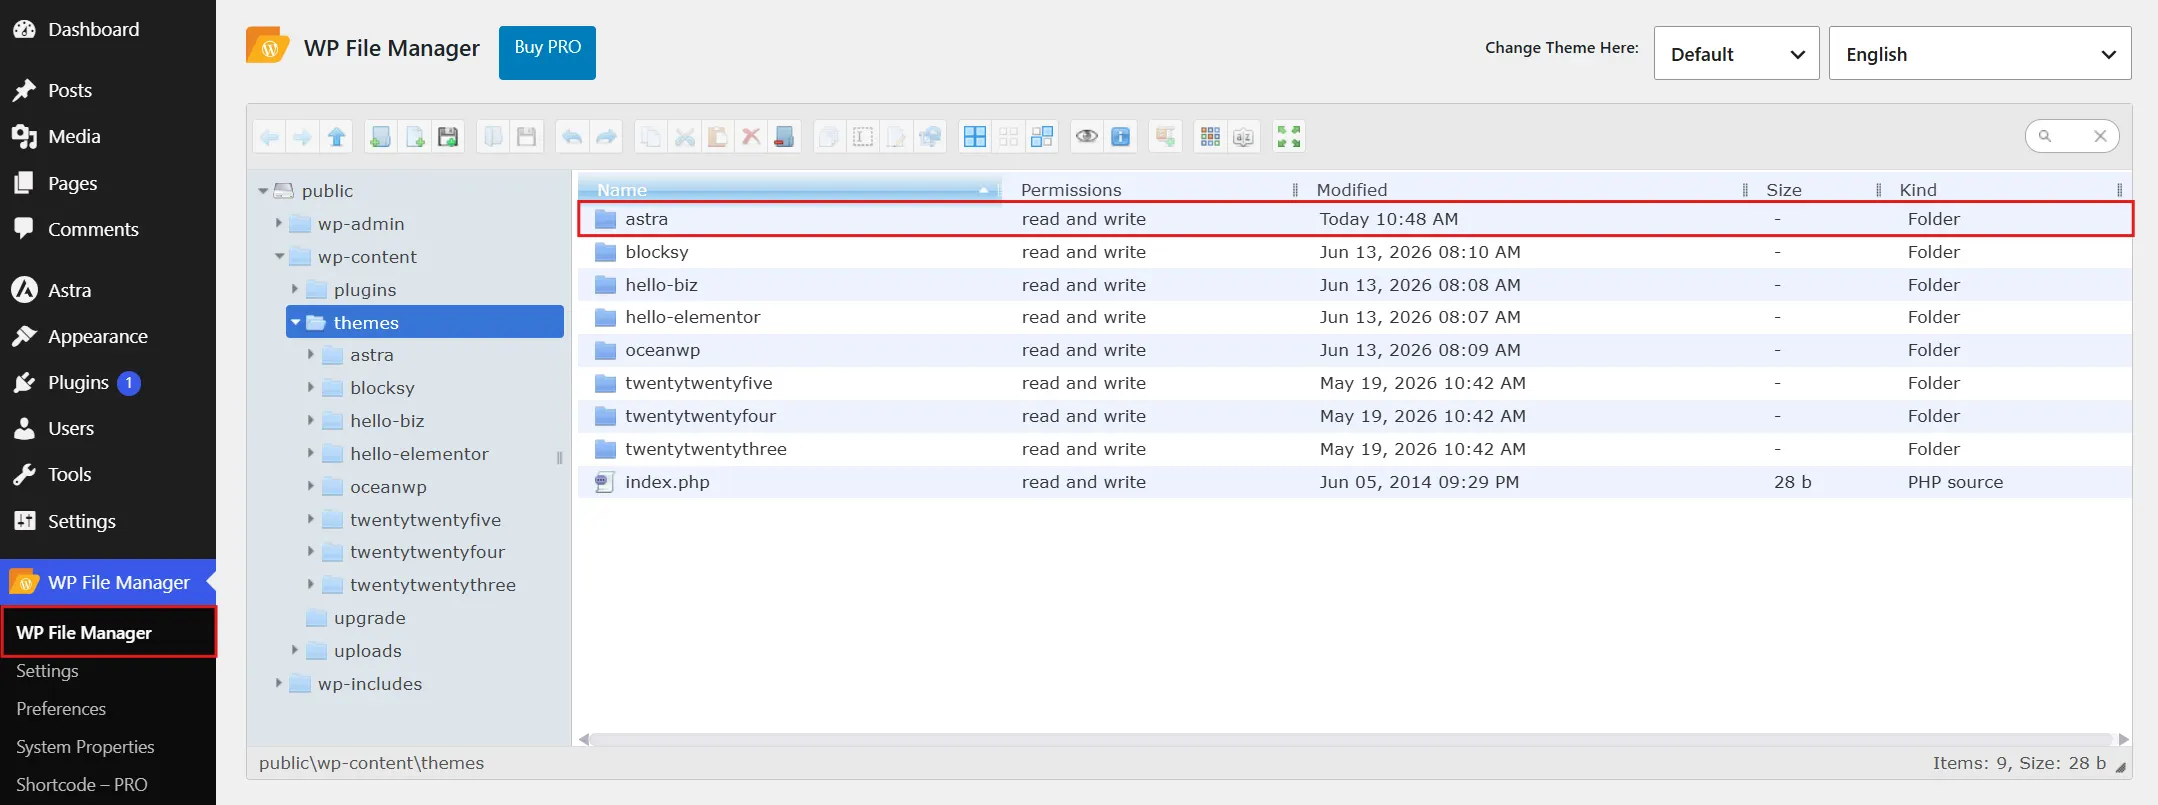
- Create
page-contact.phpinside your child theme folder.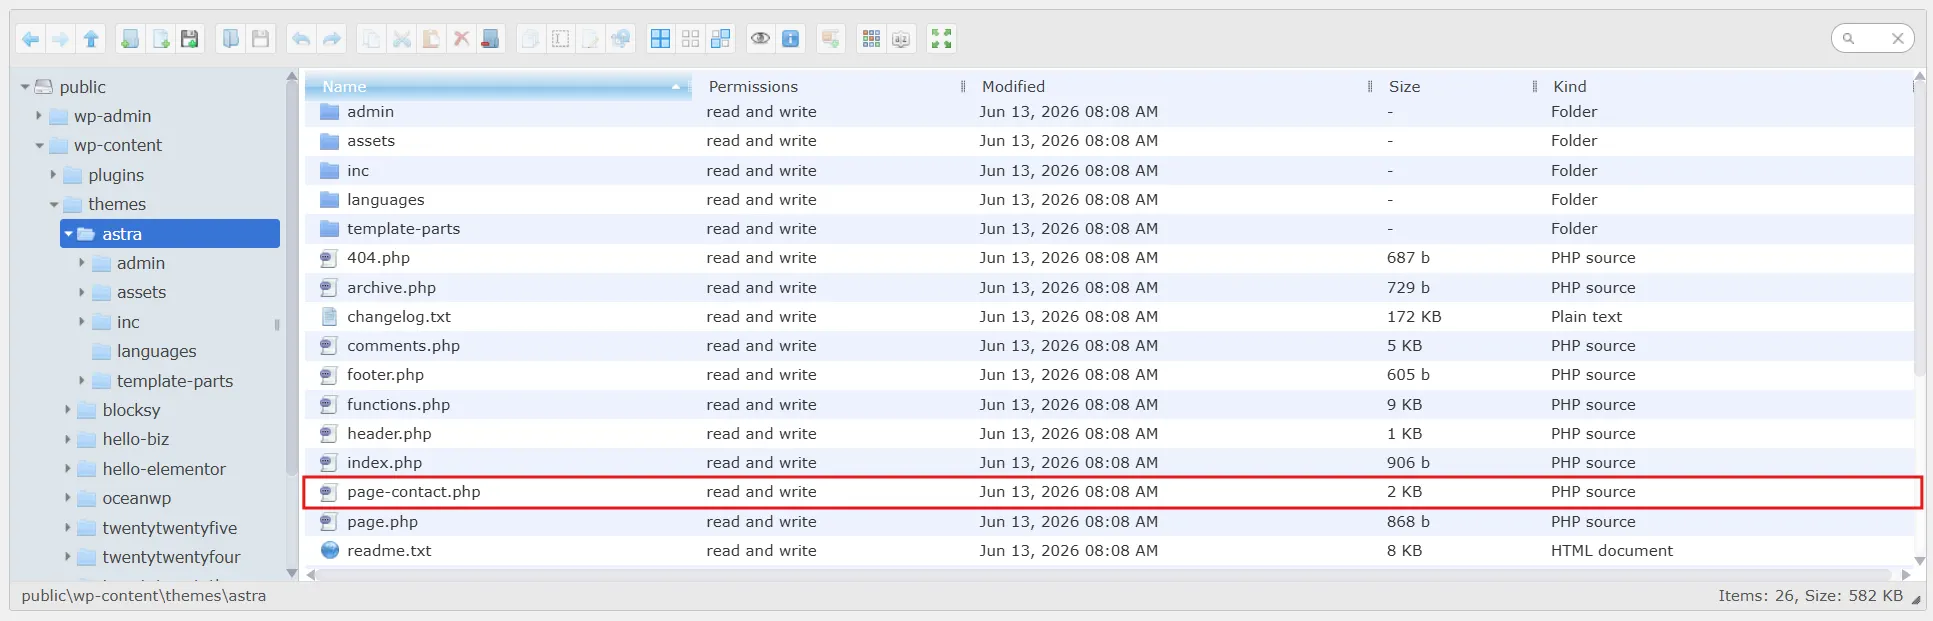
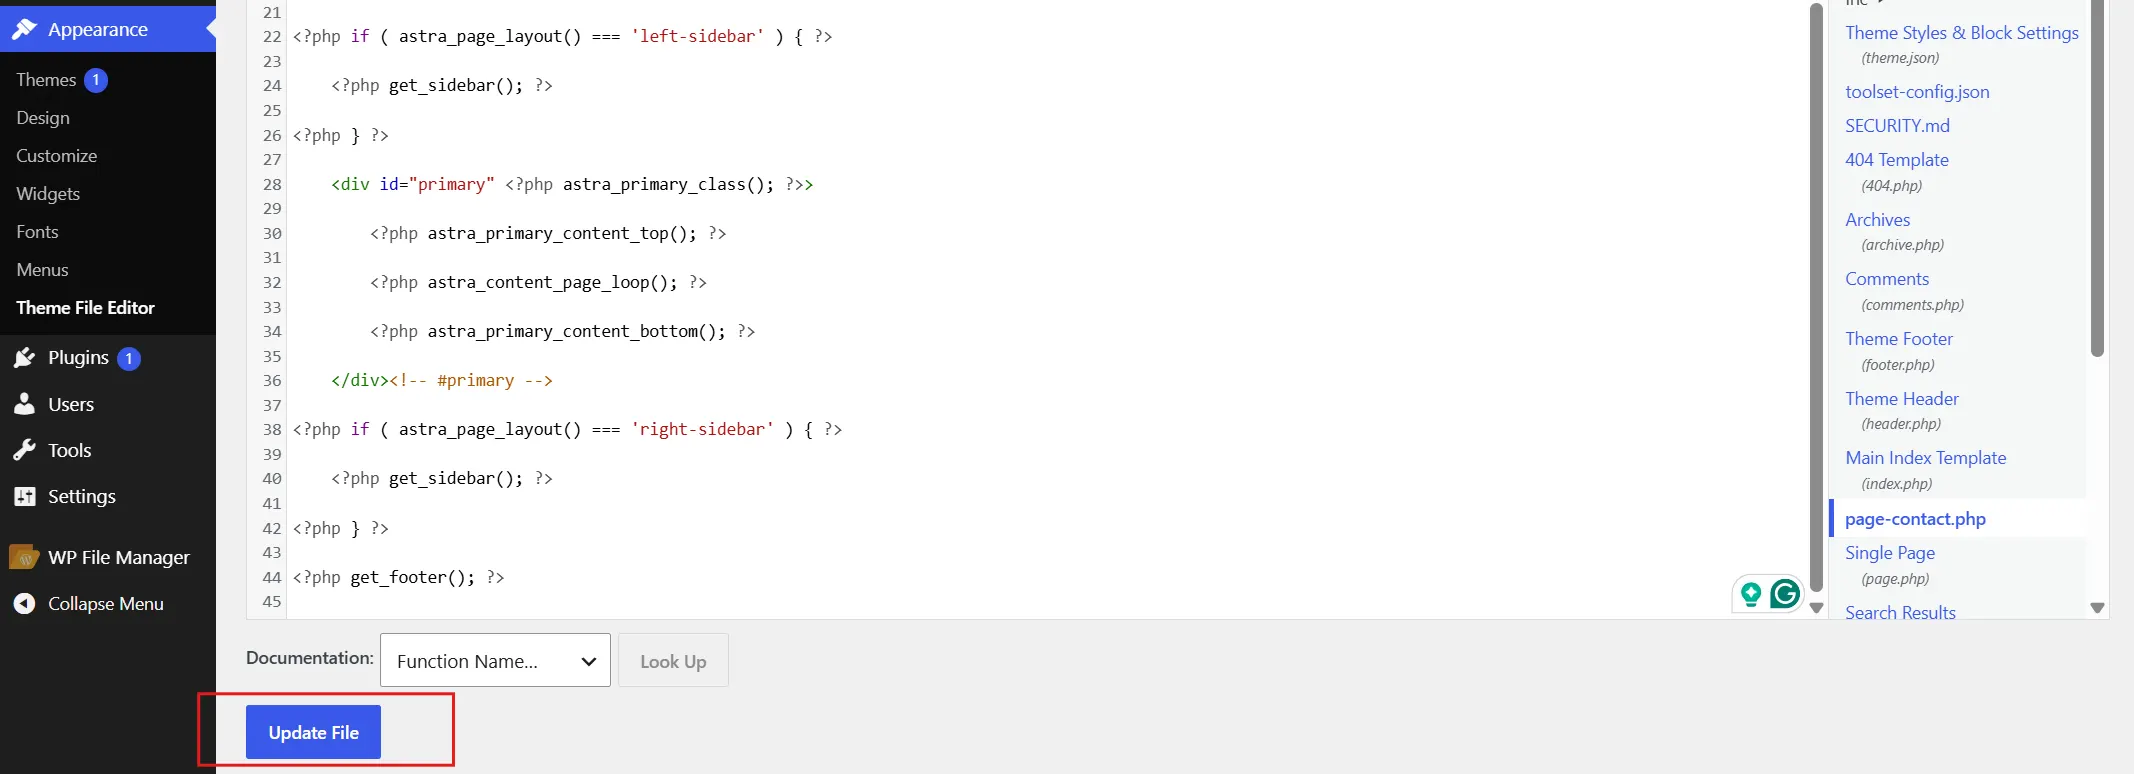
- Once the file is created, open Appearance → Theme File Editor
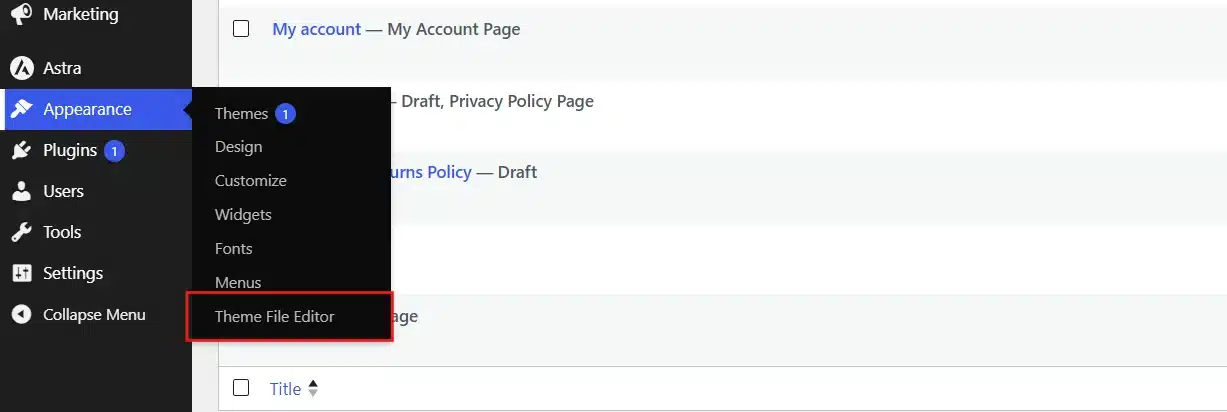
- Open
page.phpCopy all its code.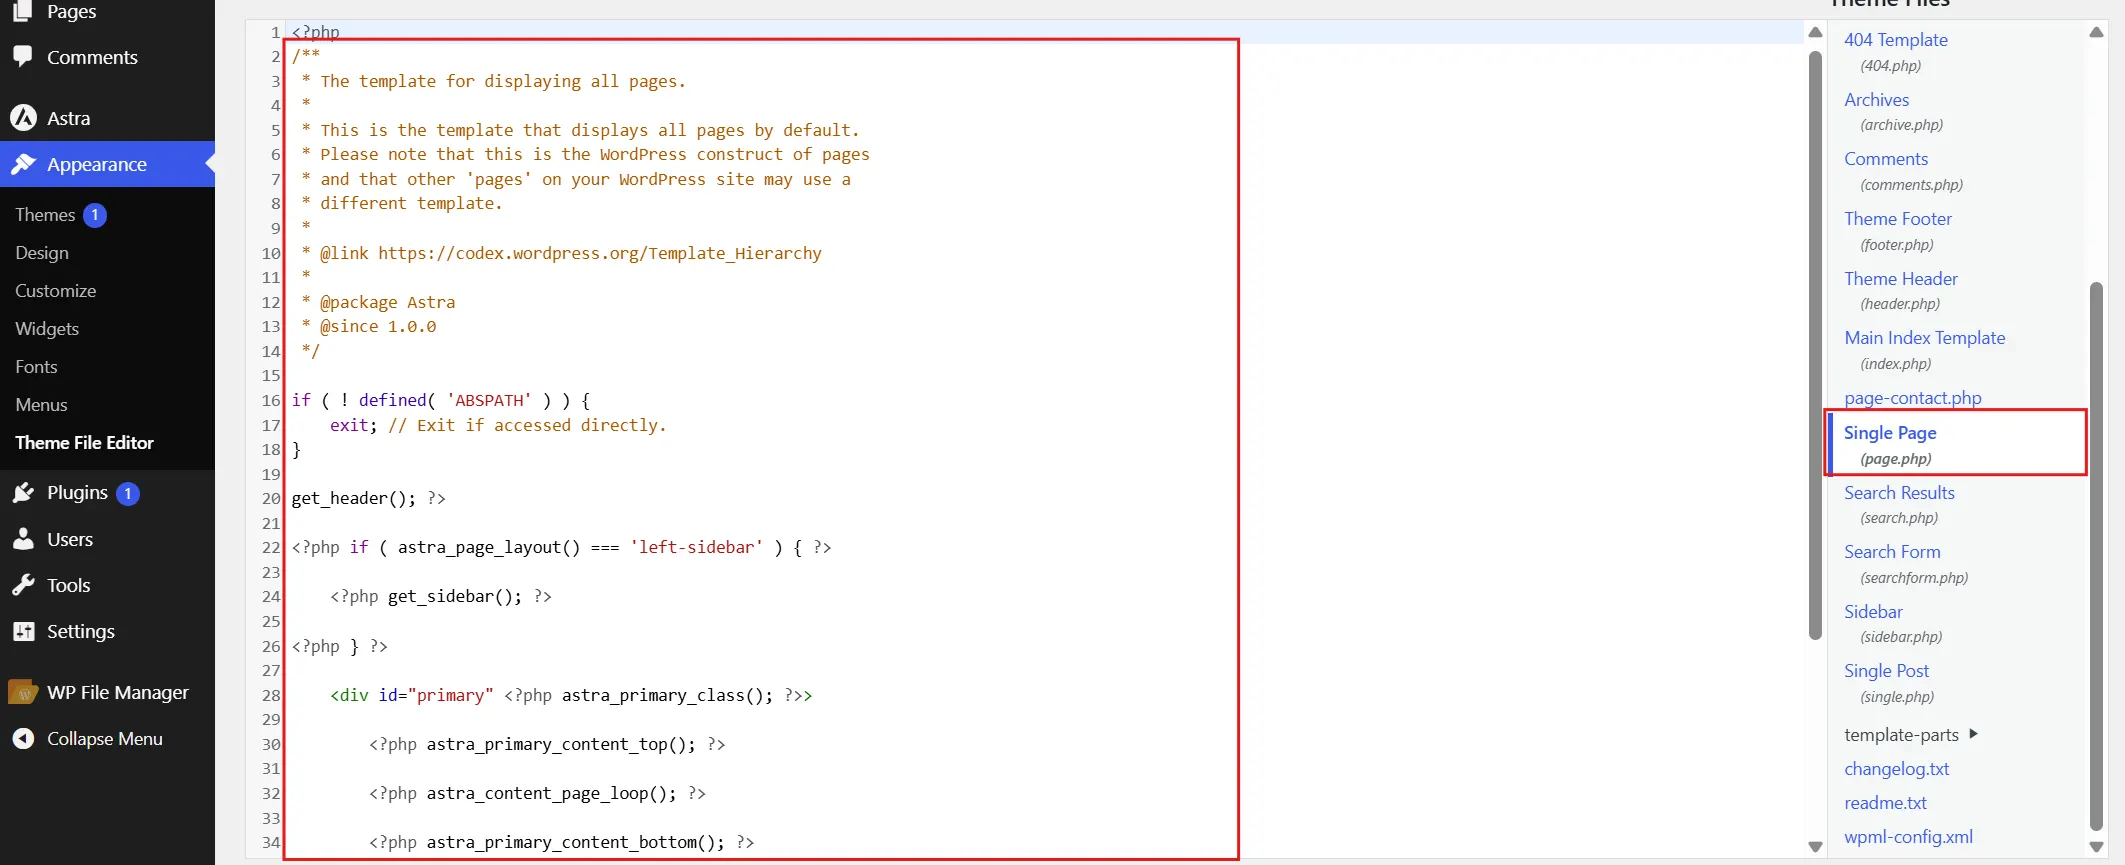
- Paste it into your new
page-contact.phpfile.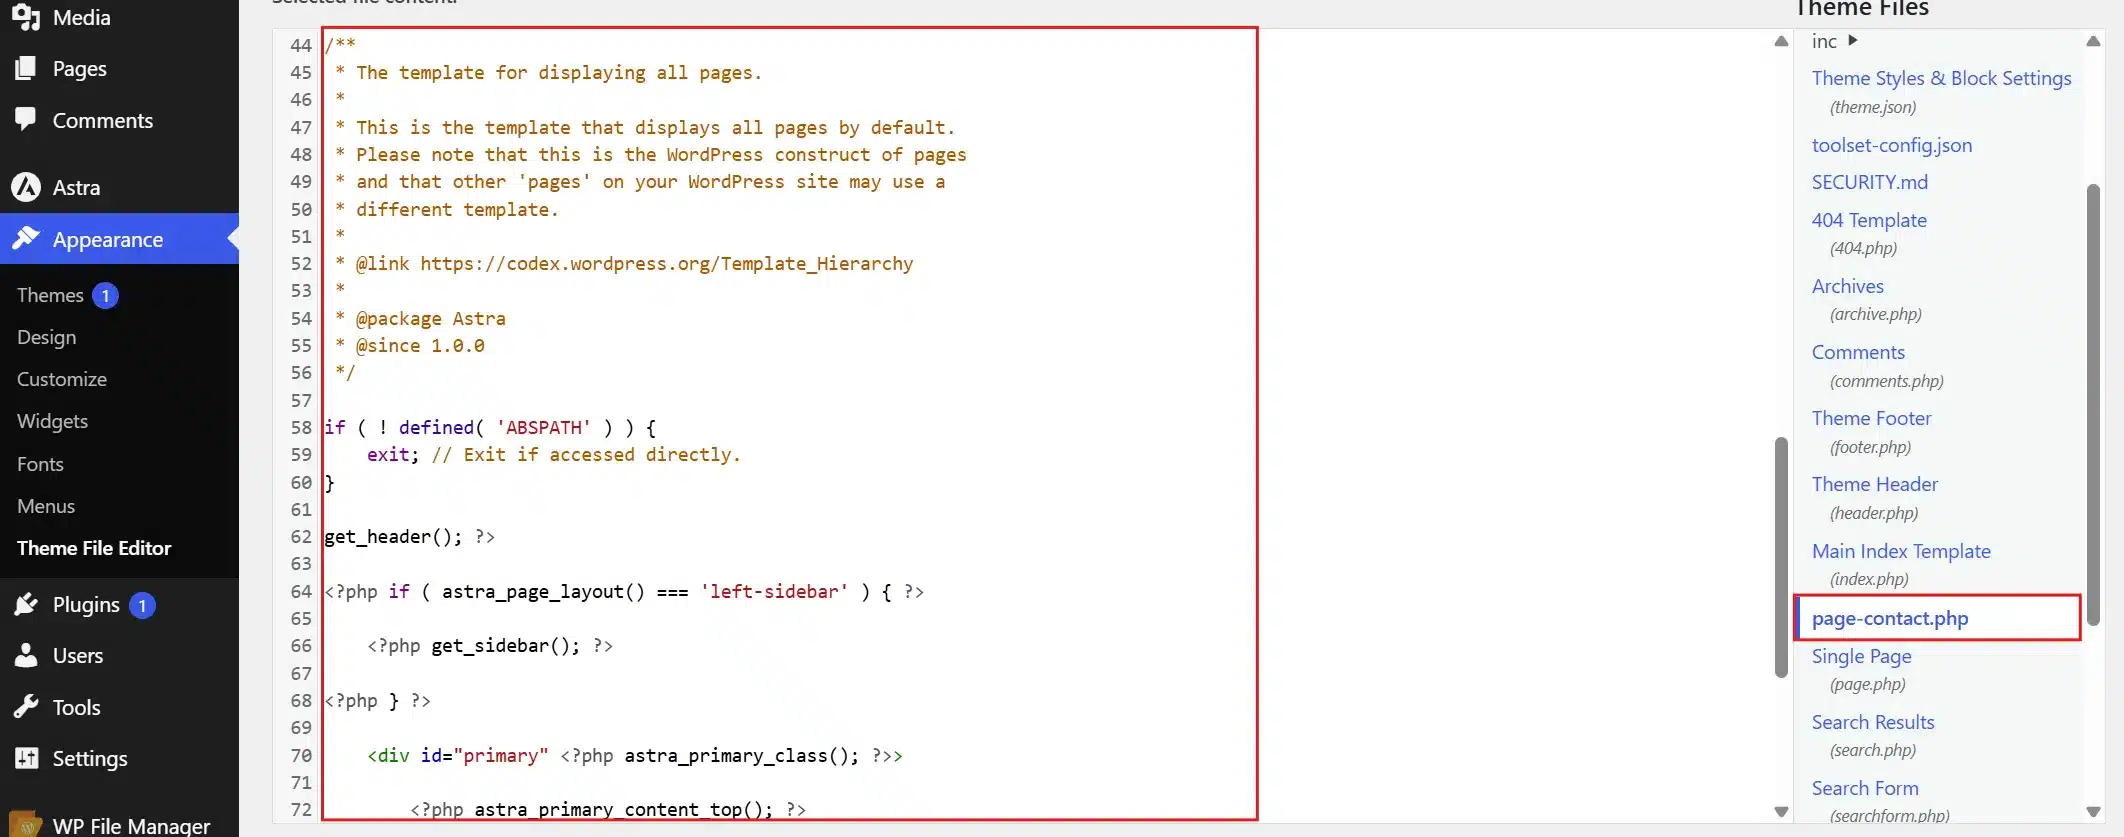
- Find the section where page content normally renders (like
the_content()) and insert your form HTML there.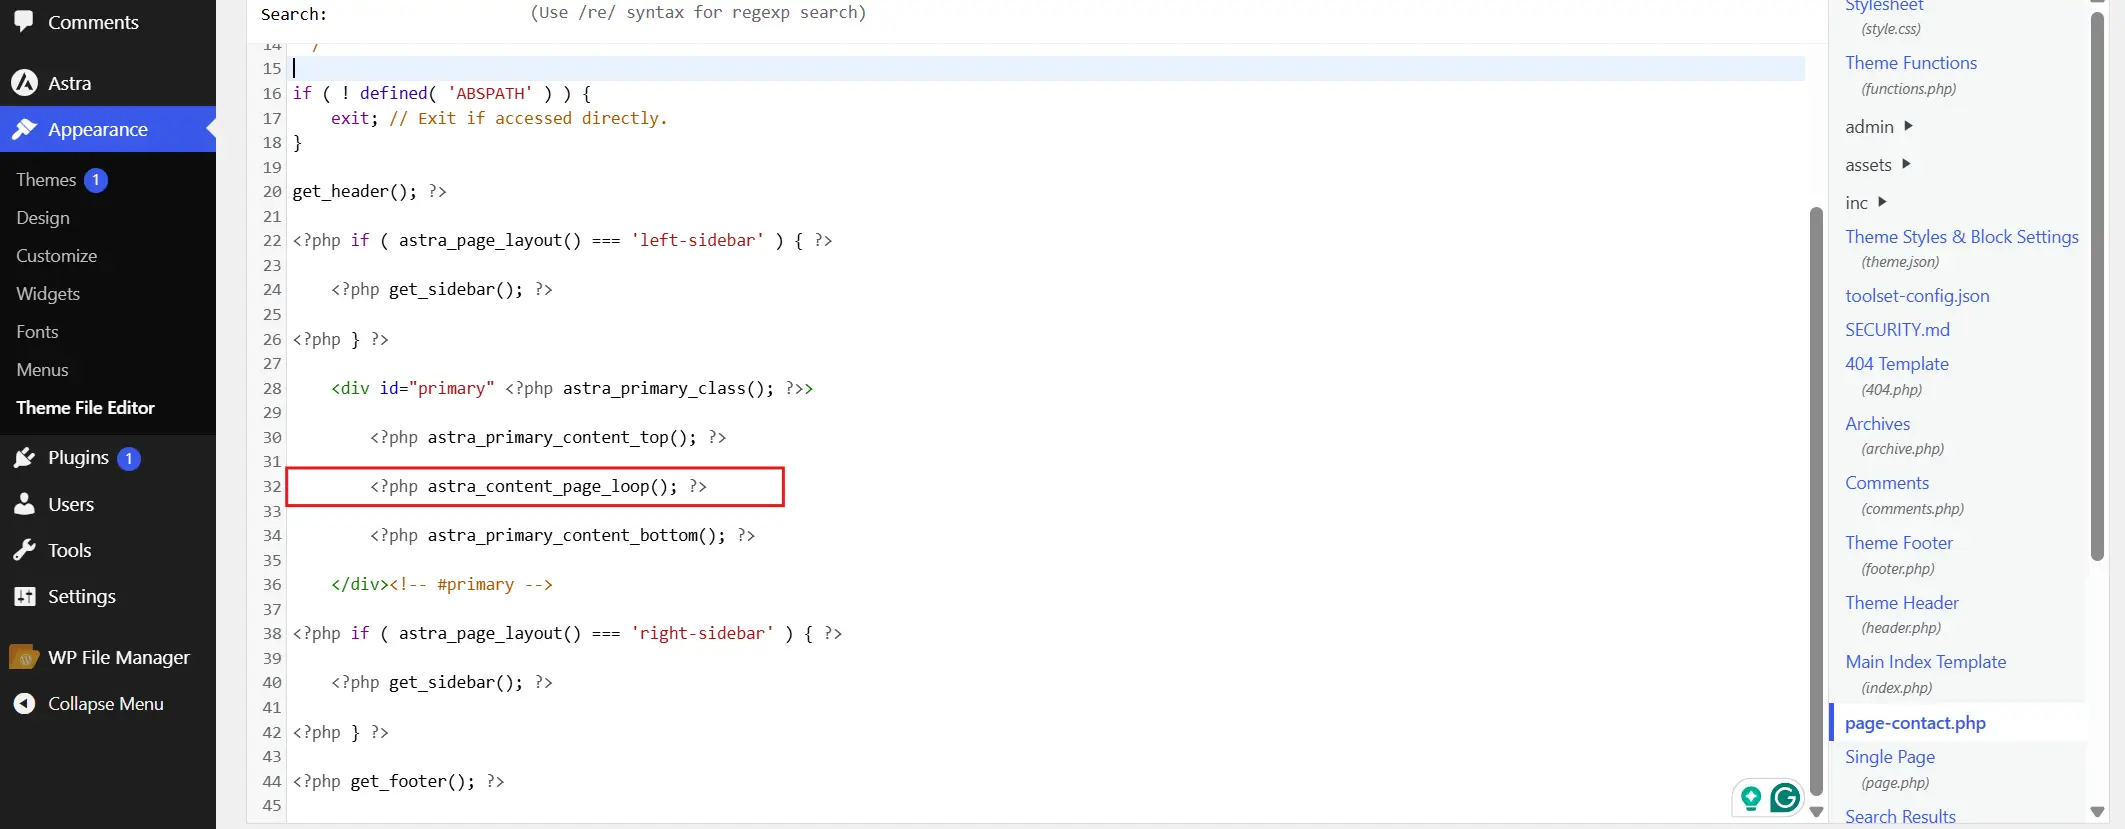
- Click Update File to save.
- Make sure your Contact page slug is set to
contactWordPress automatically uses this template for any page with the slug “contact,” based on its template hierarchy.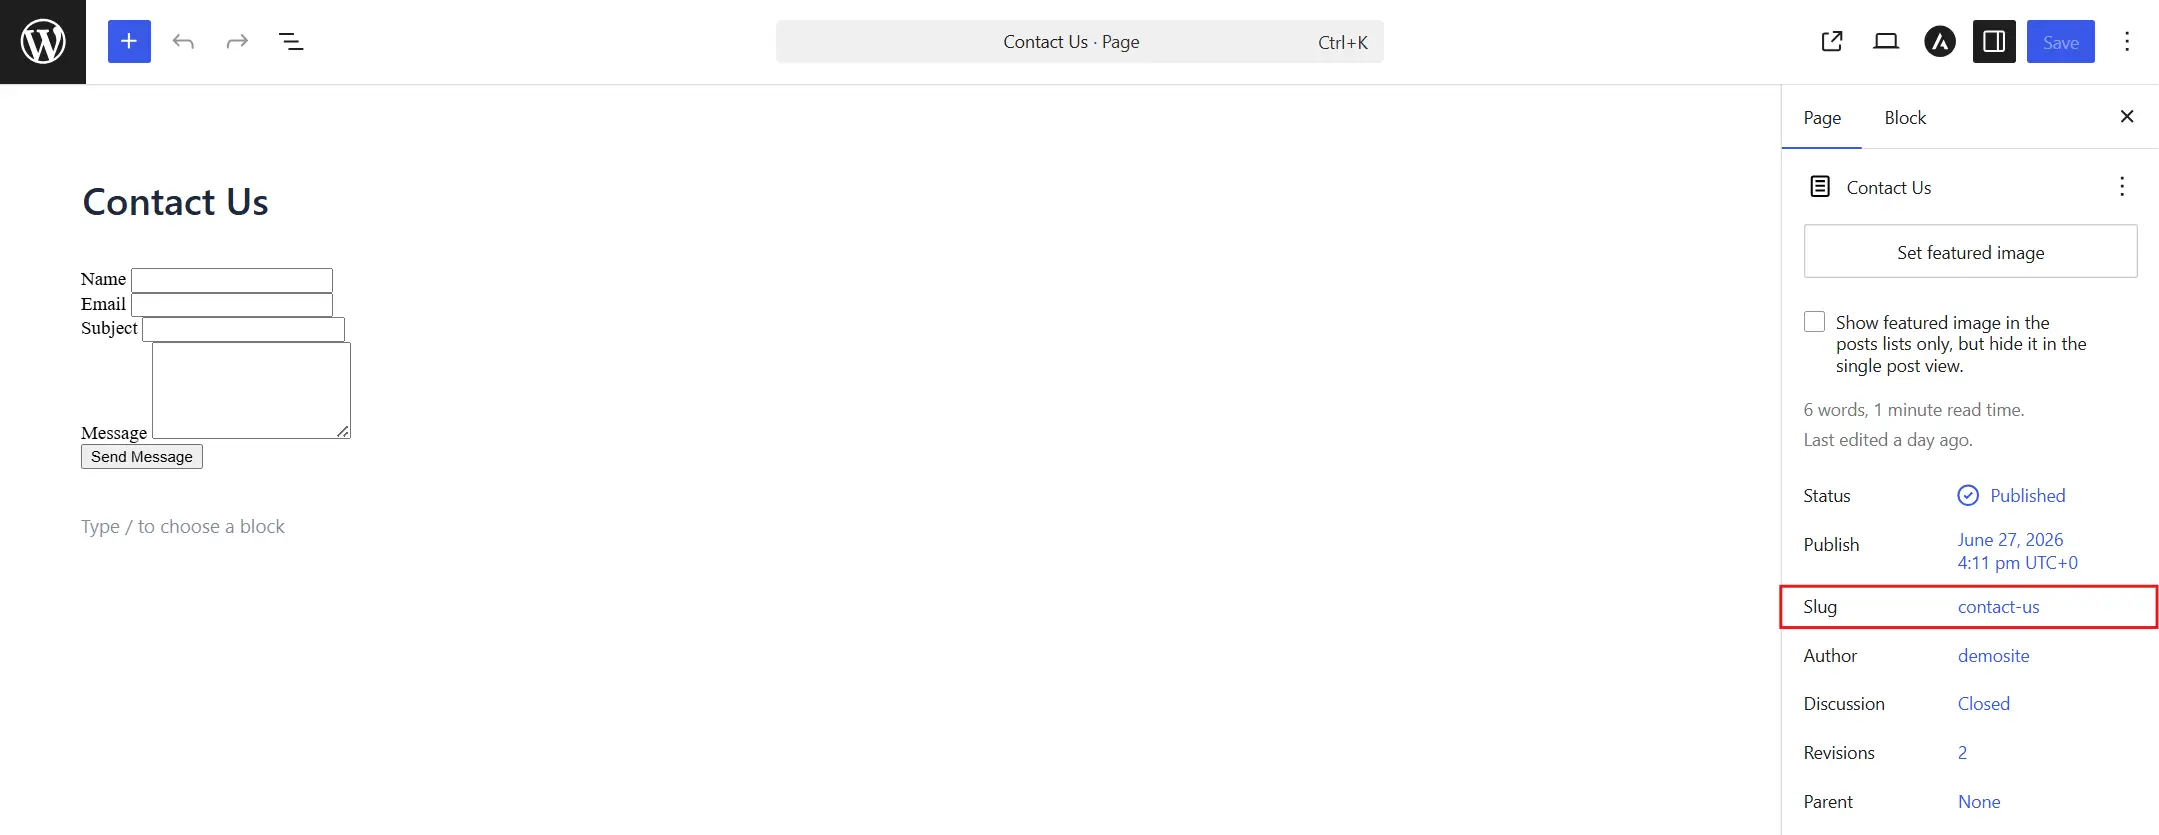
Either approach works. The Custom HTML block is faster if you’re not touching theme files elsewhere. The template file is cleaner if you’re already maintaining a child theme.
Important Note: The Theme File Editor option is only available in Classic themes (Astra, GeneratePress, OceanWP, etc.). It does not appear in default themes (Twenty Twenty-Three, Twenty Twenty-Four, etc.). For a step-by-step guide on working with theme files, see How to Create a WordPress Child Theme on DevDiggers.
Step 4: Handle the Form Submission with PHP
This is the part most tutorials skip, and it’s where security happens. Add the following to your child theme’s functions.php file.
First, add a nonce (Security Token) field to the form from Step 2 (place it right before the submit button):
<?php wp_nonce_field( 'cf_submit_action', 'cf_nonce' ); ?>
A nonce is a one-time security token. Without one, anyone could write a script that posts directly to your form’s URL from another website, a common way contact forms get abused.
Now add the handler itself:
<?php
add_action( 'template_redirect', 'devdiggers_handle_contact_form' );

function devdiggers_handle_contact_form() {

	if ( empty( $_POST['cf_submit'] ) ) {
		return;
	}

	// Verify the nonce first. If this fails, stop here.
	if ( ! isset( $_POST['cf_nonce'] ) || ! wp_verify_nonce( $_POST['cf_nonce'], 'cf_submit_action' ) ) {
		wp_die( esc_html__( 'Security check failed. Please go back and try again.', 'text_domain' ) );
	}

	$name    = sanitize_text_field( wp_unslash( $_POST['cf_name'] ?? '' ) );
	$email   = sanitize_email( wp_unslash( $_POST['cf_email'] ?? '' ) );
	$subject = sanitize_text_field( wp_unslash( $_POST['cf_subject'] ?? '' ) );
	$message = sanitize_textarea_field( wp_unslash( $_POST['cf_message'] ?? '' ) );

	if ( empty( $name ) || empty( $message ) || ! is_email( $email ) ) {
		wp_die( esc_html__( 'Please fill in all required fields with a valid email address.', 'text_domain' ) );
	}

	$to      = get_option( 'admin_email' );
	$headers = array( 'Reply-To: ' . $name . ' <' . $email . '>' );
	$body    = "Name: $name\nEmail: $email\n\nMessage:\n$message";

	wp_mail( $to, $subject ?: 'New contact form submission', $body, $headers );

	wp_safe_redirect( add_query_arg( 'contact', 'success', wp_get_referer() ) );
	exit;
}
Each cleaning function strips out anything that shouldn’t be in a name, email, or message field before it touches your database or an email. The is_email() Check catches addresses that aren’t formatted like real emails. The redirect at the end matters too. Redirecting after a successful submission, rather than just echoing a message, avoids the classic “resubmit form?” warning if someone refreshes the page.
Step 5: Add a Honeypot Field to Block Spam
A honeypot is a field that’s invisible to real visitors but visible to most spam bots, which fill in every field they find. If it’s filled in, you know the submission is junk.
Add this inside your form, anywhere between the opening <form> tag and the submit button:
<div class="cf-honeypot" aria-hidden="true">
  <label for="cf-website">Website</label>
  <input type="text" id="cf-website" name="cf_website" tabindex="-1" autocomplete="off">
</div>
Then add one line near the top of the PHP handler from Step 4, right after the nonce check:
if ( ! empty( $_POST['cf_website'] ) ) {
	return; // Likely a bot. Quietly drop the submission.
}
This catches a surprising amount of automated spam with zero impact on real visitors. It won’t stop a determined human spammer. For that level of protection, Cloudflare Turnstile CAPTCHA in WordPress is worth adding on top, and it’s also plugin-free.
Step 6: Style Your Contact Form with CSS
The HTML structure from Step 2 uses .form-row wrappers specifically so the CSS stays simple. Add this to your theme’s stylesheet, or inside a <style> tag if you’re using the Custom HTML block approach.
#contact-form {
  max-width: 600px;
  display: flex;
  flex-direction: column;
  gap: 1.25rem;
  padding: 2rem;
  border: 1px solid #e0e0e0;
  border-radius: 8px;
  background-color: #fafafa;
}

.form-row {
  display: flex;
  flex-direction: column;
  gap: 0.4rem;
}

.form-row label {
  font-weight: 600;
}

.form-row input,
.form-row textarea {
  padding: 0.65rem;
  border: 1px solid #ccc;
  border-radius: 4px;
  font-size: 1rem;
}

.form-row input:focus,
.form-row textarea:focus {
  outline: 2px solid #2271b1;
  outline-offset: 1px;
}

.cf-honeypot {
  position: absolute;
  left: -9999px;
}

#contact-form button {
  align-self: flex-start;
  padding: 0.75rem 1.75rem;
  background-color: #2271b1;
  color: #fff;
  border: none;
  border-radius: 4px;
  font-size: 1rem;
  cursor: pointer;
}

#contact-form button:hover {
  background-color: #1a5a8a;
}
Flexbox handles the layout here instead of fixed widths, so the form adjusts on smaller screens without a separate mobile stylesheet. The focus outline matters more than it looks. Without it, keyboard users have no way to tell which field they’re typing into.
Step 7: Test Your Contact Form
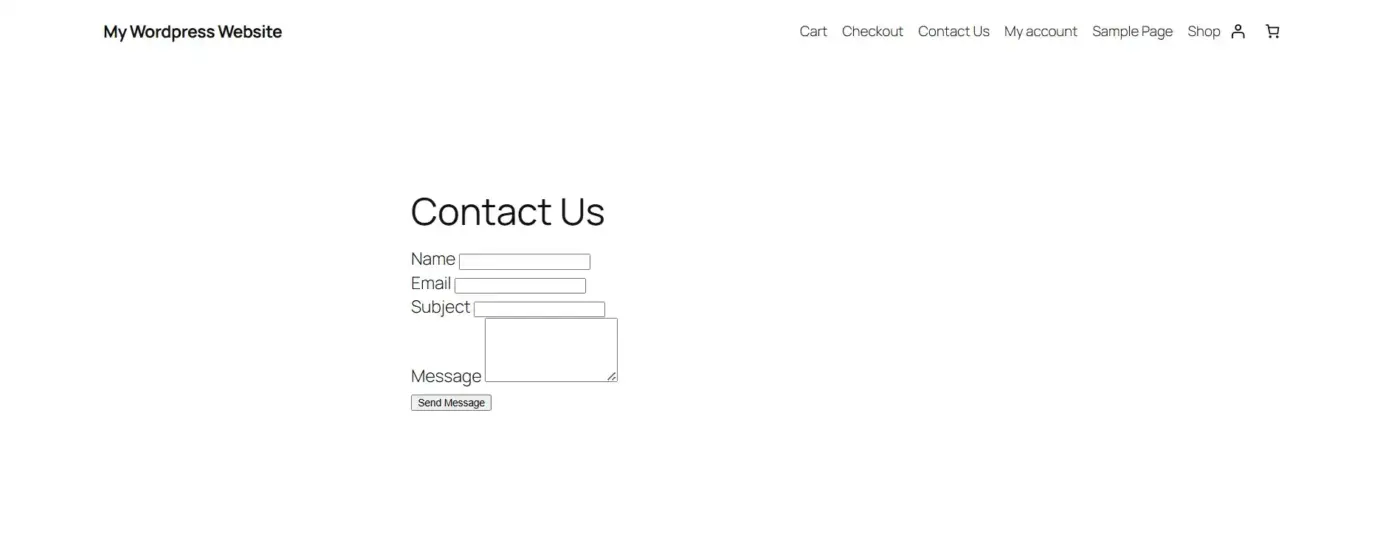
Publish the Contact page, then test it the way a real visitor would, not just by glancing at it.
- Submit the form with every field filled in correctly. Confirm the email arrives.
- Submit it with the email field left blank or filled with something like “notanemail” and confirm you get the validation message instead of a silent failure.
- Open your browser’s developer tools, find the hidden honeypot field, and try submitting with it filled in. The submission should disappear with no email sent.
- Tab through the form using only your keyboard to confirm the focus order makes sense.
If you want a record of every submission beyond what lands in your inbox, read up on checking form submissions in WordPress. The code above doesn’t log anything to the database by default.
Why Your Contact Form Emails Aren’t Arriving (and How to Fix It)
WordPress sends email through PHP’s mail() function by default (wrapped by wp_mail()). On shared hosting, this sends without authentication and Gmail, Outlook, and most spam filters quietly reject or bin those messages, especially when the “from” address claims a domain the server has no permission to send from.
Key points:
- This isn’t a code problem. Contact form plugins face the exact same issue: their code can be perfectly fine and still deliver nothing.
- The fix is routing outgoing mail through an authenticated SMTP connection instead of PHP’s
mail(). You don’t need a contact form plugin, but you do need a small SMTP plugin. Writing an SMTP client from scratch isn’t realistic. - Once configured with your email provider’s SMTP credentials, every
wp_mail()call, including your custom handler, goes through that authenticated connection automatically.
Quick check: Submit the form, wait five minutes, then look in your spam folder. If the message is there, it’s a deliverability issue, not a code issue.
For more on the notification side of this, getting notifications on form submissions in WordPress covers it in detail.
Add AJAX Submission So the Page Doesn’t Reload
The form from Step 4 redirects after submission, which works fine, but reloads the entire page. If you’d rather show a confirmation message in place without a reload, AJAX handles that.
First, register an AJAX handler in functions.php, alongside (not instead of) the handler from Step 4:
add_action( 'wp_ajax_cf_submit', 'devdiggers_ajax_contact_form' );
add_action( 'wp_ajax_nopriv_cf_submit', 'devdiggers_ajax_contact_form' );

function devdiggers_ajax_contact_form() {

	check_ajax_referer( 'cf_submit_action', 'cf_nonce' );

	if ( ! empty( $_POST['cf_website'] ) ) {
		wp_send_json_success();
	}

	$name    = sanitize_text_field( wp_unslash( $_POST['cf_name'] ?? '' ) );
	$email   = sanitize_email( wp_unslash( $_POST['cf_email'] ?? '' ) );
	$message = sanitize_textarea_field( wp_unslash( $_POST['cf_message'] ?? '' ) );

	if ( empty( $name ) || empty( $message ) || ! is_email( $email ) ) {
		wp_send_json_error( array( 'message' => 'Please check the form and try again.' ) );
	}

	wp_mail( get_option( 'admin_email' ), 'New contact form submission', "Name: $name\nEmail: $email\n\n$message" );

	wp_send_json_success();
}
Then add a short script that intercepts the form’s submit event:
document.getElementById('contact-form').addEventListener('submit', function (e) {
  e.preventDefault();

  const formData = new FormData(this);
  formData.append('action', 'cf_submit');

  fetch('/wp-admin/admin-ajax.php', {
    method: 'POST',
    body: formData,
  })
    .then((res) => res.json())
    .then((data) => {
      this.style.display = data.success ? 'none' : 'block';
      document.getElementById('cf-response').textContent = data.success
        ? 'Thanks, your message has been sent.'
        : 'Something went wrong. Please try again.';
    });
});
Add an empty <div id="cf-response"></div> right after the form’s closing tag for the message to appear in. This step is optional. The redirect-based version from Step 4 is more reliable, since it still works with JavaScript disabled. Treat AJAX as a UX upgrade rather than a requirement.
Make Your Contact Form GDPR Compliant
If your visitors might be in the EU or UK, collecting a name and email address through a form counts as processing personal data. GDPR has a few requirements worth building in from the start.
Add a consent checkbox to the form from Step 2:
<div class="form-row form-row--checkbox">
  <input type="checkbox" id="cf-consent" name="cf_consent" required>
  <label for="cf-consent">I agree to the <a href="/privacy-policy/">privacy policy</a> and consent to having this site store my submitted information.</label>
</div>
In the PHP handler, add a check alongside the existing validation:
if ( empty( $_POST['cf_consent'] ) ) {
	wp_die( esc_html__( 'Please agree to the privacy policy to send your message.', 'text_domain' ) );
}
Beyond the checkbox, GDPR also expects you to collect only what you need. The form above doesn’t ask for a phone number or address unless your business requires it. You should also have a privacy policy page that explains what happens to submitted data, including how long you keep emails containing it. None of this requires a plugin. It’s mostly about what you ask for and what you tell people about it.
DIY Contact Form vs WordPress Plugins: Which Should You Use?
After building all of this, it’s worth being honest about when a plugin still makes sense.
| DIY (this guide) | Contact Form 7 | Jetpack Form | |
|---|---|---|---|
| Setup time | 20 to 30 minutes | 5 to 10 minutes | 5 minutes |
| Code added to your site | Minimal, only what you write | Plugin codebase plus your config | Part of the larger Jetpack plugin |
| Spam protection | Honeypot (manual setup) | Requires a separate CAPTCHA plugin | Built-in (Akismet) |
| Multiple forms, conditional fields | Possible, but you build it yourself | Built-in | Built-in |
| Long-term maintenance | None, it’s just code | Plugin updates | Plugin updates |
| Best for | One simple form, performance-focused sites | Multiple forms, non-developers | Sites already using Jetpack |
If you need one contact form and you’re comfortable with the code in this guide, doing it yourself is the faster, lighter option. Nothing about it needs updating later. If you need five different forms across your site with conditional logic and a visual builder for non-technical team members, that’s a different story. That’s exactly the gap Contact Form 7 or Jetpack Form exists to fill. Fighting that with custom code stops being worth the time it saves.
Conclusion
Creating a WordPress contact form without a plugin comes down to three files: an HTML form, a PHP handler in functions.php, and a CSS stylesheet. Add a nonce and a honeypot field, and it won’t become a spam magnet either. The build itself takes less time than most people expect.
The part that causes problems later is email delivery, not the form. If messages stop arriving weeks after launch, check your SMTP setup before assuming the code broke. From here, the AJAX and GDPR sections in this guide are there when you need them, not requirements for a working form.
If you’d rather have this built and tested for you, or need it integrated into a larger custom site, that’s a job for a developer. DevDiggers’ WordPress development services cover exactly this kind of work.
Frequently Asked Questions (FAQs)
Q1. Do I need to know PHP to create a WordPress contact form without a plugin?
You need to be comfortable copying PHP code functions.php exactly as written, including matching brackets and semicolons. You don’t need to write PHP from scratch, but a single typo can cause a fatal error. Paste carefully, and test on a staging site first if you have one.
Q2. Can I add this form without editing any theme files?
Mostly yes. The HTML form goes into a Custom HTML block on the page itself, no file editing required. The PHP handler does need to go into functions.php, which is the one part that requires file access, ideally through a child theme.
Q3. Will this method work with any WordPress theme or page builder?
Yes. The HTML and CSS in this guide are standard and don’t depend on any specific theme. Page builders like Elementor or Divi also support custom HTML blocks or widgets where you can paste the same form code.
Q4. How do I know if the honeypot field is blocking spam?
Check your admin_email inbox over a week or two before and after adding it. Most sites see a noticeable drop in junk submissions almost immediately, since simple bots fill in every field they find, including hidden ones.
Q5. What happens to the form if I switch themes later?
If you used the Custom HTML block approach from Step 3, the form content stays with the page and survives a theme switch. The PHP handler functions.php, however, lives in the old theme. You’ll need to copy that code into your new theme, or its child theme, as well.
Q6. Is it normal for the contact form to redirect after submission instead of showing a message on the same page?
Yes, and it’s intentional. Redirecting after a successful submission prevents the browser from resubmitting the form if someone refreshes the page or clicks back. If you’d prefer no redirect at all, the AJAX section in this guide shows how to handle the response in place instead.