You can get notifications on form submissions in WordPress in under ten minutes, no coding required. Every popular form plugin already has a built-in notification setting sitting there waiting to be turned on. The problem isn’t that it’s hard. It’s that most guides skip the part where you see each screen, and that’s exactly the part that trips beginners up.
This guide walks through the exact clicks for three of the most-used form plugins: WPForms and Contact Form 7. Whichever one you’re already running, you’ll find the matching section below, so there’s no need to read through all three if you’ve already made your choice.
Each step is broken down into small enough steps that you can screenshot it, follow along, and check it off as you go. No guessing which menu something’s hiding in, no jumping between half-finished instructions.
We’ll also cover why notifications sometimes silently fail even after everything looks set up correctly, and the one fix, an SMTP setup most people never think to check, that solves the majority of those cases for good.
Why You Need Form Submission Notifications?
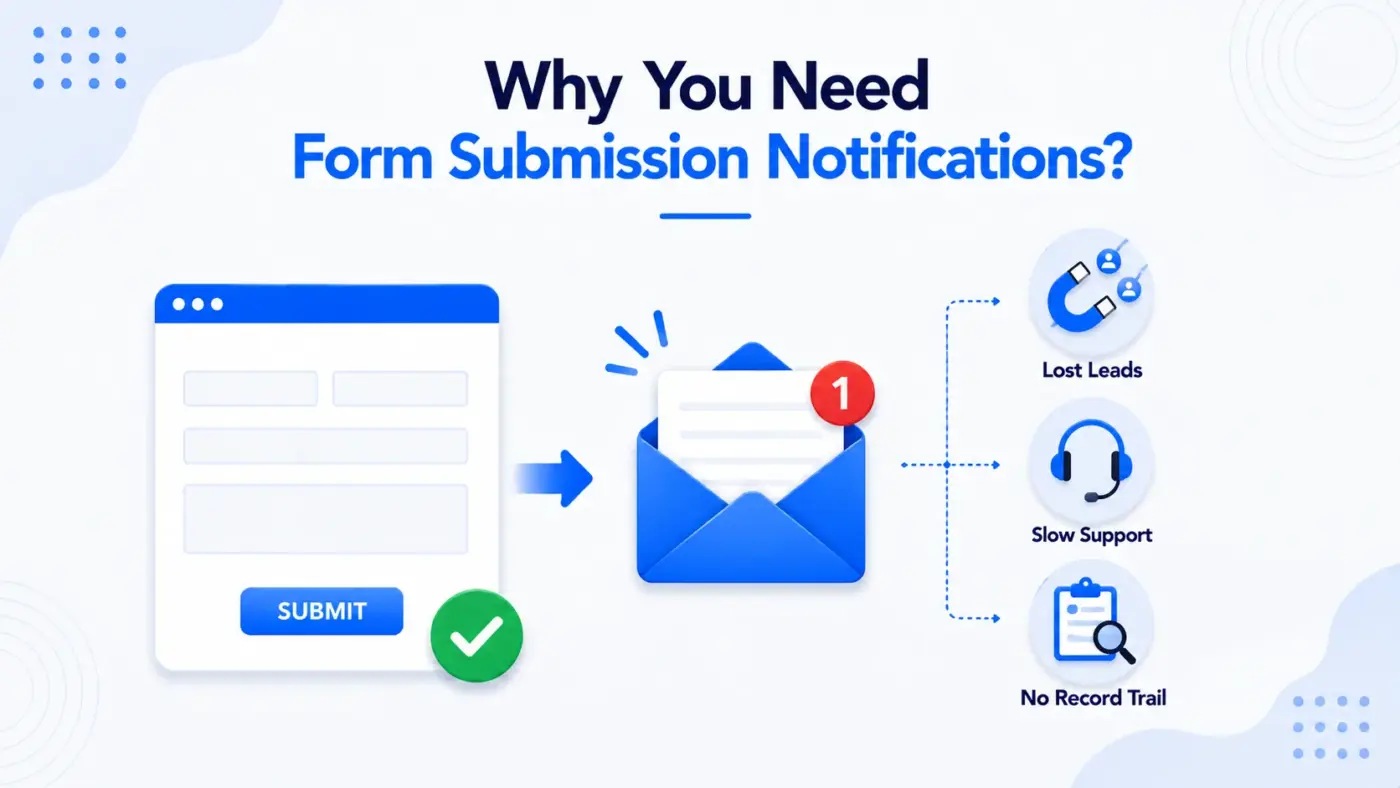
Without notifications, a form is just a black hole. Someone fills it out, and unless you happen to log into WordPress and check the entries table, you have no idea it happened.
That’s a real problem for a few reasons.
- Lost leads: A contact form submission that sits unread for three days rarely converts into a sale.
- Slow support: If a customer submits a help request and nobody sees it, they’ll assume you’re ignoring them.
- No record trail: Notifications land in your inbox, giving you a searchable backup outside the WordPress database.
Getting notifications on form submissions in WordPress isn’t a nice-to-have. It’s the difference between a form that works for your business and one that just sits there collecting dust.
What You’ll Need Before You Start
You don’t need any special skills for this. Here’s the short list.
- A WordPress site with admin access.
- One form plugin is installed. This guide covers WPForms and Contact Form 7. Pick whichever one you already have, or whichever fits your budget.
- A working outbound email setup on your server (we’ll cover what to do if this is broken later in the guide).
If you haven’t built a form yet and want to skip plugins entirely, you can also create a WordPress contact form without a plugin. Just know you’ll be writing your own notification logic by hand in that case.
One more thing worth checking before you start. If your site has never sent a WordPress email successfully, in a password reset or an order confirmation, jump ahead to the SMTP section first. There’s no point in configuring notification settings on top of a broken mail setup.a
Method 1: Get Notifications on Form Submissions in WordPress Using WPForms
WPForms sends an admin email notification by default, but confirming and customising it takes about five clicks. Here’s exactly where to click.
This is the plugin we point beginners toward most often. The free version already covers everything in the steps below, and nothing here needs the paid upgrade.
- Go to Plugins > Add New Plugin in the WordPress Dashboard.
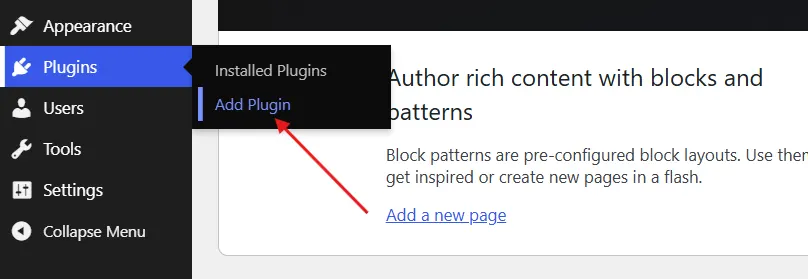
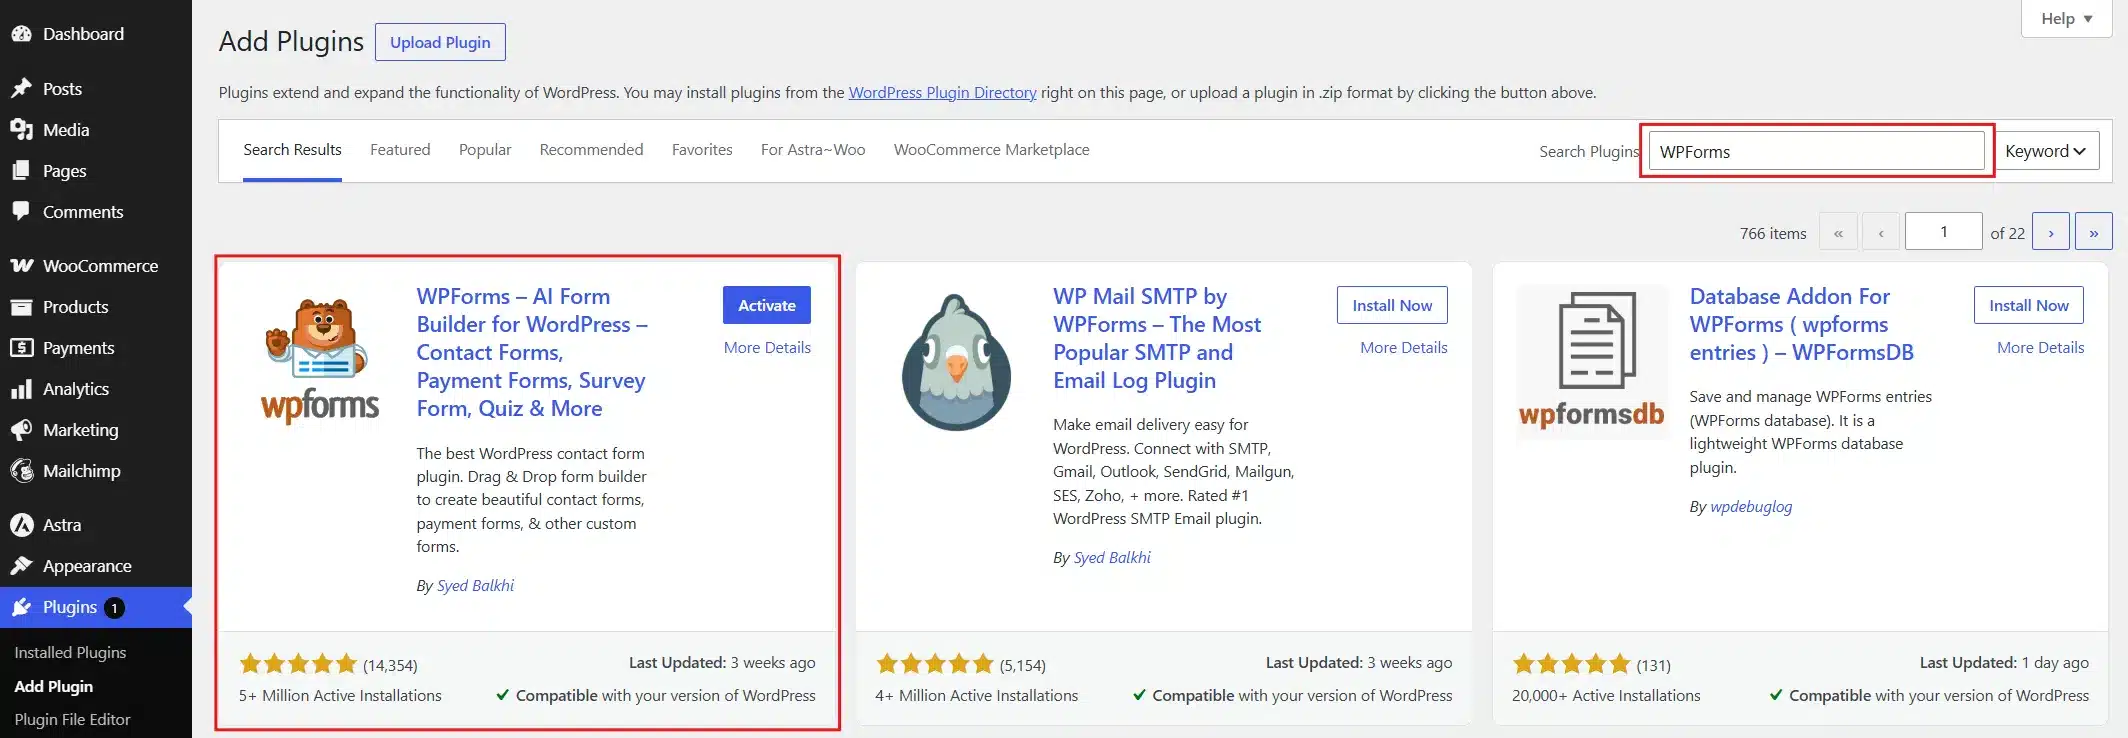
- Install and activate the “WPForms – AI Form Builder for WordPress” plugin.
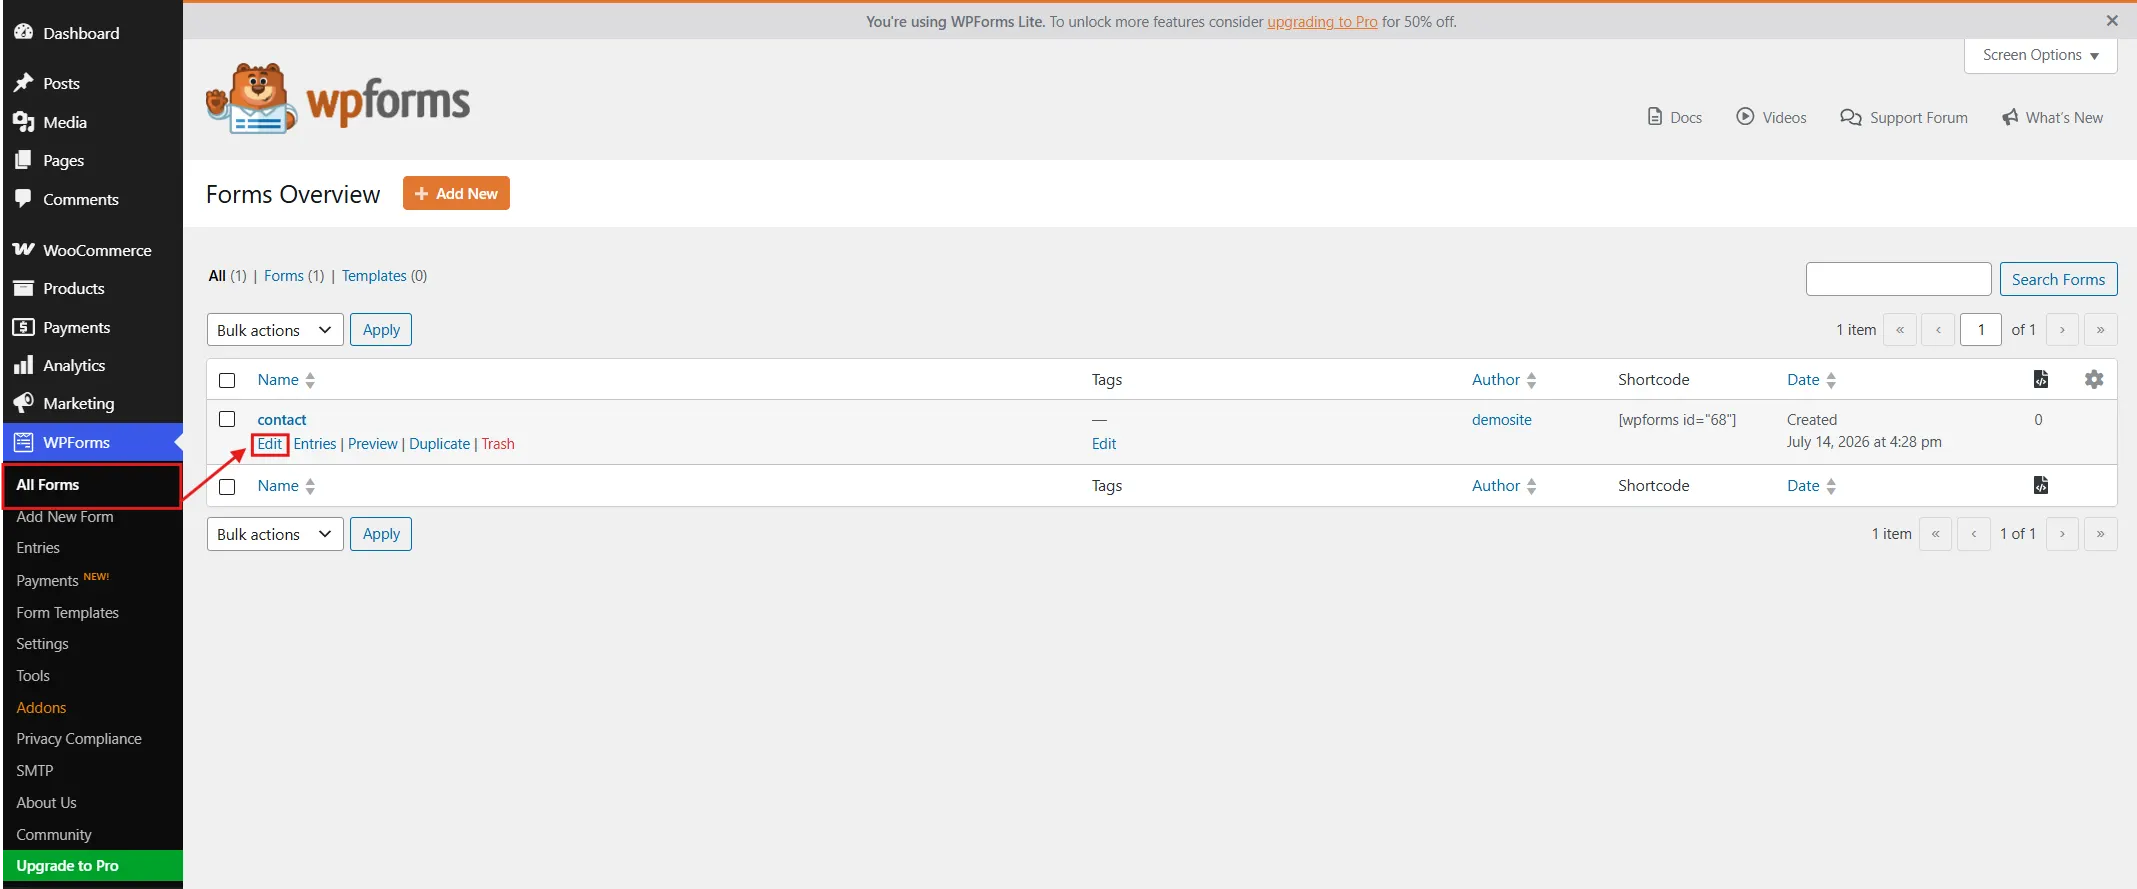
- Go to WPForms > All Forms, find your contact form, and click Edit.
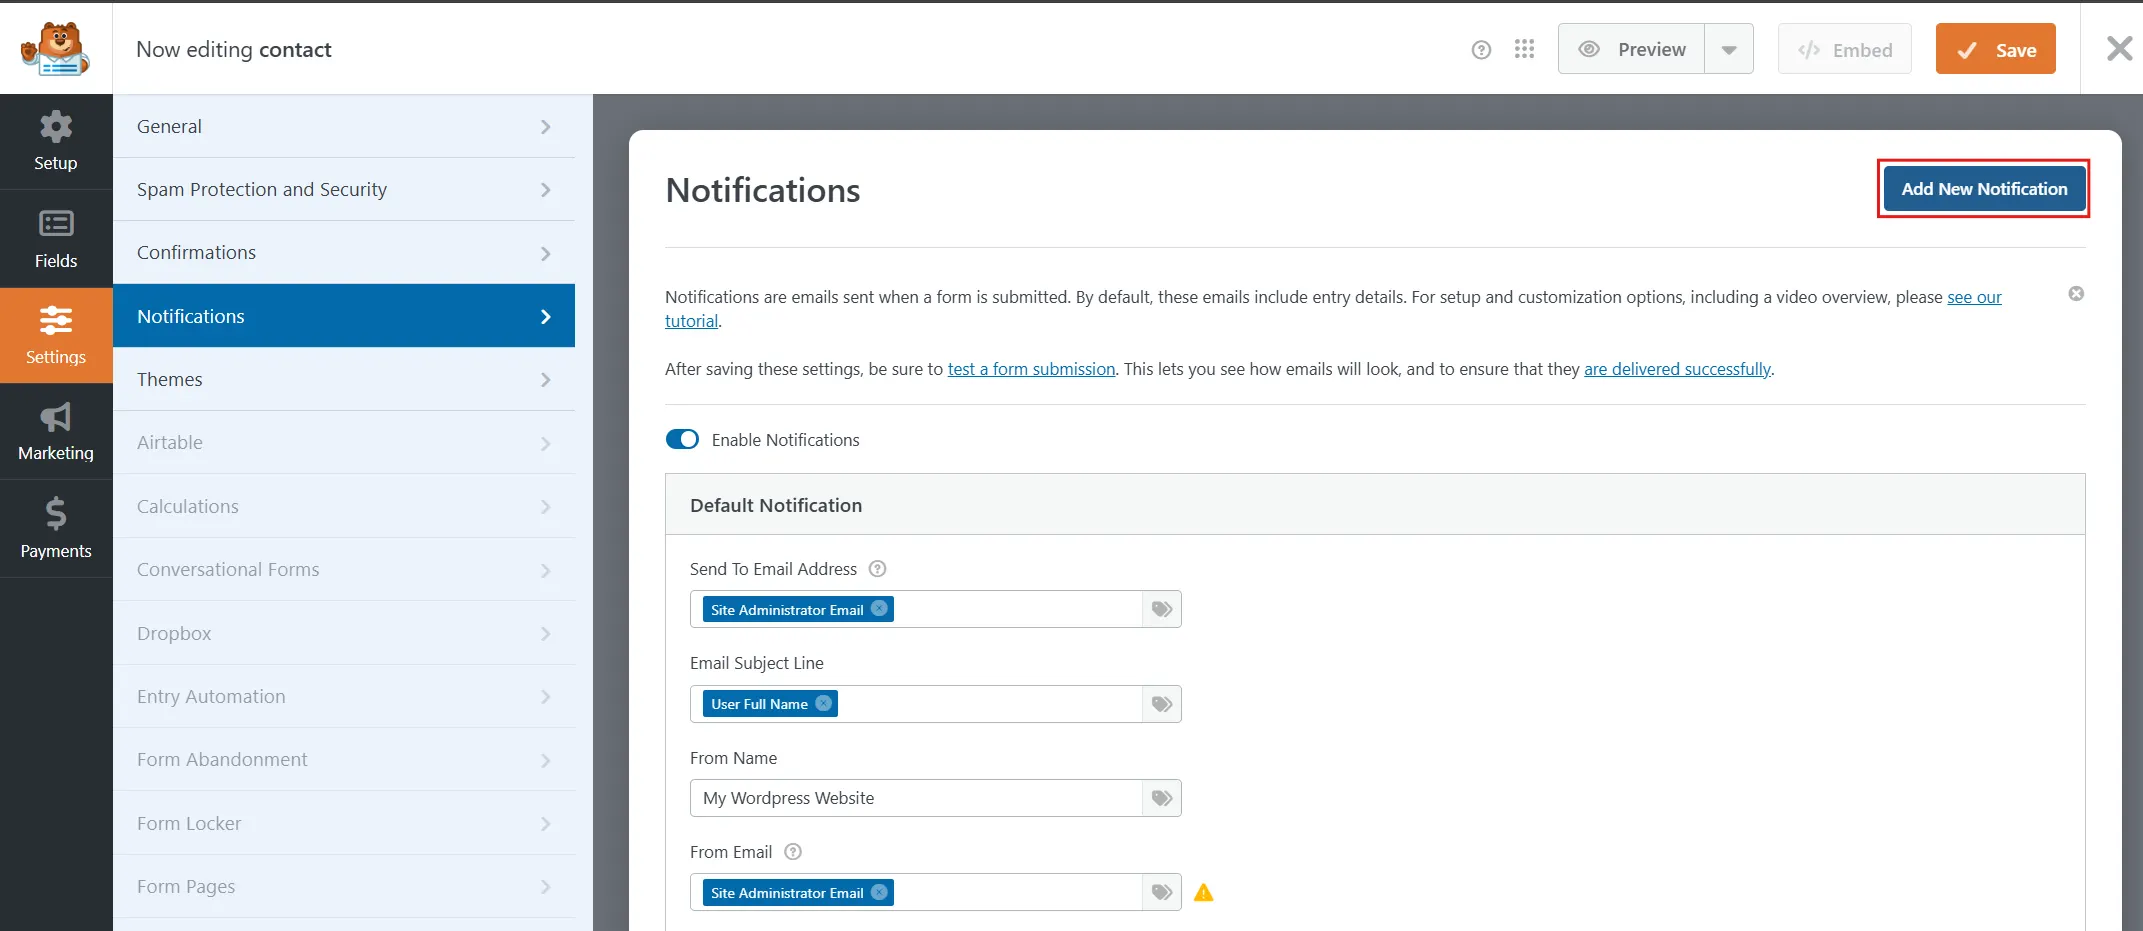
- In the form editor, go to Settings > Notifications.
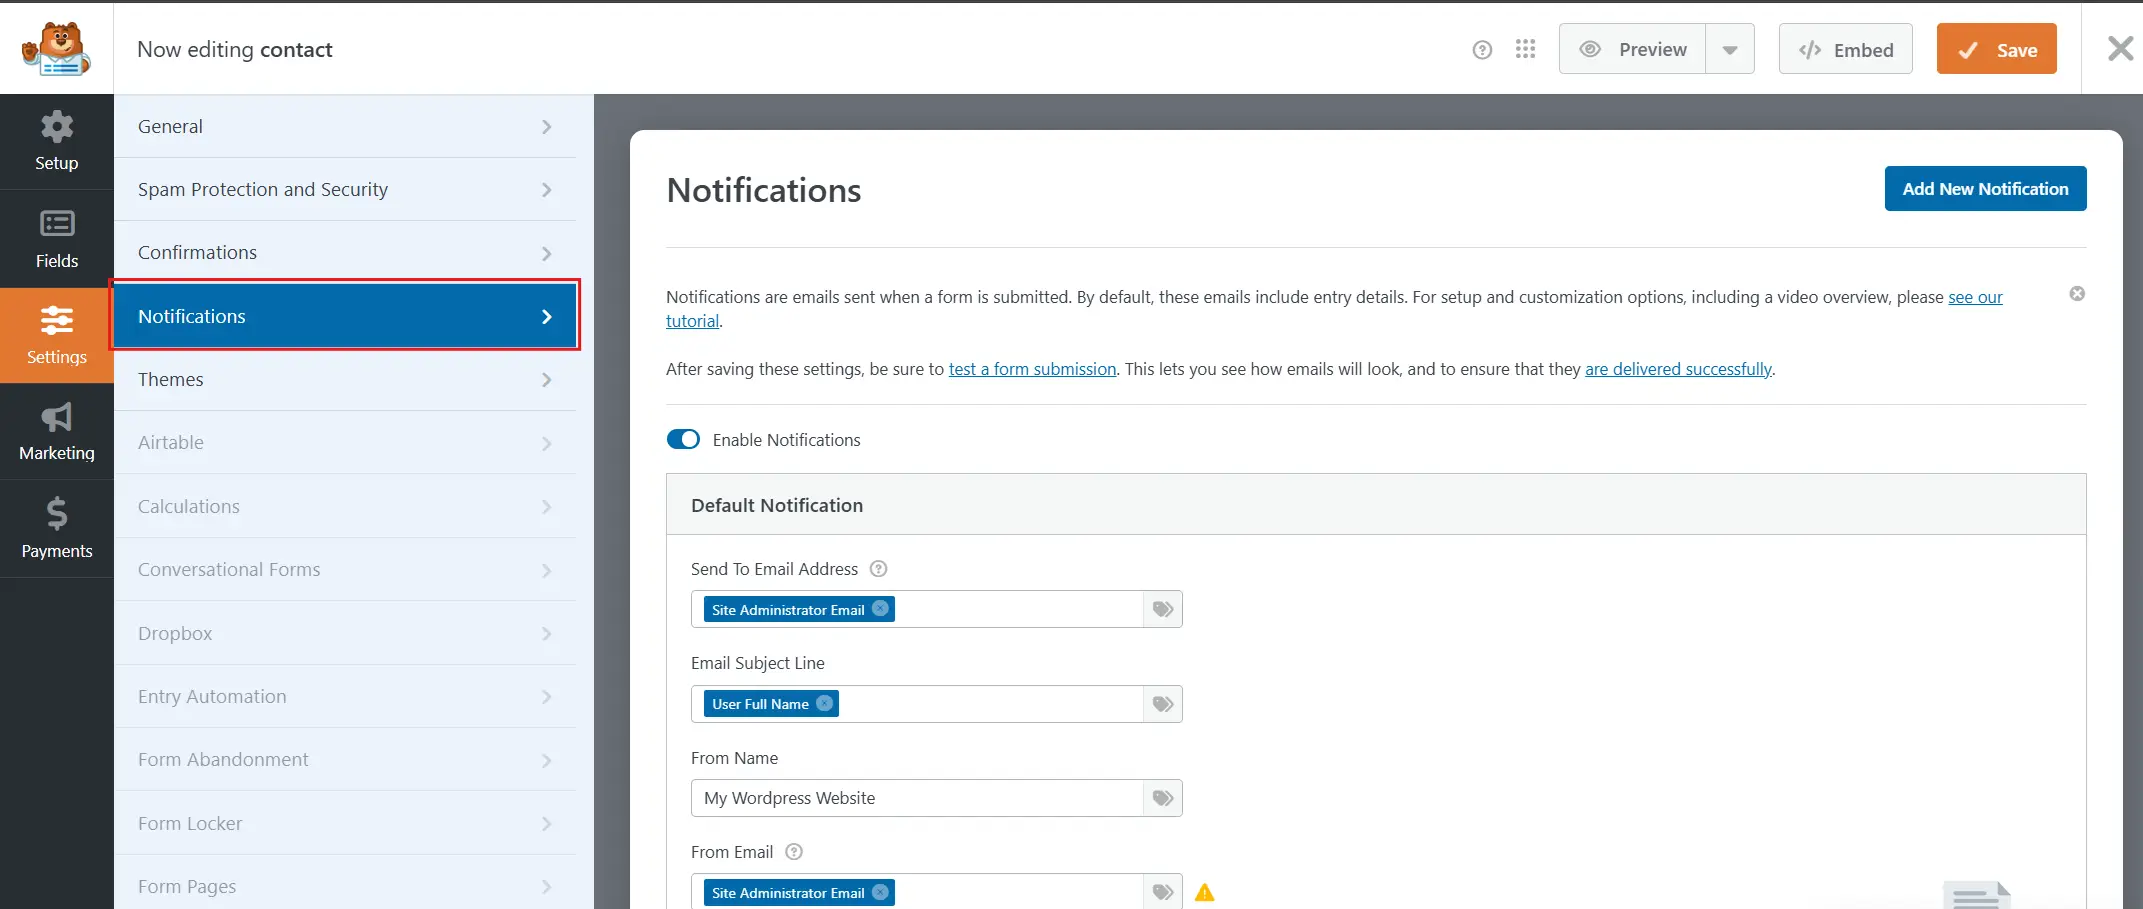
- Check the Send To Email Address field. The default value is Site Administrator Email, which sends the alert to your WordPress admin email. Replace it with a specific address (using the tag icon) if you want the notification sent elsewhere.
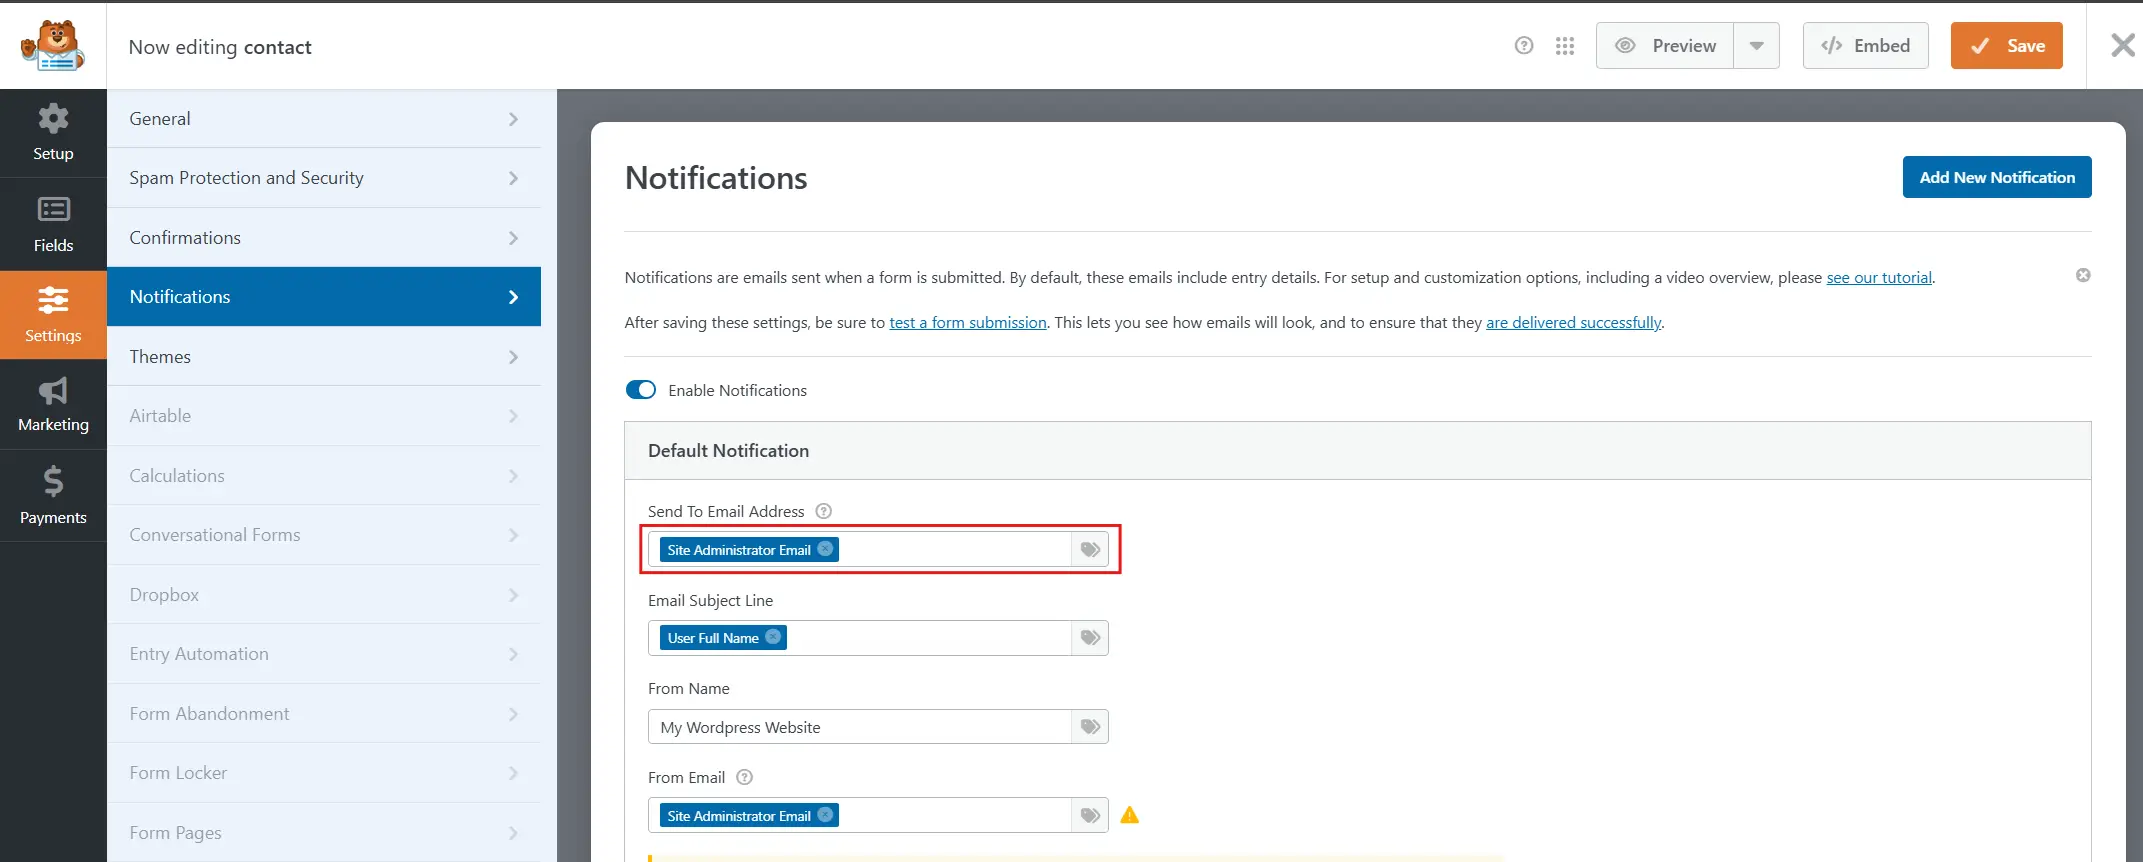
- Edit the Email Subject Line. The default uses the User Full Name smart tag. You can change it to something like “New message from {name}” using the smart tags available via the tag icon.
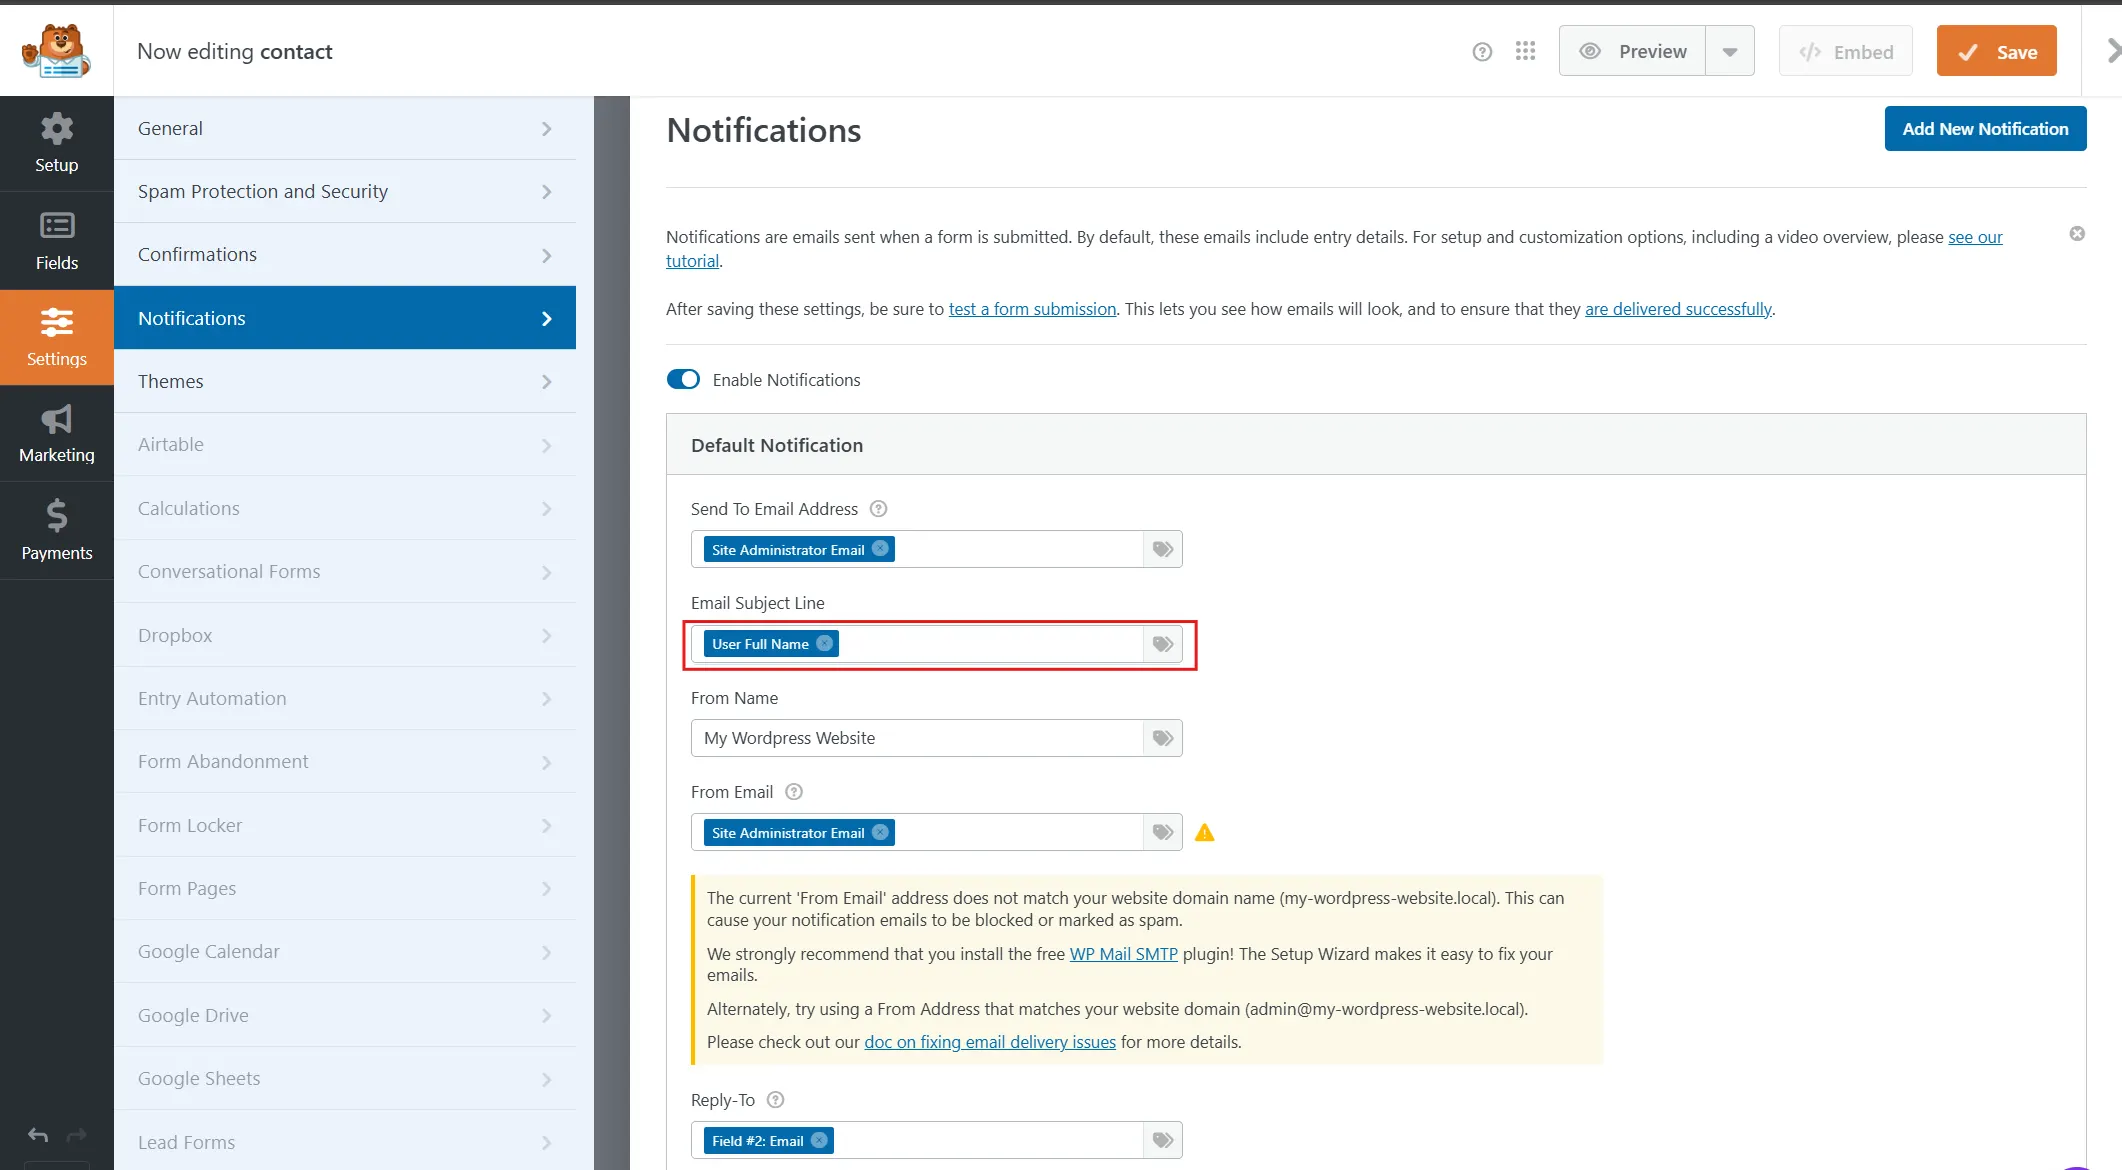
- Customise the Email Message field. It contains the
{all_fields}smart tag by default, which pulls in all the form field data (name, email, message, etc.) submitted by the visitor. You can edit this to add/remove specific fields.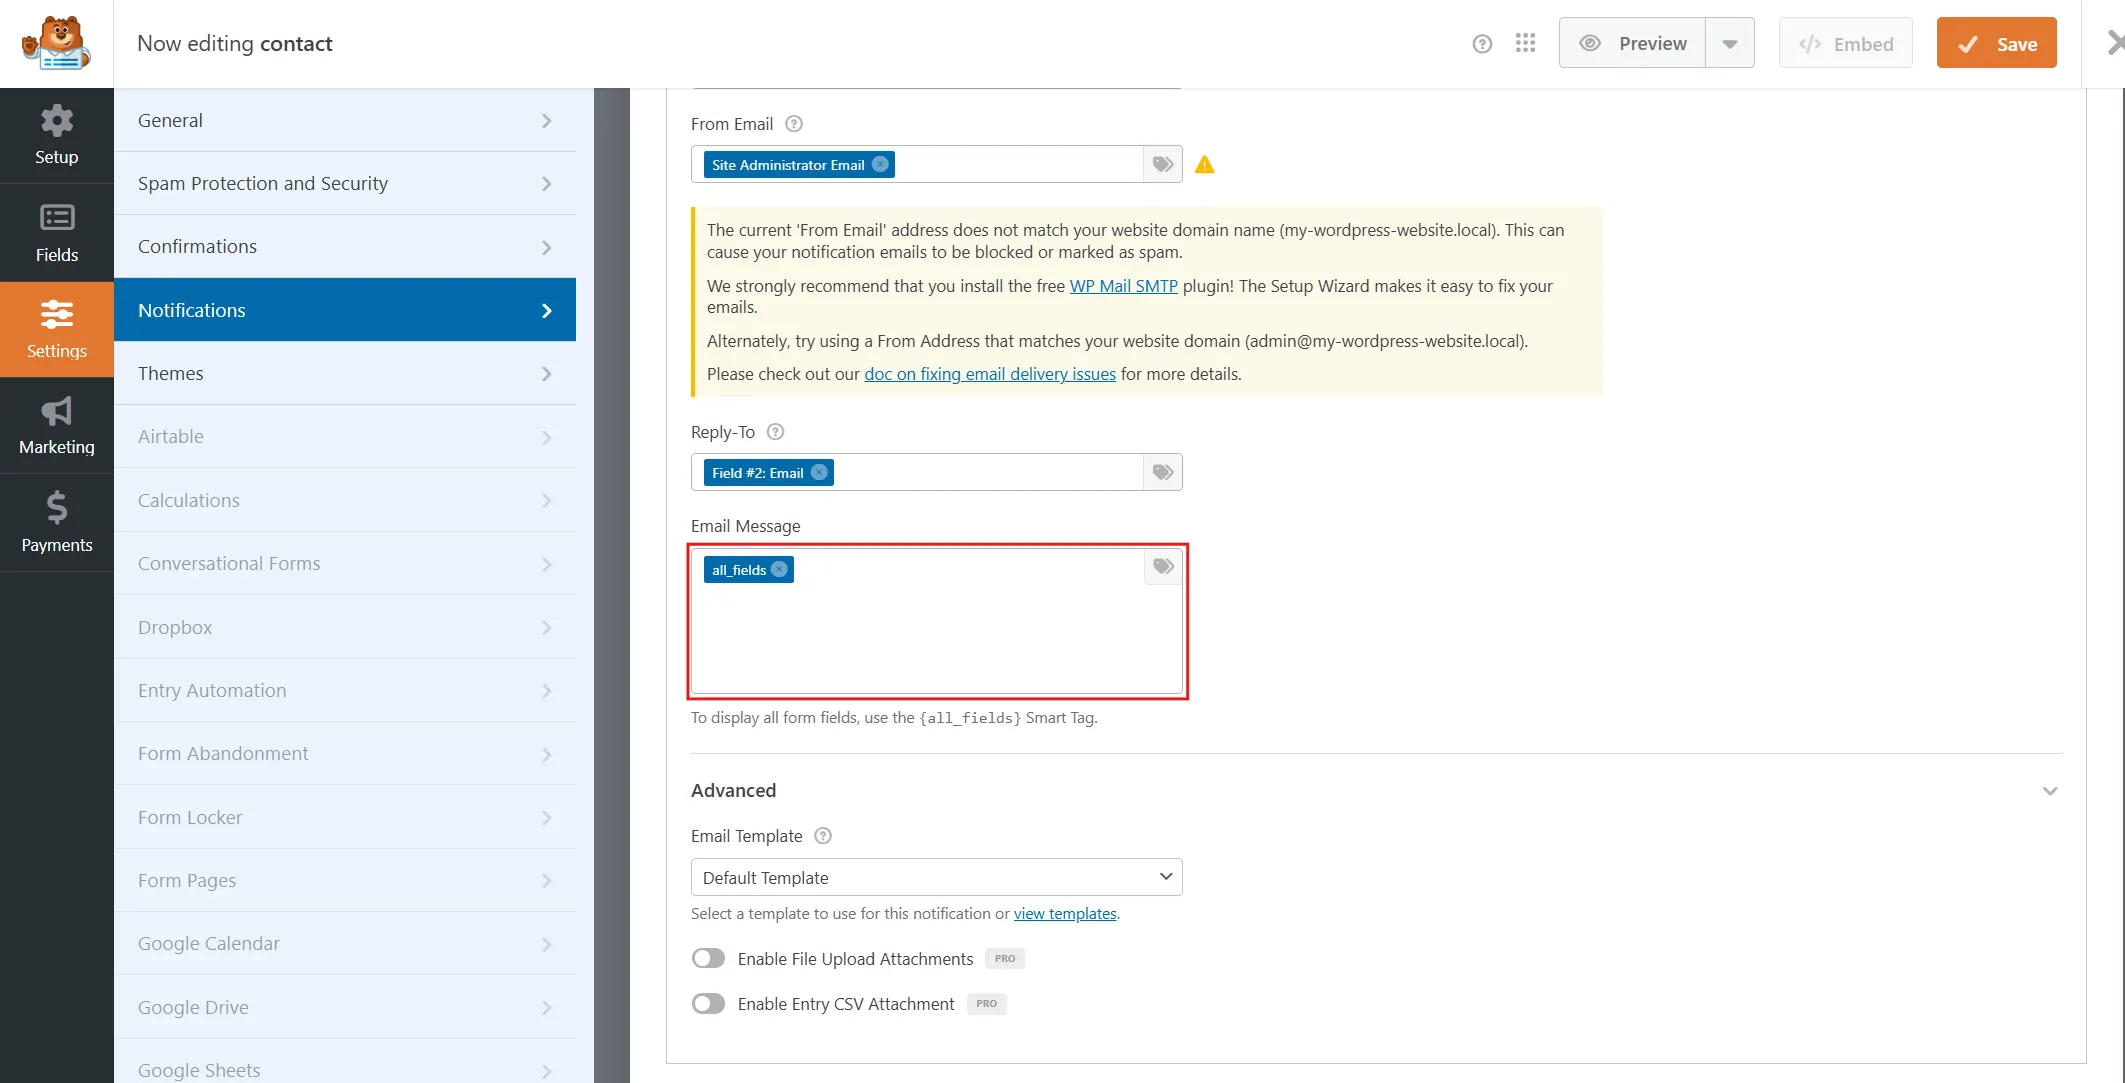
- Set up a second email (optional). Click Add New Notification (top-right) if you want a separate confirmation email sent back to the person who submitted the form.
- Save your changes. Click the Save button (top-right, orange). WPForms doesn’t show a confirmation banner on this screen, so submit a test entry afterwards to make sure the notification email works.
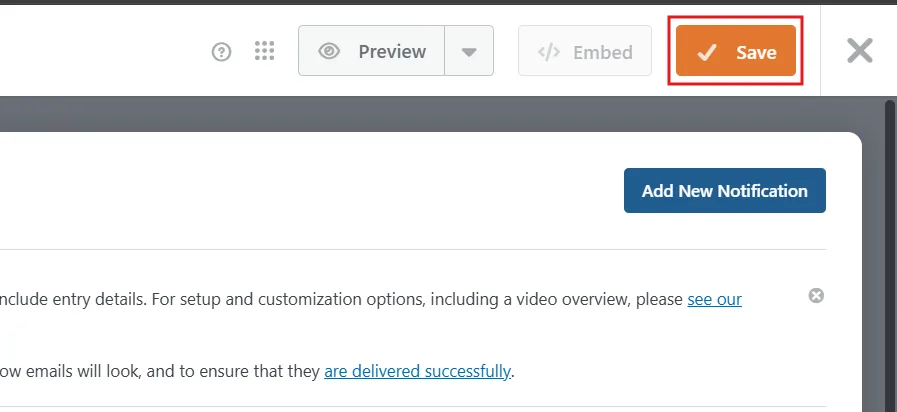
Note: Also, watch out for the yellow warning under “From Email”; it says the From Email doesn’t match your site domain, which can cause emails to be marked as spam. It recommends installing WP Mail SMTP or using an email matching your domain (e.g., admin@your-domain.com).
Method 2: Get Notifications on Form Submissions on WordPress Using Contact Form 7
Contact Form 7 handles things a little differently. Notifications are always active. There’s no toggle to switch on. You’re just editing what the notification says and where it goes.
- Install and Activate the “Contact Form 7” Plugin.
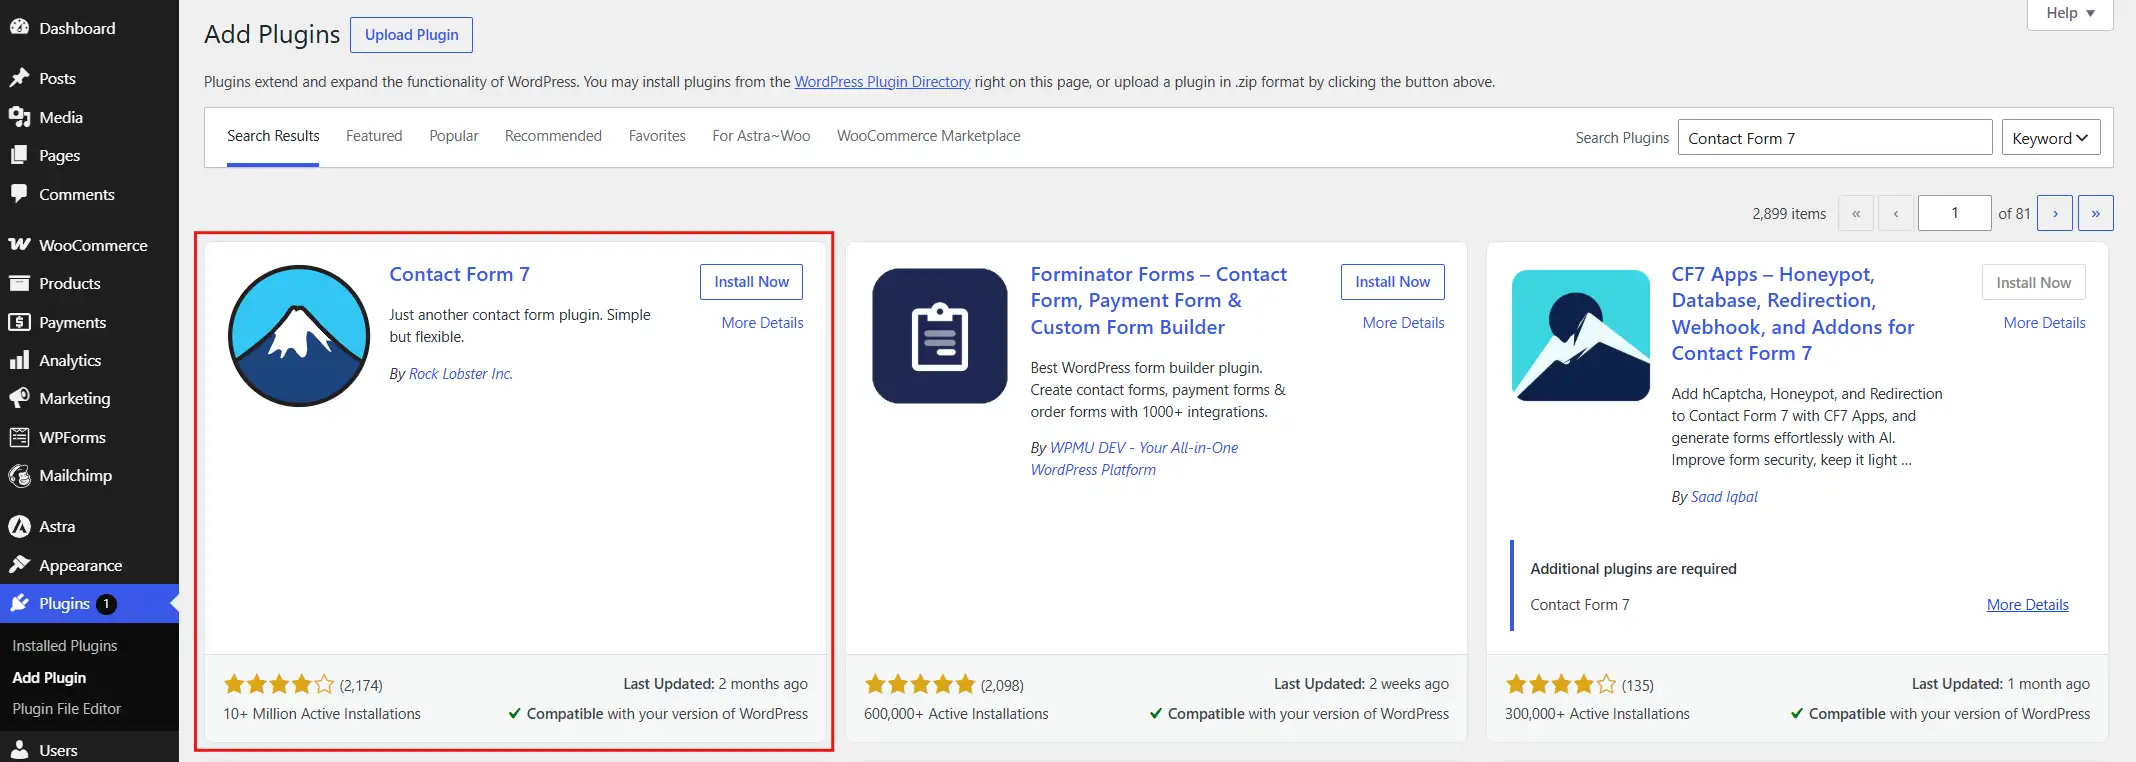
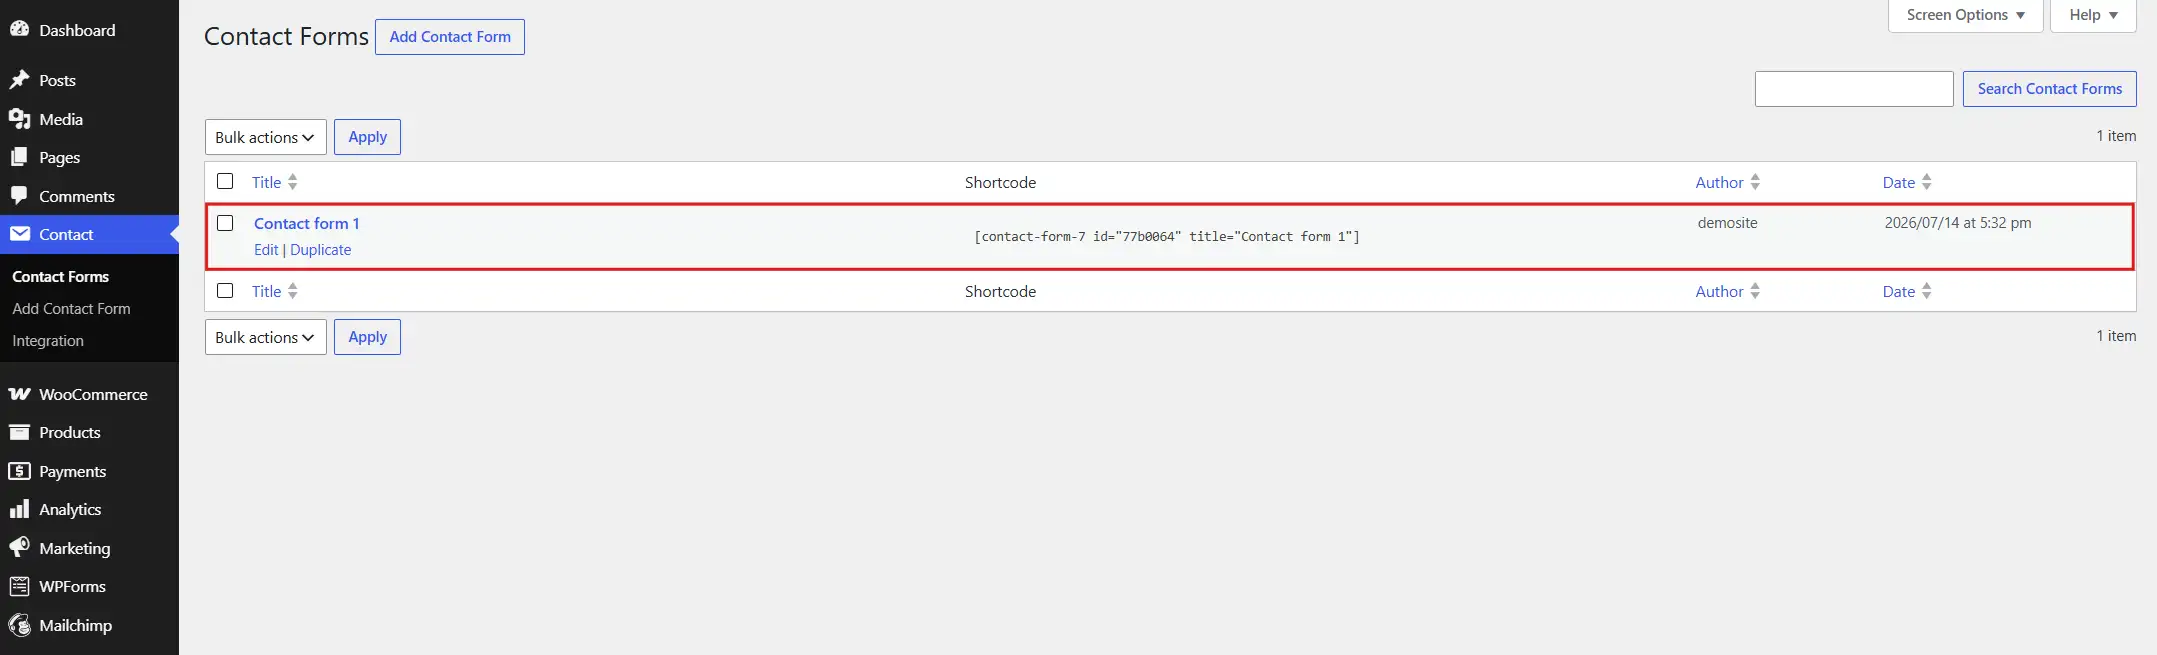
- Now, go to Contact > Contact Forms.
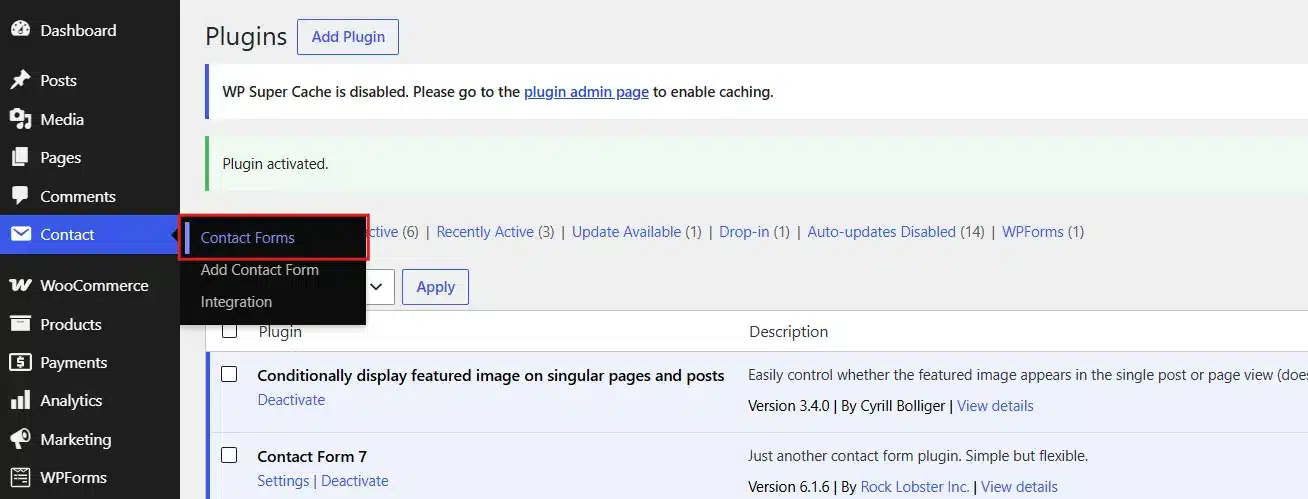
- Click the form you want to edit.
- Then click the Mail tab at the top of the editor.
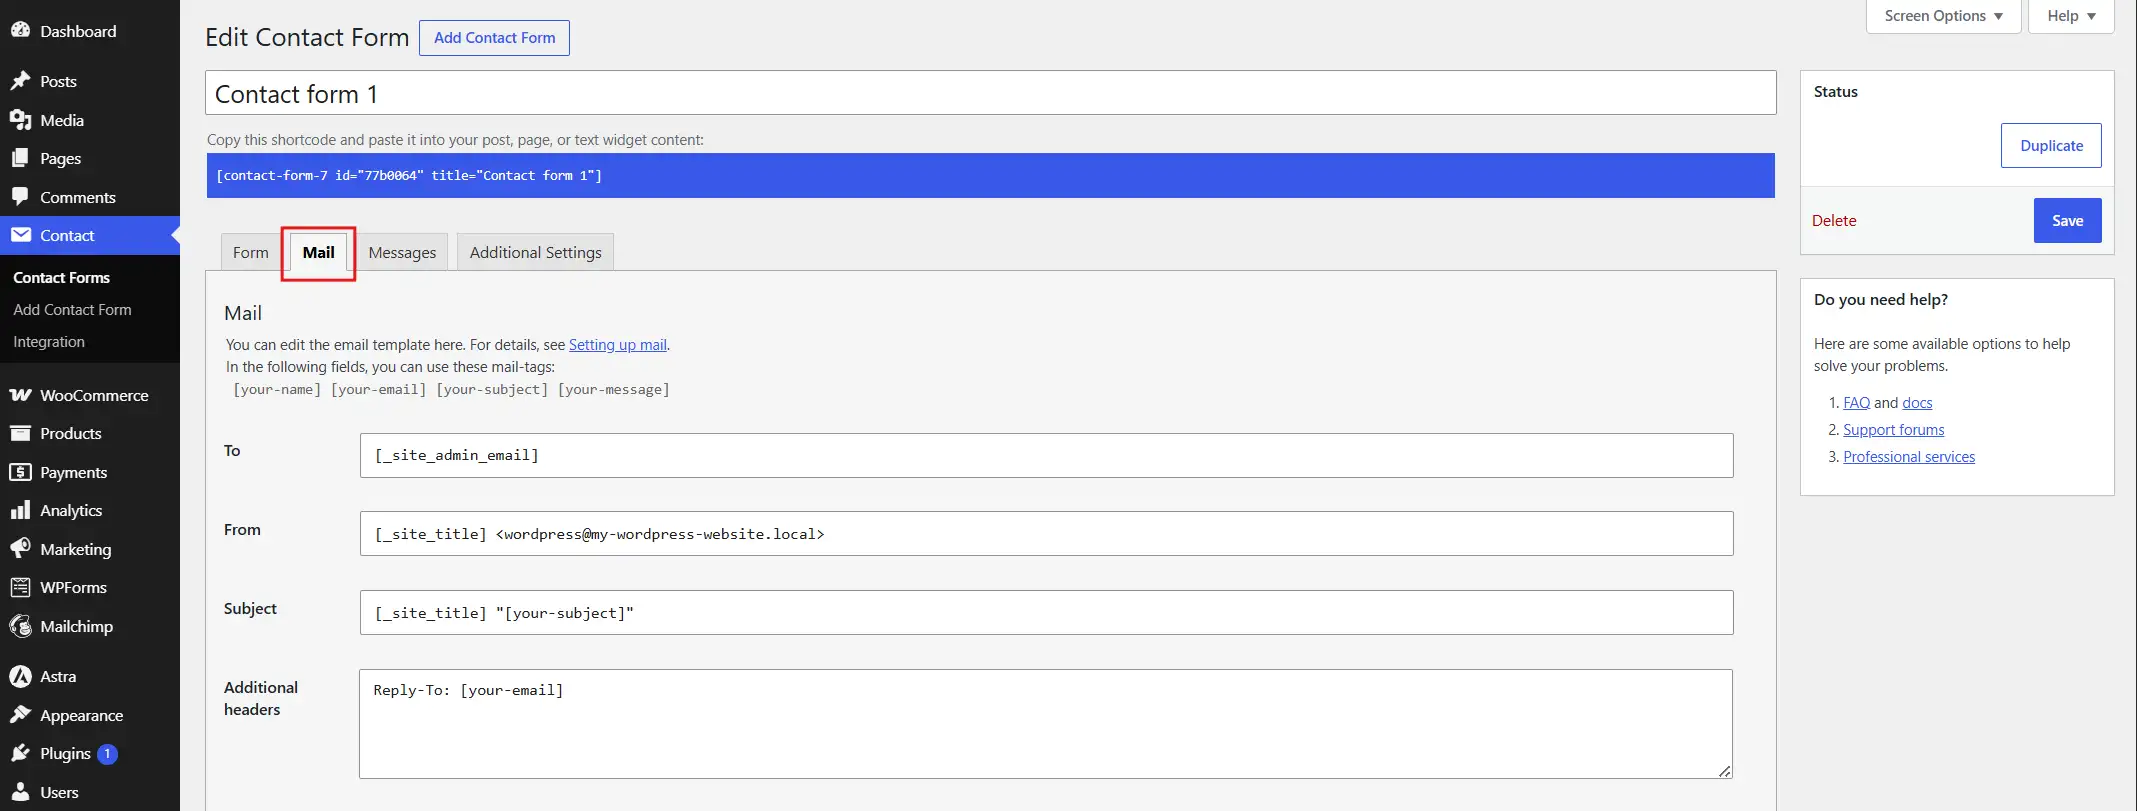
- The default value is usually
[_site_admin_email], which sends the alert to your WordPress admin email. Replace it with a specific address if you want the notification sent elsewhere.![The default value is usually [_site_admin_email], which sends the alert to your WordPress admin email. Replace it with a specific address if you want the notification sent elsewhere.](https://devdiggers.com/wp-content/uploads/2026/07/contact-form-7-subject-field.webp)
- The default subject is generic. Change it to something like “New message from [your-name]” using the mail tags shown just above the field.
![The default subject is generic. Change it to something like "New message from [your-name]" using the mail tags shown just above the field.](https://devdiggers.com/wp-content/uploads/2026/07/contact-form-7-message-body.webp)
- Add or remove mail tags in the message body to control which fields show up in your notification email.
[your-message]Pulls in whatever the visitor typed.![Add or remove mail tags in the message body to control which fields show up in your notification email. [your-message] Pulls in whatever the visitor typed.](https://devdiggers.com/wp-content/uploads/2026/07/disable-mail-2-in-contact-form-7.webp)
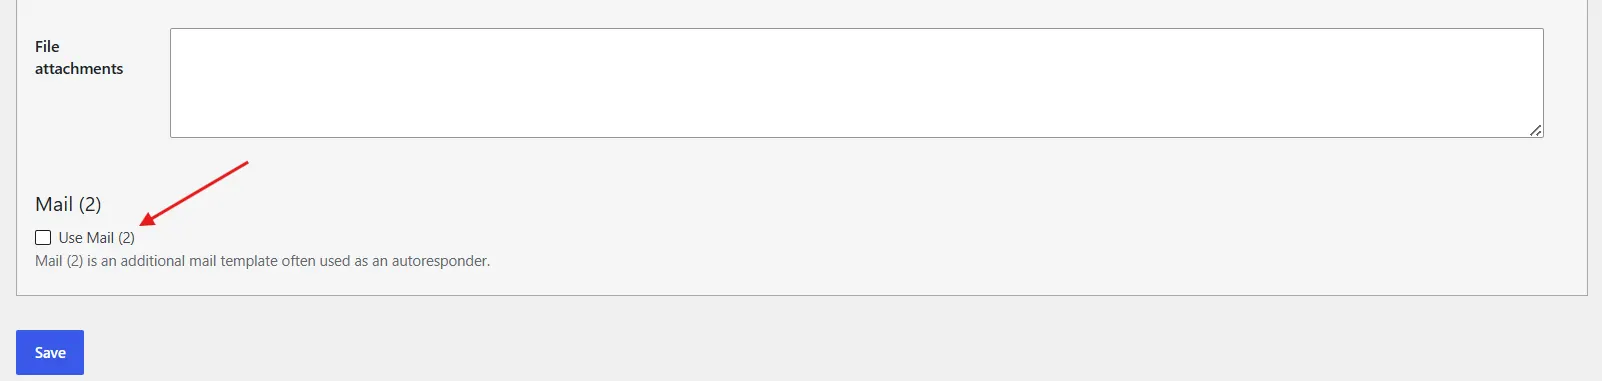
- Scroll down and click Add “Mail (2)” if you want a separate confirmation email sent back to the person who submitted the form.
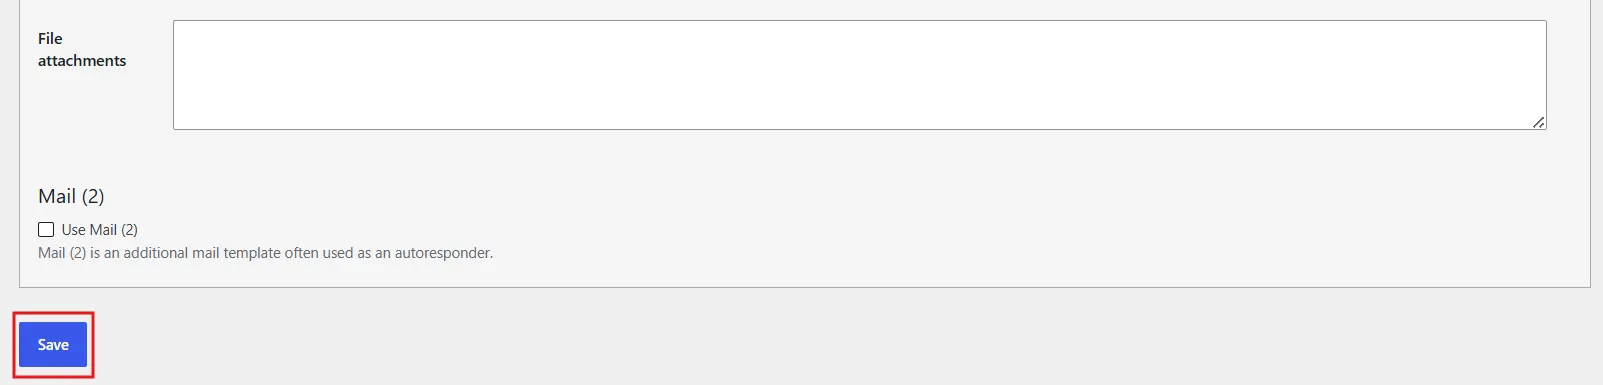
- Scroll to the bottom and click Save. Contact Form 7 doesn’t show a confirmation message, so submit a test entry afterwards to be sure it worked.
Limitation: Contact Form 7 has no visual settings panel for notifications. Everything runs through mail tags typed into a plain text field, which is less friendly for a first-time user than WPForms.
Which Plugin Should You Use: Quick Comparison
| Plugin | Best for | Notification setup | Cost |
|---|---|---|---|
| WPForms | Beginner, small business sites | Simple, one toggle | Free version available, paid tiers for advanced routing |
| Contact Form 7 | Developers who want full control | Manual mail tag editing | Free |
If you just want something working today, WPForms is the fastest path. Contact Form 7 is free forever, but expect to spend more time in the mail tag settings.
Before you rely only on email alerts, it’s worth knowing you can also check form submissions in WordPress directly from your dashboard as a backup.
Why Your Notification Emails Might Not Be Arriving (SMTP Fix)
Here’s something most tutorials leave out. WordPress sends emails through a built-in function calledwp_mail(), and by default it relies on your hosting server’s own mail settings.
That setup is unreliable. Cheap and shared hosting servers are often flagged by spam filters, so your carefully configured notification never shows up. It’s not the plugin’s fault. It’s the server behind it.
We see this constantly in support tickets. Someone swears their WPForms setup is broken. The real problem is usually that their host’s mail server got blacklisted months ago, and nobody noticed.
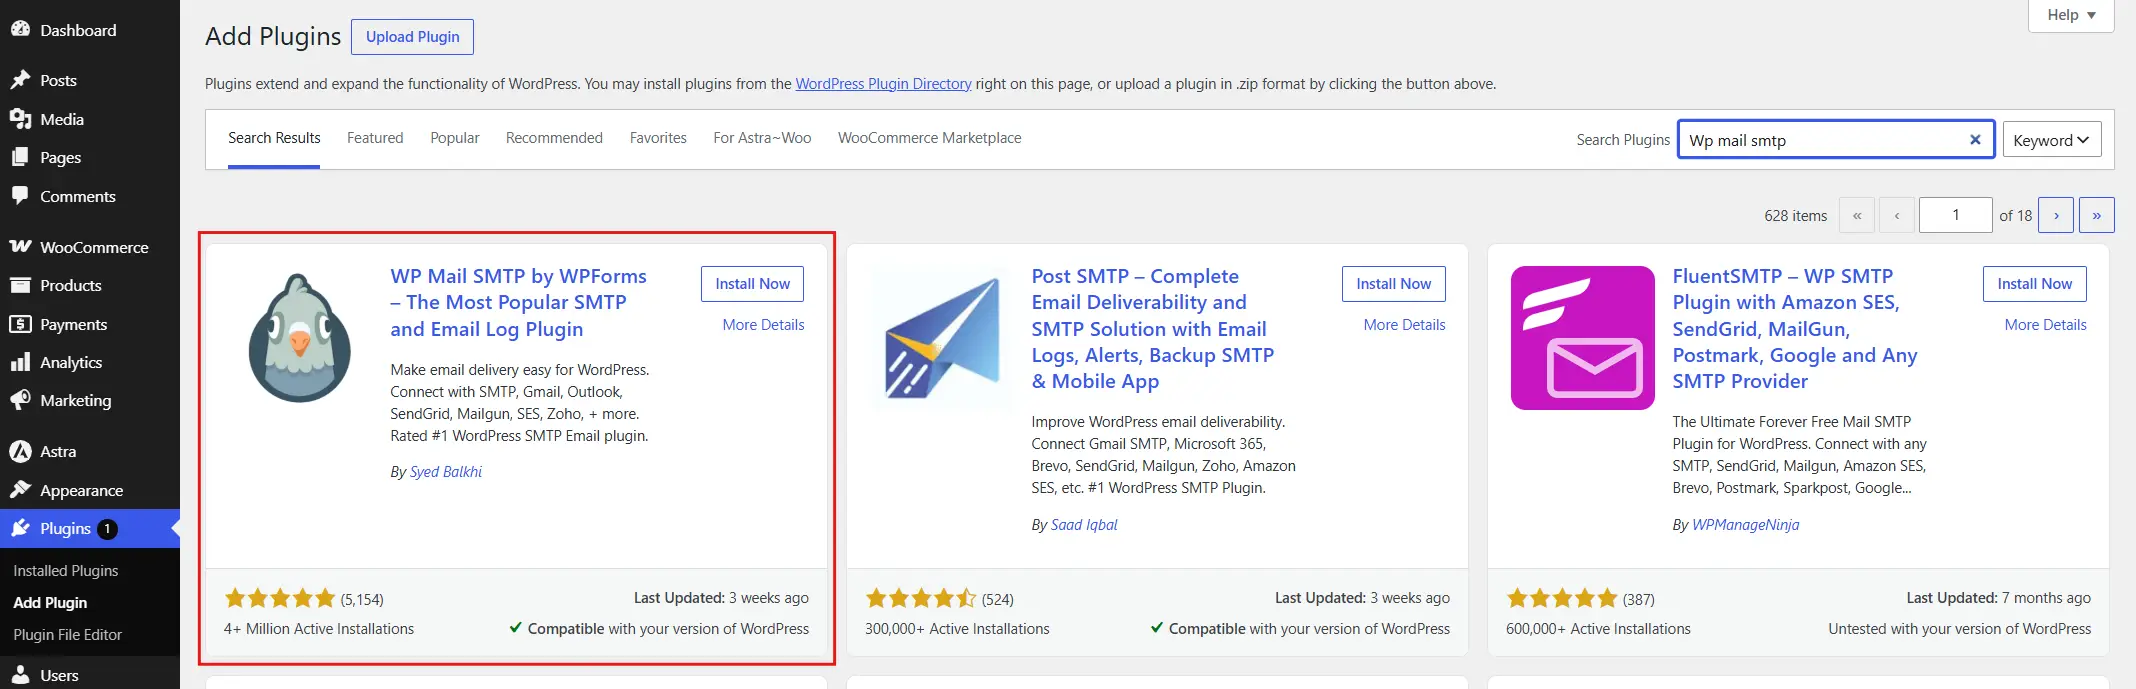
The fix is a free SMTP plugin that routes your outgoing mail through a real email service instead of your server’s default setup.
- Install WP Mail SMTP from the plugin repository.
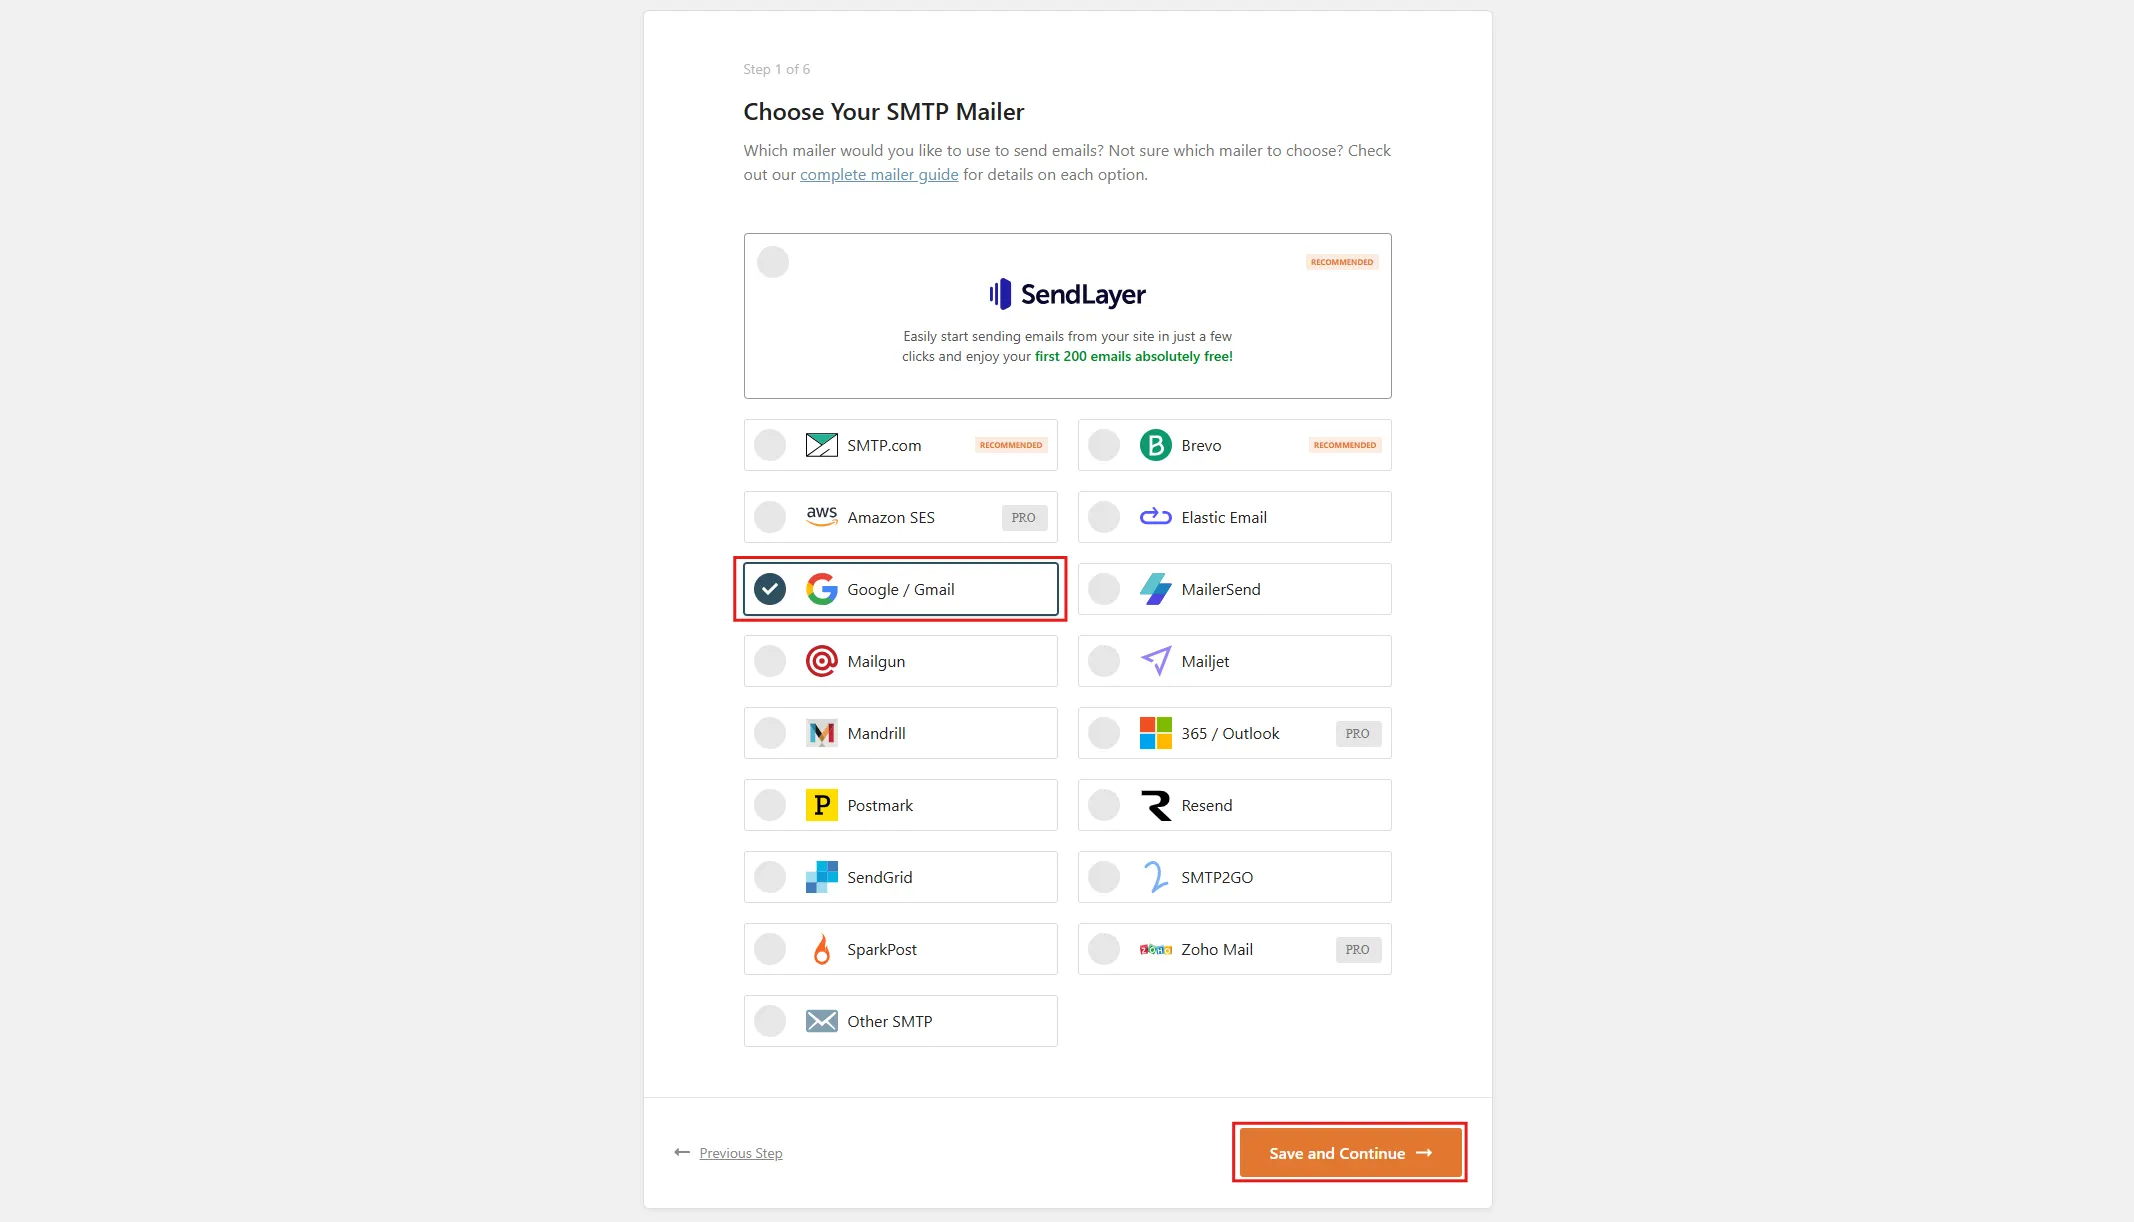
- Connect it to a mail provider such as Gmail, Google Workspace, or a transactional email service like SendLayer.
- Run the plugin’s built-in test email from WP Mail SMTP > Tools > Email Test.
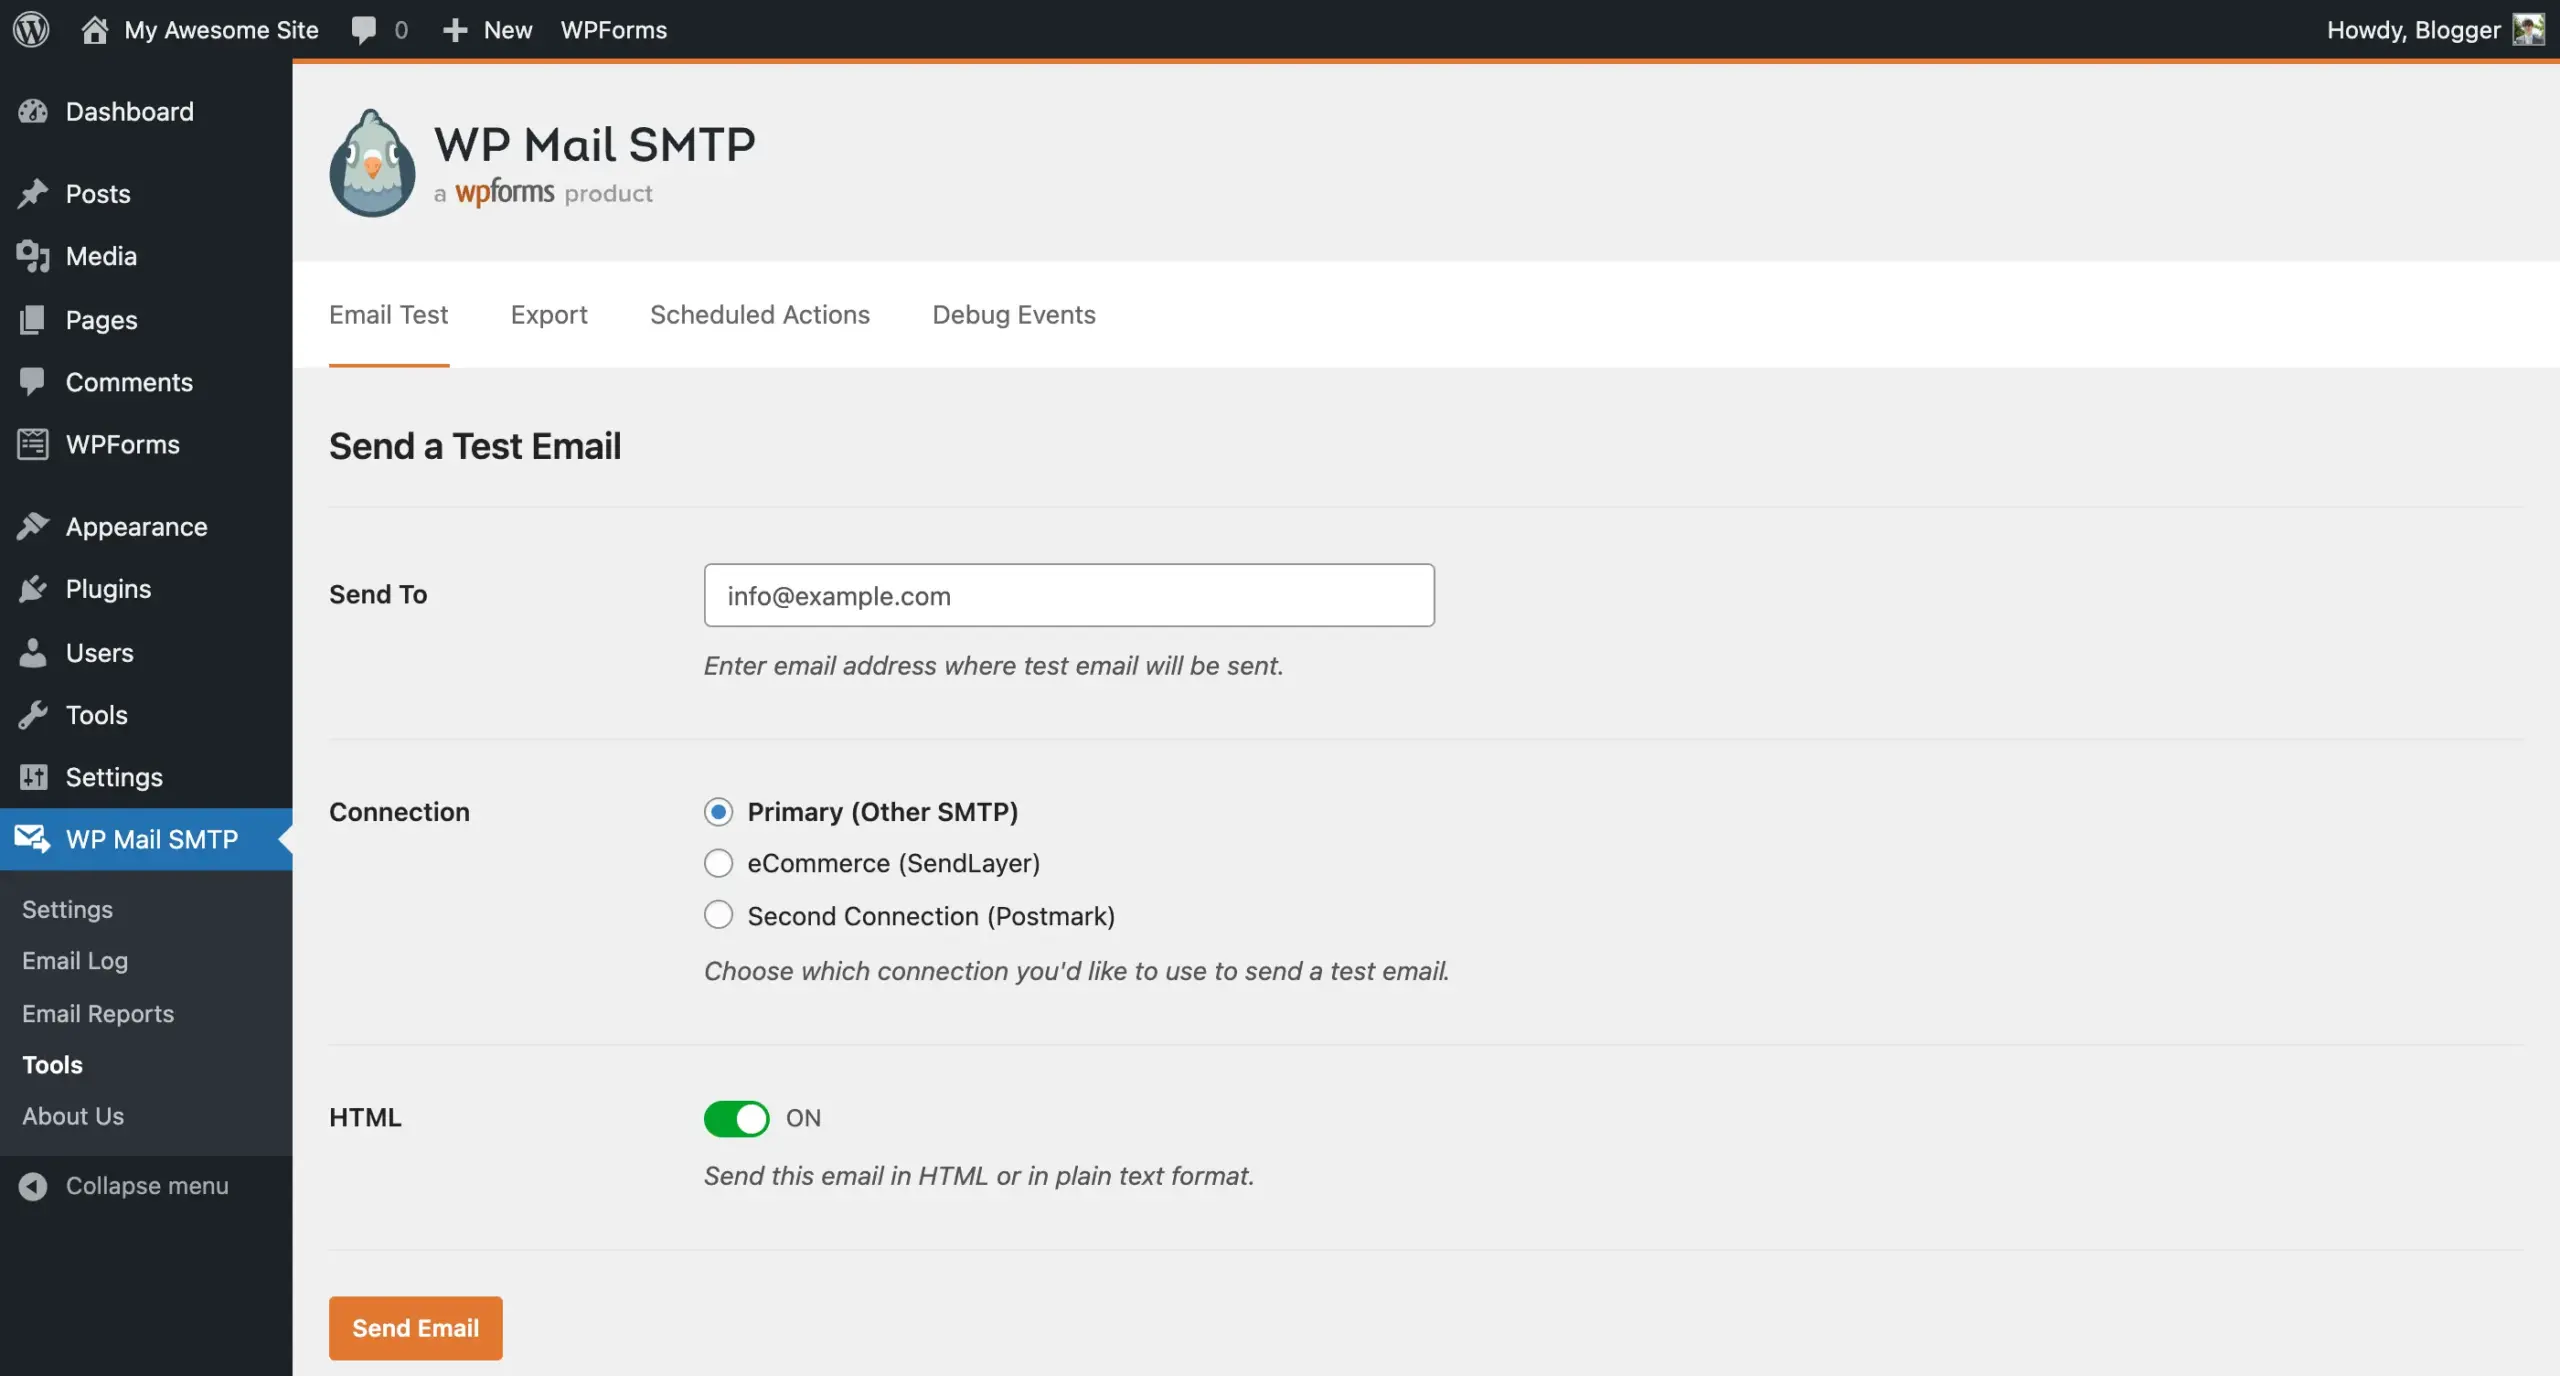
Lastly, confirm the test email lands in your inbox, not your spam folder.
Once SMTP is connected, every notification you configured in WPForms or Contact Form 7 routes through it automatically. You don’t need to touch the plugin settings again.
Advanced Notification Options Worth Knowing
Once the basics work, a few extra features are worth exploring.
- Multiple recipients: Every plugin covered here supports comma-separated addresses, so a sales inbox and a manager can both get the same alert. This works the same way in WPForms and Contact Form 7, so switching plugins later won’t change how your team gets notified.
- Conditional routing: WPForms Pro lets you send different notifications based on what a visitor selected. A “Refund Request” doesn’t have to land in the same inbox as a “General Question.”
- Slack and chat alerts: If your team checks Slack more than email, plugins like WPForms both offer webhook or Zapier connections that post a message directly into a channel the moment a form is submitted.
If you run a WooCommerce store, form notifications are only half the picture. Order-related messages are worth automating too, and the WooCommerce order communication plugin handles that side without extra setup.
Troubleshooting Checklist: Still Not Getting Notified?
If you’ve followed the steps above and notifications still aren’t showing up, work through this checklist in order.
- Check your spam or junk folder first: This solves the issue more often than anything else on this list.
- Confirm the “Send To” or “To” field has no typos: A single wrong character means the email goes nowhere.
- Test with a plain personal email address, like a Gmail account, to rule out a filter on your business inbox.
- Verify the notification toggle is switched on: WPForms has an enable switch that can be flipped off during a plugin update.
- Install WP Mail SMTP and run a test: As covered above, this fixes the majority of “notifications just stopped working” cases.
- Check for a caching plugin conflict: Some aggressive caching setups interfere with form submission handlers. Try disabling caching plugins one at a time if the issue continues.
- Watch for spam bots: A flood of fake submissions can bury real ones in your inbox. Adding CAPTCHA to your WordPress forms cuts that noise down a lot.
- Check your host’s outgoing email logs, if your hosting control panel offers one. A log entry showing the email left the server but never arrived usually points straight to a spam filter on the receiving end.
We see this pattern often in support. Nine times out of ten, the missing notification isn’t a plugin bug. It’s a spam filter or a typo in the recipient field.
Work through this list top to bottom before assuming anything is broken at the code level. Most cases resolve within the first two or three checks.
Conclusion
Getting notifications on form submissions in WordPress comes down to three things. Pick a plugin, turn on the notification setting, and fix your email delivery with SMTP if alerts go missing. WPForms and Contact Form 7 both handle the basics in under ten minutes once you know exactly where to click.
The SMTP step is the one people skip, and it’s usually the reason “working” notifications quietly stop arriving. Set it up once and you won’t think about it again. If you want a developer to build a workflow around your exact process, DevDiggers’ custom WordPress development services can handle that.
Frequently Asked Questions (FAQs)
Q1. Do I need a plugin to get form notifications in WordPress?
Yes, in almost all cases. WordPress core has no built-in form builder, so notifications come from whichever form plugin you install, such as WPForms or Contact Form 7.
Q2. Why did my WPForms notification stop working after an update?
Plugin updates occasionally reset the notification toggle to off. Check WPForms > Settings > Notifications and confirm the toggle is switched back on.
Q3. Can I get a text message instead of an email notification?
Not natively. None of the plugins covered here sends SMS out of the box. You’d need an SMS gateway service like Twilio, connected through Formidable Forms or a Zapier automation.
Q4. Is it safe to send form notifications to a free Gmail address?
It works, but spam filters trust a domain-matching address more. A free Gmail address is more likely to get flagged than one that matches your own site’s domain.
Q5. How do I stop getting notified of spam form submissions?
Adding a CAPTCHA plugin is the most effective fix, since it blocks most bot traffic before it ever reaches your notification inbox.
Q7. Does WooCommerce have its own separate form notification system?
WooCommerce order emails run through a different system than contact form plugins. If you need order-specific alerts, that’s handled separately from the form notifications covered in this guide.
Q8. Can I send a test notification without a real visitor filling out my form?
Yes. Every plugin in this guide lets you submit the live form yourself as a quick test. There’s no dedicated “preview notification” button in any of the three, so a real test submission is the reliable way to confirm everything works.