You can create a WordPress site from scratch in about an hour, and you need no code to do it. Most of that time goes on choosing a host and writing your pages.
The install itself is short. The official installation guide says installing WordPress takes less than 5 minutes. What takes longer is the setup people skip, three settings that decide whether Google can find your site.
This guide starts with hosting, installation and the settings you change on day one. Then it covers themes, pages, plugins, staging and a launch checklist you can tick off. Every screenshot comes from a fresh WordPress 7.1.2 test site, so each menu name matches what you will see.
What You Need Before You Create a WordPress Site
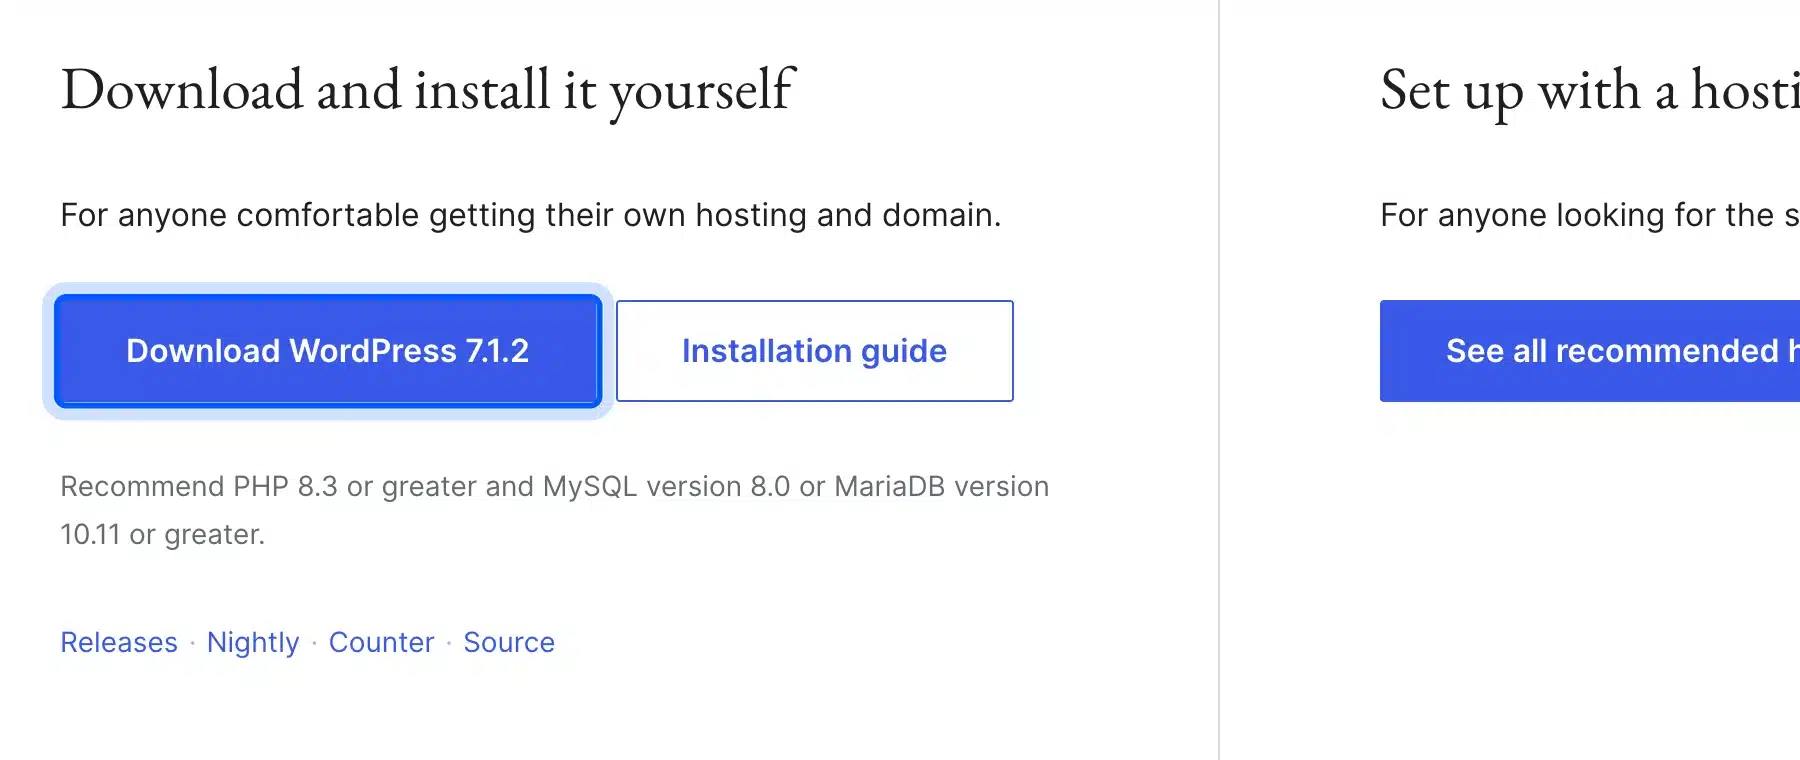
To create a WordPress site you need a domain name, a web host and the free WordPress software. As of September 2026, the current version is 7.1.2 on the WordPress.org download page. You pay only for the domain and the hosting that keeps the site online.
People who search for WordPress create website tutorials usually want one thing: a working site by the end of the week. Knowing how to make a WordPress site is mostly knowing which settings to change first. The rest is writing good pages.
Two names cause confusion here. WordPress.org is the free software you install on your own host, and it is what this guide uses. WordPress.com is a separate hosted service, so its menus differ from the steps below.
Can you create a free WordPress website? Yes, for practice. A live site on your own domain still needs paid hosting, so plan for that cost from day one.
Tip: Practice first if you are nervous. WordPress Playground runs a real WordPress in your browser with nothing to install and nothing to pay.
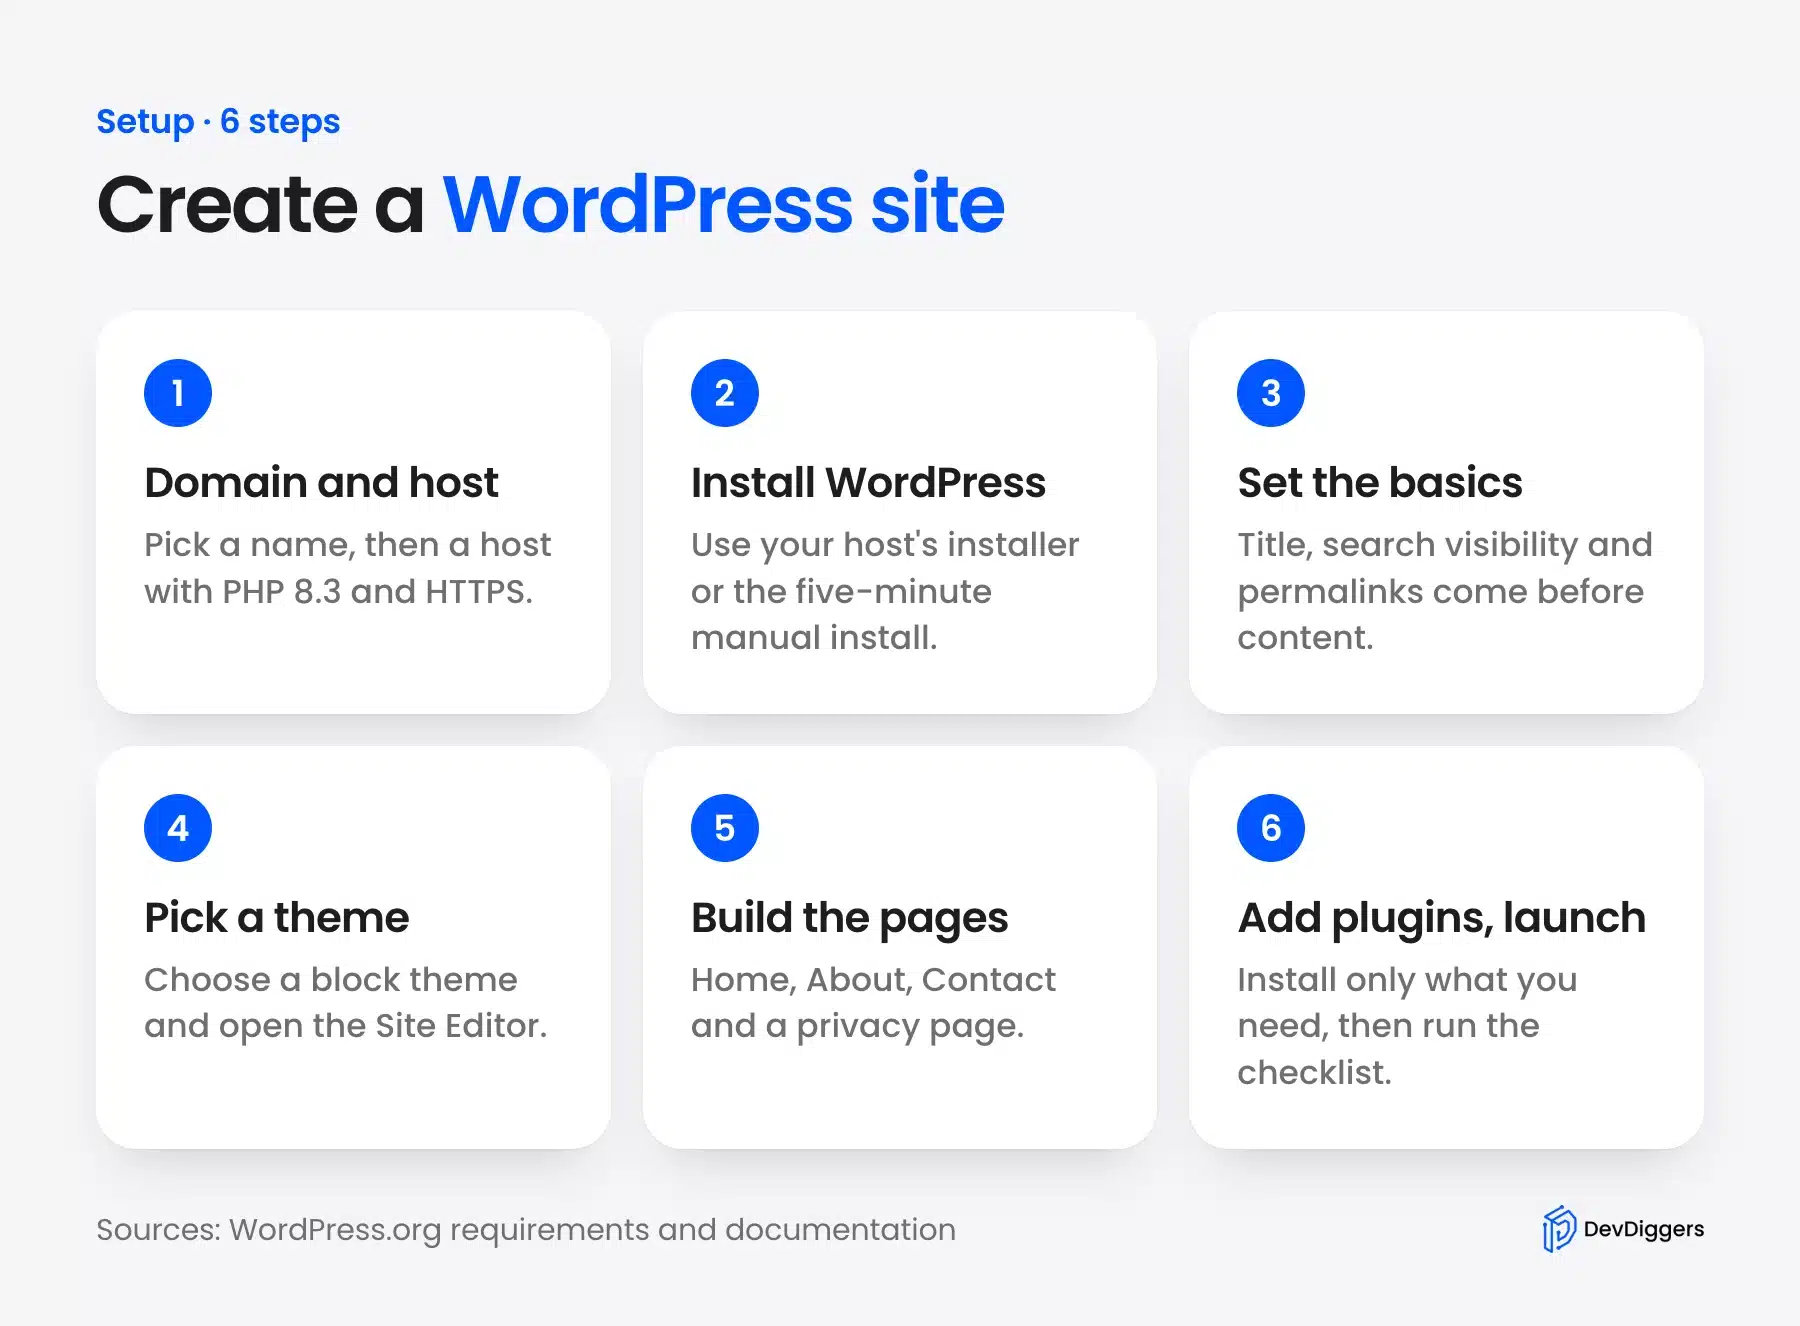
Step 1: Pick a Domain and Hosting
Pick a short domain name you can say aloud, then choose a host that meets the WordPress requirements. The official requirements page recommends PHP version 8.3 or greater plus HTTPS support on every host. For the database, it lists MariaDB 10.11 or greater or MySQL 8.0 or greater.
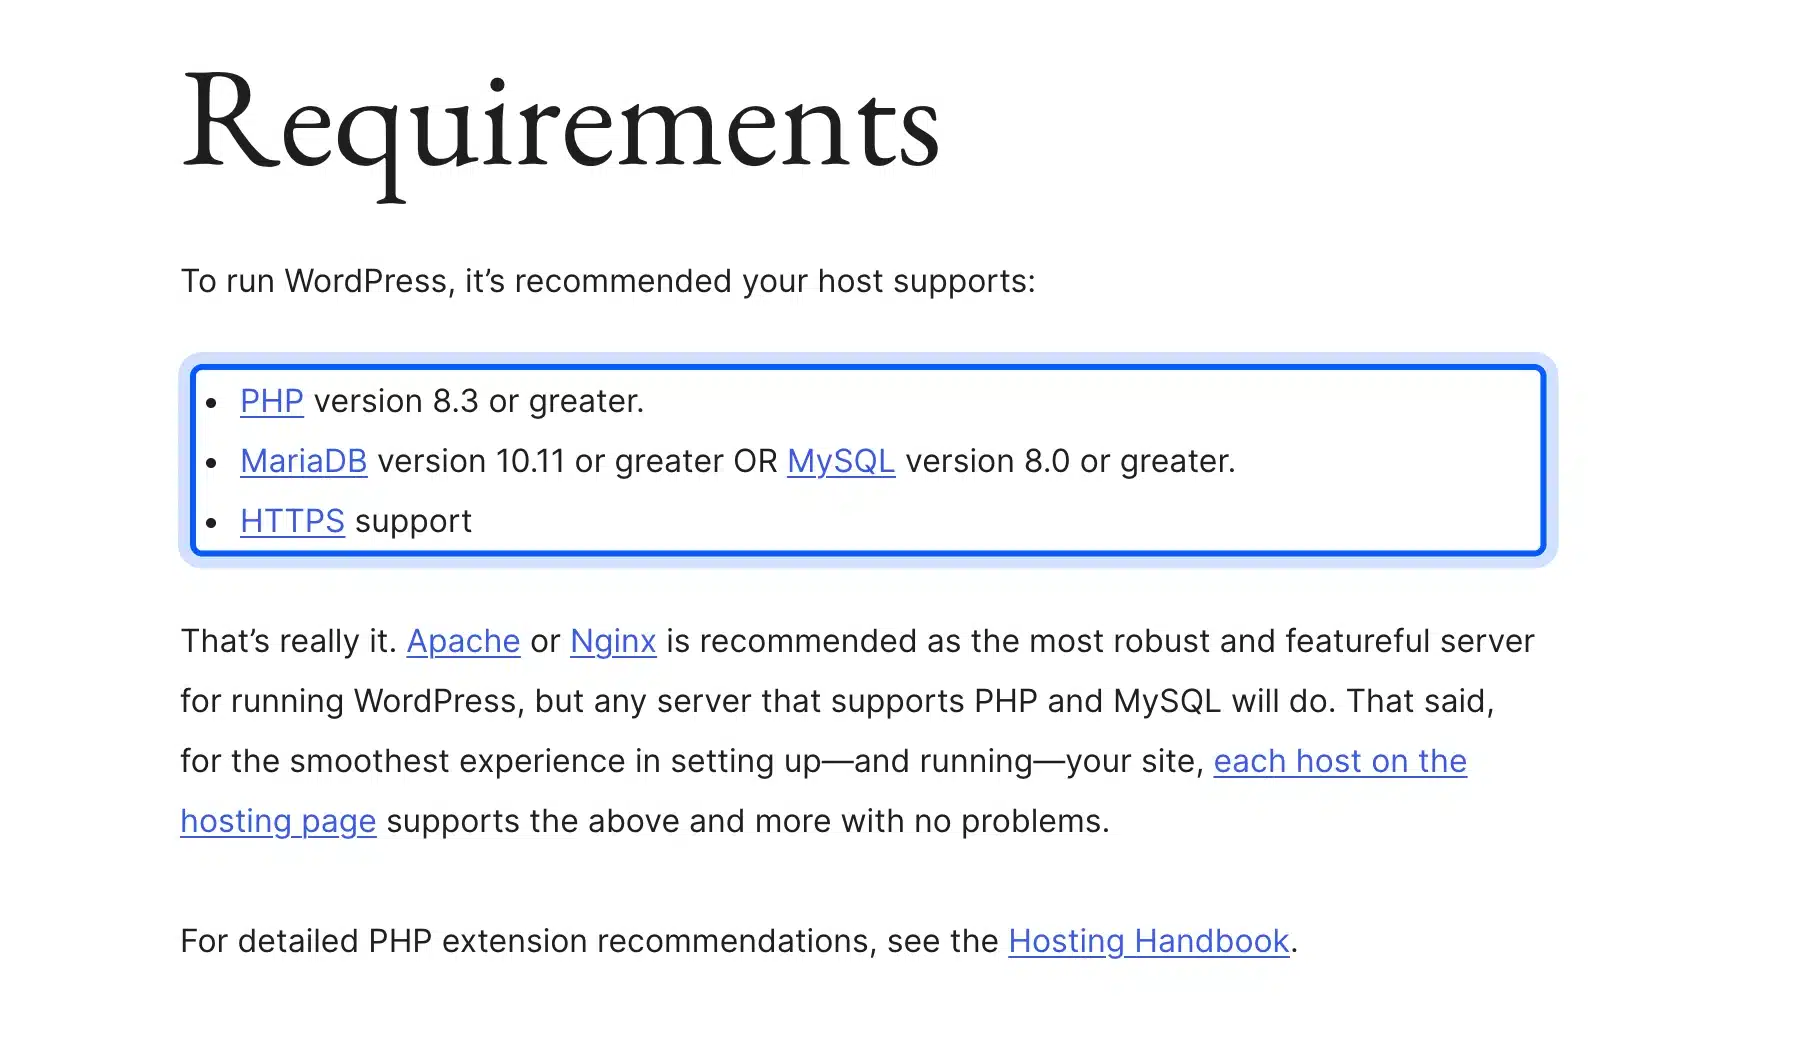
The same page adds a warning. WordPress still runs on PHP 7.4 and MySQL 5.5.5. The page says those versions reached end of life and may expose your site to security vulnerabilities.
Before you pay, check four things in the host’s plan details:
- PHP version: Look for a PHP 8.3 or newer option in the control panel.
- HTTPS: Confirm the plan includes a free SSL certificate.
- Installer: A one-click WordPress installer saves ten minutes.
- Backups and staging: Daily backups and a staging tool protect you from your own mistakes.
You can buy the domain from the host or from a separate registrar. Buying from the host is faster because the domain points at the server for you. A separate registrar means one extra step, where you change the domain’s nameservers to the ones your host gives you.
The requirements page also includes a message you can copy and send to a host that is unsure it can run WordPress. See the official requirements page for the wording.
Choose a .com if you can, keep the name short and skip hyphens. For a deeper look at running your own install, see this guide to self-hosted WordPress.
Step 2: Install WordPress
Most hosts install WordPress for you from the control panel in a few clicks. The manual route through wp-admin/install.php works on any host that meets the requirements. The official installation guide says the whole install takes less than five minutes to complete.
For the one-click route, follow these steps:
- Open the installer: Find WordPress in your host’s control panel and start a new install.
- Enter your details: Add a site title, an admin username, a password, and your email address.
- Choose HTTPS: Pick the https:// version of your domain if the installer asks.
- Log in: Visit yourdomain.com/wp-admin and sign in with the details you just set.
Tip: Pick a username other than admin, and store the password in a password manager.
If your host has no installer, the same guide lists five manual parts:
- Download: Get the WordPress package from WordPress.org and unzip it.
- Database: Create a database and a user with access to it.
- Configuration: Rename wp-config-sample.php and enter the database details.
- Upload: Copy the files to your domain root over FTP.
- Install: Open wp-admin/install.php in your browser and fill in the form.
After you log in, you land on the Dashboard. On the test site it opened with the Twenty Twenty-Five theme active, one sample post and one sample page. The left menu is your map, and the numbered boxes mark the four menus you will use most.
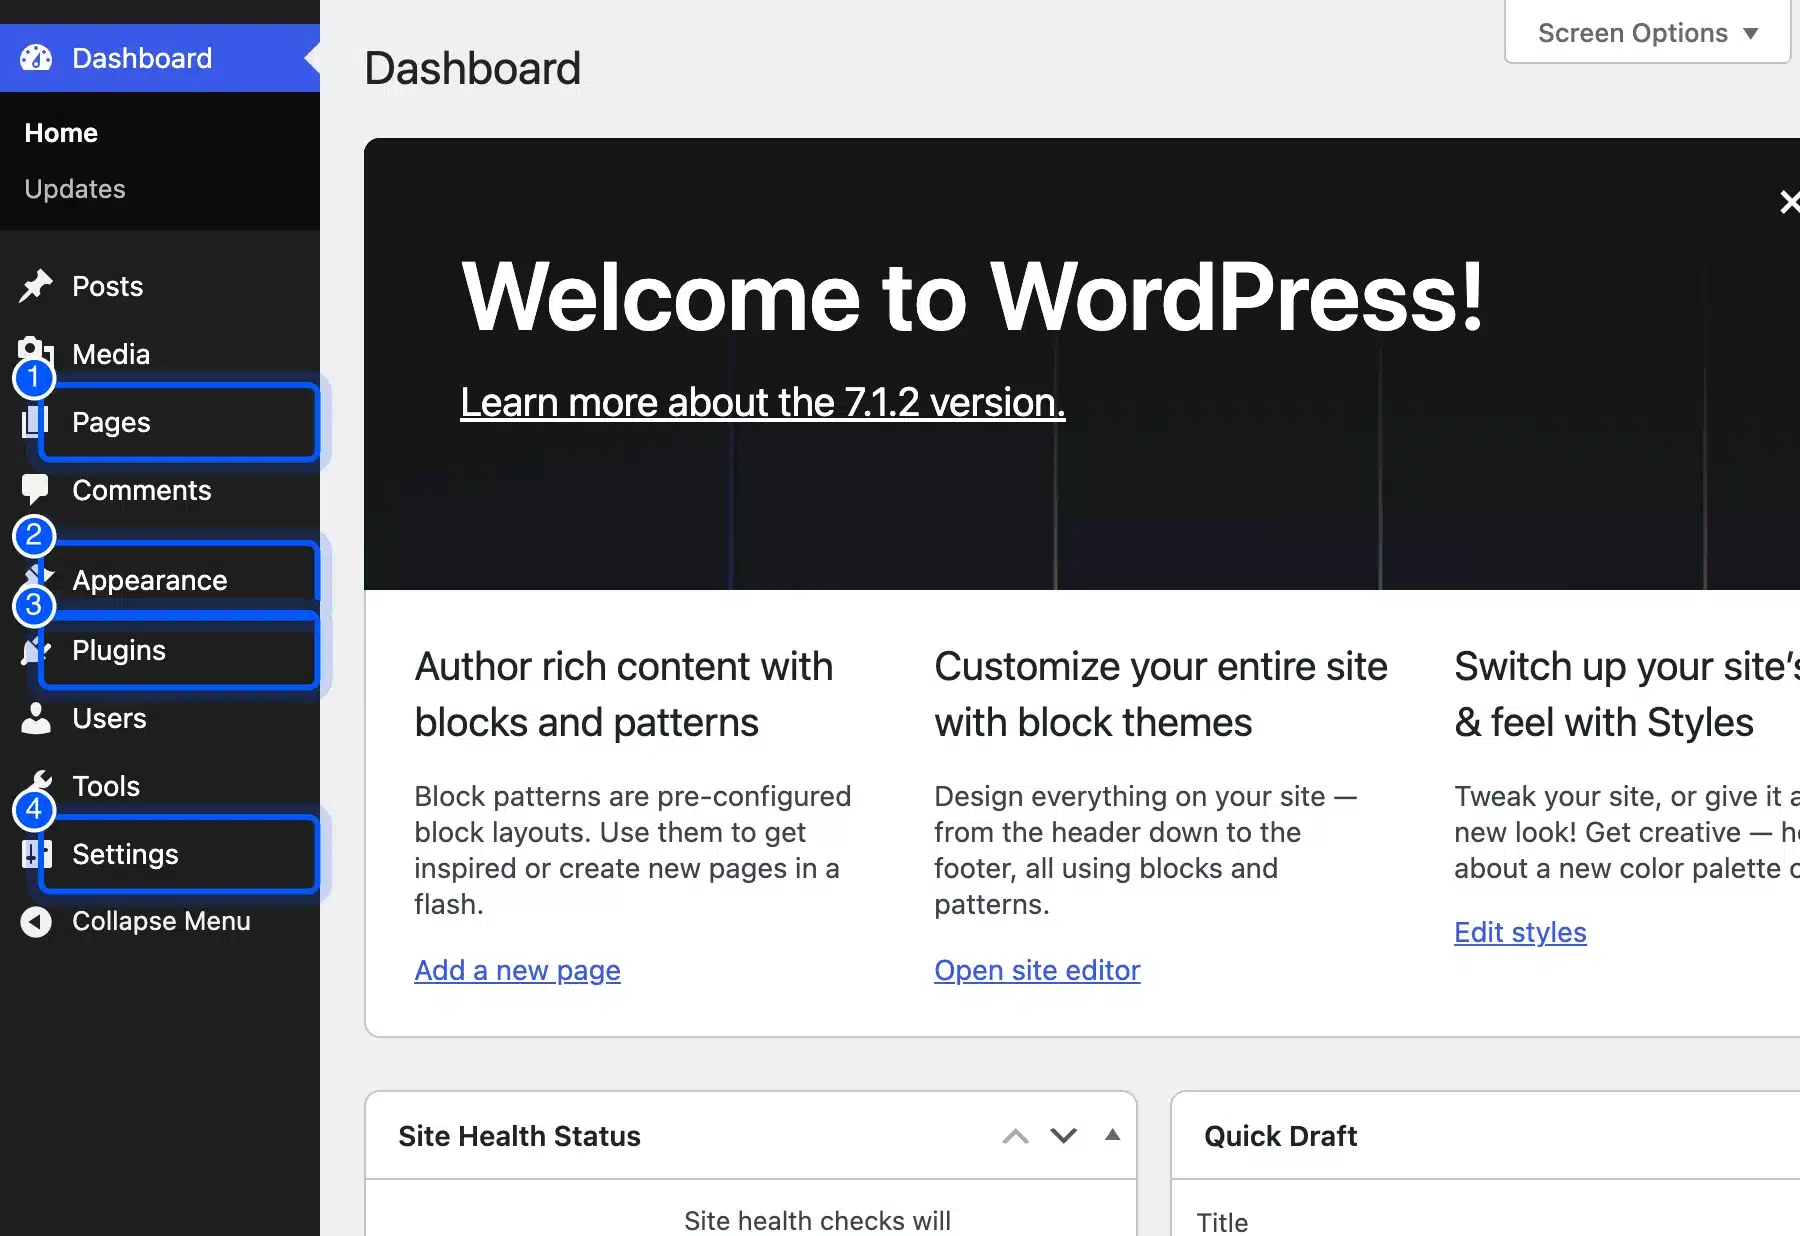
- Pages: Holds your Home, About and Contact pages.
- Appearance: Holds themes and the Site Editor.
- Plugins: Adds features such as backups and forms.
- Settings: Holds the basics covered in the next step.
Step 3: Set the Basics Before You Build
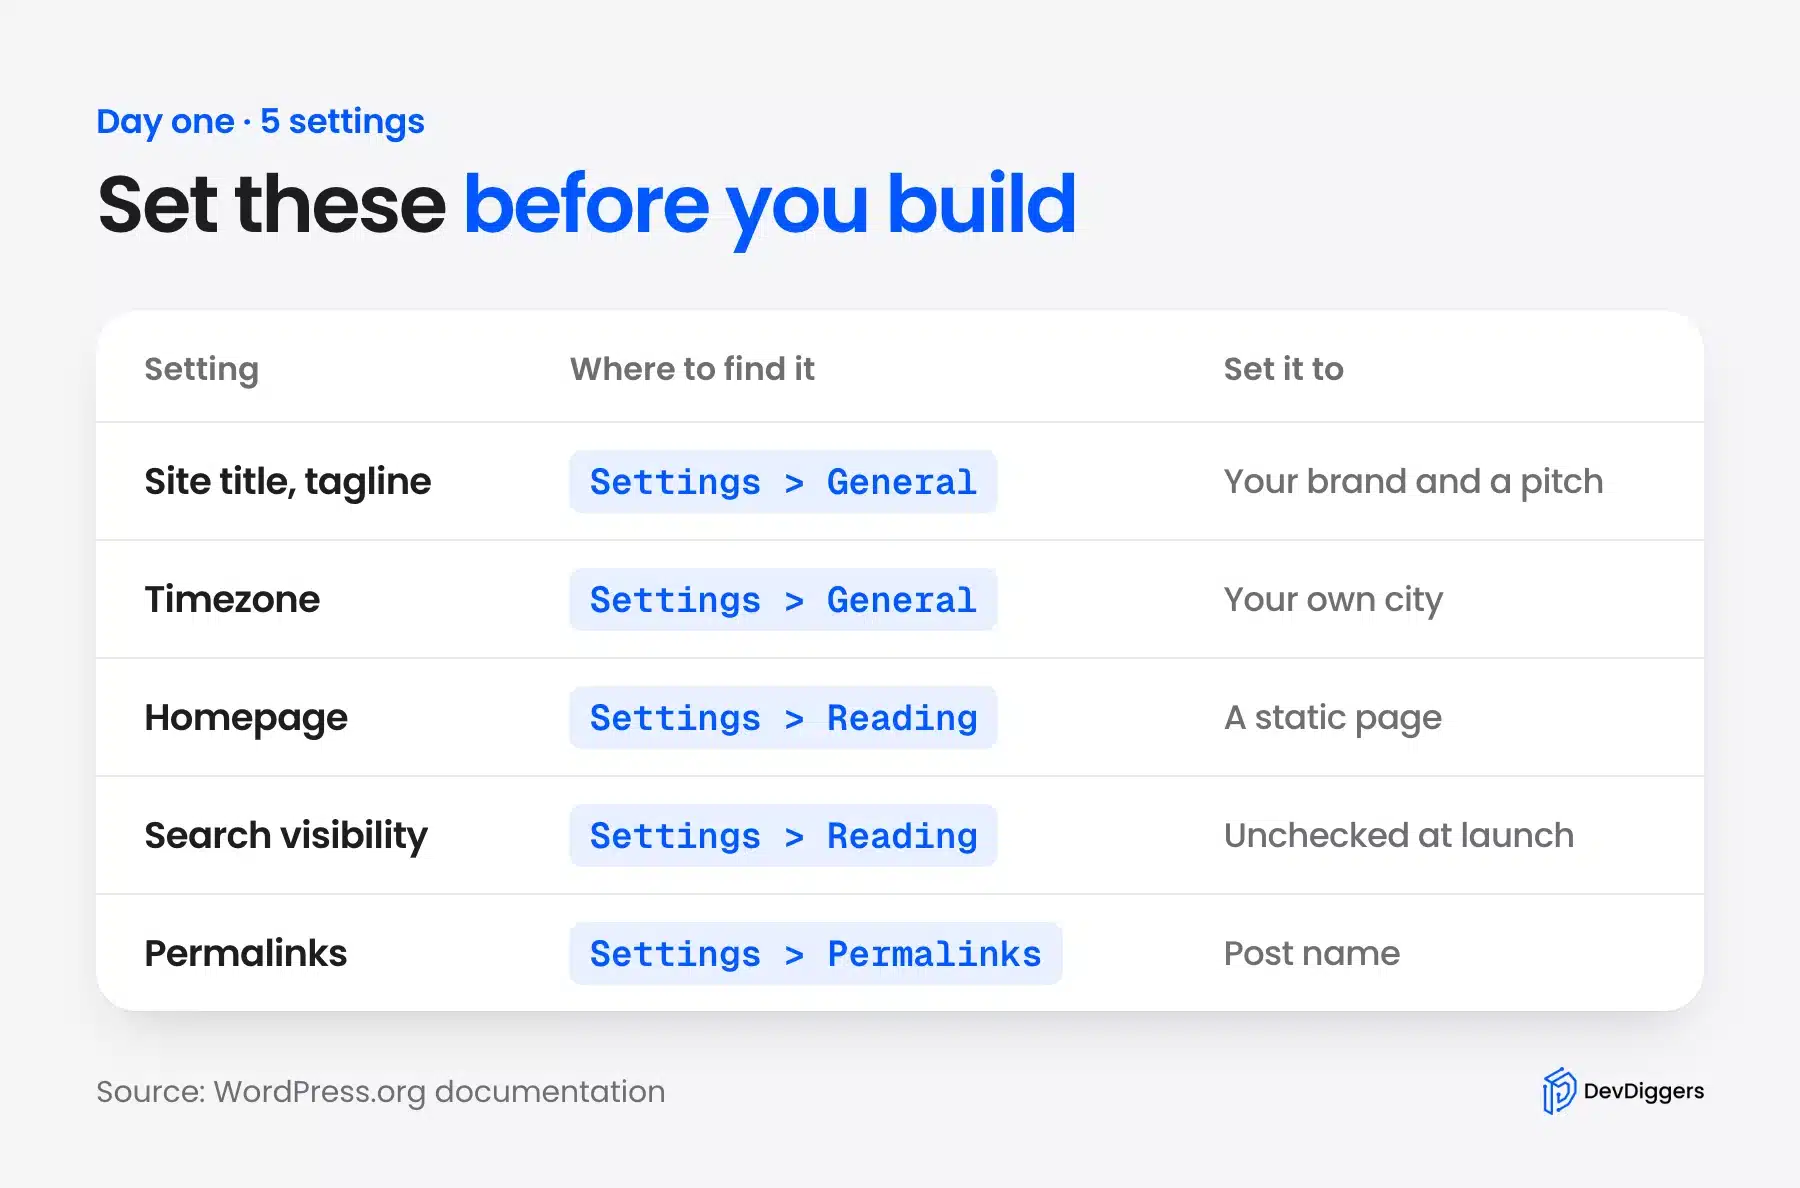
Three settings decide how your site looks to visitors and to search engines: the title, the search visibility box and the permalink structure. Set them before you publish a page, because the WordPress permalink guide calls permalinks permanent URLs that should never be changed. That is why this step comes before content.
Site Title, Tagline and Timezone
Open Settings > General. The Site Title appears in browser tabs and search results, so use your brand name. The Tagline is one short line about what the site does, and it replaces the default “Just another WordPress site.”
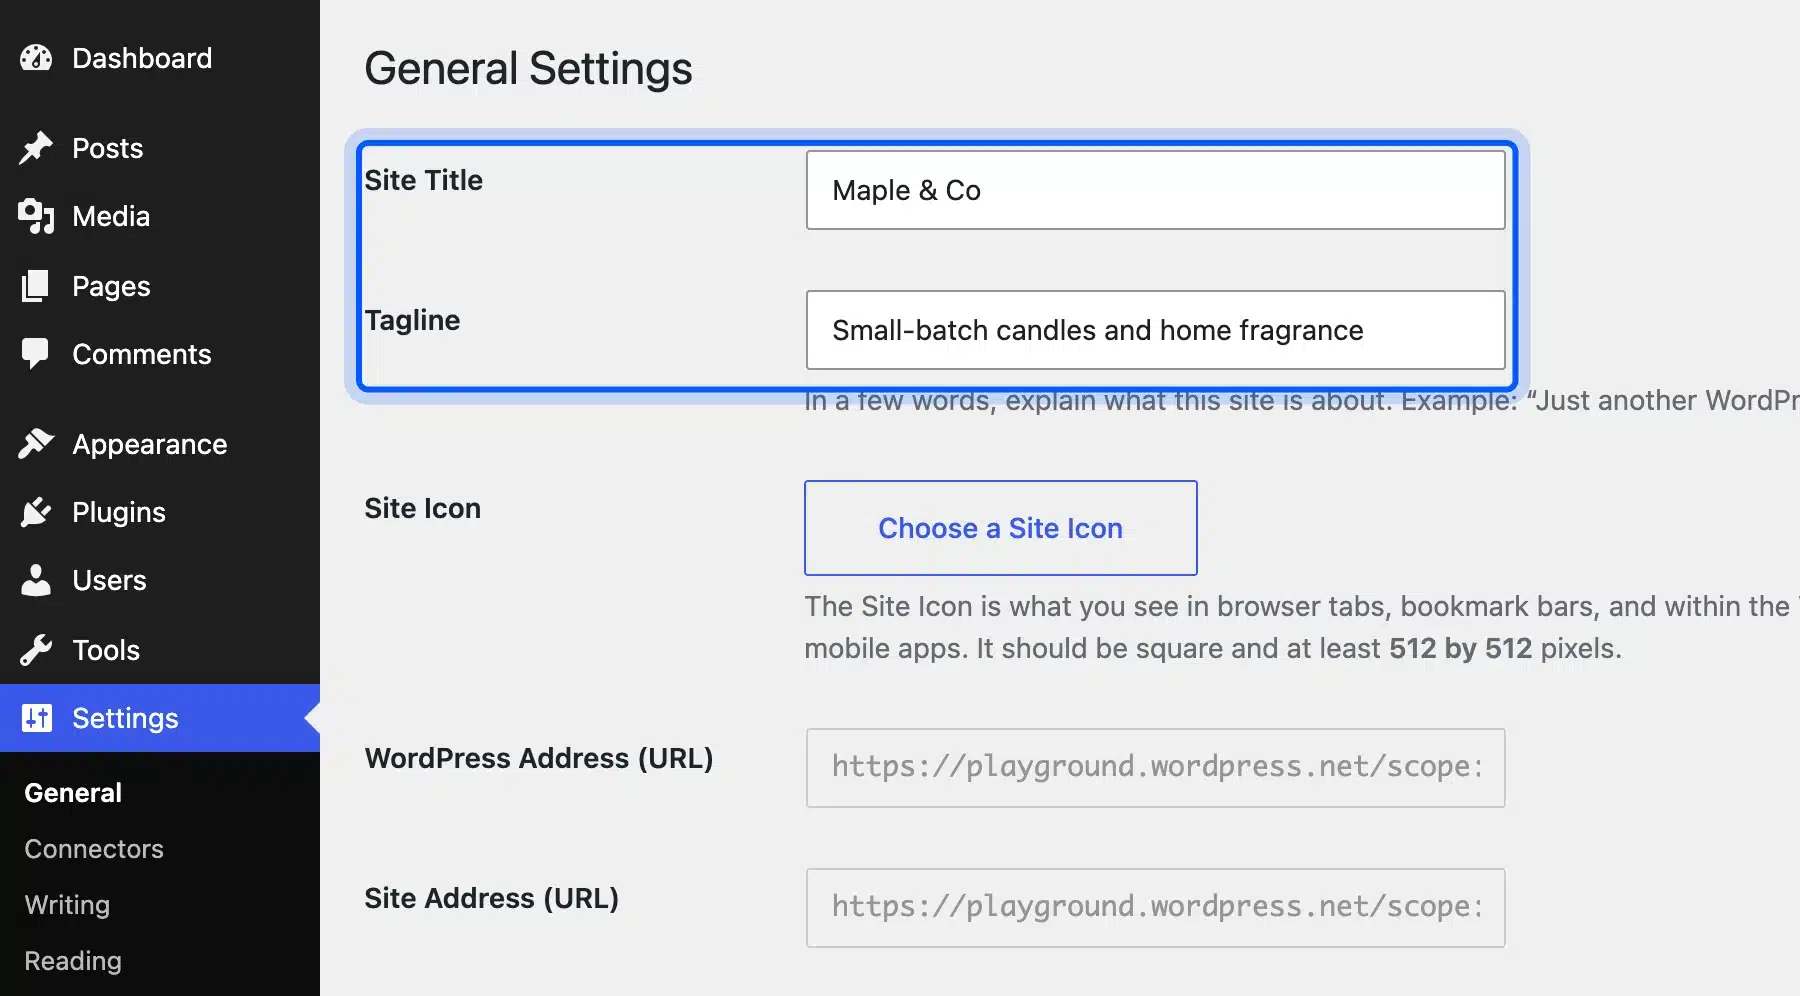
The test site uses Maple & Co as the title and “Small-batch candles and home fragrance” as the tagline. Yours should say what you sell or teach in the same plain way.
Scroll down to Timezone and pick your own city. Scheduled posts publish on this clock, so a wrong zone shifts every schedule.
Search Engine Visibility and Your Homepage
Open Settings > Reading. The box labeled “Discourage search engines from indexing this site” is the one that quietly hides new sites. The Reading Settings documentation says that since version 5.3 it adds a noindex,nofollow tag to your pages.
The same documentation adds that it is up to search engines to honor the request. Check the box while you build, and uncheck it at launch. The installer also shows this option, so look at it twice.
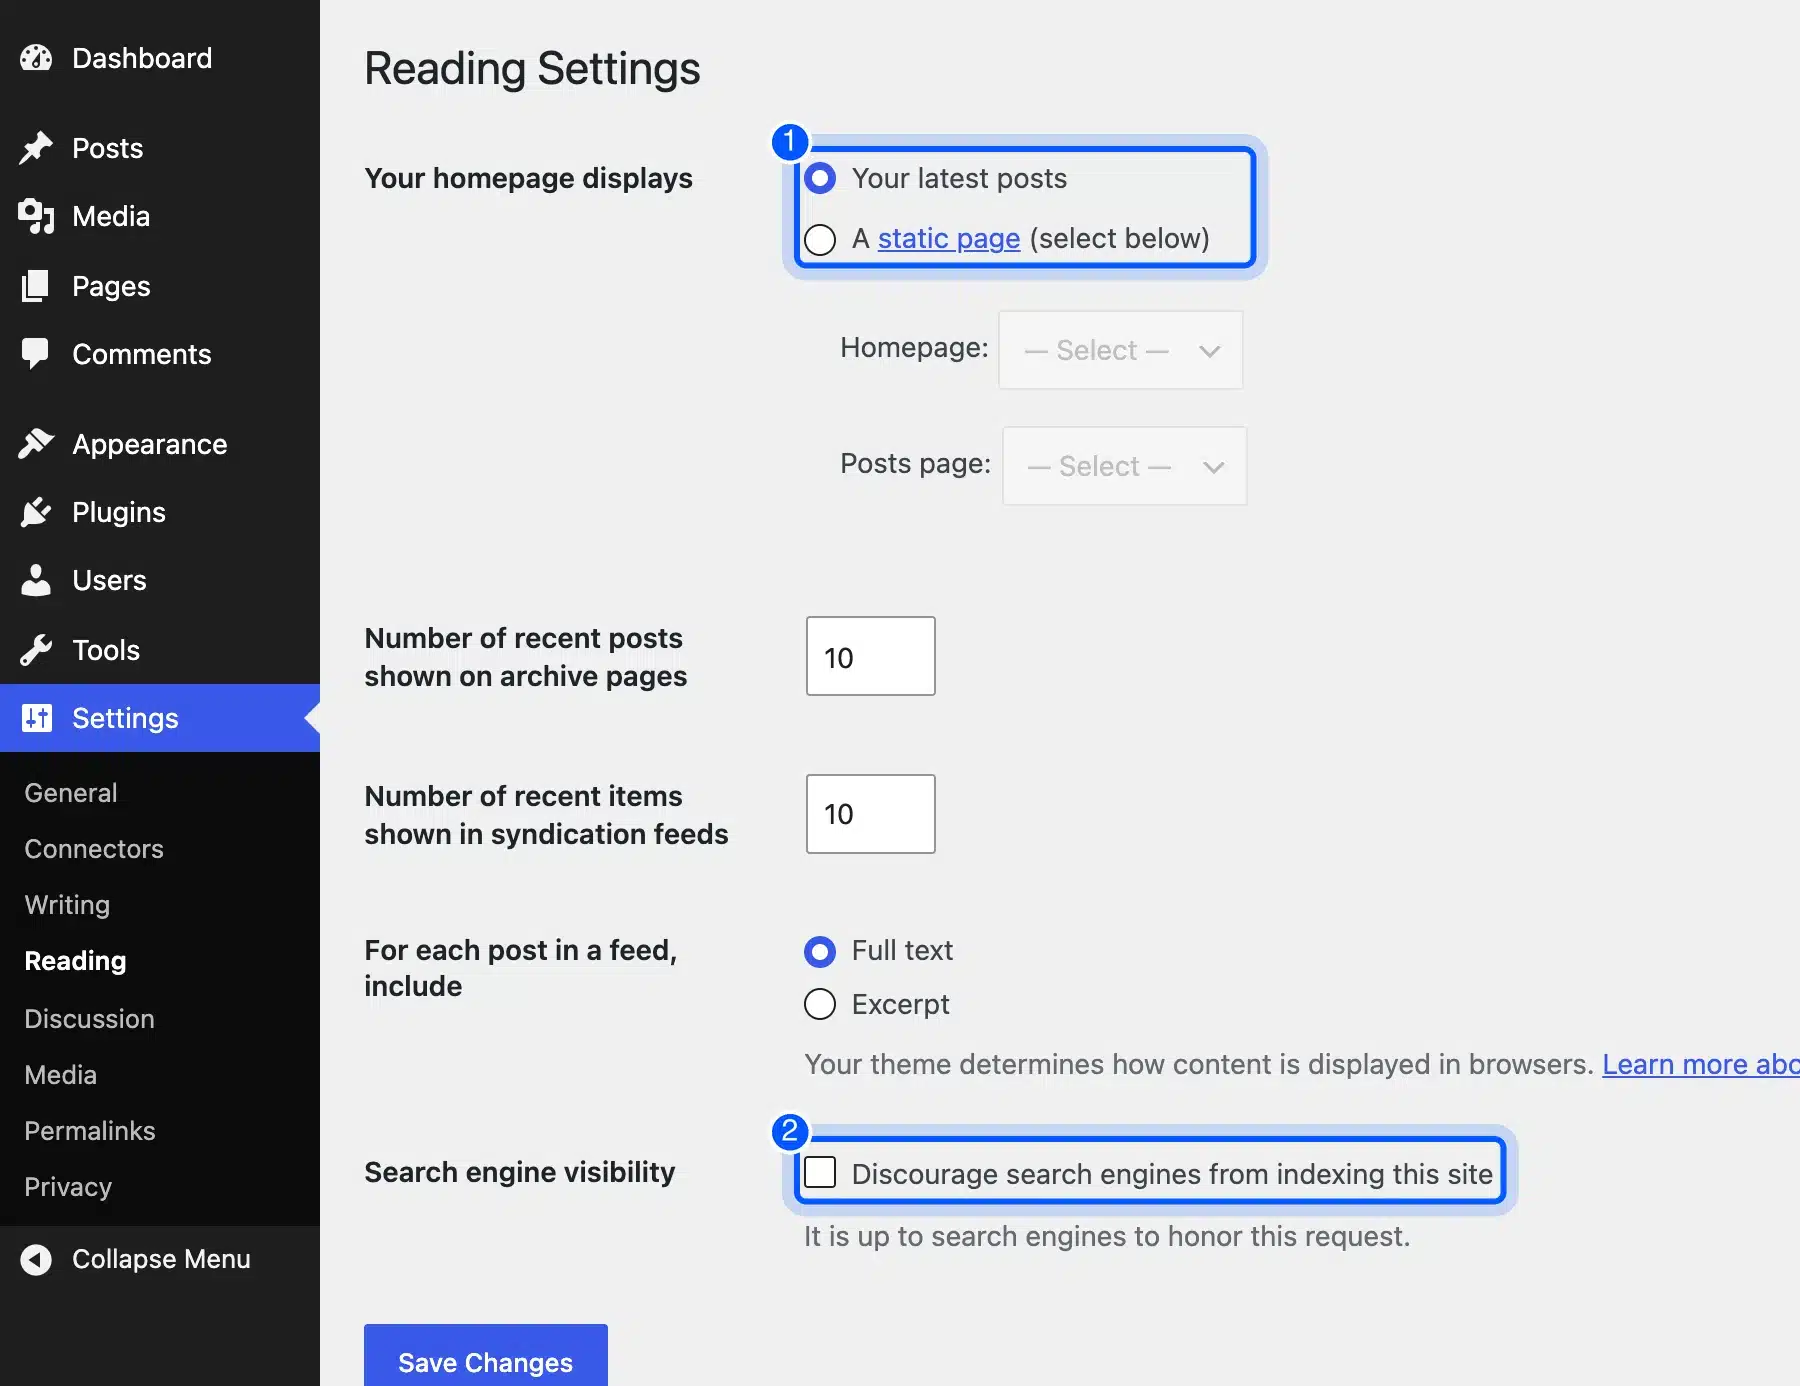
Box 1 controls your homepage. Choose “A static page” once you have created a Home page in Step 5.
Permalinks: Choose Post Name
Open Settings > Permalinks and select Post name. The permalink guide calls the default Plain structure “not optimized for search engines,” because it shows a URL like ?p=123. Post name gives you a readable address such as /contact/.
On the fresh 7.1.2 test site, Day and name was already selected, while the guide lists Plain as the default. So check yours rather than assuming.
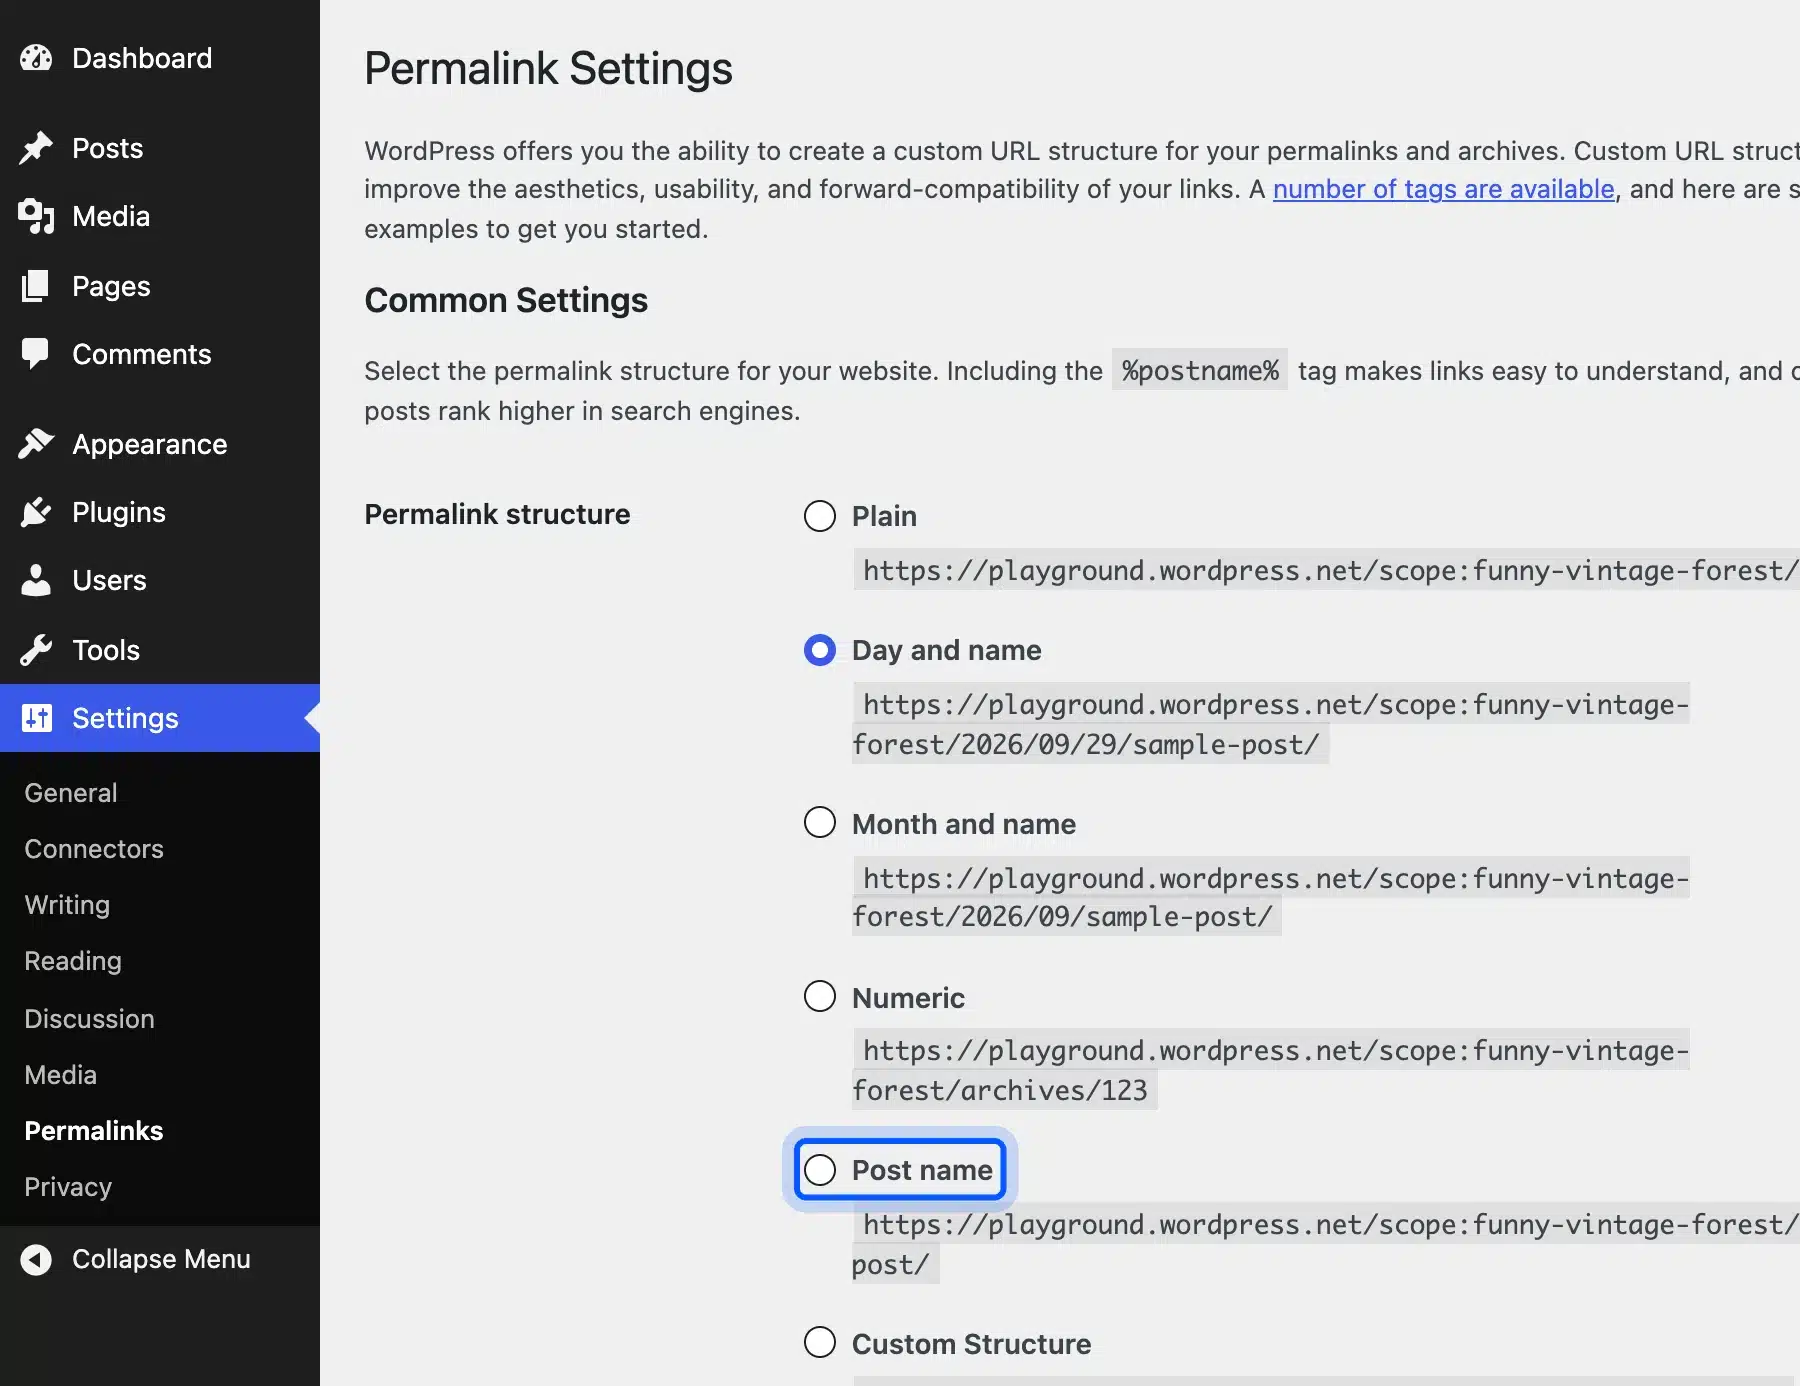
Worth checking: Change permalinks now, while the site is empty. Changing them after you publish changes every address, and links you shared earlier break.
Step 4: Choose a Theme and Open the Site Editor
Go to Appearance > Themes and select Add Theme to browse free themes. A block theme lets you edit the header, footer and templates visually in the Site Editor. On the 7.1.2 test site, Twenty Twenty-Five was already active, and it is a fine place to start.
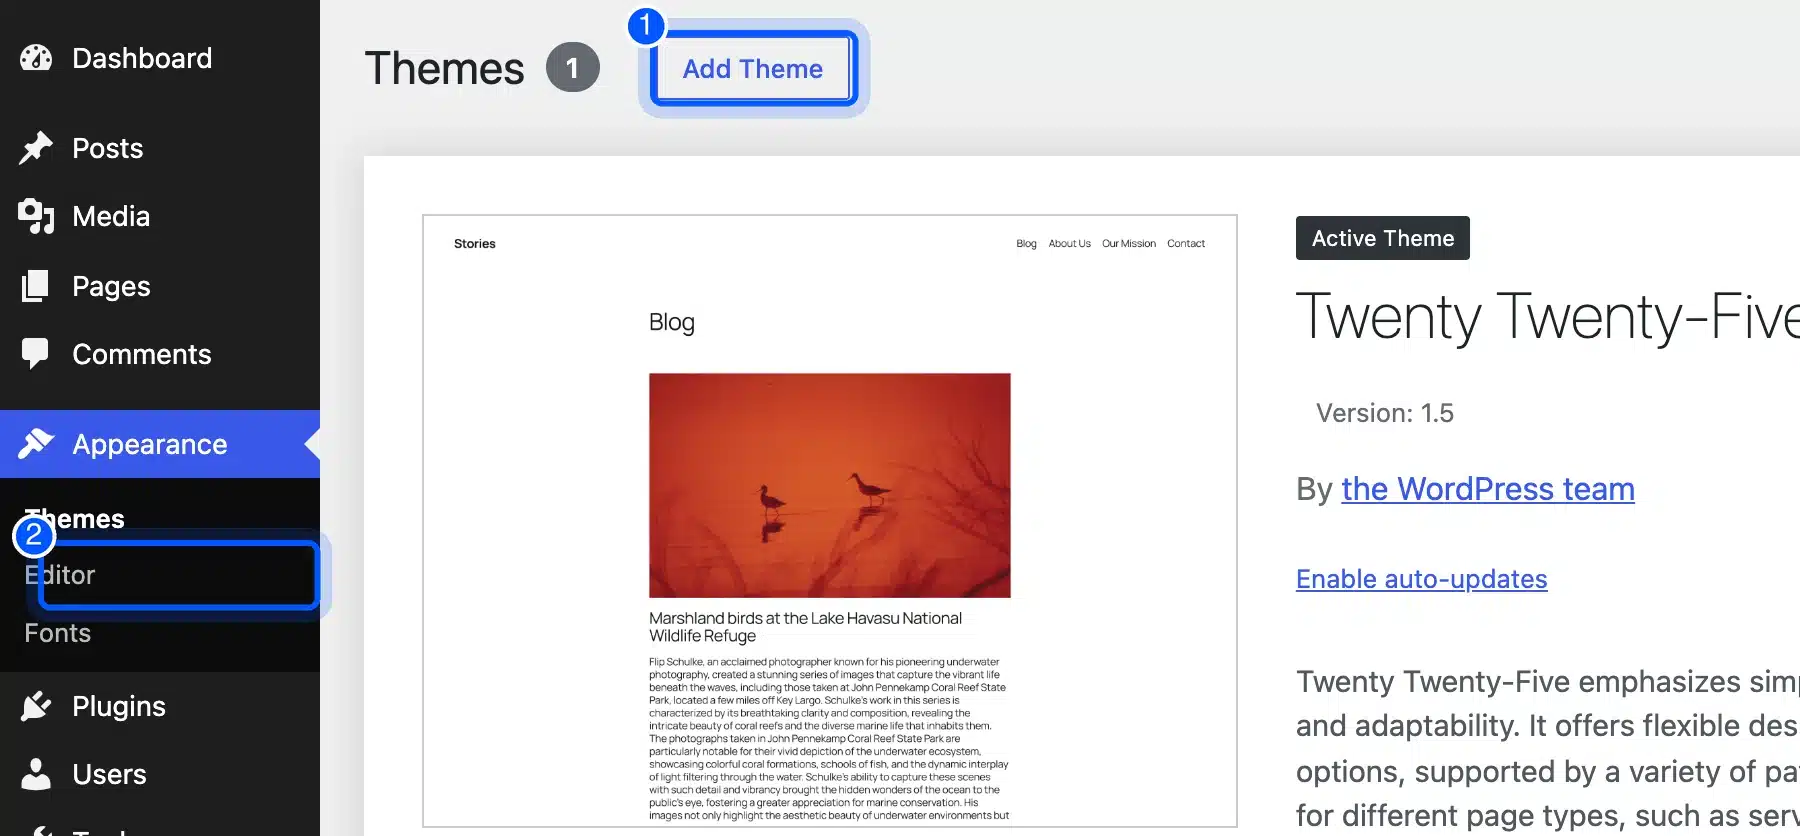
Judge a theme on four things before you activate it:
- Block support: Pick a block theme so the Site Editor works.
- Update date: A theme untouched for a year is a risk.
- Reviews and installs: Read the ratings on the theme page.
- Speed: Preview the demo on your phone before you commit.
After the theme install finishes, select Activate. Then choose Appearance > Editor to open the Site Editor. When you build a WordPress website with a block theme, you edit headers, footers and templates there instead of in code.
On the test site, the Site Editor menu offered six entries: Identity, Styles, Pages, Navigation, Patterns and Templates. Use Styles to change fonts and colors, and Navigation to build your menu.
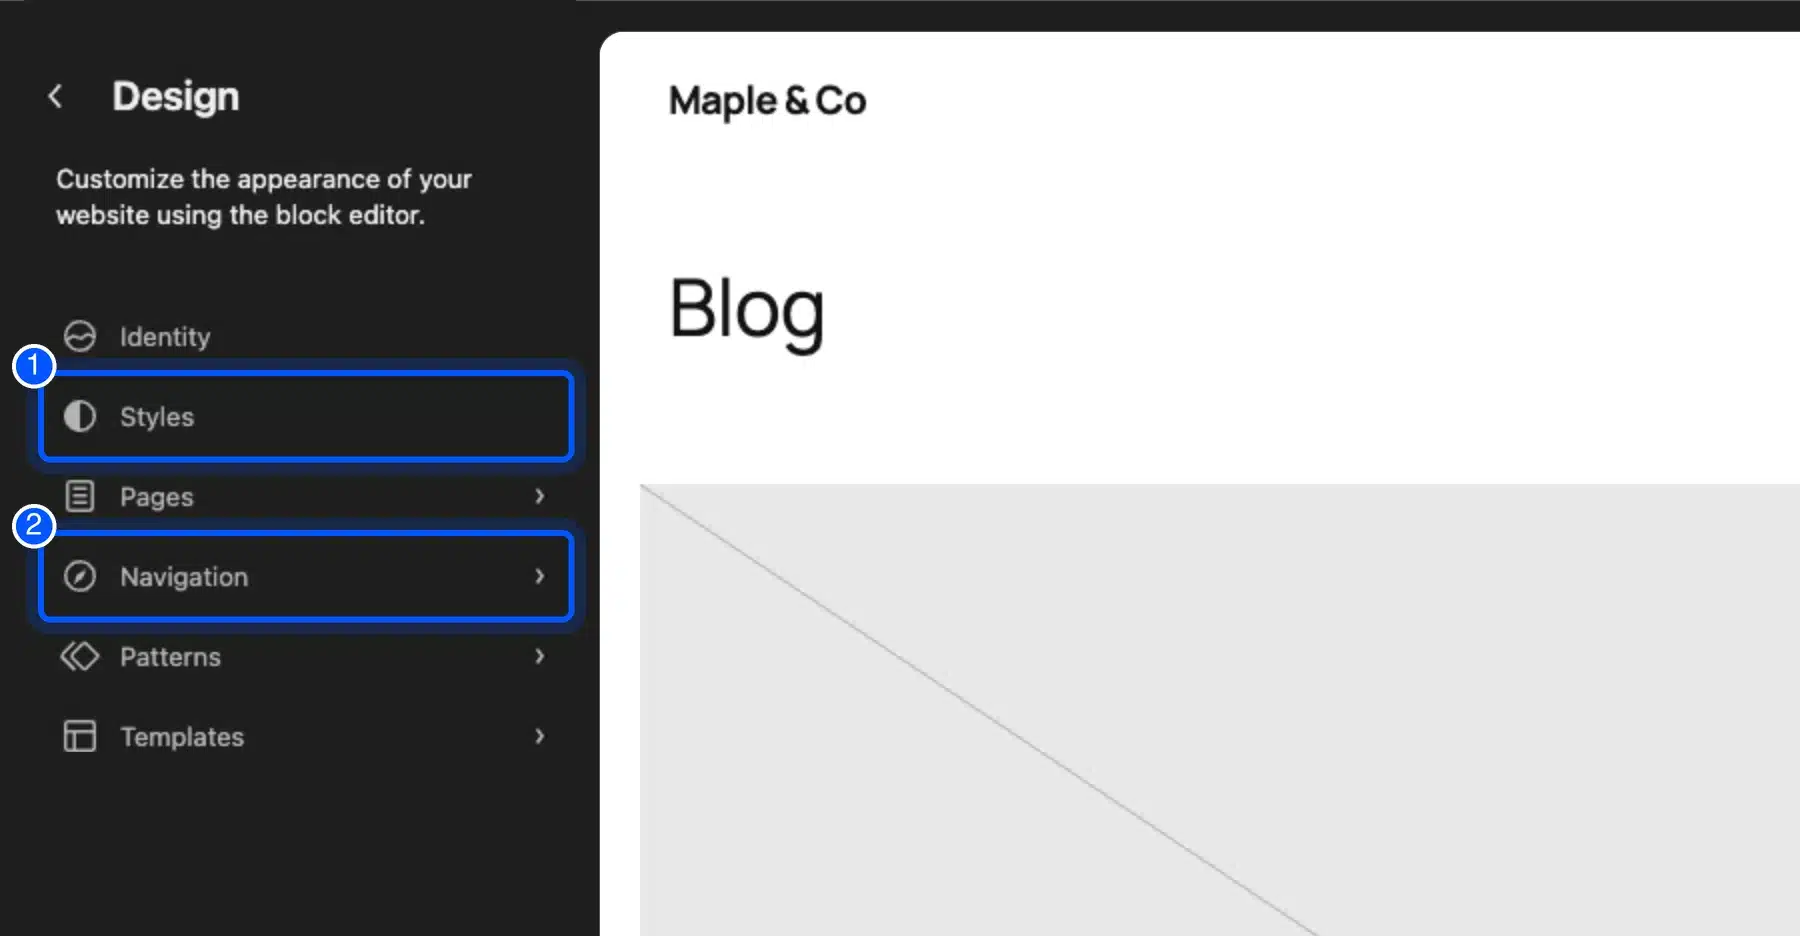
Changing themes later keeps your posts and pages. It does not keep design settings that belong to the old theme, so choose once and build on it.
Step 5: Create Your Core Pages and Menu
Delete the sample content, then create four pages: Home, About, Contact and Blog. Set Home as your static front page under Settings > Reading. Add all four pages to your navigation menu in the Site Editor, which you open from Appearance > Editor.
Go to Pages > Add Page to start each one, and delete the Sample Page from the list. On the test site WordPress had also created a draft Privacy Policy page. Edit it and publish it, since most sites need one.
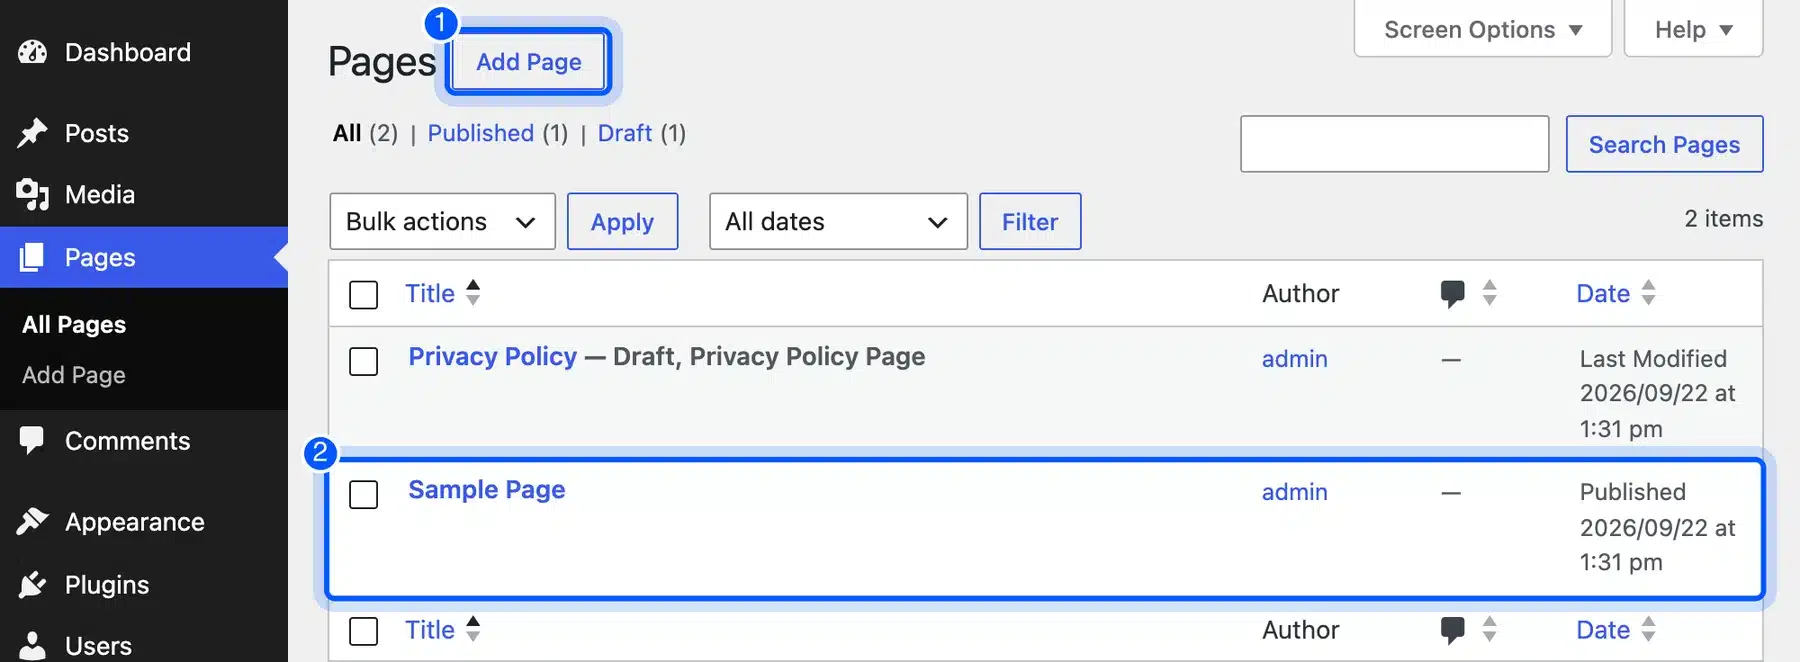
Each page has one job, so keep the first draft short:
- Home: Say what you offer and who it is for, then link to your best page.
- About: Explain who you are and why a visitor should trust you.
- Contact: Give one way to reach you, such as a form or an email address.
- Blog: Lists your posts, so it starts empty and fills as you write.
How to Create a Blog Site in WordPress
To create a blog site in WordPress, make a page called Blog and assign it in Settings > Reading. Pick your Home page in the first drop-down and the Blog page in the Posts page drop-down. The Reading Settings documentation says the Home page and Posts page cannot be the same page.
Then write your articles under Posts > Add Post. They appear on the Blog page in date order. For the wider picture of what a site needs, see critical components for your WordPress website.
Step 6: Add Only the Plugins You Need
Open Plugins > Add Plugin, search for the job you need, then choose Install Now and Activate. Start with four jobs: SEO, backups, security and speed. Every extra plugin adds code to maintain, so add one only when a real job needs it.
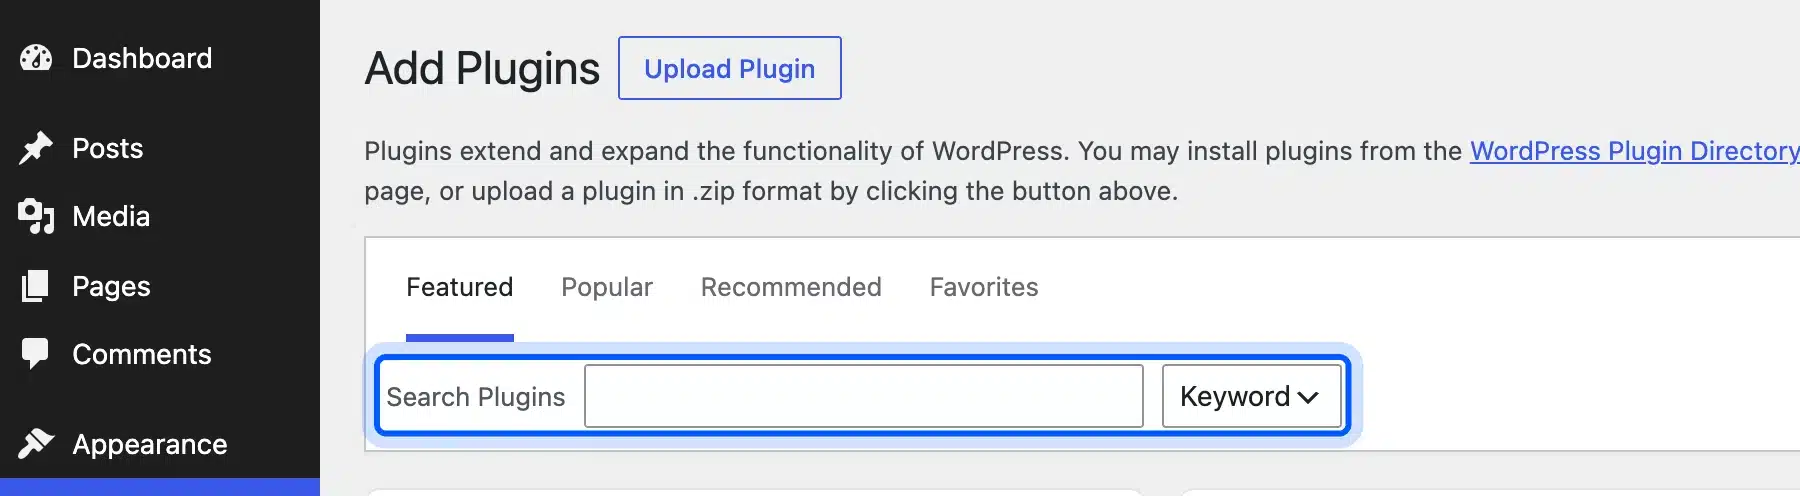
Each plugin card shows three signals worth reading before you install:
- Last Updated: A plugin untouched for a year may not keep up with WordPress.
- Active Installations: A bigger number means more sites already run it.
- Compatible: The card says whether it works with your version of WordPress.
Install one SEO plugin, not two, because two plugins can both write titles and meta tags for the same page. Set it up once and leave it alone.
Plugin count is a common worry, and this guide asks are 50 plugins too much for your WordPress eShop. Quality matters more than the number, so read the update date and reviews before you install.
To create an eCommerce website with WordPress, install the free WooCommerce plugin from the same screen. DevDiggers is an official WooCommerce core contributor with 20+ accepted contributions, and the store setup is a separate project from this one.
How Much Does It Cost to Create a WordPress Website?
The WordPress software is free, so you pay for a domain name, hosting, and any paid theme or plugin you choose. A basic site needs only the domain and hosting. Prices vary by host and plan, so compare the renewal price as well as the first-year price.
Here is where the money goes:
- WordPress software: Free to download from WordPress.org.
- Domain name: A yearly fee, paid to a registrar or your host.
- Hosting: A monthly or yearly plan, and the largest ongoing cost.
- Theme: Free block themes cover most first sites.
- Plugins: Free versions cover SEO, backups and forms, so pay only for a feature you need.
Many hosts discount the first term and charge more at renewal. Read the renewal price on the plan page before you pay, and set a reminder for the renewal date.
How to Create a WordPress Staging Site
A staging site is a private copy of your site where you test changes before visitors see them. Check your host’s control panel for a staging or clone tool. Create the copy, make the change there, then push it to the live site when it works.
You need staging most before big changes such as a theme switch or a major update. Skip it while the site is empty, because there is nothing to break yet.
Once the site takes orders or comments, be careful with the database. Pushing a staging database over the live one can erase whatever visitors added while you tested. Push files and settings only, unless you can pause the live site.
If your host has no staging tool, practice on a copy first. A local copy or a browser copy works for learning the steps, though neither replaces a real staging site for a live store.
Launch Checklist: Run These Before You Publish
Run one final pass before you announce the site, and change nothing else that day. Confirm that search visibility is unchecked, HTTPS loads and permalinks use Post name. Then test every form, take a full backup and check every page on your phone.
- Search visibility: Uncheck the Reading setting so search engines can index the site.
- HTTPS: Open the site with https:// and confirm the padlock shows.
- Sample content: Delete Hello world and the Sample Page.
- Forms: Send yourself a test message from the Contact page.
- Backup: Take a full backup before launch day.
- Phone check: Open every page on your phone.
- Search Console: Follow this guide to submit your site to Google Search once the pages are live.
Note: If you cannot tell whether the visibility box is still checked, open your homepage, view the page source and search for noindex. The Reading Settings documentation says that tag is what the box adds, so finding it means WordPress still asks search engines to skip you.
Launch on a weekday morning if you can. Any small problem then gets fixed while you are online.
When to Build a WordPress Website With an AI Builder or a Developer
The manual route has one real limit: custom layouts, migrations and integrations take time you may not have. Two shortcuts exist: an AI website builder for a fast starter draft, and a developer for custom work. Pick by how much control you need and how much time you have.
The table compares all three routes.
| Route | Best when | Trade-off |
|---|---|---|
| Manual WordPress | You want full control at low cost | You set every option yourself |
| AI website builder | You need a starter draft fast | You still edit the copy and check the settings |
| Developer | You need custom layouts or integrations | It costs more than doing it yourself |
An AI builder can draft a starter site from a short brief. Compare the options in this list of the best WordPress AI website builders. Whatever it produces, run the launch checklist above.
If you want to add AI features to a site you already run, read about AI integration with WordPress. For a custom build that needs a developer, DevDiggers offers WordPress development services.
Conclusion
To create a WordPress site from scratch, pick a host that meets the requirements, install WordPress and set the three basics first. Then choose a block theme, build four pages, add only the plugins you need and run the checklist.
Keep one habit from this guide. Check the search visibility box on the day you launch, because it is the single setting that can hide a finished site.
Frequently Asked Questions (FAQs)
Q1. How do you create a website using WordPress?
Buy a domain and hosting, install WordPress, set the basics under Settings, choose a theme, build four pages and add only the plugins you need. Then run the launch checklist and publish. A basic site takes a few hours.
Q2. How long does it take to create a WordPress website?
The install takes about five minutes, according to the official guide. A basic site with four pages takes a few hours once you add your own content. Plan a weekend for a site you are proud to share.
Q3. Can I create a free WordPress website?
You can practice for free in a browser with WordPress Playground. A live site on your own domain needs a domain and paid hosting. The WordPress software itself costs nothing.
Q4. How much does it cost to create a WordPress website?
You pay for a domain and hosting, and everything else can start free. Prices vary by host, so compare renewal prices before you buy. Add paid themes or plugins only when a real need appears.
Q5. Do I need to know how to code?
No. The block editor and the Site Editor build pages visually. Code only helps when you want a custom layout that no theme offers.
Q6. What is the difference between WordPress.org and WordPress.com?
WordPress.org is the free software you install on your own host, and you control everything. WordPress.com is a hosted service, so the host sets some limits for you. This guide covers WordPress.org.
Q7. Can I change my theme after the site is live?
Yes. Your posts and pages stay in place. Test the new theme on a staging copy first, because design settings from the old theme do not carry over.
Q8. Should I create the site on my computer or on a live host?
A live host is the simplest route for a real site. Practice on a local copy or Playground first if you want to experiment. Move to a host when you are ready to share the site.