
You can create an auction website with WordPress by adding WooCommerce and an auction plugin to a normal WordPress site. The free Ultimate Auction for WooCommerce plugin runs standard auctions with a reserve price and a Buy Now option. Our test setup took six steps and no code.
We tested plugin version 2.5.6 on WordPress 7.1.3 and WooCommerce 11.2 on our test store in October 2026. We placed bids from two customer accounts and let one auction run to its end. We also checked the paid plans against the vendor’s own comparison page.
This guide covers how an auction works, what you need and the six setup steps. It also covers what the free plugin leaves out, the costs and how far you can go toward an eBay-style marketplace.
How Does an Online Auction Work?
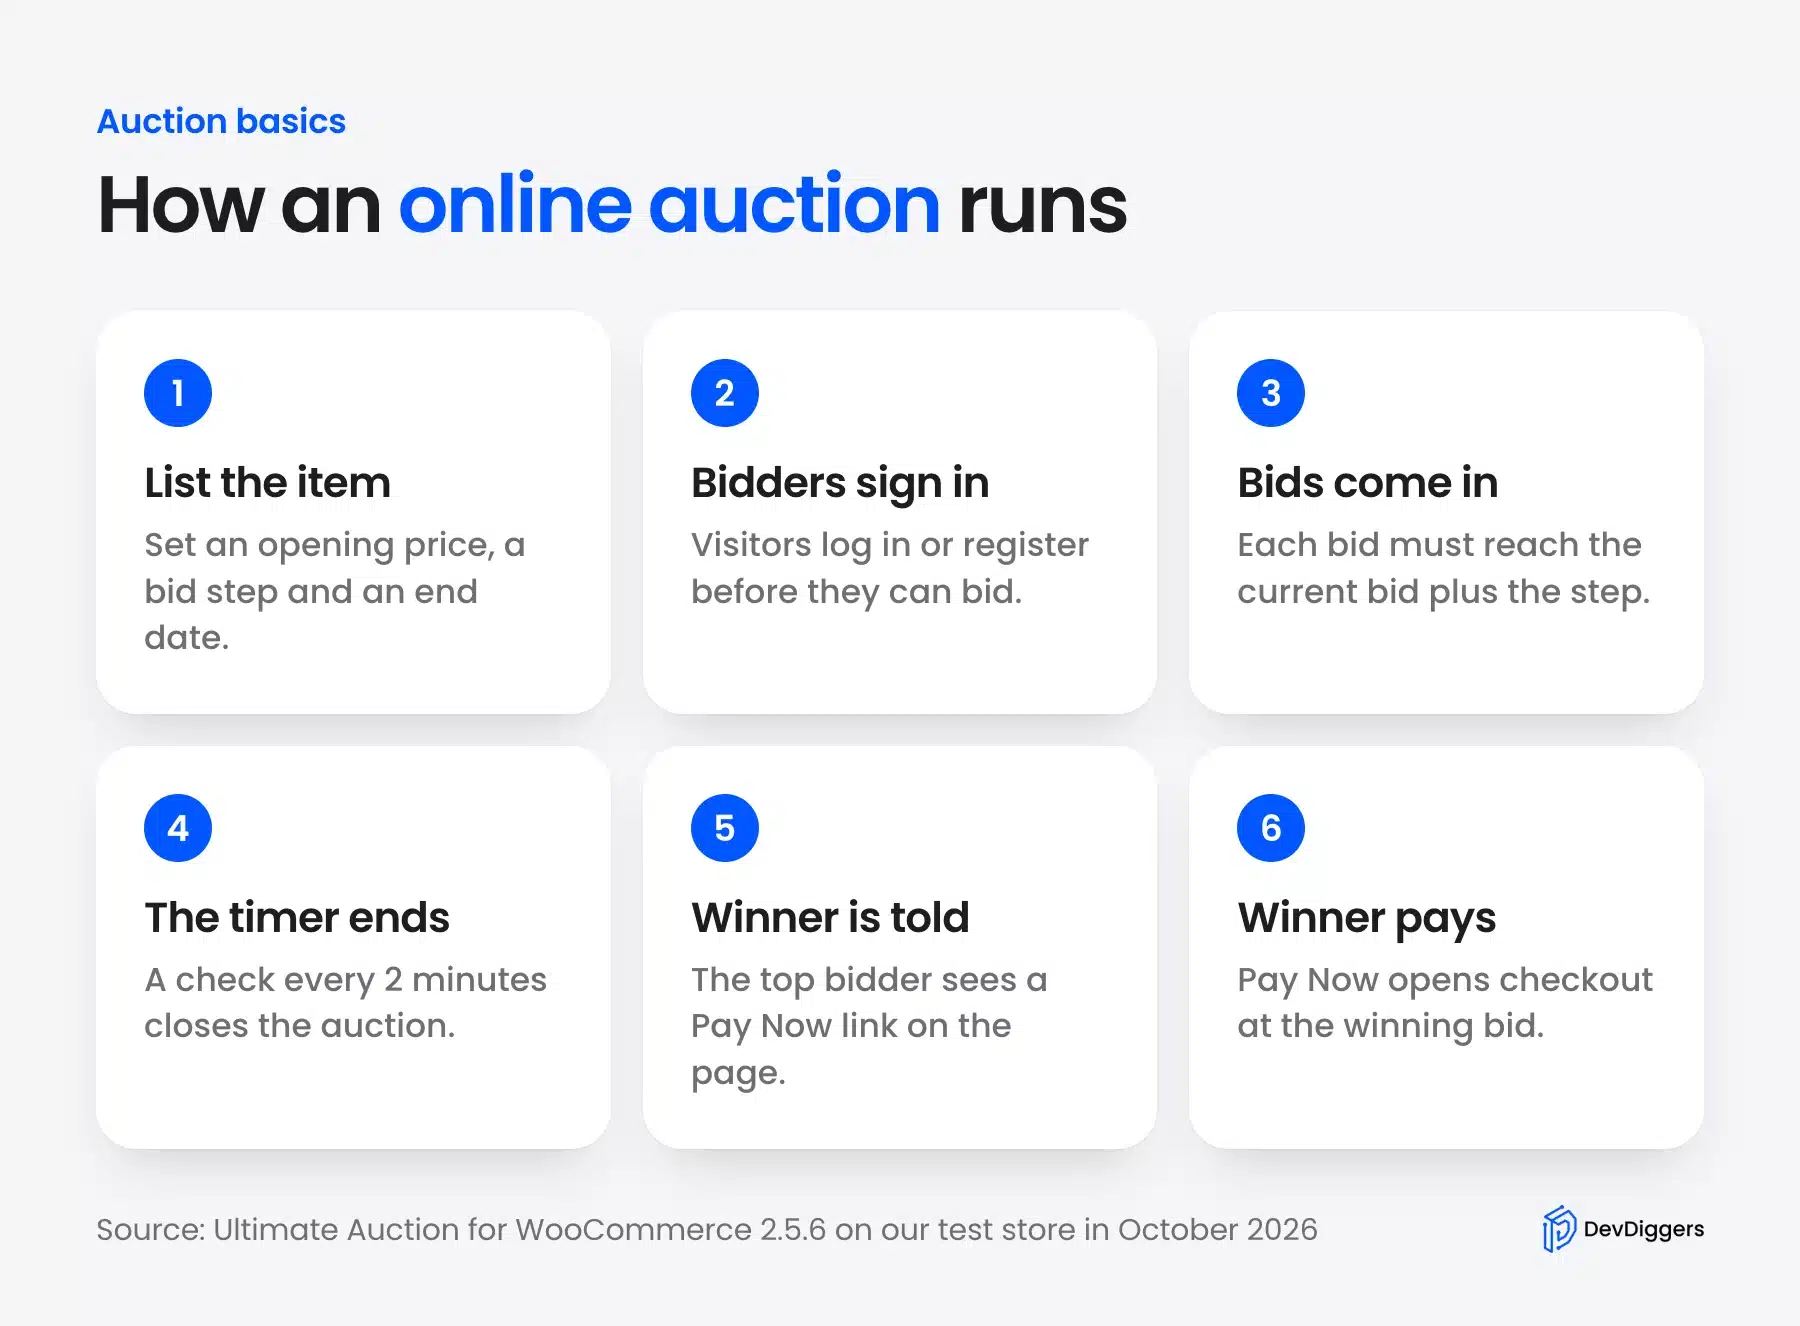
An online auction sells an item to the highest bidder before a timer ends. The seller sets an opening price, a bid step and an end date for each item. Bidders sign in and raise the price until the clock runs out and the top bid wins.
On our test store the flow ran in six stages. The plugin checks for finished auctions every 2 minutes by default. The winner then sees a Pay Now link on the auction page.
A reserve price adds one rule to that flow. It is the lowest price you will accept for the item. Bidders see a notice while the bidding is still below it, and we show how to set one in step 4.
A Buy Now price adds a second path. On our test store the Buy Now button added the lamp to the cart at the full $300 buy price. We set both prices on that lamp to watch how the page treats each one.
What You Need to Create an Auction Website
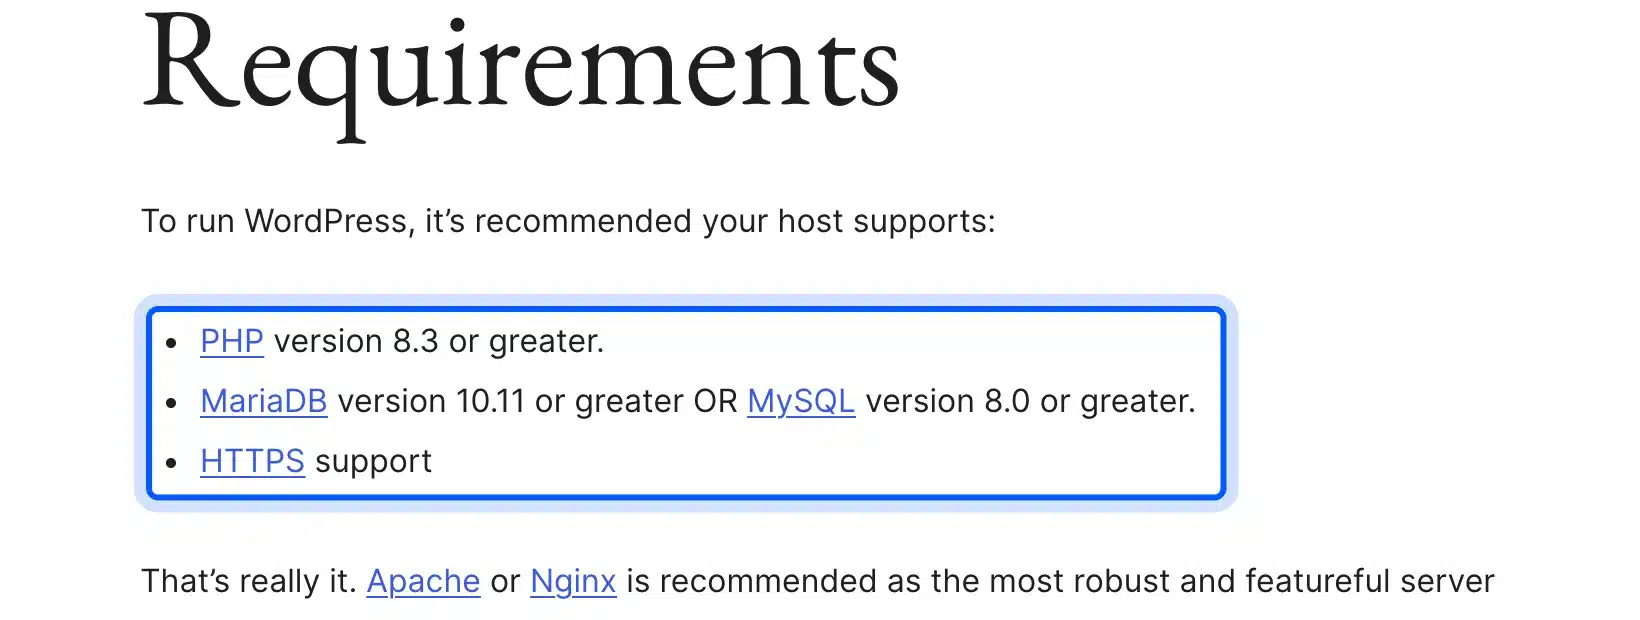
You need hosting that meets the WordPress requirements, a WordPress site, WooCommerce, an auction plugin and one payment method. WordPress asks for PHP 8.3 or newer and MariaDB 10.11 or MySQL 8.0 or newer. It also asks for HTTPS support, according to the WordPress requirements page.
Most auction sites need a theme as well. The free plugin works with any WooCommerce-compatible theme, according to its FAQ on the plugin page. You might need some styling to match your brand.
Our list of the fastest WooCommerce themes is a good place to start. The plugin’s author also sells a separate auction theme and car auction software. We did not need either one for the test.
You do not need an auction website template to launch. The default Twenty Twenty-Five theme showed the countdown, the bid form and the Bid now buttons without extra work. A dedicated WordPress auction theme only matters later when you want a custom layout.
How to Create an Auction Website with WordPress
You create an auction website with WordPress in six steps that need no code and one payment method. First you install WordPress and WooCommerce and enable a payment method for checkout. Then you install the auction plugin, add a product, set the bidding rules and test a bid before launch.
Step 1: Get Hosting and Install WordPress
Pick a host that meets the requirements above and install WordPress on it. Your host’s dashboard or the WordPress.org download both work. Our guide to create a WordPress site from scratch covers every click.
Check the PHP and database versions before you pay for a plan. The page below lists the versions WordPress asks for in 2026.
Step 2: Add WooCommerce and a Payment Method
Install WooCommerce from Plugins > Add Plugin and finish its setup wizard. Our test store ran WooCommerce 11.2. The auction plugin sells through the normal WooCommerce cart and checkout.
The store needs a working payment method before the first bid. We hit this in testing.
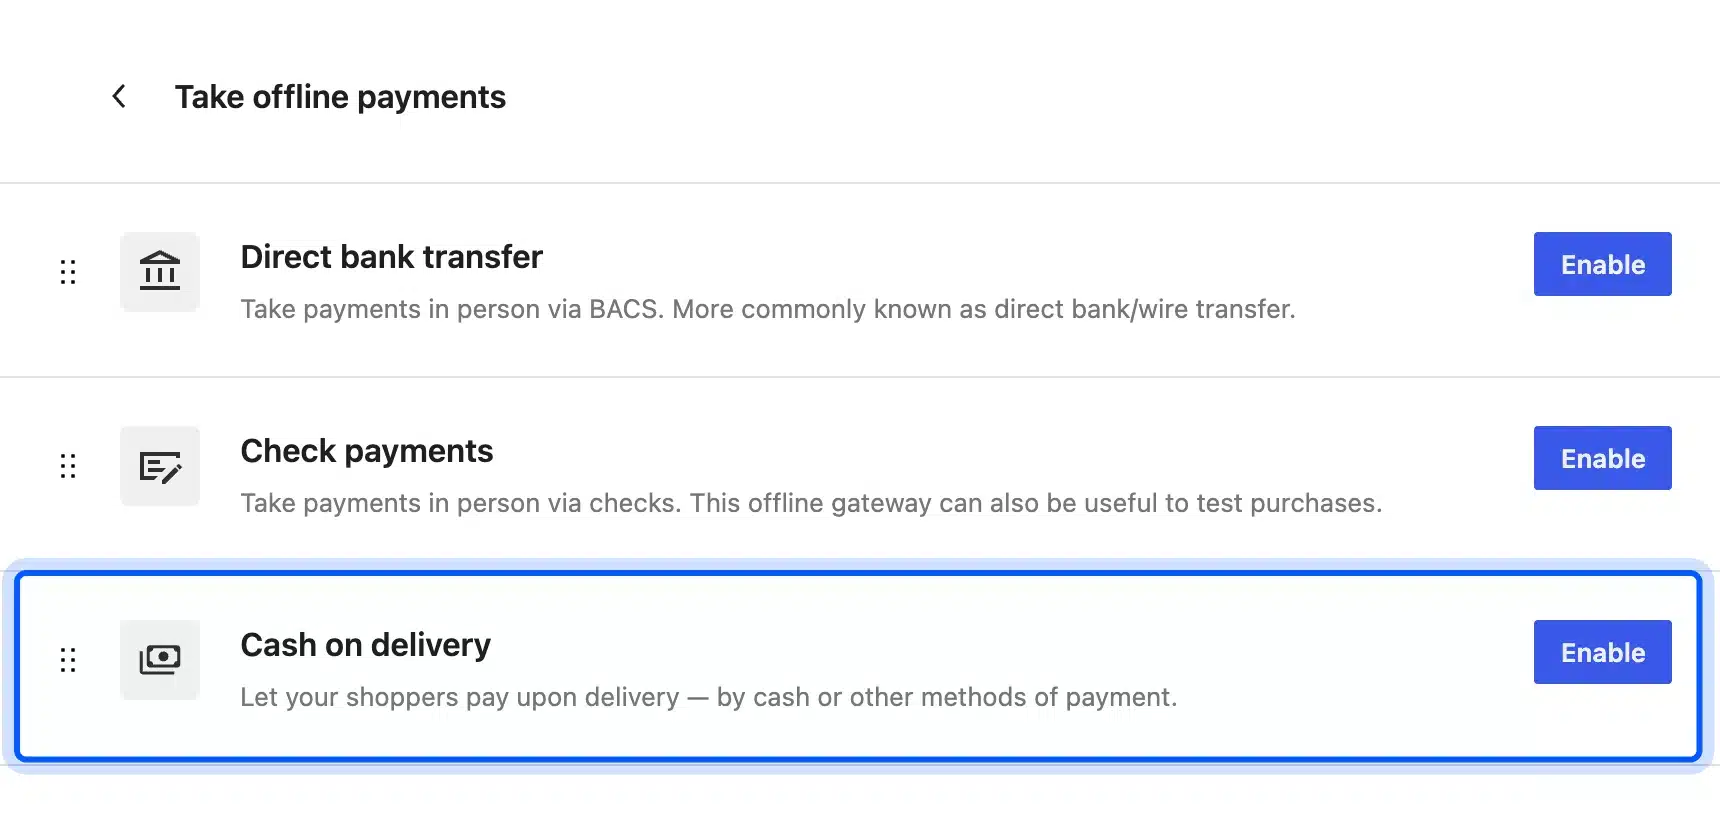
A winner who clicked Pay Now on a store with no payment method saw “There are no payment methods available.” Open WooCommerce > Settings > Payments and enable at least one method.
The screen below lists the offline methods. A live store would also add a card gateway from the same Payments screen. We enabled Cash on delivery for testing only.
Step 3: Install the Auction Plugin
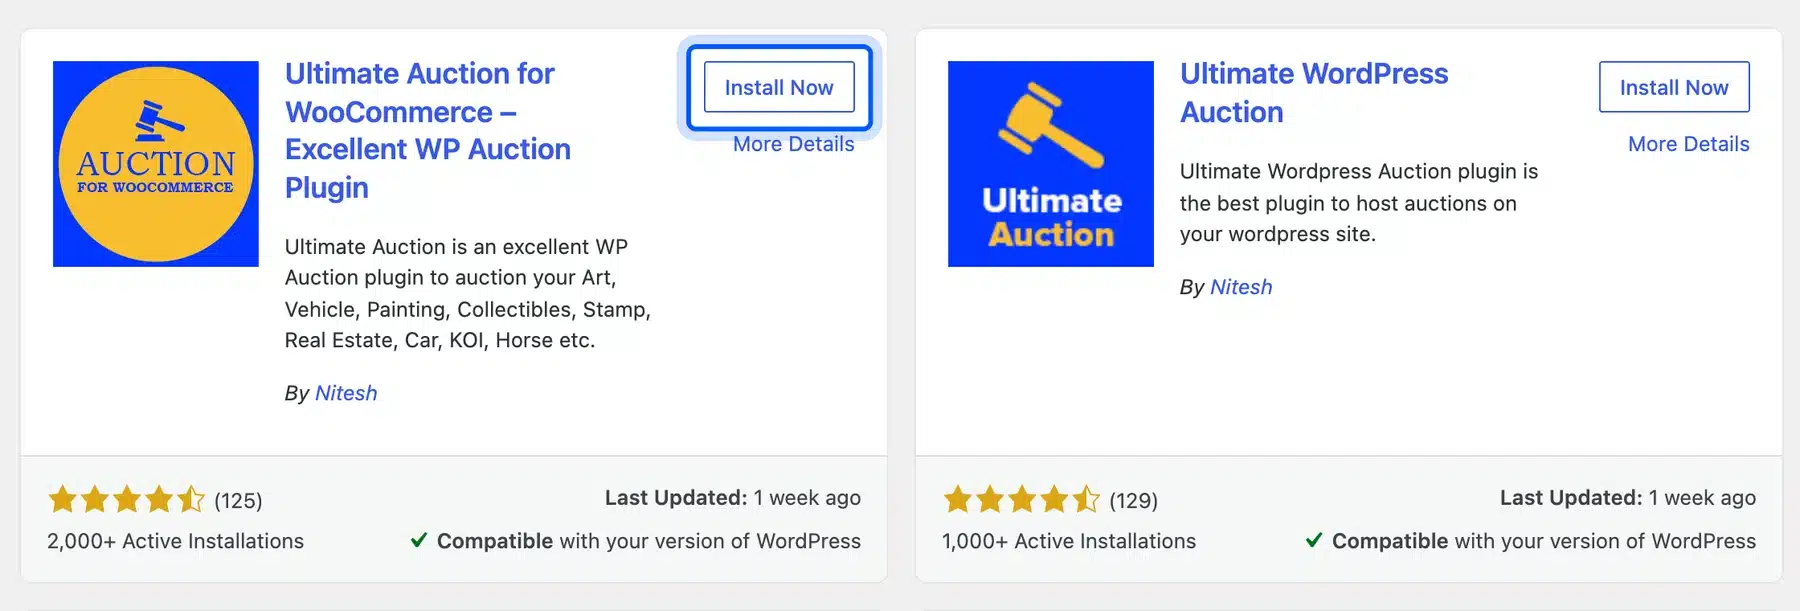
Go to Plugins > Add Plugin and search for Ultimate Auction for WooCommerce. Click Install Now and then Activate. It is a free WooCommerce auction plugin that builds on your normal products.
The listing on WordPress.org shows version 2.5.6, more than 2,000 active installations and a 4.7 out of 5 rating from 125 reviews. The plugin needs WordPress 5.5 and PHP 7.0 or newer. It was tested up to WordPress 7.1.3 when we checked.
Two plugins from the same author appear in the search results. Pick the one named for WooCommerce.
Step 4: Add Your First Auction Product
Go to Products > Add New Product. Open the Product data dropdown and choose Auction Product. The panel then shows the auction fields, and we listed a used brass desk lamp for the test.
Fill in the four boxed groups on the screen below:
- Product type: Choose Auction Product from the dropdown.
- Opening price, reserve and step: We used $40 as the opening price and $5 as the bid increment. “Lowest Price to Accept” is the reserve, and we set it to $120.
- Buy now price: We set $300. Bidders then see a Buy Now button next to the bid form.
- Ending date: We picked October 20, 2026 at 6:00 PM in the site’s time zone.
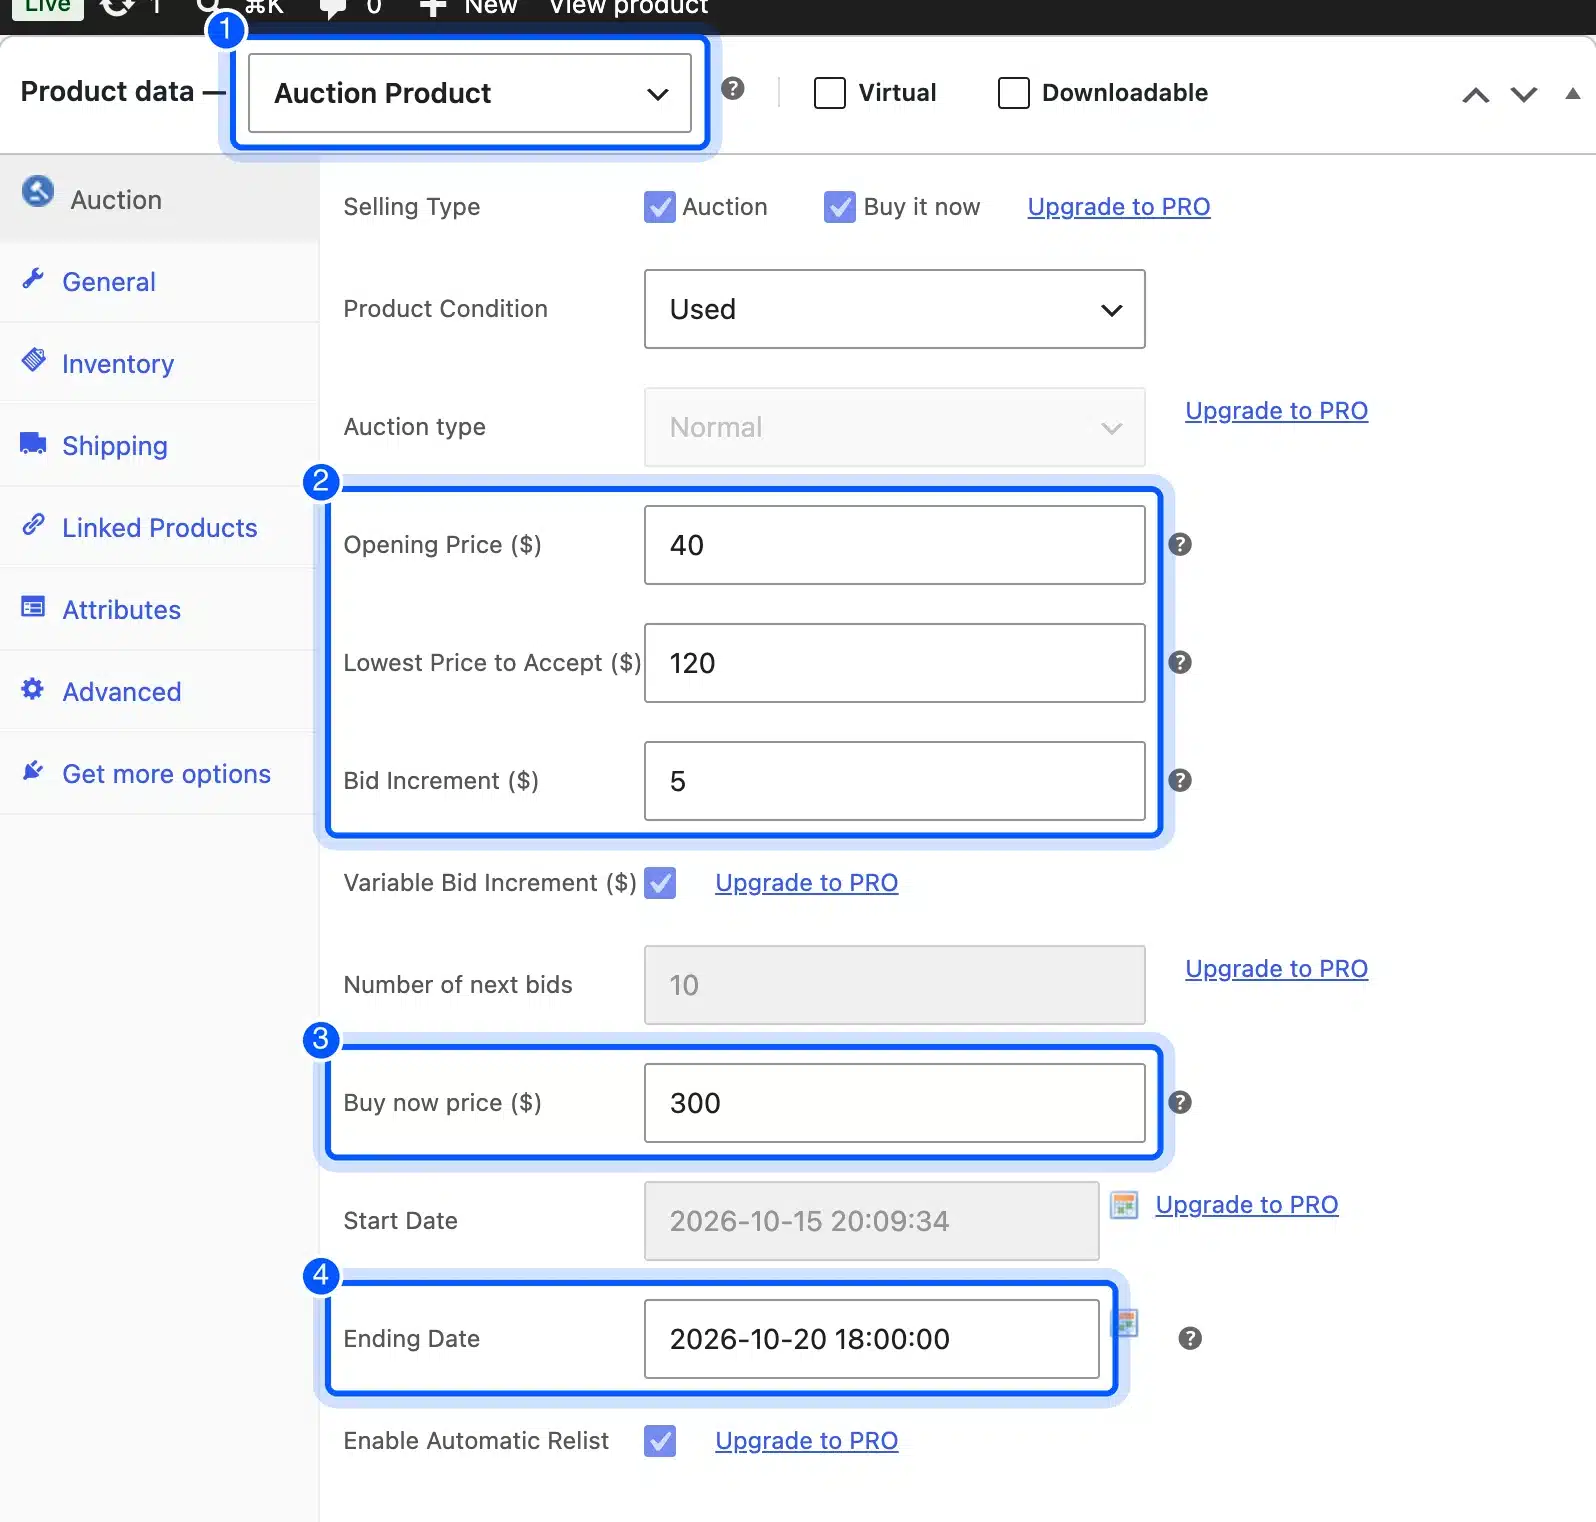
The free plugin has no working start date field. Start Date, reverse auctions and automatic relist show an Upgrade to PRO link. Our auction went live the moment we published the product.
Step 5: Set the Bidding Rules and Emails
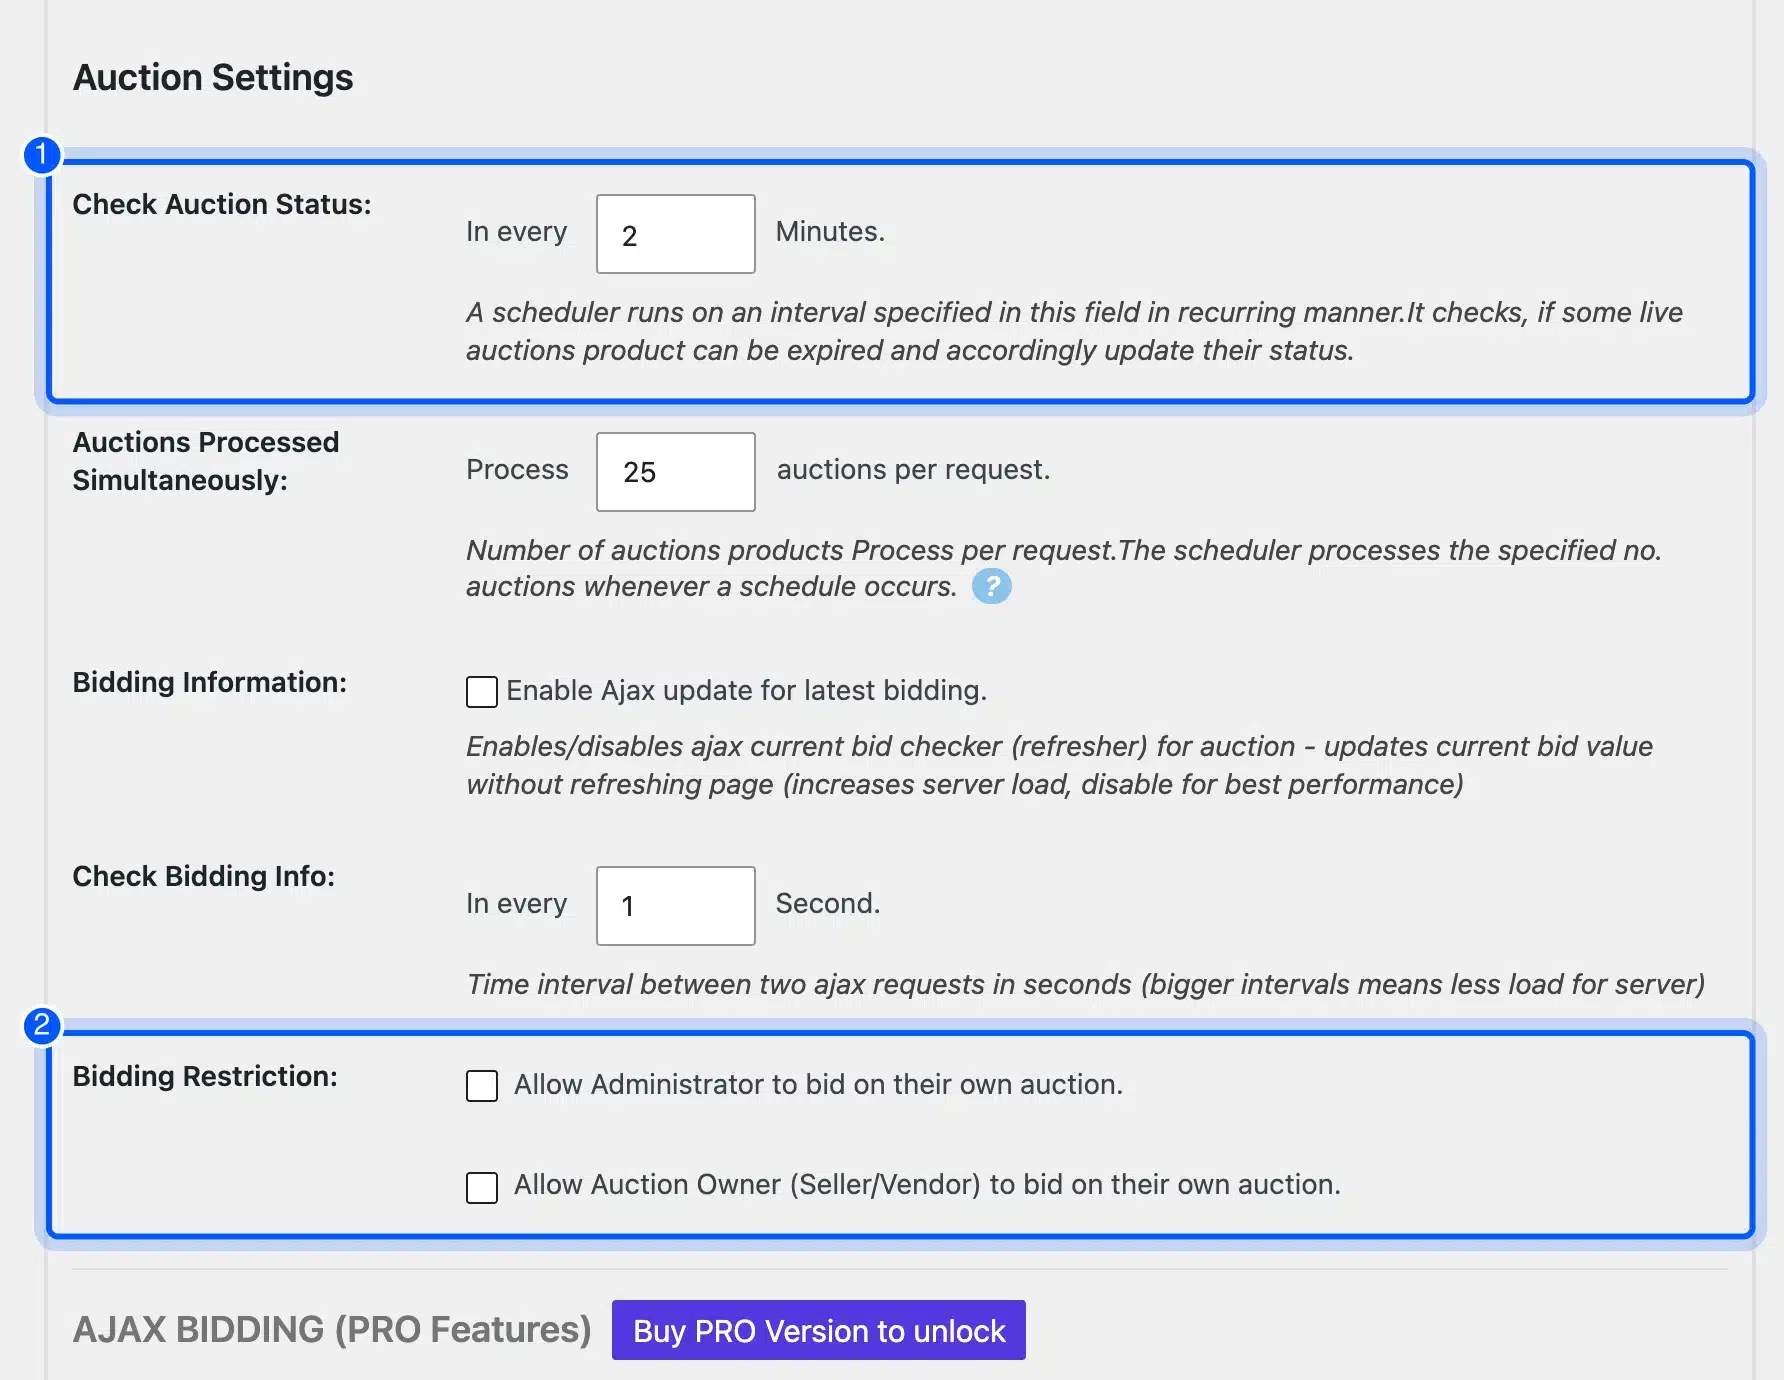
Open Auctions > Settings. The first section holds the rules most stores want to review. The scheduler checks for finished auctions every 2 minutes by default.
The restriction box blocks administrators and sellers from bidding on their own auctions. That default protected us. When we tried to bid as the administrator, the page replied “Sorry, you can not bid on your own auction product.”
Logged-out visitors saw “Please Login/Register to place your bid or buy the product.” The plugin’s settings screen has a checkbox that turns that message on or off. A Shop Page section shows auctions on the shop, search, category and tag pages by default.
Our guide to editing the WooCommerce shop page helps if you want a different layout.
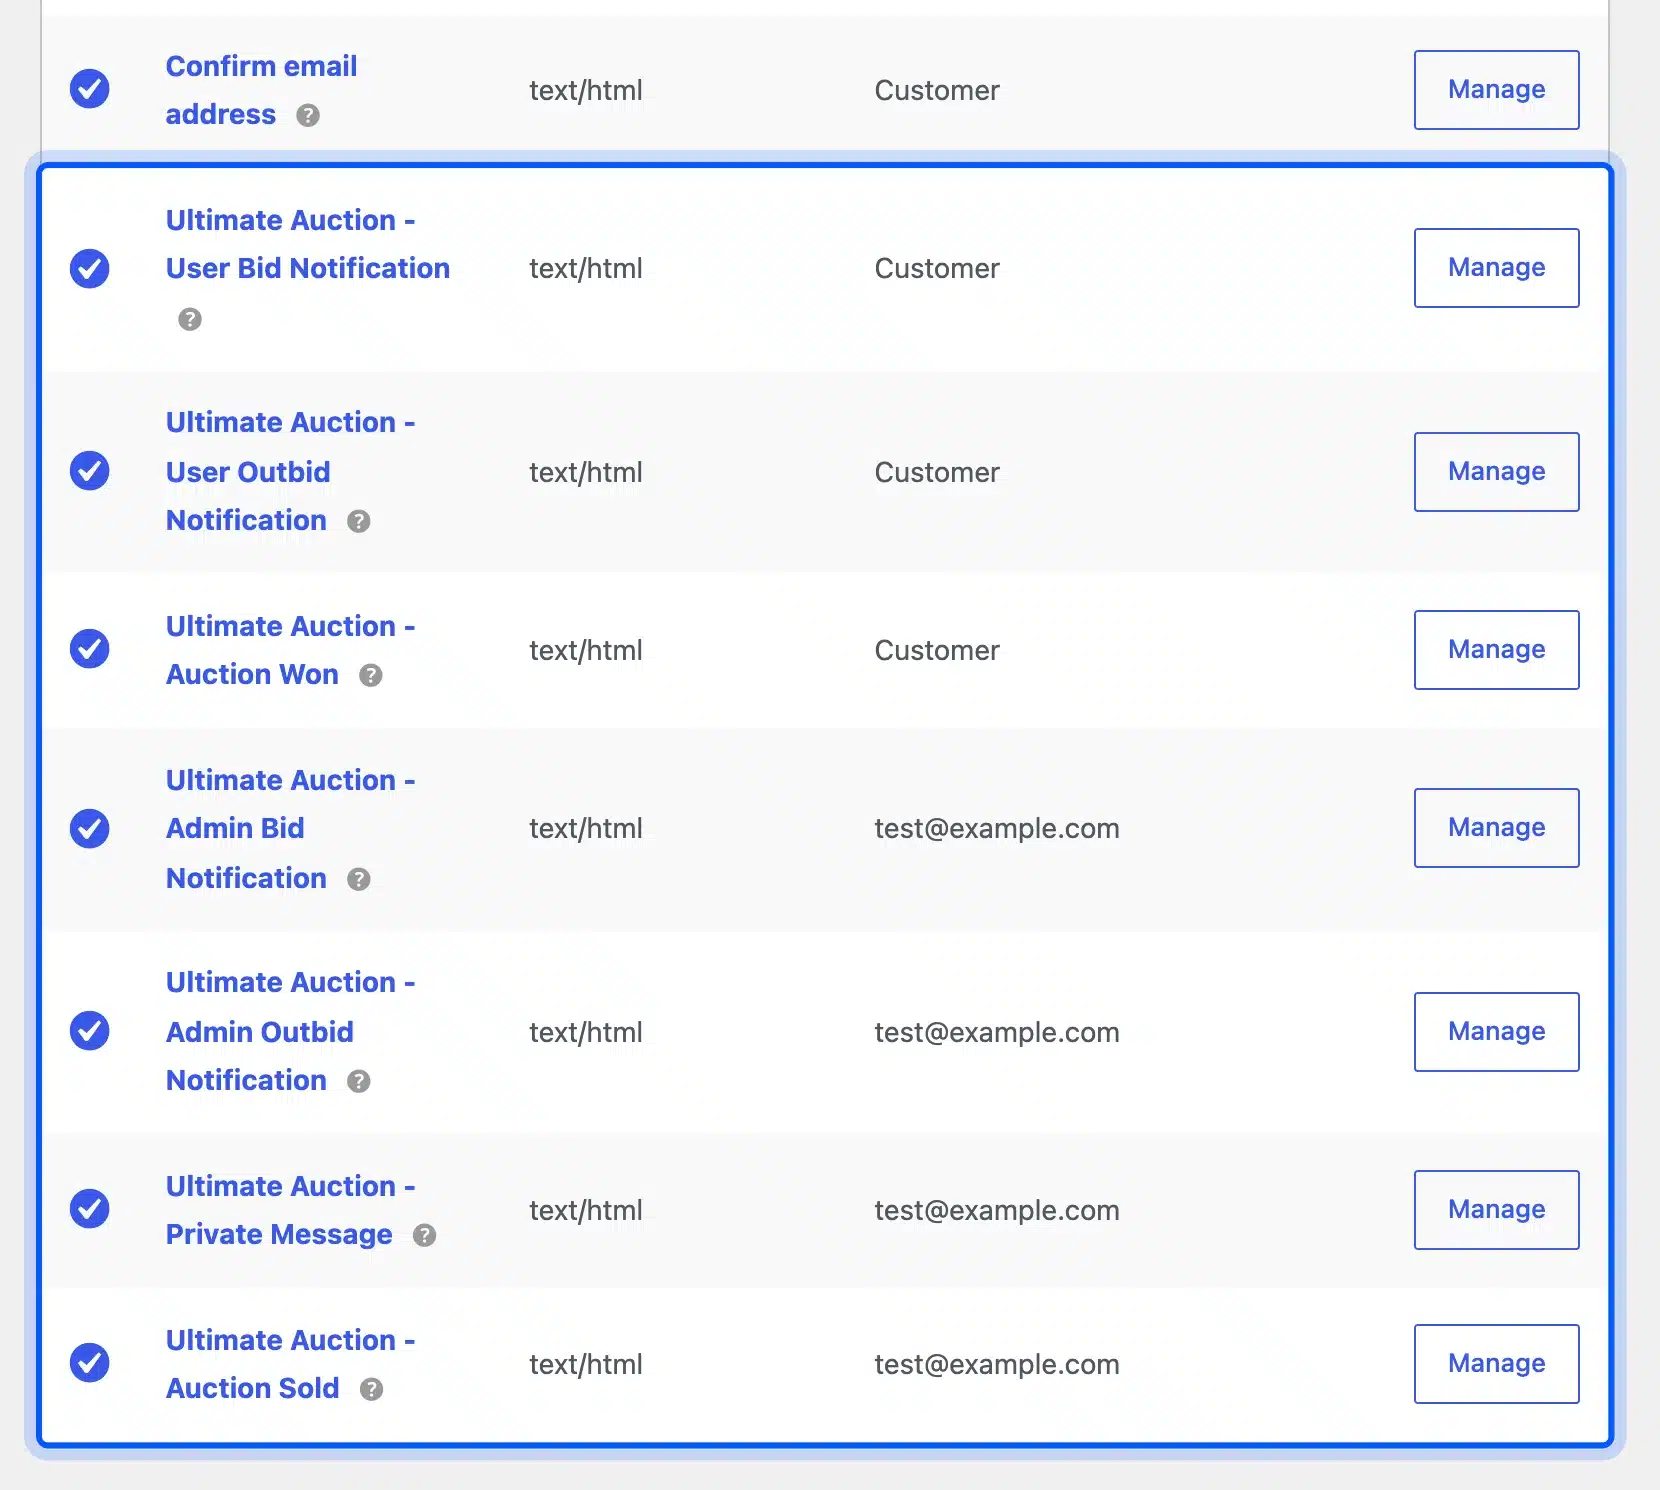
Next, review the emails. WooCommerce > Settings > Emails now lists seven Ultimate Auction messages.
They cover a user bid, an outbid notice and an auction won notice. They also cover an admin bid, an admin outbid notice, a private message and an auction sold notice.
Each message has a Manage button. We did not connect a mail server in the test and cannot report on delivery.
Step 6: Test a Bid Before You Launch
Log in as a customer and place a bid on your own test auction. Check the bid form, the countdown and the message that confirms the bid. Do this with two accounts before real customers arrive.
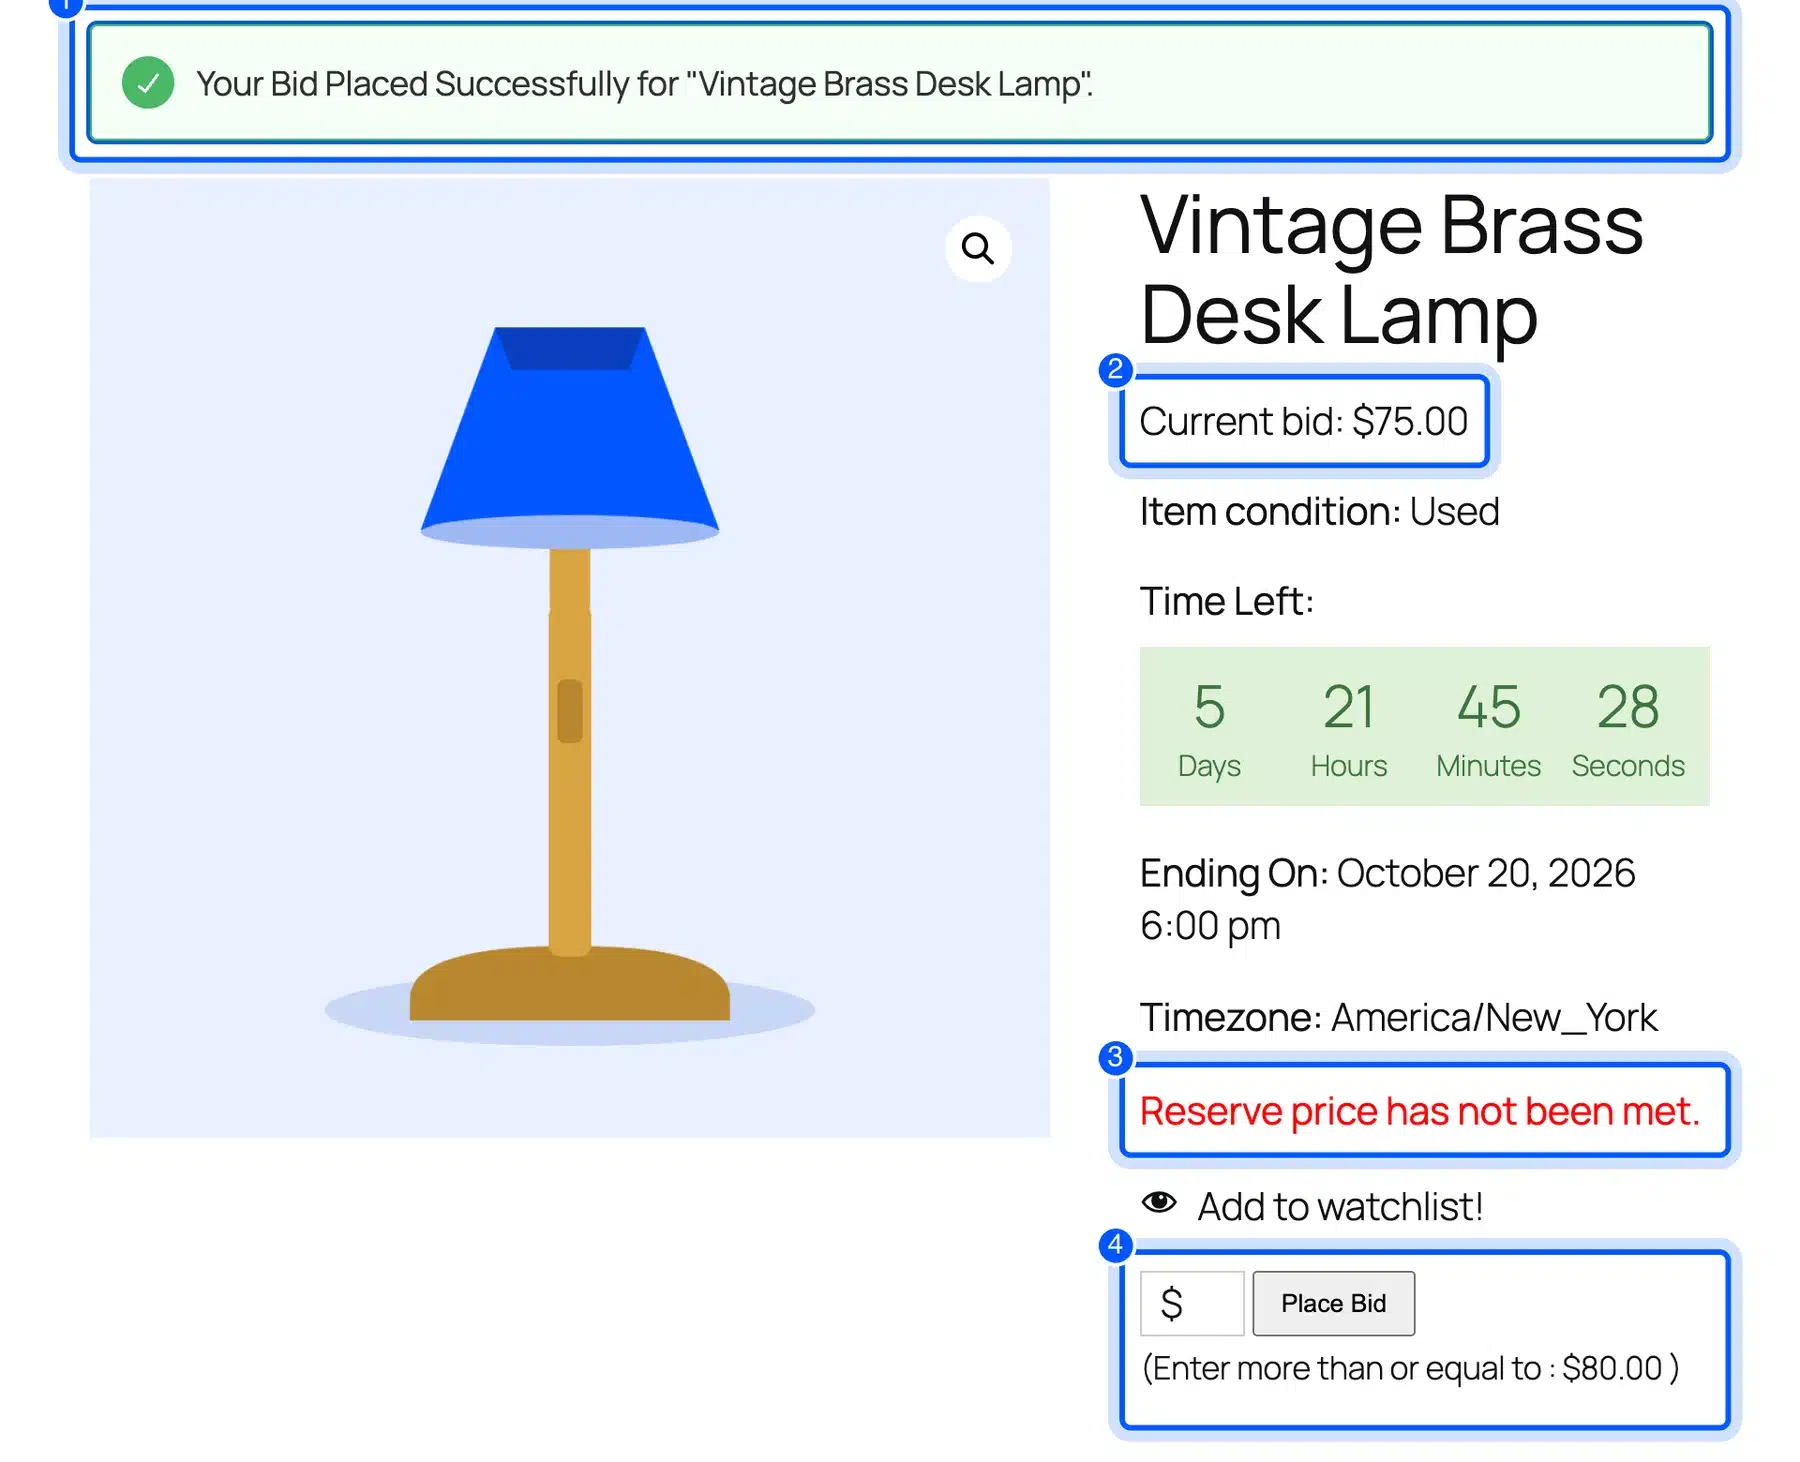
On the lamp auction the form told us the minimum for the next bid. One account bid $40 and another bid $50. After a later bid of $75 the page said “Your Bid Placed Successfully” and showed the new current bid.
The reserve notice stayed on the page because $75 was below the $120 reserve.
The Auctions screen under the plugin menu lists every live auction. It shows the opening and current price. Each bidder appears with the amount and the time of the bid.

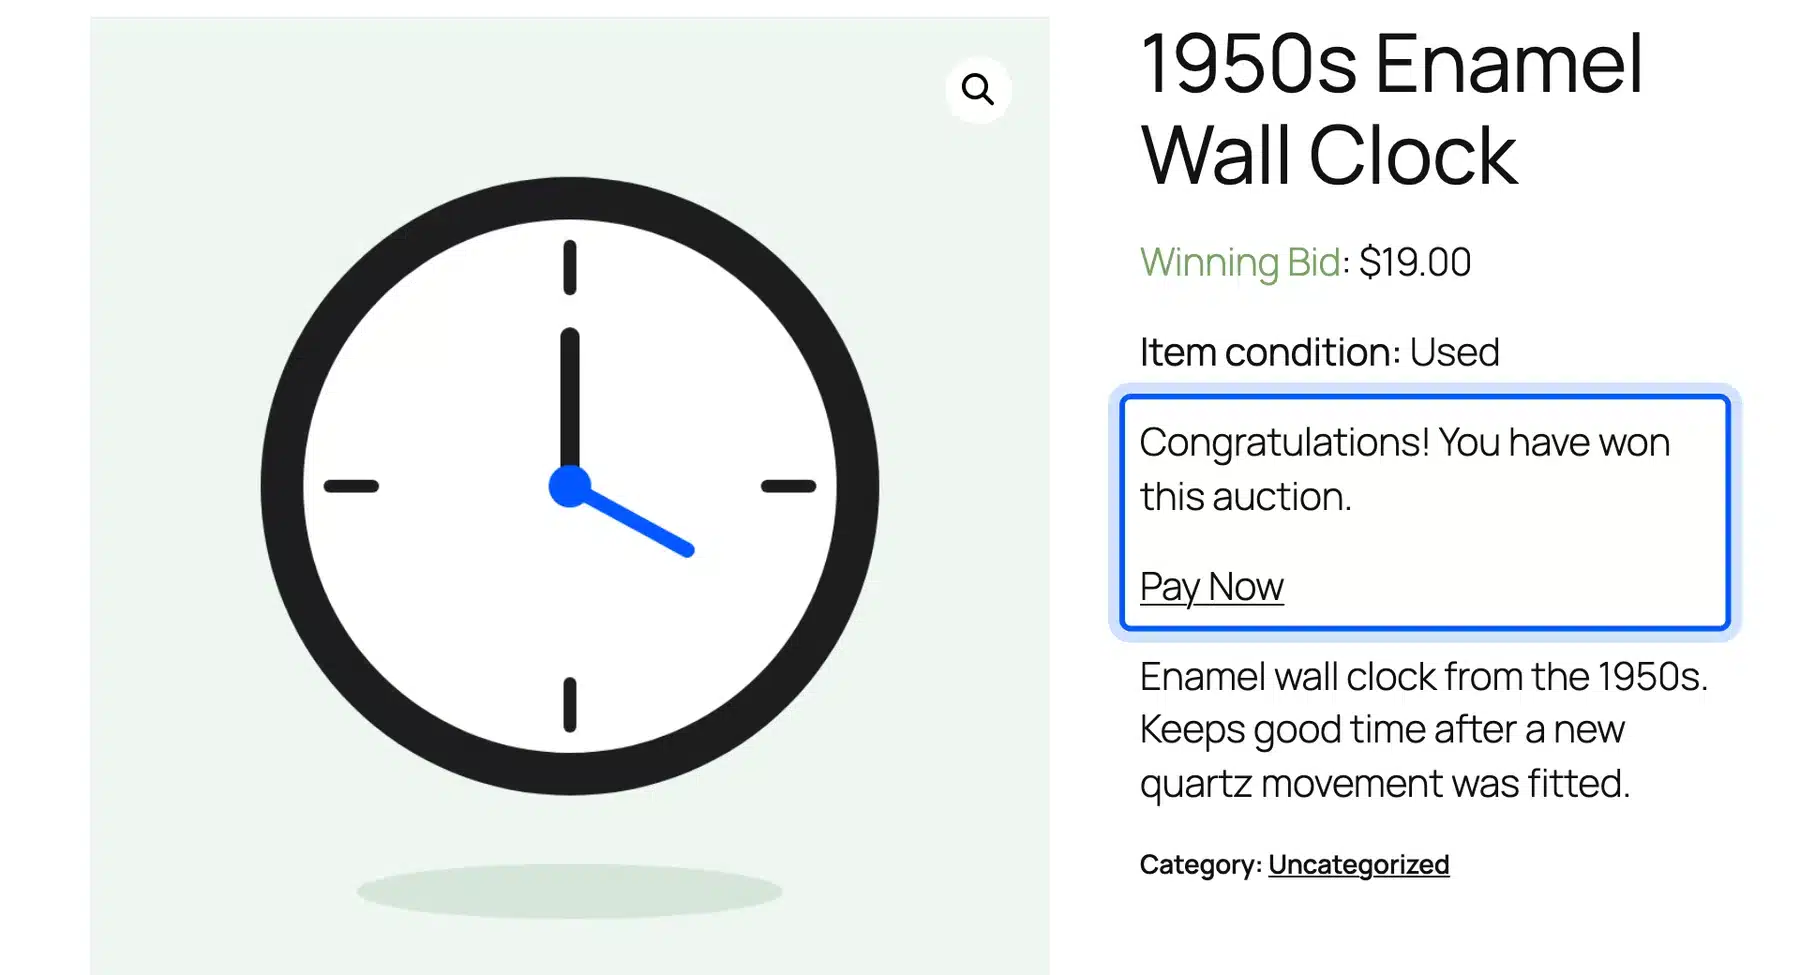
We also let a second auction end on a $19 winning bid. A few minutes after the end time the page showed the winner a congratulations message and a Pay Now link. Pay Now then opened checkout with the item at $19.
We stopped there because the test store has no live payment account.
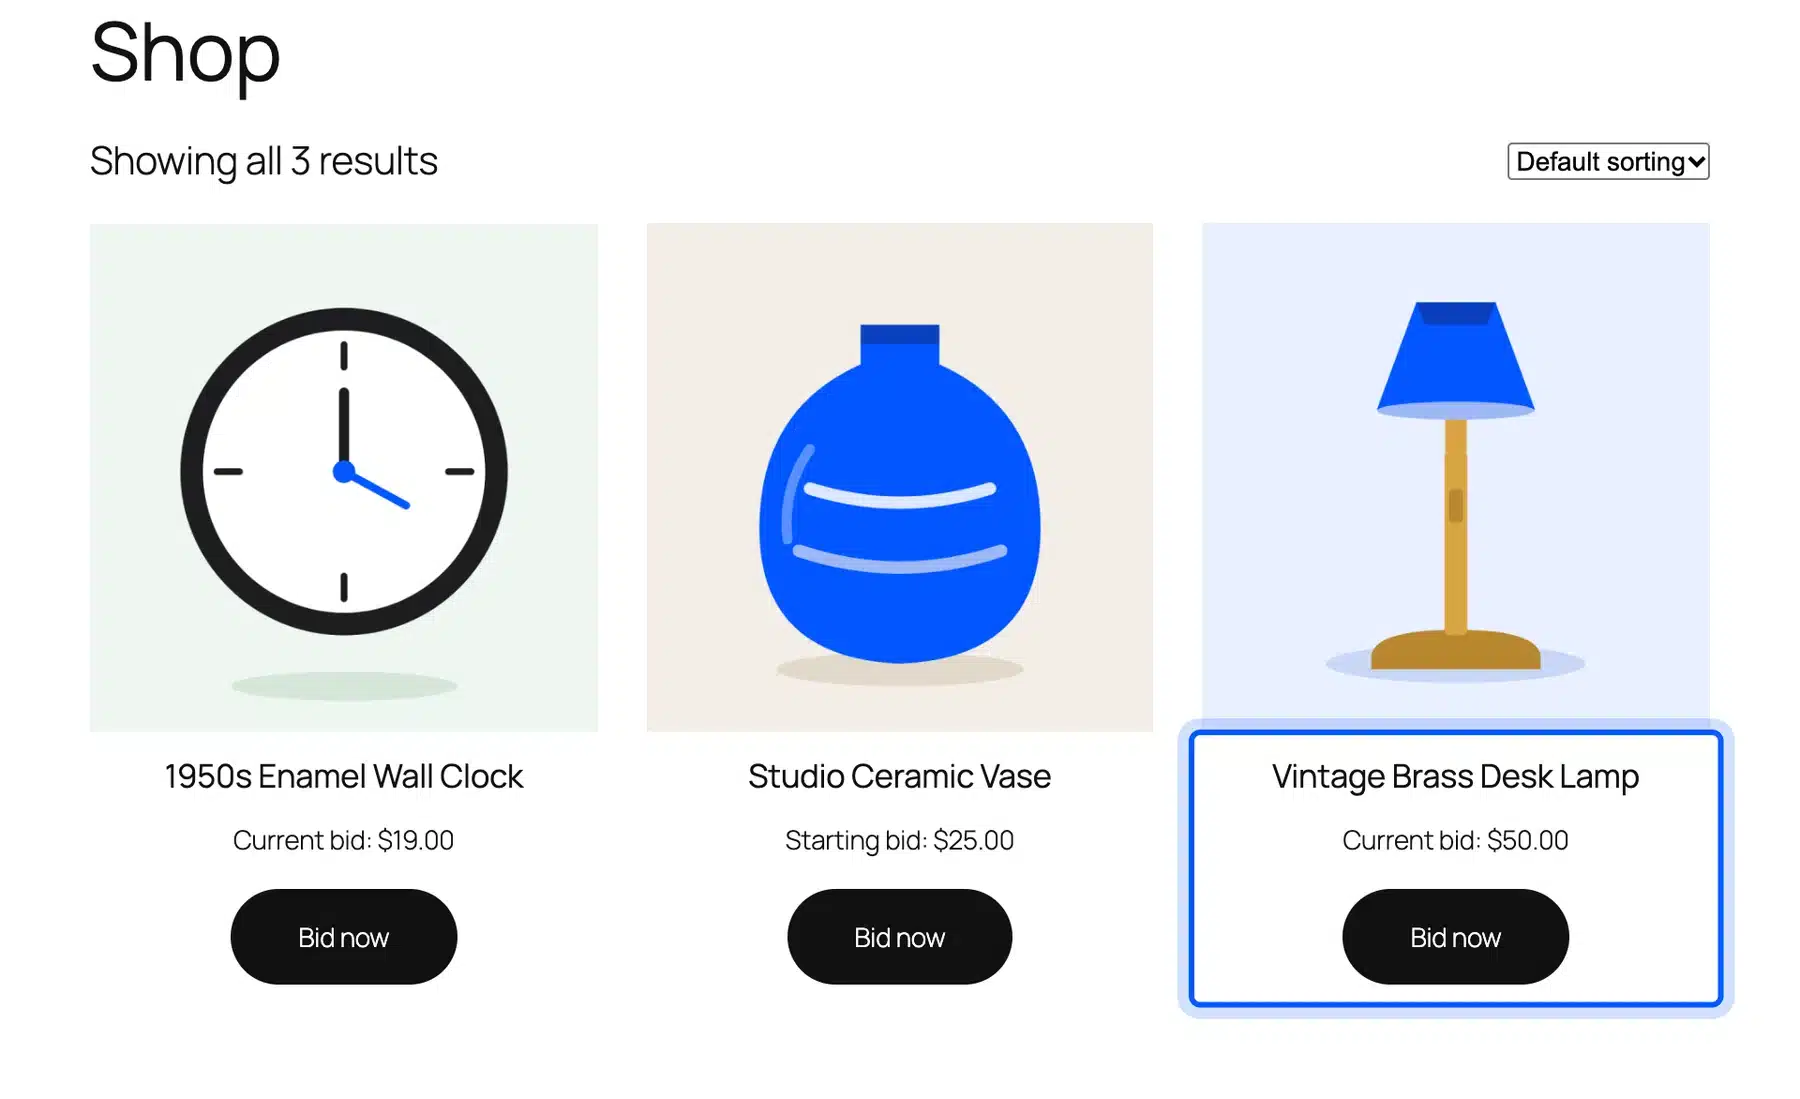
Last, open your shop page. Each auction shows its current bid and a Bid now button. Visitors can compare every live auction from one grid.
What a Free WordPress Auction Plugin Does Not Include
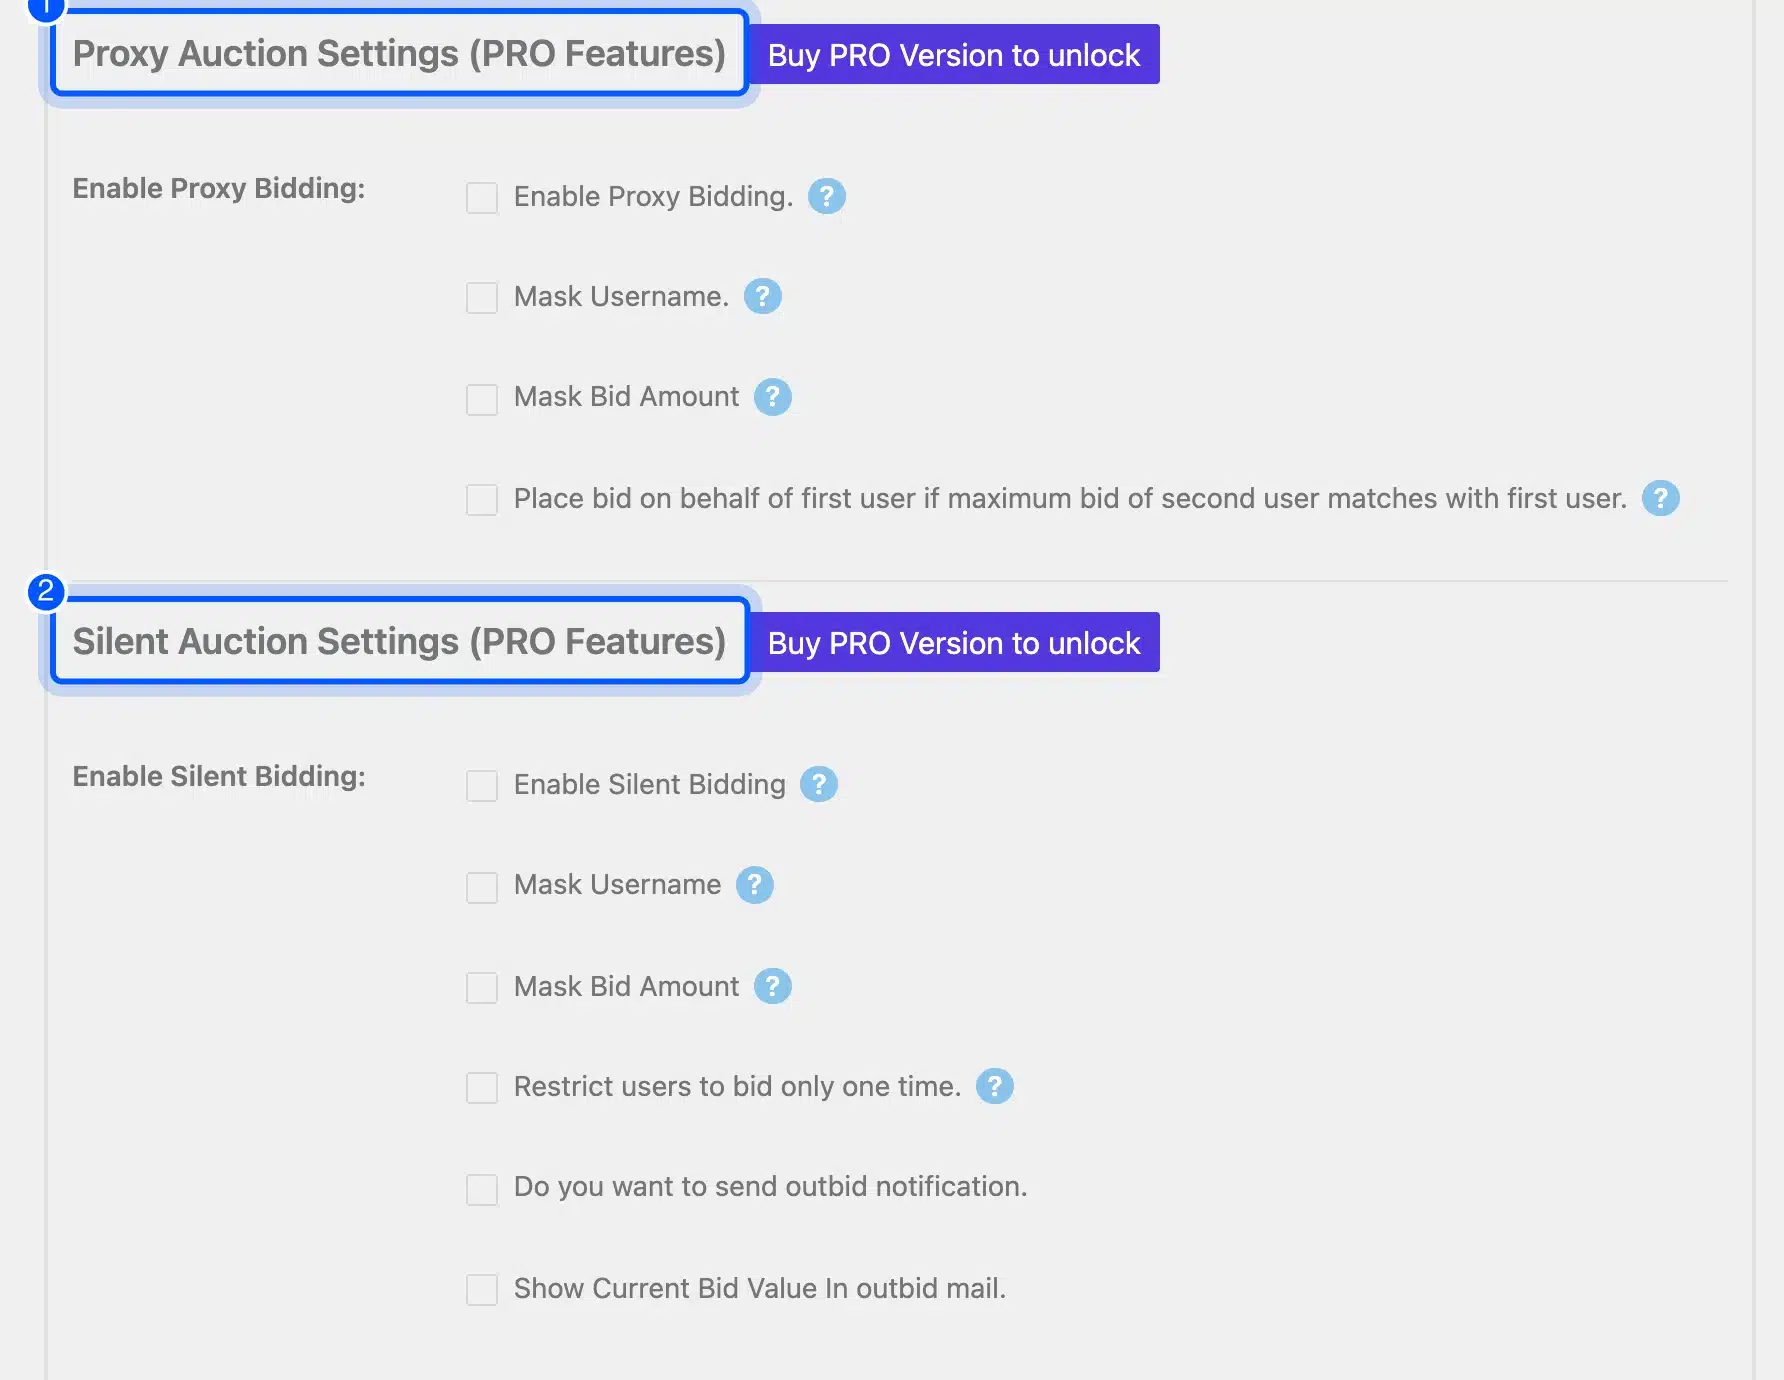
The free plugin runs standard auctions with a reserve, a bid step and a Buy Now price. Proxy bidding, soft close, future start dates, silent auctions, reverse auctions and automatic relisting need a paid plan. The plugin marks each one as a Pro feature on its own screens.
The settings page makes this plain. It has separate blocks named Proxy Auction Settings, Silent Auction Settings and Timer and Soft Close, each tagged PRO Features. The product screen adds Upgrade to PRO links beside the same options.
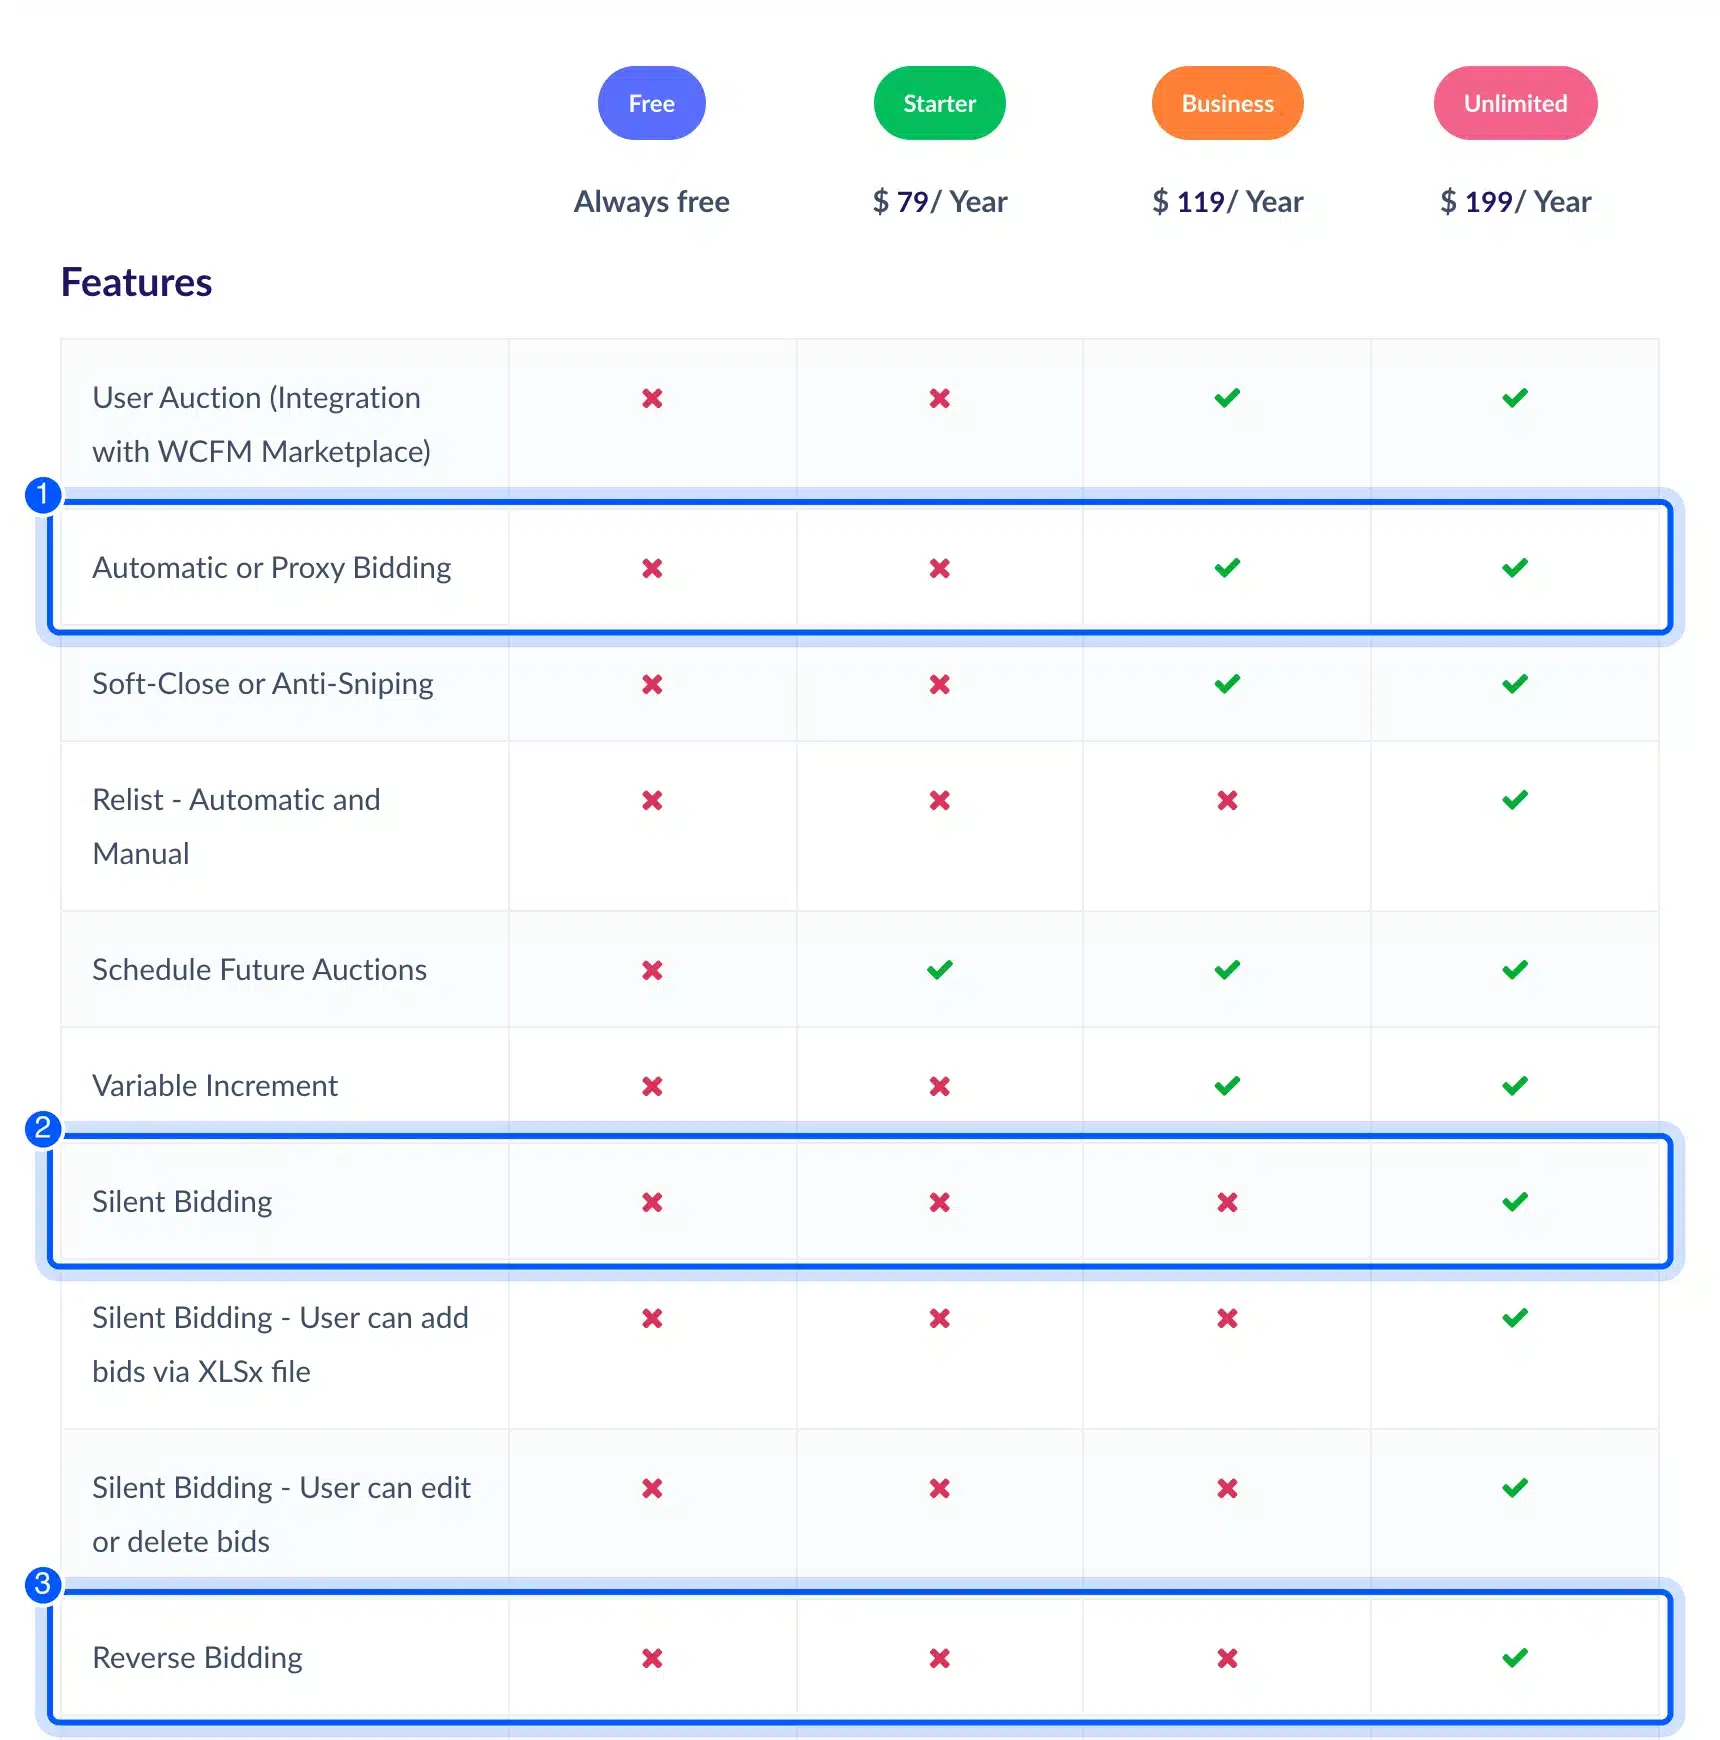
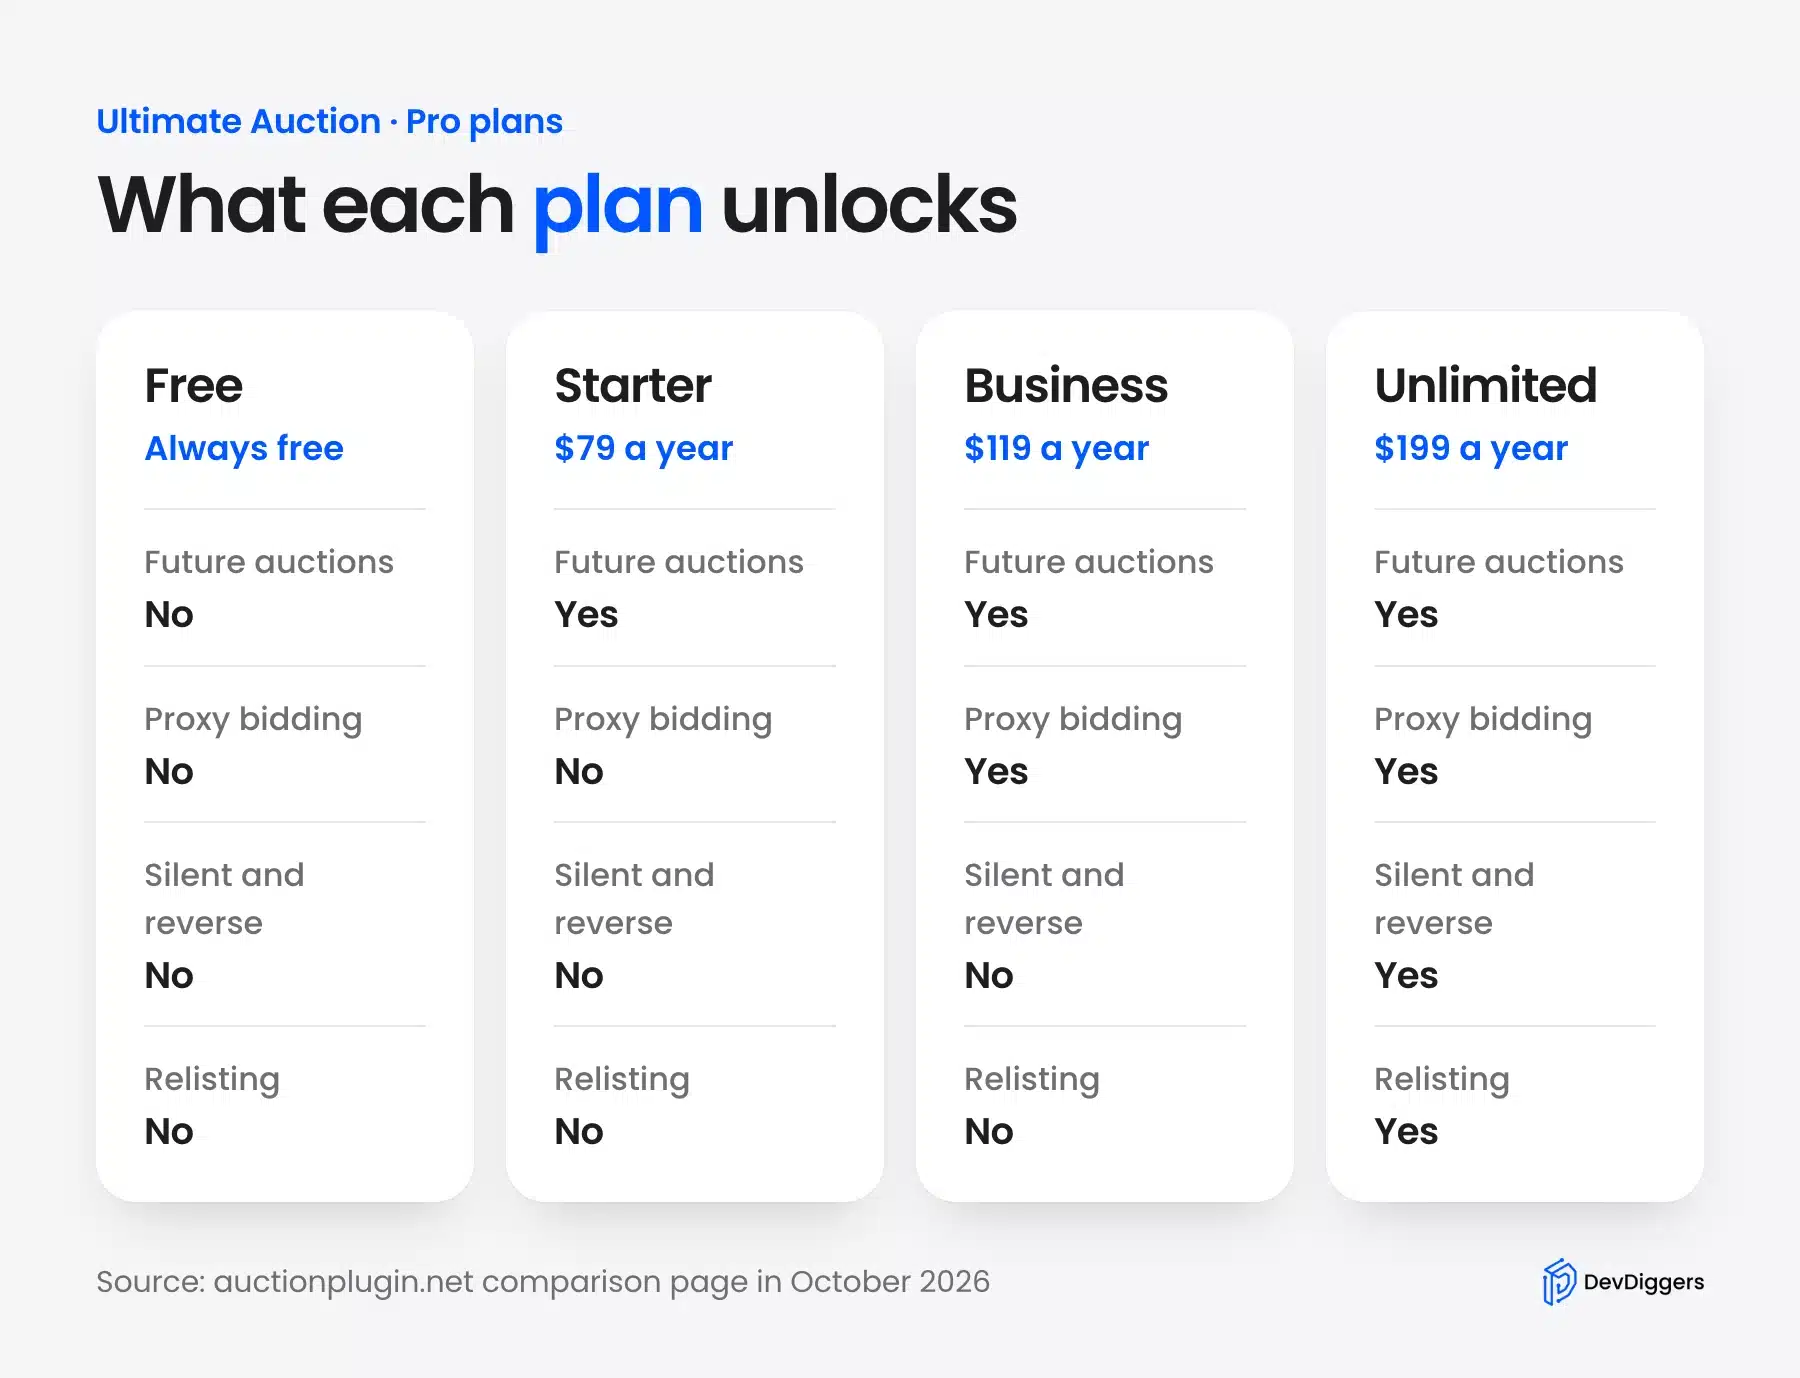
The vendor’s comparison page shows which plan unlocks each feature, as of October 2026. Starter costs $79 a year and adds scheduled start dates. Business costs $119 a year and adds proxy bidding, soft close and variable bid increments.
Unlimited costs $199 a year and adds silent bidding, reverse bidding and relisting. See the vendor’s full license comparison for the rest.
| Feature | Free plugin | First paid plan |
|---|---|---|
| Standard auction with reserve and Buy Now | Included | Not needed |
| Scheduled start date | No | Starter at $79 a year |
| Proxy bidding | No | Business at $119 a year |
| Soft close | No | Business at $119 a year |
| Variable bid increment | No | Business at $119 a year |
| Silent bidding | No | Unlimited at $199 a year |
| Reverse bidding | No | Unlimited at $199 a year |
| Automatic relisting | No | Unlimited at $199 a year |
Which type should you pick? A standard auction suits a first launch. Choose proxy bidding when buyers want the system to bid up to a maximum for them.
Choose silent bidding when buyers should not see rivals’ offers. Reverse bidding flips the usual direction so the lowest offer wins.
How Much Does It Cost to Create an Auction Website?
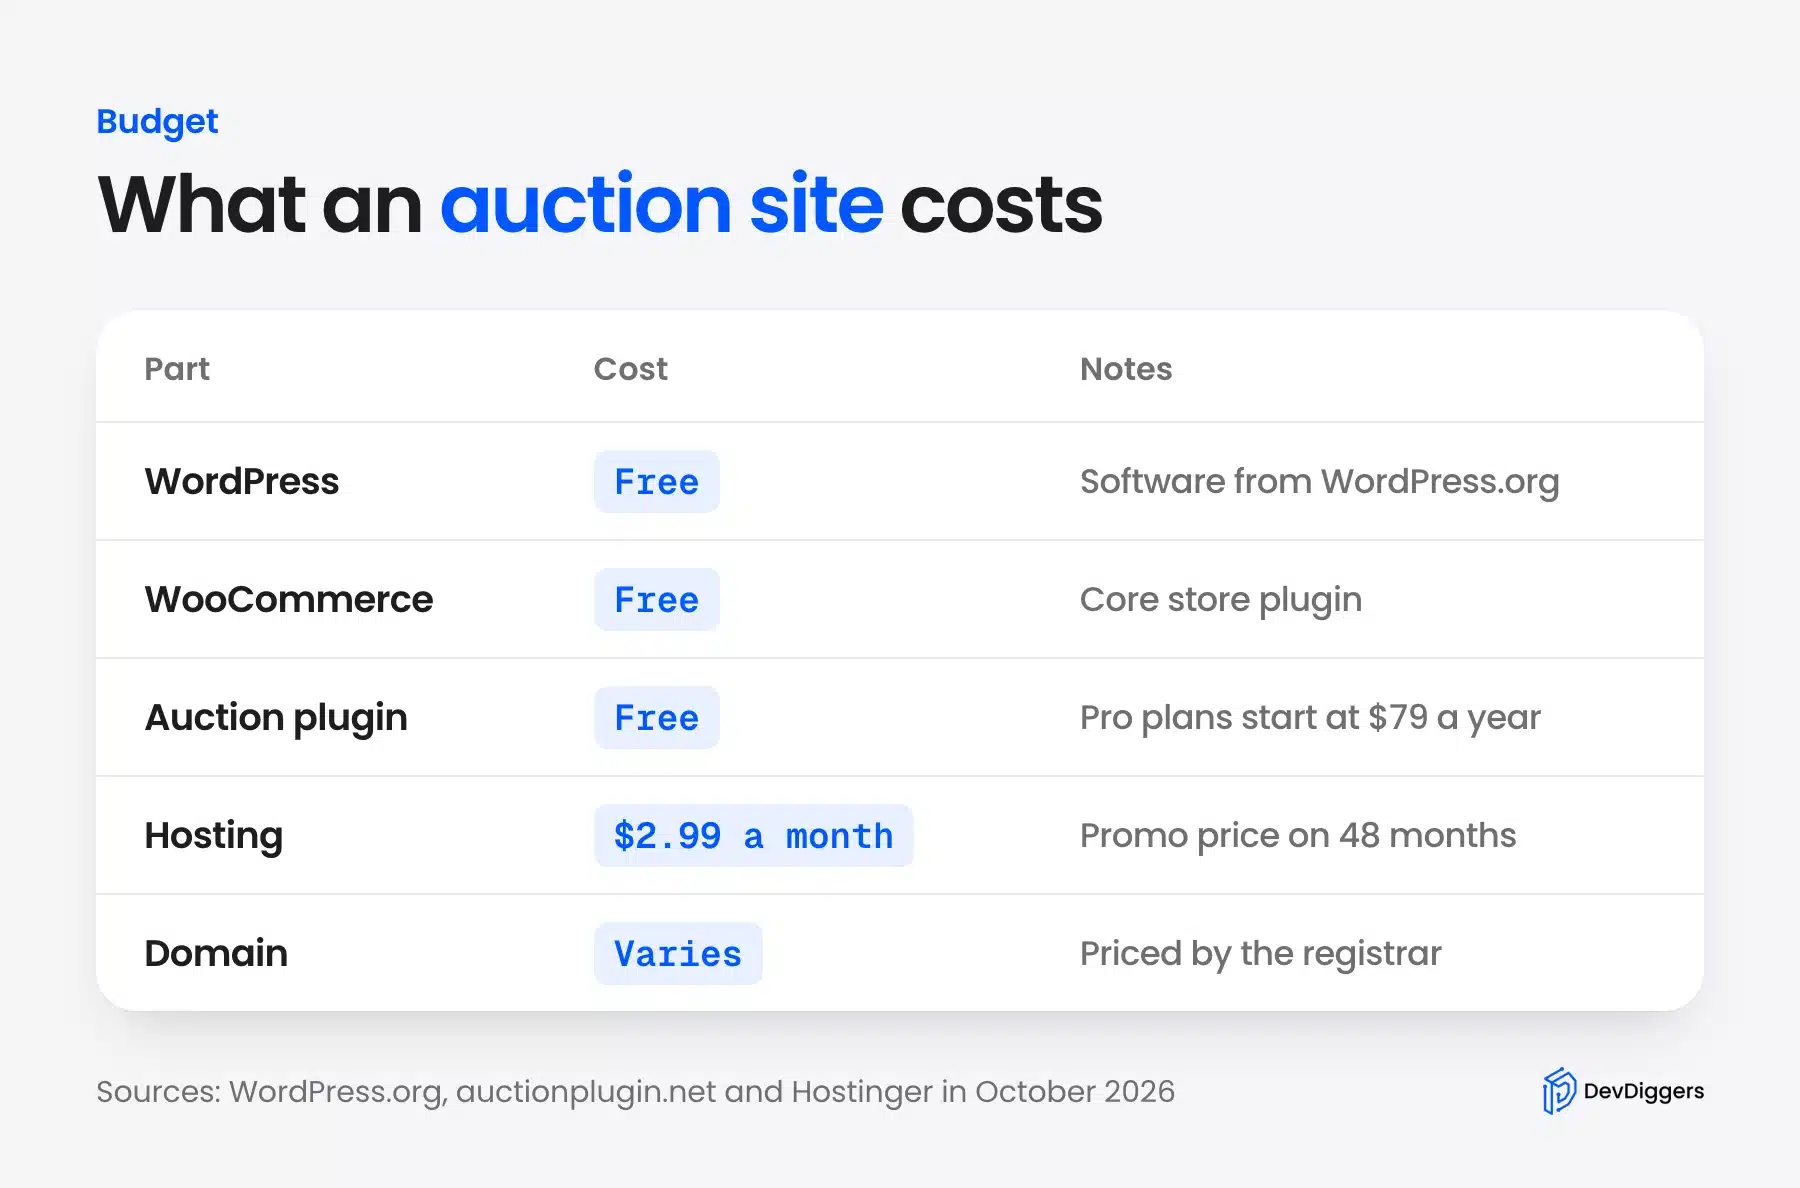
You can create an auction website for the price of hosting and a domain. WordPress, WooCommerce and the free auction plugin cost nothing, and paid plans start at $79 a year as of October 2026. Your real cost depends on the hosting plan and on any Pro features you need.
Hosting is the main fixed cost. The Hostinger Premium plan is listed at $2.99 a month on a 48-month term. That works out to $143.52 upfront.
The renewal price is $10.99 a month and the domain is free for the first year, according to the Hostinger WordPress plan page. A promotional price like that can change. Check the live page before you buy.
Your site will also need to stay fast under bidding traffic. Our guide to speed up a WooCommerce website explains what to check first.
Can You Build an Auction Website Like eBay with WordPress?
You can build an auction website like eBay with WordPress when sellers are allowed to list their own items. That needs a marketplace plugin on top of the auction plugin. The vendor’s plan table lists user auctions through the WCFM Marketplace plugin as a Business feature.
The free plugin does not do this on its own. You list every item yourself, as we did with the lamp. For a shop that sells its own stock, that is enough.
A true marketplace adds seller accounts, payouts and moderation on top of the bidding. Plan for those tasks before you promise sellers anything. A smaller store can start with its own stock and add sellers later.
Read our guide to WordPress vs WooCommerce if you are still comparing options. It explains why auction plugins sit on top of WooCommerce. Our list of ways to sell on WordPress without WooCommerce covers the other direction.
What We Noticed While Testing
Most problems we hit during testing came from missing store settings around the auction. The auction fields themselves worked as labeled on every screen we opened during the test. Check each item below against your own store before you run your first live auction.
- No payment method: Pay Now led to a checkout that showed no way to pay until we enabled one.
- Bidding on your own item: The default settings blocked the administrator from bidding on the lamp.
- Visitor login message: Logged-out visitors cannot bid. They see a login message in place of the bid form.
- Reserve notice: The product page told bidders “Reserve price has not been met.” Decide whether you want that line visible.
- Crossed-out price: At checkout the winner saw the Buy now price crossed out next to the winning bid. Check how your theme shows it.
- Closing delay: The auction closed a few minutes after its end time. The scheduler checks only every 2 minutes by default.
Custom rules go beyond the settings screens. If you need your own checkout rules or seller features, our WooCommerce development services cover that kind of work.
Conclusion
You can create an auction website with WordPress using WooCommerce and the free Ultimate Auction plugin. Install both, enable a payment method, add an auction product and test bids with two accounts. Standard auctions with a reserve and Buy Now cost nothing beyond hosting.
Plan for a paid tier only when you need proxy bidding, soft close, silent or reverse auctions. Those start at $79 to $199 a year as of October 2026. Test the whole flow once before real bidders arrive.
Frequently Asked Questions (FAQs)
Q1. Is there a free WordPress auction plugin?
Yes. Ultimate Auction for WooCommerce is free on WordPress.org and runs standard auctions with a reserve price and Buy Now option. Proxy bidding, silent and reverse auctions need a paid plan from the vendor.
Q2. Do bidders need an account to bid?
Yes. On our test store a logged-out visitor saw “Please Login/Register to place your bid or buy the product.” The bid form only worked for logged-in customers.
Q3. What is a reserve price and where do I set it?
A reserve price is the lowest price you will accept for the item. In the plugin you set it in the Lowest Price to Accept field on the auction product. Bidders see a notice until the bidding reaches it.
Q4. Can I run a silent or reverse auction?
Yes. Only the vendor’s Unlimited plan at $199 a year runs them as of October 2026. The free plugin shows both options as Pro features and does not run them.
Q5. Can I create an auction website without WooCommerce?
The plugin we tested needs WooCommerce. The same author lists a separate plugin called Ultimate WordPress Auction on WordPress.org for sites without a store.
Q6. Who closes the auction when the timer ends?
The plugin does, through a scheduler that checks every 2 minutes by default. You can change the interval under Auctions > Settings. In our test the ended auction closed a few minutes after its end time.