The WordPress block editor is the default editor for posts and pages in WordPress. A beginner can learn its basics in about 30 minutes. Everything you write is built from blocks that you add, move and style one at a time.
This guide was tested on a fresh WordPress 7.1.3 site in October 2026. Every menu name, button and shortcut was checked against the official WordPress documentation. Where the live screen differs from older tutorials, the post says so.
You will learn where the editor lives, how to add and style blocks, and how patterns save time. You also get the changes that arrived in WordPress 7.0 and 7.1, plus a short guide to switching back to the Classic Editor.
What Is the WordPress Block Editor?
The WordPress block editor is the visual editor that builds posts and pages from blocks. The WordPress documentation says it became the default in WordPress 5.0 in December 2018, and many people still call it the Gutenberg editor. Each paragraph, image, heading and button is its own block that you edit on its own.
Three names point to the same screen. “WordPress editor”, “block editor” and “Gutenberg editor” all mean the writing screen you open from Posts or Pages. Gutenberg was the name of the project that built it.
A block is one piece of content with its own settings. A paragraph block has font size and color controls, while an image block has size and alt text controls. Because each block is separate, you can move a heading without touching the paragraph under it.
The same blocks also power full site editing. On a block theme, you use them to build headers, footers and templates in the Site Editor, which opens from Appearance > Editor. This guide stays with posts and pages, but the skills carry over.
How Is the Block Editor Different From Full Site Editing?
The block editor edits the content of one post or page, while full site editing edits the layout of the whole site. Full site editing runs on block themes through Appearance > Editor, where the same blocks build headers, footers and templates.
Classic themes keep those parts in theme files and the Customizer, so they do not offer full site editing. You can still write every post and page in the block editor on a classic theme.
Note: Page builders such as Elementor load their own editing screen. The block editor ships inside WordPress itself, so it needs no plugin. If you are weighing it against a full builder, our roundup of the best WordPress AI website builders covers the alternatives.
Where Is the Block Editor in WordPress?
The block editor opens when you go to Posts > Add New or Pages > Add New in the WordPress dashboard. It also opens when you click Edit on any existing post or page. No plugin or setting is needed, because the editor is built into WordPress.
The WordPress documentation says the editor opens in fullscreen mode by default. The workspace has three parts: the top toolbar, the content area, and the sidebar that holds post and block settings.
On the 7.1.3 test site, the black admin toolbar stayed visible above the editor, and the first button on the left was a back arrow. Older guides describe a W logo in that spot, so do not worry if your screen looks slightly different from a tutorial written before 2026.
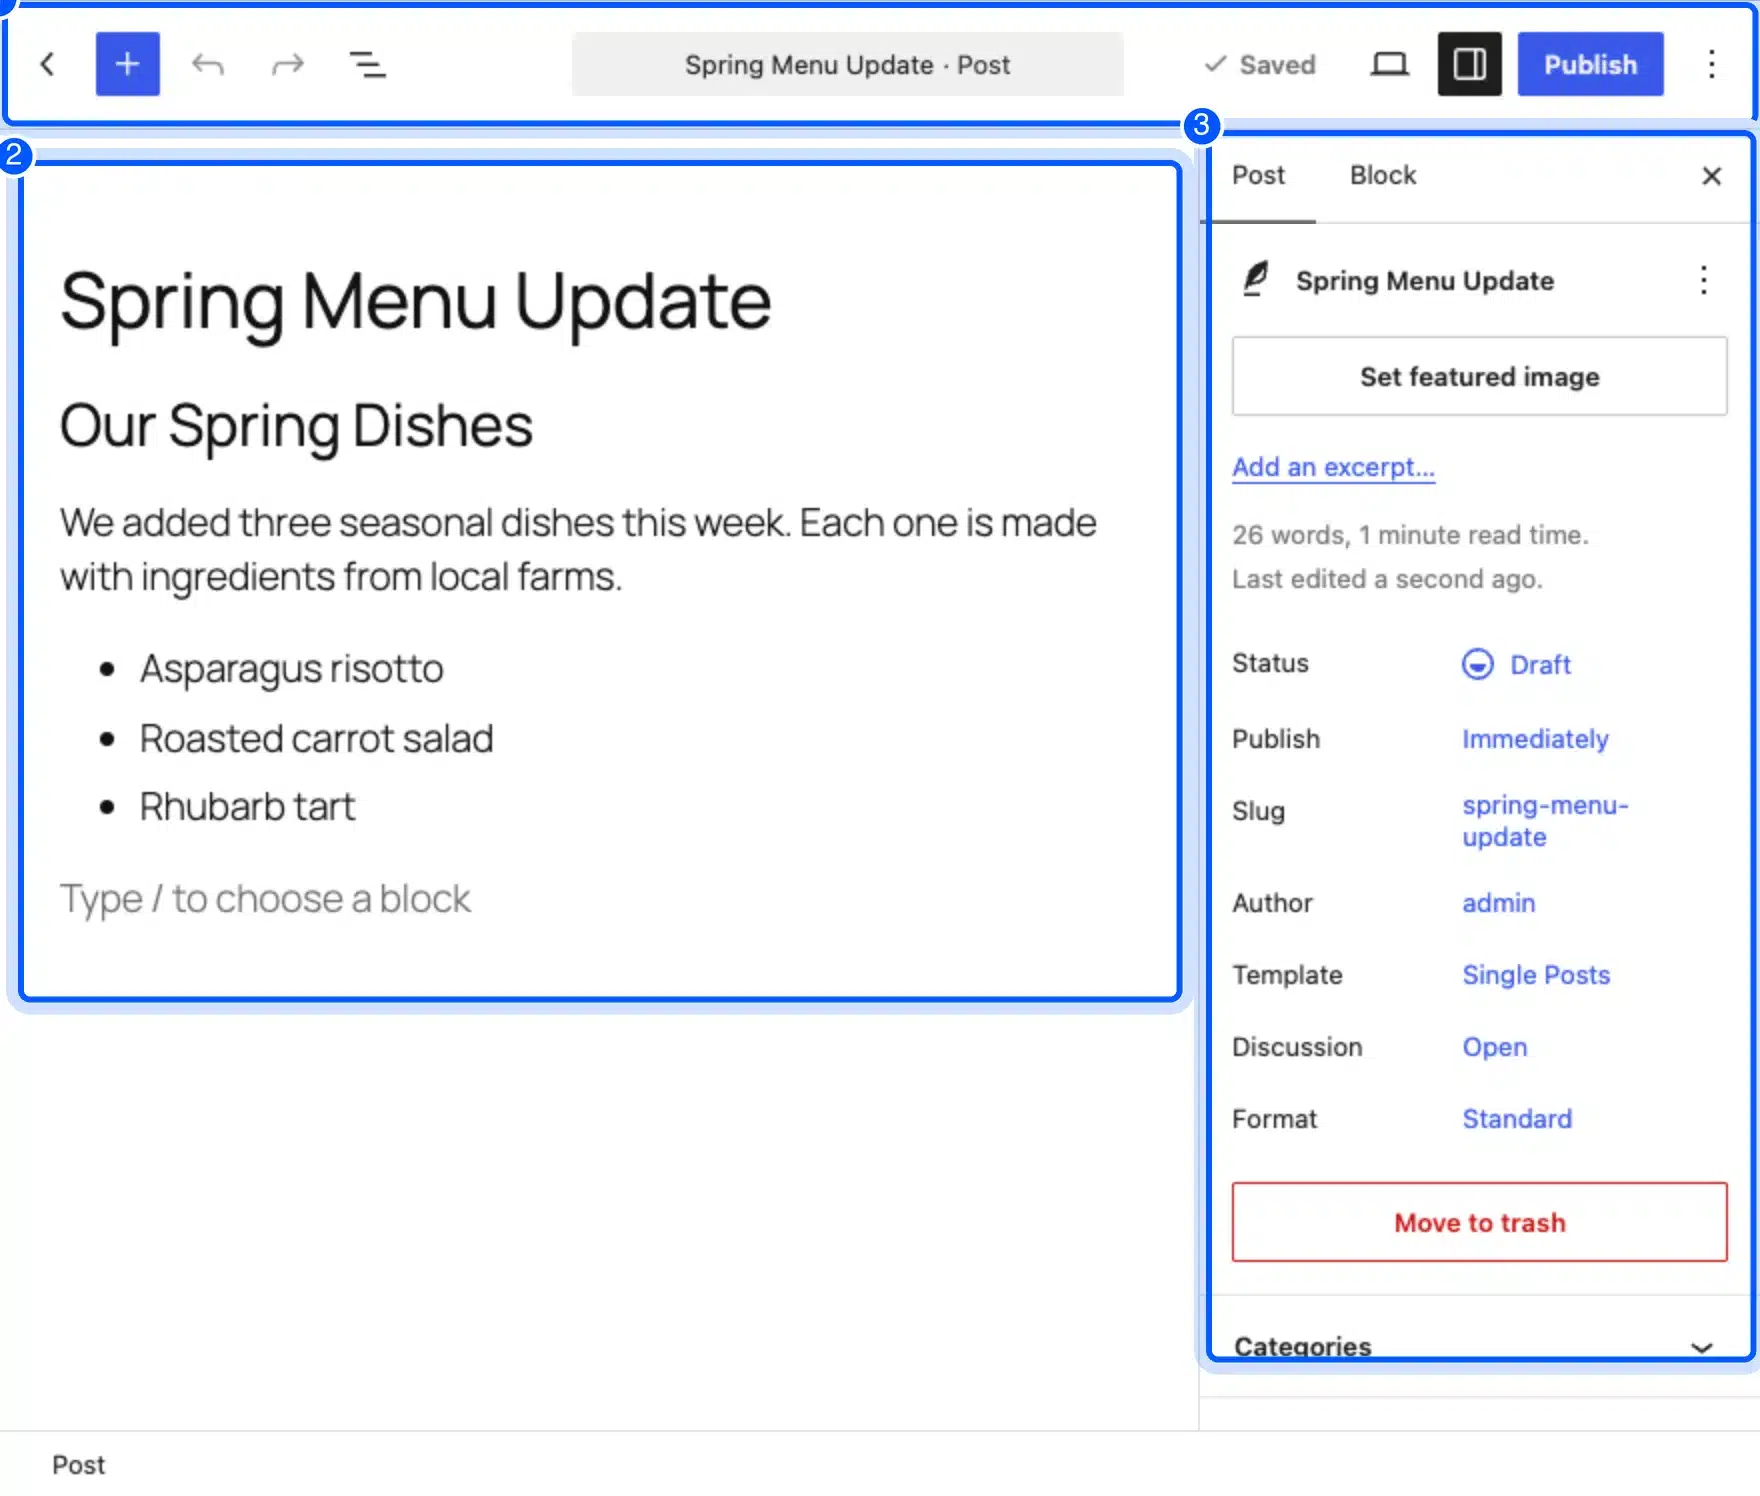
The numbered boxes mark the top toolbar (1), the content area (2) and the sidebar (3).
No site yet? Start with our guide on how to create a WordPress site from scratch. Then come back here when you write your first post.
How to Use the WordPress Block Editor: The Editor Screen
To use the WordPress block editor, learn the nine controls in the top toolbar first. They add blocks, undo mistakes, show the page structure, save your work and publish. Everything else in the editor sits inside the content area or the sidebar.
The table below lists each control with the label it carries on WordPress 7.1.3. The names follow the official block editor guide, and the wording differs slightly from older tutorials.
| Control | What it does |
|---|---|
| Back arrow | Leaves the editor and returns to the Posts or Pages list. |
| Block Inserter (blue plus) | Opens the list of blocks, patterns and media. |
| Undo and Redo | Reverses or restores your last change. |
| Document Overview | Shows the List View and Outline tabs. |
| Title bar | Opens the command palette, also reached with Cmd+K or Ctrl+K. |
| Save draft or Saved | Stores a draft without publishing. |
| View | Previews the page with your current changes. |
| Settings | Shows or hides the sidebar. |
| Publish | Makes the post or page public. |
The sidebar has two tabs. The Post tab holds the status, publish date, slug, author, featured image and categories. The Block tab shows the settings of whichever block you selected.
Tip: The Post tab also shows a word count and a read time. On the test post, 26 words showed as a one minute read, which is a quick way to check length before you publish.
How to Add a Block in the WordPress Block Editor
You can add a block with the blue plus button, the slash command or the inline plus icon. All three open the same block list, so pick the one that suits how you work. A new block appears at your cursor position, whichever route you choose.
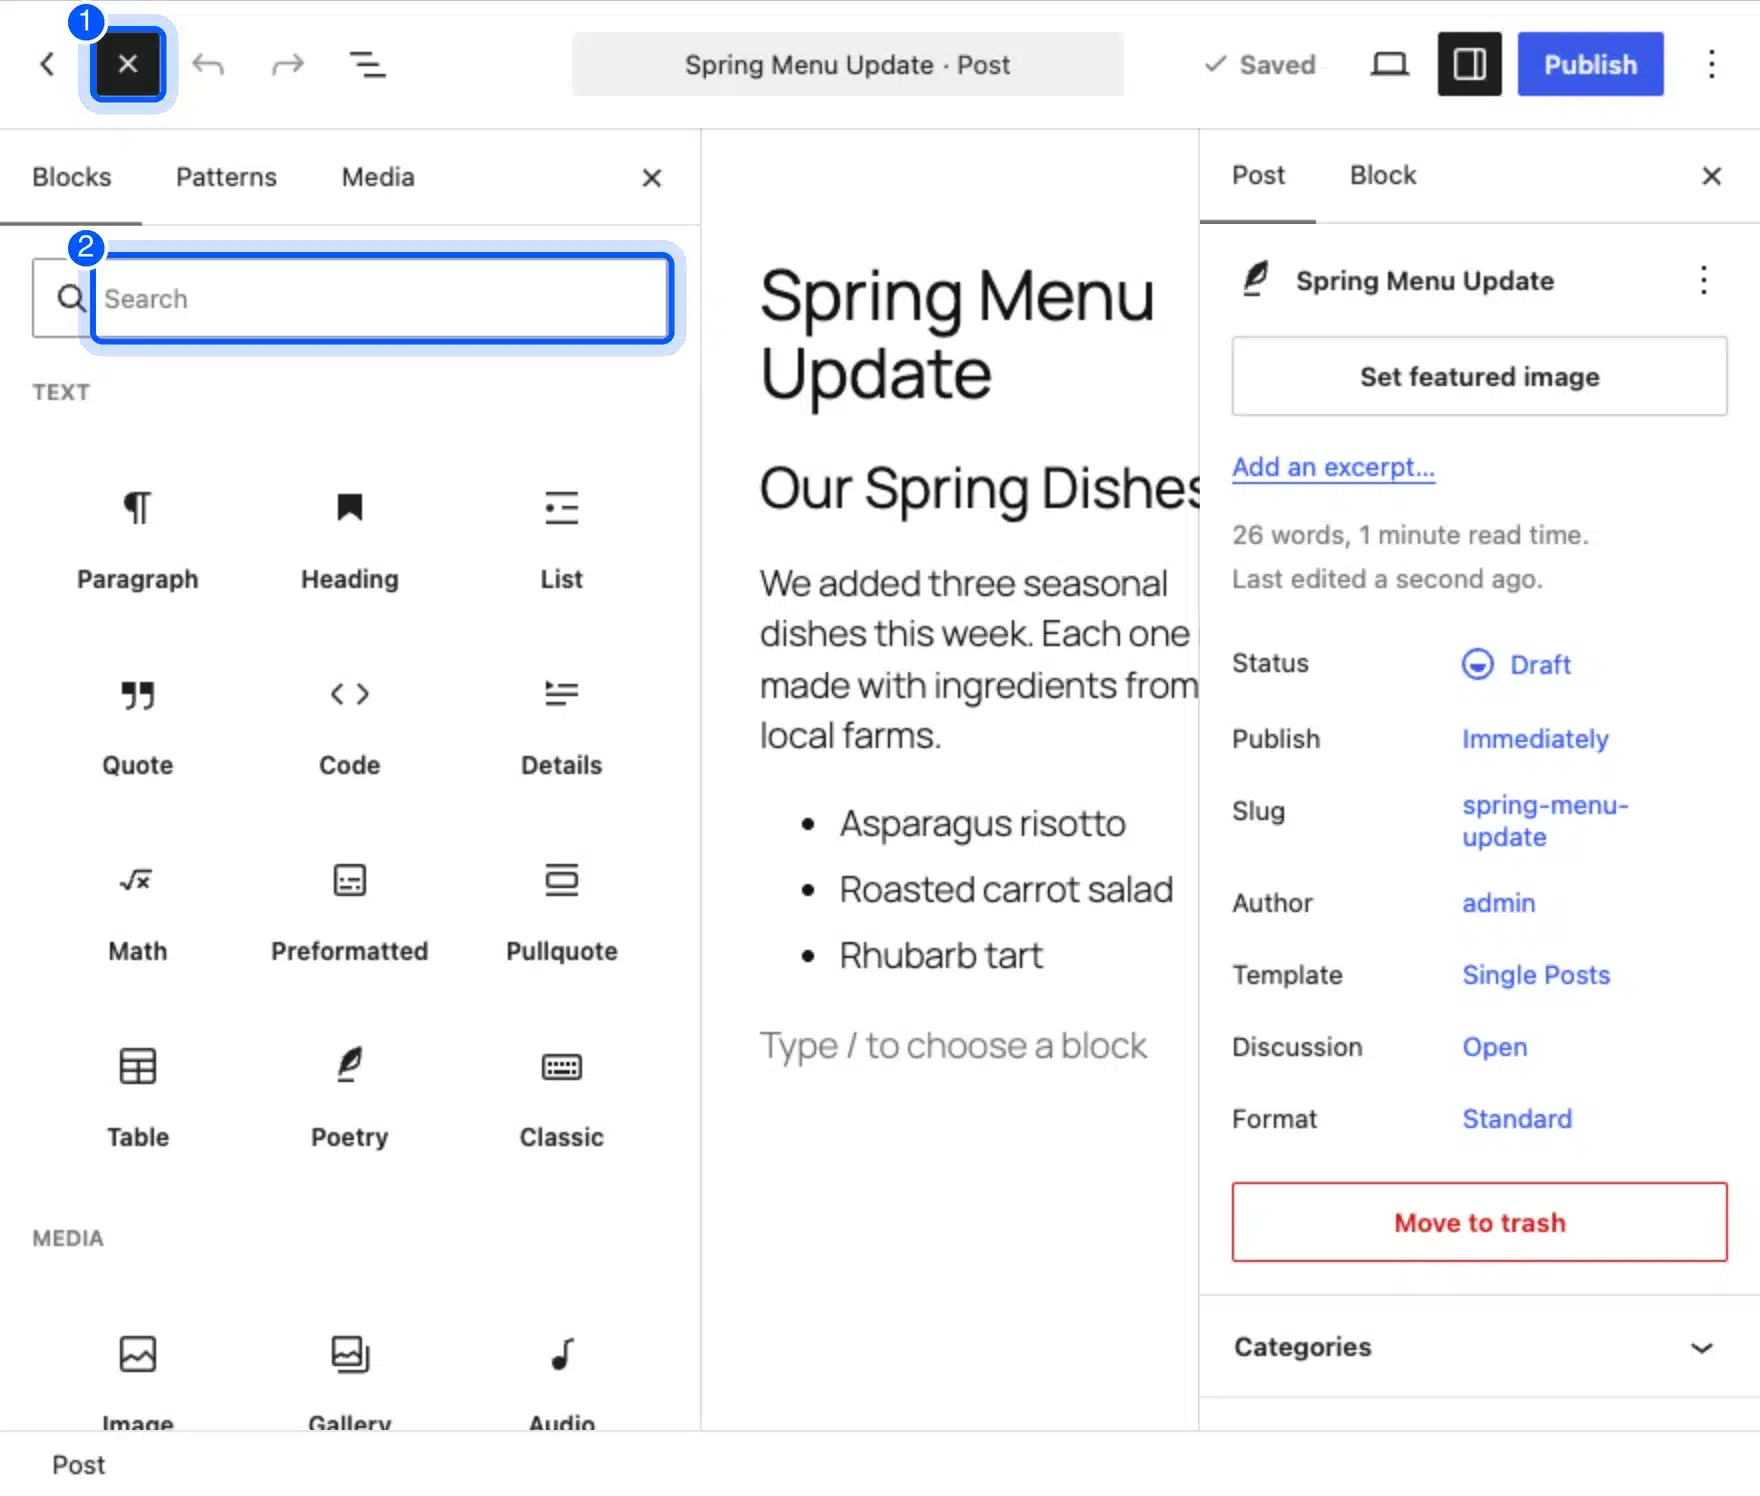
- Use the Block Inserter: Click the blue plus button at the top left, then type the block name in the search box and click the block.
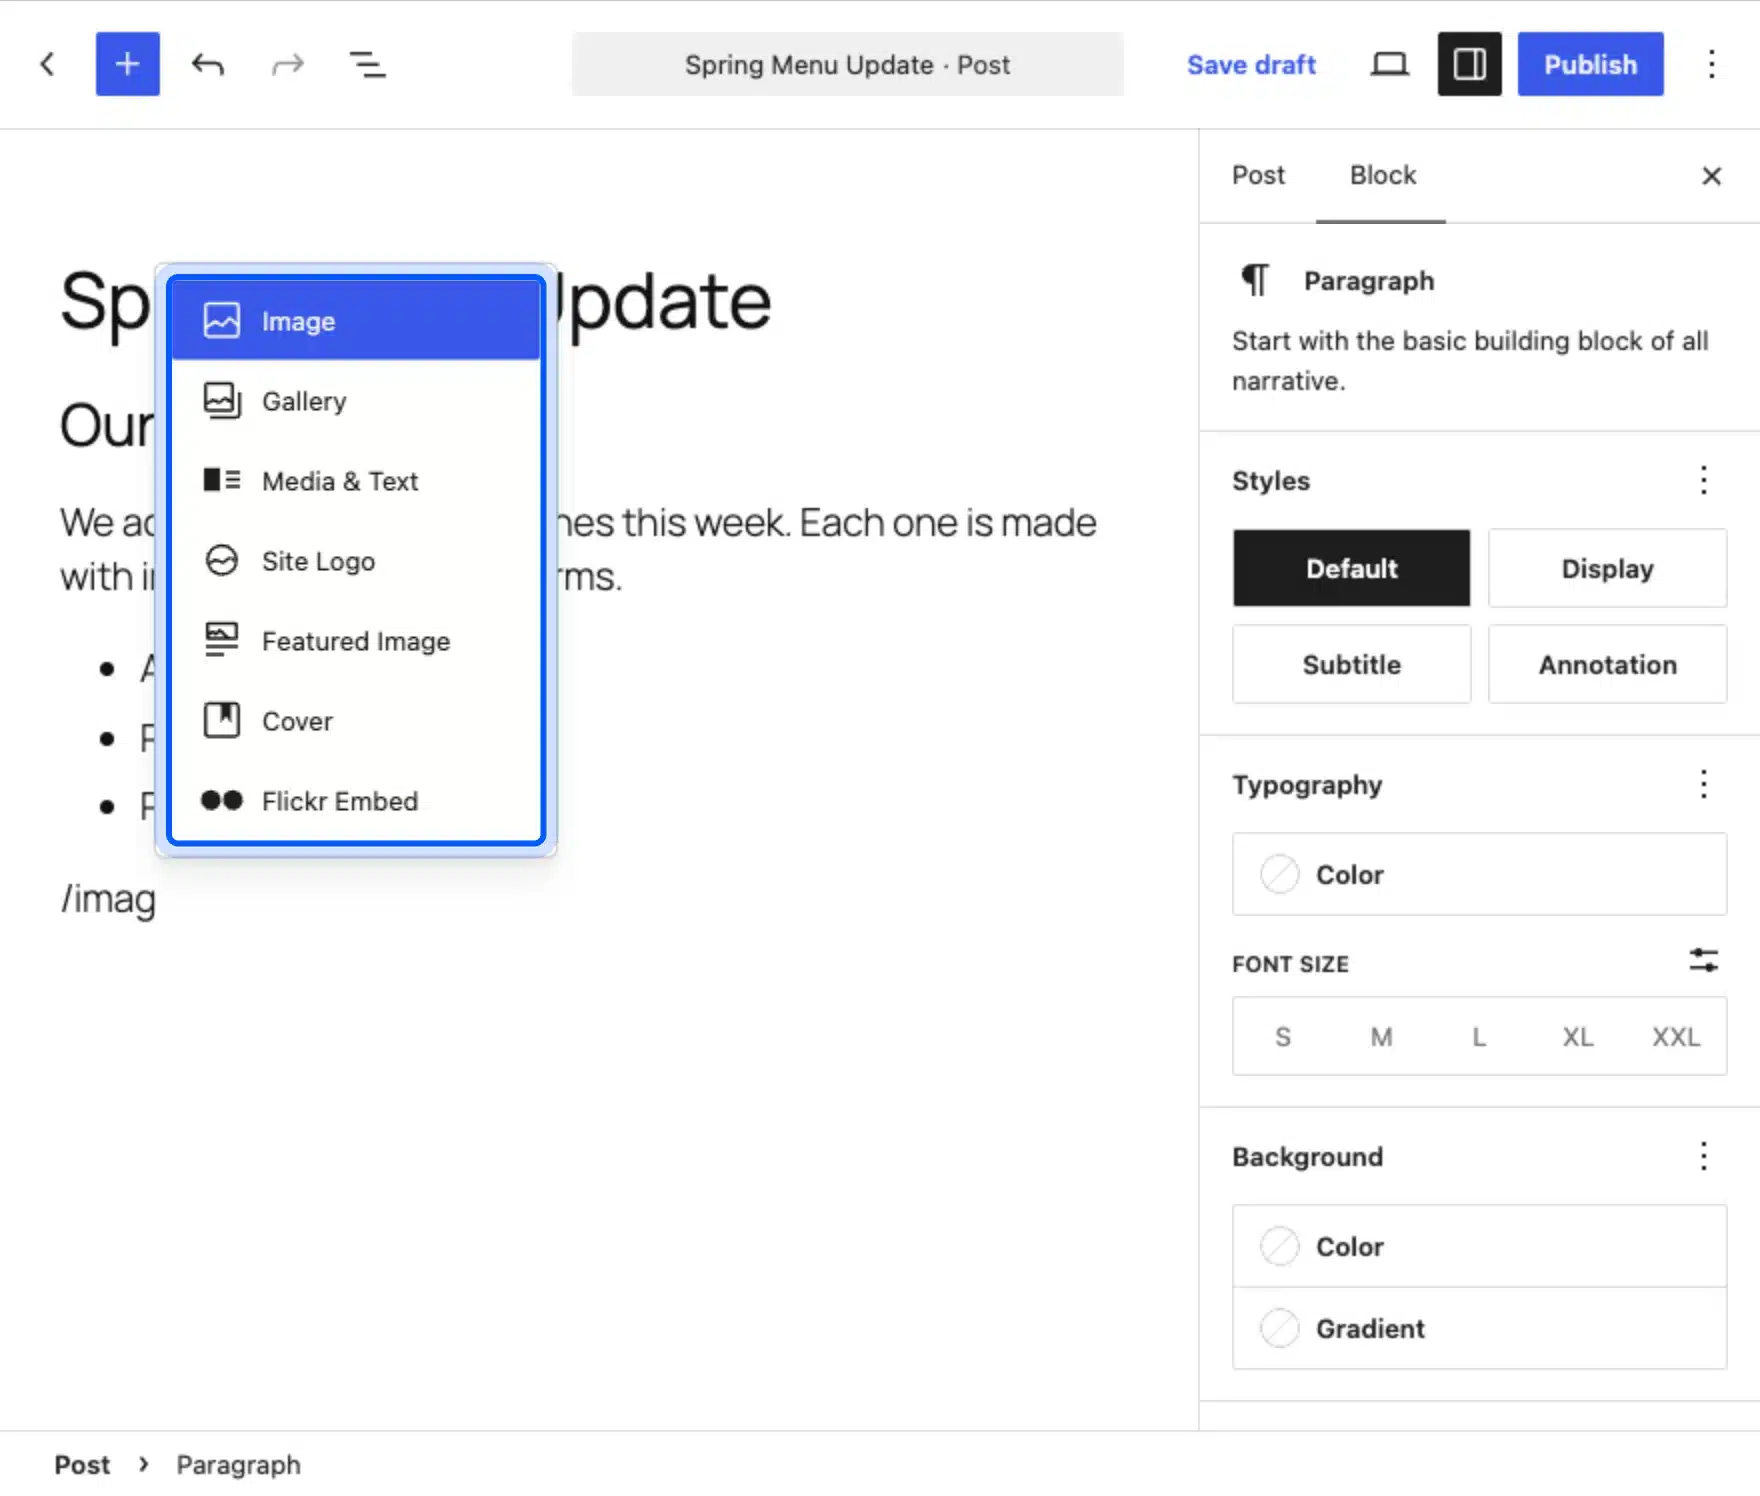
- Type a slash: Start a new line, type
/followed by the block name such as/image, and press Enter to insert it. - Click the inline plus: Click the small plus icon at the right of an empty paragraph to open the same list.
The Block Inserter has three tabs: Blocks, Patterns and Media. The Blocks tab groups items under headings such as Text and Media. On the test site, the Text group listed Paragraph, Heading, List, Quote, Code, Details, Math, Preformatted, Pullquote, Table, Poetry and Classic.
The slash command is faster once you know the block names. After typing /imag on the test site, the list showed Image first. Gallery, Media & Text, Site Logo, Featured Image, Cover and an embed block followed it.
How to Edit, Move and Style a Block
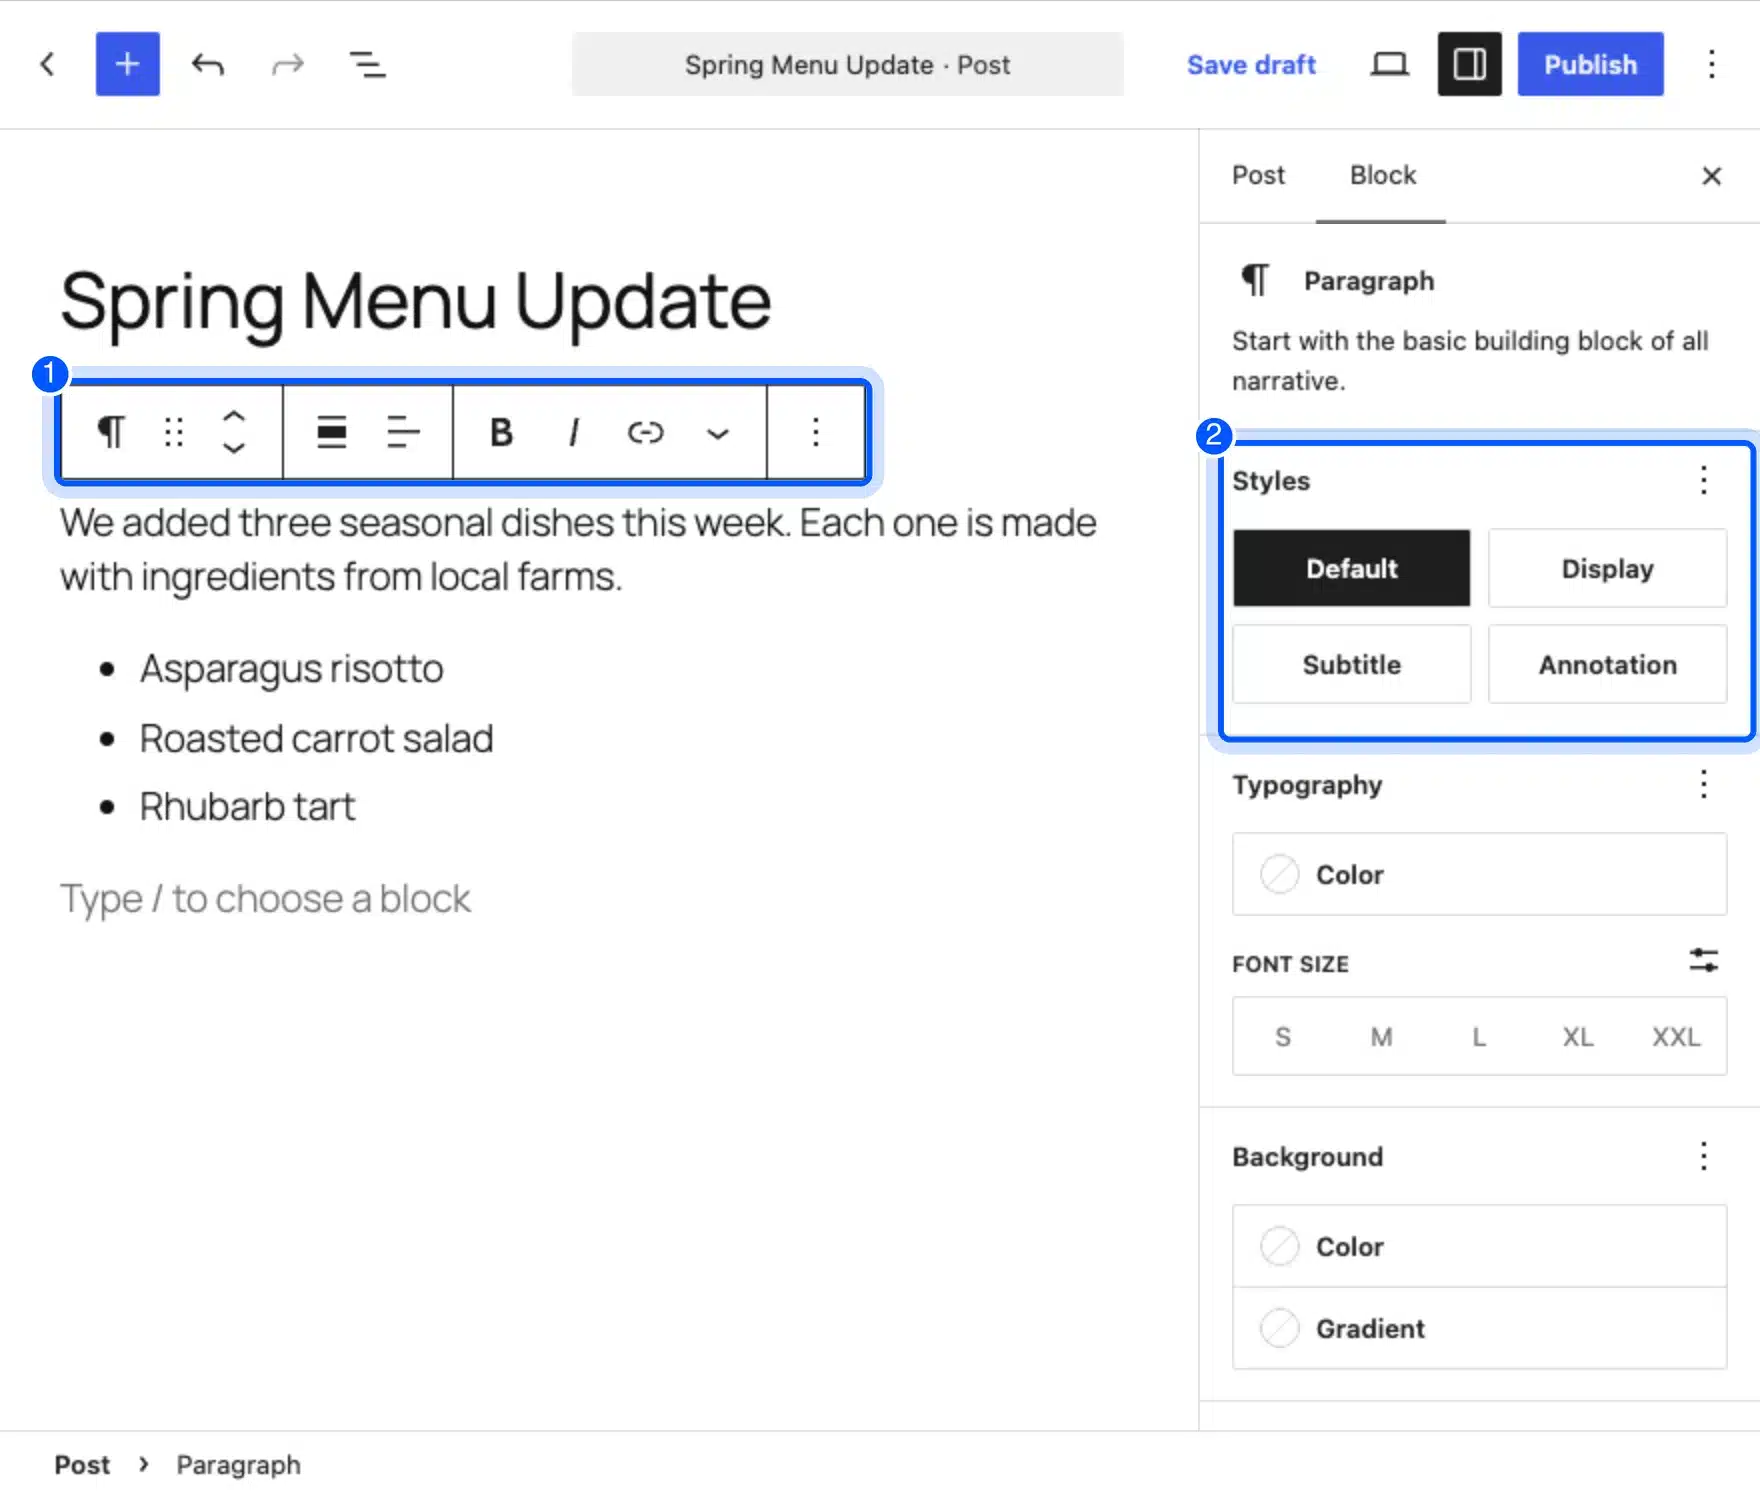
To edit a block, click it. A small toolbar appears above it, and the Block tab in the sidebar fills with that block’s settings. You change text directly on the page, and you change size, color and spacing in the sidebar.
The block toolbar holds the controls you use most. From the left it shows the block type, a drag handle and move arrows. Next come alignment, bold, italic and link buttons, a menu of more text options, and a three-dot menu for block actions.
Drag the handle or click the arrows to move a block. The keyboard shortcuts page also lists Ctrl+Shift+Alt+T to move a block up and Ctrl+Shift+Alt+Y to move it down on Windows.
In the Block tab of a paragraph on WordPress 7.1.3, the first panel is Styles with four choices: Default, Display, Subtitle and Annotation. Below it sit Typography, with a color field and font sizes from S to XXL, and then Background and other panels.
The three-dot menu in the block toolbar holds the actions that change a block as a whole. On the test site it listed Copy, Cut, Duplicate, Add before, Add after, Add note, Copy styles, Paste styles, Group, Lock, Rename and Hide.
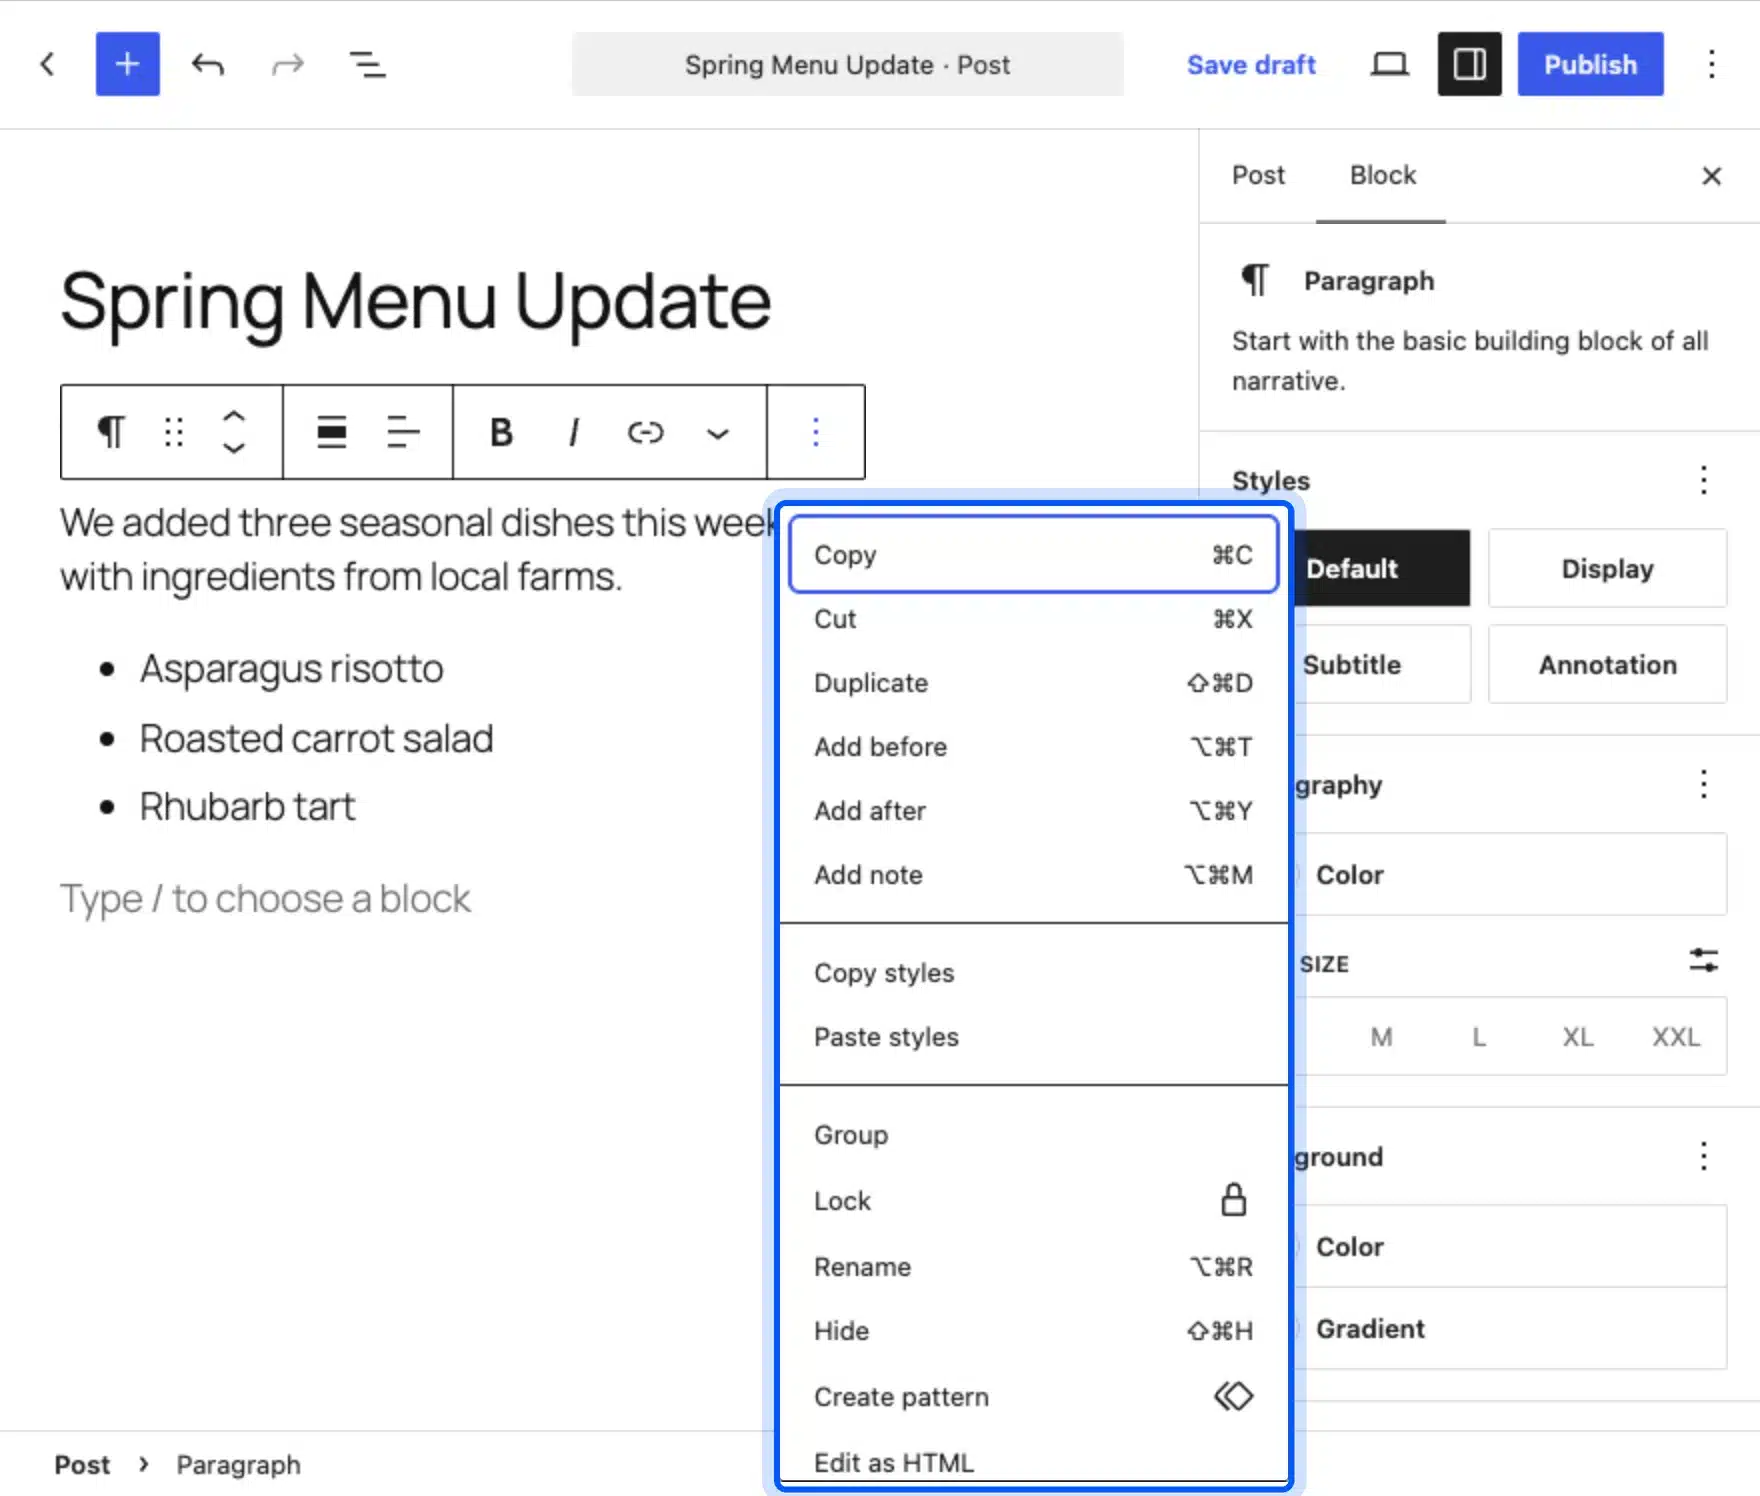
- Duplicate: Copies the block right below the original, which is useful for repeated layouts.
- Group: Wraps blocks in a container so you can give them one background or spacing.
- Lock: Stops you or a teammate from moving or deleting the block by accident.
- Copy styles and Paste styles: Move the look of one block to another block of the same type.
The Blocks Beginners Use Most
Most posts need only about ten blocks to look finished. Paragraph, Heading, List, Image, Quote and Table cover plain articles, while Group, Cover, Columns and Buttons handle page layouts. Learn these ten first and ignore the rest until a post asks for something more.
| Block | Best use | One thing to know |
|---|---|---|
| Paragraph | Body text | Press Enter for a new paragraph block. |
| Heading | Section titles | Choose H2 for sections and H3 for sub-sections. |
| List | Steps and bullet points | Switch between ordered and unordered in the toolbar. |
| Image | Photos and screenshots | Add alt text in the Block tab for accessibility. |
| Quote | Testimonials and cited text | Add the source in the citation field. |
| Table | Comparisons | Set the number of rows and columns when you insert it. |
| Details | Collapsible answers | Good for short FAQ lists. |
| Cover | Banners with text on an image | Needs a bright or dark overlay for readable text. |
| Group | Grouping blocks | Lets you set one background for everything inside. |
| Columns | Side-by-side layouts | Stack automatically on small screens. |
Our guide on how to add bullet points in WordPress shows the List block in detail. For images, read how to add alt tags to images in WordPress. The Image block has an alt text field that is easy to skip.
How to Use List View and the Outline
List View is a panel that shows every block on the page as a nested list. You open it with the Document Overview button, which is the third icon from the left in the top toolbar. It is the fastest way to find and select a block in a long post.
According to the documentation, Document Overview has two tabs. List View shows all the blocks. Outline shows the character and word count, the reading time and the heading structure.
On the test post, List View showed the heading, the paragraph, the list and the empty paragraph as four rows. Clicking a row selected that block on the page. Lists and groups carry a small arrow, so you can expand them and select a block nested inside.
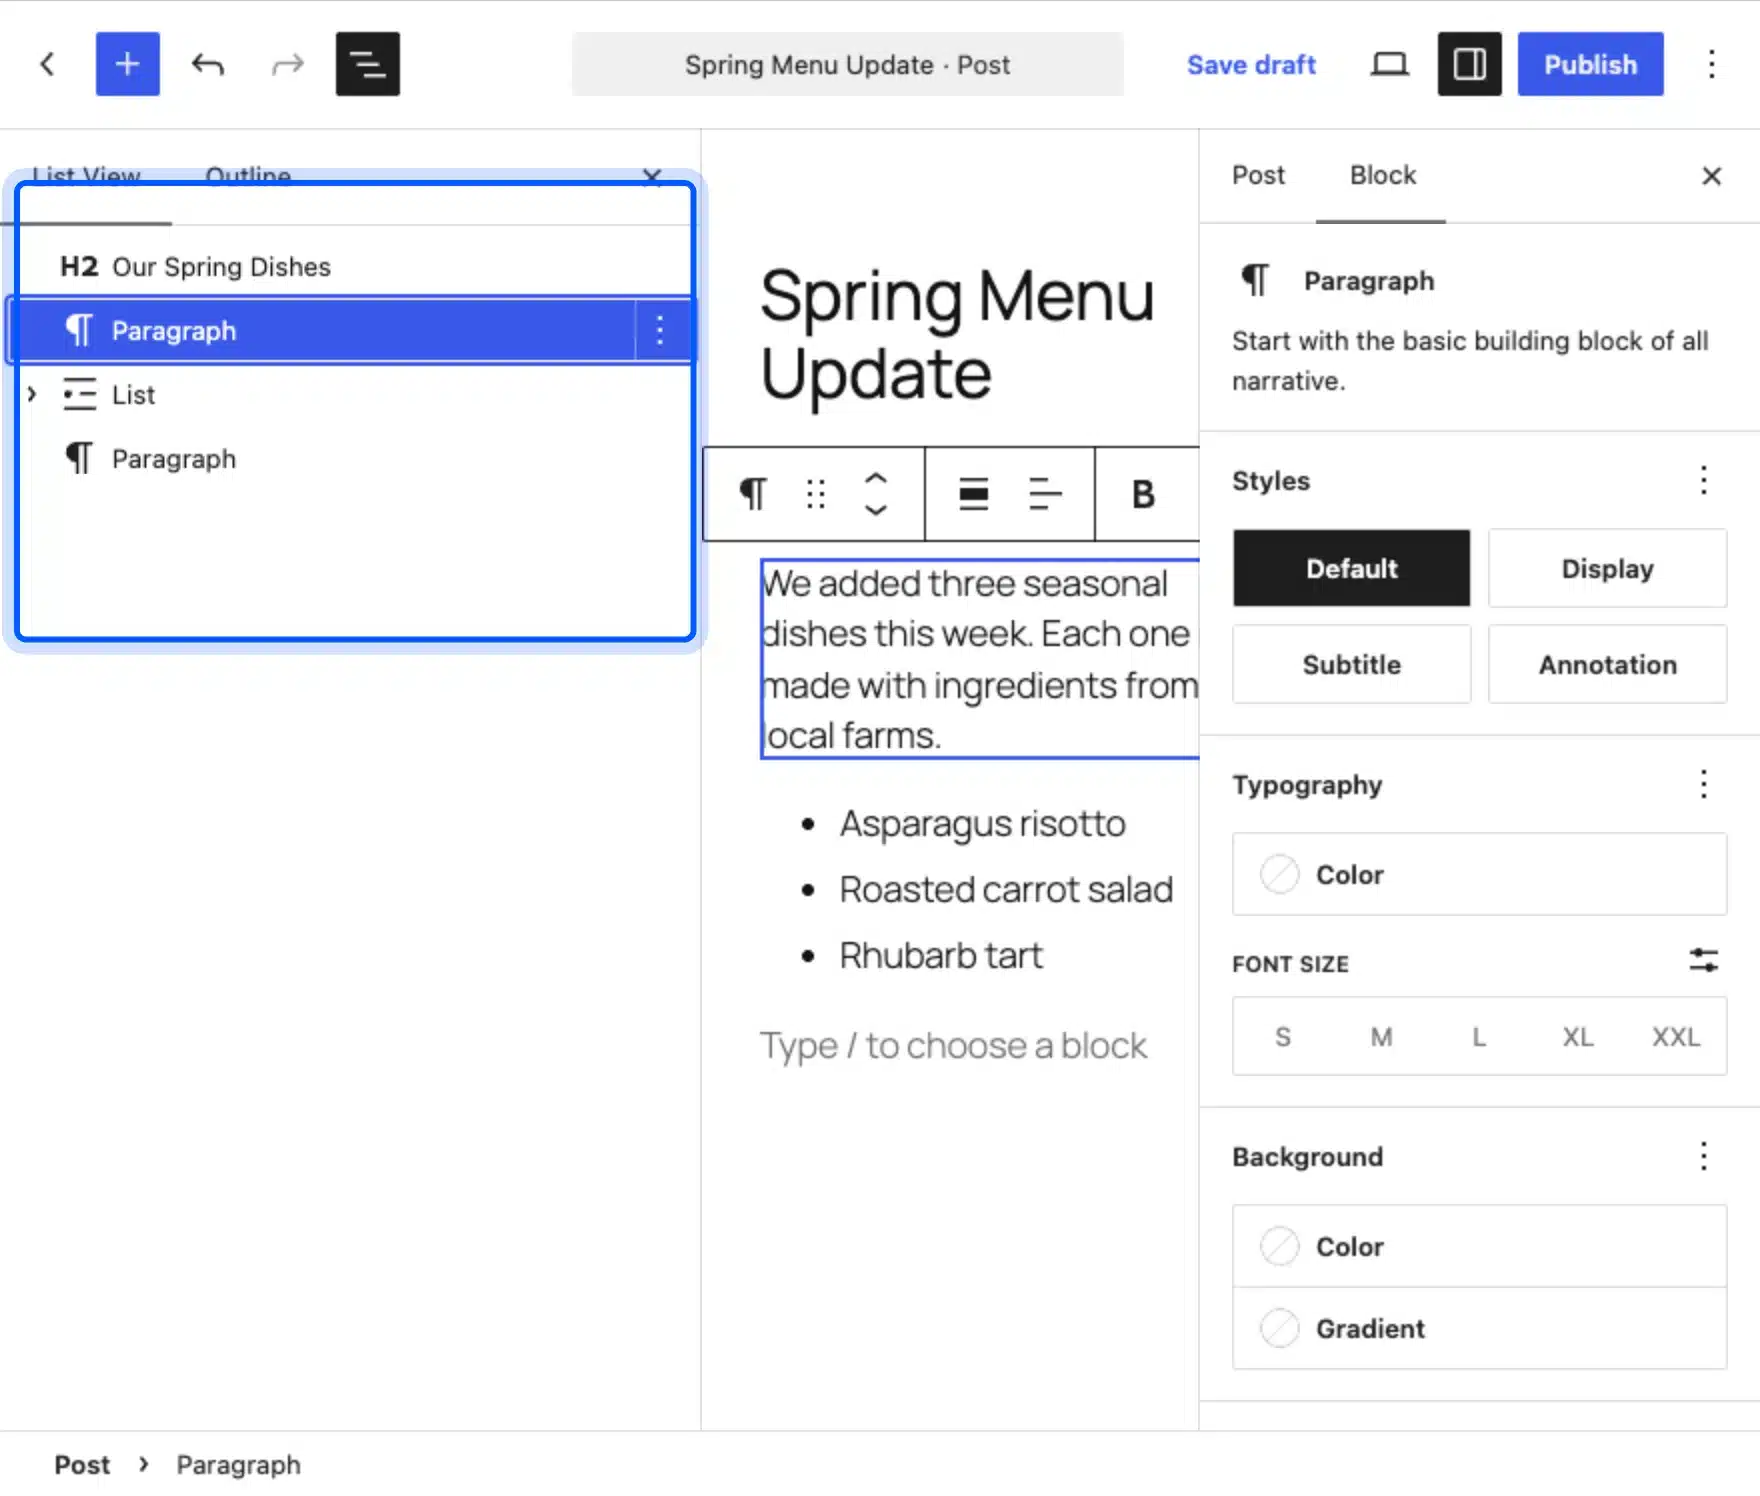
Use the Outline tab before you publish. It shows whether your headings follow a logical order, which also helps readers who use screen readers.
How to Use Block Patterns and Synced Patterns
A block pattern is a ready-made group of blocks that you insert and then edit. A synced pattern is a pattern you save yourself that stays linked, so a change in one place updates every copy. Use patterns for anything you build more than once.
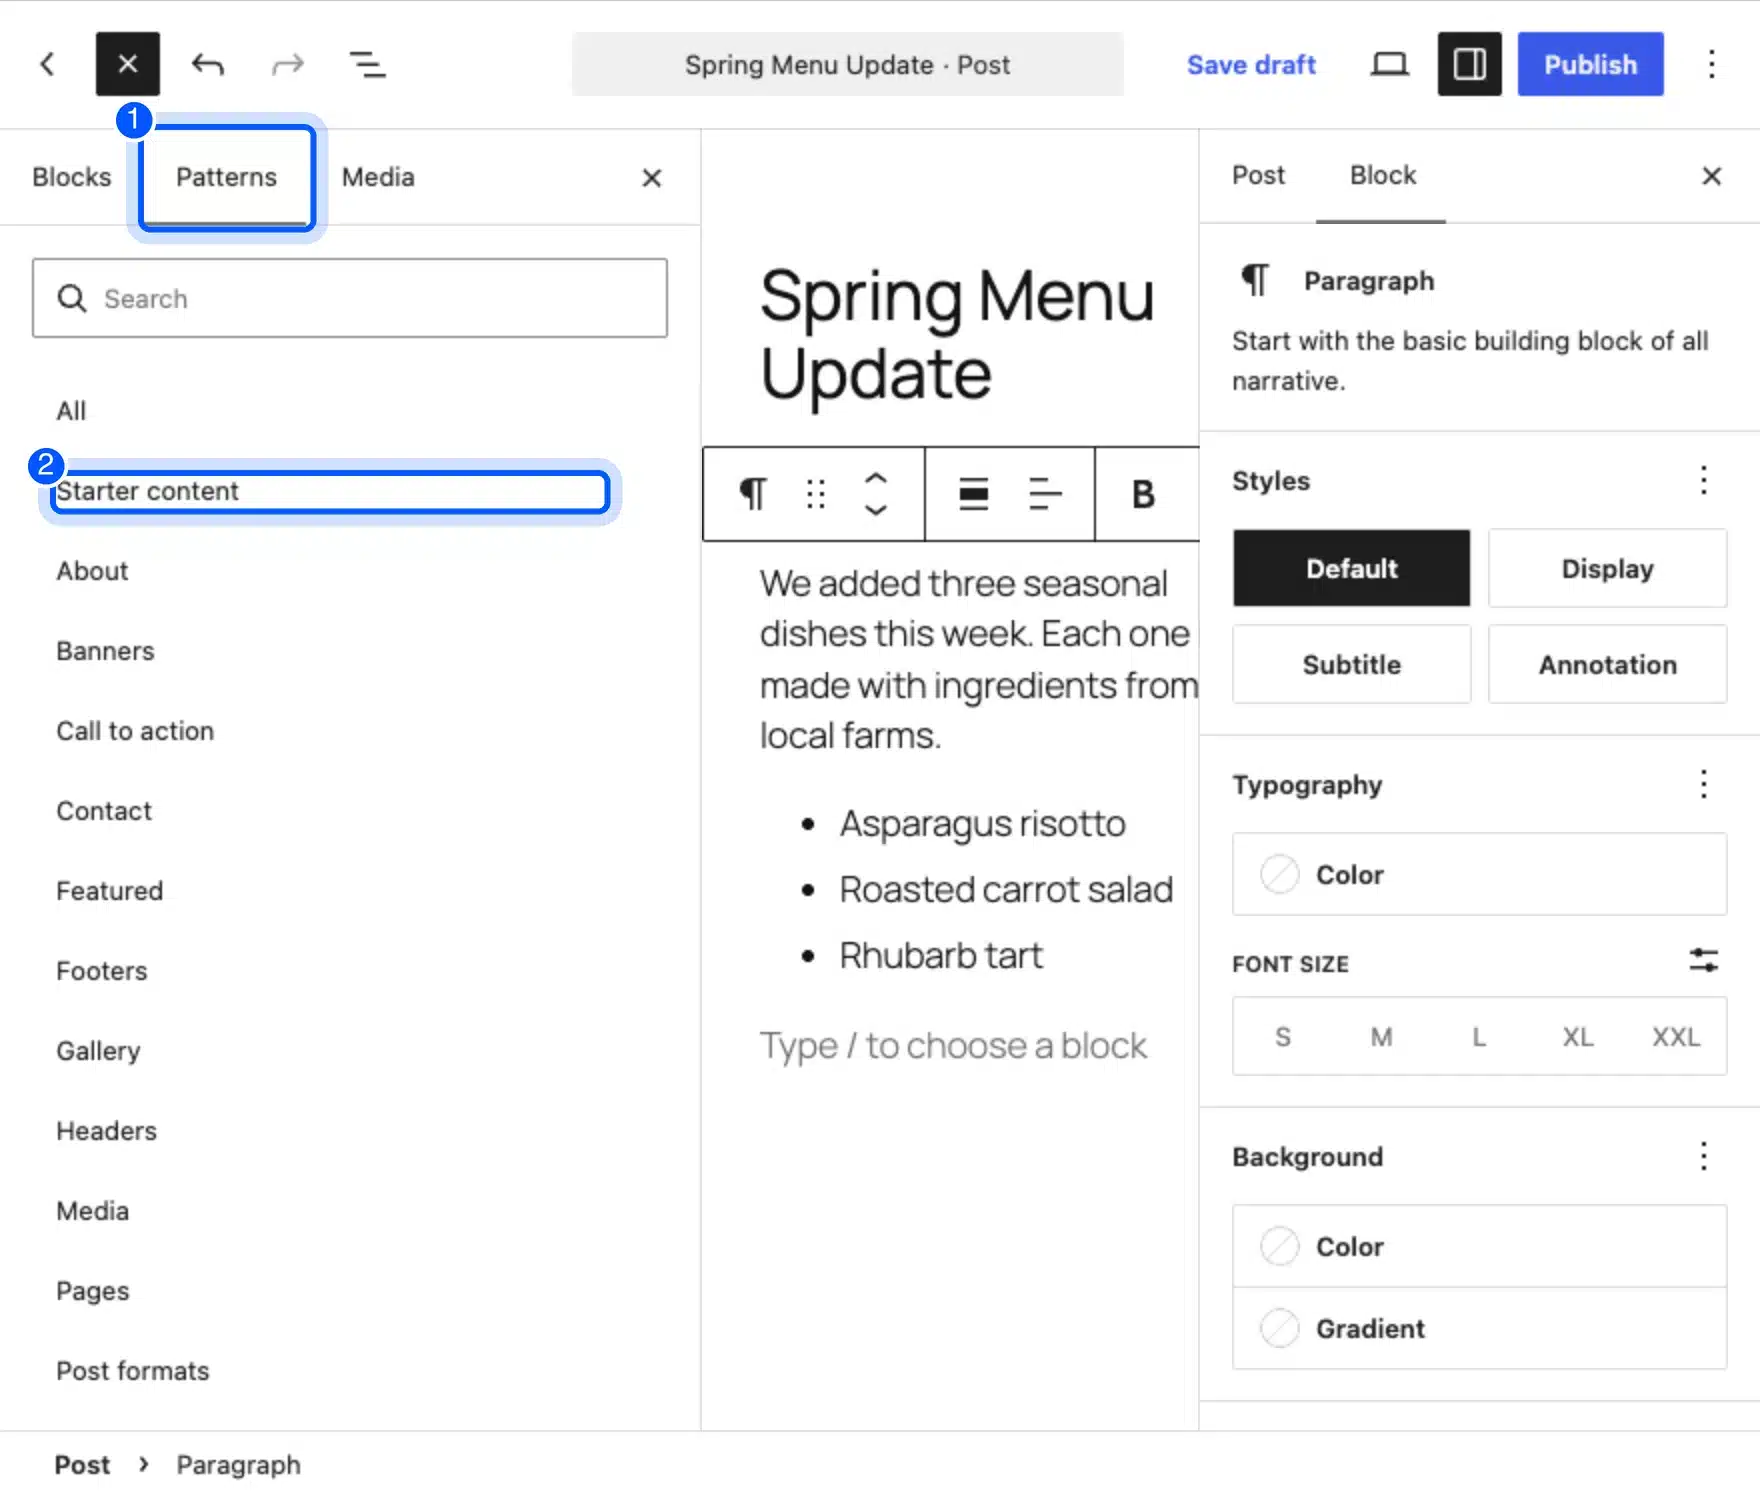
To insert a pattern, open the Block Inserter, click the Patterns tab and pick a category. On the test site, the categories included All, Starter content, About, Banners, Call to action, Contact, Featured, Footers, Gallery and Headers. The pattern documentation says a click inserts the pattern where your cursor is.
To save your own pattern, select the blocks, open the three-dot menu and click Create pattern. A dialog called Add Pattern asks for a name and optional categories, and it has a Synced switch. On WordPress 7.1.3 that switch was already on when the dialog opened.
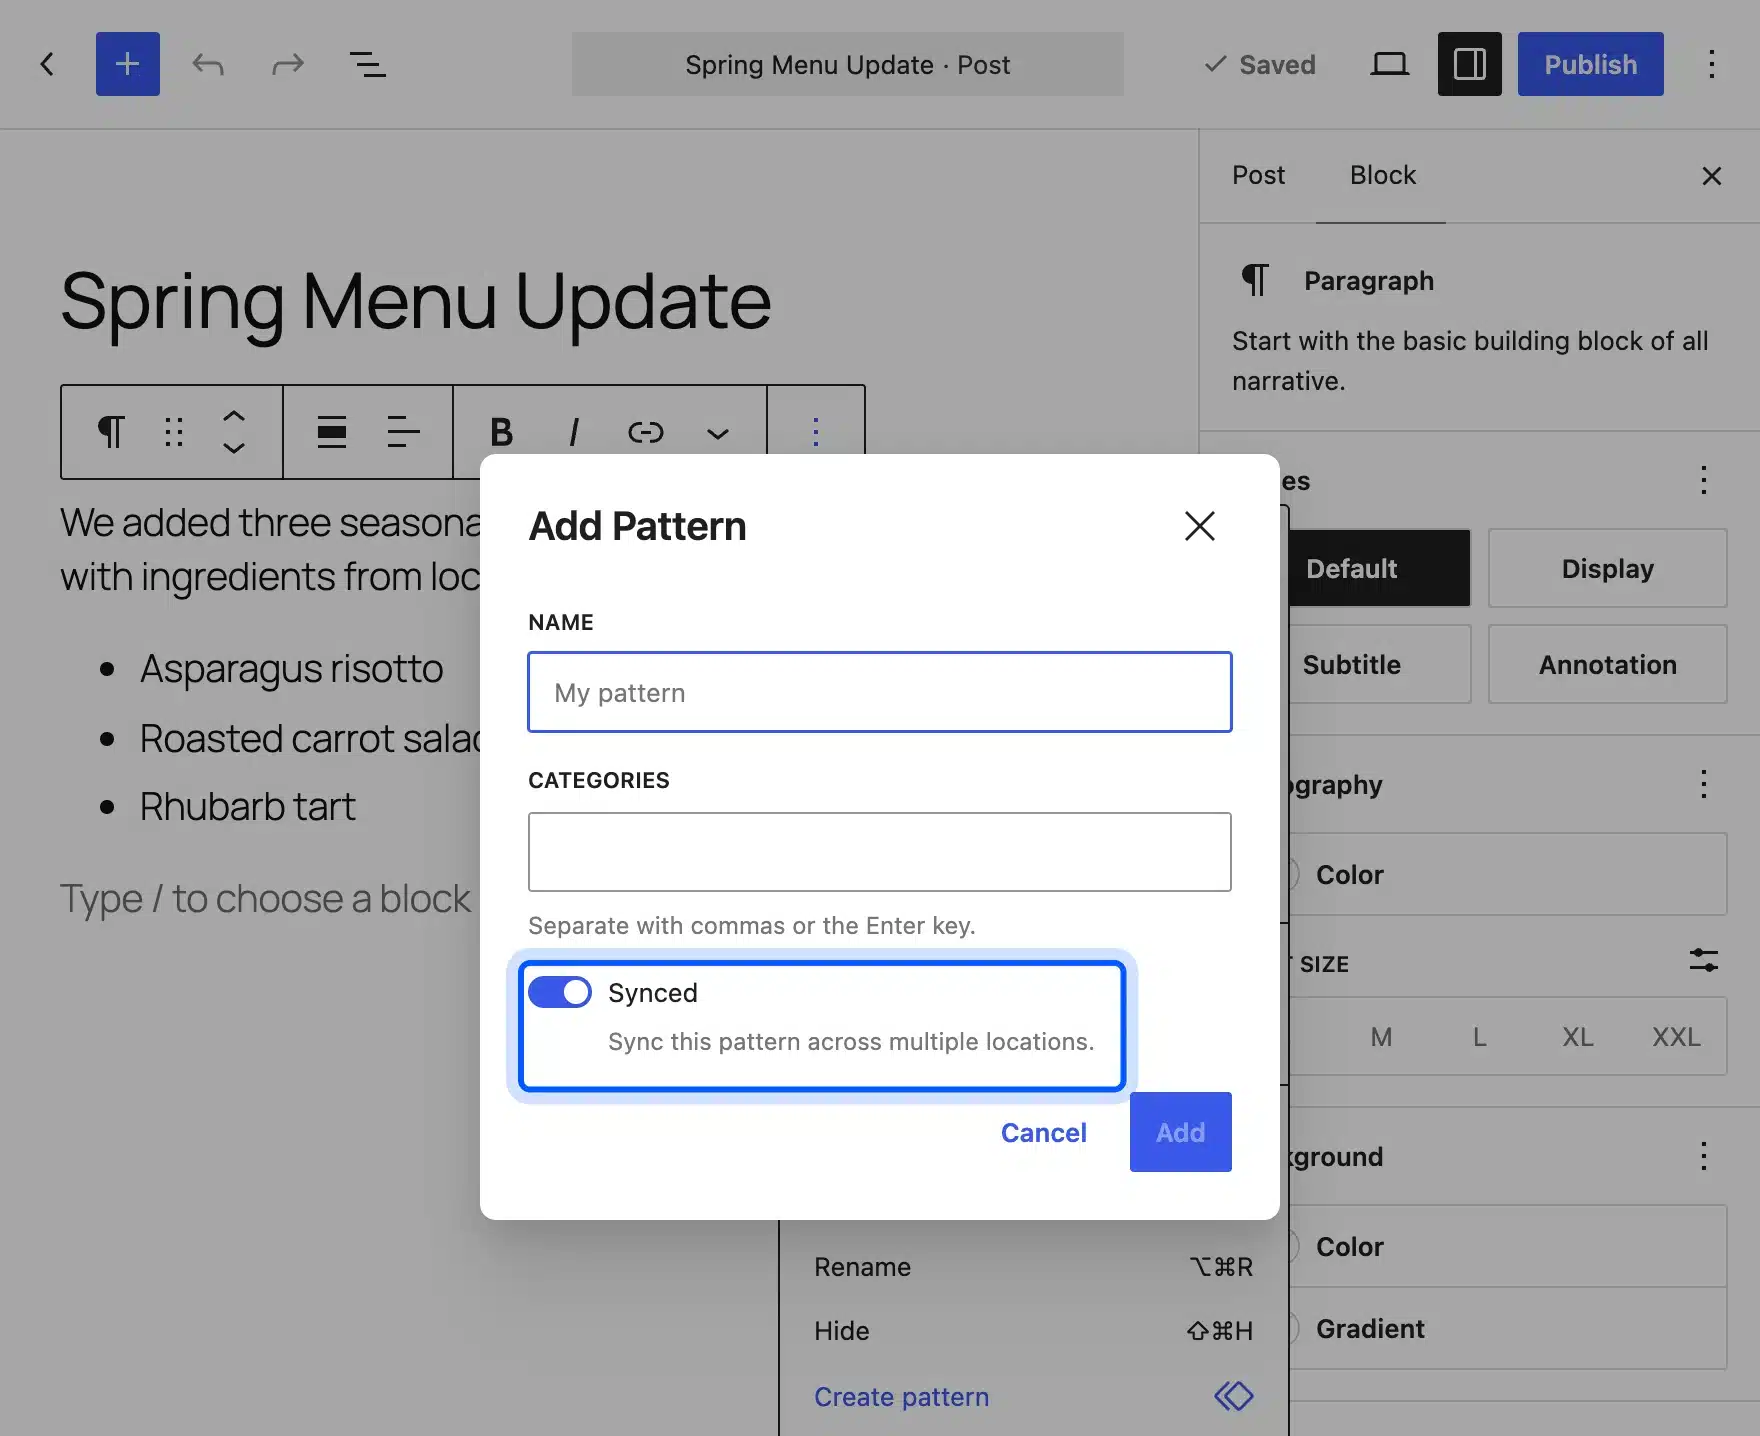
The documentation explains that WordPress 6.3 renamed Reusable Blocks to patterns, and that a synced pattern behaves exactly like a reusable block. Turn the switch off when you want a copy that you can change without affecting other pages.
Worth knowing: You can rename, duplicate, export or delete saved patterns from Options > Manage patterns in the editor. The same panel opens from Appearance > Editor > Patterns on a block theme.
How to Preview and Publish a Post in the Block Editor
To publish a post in the block editor, add a title, check the Post tab, preview the page, then click Publish and confirm. WordPress shows a pre-publish panel first, so you get one last look at the settings before the post goes live.
- Add the title and content: Type the title at the top and build the body with blocks.
- Fill in the Post tab: Set the featured image, categories, tags and excerpt in the sidebar.
- Click View: Preview the page with your current changes before anyone else can see them.
- Click Publish: Review the pre-publish panel, then click Publish again to confirm.
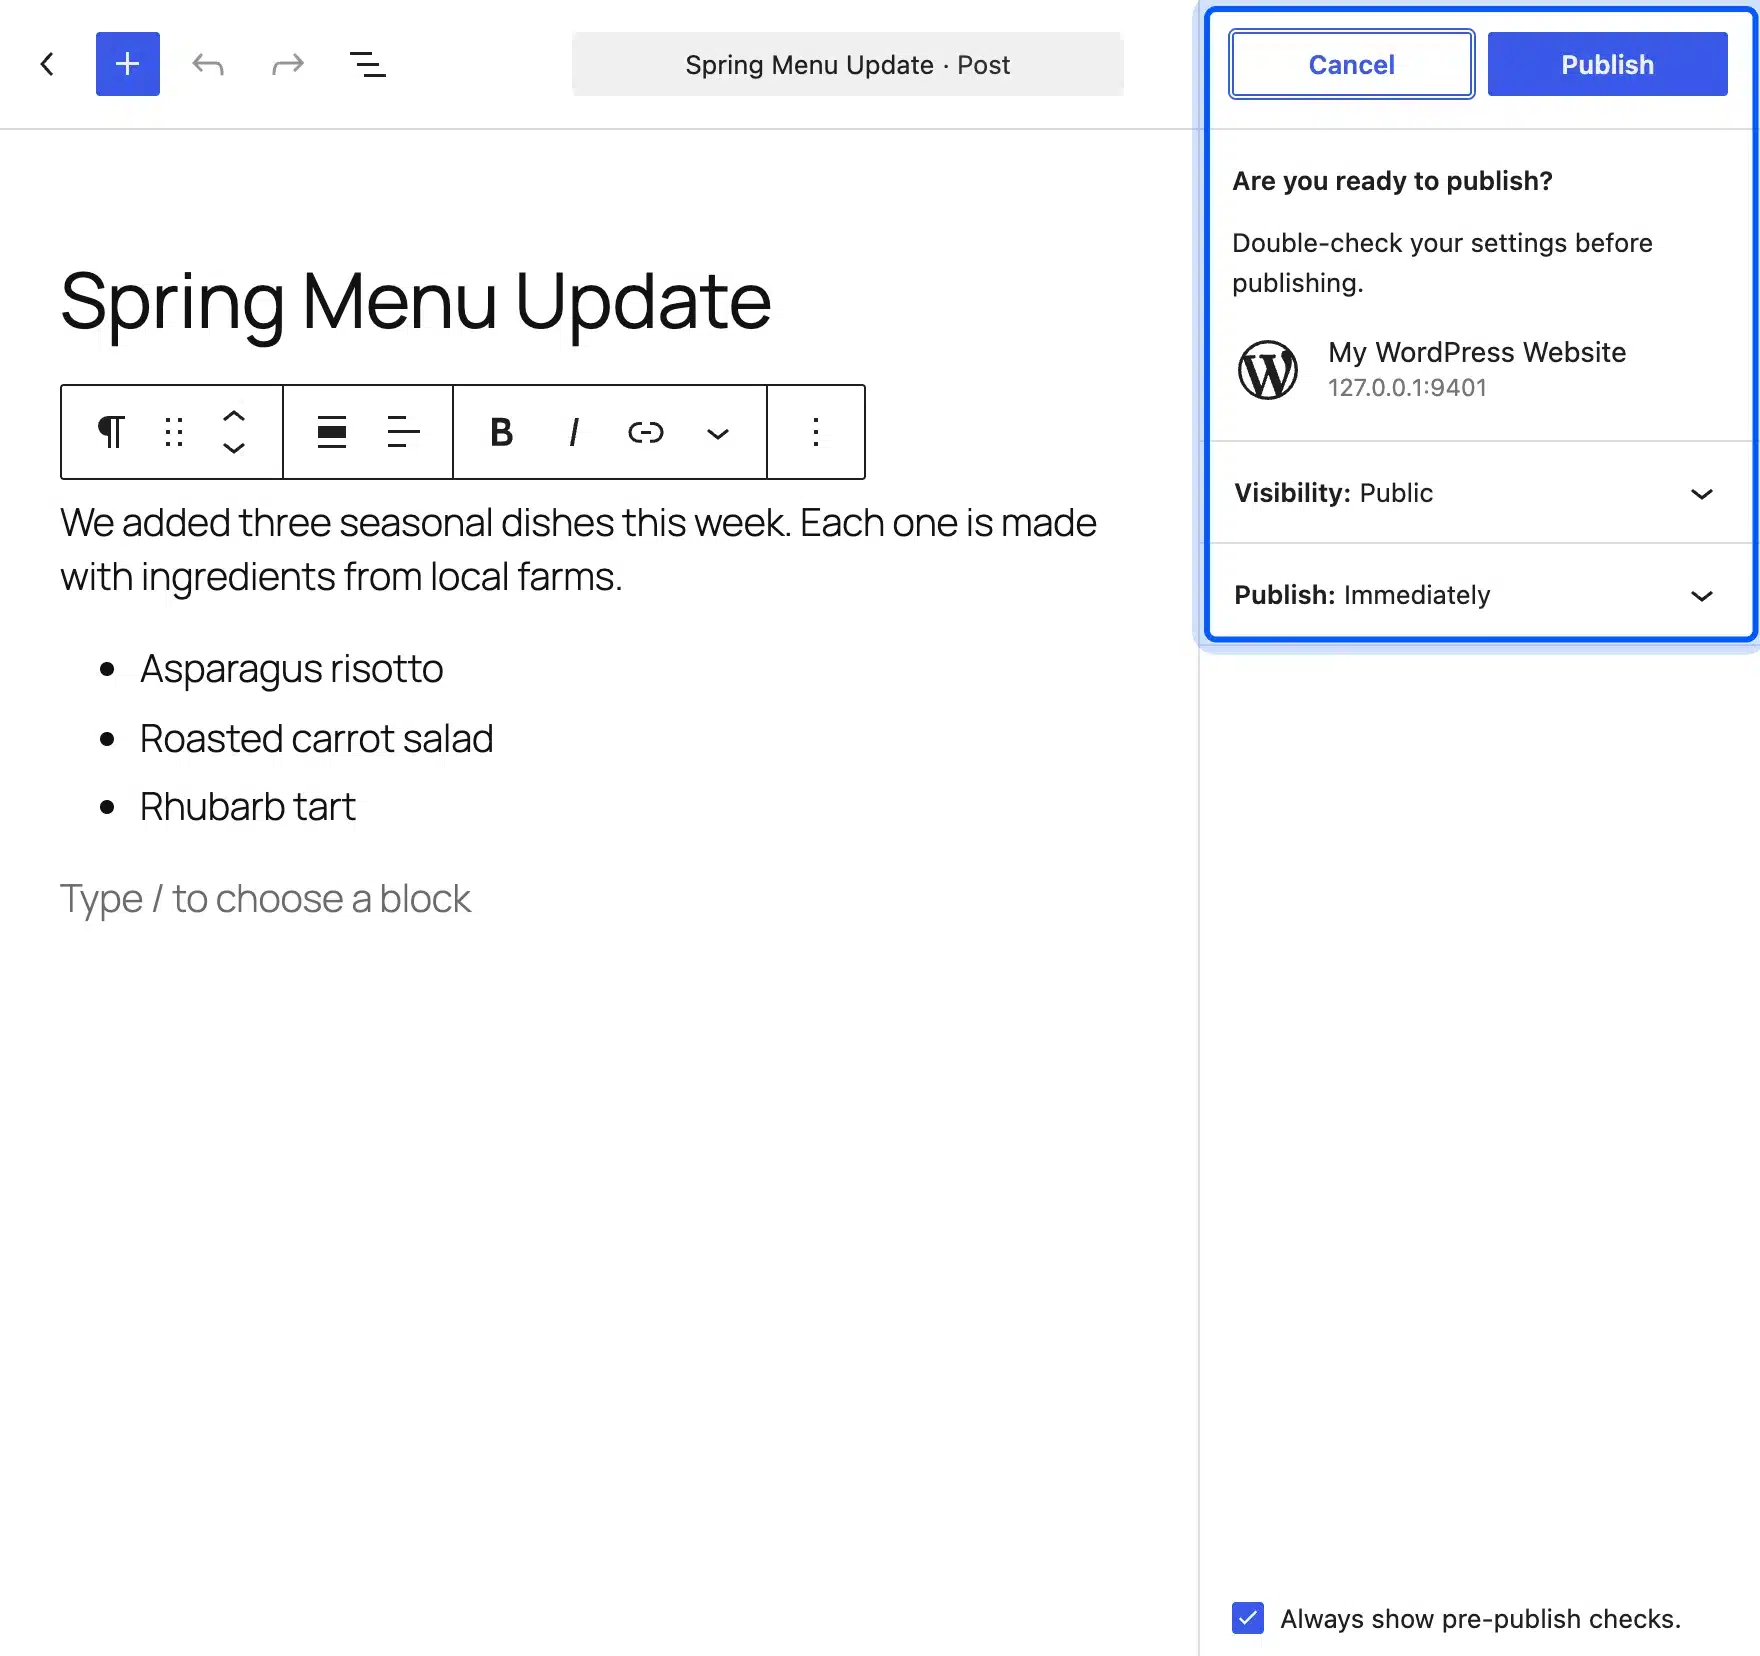
Use Save draft when you are not ready. The label changes to Saved after WordPress stores the draft, and the documentation says the label disappears after the post is published.
Tip: Press Ctrl+S or Cmd+S to save at any time. It is a good habit after you build a pattern or a long table.
WordPress Block Editor vs Classic Editor
The block editor builds content from separate blocks, while the Classic Editor is a single text box with a formatting bar. The block editor became the default in WordPress 5.0 in 2018. You can still switch back to the Classic Editor with the official plugin of that name.
| Feature | Block editor | Classic Editor |
|---|---|---|
| Content structure | Separate blocks | One text area |
| Layouts such as columns | Built in | Needs shortcodes or a page builder |
| Patterns and saved layouts | Yes | No |
| Learning curve | A few hours | Familiar to long-time users |
| Future features | Receives new releases first | Maintenance only |
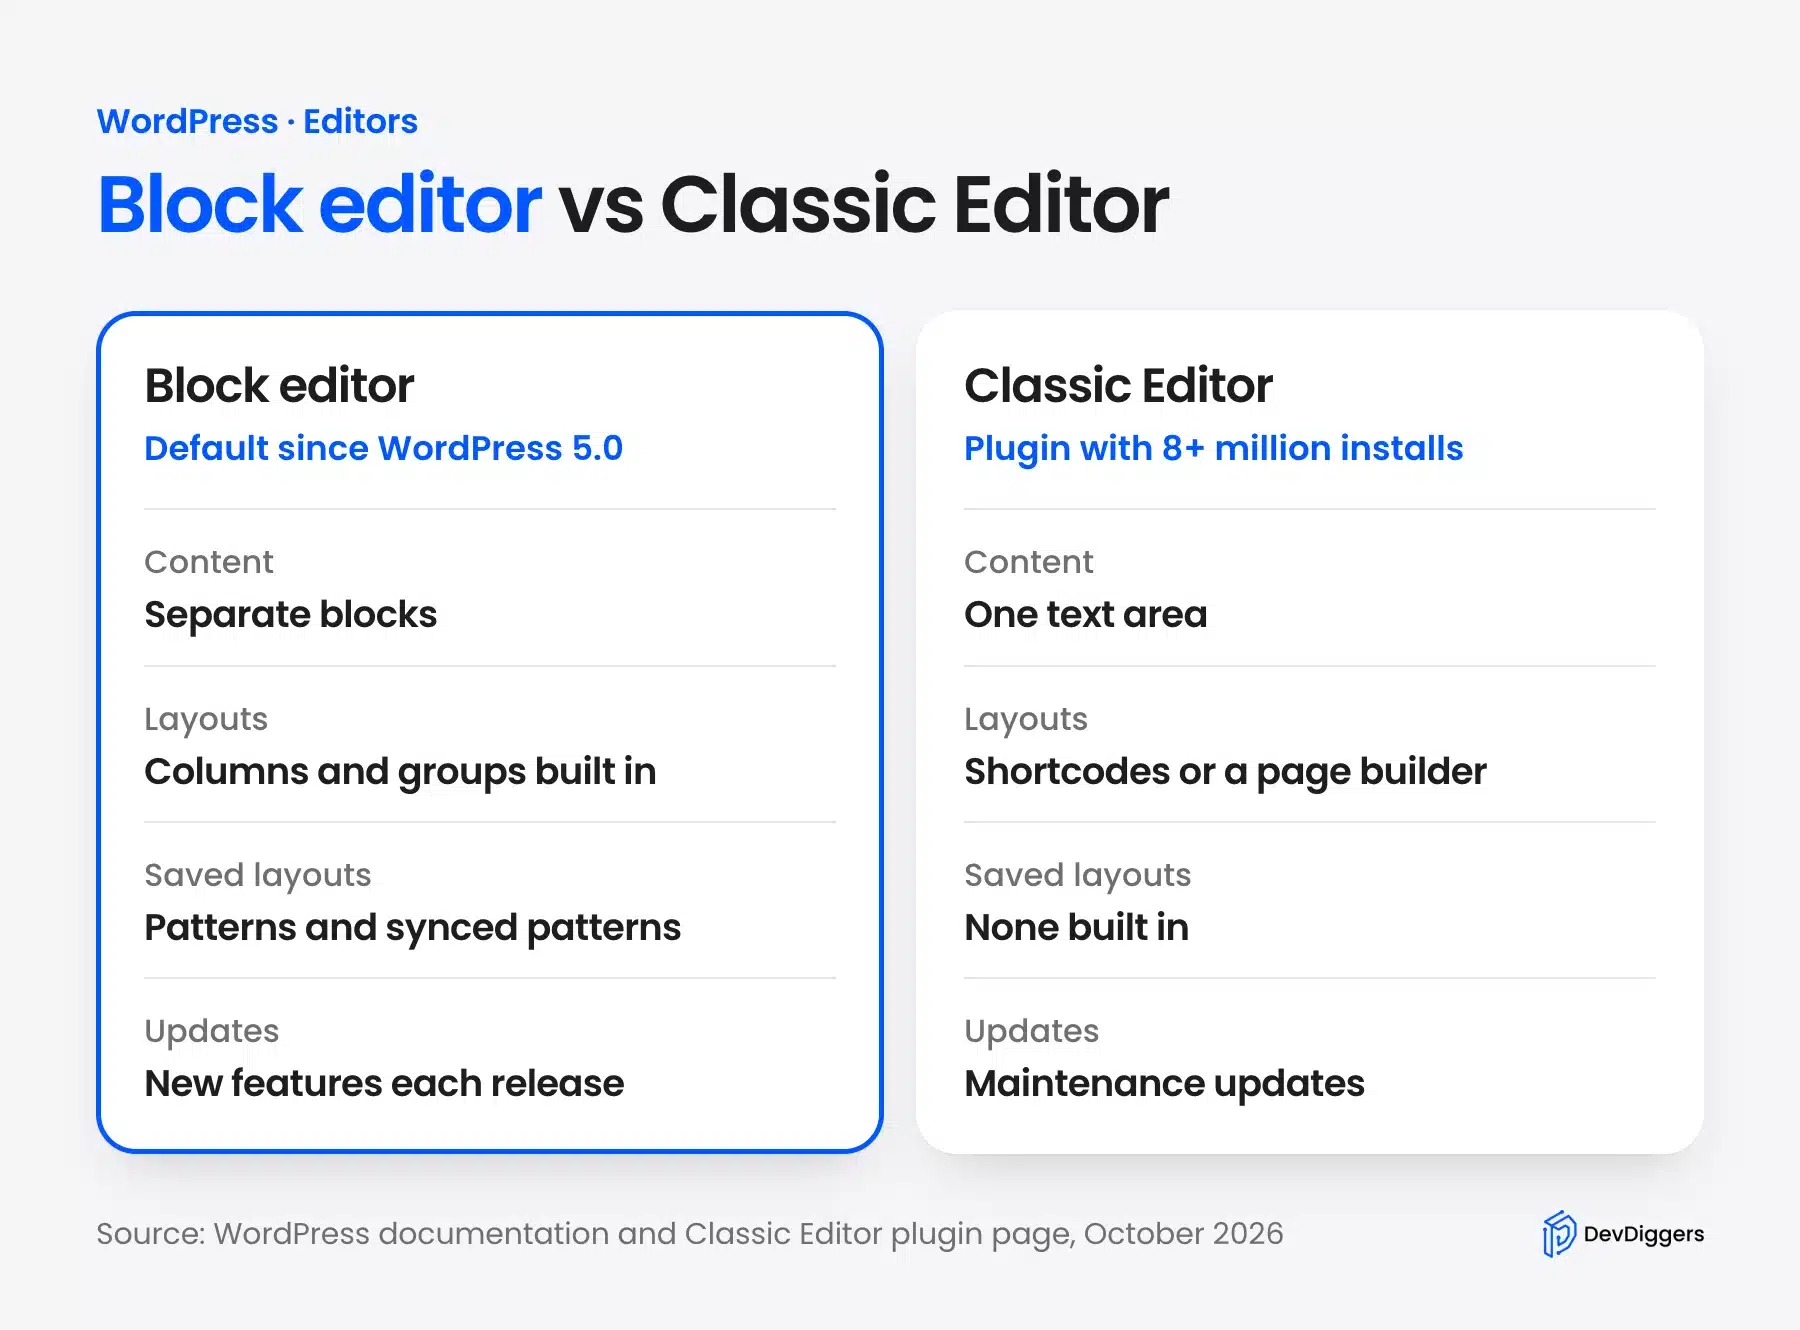
To switch, go to Plugins > Add New, search for Classic Editor, then install and activate the plugin. The Classic Editor plugin page lists more than 8 million active installations. As of October 2026 its latest version was tested up to WordPress 7.0.7.
After you activate the plugin, open Settings > Writing. According to the plugin description, administrators can select the default editor for all users there and can allow users to change their own default. Old posts keep their content either way, because the block editor wraps classic text in a Classic block that you can convert later.
What Changed in the WordPress Block Editor in 7.0 and 7.1
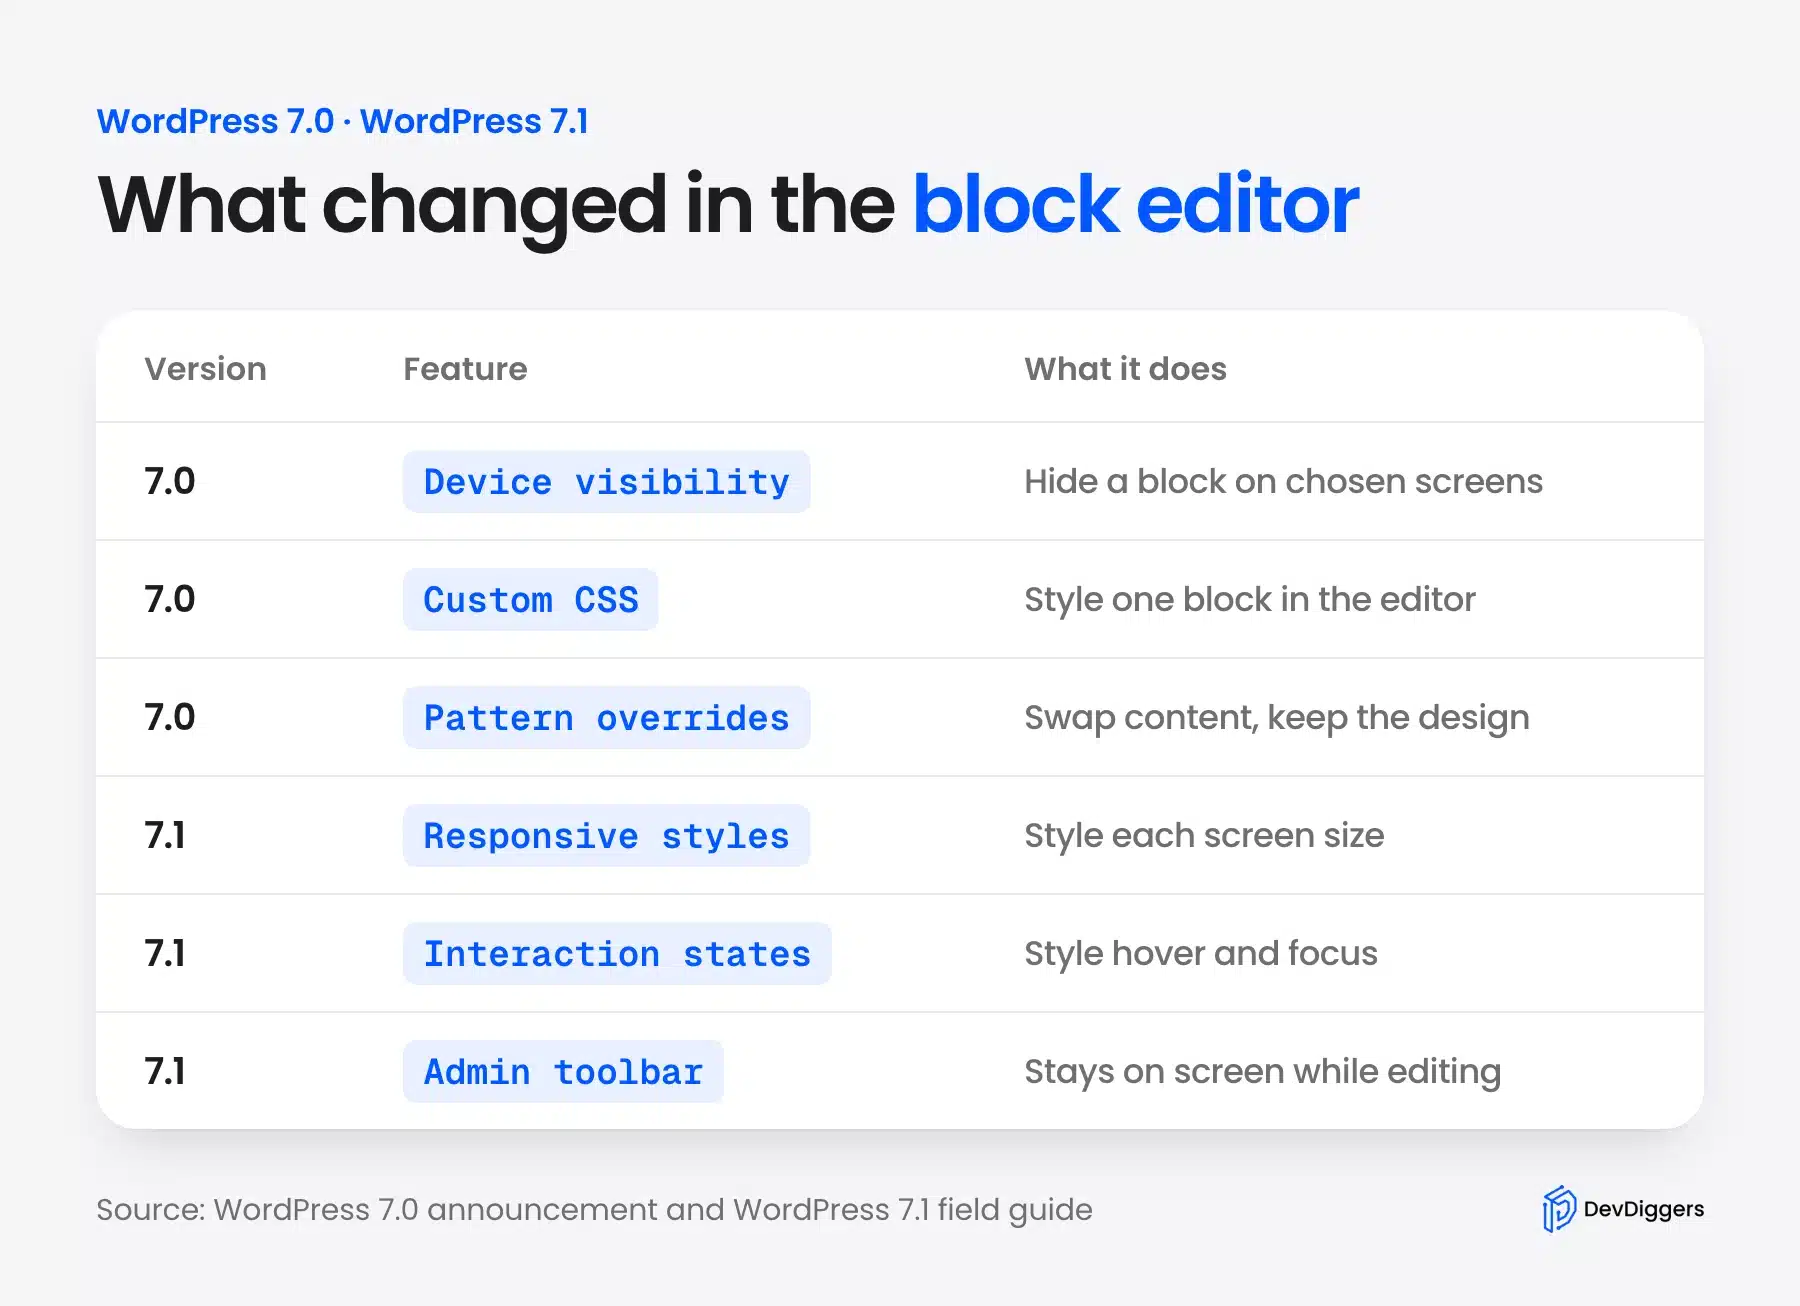
WordPress 7.0 arrived on May 20, 2026, and WordPress 7.1 followed on August 19, 2026. Version 7.0 added device visibility, block-level custom CSS and pattern overrides to the editor. Version 7.1 added responsive styling, pseudo-state styles and a persistent admin toolbar.
The table lists the editor changes that beginners notice first. The 7.0 items come from the WordPress 7.0 release announcement, and the 7.1 items come from the WordPress 7.1 field guide.
| Version | Change | What it means for you |
|---|---|---|
| 7.0 | Hide and reveal blocks by device | Show a block on desktop only, without touching other screen sizes. |
| 7.0 | Custom CSS per block | Style one block from inside the editor. |
| 7.0 | Pattern overrides | Swap content in a pattern while keeping its design. |
| 7.0 | Gallery lightbox | Open gallery images in a slideshow. |
| 7.1 | Responsive style variations | Set different styles for different screen sizes. |
| 7.1 | Interaction states | Style hover and focus states in the interface. |
| 7.1 | Persistent admin toolbar | Keeps the admin bar on screen while you edit. |
| 7.1 | Background gradient and minimum width supports | New design controls for blocks. |
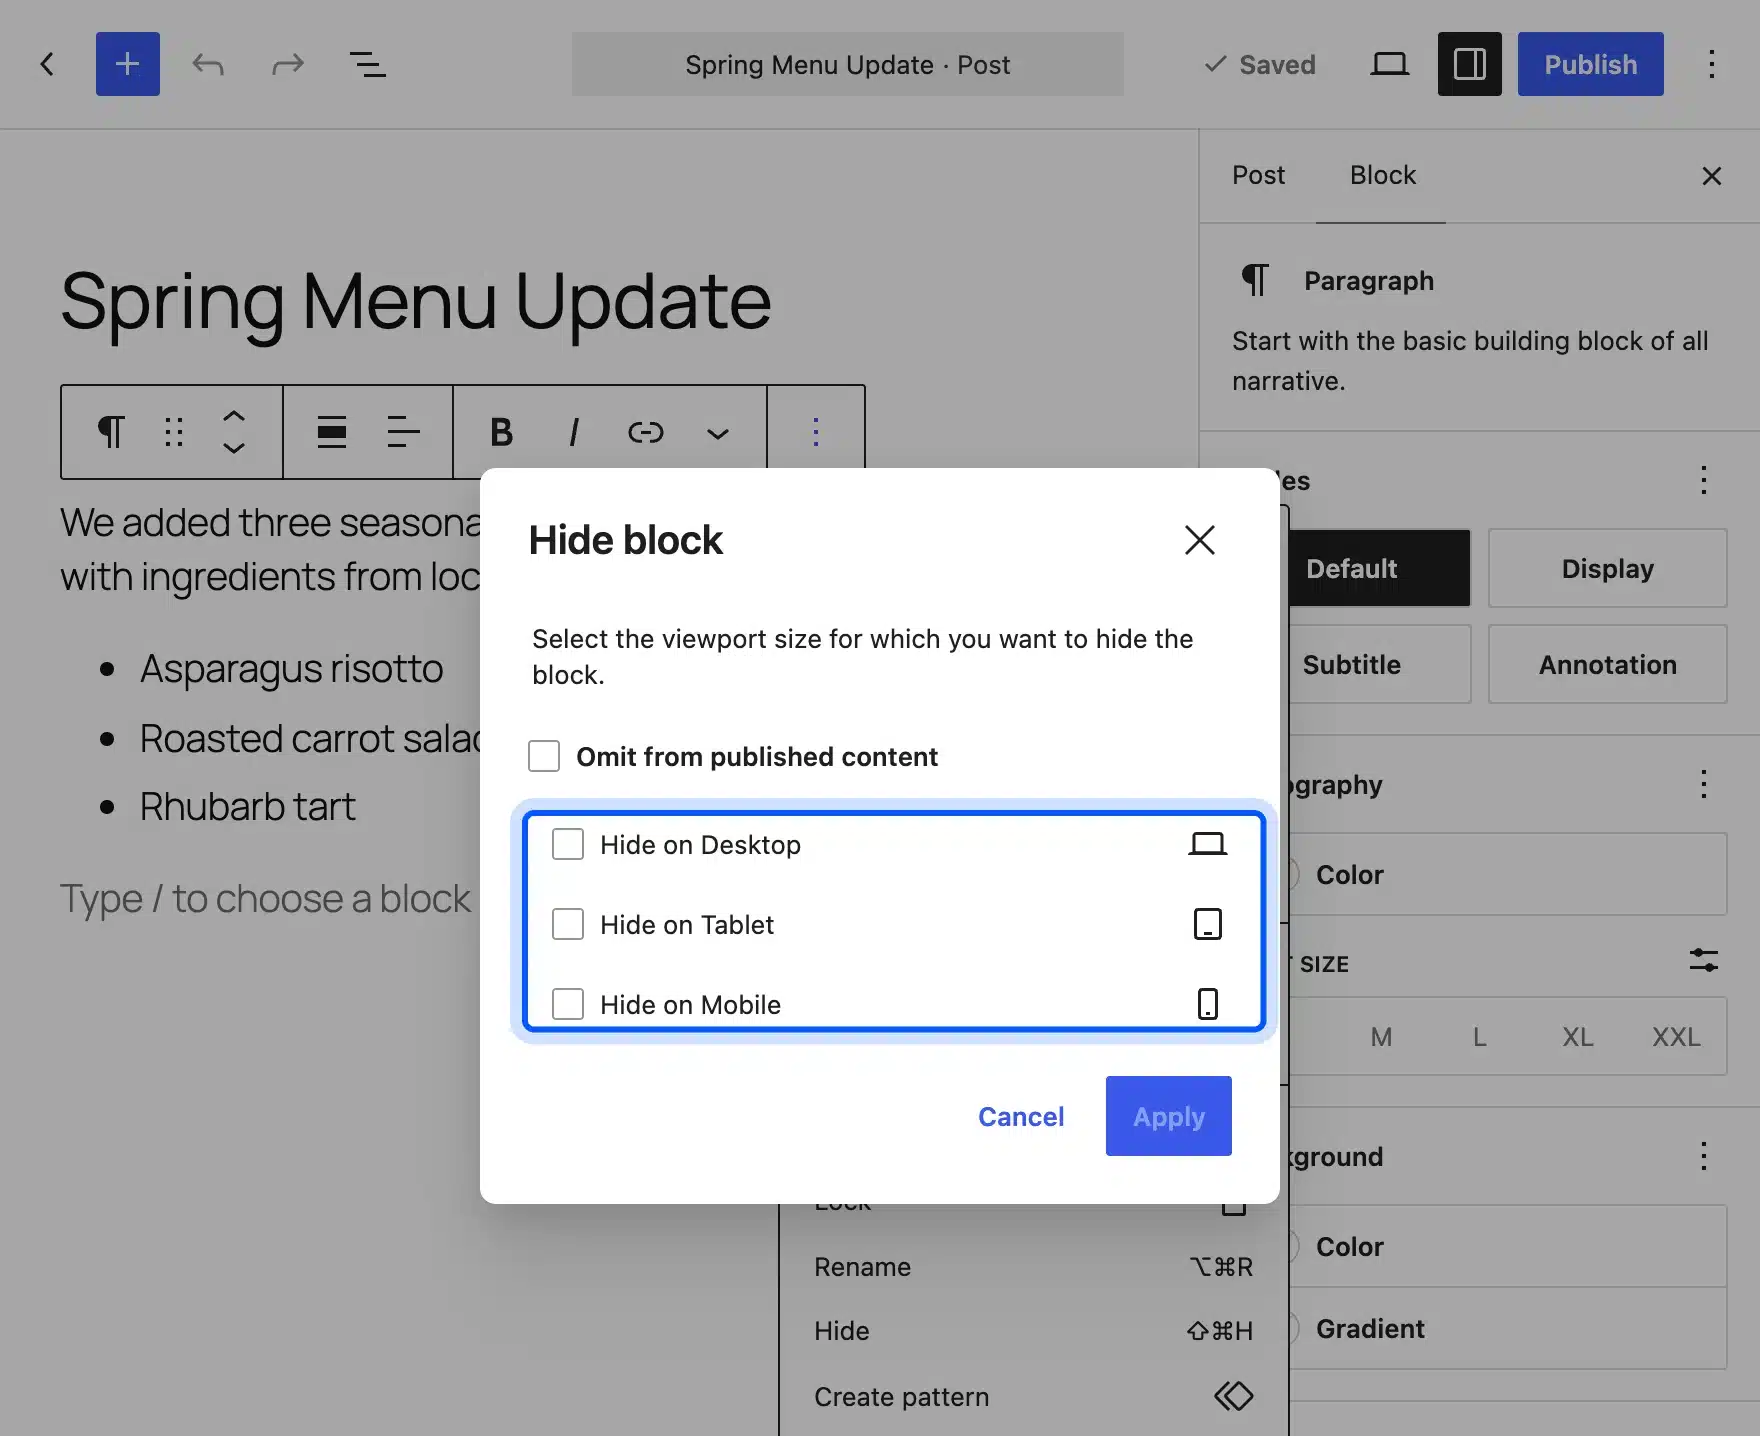
On the 7.1.3 test site, the Hide item in the block menu opened a Hide block dialog. It offers Hide on Desktop, Hide on Tablet and Hide on Mobile, plus an Omit from published content box.
The persistent admin toolbar was also visible above the editor in every screenshot in this guide.
If you want the full release history, read our WordPress 7.0 changelog and the WordPress version history.
Editor Settings Worth Changing
The Options menu, the three-dot icon at the far right of the toolbar, holds the settings that change how the editor feels. It has three groups: View, Editor and Tools. Five minutes spent here makes long writing sessions much more comfortable.
On WordPress 7.1.3, the View group listed Top toolbar, Distraction free and Spotlight mode. The documentation also lists a Fullscreen mode option, which did not appear in that group on the test site.
The Editor group switches between the Visual editor and the Code editor. Tools holds Keyboard shortcuts, Copy all blocks, Help, Manage patterns and Welcome Guide.
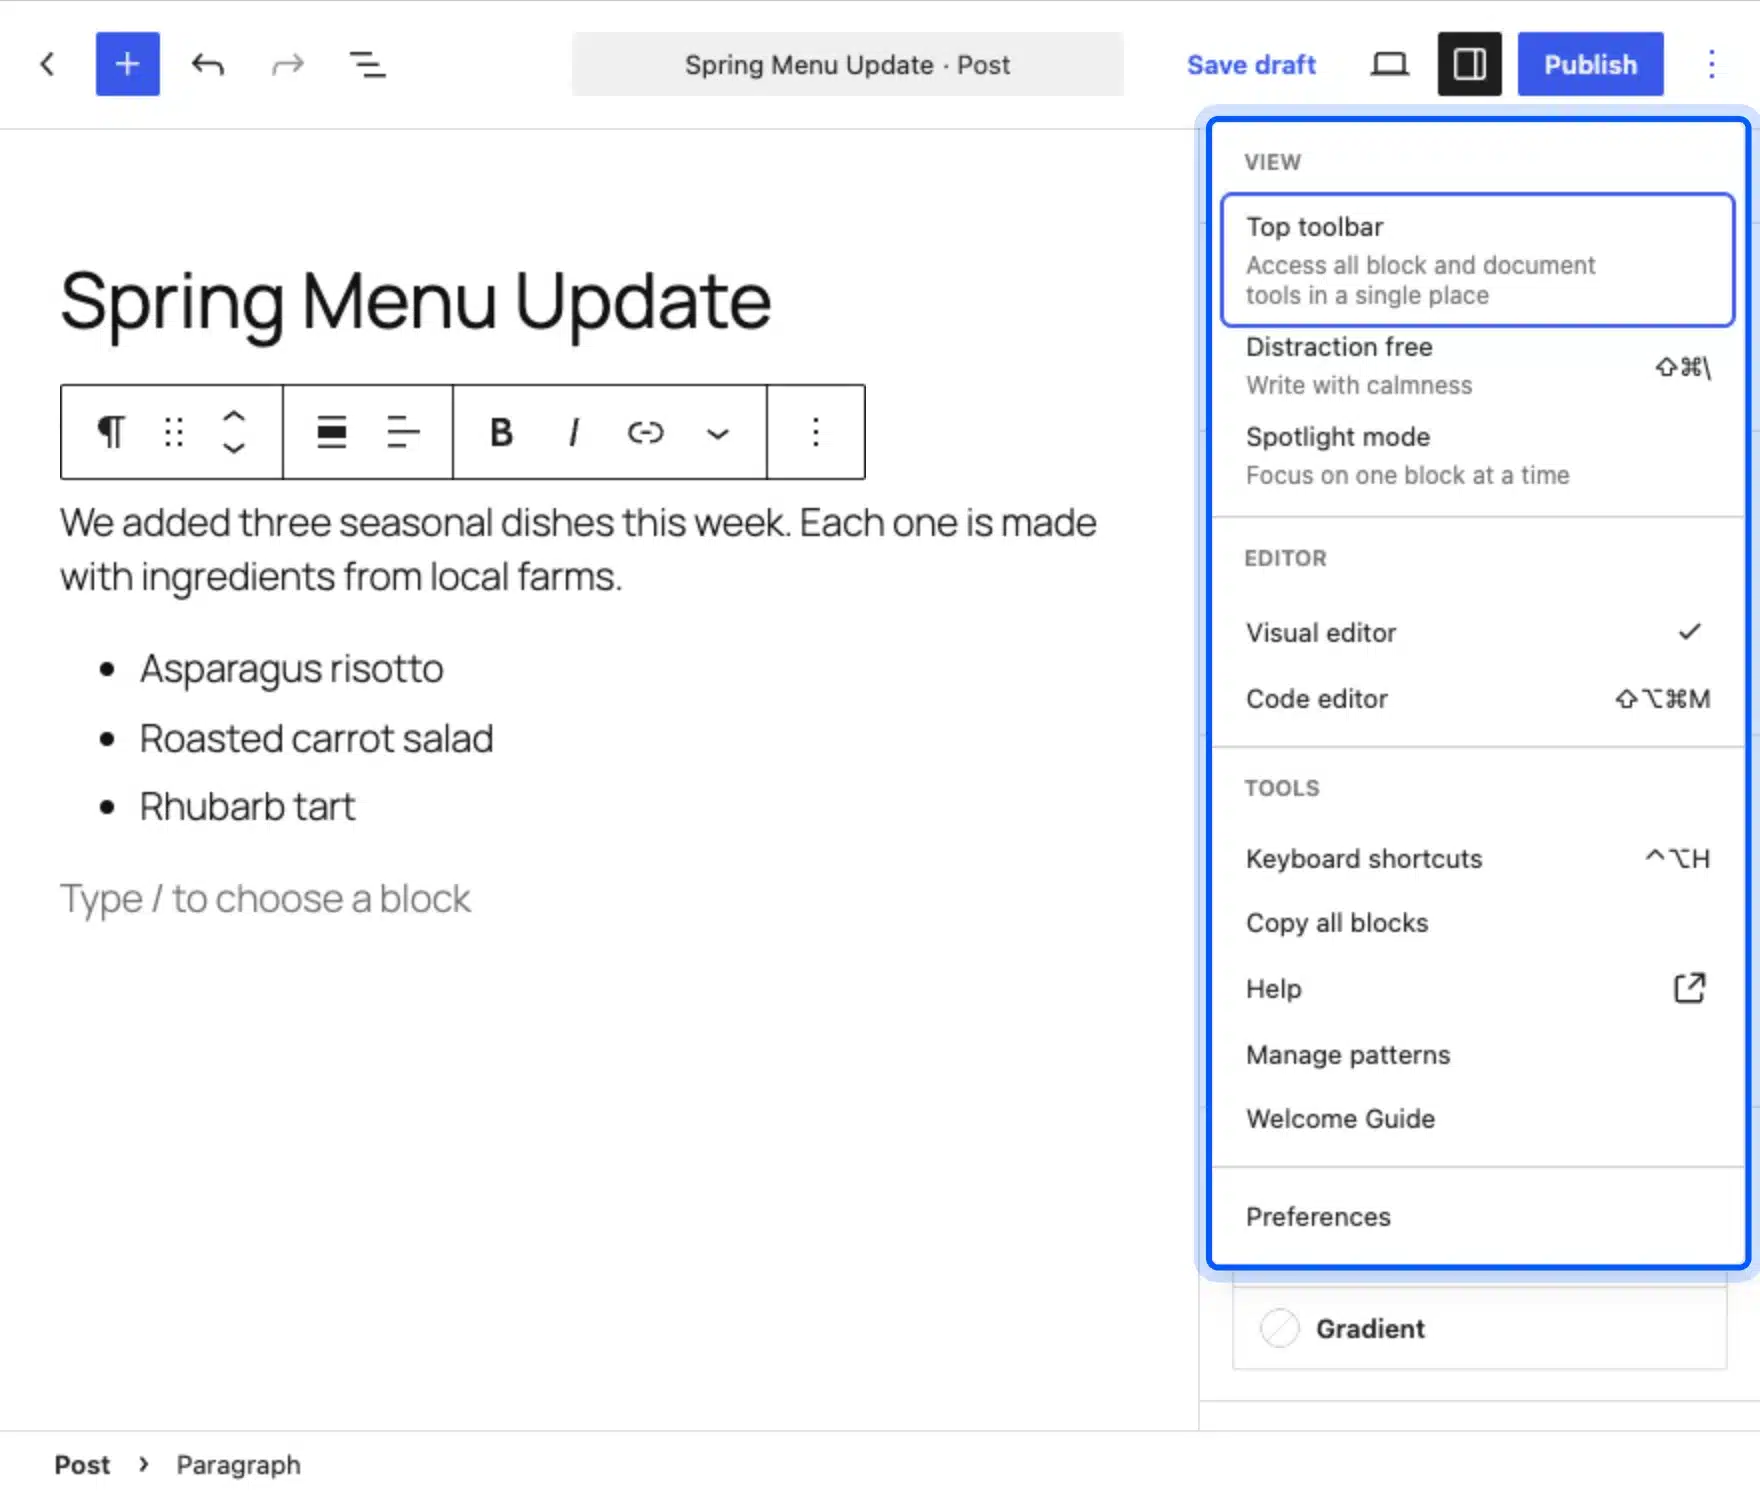
- Top toolbar: Pins the block toolbar to the top of the editor instead of floating it above each block.
- Distraction free: Closes the sidebars and hides most controls so you can write.
- Spotlight mode: Fades every block except the one you are working on.
- Code editor: Shows the raw block markup, which helps when you need to fix a broken block.
Keyboard Shortcuts That Save Time
A handful of shortcuts cover most daily work in the editor. The slash command adds a block, Ctrl+Shift+D duplicates one, Ctrl+G groups several and Ctrl+S saves. Learning just five of them removes most of the mouse travel and speeds up every post.
The shortcuts below come from the block editor keyboard shortcuts page. Press Shift+Alt+H on Windows to see the full list inside the editor.
| Action | Windows | Mac |
|---|---|---|
| Add a block | / then block name | / then block name |
| Duplicate the selected block | Ctrl+Shift+D | Shift+Cmd+D |
| Group selected blocks | Ctrl+G | Cmd+G |
| Open List View | Shift+Alt+O | Ctrl+Option+O |
| Switch to Code editor | Ctrl+Shift+Alt+M | Shift+Option+Cmd+M |
| Save your changes | Ctrl+S | Cmd+S |
| Undo | Ctrl+Z | Cmd+Z |
Text formatting has its own shortcuts. Ctrl+B and Ctrl+I make selected text bold or italic, and Ctrl+K turns it into a link. Typing two opening square brackets opens a list of your existing posts and pages, which makes internal linking much faster.
The same page lists Shift+Alt+1 through 6 to turn a paragraph into a heading of that level. Shift+Alt+0 turns a heading back into a paragraph. Mac users replace Shift+Alt with Cmd+Alt.
Common Mistakes Beginners Make
Most beginner problems come from fighting the block structure instead of using it. The mistakes below cost new users the most time, and each one has a short fix. Read through the list once and you will avoid hours of cleanup later.
- Pasting from Word: Pasted text can carry hidden formatting, so use the guide on copying and pasting in WordPress.
- Pressing Enter for spacing: Empty paragraphs create gaps that break on mobile, so use padding in the Block tab instead.
- Skipping heading order: Jumping from H2 to H4 confuses screen readers, and the Outline tab shows the problem at a glance.
- Rebuilding the same layout: Save repeated layouts as patterns instead of copying blocks between posts.
- Adding a plugin for every layout: Core blocks already cover columns, groups and buttons, and our post on too many plugins on a WordPress site explains what extra plugins cost.
- Editing the wrong nested block: Use List View to select a block inside a group before you change its settings.
If a block ever looks broken after an edit, press Ctrl+Z first. When that does not help, open the Options menu and switch to the Code editor to read the block markup. Switch back to the Visual editor once you have found the problem.
Conclusion
The WordPress block editor is easier than it looks once you know three areas: the top toolbar, the content area and the sidebar. Add blocks with the plus button or a slash, style them in the Block tab, and save repeated layouts as patterns.
WordPress 7.0 and 7.1 added device visibility, per-block CSS and responsive styling, so older tutorials may not match your screen. Keep List View and the keyboard shortcuts handy, and switch to the Classic Editor plugin only if your team truly needs it.
When you want help with a custom editing experience or a block built for your store, our WordPress plugin development team can build it. If you want AI help while you write, read our guide on AI integration with WordPress.
Frequently Asked Questions (FAQs)
Q1. Is the WordPress block editor a page builder?
It is a built-in editor that behaves like a basic page builder, because you can build layouts with columns, groups and patterns. Dedicated page builders add more design controls, but they run as plugins on top of WordPress.
Q2. Why is the WordPress block editor called Gutenberg?
Gutenberg was the name of the project that built the editor, named after the inventor of the printing press. Since WordPress 5.0 the editor is part of core, so most documentation now says block editor.
Q3. How do I switch WordPress to the Classic Editor?
Install and activate the official Classic Editor plugin from Plugins > Add New. The plugin page lists more than 8 million active installations. Your old posts keep their content when you switch.
Q4. What is the difference between a block pattern and a synced pattern?
A block pattern is a layout you insert and then change freely. A synced pattern stays linked to its original, so editing it updates every place it is used. The pattern documentation calls synced patterns the replacement for reusable blocks.
Q5. Does the block editor change my old posts?
No. Old posts open as a single Classic block, and the content stays the same. You can keep editing it as one block or convert it into separate blocks when you are ready.
Q6. Does my theme need to support the block editor?
Any modern theme works with the block editor, because the editor adds blocks without changing the theme. A block theme adds extra control, since you can edit its headers, footers and templates in the Site Editor.
Q7. How do I disable the Gutenberg editor?
The cleanest way is the Classic Editor plugin, which replaces the block editor for posts and pages. Deactivating Gutenberg through code is possible, but the plugin is supported and survives WordPress updates.
Q8. Do I need to know code to use the WordPress block editor?
No. You add and style every block from menus and the sidebar. Code only helps if you want custom CSS, which WordPress 7.0 added as a per-block control.