How to change fonts in WordPress depends on one thing: whether your theme is a block theme or a classic theme. Block themes change fonts in the Site Editor. Classic themes need a little CSS.
Since WordPress 7.0, both kinds of theme share one place to add fonts, called the Font Library. It lets you install Google Fonts or upload your own files, then use them anywhere on your site. That one screen replaces most font plugins.
This guide shows both routes step by step. Every screenshot comes from a WordPress 7.1.2 test site, checked in September 2026, with the Twenty Twenty-Five block theme and the Twenty Twenty-One classic theme.
How to Change Fonts in WordPress: The Two Jobs
How to change fonts in WordPress comes down to two jobs: add the font, then apply it. Add fonts under Appearance, then Fonts, which works with every theme in WordPress 7.0 and later. Apply them in the Site Editor for a block theme, or with CSS for a classic theme.
The official Font Library documentation says the library became available to block themes and classic themes starting in WordPress 7.0. The feature itself first shipped in WordPress 6.5, according to the core team’s announcement. On older sites it lives inside the Site Editor.
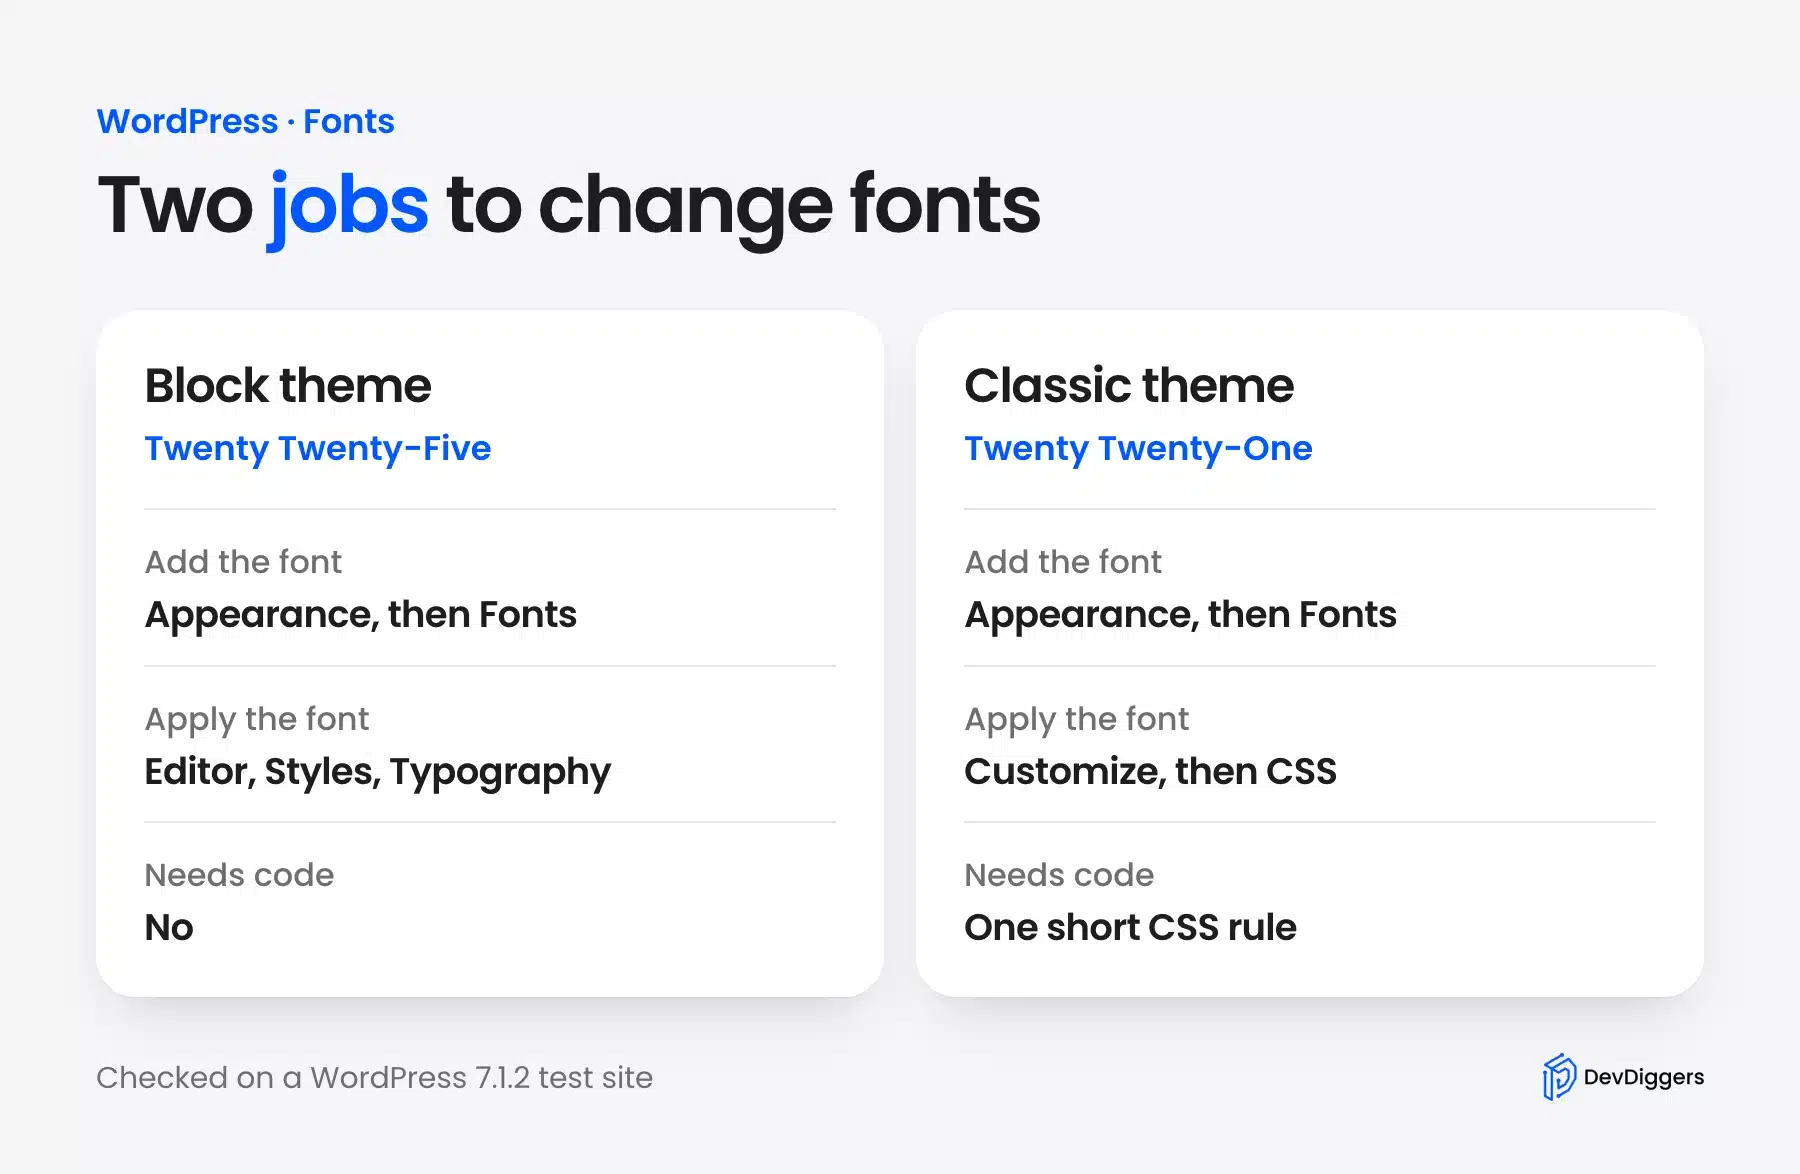
Most guides skip the second job on classic themes. A font can sit in your library and still do nothing until your theme is told to use it. We show that gap on our test site later in this guide.
Check If You Use a Block Theme or a Classic Theme
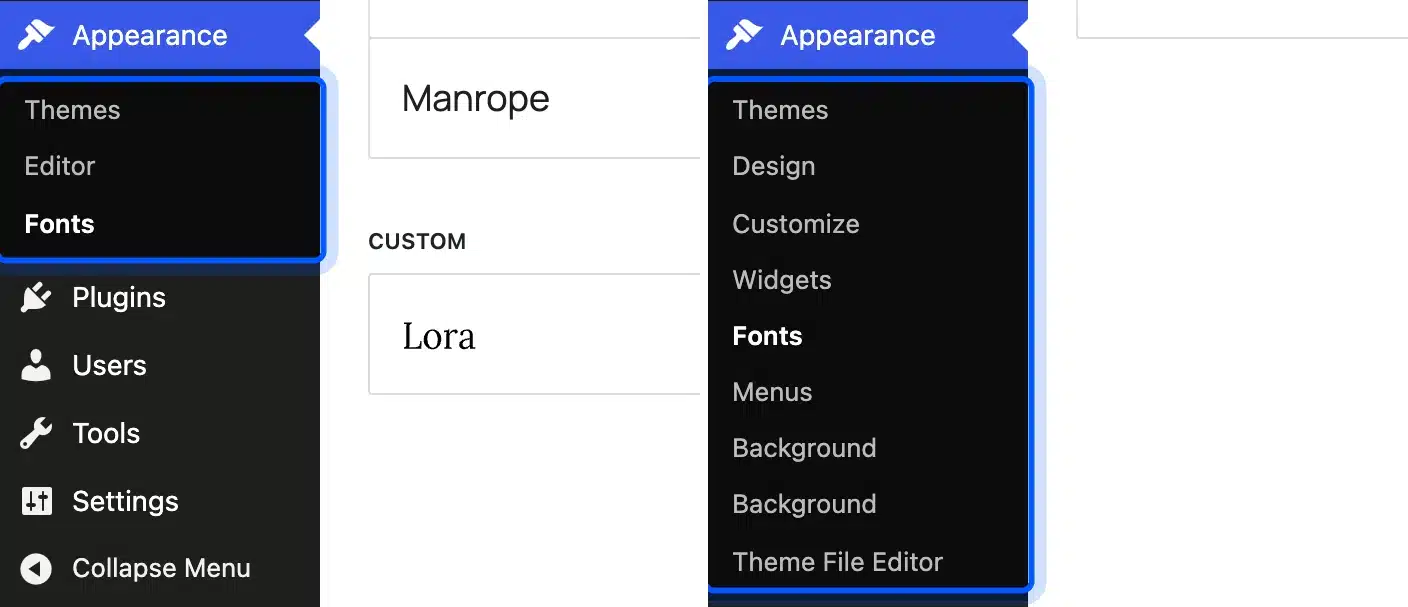
Open the Appearance menu in your dashboard and read the sub-items under it. A block theme lists Editor, which opens the Site Editor, while a classic theme lists Customize, Widgets and Menus. Both types list Fonts in WordPress 7.0 and later.
On our block theme test site, the Appearance menu showed Themes, Editor and Fonts. On the classic theme, it showed Themes, Customize, Widgets, Fonts, Menus and Background, among others.
How to Add Fonts to WordPress With the Font Library
Go to Appearance, then Fonts, to open the WordPress Font Library. It has three tabs: Library, Upload and Install Fonts. Use Install Fonts for Google Fonts and Upload for your own files, and new fonts then appear in the Library tab.
The Library tab lists every font on your site. On our test site, the Theme group showed Fira Code and Manrope, which came with Twenty Twenty-Five. Fonts you add appear in a separate Custom group.
Install a Google Font
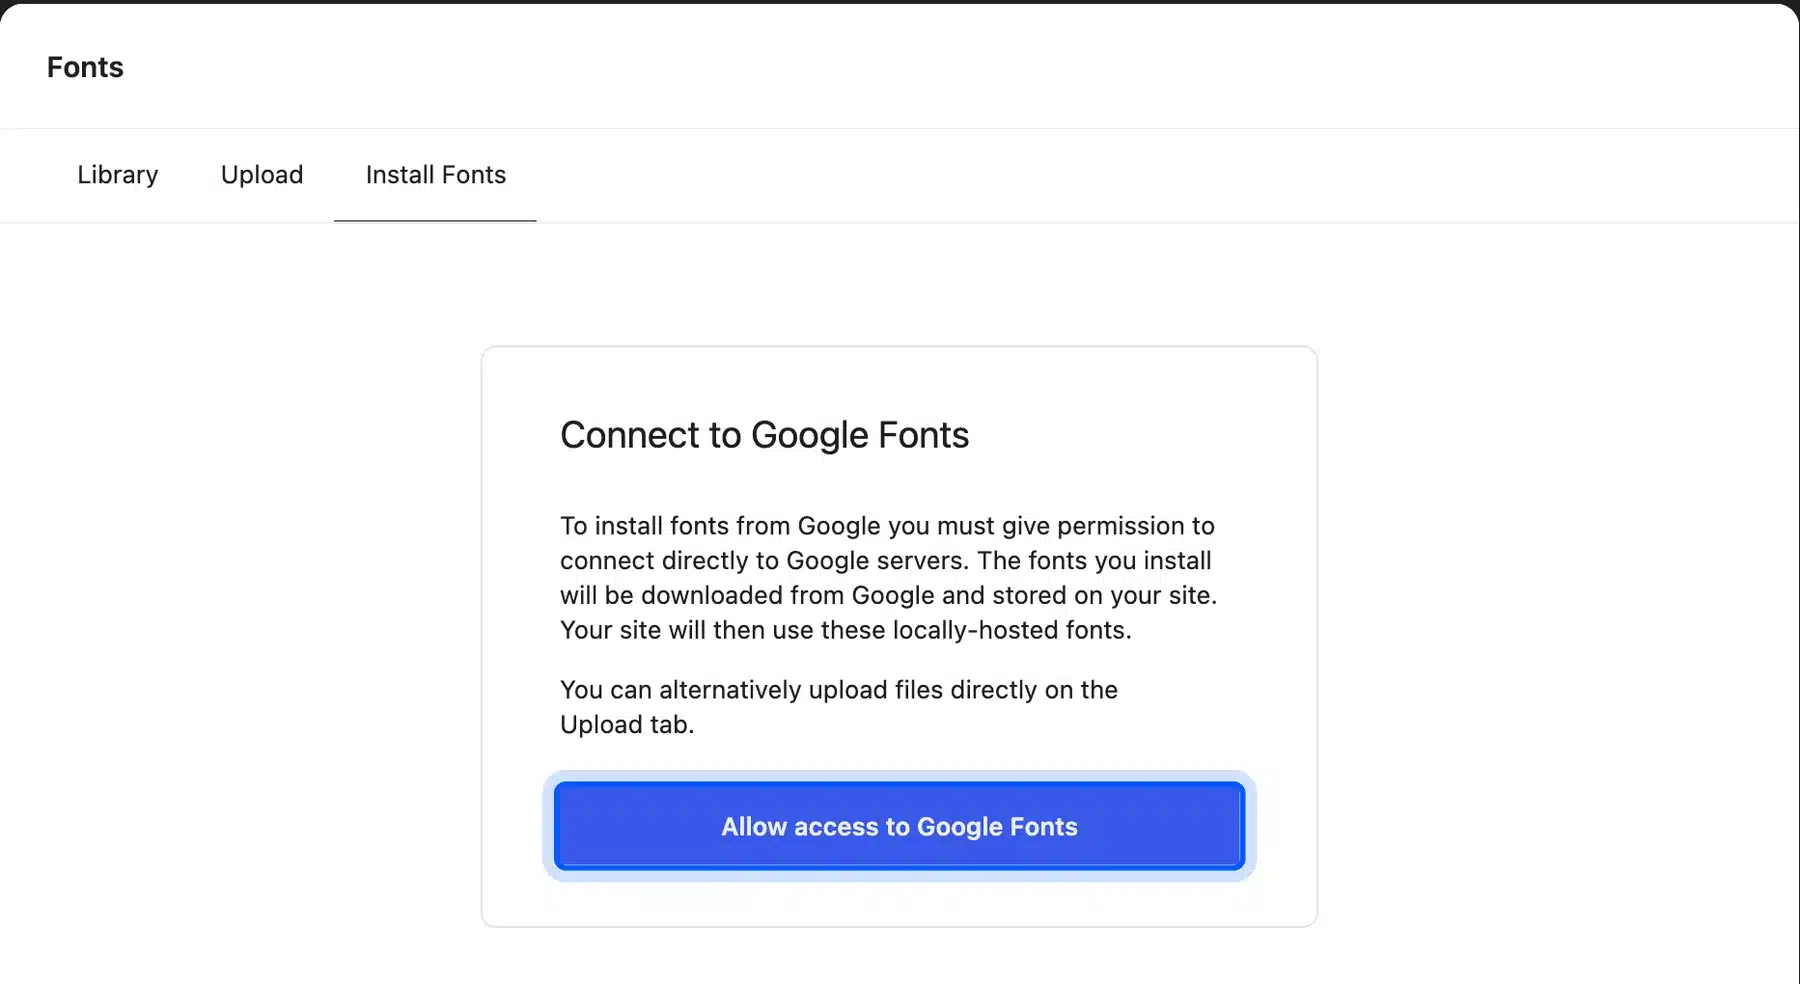
Click the Install Fonts tab. The first time, WordPress asks for permission to connect to Google. The screen explains that installed fonts are downloaded from Google and stored on your site.
Your site then uses these locally hosted fonts. Click Allow access to Google Fonts to continue. You can take that access back later from the three-dot menu on the same tab, as the official docs describe.
Type a font name into the search box and click the result. We searched for Lora and found it with 8 variants. The list also showed other fonts with similar names, so pick the exact name you want.
Now choose the variants. Each variant is one style and weight, such as 400 normal for regular text or 700 normal for bold. Tick only the ones you need, then click Install.
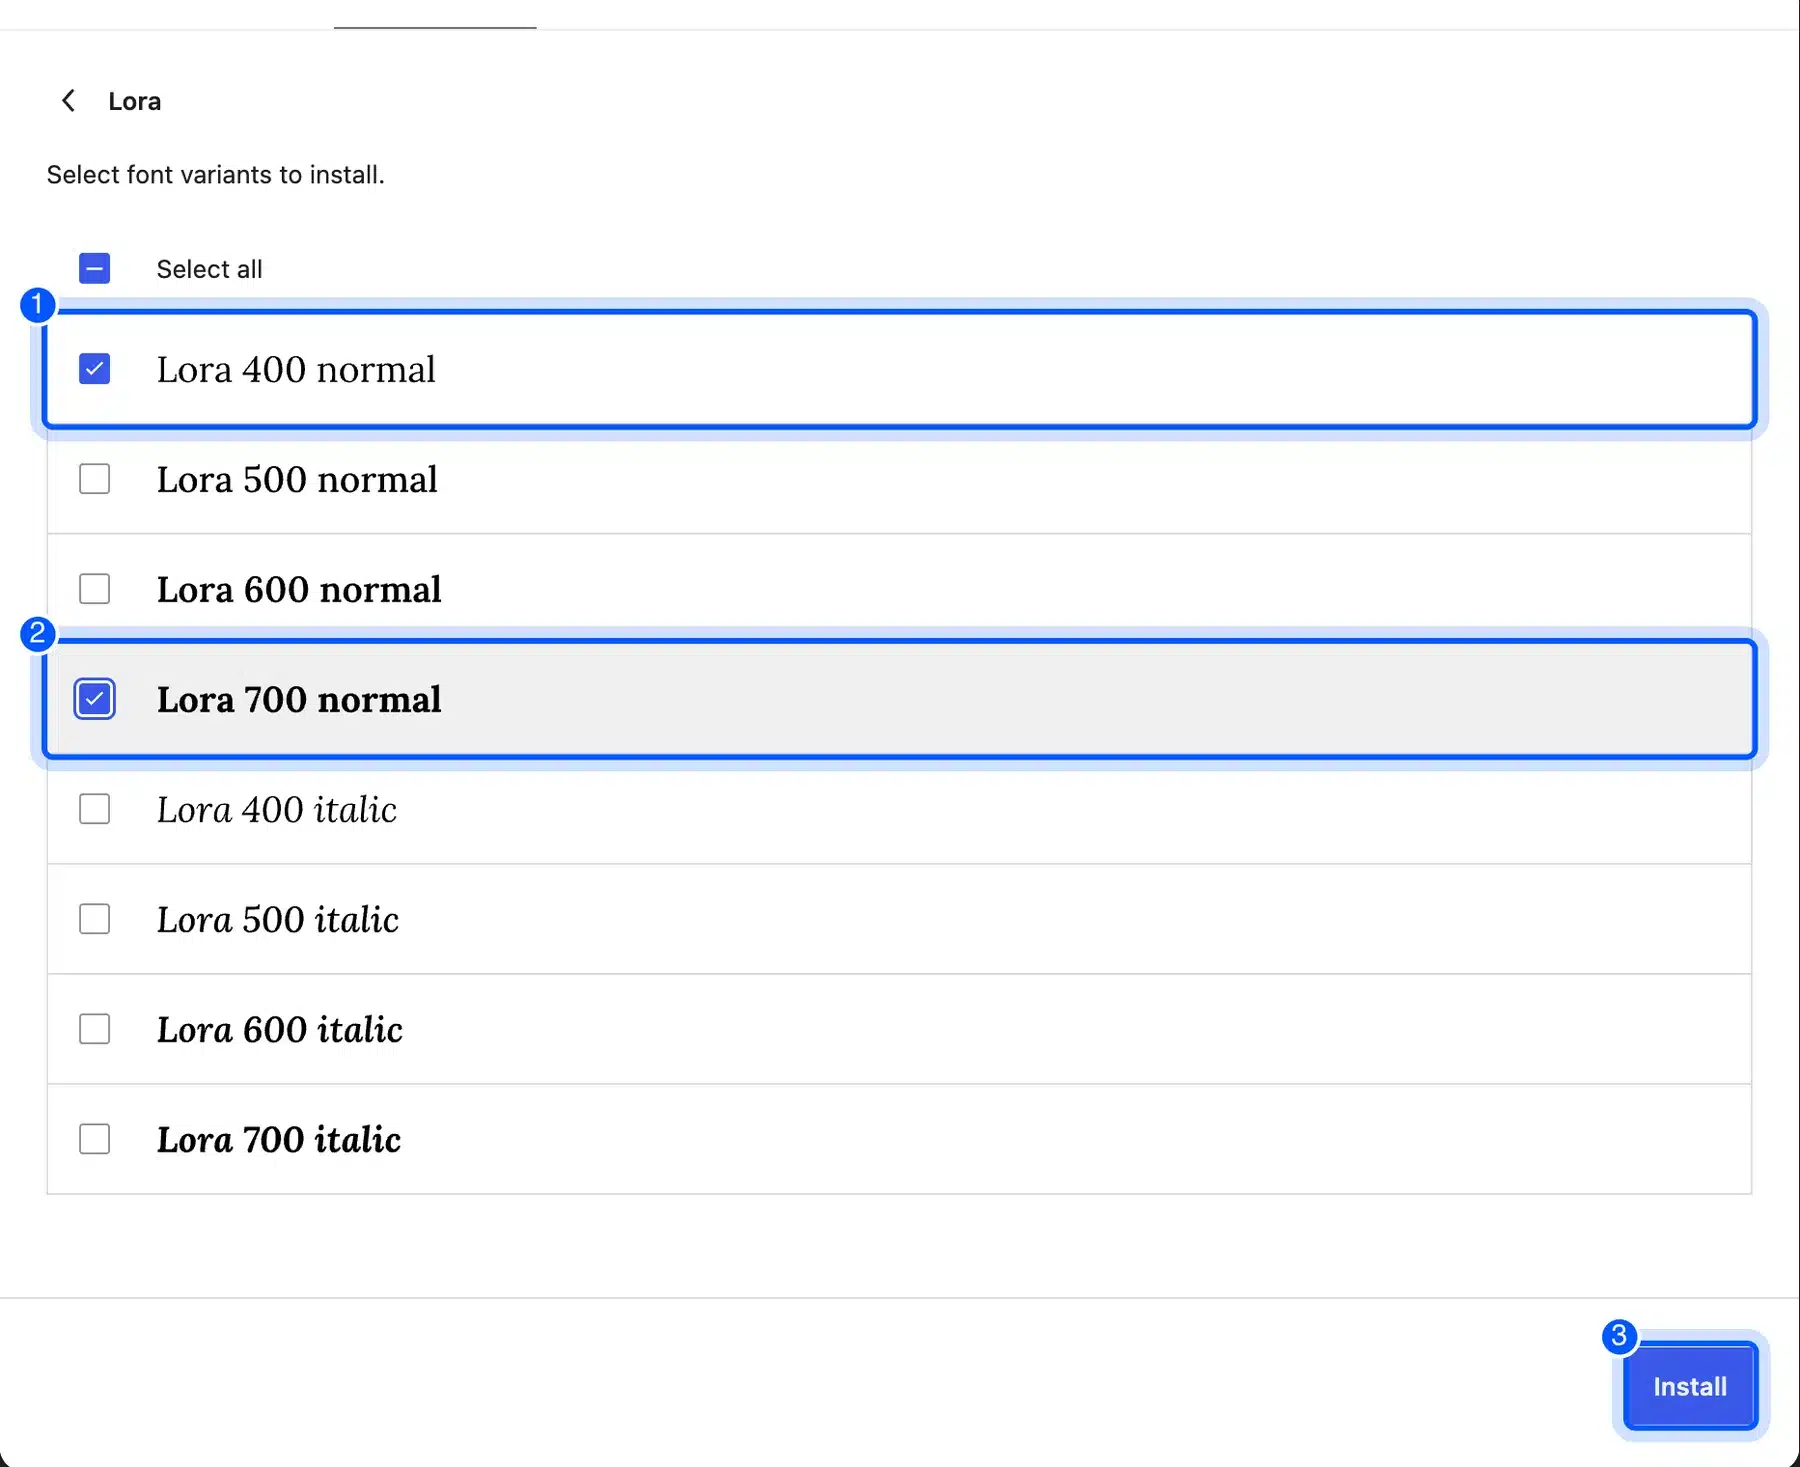
We ticked 400 normal and 700 normal. WordPress showed a notice that read Fonts were installed successfully, and Lora appeared in the Library tab with 2 of 2 variants active.
Fewer variants mean fewer files for visitors to download. When you open an installed font, the screen itself warns that too many variants could make your site slower.
Upload Your Own Font Files to WordPress
Click the Upload tab, then drop a font file onto the Upload font area or click it to choose a file. WordPress accepts .ttf, .otf, .woff and .woff2 files. Uploaded fonts join the same Library tab as your Google Fonts.
The screen lists those four formats right under the upload area. The official documentation adds a warning that you need permission to use and distribute the font, so check the license first.
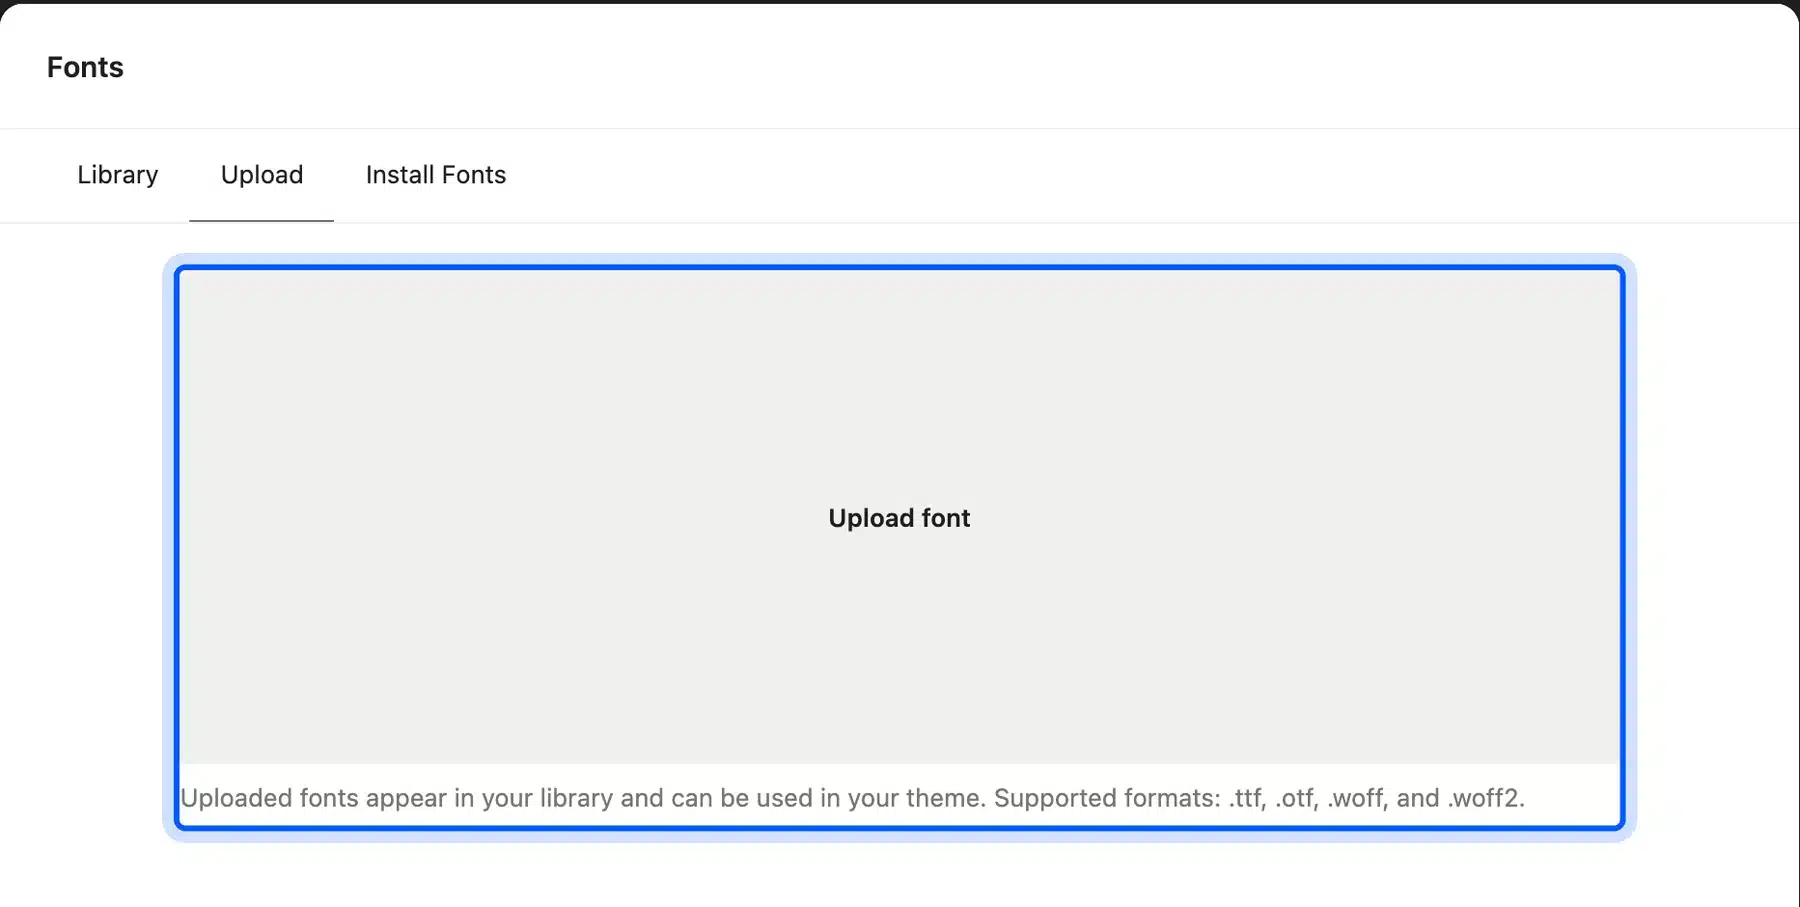
We did not upload a file on our test site, so this screenshot only shows the screen. By default, the core team’s announcement says fonts go into the wp-content/fonts folder. A developer can move that folder with the font_dir filter.
Prefer WOFF2 when you have a choice. The web.dev guide to font best practices says WOFF2 compresses about 30 percent better than WOFF, so visitors download less data.
Change Fonts for the Whole Site in a Block Theme
Go to Appearance, then Editor, click Styles, then click Typography. Pick a typeset for a quick change, or open Headings or Text under Elements to change one part of your site. Choose a font from the Font list, and the preview updates at once.
The Typography screen has four groups: Typesets, Fonts, Elements and Font sizes. Typesets are the Aa tiles at the top, and each one is a ready-made font combination. Fonts lists everything in your library, which on our test site meant Fira Code, Lora and Manrope.
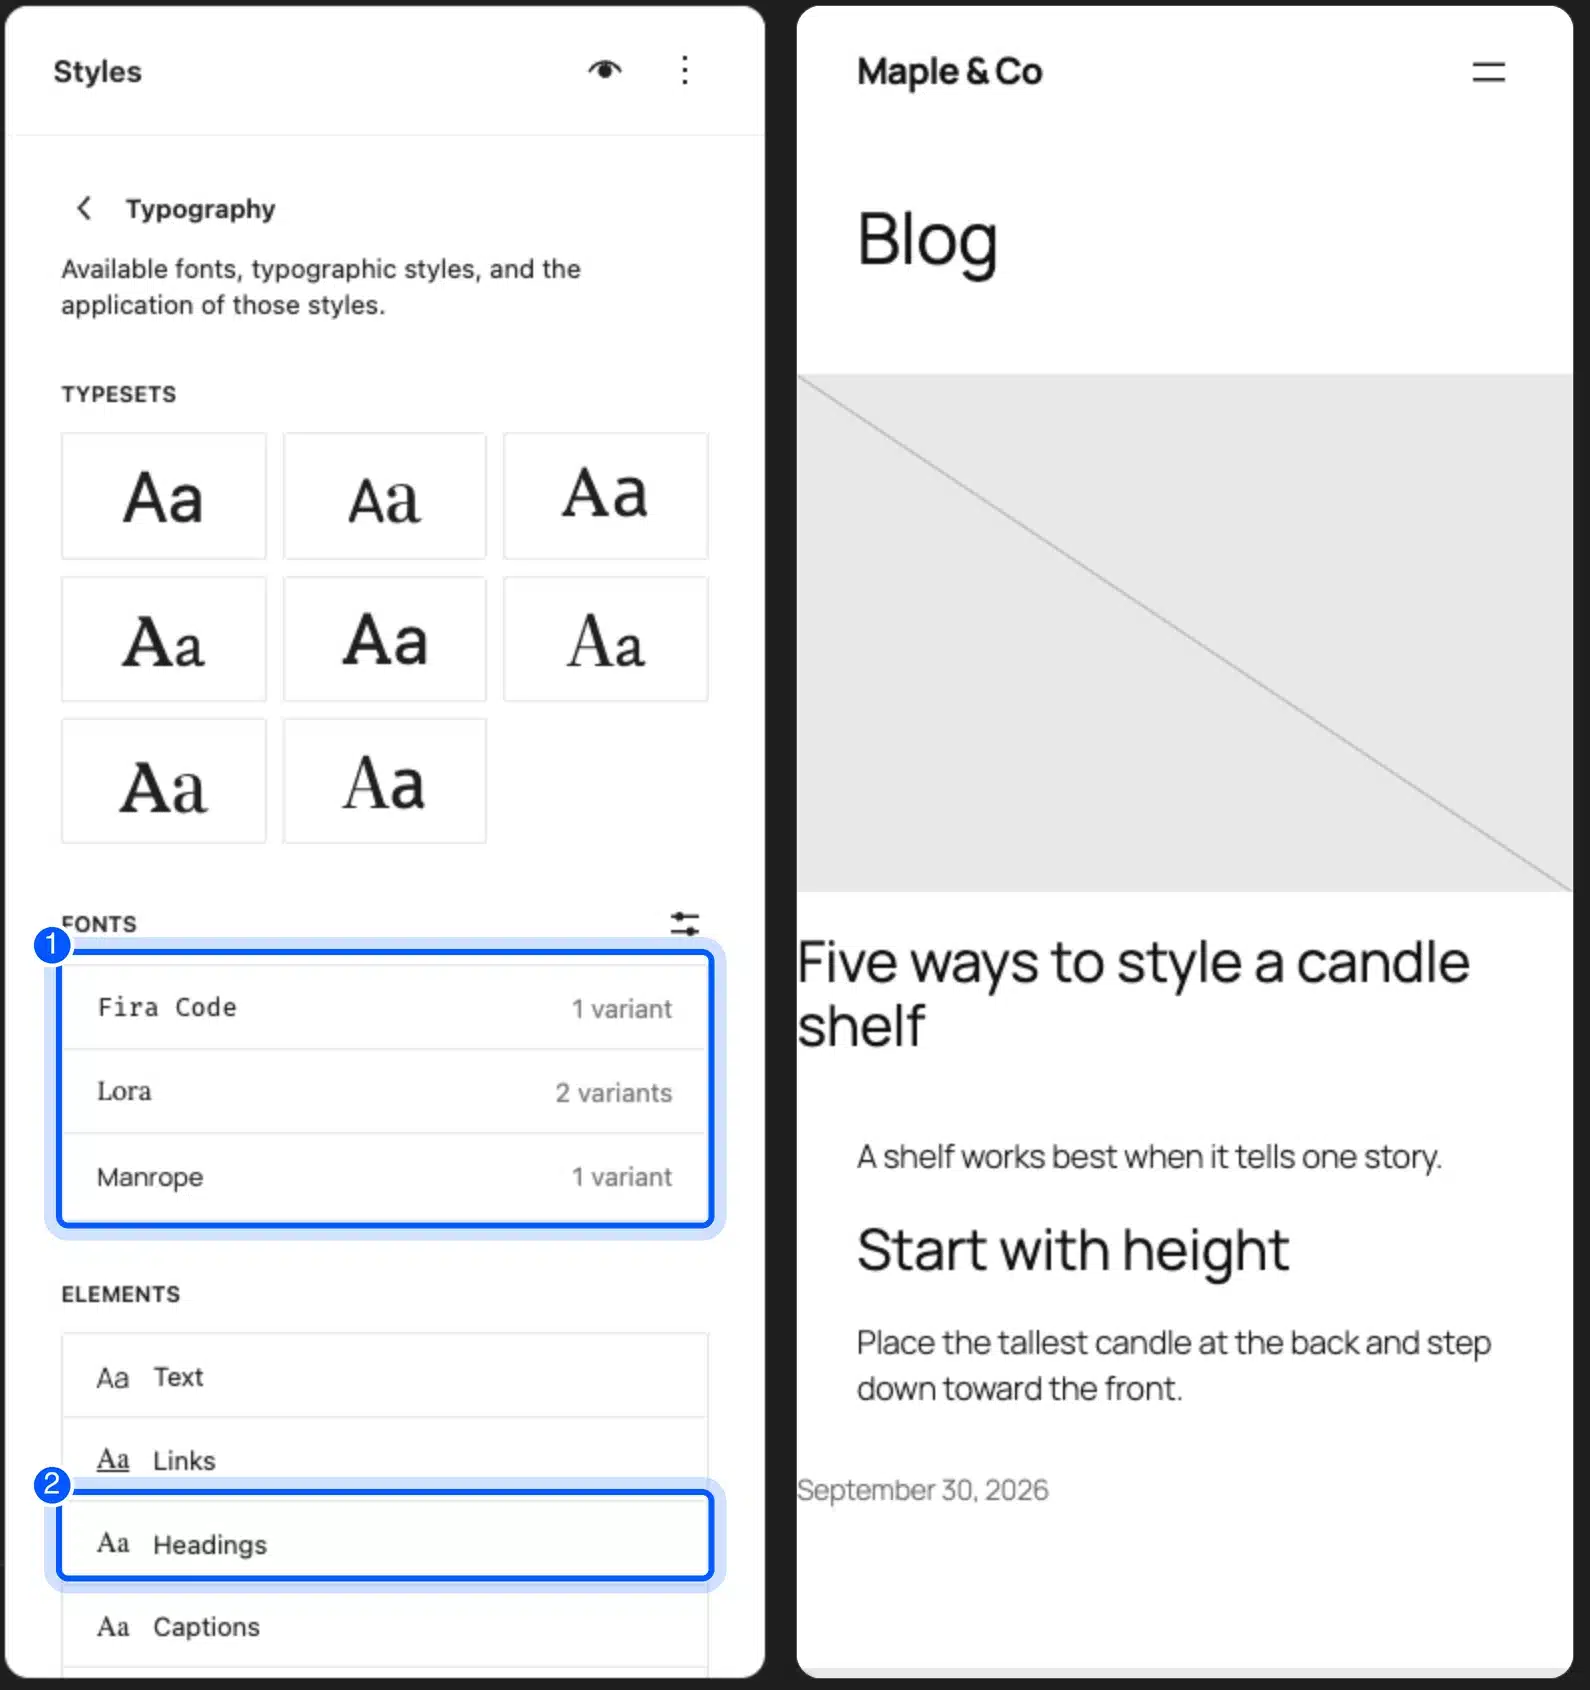
Under Elements you choose what to change: Text, Links, Headings, Captions or Buttons. Open Headings, and you can change all headings at once or pick one level from H1 to H6.
We opened Headings, clicked the Font list and chose Lora. The preview on the right showed our headings in Lora straight away. The body text stayed in Manrope, because Text is a separate element.
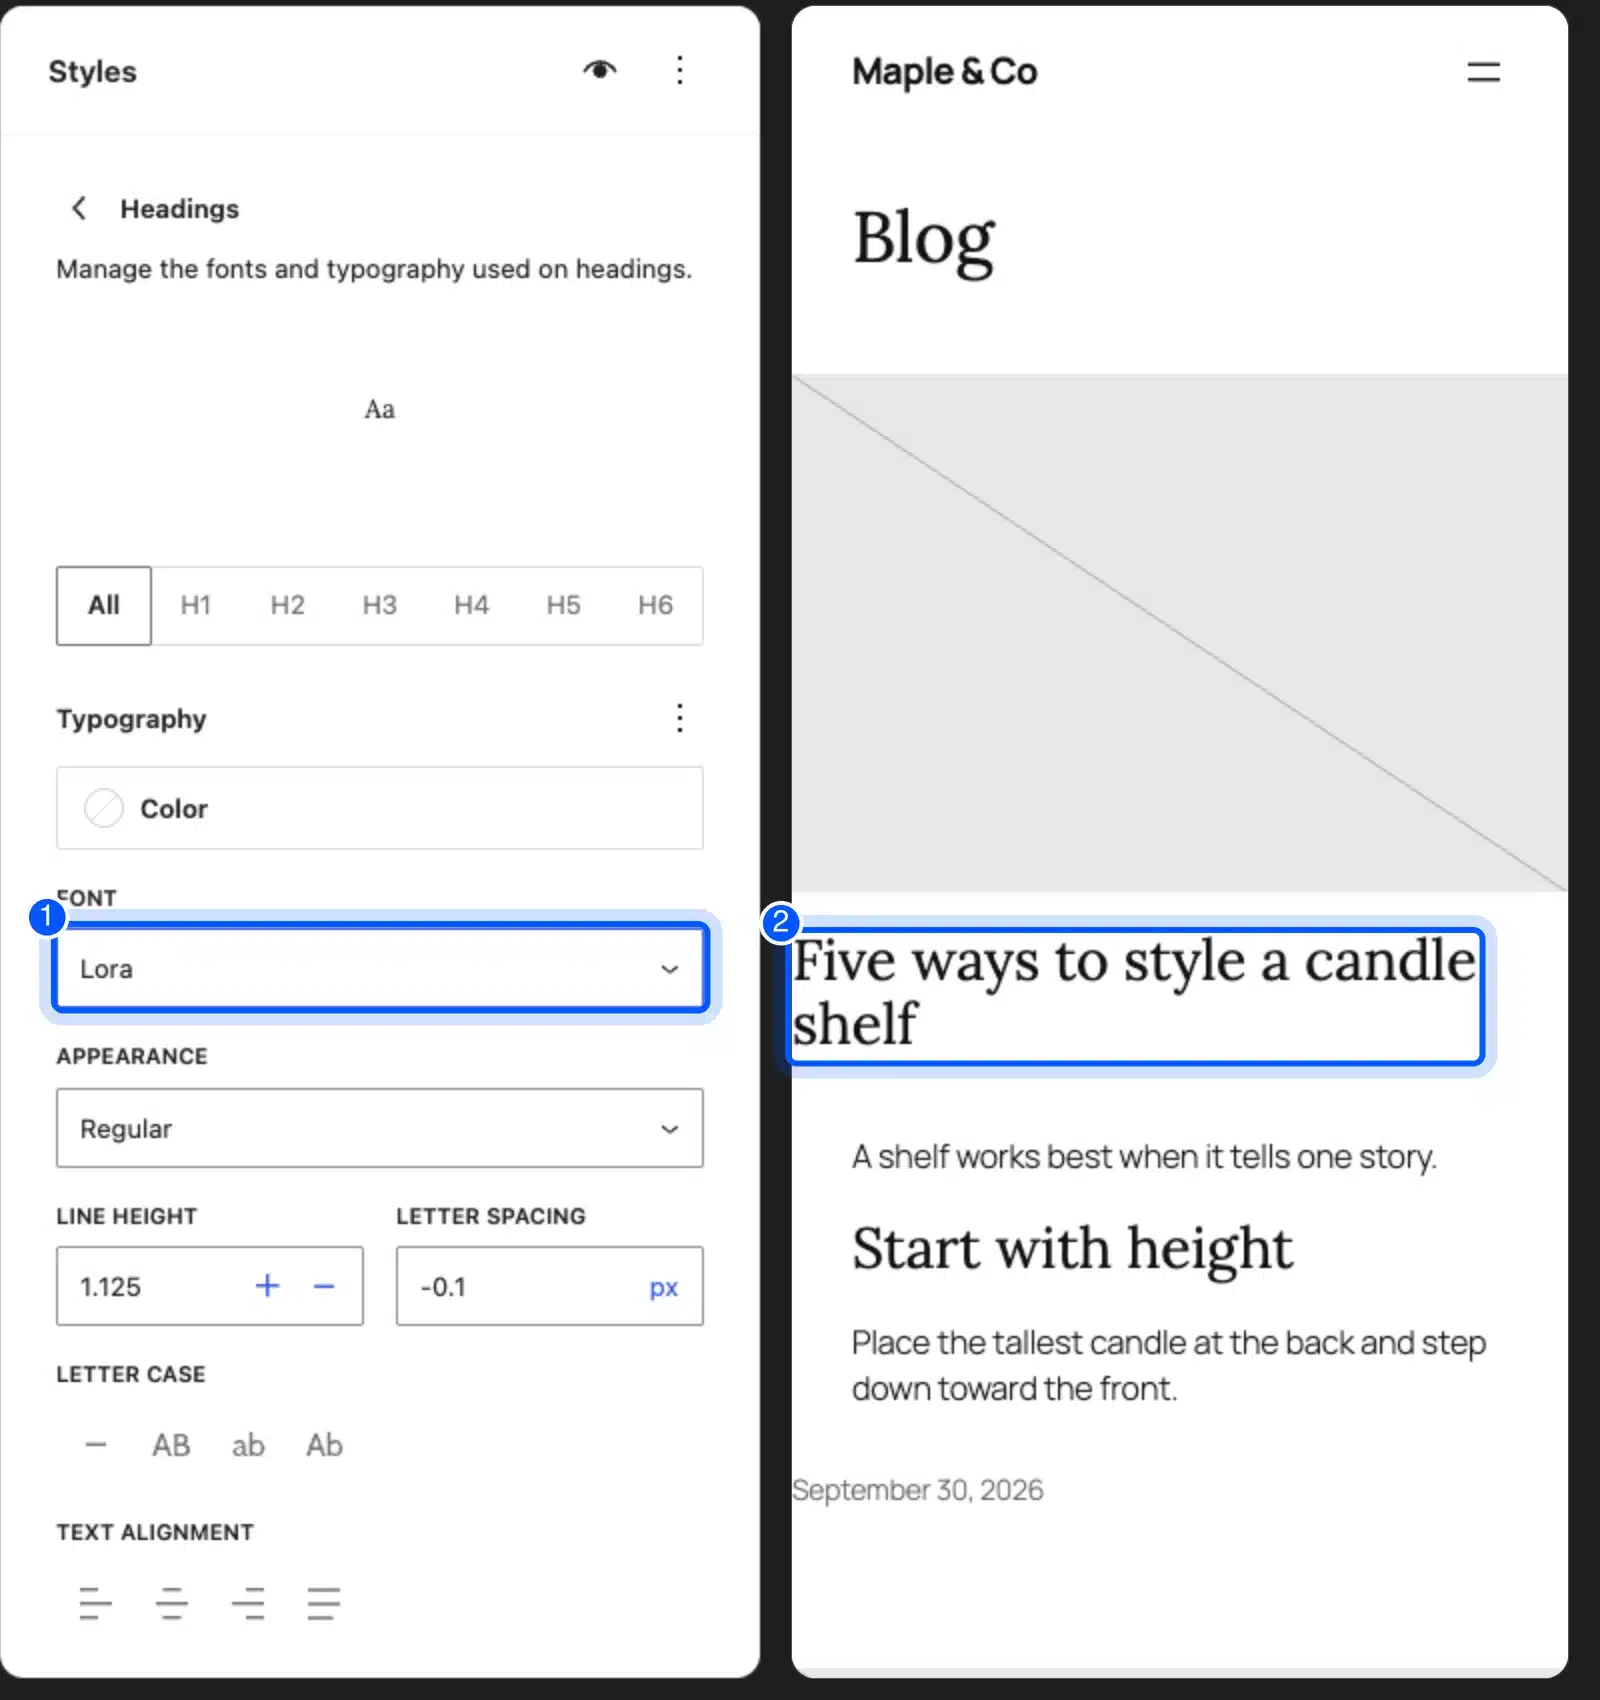
The button at the bottom left changed to Review 1 change after our edit. Click it and save to make the change live. We stopped at the preview on our test site and did not save.
Change the Font of One Block
Click a block, open the Block tab in the sidebar and find the Typography panel. The Font option is hidden by default, so open the three-dot menu on that panel and tick Font. A Font list then appears, and you can pick any font in your library.
On our test site, the Typography panel of a Paragraph block showed only Color and Font size at first. The three-dot menu listed Font among the tools that were switched off.
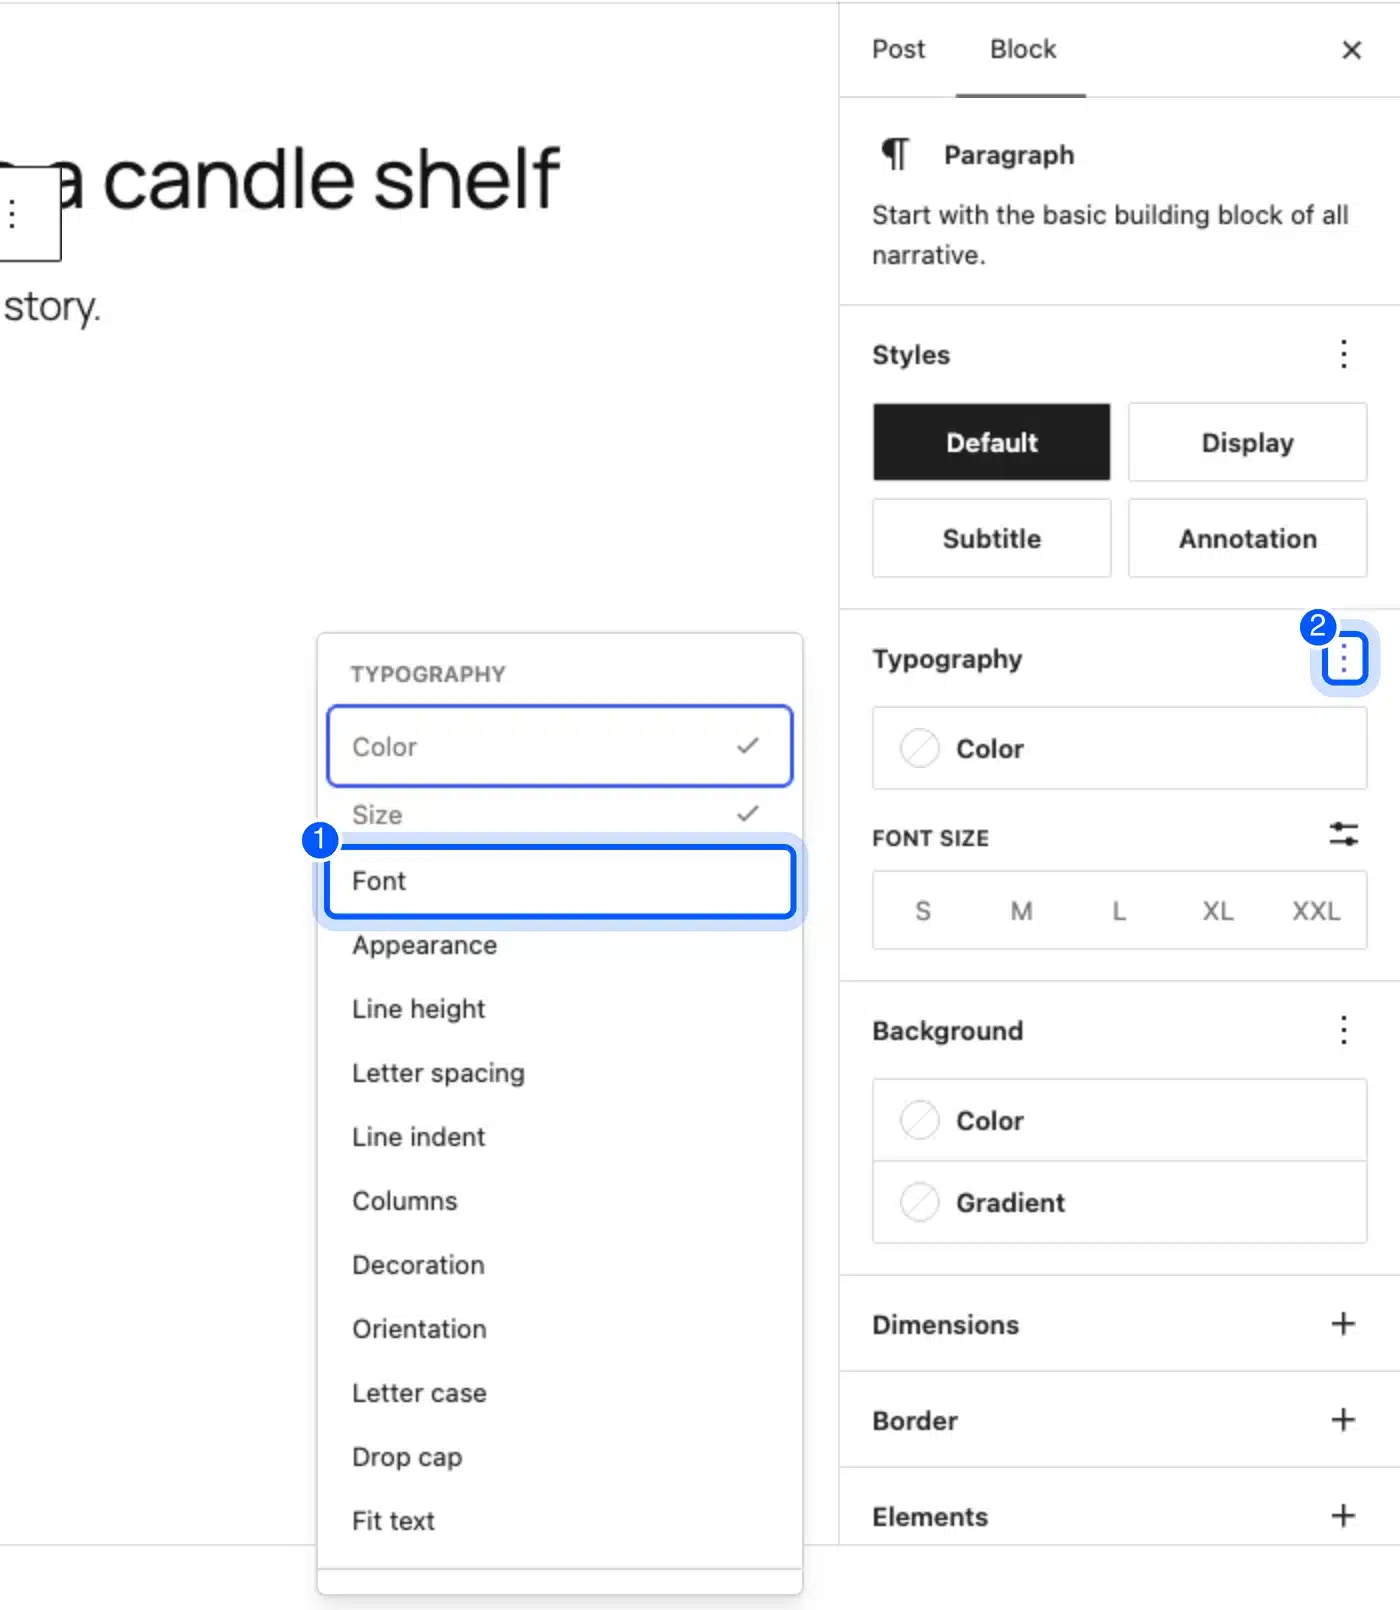
After we ticked Font, a Font list appeared under Color. We chose Lora, and the paragraph changed to Lora at once. Only that block changed, so every other paragraph kept the site font.
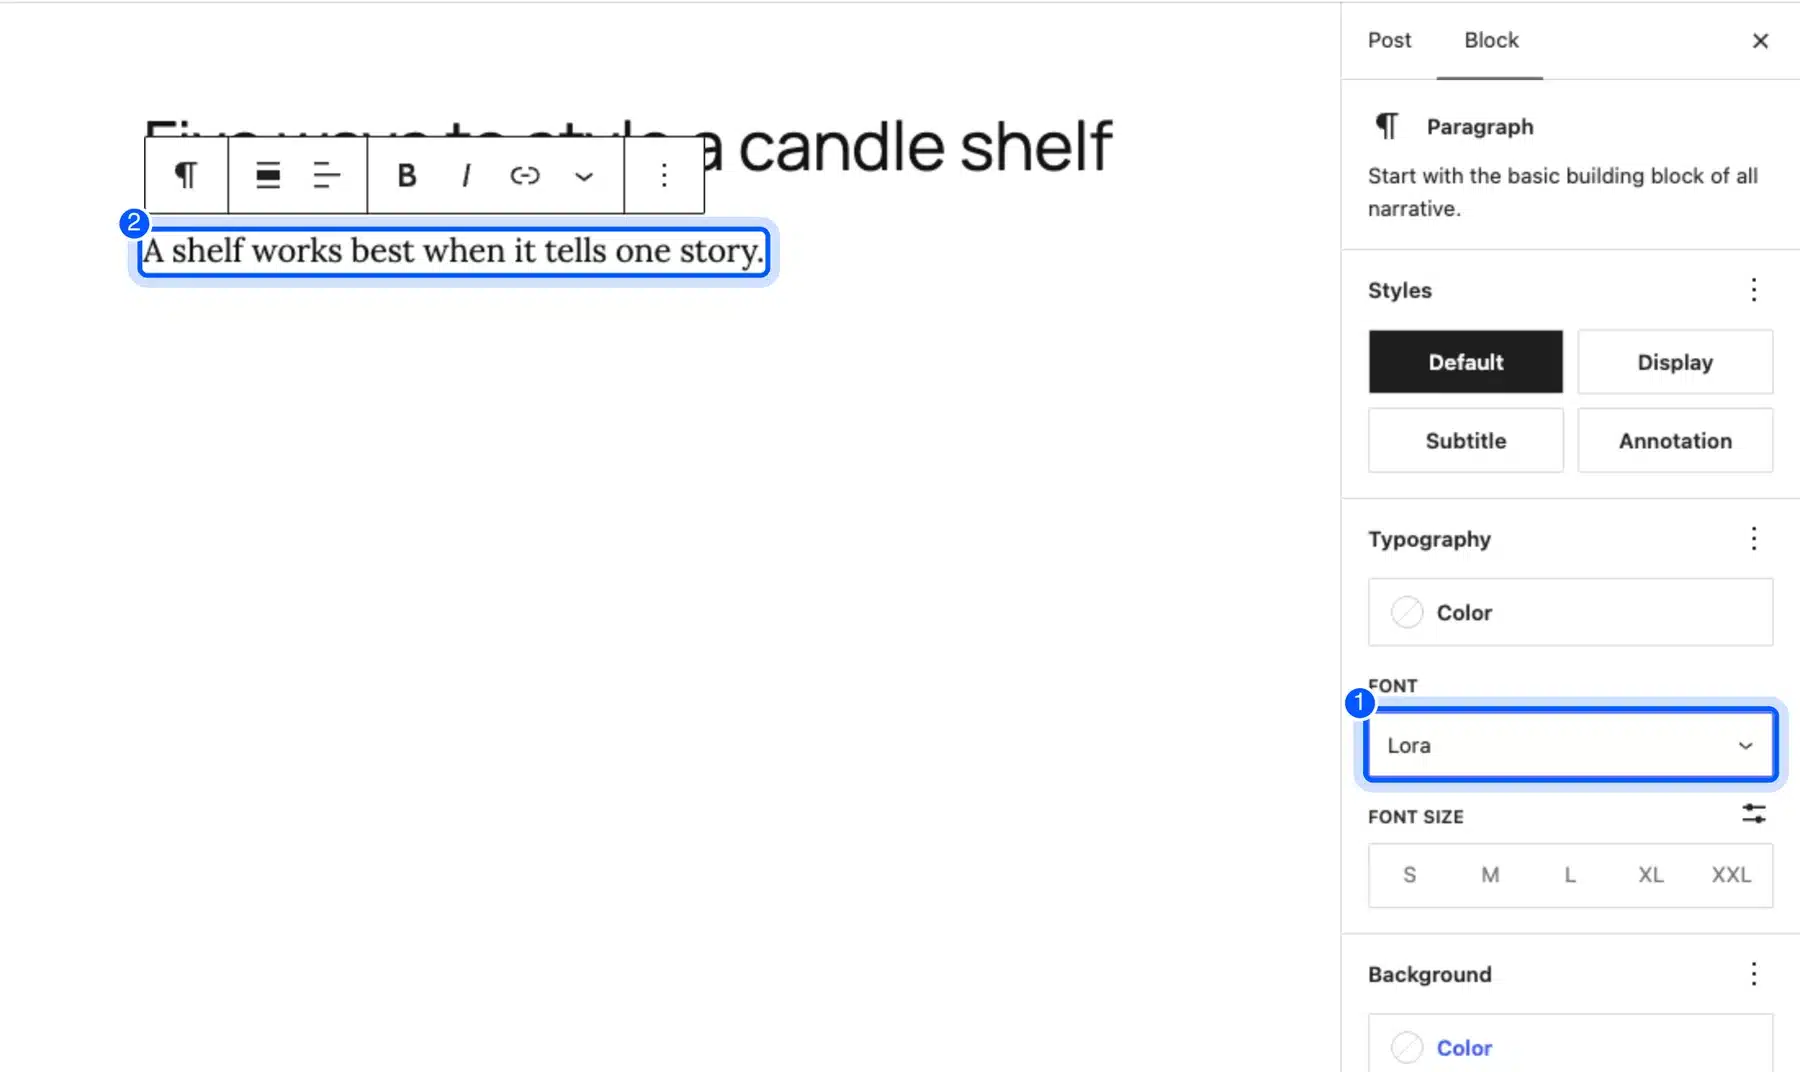
Use this for one-off cases, such as a quote or a callout. For a rule that applies everywhere, set the font in Styles instead, so you do not repeat the change on every page.
Change Fonts in a Classic Theme
Classic themes have no Styles panel, so the steps differ. Install the font in Appearance, then Fonts, and turn its variants on. Then open Appearance, then Customize, then Additional CSS, and set the font-family for the elements you want to change.
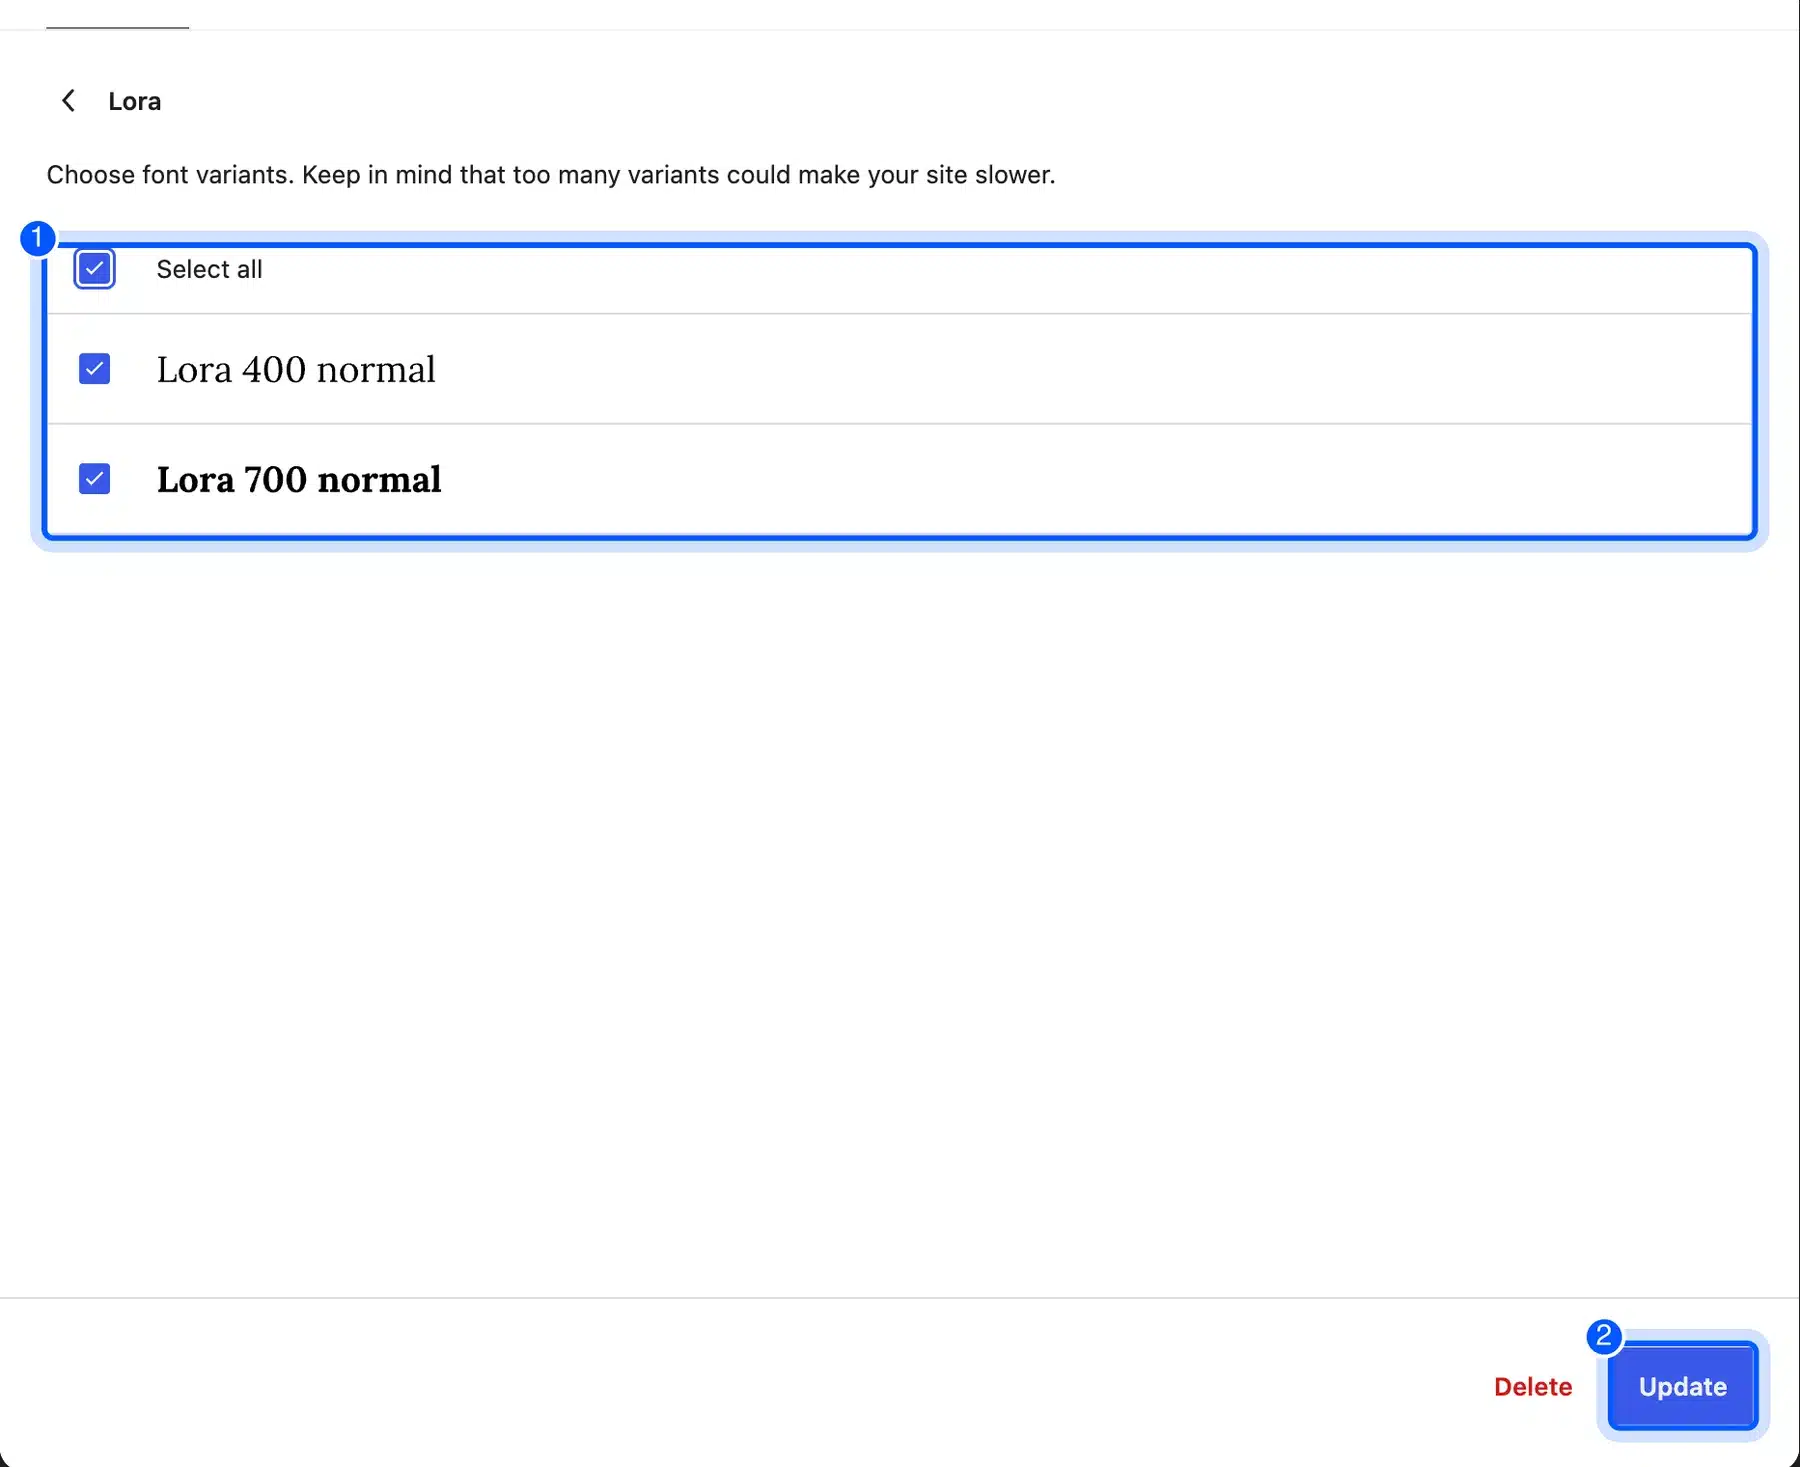
Here is the catch we found. After we switched to Twenty Twenty-One, the Library showed Lora with 0 of 2 variants active. The font was installed but switched off for that theme.
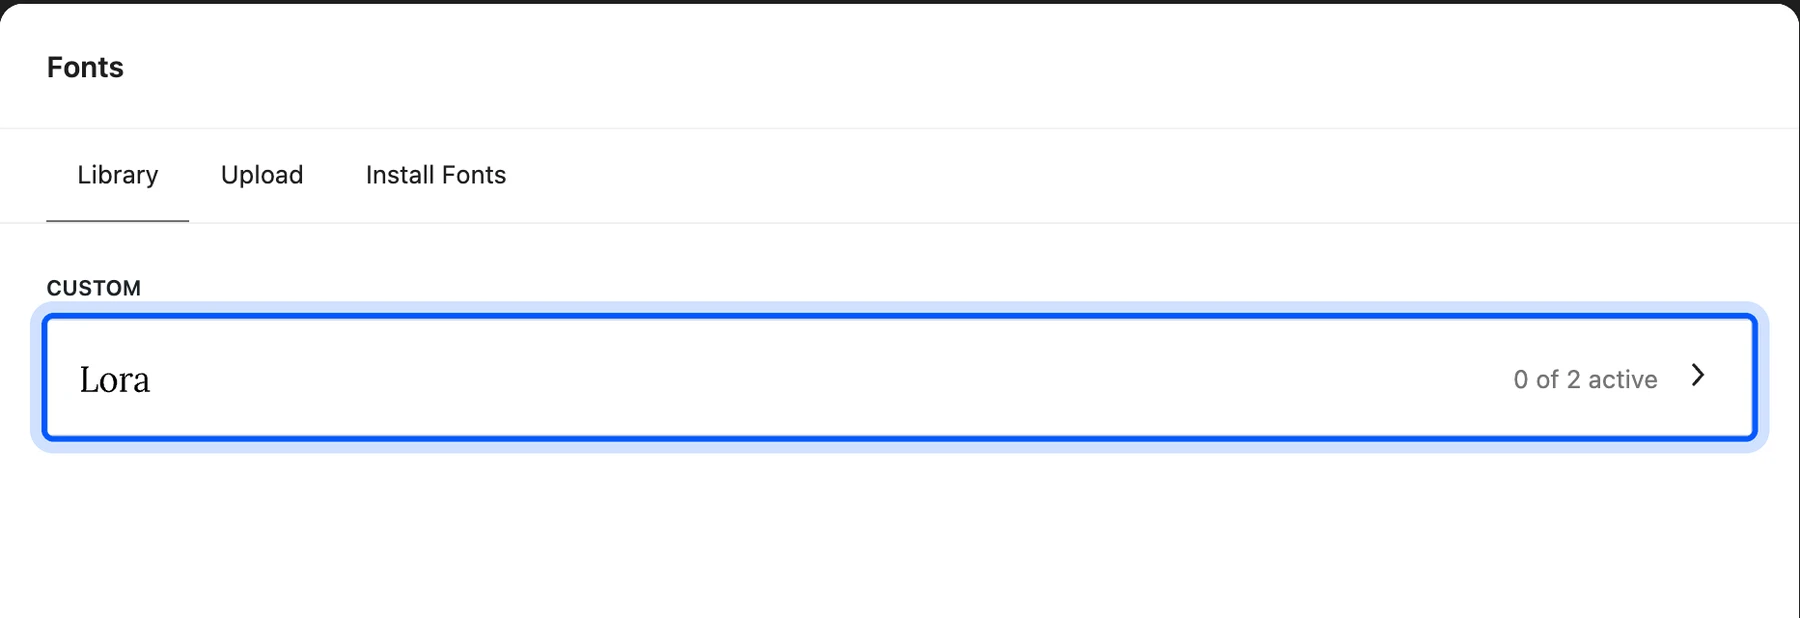
Click the Lora row, tick Select all, then click Update. Both variants switch on, and WordPress can load the font files for your theme.
Now go to Appearance, then Customize, then Additional CSS, and paste a rule. This one sets Lora on headings and post titles.
h1, h2, .entry-title {
	font-family: "Lora", serif;
}
The serif at the end is a fallback. Browsers use it if Lora fails to load.
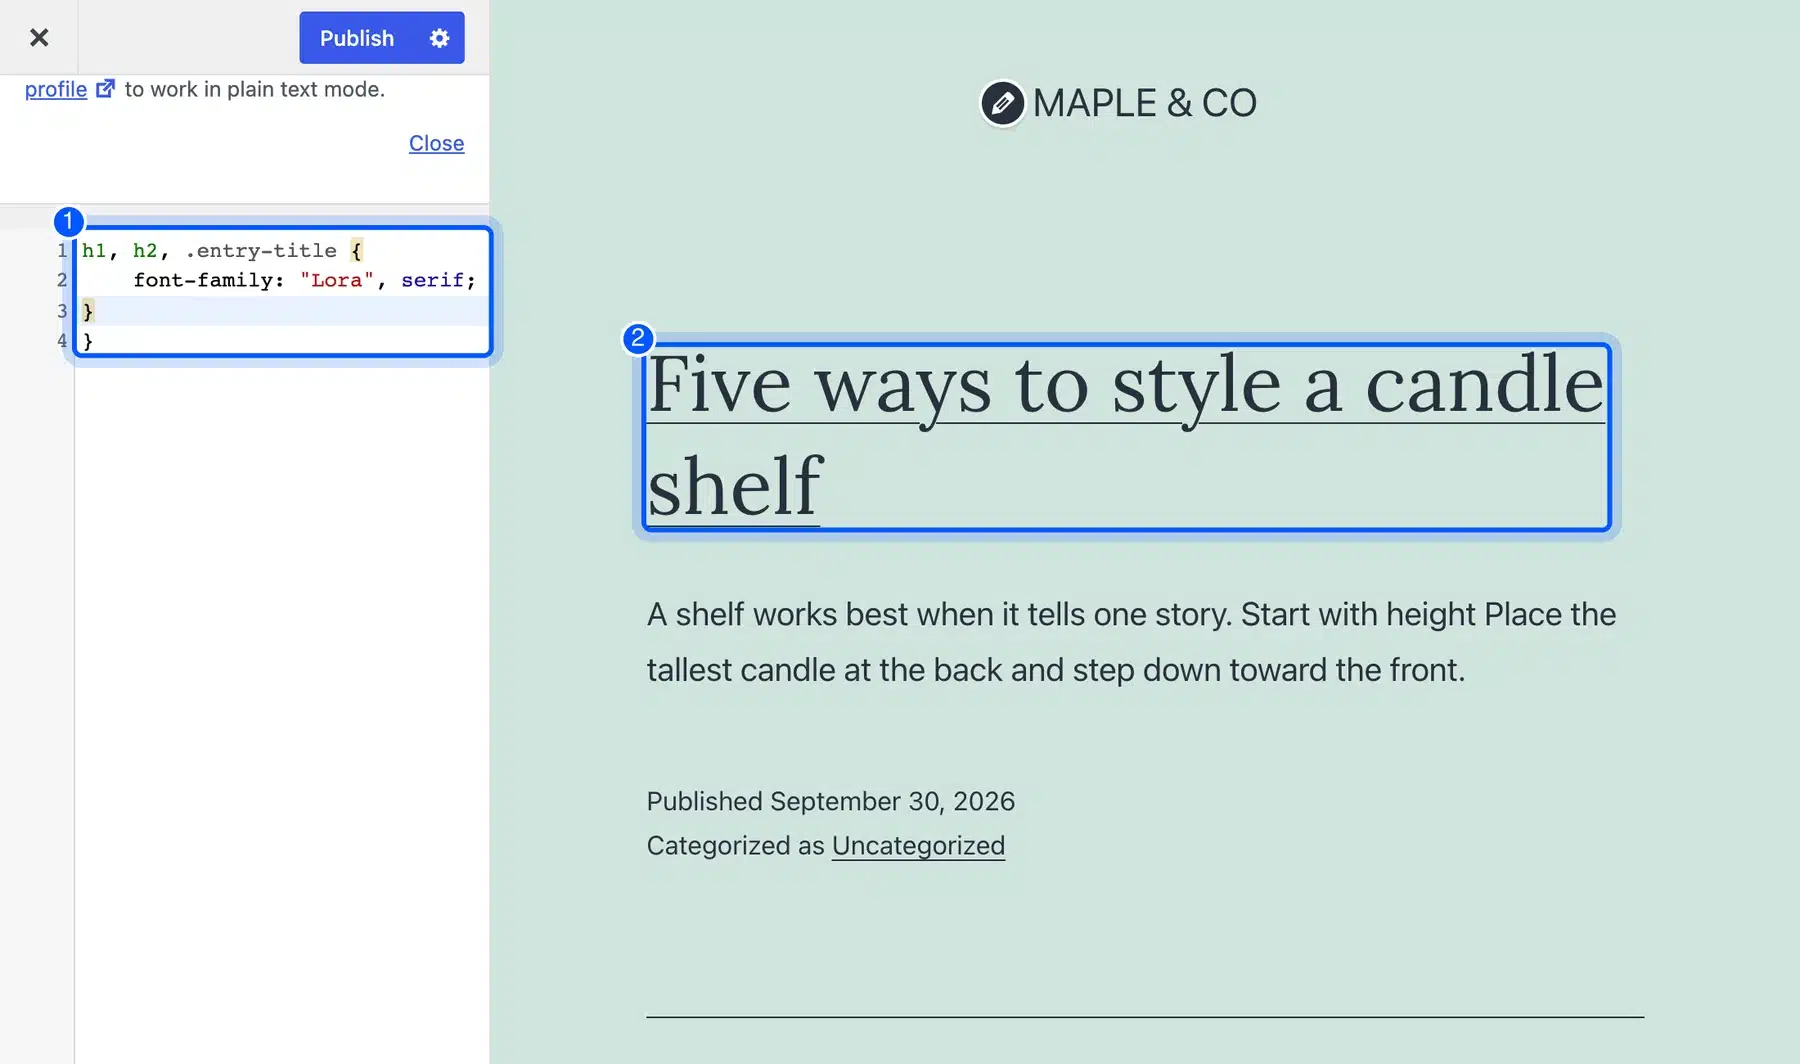
Without that activation step, our first test looked wrong. The same CSS rule showed a plain serif font instead of Lora, because the font files were switched off. Always check the variant count in the Library first.
Change Fonts in WordPress Theme Files With a Child Theme
The Customizer CSS box is fine for a few rules. To change fonts in WordPress theme files for good, put the CSS in a child theme, so a theme update cannot wipe it. Our guide to a WordPress child theme shows how to set one up.
Turn Off or Delete Fonts You No Longer Use
Open Appearance, then Fonts, and click the font family in the Library tab. Clear the checkbox of any variant you no longer want, then click Update. To remove the whole family, tick its box, click Delete and confirm the prompt.
The official docs say a notice reading Font family uninstalled successfully appears after you delete a font. Turning a variant off is the safer first step, because you can turn it on again later.
On our classic theme test, the variants screen showed both Update and Delete buttons at the bottom. Delete stays out of the way until you open a family.
Do You Need a Font Plugin?
Most sites no longer need a font plugin, because the WordPress Font Library installs and hosts fonts by itself. A plugin still helps if you use a page builder or an older WordPress version. Check that any plugin lists your WordPress version before you install it.
For example, the Fonts Plugin listing on WordPress.org says it adds Google Fonts, Adobe Fonts and uploaded fonts. It shows more than 200,000 active installations and lists a test up to WordPress 7.1.2 as of September 2026.
We did not install that plugin for this guide, so we cannot judge how it behaves. Try the built-in library first, since it needs no extra code on your site.
Change Font Size and Color Too
Font family, size and color are three separate settings, and everything above covers the family. On a block theme, size and color live in the same Styles panel. On a classic theme, you set them with CSS in the Customizer.
We wrote a full guide for each one. Read how to change font size in WordPress for headings, body text and mobile sizes. Read how to change font color in WordPress for text, links and buttons.
Not sure which font to pick? Our list of the best WordPress fonts compares readable options for headings and body text.
Choose Fonts That Load Fast
Pick few fonts and few variants, because every extra file adds to the download. Two families are enough for most sites: one for headings and one for body text. Install only the weights you use, and prefer the WOFF2 format.
The web.dev font best practices give four rules worth following. Use WOFF2 only, use fewer web fonts, use font-display: swap so text shows at once, and remove unused glyphs when you can. The guide is from 2022, but these rules still hold.
Local hosting helps with privacy, since your visitors do not call Google’s servers for each font. The web.dev guide adds a warning on speed. It says self-hosting is only faster with a CDN and HTTP/2, so do not expect a miracle.
If your fonts still slow the page, our WordPress speed optimization services team can audit what loads and when.
Fix Fonts That Do Not Change in WordPress
Most font problems have four causes, and you can check them in minutes. The variants are switched off, you changed the wrong element, your theme CSS wins, or a cache shows the old page. Check them in that order, since the first two need no code.
| What you see | Likely cause | Fix |
|---|---|---|
| Font missing from the Font list | The font is not installed or its variants are off | Open Appearance, then Fonts, and check the active count |
| Plain serif or sans-serif instead of your font | Variants switched off on a classic theme | Open the font, tick Select all, click Update |
| Headings changed but body text did not | Text is a separate element | Set the font under Text in Styles |
| Font works in the preview but not on the site | A cache plugin or CDN serves the old page | Clear the cache and reload |
| Your CSS rule has no effect | The theme uses a more specific selector | Use a more specific selector in your CSS |
After each fix, reload the page in a private window. That avoids your own browser cache.
If two rules fight, the more specific selector wins. A rule for .entry-title beats a rule for h1 on the same element. That is why the CSS rule above lists .entry-title next to h1 and h2.
Conclusion
Now you know how to change fonts in WordPress for both theme types. Add the font in Appearance, then Fonts. Then apply it in the Site Editor on a block theme, or with CSS on a classic theme.
The biggest trap is on classic themes, where an installed font can stay switched off. Check the active count in the Library before you write any CSS. For help with a custom design, see our WordPress development services.
Frequently Asked Questions (FAQs)
Q1. Where do I find fonts in WordPress?
Go to Appearance, then Fonts, in WordPress 7.0 and later. The Font Library has Library, Upload and Install Fonts tabs. On older sites, open the Site Editor and find the font manager in the Styles panel.
Q2. Can I upload my own font to WordPress?
Yes. Open Appearance, then Fonts, then the Upload tab, where WordPress accepts .ttf, .otf, .woff and .woff2 files. Make sure you have permission to use and share the font before you upload it.
Q3. Does WordPress host Google Fonts on my own server?
Yes, when you install them through the Font Library. WordPress downloads the files from Google and stores them on your site. Your visitors then load the fonts from your own server.
Q4. Why is my new font not showing on my site?
The most common cause is that its variants are switched off. Open the font in the Library and check the active count. Then check that you applied the font, and clear your cache plugin.
Q5. How many fonts should a WordPress site use?
Two is a safe start: one for headings and one for body text. More fonts add more files to download and can make your design look messy. Use bold and italic variants of the same family for emphasis.
Q6. Do custom fonts slow down my WordPress site?
They can. Each variant is a separate file that visitors download. Install only the weights you use, prefer WOFF2, and avoid loading fonts you no longer need.
Q7. How do I change font size or color instead of the font?
Those are separate settings from the font family. On a block theme, use the Styles panel. Our guides to changing font size and changing font color cover both.
Q8. Can I use a different font on one page only?
Yes, but the steps depend on your theme. On a block theme, open the page in the editor and use the Typography panel on a block. On a classic theme, target that page with a CSS rule in the Customizer.