
You can create a multilingual WordPress site with one translation plugin, one URL structure and a language switcher. WordPress core can run its dashboard in many languages but it publishes your content in one language. A translation plugin adds a translated copy of each page under its own web address.
We tested the setup in October 2026 on a WordPress 7.1.3 test site with TranslatePress 3.3.8 and WooCommerce 11.2. Every screenshot in this guide comes from that site or from the vendor page we name.
This guide covers URL choices and a six step TranslatePress setup with real screenshots from our test. It also explains how WooCommerce text behaves and what the main plugins cost in 2026. You will finish by checking the hreflang tags that tell Google which page belongs to which language.
Does WordPress Support Multiple Languages?
WordPress supports many languages in its dashboard but publishes each page in one language. The Site Language setting under Settings > General only changes the dashboard language according to the WordPress documentation. A translation plugin adds the languages your visitors see and stores each translation next to the original.
That split explains why every guide starts with a plugin choice. The plugin decides where translations live and how translated pages get their web addresses. It also decides which languages you get for free.
Two numbers frame the choice. TranslatePress lists more than 400,000 active installations on its WordPress.org page. Polylang lists more than 900,000 on its own WordPress.org page.
Both are free to install and both sell paid upgrades.
You do not need a second website for this. All versions of a page can live on one WordPress install with one admin screen.
Our guide to creating a WordPress site from scratch covers the base setup if you have not built the first language yet.
Plan Your Languages and Content First
A multilingual website starts with a short plan for languages and pages. Pick the languages your buyers already search in and decide which pages to translate first. Name one person who reads each translation before it goes live and signs off the result.
Start with the pages that earn money or answer the first question a buyer asks. For a store that means the home page and the product pages. It also means the cart and checkout and the shipping and returns policy.
- Languages: Choose one new language first. A second language doubles your review work and a third triples it.
- Priority pages: List the ten pages visitors use most in your analytics and translate those first.
- Translator: Name one person who reads every translation before it goes live.
- Reading direction: Check that your plugin handles right to left scripts if you plan an Arabic or Hebrew version. Polylang lists RTL support on its WordPress.org page.
- Currency and units: Decide whether prices stay in one currency. A free translation plugin changes words and leaves prices alone.
Keep the first launch small. A site with ten fully translated pages beats a site with a hundred pages that mix two languages. Our guide to website structure shows how to map the page tree before you copy it into a second language.
Pick a URL Structure for Your Multilingual Website
A multilingual website needs one web address per language version. Google lists a country domain, a subdomain, a subdirectory and a URL parameter as the four options for translated pages. A subdirectory such as example.com/de/ is the easiest to run on one host.
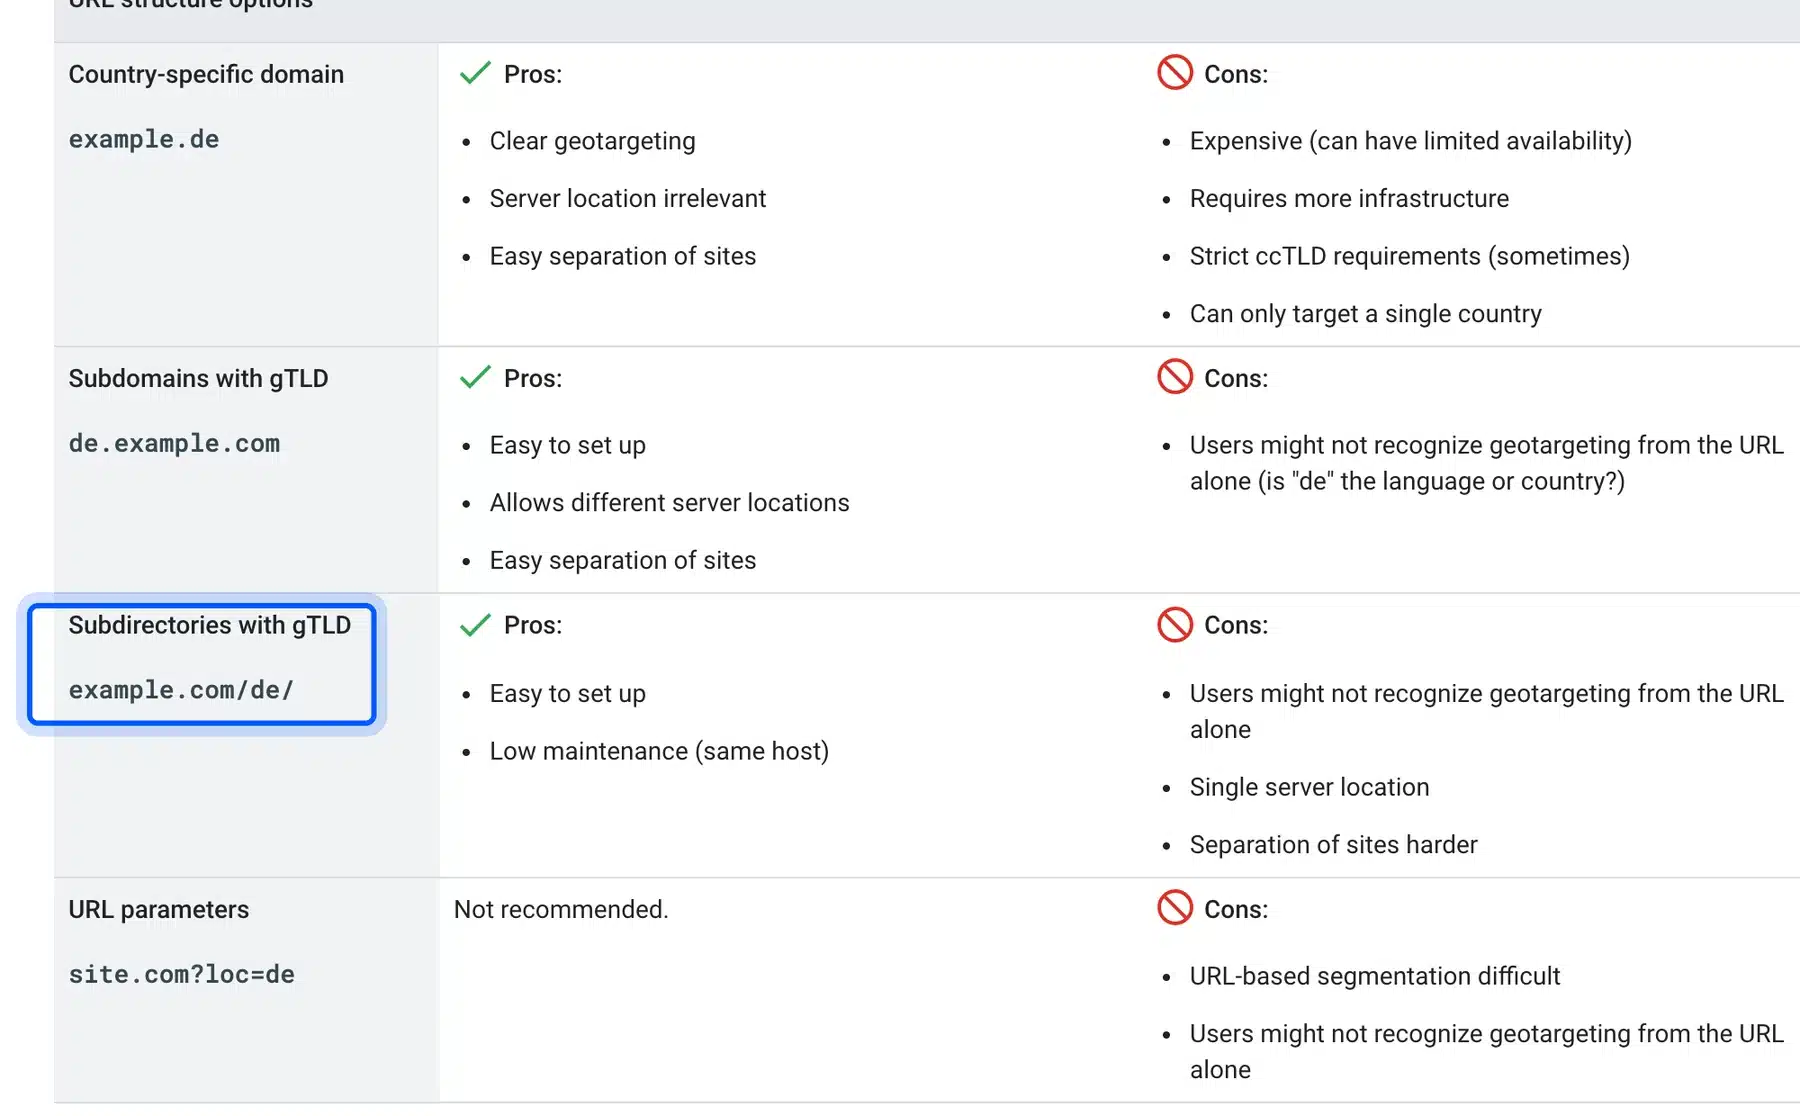
Google’s own table of URL structures marks the subdirectory as easy to set up and low maintenance because everything stays on the same host. The same table warns that a subdirectory runs from a single server location. It also marks URL parameters as not recommended.
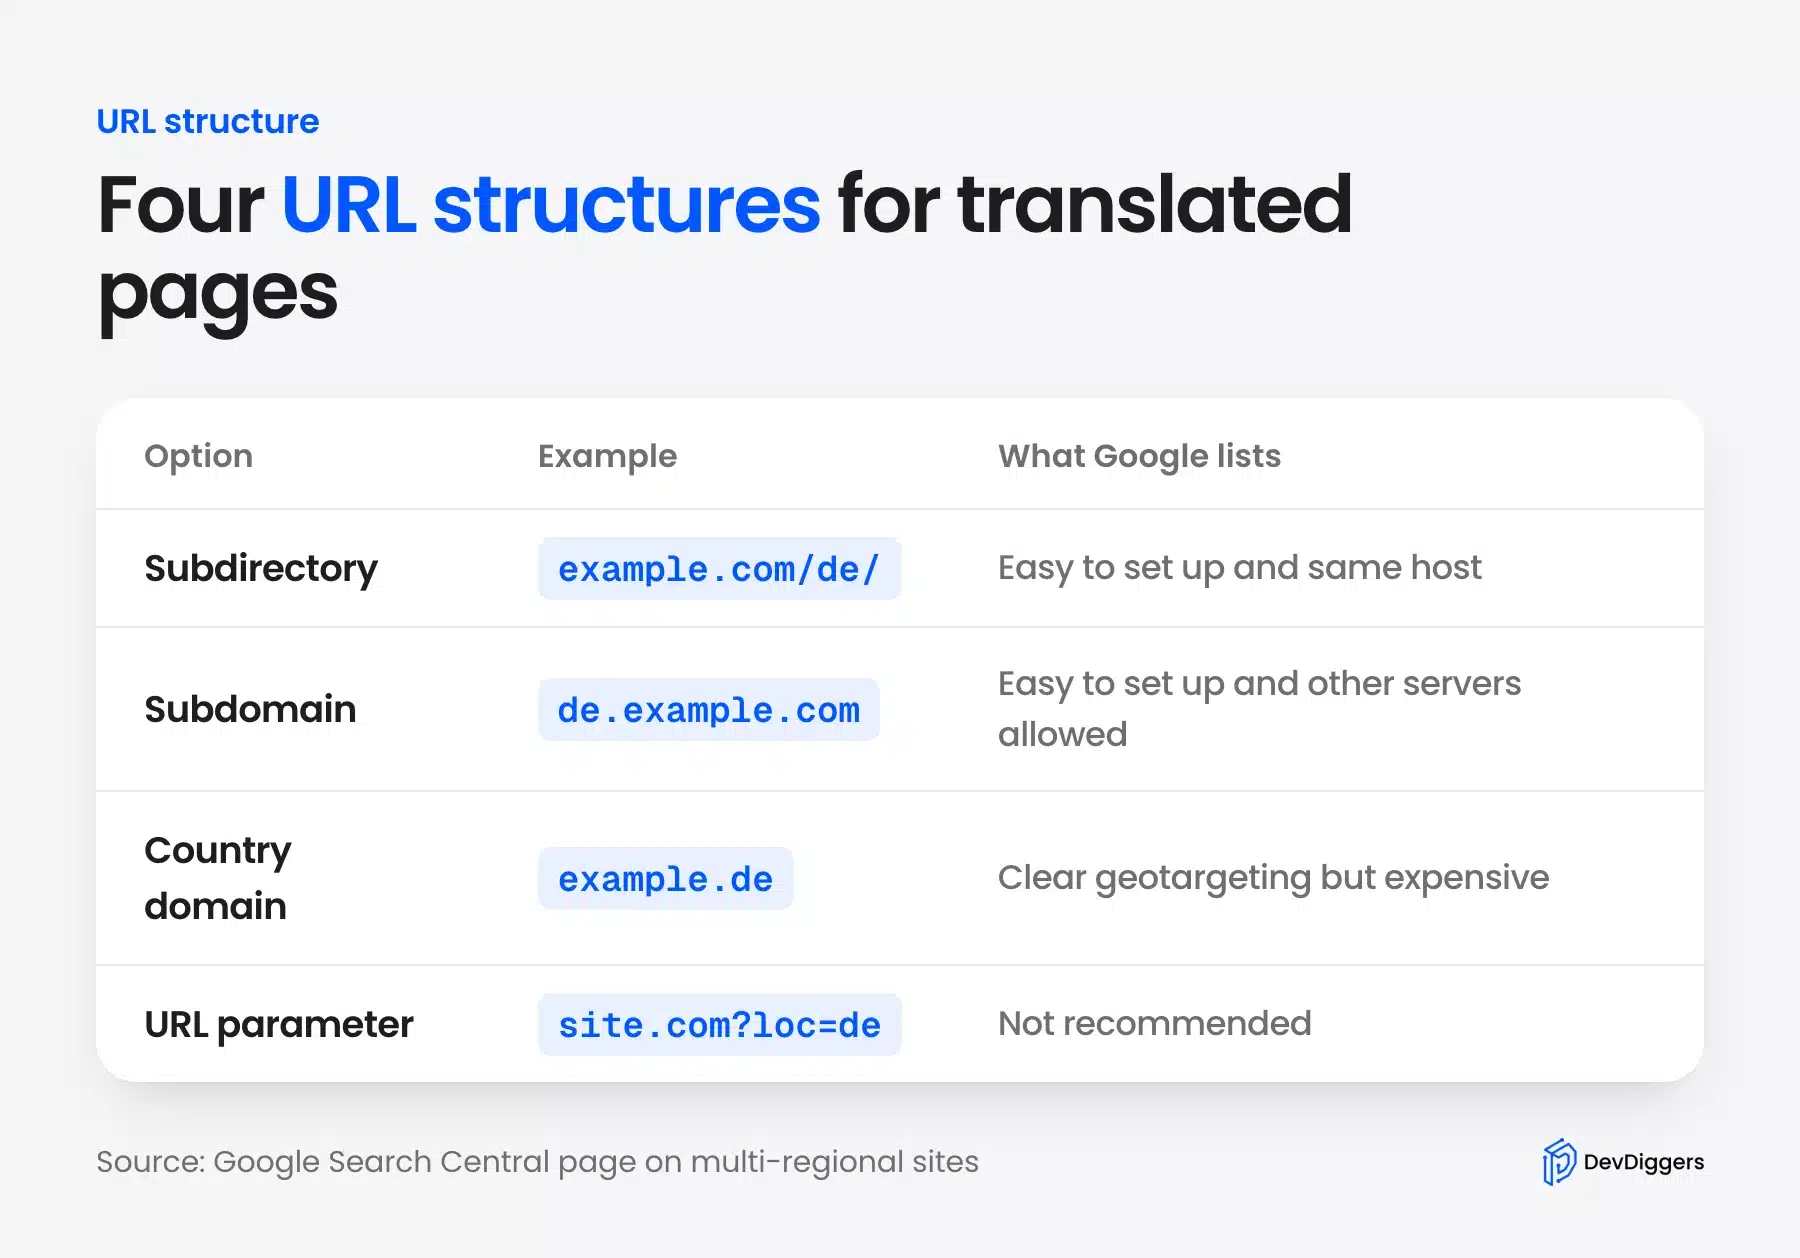
Here is the trade off in plain terms. A country domain gives the clearest signal for one country but costs more and covers only that country.
A subdomain lets you host each language on a different server but needs more setup. A subdirectory keeps one domain and one hosting account.
Tip: Pick the structure before you translate anything. Moving from example.com/es/ to es.example.com later means redirecting every translated page.
Google also gives two rules for how visitors reach a language. It recommends separate URLs for each language instead of cookies or browser settings.
It also tells site owners to avoid redirecting visitors by guessing their language. TranslatePress follows the first rule because every language gets its own folder such as /es/.
How to Create a Multilingual WordPress Site With TranslatePress
You can create a multilingual WordPress site with TranslatePress in six steps. Install the plugin and add a second language before you translate pages in the visual editor. Then add a switcher and review the automatic translation limits and check the translated page.
TranslatePress is the best fit for a first multilingual site because its editor shows the real page beside the translation fields. We used it for the whole test.
The free version translates into one extra language. We added Spanish to an English site.
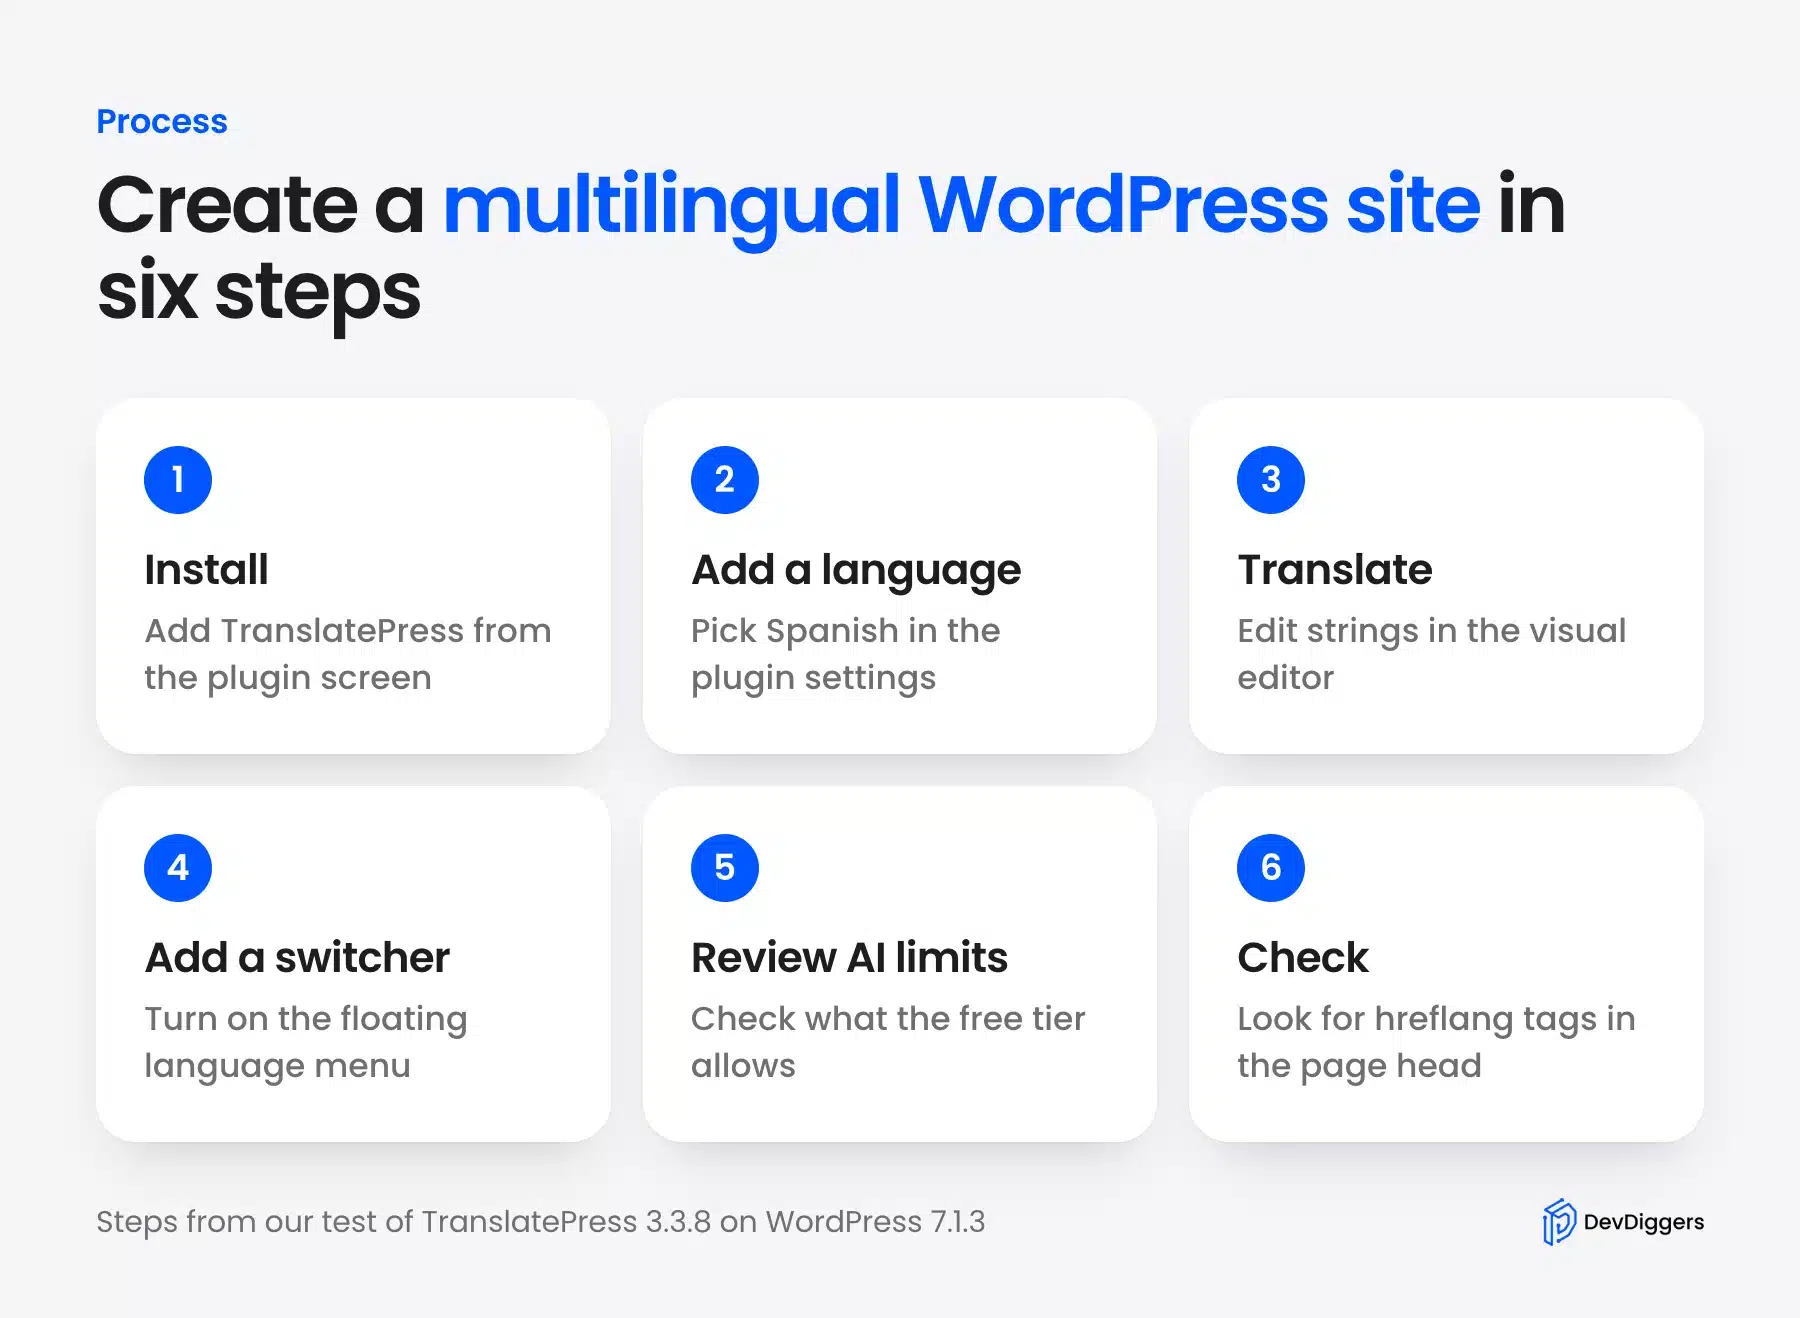
Step 1: Install TranslatePress
Open Plugins > Add Plugin in your dashboard and search for TranslatePress. The plugin from Cozmoslabs shows 400,000+ active installations and a Compatible label for WordPress 7.1.3 on our test site. Click Install Now and then Activate.
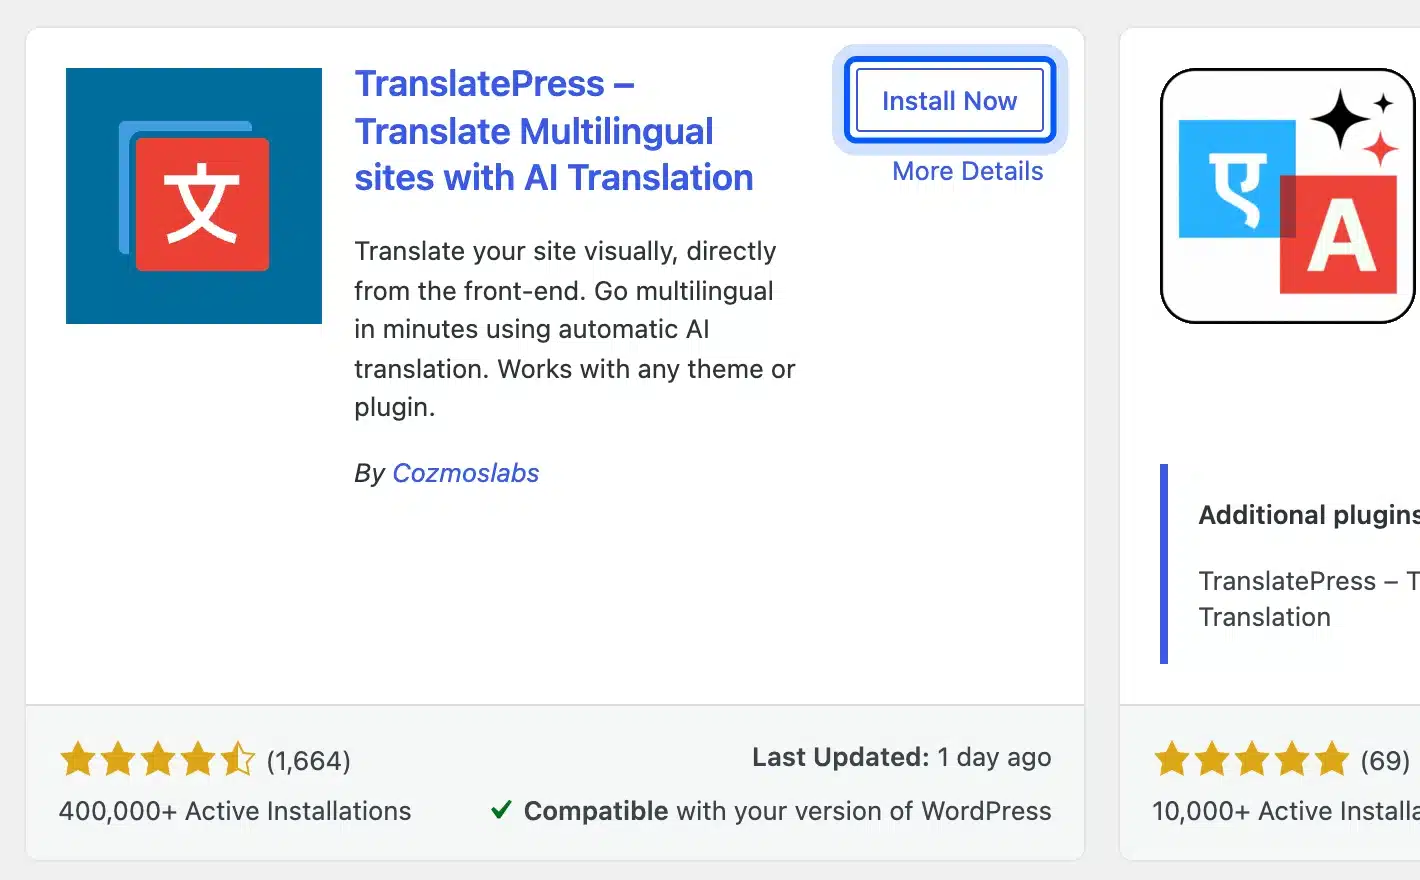
After activation the plugin shows a screen that offers update notifications and diagnostic data sharing. We clicked Skip and the plugin worked normally. The settings now live under Settings > TranslatePress.
Step 2: Add Your Second Language
Open Settings > TranslatePress and stay on the General tab. The Default Language list sets the language your content is written in.
Our test site used English (United States). Pick Spanish (Spain) in the Select language list and click Add.
The plugin fills in a language code of es_ES and a URL slug of es. Your Spanish pages now live under the /es/ folder of your site. Click Save Changes to store the language.
Scroll down to Language Settings for three more options. Use Native language name shows Español instead of Spanish in the switcher. Use a subdirectory for the default language adds a folder for your first language too.
The third option is Force language in custom links and it was already checked on our site. It keeps visitors in the language they chose when a link has no language folder.
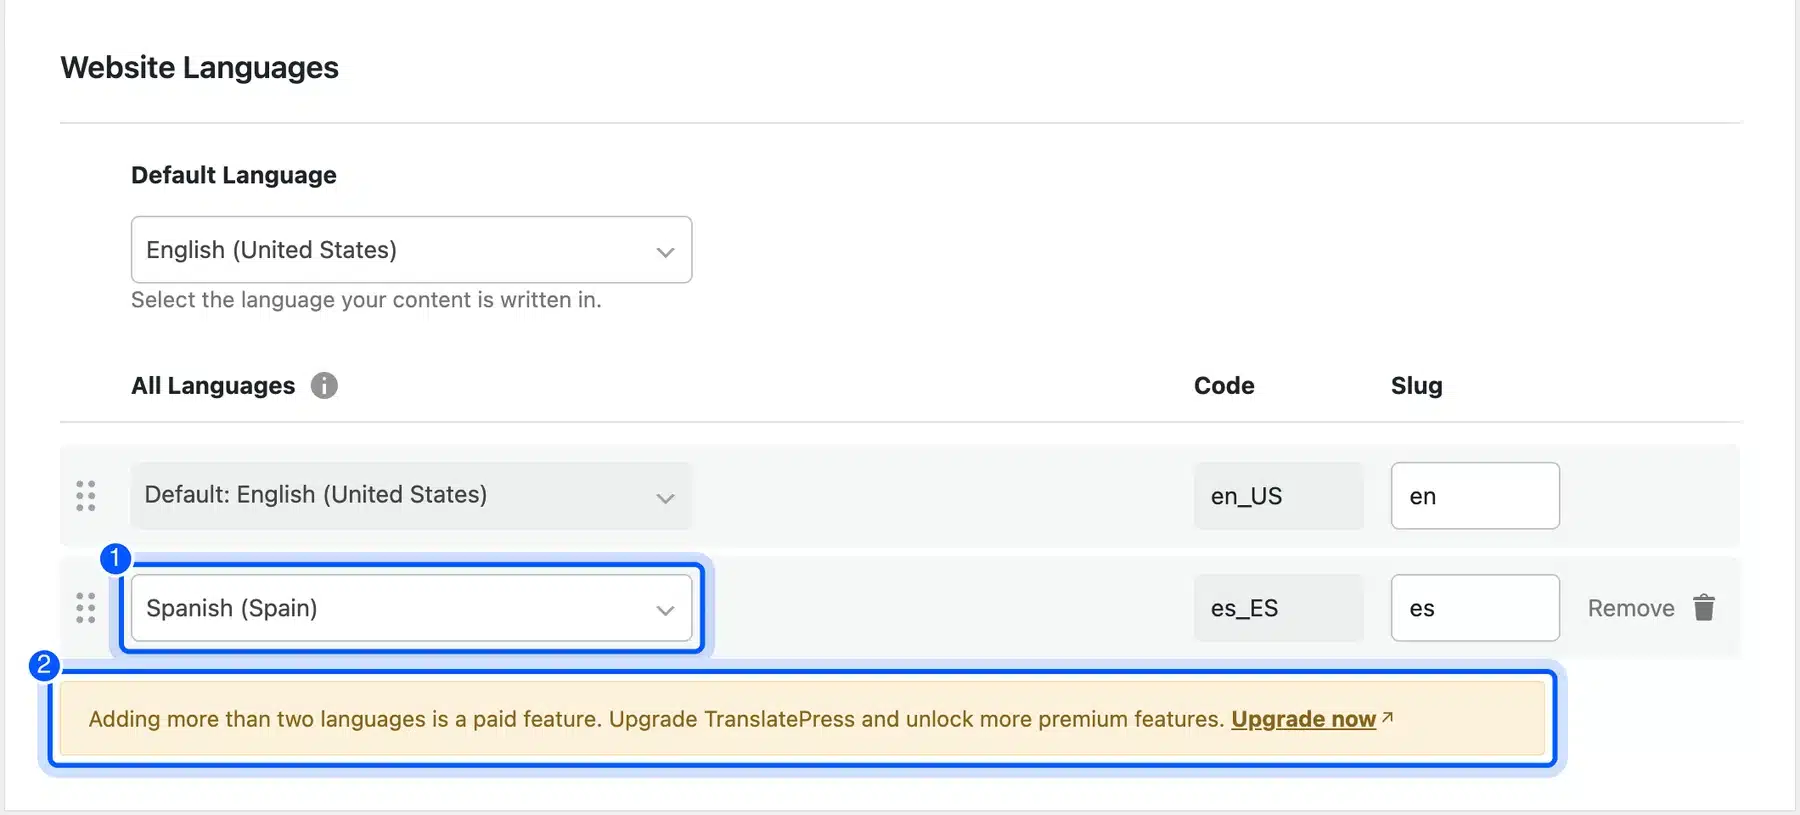
The same screen shows the free limit. Once Spanish was in the list the plugin displayed the line “Adding more than two languages is a paid feature” in version 3.3.8. The free plugin therefore covers the default language plus one more.
Worth checking: The slug field lets you change /es/ to another folder name. Change it now because renaming it after launch changes every translated address.
Step 3: Translate Pages in the Visual Editor
Click Translate Site in the admin bar to open the editor. The page you are viewing appears on the right and the translation fields appear on the left. Choose Spanish in the first list and pick a string in the Select string to translate list.
Each string shows its English text under From English and an empty box under To Spanish. Type the Spanish text in that box and click Save. Undo and redo arrows sit under the string list and a Discard changes link sits under each box.
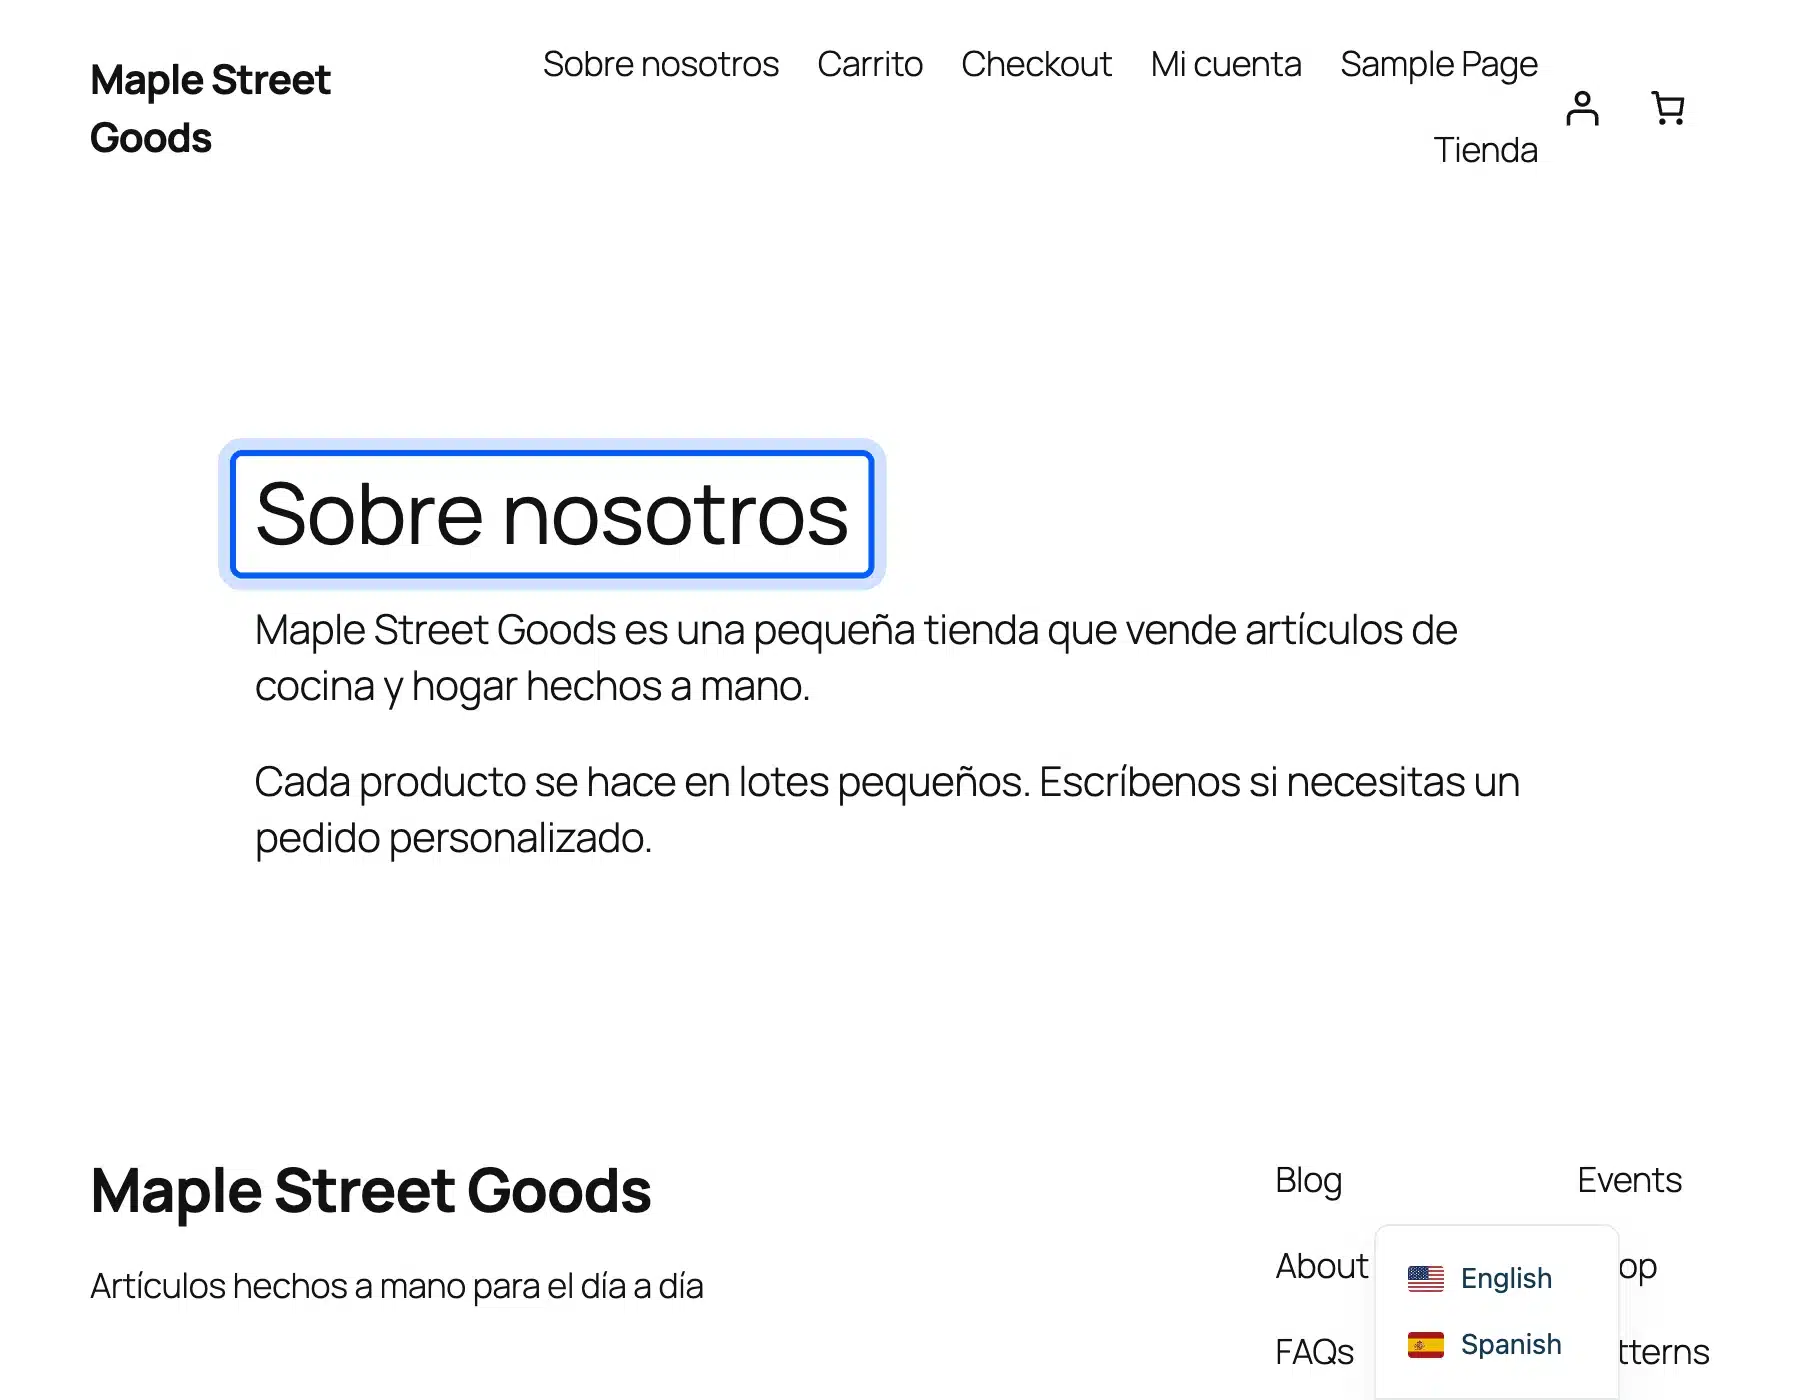
We translated the About Us page headline and both paragraphs this way. The preview switched to Spanish after saving.
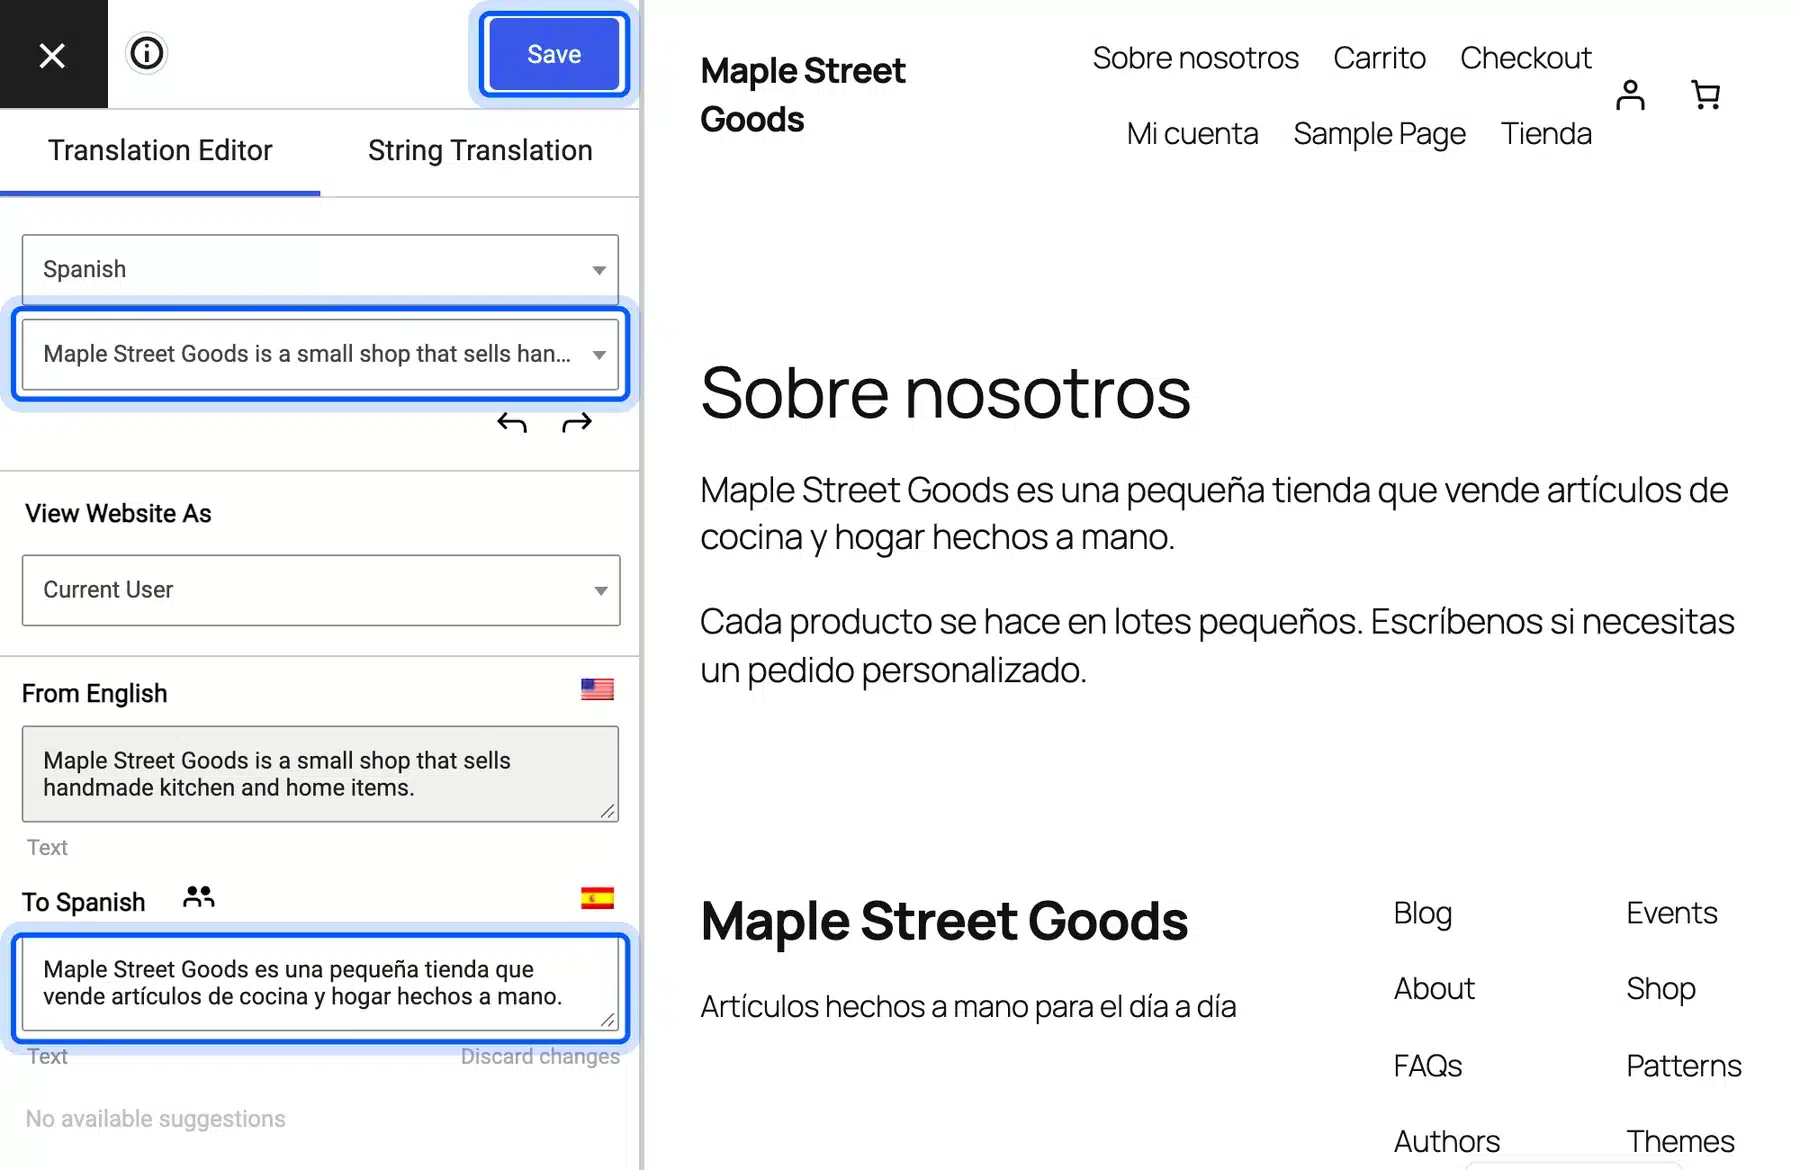
Menu labels and footer text show up as strings in the same list. Our test theme listed About Us and Cart and Shop there.
We typed Sobre nosotros and Carrito and Tienda. Words that the editor did not list stayed in English.
Step 4: Add a Language Switcher
Open the Language Switcher tab in the TranslatePress settings. It has three sub tabs named Floating and Shortcode and Menu Item. The floating switcher was already enabled on our site and it appears as a small flag and language name in the corner of every page.
The Switcher Type setting chooses between a dropdown and languages side by side. Four presets named Default and Dark and Border and Transparent change the colors. The floating switcher showed English and Spanish on our front end when we hovered over it.
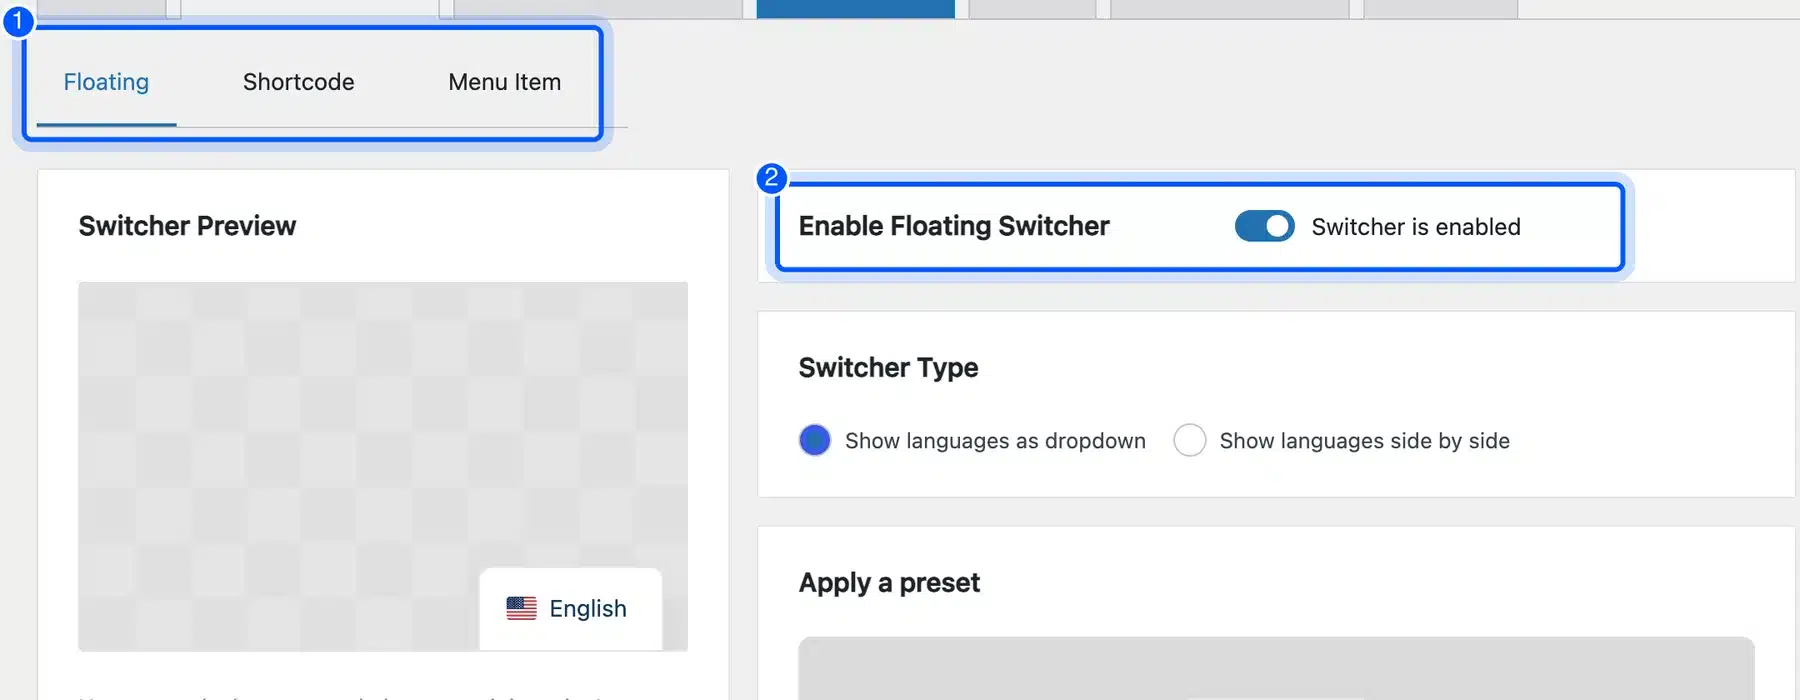
The Shortcode tab gives you [language-switcher] to paste into any page or widget. We added it to a Contact page and a dropdown appeared inline. A Language Switcher block in the editor does the same job according to the note on that tab.
The Menu Item tab sends you to Appearance > Menus. Our block theme Twenty Twenty-Five has no Menus screen.
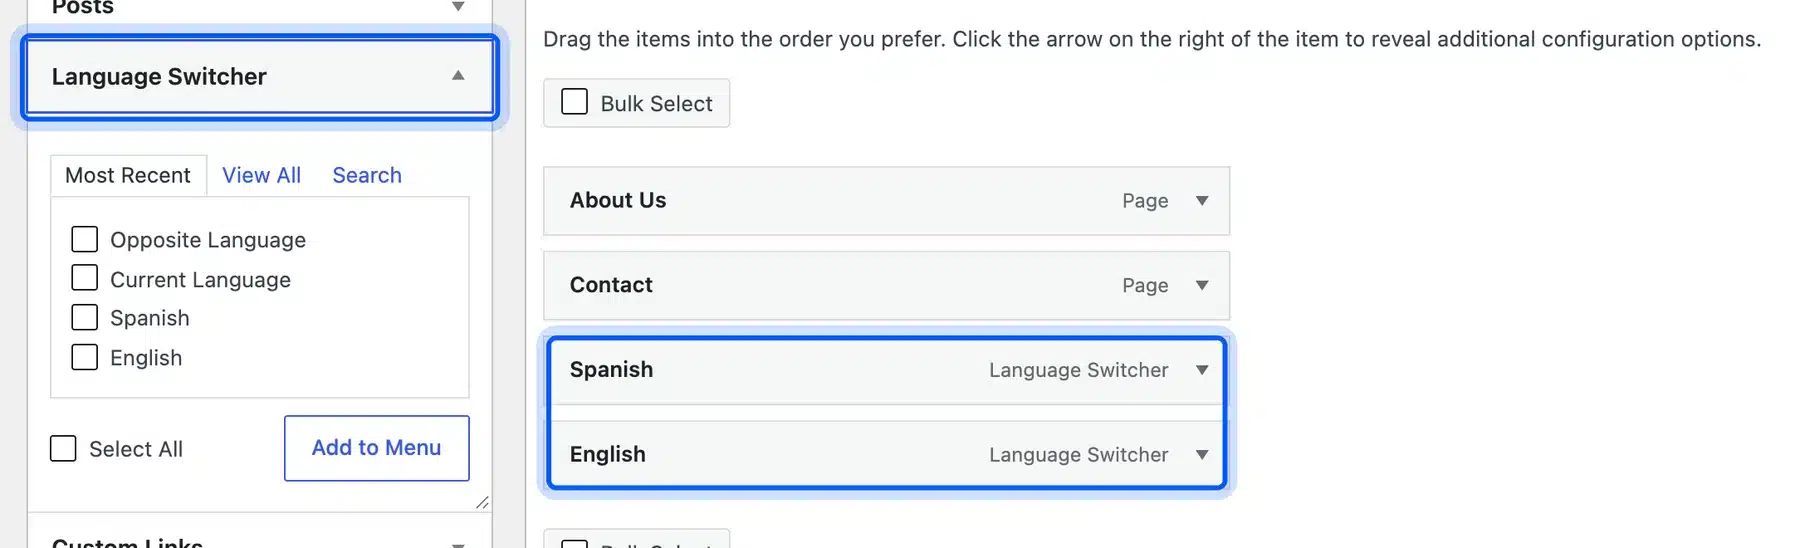
We switched the test site to the classic Twenty Twenty-One theme to try it. A Language Switcher box appeared in the menu editor with four choices named Opposite Language and Current Language and Spanish and English.
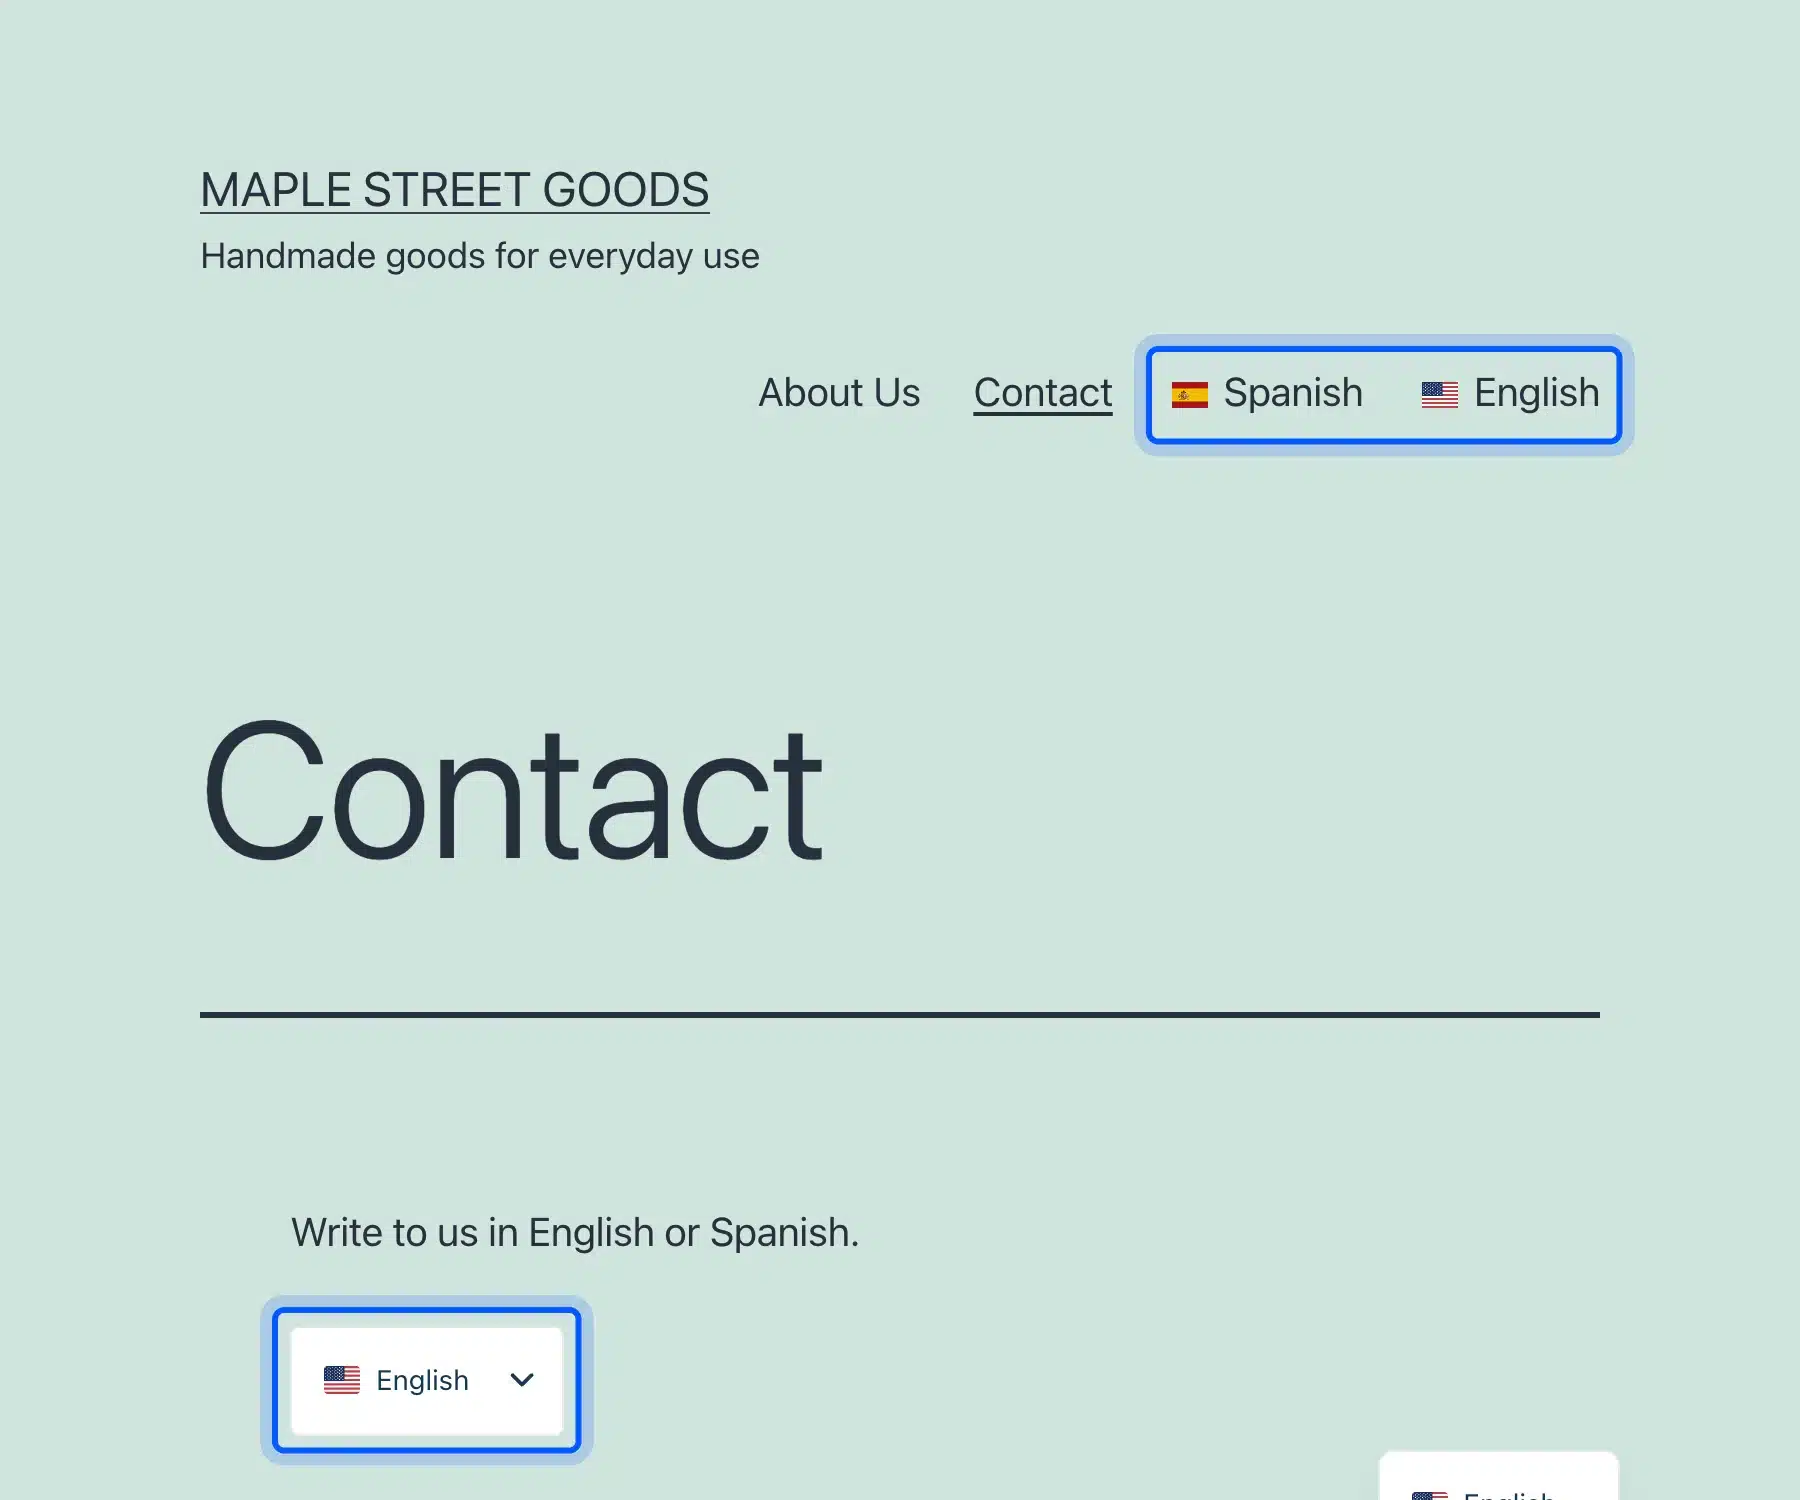
We ticked Spanish and English and clicked Add to Menu. Both items joined the menu and showed a flag and language name in the page header after we saved.
Step 5: Review the Automatic Translation Limits
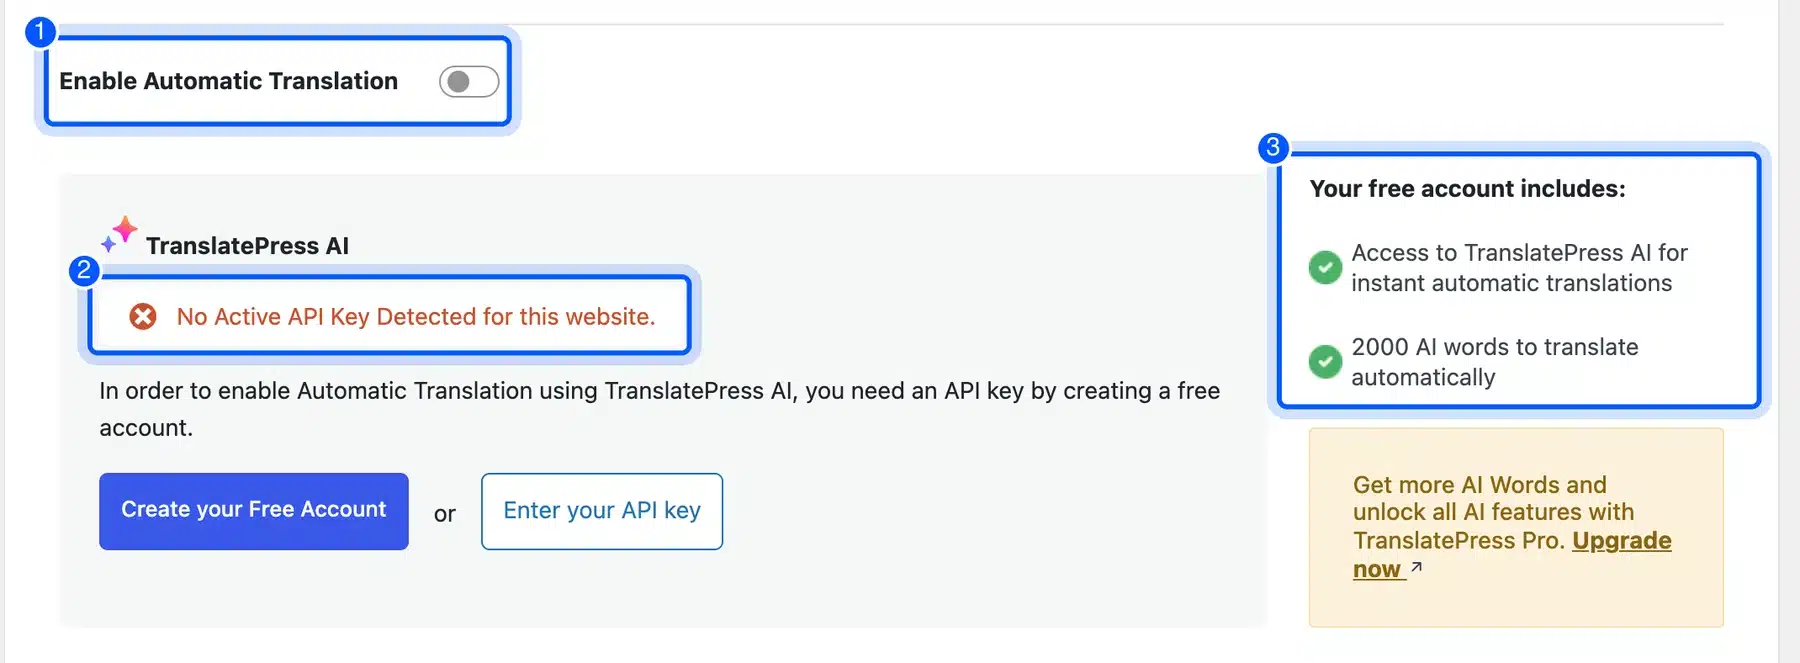
Open the Automatic Translation tab. The Enable Automatic Translation toggle is off by default. Turning it on needs a TranslatePress AI key or your own Google Translate key according to the plugin screen.
The screen on our site read “No Active API Key Detected for this website” and offered Create your Free Account or Enter your API key. The free account includes 2000 AI words to translate automatically. Creating an account is your decision so we left it out and cannot rate the machine output.
Plan for human review of anything the plugin translates. A store page with wrong sizes or wrong prices costs more than the time you save.
Step 6: Check the Translated Page
Open your site in a private browser window and visit the /es/ version of a page. The Spanish headline and paragraphs should appear and the language switcher should list both languages.
Our Spanish About Us page showed the translated headline and menu labels. The address changed from /about-us/ to /es/about-us/ when we used the switcher.
Pages you have not translated still load at the /es/ address but show English text. Check every page in the main menu before you announce the new language.
Set Up a WooCommerce Multilingual Store
A WooCommerce multilingual store needs the same plugin plus a translation of product text and store labels. TranslatePress states on its WordPress.org page that it works out of the box with WooCommerce. We checked that claim on a test store with 12 products and saw the results below.
We opened a product page in the editor and translated the product title and the short description. Both appeared in Spanish on the /es/product/ceramic-mug-1/ address. The product title changed from Ceramic Mug 1 to Taza de cerámica 1.
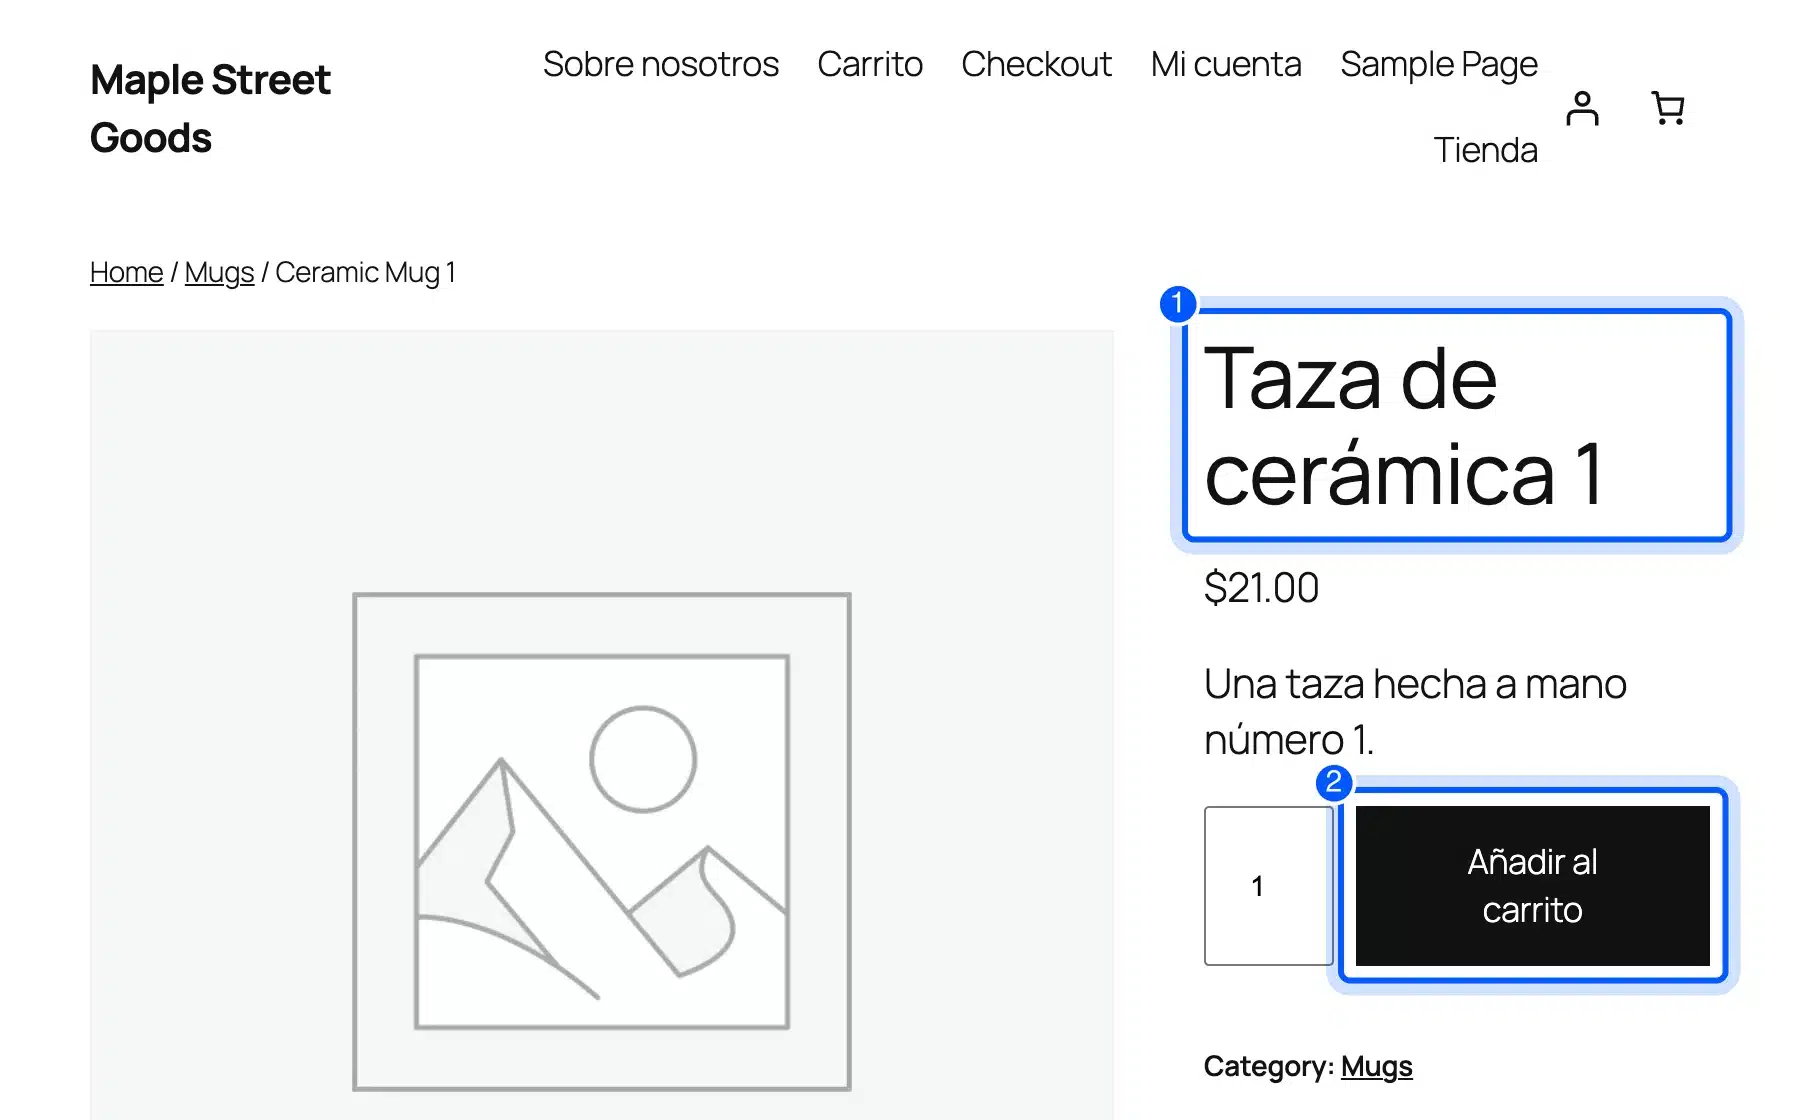
Text that comes from WooCommerce itself needs one extra step. The editor showed two fields for the Add to cart and Description strings.
Our first try went into the English field. Type the translation into the To Spanish field and the button changes to Añadir al carrito.
Several things stayed English until we translated them one by one. The Checkout menu link and the breadcrumb and the Category label were all still English on the Spanish page. The price stayed in dollars because the free plugin does not convert currencies.
The product web address also stayed in English. The TranslatePress pricing page lists URL slug translation among its paid features. A Spanish store that wants /es/producto/ addresses needs a paid plan.
The cart and checkout pages gave a harder result. We added the mug to the cart and opened the Spanish cart. The product name and description were Spanish.
The Add coupons line and the Estimated total line and the Proceed to Checkout button were all English.
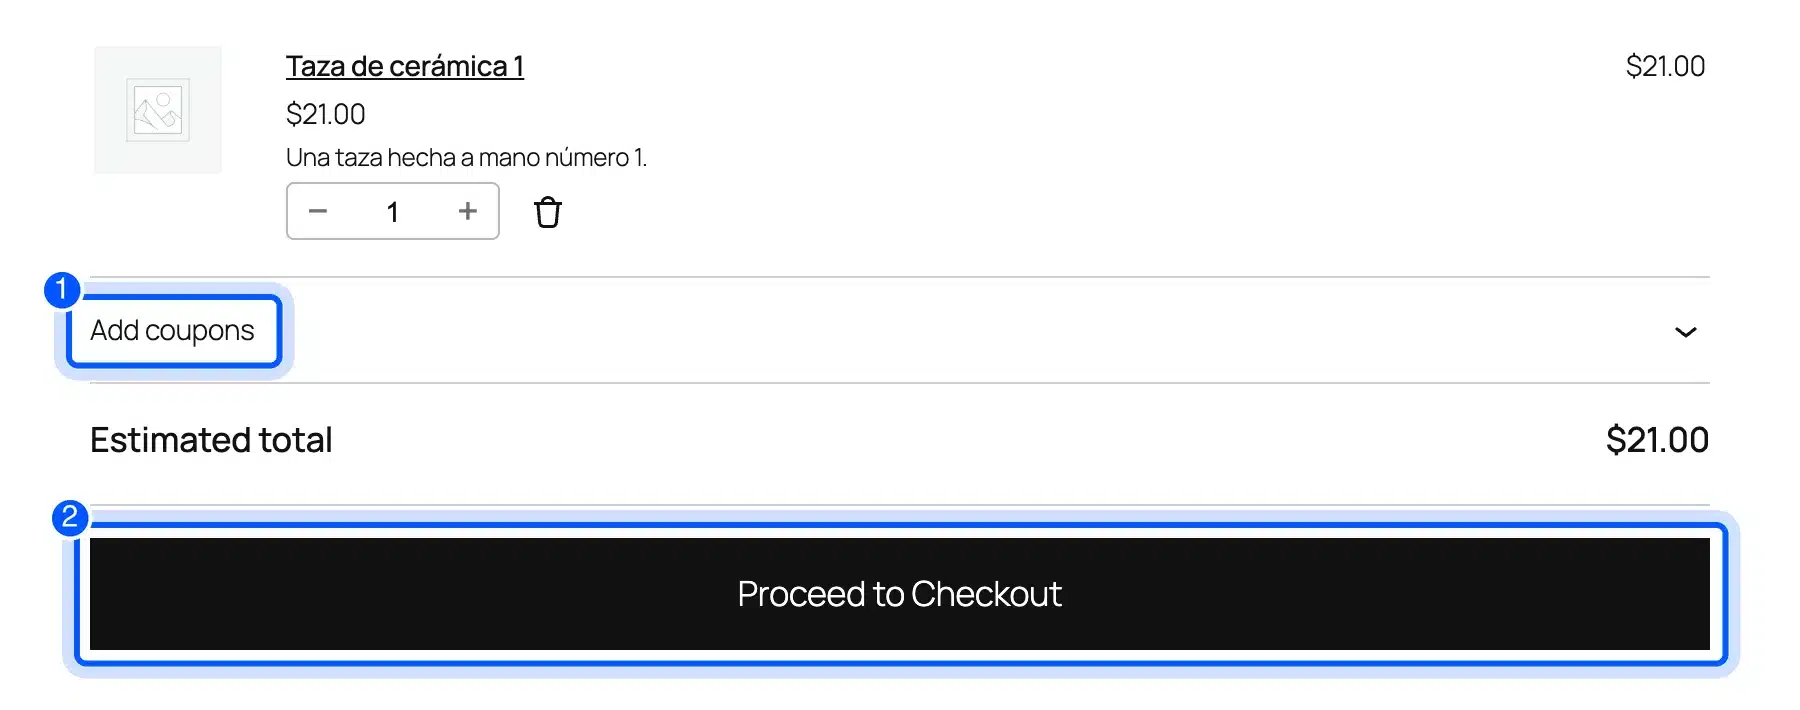
We opened the editor on that cart page to translate those lines. Its string list did not include them.
The Spanish checkout page showed the same pattern with English field labels and a Spanish product name. Our test store had no payment method set up so we did not place an order.
That result matters for any store that sells in a second language. Plan time to find and fix every checkout string and to test the order emails in Spanish. Our WooCommerce SEO guide covers the product page basics that also apply to the Spanish version.
If your checkout and emails and payment screens all need translating you may want a developer to map every string. Our WooCommerce development services cover that kind of store work.
Which WordPress Multilingual Plugin Should You Use?
The best WordPress multilingual plugin depends on your budget and editing style. TranslatePress suits owners who translate on the live page and WPML is a paid plugin built for larger sites with translation teams. Polylang suits people who want a free core and manual translations.
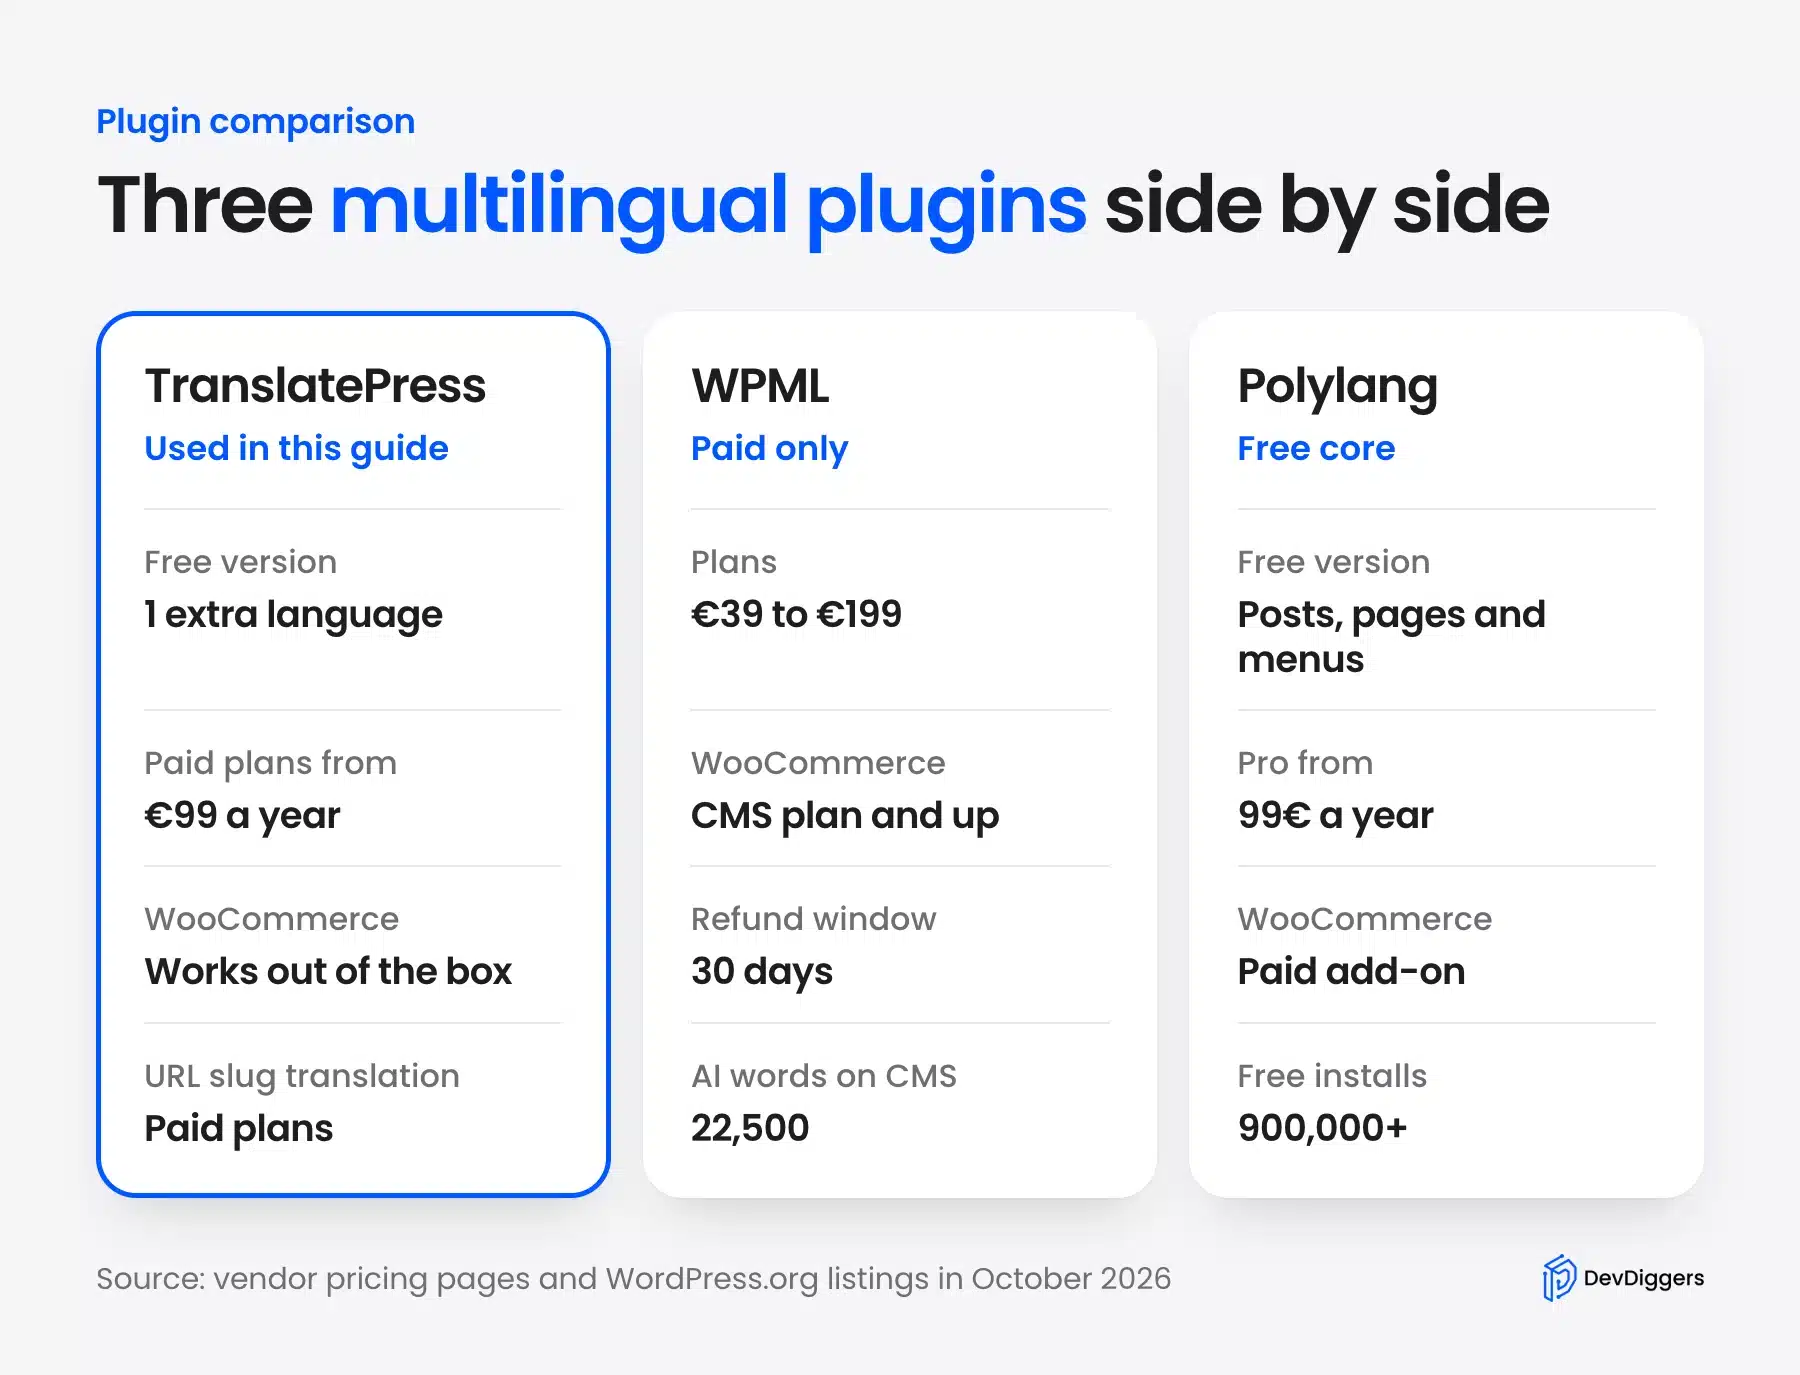
The table below lists facts we checked on each vendor page and WordPress.org listing in October 2026.
| Plugin | Free version | Paid price | WooCommerce |
|---|---|---|---|
| TranslatePress | One extra language | From €99 a year | Works out of the box |
| WPML | None listed | €39 to €199 | CMS and Agency plans |
| Polylang | Posts and pages and menus | Pro from 99€ a year | Paid add-on |
TranslatePress uses a visual editor and stores translations in your own database according to its WordPress.org listing. That makes it the quickest way to see what visitors see. It costs more once you need a third language.
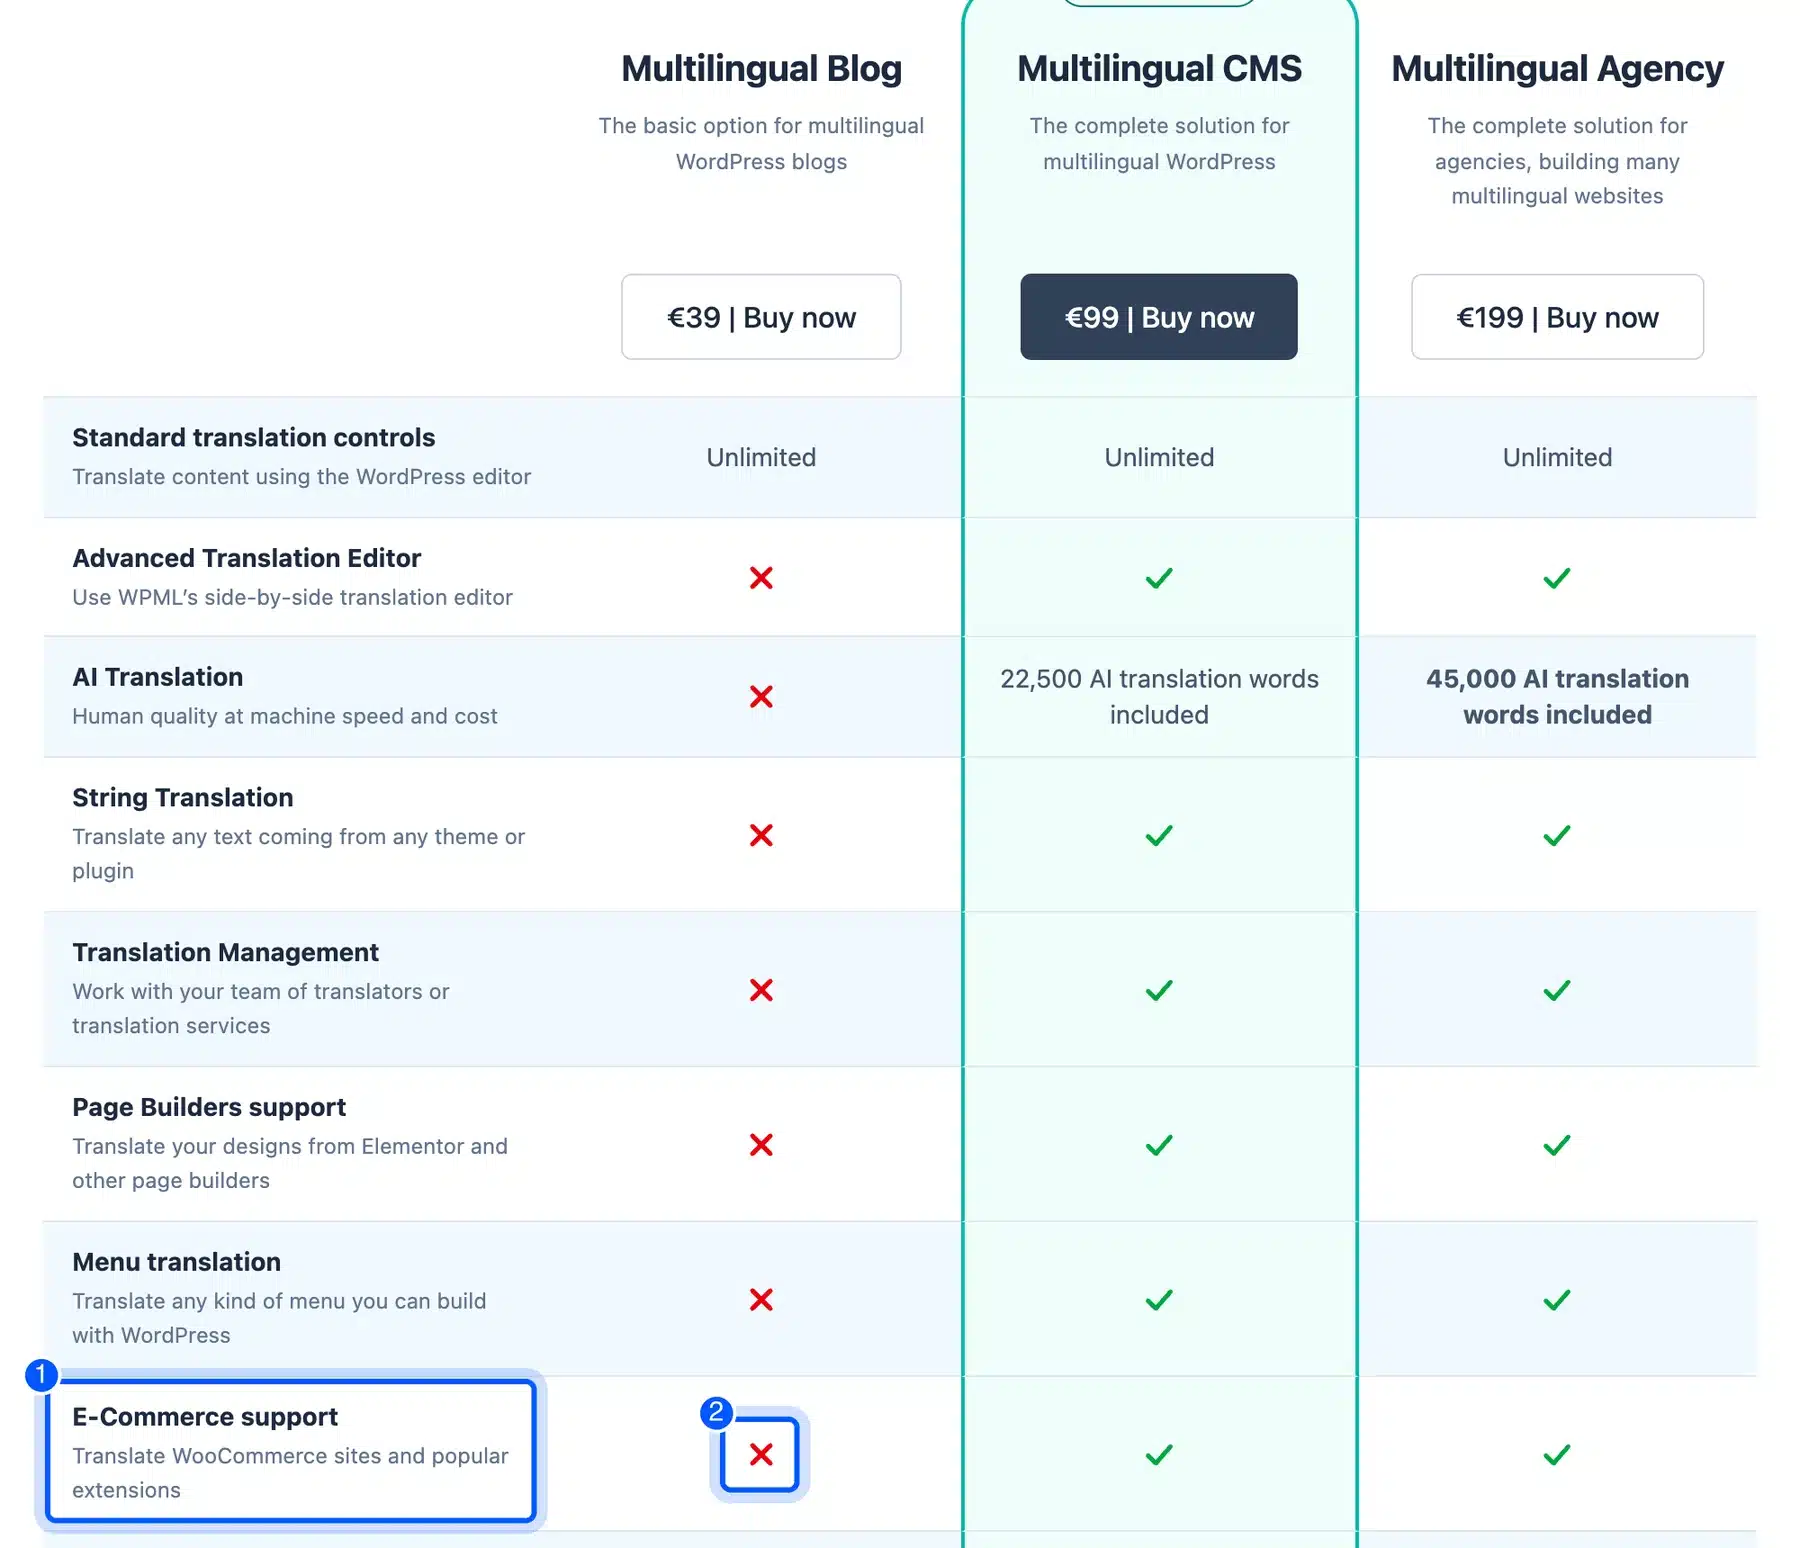
WPML sells three plans named Multilingual Blog and Multilingual CMS and Multilingual Agency. The cheapest plan has no advanced translation editor and no e-commerce support on the vendor’s pricing page. The CMS plan adds both and includes 22,500 AI translation words.
Polylang translates posts and pages and menus in its free version according to its WordPress.org listing. Its Pro version adds slug translation and DeepL machine translation. WooCommerce support is a separate paid add-on from Polylang.
These plugins are all a WordPress translation plugin at heart. The choice comes down to three questions.
Do you need more than two languages for free and do you sell products? Do you want to translate on the page or in a list?
Here is how we would pick:
- One extra language and a small store: TranslatePress free, because the visual editor and the free second language cover the first launch.
- Three or more languages on a budget: Polylang free for posts and pages. Add its paid WooCommerce add-on if you sell products.
- A large catalog with a translation team: WPML on the CMS plan or higher because the Blog plan lacks e-commerce support.
We tested only TranslatePress. We read the WPML and Polylang facts from their vendor pages and did not install them.
How Much Does a Multilingual WordPress Site Cost?
A multilingual WordPress site costs nothing for one extra language with TranslatePress and starts at €99 a year for more. Prices below come from each vendor page in October 2026 and are shown in euros as the vendors list them. Automatic translation can add separate API fees.
TranslatePress lists three paid plans. Personal costs €99 a year for one site and 50,000 AI translated words.
Business costs €199 a year for three sites and 200,000 words. Developer costs €349 a year for unlimited sites and 500,000 words.
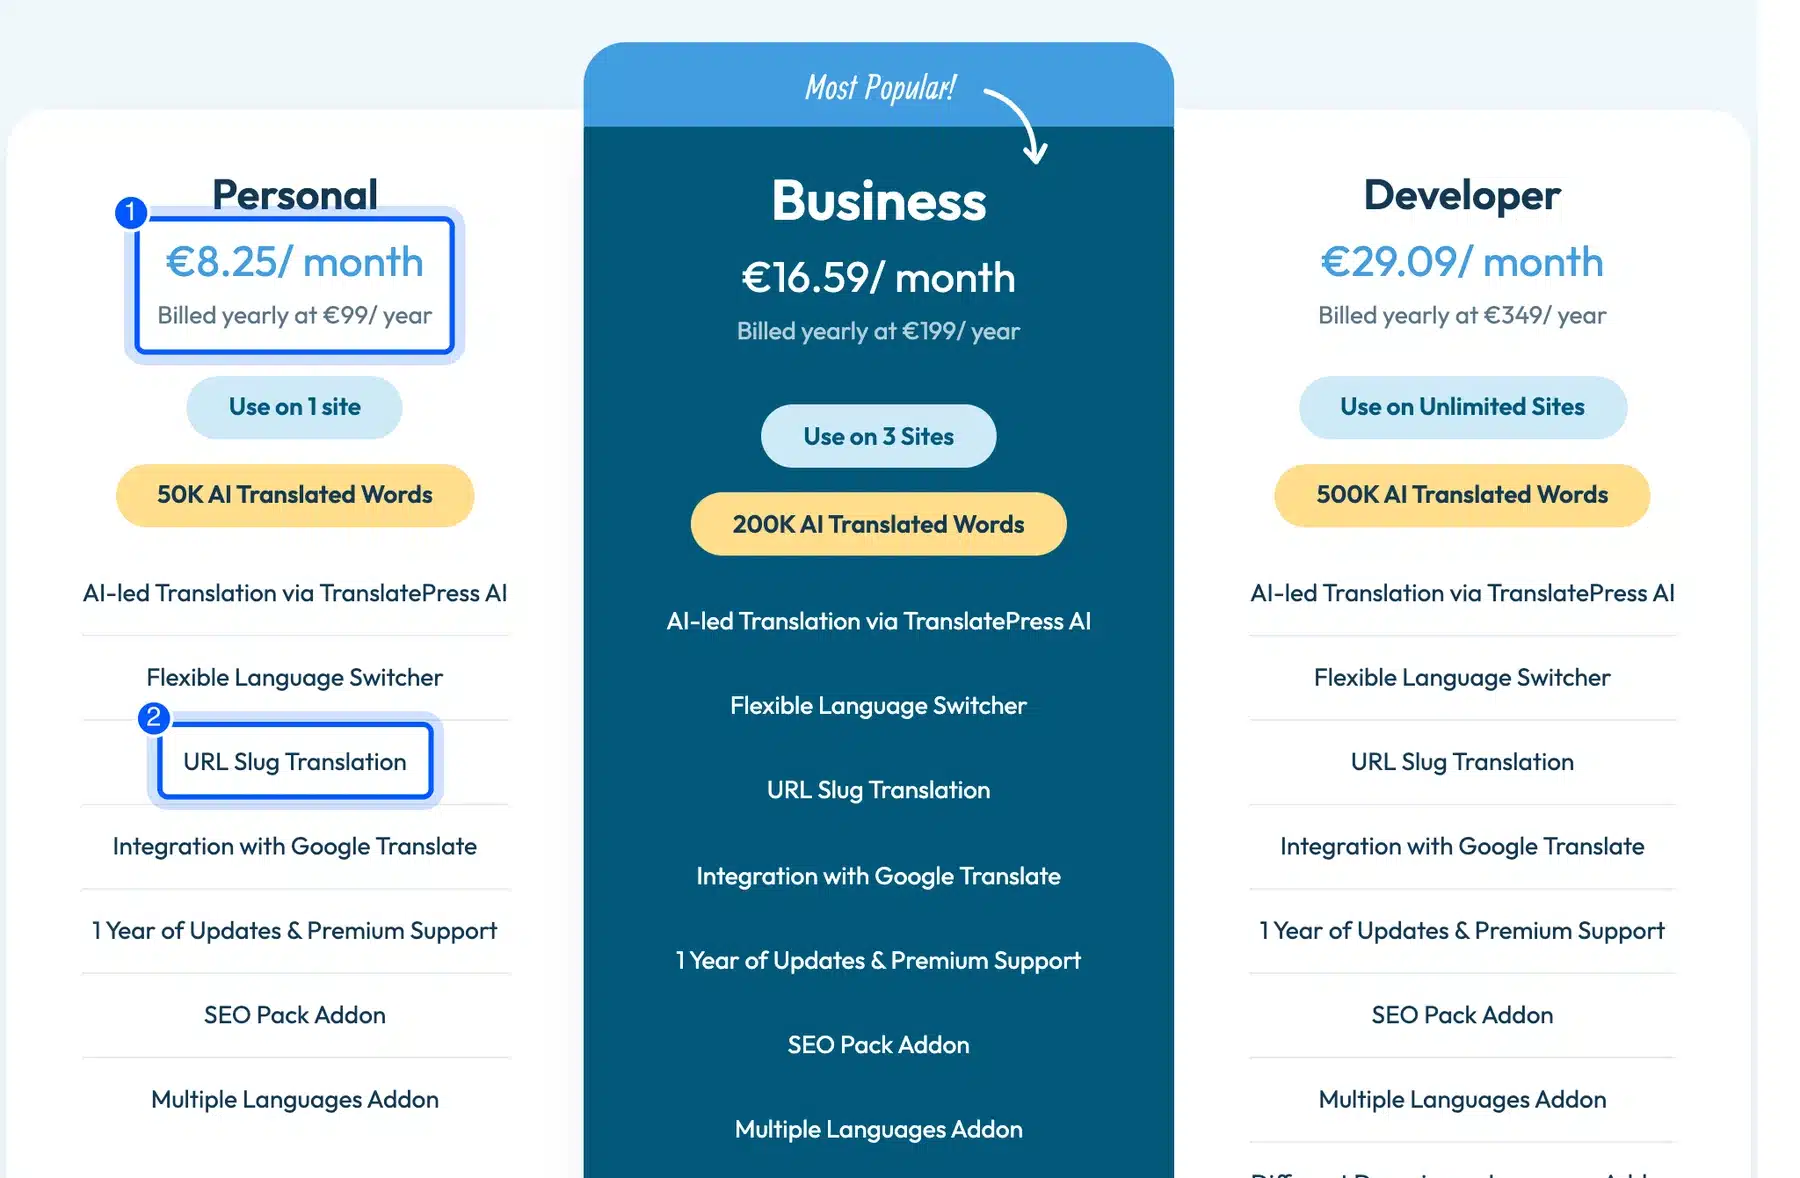
The same page says Google Translate and DeepL need your own API keys and that the API providers may charge extra. All three plans list URL slug translation and the SEO Pack add-on. The Different Domain per Language add-on appears on Business and Developer.
WPML lists its plans as €39 for Multilingual Blog and €99 for Multilingual CMS and €199 for Multilingual Agency. Every plan includes one year of support and updates and a 30 day money back guarantee. The E-Commerce support row shows a cross on the Blog plan.
Polylang Pro starts from 99€ a year and Polylang for WooCommerce also starts from 99€ a year. A Business Pack is listed at 139€ a year. The Polylang pricing page shows prices without VAT.
Renewals deserve a look before you buy. The Polylang page says each license lasts one year and renews at a 50 percent discount. One license covers one public site plus localhost and matching staging addresses.
Say you run one store with English and Spanish and French. TranslatePress Personal at €99 a year covers one site and lists the Multiple Languages add-on. Polylang Pro and the WooCommerce add-on each start from 99€ a year so the same store starts at 198€ a year.
That example is a starting price and not a quote. Your cost rises with the number of sites and the AI words you use.
Human translation is a separate cost and none of these pages list a price for it. Ask a translator for a quote per word before you plan a large catalog.
Machine Translation or Human Translation?
Machine translation gives a fast first draft and human review makes it safe to publish. Use machine output for volume and a native speaker for the pages that sell. Google’s spam policies list translating copied content among the automated tricks behind scaled content abuse.
AI word allowances decide how far machine translation goes. TranslatePress counts words per plan. Personal includes 50,000 and Business includes 200,000 and the free account on our test site showed 2,000.
Here is a worked example. Say your store has 40 pages of 300 words each.
That is 12,000 words for one language and 24,000 words for two languages. The Personal allowance of 50,000 words would cover both if the plan counts each translated word once.
The allowance only pays for the first pass. Product names and size charts and legal text still need a human eye. Budget review time for each page before you publish.
Set Up hreflang and Multilingual SEO
The hreflang attribute tells Google which language version of a page belongs to which audience. Google says each language version must list itself and all other language versions according to its localized versions guide. If two pages do not link to each other the tags are ignored.
TranslatePress writes these tags for you. We opened the source of our Spanish About Us page and found a self referencing canonical tag and four alternate links. The output below is shown with example.com in place of our test domain:
<html lang="es-ES">
<link rel="canonical" href="https://example.com/es/about-us/" />
<link rel="alternate" hreflang="en-US" href="https://example.com/about-us/"/>
<link rel="alternate" hreflang="es-ES" href="https://example.com/es/about-us/"/>
<link rel="alternate" hreflang="en" href="https://example.com/about-us/"/>
<link rel="alternate" hreflang="es" href="https://example.com/es/about-us/"/>
Both language and region codes appear in the tags. The output had no x-default line. Google describes x-default as the fallback for visitors whose language matches no version on the same localized versions page.
Note: Check the source of one page after every plugin update. View the page source and search for hreflang. The tags should list every language version of that page.
You can run the same check on your own site in four short steps:
- Open a translated page in your browser.
- Right click the page and choose View Page Source.
- Search the source for hreflang and read each line.
- Confirm that every language lists itself and the other languages and that each address opens the right page.
A translated page is not a duplicate of the original. Google says on its localized versions page that versions count as duplicates only when the main content stays untranslated. That is another reason to translate the whole page instead of the menu alone.
Keep your usual SEO basics in each language. Titles and descriptions need their own translation. The free version leaves them untranslated.
Its editor panel lists the SEO title and description and slug translation among the paid extras in version 3.3.8.
Plan the page tree before you duplicate it into a second language so that every translated page has a matching original page.
Translate Menus and Theme Text
Menus and theme text need translating too because visitors see them on every page. TranslatePress listed our menu labels and footer text as strings in the editor. Text that comes from a theme or plugin file may need a separate translation file.
Some theme text translated itself. After we added Spanish the footer link Skip to content showed as Saltar al contenido and the menu button label read Abrir el menú. We typed neither of them.
We left Checkout and Sample Page in English on purpose. They look like a bug to a Spanish visitor and they show why a final walk through matters.
Our test used a block theme. The navigation labels and footer text appeared in the editor list and we translated them there. A classic theme may store text in translation files instead.
Use a file based tool for theme and plugin text that sits outside the page content. Our post on translating a WordPress plugin with Loco Translate shows how that works. The two methods complement each other.
Mistakes That Break a Multilingual WordPress Site
Most multilingual sites fail in small ways that the visitor notices first. Google warns about translating only the boilerplate text while the main content stays in one language on its multi-regional sites page. Our test store showed the same problem on a smaller scale.
- Half translated pages: The main content stays in one language while the menu changes. Translate the whole page.
- Redirecting by browser language: Google advises against automatic redirects based on a guess about the visitor’s language. Show a switcher and let visitors choose.
- IP based content: Google says not to use IP analysis to adapt your content because location is unreliable according to the same multi-regional guidance.
- Unchanged prices: The free plugin left every price in dollars on our Spanish store. Decide on currency before launch.
- Forgotten strings: On our store the Checkout link and the cart buttons stayed English after the product was translated.
- Untranslated addresses: The free plugin kept the English product slug on the Spanish page.
Worth checking: Create a list of every page type your store uses before launch. Walk through each one in the second language and write down the English strings that remain.
Check a Multilingual WordPress Site Before Launch
A pre launch check catches the strings and links that a plugin leaves behind. Walk through each language as a visitor would and use a private window so your admin session hides nothing. Write down every English line that remains on a translated page.
- Open the home page in each language and click every menu link.
- Switch language with each switcher on the page and confirm you land on the matching page.
- View the page source of one translated page and search for hreflang.
- Add a product to the cart and read the cart and checkout in the second language.
- Place a test order if you have a payment method and read the emails.
- Resize your browser to a phone width and confirm the switcher still shows.
Fix the English strings you found and repeat the walk through. Then ask a native speaker to read the five most important pages.
Conclusion
You can create a multilingual WordPress site in an afternoon when you plan the URL structure first. A subdirectory such as /es/ keeps everything on one host and one admin. TranslatePress adds the second language and gives you a visual editor and a switcher.
Test the pages your visitors use most in the new language. Check the hreflang tags and translate the menu and every WooCommerce string. Our testing found that cart buttons and slugs are where a free setup shows its limits.
Frequently Asked Questions (FAQs)
Q1. How do I add a language to a WordPress site?
Install a translation plugin and add the language in its settings. In TranslatePress you open Settings > TranslatePress and pick the language in the Select language list. Click Add and then Save Changes.
Q2. Can I make a multilingual WordPress site for free?
Yes for two languages. TranslatePress lists a bilingual setup with one translation language on its WordPress.org page and Polylang offers a free core. Extra languages in TranslatePress need a paid add-on.
Q3. How do language plugins handle SEO for multilingual sites?
They give each language its own web address and add hreflang tags. In our test TranslatePress added a canonical tag and four alternate links to a Spanish page. You still need to translate titles and descriptions.
Q4. Should I use automatic translation?
Use it as a first draft and review the result. TranslatePress offers 2,000 free AI words with a free account and Google Translate needs your own key. We did not create an account so we cannot rate machine quality.
Q5. Do I need a different domain for each language?
No. Google says on its localized versions page that alternate URLs do not need to sit on the same domain. A subdirectory such as example.com/de/ works on one domain.
Q6. Will my translated pages count as duplicate content?
Not when you translate the main content. Google treats localized versions as duplicates only when the main content stays untranslated according to its localized versions guide. Translate the whole page and add hreflang tags.
Q7. How do I translate my WordPress admin area?
Open Settings > General and choose a Site Language. The WordPress documentation describes this setting as the dashboard language. It does not translate what visitors see.