How to Have 2 Lines of Text in a WordPress Header


Your header is the only thing that your site visitors see when they visit your site. It provides an overview of what your site is about. Designers often split the text in your header into two lines.
Generally, this is putting the title of the site on the first line and a tagline or other information on the second.
Here in this blog, you will learn how to have 2 lines of text in a WordPress header. You will also walk through different methods that use the native WordPress Customizer and custom code in your theme files and plugins.
Why Have 2 Lines of Text in a WordPress Header?
One line of text in your header may be sufficient in most situations, but there are several advantages to using two lines.
- Better Communication: Breaking your header into two lines enables you to show your site’s name and a descriptive tagline on your own. This gives your site visitors an overview of the purpose of your site.
- Improved Visual Balance: Having a two-line header also improves visual balance, and on top of that, your content becomes visually readable. It often contains information related to your brand name along with a slogan depicting your brand.
- Improved Readability on Mobile Devices: Long titles spanned across a single line are sometimes difficult to read on a small screen. Breaking the text up ensures that your header is readable even on a mobile device.
- Better Branding: Repeated header design enhances your brand identity and hence makes your online presence much stronger. You provide a branding message each time a user comes to your site by giving your tagline or additional line of text in the header.
How to Have 2 Lines of Text in a WordPress Header?
There are multiple ways to add 2 lines of text in a WordPress header. You can choose to follow either of the methods – using the WordPress Customizer, Splitting the header inside your WordPress editor, using custom CSS and HTML, and running any plugin for the same.
Each of the methods is helpful depending on your priorities and skill sets. Below are the steps to execute while following a certain method to have 2 lines of text in your header.
Method 1: Using the WordPress Customizer
The easiest method to insert a two-line header in WordPress is through the use of the Customizer’s Site Identity. Most WordPress themes have this capability, so it is an easy option for users who are not comfortable with coding.
Step 1: Log in to Your WordPress Dashboard
Simply first log in to your WordPress admin panel.
Step 2: Access the Customizer
- Navigate to Appearance, then Customize. This will open up the WordPress Customizer, where you will be able to view a live preview of your site and also find some customization settings.

- Then click on Site Identity from the Customizer menu.

- You will then get to see an option for changing your site title and tagline here.
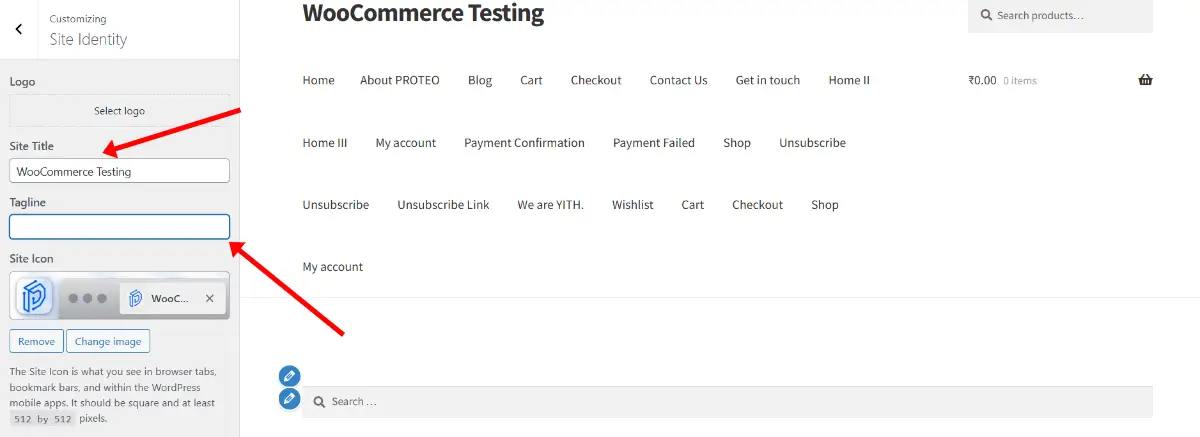
Step 3: Enter Your Text
- Site Title: Type in the main text that identifies your website.
- Tagline: Enter the secondary line, such as a slogan or a short description of your site.
When you enter these, WordPress will show them automatically in the header based on your theme.
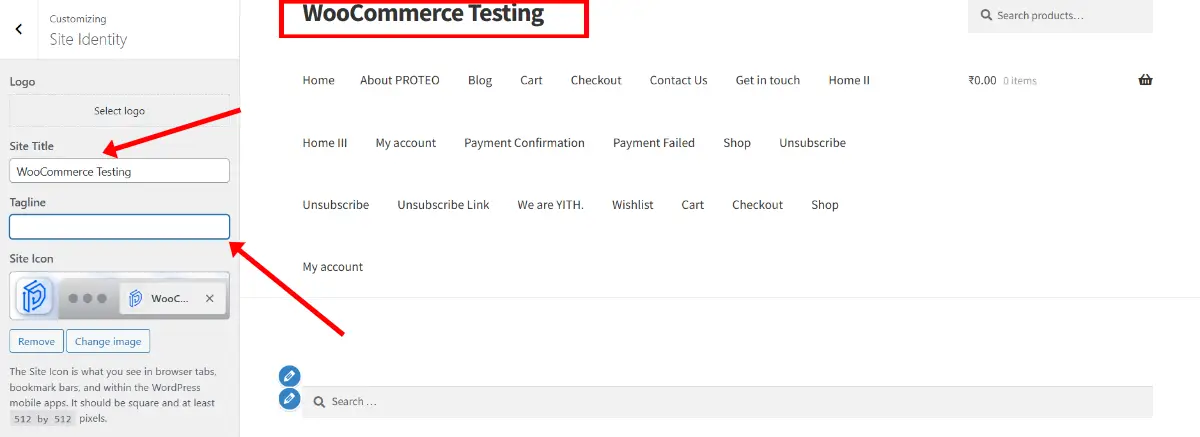
Step 4: Preview and Publish
You will see the changes live as you type. Change the spacing or text length as required. When you feel confident with how it looks, simply click the Publish button to save your changes.
Benefits and Considerations
- Ease of Use: This approach involves no coding and is completely integrated with your WordPress control panel.
- Theme Dependency: There are a few themes that do not display the tagline as a default. In those situations, you may need to visit your theme settings or use one of the other approaches covered in this post.
- Limited Flexibility: Although the Customizer is suitable for default header text, it might not provide flexibility, such as having custom line breaks or extra formatting, which some users might prefer to have.
Method 2: Placing Line Breaks Within the Header Directly
In case the theme of your WordPress site does not support any definite tagline field or you want additional control over the appearance of your header text, you might choose to add a line break directly into your header code.
This is generally done by changing your theme’s header file, usually known as header.php.
Step 1: Editing the Header File
- Modifying the Header File: Always keep a backup of your site’s theme files before you start making any changes. Directly editing PHP files sometimes causes problems, so in case you fall into any kind of trouble, having a backup always saves you in such situations by restoring everything your site has.
- Get Access to Your Theme Files: You can access your theme files by FTP/SFTP or from the WordPress theme editor, which you will get under the Appearance tab, followed by Theme Editor. Still, it is preferred to use the FTP route, which is best for beginners to ensure error-free tasks.

- Find the Header File: Simply open the header.php file in your theme directory. Then, edit this file to make changes to the code.

- Find the Site Title Code: Search for the code block that prints the site title. This might appear as follows:
<h1 class="site-title"><?php bloginfo('name'); ?></h1>
Step 2: Using the <br> Tag
To split the text into two lines, you can insert a <br> (line break) tag into the code where you want to add the line break.
Option 1: Modify the Site Title Output
You can directly modify the PHP code that outputs the site title by inserting HTML. For instance, if you want to display your site title on one line and a short tagline on the next, you might change the code to something like this:
<h1 class="site-title">
    <?php echo str_replace(' ', '<br>', get_bloginfo('name')); ?>
</h1>
This code replaces a space in the site title with a <br> tag, which causes the text to break into two lines in the first space. Then, you can choose to adjust the code as required for your specific title format.
Option 2: Hardcoding the Two Lines
You can hardcode the text if you prefer to have complete control over both lines. For example:
<h1 class="site-title">
    My Website Name<br>
    Your Trusted Source for [Topic]
</h1>
This approach works well if your site title and tagline are static and are generally neither changing frequently nor expecting to change in the future.
Method 3: Using Custom CSS and HTML
Another effective way to create a two-line header is by combining custom HTML with CSS.
This method is especially helpful if your theme supports custom HTML widgets or if you want to create a header section that is entirely customized beyond just text changes.
Step 1: Create a Custom HTML Block
Depending on your theme and page builder, you might have an option to add a Custom HTML widget to your header area.
Alternatively, if your theme allows editing header templates using the Customizer or any other theme options panel, you can insert your HTML code there.
Add your two lines of text:
<div class="custom-header">
    <h1>My Website Name</h1>
    <p>Your Trusted Source for [Topic]</p>
</div>
In this example, the <h1> (heading 1) tag contains your main site title and the <p> (paragraph) tag contains your tagline or additional information.
Step 2: Styling with CSS
Once the HTML is added, you can then adjust the spacing, font size, and alignment of your text to ensure that it looks good on all devices.
Add custom CSS either in your theme’s custom CSS section, which is often found in the Customizer, or your WordPress child theme’s stylesheet.
Here is an example of CSS for this:
.custom-header h1 {
    margin: 0;
    font-size: 2.5em;
    text-align: center;
}

.custom-header p {
    margin: 0;
    font-size: 1.2em;
    text-align: center;
    margin-top: 5px;
}
Benefits of This Method
- Full Control Over Appearance: This method gives you complete control over both the HTML structure and the CSS styling. You can adjust the layout, spacing, and typography to match your branding styles.
- Responsive Design: With custom CSS, you can add media queries to ensure that your header looks good on mobile devices as well as desktops.
- Flexibility: If you decide to change your header layout in the future, you can easily adjust your HTML and CSS without even affecting other parts of your site.
Method 4: Using a Plugin to Enhance Header Text
If you are someone who does not prefer to edit theme files or write custom code, you can go for plugins. Several WordPress plugins allow you to customize the header area easily and might also include options for adding multi-line text.
How to Choose the Right Plugin?
When selecting a plugin, you need to keep the following points in mind:
- User Reviews: Look for plugins with good reviews and also those that have an active support system.
- Compatibility: Ensure that the plugin is compatible with the version of WordPress that you are using, as well as your theme.
- Customization Options: Some plugins also provide drag-and-drop options along with some additional styling options that can make your header look professional without manual coding.
- Ease of Use: Choose a plugin that provides a user-friendly interface and allows you to easily manage two lines of text in the header, even without having technical knowledge.
- Support and Updates: Choose plugins with regular updates and dependable support to ensure your header text stays functional and compatible with the latest WordPress version.
What is the Plugin Workflow?
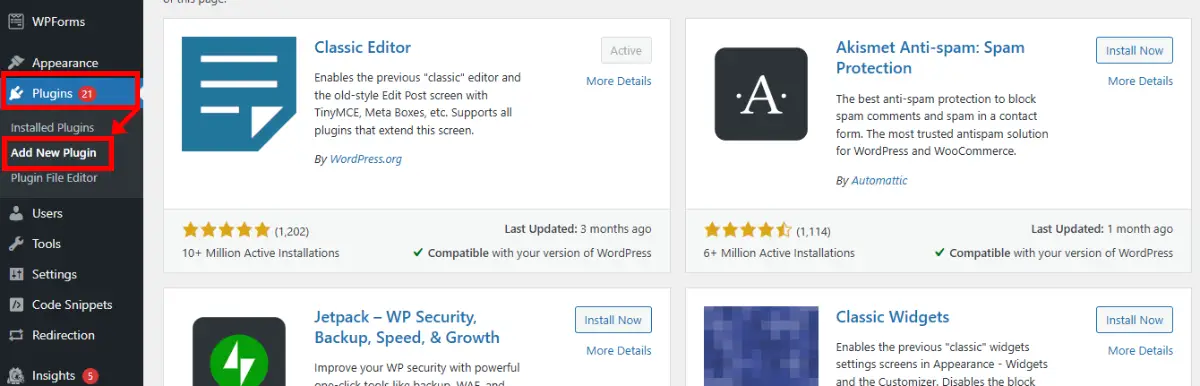
- Install the Plugin: Simply navigate to Plugins, then Add New to your WordPress dashboard, and look for any header customization plugin. Once you find a plugin that meets your needs, click Install Now, followed by Activate.
- Configure the Plugin: Most plugins have their own settings page where you can adjust the header layout. Simply navigate to the plugin’s settings and look for options that allow you to add custom text or specify multiple lines.
- Enter Your Text: Use the plugin interface to enter your site title and tagline on separate lines. Some plugins might also offer real-time previews, where you can easily preview your site while editing.
- Save and Test: At last, click on Save to save all your changes and view your site. Check how the header looks on different devices, and adjust the settings as needed.
Advantages of Using a Plugin
- No Coding Required: A plugin solution can be better for someone who does not prefer to code. The user-friendly interfaces allow you to make changes with just a few clicks.
- Extra Features: Many header customization plugins offer additional features such as animation effects, different fonts, or even page builders integration.
- Safe Updates: Plugins are generally updated independently from your theme, which means you can change your header without even breaking the theme’s core files.
- Increased Flexibility: Plugins allow easy customization of your WordPress header, which helps you add and adjust the text, fonts, and spacing without coding.
- Time-Saving: Plugins simplify the header changes with a user-friendly interface, saving time by reducing the need for you to change the code manually.
Common Challenges and How to Troubleshoot Them
Even with clear instructions, you might encounter a few challenges while you are trying to implement a two-line header in WordPress.
Here are some common issues along with their troubleshooting steps to get you out of trouble if you face any problems.
1. The Tagline Doesn’t Appear
- Possible Causes: Some themes hide the tagline by default. Check your theme options or you can also look over the documentation to check if there is an option to enable it.
- Solution: If the theme does not support it, you can consider using one of the alternative methods, such as adding custom code or using a plugin just to show the tagline.
2. Layout Issues on Mobile Devices
- Possible Causes: The header text might look good on a desktop but can get misaligned on mobile devices.
- Solution: Use responsive CSS techniques. You can add CSS media queries to adjust font sizes and spacing for smaller screens. Testing on multiple devices or using browser developer tools can help pinpoint the issue.
3. Editing Theme Files Causes Errors
- Possible Causes: Direct changes to the theme files might lead to PHP errors if not done carefully.
- Solution: Always use a child theme to avoid losing the changes on the updates that you made, and ensure you have backups before making any changes. If you are not comfortable with editing the PHP files, you can consider using a plugin or custom HTML method instead.
4. Conflicts with Plugins or Theme Styles
- Possible Causes: Custom CSS or HTML might conflict with existing theme styles or other plugins.
- Solution: You can use browser developer tools to inspect the elements and identify any conflicting styles. You can also adjust your custom CSS accordingly and check the plugin settings to see if a plugin is causing the conflict.
Conclusion
No matter what method you are using to have 2 lines of text in your WordPress header, whether you go for the built-in WordPress options, modifications in the code, or use any plugin.
Having your header text split between 2 lines not just only enhances the visual attractiveness of your site but also your branding and communication with your site visitors. He also shows the purpose of your site and improves your site’s user engagement.
Frequently Asked Questions (FAQs)
Q1. Why should you use two lines of text in a WordPress header?
Using two lines of text in your WordPress header helps display your site’s name and tagline, which further enhances the visual balance and readability of mobile devices.
Q2. How can you add 2 lines of text to your WordPress header without coding?
The easiest way to add two lines of text to your WordPress header is by using the WordPress Customizer. This method does not require any coding and is simple for most users.
Q3. What if the theme does not support a tagline in the header?
If your theme does not support showing a tagline, you can manually insert a line break into your header code by simply editing the header.php file. Alternatively, you can also use custom CSS or a plugin to display your tagline on a separate line.
Q4. How to style the text to look good on mobile devices?
To ensure your two-line header looks fine on mobile devices as well, you can use responsive CSS techniques by implementing media queries. This will also help you adjust the font sizes and spacing based on the device’s screen size.
Q5. Can you use a plugin to add multiple lines of text to the header?
Yes, several WordPress plugins are available in the market, and you can easily customize the header area and add multi-line text without even knowing the coding. You will also get features such as drag-and-drop design tools and real-time previews.
Yogesh Rude
Yogesh Rude is an SEO and content writer at DevDiggers who focuses on eCommerce visibility and on-page optimization. His guides cover the SEO decisions WooCommerce store owners face most often, including product page structure, metadata strategy, and how search engines interact with site content.
Join thousands of readers getting smarter every week.
Leave a Reply