You can import orders from WooCommerce to QuickBooks using three main approaches: a manual CSV export, a dedicated sync plugin, or the official QuickBooks Connector by Intuit. Most store owners get this running in under an hour. The challenge is choosing the method that won’t break when order volume grows.
Most guides stop at “export a CSV and upload it.” That works for ten orders. It falls apart at a thousand. This post covers all three methods in full, tells you exactly which one fits your store, and explains what happens to your refunds and canceled orders after import.
You will learn how to export and format your WooCommerce order data for QuickBooks, how to set up a real-time plugin sync, how to use the official connector, how to pick the right method for your store size and QuickBooks version, and how to fix the most common errors that block the import.
Why You Need to Import WooCommerce Orders to QuickBooks?
WooCommerce and QuickBooks do not talk to each other by default. That sounds obvious, but the consequences sneak up on you.
When you process an order in WooCommerce, QuickBooks knows nothing about it. Your sales, taxes, and customer payments exist in two separate systems. Every week you delay connecting them, your books fall further behind reality.
Entering the same order twice is where mistakes start. Each sale gets typed once in WooCommerce and again in QuickBooks. A wrong total or a missed refund then surfaces at tax time, when it is hardest to trace.
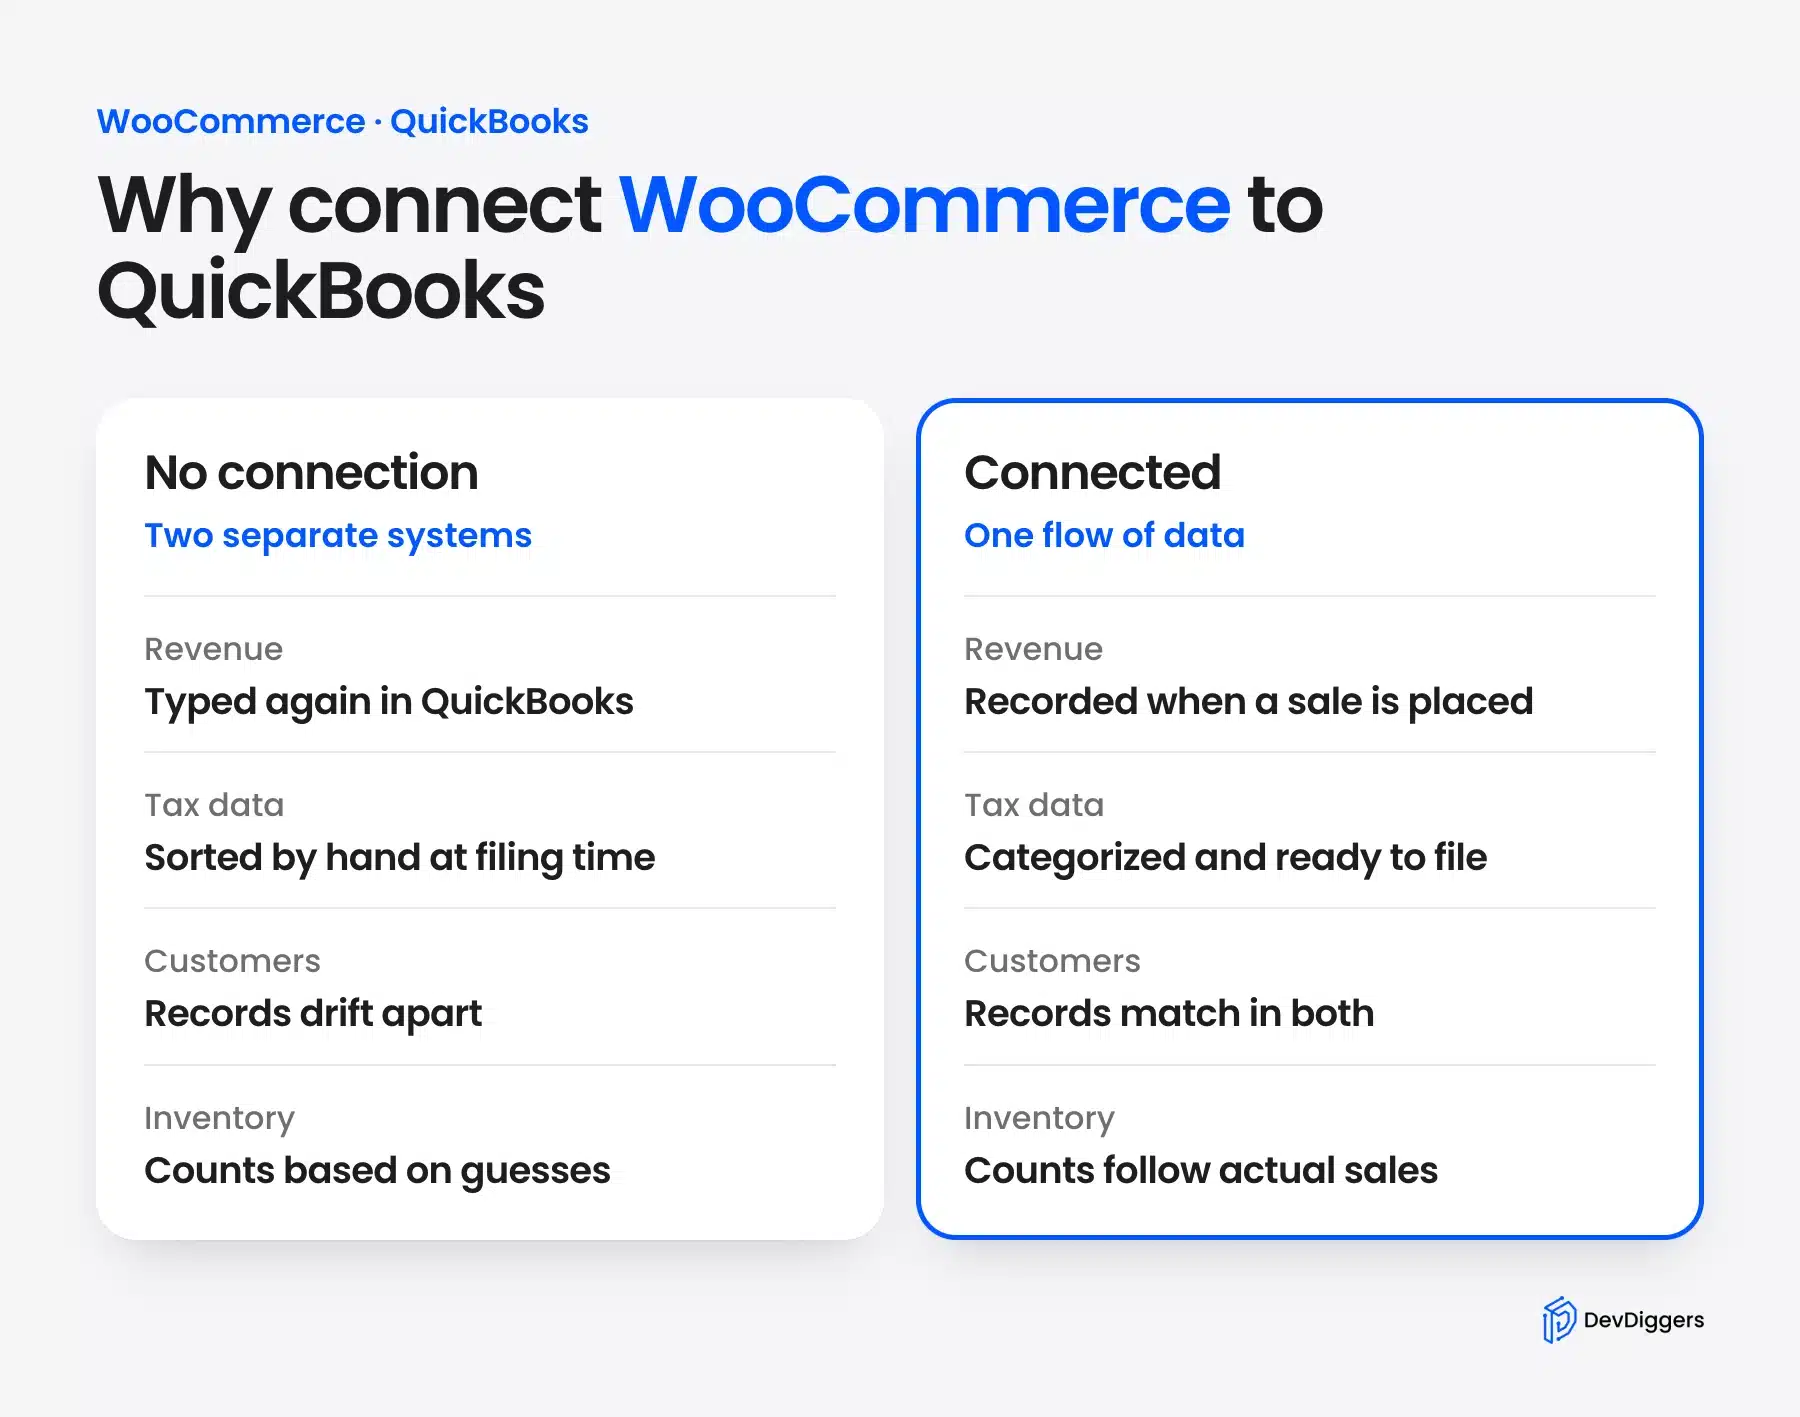
Connecting the two systems fixes this. When you successfully import orders from WooCommerce to QuickBooks, you get:
- Accurate revenue is recorded the moment a sale is placed
- Tax data already categorized and ready for filing
- Customer records that match across both platforms
- Inventory counts that reflect actual sales and not guesses
There is a version of this worth flagging honestly: the sync is only as clean as your product data. If your WooCommerce SKUs are inconsistent or your QuickBooks chart of accounts is a mess, no integration method will fix that for you. Set your house in order first. Then connect the systems.
If you have not set up WooCommerce on WordPress properly yet, start there before attempting any QuickBooks integration.
Method 1: Import WooCommerce Orders to QuickBooks via CSV
This is the simplest way to get WooCommerce data into QuickBooks. No plugin accounts, no API connections, no subscriptions. You export a file, reformat it, and upload it directly.
Orders go to QuickBooks through their own export. For the item list, export WooCommerce products to CSV.
It works well if you process fewer than 100 orders a week or need to do a one-time historical import. It does not scale. And if your date formats or column names are off, QuickBooks will reject the file without much explanation.
Here is how to do it correctly.
Step 1: Export Orders from WooCommerce
WooCommerce core has no CSV export button on the Orders screen. The closest built-in option is Analytics > Orders, where a Download link sits at the top right of the report table. That CSV lists one row per order, and QuickBooks needs line-item detail: each product, its SKU, quantity, price, tax and shipping as separate fields.
Analytics reports that fit on one screen download right away. Larger exports run in the background, and WooCommerce emails a download link to the address on your WordPress account. The WooCommerce Analytics documentation explains both cases as of October 2026.
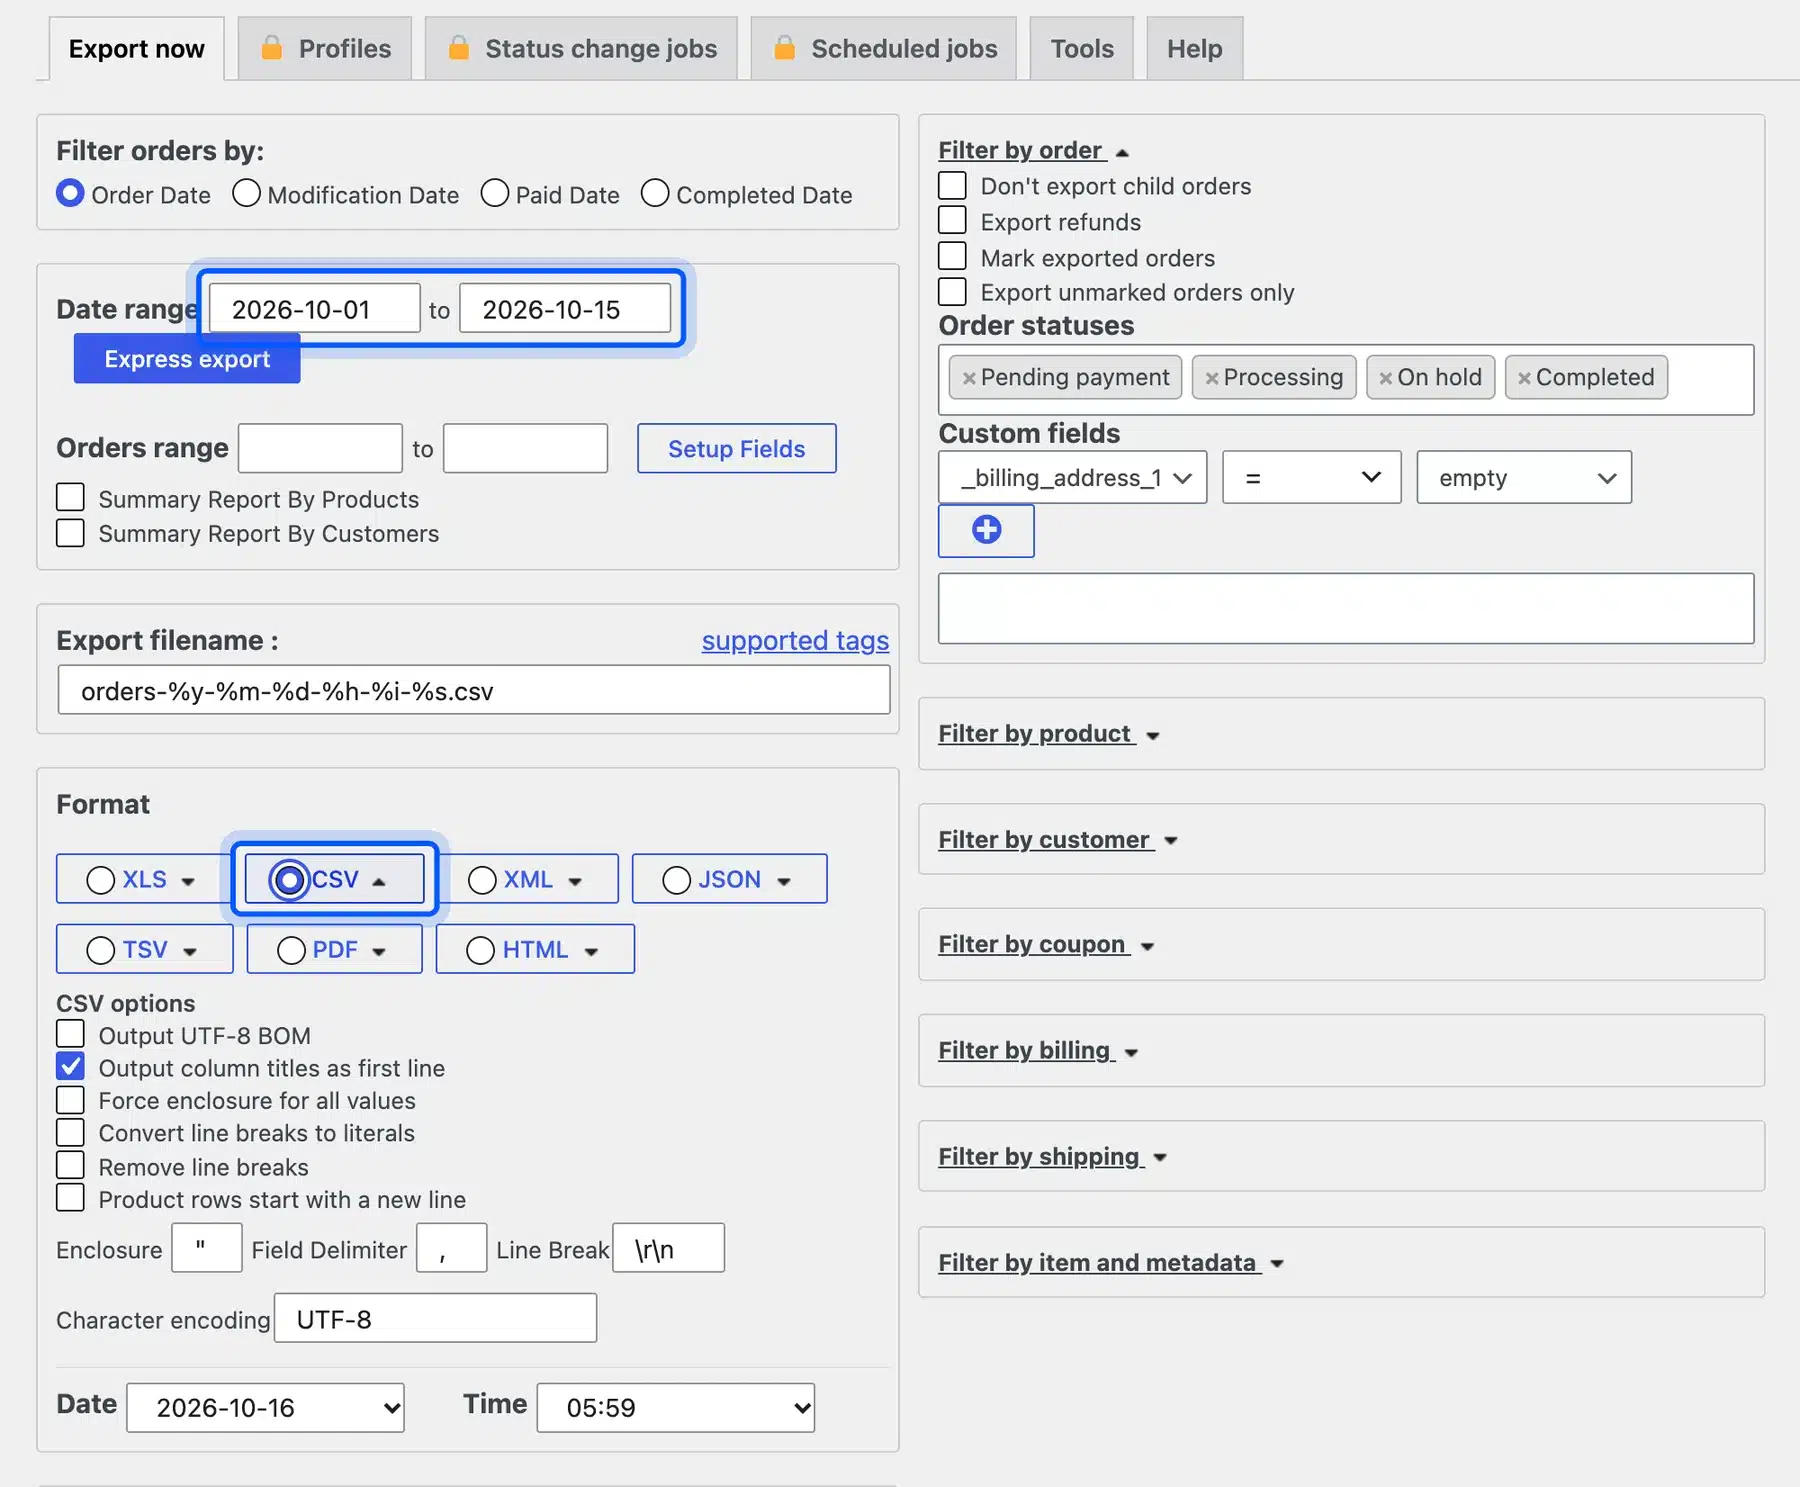
The free Advanced Order Export for WooCommerce plugin handles this. Install it. Then go to WooCommerce > Export Orders. Set your date range, pick CSV as the output format, and select the fields you need.
As of October 2026, the plugin lists 100,000+ active installs on its WordPress.org page and says it works with HPOS stores. The free version exports to CSV, Excel, XML and JSON. Scheduled exports on a timer need its Pro version.
At a minimum, export: Order ID, Order Date, Customer Name, Product Name, SKU, Quantity, Line Total, Tax Amount, Shipping Amount, and Payment Method.
Click Export. The plugin generates a file with most of the fields QuickBooks requires. You will still need to reformat some columns, but you start with far less manual work than the Analytics download.
Step 2: Format the CSV File for QuickBooks
This step is where most people get stuck. Open your exported file in Excel or Google Sheets and rebuild it to match QuickBooks’ Sales Receipt structure.
Each row must have at least:
| Column | What to put here |
|---|---|
| Sales Receipt # | Your WooCommerce Order ID |
| Sales Receipt Date | Date in MM/DD/YYYY format |
| Customer Name | Full buyer name |
| Product / Service | Product name or SKU (must match your QB item list) |
| Quantity | Units sold |
| Amount | Line total (not the order total) |
| Tax Amount | Only include if VAT is enabled in your QB account |
A few rules that catch people out:
- One row per line item and not per order. If an order has three products, it needs three rows. All must share the same Order ID, date, and customer.
- QuickBooks does not accept discounts as negative values. If your order had a coupon, you need to rework that line manually or leave it out.
- Custom transaction numbers must be enabled in QuickBooks Settings if you want to preserve WooCommerce order numbers in QuickBooks.
- Limit imports to 100 sales receipts at a time. Larger files slow the importer and often produce cryptic errors.
Save the file as .csv once formatted.
Step 3: Upload and Map Fields in QuickBooks
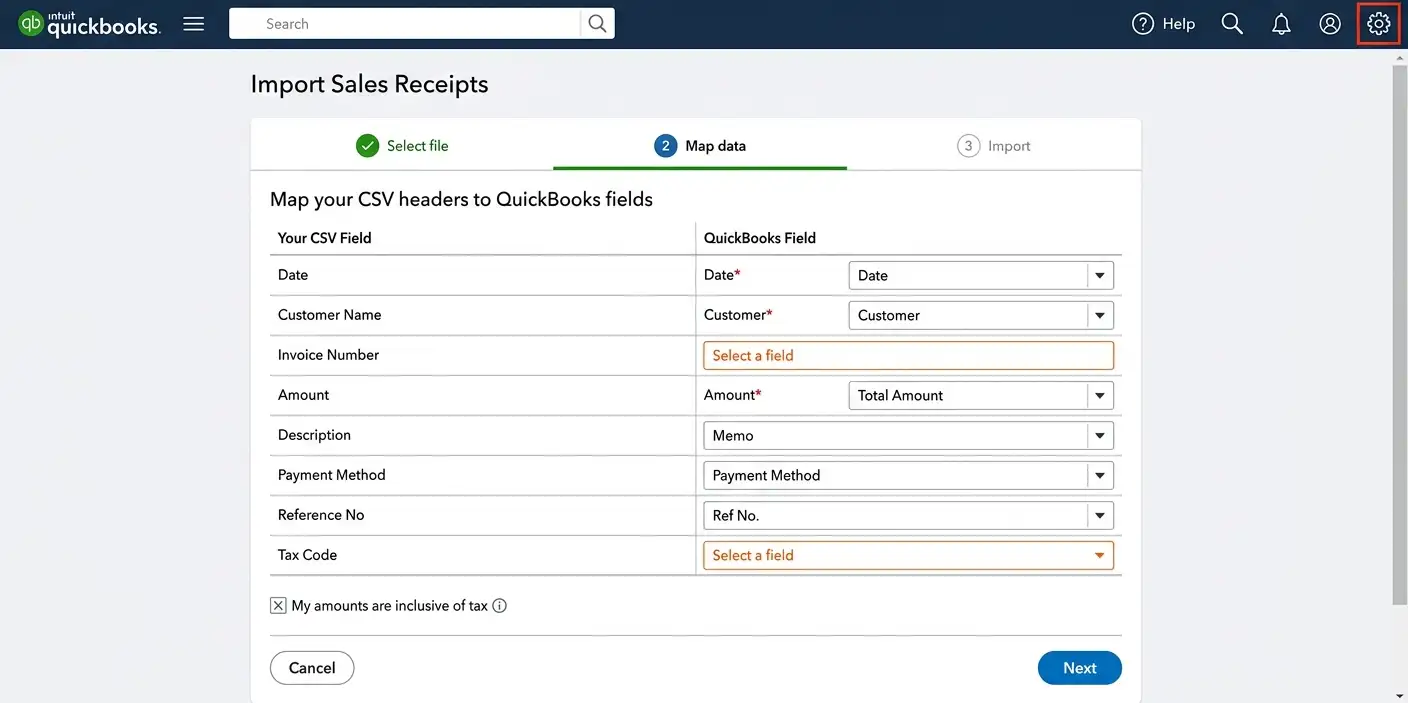
In QuickBooks Online, click the Gear icon in the top right, go to Tools > Import Data, and select Sales Receipts.
QuickBooks will show you a sample format and ask you to upload your file. Click Browse and select your CSV.
After upload, you will see a column mapping screen. This is where you match your CSV headers to QuickBooks fields. Required fields are marked with an asterisk. Map the date field and confirm whether your amounts are tax-inclusive or exclusive.
QuickBooks highlights any missing or mismatched fields before you confirm. Fix them here. Do not save corrections for after the import.
Sales Receipts vs Invoices: Most WooCommerce stores collect payment at checkout. Use Sales Receipts for these orders. The payment is already collected. Use Invoices only if you bill customers after the order is placed, which is typical for wholesale or B2B stores.
Step 4: Verify the Import
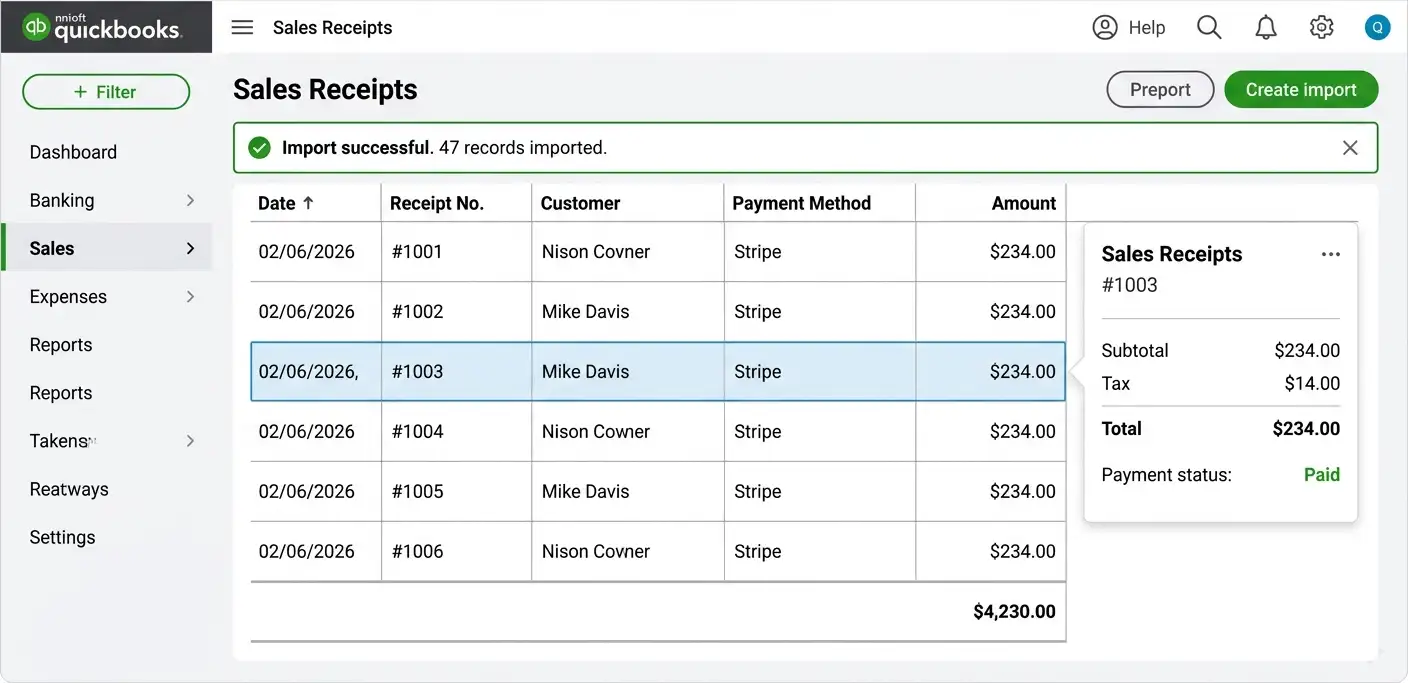
After QuickBooks completes the import, pull up three to five orders at random and compare them to the original WooCommerce data. Check that totals match, taxes are correct, and customer names align.
Reconcile your payment gateway deposits against the QuickBooks entries. If PayPal or Stripe sent you $4,230 last week, QuickBooks should show $4,230 from those orders.
QuickBooks flags failed imports with reasons. Common failures include date format mismatches and products that do not exist in your QuickBooks item list. Both are fixable. More on that in the errors section below.
Method 2: Use a Plugin to Sync WooCommerce with QuickBooks
If your store processes more than a few orders per week, manual CSV imports will become a chore. A plugin handles the sync automatically in real time or on a schedule. Your books stay current without you touching them.
The most widely used plugin for this is QuickBooks Sync for WooCommerce by MyWorks. It supports QuickBooks Online, Desktop, and POS, which matters if you have not moved to cloud accounting yet.
Here is how to set it up.
Step 1: Install MyWorks Sync Plugin
- Go to Plugins > Add Plugin
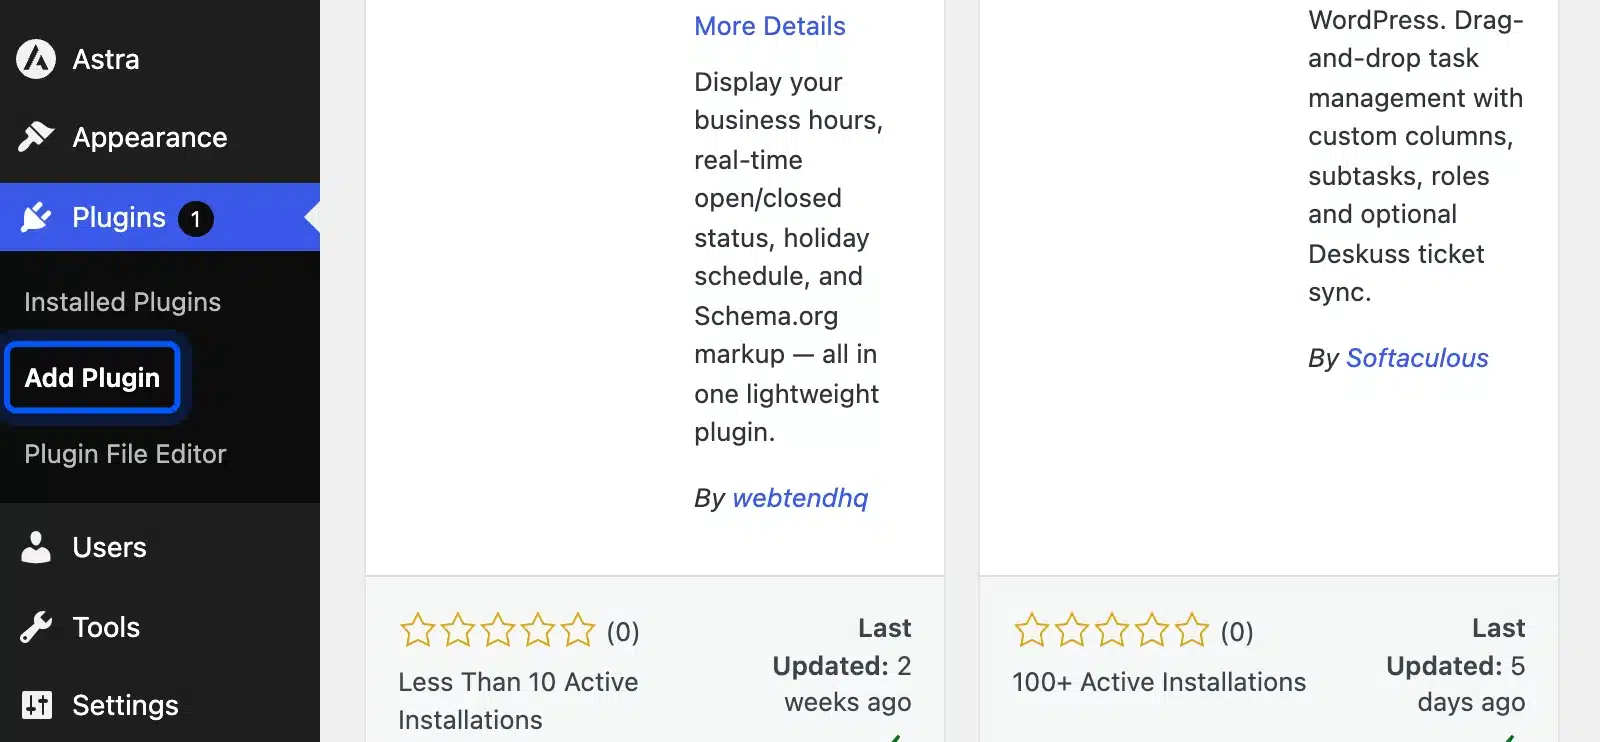
- Search for MyWorks Sync, install it, and activate it.
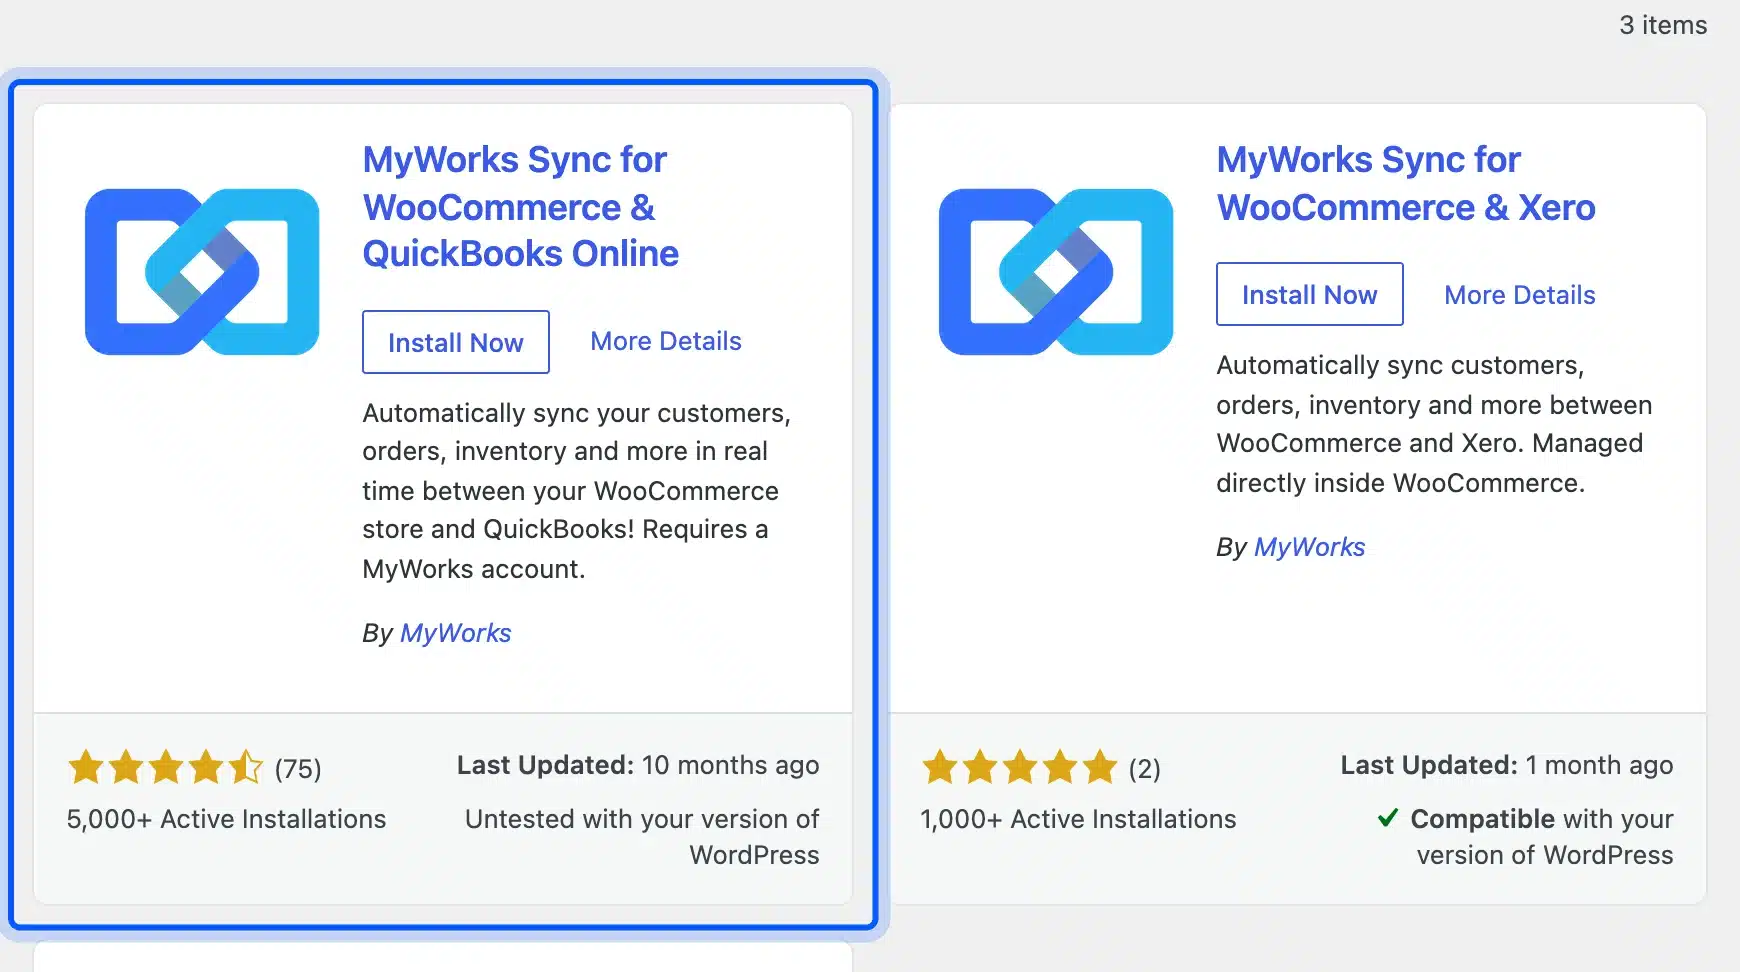
Step 2: Connect Your Accounts
- You will need a MyWorks account (free trial available).
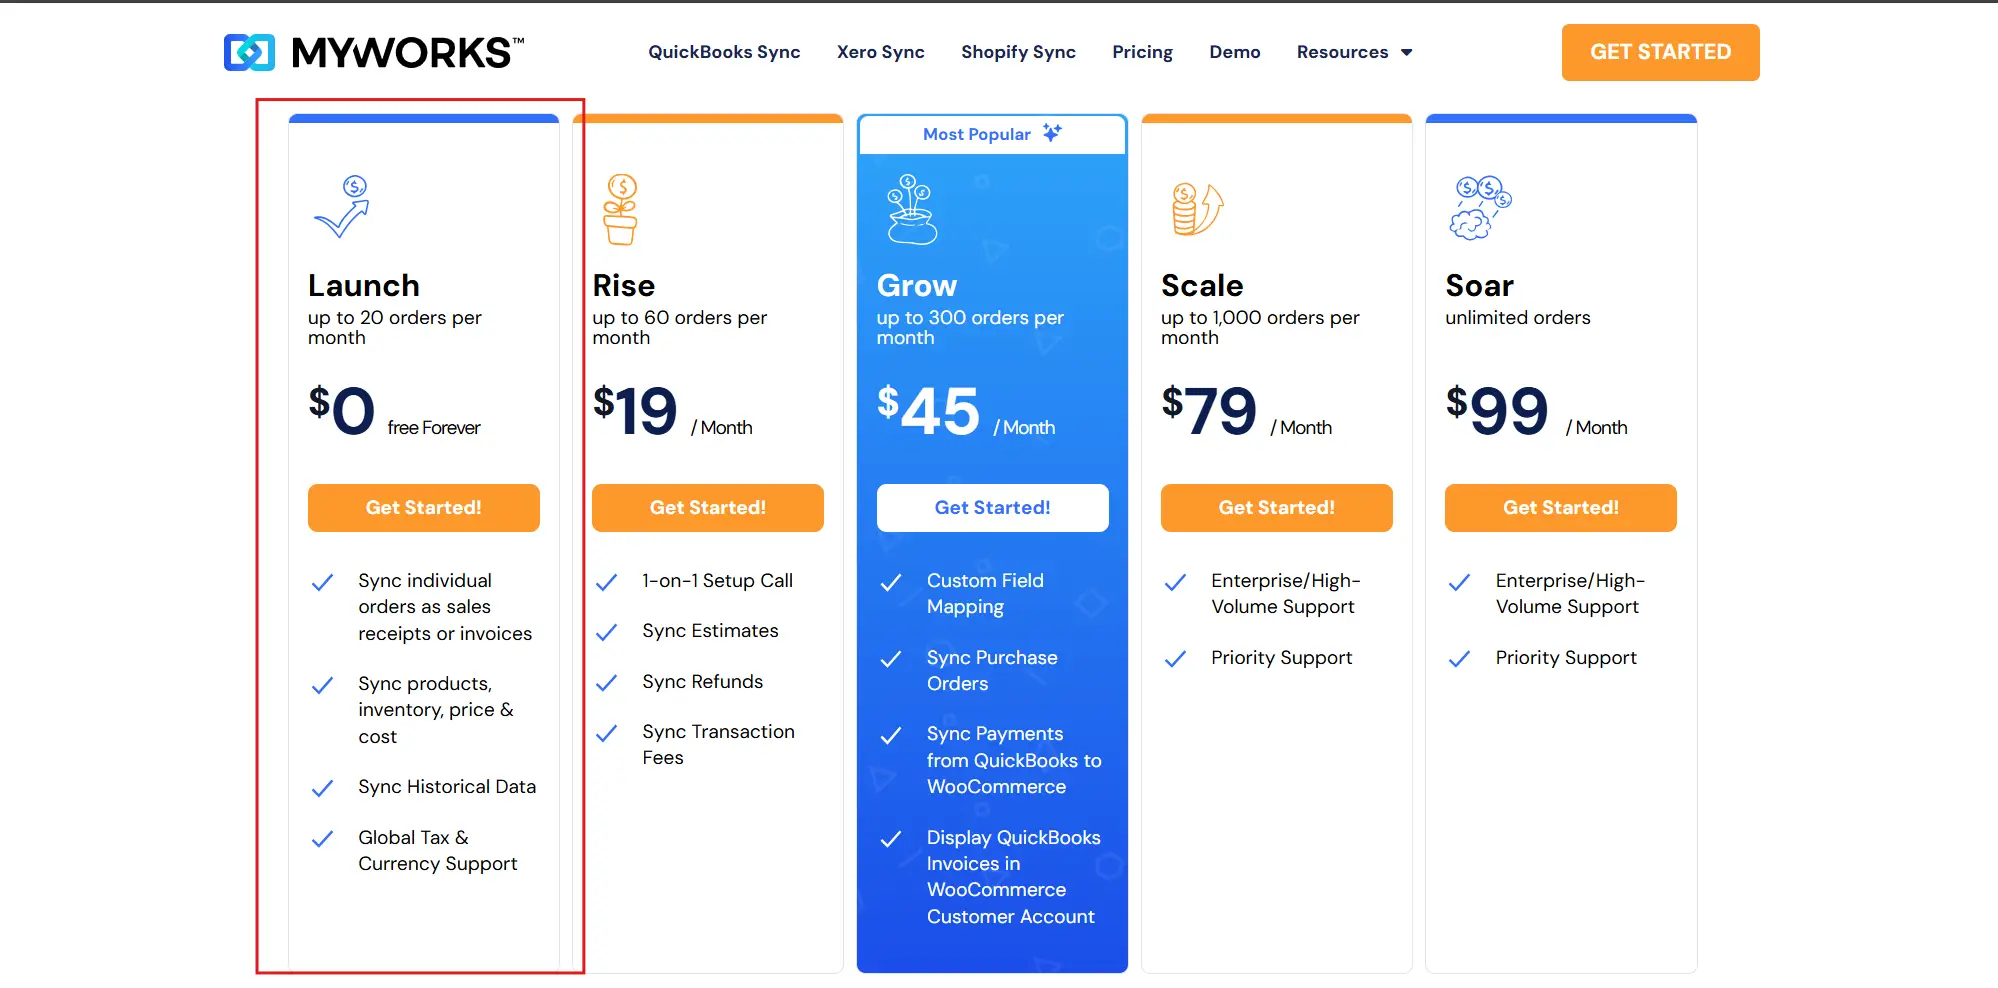
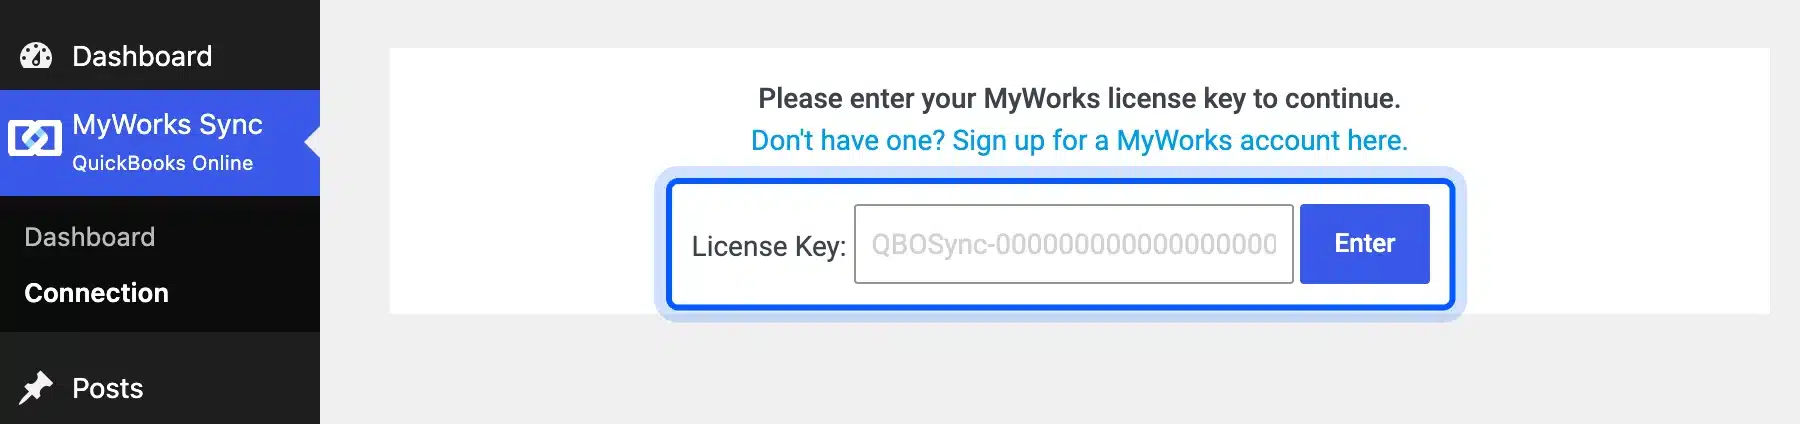
- In MyWorks Sync > Connection, enter your license key and click Connect to QuickBooks.
Step 3: Configure Sync Settings
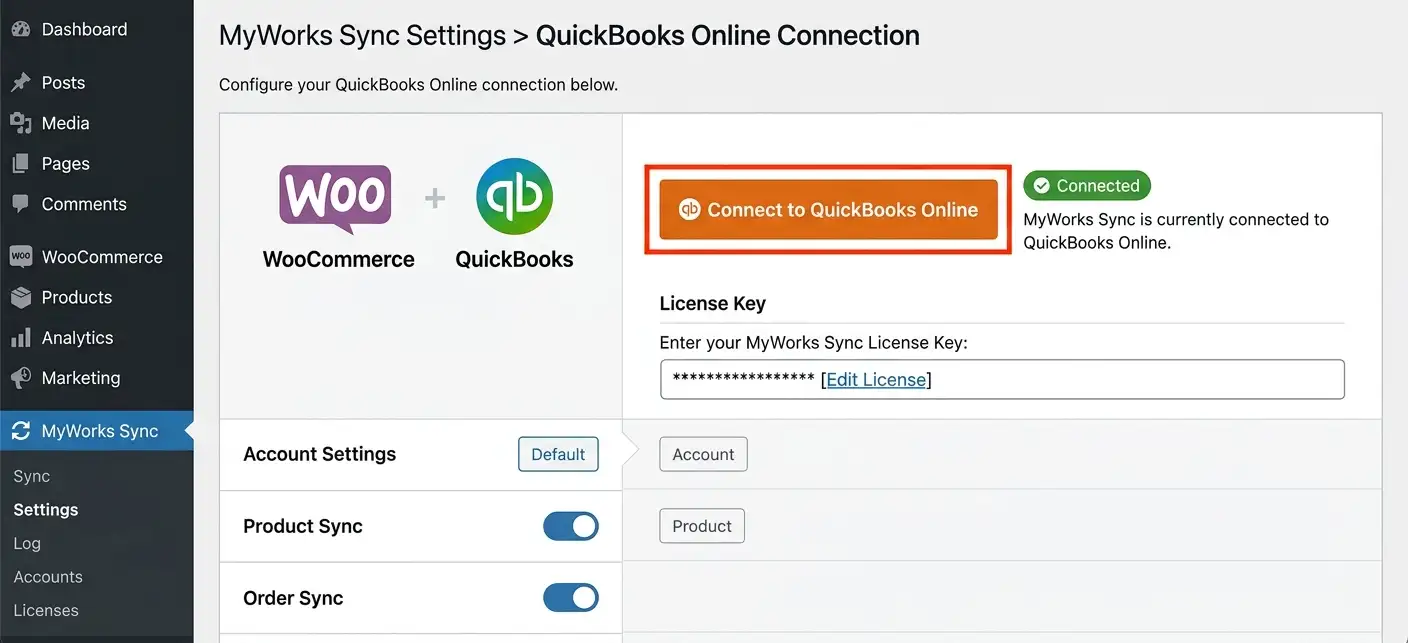
Under Settings, choose whether new orders sync as Sales Receipts or Invoices. Enable real-time sync for orders, customers, inventory, and products. You can control each data type independently.
Step 4: Map your Data
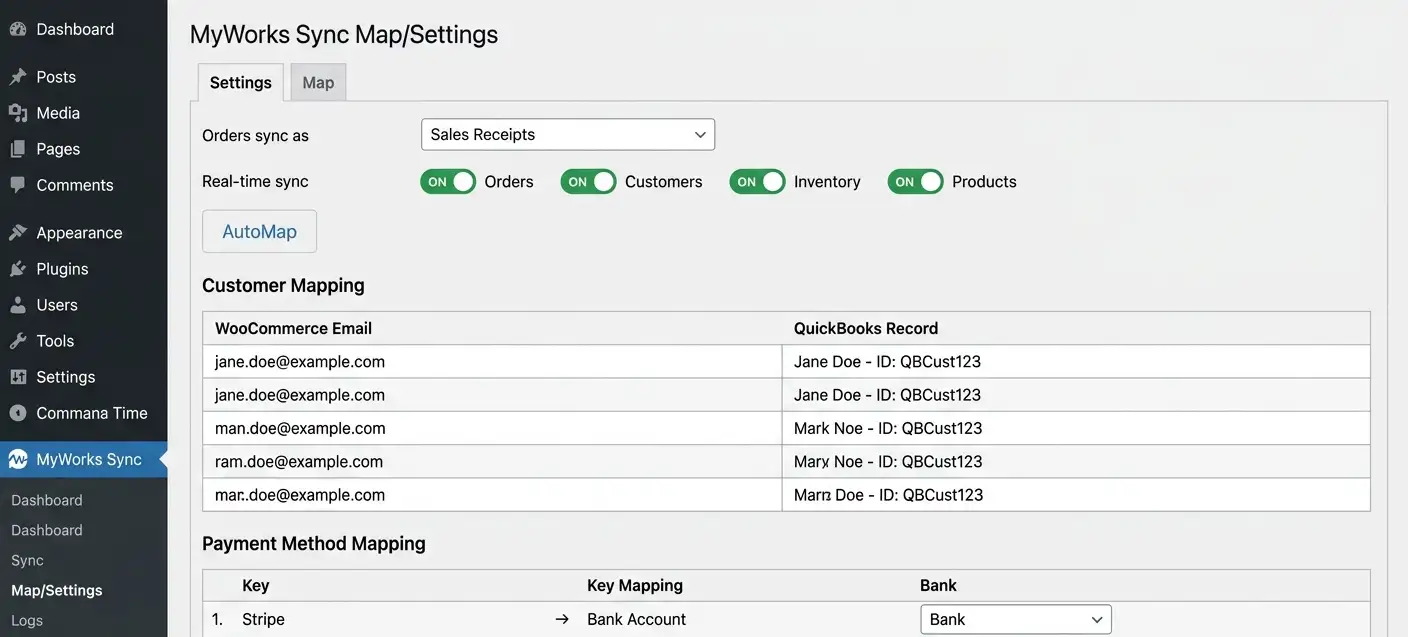
In MyWorks Sync > Map, match your WooCommerce customers to QuickBooks records, your products to QuickBooks items, and your payment methods to the correct bank accounts. The plugin includes an AutoMap tool that matches by name or email.
Once mapping is done, every new WooCommerce order is pushed to QuickBooks within minutes. Refunds, cancellations, and inventory changes sync the same way.
Worth noting: the WooCommerce QuickBooks integration this plugin creates is HPOS-compatible. This means it works correctly if your store has switched to High-Performance Order Storage, which WooCommerce now recommends for all stores.
Method 3: Use the Official QuickBooks Connector
The QuickBooks Connector (previously called OneSaas, now built by Intuit) is the official integration tool. It is free to use with an active QuickBooks Online subscription, which makes it appealing for stores that want to avoid a third-party subscription.
That said, this method only works with QuickBooks Online. If you are on QuickBooks Desktop, skip to Method 2.
Find the QuickBooks Connector for WooCommerce in the QuickBooks App Store and install it from there.
Step 1: Connect Your Store
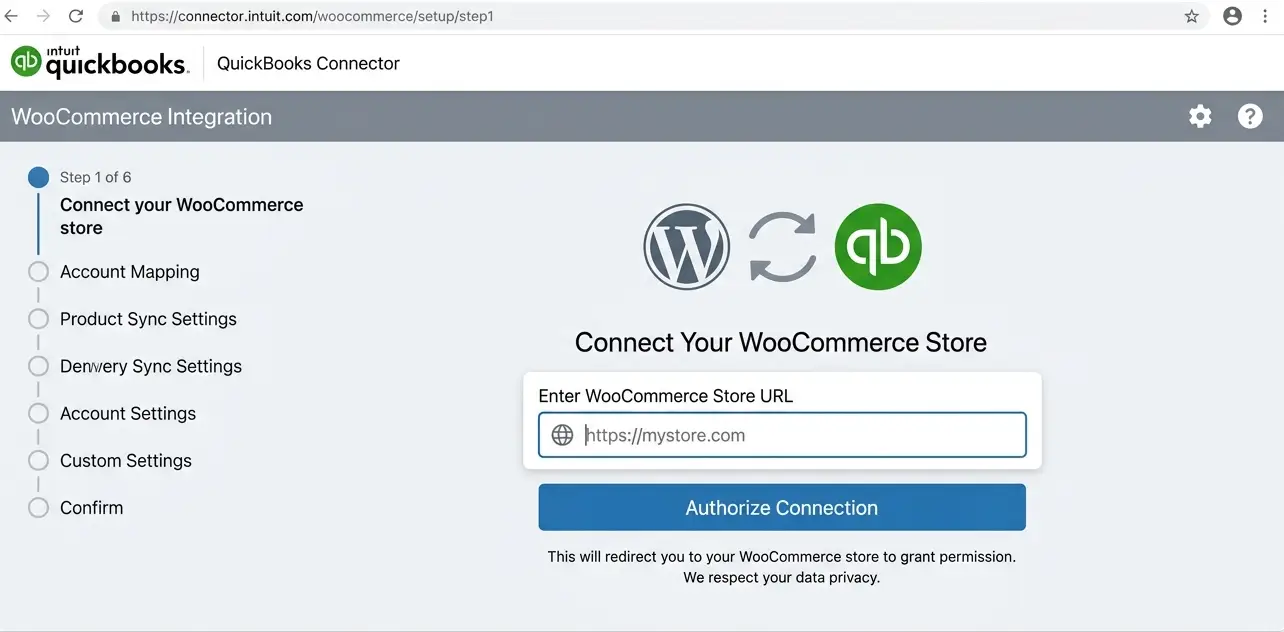
Log in to the QuickBooks Connector using your QuickBooks Online credentials. Enter your WooCommerce store URL and click Authorize Connection. You will be redirected to your WooCommerce site to grant the Connector access to your store data.
Once authorized, the Connector confirms the link between both platforms and you can proceed to configuration.
Step 2: Configure Order Workflow
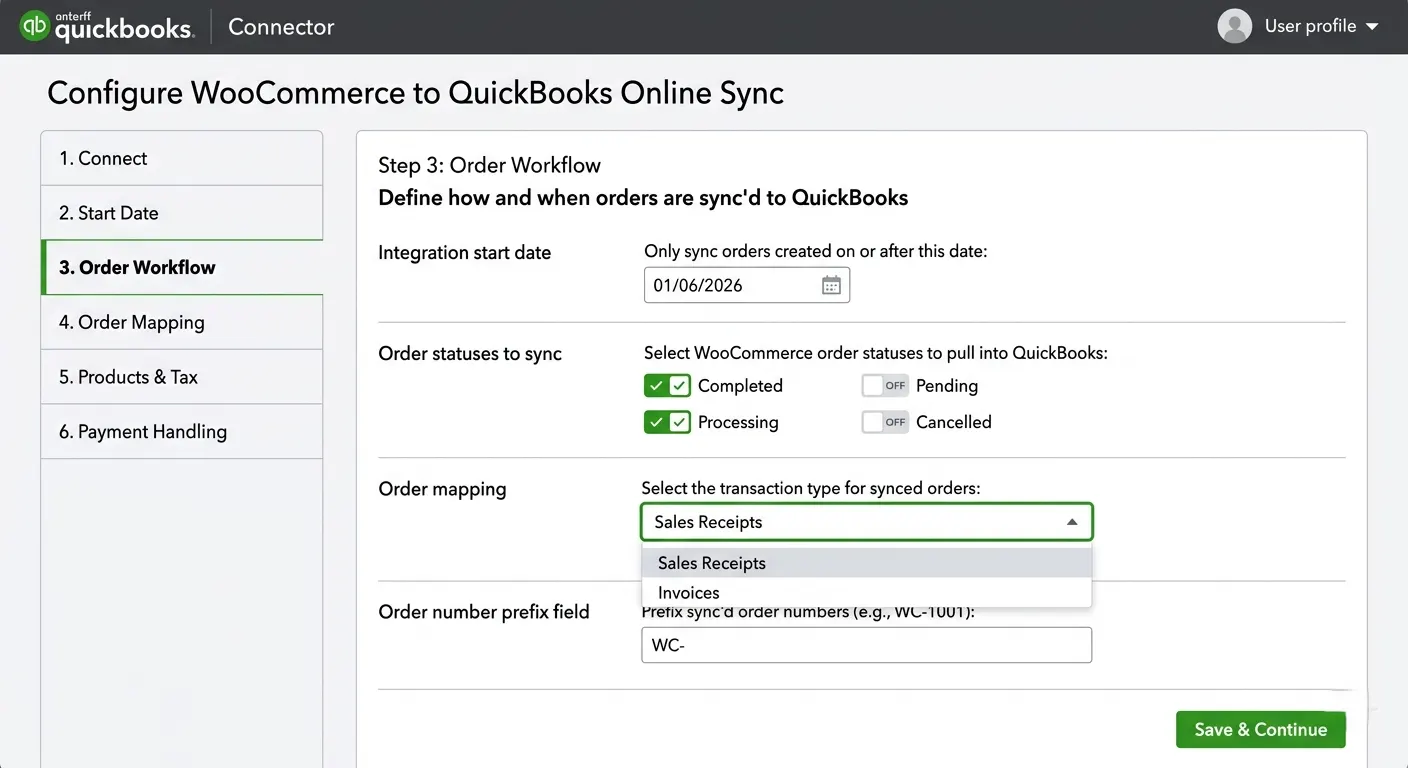
Next, select which WooCommerce order statuses should sync. Most stores should enable Completed and Processing only. Pending orders that never convert will clutter your books.
Then choose how orders appear in QuickBooks: map them to Sales Receipts or Invoices, and add an order number prefix like “WC-” so WooCommerce orders are easy to identify inside QuickBooks.
Step 3: Match Products, Taxes and Payments
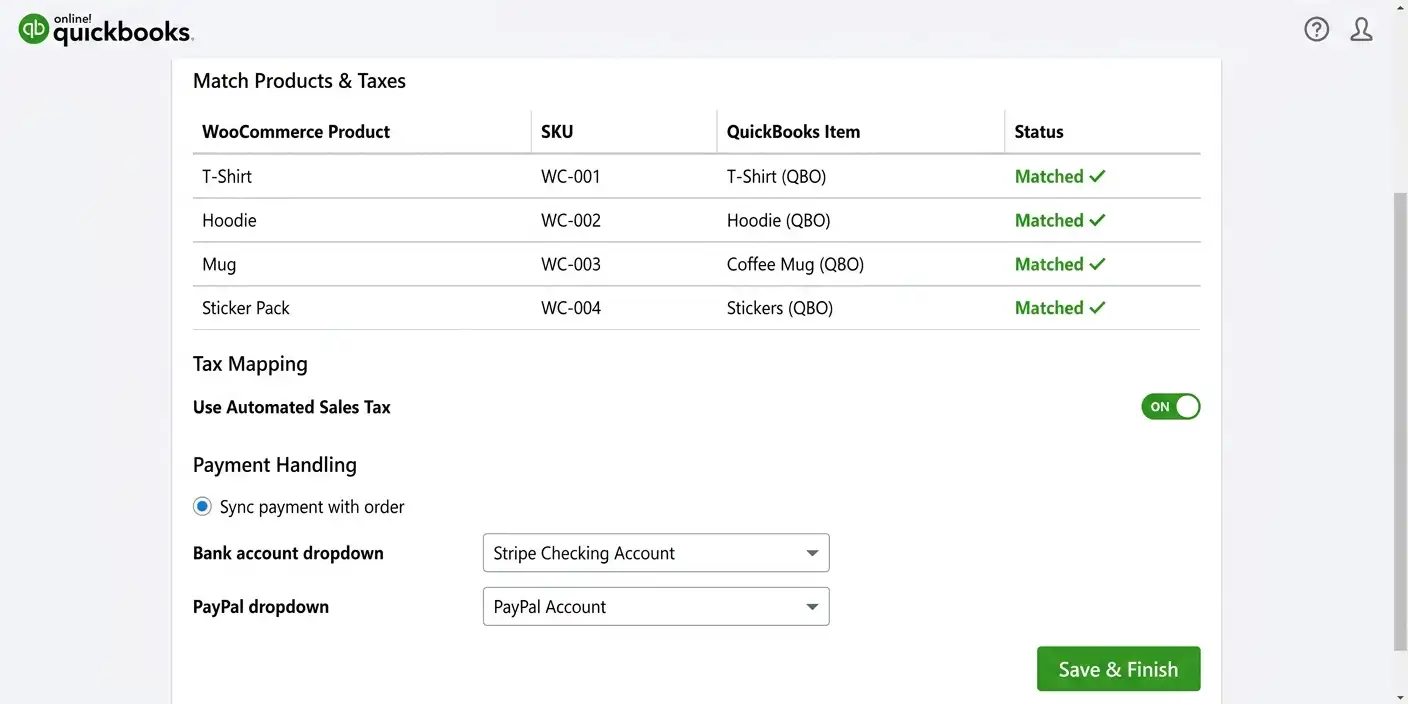
Your WooCommerce products need unique SKUs that match items in your QuickBooks account. The Connector matches by SKU or name. Unmatched products show in red and need manual linking. For tax, US stores using Automated Sales Tax in QuickBooks can skip manual mapping entirely.
Finally, set your payment handling: choose whether payment data syncs with each order or is managed separately, and map each payment method like Stripe or PayPal to the correct QuickBooks bank account.
Once configured, every new order flows from WooCommerce to QuickBooks automatically. The Connector checks for new data at regular intervals. This is not strictly real-time. But for most stores, the delay is under 30 minutes.
Which Method Is Right for Your Store?
Here is an honest comparison. Pick based on your order volume, QuickBooks version, and whether you want to pay for a plugin subscription.
| Factor | CSV Import | Plugin (MyWorks) | QB Connector |
|---|---|---|---|
| Cost | Free | Paid subscription | Free with QB Online |
| Setup time | 30–60 min per import | 1–2 hours (one time) | 1–2 hours (one time) |
| Order volume | Under 100/week | Any volume | Any volume |
| Sync speed | Manual only | Real-time or near real-time | Scheduled (every 30 min) |
| QuickBooks version | Online and Desktop | Online and Desktop | Online only |
| Refunds and cancellations | Manual | Automatic | Automatic |
| HPOS compatible | N/A | Yes | Yes |
| Best for | One-off imports for small stores | Growing stores and Desktop users | Online-only stores that are budget-conscious |
If your store handles more than 50 orders per week and you want your books current without manual effort, skip the CSV method entirely. The plugin or connector will pay for itself in hours saved within the first month.
How to Handle Refunds and Canceled Orders After Import?
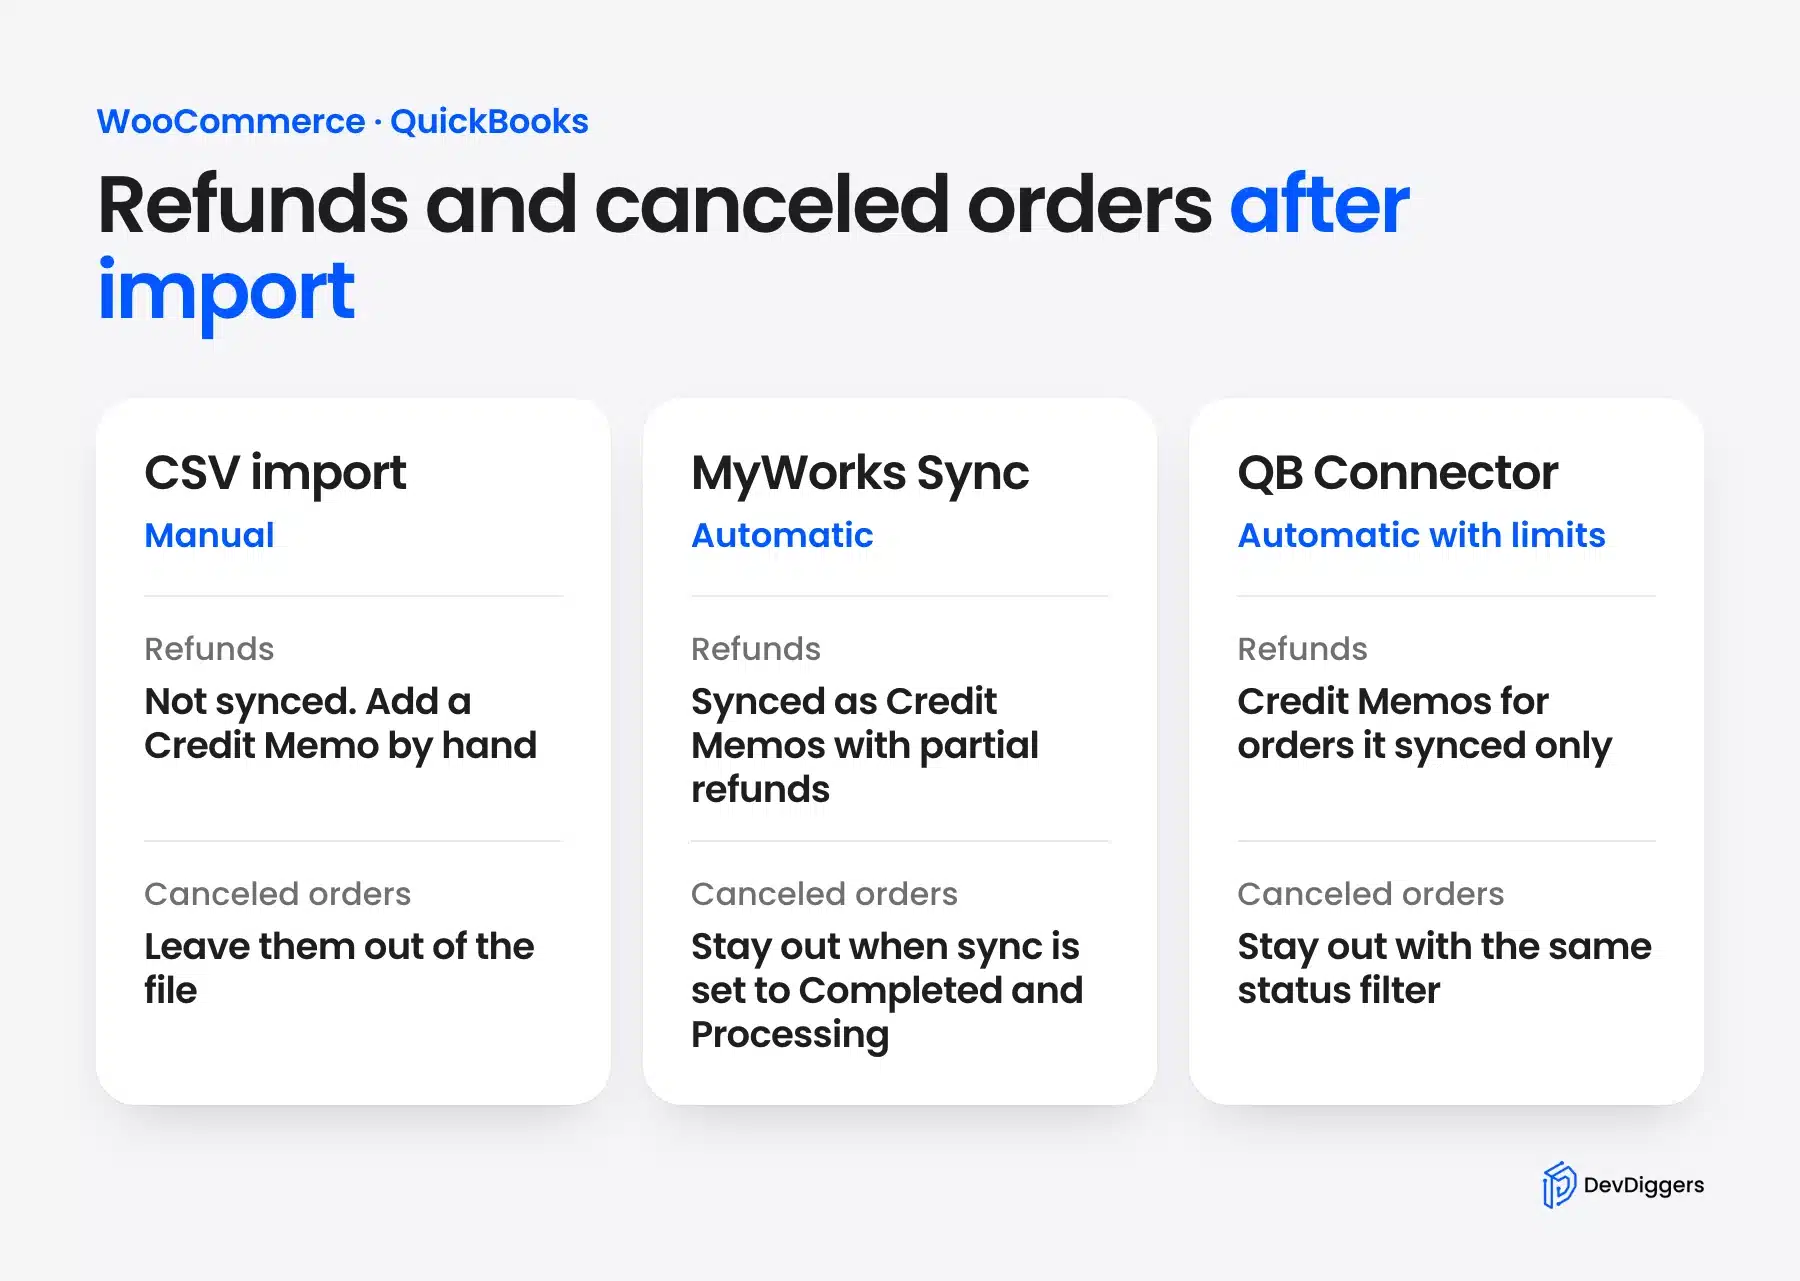
This is the section every guide skips. You import your orders, and everything looks right. Then a customer returns an item.
How that refund flows into QuickBooks depends entirely on which method you used.
- With CSV imports, Refunds do not appear automatically. When you process a refund in WooCommerce, nothing happens in QuickBooks. You need to create a Credit Memo manually in QuickBooks for every refund and apply it to the original Sales Receipt. This is fine for one or two refunds. At scale, it breaks your bookkeeping.
- With MyWorks Sync, Refunds sync automatically as Credit Memos in QuickBooks. When you process a refund in WooCommerce, the plugin creates the corresponding entry in QuickBooks. Partial refunds (refunding one item from a multi-item order) also sync correctly, which is something many stores discover the hard way is not handled well by cheaper tools.
- With the QB Connector, the Connector supports refund syncing as Credit Memos, but only for orders that were originally synced through the Connector. If you have older orders that came in via CSV or before you installed the Connector, those refunds will need to be handled manually.
- Canceled orders work differently from refunds. A canceled WooCommerce order with no payment collected should not appear in QuickBooks at all. With plugin or Connector syncs, you can configure which order statuses trigger a sync. Setting it to Completed and Processing only means canceled orders stay out of QuickBooks by default.
If you are handling complex order scenarios like subscriptions, partial fulfillments, or split payments. That is where a custom integration via WooCommerce development services often makes more sense than a plugin.
Common Errors When Importing WooCommerce Orders to QuickBooks
These are the errors that show up most in support tickets, regardless of which method you use.
- Error: Date format not recognized: QuickBooks expects MM/DD/YYYY. WooCommerce exports in different formats depending on your settings. Open your CSV, find the date column, and reformat every date before uploading. In Excel, select the column, choose Format Cells > Date, and apply the correct format.
- Error: Product not found in QuickBooks: This happens when your WooCommerce product name or SKU does not match any item in your QuickBooks item list. Fix it by either (a) creating the missing item in QuickBooks before importing or (b) using the plugin’s auto-create feature, which creates items on the fly during sync.
- Error: Duplicate order ID conflict: If you are importing orders that were previously imported (or that share IDs with other QuickBooks entries), QuickBooks throws a conflict error. The fix: delete the ID column from your CSV before importing, and let QuickBooks generate its own transaction numbers. Then enable the order number prefix in QuickBooks settings so you can still trace back to WooCommerce.
- Error: Import fails for orders over a certain size: QuickBooks Online limits CSV imports to 100 rows at a time. If your file is larger, split it into batches of 100 and import each batch separately.
- HPOS compatibility issues with older plugins: If your WooCommerce store uses High-Performance Order Storage (which all modern WooCommerce stores should use) and your integration plugin is older than mid-2024, you may see orders not syncing at all. Check that your plugin’s changelog confirms HPOS support. Both the official Connector and MyWorks Sync added HPOS compatibility in 2024 and have maintained it since.
- Tax amounts are not appearing in QuickBooks: For non-US stores, taxes need to be mapped explicitly. The same tax rate must exist in your QuickBooks account with the same code you are using in WooCommerce. For US stores using Automated Sales Tax in QuickBooks, leave tax mapping off. QuickBooks calculates it automatically, and adding manual tax amounts causes double-counting.
Keeping your WooCommerce store secure throughout this process matters too. Follow a solid WooCommerce security checklist. This matters especially if you are granting API access to external sync tools.
And if you ever need to change order statuses in bulk during cleanup after a failed import, knowing how to mark WooCommerce orders complete via MySQL is a useful fallback.
Conclusion
Importing orders from WooCommerce to QuickBooks comes down to three choices: the CSV method for small or occasional imports, a plugin like MyWorks Sync for ongoing automated sync across any QuickBooks version, or the official QuickBooks Connector for stores on QuickBooks Online who want to avoid a third-party subscription.
The CSV route works, but it is a treadmill. Every week without automation is a week of manual entry. If your store is growing, the plugin or Connector setup cost pays back fast.
Handle your refunds deliberately. They are the most overlooked part of this integration and the most likely cause of matching records headaches at the end of the month.
Set it up once, test with a small batch first, verify three to five orders manually after each major import, and you will have clean books that match your WooCommerce reality.
Frequently Asked Questions (FAQs)
Q1. Can I import WooCommerce orders to QuickBooks Desktop and not just QuickBooks Online?
Yes. QuickBooks Desktop is supported via CSV import and through third-party plugins like MyWorks Sync, which has a Desktop-specific setup. The official QuickBooks Connector by Intuit only supports QuickBooks Online. Desktop users need one of the other two methods.
Q2. How often does the plugin sync WooCommerce orders to QuickBooks?
This depends on the plugin. MyWorks Sync can sync every five minutes. The official QuickBooks Connector runs on a scheduled interval, typically every 15 to 30 minutes. Neither is truly instant, but both are fast enough for most stores.
Q3. What fields does QuickBooks require when importing orders via CSV?
At minimum: Sales Receipt number, Sales Receipt date (MM/DD/YYYY), Customer name, Product or service name, quantity, and line amount. Tax amount is required only if VAT is enabled in your account. Currency is optional but recommended for stores selling in multiple currencies.
Q4. Will importing WooCommerce orders to QuickBooks create duplicate customers?
It can, if customer names in WooCommerce do not exactly match names already in QuickBooks. Plugins handle this with AutoMap tools that match by email address. For CSV imports, check your existing QuickBooks customer list before importing and clean up any name variations first.
Q5. Does the WooCommerce QuickBooks sync work with subscription orders?
It depends on the plugin and your subscription setup. MyWorks Sync supports WooCommerce Subscriptions and syncs each renewal as a separate transaction. The official Connector has more limited support for subscriptions. CSV imports treat each order individually. Subscription renewals import fine as long as they appear as separate WooCommerce orders.
Q6. What happens if a sync fails halfway through?
Most plugins log sync failures and retry automatically. Check the plugin’s activity log in your WordPress dashboard after setup. For the QuickBooks Connector, Intuit provides sync reports by email if you enable them. For CSV imports, QuickBooks shows a summary of failed rows after each upload. Download the error log and fix those rows before re-importing.