You can get Venmo working on WordPress and WooCommerce in under 20 minutes. No code needed. If you’re figuring out how to set up Venmo in WordPress and WooCommerce, there are two ways to do it: a PayPal-connected plugin or a manual QR code setup. Most tutorials treat this as a skill-level question. It’s not. The real deciding factor is whether you already have a PayPal Business account.
This guide walks through both paths so you can pick the one that matches your setup, not someone else’s checklist. We’ll also get into what Venmo actually costs per transaction, plus the checkout issues that tend to catch WooCommerce Blocks and HPOS stores off guard.
By the end, you’ll know which method fits and how to test it before a real customer hits your checkout.
Why Add Venmo to Your WooCommerce Store?
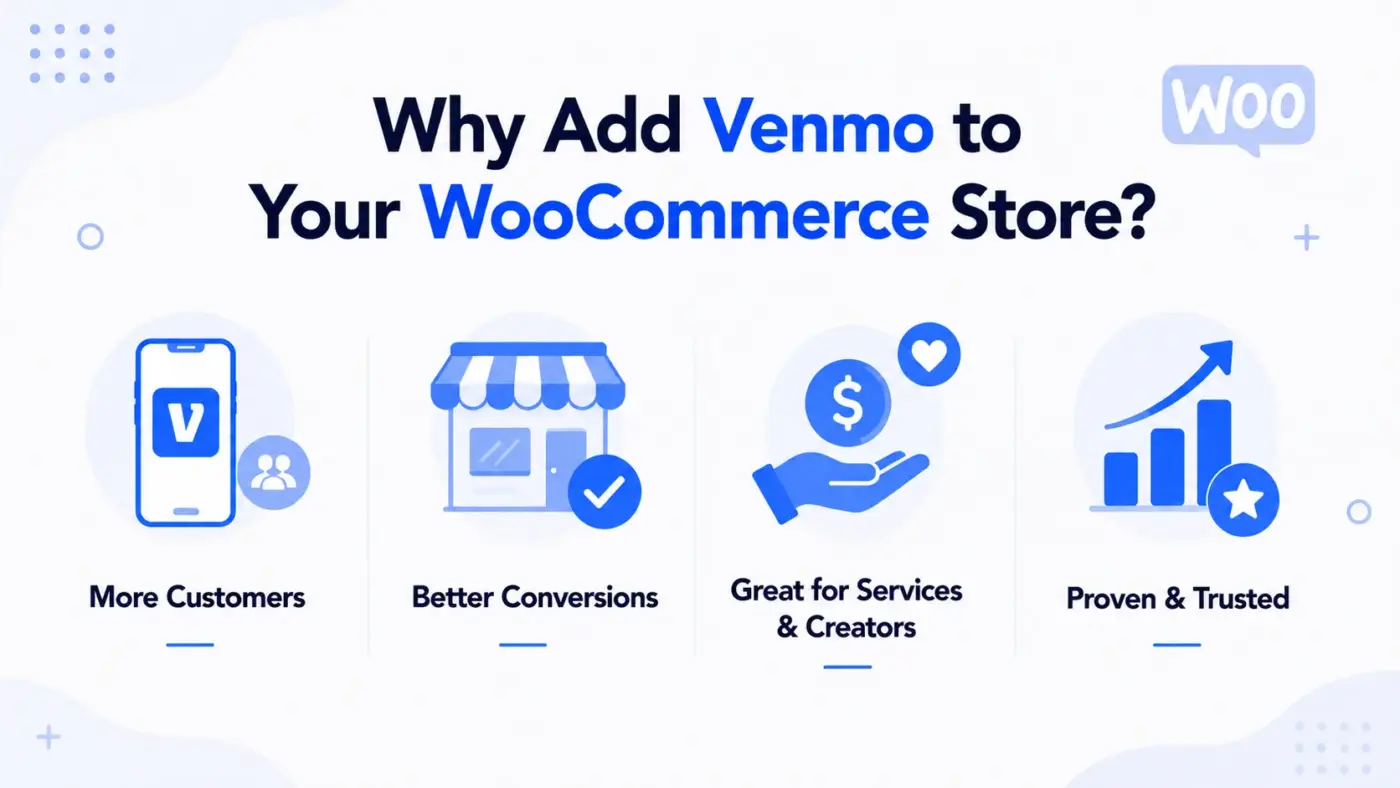
Venmo fills a gap that credit cards and standard PayPal checkout don’t. It’s mobile-first, social, and part of daily life for younger US shoppers, an addition to your gateways, not a replacement, that catches customers who’d otherwise leave checkout.
The numbers back it up. By 2019, PayPal’s SEC filings showed Venmo processing $21 billion in a single quarter, up 73% year over year. Amazon, Walmart, and Target now accept it too.
In our experience, service-based businesses like photographers, tutors, and subscription boxes see the biggest lift. Large multi-category retailers, less so, since their customers already pay by card.
Nonprofits and creators also use Venmo for one-off payments, since their US audience already has the app and doesn’t want to type in card details. The manual QR method later in this guide is the faster route for that.
Skip Venmo if your customers are mostly outside the US, or if your checkout completion rates are already strong. It helps most at the margins, the customers who’d otherwise close the tab.
Set Up Venmo in WordPress and WooCommerce: Requirements
Before touching any settings, run through the checklist below. You’ll need an active WooCommerce store and an SSL certificate. On top of that, you’ll need either a PayPal Business account or a Venmo username, depending on which method you choose.
- WooCommerce is installed and running: If you haven’t set this up yet, follow our guide on setting up WooCommerce on WordPress first.
- A valid SSL certificate: Every payment gateway, Venmo included, requires SSL encryption to stay compliant. If you’re unsure whether your store meets this bar, check our breakdown of WooCommerce PCI compliance.
- A PayPal Business account (Method 1) or a Venmo username (Method 2): You only need one, not both, depending on your chosen path.
- An updated WooCommerce and PHP version: Since payment plugins are usually built against current releases. Running an outdated version is one of the more common reasons a Venmo plugin installs but fails to connect properly. If your store hasn’t been updated in a while, check your version numbers under WooCommerce > Status before you start.
Method 1: Add Venmo With WooCommerce PayPal Payments
This method processes Venmo payments automatically and updates your order status without any manual work on your end.
- Go to Plugins > Add New in your WordPress dashboard
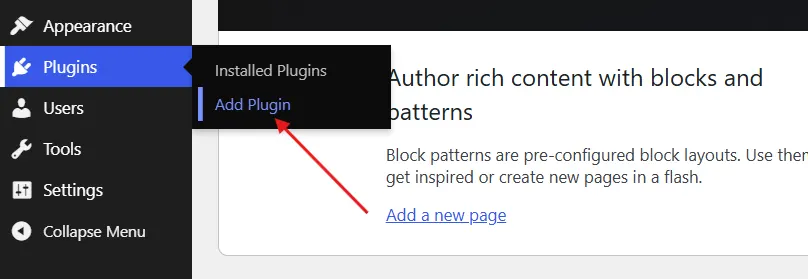
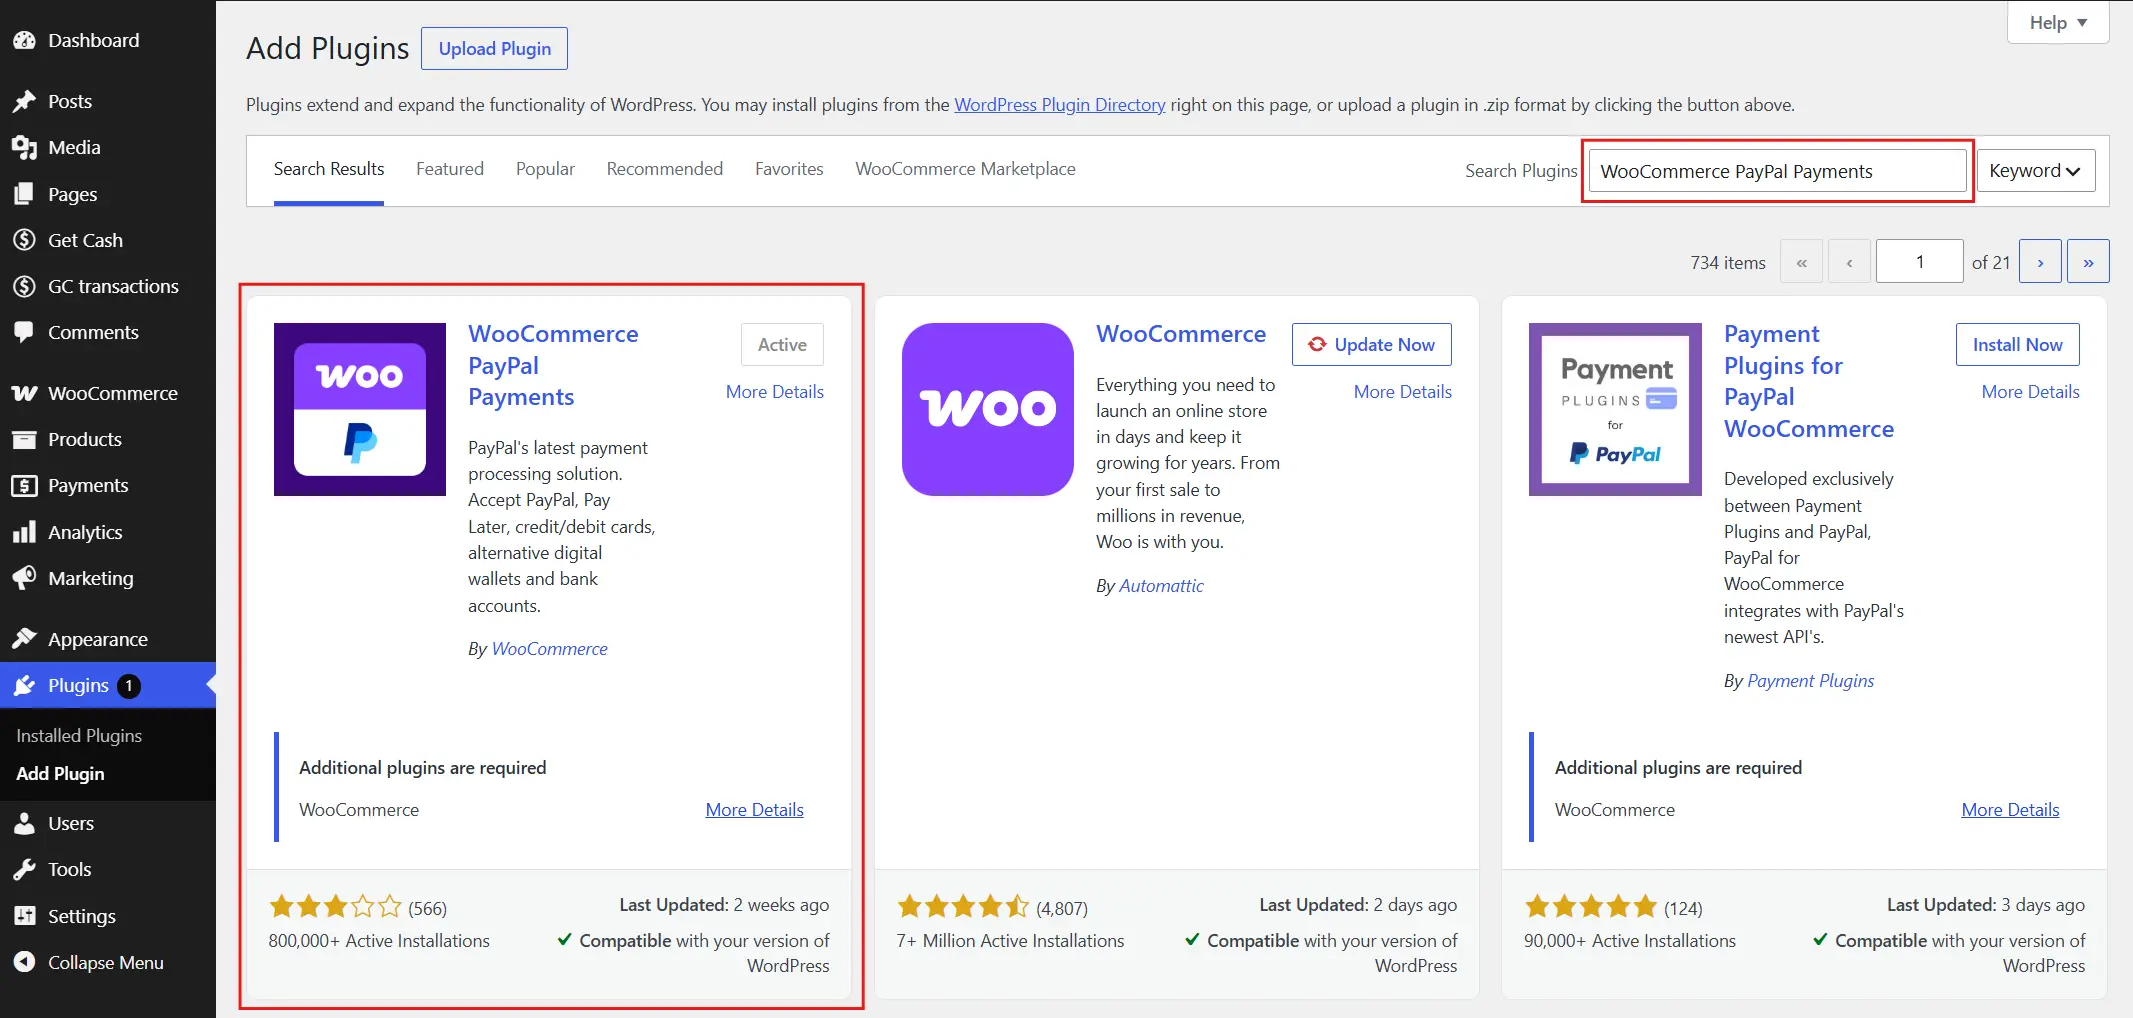
- Search for WooCommerce PayPal Payments. Click Install Now, then Activate.
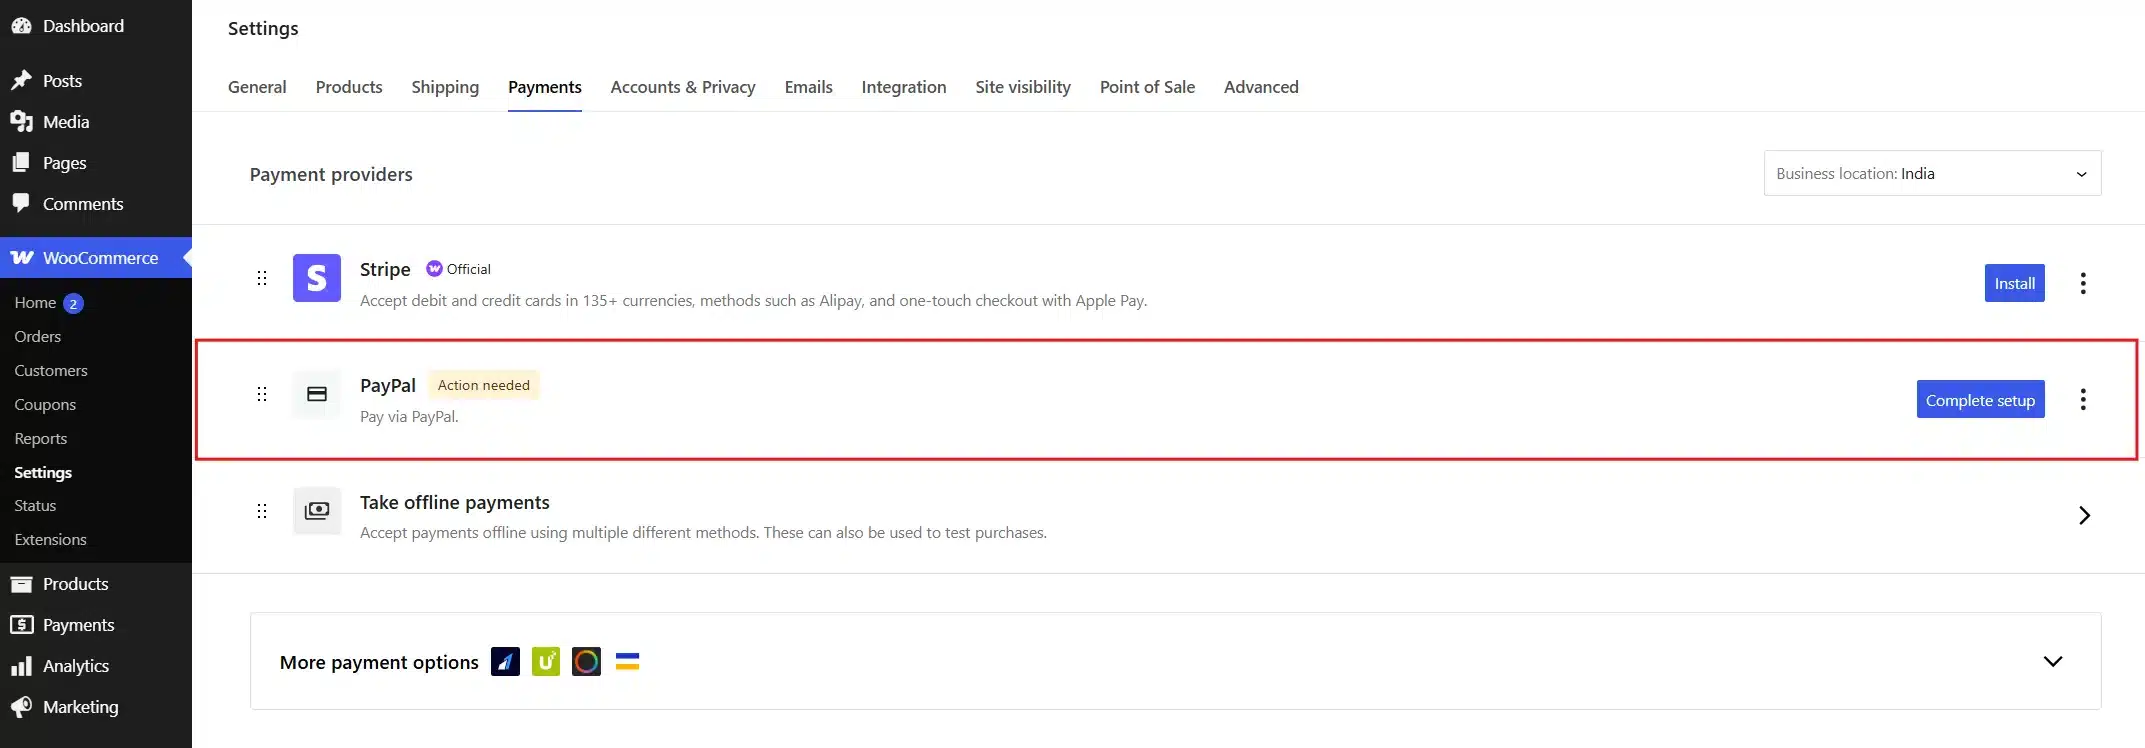
- Go to WooCommerce > Settings > Payments and find PayPal Payments in the list. Click Complete Setup.
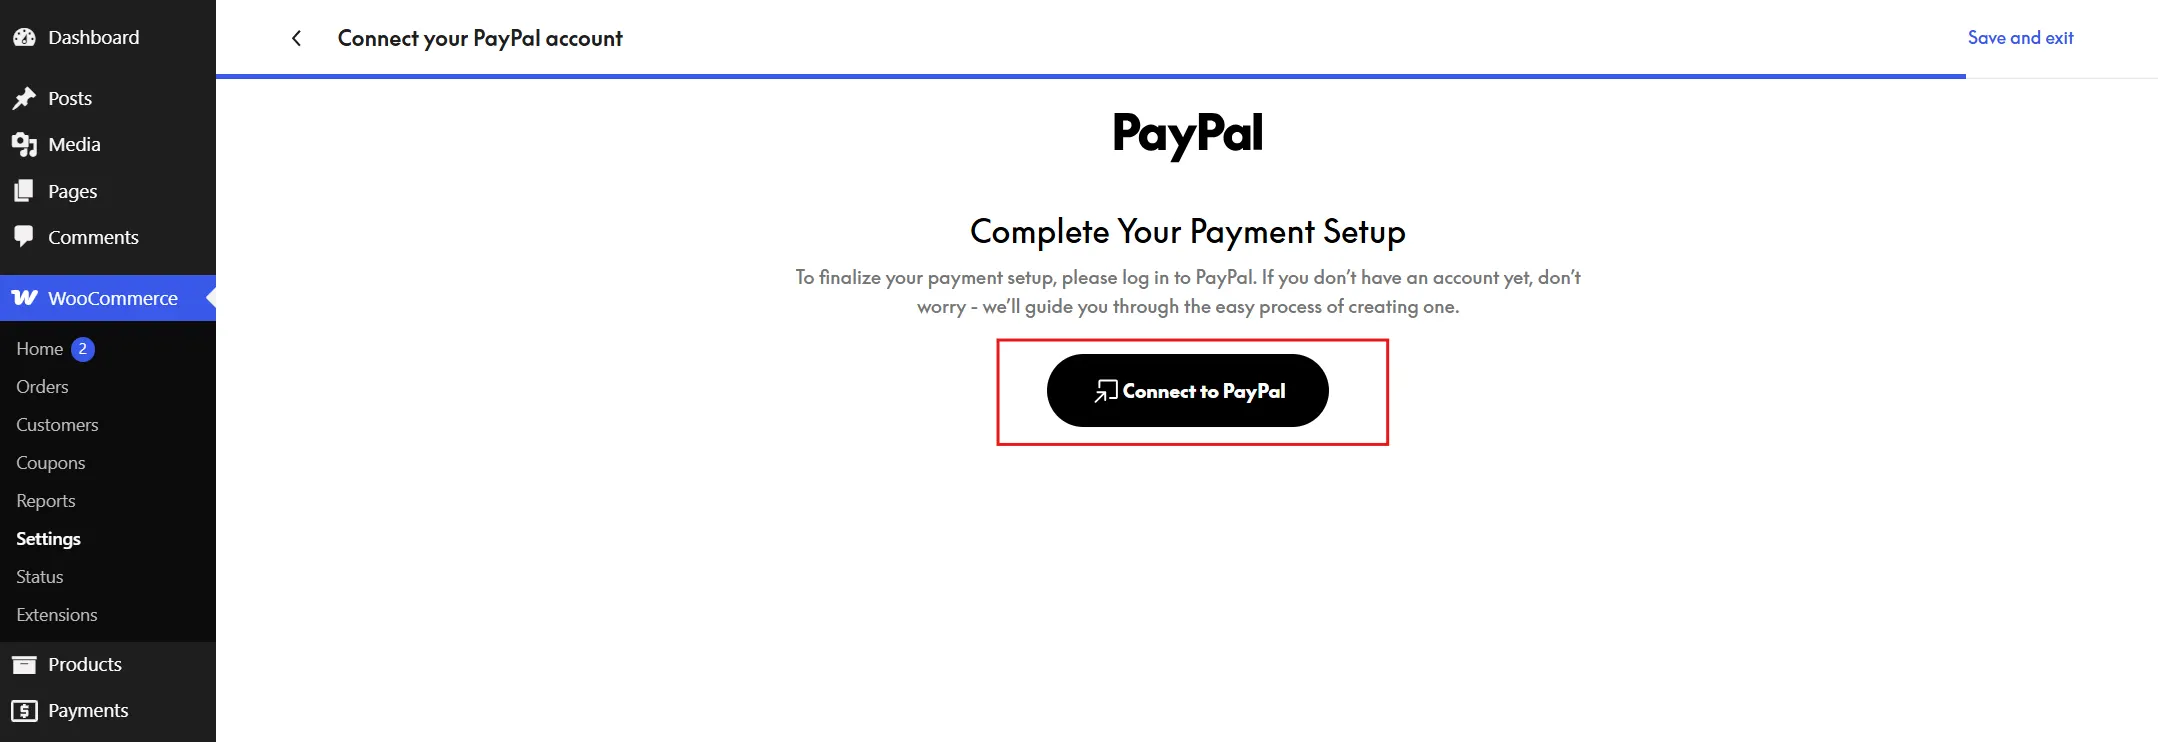
- Click Connect to PayPal, log into your PayPal Business account, and approve the requested permissions.
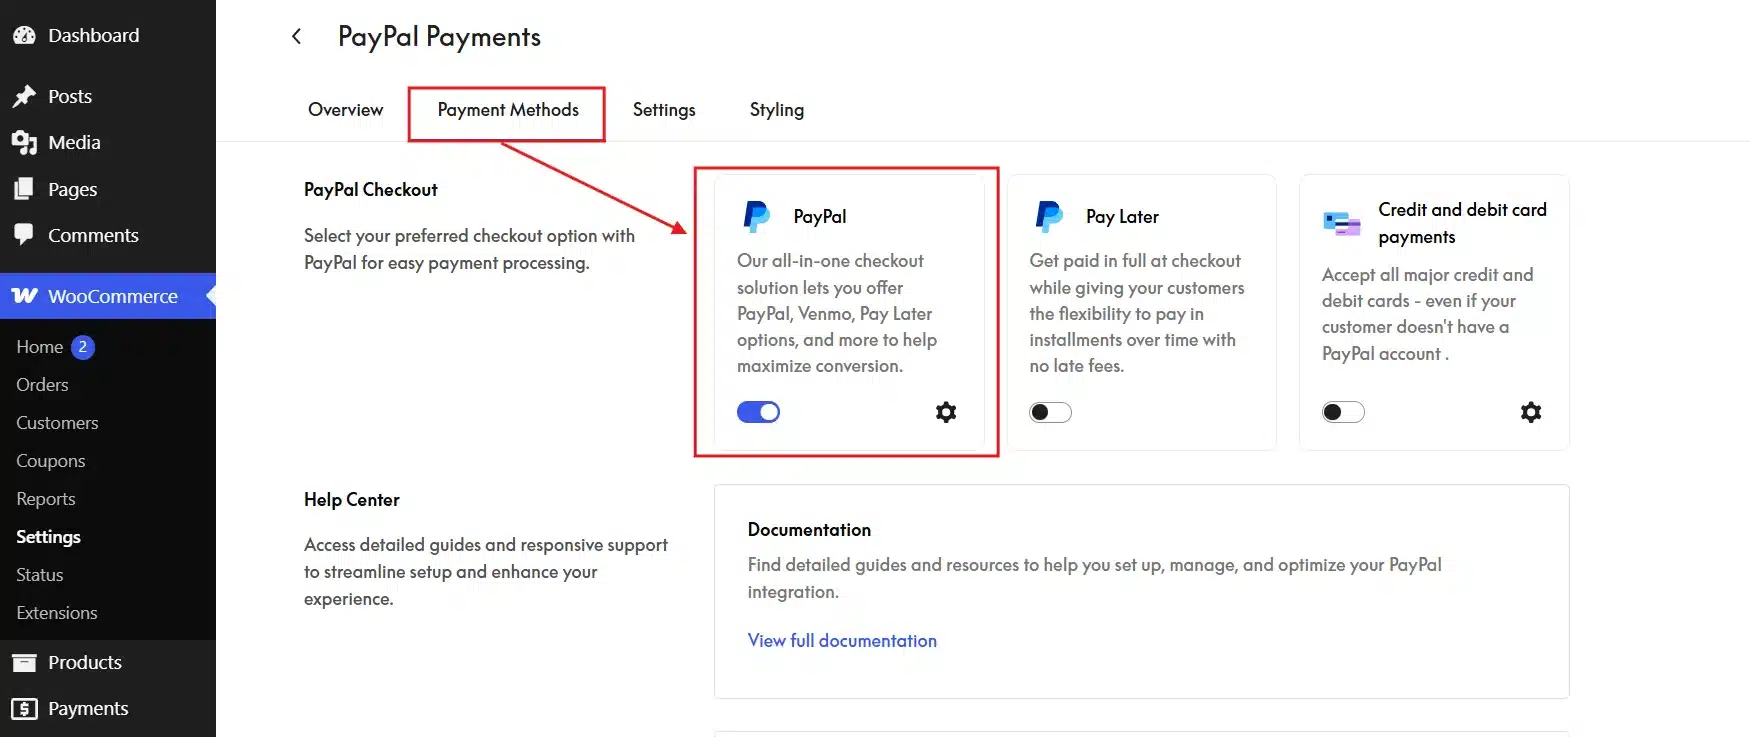
- Scroll to the Payment Methods section and toggle Venmo on.
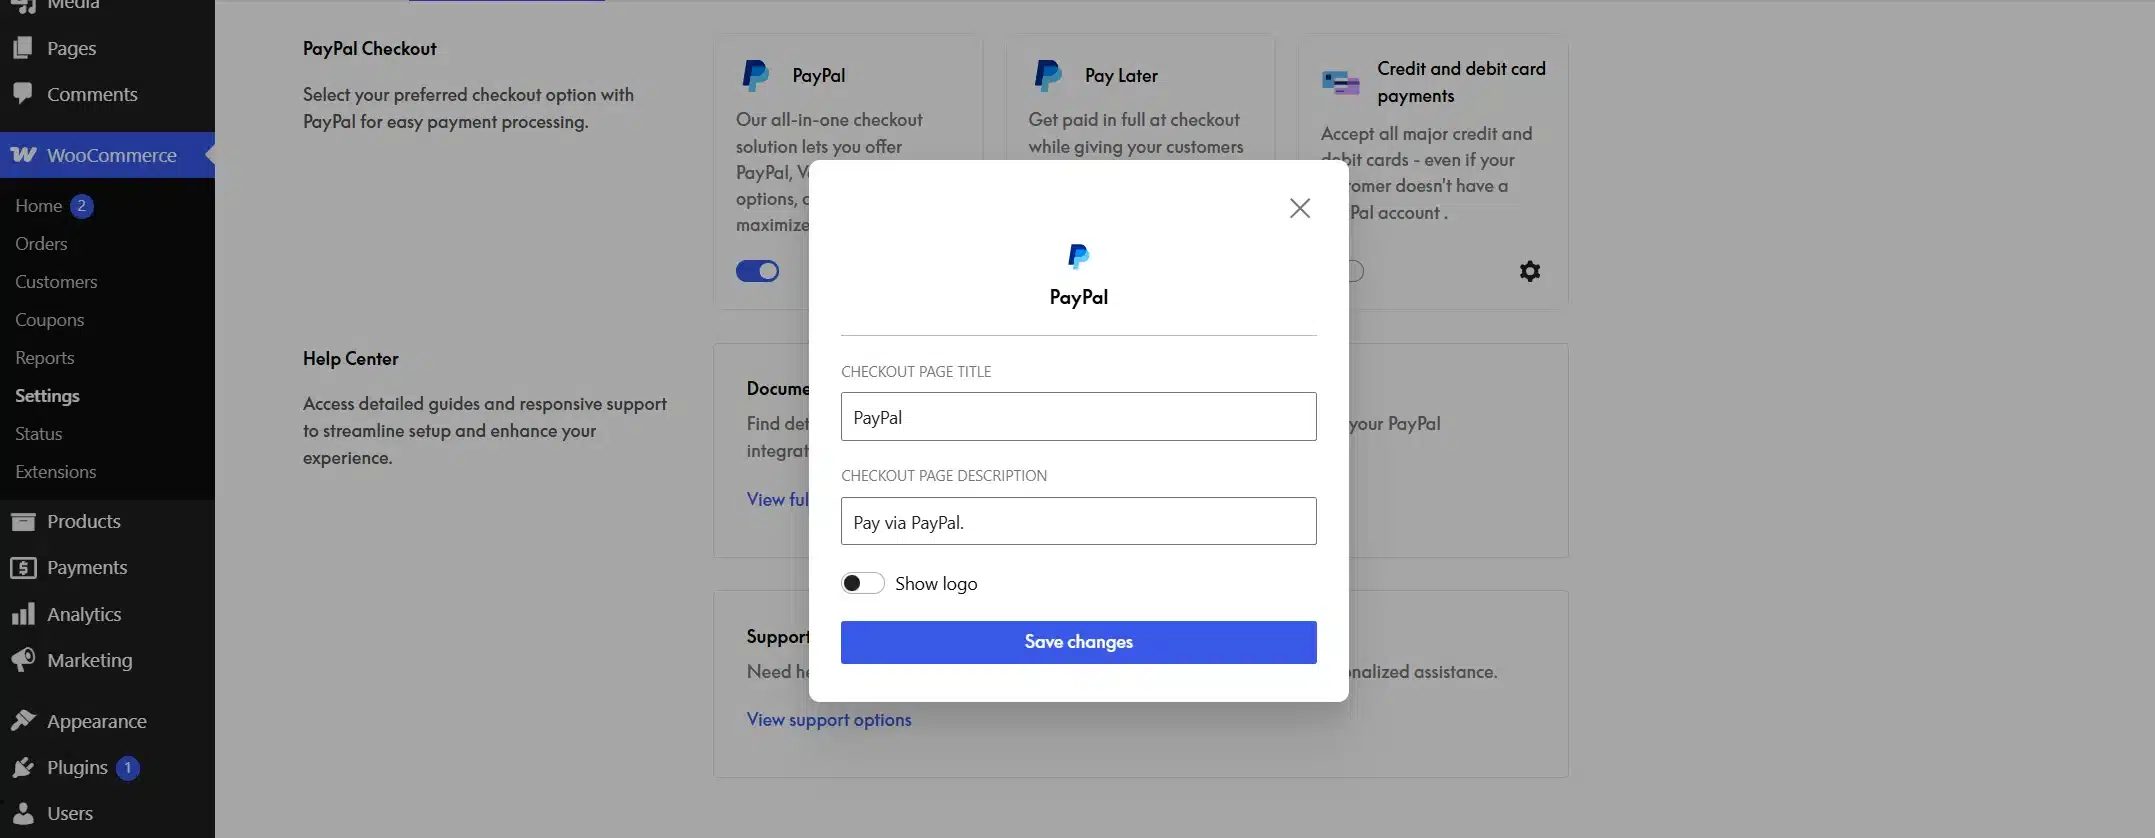
- In the General Settings, keep the title short and recognisable, like “Venmo” or “Pay with Venmo”, and click Save Changes.
As of the current WooCommerce PayPal Payments release, Venmo only shows up as a checkout option on mobile devices. Venmo itself doesn’t support desktop payments. Don’t assume something’s broken if you don’t see it while testing on a desktop browser. Switch to a phone or a mobile emulator before troubleshooting further.
Method 2: Add Venmo Without a PayPal Business Account
Maybe you don’t have a PayPal Business account. Maybe you’d rather skip Venmo’s per-transaction fee on this specific channel. Either way, a manual QR code method works too. It trades automation for simplicity.
- Install and activate a Venmo QR code plugin, such as Get Cash, from Plugins > Add New.
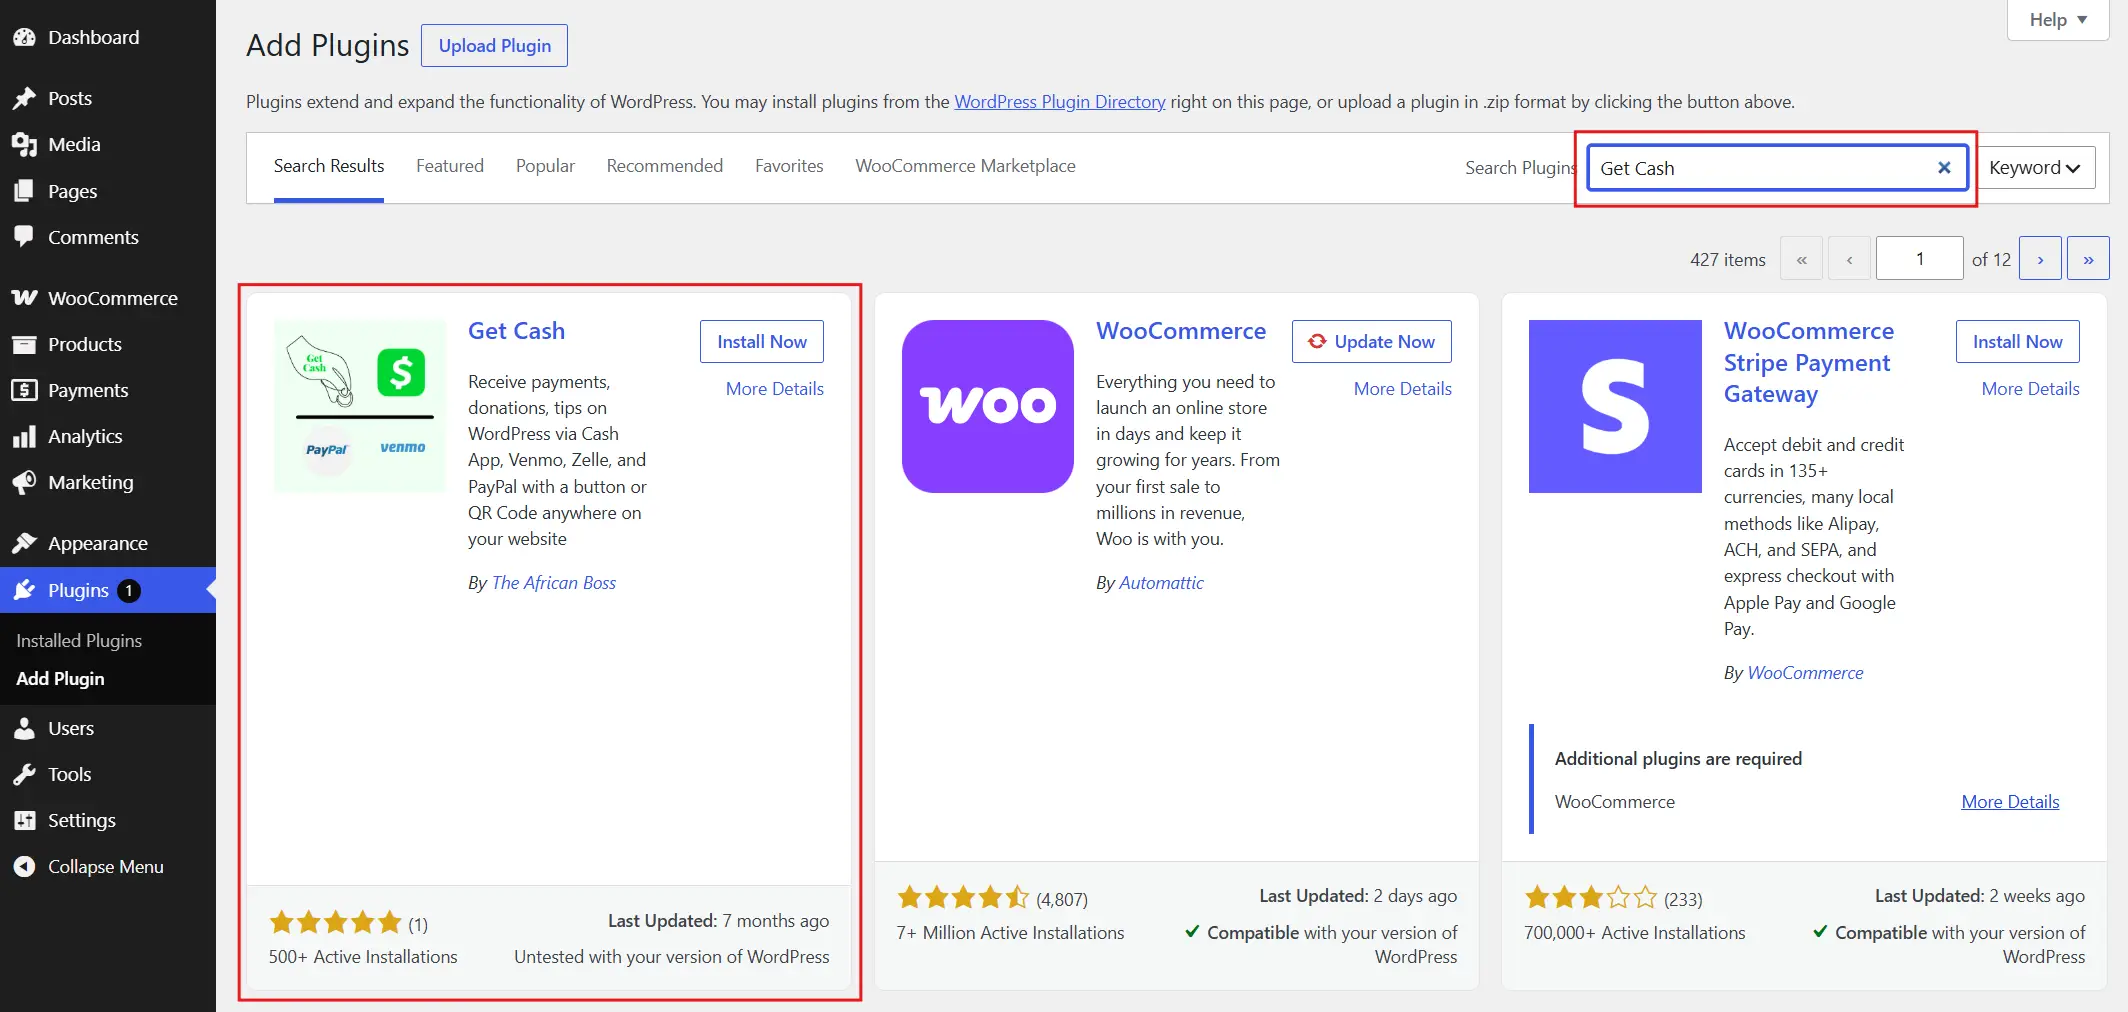
- Go to the plugin’s settings page and enter your Venmo username in the field provided.
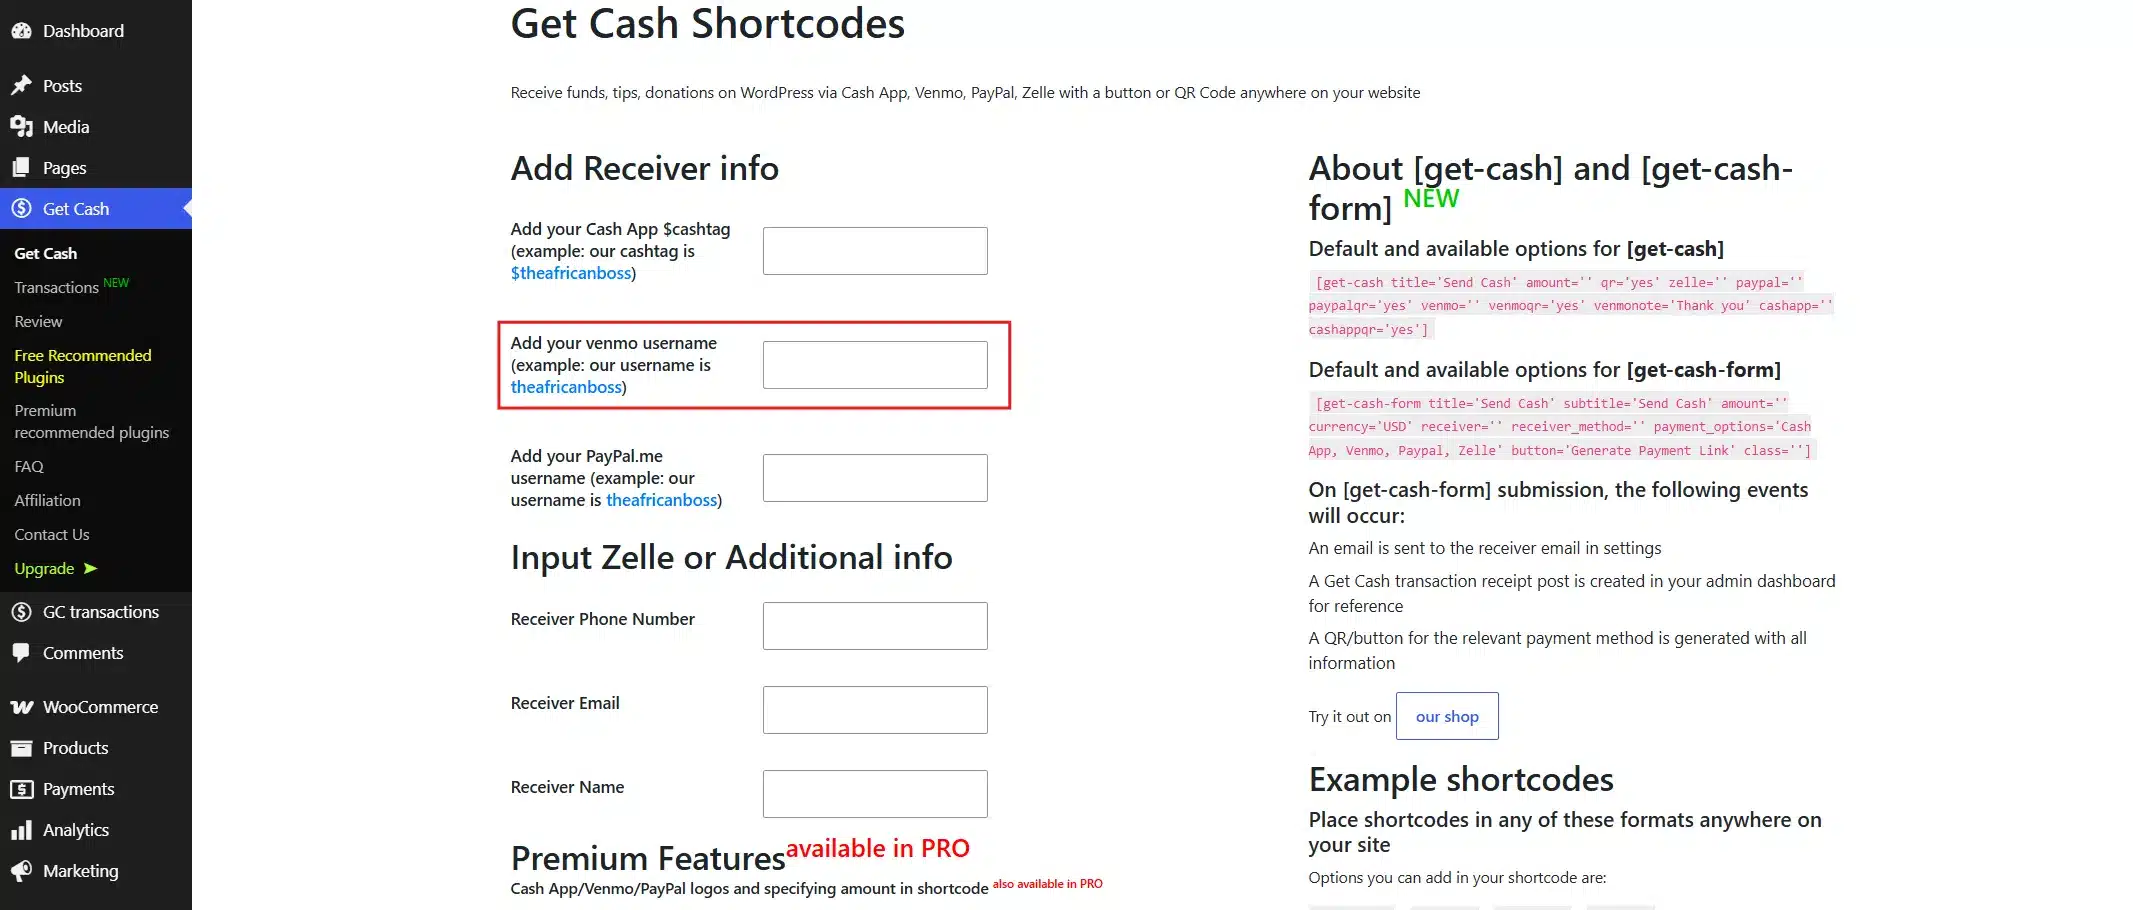
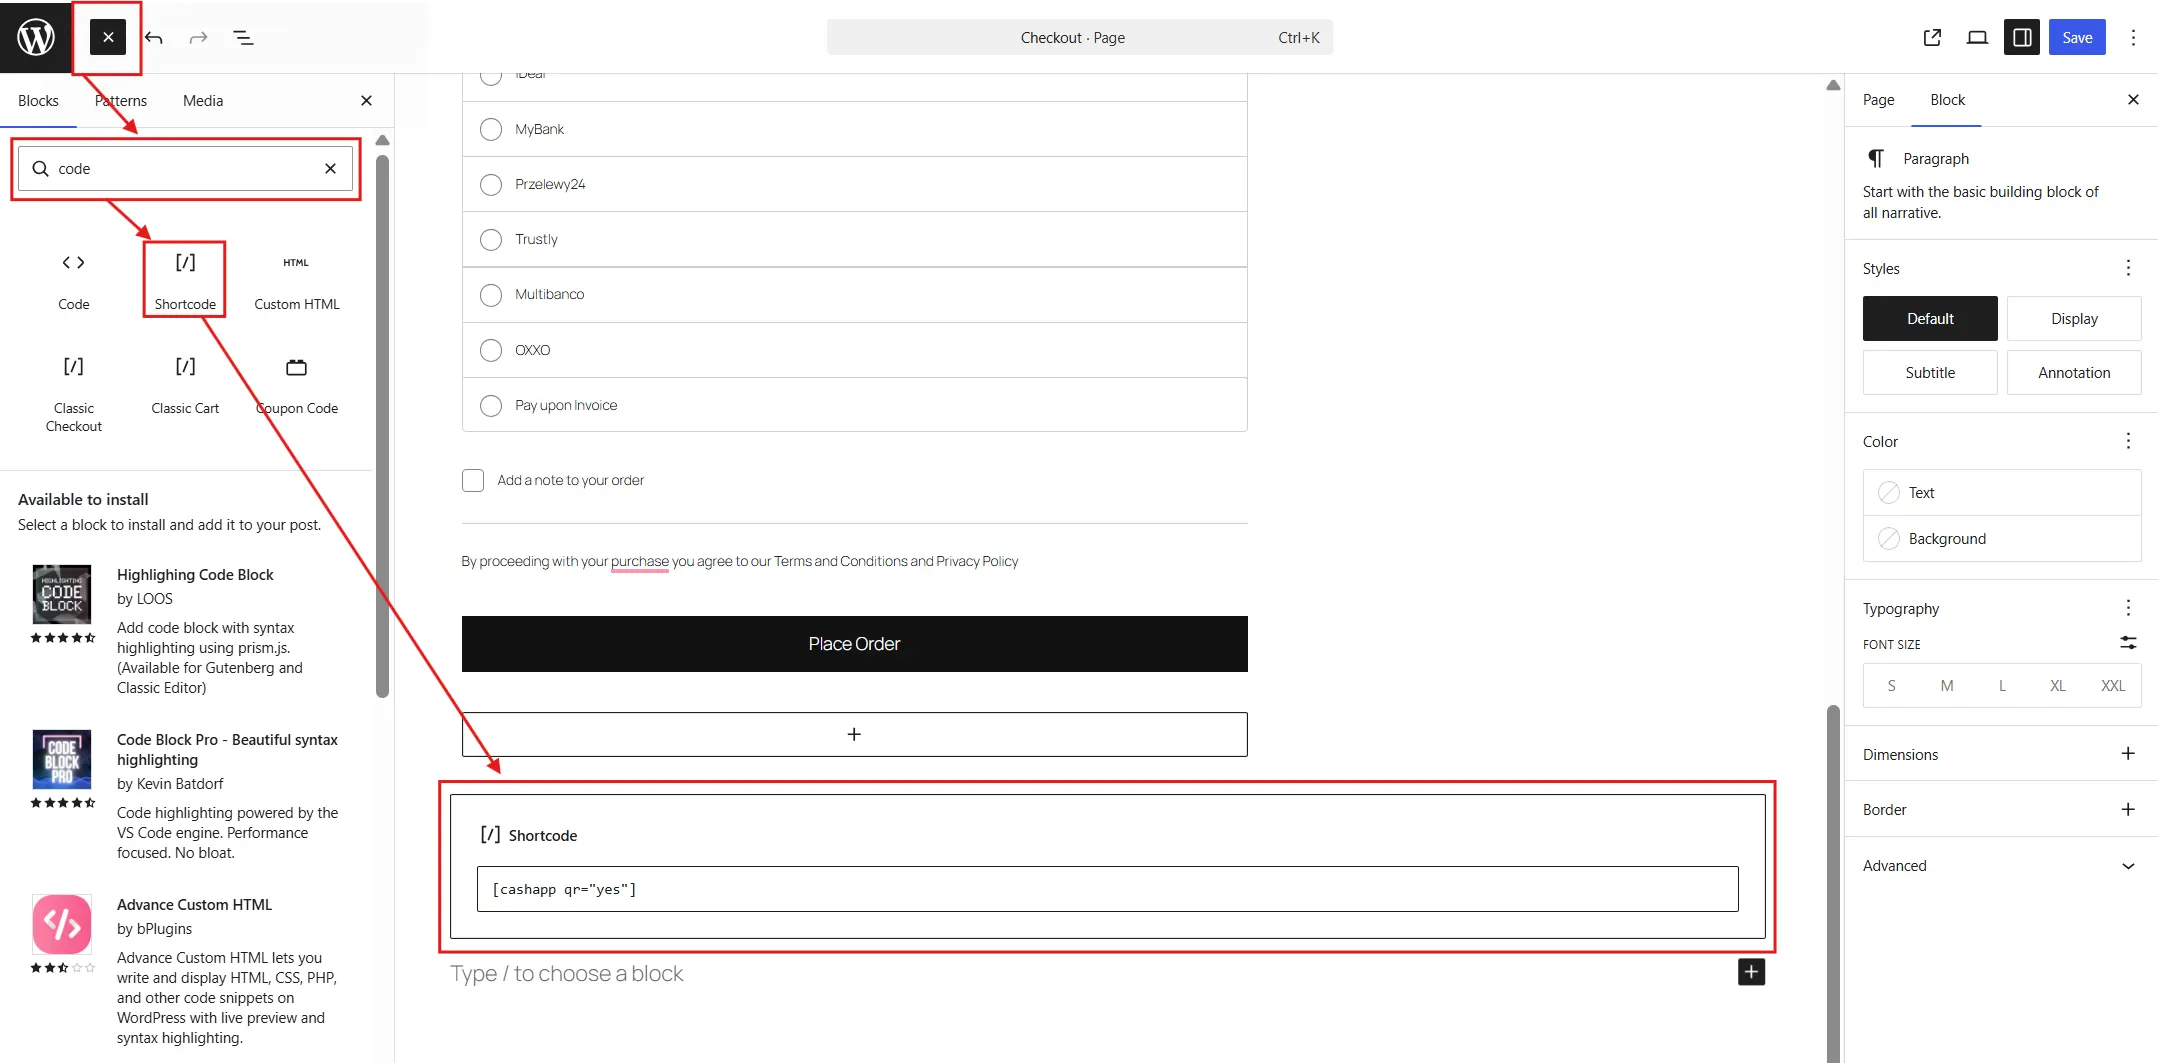
- Copy the Shortcodes given.
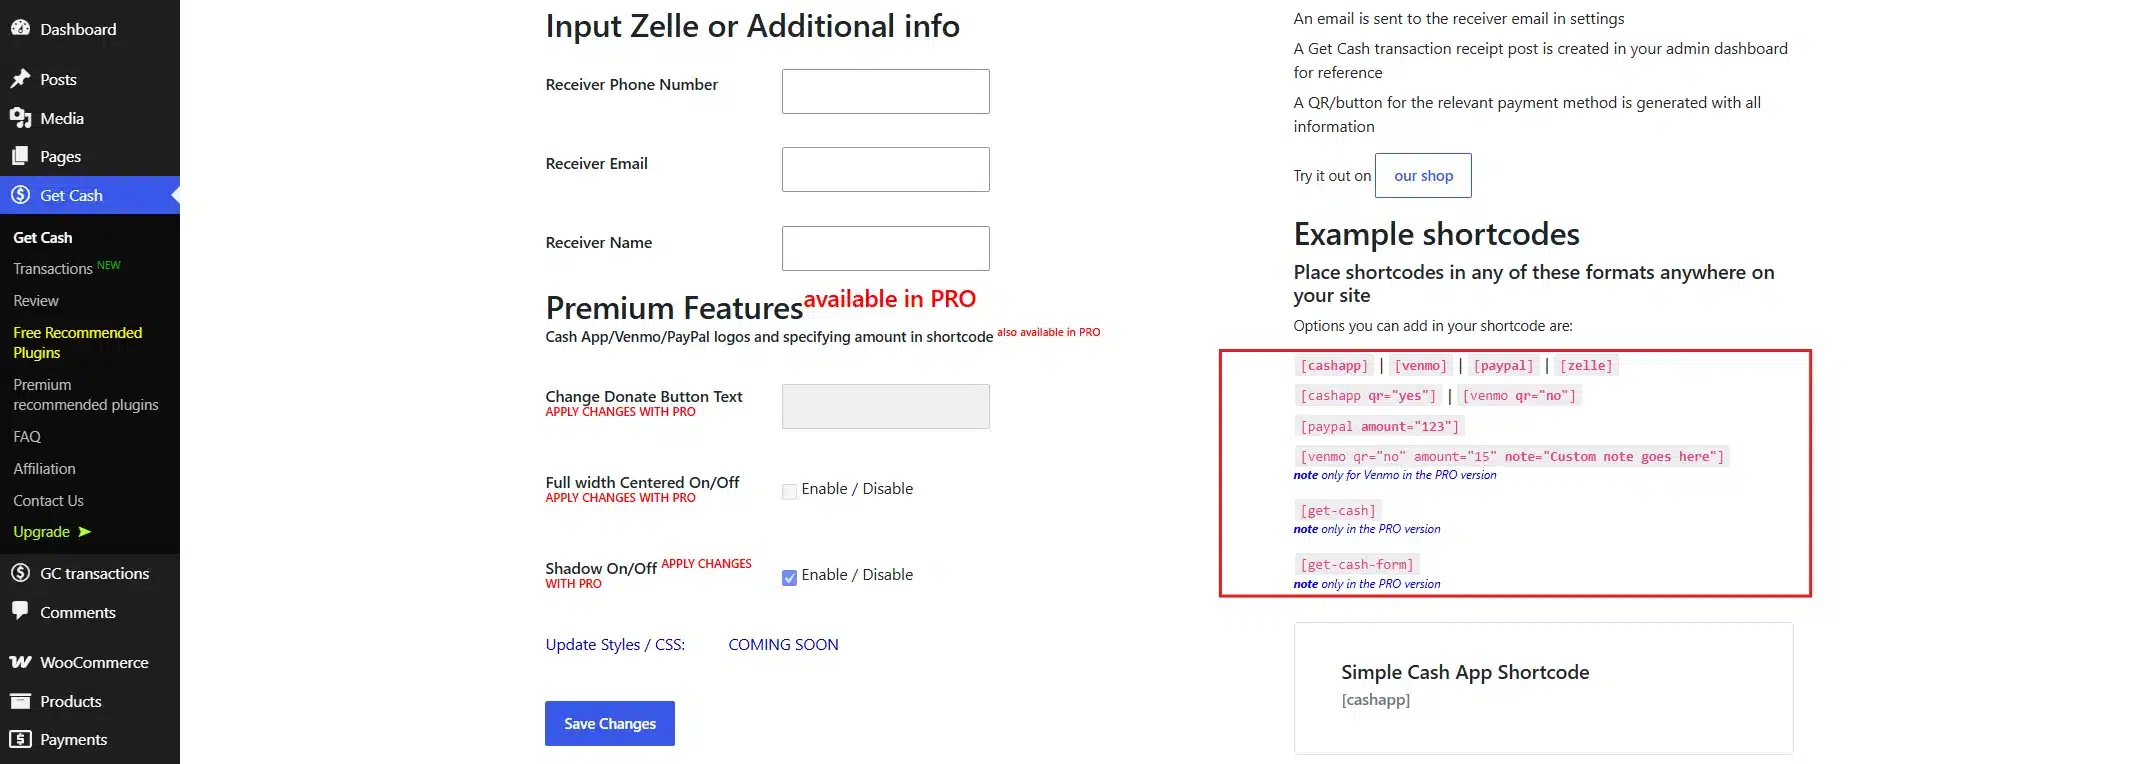
- Click Save Changes.
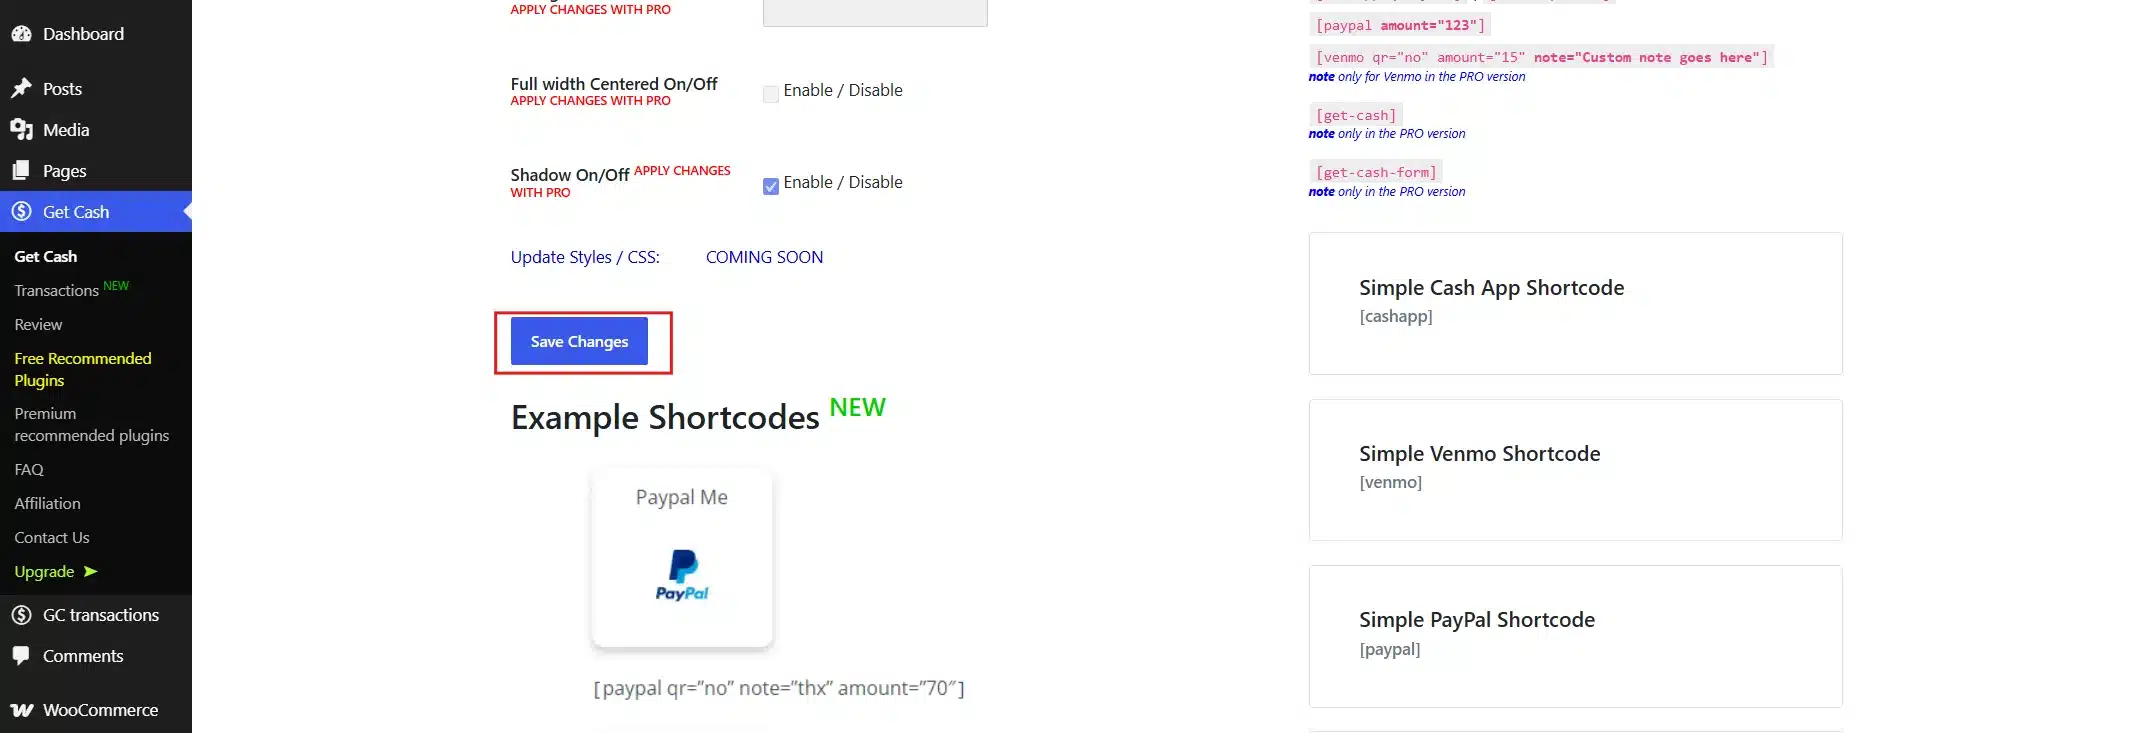
- Open your WooCommerce checkout page in the block editor.
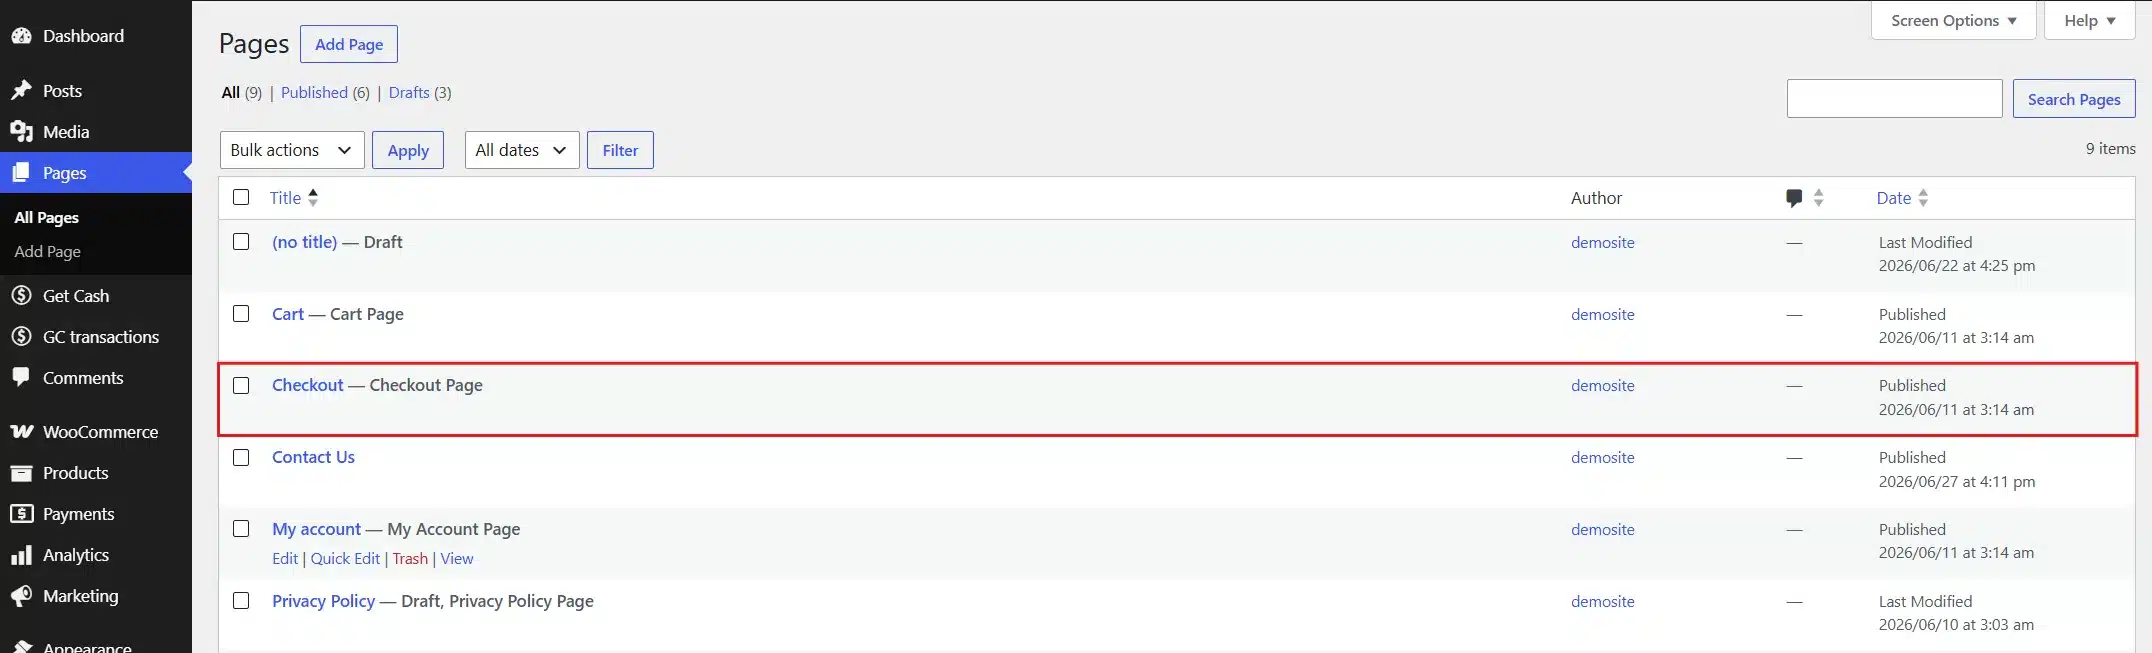
- Add the plugin’s shortcode to the Payment Options section.
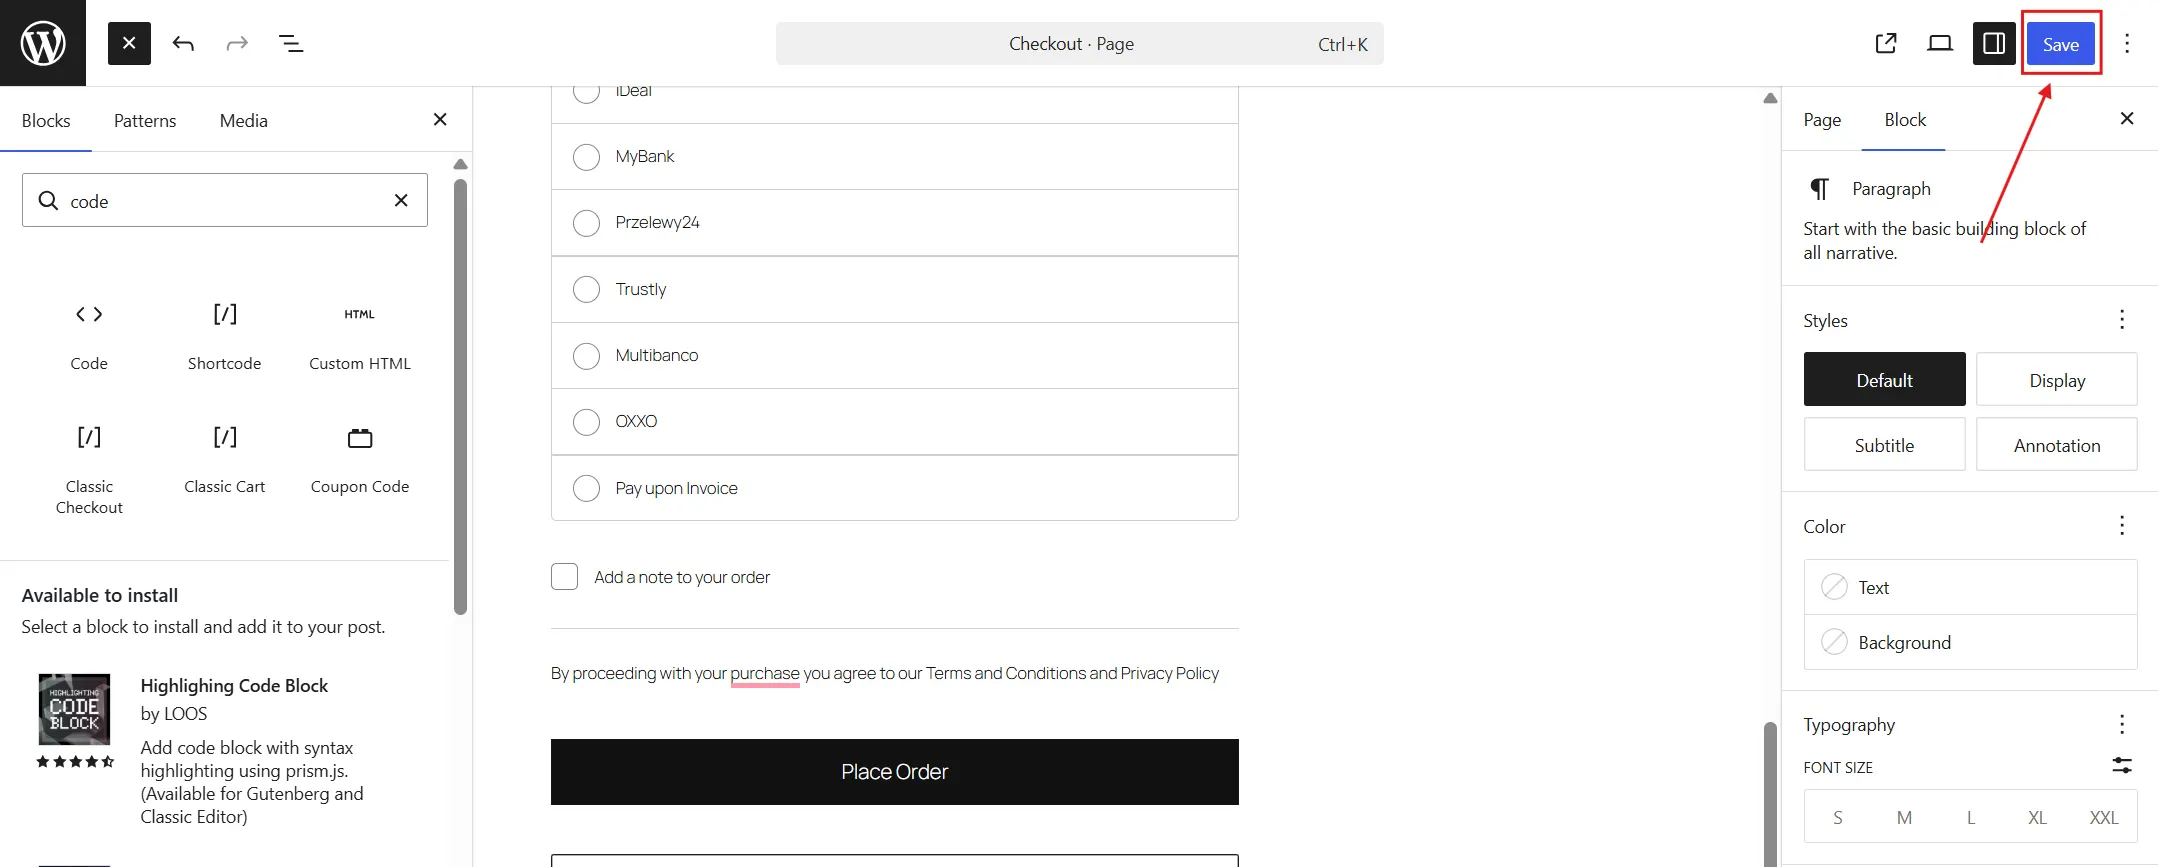
- Publish or Save the page.
That last step matters more than it sounds. Ask customers to include their WooCommerce order number in the Venmo payment note. But you still have to open your Venmo app and manually mark each order as processing or complete. It works fine at low volume. It turns into a real time sink once you’re handling more than a handful of Venmo orders a day.
Which Method Should You Use?
Pick Method 1 if you already have a PayPal Business account and want orders processed automatically. Pick Method 2 if you don’t have a PayPal Business account yet, or you’re a small, low-volume store that doesn’t mind a manual step.
| Factor | Method 1: PayPal Payments | Method 2: QR Code |
|---|---|---|
| PayPal Business account | Required | Not required |
| Order status updates | Automatic | Manual |
| Typical setup time | About 15 minutes | About 10 minutes |
| Best fit | Higher order volume | Low-volume service businesses |
How Much Does Venmo Cost Your WooCommerce Store?
Venmo charges 1.9%+$0.10/transaction on payments sent to a business profile. That rate comes straight from Venmo’s own business profile page. It applies whether the customer pays from their Venmo balance, a linked bank account, or a credit card.
Here’s what that looks like on a real order. On a $60 sale, the fee comes to $1.24, leaving you $58.76. There’s no monthly fee and no setup cost tied to the business profile itself.
One detail that’s easy to miss: customers who fund a Venmo business payment with a credit card skip Venmo’s usual 3% credit card surcharge. That’s confirmed in Venmo’s own help documentation. The 1.9%+$0.10 rate is what you’ll see across the board, regardless of how the customer funds the payment.
Store owners often ask how that stacks up against their existing gateways. PayPal’s standard web rate typically runs closer to 2.9%+$0.30/transaction, and Stripe charges a similar rate. Venmo’s 1.9%+$0.10 on business profile payments comes in lower than both. But the savings only show up if enough of your customers choose Venmo at checkout in the first place. For most stores, Venmo is a conversion tool first and a cost-saving tool second.
Security Concern When You Accept Venmo Payments
Adding a new payment method means adding a new set of security questions, and this one’s answer is simpler than most. Venmo business profile transactions run through PayPal’s infrastructure. Venmo’s own business page states the platform keeps transactions secure with data encryption, fraud monitoring, and PCI DSS compliance built in. You’re not handling raw payment credentials on your server in either setup method, which keeps your PCI scope manageable.
That said, your SSL certificate still matters just as much as it does for every other gateway. Venmo’s own security only covers the payment step itself. If your checkout page isn’t served over HTTPS, you’re still exposing customer data in transit before the payment even reaches Venmo.
One limitation: Venmo does not currently support automated refunds back through WooCommerce for either method covered here. If a customer needs a refund, you’ll process it manually from your PayPal or Venmo account and update the order status in WooCommerce yourself. It’s a manual step regardless of which setup method you choose, so plan your refund process accordingly before you launch.
How to Test Venmo Setup?
Once Venmo is enabled, testing takes a few minutes.
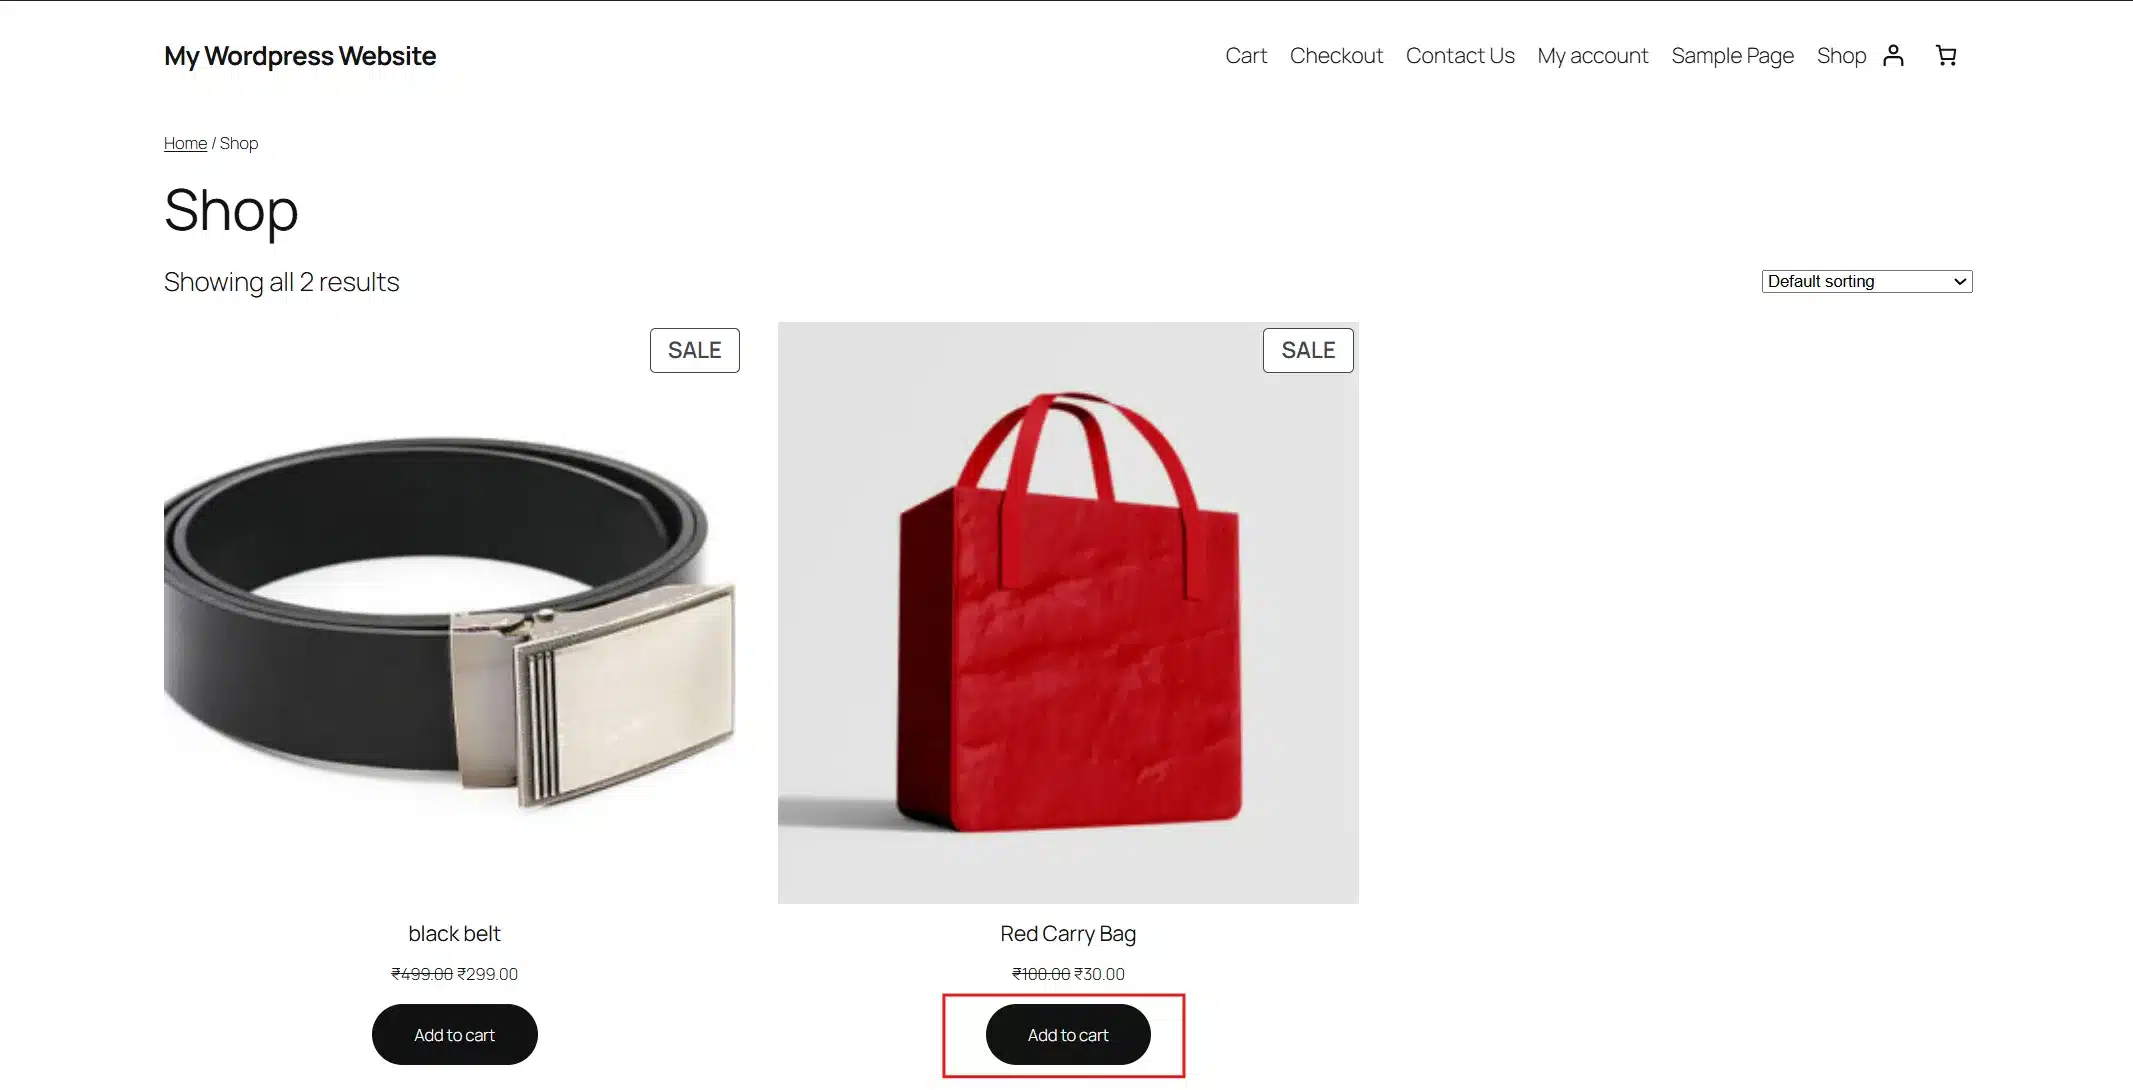
- Add a product to your cart from the storefront.
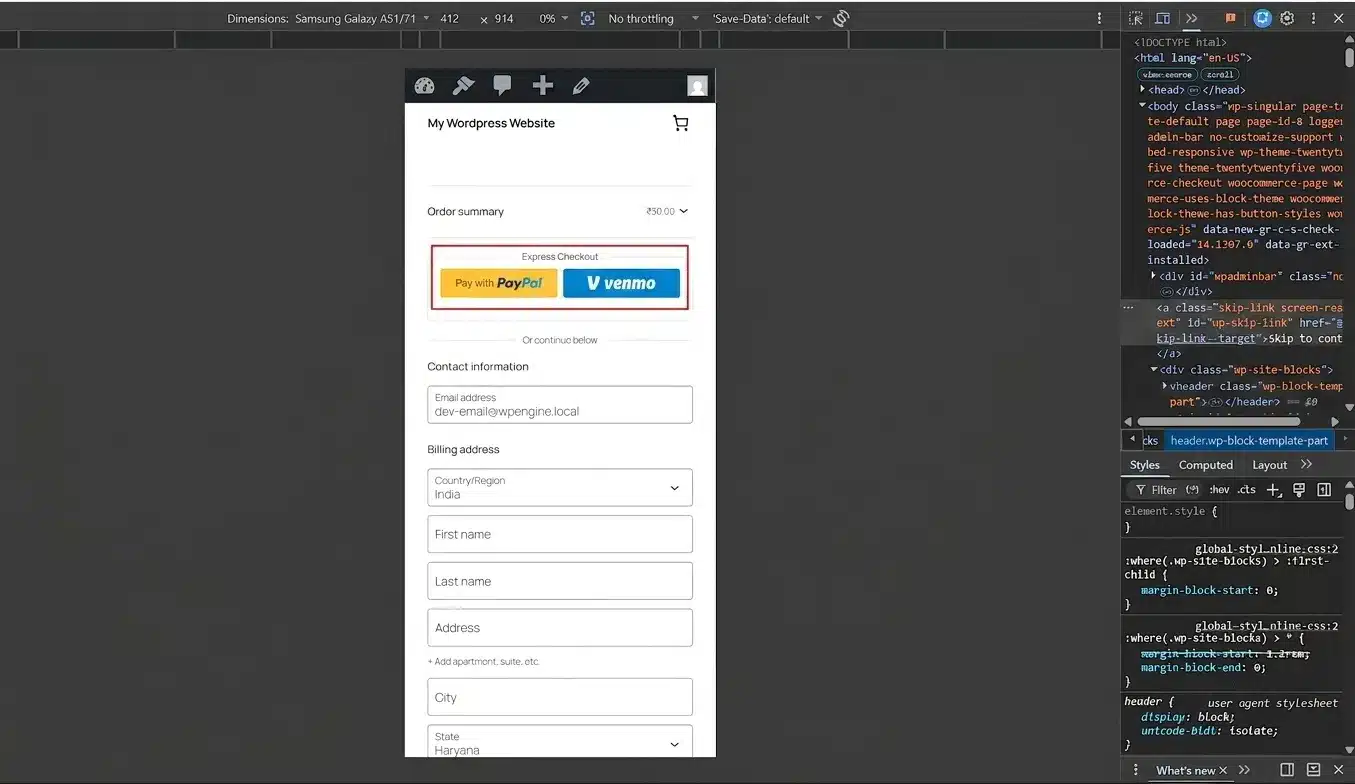
- Open the checkout page from a mobile device or Chrome DevTools. Venmo won’t appear on desktop checkout.
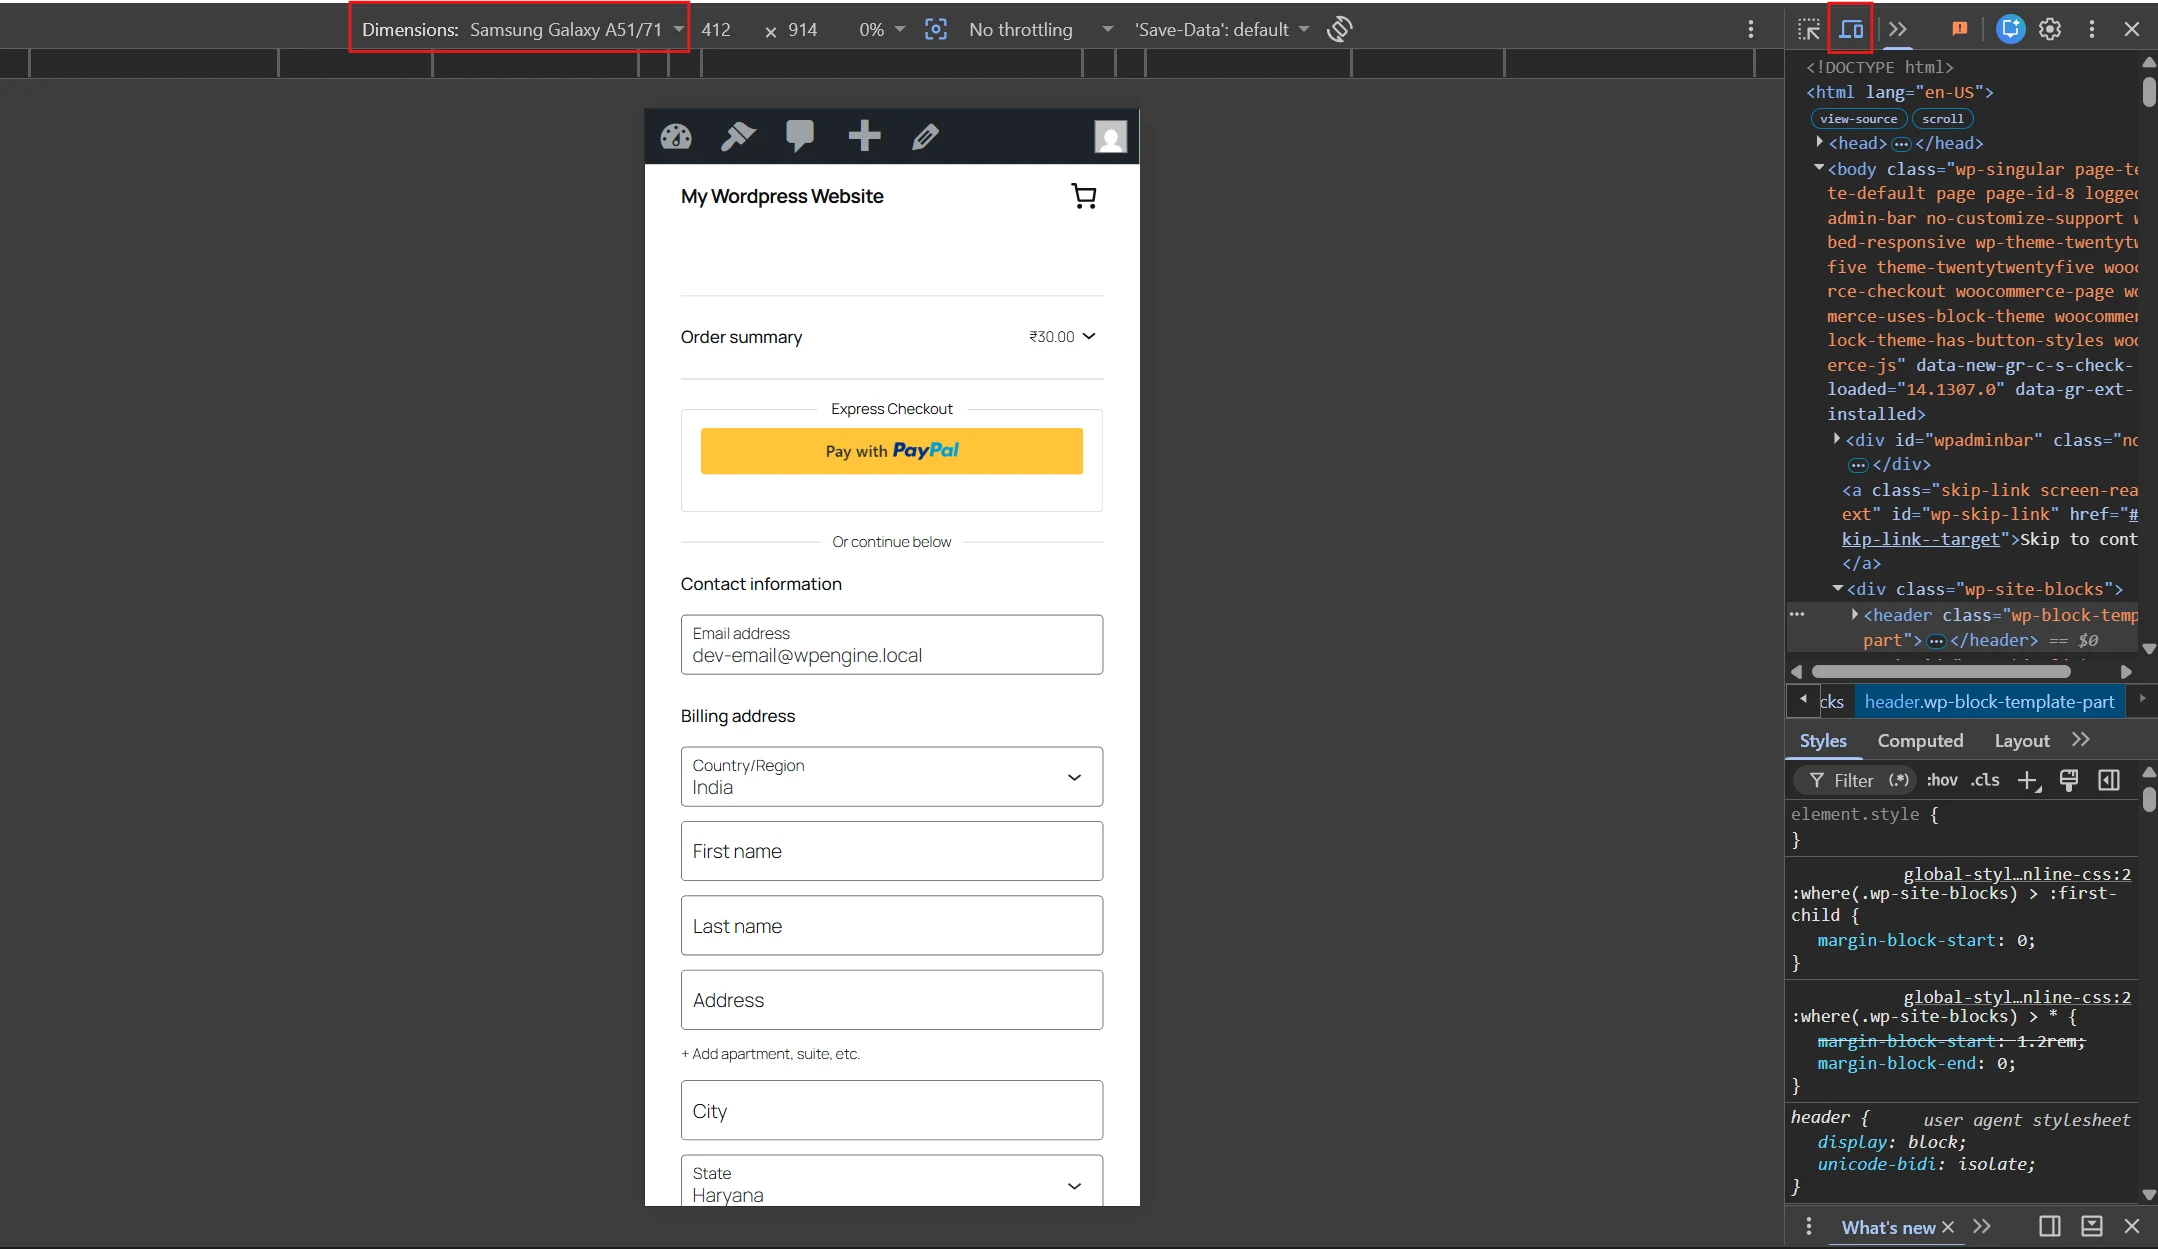
- Confirm Venmo shows up as a payment option alongside PayPal.
Common Venmo Setup Problems
- Venmo isn’t showing up at checkout. This is almost always one of two things. Either you’re testing on a desktop browser, or the PayPal Payments connection hasn’t finished syncing. Reconnect your PayPal account and confirm it shows as connected before testing again.
- Orders aren’t marked as paid automatically. With Method 2, that’s expected. You’ll always confirm those manually. With Method 1, this usually points to a webhook or connection issue between your site and PayPal, not a Venmo-specific problem.
- Venmo works on the legacy checkout but not the block-based checkout. Some payment plugin versions handle WooCommerce’s block-based checkout differently from the older shortcode checkout. If you’ve customised your checkout page, test Venmo on both versions before assuming it’s fully working.
- Test transactions succeed, but live payments fail. This almost always means your store is still in sandbox or test mode inside the PayPal Payments settings. Double-check the live credentials are entered correctly and that sandbox mode is switched off before you launch.
- Venmo conflicts with a checkout customisation plugin. Maybe you’re running a separate plugin to redesign or add fields to your checkout page. If so, test Venmo after installing it, not before. Checkout customisation plugins occasionally override the payment method markup that Venmo depends on to display correctly.
Not every Venmo-related plugin has caught up with Blocks or HPOS yet. If you’re running an older or less actively maintained payment plugin, temporarily switching back to legacy checkout while you test is the safer move.
If your store runs High-Performance Order Storage, confirm your PayPal Payments plugin declares HPOS compatibility before going live. WooCommerce’s own developer documentation notes that extensions that still query the old post tables directly can behave unpredictably once HPOS is enabled. If you want the fuller picture on this, our guide to HPOS compatibility in WooCommerce covers what to check before switching.
Make Sure Customers Actually Notice Venmo
Enabling Venmo doesn’t automatically mean customers notice it. Most shoppers decide on a payment method early and don’t scan every checkout option unless something prompts them.
A few low-effort ways to surface it: add a small payment icon row near your add-to-cart button. Mention Venmo in your cart abandonment emails if you send them. Add a line to your FAQ or shipping policy page confirming Venmo is accepted. None of this requires a developer. It’s a content update, not a code change.
If you run paid social ads targeting a younger US demographic, mentioning Venmo acceptance in ad copy or on landing pages can also encourage conversion. It signals that your checkout matches how that audience already prefers to pay.
This is a small effort compared to the setup itself. It’s also the step most stores skip after going through the trouble of connecting Venmo in the first place. A payment option nobody notices doesn’t move your conversion rate. A payment option customers know is there, before they even reach checkout, does.
Customising the Venmo Button
Once Venmo is working, you can adjust how it looks to match your store’s branding.
- Go to WooCommerce > Settings > Payments > PayPal.
- Open the Styling Tab.
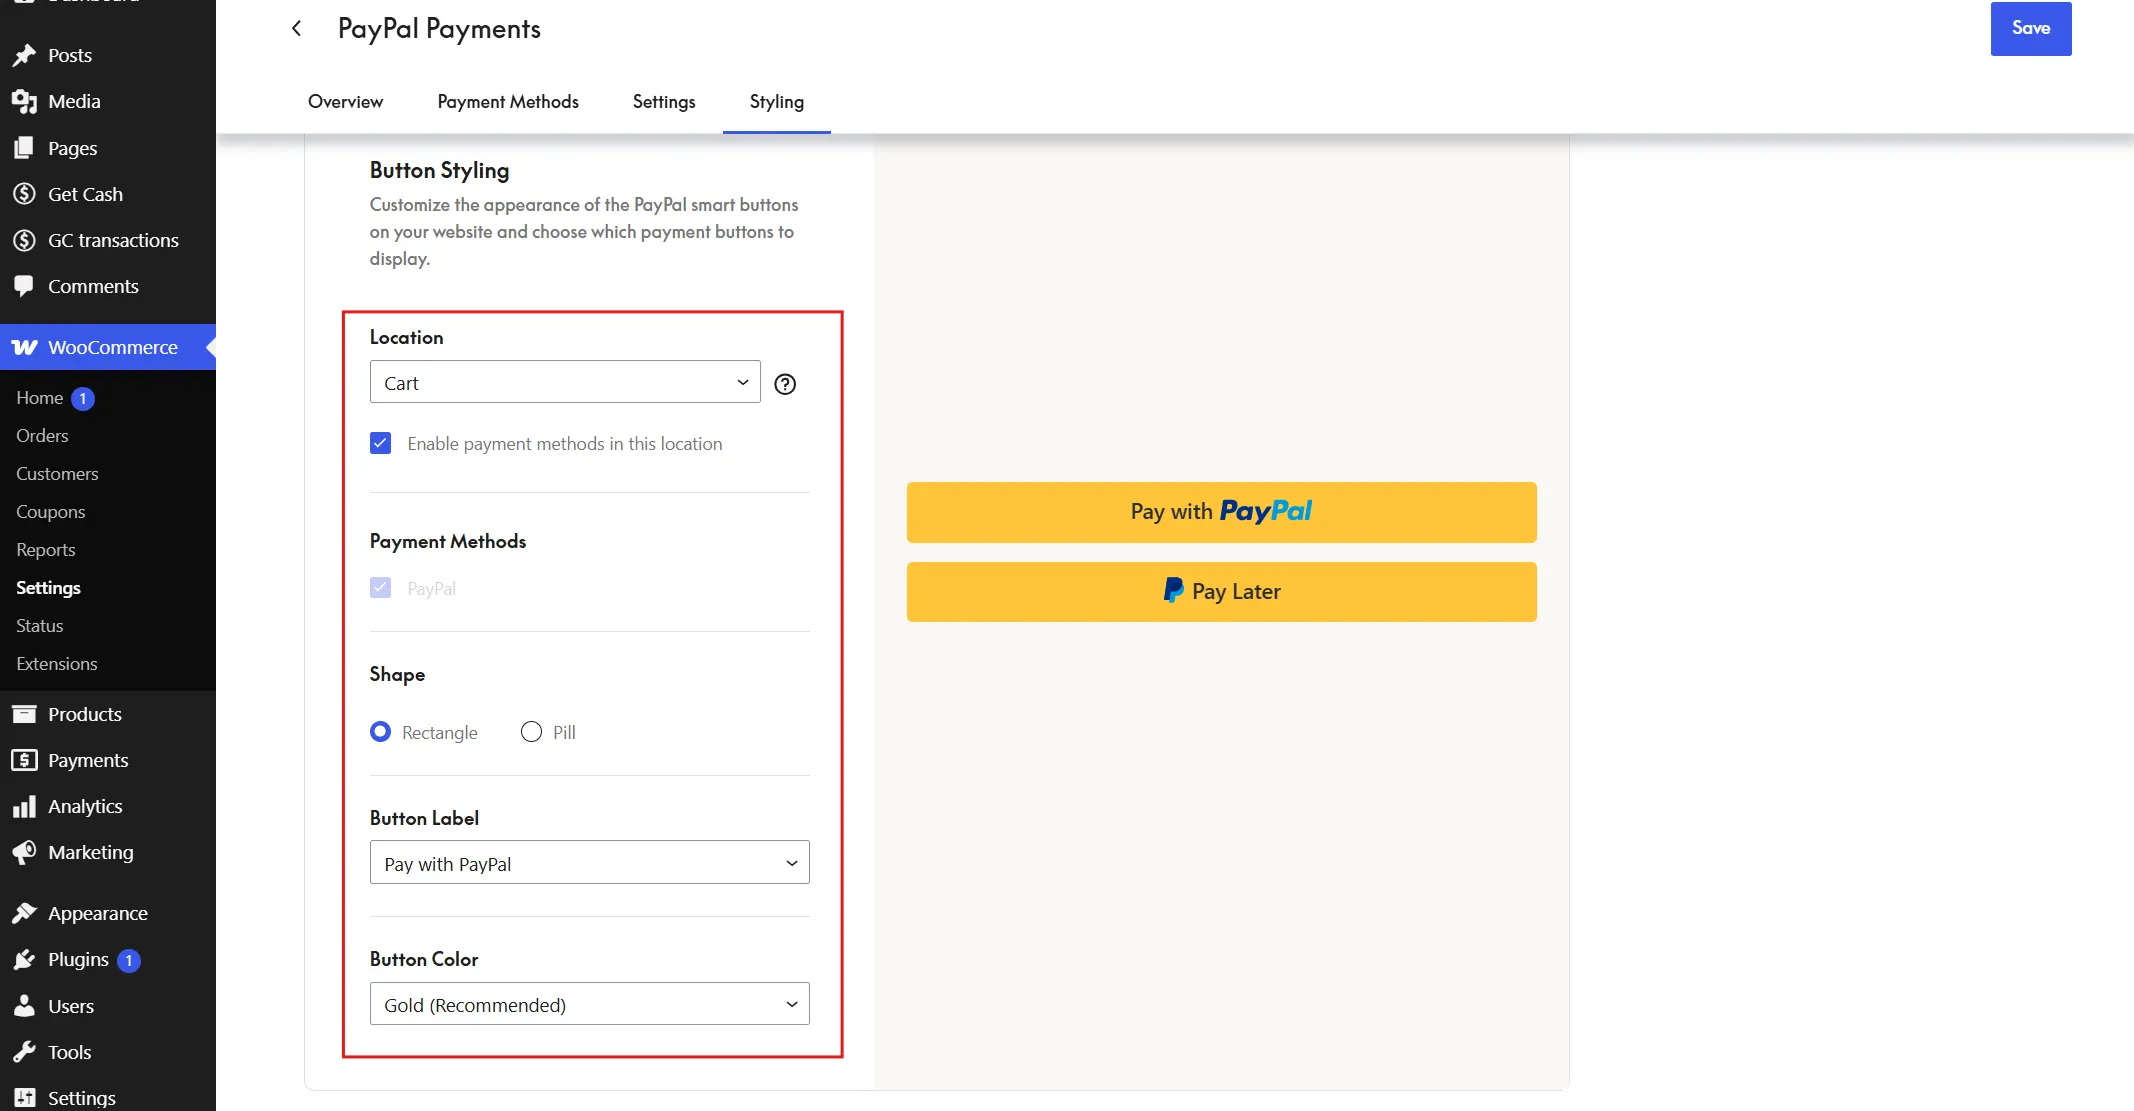
- Adjust the button location, shape, label and colour to match your store’s branding.
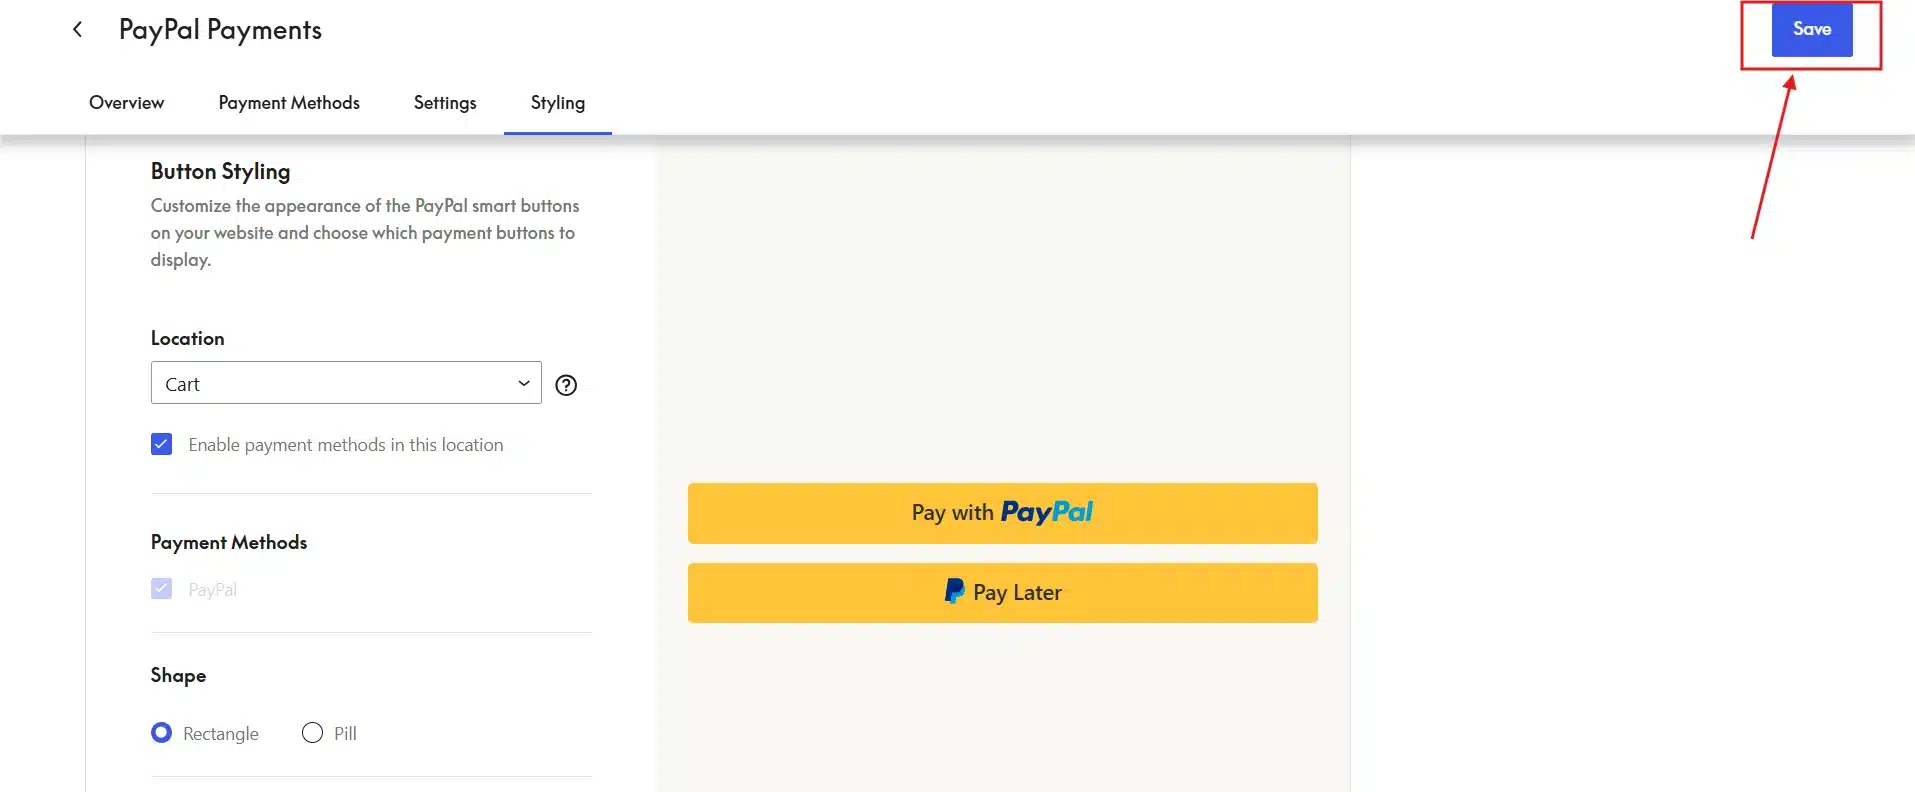
- Save changes and check the checkout page to confirm it looks like part of your flow, not an added-later extra.
Most stores don’t need custom development for this. The two methods above cover the vast majority of cases, even ones that need custom order matching or a specific fulfilment process. But once manual QR matching stops scaling, or you need Venmo tied into a workflow no readymade plugin supports, that’s a different story. That’s where custom payment gateway development for WooCommerce comes in.
Other Plugins That Support Venmo
WooCommerce PayPal Payments and a QR code plugin like Get Cash cover most stores, but they’re not the only options. Payment Plugins’ Braintree for WooCommerce is another route to automatic Venmo processing if you’d rather work through Braintree directly instead of PayPal Payments.
There’s also a dedicated Venmo plugin on WordPress built around the same two-method idea. It offers a direct Venmo link for manual payments and a PayPal-based integration for automated ones.
None of these changes the core decision covered above. Automatic processing needs a PayPal Business account. Manual QR payments don’t. Whichever plugin you pick, that trade-off stays the same. Choose based on which plugin’s interface and support you’re most comfortable with, not which one claims to work differently under the hood.
Conclusion
Setting up Venmo in WordPress and WooCommerce comes down to one decision. Choose automatic processing through WooCommerce PayPal Payments, or a manual QR code method if you don’t have a PayPal Business account yet. Both take under 20 minutes to configure. The fees are predictable at 1.9%-$0.10/transaction.
The most common setup issues, missing checkout options and HPOS compatibility, are easy to catch if you test on mobile before launch. Pick the method that matches your current setup, test it properly, and you’ll have Venmo live at checkout well before your next sales push.
Frequently Asked Questions (FAQs)
Q1. Can I accept Venmo payments without installing WooCommerce PayPal Payments?
Yes. The manual QR code method covered in Method 2 lets customers pay by scanning your Venmo code. No PayPal Business account or automatic processing plugin required.
Q2. Is Venmo the same as PayPal?
No. PayPal owns Venmo, but they’re separate products. PayPal is a general-purpose payment platform used worldwide, while Venmo is a mobile-first app built for person-to-person and small business payments within the United States.
Q3. Does Venmo work on desktop checkout in WooCommerce?
No. Venmo only appears as a payment option on mobile devices, since Venmo’s own app and payment flow are designed for mobile use. Desktop customers will see your other payment methods instead.
Q4. Do I need a business account to receive Venmo payments through WooCommerce?
For Method 1, yes, since WooCommerce PayPal Payments requires a connected PayPal Business account to process Venmo transactions automatically. For Method 2, you only need a standard Venmo account with your username set up for QR payments.
Q5. What happens if a customer forgets to include their order number in the Venmo payment note?
You’ll need to manually match the payment to an order using the amount, timing, and the customer’s Venmo name. This is exactly why Method 2 works better at low order volume than at scale.
Q6. Can international customers pay with Venmo on my WooCommerce store?
No. Venmo is currently limited to US-based accounts and bank connections, so it only works for customers with a US Venmo account. If you sell internationally, keep your other payment gateways active alongside Venmo.
Q7. Can I refund a Venmo payment directly through WooCommerce?
Not automatically. You’ll need to process the refund from your PayPal or Venmo account first. Then manually update the order status and refund note in WooCommerce so your records stay accurate.
Q8. Does enabling Venmo slow down my WooCommerce checkout?
No, enabling Venmo through either method adds a payment option without adding page weight or extra scripts that would affect checkout speed. Any slowdown you notice is more likely tied to your hosting, other plugins, or unrelated checkout customisations.