5 Best Ways to Auto-Send Tracking Emails in WooCommerce

If you’re using Auto-send tracking emails in WooCommerce, it is one of those setup tasks that pays for itself the moment you do it. Most store owners set up WooCommerce, get shipping running, and move on without realising the post-purchase gap they’ve left open.
Orders go out. Customers hear nothing. Then the “Where is my order?” emails start flooding in. This is not a shipping problem. It’s a communication problem, and it’s one you can fix in an afternoon.
Here’s what surprises most people: WooCommerce does not auto-send tracking emails by default. You have to set that up yourself. The good news is that once you set it up, the automation handles everything going forward without a single hour of manual work.
This guide covers five methods to auto-send tracking emails in WooCommerce, from the free built-in approach to automation platforms built for higher-volume stores. You’ll also learn what to include in each email and how to avoid the most common setup mistakes.
Why Auto-Sending Tracking Emails Matters More Than You Think?
Tracking emails is not just a courtesy. They are a direct response to one of the most expensive problems in WooCommerce store management.
WISMO tickets account for 30 to 40% of all inbound support volume in ecommerce, even at stores that already use carrier notification services. That is not a small number. For a store processing 500 orders a month, that could mean 150 to 200 support interactions that should never need to happen.
According to research from ShippyPro, merchants who set up timely shipping notifications reduce WISMO tickets by up to 80%. The same pattern shows up across studies: stores that automate tracking emails within 30 minutes of shipping a label see significantly fewer support requests than those that do it manually hours later.
The delay is the problem. Customers are not worried because you sent tracking information. They are worried because you did not. And that anxiety turns into emails, negative reviews, and chargebacks before any package has even left the warehouse.
A Forbes study found the average customer checks their order status 4.6 times after purchase. If your store is not timely in filling that need, they are filling it by contacting support.
There is also a longer-term effect. Stores with fast, professional post-purchase communication see measurable increases in repeat purchase rates. The tracking email is often the last branded touchpoint before delivery. That matters.
Worth noting for technical context: WooCommerce sends emails based on order status changes. The Completed status fires the “Completed Order” email by default. To send tracking information inside that email, tracking data must be attached to the order before the status changes. That is the part most guides skip. The five methods below each handle this differently.
Method 1: Use WooCommerce’s Built-In Completed Order Email (Free, No Plugin)
This is the starting point for every WooCommerce store. WooCommerce already has a “Completed Order” email built in. Most store owners have it enabled, but do not realise they can add tracking information to it using order notes.
No dedicated tracking plugin is required for this approach. It works with any WooCommerce setup out of the box.
How it works:
- Go to WooCommerce → Settings → Emails.
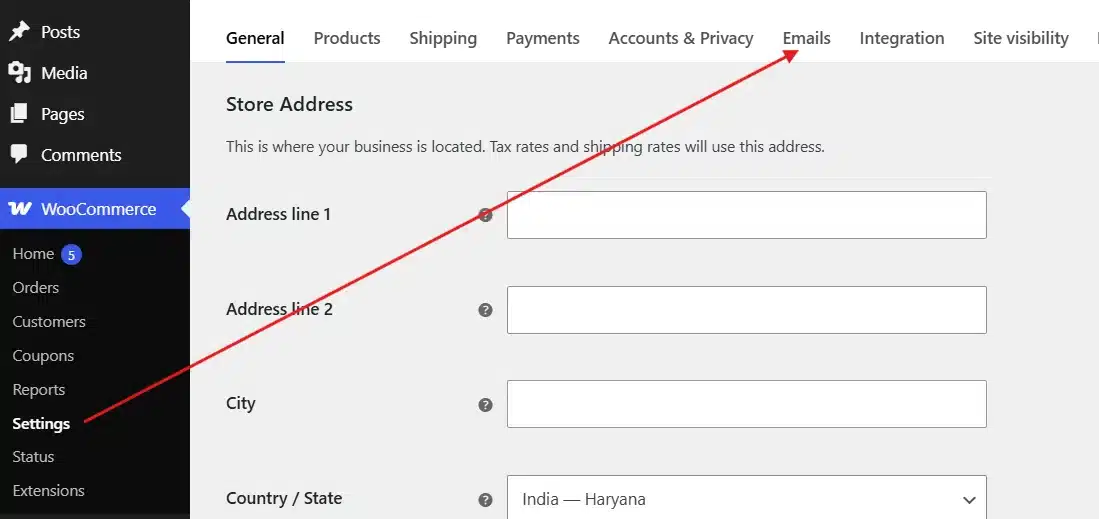
- Click Manage next to Completed Order.

- Enable the email and set a subject line. Something like “Your order has shipped”.

- Open a specific order in WooCommerce → Orders.

- In the Order Notes section, type the tracking number and carrier link directly.
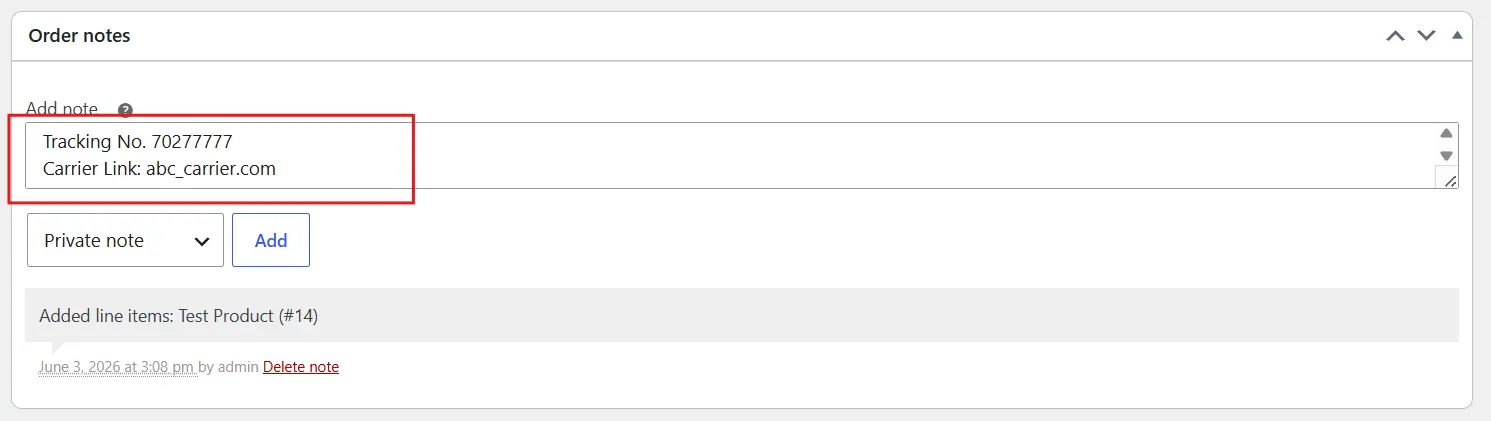
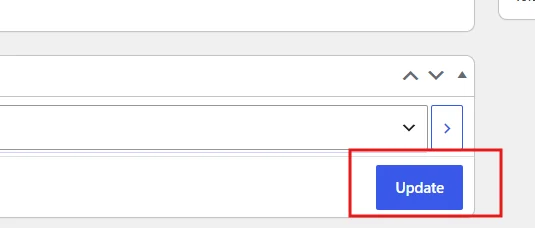
- Change the order status to Completed.

- Then, Save or Update the changes.
When the order status changes to Completed, the customer receives the email. Any notes you added appear in the body.
This approach has clear limits. Adding tracking notes manually works fine for stores processing 5 to 20 orders a day. Above that, the time cost grows fast. One WooCommerce developer calculated that manually copying tracking numbers from a shipping platform takes about 45 seconds per order. At 200 orders per day, that is over two hours of someone’s time every day, doing nothing but copying and pasting.
The other issue is timing. Manually changing order status means there is always a delay between when a label is printed and when the customer gets notified. That delay is where WISMO tickets come from.
For small stores, this method is fine. For anything above 30 to 40 daily orders, move to one of the plugin-based methods below.
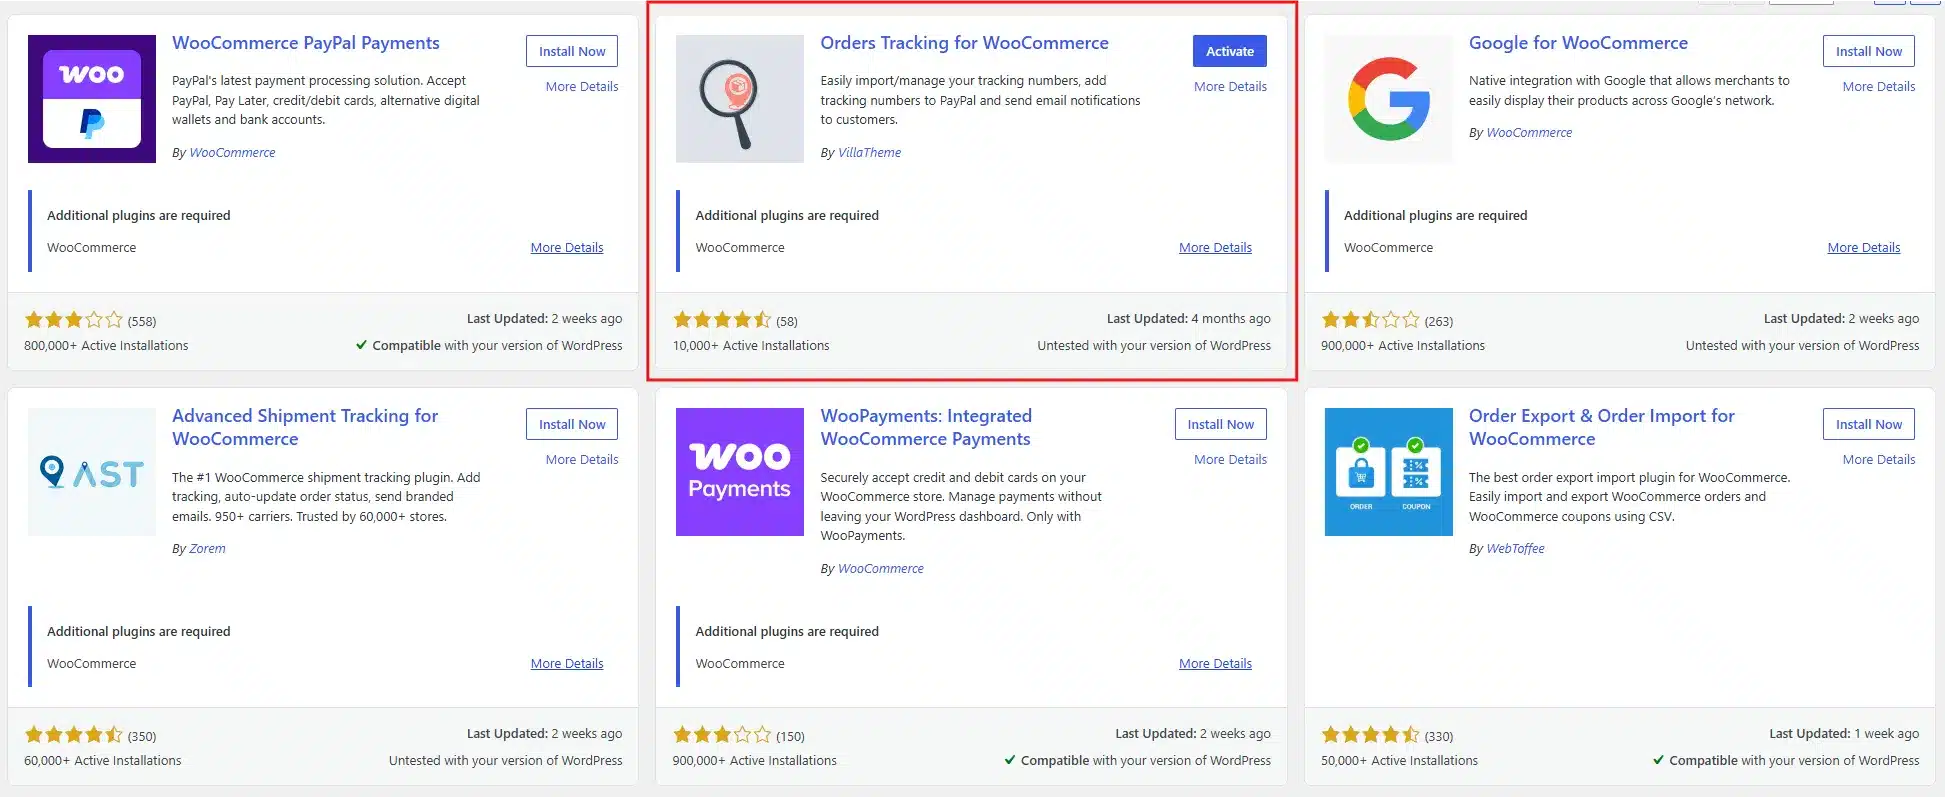
Method 2: Order Tracking for WooCommerce Plugin (Free Option)
The free Order Tracking for WooCommerce Plugin from the official WordPress repository adds a dedicated tracking field to each order. When you add a tracking number and mark the order as shipped, the plugin includes that information automatically in the email sent to the customer.
This is the most commonly recommended free solution and works well for small to mid-sized stores.
Setup steps:
- Go to Plugins → Add New in your WordPress dashboard.
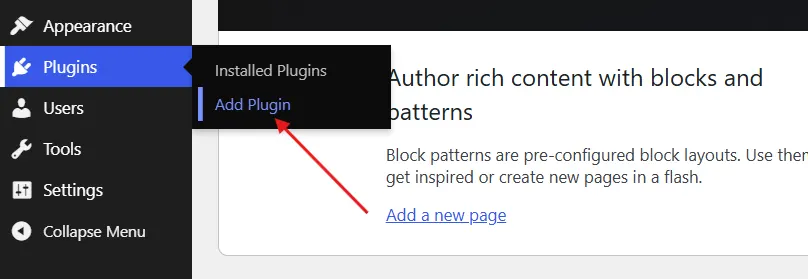
- Install and activate the Orders Tracking for WooCommerce plugin.
- Open any order in WooCommerce → Orders.
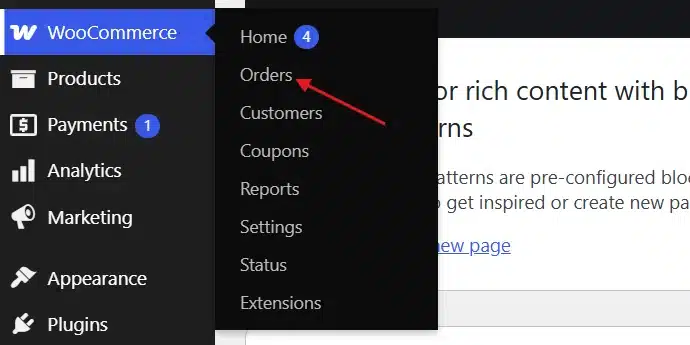
- In the order, find the Shipment Tracking meta box.
- Enter the tracking number, select the carrier, and then save.
The email includes the tracking number, carrier name, and a link directly to the carrier’s tracking page. Customers can click the link to check their delivery status without contacting you.
One configuration detail many stores miss: the plugin has a setting to control when the notification email fires. By default, it sends the email when tracking information is added, regardless of order status. If you want the email to go out only when the order is also marked Completed, check that setting in the plugin’s configuration panel under WooCommerce → Settings → Shipment Tracking.
The free version supports major carriers, including UPS, USPS, FedEx, DHL, and Canada Post. If you ship with a smaller regional carrier, the pro version adds custom carrier support.
Trade-off: Works well, but tracking still requires manual entry per order. There is no direct sync with external shipping platforms in the free version.
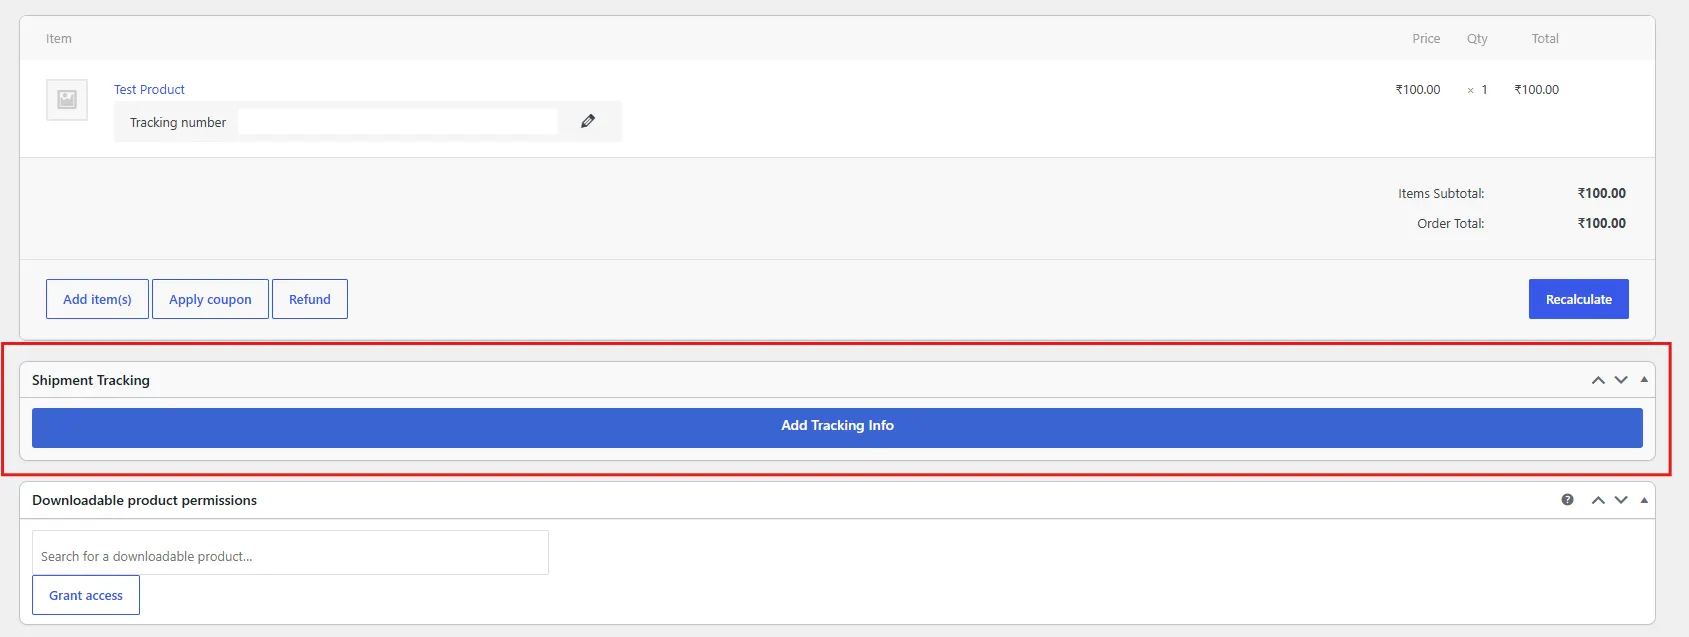
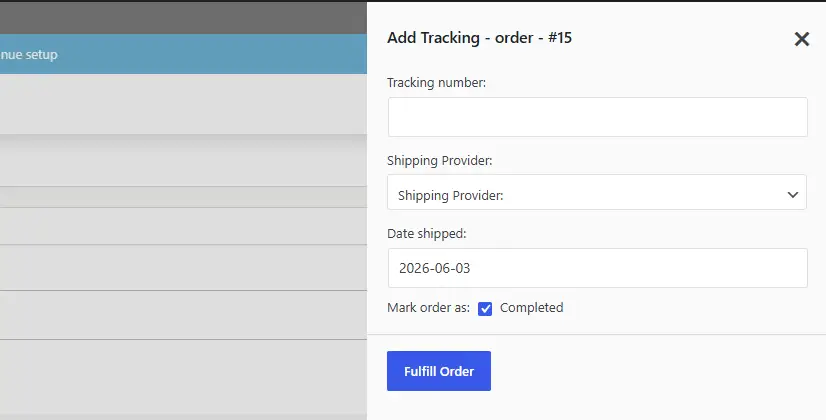
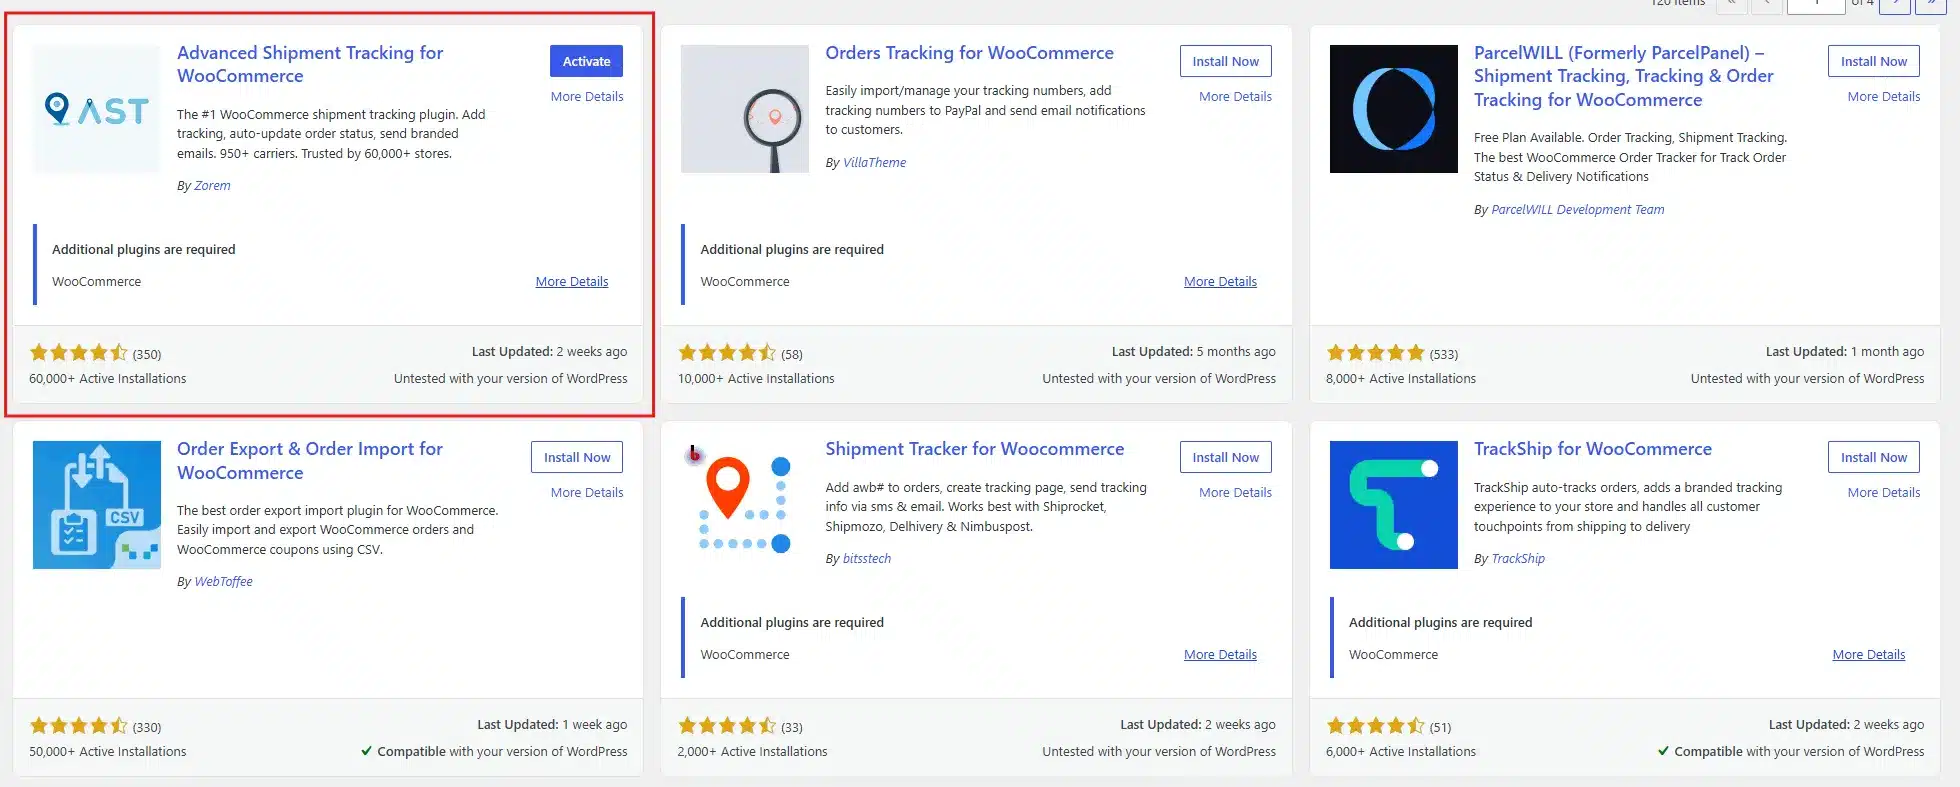
Method 3: Advanced Shipment Tracking Plugin (Free + Pro)
Advanced Shipment Tracking for WooCommerce is the most widely used dedicated tracking plugin in the WooCommerce ecosystem, with support for over 350 shipping carriers. The free version handles most use cases. The Pro version adds bulk import, custom tracking statuses, and direct integration with shipping platforms like ShipStation and Shippo.
The key difference from the basic Woo tracking plugin is flexibility. You can send tracking emails at a custom order status, customise the email template with your branding, and control exactly what information appears in each email.
Setup steps (free version):
- Install Advanced Shipment Tracking for WooCommerce from the plugin directory.
- Go to WooCommerce → Shipment Tracking → Settings.

- Enable Send tracking email notification and set up the trigger.
- Open an order, add tracking details in the Shipment tracking box, and save.
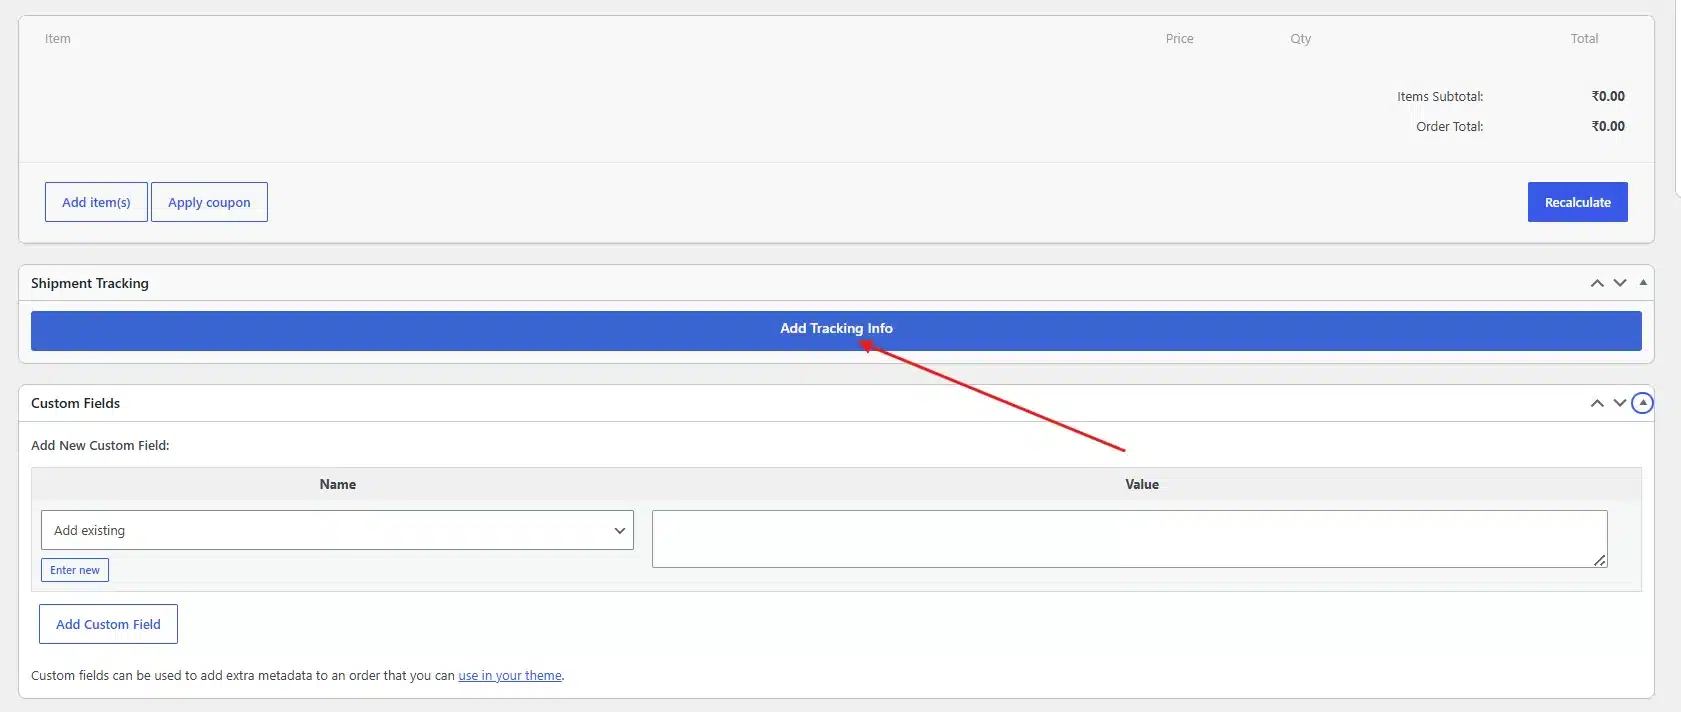
The plugin fires the tracking email automatically when the tracking number is saved.
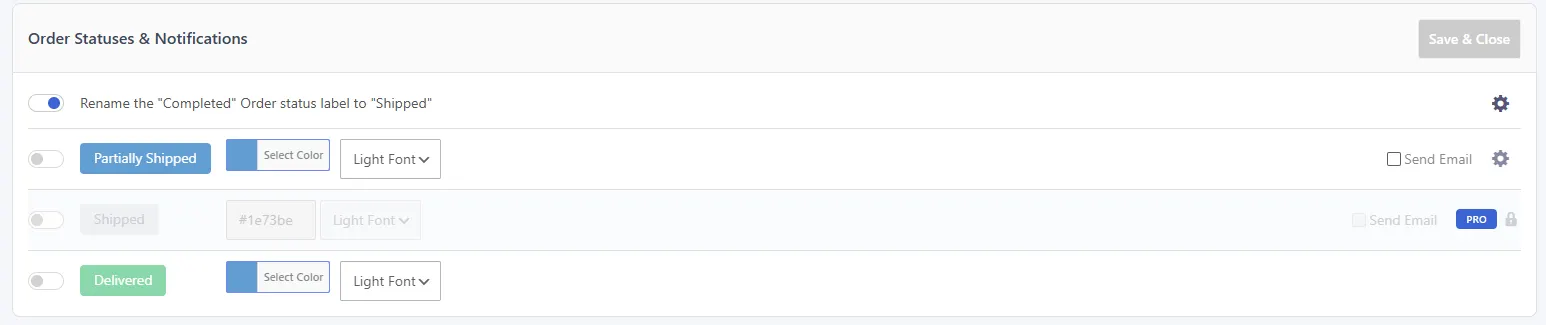
One setting worth enabling: Rename the Completed order status label to Shipped. This small change makes the order timeline much clearer to customers. When someone logs into their account and sees Shipped instead of Completed, they understand where their order is without needing to read anything.
For Pro users, the ShipStation integration works through a direct API connection. When a label is created in ShipStation, the tracking number syncs back to WooCommerce automatically and fires the email without any manual input. That is the point where you go from mostly automated to genuinely automated.
Trade-off: The free version still requires manual tracking entry. Full automation across external platforms needs the Pro version or an additional API bridge.
Method 4: Shipping Platform Integrations (ShipStation, Shippo, EasyShip)
If your store already uses a shipping platform to generate labels, this is the cleanest path to true automation. ShipStation, Shippo, and EasyShip all have official WooCommerce plugins that sync tracking data directly from the platform back to WooCommerce.
Here is how the flow works: You create a label in ShipStation. The ShipStation WooCommerce plugin detects the new label, pushes the tracking number to the order in WooCommerce, and optionally changes the order status. WooCommerce then fires the tracking email based on that status change. No manual input at any step.
For ShipStation specifically:
- Install the ShipStation Integration for WooCommerce plugin from the WordPress repository.
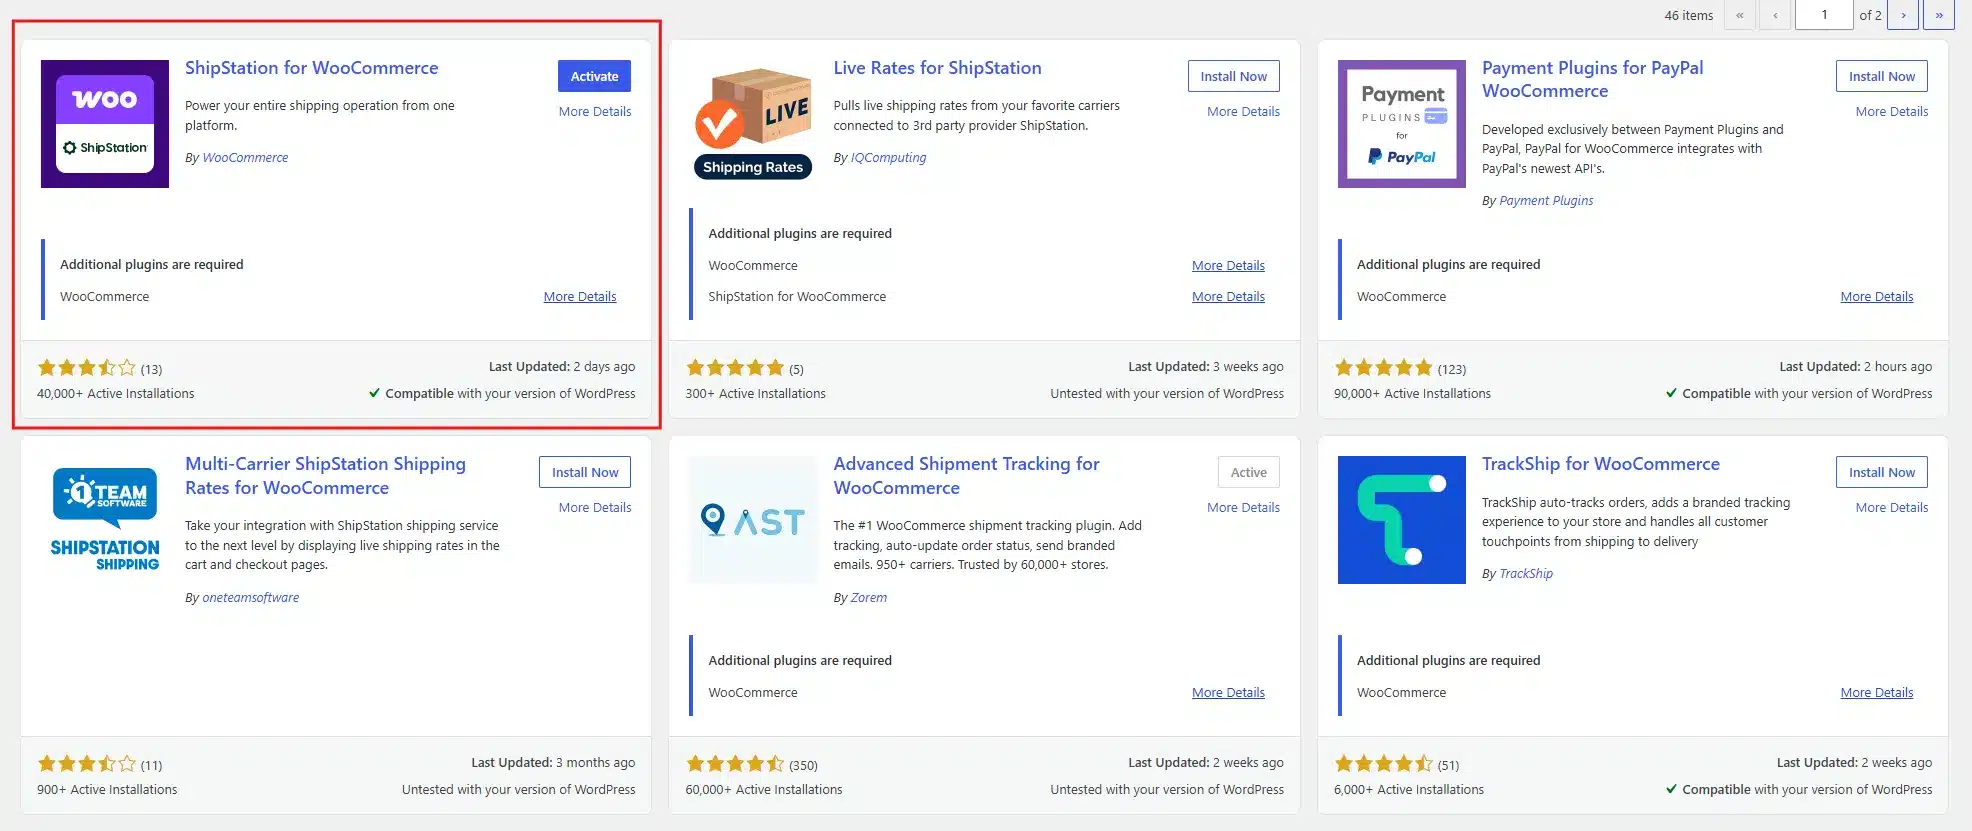
- In ShipStation, connect your WooCommerce store during account setup.
- Set up the “Mark as Shipped” automation rule in ShipStation to update the WooCommerce order status when a label is created.

- In WooCommerce, ensure the Completed Order email is enabled.
The whole configuration takes about 20 to 30 minutes. After that, every label you create automatically triggers the tracking email. Zero manual steps per order.
The downside is cost. ShipStation starts at around $9.99 per month. For stores already paying for the platform, the WooCommerce integration adds no extra charge. For stores that do not yet need ShipStation’s full feature set, that is a cost to weigh against the time savings.
One thing that trips up stores doing this for the first time: the order status mapping. If ShipStation is set to mark orders as Completed and you have also renamed Completed to Shipped using AST, you may end up with conflicting status labels. Test the full flow on one order before going live with 200.
Trade-off: The most automated method available, but it requires a paid shipping platform subscription. Best for stores already using ShipStation, Shippo, or similar.
Method 5: Use WooCommerce for Custom Tracking Updates
The four methods above focus on automated email triggers fired by order status changes. That covers the standard use case. But there are stores that need something more flexible. Stores where a customer asks a specific question about their shipment. Or where a package is delayed, and you want to send a direct update with context. Or where you need to share a PDF customs document with the order tracking link.
This is where a plugin like the WooCommerce Order Communication plugin fills a real gap. It lets you send direct messages to customers from inside the order edit page, with WooCommerce email templates for notifications. Both admin and customer are notified by email when a new message is sent, and the entire conversation is tied to the order.
It is not a replacement for automated tracking. It works alongside it. The automated email handles the standard “your order shipped” message. The Order Communication plugin handles everything that comes after: delay notifications, custom tracking updates, questions about delivery windows, or anything else that needs a direct human response.
How to set it up:
- After Plugin activation, go to DevDiggers Plugins → Order Communication → Configuration.
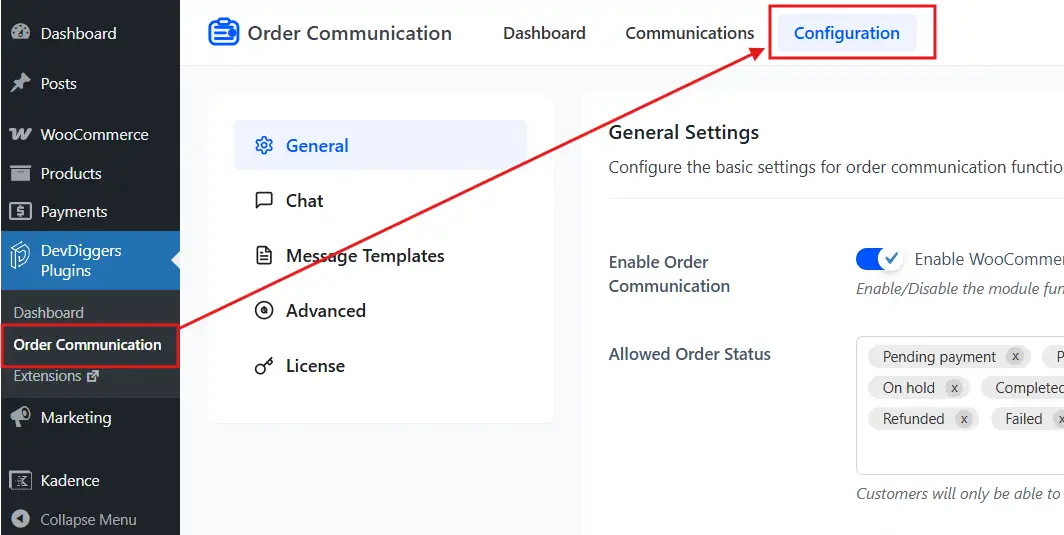
- Enable Order Communication.
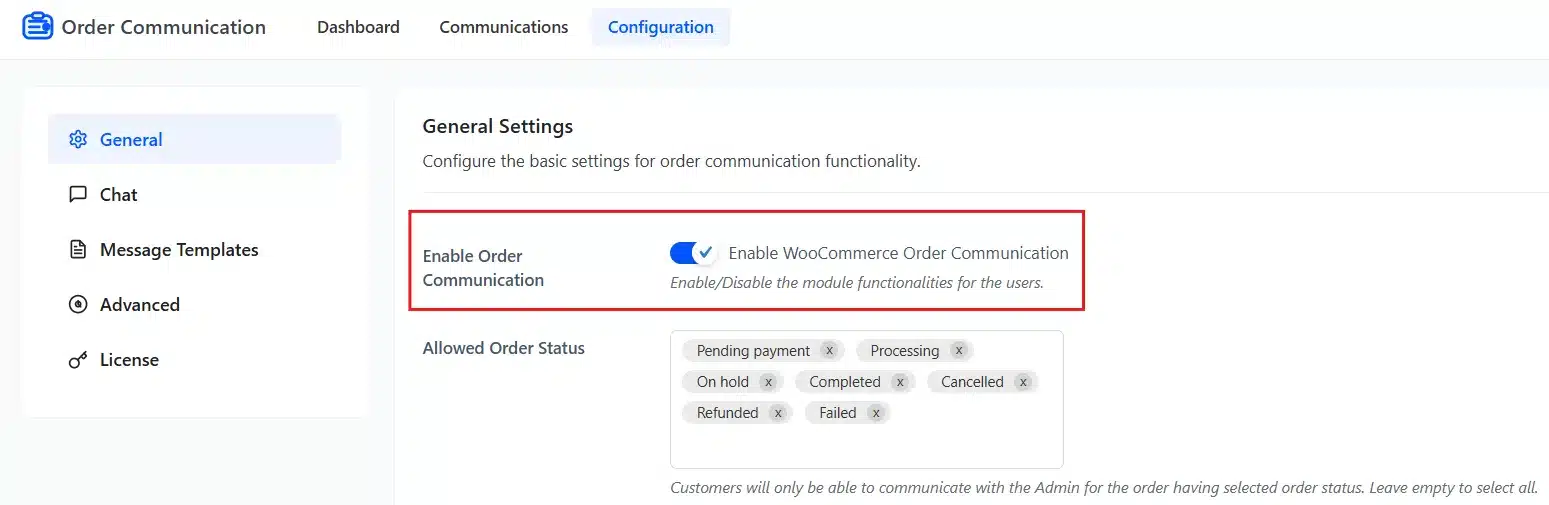
- Enable Admin Email Notifications and Customer Email Notifications.
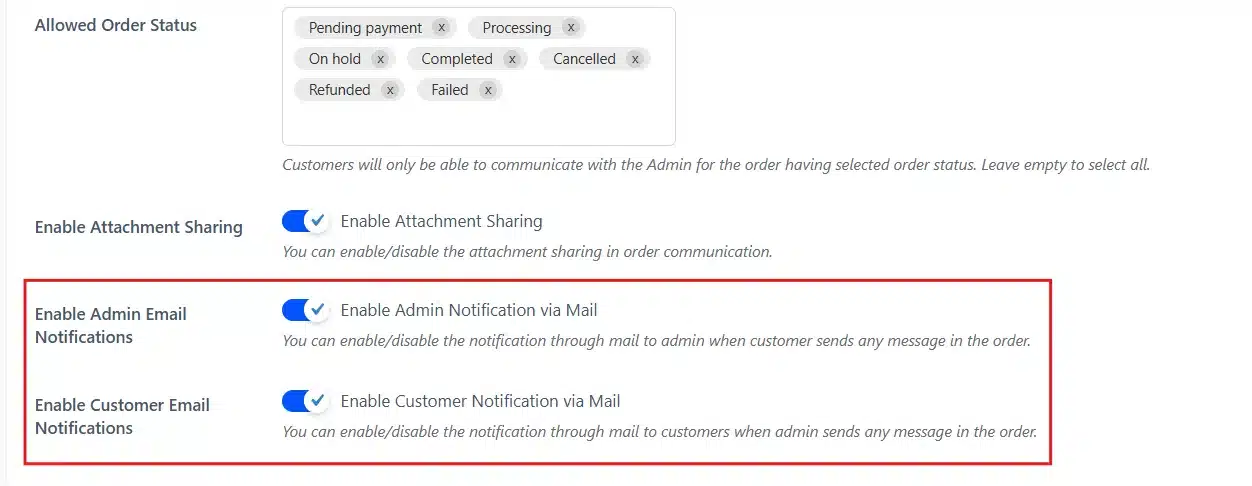
The customer receives a WooCommerce-styled email notification. They can reply from their account page, and you see the response in the same thread.
This is particularly useful for stores handling international shipments, where customs delays and tracking gaps are more common. Instead of letting a customer discover that their order is stuck at customs by checking the carrier website themselves, you can proactively message them through the order with an explanation and an updated tracking link.
Trade-off: Not a fully automated tracking system on its own. It is a direct communication layer on top of your existing automation, best used for exceptions and follow-ups.
How to Make Tracking Emails Actually Work After Setup
Setting up the plugin is only half the job. The other half is making sure the emails do what they are supposed to do.
- Use SMTP for reliable delivery: WooCommerce sends emails through PHP mail by default, which many hosting environments block or route to spam. Connect an SMTP service (Brevo, SendGrid, Mailgun, or even Gmail SMTP) through a plugin like WP Mail SMTP or FluentSMTP. This one change fixes most “tracking emails not sending” issues.
- Test before going live: Send a real test order through your store, add tracking information, change the order status, and check what the customer’s email looks like in a live inbox. Check both desktop and mobile. Most WooCommerce email templates are not mobile-optimised by default.
- Include the tracking link, not just the number: A tracking number is useless without a direct link to the carrier’s tracking page. Every tracking plugin lets you set this up automatically. Make sure it is configured correctly for each carrier you use.
- Do not send tracking emails to spam: Use a recognisable “From” name (your store name, not a generic address). Set up SPF and DKIM records for your sending domain. A tracking email that lands in spam is almost as bad as not sending one.
- Set realistic timing expectations: If you print labels in the afternoon and the shipping platform syncs with WooCommerce every 15 minutes, customers might get their tracking email at midnight. That is fine, but if your emails say “your order ships within 24 hours,” make sure your automation actually delivers within that window.
We often see stores where the tracking email is perfectly set up, but the email template still says “Your order is complete” in the subject line. Subject lines matter. “Your order has shipped” gets opened. “Your order #12345 is complete” gets archived without being read.
What to Include in Every Tracking Email?
A good tracking email covers five things. Keep it short.
- The tracking number should be visible at the top or near the top, bold and large. Customers copy it constantly.
- The carrier name tells them which website to visit and which app to download. “USPS” is clearer than “Standard Shipping.”
- A direct tracking link labelled as “Track Your Order” should be a large button, not a buried text link. One click. No copying, no searching.
- The estimated delivery date reduces follow-up questions significantly. Even a range like “Arrives November 4 to 6” is more useful than nothing.
- A brief order summary with the product name and quantity confirms you shipped the right thing. One line. It removes doubt.
Everything else is optional. A return link is useful. Recommendations for related products are fine if done without being pushy. But the tracking information itself should not be buried under paragraphs of marketing copy.
Conclusion
Auto-sending tracking emails in WooCommerce is one of the highest-return setup tasks you can do for your store. It costs almost no time once configured, cuts support workload by a significant margin, and makes the post-purchase experience noticeably better for customers.
The right method depends on your order volume and existing tools. Small stores do well with the free WooCommerce Shipment Tracking or Advanced Shipment Tracking plugins. Stores using ShipStation or Shippo should connect the built-in integration for full automation. Stores that need direct communication for exceptions or delays can layer in the WooCommerce Order Chat plugin for those cases.
Whichever method you choose, pair it with an SMTP plugin and test the full flow before going live. Most tracking email problems trace back to delivery failures or misconfigured triggers, not to the tracking plugin itself.
Frequently Asked Questions (FAQs)
Q1. Does WooCommerce automatically send tracking emails?
No. WooCommerce sends a “Completed Order” email when an order status changes to Completed, but that email does not include tracking information by default. To auto-send tracking emails in WooCommerce, you need either a shipment tracking plugin or a shipping platform integration that attaches tracking data to the order and fires the notification automatically.
Q2. What is the best free plugin to send tracking emails in WooCommerce?
The WooCommerce Shipment Tracking plugin (from WordPress.org) and Advanced Shipment Tracking for WooCommerce are both strong free options. Advanced Shipment Tracking supports more carriers and offers more template control. For most stores processing under 100 orders per day, the free version of either plugin handles the core use case.
Q3. Why are my WooCommerce tracking emails not being sent?
The most common cause is that the order status is not changing to trigger the email. Check that the plugin is set up to fire on the correct trigger event. The second most common cause is email delivery failure due to PHP mail. Install an SMTP plugin and connect to a transactional email provider like Brevo or SendGrid. Check your WooCommerce > Status > Logs for email errors.
Q4. Can I customise the tracking email template in WooCommerce?
Yes. Most tracking plugins include a basic template editor. For deeper customisation (custom branding, layout changes, dynamic product images), you can edit the WooCommerce email PHP templates directly or use a plugin like Email Customizer for WooCommerce. Make sure any template edits go in a child theme so they survive WooCommerce updates.
Q5. How do I send a tracking email to a customer who missed it?
Open the order in WooCommerce > Orders, and look for the Resend option in the email actions section on the right side of the edit order page. WooCommerce lets you manually resend any order email from there. If you need to add a message alongside it, the Order Communication plugin lets you send a direct follow-up tied to that order.
Q6. Is it possible to send tracking updates for every status change, not just shipping?
Yes, but you need a custom order status plugin for this. Plugins like Custom Order Status for WooCommerce Pro let you create new statuses like Packed, At Customs, or Out for Delivery, and trigger a separate email notification for each one. This is useful for stores with longer fulfilment cycles or international shipping, where customers benefit from more customer interactions.
Q7. Do tracking emails affect my repeat purchase rate?
The data says yes. Proactive post-purchase communication is consistently linked to higher repeat purchase rates. Customers who feel informed after an order are more likely to return. The tracking email is often the only branded touchpoint between checkout and delivery. Using it well means more than just reducing support tickets.
Rishi Yadav
Rishi Yadav is a content writer at DevDiggers who covers WooCommerce store management, WordPress performance, and security. He works through each topic in a test environment before writing about it, so his guides focus on the steps and settings that matter rather than the ones that sound good on paper.
Join thousands of readers getting smarter every week.
Leave a Reply