


You can migrate Squarespace to WordPress in eight steps, and the XML export only covers part of the job.
We tested the WordPress side of this guide in October 2026 on a WordPress 7.1 test site with a sample export file we wrote ourselves. We did not sign in to a real Squarespace account. Every Squarespace step comes from Squarespace’s own help pages.
This guide shows what moves, the eight steps, store products, your domain, the cost, and the problems to expect. Each step names the screen you will see.
Should You Migrate Squarespace to WordPress?
Move Squarespace to WordPress when you want to own your hosting, add any plugin, and control every page. Stay on Squarespace when you want hosting, security, and support handled for you. Squarespace’s pricing page says every plan includes secure hosting and 24/7 customer support.
People who migrate from Squarespace to WordPress usually want design freedom, a plugin Squarespace does not offer, or a store they can extend. On WordPress you also take over updates, backups, and security. A managed host or a care plan can cover that work, but it is a cost and a job Squarespace never gave you.
If none of those reasons apply to your site, staying put is a fair choice. If one does, the rest of this guide shows the move in order.
What Carries Over When You Move From Squarespace
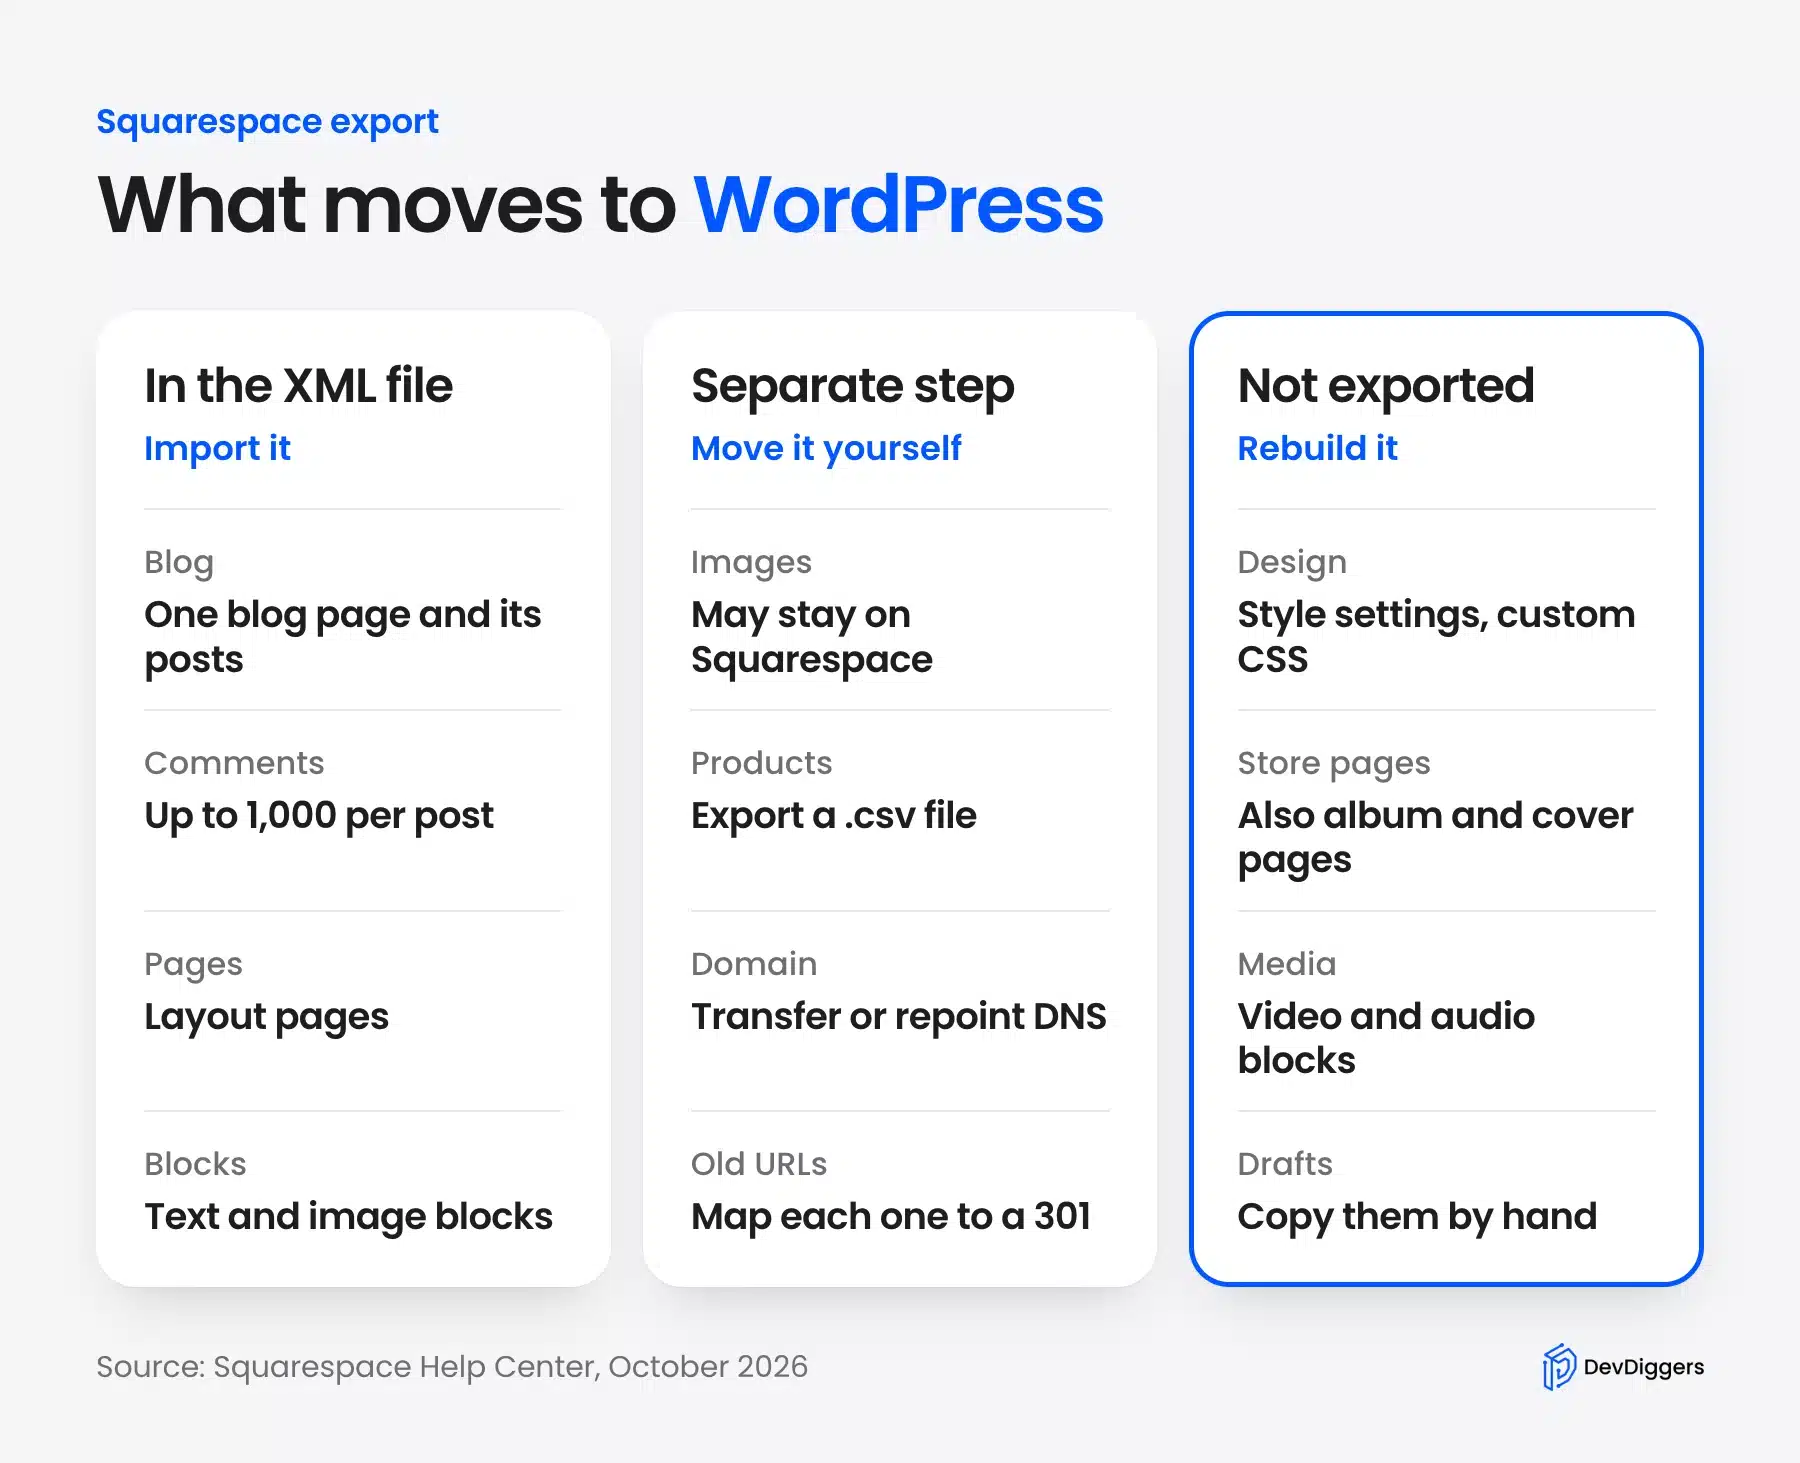
Squarespace’s export guide says the XML file carries one blog page, its posts, and layout pages. It also carries up to 1,000 comments per post and text and image blocks. It leaves out store pages, product blocks, drafts, extra blogs, audio and video blocks, style settings, and custom CSS.
Plan to rebuild the design and the store on WordPress.
The infographic below sorts everything into three groups. The first group imports from the file, the second needs its own step, and the third you rebuild by hand.
Squarespace lists the content that does not export on the same help page. Product blocks and store pages are on that list, which is why a store needs its own route in the WooCommerce section below.
Sites built on Webflow move with a CSV import instead of an XML file, as shown in the steps to migrate Webflow to WordPress.
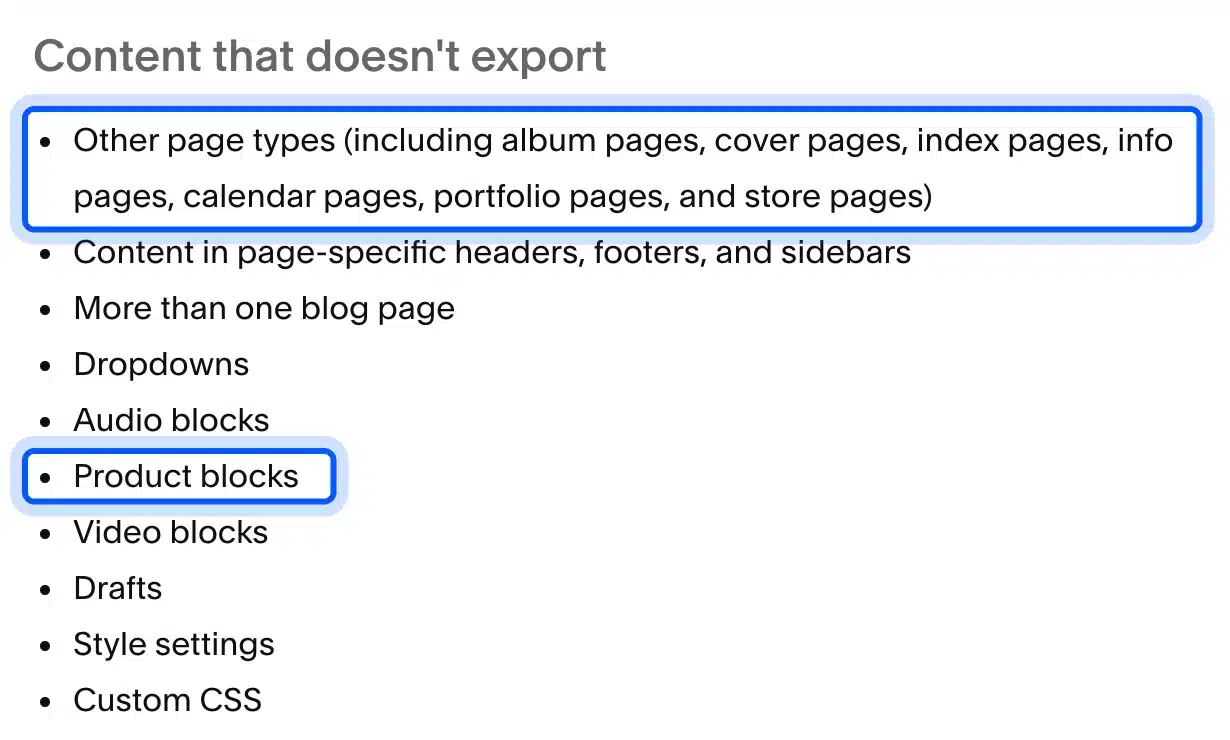
Note: Squarespace says a trial site cannot export. The site must be published with its availability set to Public before the export works.
How to Migrate Squarespace to WordPress in 8 Steps
You migrate Squarespace to WordPress by auditing your site, setting up WordPress, exporting the XML file, and importing it. Then you move the images, rebuild what is missing, and add 301 redirects. Switch your domain last, and cancel Squarespace only after the new site works.
Step 1: Audit Your Squarespace Site and List Every URL
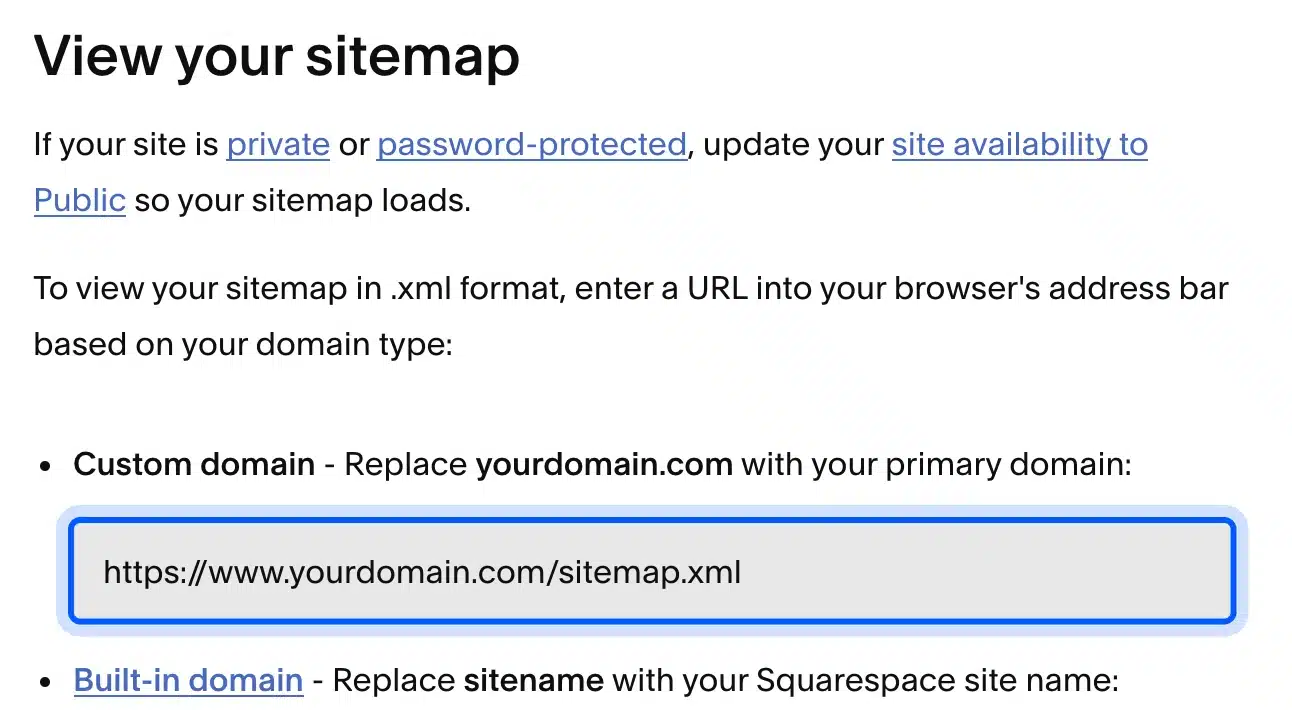
Start with a list of every page you want to keep. Squarespace builds a sitemap for every site. That list already exists.
Squarespace’s sitemap guide gives the address as your domain followed by /sitemap.xml. Copy those URLs into a spreadsheet, because step 7 turns them into redirects. Add a column for the new WordPress address.
Step 2: Set Up WordPress Hosting and Install WordPress
Buy hosting, point it at a temporary address, and install WordPress there before you touch your live domain. The software is free. WordPress.org’s requirements page asks hosts for PHP 8.3 or newer, MariaDB 10.11 or newer or MySQL 8.0 or newer, and HTTPS.
Most hosts install WordPress in one click. Our guide to creating a WordPress site from scratch walks through the hosting choice and the first login. Our explainer on self-hosted WordPress covers what you own after the move.

Step 3: Export Squarespace to WordPress as an XML File
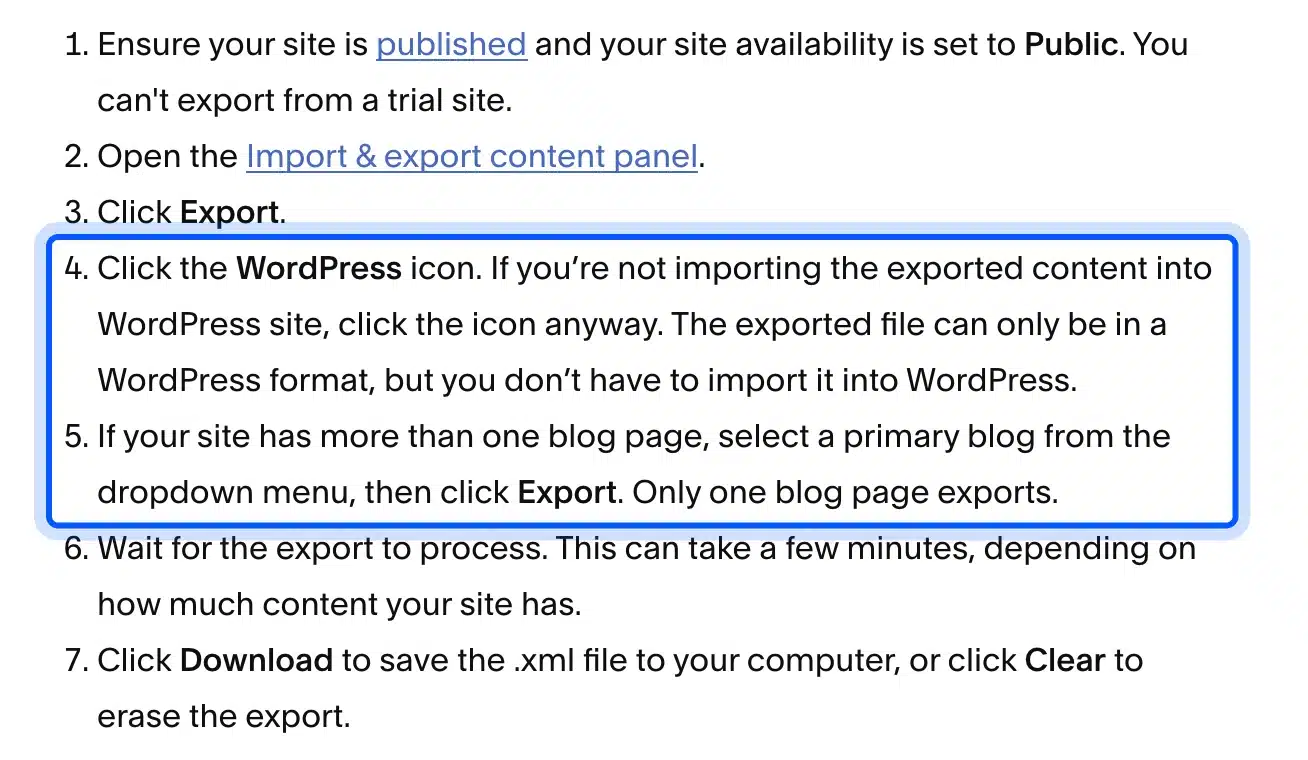
Open the Import and export content panel in your Squarespace settings, click Export, and click the WordPress icon. Squarespace builds an .xml file in WordPress format, and you download it when it finishes.
The steps below come from Squarespace’s export instructions. Pick your primary blog if you have several, because only one blog page exports.
Step 4: Import the Squarespace XML File Into WordPress
WordPress reads the file with its Importer tool. Squarespace’s export is the WordPress format. You import the Squarespace XML file the same way you would a WordPress export.
We used the WordPress Importer plugin, which lists more than 2 million active installs. Its page says it is not yet tested with the latest three major WordPress releases. It ran cleanly for us on WordPress 7.1.
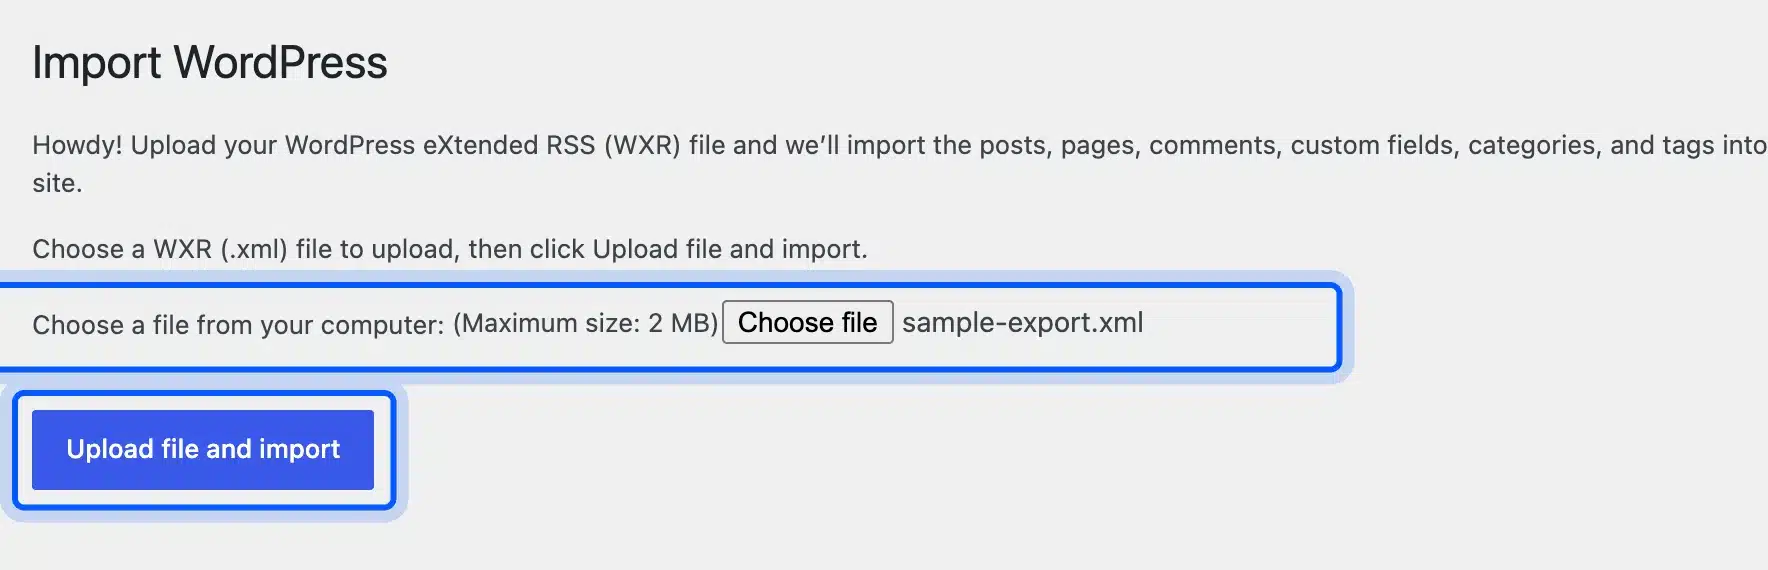
- Open the importer: Go to Tools > Import and click Run Importer under WordPress. Install the plugin when WordPress asks.
- Upload the file: Choose your .xml file and click Upload file and import.
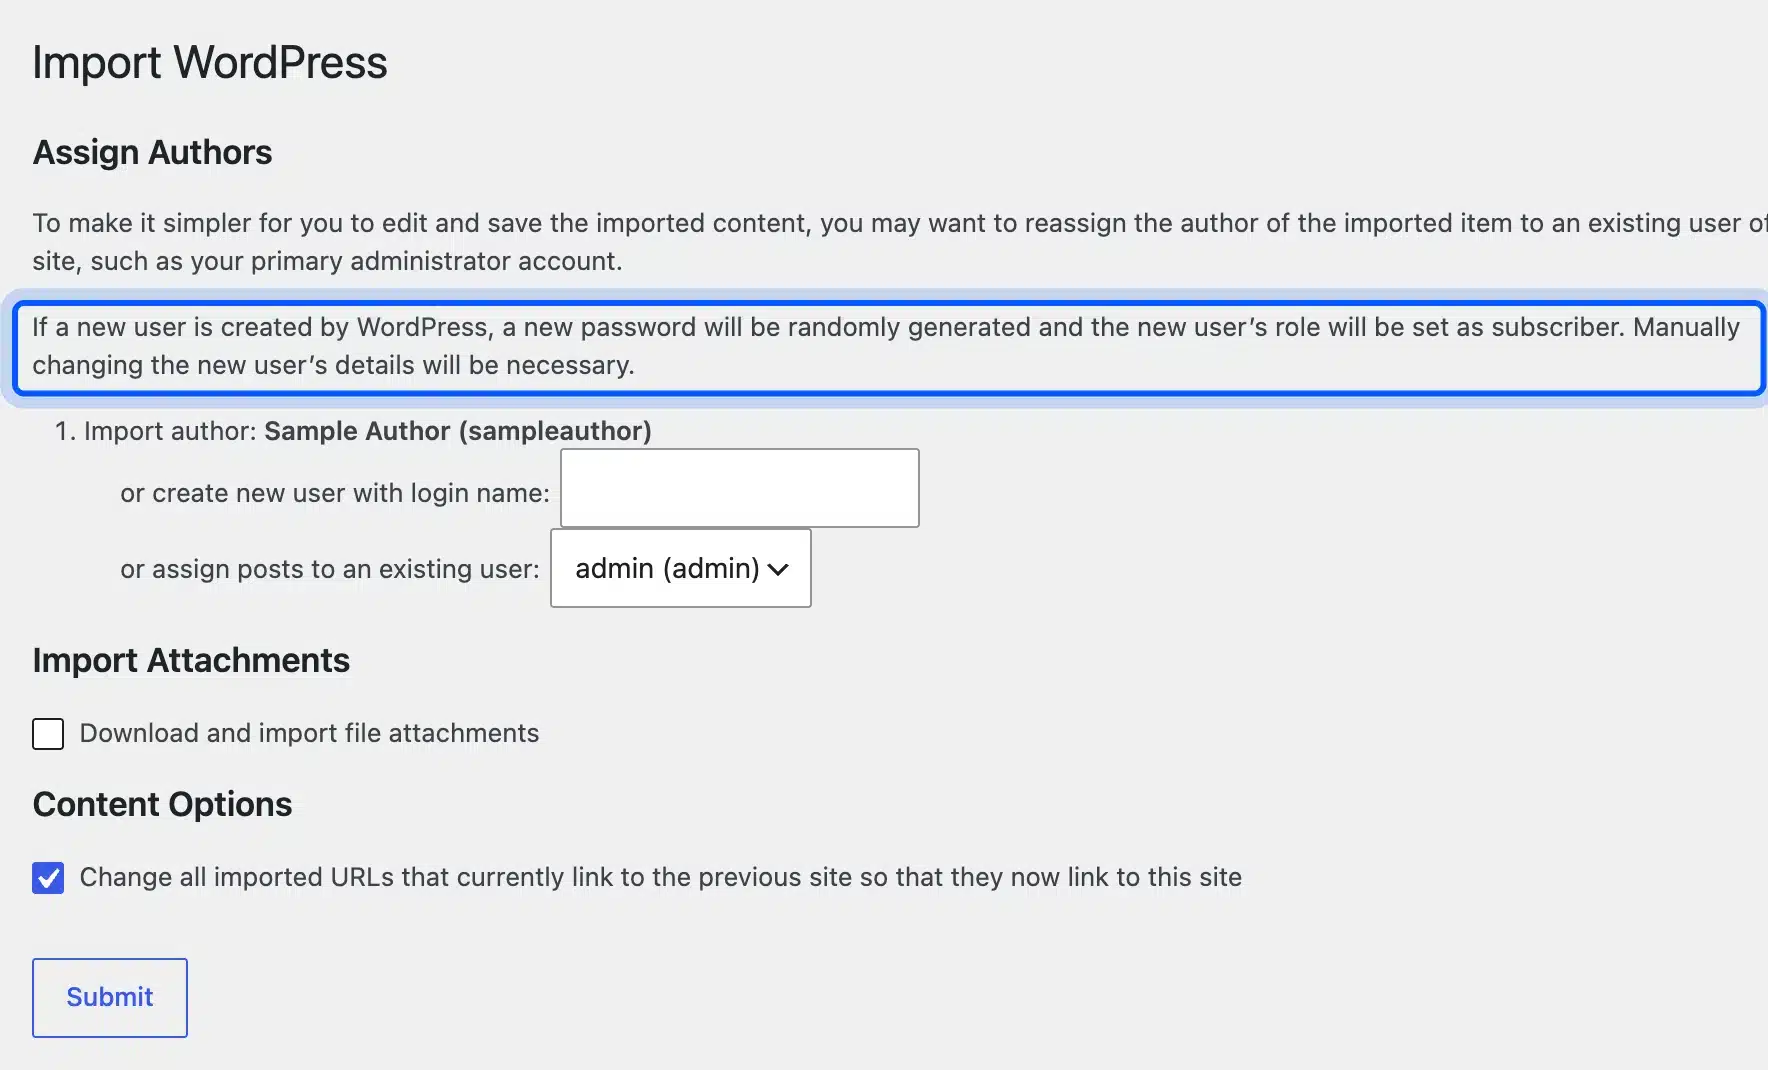
- Assign authors: WordPress shows each imported author and asks who should own the posts. A new author is created as a subscriber. Pick an existing user when you can.
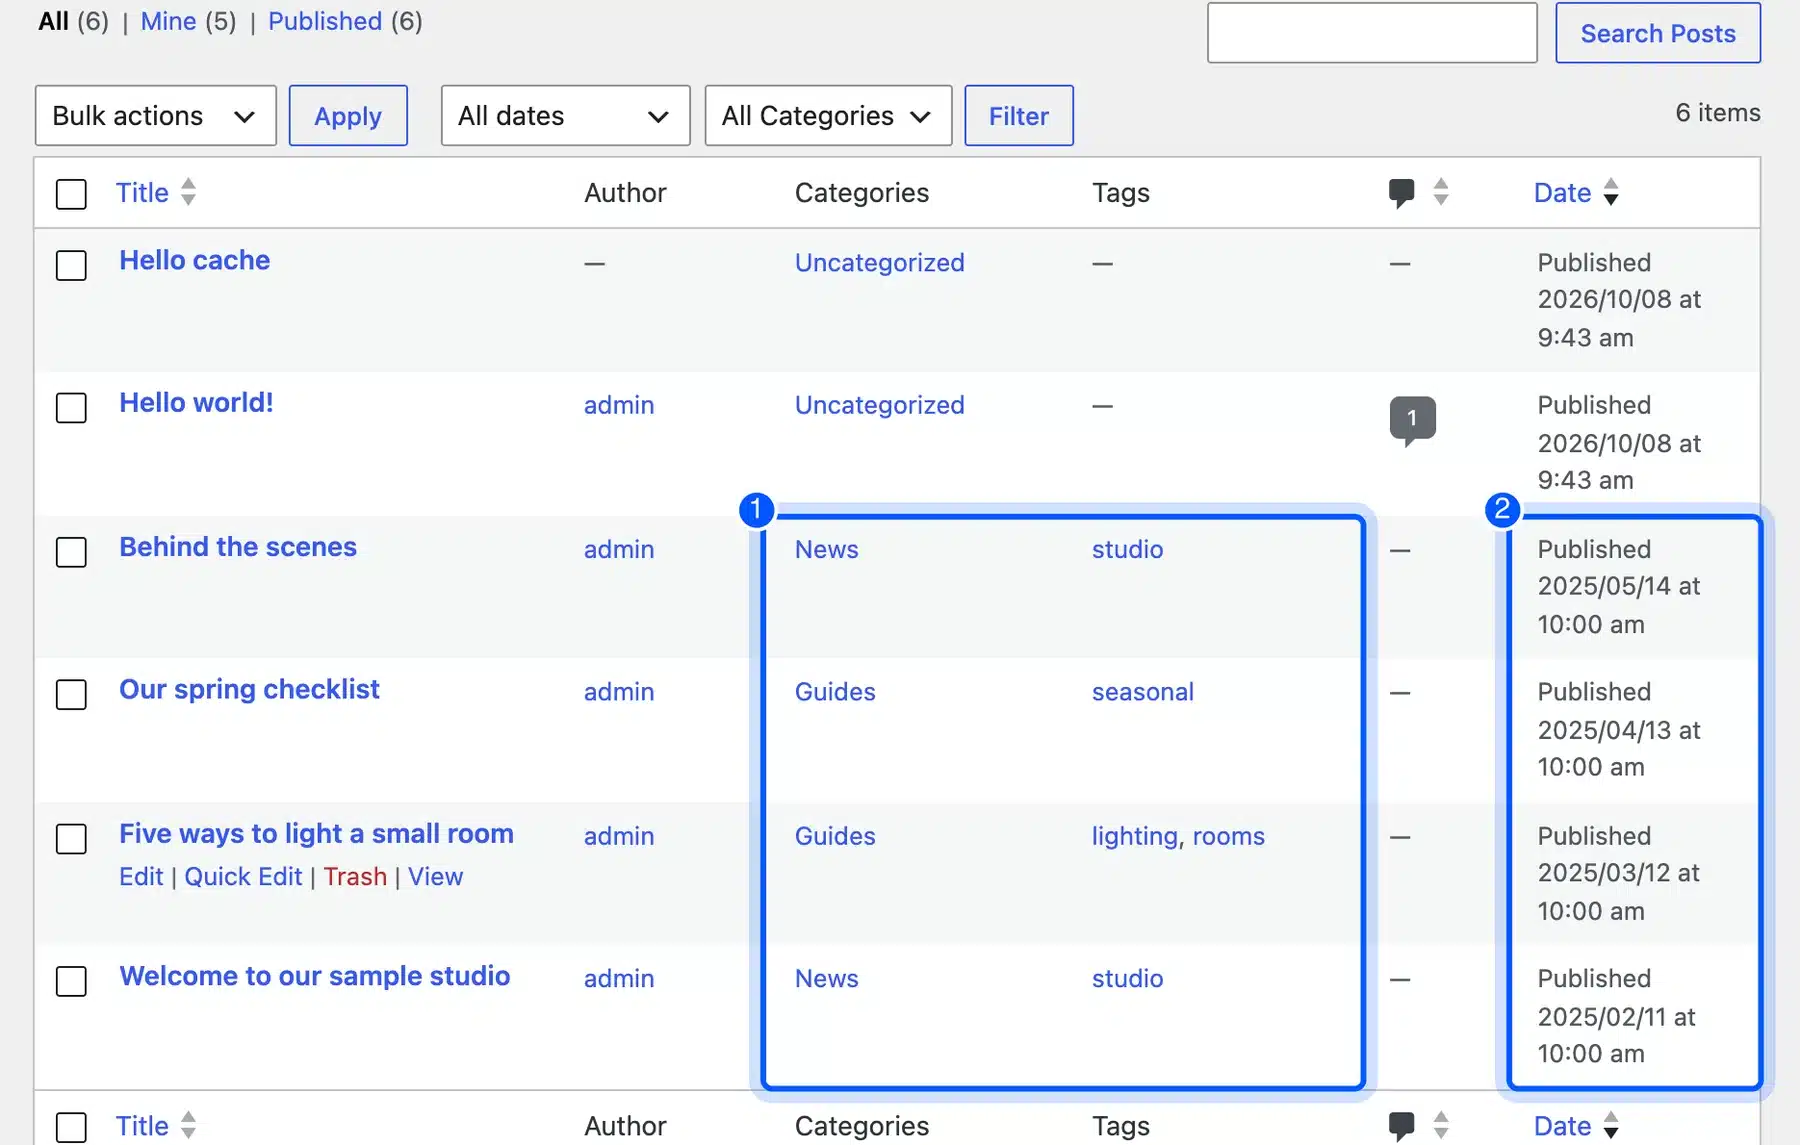
- Check the result: Open Posts and confirm the titles, categories, tags, and dates match your sample file.
The same screen has two options. Download and import file attachments was off by default in our test. Change all imported URLs that currently link to the previous site was on, and it rewrites links that point at the old domain.
In our test the import kept every post date, category, tag, slug, and page. Images were the exception. Each image tag still pointed at the old image address, which is the problem step 5 fixes.
Step 5: Move Your Images Into the WordPress Media Library
The import copies the picture links and not the pictures. Squarespace warns that images might not migrate with the WordPress Importer plugin. The links stop working after you cancel your Squarespace site.
You have three ways to fix it. You can download the images by hand and upload them. You can import into WordPress.com, which Squarespace says copies images to its servers.
The third way is a plugin that pulls each image in when you save a post. A plugin is the fastest route for a blog with many images.
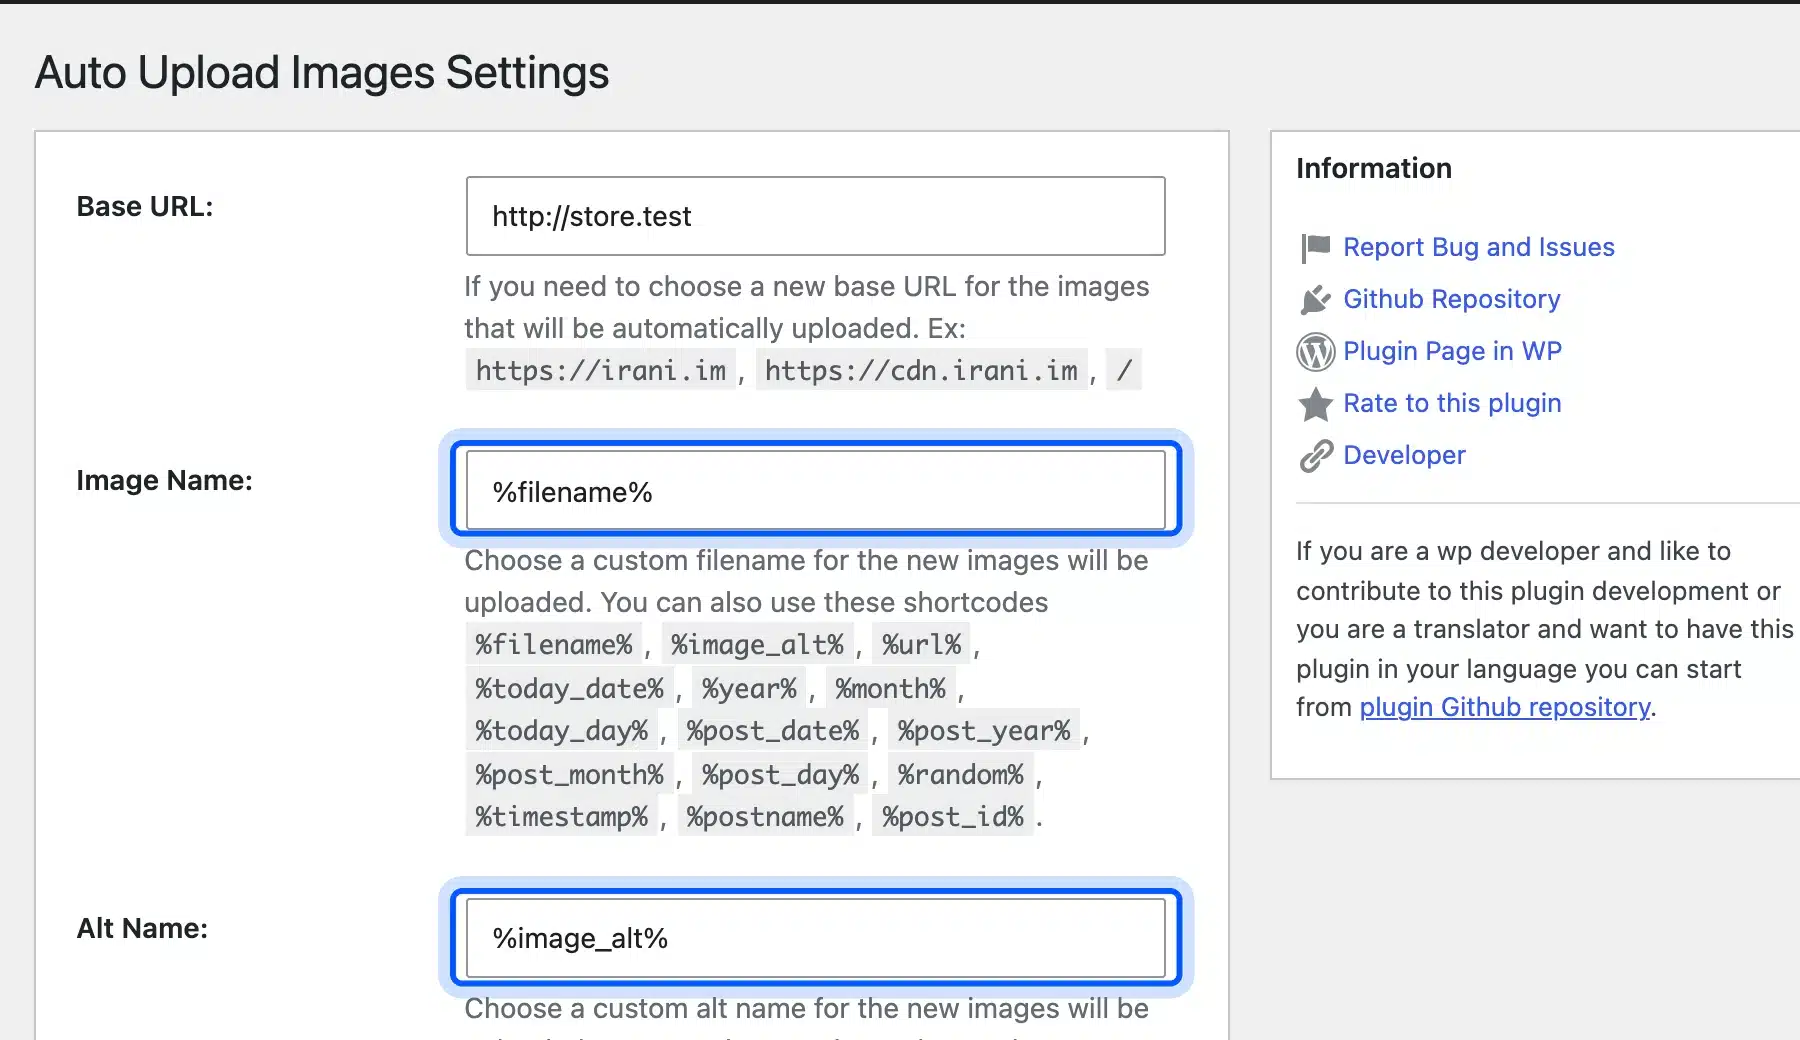
We tested Auto Upload Images, which listed version 3.4.1, an update in September 2026, and about 20,000 active installs. The plugin did the job on our test site.
- Install and activate the plugin: The settings page is under Settings > Auto Upload Images. We left the defaults that keep the original file name and the alt text.
- Update each post and page: The plugin runs when a post is saved. We selected all posts, chose Edit from Bulk actions and clicked Update. We repeated it for pages.
- Confirm the Media Library: Each image now sits in Media and is attached to its post.
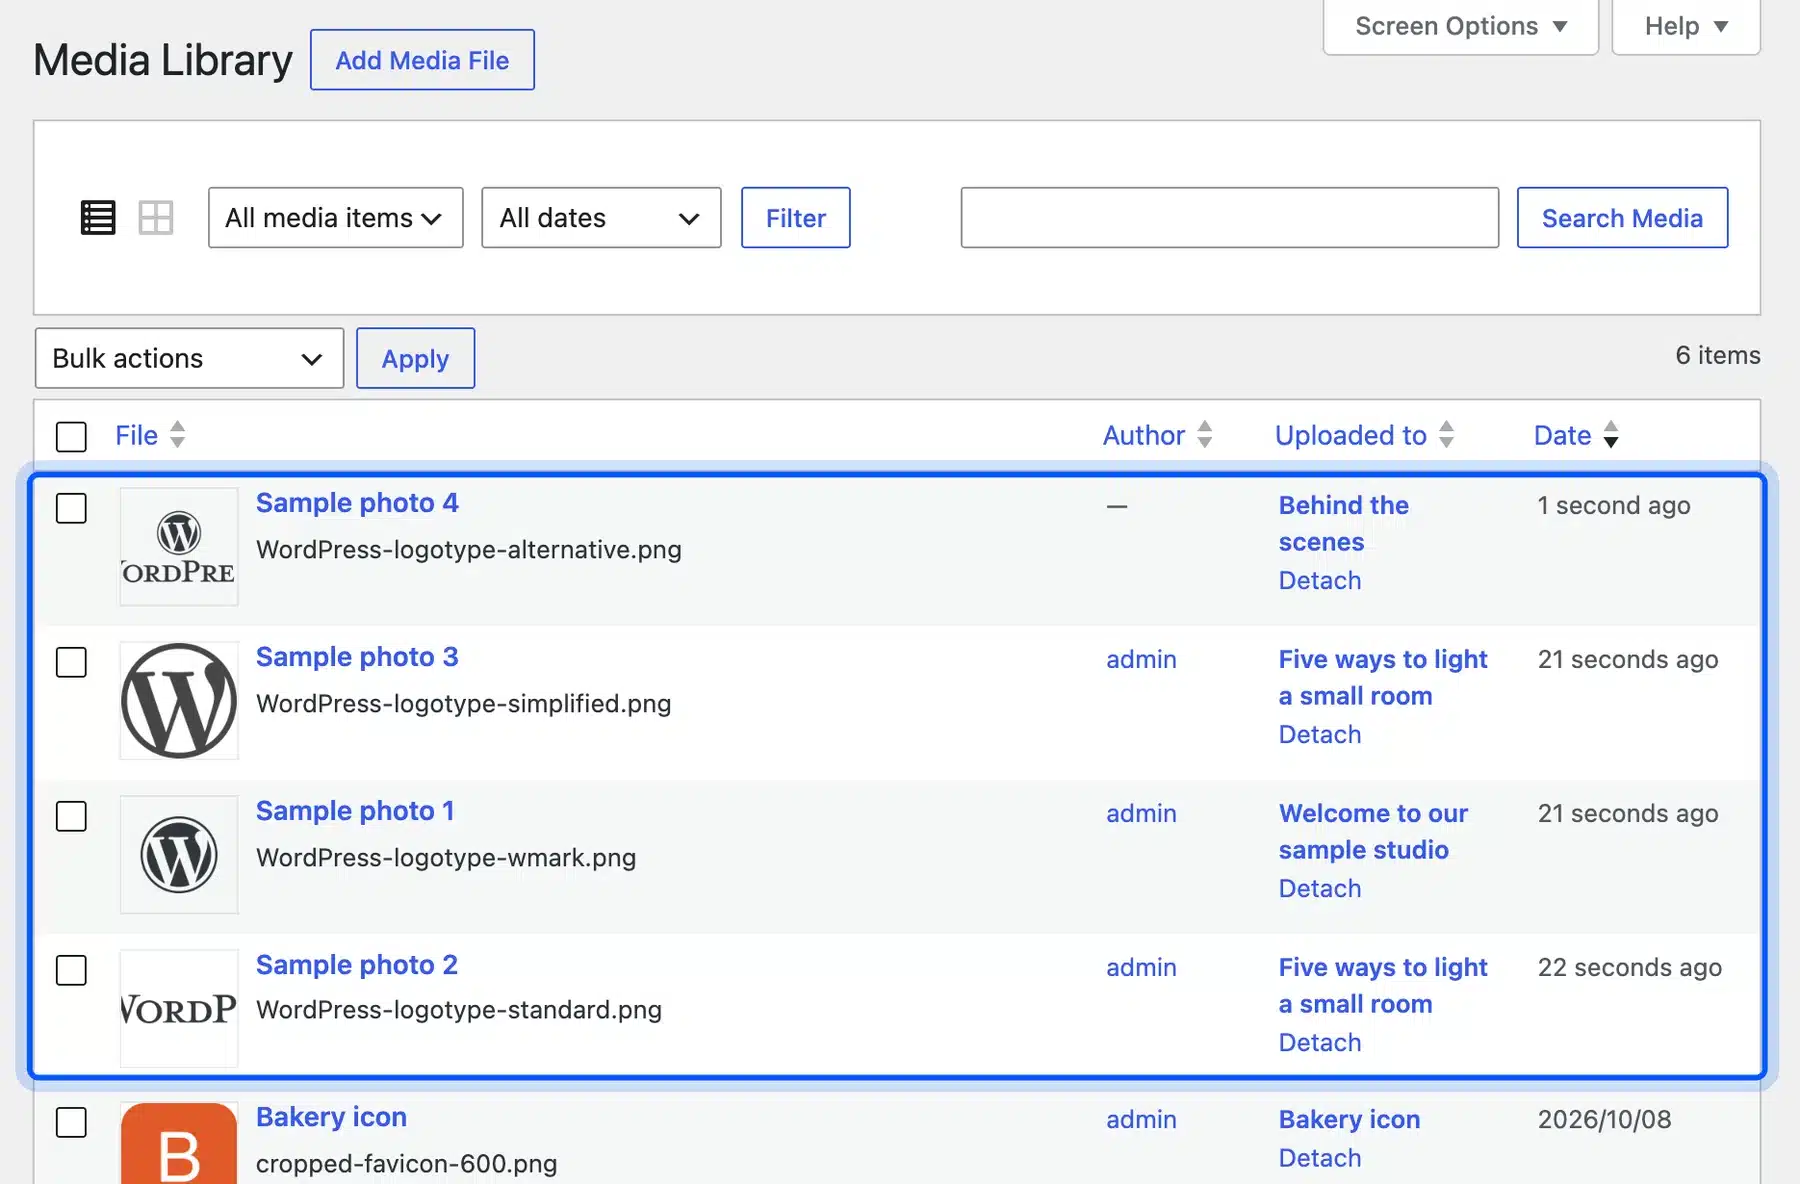
All four images in our sample posts came across, including one used on a page. The plugin does not touch pictures inside a custom field unless you select that field in its settings.
Tip: Open one imported post on the front end before you bulk update all of them. Check that the image loads from your own domain. Then run the rest.
Step 6: Rebuild Pages, Forms and Design on WordPress
The export brings text and layout pages, and nothing about how the site looks. You pick a theme, rebuild the home page, and recreate the menus with the block editor.
Contact forms, newsletters and any embedded tools need a WordPress plugin each. Squarespace does not export style settings or custom CSS. Copy any CSS you want to keep before you cancel. The table below maps each piece to the WordPress tool that replaces it.
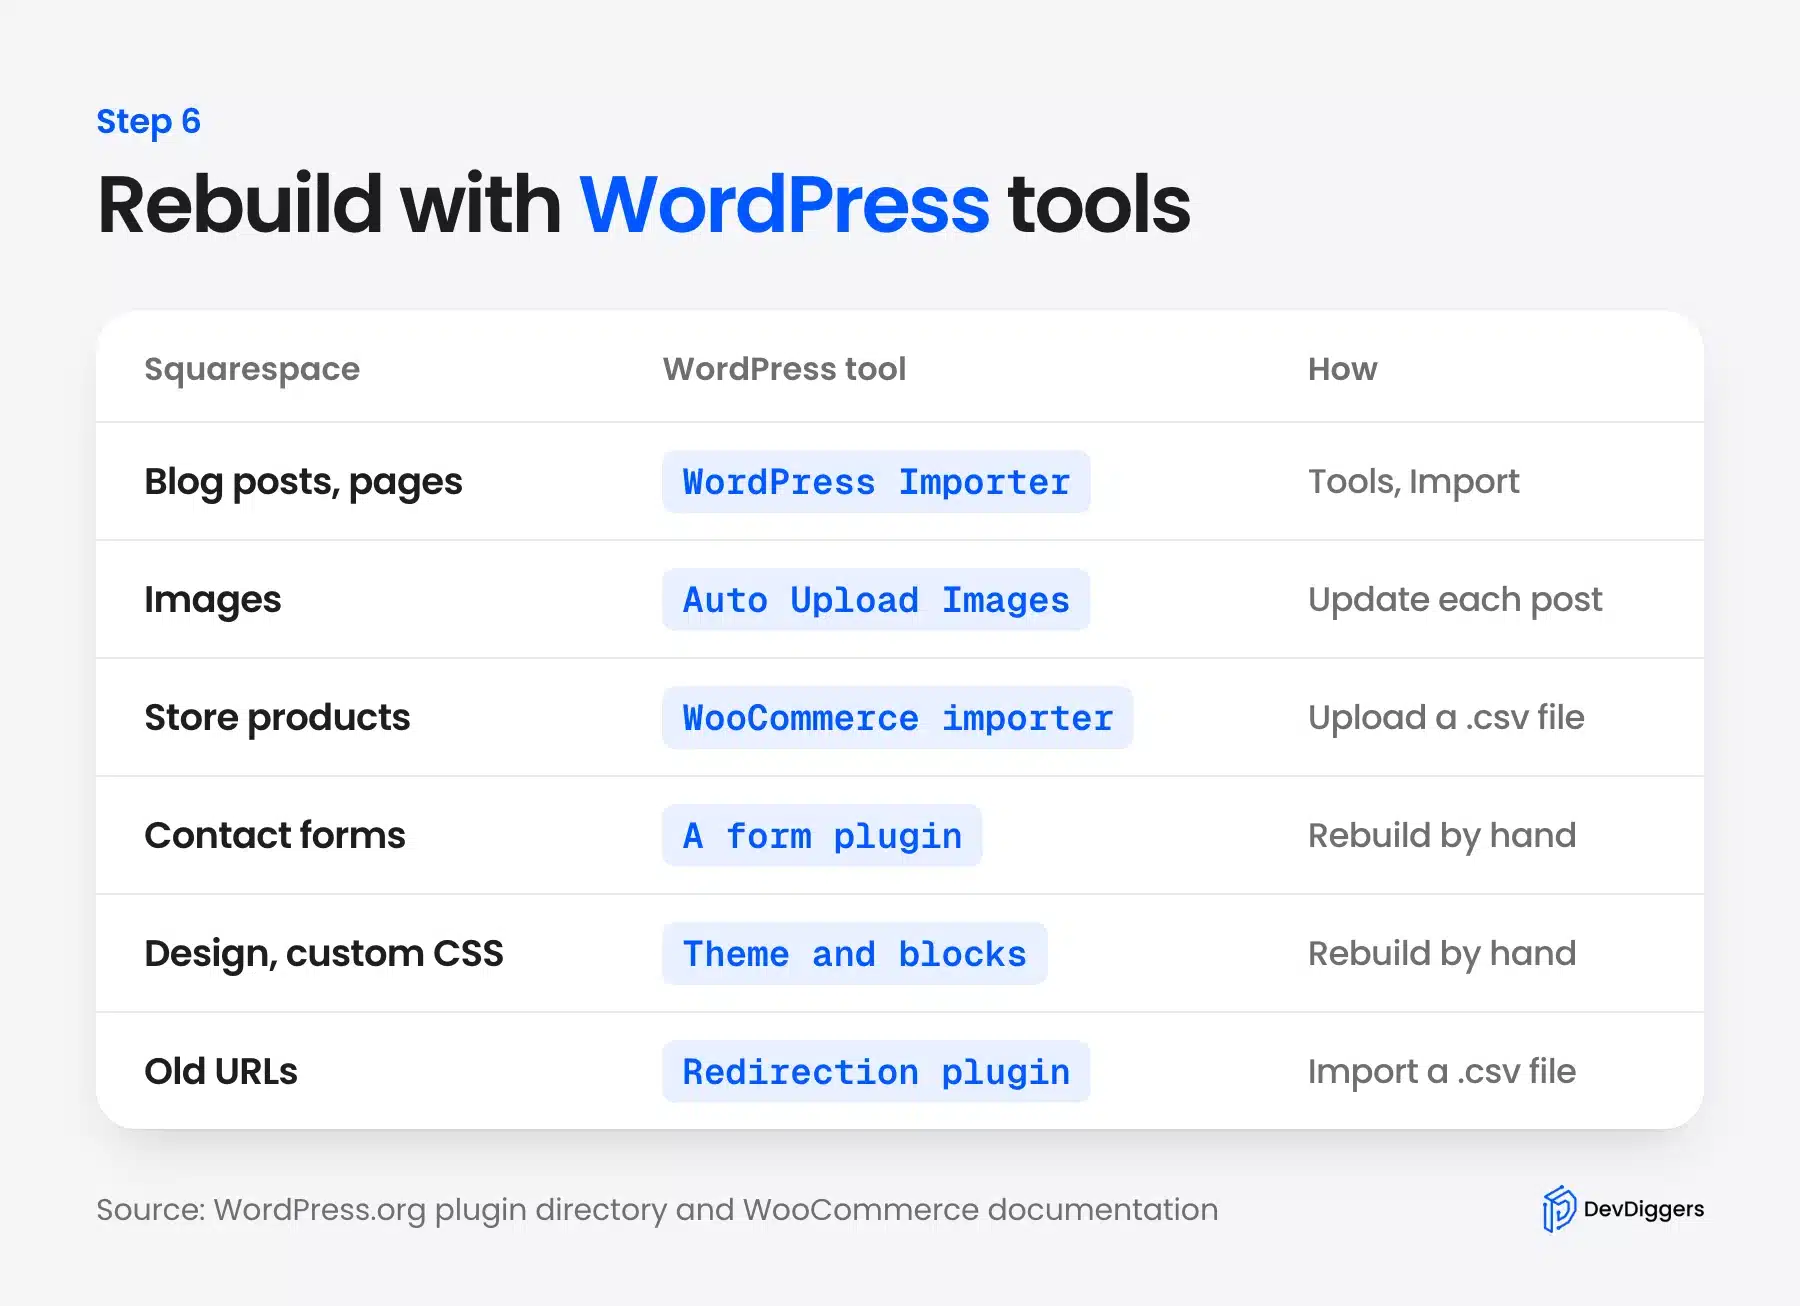
If you would rather not rebuild by hand, our WordPress migration services cover the move, the rebuild, and the redirects. Our WordPress development services handle custom layouts that a theme alone cannot match.
Step 7: Set Up 301 Redirects From Your Old URLs
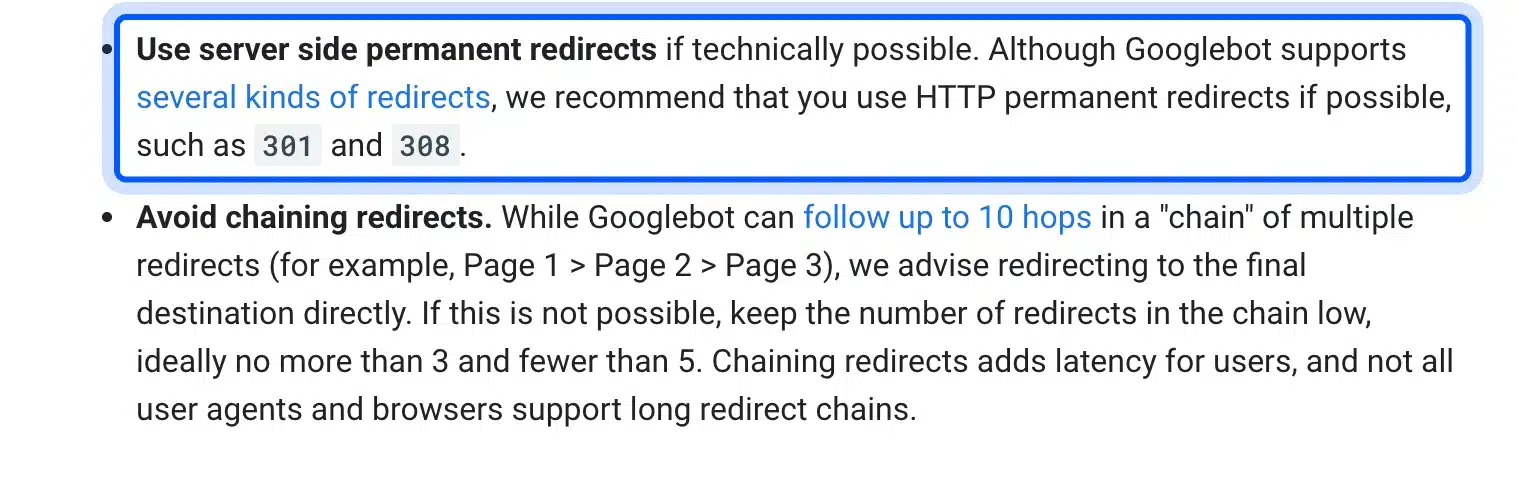
Google says to use server-side permanent redirects for a site move and to map old URLs to new ones before you start. Your Step 1 spreadsheet is that map. Without it, every old link and search result lands on an error page.
Google’s site move guide recommends 301 or 308 redirects. It advises sending each old URL to its final destination directly and keeping the redirects for at least one year. Match the old and new path as closely as you can, and avoid chains.
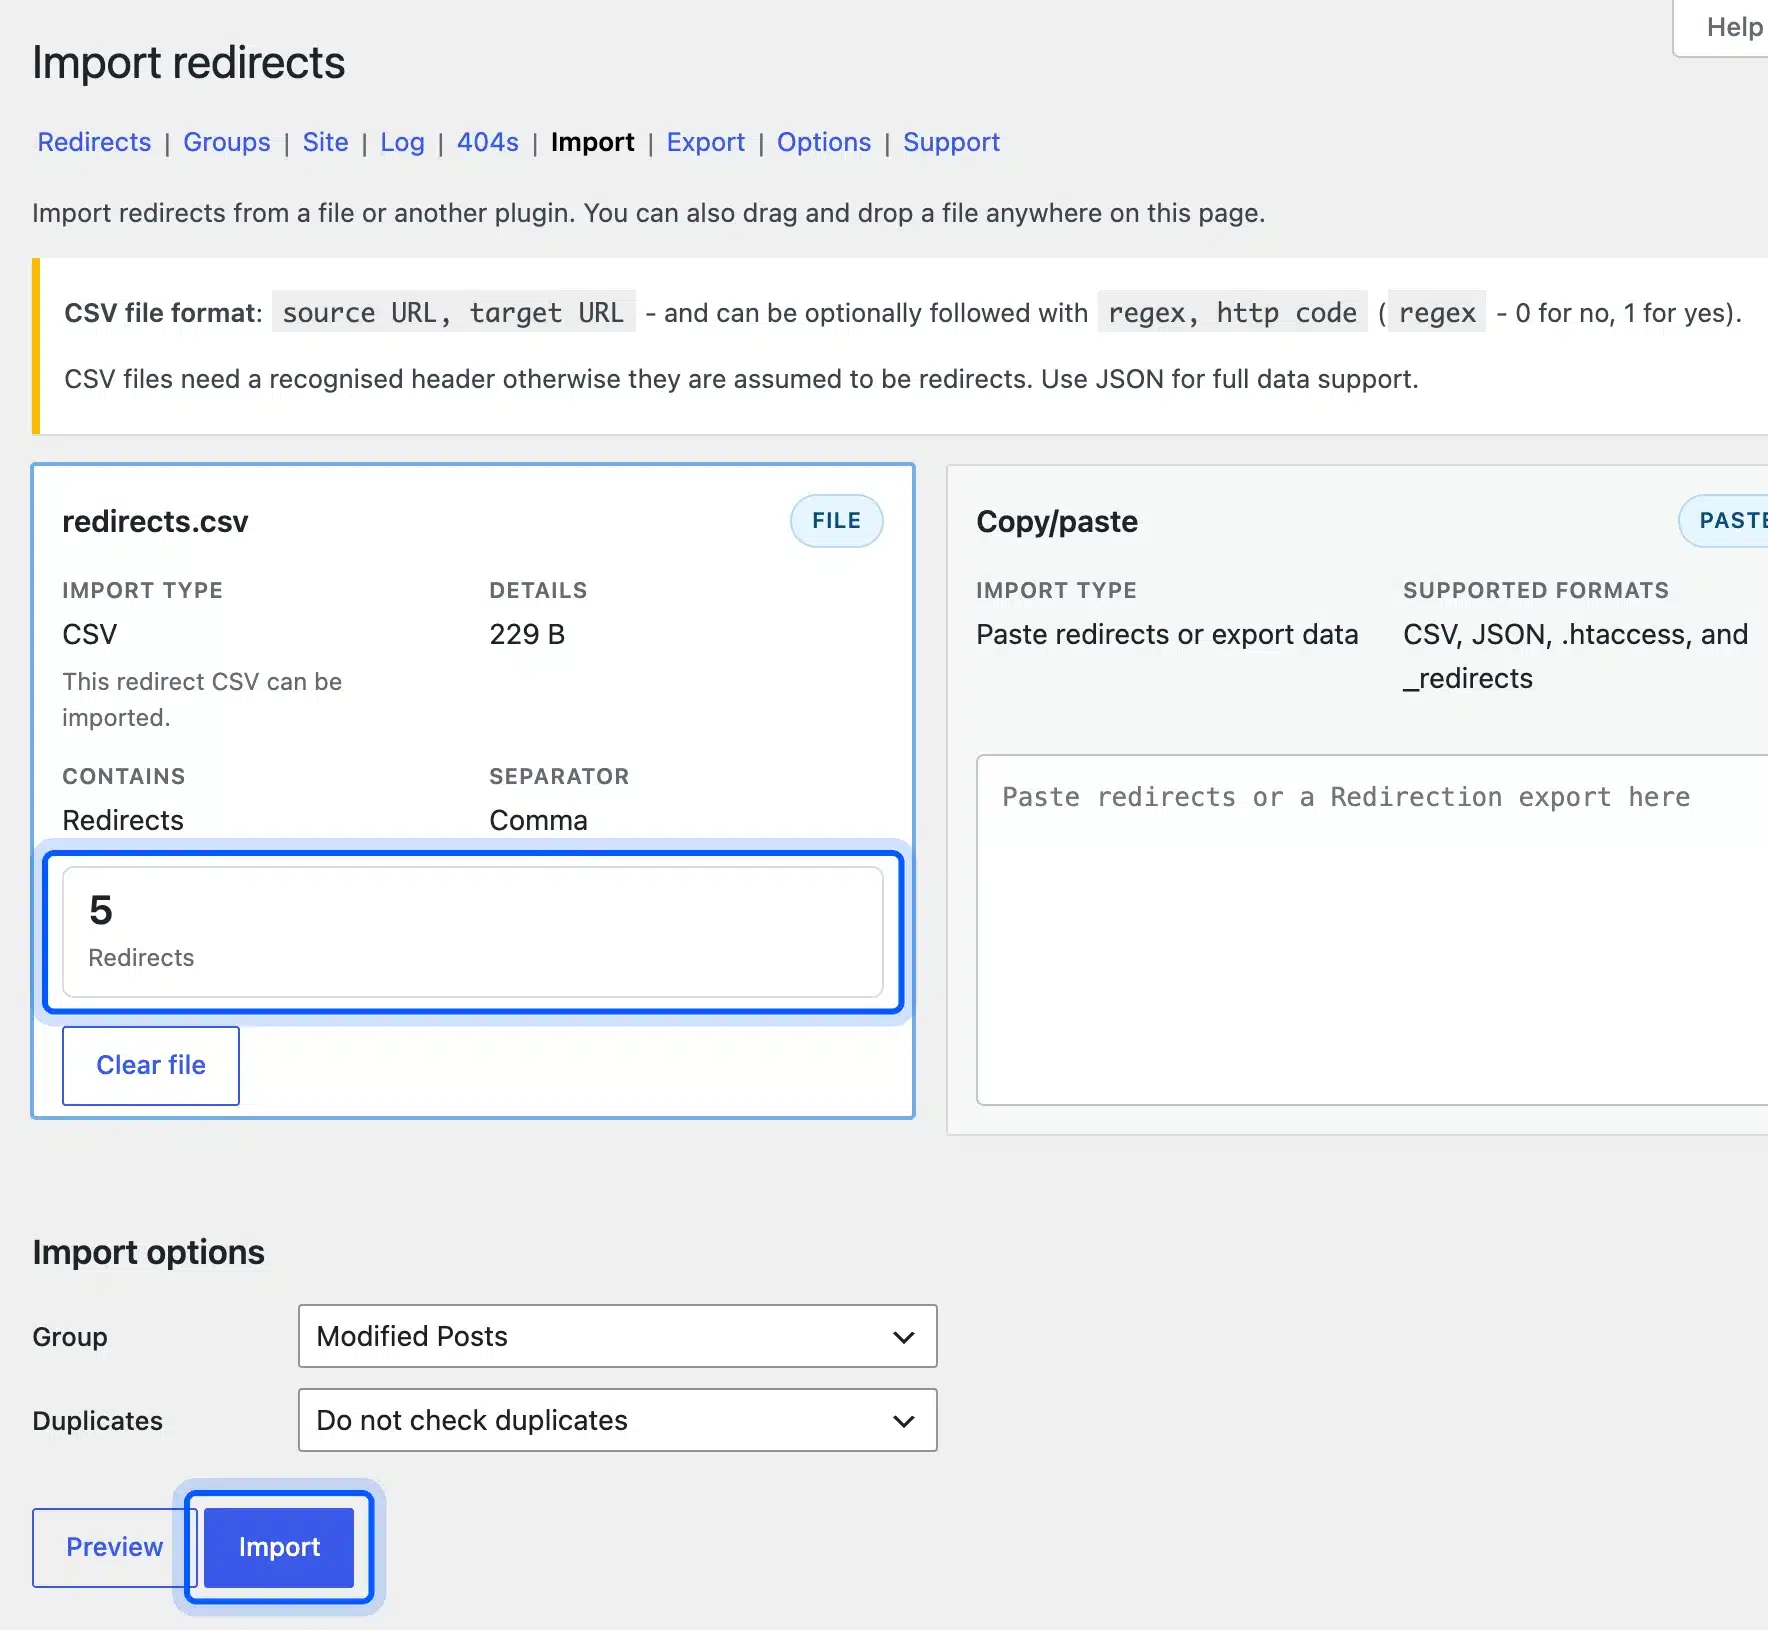
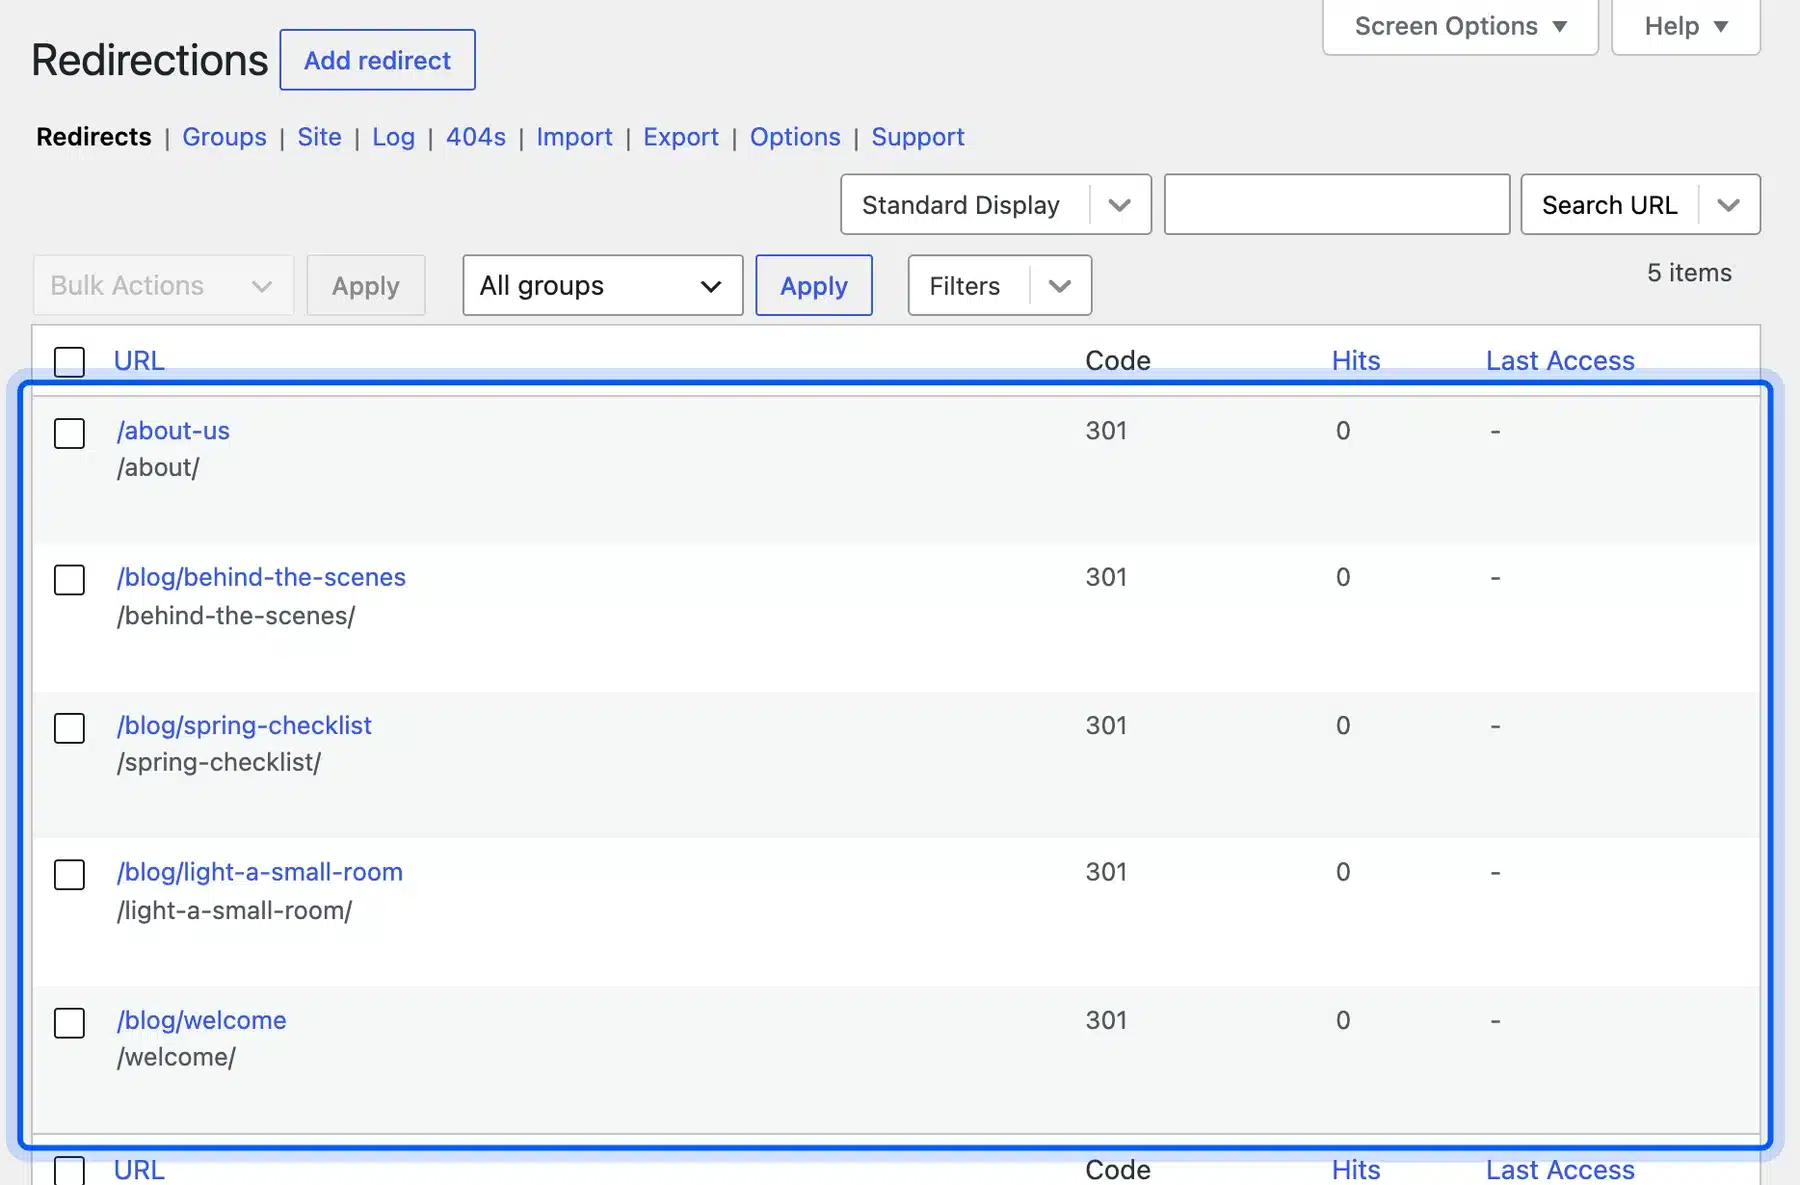
We used the free Redirection plugin, version 5.10.1. Its import screen accepts a CSV with the source URL, the target URL, a regex flag, and the HTTP code. Our five-row file used 301 for every row.
Say your old post lived at /blog/light-a-small-room and the new one lives at /light-a-small-room/. That is one row in the file. Repeat it for every post and page in your spreadsheet, and send each old address straight to its final page.
- Prepare the file: Put the old path in the first column and the new path in the second. Add 0 for regex and 301 for the code.
- Import the CSV: Open Tools > Redirection > Import and choose the file. The screen counted our five redirects before we clicked Import.
- Test the old URLs: Open each old address and check that it lands on the new one. We also checked the response headers, which showed 301 Moved Permanently from the plugin.
If your Squarespace blog posts live under a path like /blog/post-name, you can also match the old paths with a permalink structure. Set it up in Settings > Permalinks as our guide to pretty permalinks in WordPress shows. For single redirects, our post on redirecting a page or URL in WordPress covers the other options.
Step 8: Test the New Site and Switch Your Domain
Test the new site on a phone and a laptop before it goes live. Click through the menus, and check the images, the forms, and every redirect on your list.
Run through this checklist before you switch the domain:
- Search visibility: Open Settings > Reading and confirm the Discourage search engines box is unchecked. A box left ticked from the build stage asks search engines to stay away.

- Permalinks: Compare each new post address with the new column in your spreadsheet.
- Images: Open Media and check that the files sit in your own library.
- Redirects: Test the old URLs that got the most visits first.
When everything works, point your domain at the new host and then submit the new sitemap in Search Console. Our guide to submitting a website to Google covers that part. The next section covers the domain itself.
Worth checking: Keep Squarespace running until the new site is live. Squarespace says your service continues through the period you have already paid for. A short overlap costs little.
Migrate Squarespace Store Products to WooCommerce
You can migrate Squarespace to WooCommerce with a CSV file, because the XML file does not carry products. Squarespace lets you export products to a .csv file from the Products panel, up to 10,000 at a time. WooCommerce then reads that file through its own importer.
Squarespace’s product export page says product image alt text and some extra product information do not export. WooCommerce’s product CSV importer sits under Products > All Products > Import. It skips columns it does not recognize and cannot add alt text to product images.
Expect to edit the file before importing. Squarespace uses its own column layout. Match the columns to WooCommerce’s fields. We did not test a real Squarespace product file because that needs a paid Squarespace store.
If the store is large, our WooCommerce development services can set up the products, payments, and shipping for you.
How to Transfer Squarespace to WordPress Without Losing Your Domain
You can keep your domain in two ways. Leave it registered at Squarespace and change its DNS records to point at your new host, or transfer the domain away to a new registrar. Pick the first when you want the fewest moving parts.
Squarespace’s guide to editing your domain’s DNS records says a change can take 24 to 48 hours to update. Squarespace’s domain lock page says a transfer away becomes possible after the 60 day lock ends.
For a transfer, Squarespace’s transfer guide says you turn off the domain lock and request a transfer code. Squarespace emails the code to the domain contact and says it arrives within 24 hours. Give that code to your new registrar.
Cancel your Squarespace subscription last. Our post on moving a WordPress site to a new domain helps if the address also changes.
How Much Does It Cost to Migrate Squarespace to WordPress?
The WordPress software costs nothing. You pay for hosting, a domain, and any paid theme or plugin you pick, while the Squarespace plan stops once you cancel. The prices below are public figures we checked on 14 October 2026, and they change often.
Squarespace’s pricing page listed Basic at $25 a month billed monthly, and $19 a month on an annual plan. Core, Plus, and Advanced were $39, $65, and $139 monthly, and $29, $49, and $99 on annual plans. That puts Basic at $228 over a year of annual billing.
Hostinger’s WordPress hosting page listed its Premium plan at $2.99 a month on a 48 month term. That is $143.52 up front, and the plan renews at $10.99 a month.
Twelve months at the renewal price comes to $131.88. Other hosts price differently. Compare three before you buy.
Those figures leave out a premium theme, a form plugin, and a backup plan. WordPress also needs updates and security checks that Squarespace handles for you. Our WordPress care plan guide explains what that upkeep covers.
Problems We Hit After the Import
Three things caught us in testing, and each has a quick fix. They are the image links, the author role, and the draft content that never exports. Check all three before you launch, because none of them shows an error message.
- Images still point at the old address: The importer copies the tag and not the file. Step 5 fixes it.
- The imported author is a subscriber: WordPress creates a new author as a subscriber. Reassign the posts to an existing user, or raise the role under Users.
- Drafts and store pages are missing: Squarespace does not export drafts. Publish or copy them by hand before you cancel.
One more limit is worth knowing. We ran the importer on a file we wrote ourselves. It has far fewer blocks than a real Squarespace site. Formatting inside a long post can still look different. Open your biggest posts and read them before you launch.
Conclusion
To migrate Squarespace to WordPress, export the XML file, import it, move the images, rebuild the design, and redirect every old URL. The export is the short part. The image links, the redirects, and the store take the real time.
Keep Squarespace live until the new site passes your checklist. A Squarespace to WordPress migration done in that order keeps your pages, your links, and your search traffic intact. If you want a hand with it, our WordPress migration services handle the whole move.
Frequently Asked Questions (FAQs)
Q1. Can I migrate my Squarespace site to WordPress myself?
Yes, if your site is mostly a blog and pages. You export an XML file, import it with the WordPress Importer, and fix the images and redirects. A store or a custom design needs more rebuilding, which is where help pays off.
Q2. Will I lose my search rankings when I move?
Rankings can dip during any site move. Google’s guidance for a move is to map every old URL to a new one and use permanent redirects, as Google’s site move documentation explains. Keep them for at least a year.
Q3. Does the Squarespace export include my images?
Squarespace exports image blocks, but a self-hosted WordPress import may not bring the files. Squarespace’s export page says the image links can break after you cancel. Pull the images into the Media Library first.
Q4. How long does the move take?
It depends on how much you rebuild. Squarespace says an export can take a few minutes. Its DNS records guide says a DNS change can take 24 to 48 hours to settle.
Q5. When should I cancel Squarespace?
Cancel after the new site is live and the images load from your own domain. Squarespace says a canceled plan keeps working through the period you already paid for, per its pricing FAQ.
Q6. Where do I find my Squarespace sitemap?
Add /sitemap.xml to your domain, as Squarespace’s sitemap help page shows. Your site must be set to Public for the sitemap to load.