How to Set Up Venmo in WordPress and WooCommerce

In today’s digital world, providing multiple payment options is crucial for any business. Customers increasingly expect convenient, fast, and secure ways to complete transactions online.
One payment method that has gained popularity, especially among younger users, is Venmo. If you’re looking to stay competitive, learning how to set up Venmo in WordPress and WooCommerce is a great step toward meeting your customers’ needs.
This detailed guide will explain how to set up Venmo in WordPress and WooCommerce, ensuring a smooth and efficient integration for your online store.
Why You Should Add Venmo to Your WooCommerce Store

Setting Up Your WordPress Site
Before we discuss how to set up Venmo in WordPress and WooCommerce, it’s essential to ensure your WordPress site is properly configured. For guidance on setting up WordPress using Local WP, check out this helpful guide.
Benefits of Integrating Venmo with WooCommerce
Before we jump in on how to set up, let’s take one minute to make sense of why adding Venmo with WooCommerce is a perfect idea.
- Payment Options: The more payment options, the better the conversion rates. Venmo is an extremely popular service among younger mobile-first customers.
- Better Customer Experience: Venmo is seamless and mobile-friendly, which is a huge advantage in the current hypermobile eCommerce landscape.
- Better Customer Experience: Customers will be able to share purchases with their friends through Venmo, so your store will be exposed to their social circles, and they will be able to access your store through other means.
- Security and Trust: Since PayPal owns Venmo, it is a secure and trustworthy service, and many customers consider this factor when making their decisions about using a payment system.
- Additional Sales Chances: Targeting fast-growing mobile payment users will provide you with more opportunities to increase sales, as they can shop via the most convenient payment method for them.
Let’s get into the step-by-step guide for installing Venmo to WordPress and WooCommerce.
How to Set Up Venmo in WordPress and WooCommerce: Step-by-Step Guide

Step 1: Prerequisites for Setting Up Venmo in WooCommerce
Before you start setting up Venmo in WordPress and WooCommerce, there are a few prerequisites you’ll need to ensure:
- WooCommerce Plugin Installed: First, ensure WooCommerce is installed and functioning properly on your WordPress website.
- PayPal Business Account: Since PayPal owns Venmo and processes Venmo transactions, you’ll need a PayPal Business account.
- SSL Certificate: An SSL certificate is necessary for secure transactions. All payment gateways, including Venmo, require SSL encryption for processing payments.
- WooCommerce PayPal Payments Plugin: To enable Venmo, you must install the WooCommerce PayPal Payments plugin.
Once you’ve established these, you’re ready to follow the steps to set up Venmo in WordPress and WooCommerce.
Step 2: Install the Payment Plugins Braintree For WooCommerce Plugin
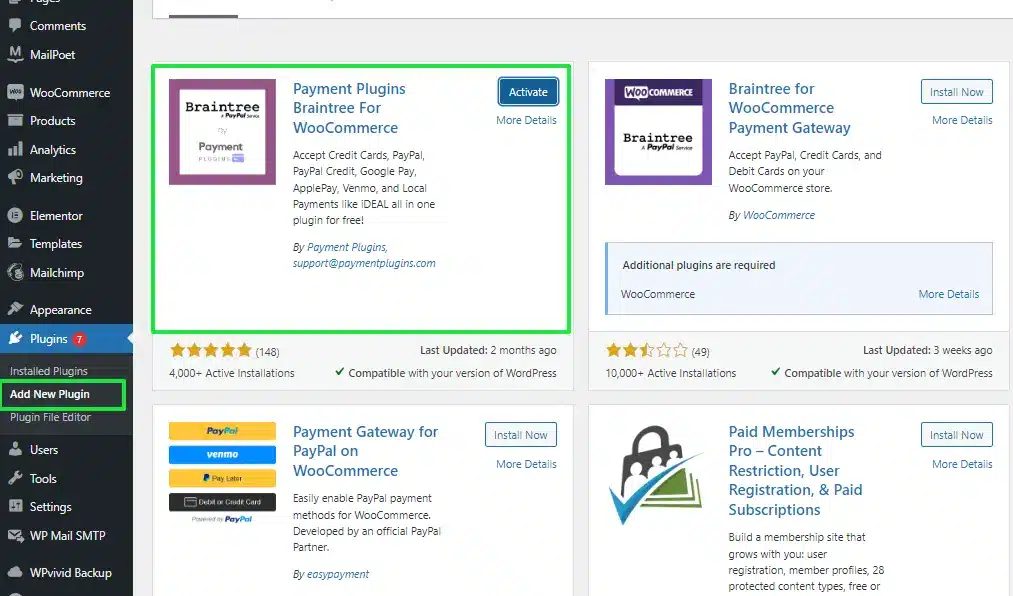
To set up Venmo in WordPress and WooCommerce, you need to install the Payment Plugins Braintree For WooCommerce plugin, which enables Venmo as a payment option.
- Go to your WordPress dashboard and click on Plugins → Add New.
- Search for WooCommerce PayPal Payments.
- Click Install Now on the WooCommerce PayPal Payments plugin, then click Activate.
This plugin allows you to integrate PayPal, Venmo, and other payment methods, setting the foundation for setting up Venmo in WordPress and WooCommerce.
Step 3: Configure PayPal and Enable Venmo

After activating the Payment Plugins Braintree For WooCommerce plugin, the next step is configuring it to enable Venmo.
Enable Venmo from Braintree Gateway → Settings from your WordPress admin dashboard.
- Navigate to WooCommerce → Settings.
- Click on the Payments tab and find PayPal Payments. Click Manage to begin configuration.
- Connect your PayPal Business account by clicking the Connect to PayPal button. Log in to PayPal and allow the necessary permissions.
- Scroll down to the Payment Methods section, where you will find the Venmo option. Toggle it to enable Venmo for your WooCommerce store.
- Next, go to General Settings and fill in the details to set up your Venmo Gateway.
- After that, you can save your changes by clicking on the Save Changes button at the bottom of the page.
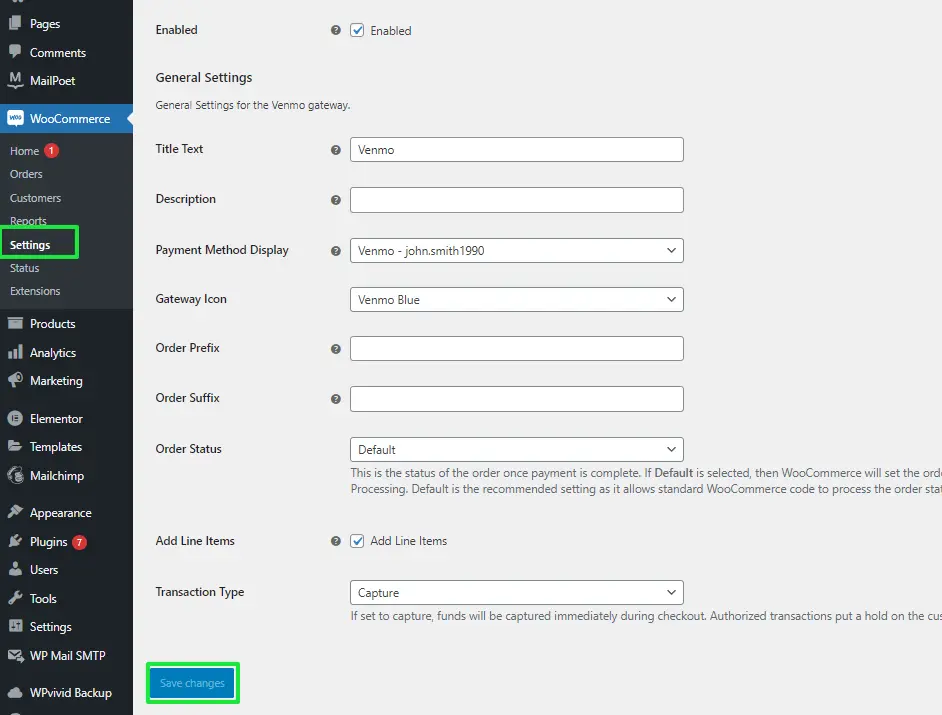
Now that you’ve enabled Venmo, the next step is to set it up in WordPress and WooCommerce. This involves testing and customizing the payment option for a seamless user experience.
Step 4: Test Venmo as a Payment Option
Once you’ve set up Venmo, testing it to ensure it works correctly for your customers is crucial.
- Go to your online store and add a product to your cart.
- Proceed to checkout and check if the Venmo option appears alongside PayPal (Venmo typically appears on mobile devices).
- Test the Venmo payment option to ensure that transactions are processed smoothly.
Testing the functionality after setting up Venmo is vital in confirming that you’ve correctly learned to set up Venmo in WordPress and WooCommerce.
Step 5: Customize the Venmo Button Appearance
You can customize the appearance of the Venmo button to better align with your store’s branding.
- Go to WooCommerce → Settings → Payments → PayPal and find the button layout customization options.
- Adjust the size, color, and shape of the Venmo button to fit your website’s design.
By customizing the button, you not only enhance your store’s aesthetics but also make it easier for customers to spot Venmo, reinforcing the idea of how to set up Venmo in WordPress and WooCommerce in a way that improves user experience.
Troubleshooting Common Issues When Setting Up Venmo
In case you find some of the common issues while installing Venmo in WordPress and WooCommerce, do not panic. Here are some of the troubleshooting tips:
- Venmo Not Show Up: Check the checkout setting. Ensure that you have enabled Venmo and that the PayPal links are proper.
- Transactions Fail: This will happen because your website has to run on HTTPS (SSL), which is required by payment gateways like Venmo to process payments.
- Mobile Optimization: Venmo is mostly used on a mobile. So, ensure your checkout process is mobile-friendly.
- Incomplete Transactions: There may be some problem with other conflicting WooCommerce add-ons or themes interfering with this payment processing.
- Venmo Button Visibility: Ensure that the Venmo button is properly configured in the WooCommerce PayPal Payments add-ons, and adjust your button layout options for higher visibility on checkout pages.
Solving the common issues for the smooth implementation of Venmo in WordPress and WooCommerce can overcome these problems.
Conclusion: How to Set Up Venmo in WordPress and WooCommerce
Adding Venmo to your WooCommerce store would provide even more flexibility and an improved user experience, reaching a large audience in the process.
This guide on how to set up Venmo in WordPress and WooCommerce will teach you everything from the initial setup to testing and promoting your preferred payment option.
Offering Venmo will enhance customers’ satisfaction and even improve sales. Monitor your performance and take any criticism seriously to ensure continuous improvement.
After you learn how to install Venmo on WordPress and WooCommerce, be prepared to implement it and give your customers the options they deserve.
FAQs
Can I use Venmo without a PayPal account?
No, you need a PayPal Business account, as all Venmo payments in WooCommerce are processed through PayPal.
Is Venmo available for desktop users in WooCommerce?
Yes, you can use it for both desktop and mobile devices.
Do I need an SSL certificate to accept Venmo payments on my WooCommerce store?
Yes, an SSL certificate (HTTPS) is required to ensure secure transactions.
Why is the Venmo payment option not showing on my checkout page?
Make sure you have enabled Venmo in the WooCommerce PayPal Payments plugin settings.
Are there any additional fees for using Venmo in WooCommerce?
Venmo transactions are processed through PayPal, so the fees associated with Venmo will be the same as PayPal’s standard transaction fees for your WooCommerce store. Always check PayPal’s latest fee structure for specifics.

Abhijit Sarkar
I am deeply passionate about creating engaging content and exploring. My journey includes gaining valuable experience in content writing and creating useful resources for my readers.
Leave a Reply