Adjustments made by hand help with exceptional cases, updates to customer information, and instances of customer service. Without manual adjustments, it would be impossible to provide customers with their point balances or rewards for extraordinary circumstances.
Using our WooCommerce Points and Rewards plugin, an administrator can make manual adjustments to a customer’s point balance. This how-to guide provides step-by-step instructions on creating and maintaining manual adjustments, both for individual customers and for multiple customers (bulk).
Reasons to Make Manual Adjustments #
There are many reasons for a business to make manual adjustments to a customer’s point balance.
The following are some common situations in which an admin could make manual point adjustments:
- Compensate customers for issues with orders or delays in receiving products
- Fix system errors or missed points in the system.
- Reward customers for participating in social media contests or posting on social media
- Remove points from a customer account that were earned through fraud or duplicate actions
- Move point balances from one loyalty program to another
- Correct loyalty program enrollment problems
- Recognize a customer for receiving excellent customer service
- Compensate a customer for an item that was out of stock or delayed
- Provide refunds with bonus points for future purchases
- Offer bonus point promotion opportunities
Why Should Your Company Care? #
Customers expect to be treated fairly and have their problems resolved quickly. Through manual adjustments, businesses can resolve problems that arise in the real world.
Without this capability, it can lead to unhappy customers and damage your business’s brand. Points represent the currency of your loyalty program and the ability to adjust them is a key area of ongoing control for your business.
Accessing the Manual Adjustment Tool #
If you are looking to create manual adjustments, you can do so from the Users section of your LoyaltyX Dashboard by following these steps:
- Go to WordPress Admin.
- Navigate to DevDiggers Plugins → LoyaltyX → Users.
- Click on the Manual Adjustment button.
- The system will display a wizard with steps to make point adjustments.
You will have two options to adjust points: Add or Deduct Points.
Step 1: Choosing Users & Points to Modify #
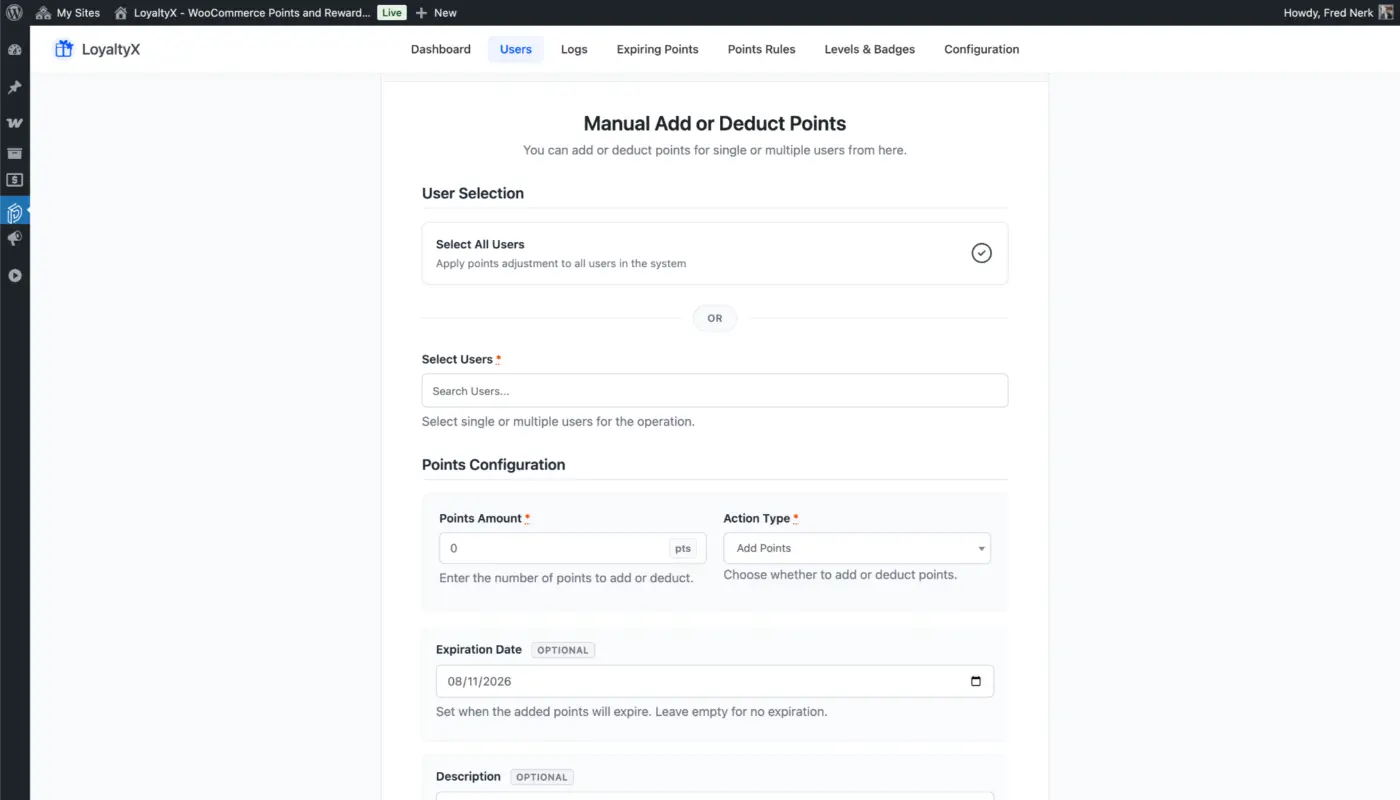
In order to make manual adjustments, the first step is to choose how you would like to modify the points for each user you wish to adjust.
Option A: All Users
- Toggle Select All Users.
- This will apply your manual point adjustment to all customers in your system.
- Use this option to make changes or promotions that affect all customers.
Example: Award all customers 50 points for our anniversary!
Option B: Specific Users
- Leave the Select All Users option unchecked.
- You can use the Search Users box to look up customers by name or email address.
- You will need to enter at least 1 character to filter (the search will be based on name and email).
- The results will be displayed as such: (#ID) Name.
- You can select multiple or single customers for your operation.
- This is useful when making corrections to targeted customers, such as “Award 100 points to john@email.com for providing a review about our product!“.
Configuration fields for managing points
- Point Amount (Required)
- Enter the point amount that you want to add or remove from the customer’s account.
- Only whole numbers can be entered (no decimals).
- Example values include: 50, 100 and 250.
- Points are displayed as “pts” for reference.
- Action Type (Required)
- Add Points: This line item will always add points to the customer’s point balance.
- Deduct Points: This line item will remove points from the customer’s point balance.
- A user cannot deduct more points than the customer currently has. This prevents a negative balance in the system.
- Choose this type of line item based on what you are actually doing (rewarding or correcting).
- Expiration Date (Optional)
- You will see a calendar to select an expiration date for the adjusted points in this section.
- The default date is the current date +1 day.
- The system automatically selects the expiration date if you do not provide one (leave it blank).
- This is helpful when a promotional bonus is set to expire.
- Example: “Award 100 points that expire on 12/31/2025 for Black Friday Promotion.”
- Description (Optional)
- For internal documentation (this appears on the customer activity log as well).
- The placeholder text in this section reads: “Manual adjustment for customer service”.
- Max character count: There is a limit to the reasonable length of this field. Some customer activity logs allow for more than 500 characters of text, while others do not.
- The description provides documentation about the reason for this adjustment.
- Examples:
- Compensating for late order #1234
- Birthday bonus awarded to the customer who celebrated with us.
- Credit from migration from the previous loyalty program.
- Points adjusted due to a syncing error within the system.
Step 2: Adjustment Process #
Once you’ve made your selections and completed your points input:
- Click the Start Adjustment button.
- You are taken to Step 2: Process Adjustment and the process will get completed in a batch.
- The system can handle an unlimited number of users.
Step 3: Complete #
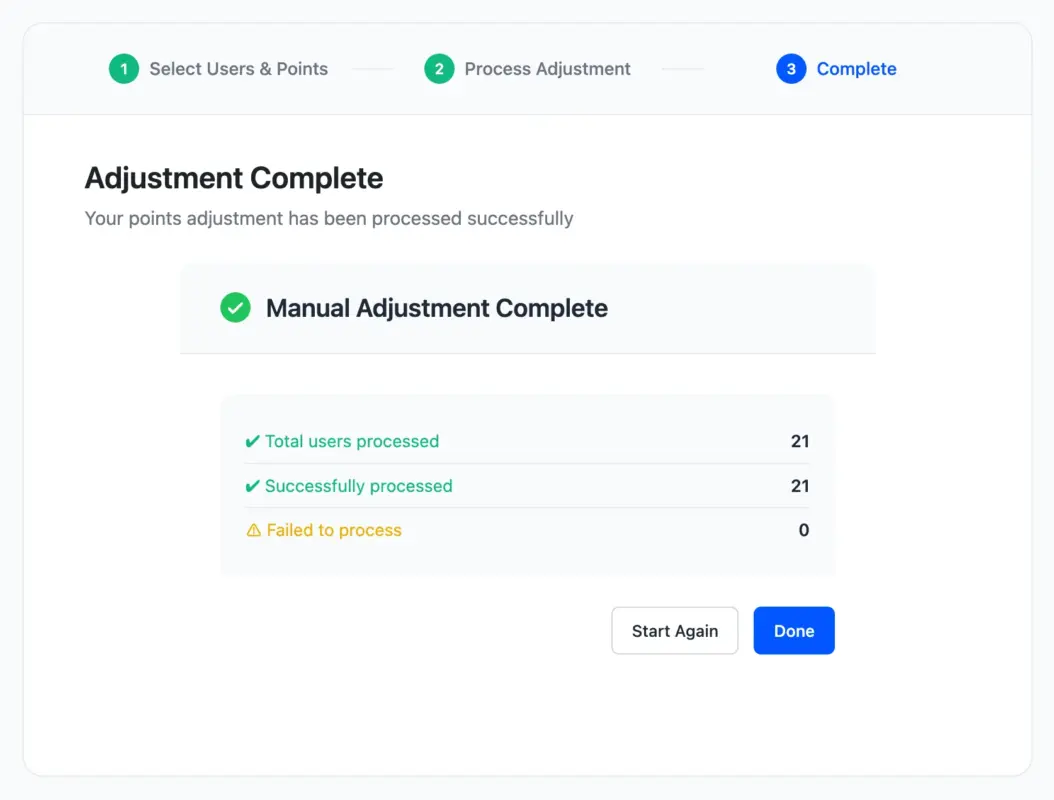
To complete your adjustment process, you will receive a Success notice that confirms the action taken, along with:
- The number of Users who received points as a result of the adjustment.
- The total number of points that were adjusted.
- This adjustment process will automatically add or remove points to/from the Loyalty account of the users involved.
- You will then receive a notification that the adjustment was completed successfully.
Logging and Audit Trail #
All Manual Adjustments are logged in the LoyaltyX platform.
Where are these logs?
- Adjustment logs can be located under DevDiggers Plugins → LoyaltyX → Logs.
- The logs will need to be filtered by “Manual Adjustment by Admin” under “Event type”.
Manual Adjustment logs have the following characteristics:
- ID – unique ID for the log entry
- User – customer name/ID of the user receiving the adjustment
- Points – number of points associated with the adjustment, green for add, red for deduct
- Event – shows as Manual Adjustment by Admin
- Description – from your notes
- Related ID – empty for manual adjustments (unlike order-based adjustments)
- Date/Time – exact date/time when the adjustment was performed
Next Steps #
Now You Have Manual Adjustments Set Up.
- Review your Usage – go to Logs → Manual Adjustment by Admin for corrections made.
- Plan Processes – Establish team guidelines for when/how to perform manual adjustments.
- Test – Test on small single-user adjustments before updating in bulk.
- Documentation Templates – Document standard descriptions for each scenario.
- Monitor Logs – Track your manual adjustments for any recurring activity.
Related Tutorials:
- How to View and Filter Activity Logs – Track how points are being moved in your program.
- How to Create Point Earning Rules – Facilitate Point Earning through automation and not through manual adjustments.
- How to Create Point Redeeming Rules – Give customers an opportunity to use their adjusted points.