You can run a pop-up shop with WooCommerce POS by installing a WooCommerce point of sale plugin, creating a dedicated outlet for your event location, assigning inventory, and processing in-person sales directly from your existing online store.
Having built and supported our MultiPOS – Point of Sale for WooCommerce plugin across thousands of WooCommerce stores, we’ve seen first-hand what separates a smooth pop-up from a stressful one. It’s almost never about the products. It’s about the setup.
Most guides out there cover the surface-level steps but skip the parts that actually trip people up, like pre-assigning stock to your pop-up location, scoping cashier permissions for temporary staff, or knowing exactly what happens to your orders when the venue Wi-Fi dies.
In this guide, you’ll learn how to prepare your WooCommerce store for in-person selling, configure your POS for a pop-up, handle offline selling with confidence, and turn the walk-ins you meet at the event into long-term online customers.
Why WooCommerce POS Is a Smart Choice for Pop-Up Selling?
Temporary retail spaces generate an estimated $80 billion in annual revenue globally, and 80% of retailers that have opened a pop-up shop consider it a success.
According to Capital One Shopping’s pop-up retail research, 66% of retailers open a pop-up with the goal of raising brand awareness, while 63% open one to improve customer connection.
The problem is that store owners set up a separate point of sale system for the event, which means two separate inventories, sets of orders, and a painful reconciliation process. The stock gets oversold on both channels because neither system knew what the other was doing.
A WooCommerce-native POS solves this cleanly. Your online catalog, stock levels, customers, and order history all live in one place. When a sale happens at the pop-up, it pulls from the same inventory your online store uses. There’s no manual syncing after the fact.
If you’re an online-only WooCommerce store owner, you don’t need a separate retail system. You need your existing WooCommerce store, a tablet or laptop, and the right WooCommerce POS plugin.
For a broader look at WooCommerce point of sale options, the best WooCommerce POS plugins roundup on our blog is a useful reference.
Before the Event — Setting Up Your WooCommerce POS for a Pop-Up
This is where most guides fall short. They jump straight to “open the app and start selling.” But the 30 minutes you spend on setup before the event day saves hours of problems on the day of the event. Here’s what you need to do.
Step 1: Create a Dedicated Pop-Up Outlet
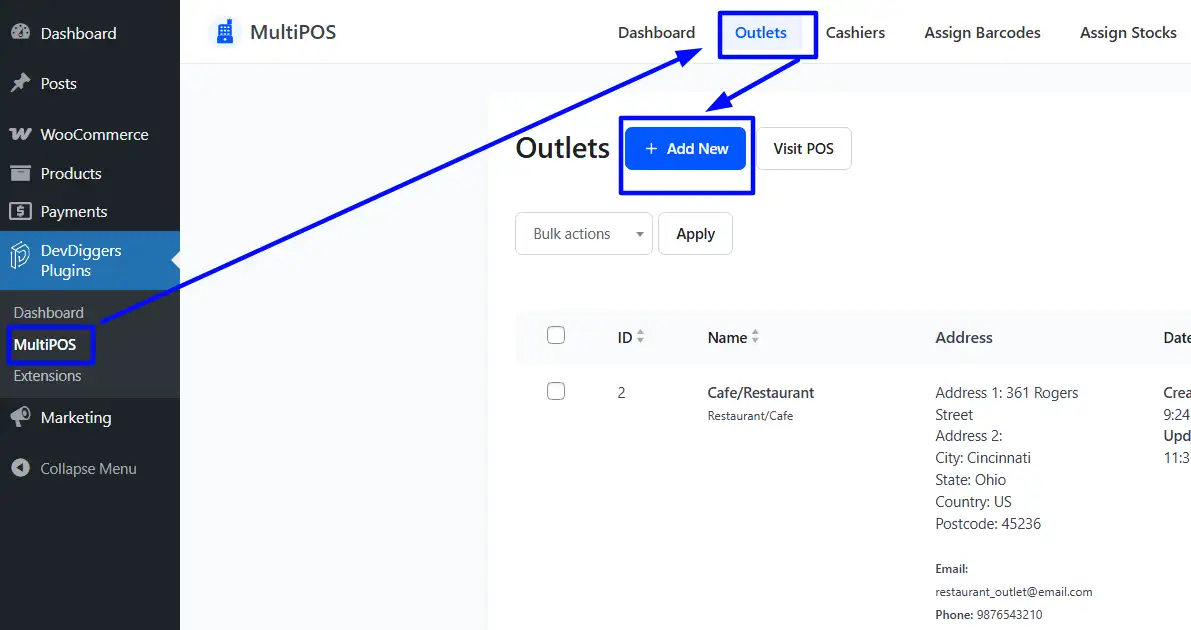
In MultiPOS, every physical location where you sell is treated as an outlet. It determines which inventory the cashier sees, which invoice template prints, and which sales data shows in your reports.
For a pop-up, create a new outlet specifically for the event. Name it something clear, like “Summer Market 2025”. Don’t reuse a permanent store outlet for a temporary event because you want clean and separate data.
To create an outlet in MultiPOS, go to MultiPOS → Outlets → Add New. Set the outlet type to retail or restaurant, assign the outlet’s stock source, and save.
Step 2: Assign Stock to Your Pop-Up Location
If you’re running the pop-up while your WooCommerce store is still live and accepting online orders, centralized stock means a customer can buy your last three items online while you’re trying to sell the same stock at the event. That’s the most common situation for everyone.
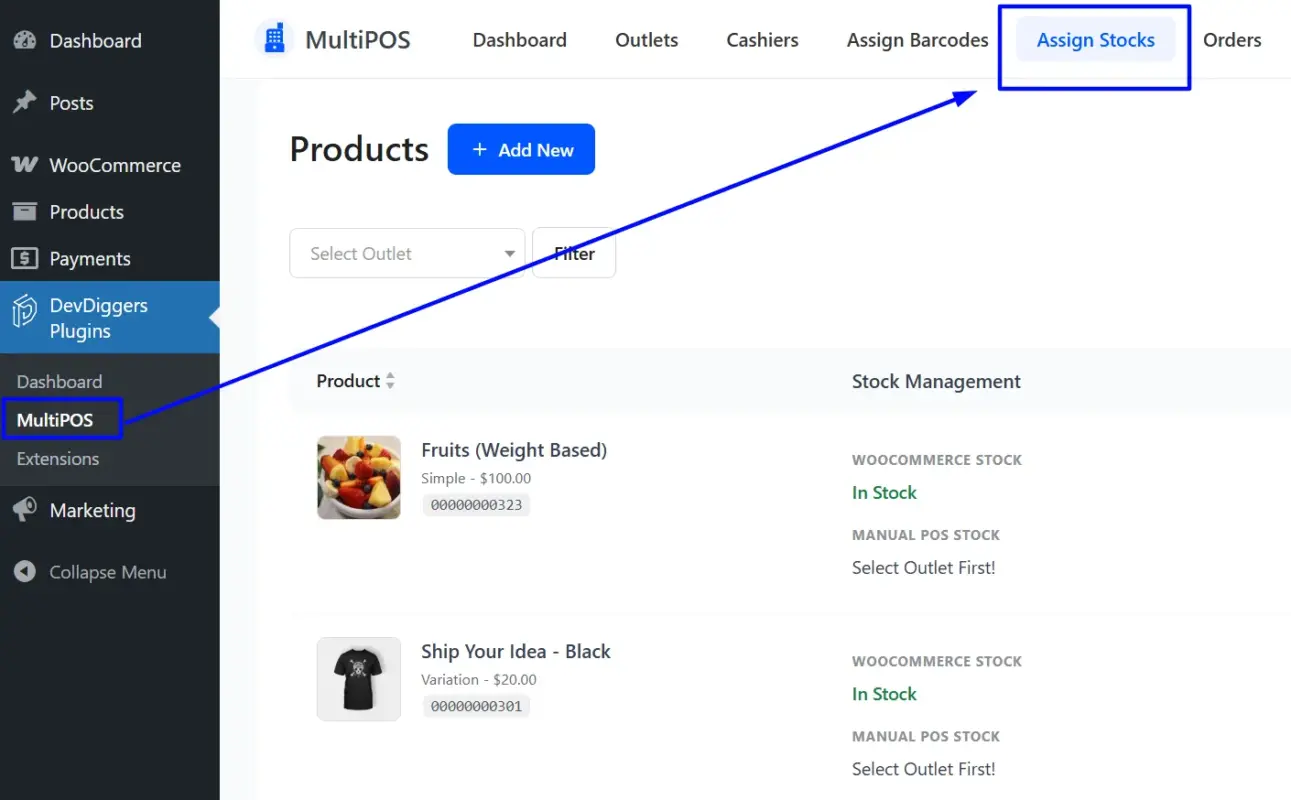
The solution is to assign outlet-specific stock to your pop-up location. In MultiPOS, go to MultiPOS → Assign Stocks, select your pop-up outlet, and set a fixed quantity per product. This creates a stock ring-fence for the event. Your online store runs on its own inventory. Your pop-up runs on its own. No crossover, no conflicts.
If you’re not selling online during the event, choose to pause their shop or mark products as backordered. Centralized stock works fine and is simpler to manage.
Step 3: Set Up Cashier Accounts and Permissions
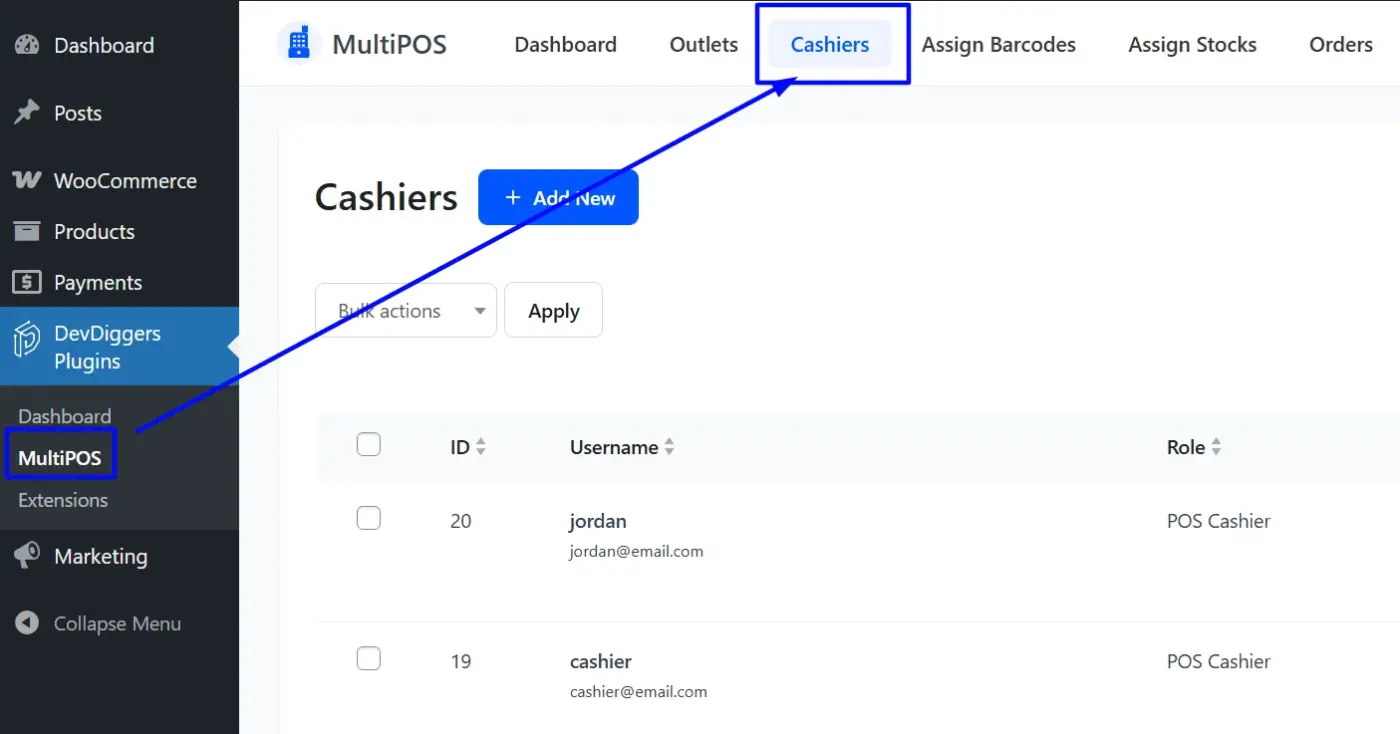
MultiPOS has a dedicated cashier role. Create a cashier account, assign it to your pop-up outlet, and that person can only access the POS terminal for that specific location. They can’t see other outlets, edit products, or access your backend orders.
To add a cashier, go to MultiPOS → Cashiers → Add New, set the role, and assign the outlet. They log in through the POS URL, not the WordPress dashboard.
Before you arrive at the venue, make sure the items you’re selling at the pop-up have SKUs assigned and are set to In Stock with the correct quantity for your pop-up outlet. If you’re selling product variants, check that all active variations are visible in the WooCommerce product editor.
Refer to the guide on the best WooCommerce plugins for your store if you want ideas on supporting tools to have in place before your event, including loyalty plugins and wallet management.
Choosing and Configuring Your POS Hardware
You don’t need a lot of hardware to run a pop-up. But you do need the right combination for your setup. Here’s how to think about it.
Minimum Viable Setup for a One-Day Pop-Up
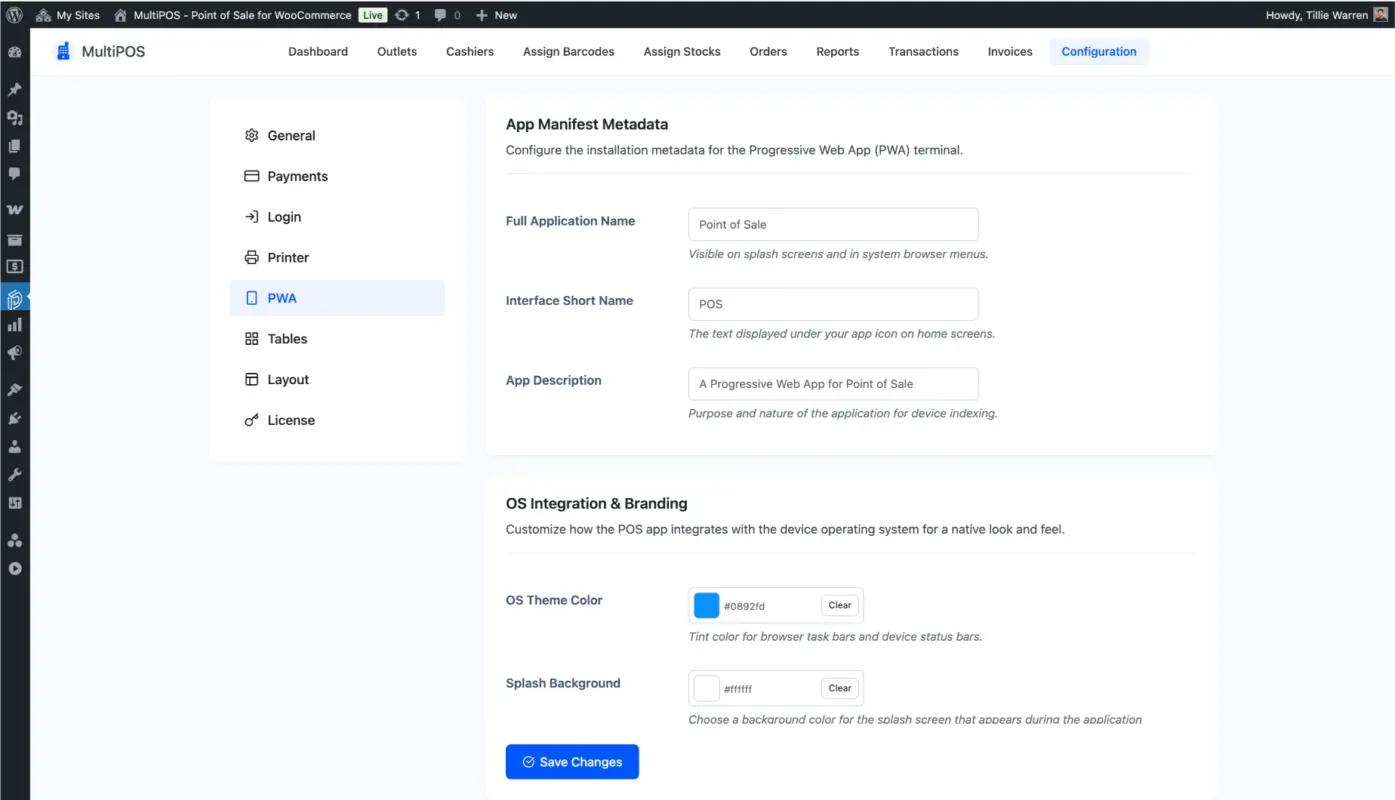
MultiPOS runs in the browser and can be installed as a Progressive Web App on any device. It behaves like a native app full screen, no browser chrome, fast. There’s no app store download required.
If you expect high volume or a queue at any point, add a USB or Bluetooth barcode scanner. Scanning a barcode to add a product to the cart is far faster than searching by name, especially when there’s a line of customers waiting.
Receipt Printers and Cash Drawers
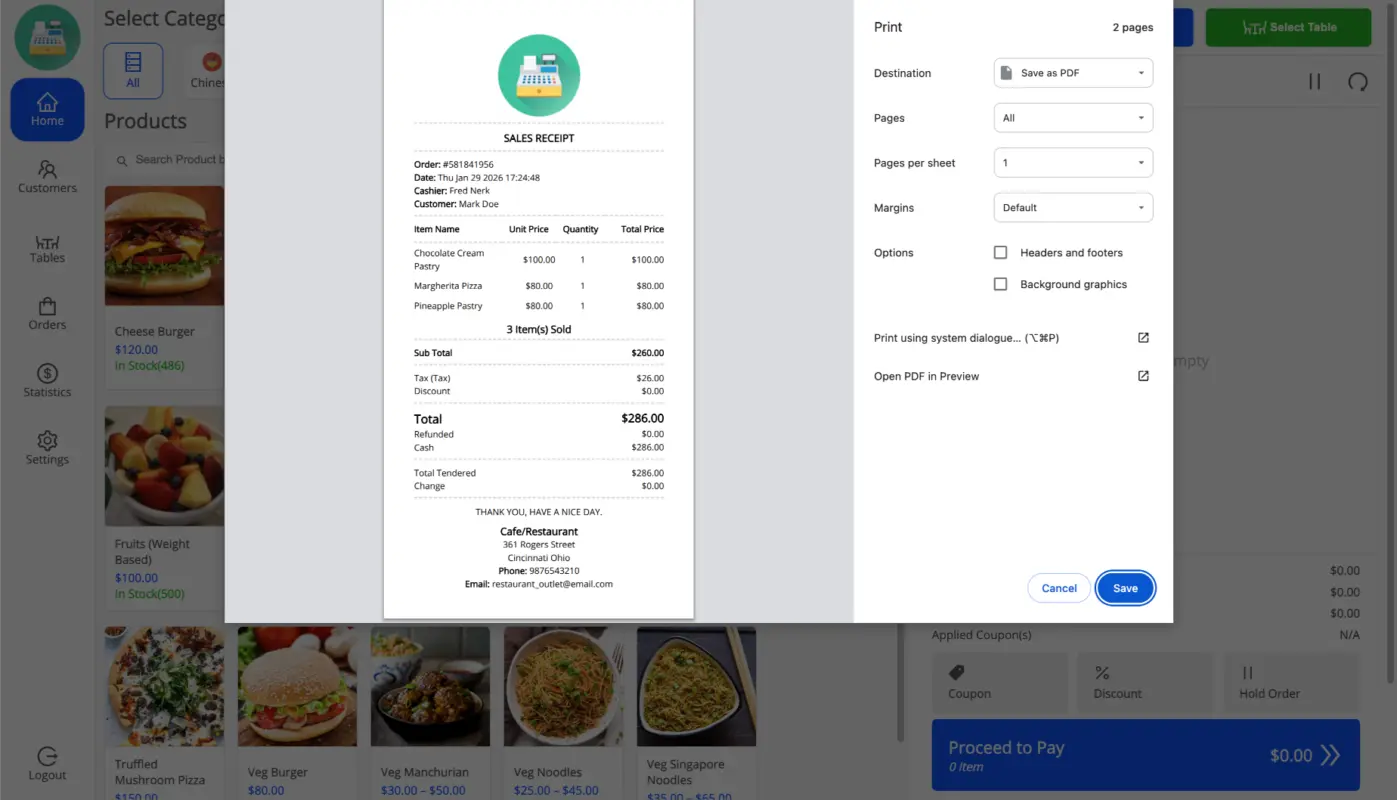
MultiPOS supports 80mm and 58mm thermal receipt printers via ESC/POS protocol. Most common thermal printers work out of the box. If you’re using a cash drawer, it typically connects through the printer, so the drawer opens automatically when a cash sale is completed.
For a pop-up, a compact Bluetooth thermal printer is practical. It doesn’t need a cable running across your table, and most models run on battery for several hours.
Multi-Day or Multi-Register Events
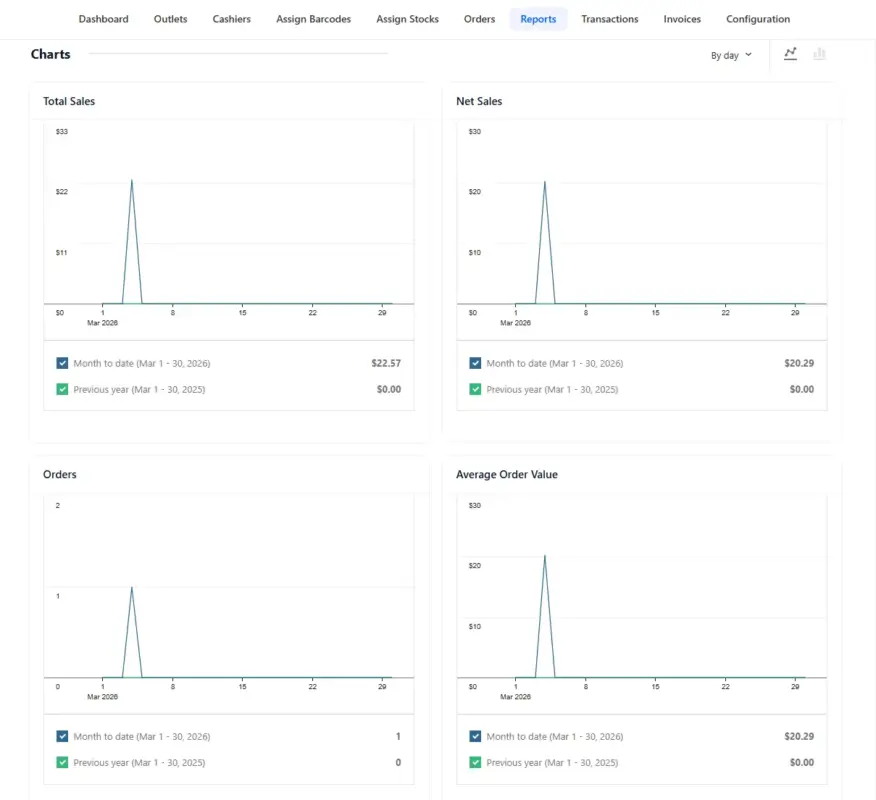
If your pop-up runs for several days, or you’re running two registers at the same time, install MultiPOS on each device and assign both to the same outlet. Each device runs independently. You can see consolidated sales for the outlet in your reports section, with individual cashier breakdowns showing who processed what.
How to Handle Offline Selling at a Pop-Up Shop
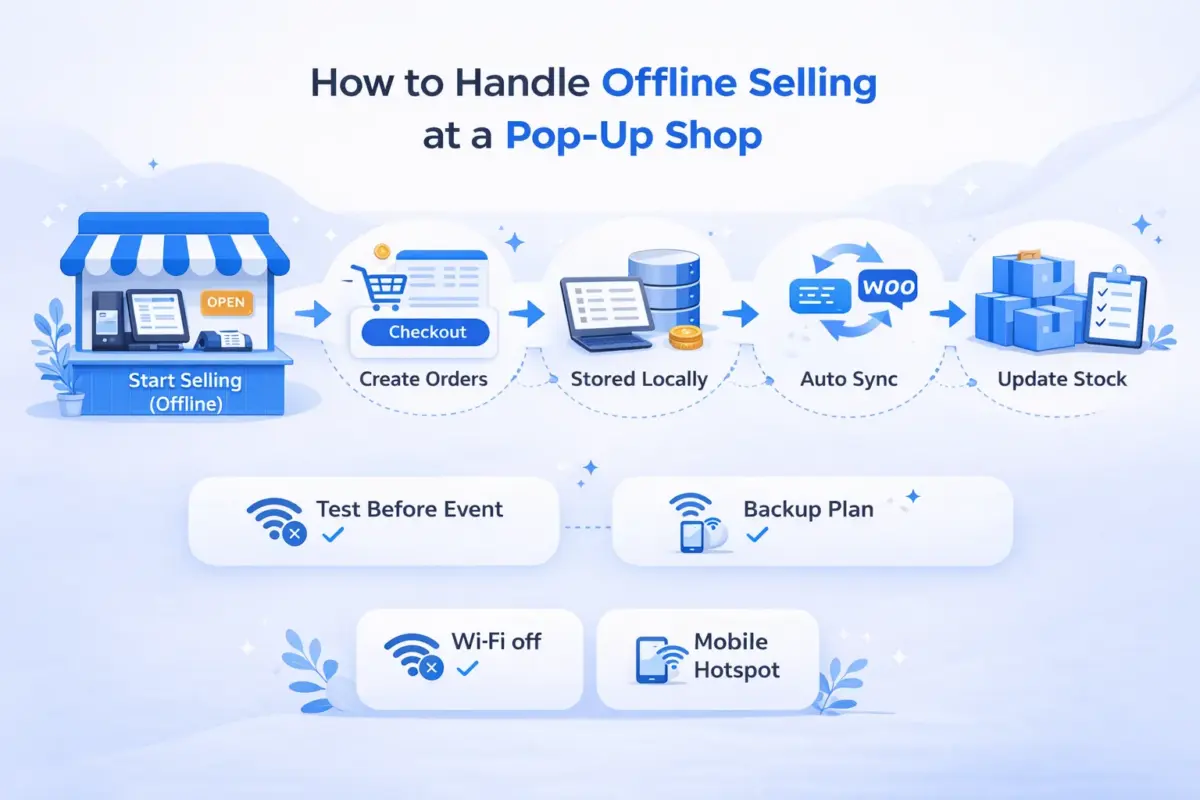
This section deserves more attention than most guides give it. Offline mode isn’t a nice-to-have. For pop-ups, it’s a necessity. Event venues, farmers’ markets, craft fairs, and temporary retail spaces often have unreliable Wi-Fi or no Wi-Fi at all.
What Actually Happens When the Internet Drops
When MultiPOS loses its internet connection, the POS continues working. The interface doesn’t freeze. Products still load from the local cache. You can add items to the cart, apply discounts, accept cash payments, and complete orders.
Those offline orders are stored locally on the device. When the connection comes back, they sync to WooCommerce automatically. Stock levels update, order records appear in your WooCommerce dashboard, and everything reconciles without you doing anything manually.
How to Test Offline Mode Before Event Day
Don’t test this for the first time at the event. The night before, open MultiPOS on the device you’re bringing, load your products so they’re cached, then turn off the Wi-Fi on that device. Place a test order. Complete the checkout. Then reconnect to Wi-Fi and confirm the order synced to WooCommerce.
This takes five minutes and tells you exactly how your setup behaves when connectivity drops. If something doesn’t sync correctly, you want to find out at home, not at the venue.
Backup Plan
Carry a mobile hotspot. A 4G or 5G mobile hotspot costs very little to run for a day and gives you reliable connectivity independent of the venue’s infrastructure. If the venue Wi-Fi fails completely, flip to the hotspot and you’re back online within seconds.
Tips to Run Sales Smoothly on the Day
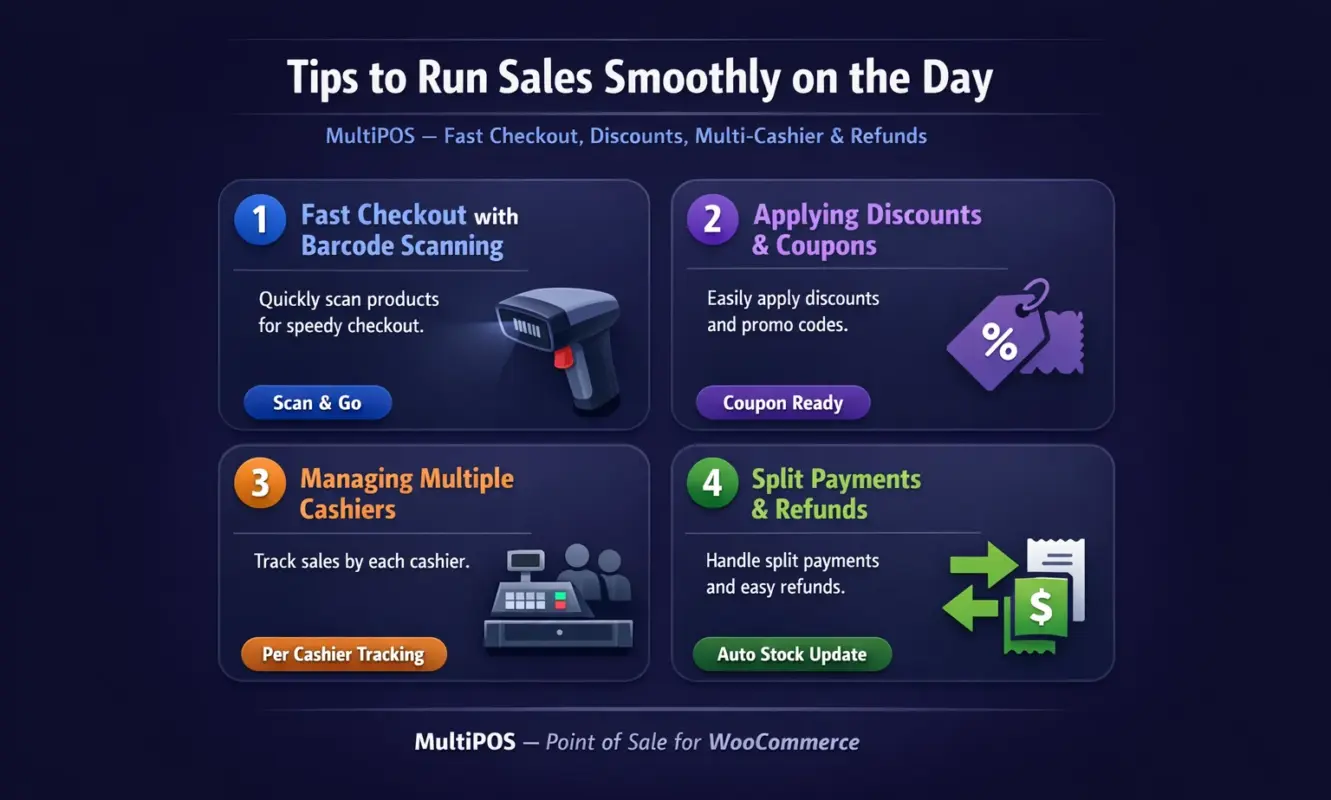
With the setup done, the event day should be straightforward. Here’s how to keep the checkout experience fast and the queue moving.
1. Fast Checkout with Barcode Scanning
If your products have SKUs and you have a barcode scanner connected, the fastest workflow is to scan the item, confirm quantity, take payment, and print or email a receipt. MultiPOS handles barcode scanning via any USB or Bluetooth HID scanner.
MultiPOS lets you create a custom product on the fly directly from the terminal. Set the name, price, and tax, and it processes like any other item.
2. Applying Discounts and Coupons at the POS
MultiPOS supports both cart-level discounts and WooCommerce coupon codes. You can apply a coupon code at checkout the same way a customer would online. The discount is calculated in real-time and shows on the receipt.
You can set a discount approval rule requiring manager override for anything above your set threshold. This is useful when you have temporary staff at the till who you don’t want giving away the margin.
3. Managing Multiple Cashiers at Once
Each cashier logs into their own session under their assigned account. Transactions are tracked per cashier, so your end-of-day reports show exactly who processed what, total sales per cashier, and payment method breakdowns.
MultiPOS also supports a Fast Sales mode where you can skip customer selection and go straight to a quick checkout. Useful for high-traffic moments where stopping to search for a customer profile would slow everything down.
4. Handling Split Payments and Refunds
MultiPOS supports split payments across multiple methods on a single order. The terminal stays open until the full amount is collected, showing the remaining balance after each partial payment.
Running a food or drinks stall as part of your pop-up? The same workflow applies, with table management added. Check out the guide on WooCommerce POS for restaurants for how table orders, kitchen displays, and dine-in management work within the same plugin.
After the Pop-Up — Reconciling Sales and Turning Walk-Ins into Customers
The pop-up is over. Now the work that most guides don’t cover begins. This phase is where you either extract lasting value from the event or let it fade into a box of unsold stock and a rough mental total of what you made.
Reading Your Outlet-Specific Sales Report
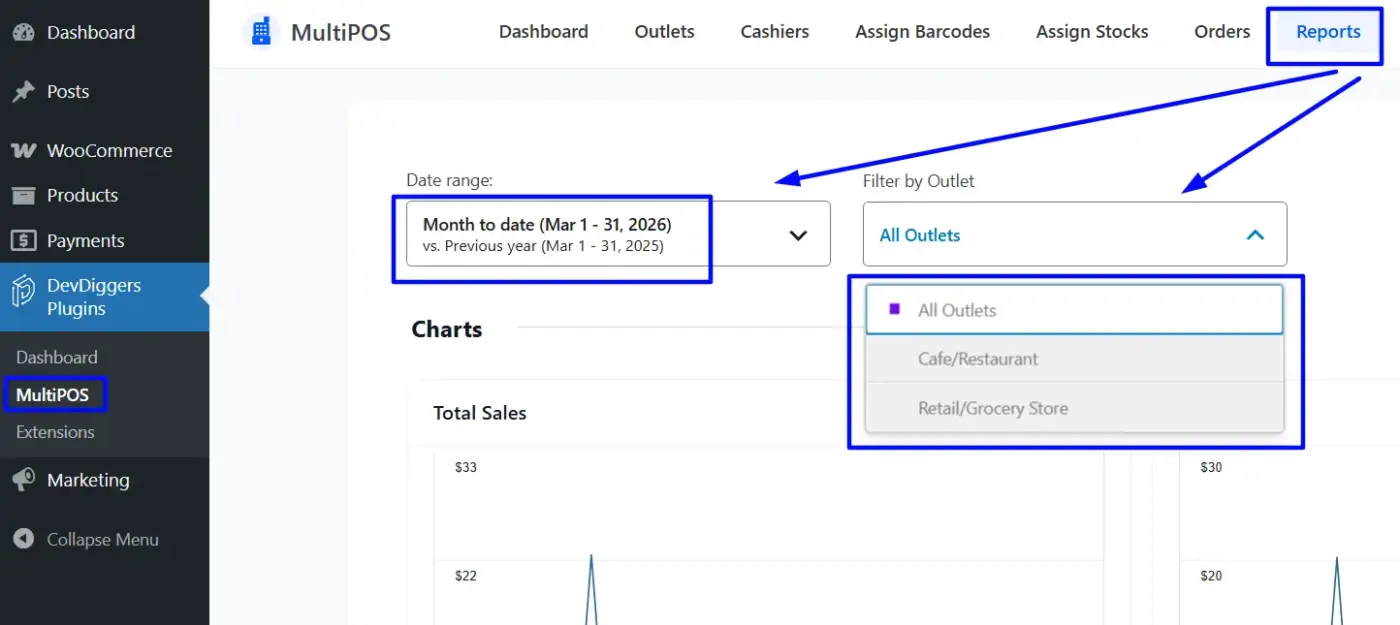
In MultiPOS, go to MultiPOS → Reports and filter by your pop-up outlet and the event date range. You’ll see total revenue, top products by quantity and value, payment method breakdown, and cashier-level performance if you have multiple staff.
Look at your top five products by revenue. If two or three items drove the majority of your sales, that’s your signal for what to feature prominently at the next event or what to push harder online.
Reconciling Cash and Card Payments
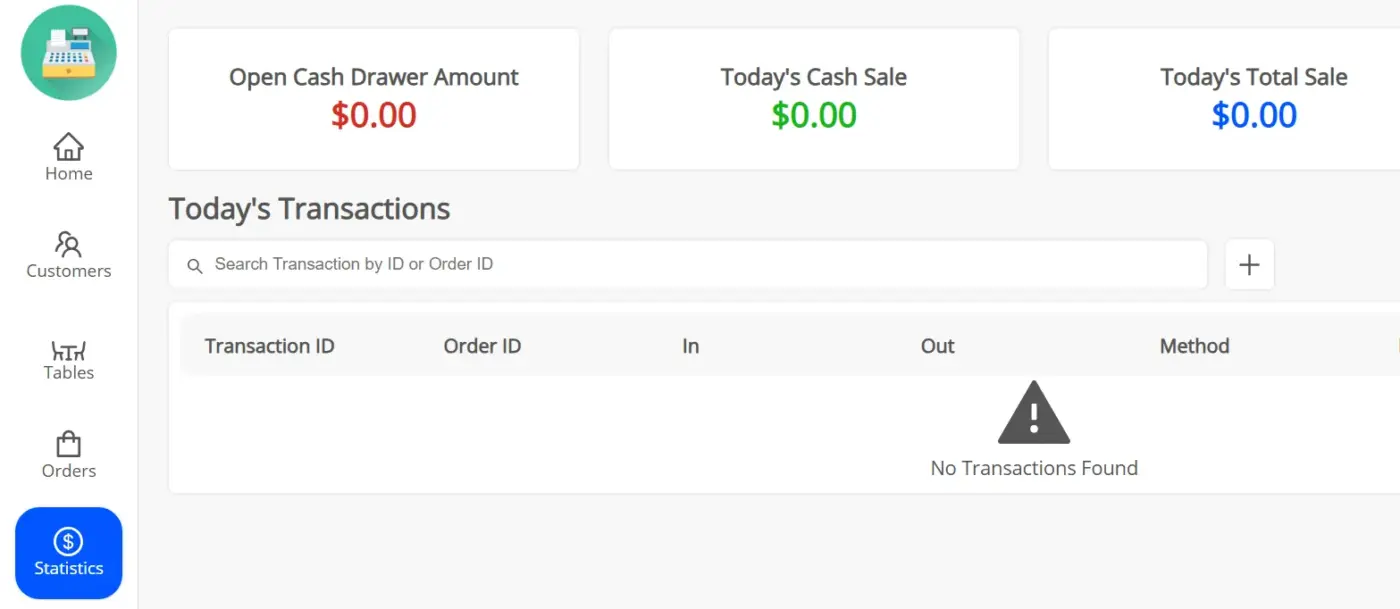
Open the cash drawer log in MultiPOS for your pop-up outlet. This shows your opening balance, every cash transaction during the event, and the expected closing balance. Count your physical cash against that figure. Any difference points to either a missed transaction or a pricing error during the event.
Card payments should match your payment provider’s settlement report. Cross-referencing these two figures gives you a clean end-of-day reconciliation. Do this the same evening as the event while the details are fresh.
Using Customer Data for Online Re-Engagement
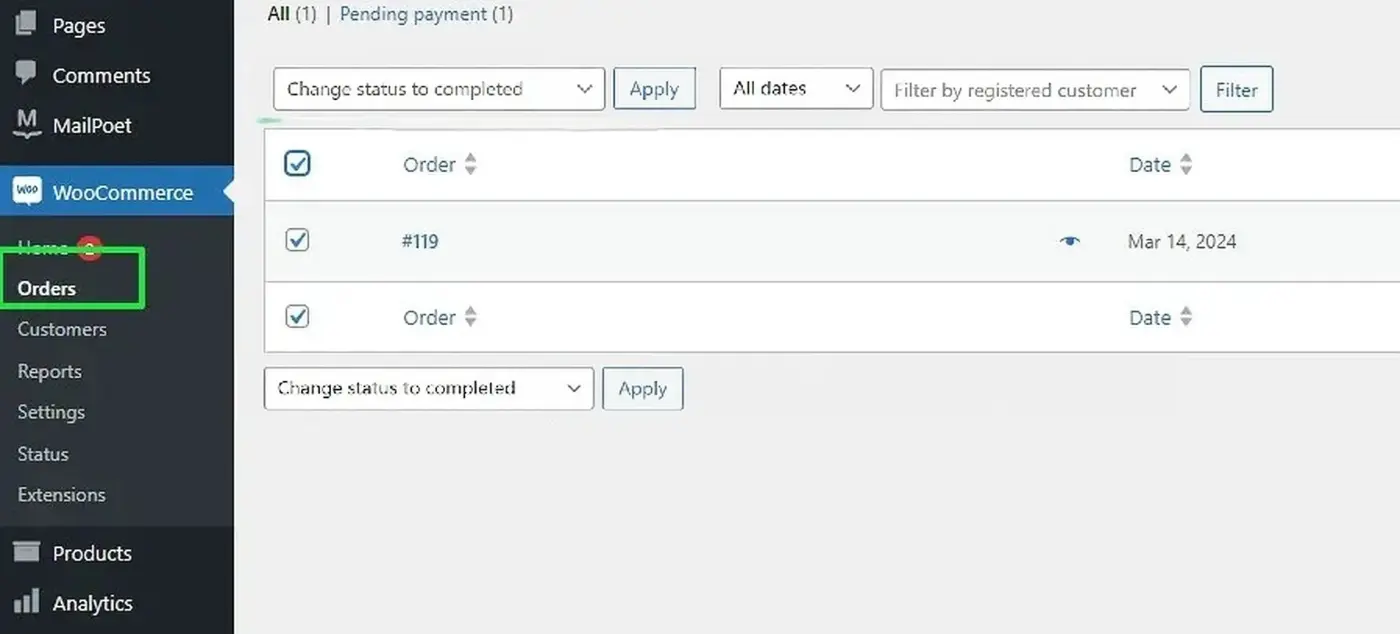
If you assigned a guest checkout to walk-in customers during the event, those orders still contain valuable product data. Use your WooCommerce order section to understand what people bought when the price was visible, and the product was in their hands. It’s one of the most honest signals you can get about what resonates.
After the event, send a follow-up email. Thank customers for visiting. Offer a discount on their first online order. A well-timed follow-up within 48 hours of the event, while the experience is still fresh, converts far better than a generic newsletter sent three weeks later.
Conclusion
Running a pop-up shop with WooCommerce POS comes down to three things: setting up your outlet and inventory correctly before the event, running a fast and reliable checkout on the day, and extracting useful data after it ends.
The biggest advantage of using a WooCommerce-native point of sale is that your online store and in-person sales live in the same system from day one. No duplicate catalogs. No manual stock reconciliation. No guessing which channel sold what.
If you’re ready to run a pop-up shop with WooCommerce POS, our MultiPOS – Point of Sale for WooCommerce plugin handles all of it: outlets, cashiers, offline mode, barcode scanning, receipt printing, and post-event reporting. Start with a live demo to see how the terminal works before your event.
Have a question about setting up MultiPOS for a specific type of pop-up? Drop it in the comments or reach out to our support team.
Frequently Asked Questions(FAQs)
Q1. Do I need a separate WooCommerce store for my pop-up shop?
No. A WooCommerce-native POS plugin connects directly to your existing store. You create a separate outlet within the plugin for the pop-up location, but all products, customers, and orders stay in the same WooCommerce installation. There’s no need to set up a second store or duplicate your catalog.
Q2. Can I sell at a pop-up without an internet connection?
Yes. A WooCommerce POS plugin with offline mode, like MultiPOS, caches your product catalog locally on the device. The sales process normally runs during an outage and syncs to WooCommerce automatically once the connection is restored. The only limitation is card payments, which require connectivity to process in real-time.
Q3. What hardware do I actually need for a one-day pop-up?
At minimum, a device (tablet, laptop, or phone), a payment method (cash box or card reader), and a way to display products. A barcode scanner and thermal receipt printer speed up the checkout experience, but neither is essential for a low-volume event. MultiPOS installs as a PWA, so any modern device with a browser works without needing a dedicated app download.
Q4. How do I stop my pop-up from overselling items that are also listed in my online store?
Assign outlet-specific stock to your pop-up location within MultiPOS rather than using centralized WooCommerce inventory. This gives the pop-up its own stock quantity that operates independently from your live online store. Your online store won’t draw from the same pool that your cashier is selling from at the event
Q5. Can I train temporary staff to use the POS quickly?
Most people who aren’t familiar with the software can process a basic sale in under two minutes after a short walkthrough. Create a dedicated cashier account for each team member, assign them to the pop-up outlet only, and run a five-minute practice session before the doors open. The cashier’s view is intentionally simple: search or scan a product, set the quantity, and take payment.
Q5. What’s the best way to use pop-up customer data after the event?
Export the customer records captured at the POS and send a targeted follow-up email within 48 hours of the event. Offer a discount on their first online order, highlight products that were popular at the pop-up, and include a direct link to your WooCommerce store. This window of engagement, while the experience is still fresh, tends to convert far better than reaching out weeks later.
Q6. How do pop-up sales show up in WooCommerce?
Every order processed through MultiPOS syncs to WooCommerce as a standard order. You can view it in WooCommerce → Orders like any other sale. Within MultiPOS, you can filter reports by outlet to see only the pop-up data. This keeps your overall WooCommerce reporting clean while still giving you the outlet-specific breakdown you need for reconciliation.