How to Add a Custom Add to Cart Button in WooCommerce


Customizing your WooCommerce store is one of the best ways to improve your user experience. One essential element that will benefit from personalization is the “Add to Cart” button.
In this blog, we’ll explain how to add a custom add to cart button in WooCommerce.
From understanding the benefits of customization and exploring various methods to implementing code snippets and troubleshooting common issues.
Why Customize the “Add to Cart” Button?

The “Add to Cart” button isn’t just a call to action; it’s a crucial conversion element. By customizing its design and functionality, you can:
- Enhance Aesthetics: Tailor the button to match your store’s branding and color scheme.
- Improve User Experience: Make the button more noticeable with custom text, icons, or animation, it will help to improve user experience.
- Boost Conversions: A well-designed and clearly labeled button can lead to higher click‐through rates and, ultimately, more sales.
- Add Functionality: Integrate additional features such as custom messaging or even dynamic behavior based on user interactions.
Whether you want to change the text from “Add to Cart” to “Buy Now” or add an icon for a more visual appeal, learning how to add a custom add to cart button in WooCommerce is a powerful skill for any online store owner.
How to Add a Custom Add to Cart Button in WooCommerce

In this section, we will see various options to edit the WooCommerce ‘Add to Cart’ button. The options include:
Method 1. Modifying WooCommerce Template Files
Customizer is capable of editing templates to add WooCommerce items. You can edit the template files to change the HTML and the styling of the add to cart button.
This method gives you total freedom, but you need basic knowledge of PHP and HTML.
For example, the stock template file of a simple product’s add to cart button lies in:
woocommerce/templates/single-product/add-to-cart/simple.php
You can copy this file to your child theme (keeping the same folder structure) and then modify the HTML as needed.
Implementation
For more advanced customizations, you might choose to override WooCommerce template files. For example, to customize the layout or add additional elements (such as an icon), you can copy the simple.php file from:
/wp-content/plugins/woocommerce/templates/single-product/add-to-cart/simple.php
Into your child theme’s folder under:
/wp-content/themes/mytheme-child/woocommerce/single-product/add-to-cart/simple.php
Then, open the file and modify the HTML. For instance, you could add an icon before the button text:
<?php
/**
 * Simple product add to cart
 *
 * This template can be overridden by copying it to yourtheme/woocommerce/single-product/add-to-cart/simple.php.
 *
 * @see 	    https://docs.woocommerce.com/document/template-structure/
 */
defined( 'ABSPATH' ) || exit;

global $product;

if ( ! $product->is_purchasable() ) {
    return;
}

echo wc_get_stock_html( $product ); // WPCS: XSS ok.

if ( $product->is_in_stock() ) : ?>

    <?php do_action( 'woocommerce_before_add_to_cart_form' ); ?>

    <form class="cart" action="<?php echo esc_url( apply_filters( 'woocommerce_add_to_cart_form_action', $product->get_permalink() ) ); ?>" method="post" enctype='multipart/form-data'>
        <?php do_action( 'woocommerce_before_add_to_cart_button' ); ?>

        <?php
            // Display quantity input if needed
            woocommerce_quantity_input( array(
                'min_value'   => apply_filters( 'woocommerce_quantity_input_min', $product->get_min_purchase_quantity(), $product ),
                'max_value'   => apply_filters( 'woocommerce_quantity_input_max', $product->get_max_purchase_quantity(), $product ),
                'input_value' => ( isset( $_POST['quantity'] ) ? wc_stock_amount( wp_unslash( $_POST['quantity'] ) ) : $product->get_min_purchase_quantity() ),
            ) );
        ?>

        <button type="submit" name="add-to-cart" value="<?php echo esc_attr( $product->get_id() ); ?>" class="single_add_to_cart_button button alt">
            <i class="fa fa-shopping-cart" aria-hidden="true"></i> <?php echo esc_html( $product->add_to_cart_text() ); ?>
        </button>

        <?php do_action( 'woocommerce_after_add_to_cart_button' ); ?>
    </form>

    <?php do_action( 'woocommerce_after_add_to_cart_form' ); ?>

<?php endif; ?>
In this snippet, an icon is added using a Font Awesome class (ensure that Font Awesome is loaded on your site). You can modify the HTML further as needed.
Method 2. Using Hooks and Filters
WooCommerce actually gives you a whole range of hooks and filters that let you modify the add to cart button text, classes, and even output without ever having to touch the core template files. This is generally the safest and easiest way to do it.
1 Access the Theme File Editor:
- Log in WordPress dashboard.
- Go to Appearance → Theme File Editor → functions.php.
2 Edit the functions.php File:
- In the list of theme files on the right, click on functions.php.
- Paste the custom code at the bottom of this file. For example:
// Change the Add to Cart button text on single product pages
add_filter( 'woocommerce_product_single_add_to_cart_text', 'custom_add_to_cart_text' );
function custom_add_to_cart_text() {
    return __( 'Buy Now', 'woocommerce' );
}

This snippet uses the woocommerce_product_single_add_to_cart_text filter to replace the default text.
You can easily adapt this method for archive pages using the woocommerce_product_add_to_cart_text filter.
Implementation
Creating a Child Theme
Before making any modifications, it’s best practice to create a child theme. This ensures that your changes aren’t lost when you update your theme.
- Create a New Folder: In your
/wp-content/themes/directory, create a folder (e.g.,mytheme-child). - Add a style.css File: Include the necessary header in your
style.cssfile:
/*
 Theme Name: MyTheme Child
 Template: mytheme
 */
3. Activate Your Child Theme: Go to the WordPress Dashboard under Appearance → Themes and activate your child theme.
Adding Custom Code via functions.php
Once your child theme is active, open (or create) the functions.php file in your child theme’s folder. Then, add your custom code.
Example: Changing the Button Text
// Change the text on single product pages
add_filter( 'woocommerce_product_single_add_to_cart_text', 'custom_add_to_cart_text' );
function custom_add_to_cart_text() {
    return __( 'Buy Now', 'woocommerce' );
}

// Change the text on archive pages
add_filter( 'woocommerce_product_add_to_cart_text', 'custom_add_to_cart_text_archive' );
function custom_add_to_cart_text_archive() {
    return __( 'Buy Now', 'woocommerce' );
}
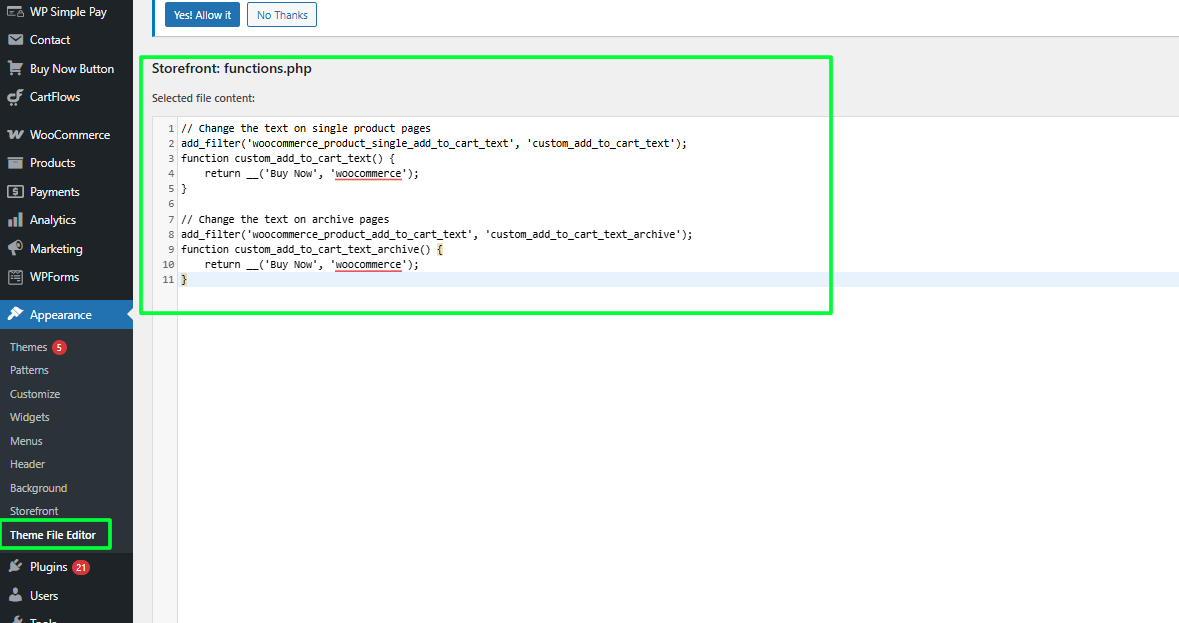
This simple code tells WooCommerce to replace “Add to Cart” with “Buy Now” on both single product and archive pages. You can further modify the function to include conditionals based on product type if needed.
Method 3. Using a Plugin to Customize the Add to Cart Button
If you don’t feel like editing template files, a plugin is an easy and easy solution. Most plugins found in the WooCommerce environment allow you to visually change your button’s text, style, and even animations. Here’s how you can do it:
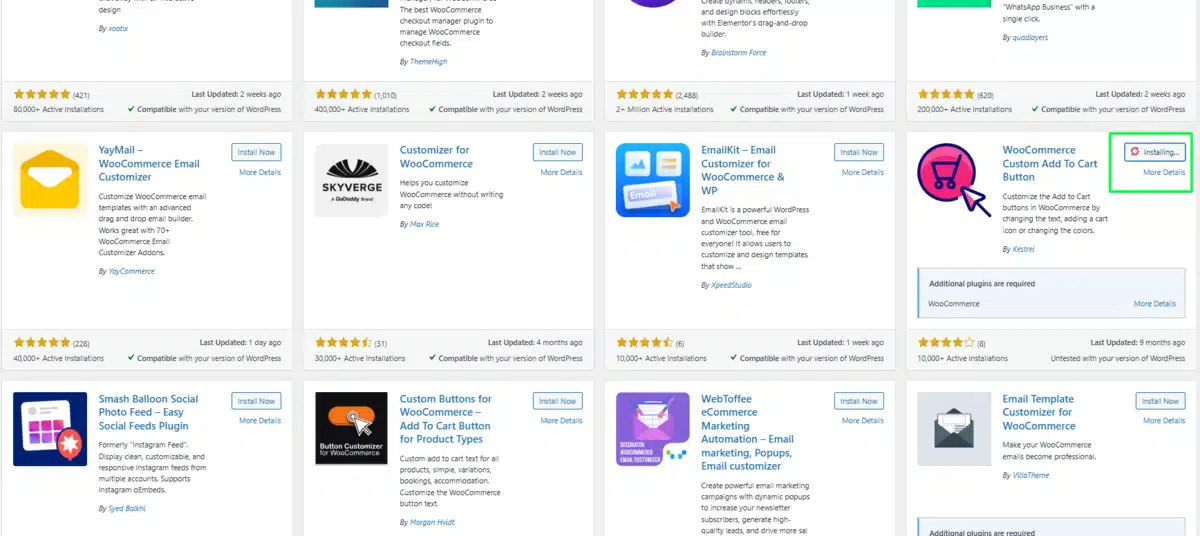
Step 1: Choose and Install a Suitable Plugin
There are many plugins that offer customization for the “Add to Cart” button. One popular option is the Custom Add to Cart Button for WooCommerce plugin.
Installation via Dashboard:
- Go to your WordPress Dashboard and navigate to Plugins → Add New.
- Search “Custom Add to Cart Button for WooCommerce.”
- Click Install Now, then Activate once the plugin is installed.
Step 2: Access the Plugin Settings
After activating the plugin
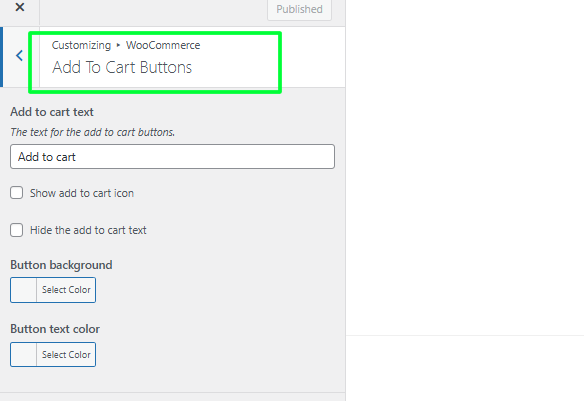
- Go to Appearance → Customize in your dashboard.
- In the Customizer, find the WooCommerce section.
- Click on Add to Cart Buttons (the menu item may vary slightly depending on the plugin).
Step 3: Customize Your Button
Within the settings panel, you’ll find several options to personalize your button. Common customization options include:
- Button Text: Replace the default “Add to Cart” text with something more brand-friendly, such as “Buy Now,” “Order Today,” or “Add & Checkout.”
- Font Size & Weight: Resize and weight the font so that the button text is readable and noticeable.
- Button Colors: Customize the background color, text color, border color, and even hover colors to fit in with your site design.
- Icon Settings: Many plugins allow you to add an icon next to the button text. Often, you can then choose from a library of icons or upload your own. Decide whether the icon comes before or after the text.
- Animation and Transition Effects: Add subtle animations (like the hover effect) to make the button more appealing.
- Conditional Rules: A few higher-level plugins allow you to define more than one rule so that different categories or products can have a differently styled button.
As you adjust these settings, most plugins provide a live preview so you can see exactly how your changes will look on the front end.
Step 4: Save and Publish
After you’ve configured your desired settings:
- Click the Publish button in the Customizer to save your changes.
- Visit your WooCommerce shop or product pages to verify that the button appears and behaves as expected.
Step 5: Test Across Devices
It’s important to ensure that your new custom button works well on all devices:
- Check the design and functionality on desktop, tablet, and mobile views.
- If any issues arise (such as misaligned elements or unexpected behavior), revisit the plugin’s settings to adjust the responsive options if available.
Troubleshooting Common Issues

Even with careful coding, you may encounter some common issues when customizing the add to cart button. Here are a few troubleshooting tips:
- Button Not Displaying or Functioning Correctly:
- Make sure your child’s theme is active.
- Double-check that you’re editing the correct template file or that your hook functions are properly hooked (using the correct action or filter).
- Disable caching plugins temporarily to ensure your changes are reflected immediately.
- Products That Were Not Put In The Cart Section:
- Ensure that the item of business is purchasable and it is in stock.
- Confirm that the add to cart hyperlink is properly formatted, e.g.
esc_url( $product->add_to_cart_url() ). - Check the browser console for potential JavaScript errors that hinder the AJAX add to cart feature.
- Custom CSS Not Applying:
- Ensure that your child theme’s CSS file is enqueued correctly.
- Use your browser’s developer tools to inspect the button and verify that your custom styles are not being overridden by your parent theme or plugins.
- Conflict with Plugins: Sometimes, other plugins (especially those that modify WooCommerce behavior) can conflict with your customizations. Disable non-essential plugins one by one to identify any conflicts.
By following these troubleshooting steps, you can isolate and resolve issues to ensure your custom button works as intended.
Best Practices for Customizing WooCommerce Buttons
When customizing the add to cart button in WooCommerce, consider these best practices:
- Employ a child theme: A child theme is essential for preventing overwriting during theme updates. Always keep a child theme handy for any modifications.
- Code Maintenance: Make separate files or distinct sections in the functions.php file for all the custom functions that deal with WooCommerce.
- WooCommer Standards: Always look for customization options first. Custom hooks, filters, and template overrides can be made without the need to edit core files. This is a better approach because it is upgrading safer.
- Testing: Before any changes are made to a live site, make sure that they are fully tested first on a staging environment. This will reduce the chances of unintentional downtime or unfavourable behavior.
- Performance Optimizations: Make sure that the additional codes and CSS do not tamper with the page loading speed. Logic should be made sure, and if needed, non-critical javascript should be deferred.
- Keeping Up with The Industry: WooCommerce has regular updates; thus, make sure that the customizations align with the most recent version and check any code made against the WooCommerce release notes for any changes to make.
Conclusion
Changing the add to cart button on your business website may seem like a mundane task, but it proves to be a very solid conversion booster for the store.
Knowing how to add a custom add to cart button in WooCommerce allows the owner to maintain the look and feel of the store and offers various features that can be used to enhance the shopping experience further.
In terms of overriding template files or plugins, what is important is version control such that every customization is well documented, each of the changes is properly thoroughly tested, and everything that is designed is pleasing.
A few customizations here and there on WooCommerce can make the add to cart buttons a centerpiece, which can greatly affect sales.
As mentioned before, do not restrict yourself to simply adding text or changing the color of the buttons in question. There is a sweet spot between engaging the customers and increasing the feedback the store receives in terms of performance.
FAQs
Q1. Where should I place the PHP file to be able to customize the Add to Cart button?
Copy the file within your child theme’s directory of WooCommerce so that your changes will not be lost when an update is taken.
Q2. Can I directly edit the PHP file within the WordPress Theme Editor?
Yes, but not for extensive modifications. Alteration through an FTP client or cPanel is preferable so you don’t wreck your site.
Q3. Will my changes be erased after a WooCommerce update?
If you do change the original WooCommerce files, your changes will be erased. To prevent this, always work with a child theme.
Q4. How do I change the look of the Add to Cart button?
You can change the color, size, and look of the button using custom CSS in the WordPress Customizer or theme options.
Q5. My changes are not appearing. What do I do?
Try clearing your browser cache, disable plugins for caching, and check to see if the file is inserted in the correct directory.
Abhijit Sarkar
Abhijit Sarkar is a content writer at DevDiggers covering WordPress setup, platform migration, and site security. He works through each process himself before writing about it, so his guides on topics like migrating from Blogger or locking down WordPress reflect what actually happens on screen, not just what the documentation describes.
Join thousands of readers getting smarter every week.
Leave a Reply