How to Add a Custom Button to the Cart Page in WooCommerce
WooCommerce is a great and adaptable eCommerce plugin through which online stores can easily customize their store. Here is a comprehensive step-by-step guide on how you can include a custom button within the cart page of WooCommerce.
If you’re interested in offering a shortcut to a limited offer, running some custom code or simply want a better user interface, this handy guide is a must-read, as it has every detail to bring you to a successful level in just a couple of steps.
Placing a custom button on your WooCommerce cart page can be useful for various reasons, including leading the customers to a special offer, offering extra information, or referencing a custom checkout process.
Here in this blog, we are going to discuss how to add a custom button to the cart page in WooCommerce and how to do it in such a way that the changes are SEO-friendly and accessible and improve the shopping experience as well.
Why Customize the Cart Page?
The cart page is the hub of every multiple store and is very crucial. It becomes the final stage of the order submission process.
Thus, an optimized cart page will positively transform your conversion metrics. Here are a handful of reasons you may want to consider including a catchy button on the cart page.
- UX Benefits: Customers can be guided along the customized sales funnel with the added button by providing them with custom offers.
- Increased Engagement: Buttons can be constructed in a way that can help the customers to look at other related products, apply for discount orders, or even contact support.
- Relevant Ads: Using button design, It is possible to place some offers, discounts, or bonuses on the cart page and promote them right there and then.
- Improved Usability: You can enhance the customer experience by directly linking keystone pages on your site, including detailed shipping information, additional materials, and expedited order processing.
- Boosting Cross-selling Focus: You can use a button designed like this and suggest companion items or parts that go along with what is already selected in the shopping cart.
By implementing a catchy button in the right spot, you can potentially improve your cart abandonment rates and boost your total sales.
Understanding WooCommerce Hooks and Actions
Before we get into the implementation, let’s first know how hooks and actions work in WooCommerce.
Hooks enable you to add custom code to different areas of your WooCommerce pages without having to touch the core files. This is critical in ensuring the upgradability and security of your site.
Types of Hooks
- Action Hooks: They are employed to insert custom functions in particular areas. For instance,
woocommerce_cart_actionsis an action hook under which you can insert content in the cart actions space. - Filter Hooks: These hooks change data before the data is shown. Even though our emphasis in this guide is on actions, filters can be helpful for additional customizations.
Knowing these hooks is important since they provide you with the ability to place your own custom button where you want it on the cart page.
Planning Your Custom Button Integration

Planning is key to successful customization. Here are some steps to consider before adding your custom button:
- Decide on the Purpose of the Button: Specify the exact purpose of the button. Will it give a discount, redirect the user, or do something more sophisticated?
- Visual Design: Think about the style and format of the button, its dimensions, and the preferred location of the button. It should be distinct enough to attract the user’s attention but without being so attention-grabbing that the overall shopping experience suffers.
- Customer Experience (UX): User experience ensures that what the button will do is clear to the user without expending any cognitive effort. A tooltip or simple label will be sufficient to brief them on the purpose of the button.
- Compatibility: Consider how this modification will affect the compatibility of existing plugins and themes. Always do your first round of testing on a staging server and not on a live environment.
- Analytics & Performance Monitoring: Include attribution for click-through rates and conversion rates from the custom button. This will enable you to optimize and improve performance over the long term.
By carefully planning these aspects, you ensure that your customization not only looks good but also functions seamlessly within your WooCommerce setup.
How to Add a Custom Button to the Cart Page in WooCommerce
Now let’s get into the practical steps of how to add a custom button to the cart page in WooCommerce. This section provides a detailed walkthrough from setting up your environment to writing and testing the code.
1. Prerequisites
Before you start, ensure you have the following:
- A WordPress website with WooCommerce installed.
- An elementary understanding of PHP, HTML, and CSS.
- Access to your site’s code via FTP, file manager, or code snippet plugin.
- It is highly advisable to have a child theme so as not to lose customizations upon theme updates.
2. Creating a Child Theme or Using a Code Snippet Plugin
In order to have your changes last even after theme updates, you can either develop a child theme or use a plugin such as Code Snippets, which enables you to insert custom PHP code.
- Creating a Child Theme: A child theme copies the functionality of your parent theme but provides a safe environment for you to make changes. If you do not know how to create a child theme, there are several step-by-step tutorials available to teach you
- Using a Code Snippet Plugin: Alternatively, plugins such as Code Snippets offer a simple way to add custom PHP code without having to edit your theme files directly.
3. Writing the Custom Code
Let’s add a custom button using WooCommerce’s action hooks. In this example, we will add a button below the cart totals area using the woocommerce_after_cart_totals hook. This hook is ideal because it ensures that the button appears after all cart totals are calculated and displayed.
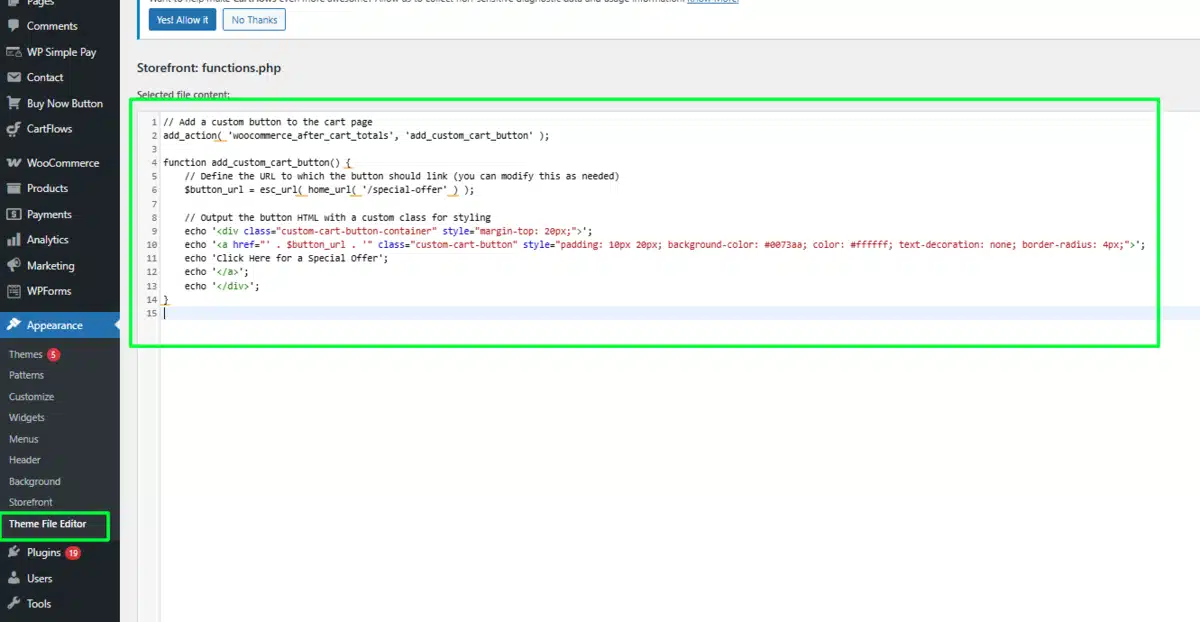
1 Access the Theme File Editor:
- Log in to your WordPress dashboard.
- Navigate to Appearance → Theme File Editor → functions.php.
- On the right side, you’ll see a dropdown menu at the top; make sure to select your child theme.
2 Edit the functions.php File:
- In the list of theme files on the right, click on functions.php.
- Paste your custom code at the bottom of this file. For example:
Code Example
// Add a custom button to the cart page
add_action( 'woocommerce_after_cart_totals', 'add_custom_cart_button' );

function add_custom_cart_button() {
    // Define the URL to which the button should link (you can modify this as needed)
    $button_url = esc_url( home_url( '/special-offer' ) );

    // Output the button HTML with a custom class for styling
    echo '<div class="custom-cart-button-container" style="margin-top: 20px;">';
    echo '<a href="' . $button_url . '" class="custom-cart-button" style="padding: 10px 20px; background-color: #0073aa; color: #ffffff; text-decoration: none; border-radius: 4px;">';
    echo 'Click Here for a Special Offer';
    echo '</a>';
    echo '</div>';
}
Explanation
- Hook:
woocommerce_after_cart_totalsgets called by the custom function add_custom_cart_button, which is hooked using the add_action function. - URL Configuration: The URL Of the button is set dynamically, and you can change it from
/special-offerto any other URL you want. - Button HTML: The button is very straightforward; it is wrapped inside an anchor tag and is styled inline to keep things easy. These styles should be moved to separate CSS files in production-ready code.
Here’s an example of a simpler method in use. It can be improved in many ways, like integration with other plugins or adding data attributes for JS prop manipulations.
4. Styling Your Button with CSS
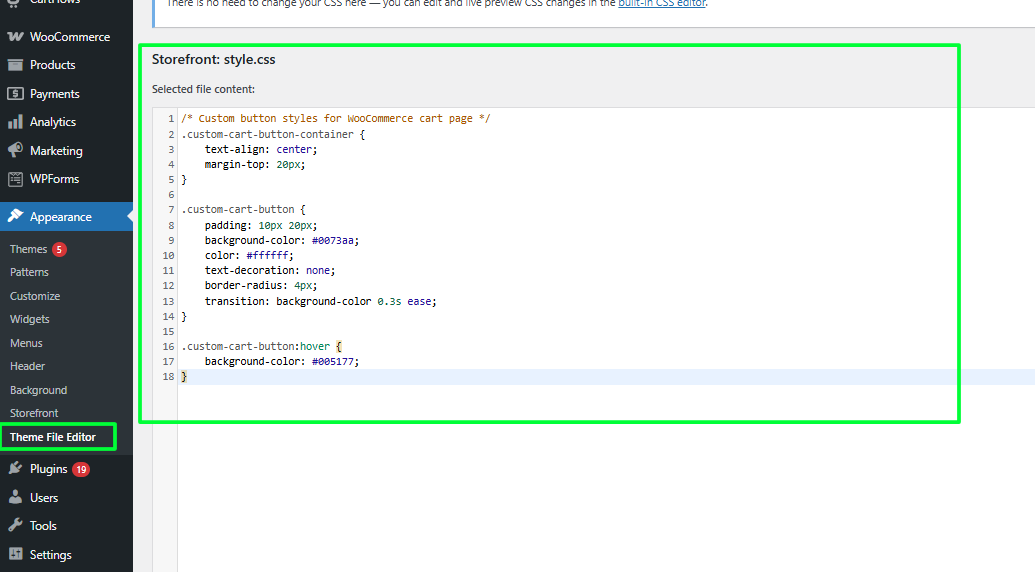
Access Theme File Editor
- Go to Appearance → Theme File Editor → style.css in your WordPress dashboard.
- At the top-right, select your child’s theme from the dropdown menu.
While inline styles are acceptable for demonstration purposes, you should ideally place your CSS in your theme’s stylesheet. Here’s how you might add custom CSS to style your button more robustly:
/* Custom button styles for WooCommerce cart page */
.custom-cart-button-container {
    text-align: center;
    margin-top: 20px;
}

.custom-cart-button {
    padding: 10px 20px;
    background-color: #0073aa;
    color: #ffffff;
    text-decoration: none;
    border-radius: 4px;
    transition: background-color 0.3s ease;
}

.custom-cart-button:hover {
    background-color: #005177;
}
Adding these styles to your child’s theme’s stylesheet ensures that your button is visually consistent with your overall design and can be easily adjusted if you decide to change your theme’s look in the future.
Advanced Customizations and Use Cases
After the basics, you can take your custom button feature to the next level with additional features. Here are some ideas that can help you:
1. Invoking a JavaScript Function
If you need your button to perform an action, such as opening a modal or refreshing the cart data instead of leading to another page, you can set a custom JavaScript function.
This also works well if you want to interact with other services’ APIs.
Code Example
add_action( 'woocommerce_after_cart_totals', 'add_custom_cart_js_button' );

function add_custom_cart_js_button() {
    echo '<div class="custom-cart-js-button-container" style="margin-top: 20px;">';
    echo '<button type="button" class="custom-cart-js-button" onclick="handleCustomAction()">Click for Info</button>';
    echo '</div>';
}
And in your JavaScript file:
function handleCustomAction() {
    // Perform your custom action here
    alert('Custom action triggered!');
}
This method gives you the flexibility to define any interactive behaviour you want without forcing the user to navigate away from the cart page.
2. Conditional Display Based on Cart Contents
Another advanced use case is displaying the button only under certain conditions. For example, you might only want to show the button if the cart total exceeds a certain amount or if a particular product is in the cart.
1 Access the Theme File Editor:
- Log in to your WordPress dashboard.
- Navigate to Appearance → Theme File Editor →
functions.php.
Code Example
add_action( 'woocommerce_after_cart_totals', 'conditionally_add_custom_button' );

function conditionally_add_custom_button() {
    // Get the current cart total
    $cart_total = WC()->cart->total;

    // Define the threshold value (e.g., $50)
    $threshold = 50;

    if ( $cart_total >= $threshold ) {
        $button_url = esc_url( home_url( '/vip-offer' ) );
        echo '<div class="custom-cart-button-container" style="margin-top: 20px;">';
        echo '<a href="' . $button_url . '" class="custom-cart-button" style="padding: 10px 20px; background-color: #28a745; color: #ffffff; text-decoration: none; border-radius: 4px;">';
        echo 'Unlock VIP Offer';
        echo '</a>';
        echo '</div>';
    }
}
This snippet checks the cart total and displays the custom button only if the total exceeds the threshold. You can modify the logic to suit any condition you need.
3. Connection with WooCommerce Extensions
Your individual button can also serve as a portal for various WooCommerce extensions. For instance, you can use it alongside a coupon plugin, which applies the discount automatically when the button is clicked.
You can use the WooCommerce hooks to integrate various components of your store with ease.
4. Localization and Usability
If your audience’s reach is worldwide, consider making your custom button translatable. Certain functions in WordPress serve for translations, such as __() and _e().
Similarly, make certain that your button adheres to the standards of usability with the correct ARIA labelling, and ensure that it is operable from a keyboard.
Code Example for Localization
add_action( 'woocommerce_after_cart_totals', 'add_localized_custom_button' );

function add_localized_custom_button() {
    $button_text = __( 'Click Here for a Special Offer', 'your-text-domain' );
    $button_url = esc_url( home_url( '/special-offer' ) );
    echo '<div class="custom-cart-button-container" style="margin-top: 20px;">';
    echo '<a href="' . $button_url . '" class="custom-cart-button" style="padding: 10px 20px; background-color: #0073aa; color: #ffffff; text-decoration: none; border-radius: 4px;">';
    echo $button_text;
    echo '</a>';
    echo '</div>';
}
In this example, the button text is wrapped in the __() function, allowing you to provide translation files for different languages. This not only improves SEO for international visitors but also makes your site more inclusive.
Conclusion
Customizing WooCommerce allows you to improve customer’s experiences with your store. Following the steps in this guide will allow you to insert a custom button specific to your store’s branding and functionalities.
Modifying your brand’s WooCommerce shopping cart page will surely boost user experience and accentuate engagement, ultimately increasing your conversion rates.
Key Points:
- Set A Goal For Your Button: Design Your Button While Following SEO Guidelines: A goal must always be set before execution to avoid failure.
- Never Change Base Files: Use the provided WooCommerce hooks like woocommerce_after_cart_totals to place your button.
- Use Custom Styles Responsively: Use CSS to custom style your button while maintaining user accessibility.
- Thorough Testing: Staging your changes is great, but always test on different devices and browsers afterwards.
Following these recommendations helps ensure the customizations visually look great, function great, and comply with SEO guidelines.
Next Steps
To improve WooCommerce, you may want to explore the filters and hooks available further, as well as conditional logic-based customization, which alters user pathways based on items in the cart, the user’s role, or certain marketing actions.
While improvement of an online store might seem rather challenging, merging creativity with technical expertise makes it easy to achieve, a plain online store can easily be achieved with the right tweaks.
There are virtually almost no eCommerce websites that are completely finished. A business needs to incorporate continuous upgrades, thorough A/B tests and rapid user feedback along with conversions and search engine optimizations.
The techniques mentioned here will help anyone, whether they are looking to add new interactive features, improve systems integration, or have a custom WooCommerce setup.
By affecting the design of your eCommerce site, you polish the shopper’s experiences and make sure your business stands out from the rest. So, keep looking for ways to develop your business through endless experiments to achieve a better experience for your users.
In short, as for the WooCommerce cart page, it is quite easy to add a custom button. This -and careful planning, coding, and testing – makes a custom button tailored to any business and customer’s requirements.
We hope that through this guide, we have managed to provide valuable insights and the necessary tools to optimize WooCommerce even more.
Wishing you happy coding and increased conversions with a better user experience!
FAQs
How do I add a custom button to my WooCommerce cart page?
To insert a button under the order totals, use the woocommerce_after_cart_totals hook in the functions.php file.
Where should I paste the custom button code?
Make sure to place the code in a child theme so that when the parent theme changes, your customizations don’t get overwritten.
Can I alter the text and hyperlink of the button?
Of course, you can change the text enclosed in the <a> tag and also update the $button_url variable to whatever link you want it to go to.
How do I change the style of the button?
To manage styles in a better way, you may choose to use inline CSS in functions.php, but it is better to put styles in the child theme style.css.
Am I able to add JavaScript capability to the button?
Yes, you can. You are able to add interactivity to the button by enqueuing custom javascript in functions.php through wp_enqueue_script.

Abhijit Sarkar
Hi, I’m Abhijit Sarkar. I am deeply passionate about creating engaging content and exploring. My journey includes gaining valuable experience in content writing and creating useful resources for my readers.
Leave a Reply