
The WooCommerce shopping cart is a normal WordPress page. You edit it in the block editor like any other page. Open Pages, edit Cart and change the text, the order of sections or the colors.
I tested the cart on WooCommerce 11.2.0 and WordPress 7.1.3 with the Twenty Twenty-Five theme in October 2026. I built it both ways, with the Cart block and with the classic shortcode, and the results differ in ways that matter for edits.
This guide shows what you can change in the Cart block, how to style it with CSS and how hooks behave. You also get the settings that control the cart page and a list of fixes for common cart problems.
What Is the WooCommerce Shopping Cart Page?
The WooCommerce shopping cart page is a regular WordPress page that shows what a customer has added before checkout. The WooCommerce pages guide says it contains the Cart block and shows the cart contents. You assign it under WooCommerce, Settings, Advanced, in the Page setup section.
That guide also says Cart, Checkout and My account need separate pages, because sharing one page breaks redirects and payment gateways. WooCommerce creates the page on install and fills it with the Cart block.
The cart and the checkout do different jobs. The cart lets a shopper review items, change quantities and apply a coupon. The checkout collects the address and payment. Keep extra choices on the cart page and not on the checkout.
If the cart shows totals with no tax line, read our fixes for WooCommerce tax not working.
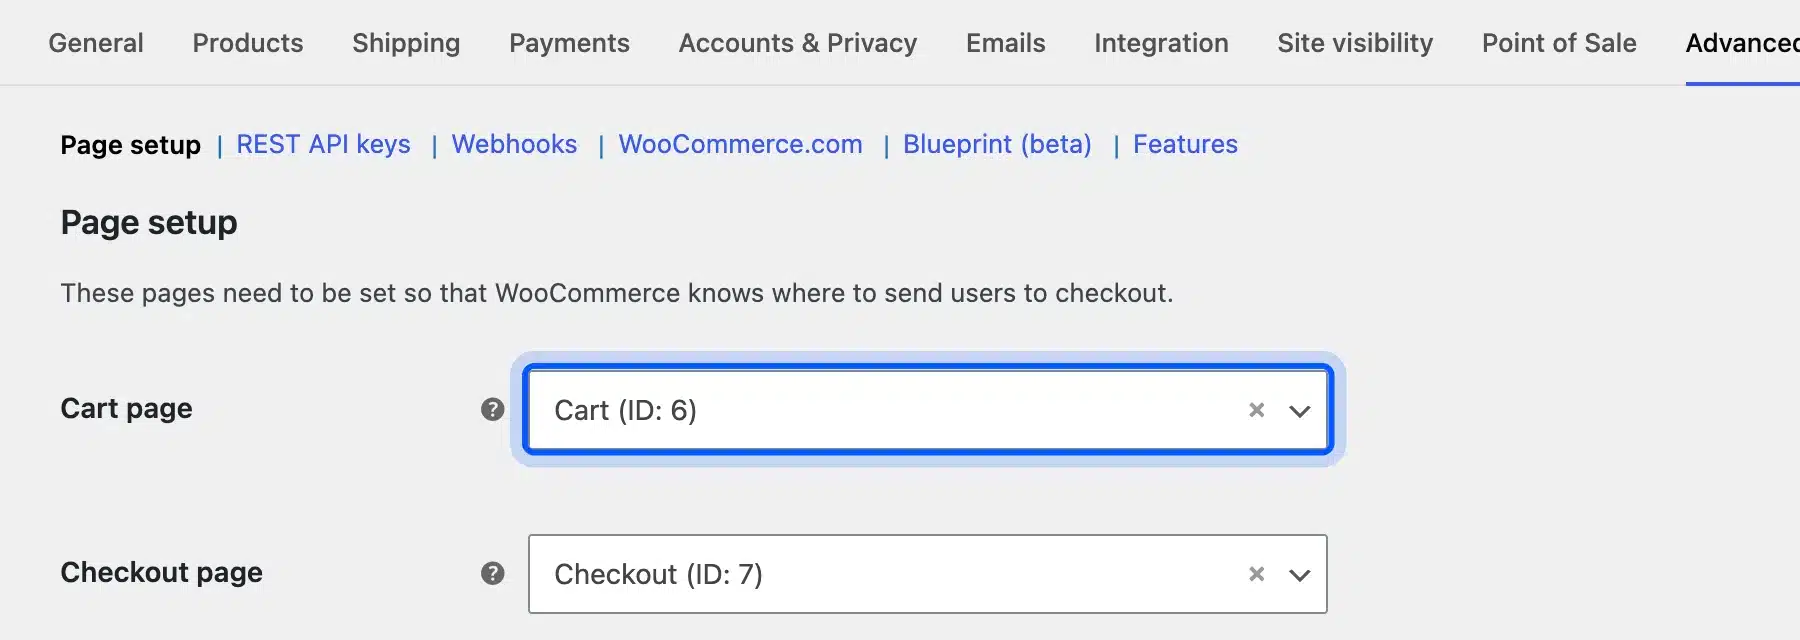
On my test store, the setting showed Cart (ID: 6).
The same screen lists the Checkout page, the My account page and the Terms and conditions page. It also lists checkout endpoints such as Pay and Order received, which you should leave alone unless a plugin asks for a change.
If your cart page ever goes missing, create a page and select it here. WooCommerce finds the page through this setting rather than through its title.
Customers reach the page from the cart icon, the Add to cart message and your menu. A second setting decides whether they jump straight to the cart after adding a product, which I cover later.
In my test the header showed a cart icon with a count badge, and the menu listed Cart and Checkout. Check both links on your own site, because a menu link to an old page is a common reason shoppers cannot find the cart.
Cart Block or Classic Shortcode: Which Should You Edit?
For new stores, edit the Cart block, because it is the default and WooCommerce builds the page around it. Use the classic [woocommerce_cart] shortcode only when your code depends on PHP hooks. The two behave differently, and the hook difference is the one that breaks custom code.
I tested both on the same store. With the Cart block, quantity changes through plus and minus buttons that stop at any purchase quantity limit you set, and there is no Update cart button. With the shortcode, quantity is a number field, and an Update cart button saves it.
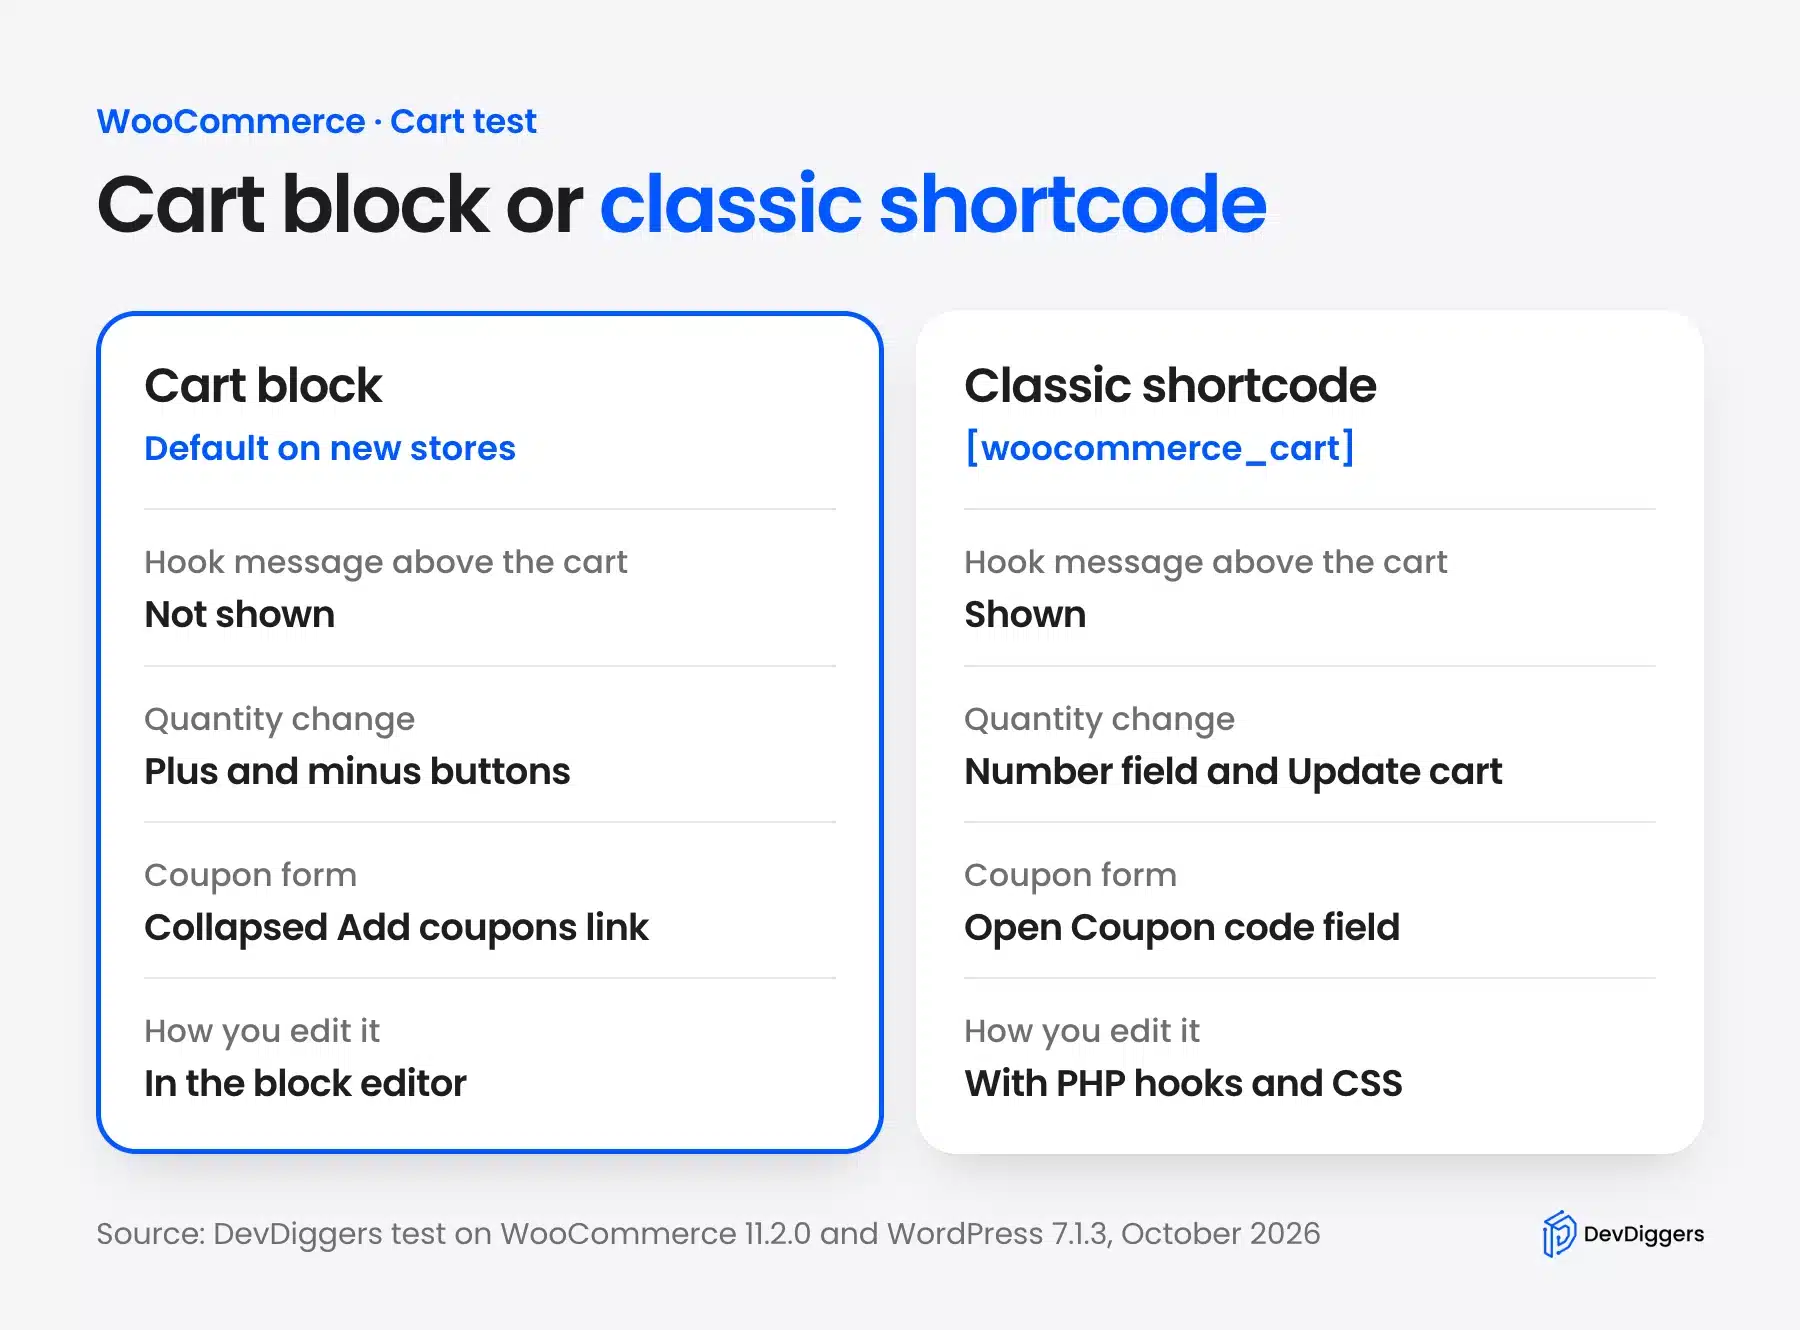
The biggest difference is hooks.
I added two small snippets that print a line on the woocommerce_before_cart and woocommerce_after_cart_table hooks. On the shortcode cart, both lines appeared. On the Cart block, neither appeared in the page HTML after it loaded.
That matches how the block works. The Cart block builds its content with JavaScript from blocks. Old PHP hooks that print around a template have nothing to attach to. If your theme or plugin relied on them, the customization silently disappears when you move to the block.
Note: WooCommerce’s own page on Cart block documentation says that in the Filled Cart state most blocks are locked, while the Cross-Sells section is unlocked. Plan edits around what stays editable.
How to Edit the WooCommerce Cart Page With the Cart Block
You edit the WooCommerce cart page with the Cart block by opening the Cart page in the editor and selecting the block. The block has two views, Filled Cart and Empty Cart. You can change text in the empty view, move or remove unlocked sections, and adjust the block’s style settings.
WooCommerce Edit Cart Page: The Steps
Follow these steps:
The product page has its own template, so see how to edit the WooCommerce product page too.
You can also use a shortcode in WordPress to place the cart on any page, as our shortcode guide shows.
- Open the Cart page: Go to Pages, hover over Cart and click Edit.
- Select the Cart block: Click the shopping cart icon in the block toolbar, or use the List View to pick Cart.
- Open block settings: Click the Settings icon and choose the Block tab. The Style panel holds two toggles, Show form step numbers and Dark mode inputs.
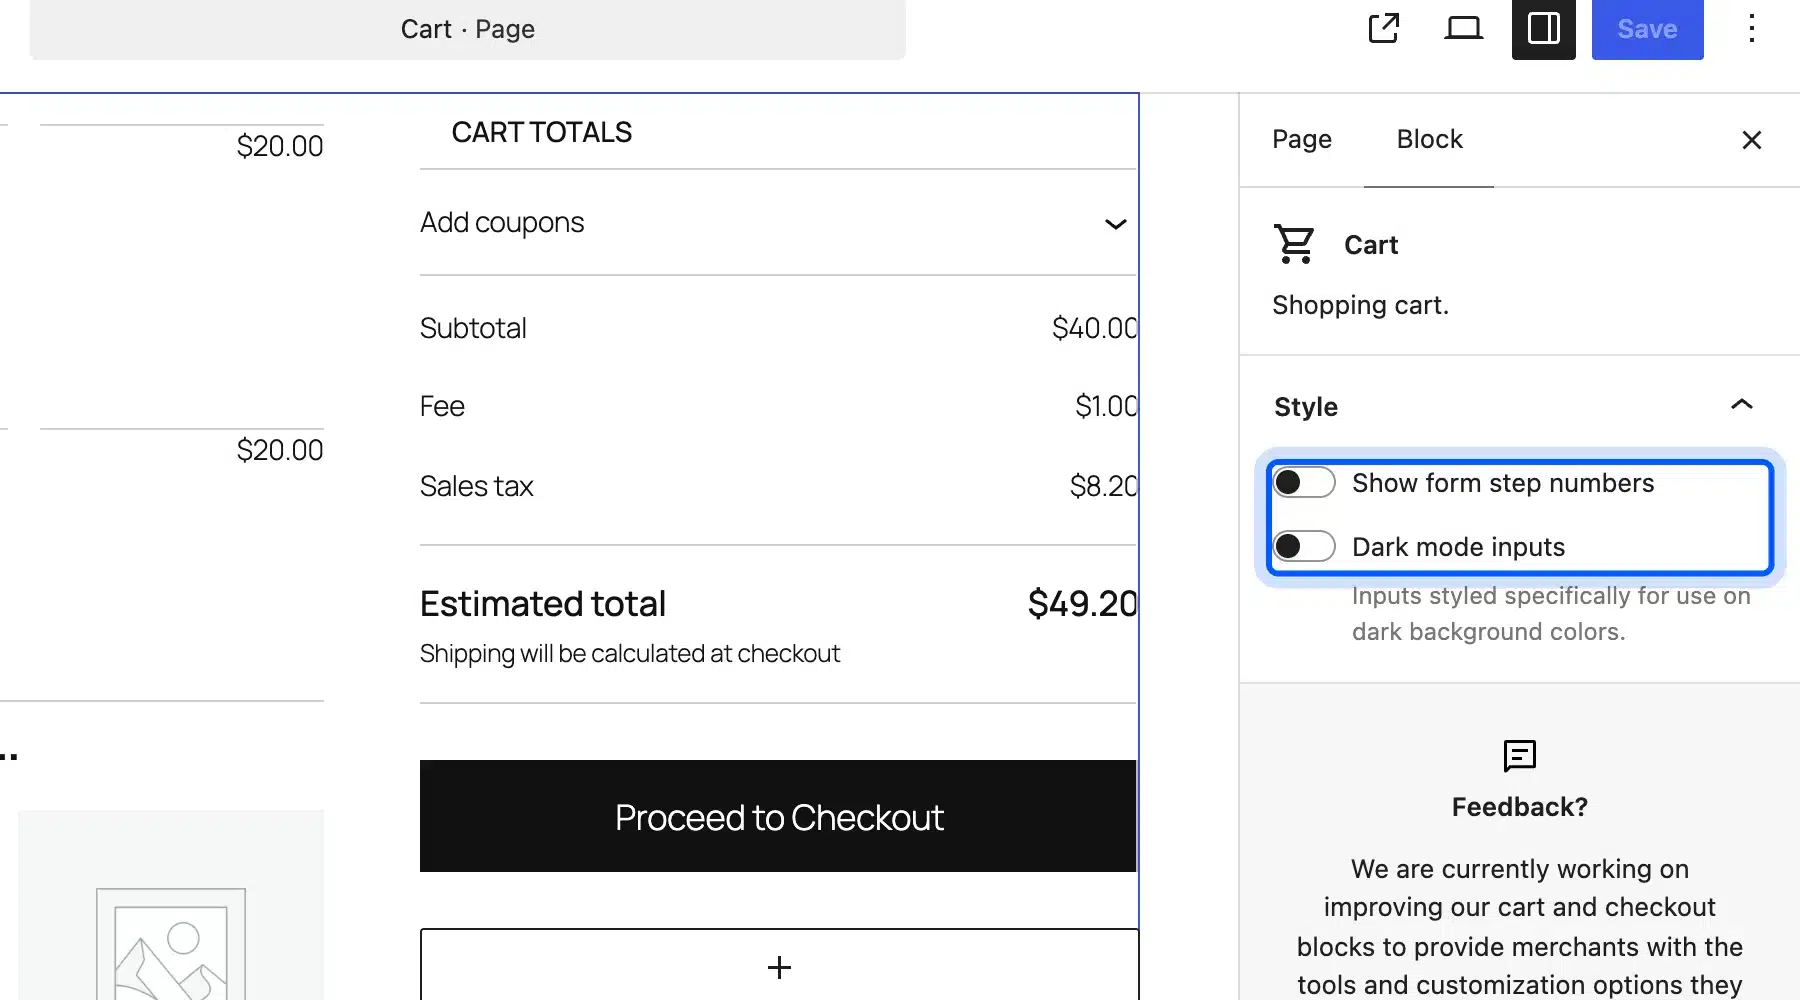
- Switch views: Use the eye icon in the block toolbar to move between Filled Cart and Empty Cart.
- Save the page: Click Save and open the cart on the front end to check it.
I opened the List View to see what the block holds. The filled view contains Cart Items, a Cross-Sells block built from the Product Collection block, and Cart Totals. Cart Totals holds the order summary, an express payment area, the Proceed to Checkout button and accepted payment methods.
The sidebar offers very little for the inner blocks. When I selected Proceed to Checkout, Cart Line Items and Cart Totals, the panel showed only a short description each. That is a real limit. Deeper changes need CSS or an extension.
Most of your design freedom therefore sits around the cart. You can edit the heading above it, add text below it and adjust the Cross-Sells section, which the documentation lists as unlocked. Treat the locked blocks as a stable core.
For the Empty Cart view, the Cart block documentation says you can remove or rearrange its elements and edit the text. Use that to write a friendly message and point shoppers to your best-selling products.
The Cross-Sells block is a good place to add value. It shows products related to what is in the cart, and you can change how many appear and in which layout.
How to Customize WooCommerce Cart Page Style With CSS
You can customize WooCommerce cart page style with CSS by adding rules to the Additional CSS box in the Site Editor. Target the class names that the Cart block prints, and set a color, a radius or a spacing value. The change applies to the cart on every page load.
The Proceed to Checkout button carries the class wc-block-cart__submit-button. I read that class from the live cart page. To restyle it, add a rule like this:
.wc-block-cart__submit-button {
	background-color: #0256FF;
	border-radius: 8px;
}
I added the rule and checked the live page. The button measured rgb(2, 86, 255) with an 8 pixel radius, which matches the rule.
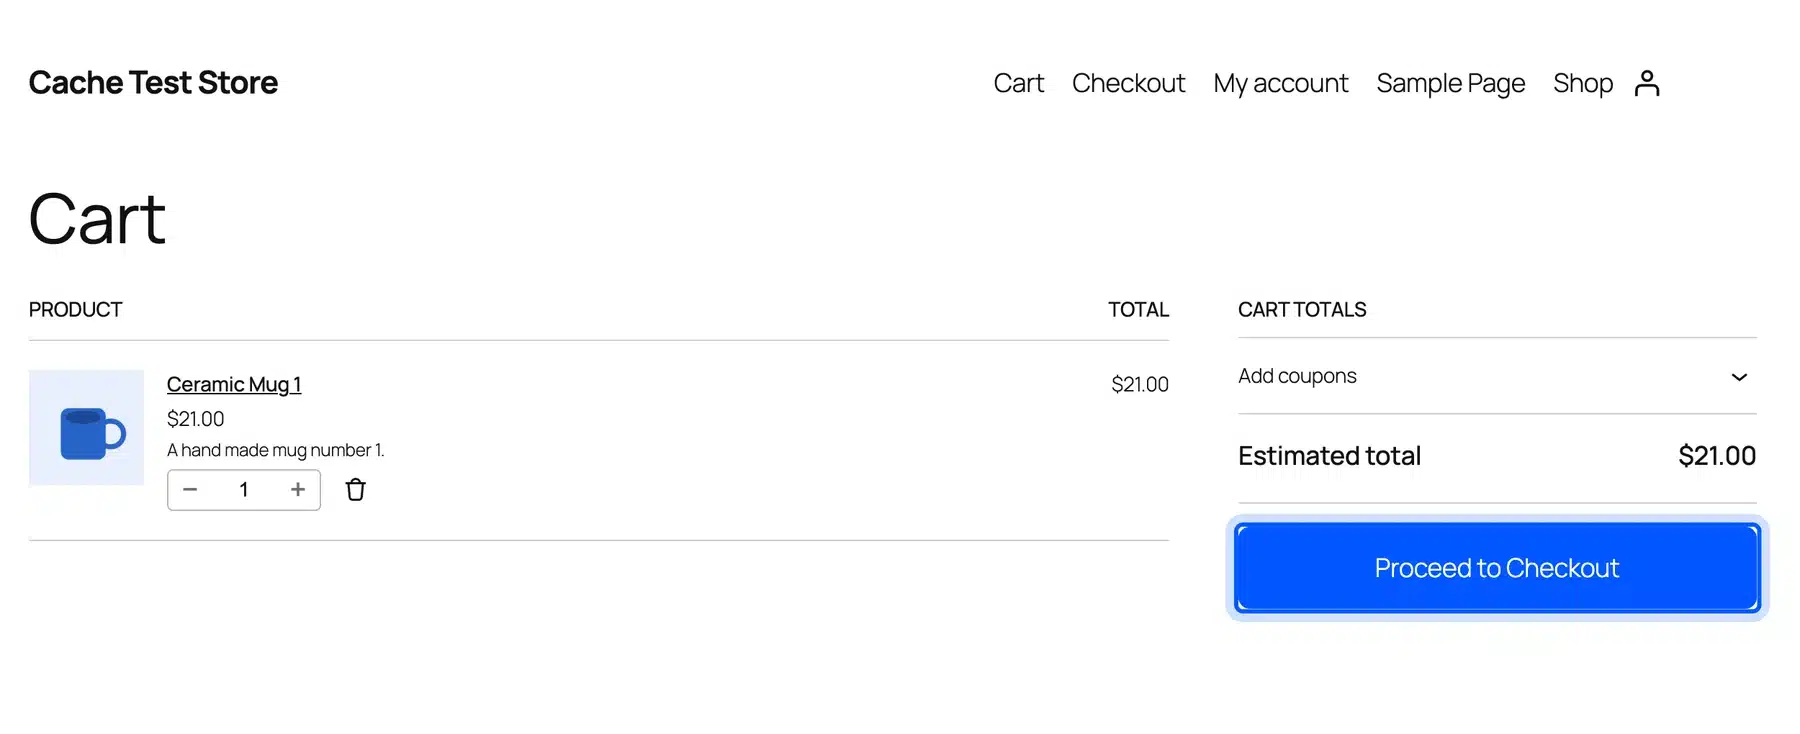
Check the contrast of any new button. White text on #0256FF measures 5.56 to 1, which clears the 4.5 to 1 minimum for normal text in the WCAG contrast guide. A pale button color with white text would fail.
A WooCommerce cart style change usually needs only one rule.
Keep CSS changes small. Class names inside blocks can change when WooCommerce updates. Re-check your cart after each major update. A care routine that includes a quick cart test keeps surprises away.
If you want to edit templates or add layout code, our custom WooCommerce development services can build it safely. That is the faster route when a change touches more than a color.
How to Edit the Classic Cart With Hooks
To edit the classic cart, put the [woocommerce_cart] shortcode on the Cart page and add your changes with PHP hooks. WooCommerce prints the cart from a template, and hooks such as woocommerce_before_cart let you add content above it. Use a child theme or a small plugin for the code.
Switching the page is simple. Edit the Cart page, remove the Cart block, add a Shortcode block and type [woocommerce_cart]. The WooCommerce pages guide describes the same method for adding a shortcode with the block editor.
Then add the hook. This snippet prints a shipping note above the cart table:
add_action( 'woocommerce_before_cart', function () {
	echo '<p class="cart-note">Free shipping on orders over $50.</p>';
} );
I tested this on the shortcode cart. The note appeared above the table, and the Update cart button saved quantity changes. Do not paste the snippet into your theme’s functions.php unless it is a child theme, because a theme update would erase it.
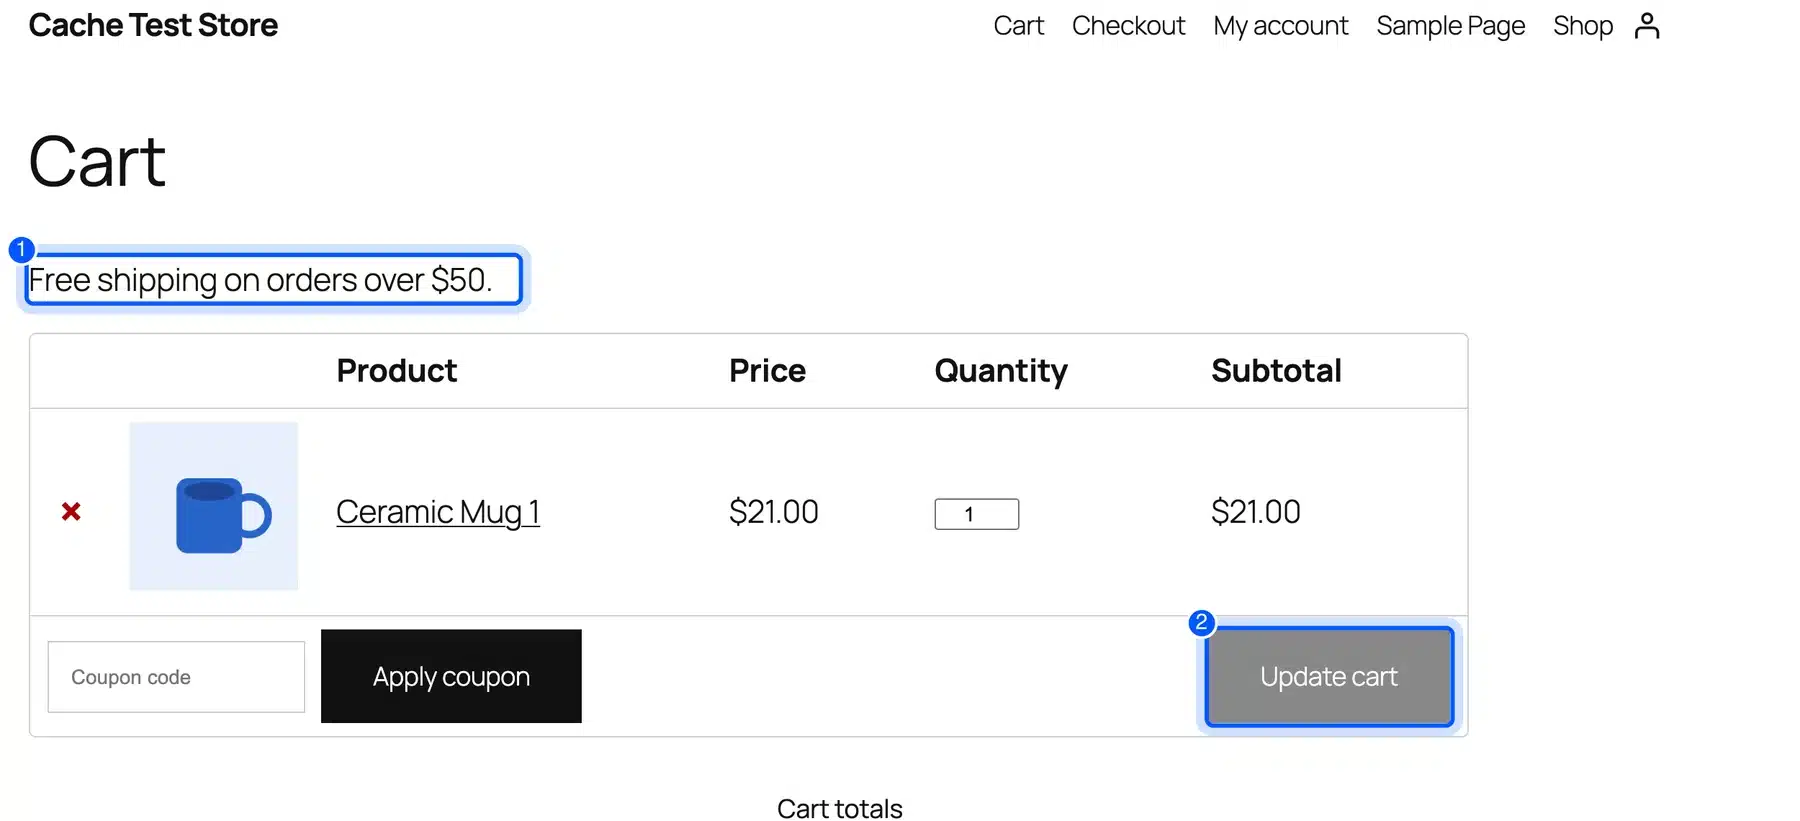
Use woocommerce_after_cart_table for a note under the table, such as a returns line. I confirmed in the same test that it prints on the shortcode cart.
Put custom code in a small plugin or a child theme. A plugin keeps the change when you switch themes, which makes it the better home for store logic.
The classic cart is easier to extend with code, but it is the older layout. WooCommerce 11.2 builds new stores with the Cart block. Plan to move to it when your customizations allow.
Cart Settings That Change How Customers Reach the Cart
Two settings decide how customers reach and use the cart: the Cart page assignment and the add-to-cart behavior. Both sit in WooCommerce, Settings. Check them before you spend time on design, because a wrong setting sends shoppers to the wrong page.
Under Settings > Products, the add-to-cart options hold two checkboxes. One redirects customers to the cart page after a successful addition. The other turns on AJAX add to cart buttons on archives.
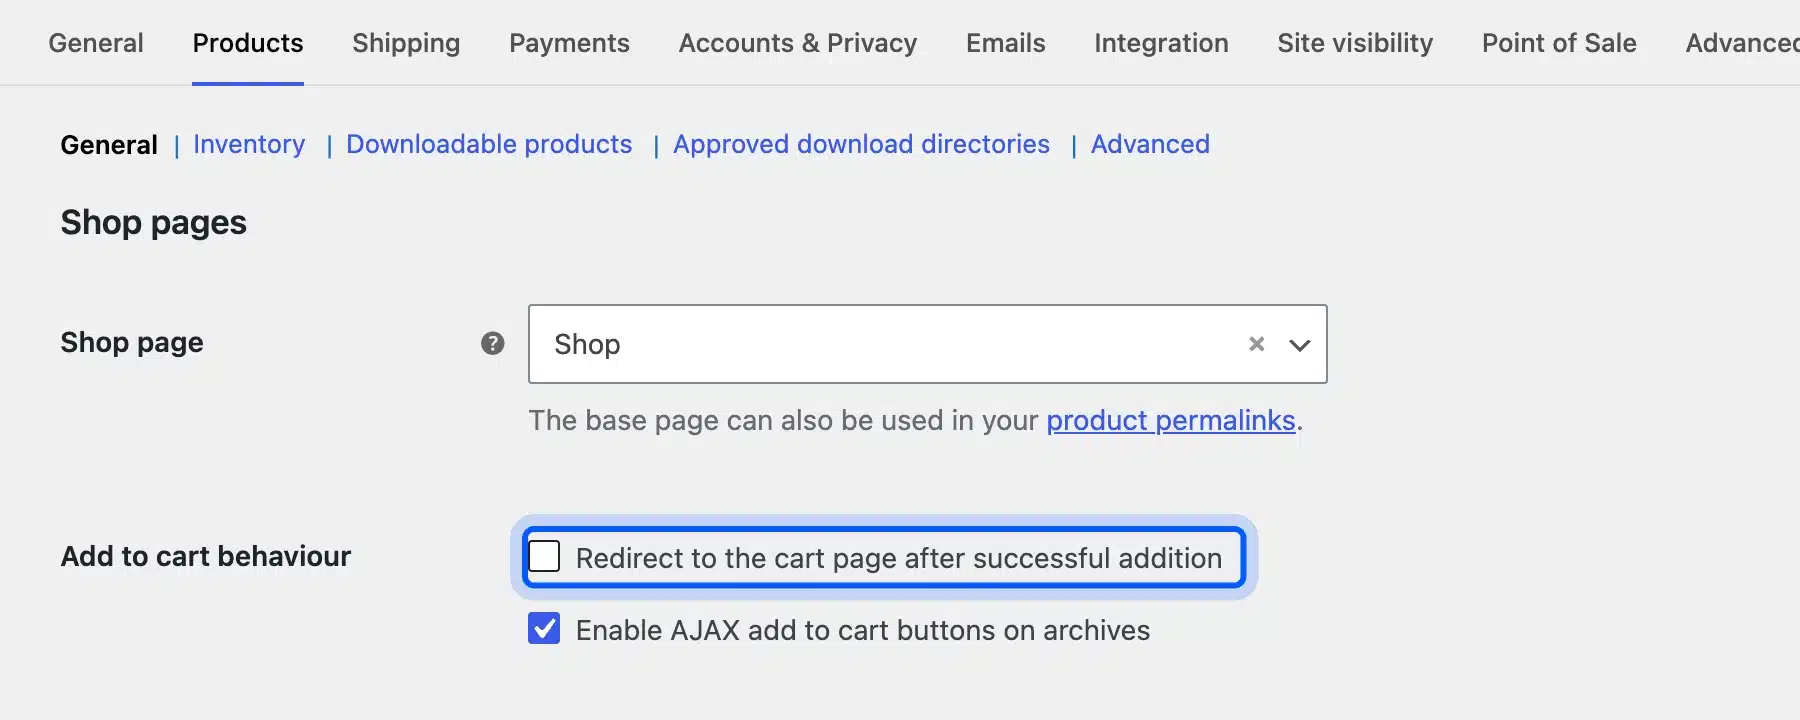
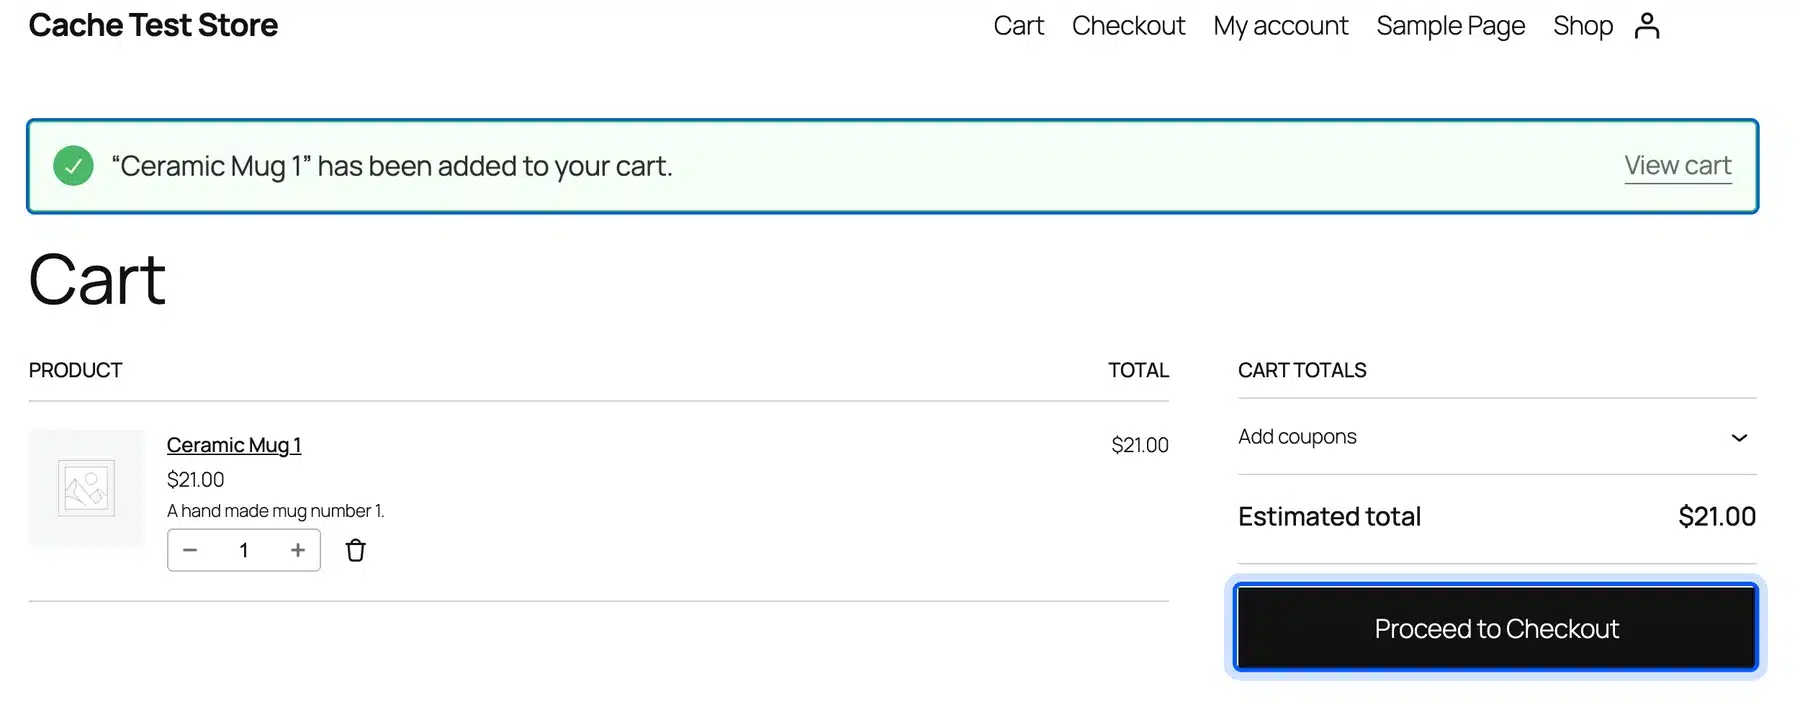
On my test store, the redirect was off and the AJAX option was on. With the redirect off, shoppers stay on the product list and see a View cart link, as the message in my front-end test showed.
The second option controls the Add to cart buttons on archive pages. With it on, a button adds the product without reloading the page, which keeps people browsing.
Turn the redirect on only if your shoppers buy one product at a time. A store with many small items works better when people keep browsing and open the cart themselves.
What to Add to a WooCommerce Cart Page
The most useful cart page additions are a shipping message, a clear coupon field and related products. An easy way to fix a wrong choice helps too. Each one removes a reason to leave. Add them one at a time and keep the page quick to read.
- Shipping message: A line such as the free shipping note shows what a shopper still needs to add.
- Coupon field: The Cart block collapses it behind an Add coupons link. Make sure your coupon codes are easy to find.
- Cross-sells: Show items that go with what is in the cart, such as a case for a phone.
- Trust notes: Add return and payment details near the checkout button.
- Variation changes: Let shoppers switch size or color without leaving the cart.
Order matters on the page. Put the shipping message above the table, where it is read first. Keep cross-sells below the totals so they do not push the checkout button down.
That last item is a common gap. When a shopper picks the wrong size, the default cart forces them to remove the line and start again. WooCommerce Cart Variation Switcher lets customers change a variation in the cart, and its product page lists prices from $19 as of October 2026.
Cart pages also feed your reports. If you track cart events, our guide on installing Google Tag Manager in WordPress shows how to add tags without editing theme files.
How to Test Your Cart Page After Editing
After you edit the cart, test it as a customer would, on a phone and a desktop. Add an item, change its quantity, remove it, apply a coupon and press the checkout button. Do this while logged out, because that is how most shoppers arrive.
For products sold one per order, you can also stop customers from changing the quantity in the cart.
Run through this short checklist each time:
- Add and remove: Put two products in the cart. Then remove one and confirm the total updates.
- Quantity: Change the quantity and confirm the subtotal changes without a page error.
- Coupon: Apply a real coupon code and check that the discount line appears.
- Empty cart: Remove everything and read the Empty Cart message for typos.
- Checkout link: Click Proceed to Checkout and confirm it opens the checkout page.
- Mobile view: Open the cart on a phone and check that the buttons are easy to tap.
Test one coupon with a limit as well, such as a minimum spend. You will see the exact error message customers see when they miss the rule.
Use a private window for each run so a saved login or cached page cannot hide a fault. Note the date and the plugin versions you tested so you can compare after the next update.
Common WooCommerce Cart Page Problems
Most cart problems come from caching, a conflicting plugin or a theme that overrides the template. Test with all three in mind. Clear the cache first, because it is the fastest check and the most common cause on busy stores.
- Cart shows old items: A page cache is serving a saved copy. Exclude the cart page from caching, as I found in my own cache test.
- Cart is empty after adding: A plugin or a cache is blocking the cart cookie. Test with other plugins off.
- My changes do not show: You may be editing the wrong page. Confirm the page in WooCommerce, Settings, Advanced.
- Custom code disappeared: Your hooks no longer run on the Cart block. Use the shortcode or move the change into CSS or blocks.
- Cart link goes to a 404: Save the page first and then re-save your permalinks.
When a problem shows only for some visitors, look at cookies first. WooCommerce stores the cart in a session that starts when a shopper adds an item. A security or cache plugin that blocks that cookie can leave the cart empty.
Test big cart changes on a staging copy of the store instead of the live site. A broken cart costs orders by the minute, and a staging test costs nothing.
In my caching plugin test, the WooCommerce cart, checkout and My account pages were not cached by all four plugins I tried. Most cache plugins skip them by default, but a CDN rule or a custom setting can undo that.
If you change the cart page address, check your sitemap and tracking too. Our WooCommerce SEO guide explains which store pages belong in search results and which do not.
Conclusion
You now know how to edit the WooCommerce shopping cart page with the Cart block, CSS and hooks. Use the block for new stores, and use the shortcode only when your code needs PHP hooks.
Test the cart after each change, on a phone as well as a desktop. Keep your edits small, because inner blocks and class names can shift when WooCommerce updates.
If you need more than colors and text, plan the change before you start. A cart that stays simple converts better than one with many extras.
Frequently Asked Questions (FAQs)
Q1. How do I edit WooCommerce cart page text?
Open Pages in the dashboard, edit the Cart page and select the Cart block. Change the text in the Empty Cart view, adjust the style toggles and save. For colors and spacing, add CSS in the Site Editor.
Q2. Can I edit the cart page without coding?
Yes. The Cart block lets you change text, move unlocked sections and switch two style options with no code. For deeper layout changes, you need CSS, hooks or an extension.
Q3. Why don’t my hooks work on the cart page?
The Cart block does not run old hooks such as woocommerce_before_cart. In my test, both lines I hooked appeared on the shortcode cart and not on the block cart. Switch to the [woocommerce_cart] shortcode or use blocks.
Q4. How do I switch back to the classic cart shortcode?
Edit the Cart page, remove the Cart block and add a Shortcode block with [woocommerce_cart]. Save the page. The classic table, coupon field and Update cart button then return.
Q5. How do I change the cart button color?
Add a CSS rule for .wc-block-cart__submit-button in the Additional CSS box of the Site Editor. Set background-color and keep contrast above 4.5 to 1. I tested #0256FF and it applied at once.
Q6. Where do I set which page is the cart?
Go to WooCommerce, Settings, Advanced and use the Cart page dropdown in Page setup. The cart, checkout and My account pages must each be separate pages.
Q7. Should I redirect customers to the cart after adding a product?
Only if most orders contain one item. The option sits in WooCommerce, Settings, Products. For stores where people add several items, leave it off so shoppers keep browsing.