
You can disable quantity change in the WooCommerce cart in about 10 minutes, using nothing more than your WordPress dashboard.
Most tutorials skip the one step that matters most: back up your site before you touch any code or settings. This guide walks through four beginner-friendly methods, from a built-in checkbox to a short PHP snippet. Every step is broken down small enough to screenshot as you go.
By the end, you will know which method fits your store, whether you are locking one product or every item in the cart.
What Does “Disable Quantity Change” Mean in WooCommerce?
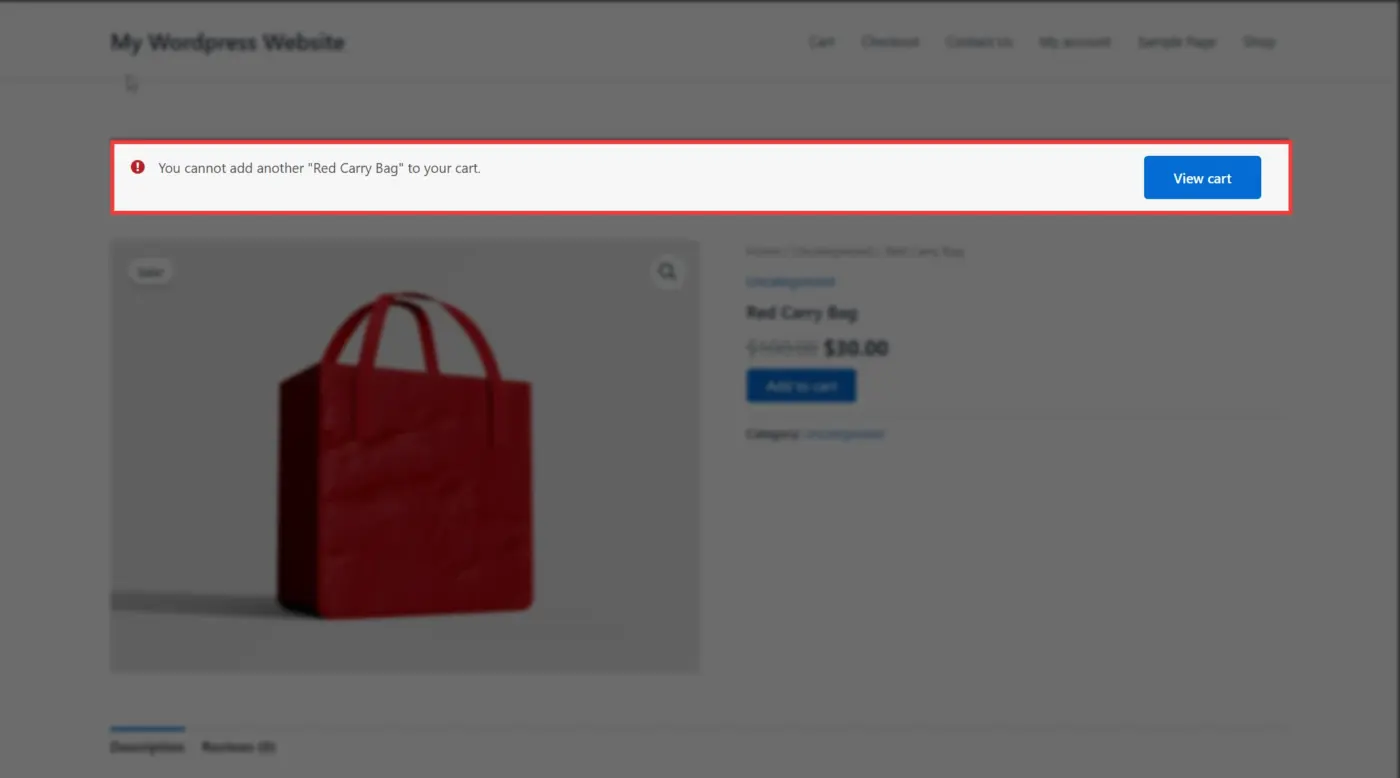
By default, WooCommerce shows a small number box next to every cart item. Customers can type a new number or click the arrows to raise or lower it.
Disabling quantity change means that box either disappears or stops accepting new values. The customer sees how many units they added, but they cannot edit that number from the cart page.
This is different from removing a product from the cart entirely. The item stays. Only the ability to adjust how many units of it stay goes away.
Store owners typically want to disable quantity change in the WooCommerce cart for one of two reasons. Either they need to protect limited inventory, or they need to keep pricing and bundling rules intact. Both goals point to the same core fix, just applied at a different scope, whether that’s one product or the entire catalogue.
Why Store Owners Disable Cart Quantity Changes
Here’s what most store owners don’t realise until it costs them a sale: an editable quantity box on a one-of-a-kind product invites mistakes.
A handful of situations come up again and again in support tickets:
- Unique or made-to-order items: Custom artwork, engraved products, and personalised digital downloads only make sense as a single unit per order.
- Limited stock: Say you have 12 units of something rare. Letting one shopper set the quantity to 12 can wipe out your entire supply in a single order.
- Subscription or membership products: A subscription doesn’t scale the same way a t-shirt does. Multiple “quantities” of the same plan usually confuse customers more than it helps.
- Fixed-price bundles: If three items are bundled at one price, changing the quantity of the bundle can silently break your intended pricing.
- Promotions with a per-customer limit: A “one per household” sale loses its point if shoppers can grab five in a single cart.
None of this means quantity changes are a bad feature. For most everyday products, they’re expected and useful. The goal here is control, not a blanket rule for your whole catalogue.
Here’s the distinction that trips up a lot of store owners. Disabling quantity change is not the same as limiting product quantity in the cart to a specific range. Disabling removes the ability to change the number at all, locking it at one. Limiting sets a floor and ceiling, like “minimum 2, maximum 10,” while still letting customers adjust within that range. If you want the second option, skip ahead to the comparison table near the end of this guide.
A quick real-world example makes this concrete. Say you sell a limited-run print with only 20 copies made. Without any restriction, one shopper could order 15 of them in a single cart, leaving almost nothing for anyone else. Store owners in this exact position usually decide to disable quantity change in the WooCommerce cart for that one product. Everywhere else in the store, quantity stays fully editable.
Before You Start: Backup and Access Checklist
Skip this section, and you’re rolling the dice with your live store. Every method below except one requires editing code or plugin settings, and a typo in either can break your cart page.
Before you touch anything, confirm you have:
- A recent backup of your site files and database, taken through your host or a backup plugin.
- Admin access to your WordPress dashboard (not just an editor or shop manager role).
- A staging site, if your host offers one, to test changes before they go live.
- FTP or file manager access, only needed if you plan to use Method 4.
If you don’t have a staging environment, that’s fine. Just test each change on a low-traffic product first, and keep the backup close by.
Method 1: Use the “Sold Individually” Setting (Per Product)
This is the fastest method, and the only one that needs zero code. It works at the individual product level, so it’s the right pick if only some of your catalogue needs this.
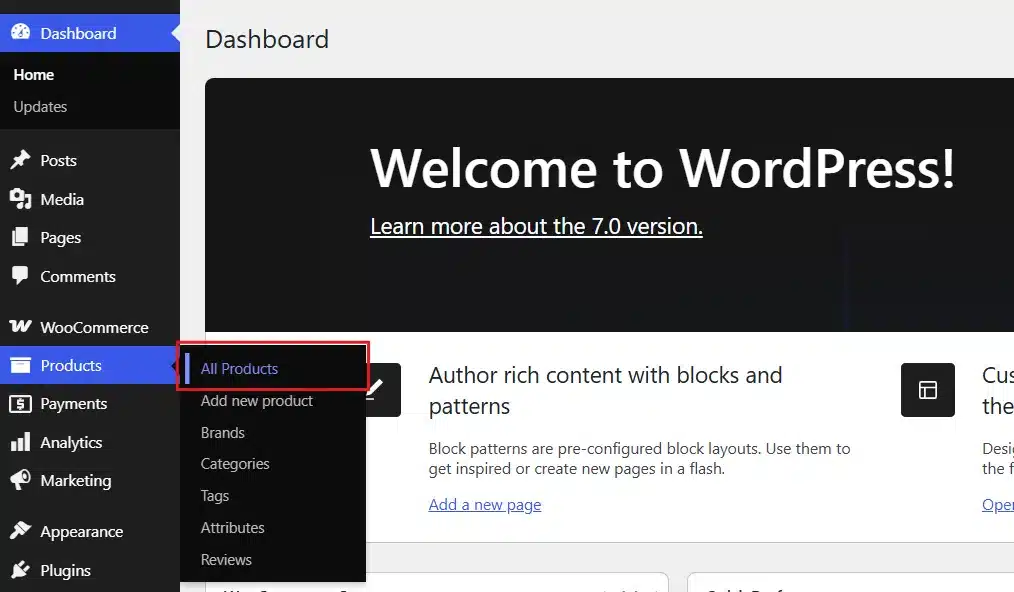
- From your WordPress dashboard, go to Products → All Products.
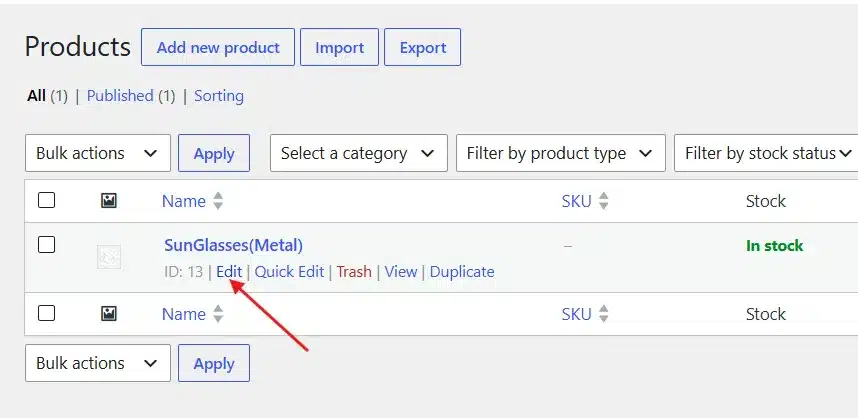
- Find the product you want to lock, and click Edit.
- Scroll down to the Product Data box in the middle of the screen.
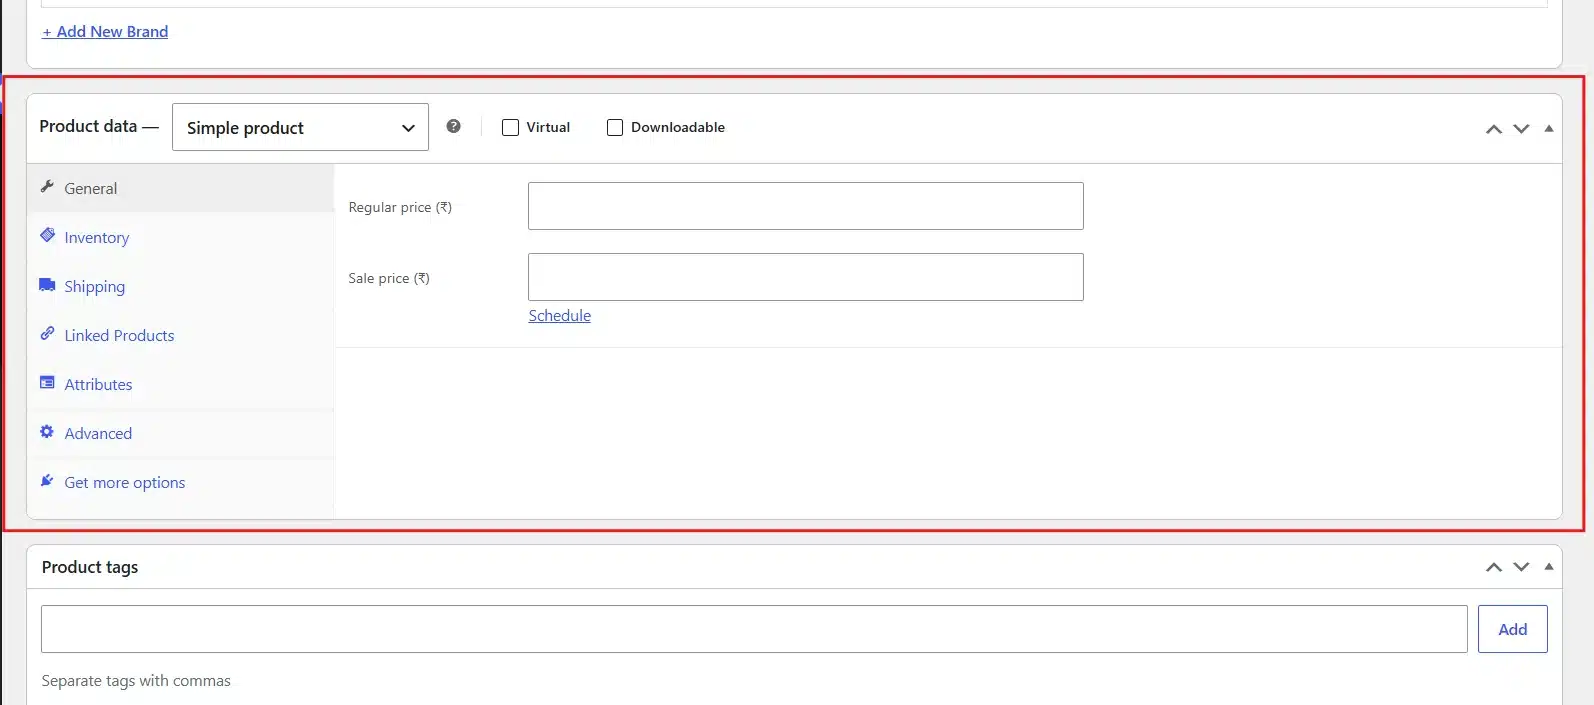
- Click the Inventory tab inside that box.
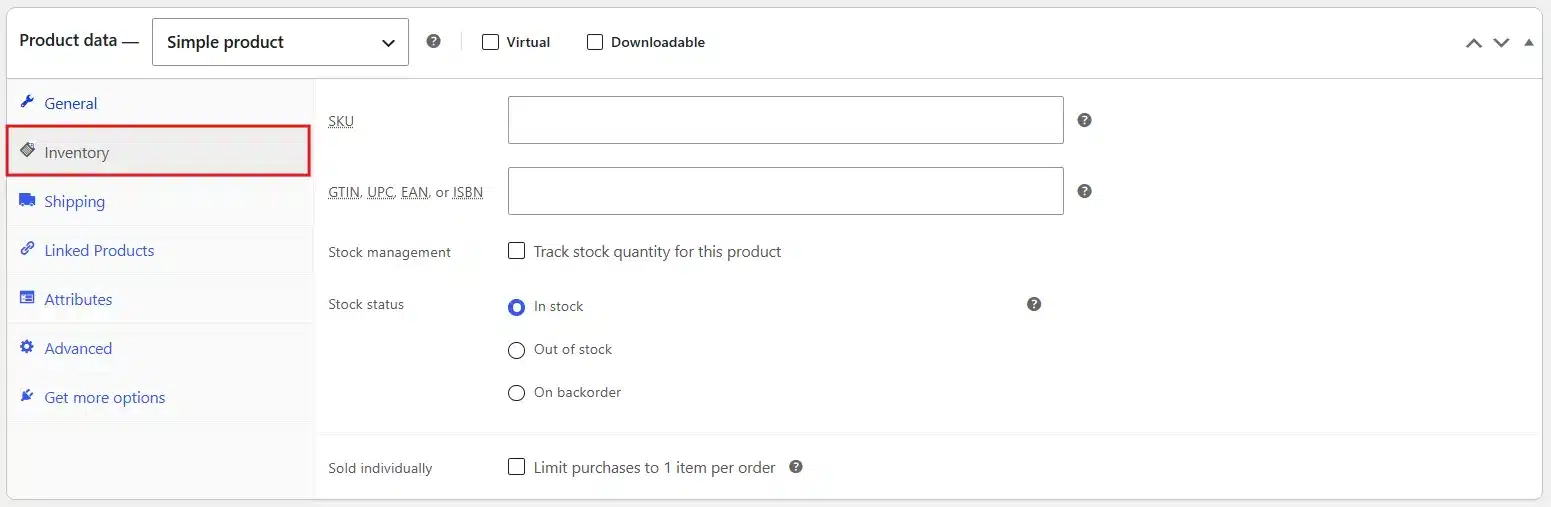
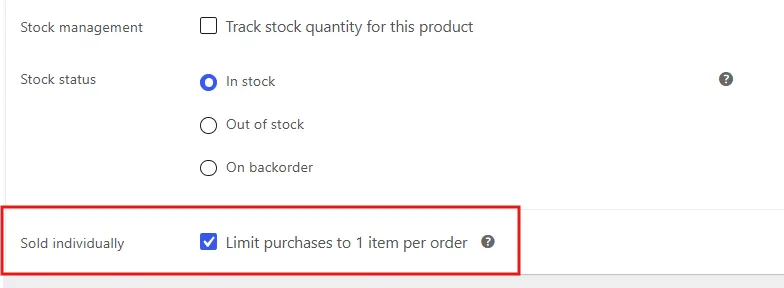
- Check the box labelled Sold Individually.
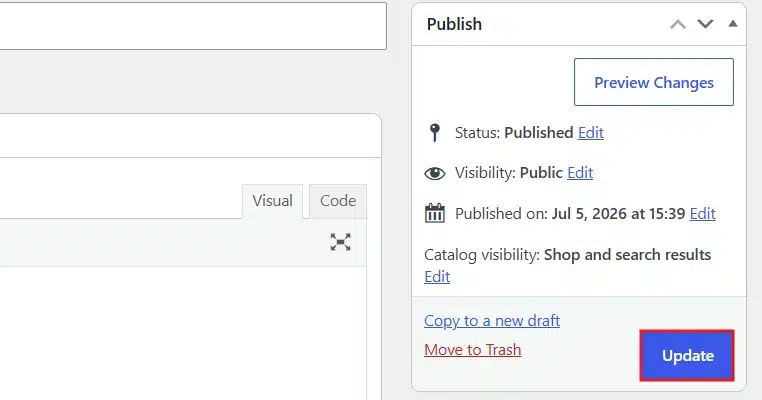
- Click Update in the top right to save the product.
- Open your store’s front end, add the product to your cart, and visit the cart page to confirm.
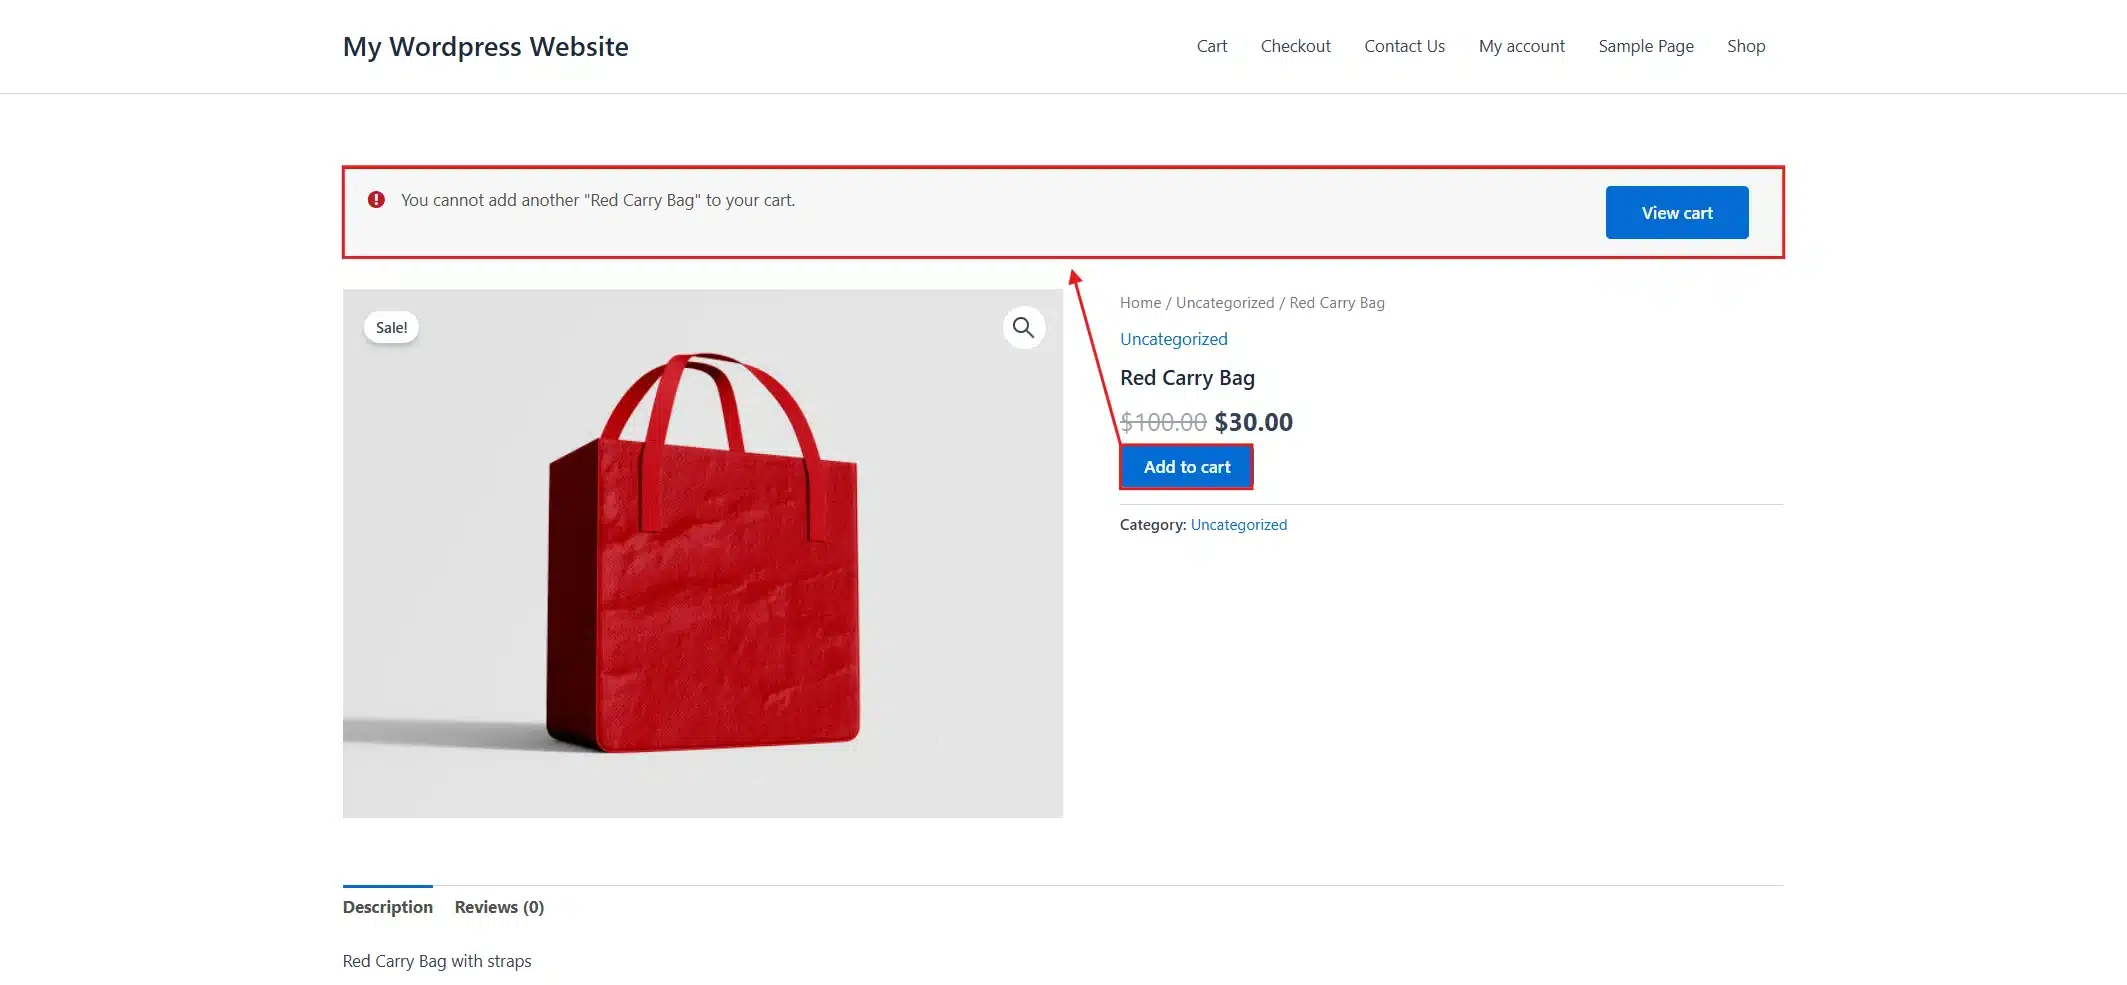
What this setting does: According to WooCommerce’s own product settings documentation, it caps the product at one unit per order. It also removes the quantity box from both the product page and the cart. Customers can still buy it. They just cannot buy more than one at a time.
Trade-off: “Sold Individually” is all-or-nothing per product. There’s no setting to allow, say, a maximum of three. For that level of control, you’d need a dedicated quantity plugin instead.
Repeat these seven steps for each product you want locked if you’re managing more than a dozen products, that gets repetitive fast. That’s exactly the scenario Method 2 is built for. It applies the same rule across your entire catalogue in one place, instead of product by product.
Method 2: Add a Code Snippet with WPCode
Use this method when you want to disable quantity changes site-wide, or for a specific group of products, without editing your theme files directly.
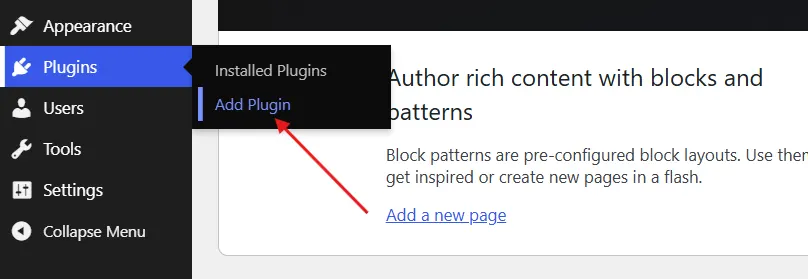
- From your dashboard, go to Plugins → Add New Plugin.
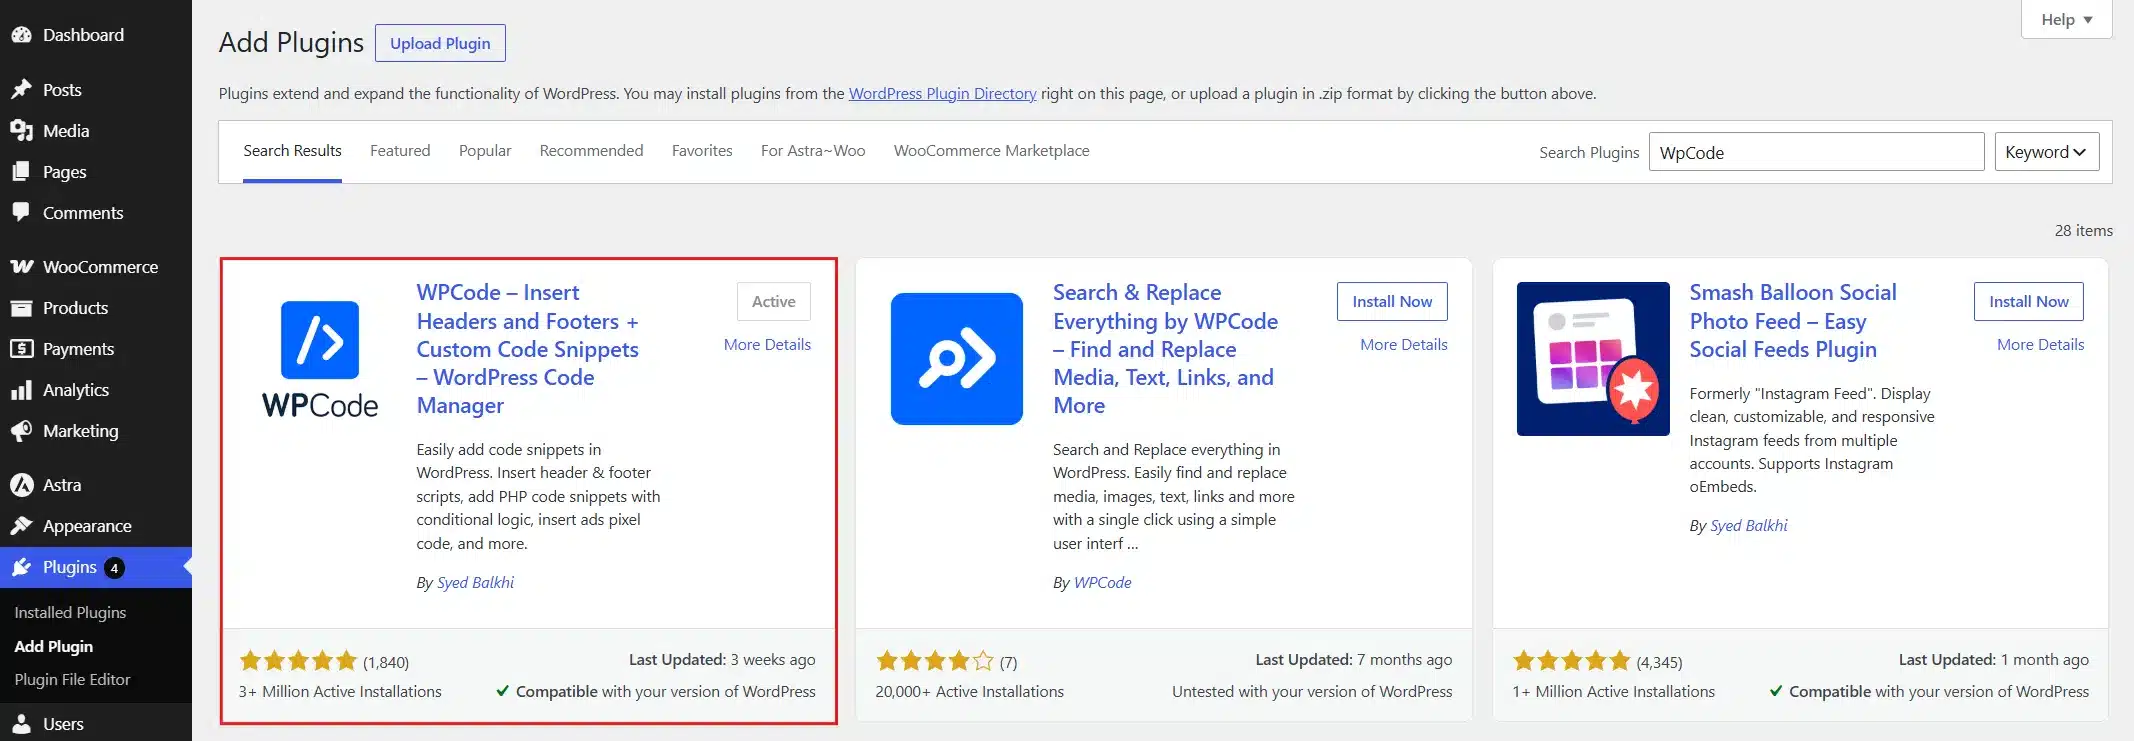
- Install and activate the WPCode plugin.
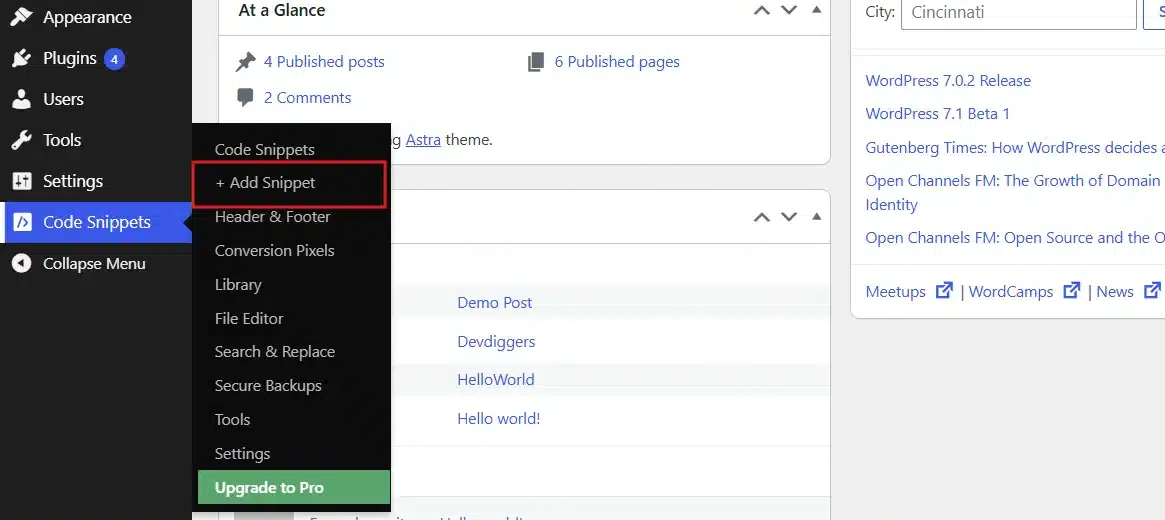
- After Installation, go to Code Snippets → + Add Snippet.
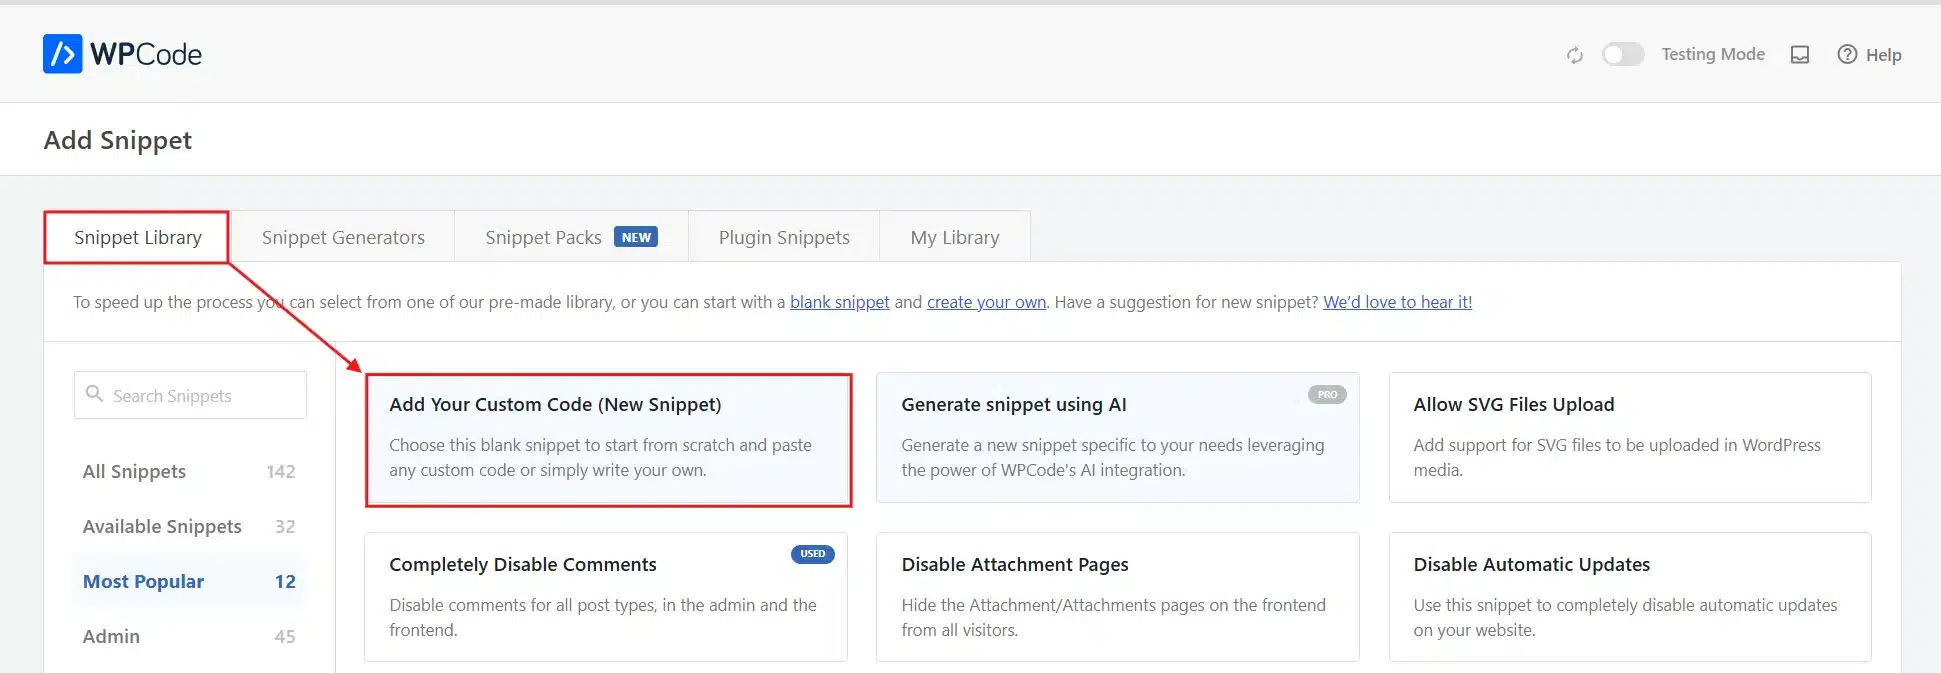
- Choose Snippet Library → Add Your Custom Code.
- Give the snippet a clear title, such as “Disable Quantity Change in Cart,” and Set Code Type to PHP Snippet using the dropdown on the right.
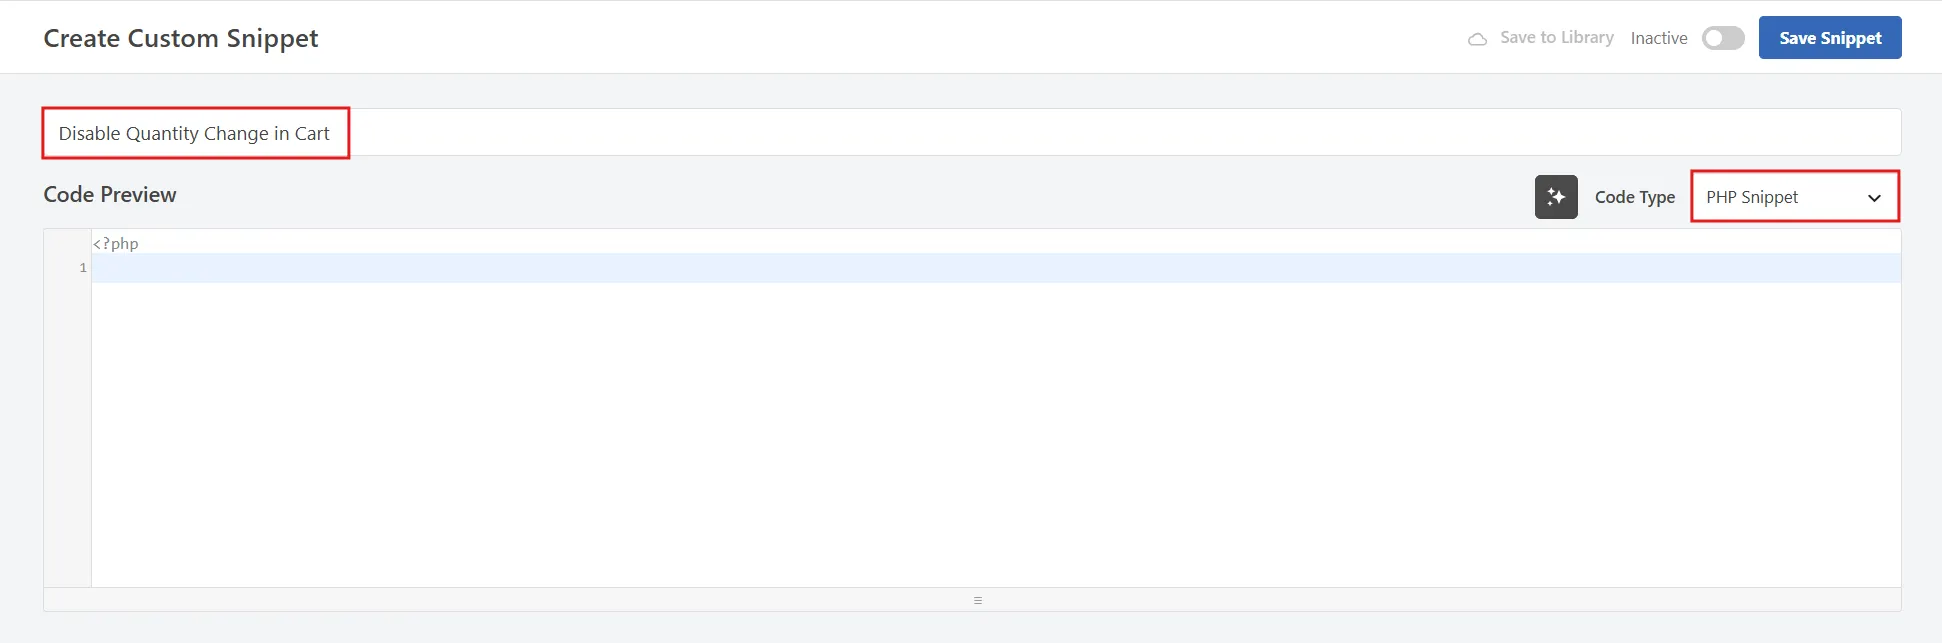
- Paste this code into the Code Preview box:
add_filter( 'woocommerce_is_sold_individually', 'devdiggers_disable_cart_quantity', 10, 2 );
function devdiggers_disable_cart_quantity( $return, $product ) {
    return true;
}
- Scroll down and set Insertion→ Location → Run Everywhere.
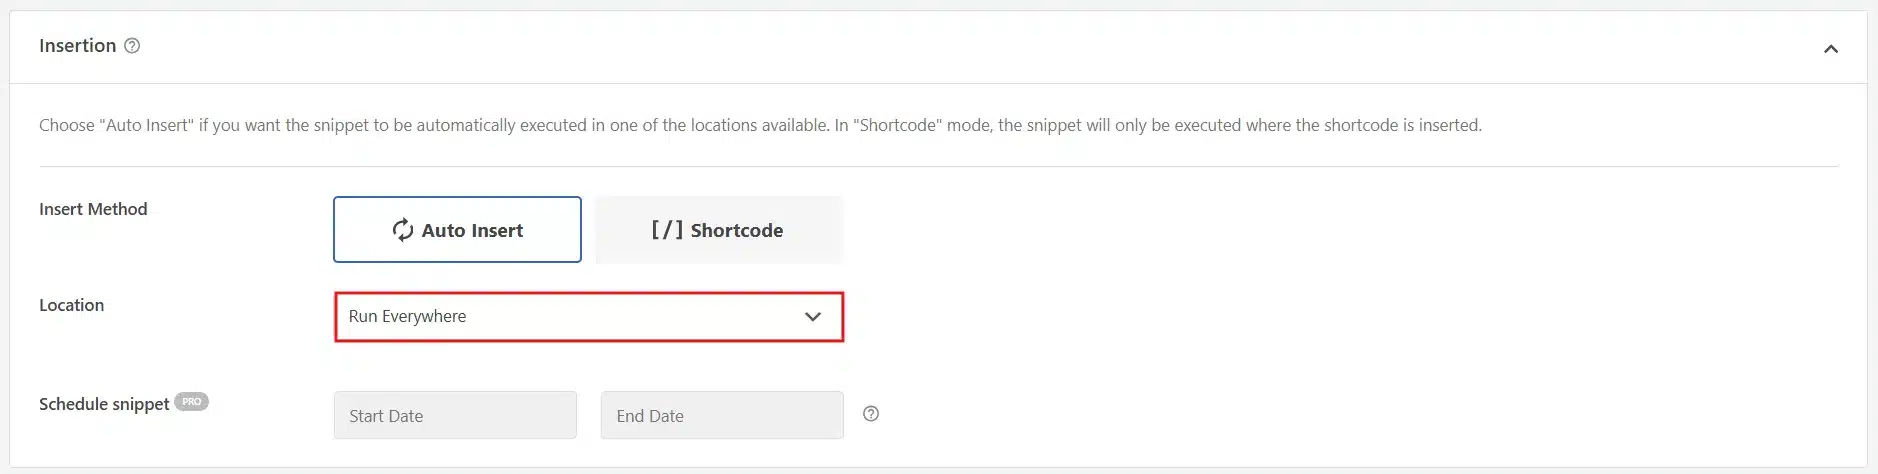
- Toggle the snippet to Active, then click Save Snippet.
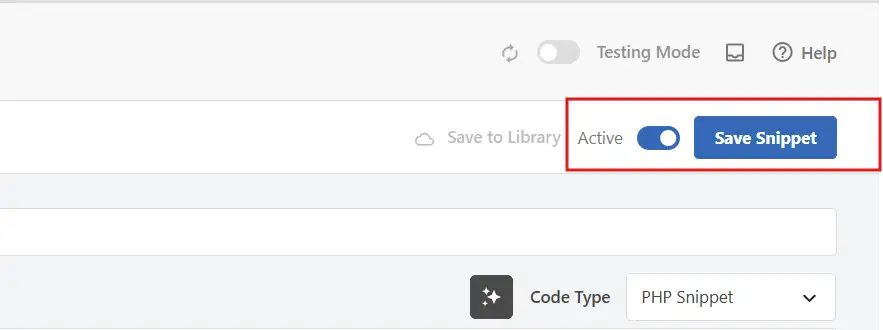
This snippet reuses the same woocommerce_is_sold_individually filter that Method 1 sets manually, just applied to every product at once. That’s a support-level detail worth knowing. If a specific product still shows a changeable quantity after adding this, check for a conflict. A theme or another plugin may override that same filter with a lower priority.
If you only want this to apply to certain products, swap the function for this version instead:
add_filter( 'woocommerce_is_sold_individually', 'devdiggers_disable_quantity_for_ids', 10, 2 );
function devdiggers_disable_quantity_for_ids( $return, $product ) {
    $target_ids = array( 123, 456 );
    if ( in_array( $product->get_id(), $target_ids ) ) {
        return true;
    }
    return $return;
}
Replace 123, 456 with the actual product IDs you want locked, separated by commas. You’ll find each product’s ID by hovering over its title in Products → All Products. The number appears in the link shown at the bottom of your browser.
Setting up this snippet takes about five minutes once WPCode is installed. The harder part is usually deciding which products need it, not writing the code itself.
Method 3: Hide the Quantity Field with CSS (Visual Only)
This is the quickest way to visually disable quantity change in the WooCommerce cart, but it’s worth being upfront about its limits. CSS only hides the quantity box from view. It doesn’t stop the quantity from being changed through a direct link or a browser tool. Pair it with Method 1 or 2 if you need a real functional lock.
- From your dashboard, go to Appearance → Customize.
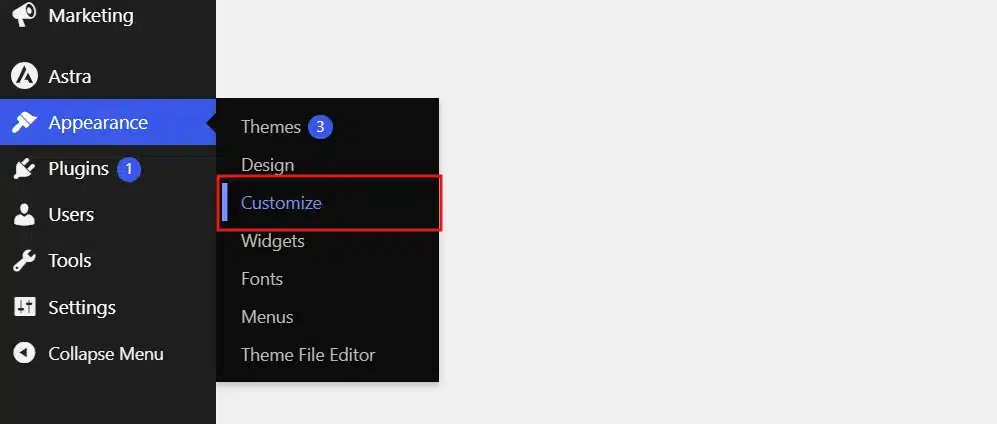
- Click Additional CSS in the left panel.
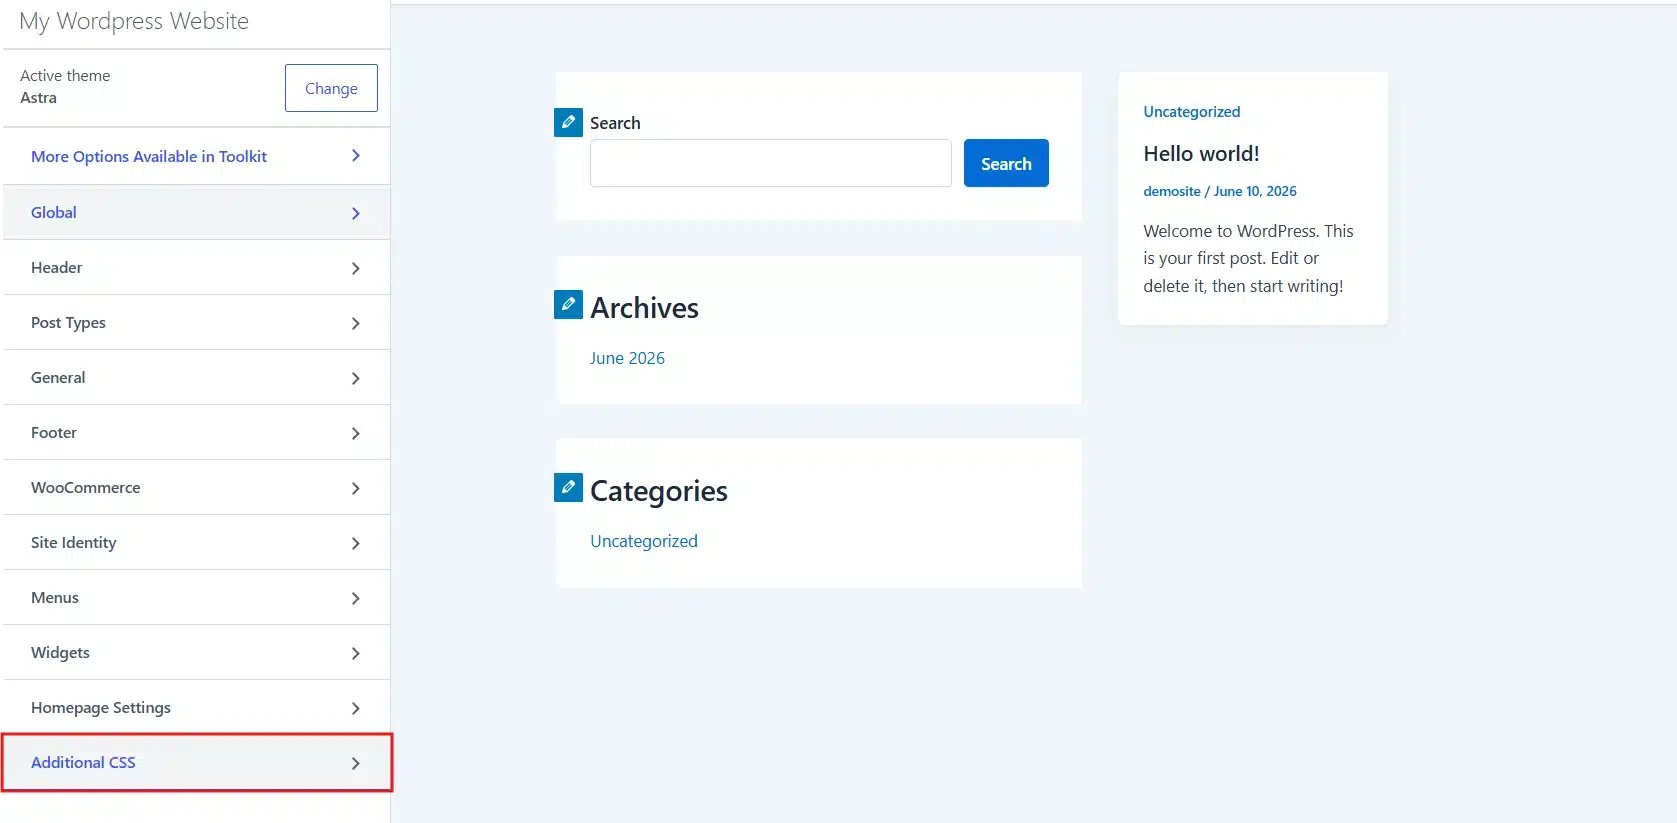
- Paste the following code into the box:
.woocommerce-cart .quantity {
    display: none;
}
- Click Publish at the top of the screen, and the quantity field is gone.
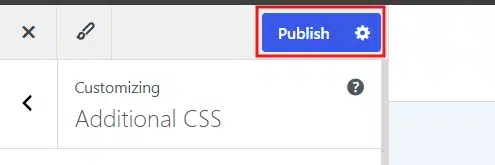
Use this when your goal is a cleaner cart layout for products that are already capped some other way. Don’t rely on it as your only line of defence against quantity changes.
Method 4: Edit functions.php Directly (Advanced Users)
This method gives developers a direct way to disable quantity change in the WooCommerce cart without installing an extra plugin. Skip it unless you’re comfortable editing theme files, ideally through a child theme. Editing the parent theme’s functions.php directly means losing your change on the next theme update.
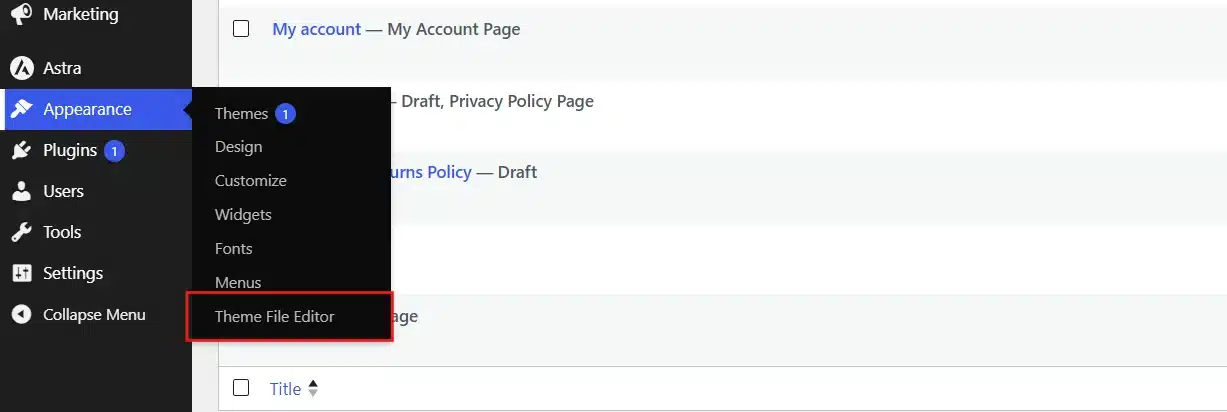
- From your dashboard, go to Appearance → Theme File Editor.
- On the right, select
functions.phpunder Theme Files.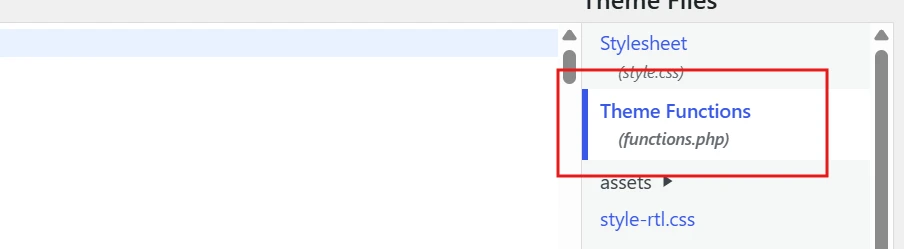
- Paste in the same filter code shown in Method 2.
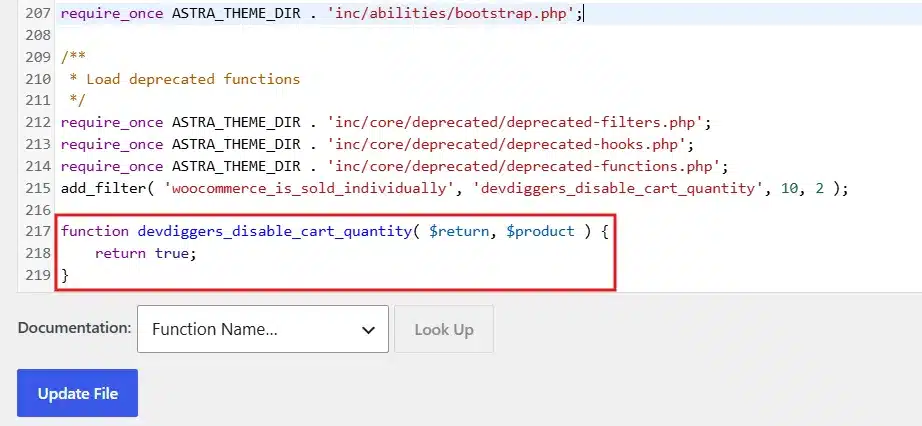
- Click Update File to save.
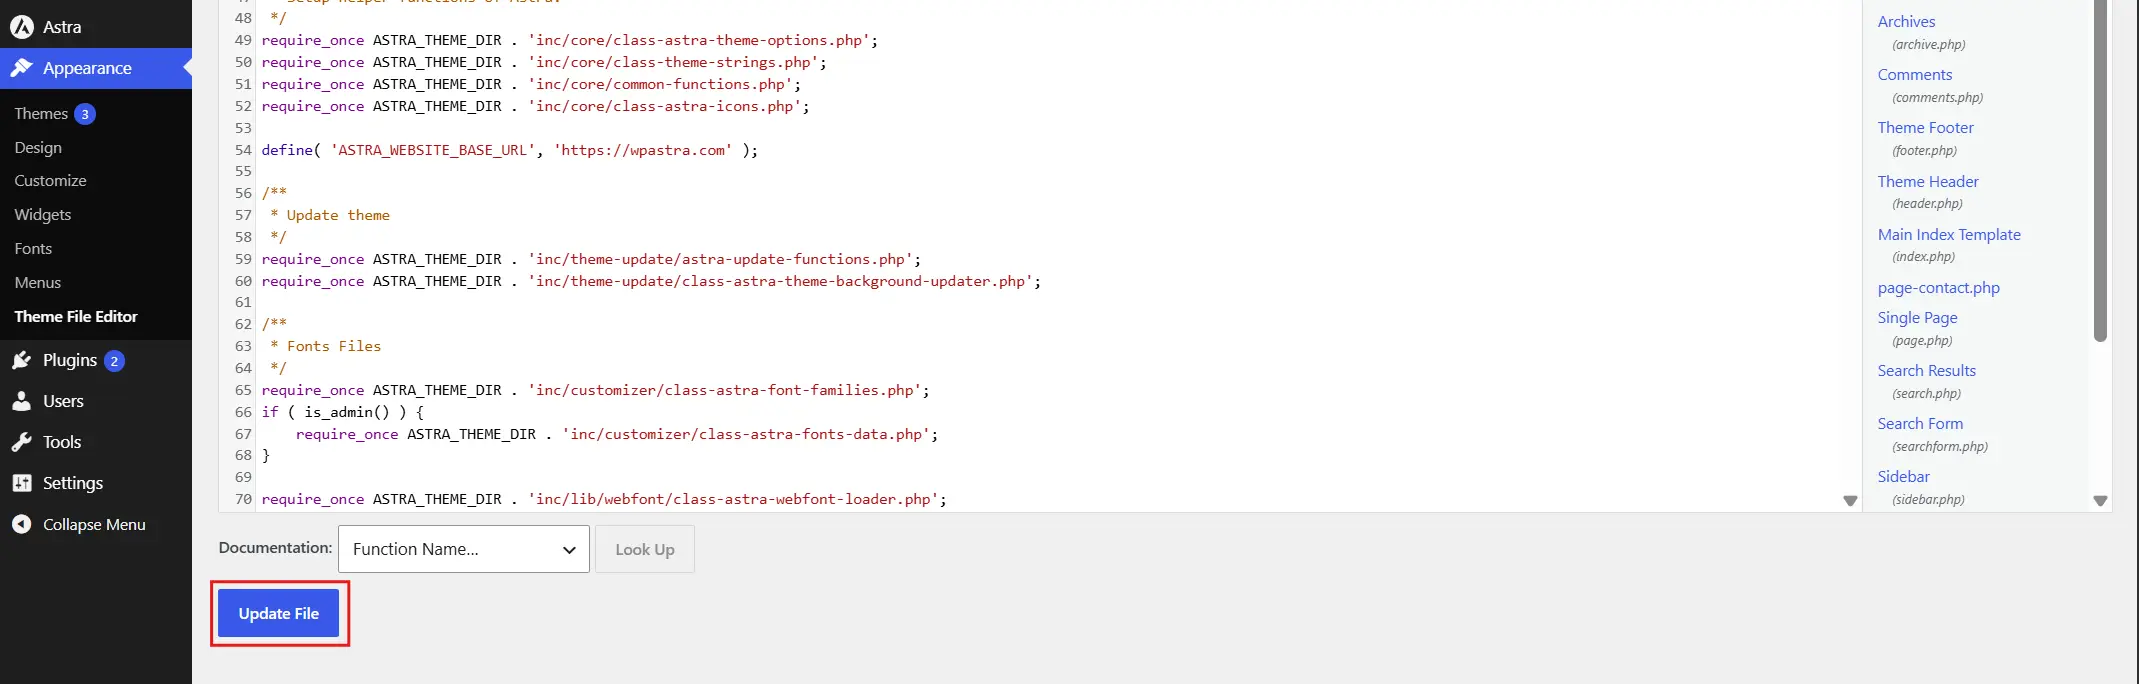
A quick version note: as of WooCommerce 7.2 and later, this filter disables the quantity field rather than physically removing it from the page markup. If your theme adds custom quantity controls outside the standard WooCommerce template, this filter alone might not touch those. Test on a real cart before trusting it in production.
Does This Work with Variable Products?
A common question is whether you can disable quantity change in the WooCommerce cart for variable products the same way. Variable products, items with size or color options, follow the same Sold Individually rule, but only at the parent level. Enabling it locks the entire product to one unit combined across all variations, not one unit per variation.
Say you need shoppers to pick one unit per variation while still choosing freely between variations. The settings for that are covered in this guide on how to control WooCommerce variable products.
A related question comes up often in support: what if a shopper wants to change which variation they picked, not the quantity? That’s a different feature entirely. A WooCommerce cart variation switcher plugin lets customers swap the size or colour of an item without removing it from the cart first. It pairs well with a locked quantity, since there’s no other reason left to touch the cart line.
How to Test That It Worked?
Don’t skip this step just because a method “looks” finished in the admin area.
- Open your store in an incognito or private browser window.

- Add the affected product to the cart.
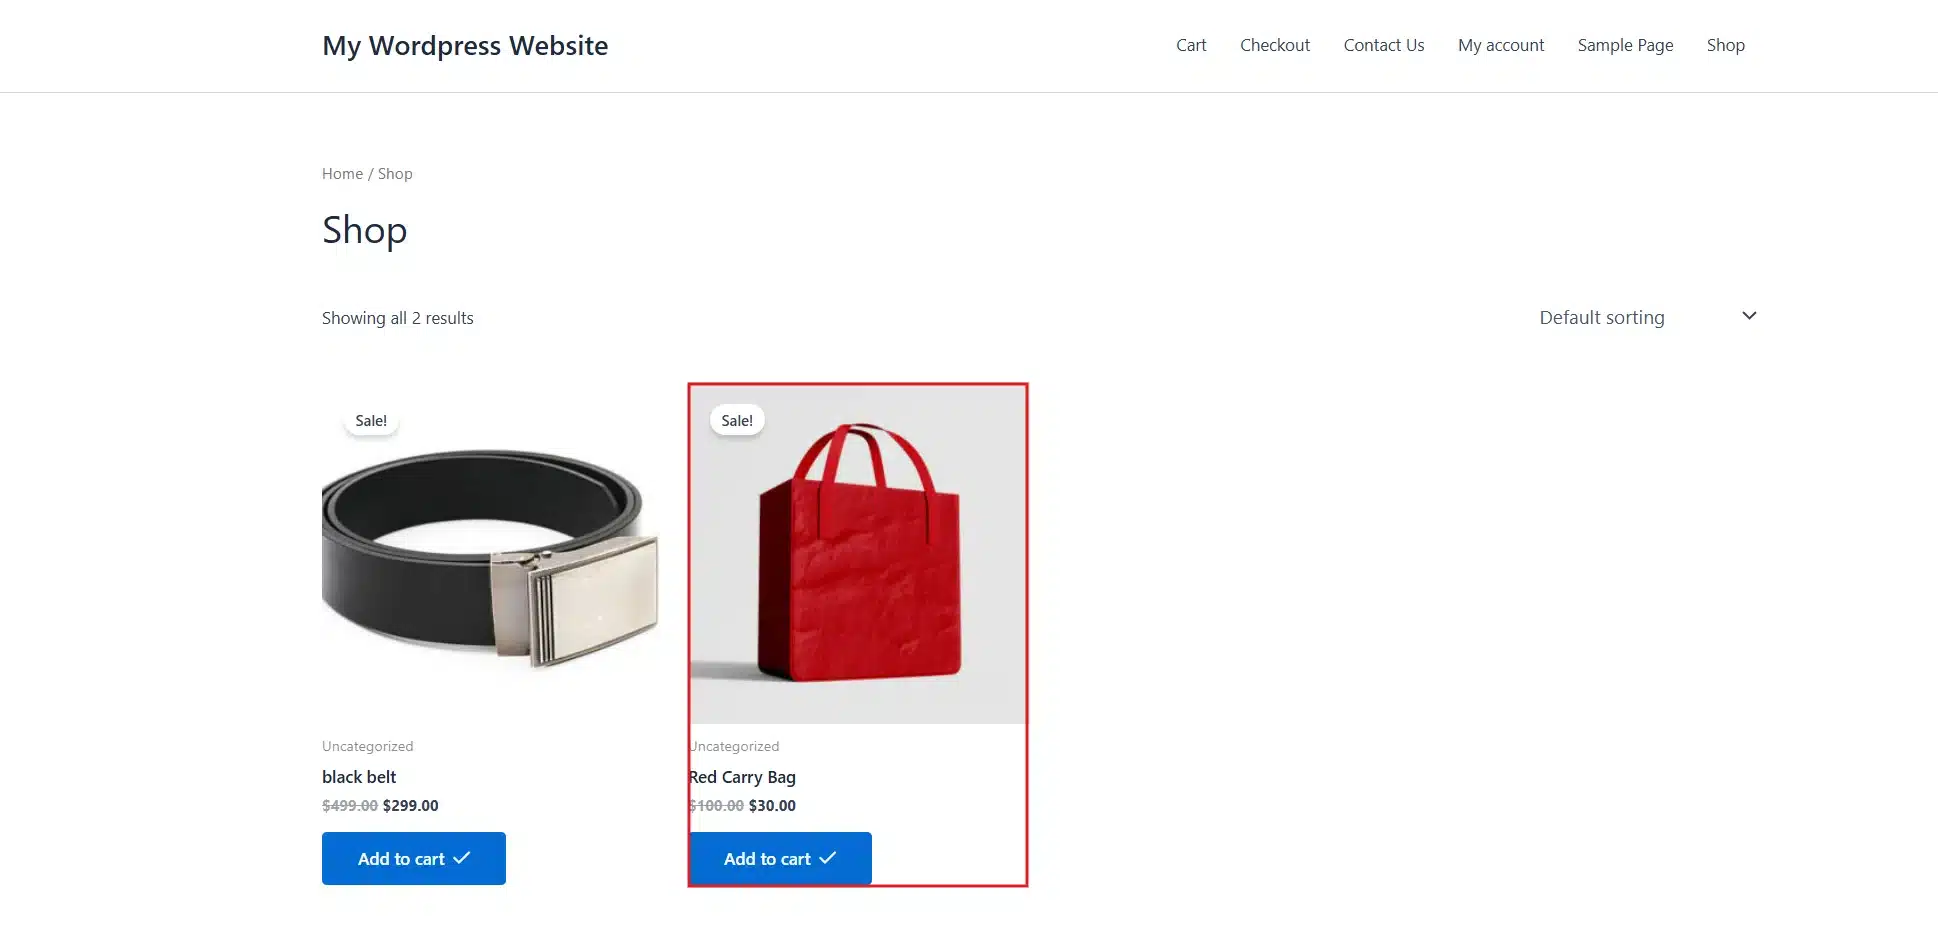
- Confirm the field is either gone or locked at one unit.
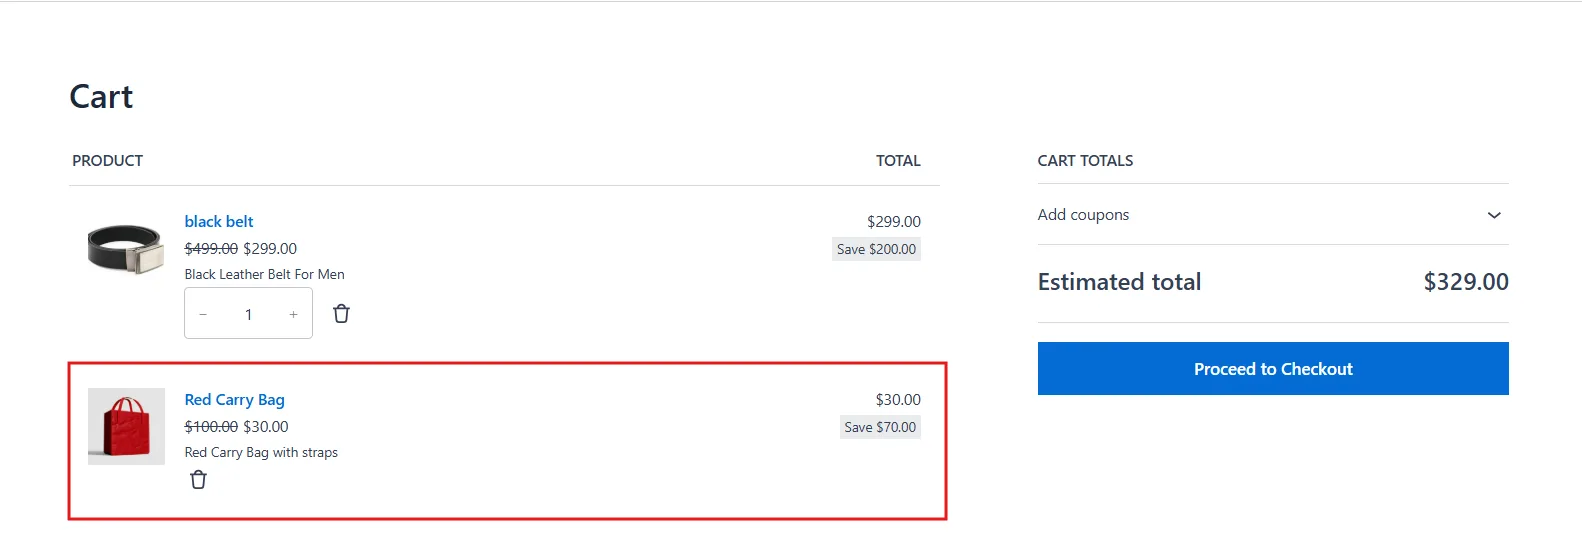
That last check matters more than it sounds. Some setups quietly add a second cart row rather than blocking the action. That looks like a bug to shoppers, even though the plugin is technically doing its job.
Common Mistakes and Troubleshooting
Even with the right steps, attempts to disable quantity change in the WooCommerce cart can run into a handful of predictable snags. A few issues show up often enough to call out directly.
- The quantity box still appears after adding the code: Check for caching first. Page caching and CSS/JS minification plugins can serve an old version of your cart page. Clear the cache and reload.
- One product ignores the “Sold Individually” setting: Confirm you clicked Update after checking the box. It’s an easy step to miss, and the change silently doesn’t save without it.
- CSS hides the field, but the quantity can still change on refresh: That’s expected. CSS handles appearance only. Combine it with Method 1 or 2 for an actual functional lock.
- The snippet breaks the cart page entirely: This usually means an extra character was copied along with the code. Deactivate the snippet through WPCode’s dashboard toggle, recopy the code carefully, and re-save.
- Quantity changes still work in the mini cart but not the main cart page, or the reverse: Some themes build a custom mini cart template that doesn’t pull from the standard WooCommerce hooks. If the CSS or filter method only fixes one location, you’ll likely need a small addition to the mini cart template itself. A theme-specific CSS selector alongside the one shown in Method 3 can also help.
- The product still shows as available in bulk on a third-party page builder: Elementor, Divi, and similar builders sometimes render their own cart widgets that bypass the default WooCommerce template. Check the builder’s widget settings for a quantity toggle before assuming the code snippet failed.
Which Method Should You Use to Disable Quantity Change?
Here’s a side-by-side view of all four ways to disable quantity change in the WooCommerce cart. Use it to match the right method to your store.
| Method | Best For | Coding Needed | Scope |
|---|---|---|---|
| Sold Individually | A handful of specific products | None | Per product |
| WPCode Snippet | Store-wide or a defined product list | Basic copy-paste | Site-wide or selected IDs |
| CSS Hide | Cleaning up the cart visually | Basic copy-paste | Site-wide (visual only) |
functions.php Edit | Developers comfortable with child themes | Moderate | Site-wide or selected IDs |
If you’re managing quantity limits rather than blocking changes outright, this is worth a look. Say you want customers to buy two to five units but no more. A dedicated WooCommerce tiered pricing plugin handles that kind of rule without custom code. It can even reward larger orders instead of just capping them.
Quick Recap Before You Go
If you only remember three things from this guide, make it these:
- Back up first: Every method except the checkbox involves code or settings that can misfire.
- Match the method to your scope: One product needs Method 1. Your whole store needs Method 2.
- Test in a private browser window: Caching hides broken changes more often than it should.
Store owners who disable quantity change in the WooCommerce cart without testing often find out something went wrong the hard way. A customer tells them, not their own dashboard. A five-minute test avoids that entirely.
Conclusion
Disabling quantity change in the WooCommerce cart comes down to picking the method that matches your scope.
Use Sold Individually for a handful of products, and WPCode for store-wide control without editing theme files. Reserve the functions.php route for cases where you already work inside a child theme.
Whichever method you choose, test it in an incognito window before calling it done.
If you’re also reworking how your cart page looks and behaves, it’s worth handling both changes in the same session so you’re not testing twice.
Frequently Asked Questions (FAQs)
Q1. Does disabling quantity change affect existing orders already placed?
No. When you disable quantity change in the WooCommerce cart, the change only affects new cart activity from that point on. Orders that were already completed, or that were already sitting in someone’s cart before you made the change, are not altered.
Q2. Will disabling quantity change hurt my conversion rate?
It depends on the product. For unique or limited-stock items, it usually helps by preventing overselling. For everyday products where bulk buying is common, removing that flexibility can frustrate shoppers, so apply it selectively.
Q3. Can customers still buy multiple units by adding the product to the cart twice?
With the “Sold Individually” setting, no. WooCommerce blocks the second add-to-cart attempt for that product entirely. The CSS-only method does not prevent this, since it only hides the field.
Q4. Does this work with the WooCommerce mini cart, not just the main cart page?
The code-based methods using the woocommerce_is_sold_individually filter apply to both the mini cart and the full cart page. Both templates read from the same product setting. Theme-specific mini carts that don’t use the standard template may need extra CSS.
Q5. Is there a way to set a maximum quantity instead of blocking changes completely?
Yes. The methods here fully lock quantity at one unit. If you want to allow a capped number, like a maximum of three per order, you would need a quantity rules plugin instead. The “Sold Individually” setting doesn’t support custom limits.
Q6. Does this feature work with WooCommerce’s High-Performance Order Storage (HPOS)?
Yes. Quantity control through the “Sold Individually” flag and the related filter operates at the product and cart level. That holds true whether your store uses HPOS or the legacy post-based order storage.
Q7. How do I undo this and let customers change quantity again?
Reverse whichever method you used. Uncheck “Sold Individually” and click Update, deactivate the WPCode snippet from its dashboard toggle, or remove the CSS from Additional CSS. Each change is fully reversible and takes effect immediately.