

WooCommerce Apple Pay comes from your payment plugin, because WooCommerce itself has no Apple Pay setting. WooPayments, Stripe and Square all add it for free, and each one puts the setting in a different place.
I installed all three on our WordPress 7.1.3 and WooCommerce 11.2 test store in October 2026. Then I opened every Apple Pay screen to see where each toggle lives and how each plugin handles domain verification. No payment account was connected and no live Apple Pay charge was run, since that needs a real account, HTTPS and an Apple device.
You get the requirements first, then a plugin comparison and the setup steps for each plugin. After that come Google Pay, the reasons the button goes missing and how to test before you go live.
WooCommerce Apple Pay Requirements
WooCommerce Apple Pay needs HTTPS on every page and a domain verified with Apple. The shopper needs a supported Apple device, and you need a plugin account in a supported country. Your plugin handles the domain step while you handle HTTPS and the account.
Apple’s Apple Pay on the web documentation lists the website rules in three lines. The one that blocks most stores is the last: serve all pages that include Apple Pay over HTTPS.
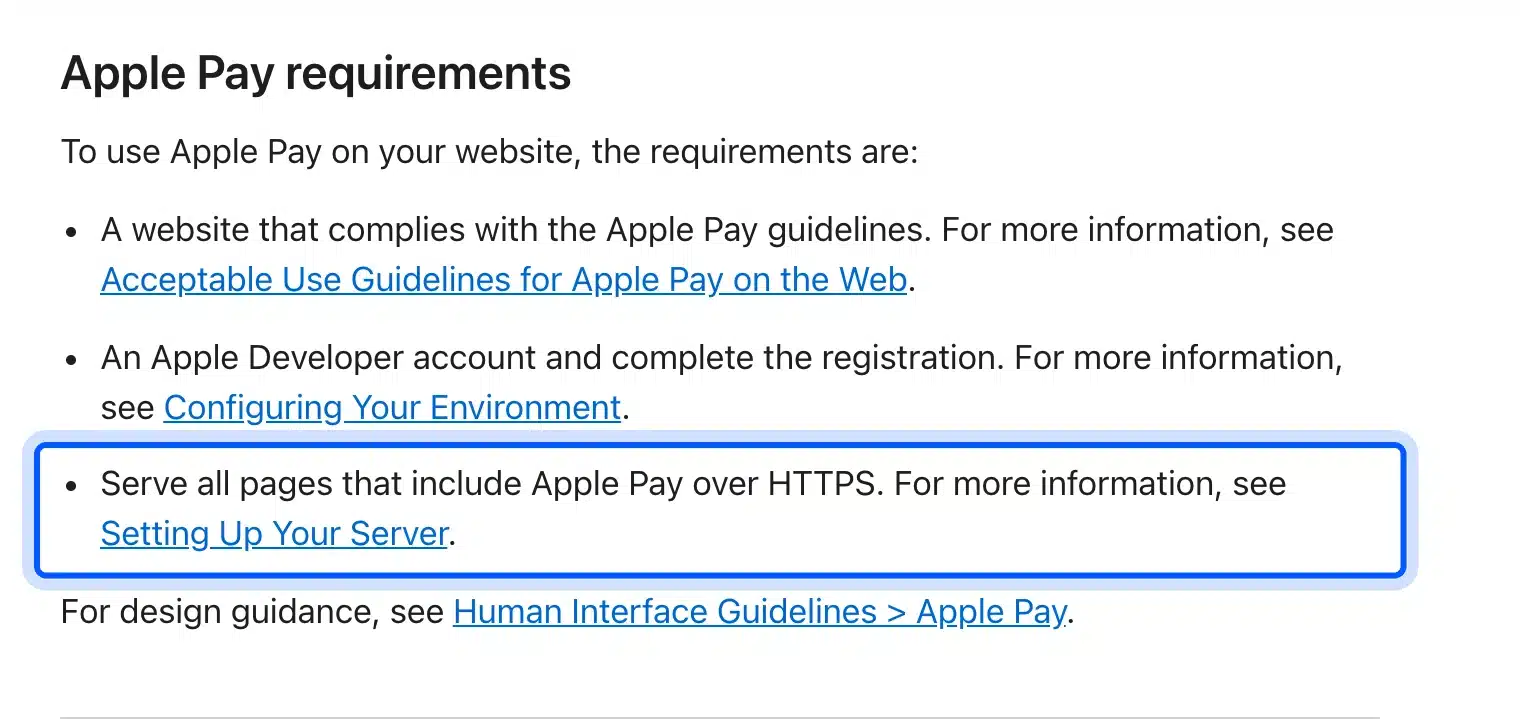
Here is what each requirement means for a WooCommerce store:
- HTTPS everywhere: Product, cart and checkout pages all need a valid SSL certificate.
- Domain verification: Apple checks a file at
/.well-known/apple-developer-merchantid-domain-associationon your domain. - Apple device: Apple Pay works on iPhone and iPad, and on a Mac with Touch ID or a nearby iPhone or Apple Watch.
- Supported country: Your payment plugin must offer Apple Pay where your business is based.
- A card in Wallet: The shopper needs a card in Apple Wallet to finish paying.
Apple’s sandbox testing guide adds one server detail. Every page hosting an Apple Pay button must use HTTPS, and your web server must support TLS 1.2.
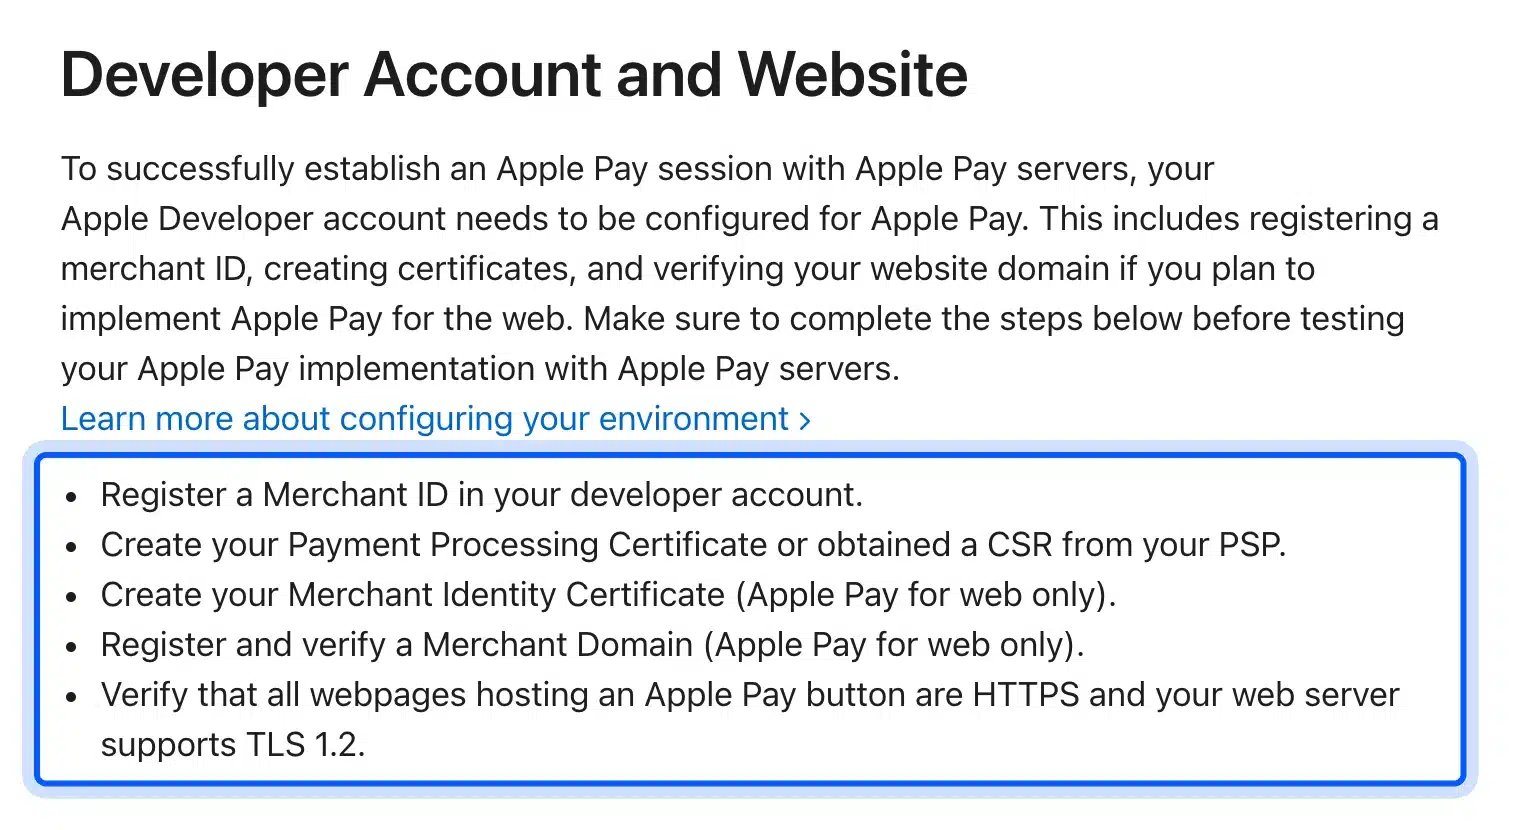
Apple’s domain setup page also says you must verify every top level domain and subdomain that shows the button. So a store on shop.example.com and example.com needs both verified.
Apple Pay WooCommerce Plugins Compared
Three free plugins add Apple Pay to WooCommerce: WooPayments, the Stripe plugin and Square for WooCommerce. All three show the button on product, cart and checkout pages, and all three switch Google Pay on with it. They differ in where the setting lives and how they verify your domain.
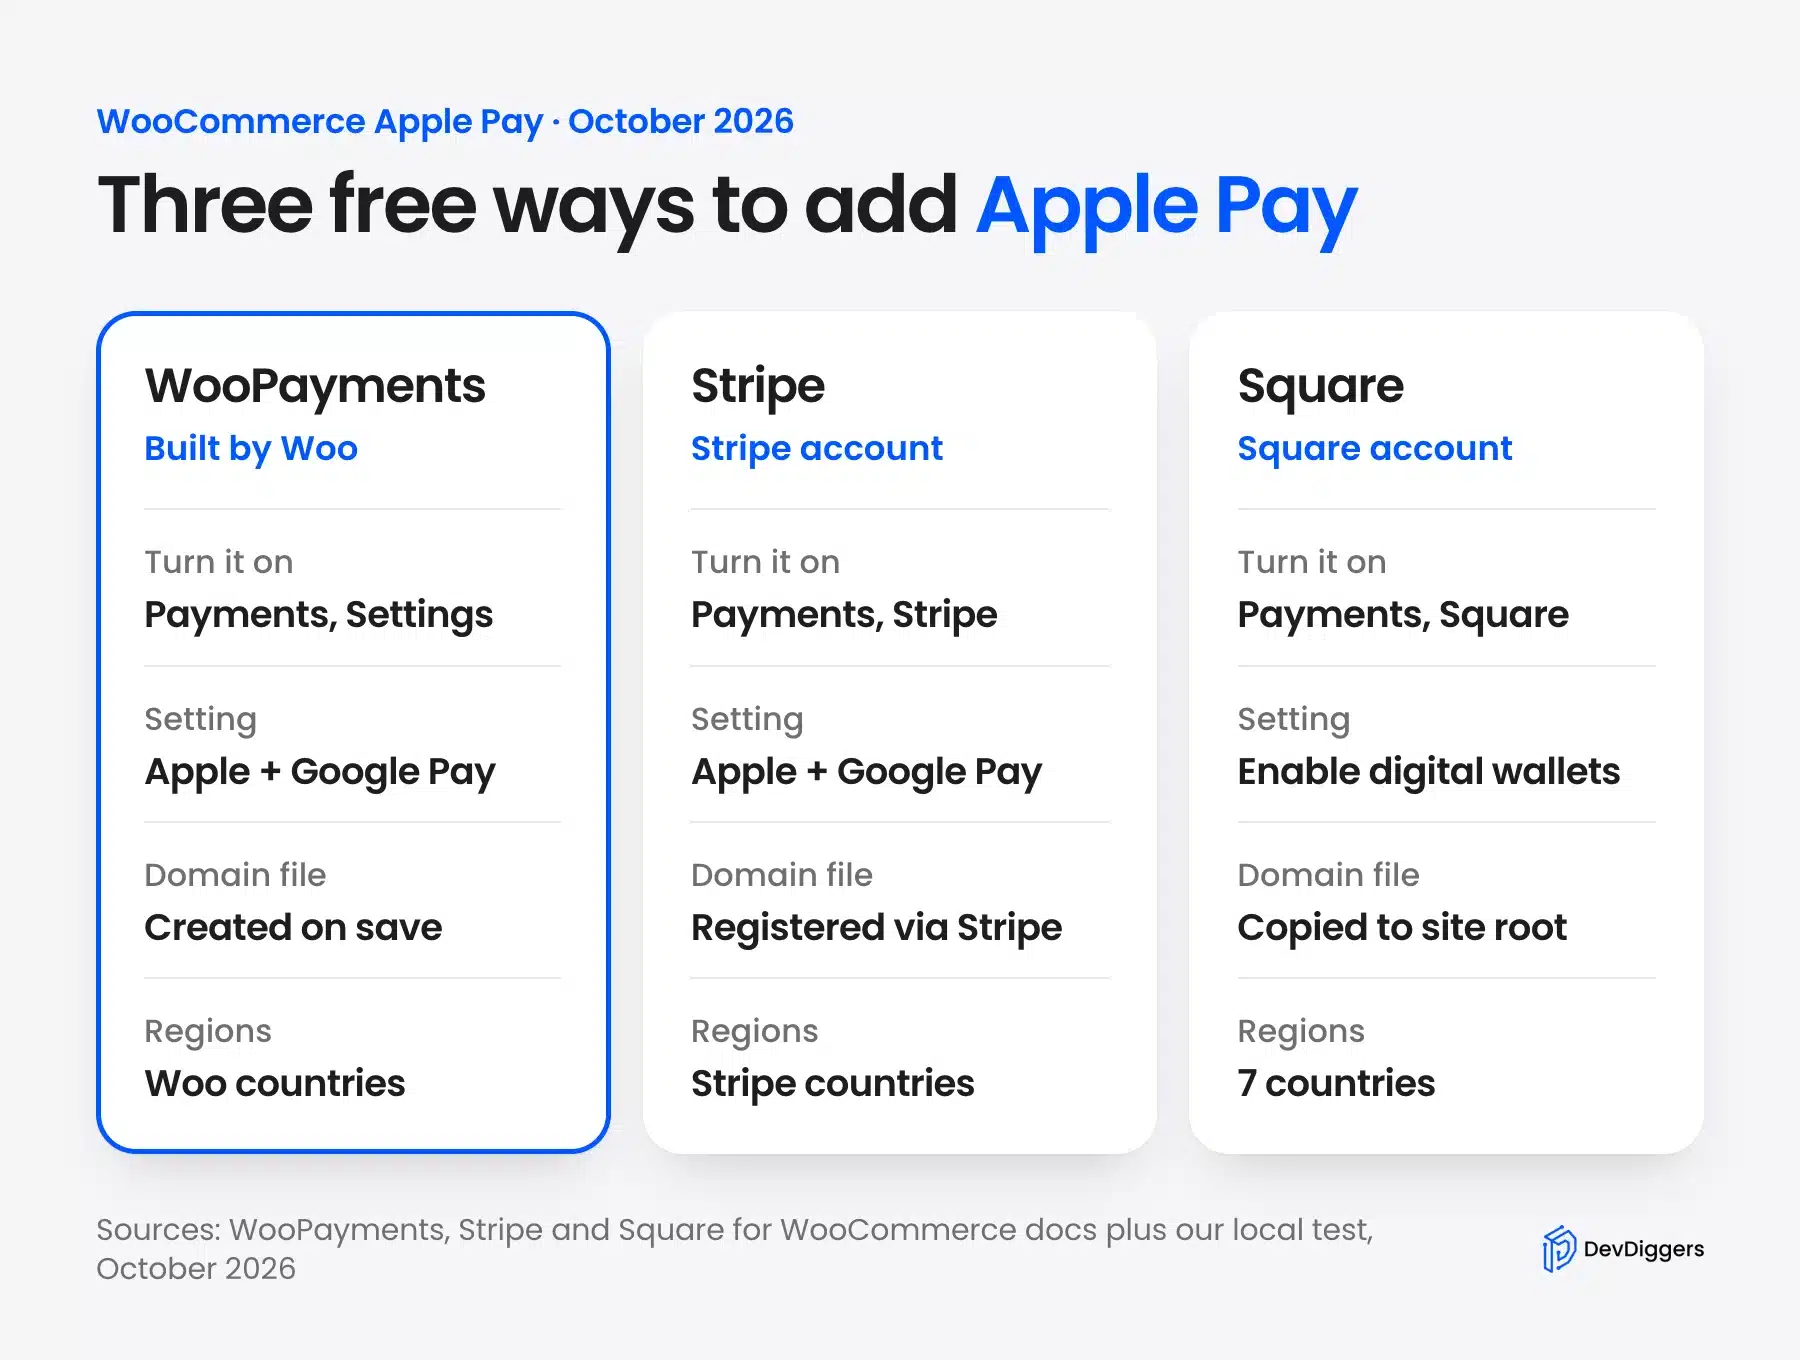
WooPayments is the simplest pick if you have no gateway yet. WooCommerce’s own Apple Pay page lists WooPayments, Stripe and Square as the ways to get it.
Pick Stripe if you already process cards through a Stripe account. Pick Square if you also sell in person with Square hardware, since the same account runs both.
The domain step is where they split most. WooPayments creates the file when you save, Stripe registers the domain through your Stripe account, and Square copies a file into your site root.
Whichever you pick, the normal card form stays on the checkout page as the fallback. A shopper without Apple Pay never loses the option to pay by card.
Tip: Turn on Apple Pay in one plugin only. The WooPayments Apple Pay guide warns that two gateways offering it on one page can show duplicate buttons.
Method 1: Add Apple Pay With WooPayments
WooPayments adds Apple Pay through one checkbox called Apple Pay / Google Pay under Payments, Settings, in the Express Checkouts section. Saving it creates the domain verification file for you and registers your site with Apple. You need a connected WooPayments account before the setting appears.
Install WooPayments from Plugins, Add New, then follow these steps:
- Start setup: Go to WooCommerce, Settings, Payments and click Complete setup next to WooPayments.
- Keep Apple Pay on: The first screen lists payment methods, and Apple Pay and Google Pay share one toggle.
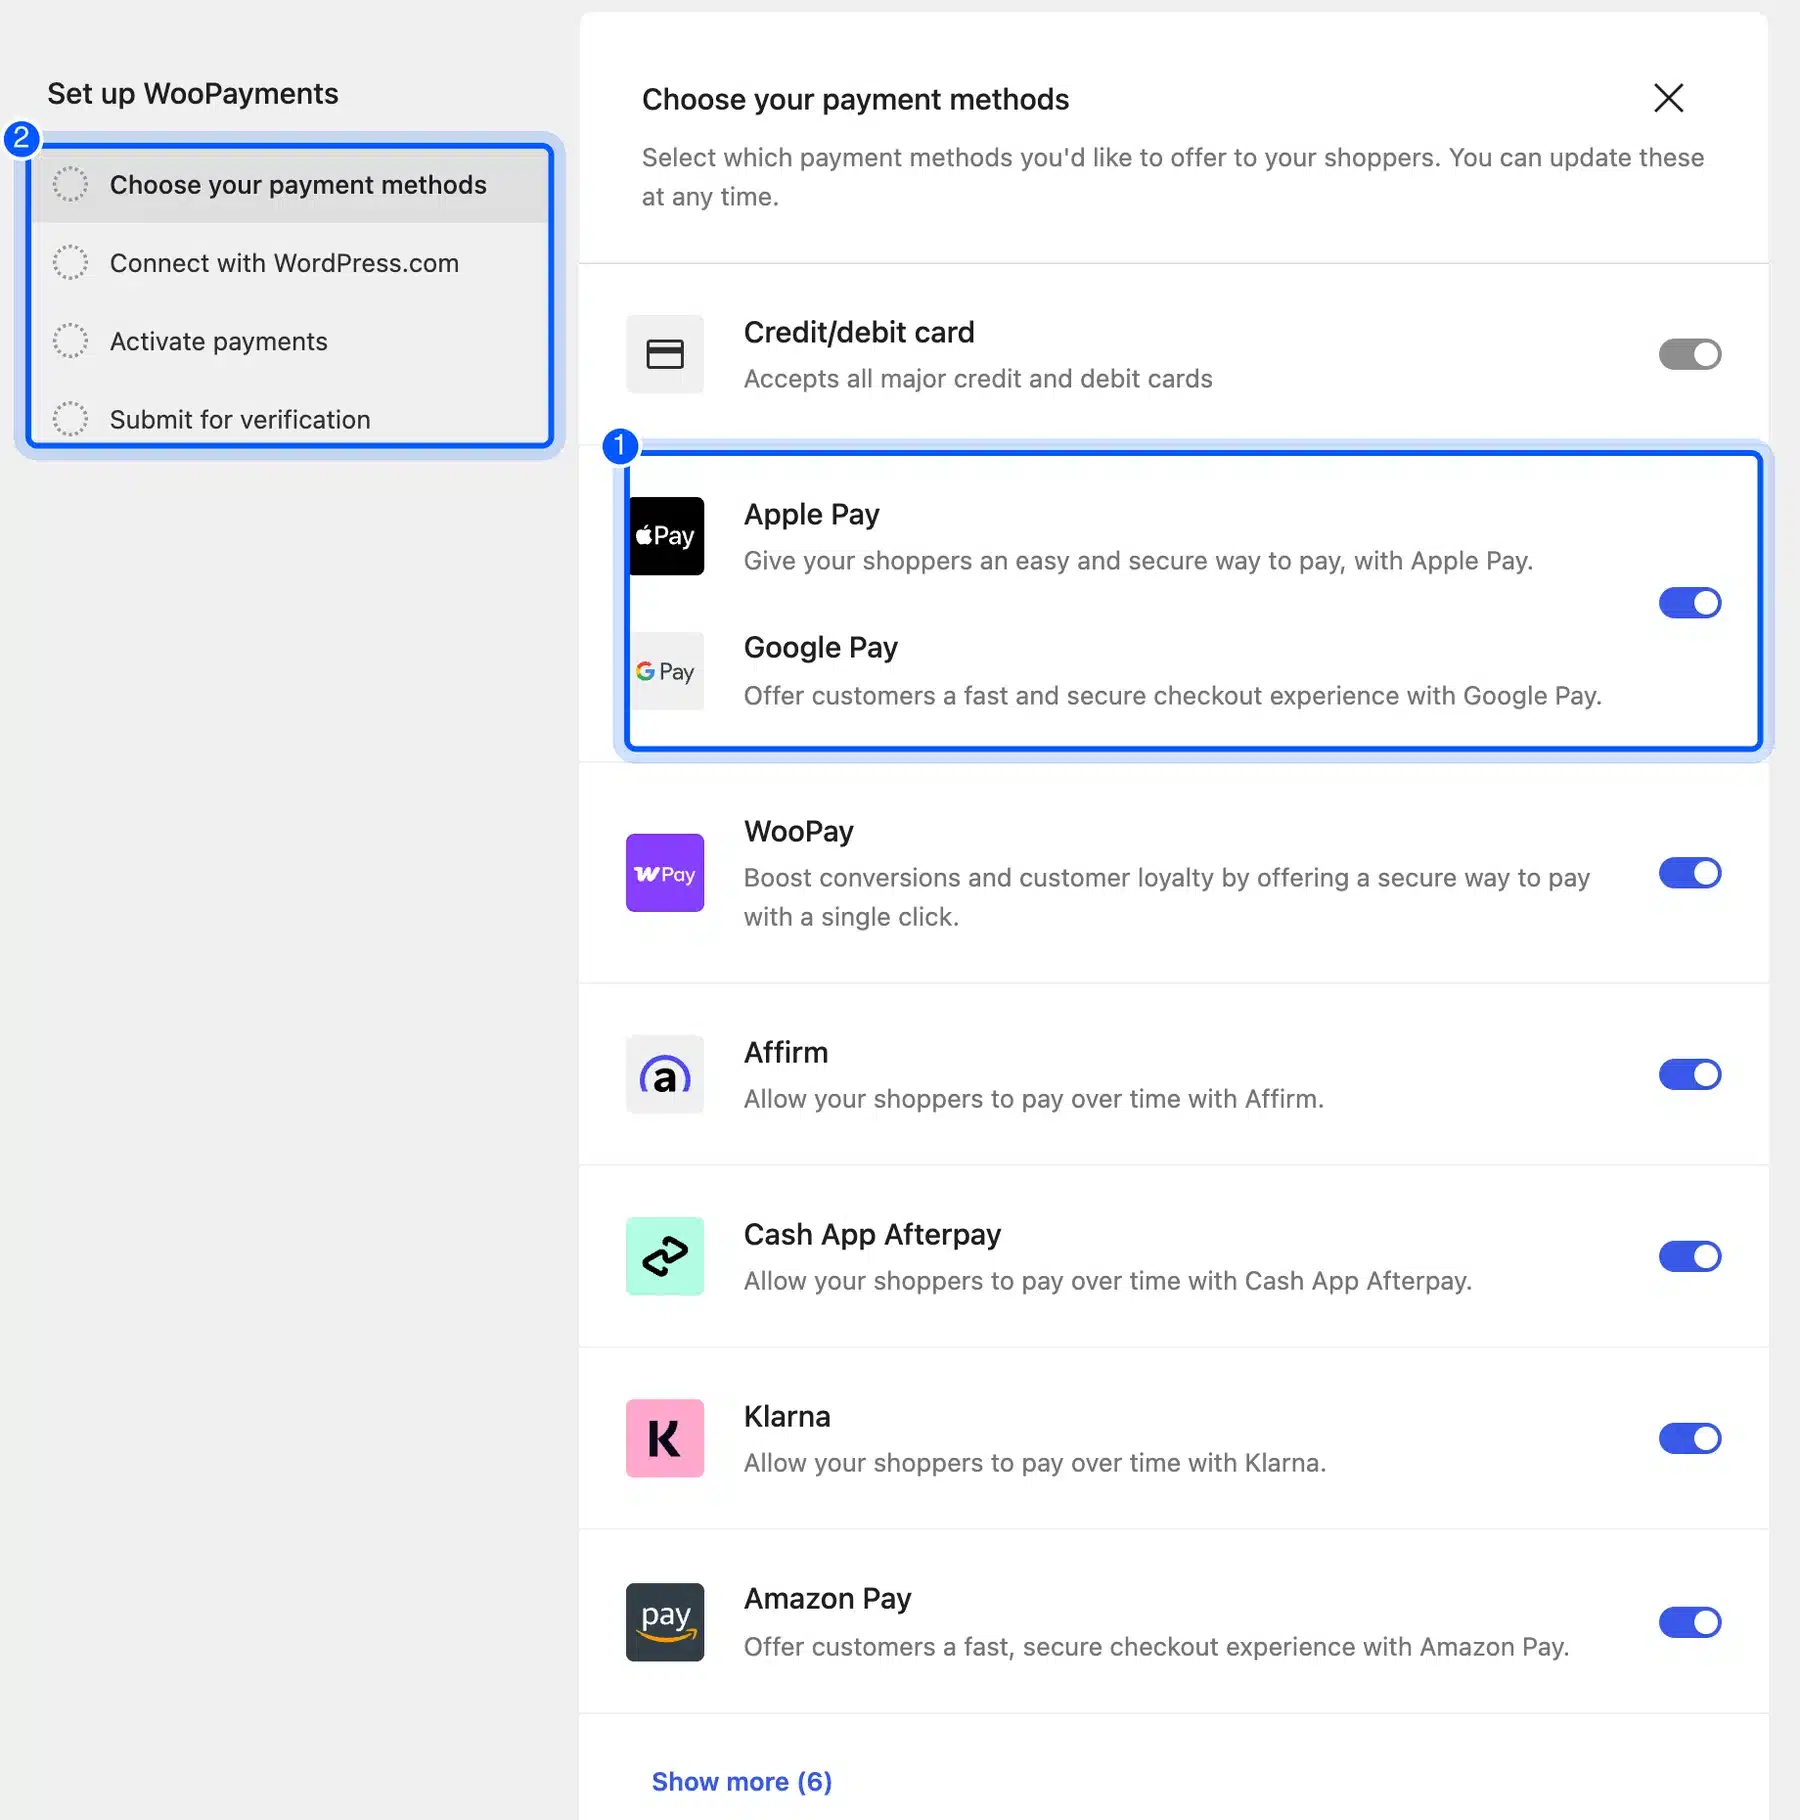
- Connect your account: Continue through Connect with WordPress.com, Activate payments and Submit for verification.
- Check the setting: Once connected, open Payments, Settings and confirm Apple Pay / Google Pay is ticked under Express Checkouts.
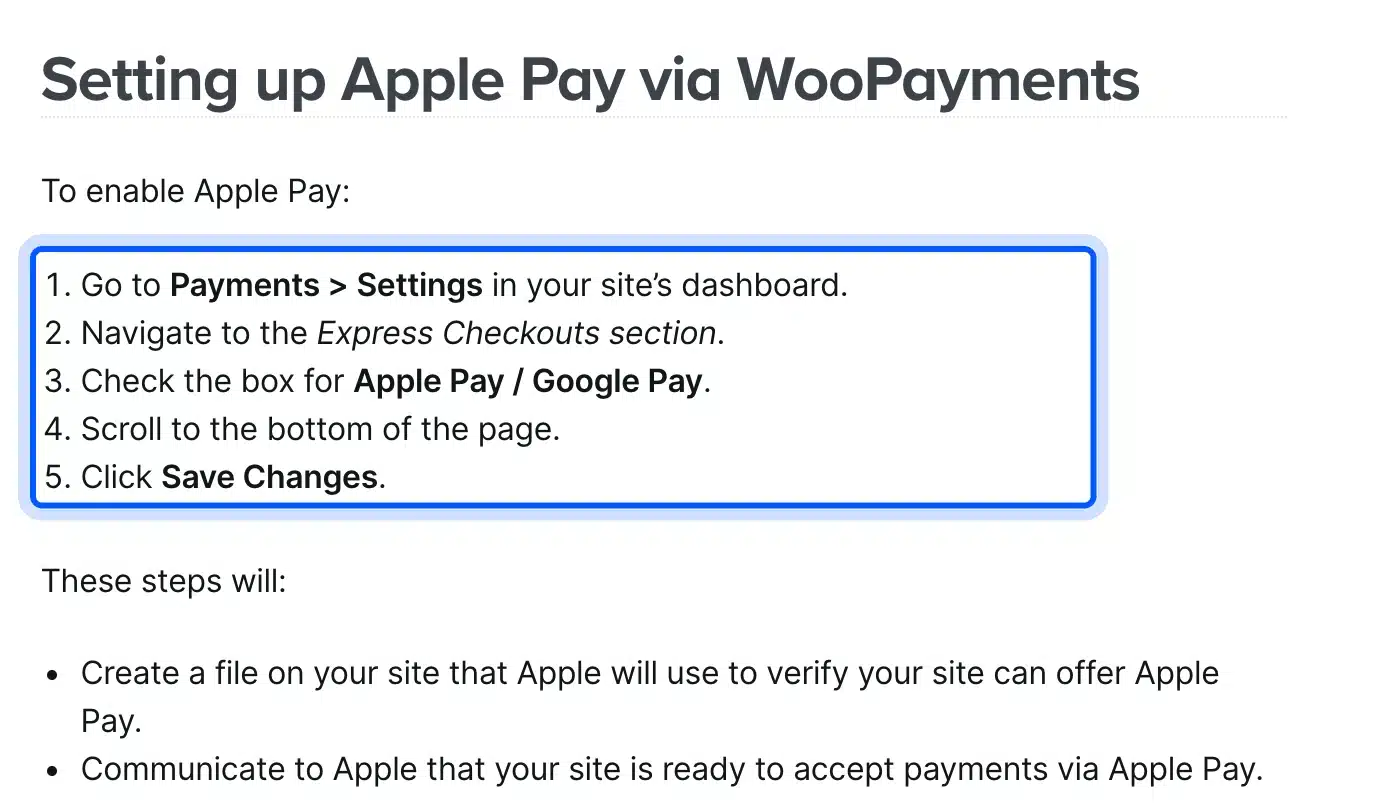
- Save and verify: Click Save Changes, then look in WooCommerce, Status, Logs for the WooPayments entry saying your domain was verified.
Our test store showed the toggle switched on by default, alongside six other methods including WooPay, Klarna and Amazon Pay. The WooPayments Apple Pay guide confirms Apple Pay works in all countries WooPayments supports.
The Customize link next to the setting picks the button pages, text, size and color scheme. It also sets the border radius, so the express buttons can match your theme’s own buttons.
That is where you remove the button from product pages if it crowds your layout. The guide notes some styles will not apply when the Express Checkout block uses its Apply uniform styles setting.
The verification log is the step most stores skip. If you cannot find the domain verified entry for today’s date, the guide says to contact WooPayments support before you test on a phone.
Method 2: Add Apple Pay With the Stripe Plugin
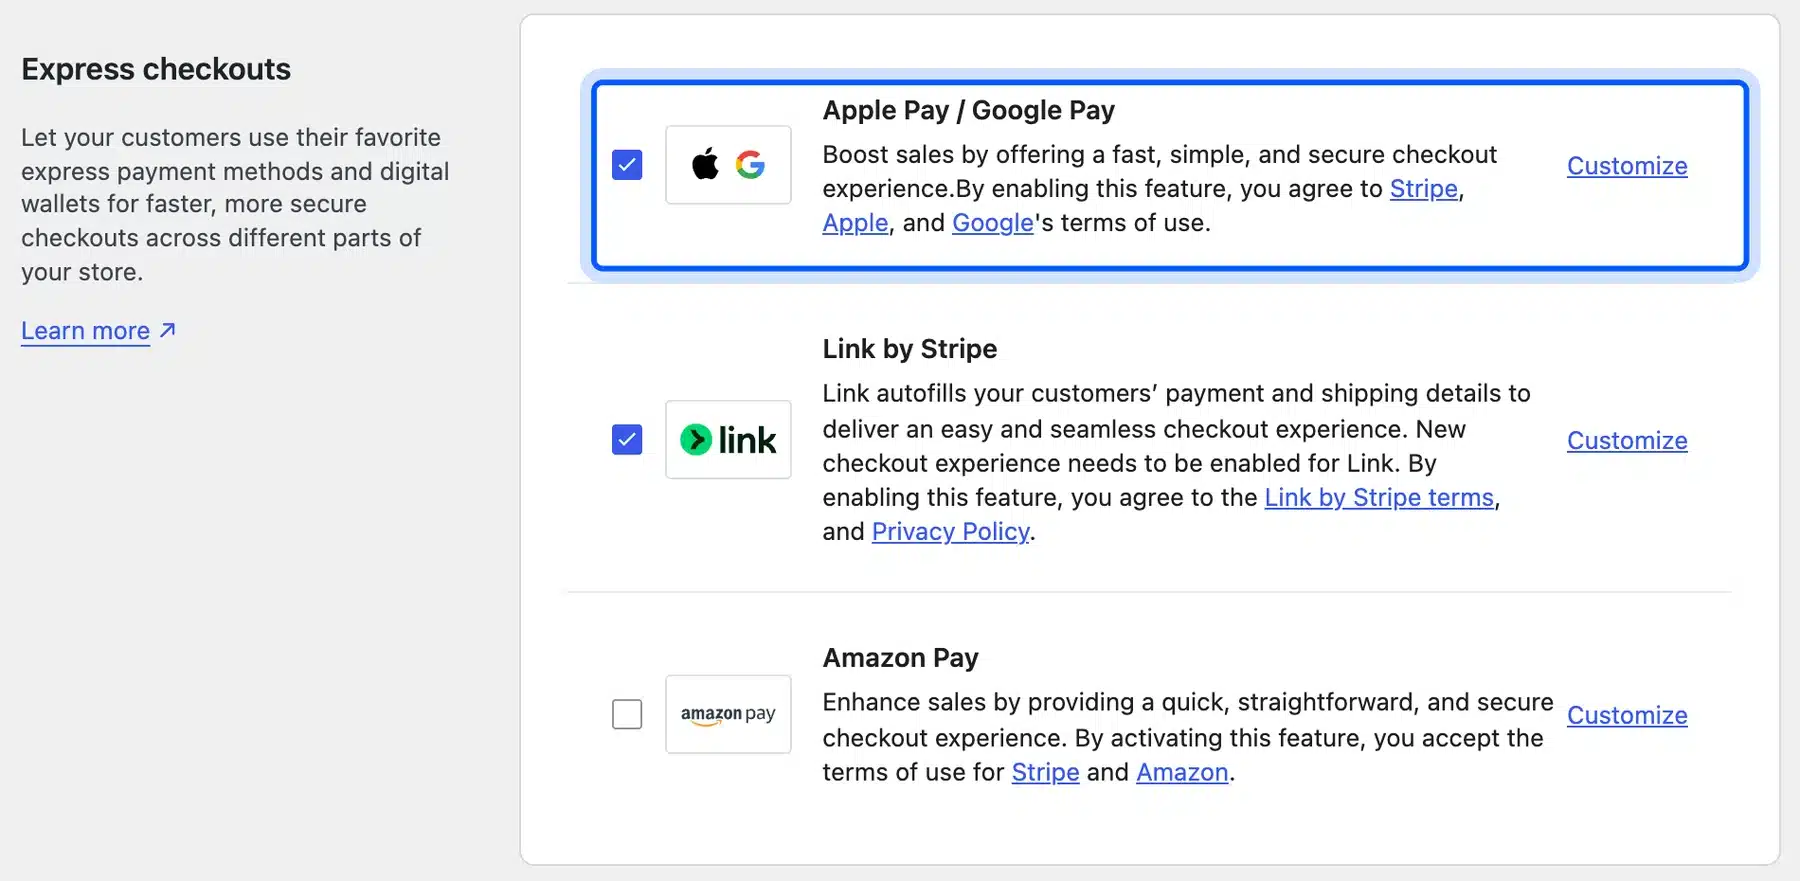
The WooCommerce Stripe plugin keeps Apple Pay under WooCommerce, Settings, Payments, Stripe, on the Payment Methods tab. The Express checkouts section holds one checkbox for Apple Pay / Google Pay. A Customize link then sets where the buttons show and how they look.
We installed Stripe for WooCommerce 11.0.1 on our test store without connecting a Stripe account. Its Payment Methods tab stays locked until API keys are saved, so connect your account and then follow these steps:
- Open the tab: Go to WooCommerce, Settings, Payments, Stripe and click Payment Methods.
- Tick the wallet box: Under Express checkouts, tick Apple Pay / Google Pay. It was already ticked on our fresh install.
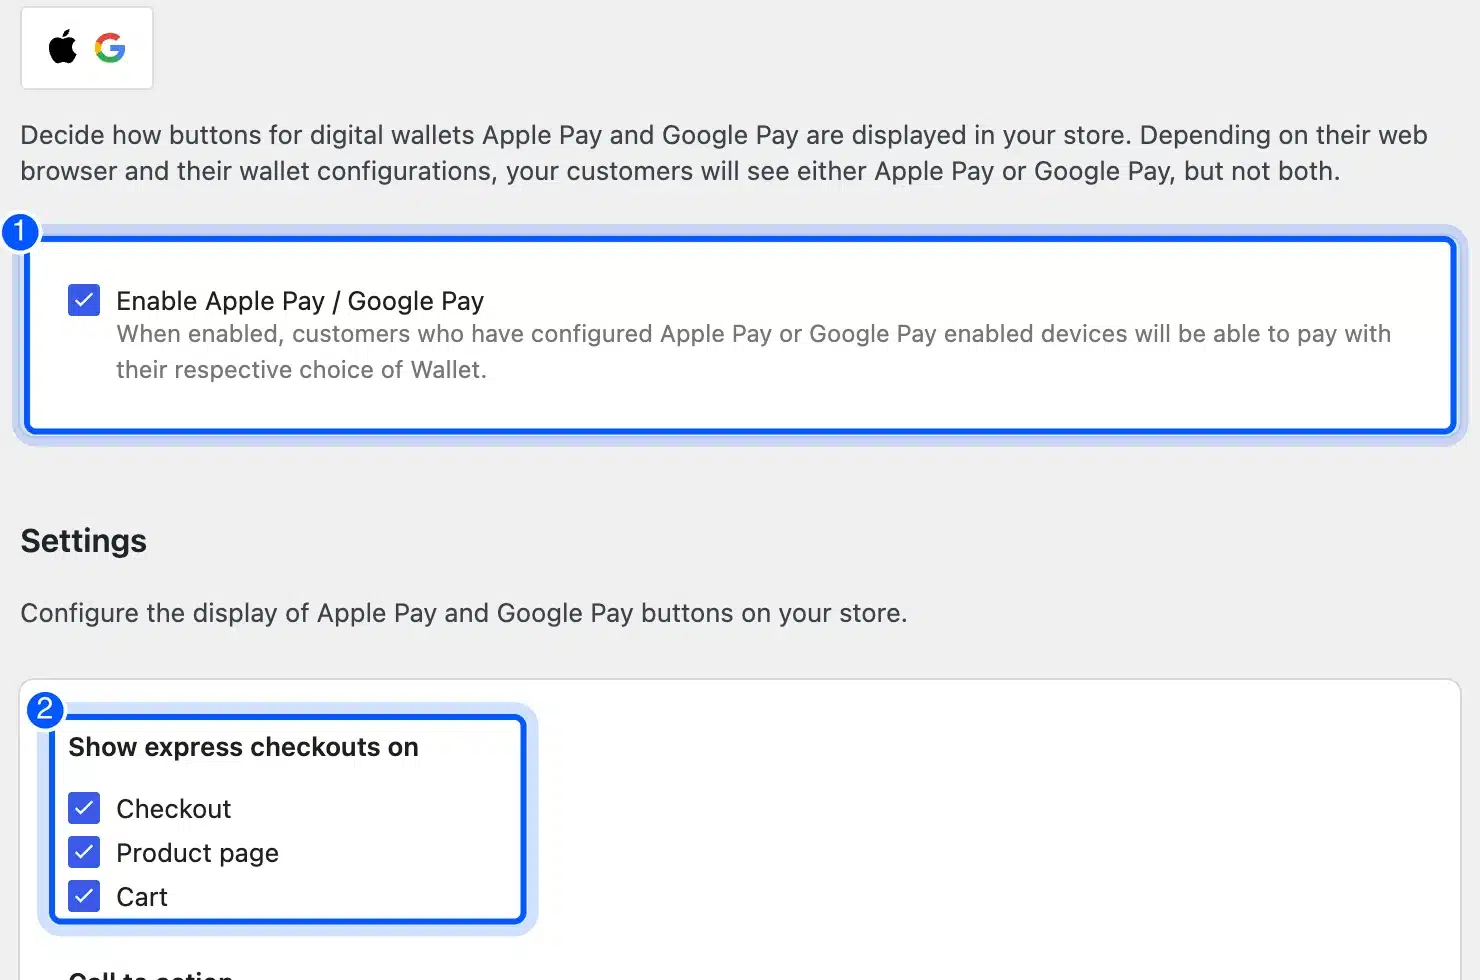
- Pick the pages: Click Customize and choose Checkout, Product page and Cart under Show express checkouts on.
- Save: Click Save changes. Stripe then tries to register your domain for Apple Pay.
That last step failed on our store, as expected without a connected account. The admin showed “Apple Pay domain registration failed” next to a warning that no SSL certificate was found.
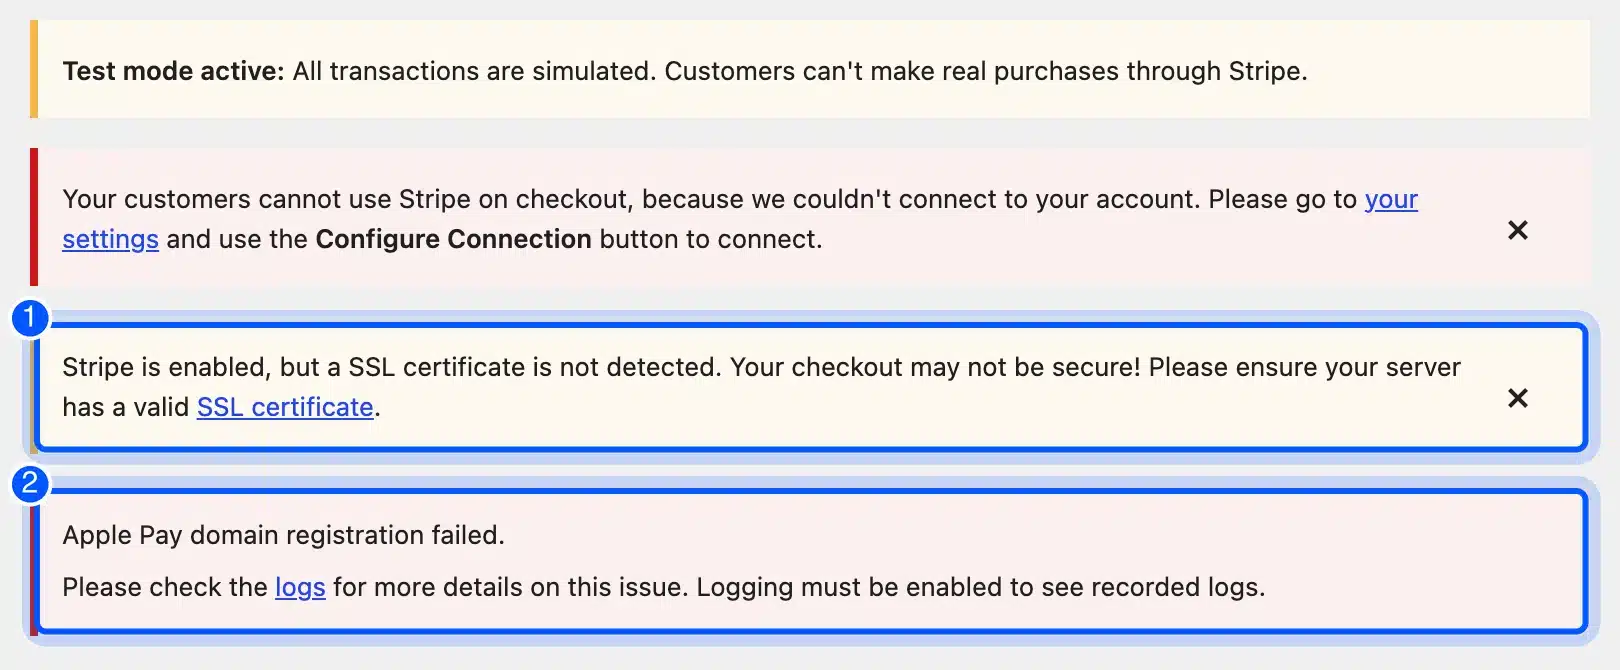
The Stripe log named the cause: Stripe refused the registration because no valid account was connected. No verification file appeared on our server either, so Stripe handles that part through your account. The Stripe express checkout guide lists the rest: HTTPS on the whole site, port 443 open and TLS 1.2 or later.
Method 3: Add Apple Pay With Square for WooCommerce
Square for WooCommerce turns on Apple Pay with the Enable digital wallets box under WooCommerce, Settings, Payments, Square. The same section sets the button type and the Apple Pay button color. Square copies the domain file to your server and then registers it once your account is connected.
Square limits wallets by region. Its digital wallets guide names seven: the US, UK, Canada, Ireland, France, Spain and Australia.
- Open the gateway: Go to WooCommerce, Settings, Payments and open Square’s credit card settings.
- Enable wallets: Under Manage Digital Wallet Settings, tick Enable digital wallets. It was on by default in Square 5.5.1.
- Style the button: Pick Buy Now, Donate or No Text, then an Apple Pay color of Black, White or White with outline.
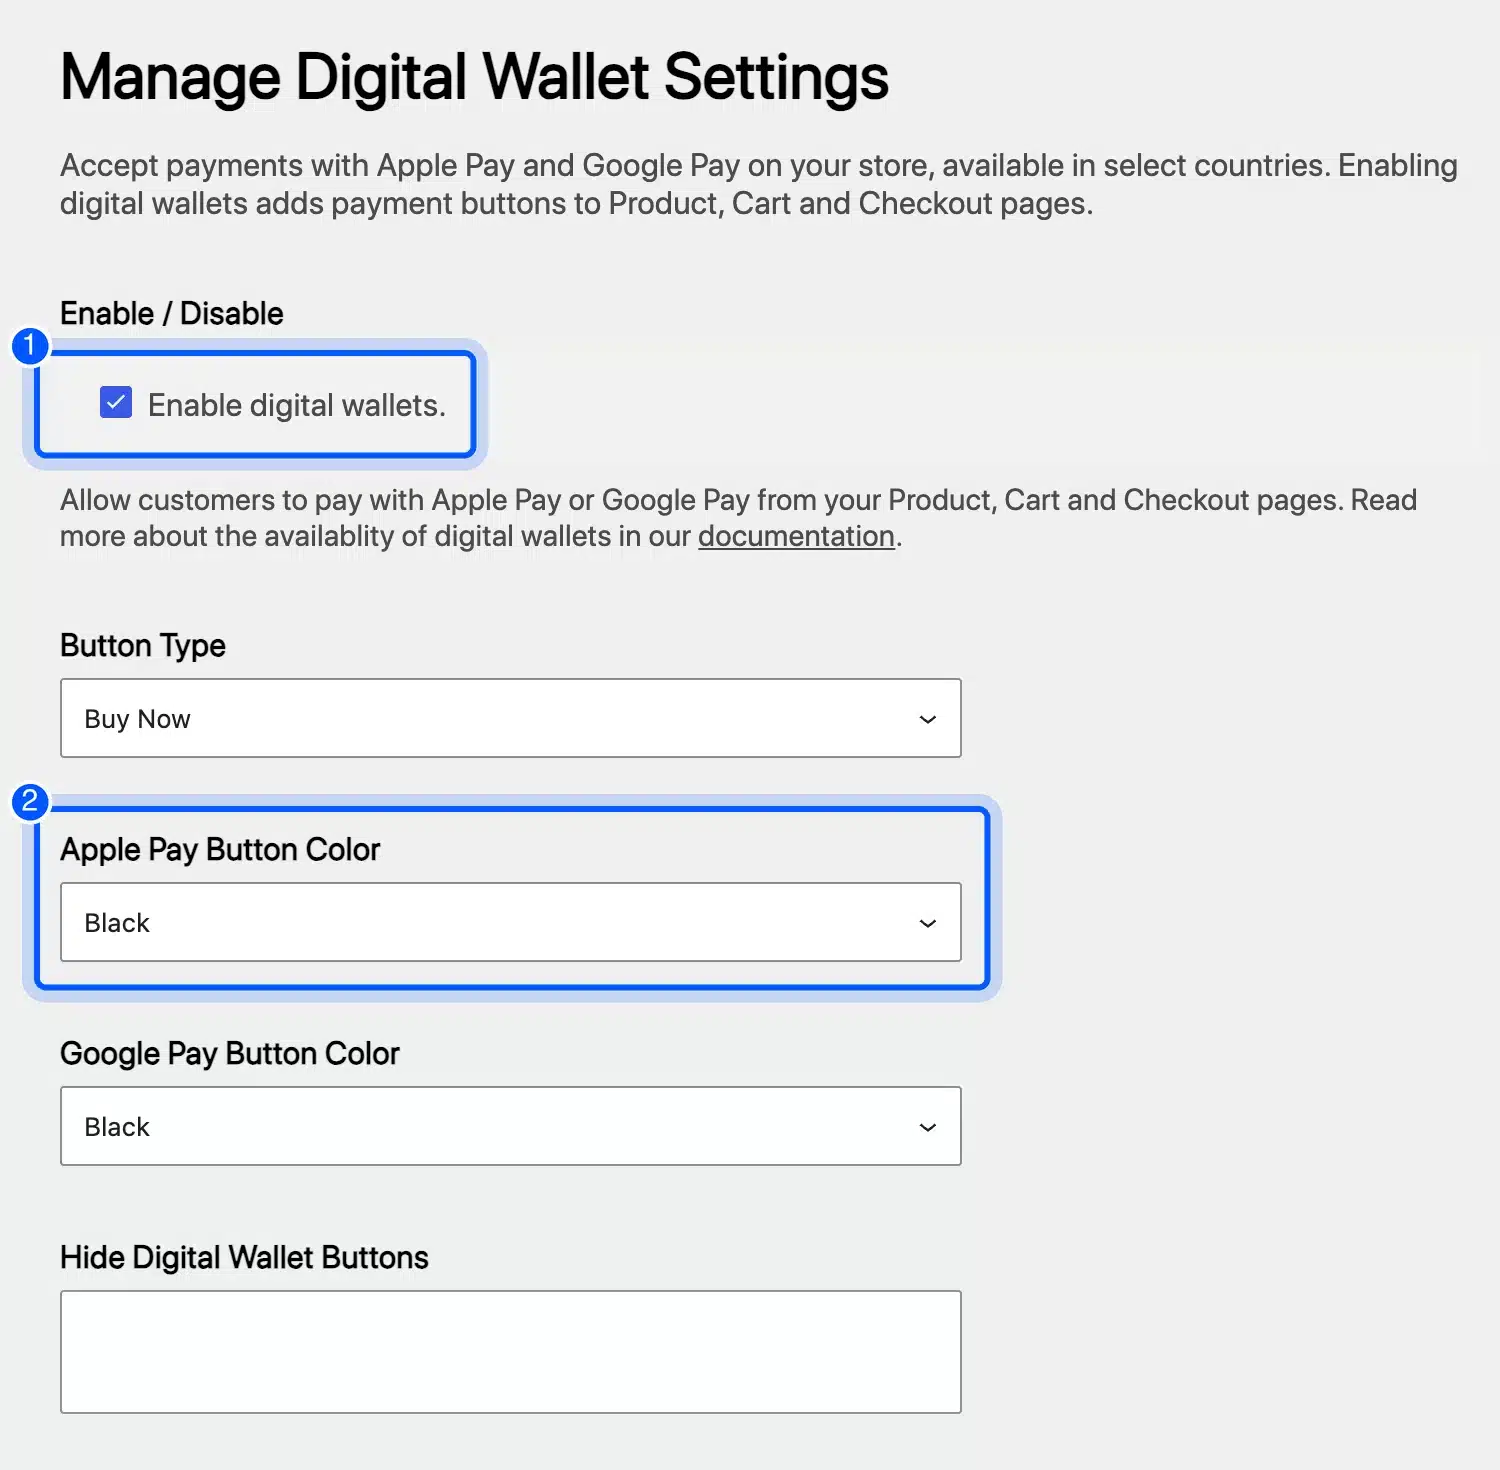
- Save: Click Apply Changes and connect your Square account through the onboarding wizard.
We enabled the Square gateway and reloaded its settings page. Square copied the 9,098 byte verification file into .well-known at once, and the file loaded in the browser with a 200 OK.
Square’s own record still listed the domain as not registered, because registration needs a connected account. So a working file alone does not mean Apple Pay is ready.
The file also depends on your host. Square writes it into the web root, so a server that blocks writes there leaves the folder empty and logs an error instead.
The settings screen has one more field worth knowing. Hide Digital Wallet Buttons lets you keep Apple Pay or Google Pay off chosen pages without turning wallets off for the whole store.
The Square digital wallets guide also asks you to follow the Apple Pay and Google Pay brand rules when you pick colors. Black suits a light theme, and White with outline suits a pale background.
How to Add Google Pay to WooCommerce
To add Google Pay to WooCommerce, turn on Apple Pay in WooPayments, Stripe or Square. All three bundle the two wallets behind one setting, so WooCommerce Google Pay switches on with Apple Pay. Shoppers then see whichever wallet their browser and device support.
The Customize screen in the Stripe plugin says customers will see either Apple Pay or Google Pay, but never both together. An iPhone in Safari shows Apple Pay, while Chrome on Android or a desktop shows Google Pay.
Google Pay has its own condition. Square’s guide says the button appears only when the browser or device has a saved payment method. Desktop Chrome needs a card linked to the Google account.
Under the hood, Apple Pay on the web runs through two browser APIs. Apple’s Apple Pay on the web documentation names Apple Pay JS and the Payment Request API, both supported in Safari.
You never write code for either one. The plugin loads them and decides which express buttons to draw for each visitor. That is why two shoppers can see different buttons on the same page.
These wallet buttons are the express checkout WooCommerce shows above the address and card forms, so a shopper can skip both. Our guide on one-click checkout in WooCommerce covers the other ways to cut checkout steps.
Why the Apple Pay Button Is Not Showing
The Apple Pay button usually goes missing because the site lacks HTTPS or the shopper’s device is unsupported. An unverified domain, a skipped product type or the wrong account settings hide it too. Each one is checked on the shopper’s device, so the button can work for one visitor and not for another.
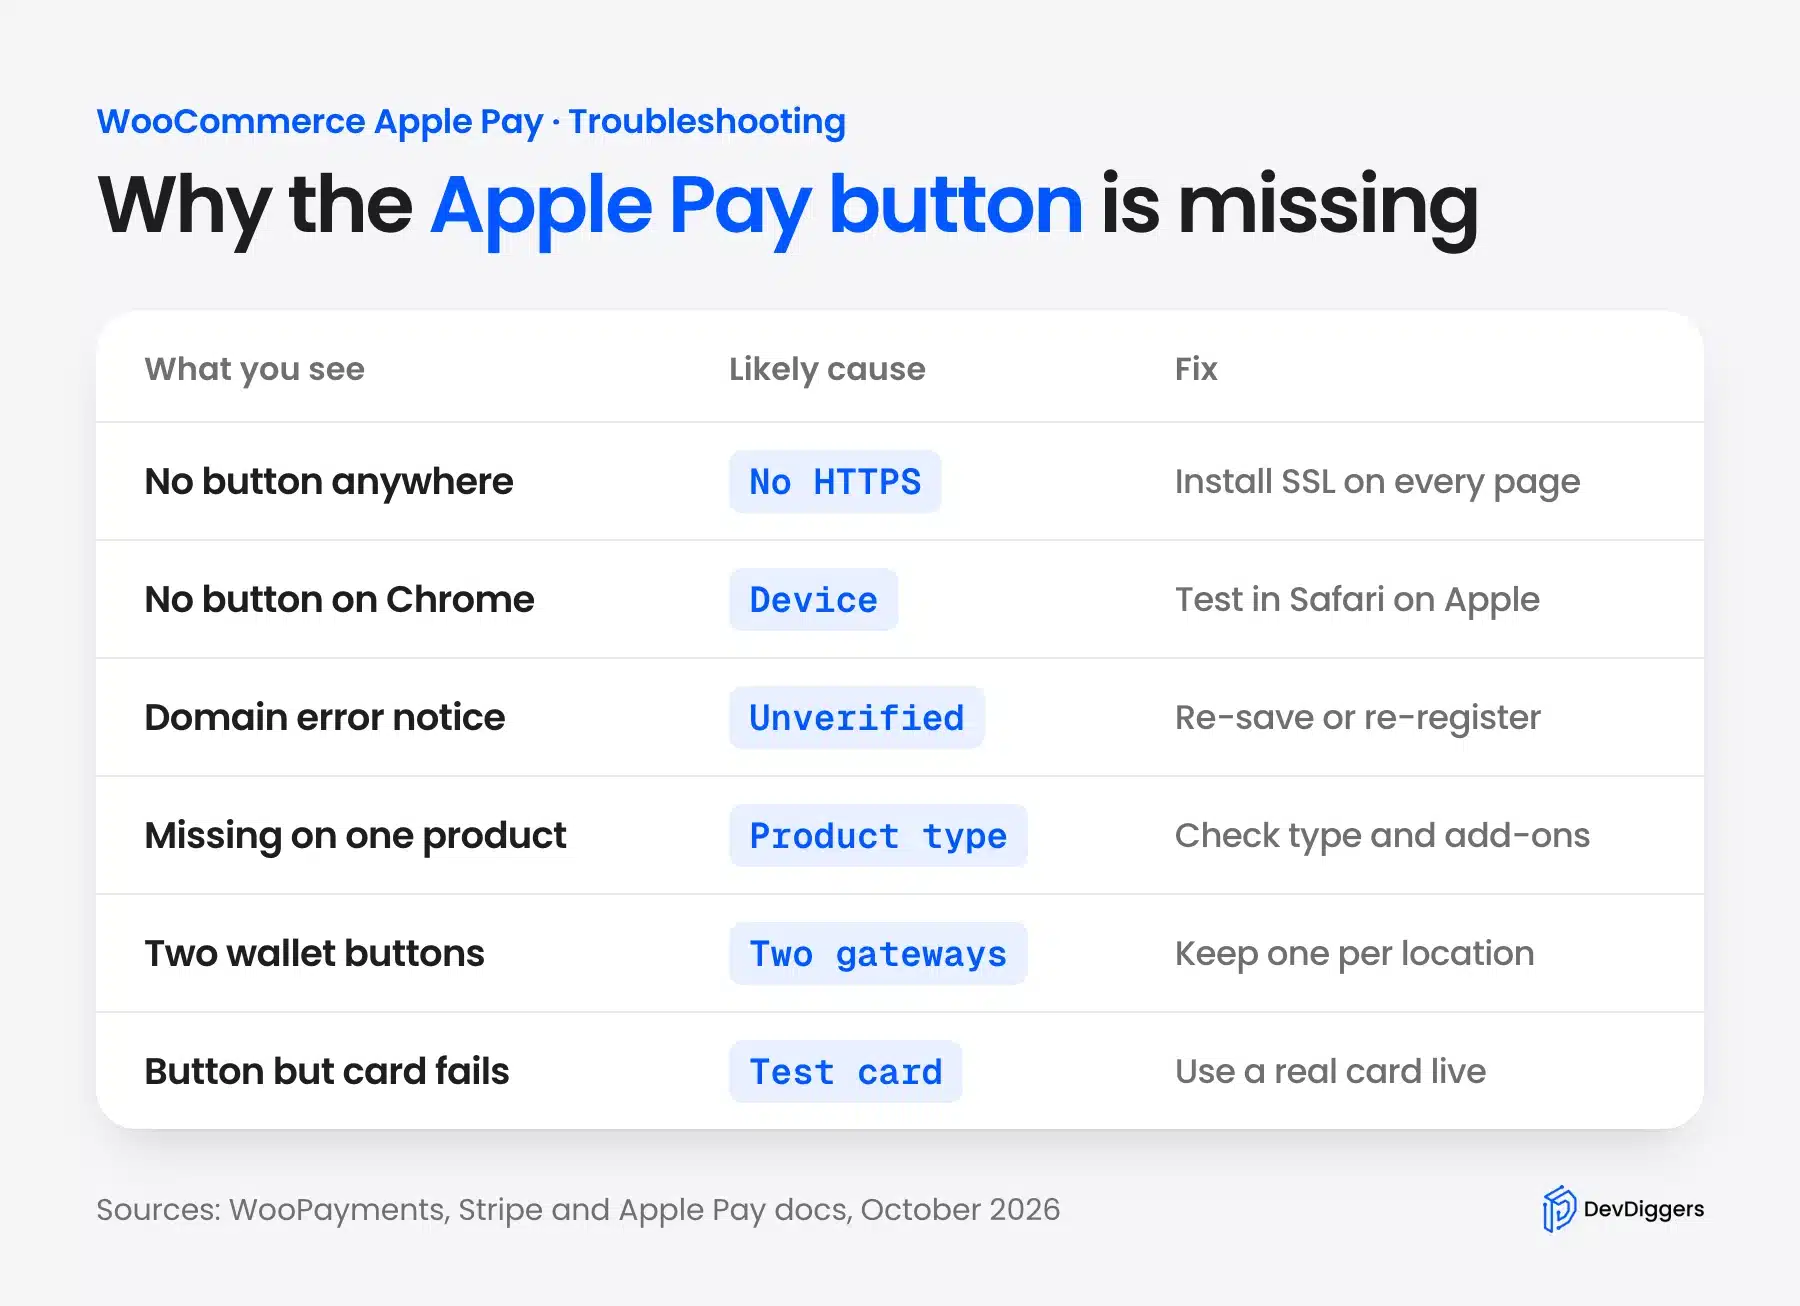
Work through the causes in this order:
- No HTTPS: Load your shop, product, cart and checkout pages and check each one for a padlock.
- Wrong device: Desktop Chrome never shows Apple Pay, so test on an iPhone or in Safari on a Mac.
- Unverified domain: Look for a domain error in your plugin’s settings and save again after fixing SSL.
- Product type: The Stripe docs say composite products, free products and file upload fields hide the buttons.
- Card method off: Stripe needs the credit and debit card method enabled before wallets show.
WooPayments has one more rule that trips stores up. Its guide says either guest checkout must be on, or both account creation during checkout and the password setup link must be on.
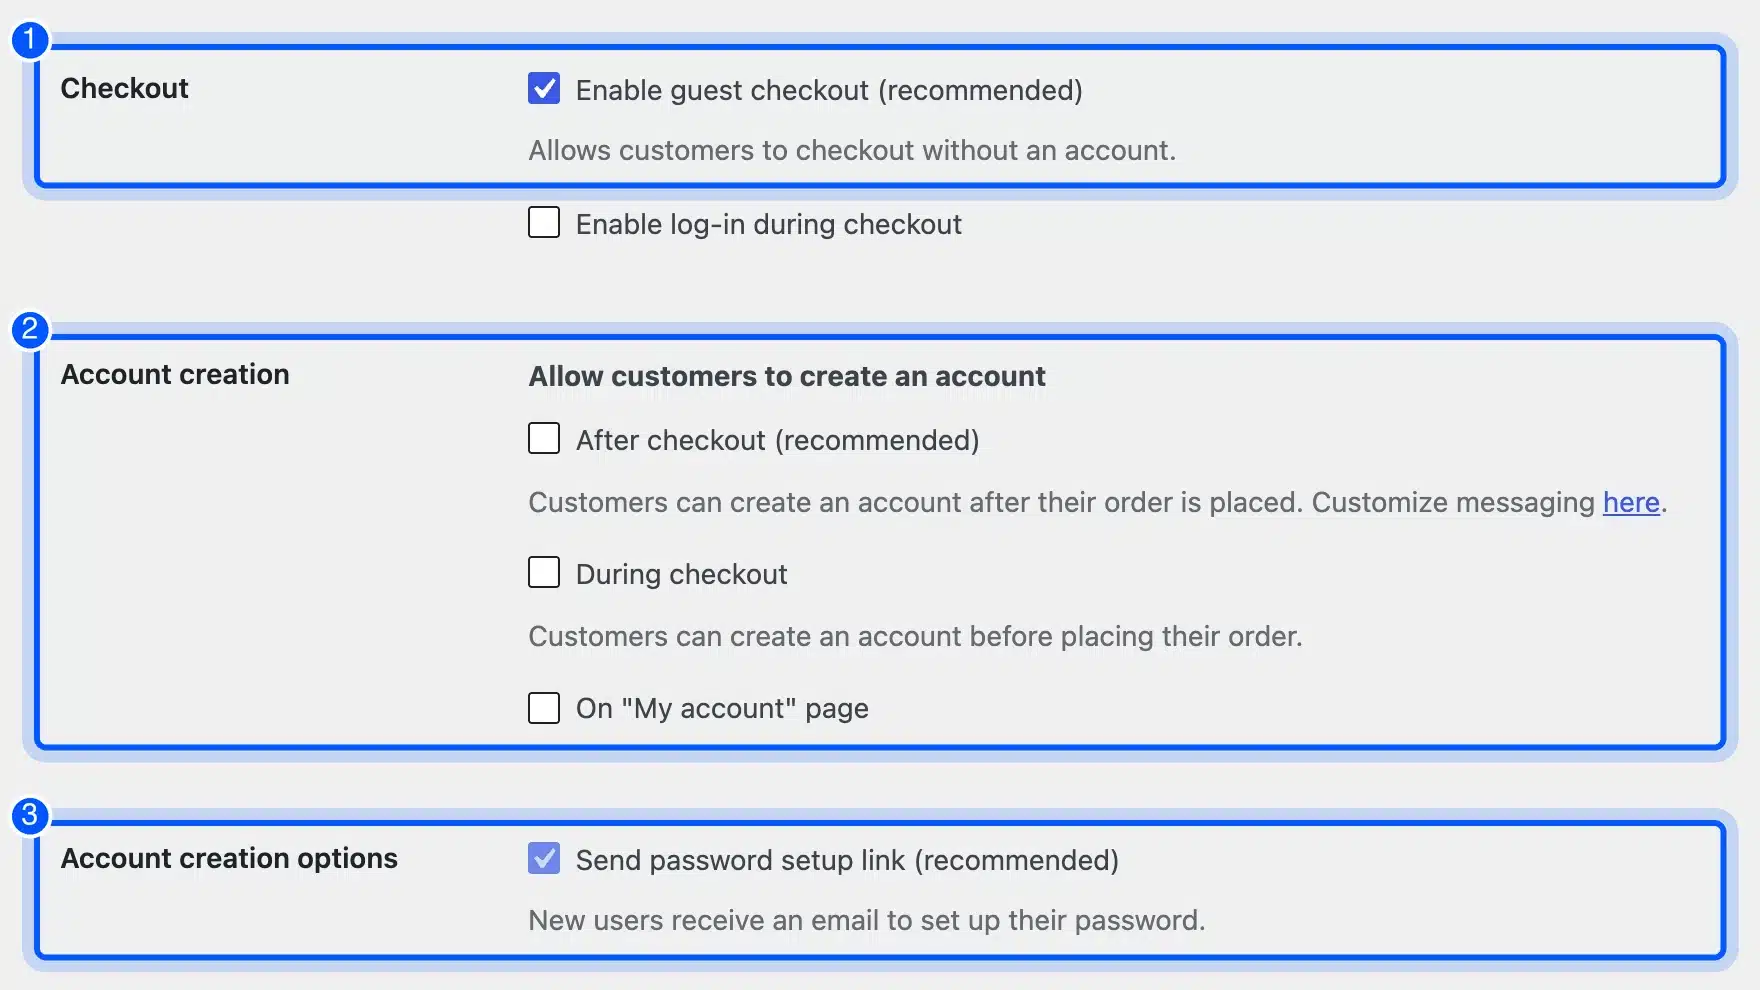
Our test store had guest checkout on, which meets that rule. Check this screen under WooCommerce, Settings, Accounts and Privacy before you open a support ticket.
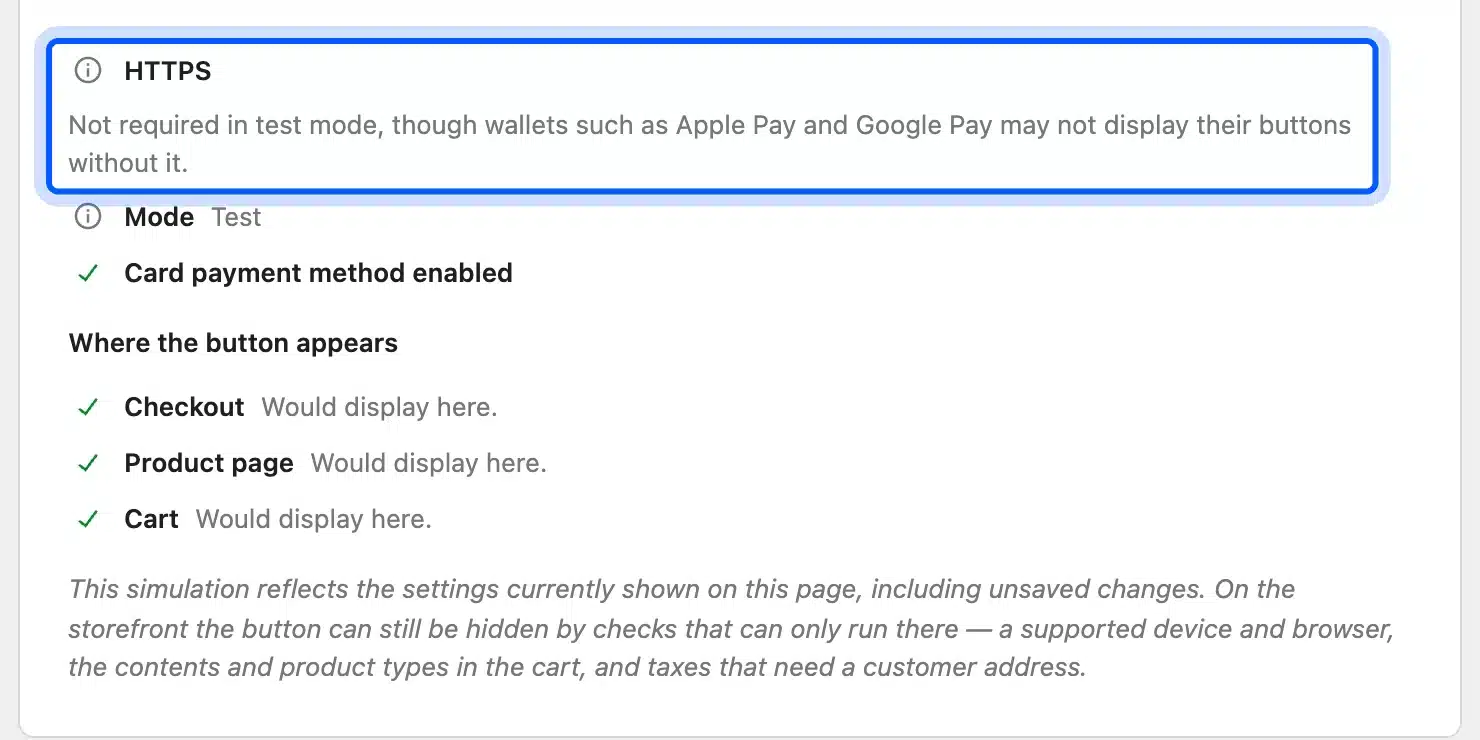
Worth checking: The Stripe Customize screen ends with a list of checks. On our store it flagged HTTPS with the note that wallets may not show their buttons without it.
How to Test Apple Pay on WooCommerce
To test Apple Pay on WooCommerce, switch your payment plugin to test mode. Open your HTTPS site on an Apple device that has a card in Wallet, and test mode will never charge it. Apple also runs a sandbox with test cards for deeper checks.
Stripe’s Customize screen gives a quick first check before you touch a phone. Its checks list shows which requirements pass on your setup.
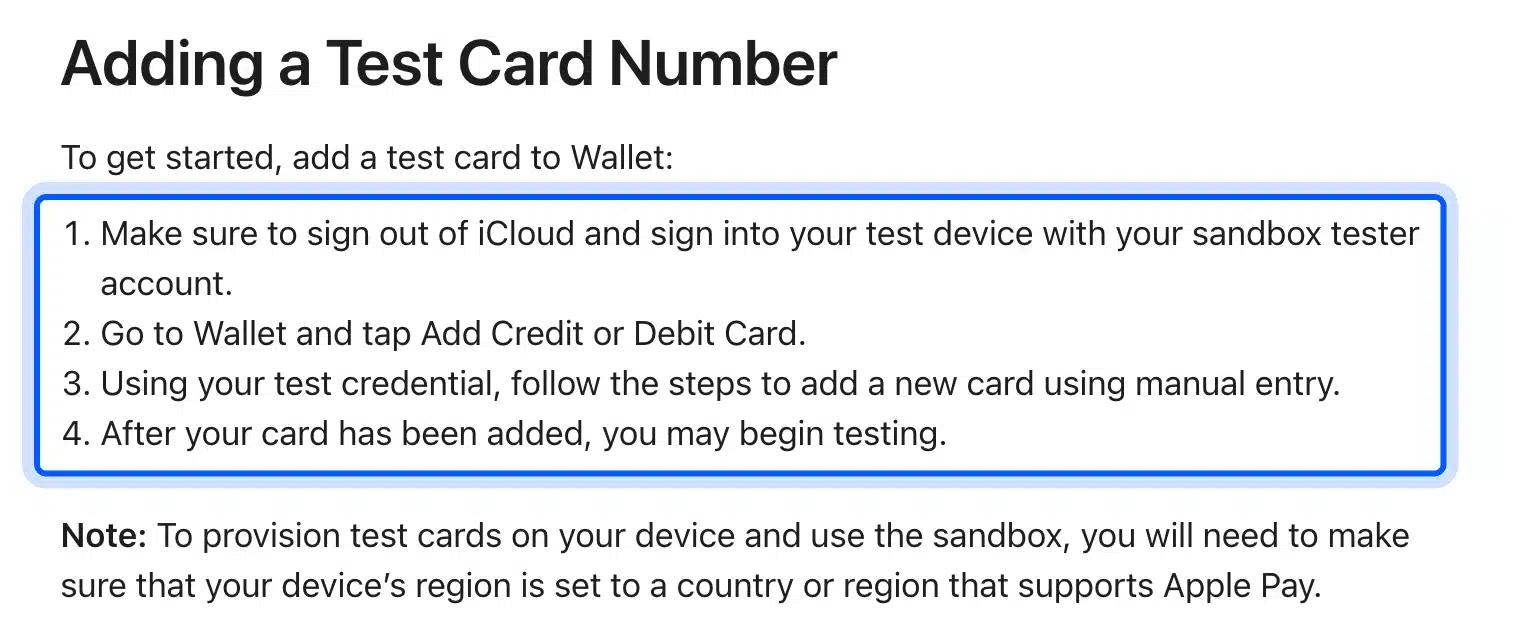
For Apple’s sandbox, you sign in to the test device with a sandbox tester account and add a test card to Wallet. The steps below come from Apple’s guide.
Apple’s guide warns that test cards will not work in production, where real cards must be used. So switch your plugin to live mode and place one small real order before you announce Apple Pay.
Important: We did not run a live Apple Pay payment on our test store, since it had no HTTPS and no connected payment account. Plan your own live test on the real domain after launch.
Apple Pay is one of several ways to make paying easier. If you also want split payments, see our list of WooCommerce buy now pay later plugins. For a custom checkout or a gateway with no plugin, our WooCommerce development services team can build it.
Conclusion
WooCommerce Apple Pay takes one checkbox once your payment plugin is connected and your whole site runs on HTTPS. WooPayments and Stripe call it Apple Pay / Google Pay, and Square calls it Enable digital wallets.
Our test showed that the toggle is the easy part. Domain registration fails without a real account, and a verification file on the server does not mean Apple has approved your domain.
So connect the account, fix SSL first and test on a real iPhone. After launch, our roundup of email marketing plugins for WooCommerce covers the next step of bringing shoppers back.
Frequently Asked Questions (FAQs)
Q1. Does WooCommerce support Apple Pay?
Yes, through a payment plugin. WooPayments, the Stripe plugin and Square for WooCommerce all add Apple Pay for free. WooCommerce core has no Apple Pay setting of its own.
Q2. Is there an extra fee for Apple Pay on WooCommerce?
Not with WooPayments. Its fee schedule says fees for Apple Pay and Google Pay are the same as for cards. Check your own gateway’s pricing page if you use Stripe or Square.
Q3. Do I need an Apple Developer account for WooCommerce Apple Pay?
Usually not. WooPayments, Stripe and Square register your domain with Apple for you once your account is connected. A developer account matters only if you build your own Apple Pay integration.
Q4. Why does Apple Pay show on Safari but not on Chrome?
Apple Pay on a desktop is built for Safari, so desktop Chrome shows Google Pay instead. On an iPhone or iPad, Apple Pay can also appear in supported third party browsers.
Q5. Can I show Apple Pay only on the checkout page?
Yes. Use the Customize link in WooPayments or Stripe and untick the product page and cart locations. Square has a Hide Digital Wallet Buttons field for the same job.
Q6. Does Apple Pay work with WooCommerce Subscriptions?
It can. The Stripe docs list a change payment method page as a button location when Subscriptions is active. Variable subscriptions with an out of stock variation hide the button, so test your plans first.
Q7. Can I use Apple Pay on WooCommerce in India?
Not through Square, which limits wallets to seven countries that do not include India. For WooPayments and Stripe, check each gateway’s supported country list first. The shopper’s own country must also support Apple Pay.