
You can separate the header from the body in HTML in WordPress by editing your theme’s header.php file. Then confirm your page templates load it with the get_header() Function, which keeps the two sections in independent files. Most guides on this topic assume you already know what a template file is. This one doesn’t. If you’ve never opened a theme editor before, you’re in the right place.
Getting this wrong usually doesn’t break your site immediately. It shows up later. A header that won’t update, styles bleeding into the wrong section, a homepage that looks different from every other page for no obvious reason.
By the end of this guide, you’ll know exactly which files control your header and body. You’ll know how to edit them safely, and how to check your work with a screenshot at every stage. We’ll also cover child themes, block themes, and the mistakes that trip up most beginners.
What Does It Mean to Separate Header from Body in HTML in WordPress?
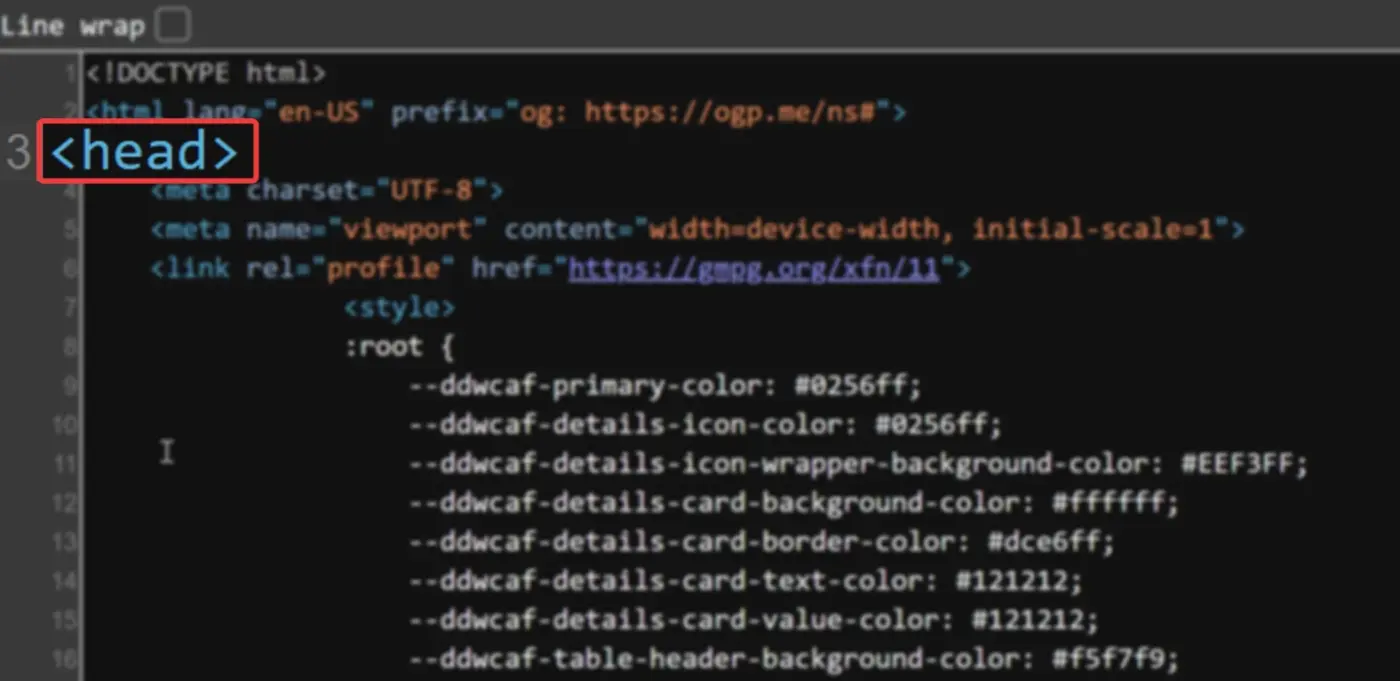
In plain HTML, a page has one <head> section (invisible metadata) and one <body> section (everything visible). WordPress doesn’t write that structure in a single file. It builds it out of smaller template files that get stitched together when a page loads.
That’s the real answer to what people mean when they search for how to separate header from body in HTML in WordPress. It’s not really about splitting a finished HTML document in half. It’s about understanding which WordPress file controls which part of that document, so you can edit one without touching the other.
Two terms get confused constantly here, so let’s clear it up first.
- The
<head>tag holds invisible metadata: stylesheets, scripts, meta tags, the page title. Visitors never see this. - The
<header>tag is the visible top section of your page: logo, navigation, tagline. Visitors see this immediately.
Most people asking about this topic mean the second one. They want to edit their visible site header without disturbing their homepage, blog posts, or product pages. That’s what this guide focuses on, though we’ll touch on the <head> section too since it lives in the same file.
How WordPress Structures the Header and Body Files
WordPress themes are built from a set of PHP template files. Understanding this WordPress theme structure makes everything else in this guide click into place.
Three files matter most for this task:
- header.php contains everything from the opening
<!DOCTYPE html>tag through the closing of your visible<header>element. Logo, navigation menu, meta tags, all of it. - index.php, page.php, or single.php (depending on what’s being viewed) hold your actual body content. This is where posts, pages, and products get displayed.
- footer.php closes out the page: copyright text, footer widgets, closing HTML tags.
These files are already separated by default in every properly built WordPress theme. Your job isn’t to invent this separation. It’s to understand it, then customize it safely.
The connection between them happens through a template tag. Every page template starts with a single line:
<?php get_header(); ?>
According to the WordPress Theme Handbook, this function pulls the entire contents of header.php into whatever template calls it. Everything written after that line, until <?php get_footer(); ?> shows up, counts as body content.
That single line is the actual mechanism behind separating header from body in HTML in WordPress. No plugin required. No special setting to toggle. It’s built into how WordPress assembles every page.
Before You Start: What You’ll Need
Skip this section, and you risk breaking your live site. It only takes two minutes.
- Admin access to your WordPress dashboard.
- FTP or file manager access as a backup option, in case the built-in editor gets disabled (some hosts do this for security).
- A full backup of your theme files, or at minimum a copy of header.php and your active page template.
- Ideally, a child theme already active. We’ll cover why in a later section, but doing this on your live parent theme means any update wipes your changes.
If you don’t have a backup plugin installed, even a manual copy-paste of your file contents into a text document works as an emergency backup.
Set aside 15-20 minutes for your first attempt at this. Not because the actual editing takes that long; it doesn’t, but because reading through header.php carefully the first time takes patience. Rushing this step is where most mistakes creep in. A second pass, after a short break, usually catches anything you missed the first time around.
How to Separate Header from Body in HTML in WordPress: Step-by-Step
Here’s the actual process, broken into small enough pieces that you can screenshot each one as you go.
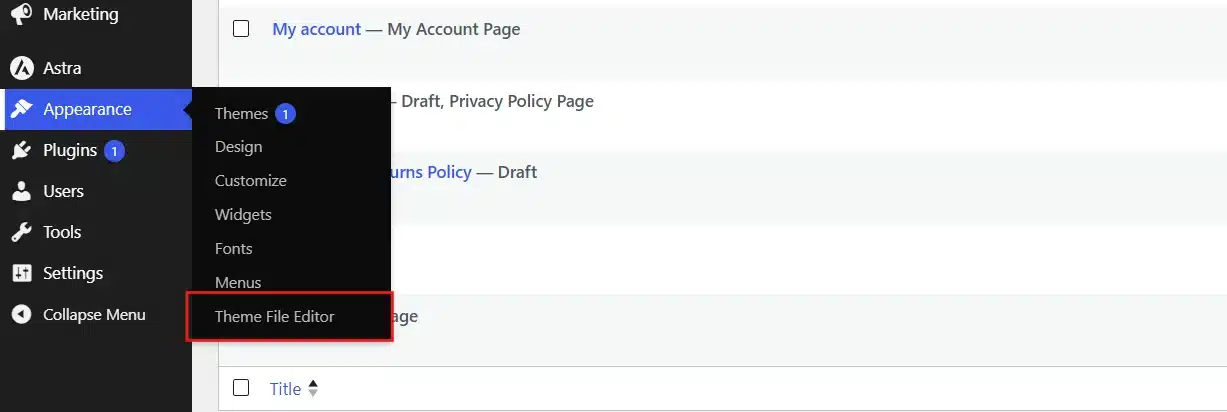
- Log in to your dashboard, then go to Appearance → Theme File Editor (older versions may label it Theme Editor). If it’s missing, your host has disabled it for security. Use FTP or your host’s file manager instead.
- Scroll down the file list on the right and click
header.php. This opens its contents in the main editing area.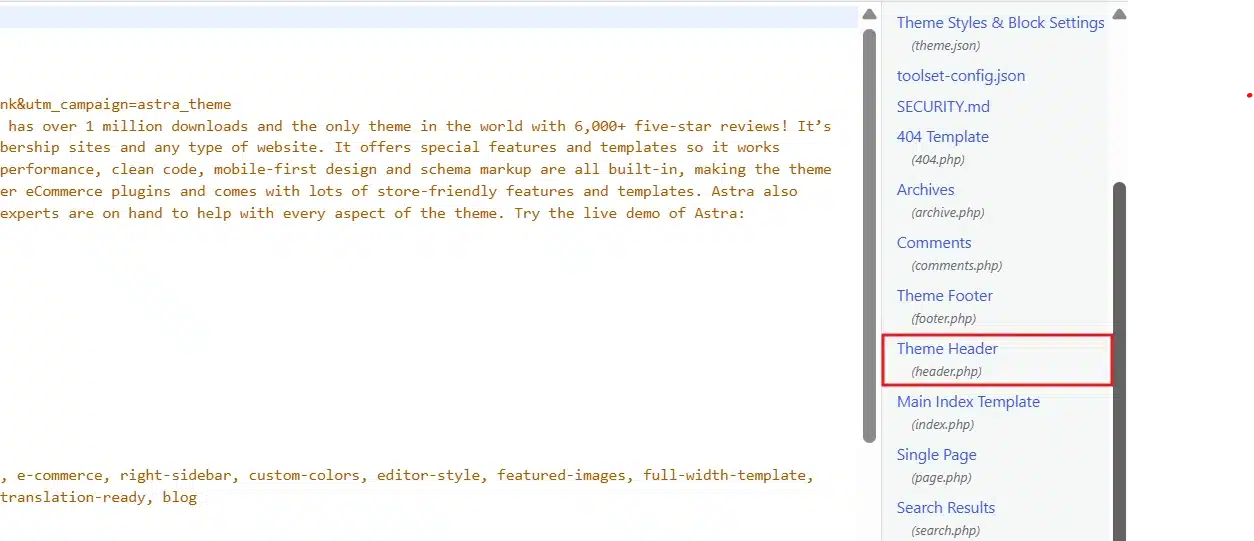
- Before editing, copy the entire contents of
header.phpinto a plain text file on your computer and save it. Tedious, but it’s the difference between a 5-minute fix and a support ticket.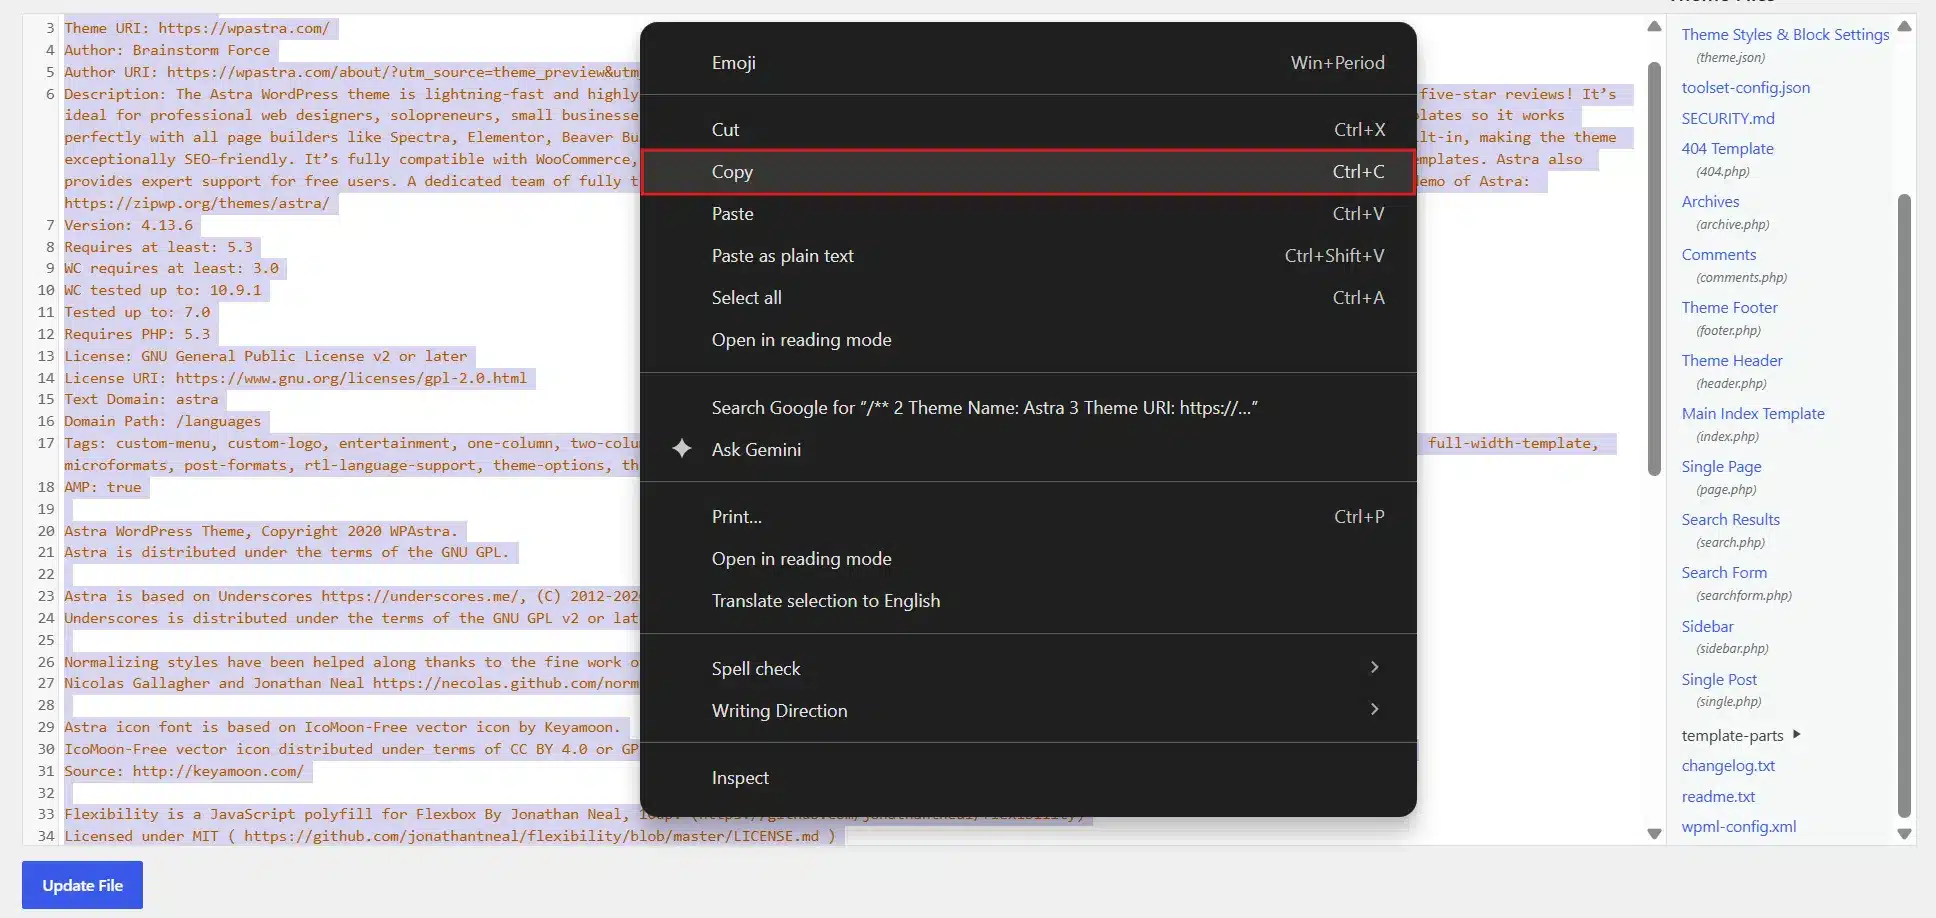
- Review what’s inside. A typical file looks like this:
<!DOCTYPE html>
<html <?php language_attributes(); ?>>
<head>
    <meta charset="<?php bloginfo('charset'); ?>">
    <meta name="viewport" content="width=device-width, initial-scale=1">
    <?php wp_head(); ?>
</head>
<body <?php body_class(); ?>>
<?php wp_body_open(); ?>
<header id="site-header">
    <div class="site-branding">
        <?php the_custom_logo(); ?>
    </div>
    <nav><?php wp_nav_menu(array('theme_location' => 'primary')); ?></nav>
</header>
The file ends right after the closing </header> tag. Everything below, in a different file, is body content.
Three functions matter here and should never be deleted: wp_head() lets plugins inject scripts, styles, and SEO tags. body_class() adds dynamic CSS classes plugins rely on. wp_body_open() lets tools like Google Tag Manager insert tracking code right after the body tag opens.
- Confirm the body lives in its own template. Click
index.phpor whichever template controls the page type. Near the top, look for:
<?php get_header(); ?>
And near the bottom:
<?php get_footer(); ?>
Everything between those lines is your body content. If your theme is built correctly, this separation already exists; you’re confirming it, not creating it. For a deeper breakdown, see this guide on what index.php does in WordPress.
- Make your customization in the correct file:

- Logo, navigation, top bar → edit
header.php, between the<header>tags. - Page content or layout → edit
index.php,page.php, orsingle.php, neverheader.php. - SEO tags or meta info → inside the
<head>section ofheader.php, above the closing</head>tag. See this guide on how to add meta tags in WordPress for the safest method.
Save your changes. WordPress applies them immediately, no republishing required.
The Theme File Editor option is currently removed from the block themes(eg., Twenty-Twenty-Five, etc.). You first need to install a classic theme (eg., Astra, etc.) to process these steps.
Pro Tip: If the problem only happens inside one app rather than in Safari, check that app’s settings. Some apps carry their own DNS-over-HTTPS setting, and it can end up misconfigured or pointed somewhere unreachable.
How to Style the Header and Body Separately with CSS
Once the files are separated, styling them independently is the next natural step. This is where most beginners realise why the separation matters in practice, not just in theory.
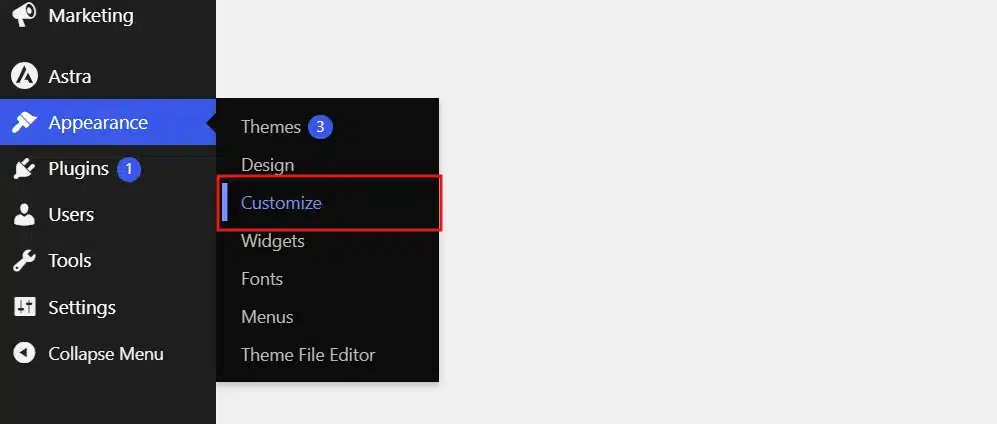
- Go to Appearance → Customize in your WordPress dashboard.
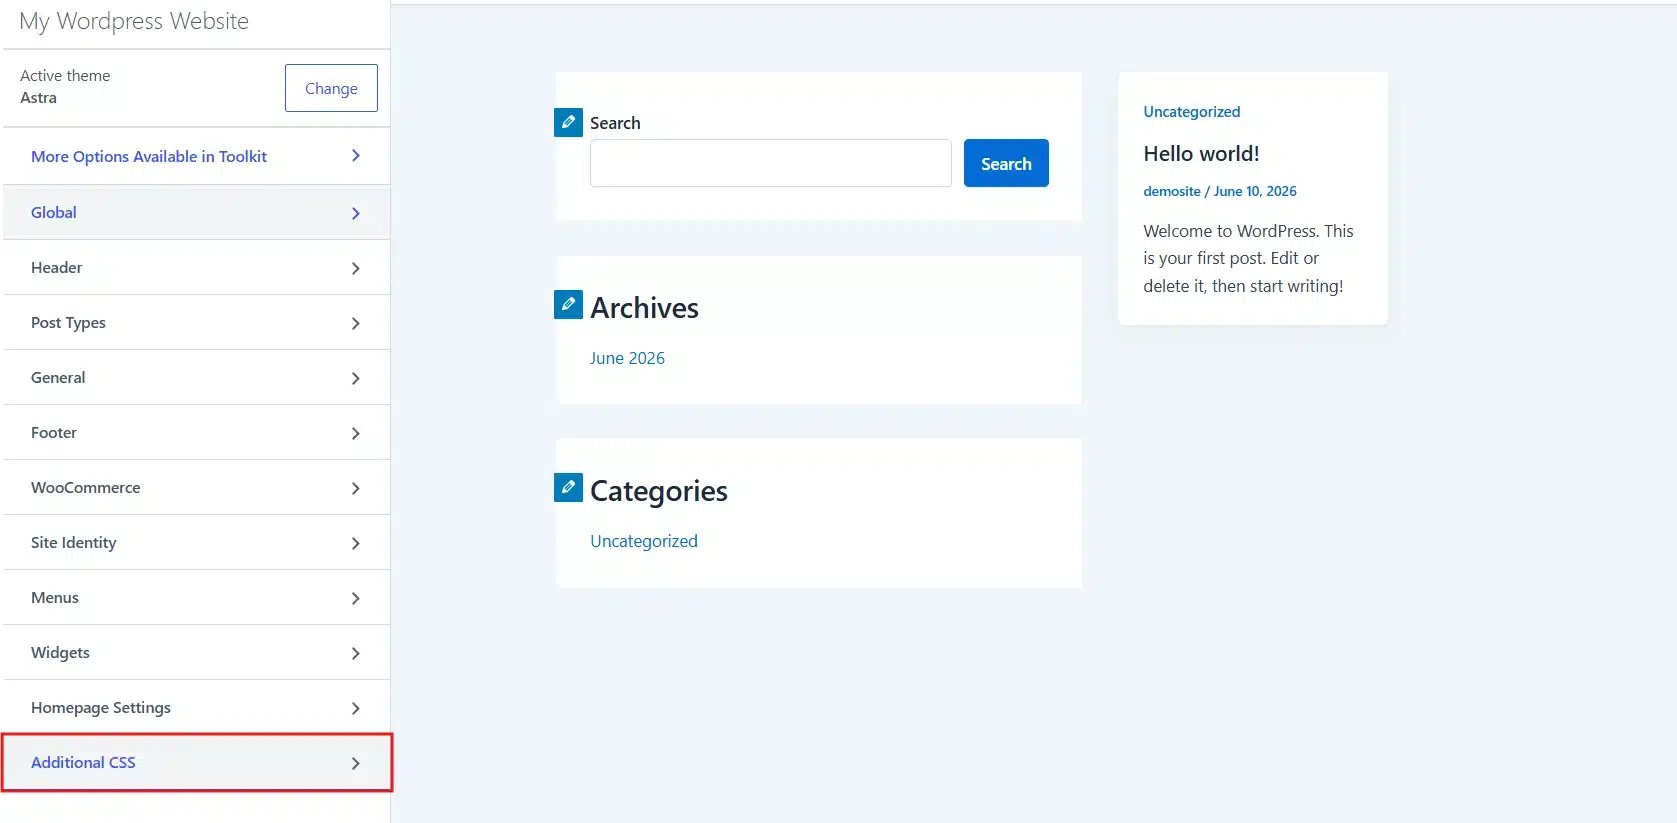
- Select Additional CSS in the bottom left.
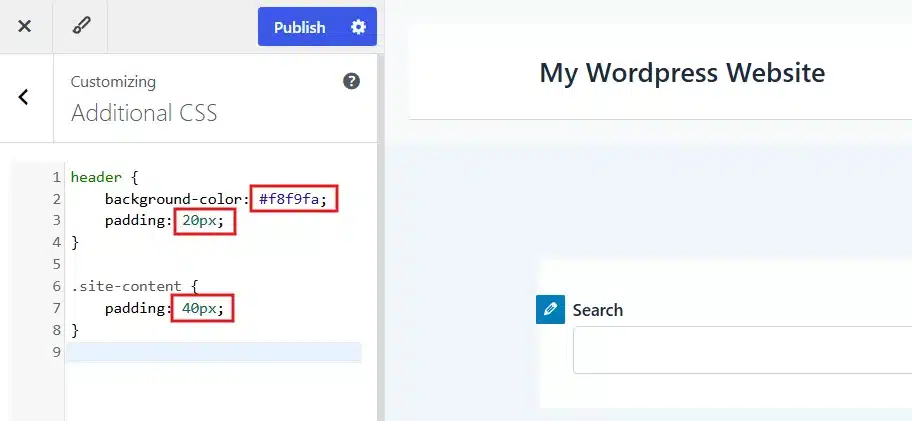
- Add the code:
header {
    background-color: #f8f9fa;
    padding: 20px;
}

.site-content {
    padding: 40px;
}
- Change the colour code and padding pixels according to your desired range.
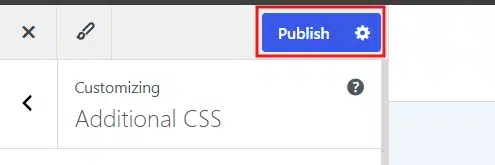
- Click Save to apply the changes.
Notice these two rulesets never touch each other. Change the header’s background colour and the body layout stays exactly where it was. That’s the whole point of keeping these sections apart in the first place.
Note: If your theme wraps body content in a different class name than .site-content, your CSS won’t apply. Check your page source first, or inspect the element in your browser’s developer tools, to confirm the actual class names your theme uses.
Use a Child Theme to Keep This Safe
Everything above works fine on a parent theme. There’s one catch: the next theme update overwrites every change you made.
A child theme solves this by inheriting your parent theme’s styles and templates while letting you override individual files, like header.php, without touching the original.
Setting one up takes a few minutes:
- Open your Site Folder and create a new folder inside
/wp-content/themes/.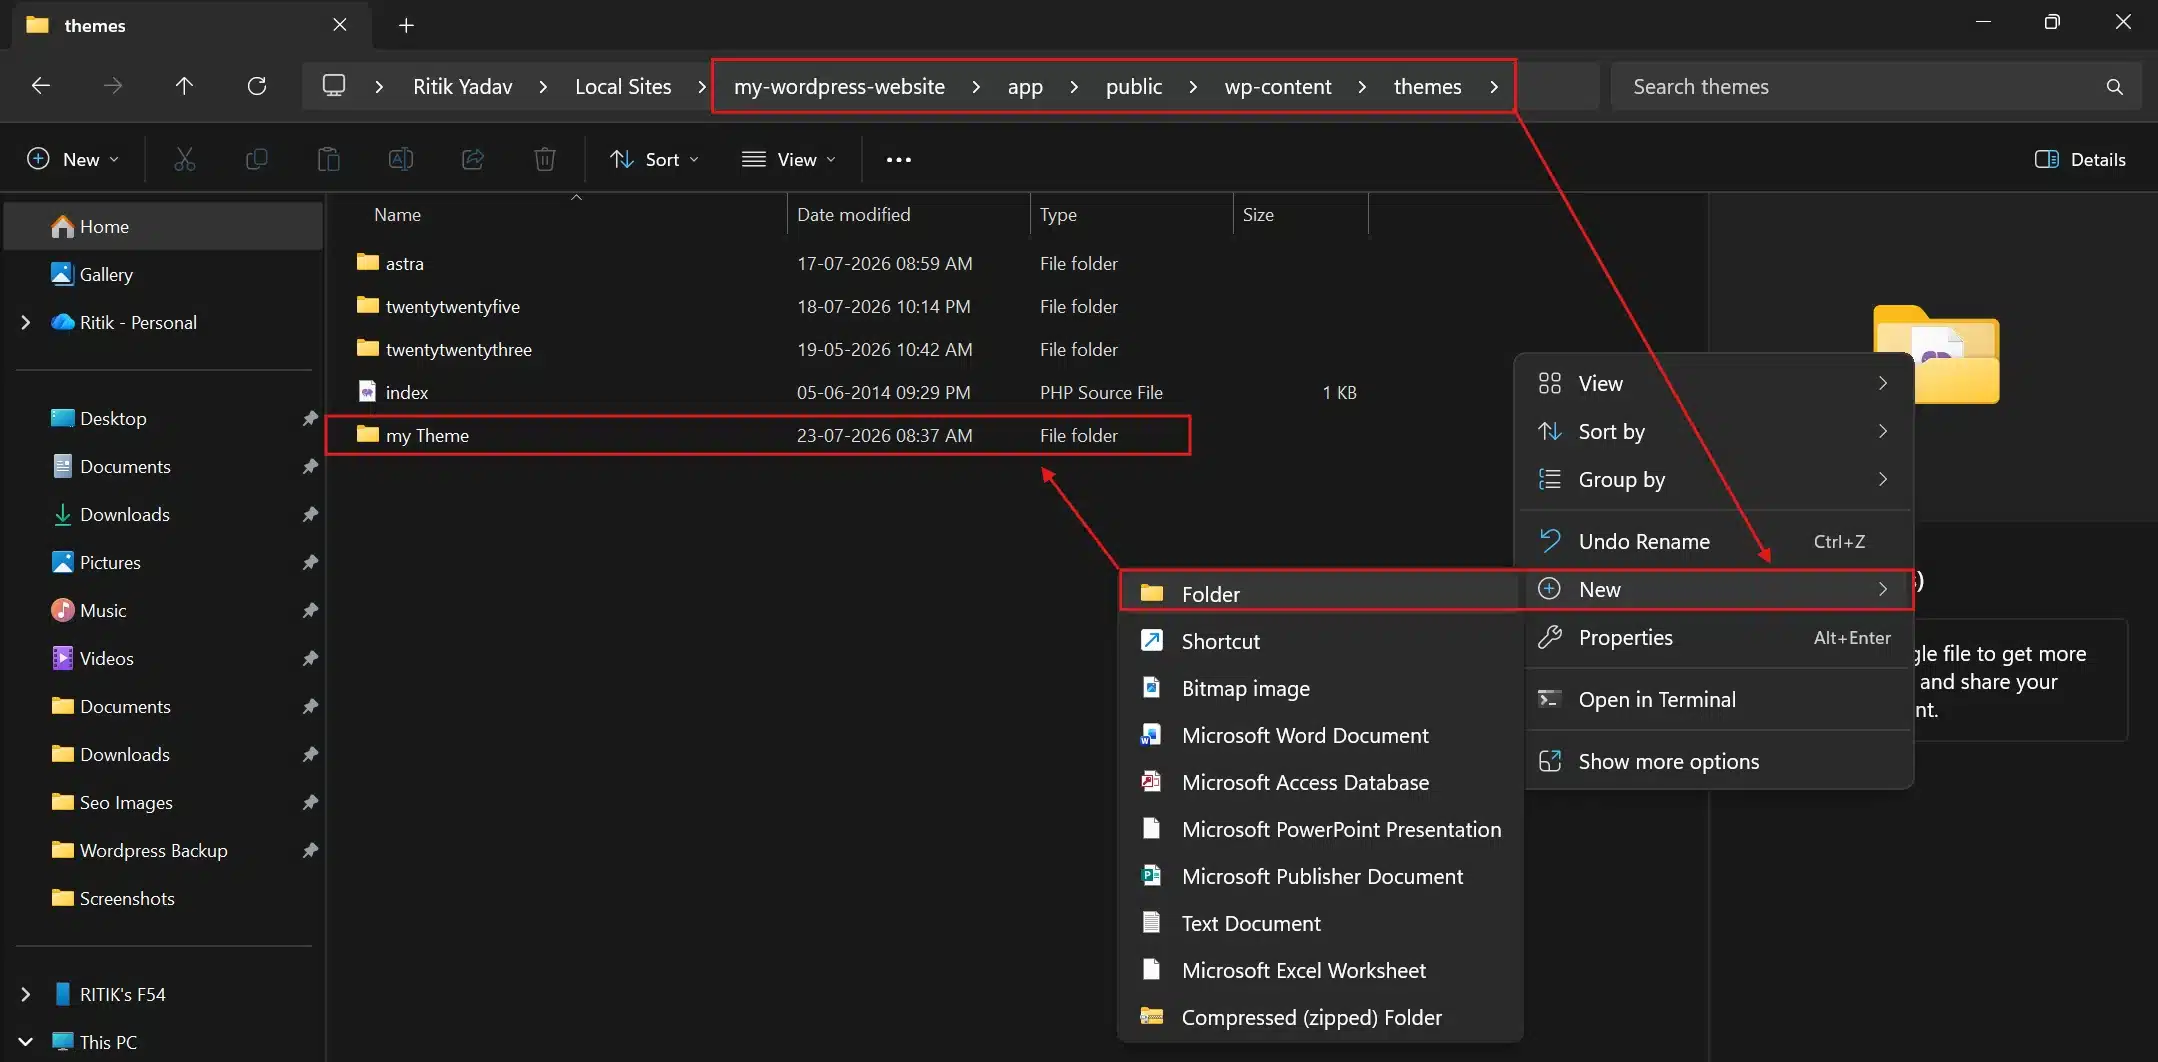
- Add a
style.cssfile that references your parent theme.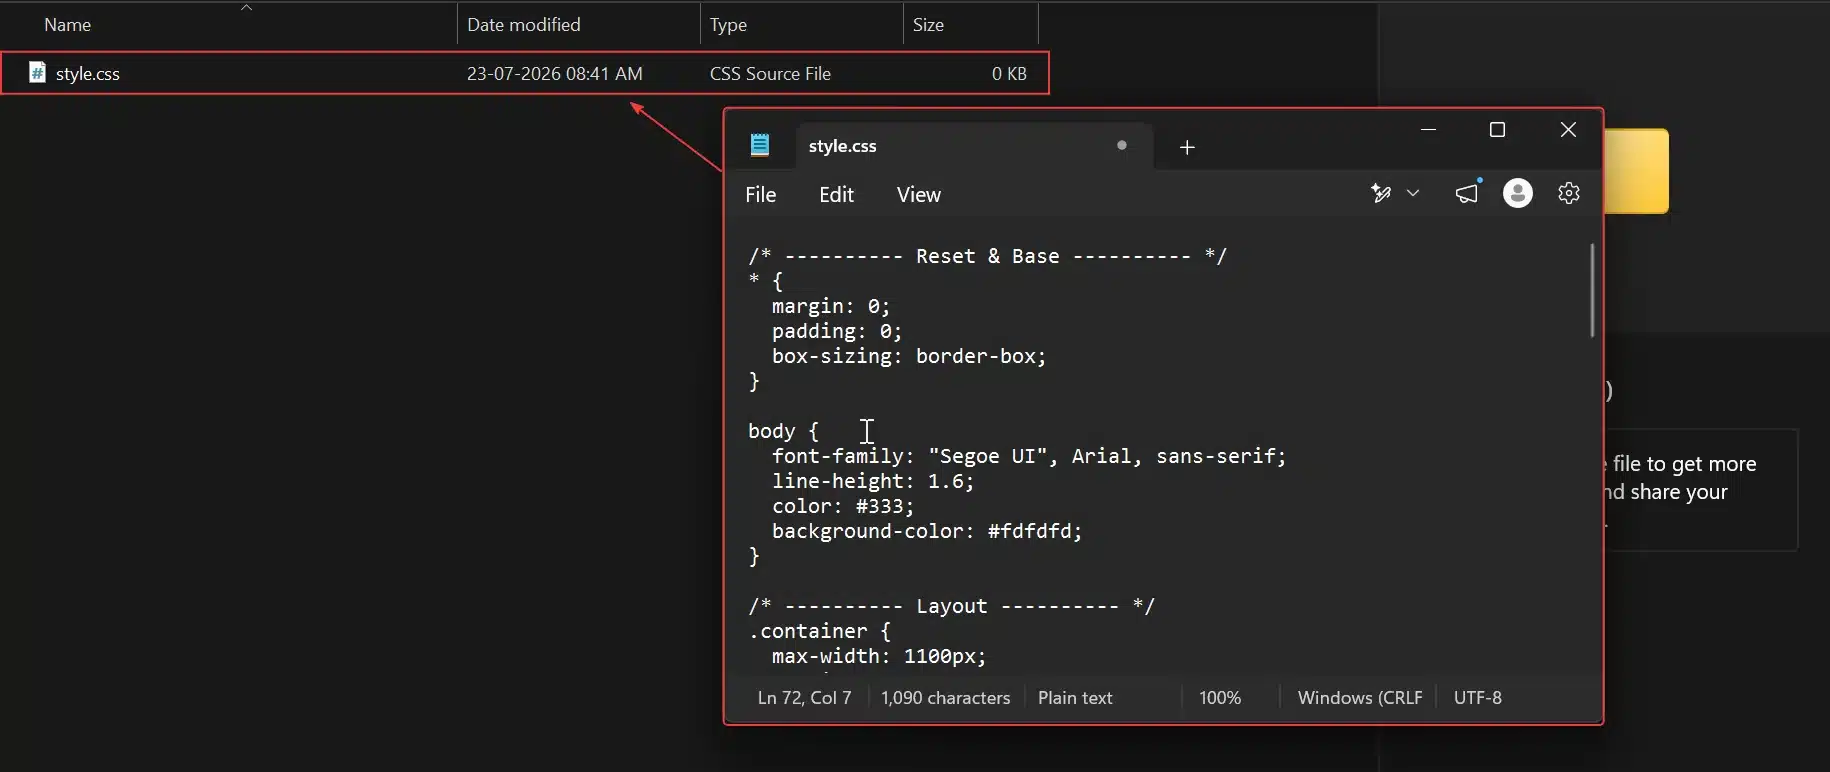
- Copy and Edit
header.phpfrom the parent theme into your child theme folder. Your changes survive every future update.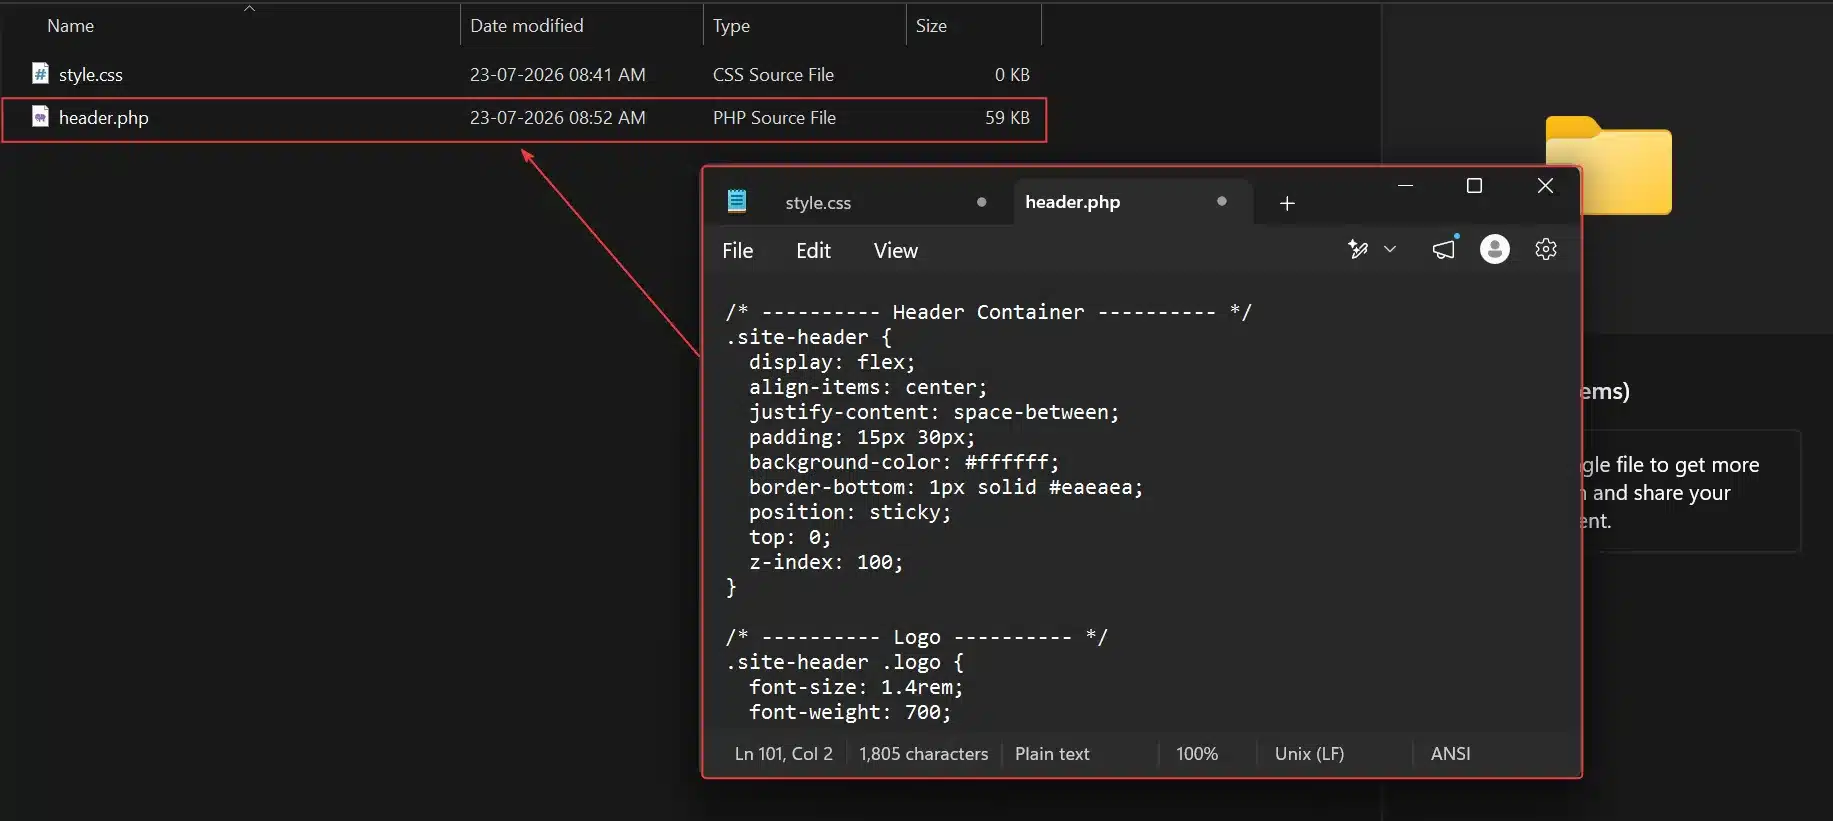
If you’d rather see the full walkthrough with every file explained, this guide on creating a WordPress child theme covers it step by step.
Skipping this step is fine for a quick test on a staging site. It’s a real risk on anything live.
How Block Themes Handle Header and Body Separation
Everything covered so far applies to classic PHP-based themes. If you’re running a block theme, sometimes called a Full Site Editing theme, the process looks different.
Block themes don’t use header.phpat all. Instead, template parts live inside an HTML file, usually found at /parts/header.html, and get edited visually rather than in code.
Here’s the block theme version of the same task:
- Go to Appearance → Editor in your dashboard.
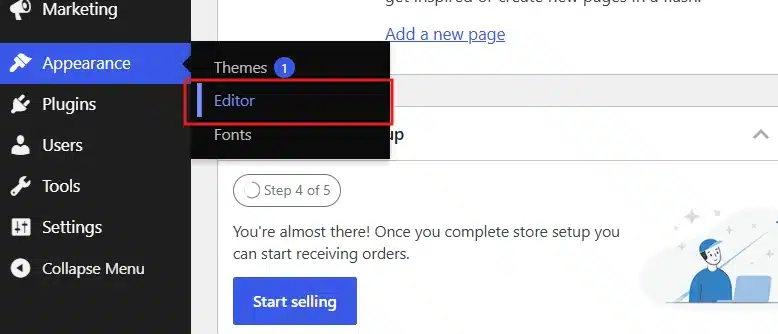
- Click Patterns → Header template part.
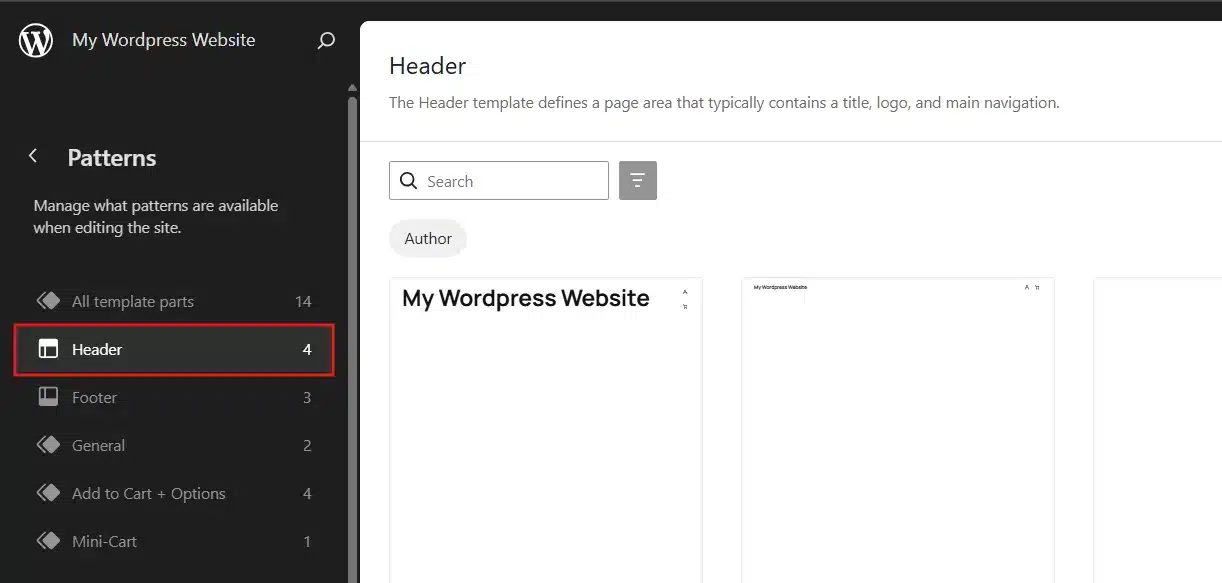
- Edit it using the block editor. Add, remove, or rearrange blocks visually.
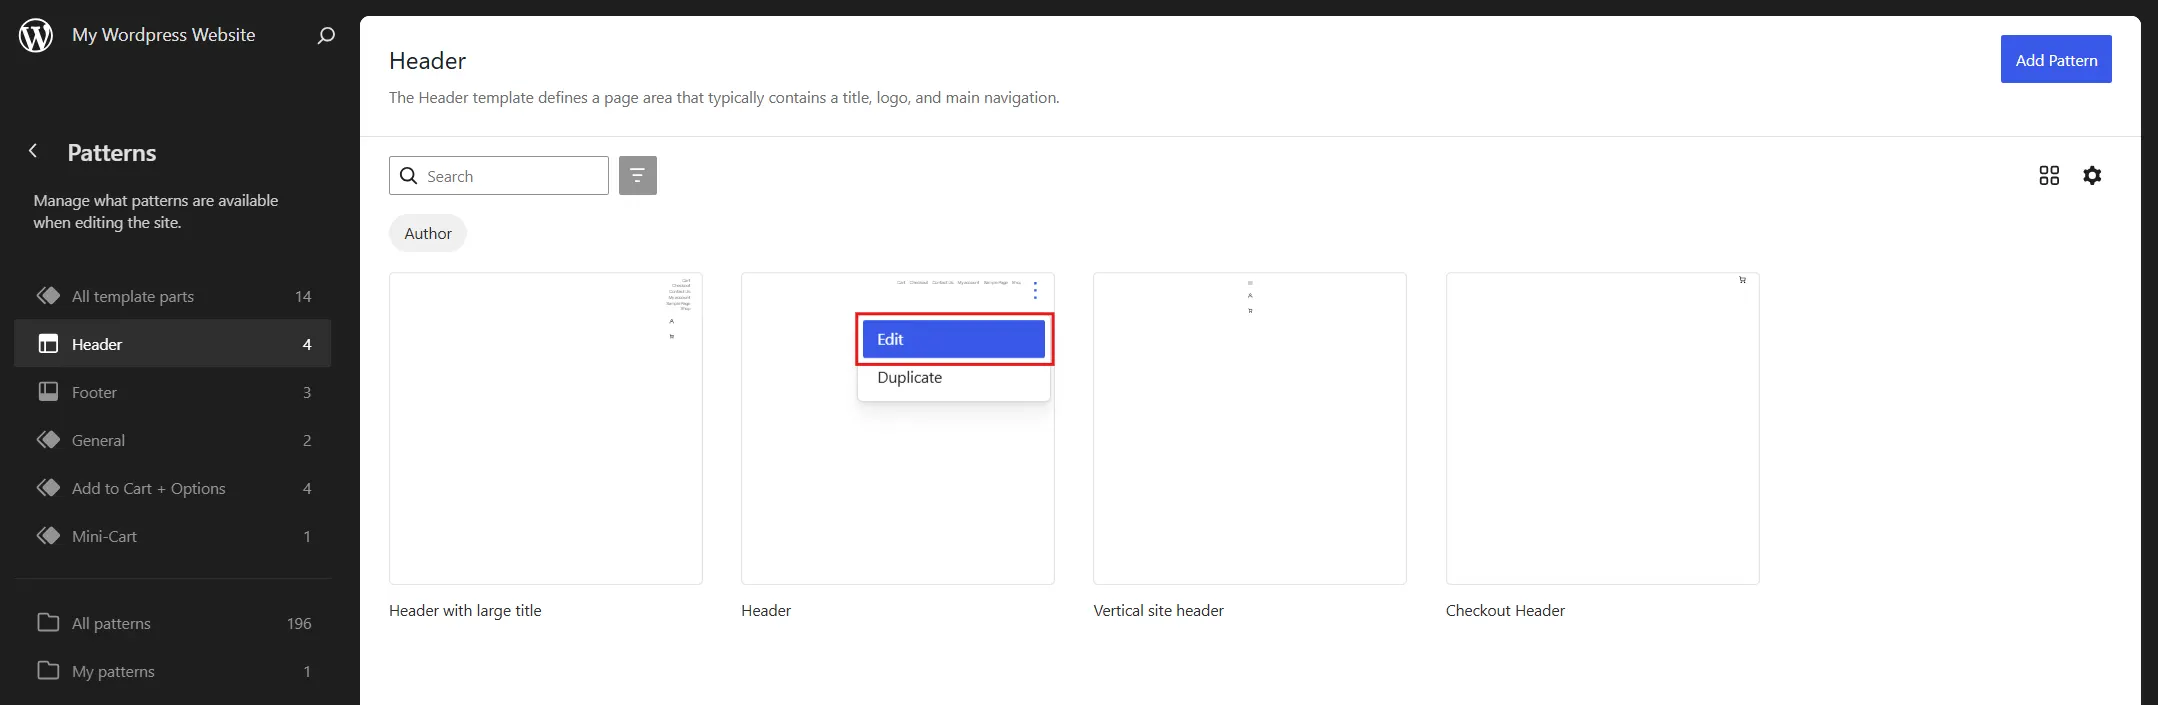
- Click Save.

No code required. The separation between header and body still exists underneath; WordPress just handles it through blocks and template parts instead of PHP includes. If you’re not sure which type of theme you’re running, check Appearance → Themes. Block themes usually show “Editor” instead of “Customize” in the theme options.
Common Mistakes When You Separate Header from Body in HTML in WordPress
A handful of mistakes account for almost every support request on this topic. Here’s what to watch for.
- Editing the parent theme directly: The moment that theme updates, your changes vanish. Always work in a child theme for anything beyond a quick test.
- Deleting wp_head() by accident: This single function powers most plugin integrations. If your SEO plugin, analytics, or caching tool suddenly stops working after an edit, check whether wp_head() is still there.
- Leaving an HTML tag unclosed: One missing closing tag in
header.phpcan break your entire site layout, not just the header. Always double-check your brackets before saving. - Confusing
<head>with<header>: They’re not the same thing. Mixing them up leads to metadata showing up where visible content should be, or vice versa. - Testing changes directly on a live site: A staging environment costs nothing on most hosts and saves you from visitors seeing a broken page mid-edit.
- Skipping the backup step entirely: It’s the one step everyone wants to skip. It’s also the one that saves the most time when something goes wrong.
- Assuming every theme structures its header the same way: Some themes split navigation into a separate template part. Others load the logo through a different function entirely. Always check your specific theme’s files before copying steps from any tutorial. This one included.
How to Test Your Header and Body Separation
Once you’ve made your changes, testing takes just a few minutes and catches problems before visitors do.
Right-click anywhere on your published page and select View Page Source. Scroll until you find the closing </head> tag. Everything above it is metadata. Everything below, starting with <body>, is what visitors see on the page.
Check your site on a phone and a desktop browser separately. Header issues often only show up at specific screen widths.
Run your page through a tool like Google PageSpeed Insights. A clean separation between header and body rarely causes performance problems on its own. A bloated header full of unnecessary scripts can slow things down, though. If your site feels slow generally, this guide on why WordPress runs slow covers the usual cause.
Finally, click through a handful of different pages, not just the homepage. A header change that looks fine on one template can behave differently on another if your theme uses multiple header variations.
Conclusion
Learning to separate header from body in HTML in WordPress comes down to three files: header.phpyour page templates, and the get_header() function connecting them. WordPress already builds this separation into every properly coded theme.
Your job is customizing it safely, ideally inside a child theme, with a backup ready before you touch anything. Whether you’re working with a classic theme’s PHP files or a block theme’s visual editor, the underlying principle stays the same. Header content stays in its file. Body content stays in its own file.
Test on a staging site first if you can back up before you edit. And if you’d rather hand this off entirely, DevDiggers’ WordPress development services can handle theme customizations like this without the trial and error.
Frequently Asked Qestions (FAQs)
Q1. What’s the difference between the head tag and the header tag in WordPress?
The <head> tag holds invisible metadata like scripts and stylesheets. The <header> tag is the visible top section of your page, containing your logo and navigation. Both live insideheader.php, but they serve completely different purposes.
Q2. Will separating the header from the body break my existing plugins?
Not if you keep wp_head() and wp_body_open() intact. Most plugin conflicts after a header edit come from accidentally deleting one of these functions rather than from the separation itself.
Q3. Do I need coding knowledge to do this?
Basic HTML familiarity helps, but the process itself is mostly locating the right file and editing existing code rather than writing from scratch. Page builders like Elementor also offer a no-code option through their Theme Builder feature.
Q4. Can I have a different header for my homepage than the rest of my site?
Yes. Create a file named header-home.php with your custom content, then call it using get_header('home') in your front page template. WordPress will load that specific file instead of the default.
Q5. How do I know if my theme uses header.php or a block theme template part?
Check Appearance in your dashboard. If you see a Site Editor option with Templates and Patterns, you’re on a block theme. If you see Theme File Editor listing PHP files, you’re on a classic theme.
Q6. What happens if I accidentally break my header.php file?
If you saved a backup first, simply paste the original content back and save. If the dashboard editor locks you out due to a fatal error, you’ll need FTP access instead. Paste the backup back in and save.
Q7. Can I style the header and body sections without editing PHP files at all?
Yes. Appearance → Customize → Additional CSS lets you style both sections using only CSS, with no PHP editing required. This works on both classic and block themes, as long as you target the correct class names.