Adding Google reCAPTCHA to your WooCommerce checkout takes about ten minutes and requires two things before you touch any plugin: a Google account and a free API key pair from the reCAPTCHA admin console. Most guides on how to add Google reCAPTCHA to WooCommerce checkout skip that requirement entirely and wonder why readers get stuck.
Bot attacks on WooCommerce checkouts have changed. Card-testing bots are smarter and more targeted than they were two years ago. Getting reCAPTCHA set up correctly, choosing the right version, and placing it where customers will actually see it; those details matter more than the setup itself.
This guide covers all of it. You’ll learn which reCAPTCHA version to pick, how to generate your API keys without the common mistakes, and how to set everything up using the WooCommerce Advanced CAPTCHA plugin.
Why Your WooCommerce Checkout Needs reCAPTCHA Right Now?
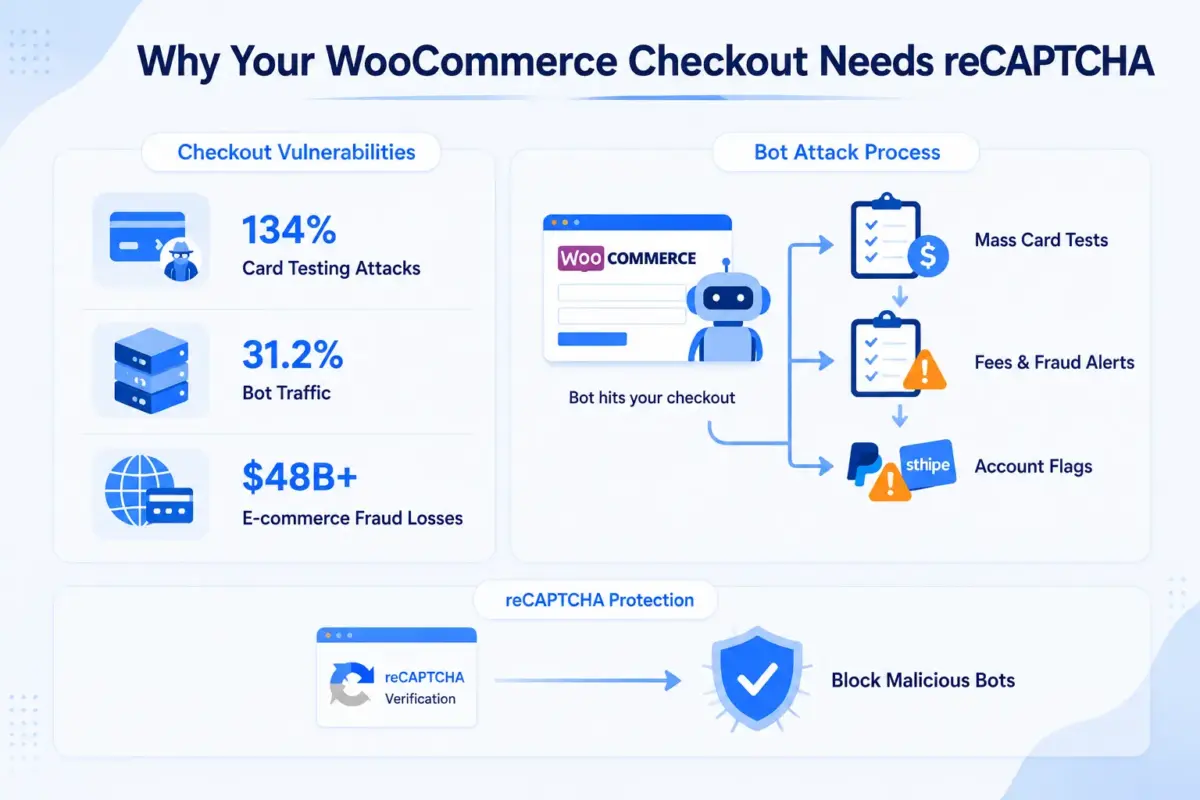
WooCommerce checkout security has become a serious concern, and the numbers are hard to ignore. According to Stripe’s fraud data, card-testing attacks increased by 134% in 2025, and WooCommerce stores are among the most targeted platforms. Cloudflare’s 2025 bot report found that 31.2% of all internet traffic is automated bot traffic, with eCommerce checkout pages sitting in the top five most targeted endpoints. Juniper Research reported that global eCommerce fraud losses exceeded $48 billion in 2025, with smaller stores bearing a large share because they have fewer security layers.
Here’s what those attacks look like in practice: a bot hits your checkout, submits dozens or hundreds of small orders using stolen card numbers to test which ones are active, then moves on. You’re left with failed orders, gateway fees, and sometimes a marked PayPal or Stripe account.
Knowing how to add Google reCAPTCHA to WooCommerce checkout and doing it correctly stops most automated bots from getting that far. It’s not a complete fraud solution on its own, but it removes the easiest path in.
More on what reCAPTCHA can and can’t stop in a moment.
reCAPTCHA v2 vs v3: Which One Should You Use?
This is the question most guides skip, and it’s the one that most affects how your checkout actually behaves.
| reCAPTCHA v2 Checkbox | reCAPTCHA v2 Invisible | reCAPTCHA v3 | |
|---|---|---|---|
| User sees it? | Yes, “I’m not a robot” box | Only if suspicious | Never |
| User interaction | One click (sometimes image challenge) | None unless activated | None |
| How it works | verification-based | Background analysis, challenge if marked | Risk score (0.0–1.0) |
| False positives | Low | Low | Requires limit adjustment |
| Setup complexity | Simple | Simple | Needs server-side score handling |
| Best for checkout? | Yes most stores | Yes lower difficulty | Use carefully; needs tuning |
For most WooCommerce stores, v2 Checkbox is the safest starting point. It’s easy to set up, clearly blocks bots, and customers understand what they need to do. The one-click difficulty is small compared to the protection it adds.
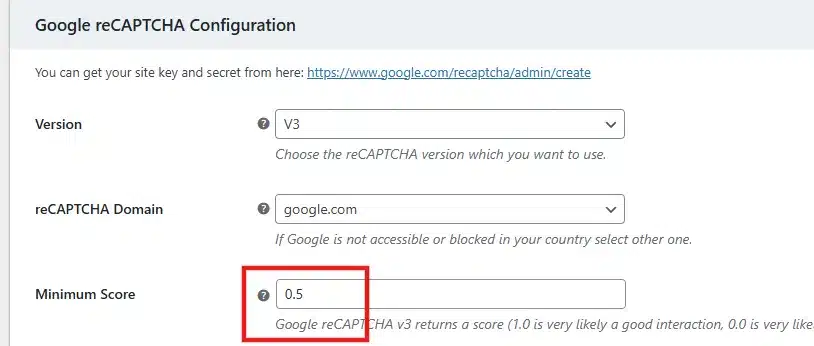
reCAPTCHA v3 is more invisible but needs work to use correctly. It returns a score between 0.0 (likely a bot) and 1.0 (likely human). You set the threshold; Google’s default is 0.5, but that may be too strict or too relaxed for your specific traffic. If you set it wrong, you either miss bots or block real customers. Worth the setup if you run a high-traffic store and want a smooth experience. Not worth it if you just want checkout protection up and running today.
Important note: OPMC Anti-Fraud documentation specifically recommends only reCAPTCHA v2 for blocking card attacks, because v3’s score-based approach doesn’t properly block the rapid-fire submission patterns that card-testing bots use.
A Note on reCAPTCHA and the WooCommerce Block Checkout
Worth knowing before you go further.
reCAPTCHA protects the front-end checkout form. But in late 2024, card-testing bots started hitting the WooCommerce Store API, directly skipping the checkout page entirely. The WooCommerce Developer Blog covered this in December 2024, noting that bots targeting the Store API don’t interact with the form at all, so front-end CAPTCHA never fires.
If you’re running the Block-based Checkout (WooCommerce 8.5+), you may also need rate limiting on the /wc/store/v1/checkout endpoint alongside your reCAPTCHA setup. The WooCommerce Advanced CAPTCHA plugin handles the form-level protection. Rate limiting is an additional layer you can set up through Cloudflare or your hosting firewall.
For most stores on classic checkout, reCAPTCHA alone is a strong first layer. If you’re on Block Checkout and seeing REST API-based attacks, add rate limiting too.
How to Get Your Google reCAPTCHA API Keys
You need a Site Key and a Site Secret before anything else. Here’s how to get them without the common mistakes.
Step 1: Open the Google reCAPTCHA Admin Console
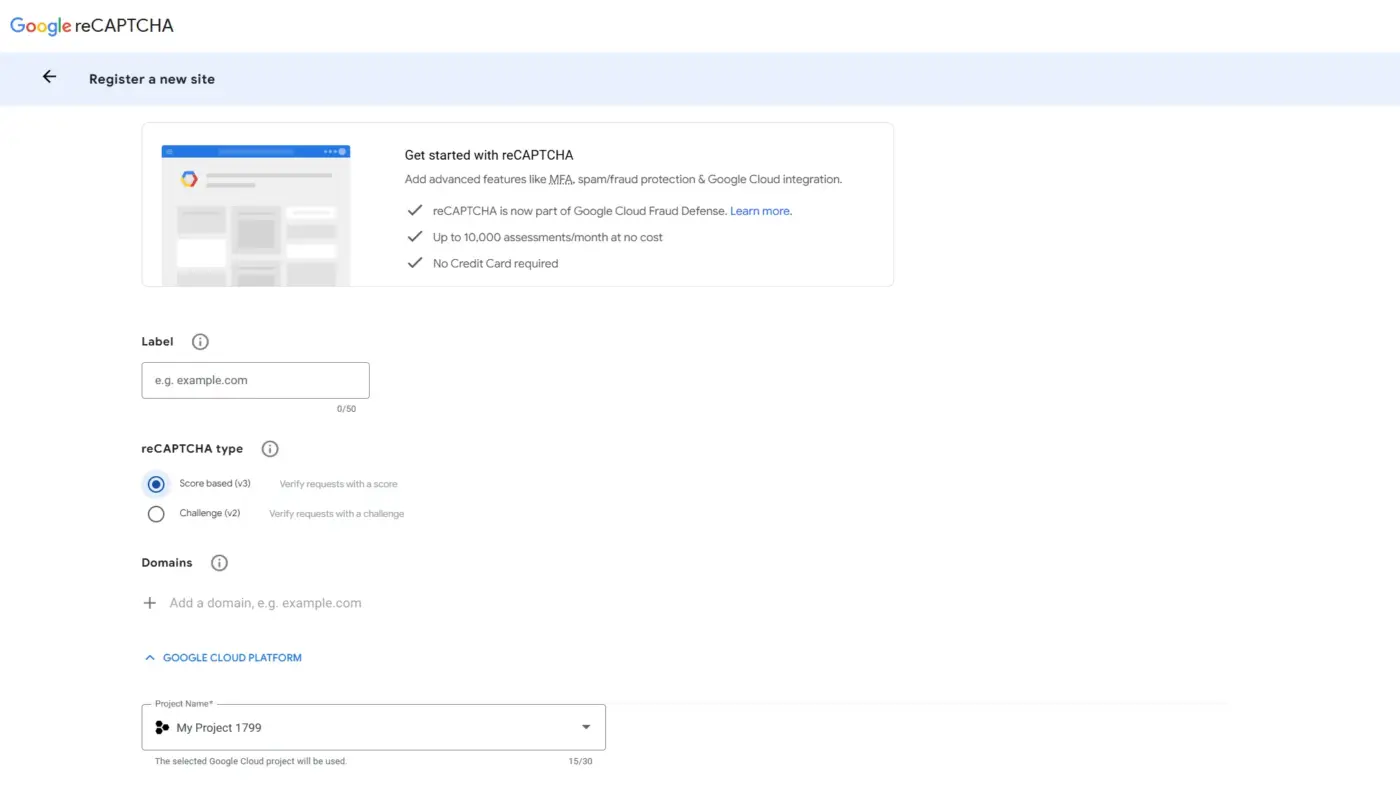
Go to google.com/recaptcha/admin/create and sign in with your Google account.
Step 2: Fill In Your Site Details
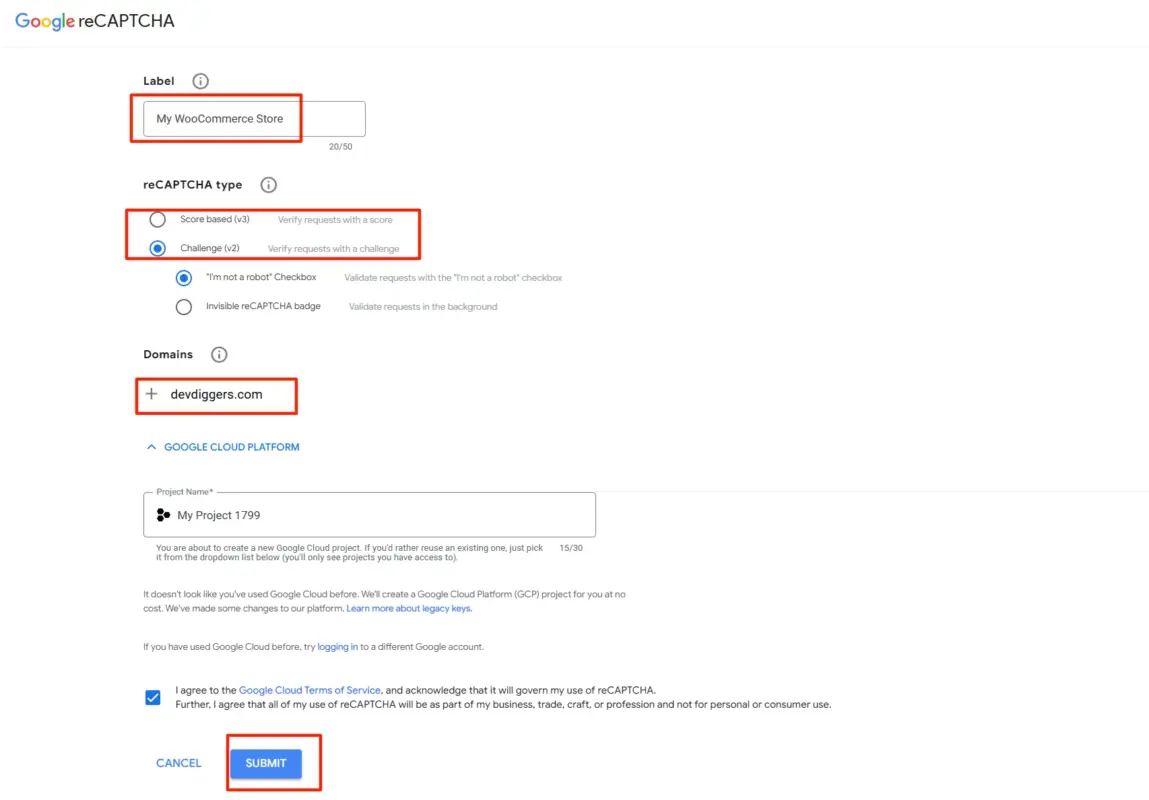
- Add a label (anything descriptive, like your store name). Then choose your reCAPTCHA type. Select reCAPTCHA v2 if you want the checkbox, or reCAPTCHA v3 if you want invisible scoring.
- Enter your domain in the domains field. Two common mistakes here: don’t include
https://and don’t add a trailing slash. Just the bare domain for example,yourstore.com. - Click Submit.
Step 3: Copy Your Site Key and Site Secret
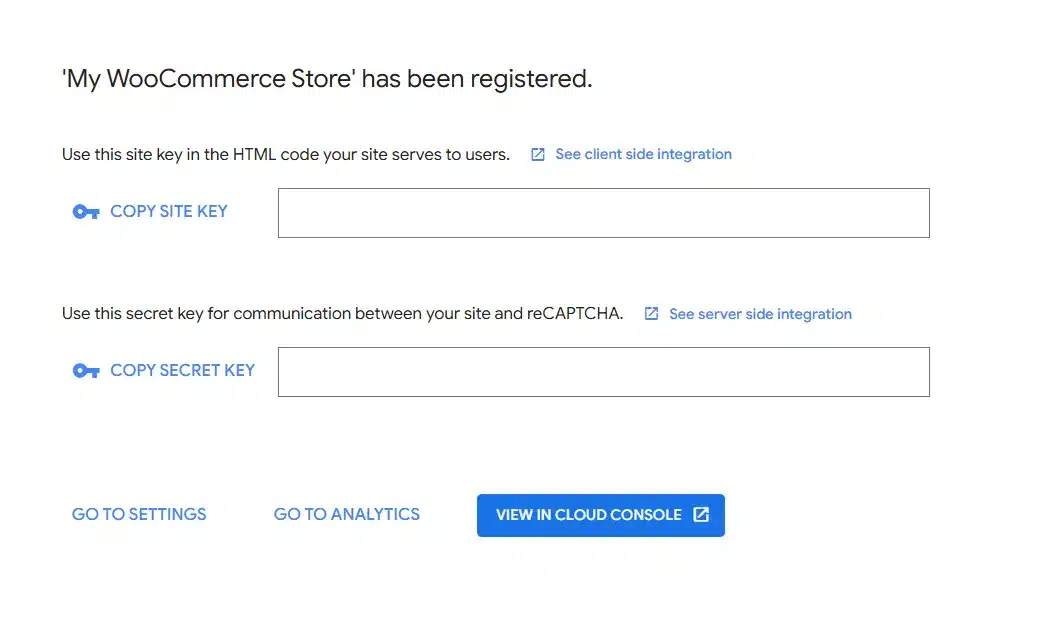
After submitting, Google shows you both keys. Copy them somewhere safe; you’ll paste them into the plugin in a moment.
How to Add Google reCAPTCHA to WooCommerce Checkout
The WooCommerce Advanced CAPTCHA plugin handles reCAPTCHA, Cloudflare Turnstile, and hCaptcha, all from one settings panel. The steps below cover the Google reCAPTCHA setup specifically.
If you’re not sure the plugin is right for you, it supports all standard WooCommerce forms (checkout, login, registration, password reset, product reviews), plus Contact Form 7 and several other DevDiggers plugins. One plugin, one settings page, all your forms covered.
Step 1: Install and Activate the Plugin
- From your WordPress dashboard, go to Plugins > Add New.

- Upload the WooCommerce Advanced CAPTCHA plugin zip file that you’ve purchased.

- Click Install Now, and the plugin will activate.

Step 2: Set up General Settings
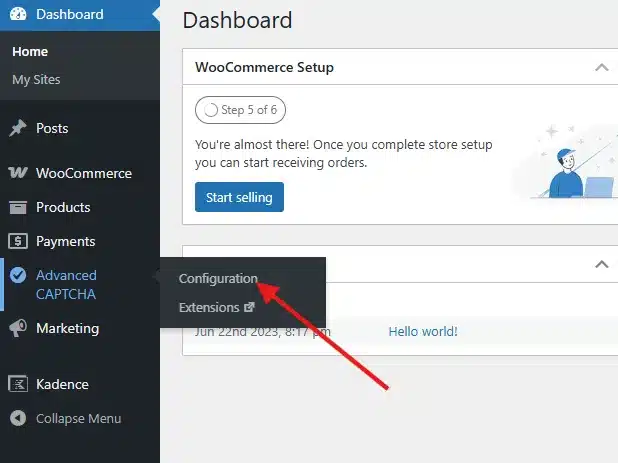
- Go to WooCommerce > Advanced CAPTCHA > Configuration.
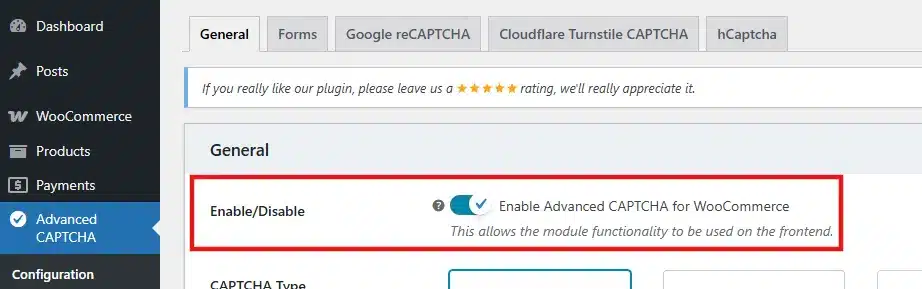
- In the General tab, toggle the plugin on.
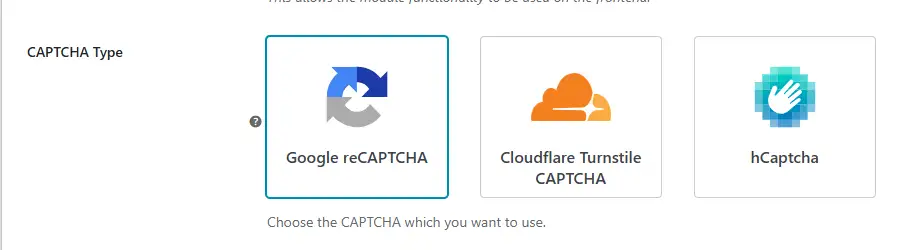
- Select Google reCAPTCHA in the CAPTCHA Type section.
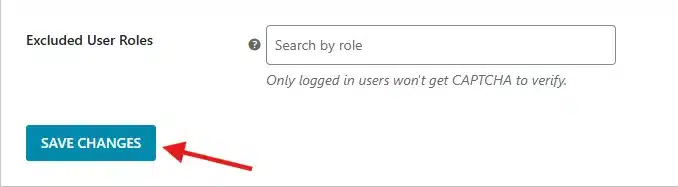
- Enable Whitelisted IPs. If you place test orders regularly, add your IP address here.

- Click Save Changes.
Step 3: Set up Forms Settings
- Switch to the Forms tab.
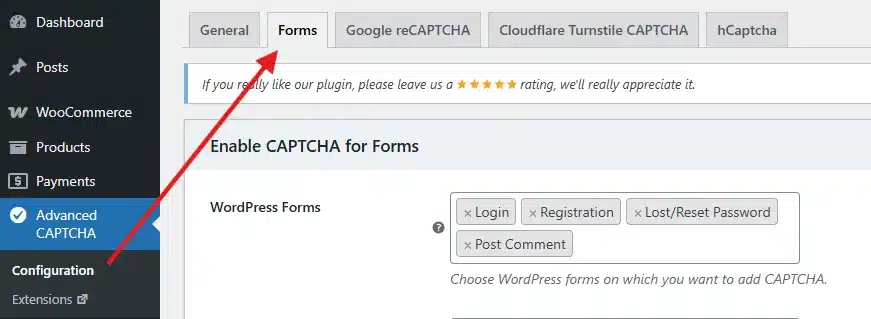
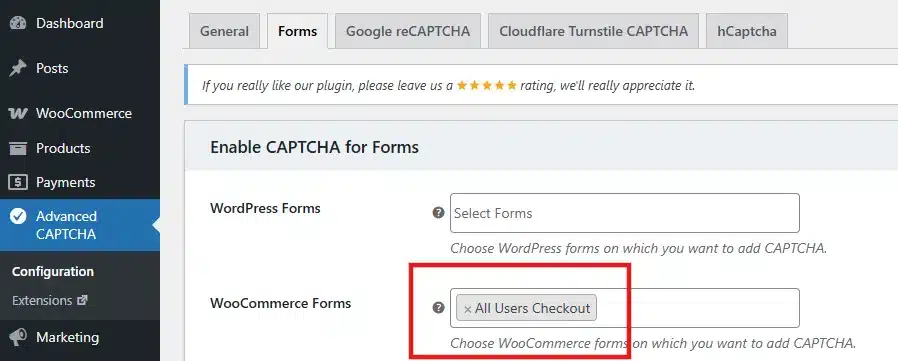
- Under WooCommerce Forms, select All Users Checkout from the dropdown. This protects both guest and logged-in checkouts.
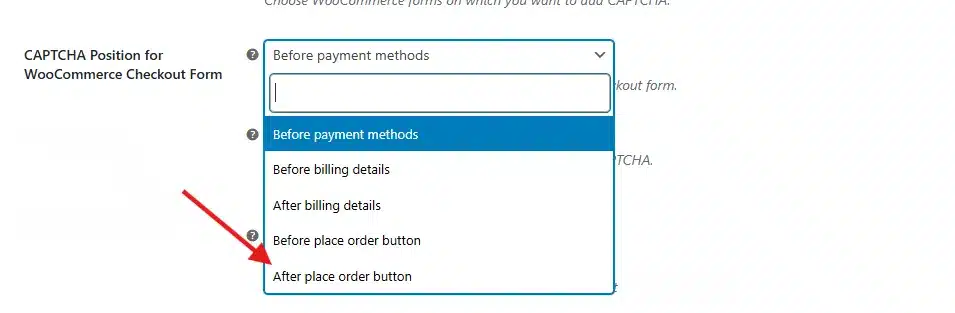
- Then set the CAPTCHA Position for the WooCommerce Checkout Form. Placing it just above the “Place Order” button gets the best visibility, as customers see it right before they click.
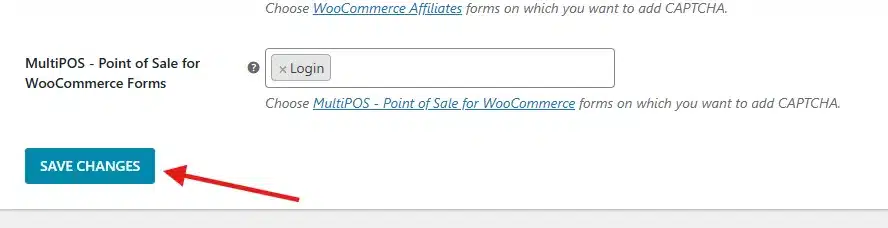
- Click Save Changes.
Step 4: Add Your reCAPTCHA Keys
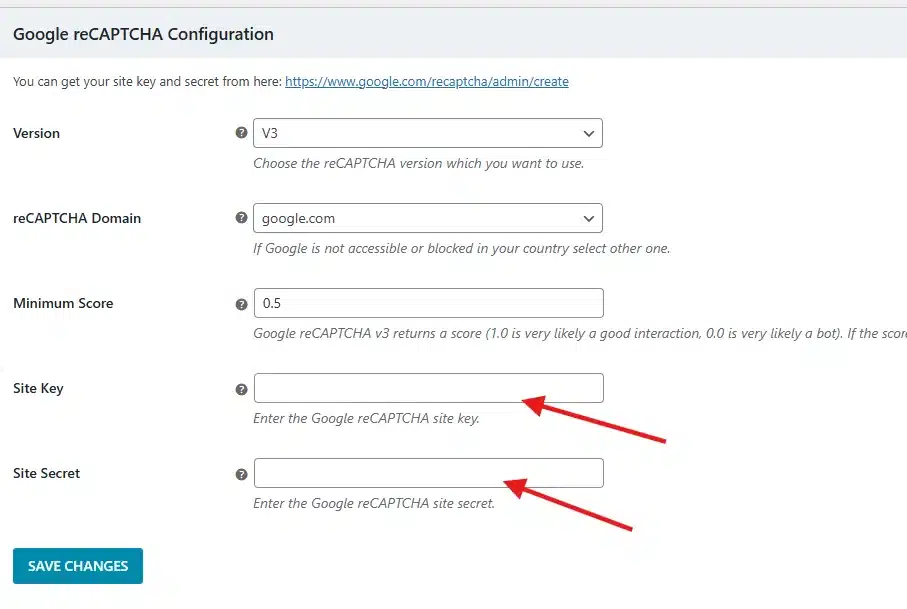
- Switch to the Google reCAPTCHA tab.
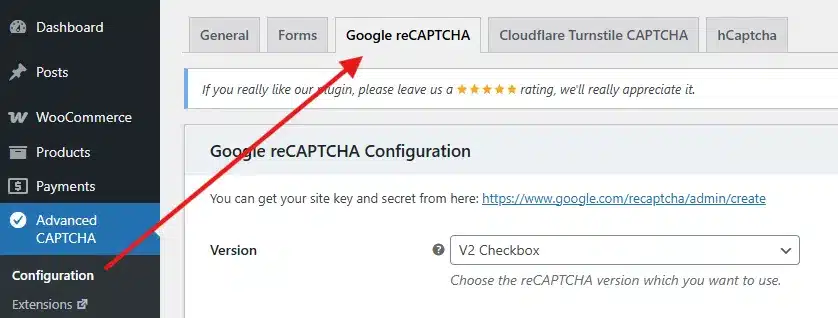
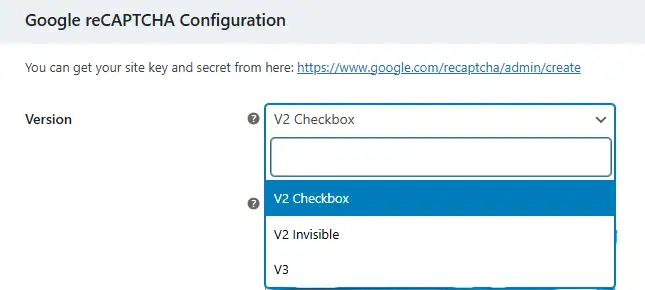
- Select your Version v2, v2 Invisible, or v3. Match this to whichever type you registered in the admin console.
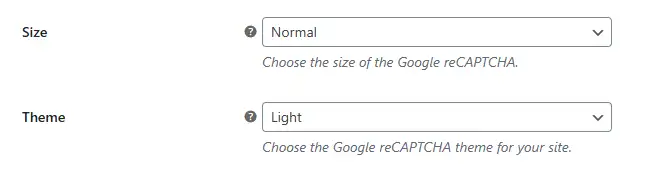
- If you chose v2, select your preferred Size (Normal or Compact) and Theme (Light or Dark). These are cosmetic options, so pick what fits your store design.
- If you chose v3, set the Minimum Score. Start with 0.5. If you see real customers getting blocked, lower it to 0.3. If bots are still getting through, raise it to 0.7 and monitor.
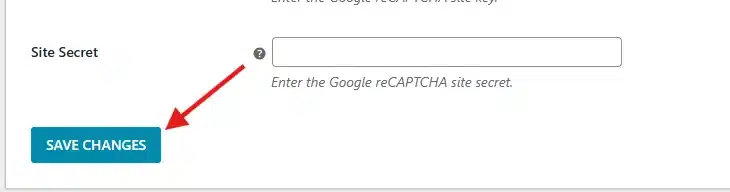
- Paste your Site Key and Site Secret into the fields.
- Click Save Changes.
Step 5: Test the Setup
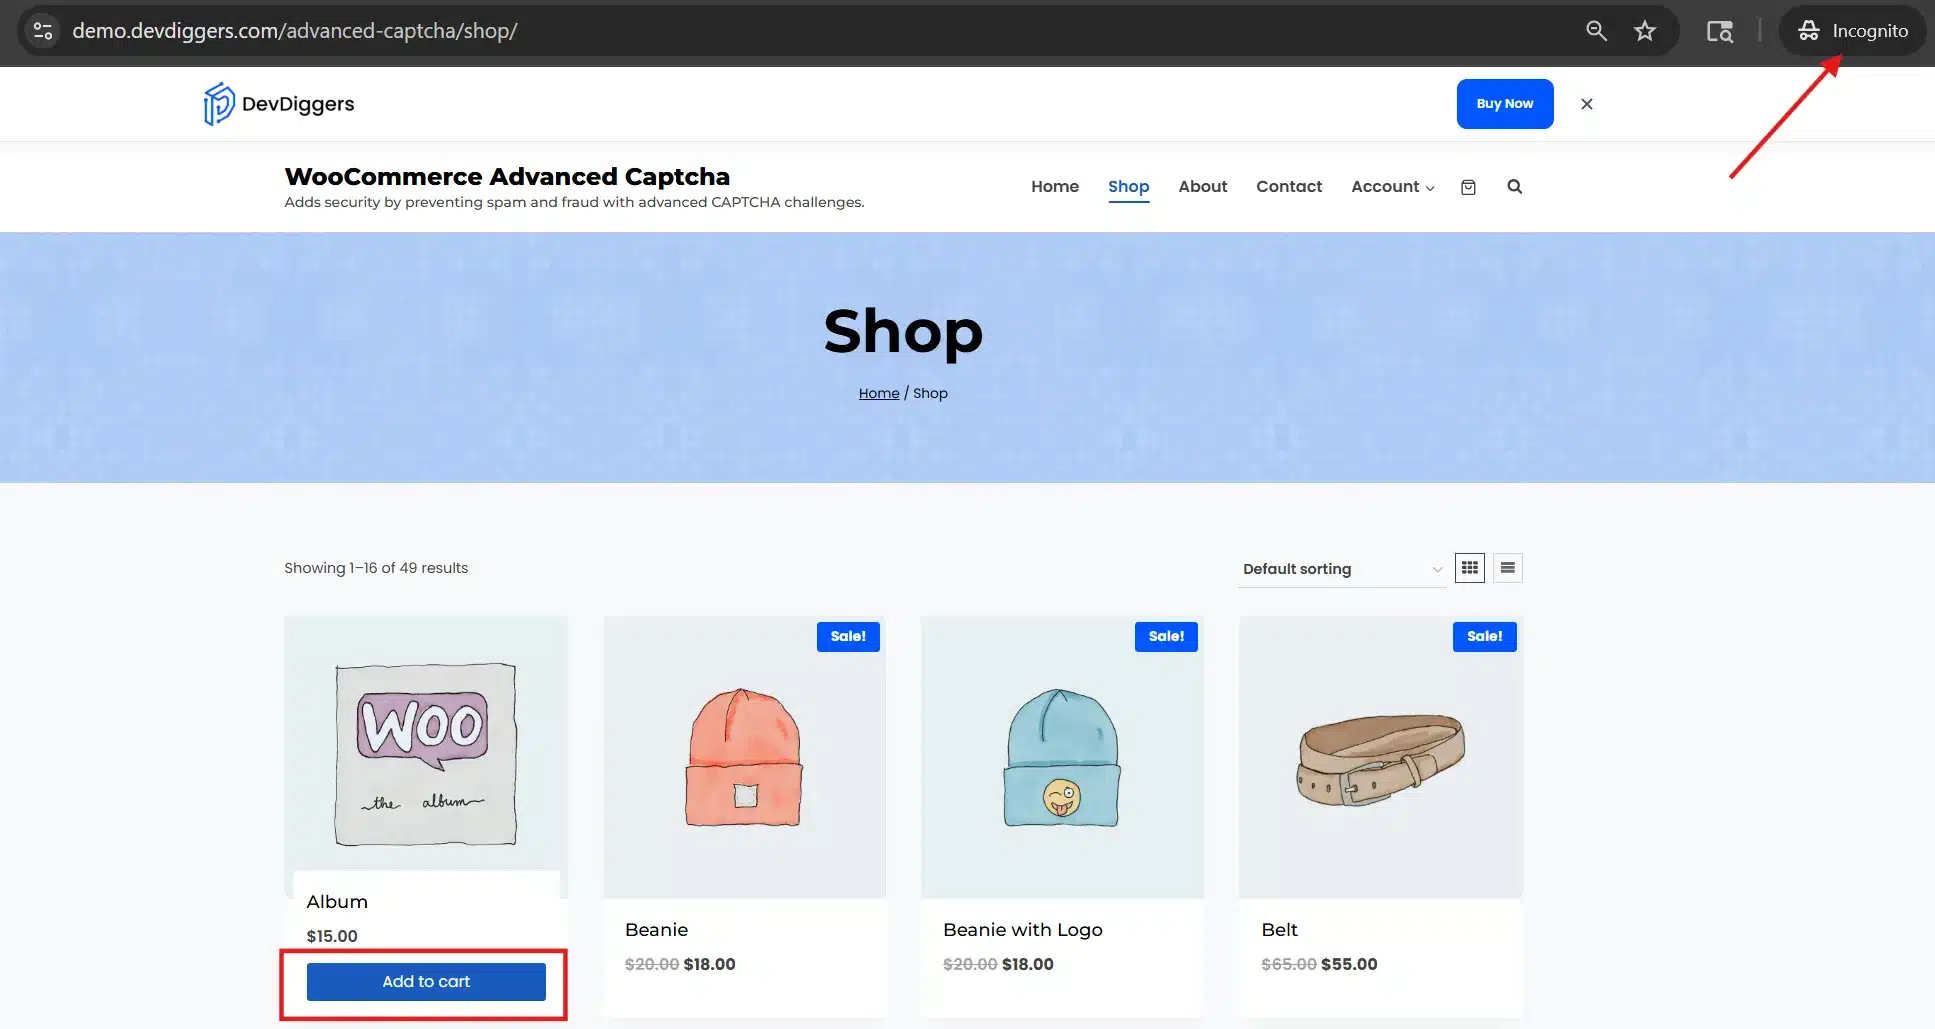
- Open an incognito browser window and add a product to your cart.
- Then, go to checkout.
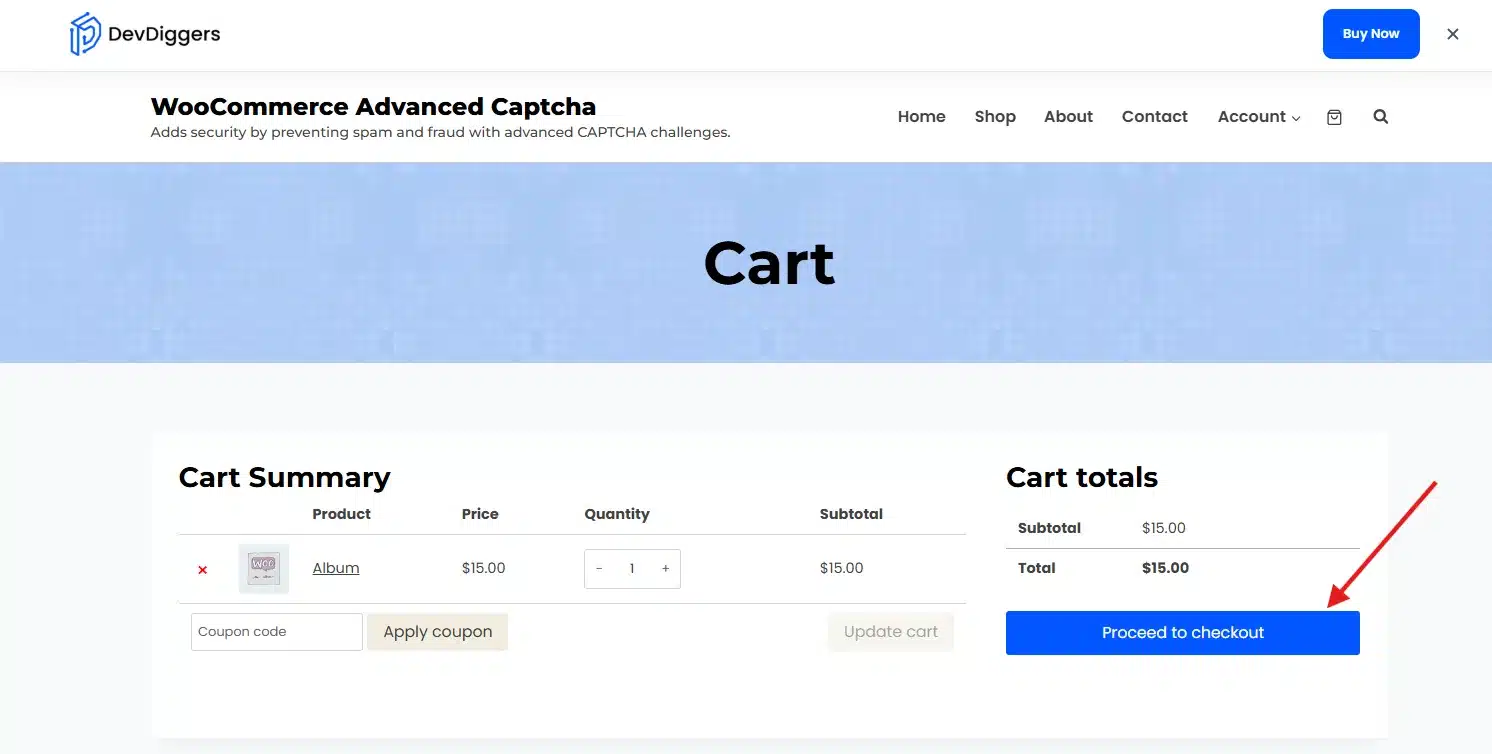
- If you set up v2, you’ll see the “I’m not a robot” checkbox. If you set up v3, you’ll see the reCAPTCHA badge in the bottom-right corner.
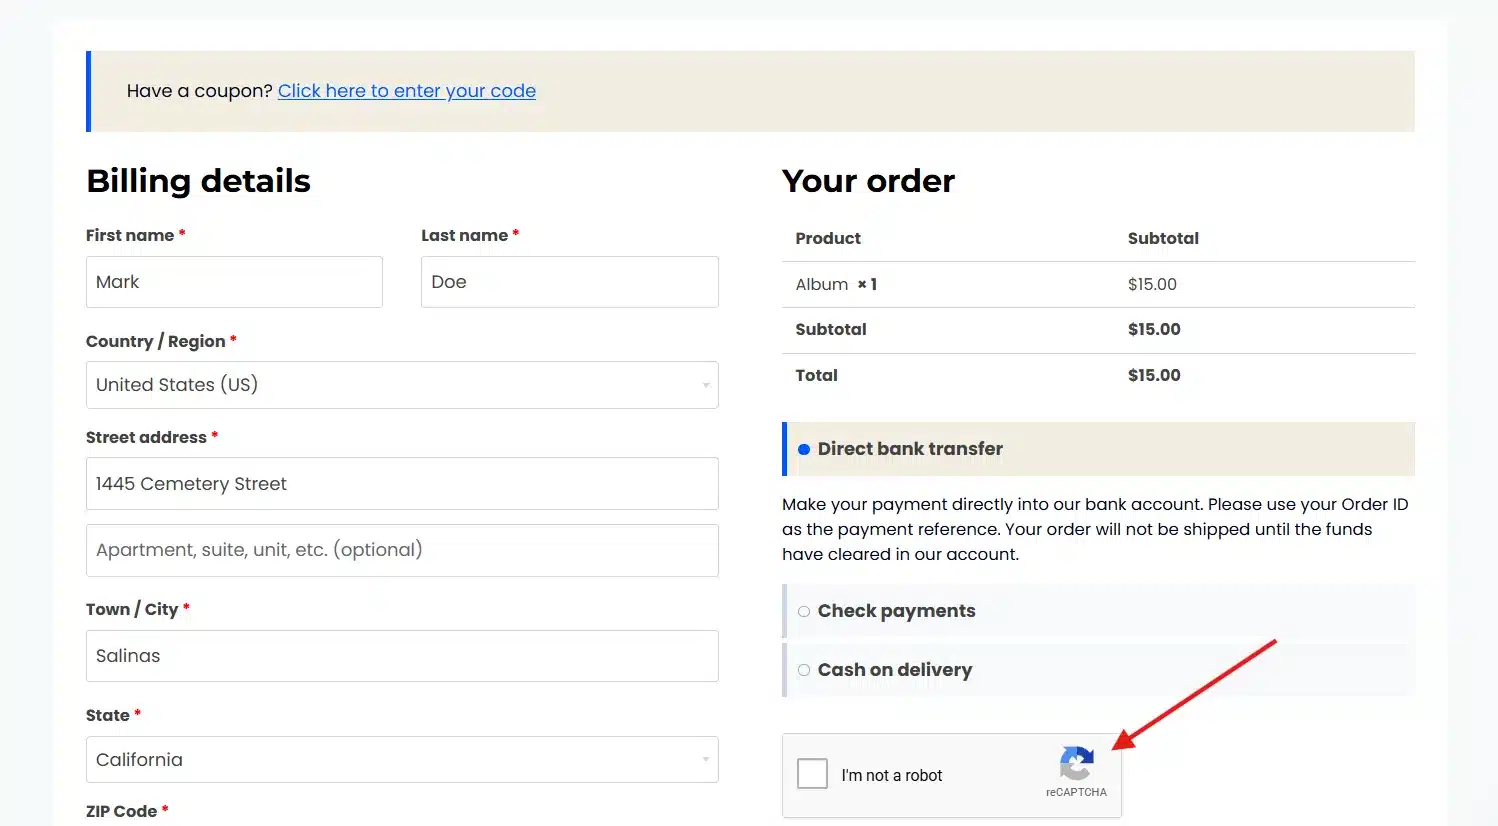
Always test in incognito. If your IP is whitelisted or your user role is excluded in the plugin settings, you won’t see the CAPTCHA when logged in as admin. Testing incognito gives you the same view a real customer gets.
Quick Troubleshooting
reCAPTCHA isn’t showing on checkout. First, check you’re in incognito and not logged in as admin. Then confirm the plugin is enabled, the CAPTCHA type is set to Google reCAPTCHA, and the WooCommerce checkout form is selected under Forms settings. Also, check that no caching plugin is serving an old version of the page, and if yes, then clear your cache after setup.
The submit button still works without completing reCAPTCHA. Go back to the Google reCAPTCHA configuration tab and enable Disable Submit Button. That option must be turned on manually.
reCAPTCHA scripts are loading on every page, not just the checkout. The plugin should only load scripts on pages where CAPTCHA is active. If a caching or performance plugin is adding scripts site-wide, check its settings for script exclusion rules.
If you haven’t set up the plugin yet, the WooCommerce CAPTCHA plugin handles all of the above from a single settings panel, with no coding needed. It also supports Cloudflare Turnstile and hCaptcha if you want to test reCAPTCHA alternatives later. One install, all your WooCommerce forms covered.
Conclusion
Learning how to add Google reCAPTCHA to WooCommerce checkout is one of the fastest security improvements you can make. The setup takes under ten minutes once you have your API keys. Pick v2 if you want a simple, reliable setup. Pick v3 if you want invisible protection and are willing to tune the score limit.
The three things most stores get wrong: choosing the wrong reCAPTCHA version for their traffic, placing the CAPTCHA somewhere customers miss it, and forgetting to enable the Disable Submit Button option. Avoid those, and your checkout protection works from the moment you save settings.
For any deeper WooCommerce development help, the DevDiggers team is available.
Frequently Asked Questions(FAQs)
Q1. Does adding reCAPTCHA to WooCommerce checkout slow down my site?
A small amount of additional load comes from Google’s reCAPTCHA script, but it only loads on pages where CAPTCHA is active, not site-wide. Most stores that follow the standard steps to add Google reCAPTCHA to WooCommerce checkout see no meaningful impact on page speed. If you use a performance plugin, verify it isn’t injecting the reCAPTCHA script on pages where you haven’t enabled it.
Q2. Can I use the same plugin to add reCAPTCHA to my login and registration pages, too?
Yes. The WooCommerce Advanced CAPTCHA plugin lets you enable CAPTCHA on all standard WooCommerce and WordPress forms from the same Forms settings tab, including login, registration, lost password, product reviews, and checkout. You don’t need a separate plugin for each form.
Q3. Does WooCommerce Advanced CAPTCHA support Cloudflare Turnstile and hCaptcha as well?
Yes. The plugin supports Google reCAPTCHA, Cloudflare Turnstile, and hCaptcha. You choose one type in the General settings and set it up from its own tab. If you later decide reCAPTCHA isn’t the right fit for your audience, switching to Turnstile takes a few minutes.
Q4. Will reCAPTCHA work if I’m using a page builder like Elementor for my checkout page?
It depends on the setup. If your checkout page uses the standard WooCommerce checkout shortcode inside an Elementor template, reCAPTCHA will load normally. If you’ve built a fully custom checkout form through a page builder that replaces WooCommerce’s form entirely, you may need to add the plugin’s shortcode manually to the form. The plugin includes a shortcode for exactly this use case.
Q5. Do logged-in customers have to complete reCAPTCHA at checkout?
Not if you configure it that way. The WooCommerce Advanced CAPTCHA plugin includes an Excluded User Roles setting. You can exclude any role; for example, you could let registered customers skip the challenge while still protecting guest checkouts. You can also whitelist specific IP addresses for team members or testers.