How to Add Google Analytics on WordPress

Google Analytics is a powerful service that allows webmasters to monitor and analyze the performance of their websites.
If your website is a WordPress website, inserting Google Analytics can give you excellent insights into visitors’ behaviour, traffic sources, and how engaged they are.
This guide will help you find how to add Google Analytics on WordPress.
Why Use Google Analytics on WordPress?

Installation in a minute. First, why you’d ever want Google Analytics on your WordPress blog:
- Know Your Visitors: View how many are visiting your site, where they live, and what they are interested in.
- Track Behavior: View page views, bounce rate, and session length so you can understand behavior on your site.
- Find Your Best Content: View which blog pages and posts your visitors spend the most time on.
- Improve Marketing Strategies: Make informed SEO and online marketing strategy adjustments with data-driven insights.
- Improve User Experience: Improve website architecture and content to generate engagement through real-time analytics.
Setting Up Google Analytics

You must create a Google Analytics account before you can integrate Google Analytics with WordPress.
1. Sign Up for Google Analytics
- Access Google Analytics.
- Click Start measuring and sign in using your Google account.
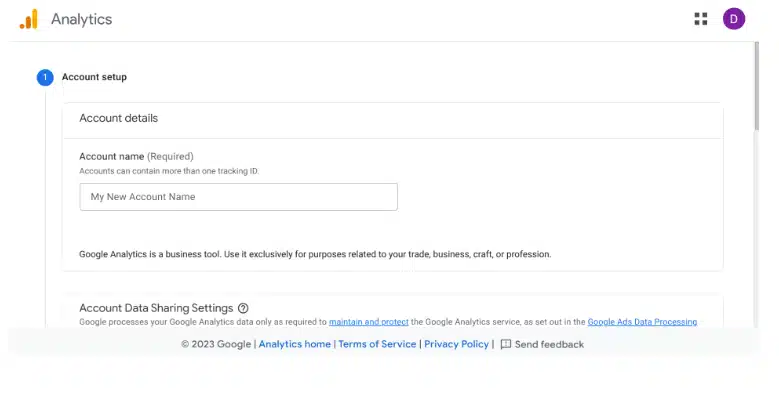
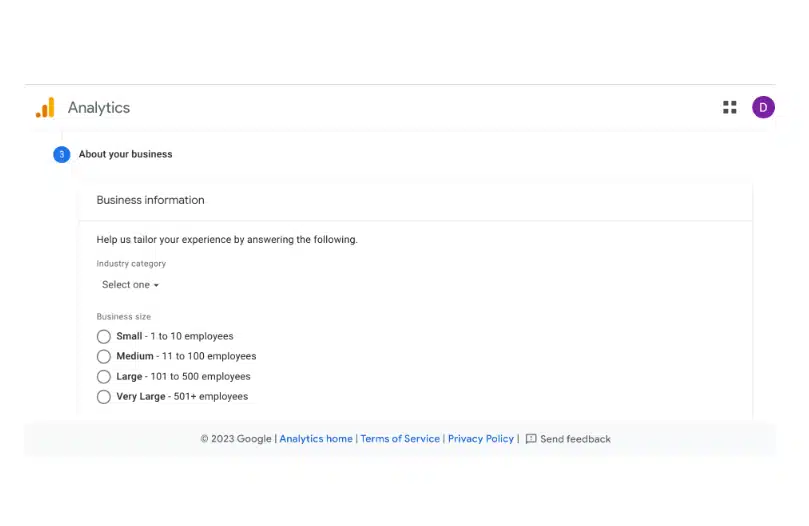
- Add your account name and select your data-sharing settings.

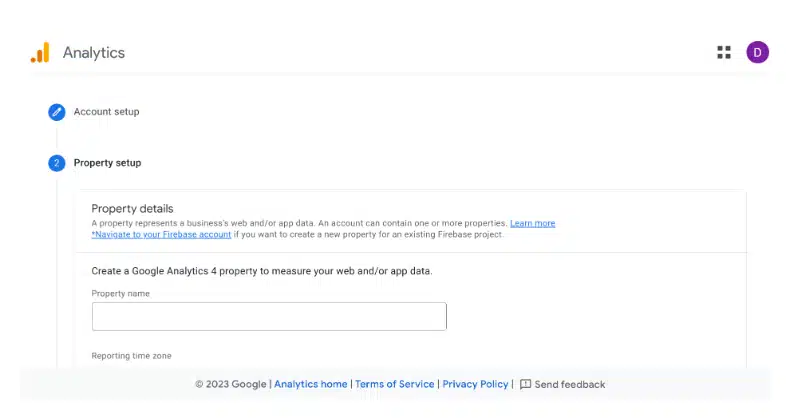
- Click Next and create a new property by entering your site information.

- Select Web as the platform and enter your WordPress site address.

- Click on Create to get your own individual tracking ID (referred to as the Measurement ID for GA4).
How to Add Google Analytics on WordPress
Depending on your technical expertise and preference, there are several ways to add Google Analytics to your WordPress site. Let’s explore each method step by step.
Method 1: Using a Plugin (Recommended for Beginners)

For a non-technical user, the easiest way for Google Analytics is via a plugin like MonsterInsights or Site Kit by Google.
1. Install the plugin: MonsterInsights Plugin
- Log in to the WordPress site.
- Go to Plugins → Add New.
- Search for MonsterInsights and click Install Now.
- Activate the installed plugin.
2. Connect Google Analytics with MonsterInsights
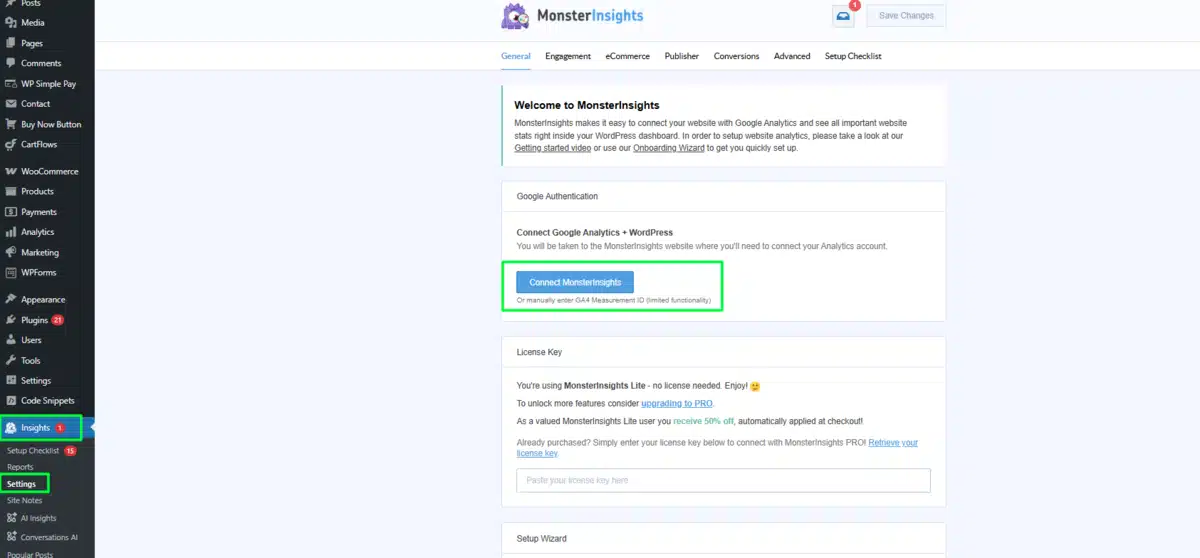
- Go to Insights → Settings on your WordPress site.
- Click on Connect MonsterInsights and provide your Google account Details.
- Provide the necessary permissions and select the Google Analytics property that you have created.
- Configure the last setup and verify the connection.
Method 2: Manually Adding Google Analytics Code
Users who prefer a manual approach can add the tracking code directly to your WordPress theme.
Get Your Google Analytics Tracking Code
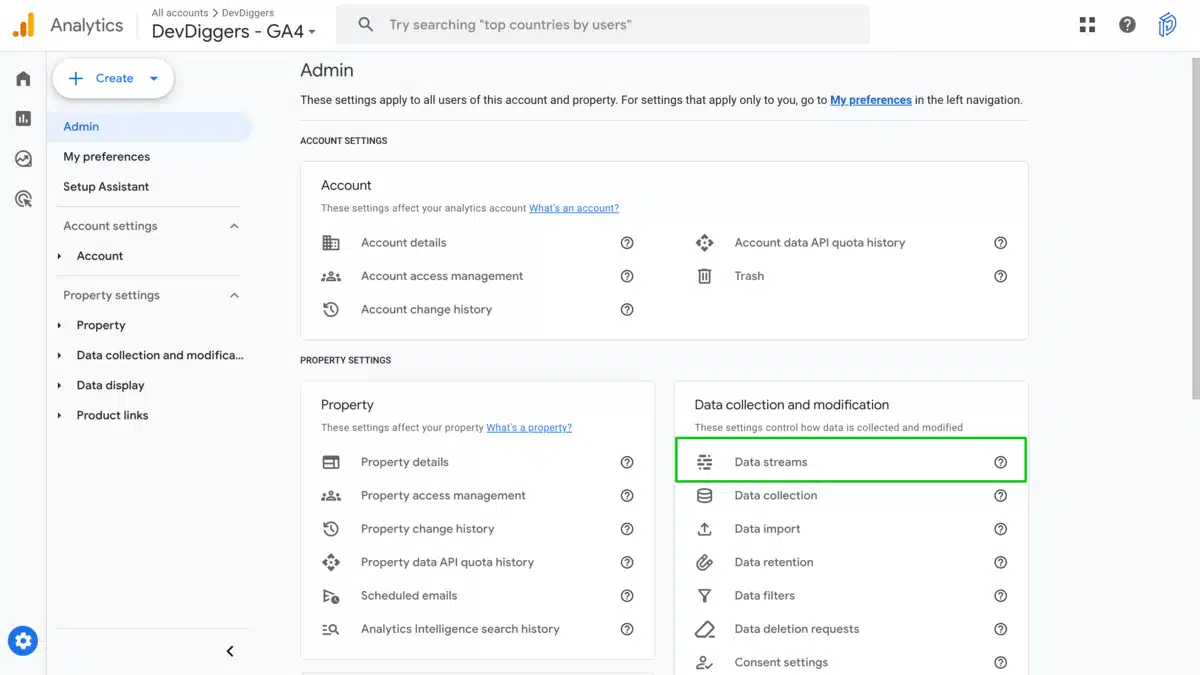
- Sign in to Google Analytics.
- Click on Admin → Data Streams.

- Select your website’s data stream.
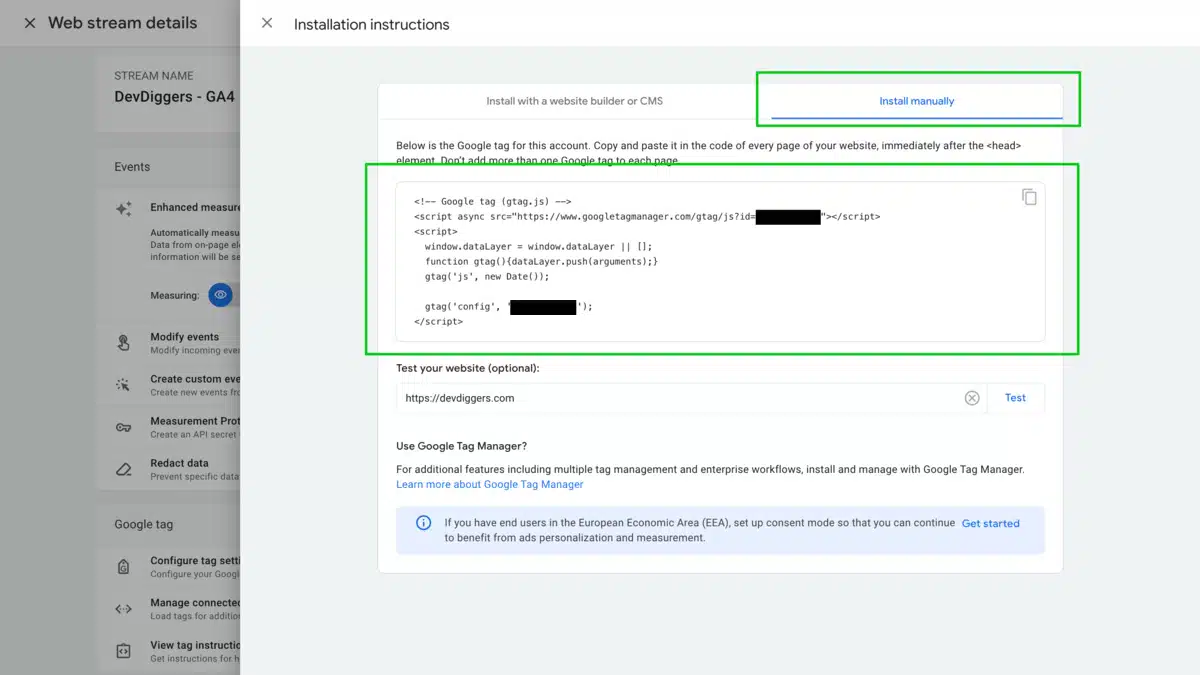
- In the Tagging Instructions section, click Install manually to display your Global Tag (gtag.js) code, and Copy the provided tracking code snippet.
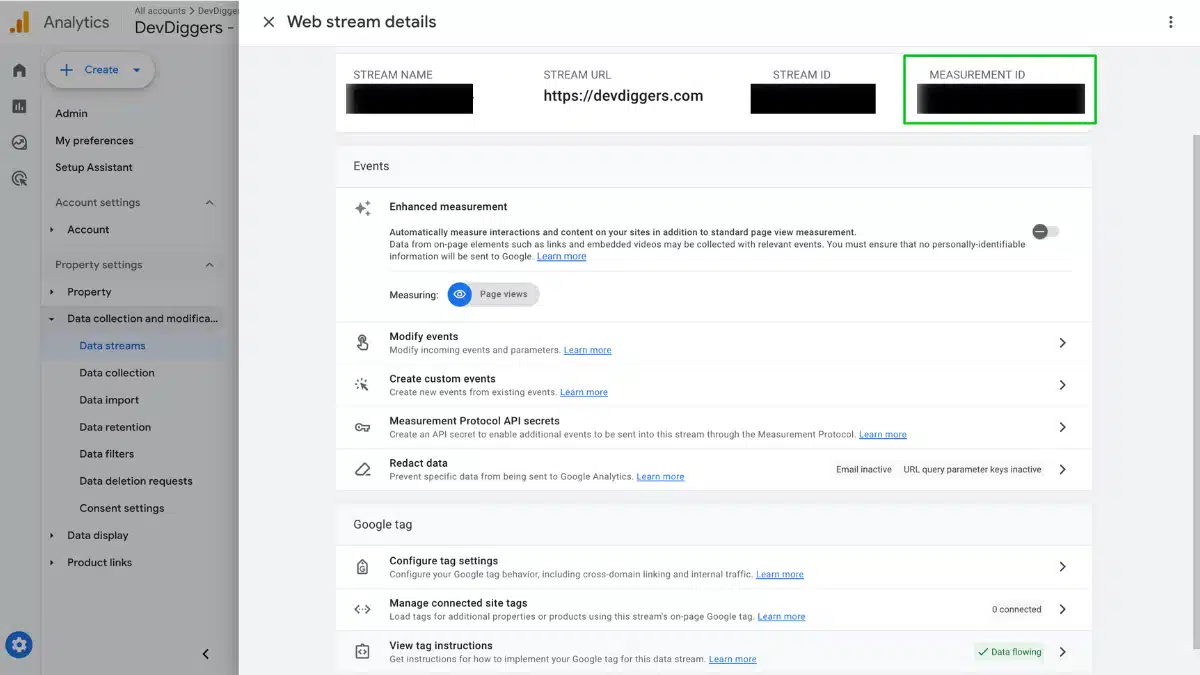
For Measurement ID, You can follow these steps
- Sign in to Google Analytics.
- Go to Admin Settings
- In the left-hand menu, click on Admin.
- Under Property Settings, select Data Streams.
- In the Data Streams section, find your website and click on it.
Insert the Code into WordPress
<!-- Global site tag (gtag.js) - Google Analytics -->
<script async src="https://www.googletagmanager.com/gtag/js?id=YOUR_MEASUREMENT_ID"></script>
<script>
  window.dataLayer = window.dataLayer || [];
  function gtag(){dataLayer.push(arguments);}
  gtag('js', new Date());

  gtag('config', 'YOUR_MEASUREMENT_ID');
</script>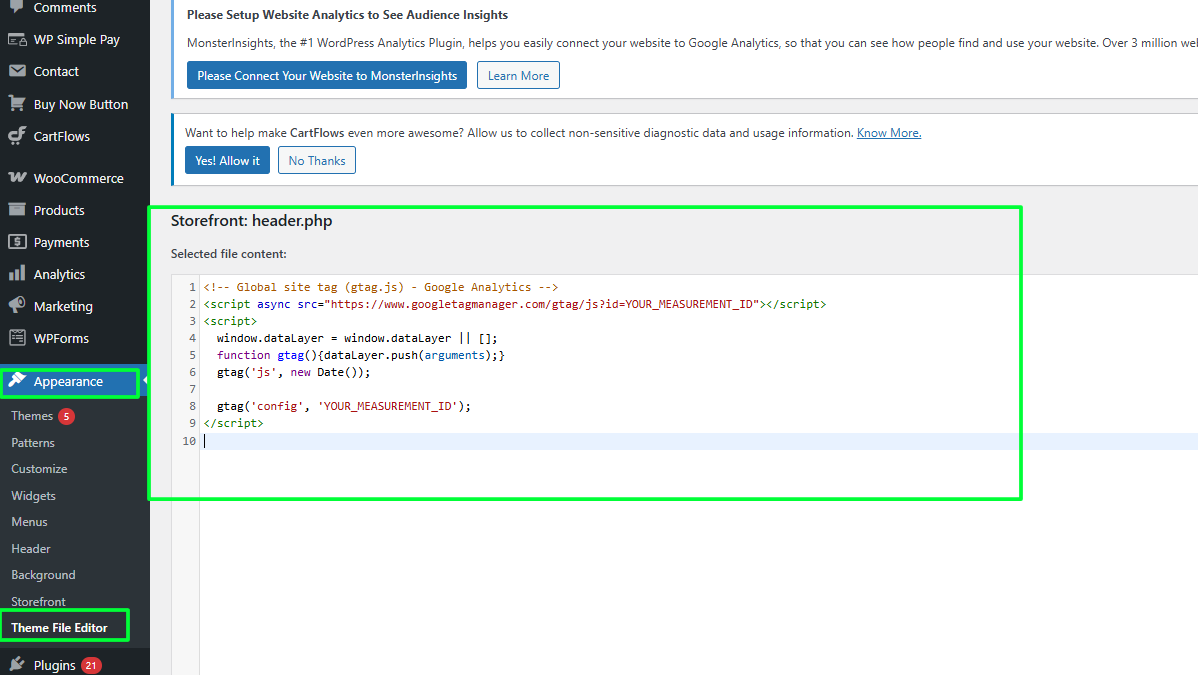
- In your WordPress dashboard,
- Go to Appearance → Theme Editor → header.php.
- Paste the tracking code before the
</head>closing tag. - Click Update File.
Method 3: Using a Header/Footer Plugin
If you do not wish to work with theme files, you may use a plugin such as Insert Headers and Footers.
- Download and install, then activate, the Insert Headers and Footers plugin.
- Visit Settings → Insert Headers and Footers.
- Place the tracking code in the Header field.
- Hit Save to take effect.
Verify Google Analytics Installation
Verifying that Google Analytics is tracking properly after you’ve integrated it with WordPress is crucial.
1. View Reports in Real Time
- Access Google Analytics.
- Next, select Real-time under Reports.
- Explore a few pages of your WordPress website by opening it in a separate tab.
- The setup is successful if it displays the current number of active users.
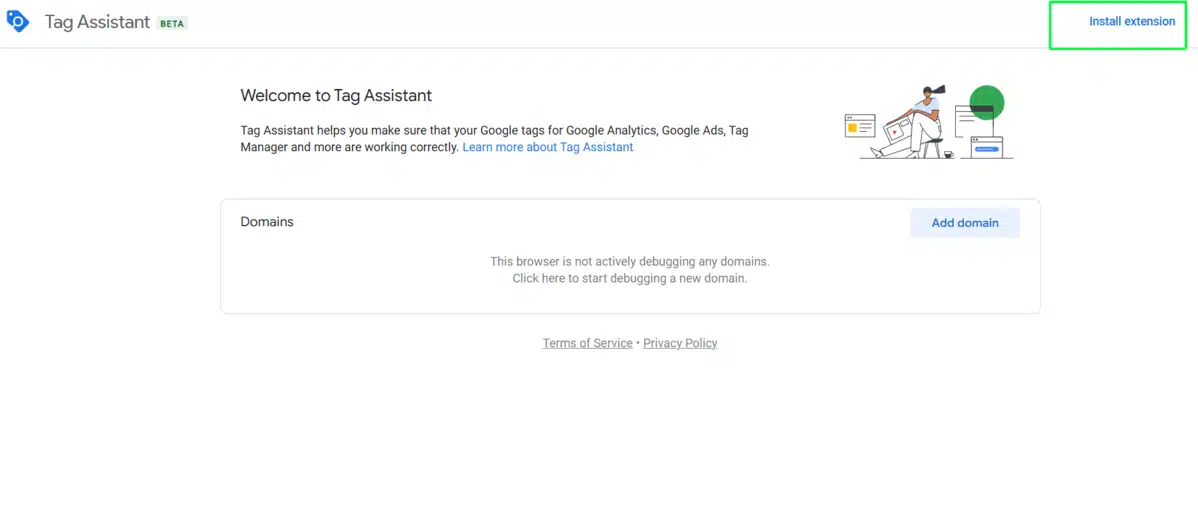
2. Use Chrome Extension’s Google Tag Assistant
- Install Google Tag Assistant, an extension for Chrome.
- To activate the extension, open your website.
- If Google Analytics is operational and operational, it will be displayed.
Troubleshooting Common Issues
Even after following the steps, you may encounter issues with Google Analytics tracking. Here are some solutions:
- No Data in Reports: Ensure that you’ve selected the correct property in Google Analytics and wait at least 24 hours.
- Incorrect Tracking ID: Double-check that you’ve copied the right Measurement ID.
- Plugin Conflicts: Disable other analytics-related plugins to avoid conflicts.
- Theme Updates: If you manually add the tracking code, update it after changing themes.
Advanced Google Analytics Features
You can now explore the sophisticated features to enhance your understanding following the setup of Google Analytics for WordPress:
- Create Goals: Track information such as purchases and form submissions.
- Activate Enhanced Ecommerce Tracking: Track sales and product performance if running an online business.
- Utilize Custom Events: Track specific user actions, for example, button clicks and downloads.
- Integrate with Google Search Console: Gain more in-depth SEO insights by connecting to Google Search Console.
Conclusion
Google Analytics needs to be integrated with WordPress in order to monitor audience behavior better and optimize the website for a better user experience. Whether you choose to utilize a plugin or a manual method, the setup process is straightforward.
This course can help you make decisions, improve user experience, and effectively track and analyze website traffic. Use Google Analytics right now to advance your WordPress website!
FAQs
Can I use Google Analytics for free?
In fact, Google Analytics offers a more sophisticated tracking and reporting version for free. A business equivalent, Google Analytics 360, is also offered but needs to be purchased.
Does Google Analytics require a plugin in order to be used on WordPress?
Using a header/footer script plugin or adding the Global Site Tag (gtag.js) to your header.php file are your two options.
What is the estimated time of arrival for Google Analytics tracking data?
Although data takes 24 to 48 hours to surface, you can see real-time results as soon as you install Google Analytics.
Will my WordPress website load slower if I install Google Analytics?
Because Google Analytics loads asynchronously, it doesn’t cause your site to lag.
What are the ways to find out if my WordPress website has Google Analytics installed?
By looking at Google Analytics’ Real-Time report using the Google Tag Assistant Chrome extension, you may verify that tracking is enabled.

Abhijit Sarkar
I am deeply passionate about creating engaging content and exploring. My journey includes gaining valuable experience in content writing and creating useful resources for my readers.
Leave a Reply