You set up an unsubscribe link in WooCommerce by sending marketing emails through a plugin such as MailPoet. WooCommerce core adds no unsubscribe link at all. The plugin puts the link in every newsletter footer and records the opt-out for you, and the setup takes one sitting.
This guide is built on a real October 2026 test, where I ran WooCommerce 11.2 and MailPoet 5.41.0 on a local WordPress 7.1.3 store. I caught every outgoing email in a local mail server and read the raw headers. Then I clicked the unsubscribe link myself and checked what changed in the database.
You get the steps with a screenshot at each screen, plus which emails legally need the link and which do not. You also get the Gmail one-click rule, a test routine and the mistakes that break the link without anyone noticing.
Does WooCommerce Have a Built-In Unsubscribe Link?
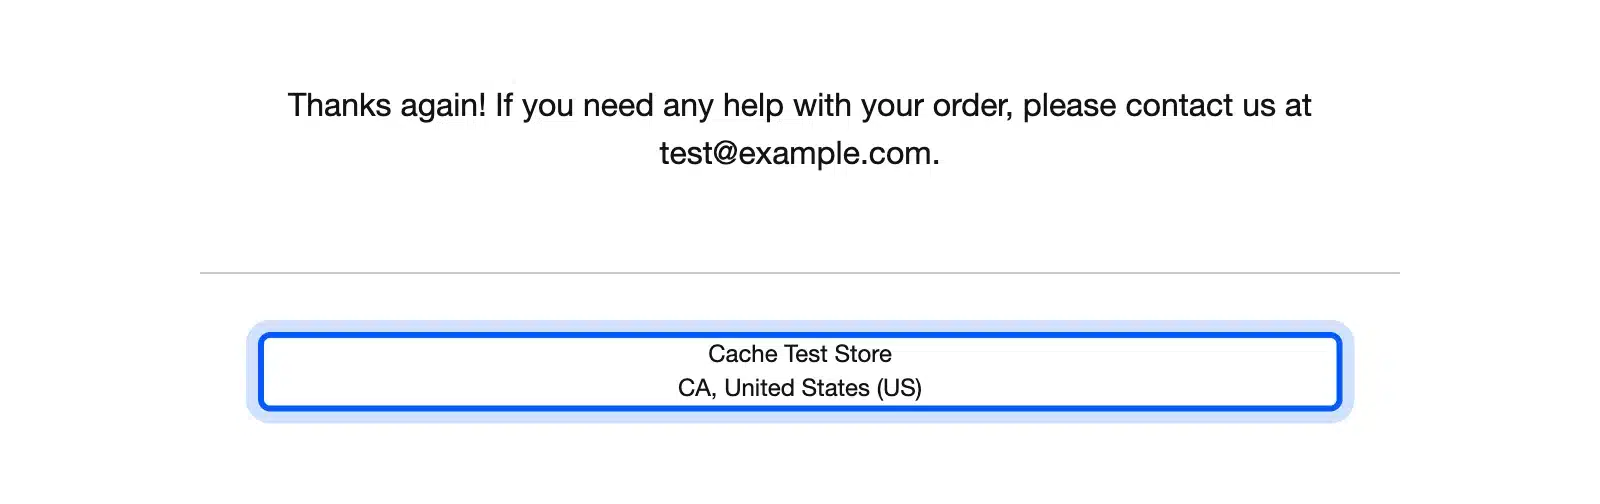
WooCommerce has no built-in unsubscribe link, and in my WooCommerce 11.2 test none of the order emails carried one. The completed order email ended with the store name and address, and its headers had no List-Unsubscribe line. That is by design, because order emails are transactional messages a buyer cannot opt out of.
Here is the footer of the real “Your order is on its way” email my test store sent:
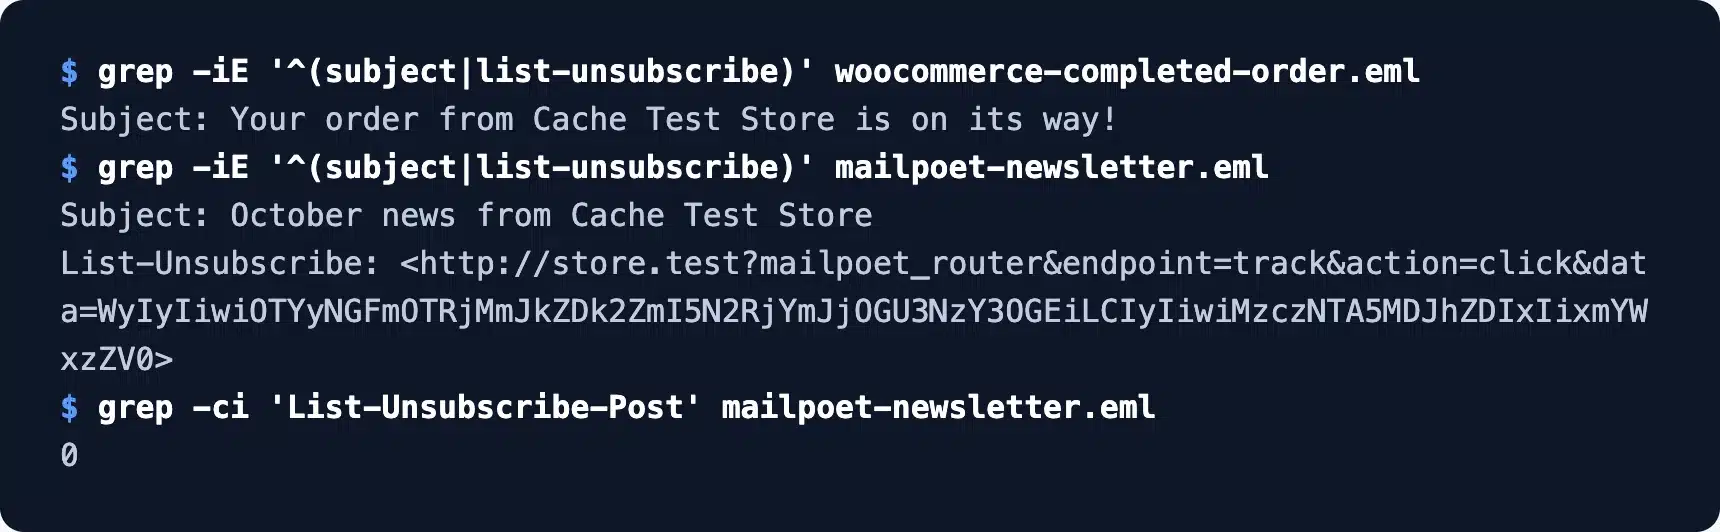
The email headers tell the same story. I saved both test emails as files and searched them for the unsubscribe header:
WooCommerce 11.2 listed 16 notifications on its Emails screen in my test. They include New order, Processing order, Completed order, Refunded order, Customer note, Reset password and New account, plus two for the new point of sale.
Every one of them is tied to an order, an account or a payment. None is a newsletter, which is why the plugin gives them no opt-out control.
Store owners still see the gap because WooCommerce gives them no tool for newsletters either. The marketing side has to come from an extension or an outside email service.
So the real question is not how to add a link to order emails. It is how to send marketing emails from a tool that handles opt-outs, while order emails keep doing their job.
Which Emails Need a WooCommerce Unsubscribe Link
Marketing emails need a WooCommerce unsubscribe link, and order emails do not. Newsletters, discount campaigns, abandoned cart reminders and review requests sent to sell are all marketing. Receipts, shipping updates, refund notices and password resets are transactional. They can go out without an opt-out link.
The US rule here is the CAN-SPAM Act. The FTC’s CAN-SPAM compliance guide says you must honor an opt-out within 10 business days. It also says transactional and relationship messages are exempt from most of the law’s provisions.
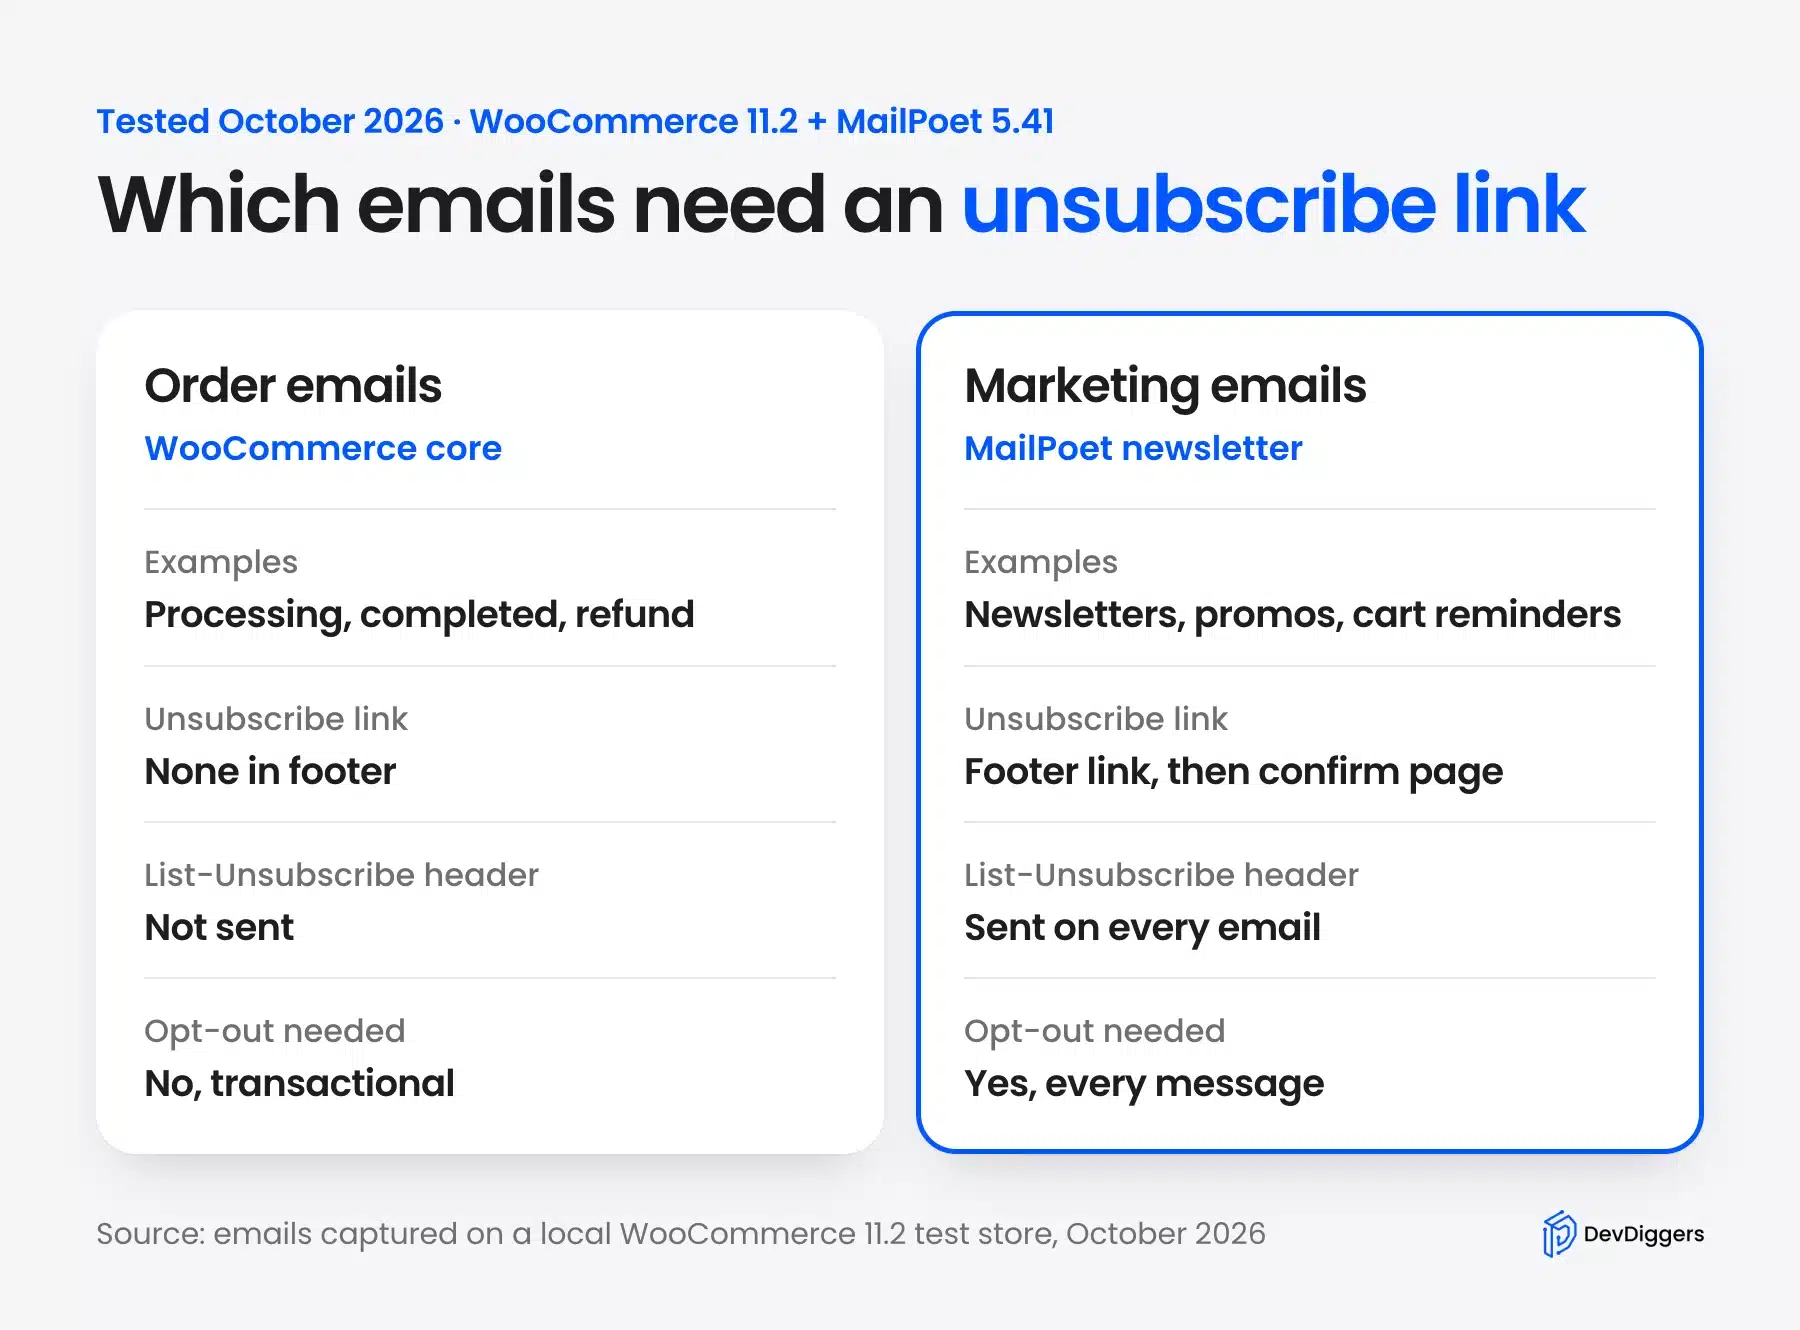
The gray zone is the mixed email. An order confirmation that turns into a sales pitch for other products may count as marketing. The FTC’s CAN-SPAM guide judges a message by its primary purpose.
Here is a quick way to sort your own emails. Ask whether the customer would still need the message if you never sold them anything again.
A shipping notice passes that test because the buyer is waiting for a parcel. A “we miss you” coupon fails it. It needs the opt-out link and a working list behind it.
Abandoned cart reminders sit on the marketing side for most stores. The buyer never finished an order. There is no transaction for the email to report on.
Loyalty emails are a common example. Points balance reminders from a points and rewards plugin for WooCommerce often push the reader to buy again. Treat them as marketing and give them a way out.
Note: CAN-SPAM is a US law. Stores selling into the EU or the UK also deal with consent rules under privacy law. Ask a lawyer if you sell there.
Gmail and Yahoo One-Click Unsubscribe Rules
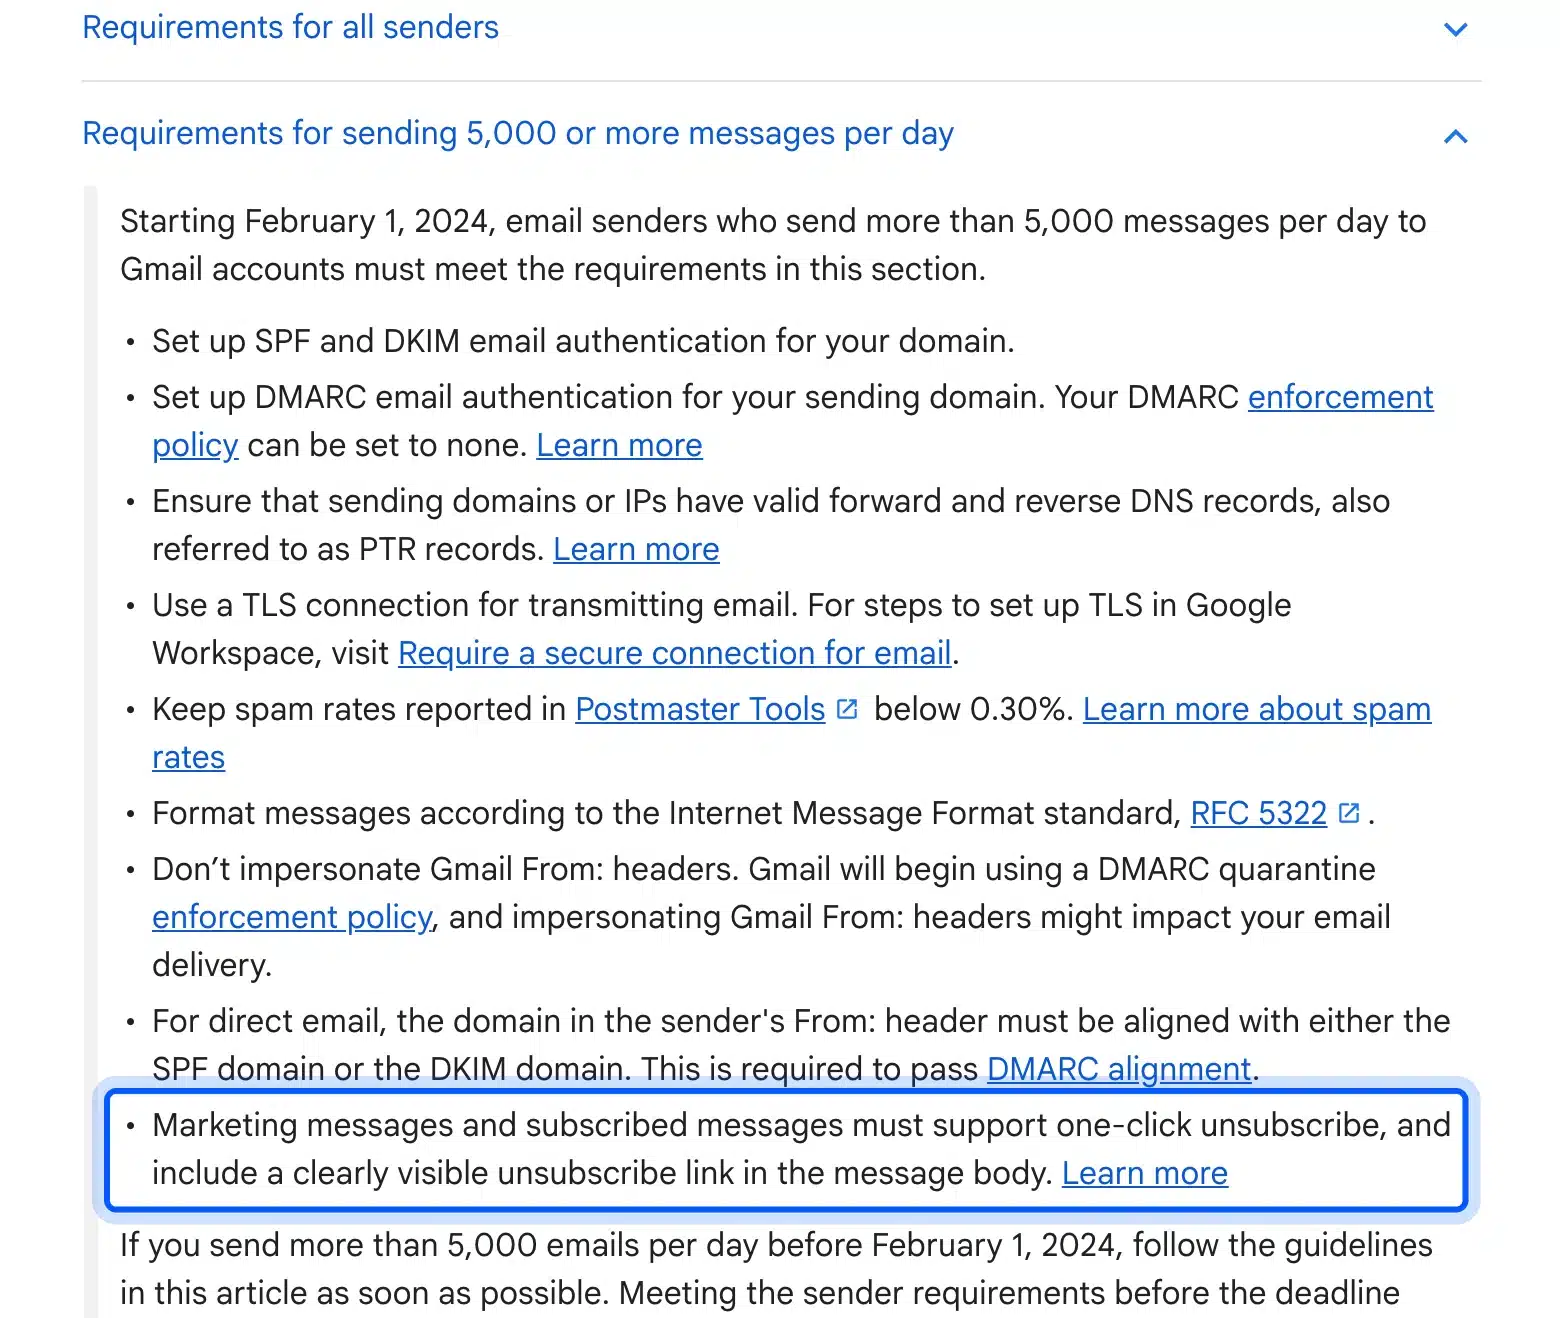
Gmail requires one-click unsubscribe from anyone sending more than 5,000 messages a day to Gmail accounts. The rule has applied since February 1, 2024. Those senders must also show a visible unsubscribe link in the body. The header alone does not cover it.
Google spells this out on its email sender guidelines page, in the section for bulk senders:
One-click works through two email headers defined in RFC 8058.
The first header, List-Unsubscribe, holds the opt-out URL. The second, List-Unsubscribe-Post, tells the inbox it can unsubscribe the reader with a single request.
My test turned up a detail worth knowing. MailPoet 5.41.0 added the List-Unsubscribe header to my newsletter but left out List-Unsubscribe-Post. The plugin’s code only adds that second header when the unsubscribe URL uses HTTPS, and my local store ran on plain HTTP.
The exact pair MailPoet writes is List-Unsubscribe: <url> and List-Unsubscribe-Post: List-Unsubscribe=One-Click. Those match the two lines RFC 8058 describes. Any inbox that supports the standard can act on them.
So a live store needs a valid SSL certificate before one-click can work. Yahoo publishes similar sender best practices. The same setup covers both inboxes.
How to Set Up an Unsubscribe Link in WooCommerce With MailPoet
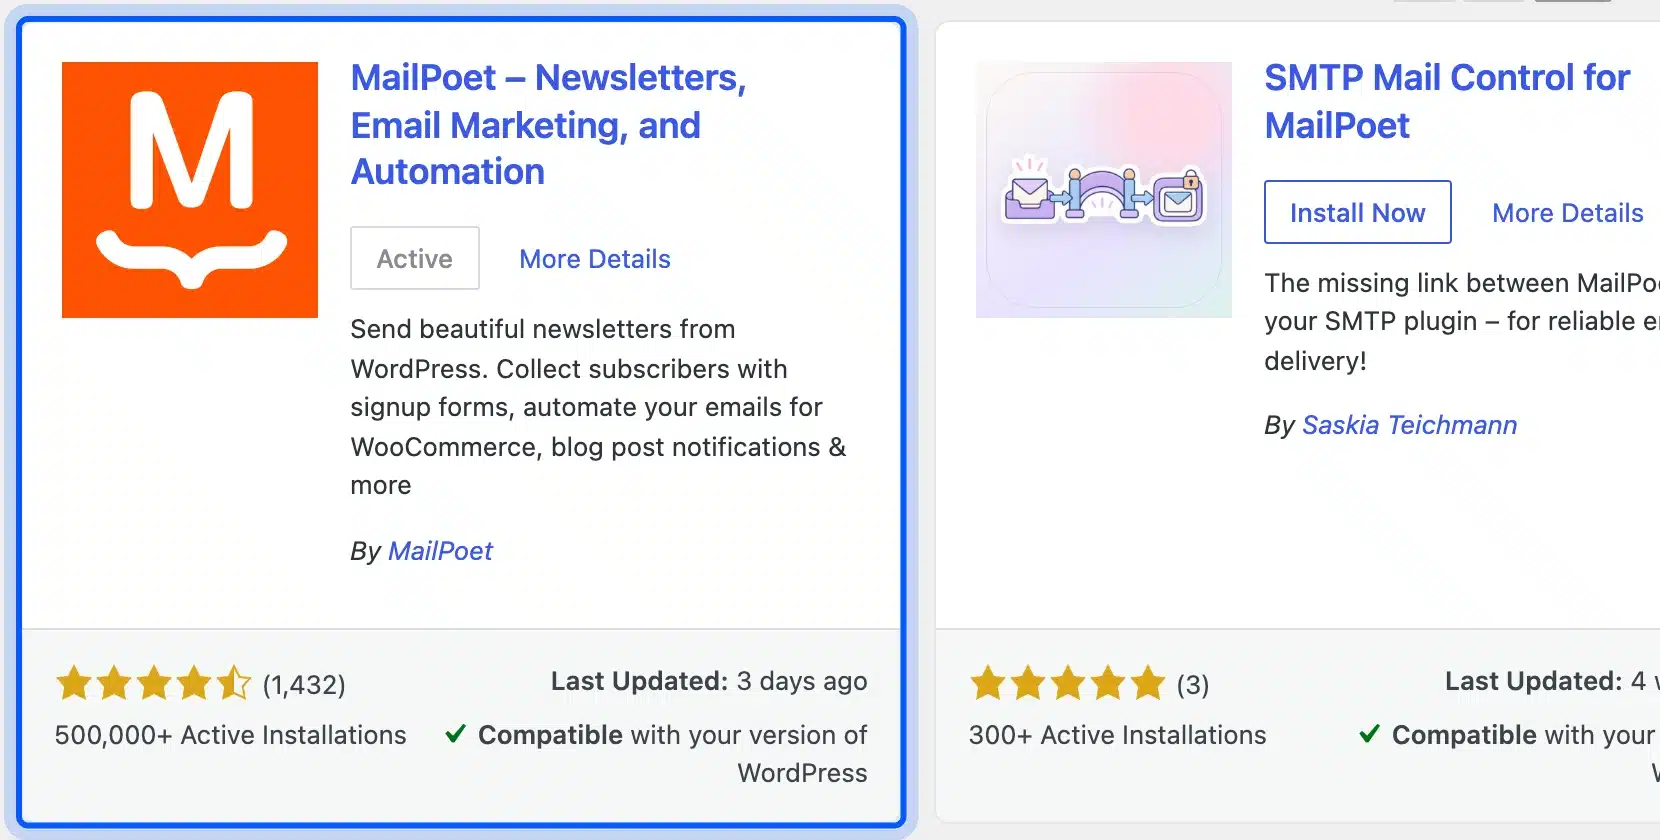
MailPoet is a free WordPress.org plugin that adds an unsubscribe link in WooCommerce marketing emails without any code. It has a checkout opt-in box, a footer link in every template, and its own confirmation pages. I tested version 5.41.0, which listed 500,000+ active installations in October 2026.
Here is the whole setup on one screen before the details:
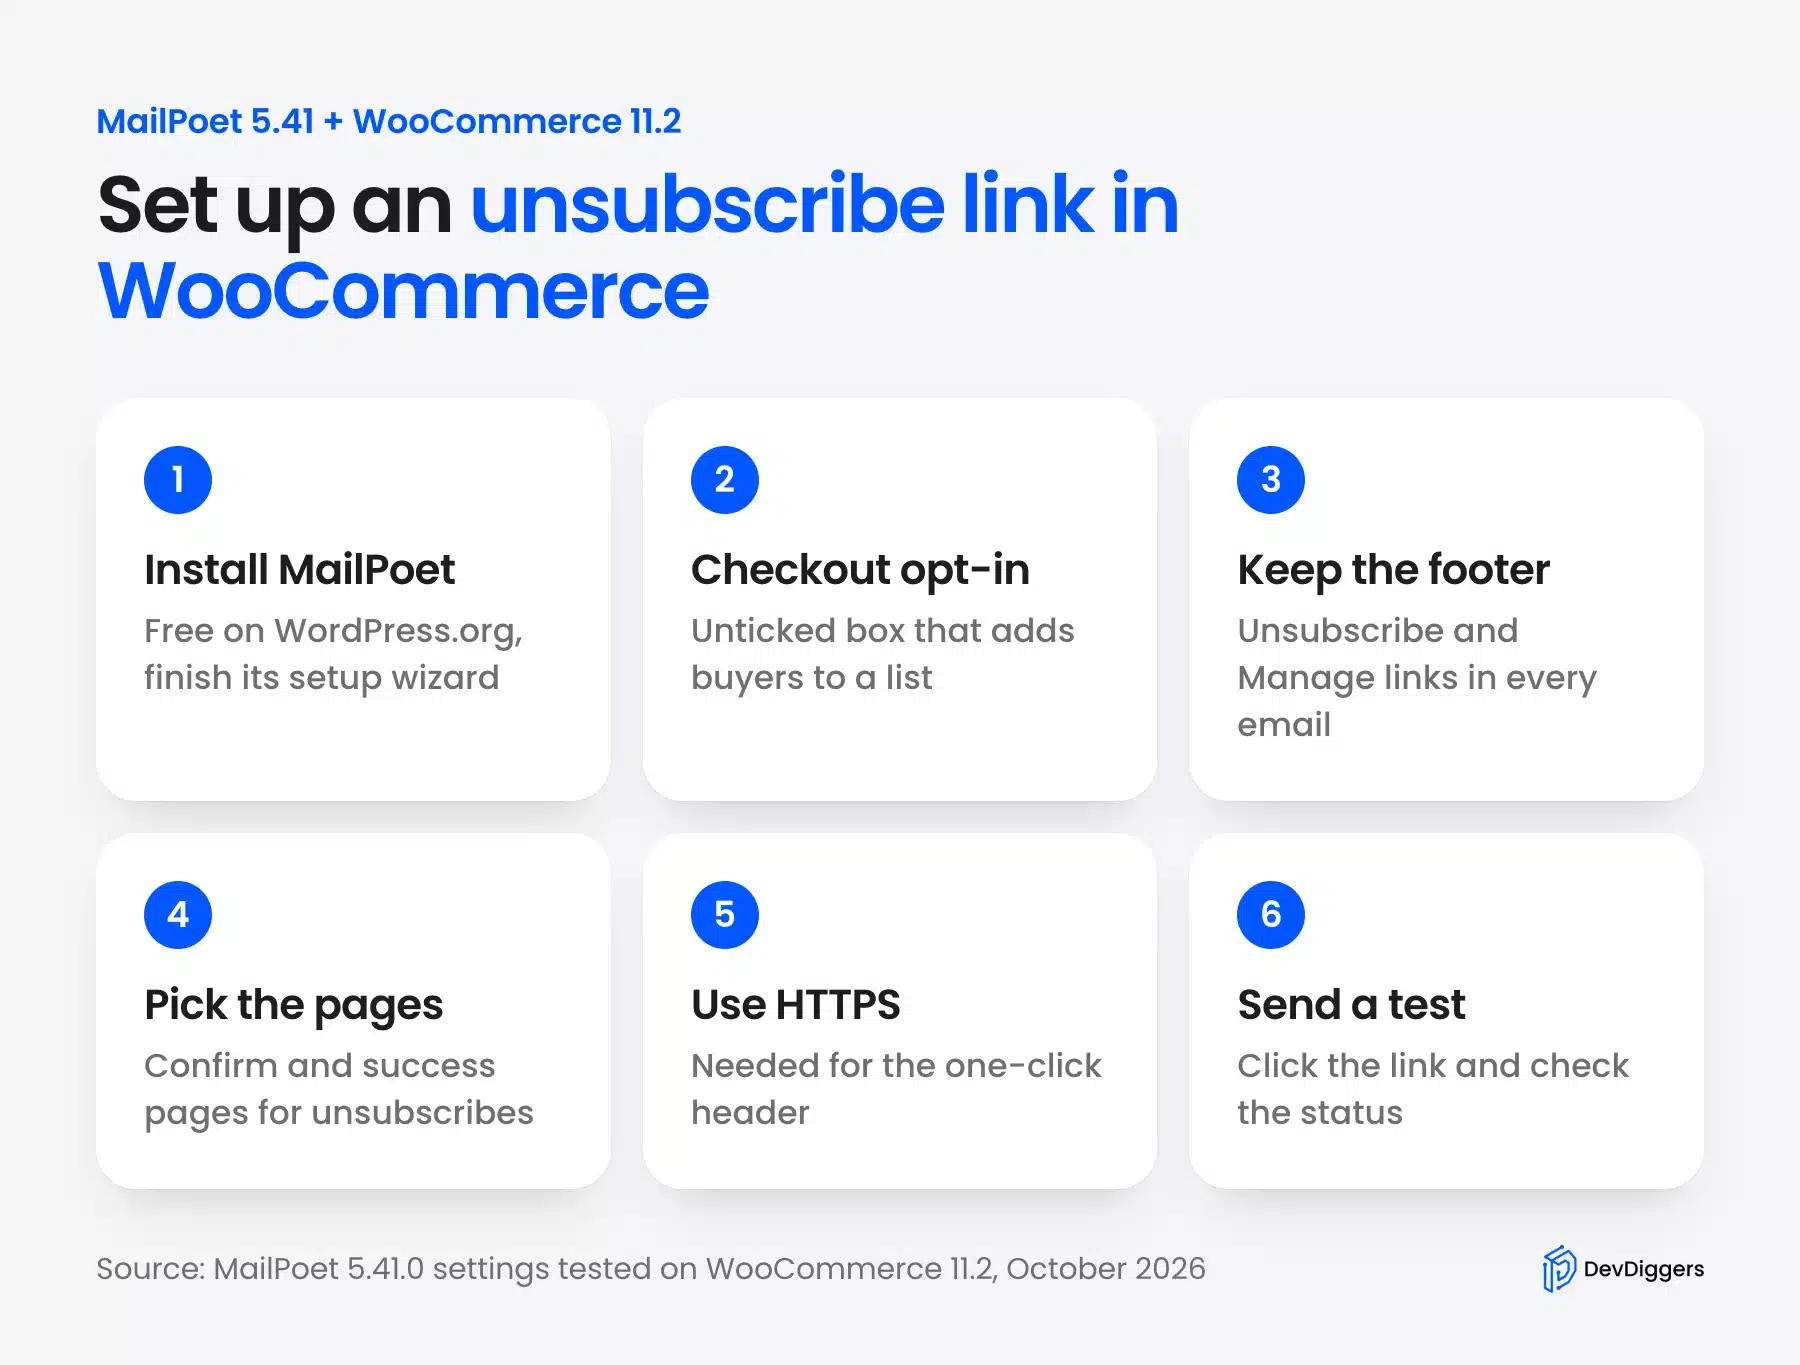
- Install MailPoet: Go to Plugins > Add Plugin and search for MailPoet. Click Install Now and then Activate. Finish the short setup wizard.
- Turn on the checkout opt-in: Open MailPoet > Settings and click the WooCommerce tab. Tick Opt-in on checkout and edit the checkbox message so it says plainly what buyers will receive.
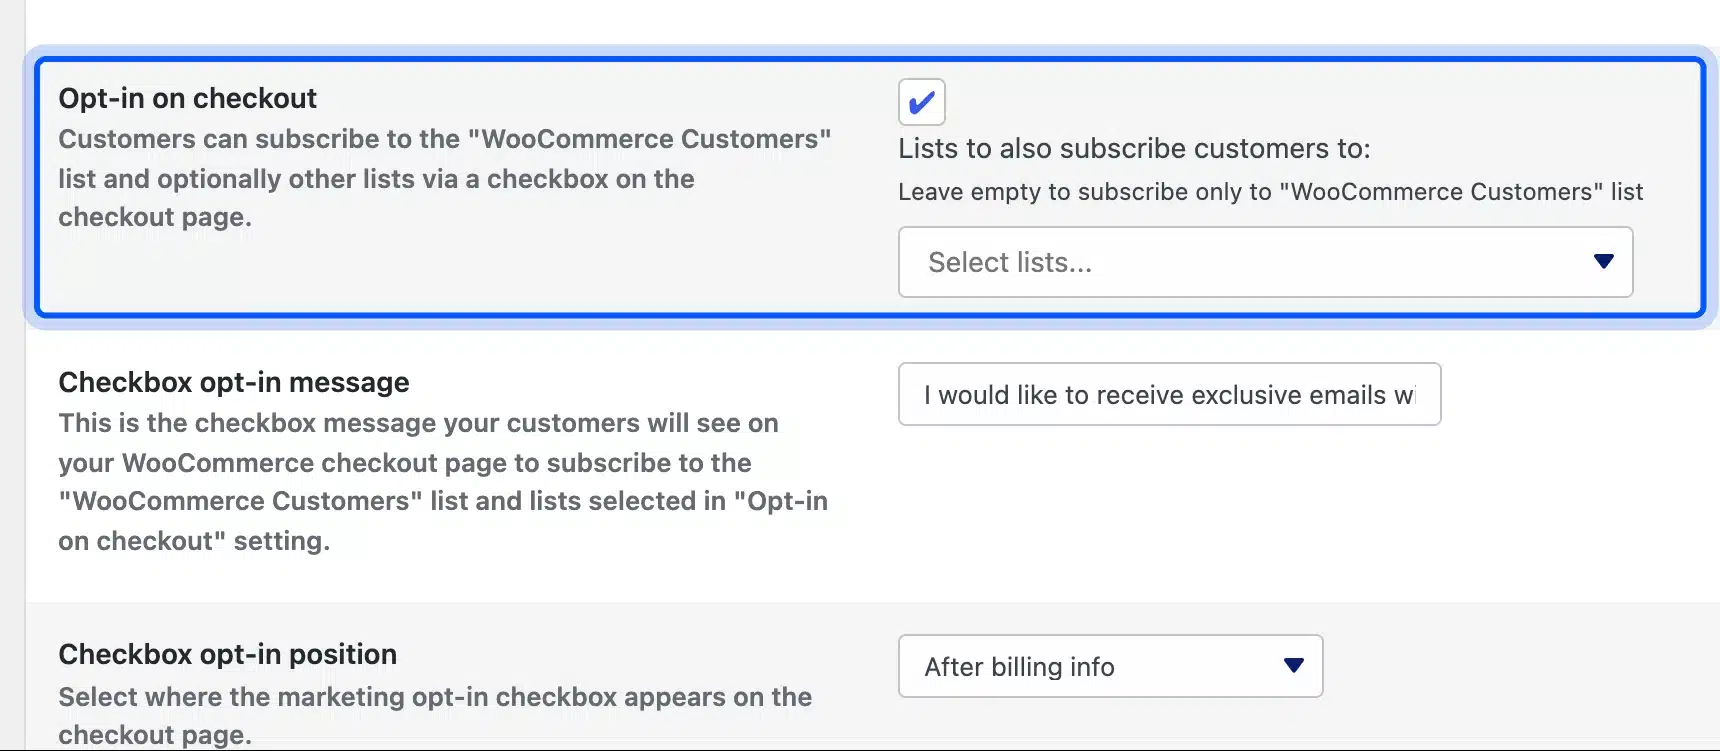
- Check the box on your checkout: Open your checkout page in a private window. The opt-in checkbox appeared under the email field on my block checkout, and it was unticked by default.
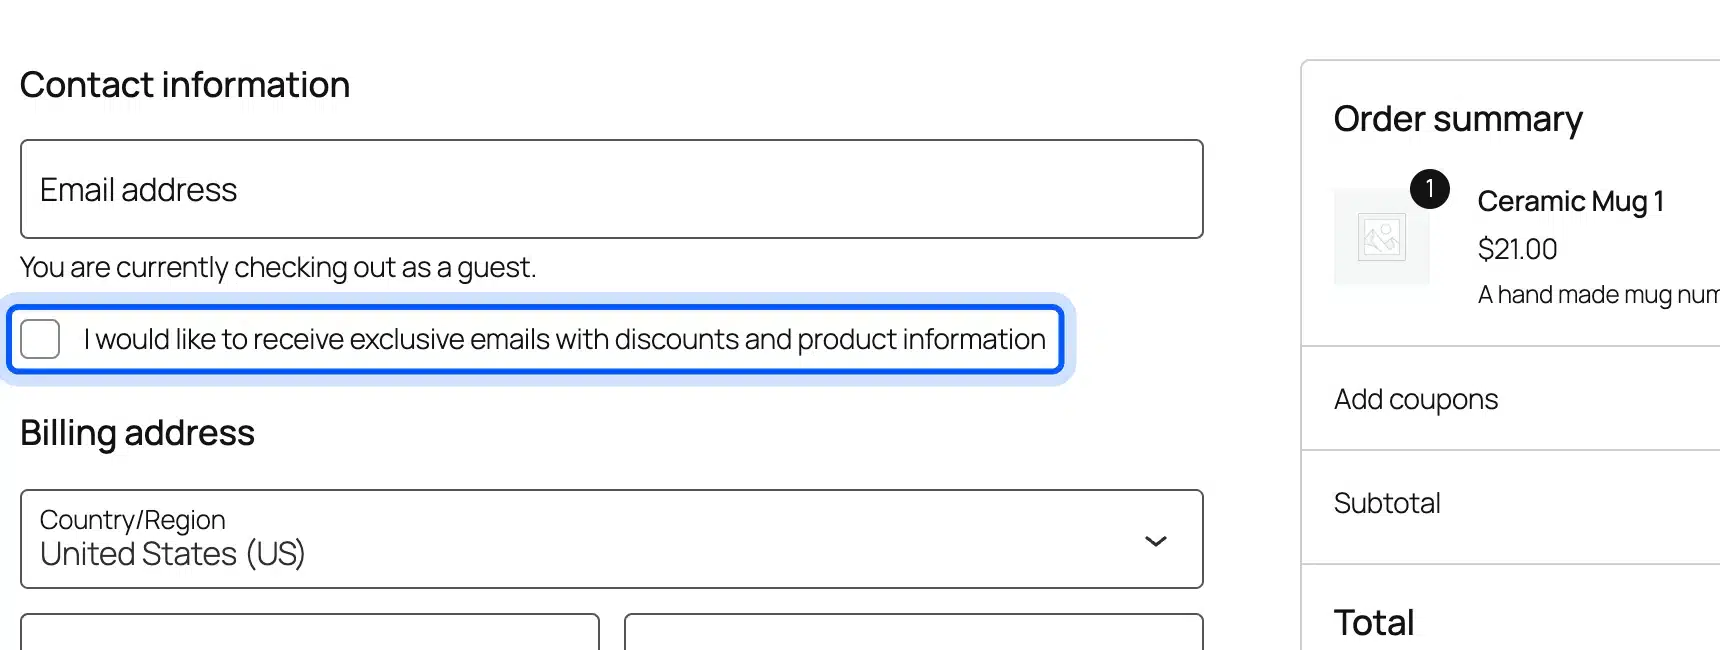
- Keep the footer links in every email: Every MailPoet template I opened had an Unsubscribe link and a Manage your subscription link in the footer. Leave both in place when you design your newsletter.
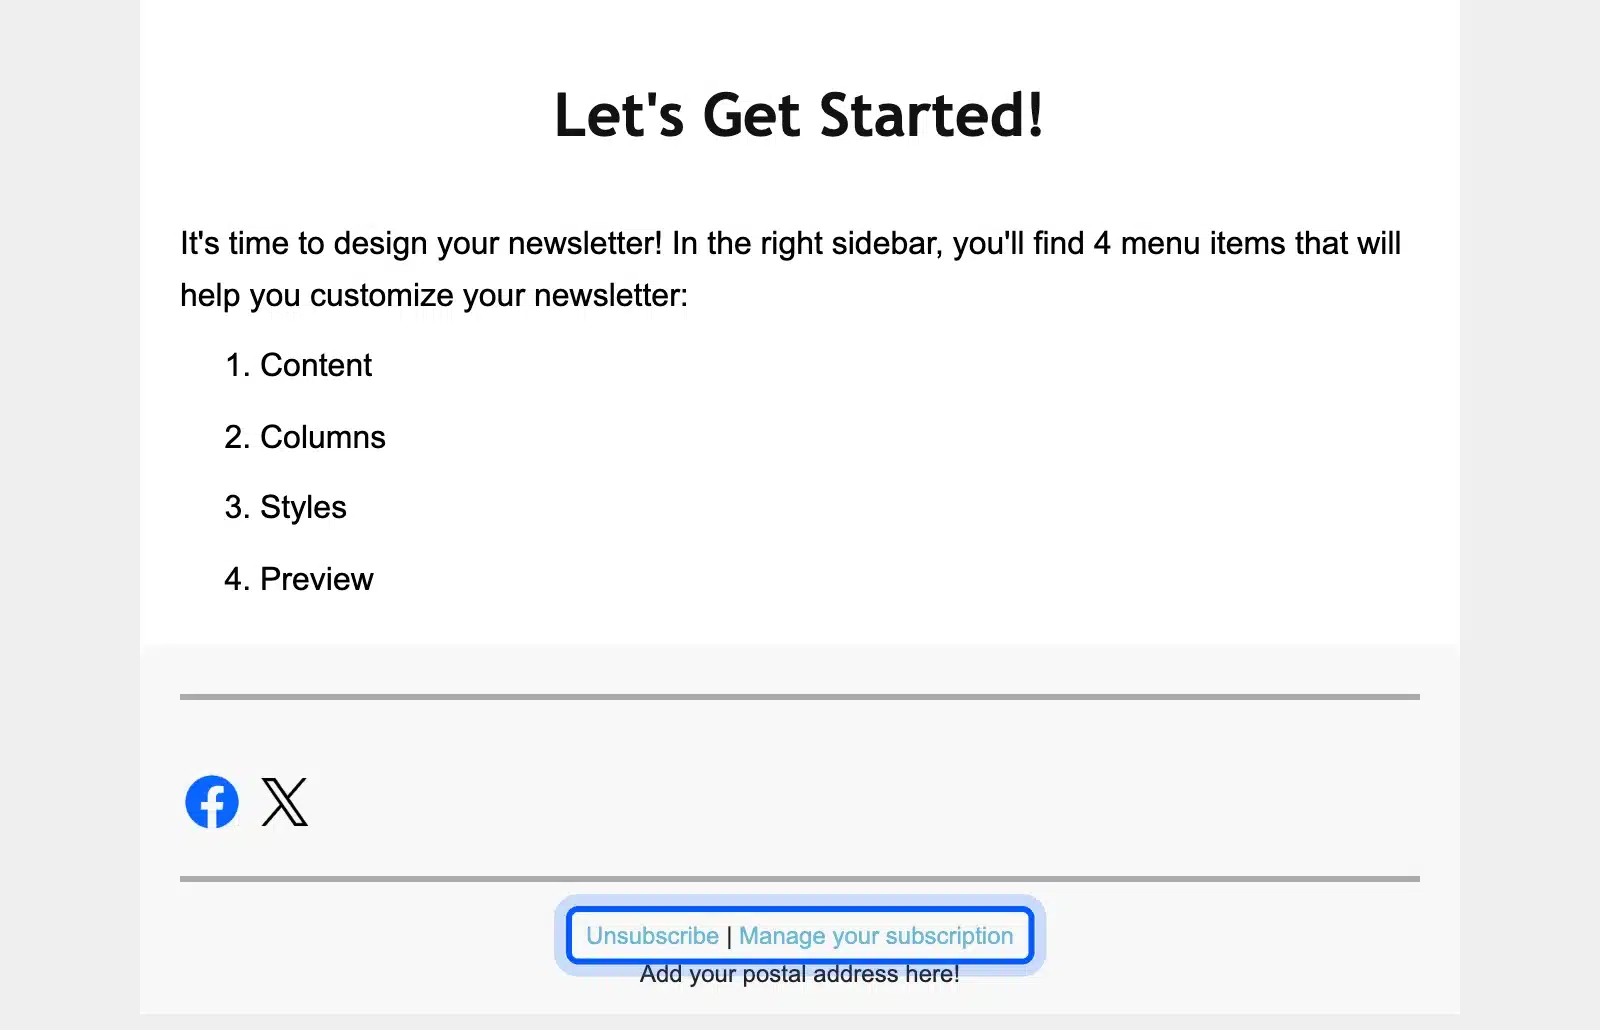
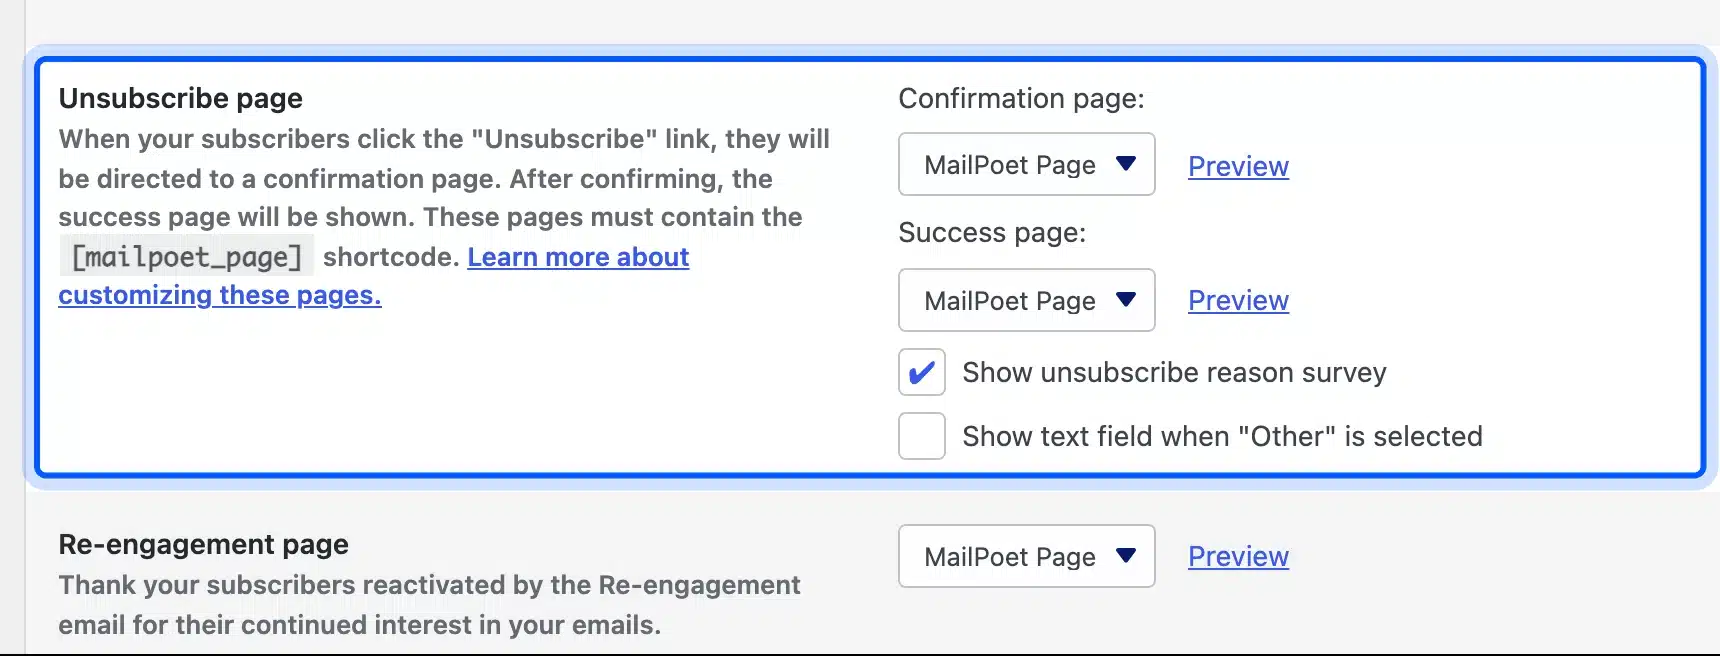
- Choose the unsubscribe pages: Go to MailPoet > Settings > Basics. Under Unsubscribe page, pick a confirmation page and a success page or keep the default MailPoet Page.
- Serve the site over HTTPS: Make sure every page loads on
https://. MailPoet only adds the one-click header when the unsubscribe URL is secure.
The setup is now live for every newsletter you send. If you also want a link inside order emails, the next section covers that.
If you would rather compare tools before you commit, the DevDiggers list of email marketing plugins for WooCommerce covers the main options. Most of them add the same footer link and header.
Add a Preferences Link to WooCommerce Order Emails
You can add a preferences link to WooCommerce order emails through the Footer text field and no code at all. WooCommerce 11.2 keeps that field under WooCommerce > Settings > Emails in the Email template section. It accepts the {site_title} and {store_address} placeholders plus plain HTML.
Here is the field with its default value on my test store:
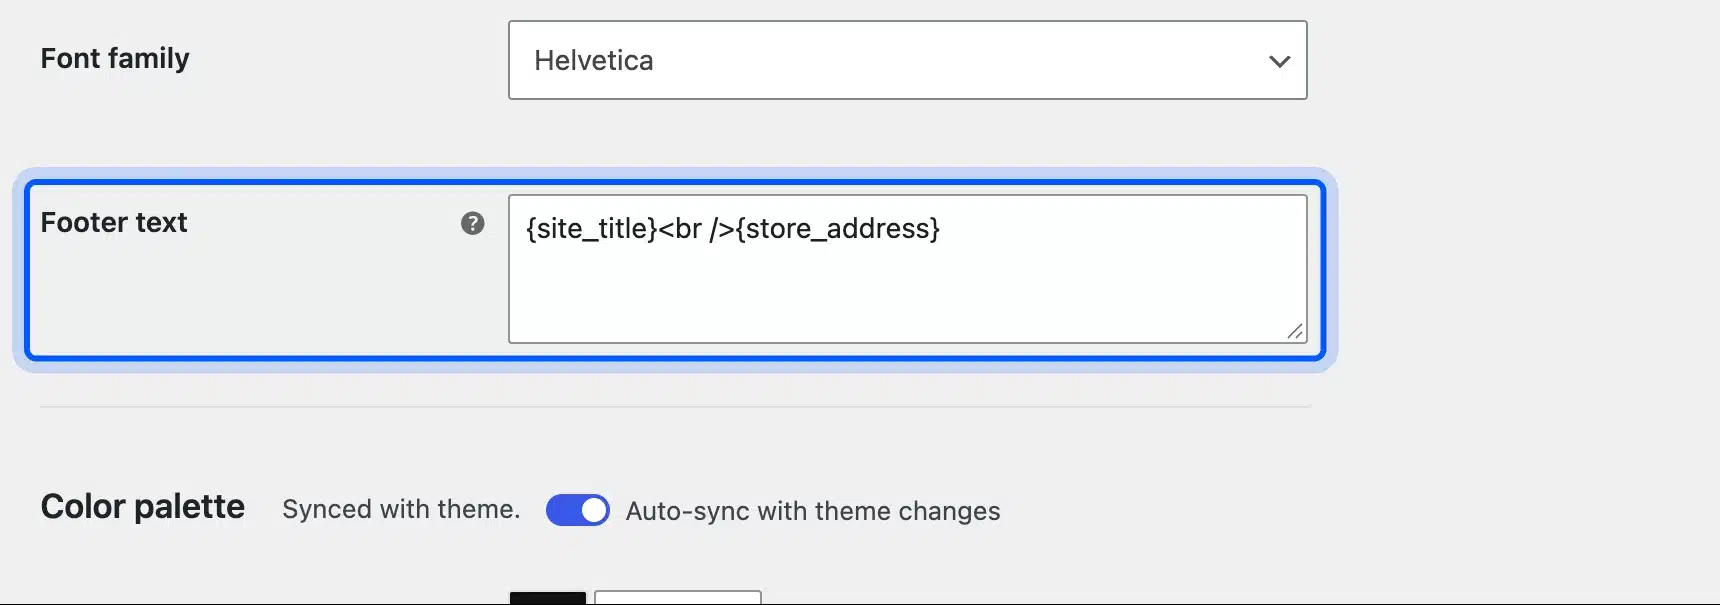
I added a link to the MailPoet subscriptions page after the address and sent a new completed order email. The link showed up in the footer, underlined, with the anchor text I typed.
The HTML I used was a single anchor tag pointing at the MailPoet subscriptions page and placed after a br tag. WooCommerce kept the link and styled it with an underline in the footer color. It matched the rest of the email.
The placeholders still work next to your HTML. The footer printed “Cache Test Store” followed by the store address and then my link in one centered block.
This is not required by law, since order emails are transactional. Still, it gives a customer who wants fewer emails an easy route, which beats a spam complaint against your store domain.
Keep the anchor honest. “Manage email preferences” works better than “Unsubscribe” here, because clicking it does not stop receipts, and a buyer who expects that will be annoyed.
How to Test Your Unsubscribe Link
Test your unsubscribe link by sending one real campaign to an address you control, clicking the link and checking the subscriber status. A preview email is not enough. In MailPoet, real sends carry the unsubscribe header, while the preview feature skips it.
- Send to a test subscriber: Add your own address to a list and send a short newsletter to that list only.
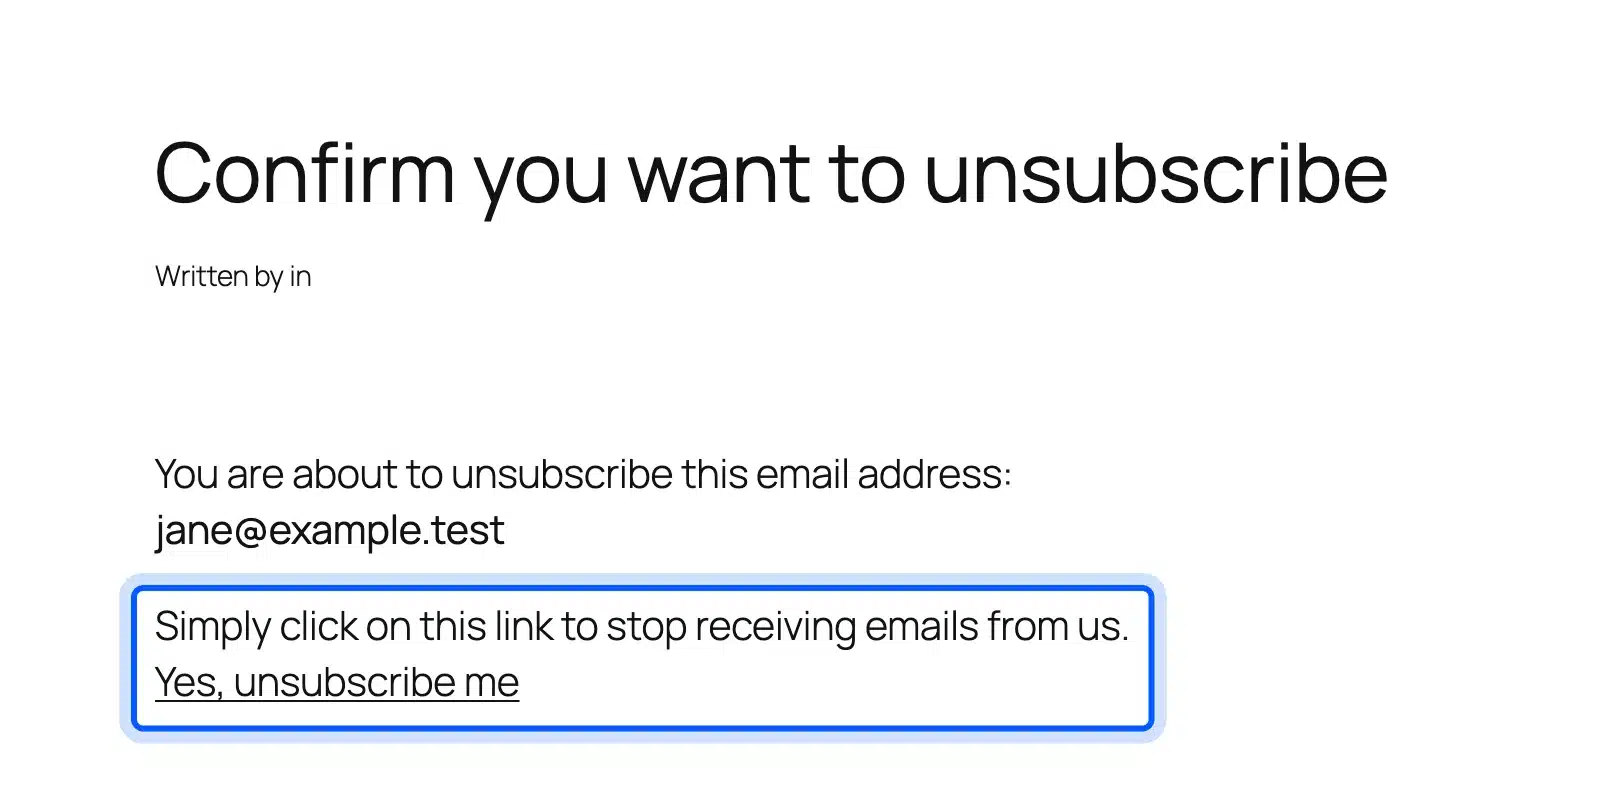
- Click Unsubscribe in the email: MailPoet first opened a confirmation page that showed my test address and a “Yes, unsubscribe me” link. Nothing changed until I clicked it.
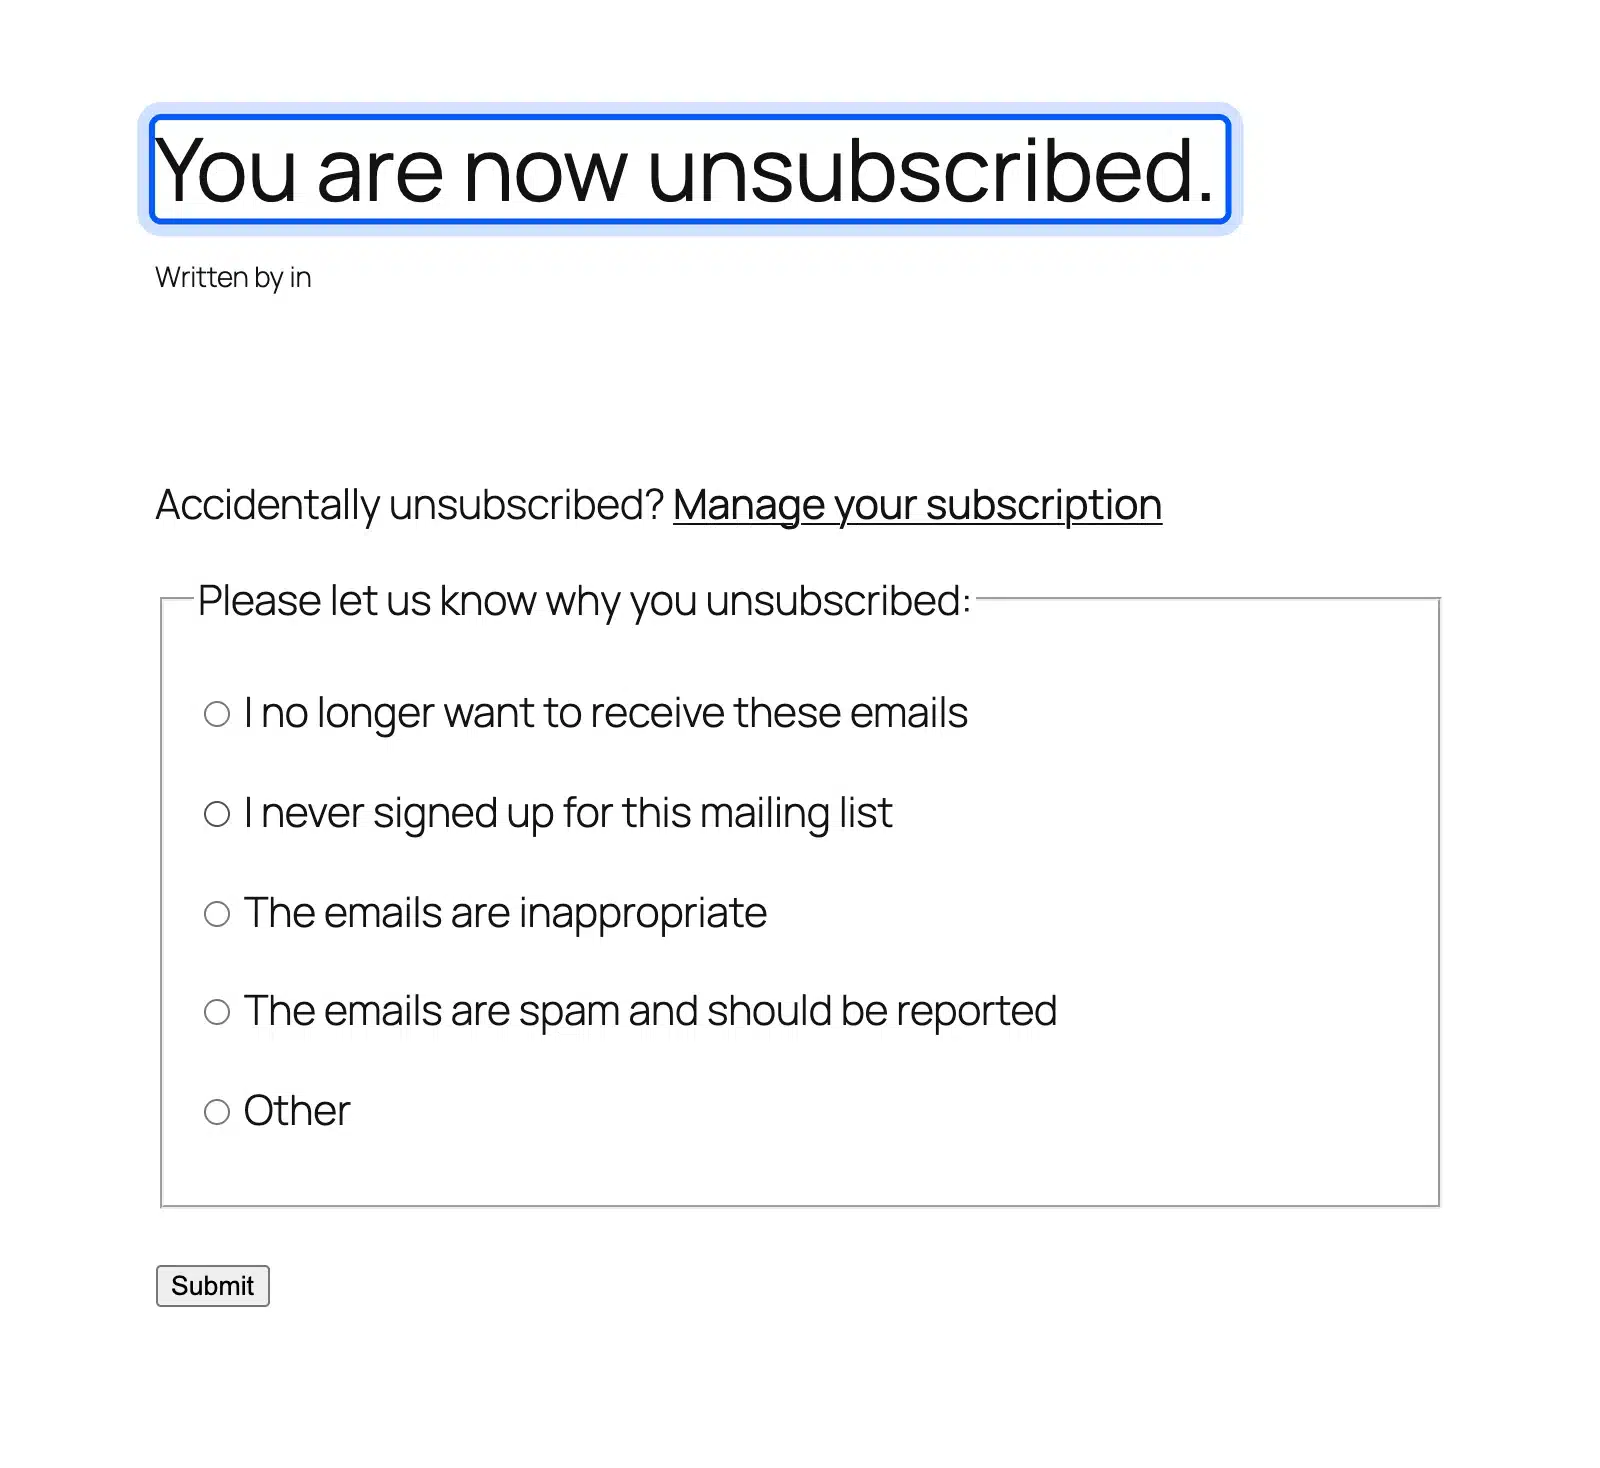
- Confirm the opt-out: The next page said “You are now unsubscribed.” It also offered a short survey asking why, with five reasons to pick from.
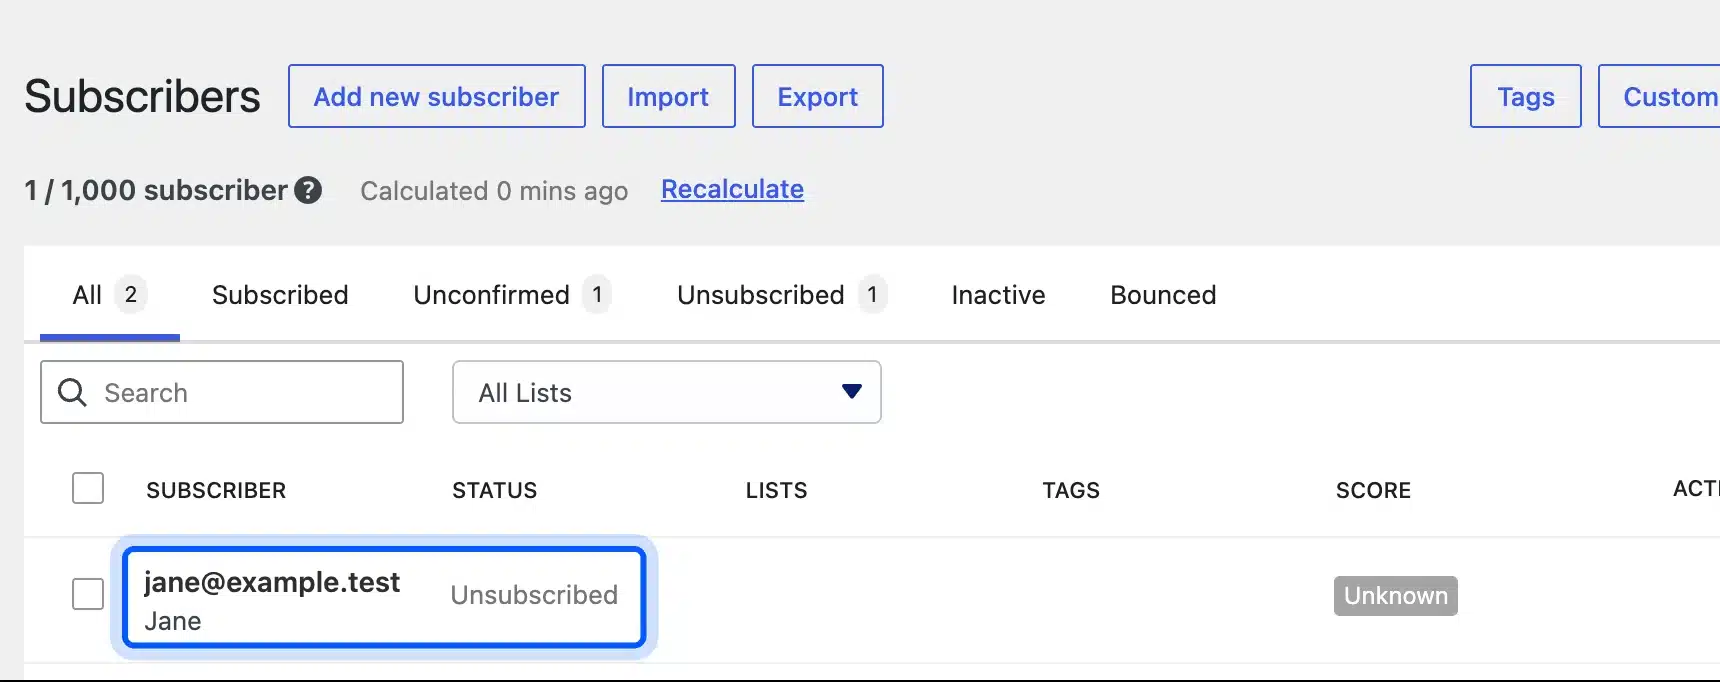
- Check the subscriber list: Open MailPoet > Subscribers. My test address moved to Unsubscribed in the same minute and the Unsubscribed tab count went to 1.
The Manage your subscription link in the same footer leads to a page where the reader can leave single lists instead of everything. Keep it, because a reader who only wants fewer emails may pick that over a full opt-out.
Then send the next campaign and confirm the address no longer receives it. That last step catches lists that sync from another tool and quietly add people back.
Tip: Read the raw email headers once from a real inbox. In Gmail, open the message, choose Show original, and search for List-Unsubscribe to confirm both header lines arrived.
Common Mistakes That Break Unsubscribe Links
Most broken unsubscribe links come from settings rather than from code. A plain HTTP site, a deleted confirmation page or a footer someone trimmed in the editor can each stop opt-outs from working. Run the test above after every theme change, plugin update or template redesign.
- Plain HTTP site: MailPoet skips the one-click header when the URL is not HTTPS. My local HTTP store proved it. Fix the certificate first.
- Deleted pages: The confirmation and success pages hold the
[mailpoet_page]shortcode. Delete one and the link lands on a 404 page. - Trimmed footers: A designer who removes the footer block also removes the opt-out. Check the footer in every new template.
- Ticked opt-in boxes: The MailPoet checkout box shipped unticked in my test. Pre-ticking it adds people who never chose your emails. Expect more spam reports.
- Click tracking redirects: MailPoet wrapped the unsubscribe link in a tracking redirect in my test, and it still worked. A third-party tracker that rewrites links needs the same click test.
- Two email tools: If one tool holds the list and another sends, an opt-out in the sender may never reach the list. Sync the status both ways.
MailPoet pages run on a shortcode, the same way the WooCommerce shortcodes build your cart and checkout pages. A page builder that rewrites shortcodes can break both.
Developers who prefer their own code can also build a small plugin that adds a link through a WooCommerce email hook. The DevDiggers guide to creating a WooCommerce plugin covers the plugin side of that job.
Conclusion
WooCommerce sends order emails with no unsubscribe link, and that is fine because they are transactional. The unsubscribe link in WooCommerce stores belongs in marketing email, and a plugin like MailPoet adds it to every footer and header.
Turn on the checkout opt-in, keep the footer links, choose the unsubscribe pages and serve the site over HTTPS. Then send a real test and confirm the status changes, because a preview will not show you the headers.
Bulk senders also need Gmail’s one-click unsubscribe. Check your headers once a quarter so a theme or plugin update does not quietly break it.
Frequently Asked Questions (FAQs)
Q1. Can customers unsubscribe from WooCommerce order emails?
No. Order emails such as receipts and shipping notices are transactional. WooCommerce sends them to every buyer. You can still add a preferences link in the email footer text.
Q2. Does MailPoet add the List-Unsubscribe header automatically?
Yes, on real campaign sends. In my MailPoet 5.41.0 test the newsletter carried List-Unsubscribe, and the one-click List-Unsubscribe-Post header only appears when the site uses HTTPS.
Q3. How fast must I remove someone who unsubscribes?
The FTC’s CAN-SPAM guide gives you 10 business days to honor the request. MailPoet changed the status instantly in my test. You are well inside that window.
Q4. Where do unsubscribed customers go after clicking the link?
In MailPoet they see a confirmation page first and a success page after they confirm. You choose both pages under MailPoet > Settings > Basics.
Q5. Will unsubscribing stop a customer’s order confirmations?
No. An opt-out in MailPoet only removes the address from marketing lists. WooCommerce keeps sending receipts, refund notices and shipping updates for every order.
Q6. Should the checkout newsletter box be ticked by default?
Leave it unticked, which is how MailPoet shipped it in my test. A buyer who ticks the box has chosen to hear from you. That makes your list cleaner and your opt-outs easier to defend.