

WooCommerce GDPR compliance means your store collects only the personal data it needs and tells customers what it does with it. It also means you can answer their requests. WooCommerce ships most of the tools for this, and they take a few minutes to set up.
We tested every step in October 2026 on a WooCommerce 11.2 store running WordPress 7.1.3. We also ran real erasure requests on test customers and compared their orders before and after. The screenshots in this guide come from that store.
This guide covers lawful bases, eight setup steps and cookie consent with Google Consent Mode v2. It also covers what to do after a breach. It is a setup guide and it is not legal advice.
WooCommerce GDPR Compliance Basics
GDPR applies to any online store that sells goods to people in the European Union. Your own location does not matter, because Article 3(2) of the regulation also covers businesses outside the Union. A store in Texas or India that ships to a customer in Berlin falls under the same rules.
WooCommerce stores hold more personal data than most owners expect. The WooCommerce text in the WordPress privacy guide lists products viewed, IP address, browser type, shipping address and cookies that track cart contents. Add order history, customer accounts, review forms and every marketing plugin you run.
Customers also hold rights over that data. They can ask to see it, correct it, export it or have it erased. Steps four and five show how WooCommerce supports the last two.
The penalty ceiling is high. Article 83(5) allows fines of up to 20 million euros or 4% of worldwide annual turnover for the most serious infringements.
WooCommerce is not compliant by itself. It gives you settings and tools. You still choose how long to keep data, what to erase and when to ask for consent.
Note: This guide is not legal advice. Rules differ by country and by business. Check your own setup with a data protection lawyer or your national regulator.
Which Lawful Basis Covers Your Store Data?
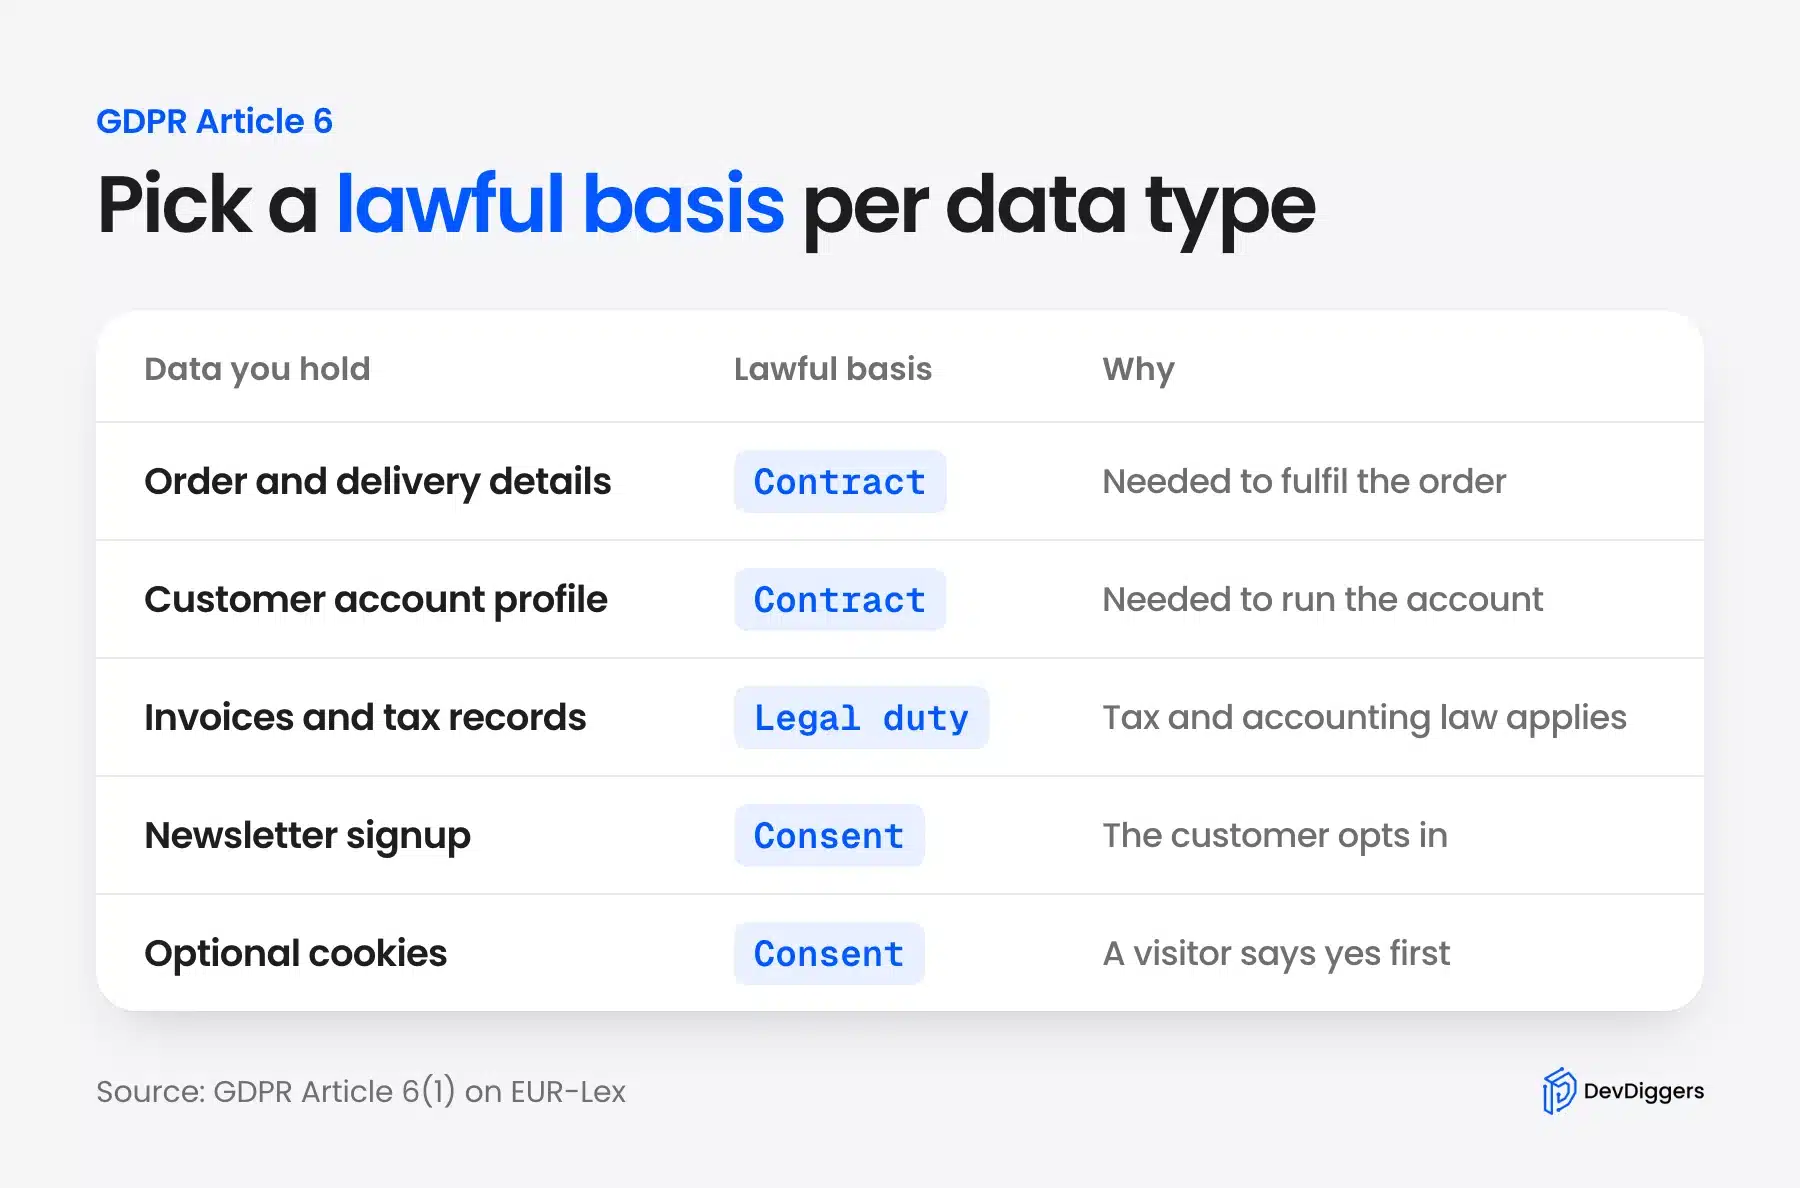
Every use of personal data needs a lawful basis under Article 6 of the GDPR. Consent is only one of several options and most store data does not need it. Order details usually rest on the contract with the customer and tax records on a legal obligation.
This corrects a common piece of advice. A customer who orders a mug does not tick a consent box for you to ship it. The order is a contract and you process the address because you must deliver.
Write the basis down for each type of data. A short table in your own records is enough. It saves guesswork when a customer or a regulator asks why you hold something.
Consent is the right basis for optional extras such as a newsletter signup or an analytics cookie. The UK regulator’s guide to lawful basis describes each option. It also says consent is not always the best choice and that you should pick the most appropriate basis for each purpose.
Where you do rely on consent it must be easy to take back. Article 7(3) states that it shall be as easy to withdraw as to give consent. The European Data Protection Board explains valid consent in its consent guidelines.
How to Make a Website GDPR Compliant on WooCommerce
You can make a WooCommerce store GDPR compliant in eight steps inside the WordPress dashboard. Steps one to four cover the privacy page, checkout notices, retention periods and erasure settings. Steps five to eight cover customer requests, cookie consent, comment forms and plugin review.
Step 1: Publish and Assign Your Privacy Policy Page
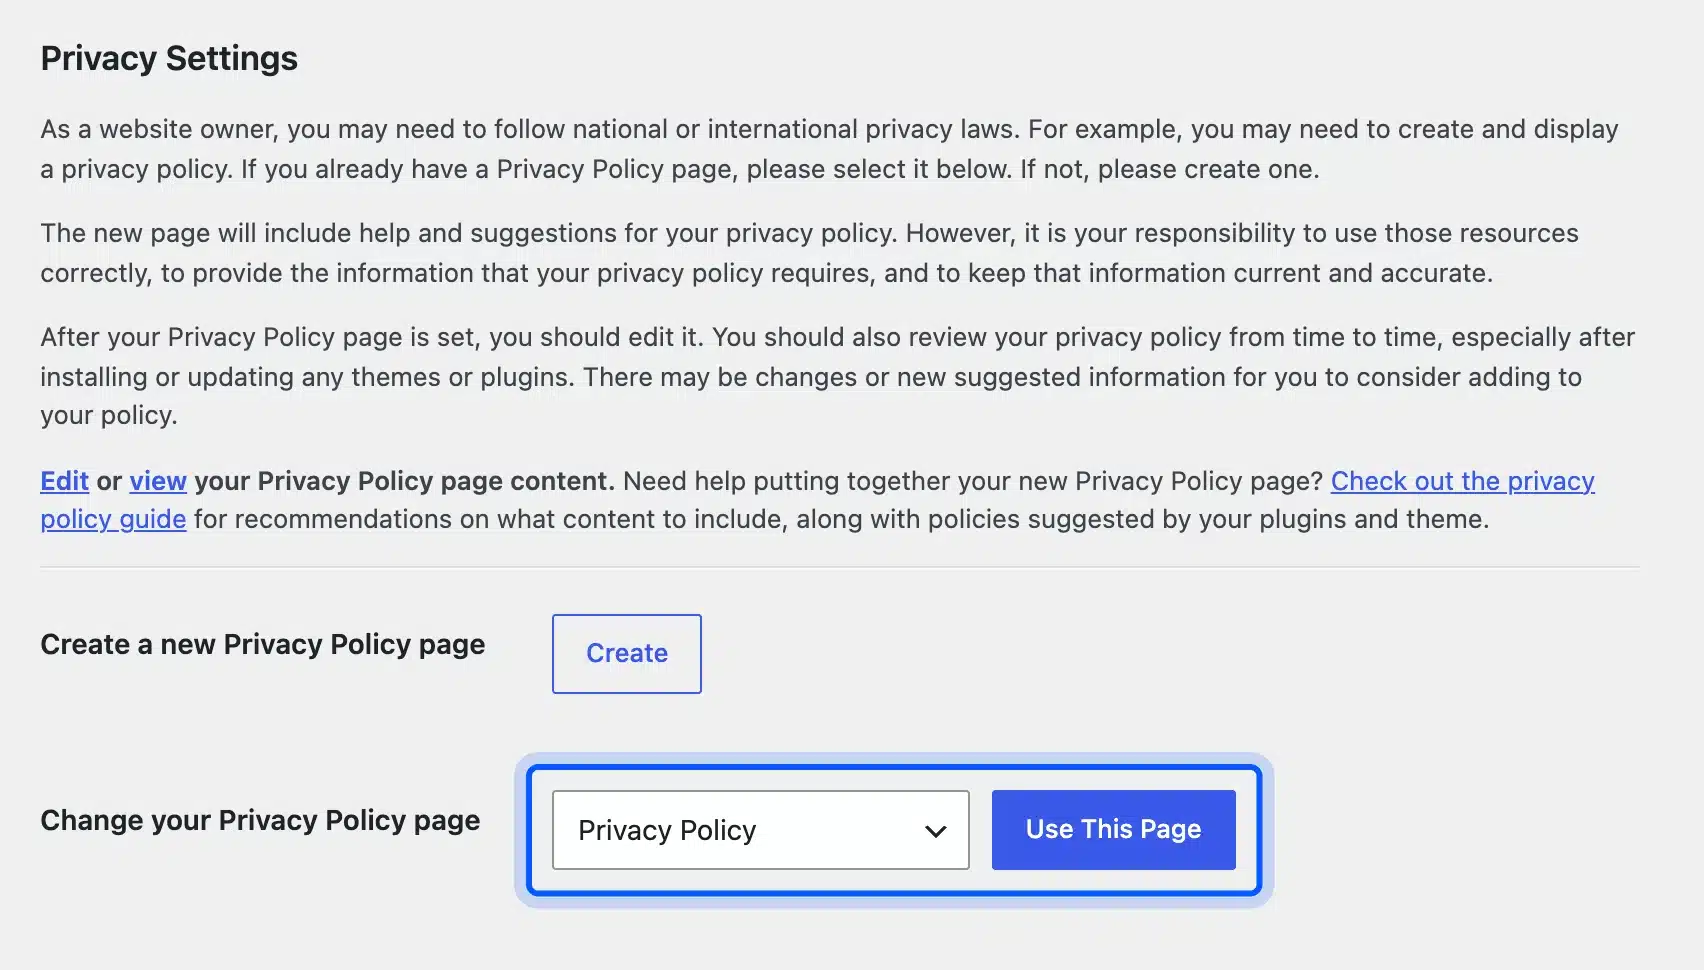
A privacy policy page tells customers what you collect and why. WordPress can create the page and WooCommerce links to it from checkout. The WooCommerce privacy notices stay hidden until a page is assigned, as the settings screen itself says.
Do this in the WordPress dashboard:
- Open
Settings > Privacy. - Click Create to build a new page or pick an existing one from the drop-down.
- Click Use This Page to assign it.
- Edit the draft with the Policy Guide text from step 8 and publish it.
In our test WordPress created a draft page called Privacy Policy. It stayed a draft until we published it. Check the status before you rely on it.
Step 2: Add Privacy Notices to Registration and Checkout
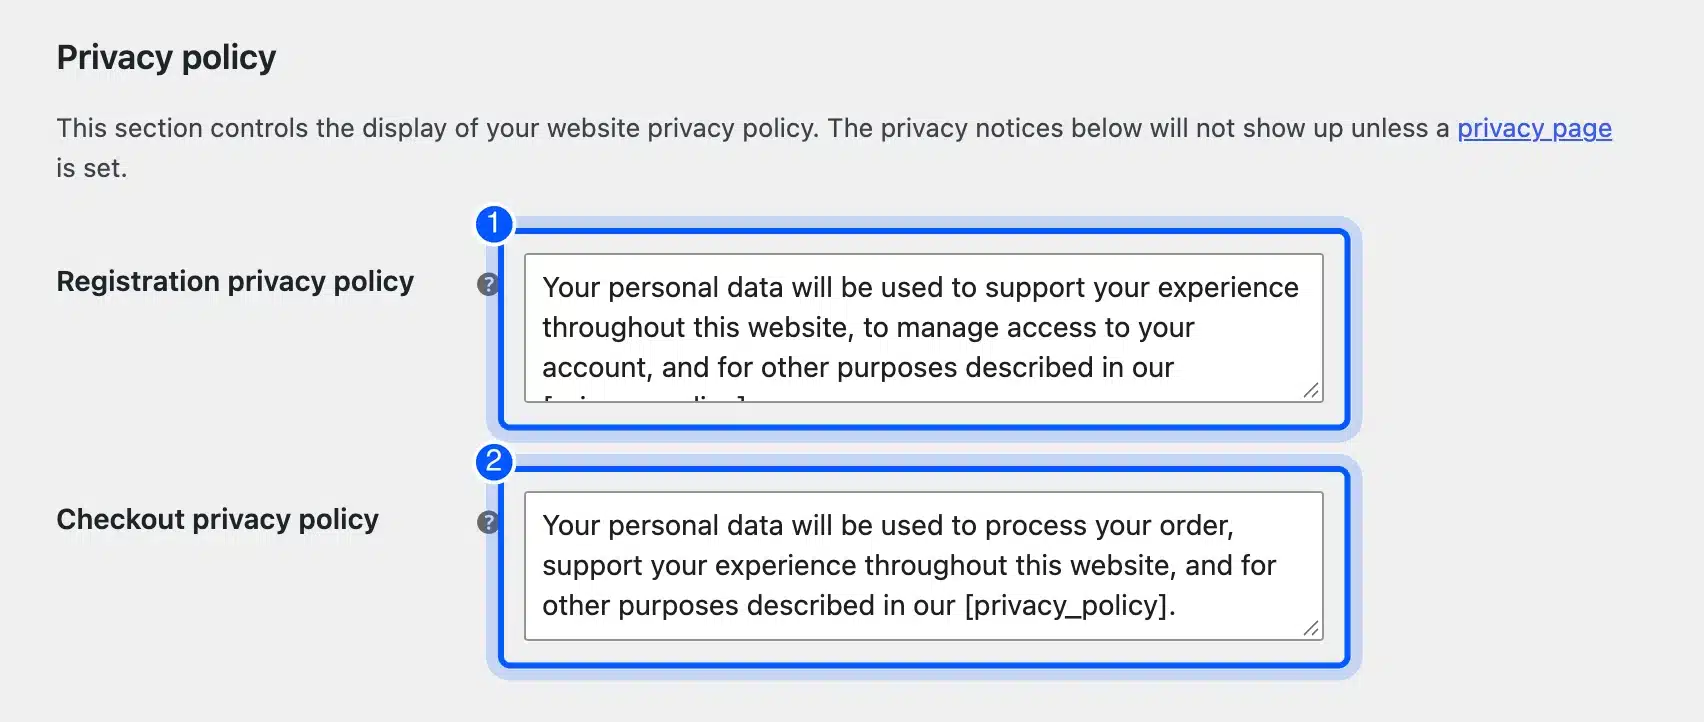
WooCommerce shows a short privacy notice at registration and at checkout. You edit both under WooCommerce > Settings > Accounts & Privacy.
The default checkout text says your data will be used to process the order. It ends with a [privacy_policy] shortcode that becomes a link to your page, as the WooCommerce documentation explains.
This notice informs people. It is not a consent checkbox. The order itself needs no tick box because the lawful basis is the contract.
A short checkout notice could read: Your personal data is used to process your order and to keep tax records. See our [privacy_policy] for details. Adjust it to match what your store really does.
- Open
WooCommerce > Settings > Accounts & Privacy. - Scroll to the Privacy policy section.
- Keep the
[privacy_policy]shortcode in both texts so the link appears. - Edit the wording to match what your store really does.
The same screen has a guest checkout option. It was ticked on our test store as Enable guest checkout (recommended).
Guests buy without an account. You store fewer customer profiles that way.
Step 3: Set Personal Data Retention Periods
Retention settings delete or anonymize old data for you. They sit in a section called Personal data retention lower on the same screen. A blank field keeps the data forever, and cleanup runs daily once a period is set, according to the WooCommerce documentation.
- Inactive accounts: Deleted after the period you choose when the customer has not logged in or ordered.
- Pending, failed and canceled orders: Moved to the trash after their period.
- Completed orders: Anonymized instead of deleted so sales reports stay accurate.
- Refunded orders: Have their own field in the same section.
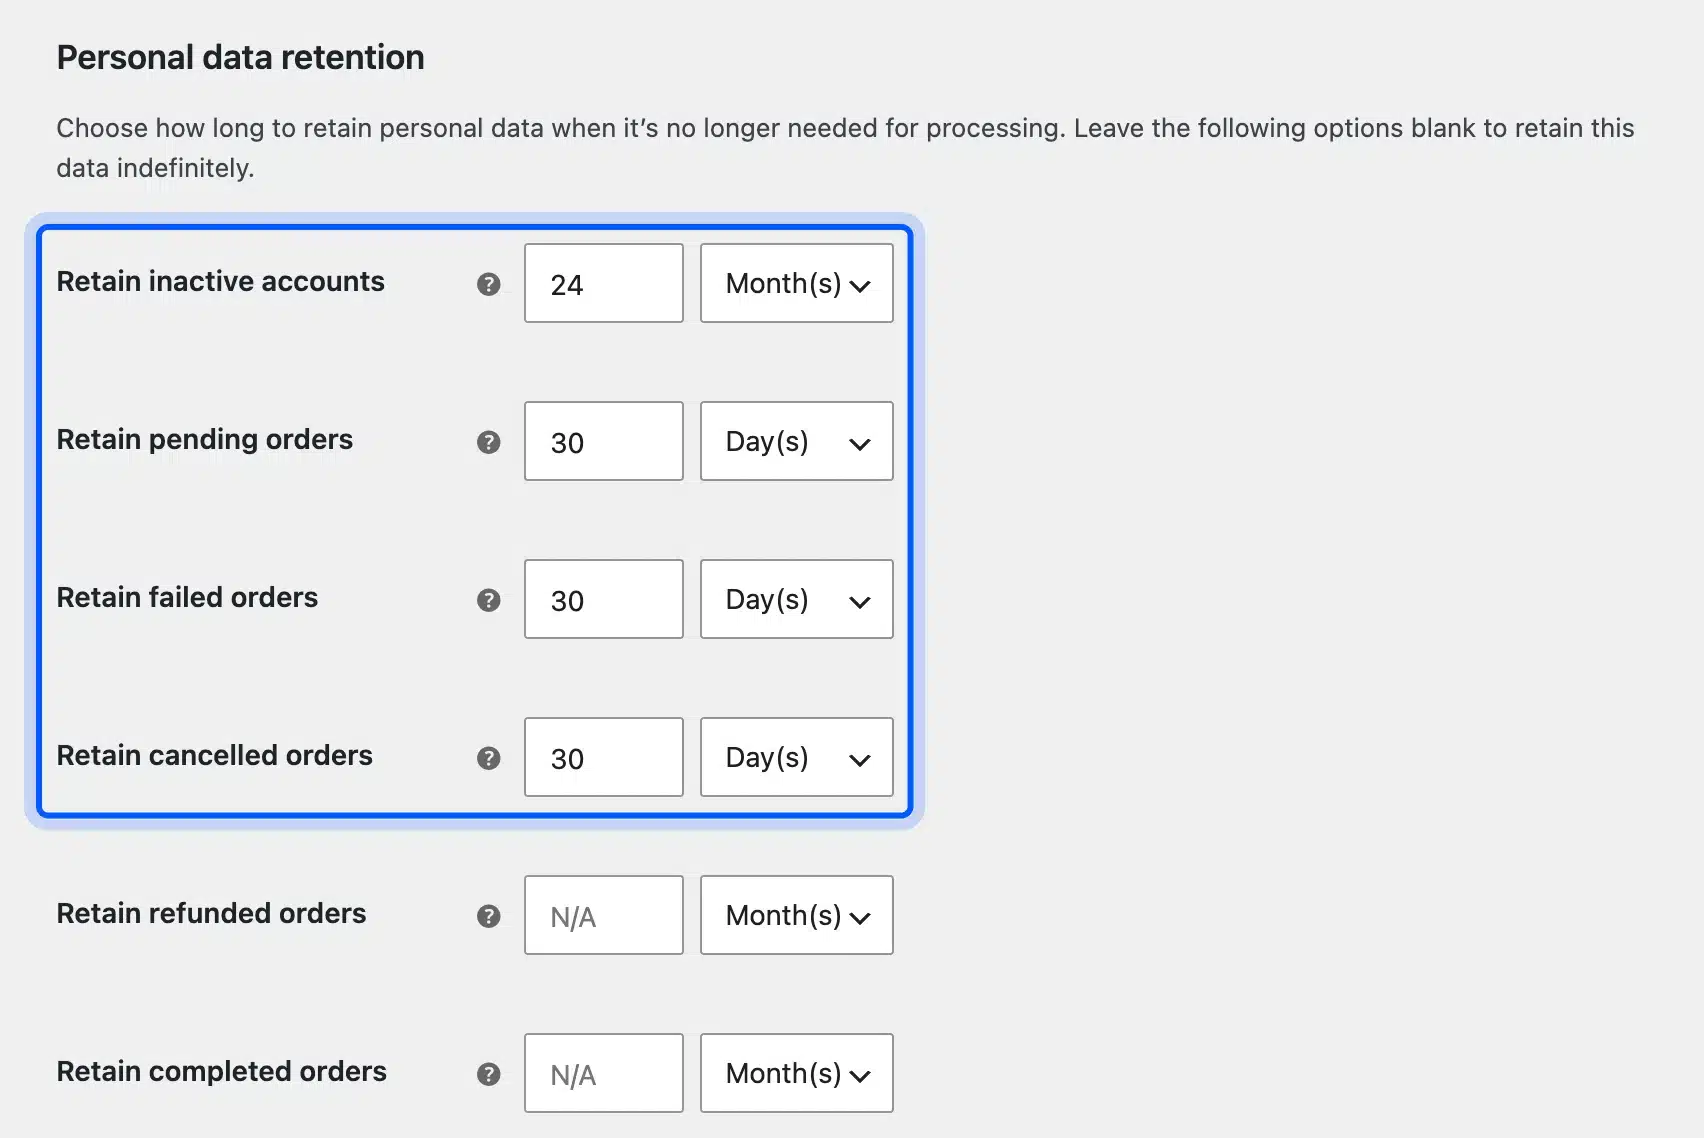
We entered 24 months for inactive accounts and 30 days for pending, failed and canceled orders as an example. Those numbers are not legal advice.
We left completed orders blank because tax and accounting law sets how long you keep sales records. Ask your accountant for that period.
Step 4: Decide What an Erasure Request Removes From Orders
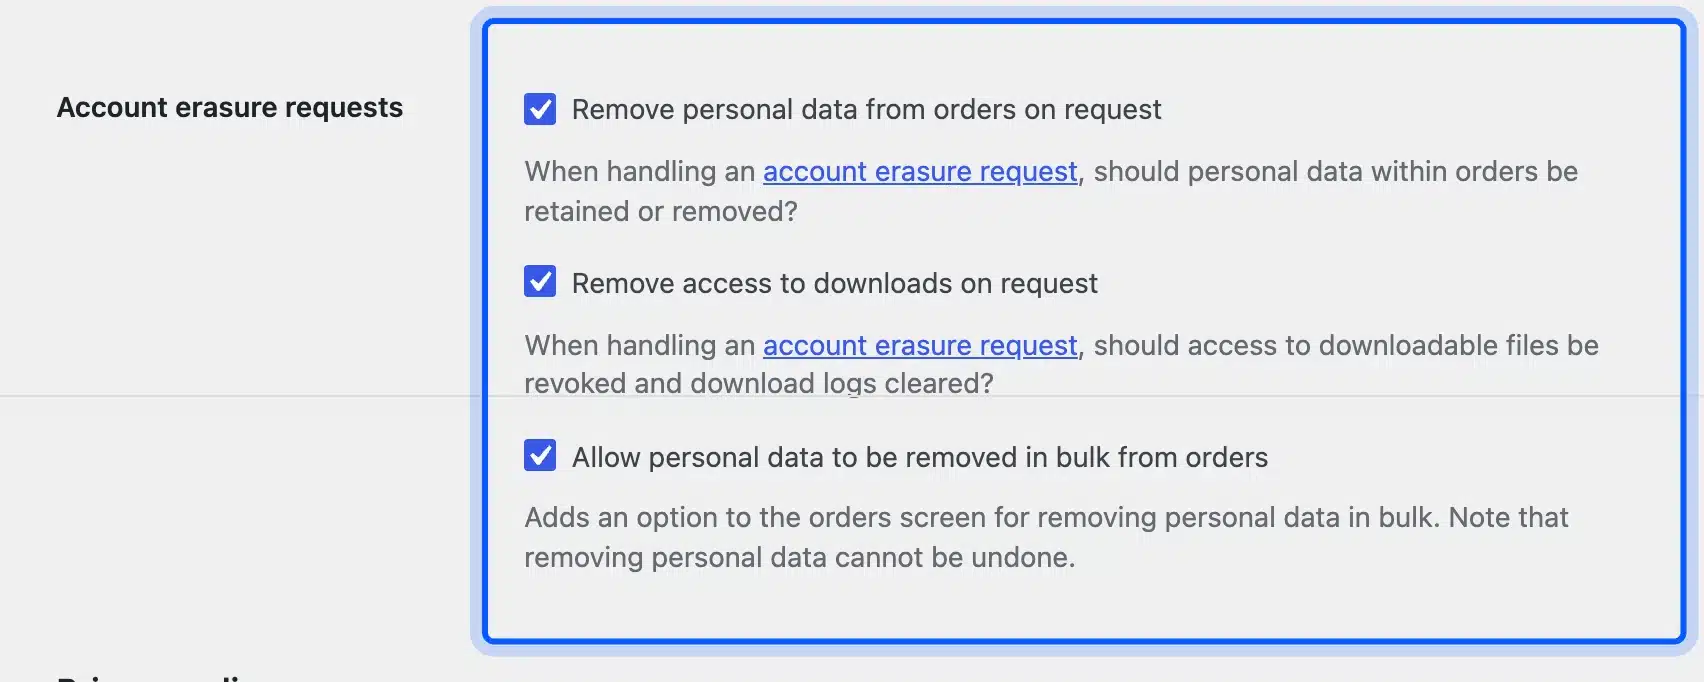
WooCommerce adds three settings to the Account erasure requests row. They control what happens to order data when you process an erasure request. The right choice depends on what the law requires you to keep.
- Open
WooCommerce > Settings > Accounts & Privacyand find the Account erasure requests row. - Tick Remove personal data from orders on request if you can do without the name and address on old orders.
- Tick Remove access to downloads on request if you sell downloadable products.
- Tick Allow personal data to be removed in bulk from orders if you want a bulk action on the Orders screen.
We tested both states on test customers with one completed order each. With the setting off the erasure removed the customer’s billing fields but reported that the personal data within the order had been retained.
With the setting on the order showed [deleted] for the billing name and address and deleted@site.invalid for the email. The order also moved to the Guest customer.
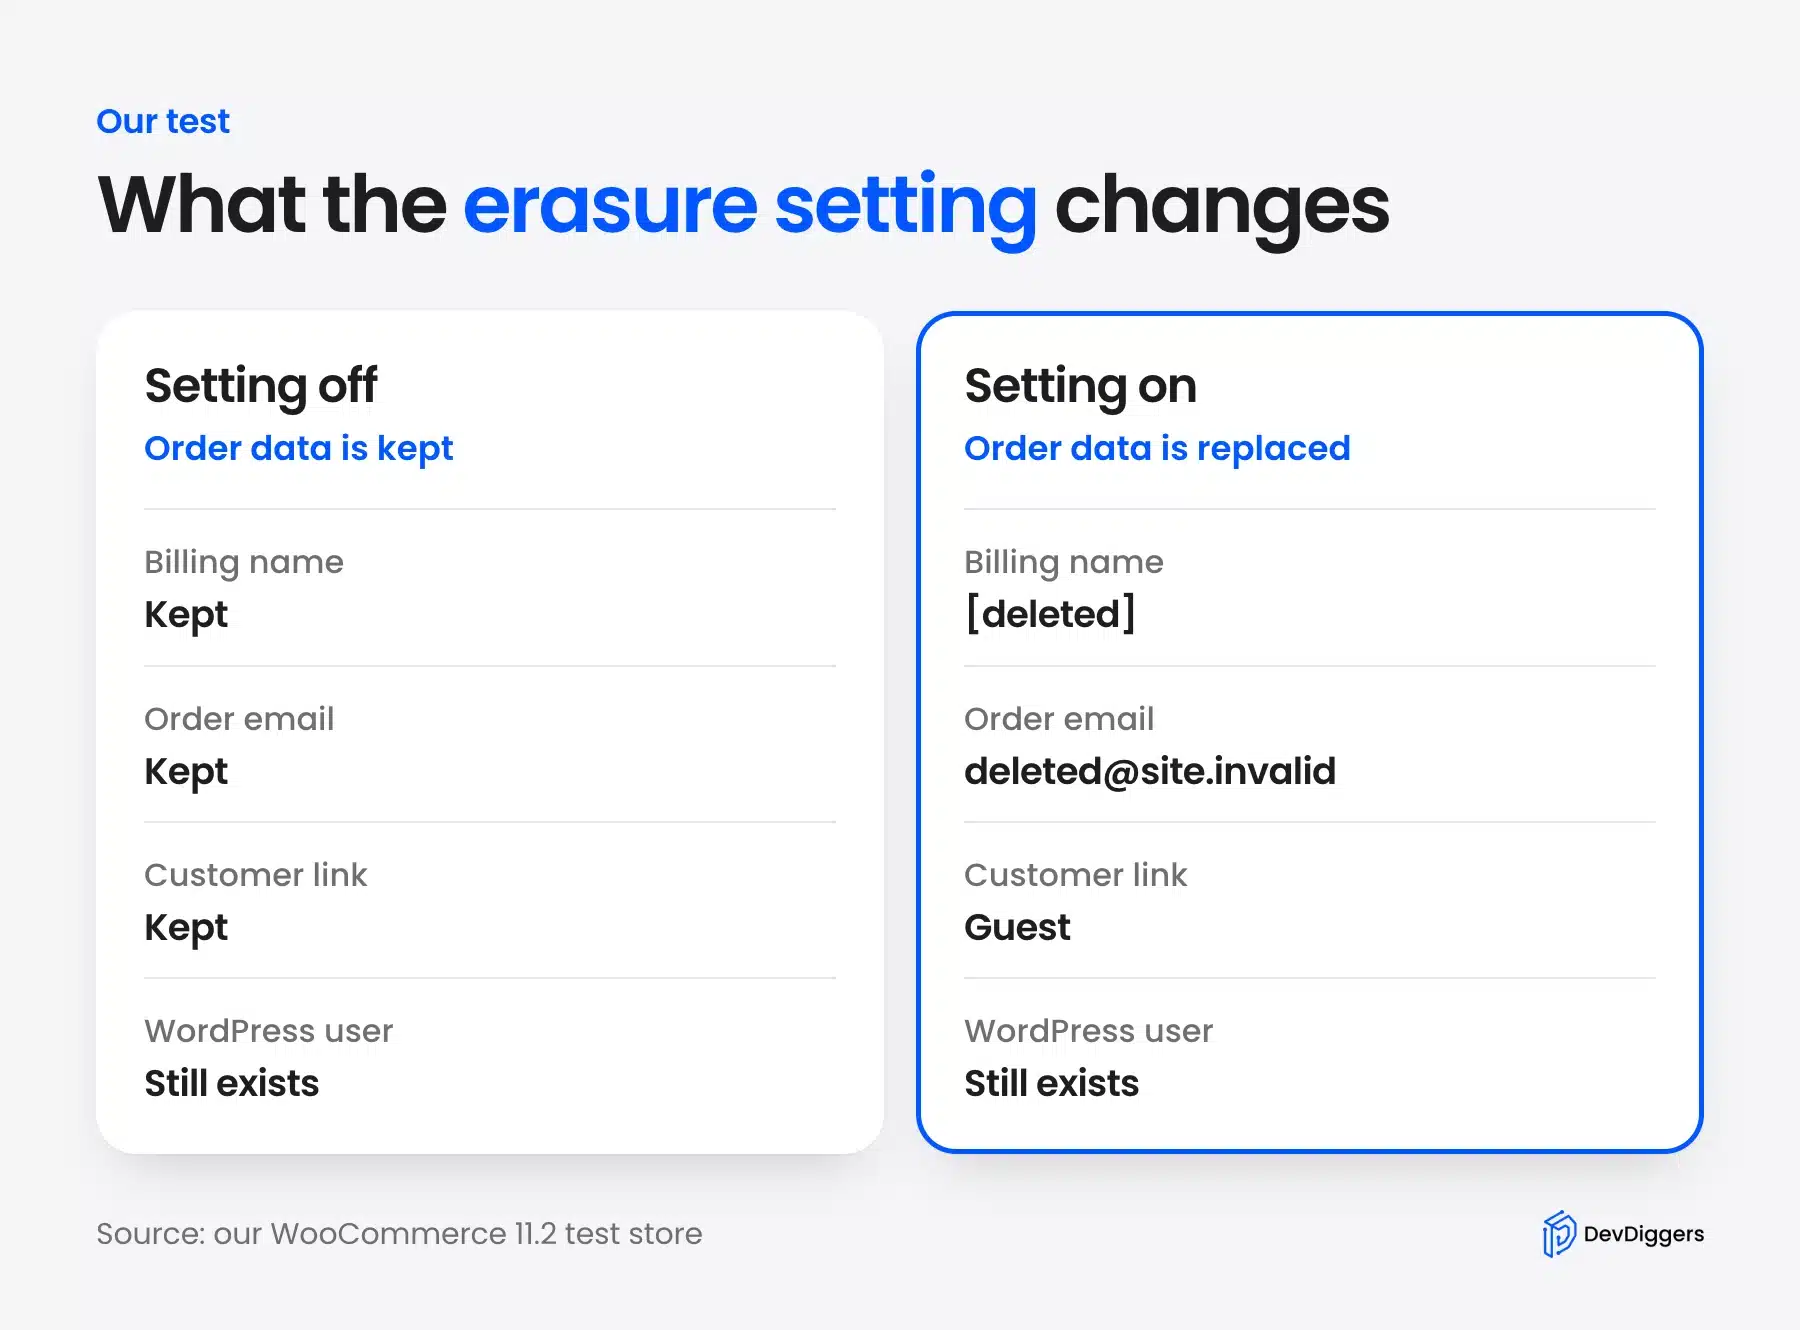
Keep order records when tax law says you must. The WordPress privacy documentation states that deletion requests are not absolute and that you may keep records you are legally required to hold.
Bulk removal cannot be undone. Back up the store first.
Step 5: Handle Export and Erasure Requests
Customers can ask for a copy of their data or for its removal. WordPress handles both under the Tools menu. According to the documentation the export produces a zip file and you approve each request by hand.
You must answer within one month. Article 12(3) sets that deadline and allows a longer period only for complex requests.
- Open
Tools > Export Personal DataorTools > Erase Personal Data. - Enter the customer’s email address or username and click Send Request.
- Wait until the status reads Confirmed. The customer confirms by clicking the link in the email.
- Click Erase personal data in the Next steps column.
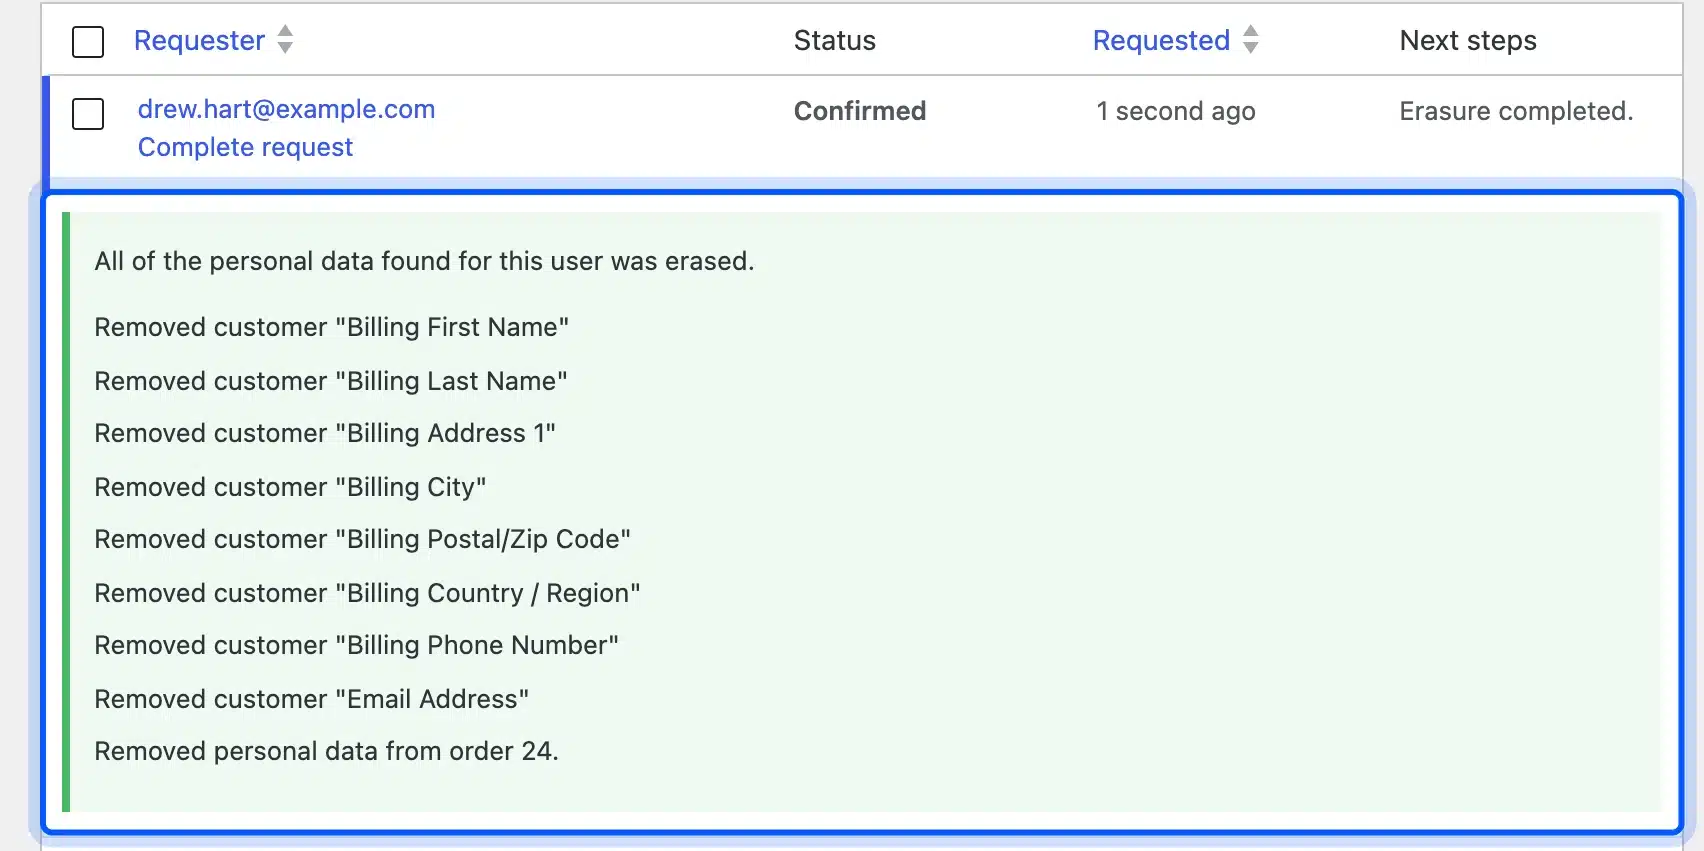
The report lists every item it removed. On our store with the order setting on it ended with the line Removed personal data from order 24.
Erasure did not delete the WordPress user. The customer account still existed after our test, which matches the WordPress documentation. Delete the user yourself under Users once the request is complete.
Keep a simple log of each request. Note the date you received it, the date you answered and what you sent or erased. A spreadsheet is enough.
Backups keep old data, and the tool does not reach outside services such as email providers or analytics. The documentation tells you to honor earlier erasures when you restore a backup.
Step 6: Add Cookie Consent and Google Consent Mode v2
Optional cookies such as analytics and ad pixels are the usual case where consent is the lawful basis. A consent plugin shows the banner and holds those scripts back until the visitor agrees. Google tags need a second piece called Consent Mode.
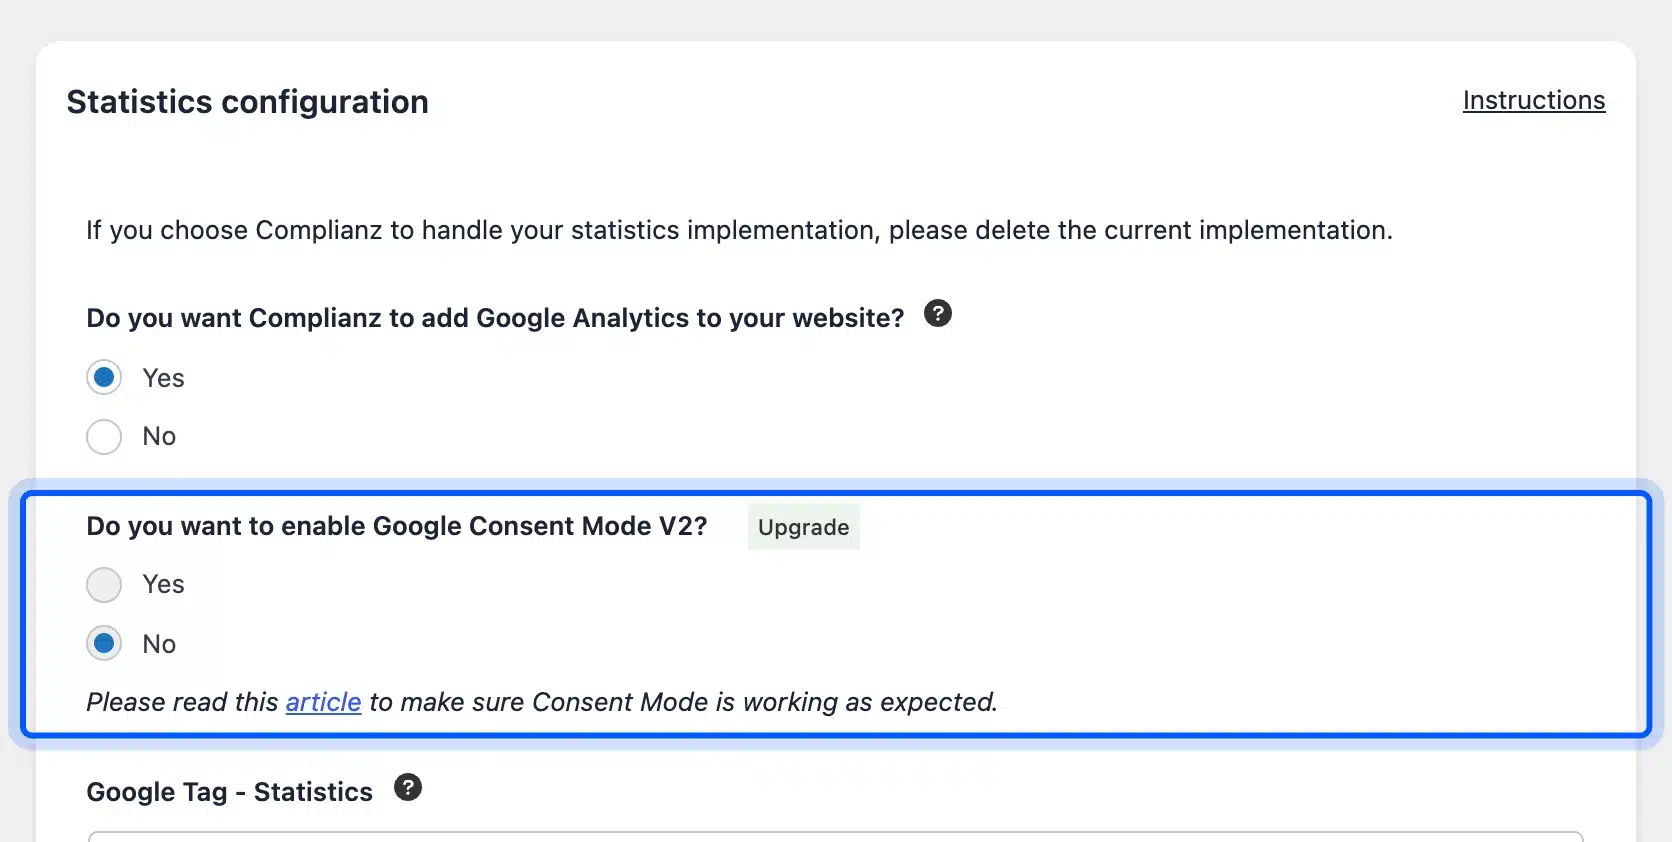
We tested the free Complianz plugin version 7.5.6. Its wizard asks whether you compile statistics and offers Google Analytics as an answer.
The next screen asks Do you want to enable Google Consent Mode V2? On our store that question carried an Upgrade tag and the Yes option was greyed out. So in this plugin Consent Mode v2 needs the premium version.
- Install a consent plugin from
Plugins > Add Pluginand open its wizard. - Answer the statistics question for the tools you really use.
- Find the Consent Mode V2 question and check whether you can switch it on.
Google’s consent mode documentation lists four consent types. They are ad_storage, analytics_storage, ad_user_data and ad_personalization. Version 2 added the last two, and Google says it is strengthening enforcement of its EU user consent policy.
This is the default state Google documents for a page where all four types start as denied:
gtag('consent', 'default', {
  'ad_storage': 'denied',
  'ad_user_data': 'denied',
  'ad_personalization': 'denied',
  'analytics_storage': 'denied'
});
A consent plugin normally sets these values and updates them when the visitor chooses. Check that yours supports all four before you run Google Ads or Google Analytics for EU visitors. If you have not set up analytics yet, our guide shows how to add Google Analytics on WordPress.
We did not connect a live Google account. We only checked what the plugin offers.
Test your own banner in a private browser window before launch. Confirm that optional scripts stay quiet until you accept. Then reject the banner and check that your choice sticks.
Step 7: Check Comment and Review Forms
WordPress adds an opt-in checkbox to comment forms. It asks visitors whether you may save their name and email in a browser cookie. You control it under Settings > Discussion.
- Open
Settings > Discussion. - Find Show comments cookies opt-in checkbox. It allows comment author cookies to be set.
- Keep it ticked.
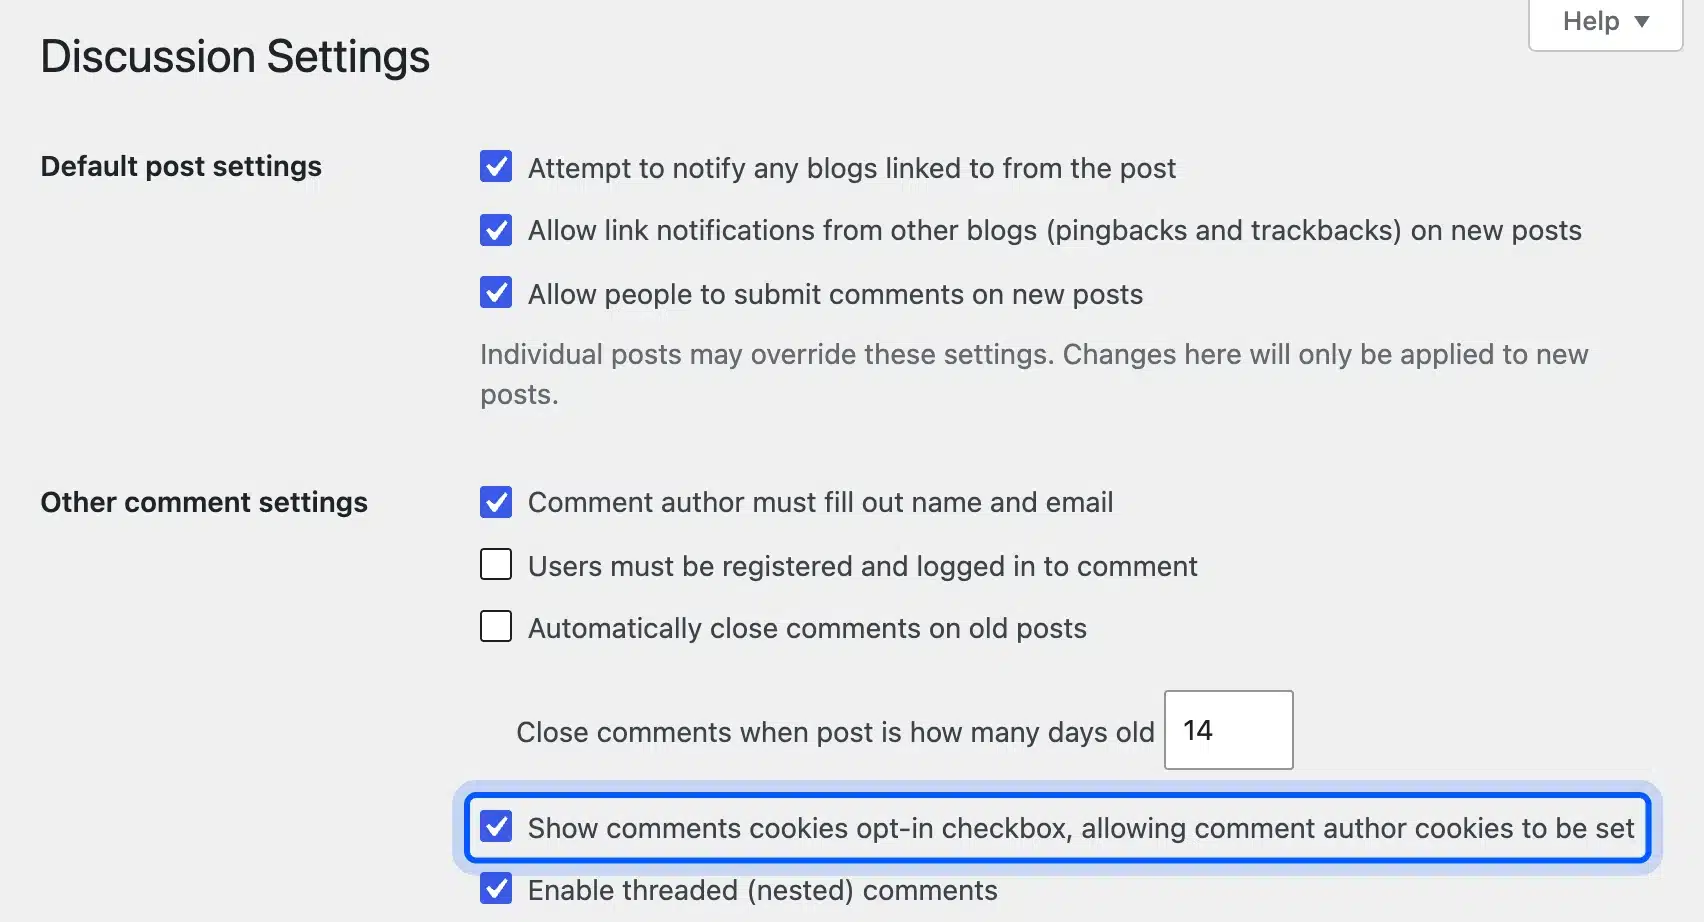
It was ticked by default on our test site. We also opened a product page as a logged-out visitor. The review form showed the same Save my name, email, and website in this browser for the next time I comment checkbox, unticked.
That checkbox covers the browser cookie only. It does not decide how long you keep the review text or the reviewer’s email. State both in your privacy policy.
Step 8: Review Every Plugin That Handles Customer Data
Each plugin that stores or sends customer data needs a line in your privacy policy. WordPress collects suggested text from core and from plugins that support the feature. You find it in the Policy Guide tab under Settings > Privacy.
- Open
Settings > Privacyand click Policy Guide. - Open the WooCommerce entry under Policies.
- Copy the text into your privacy page and edit it to match your settings.
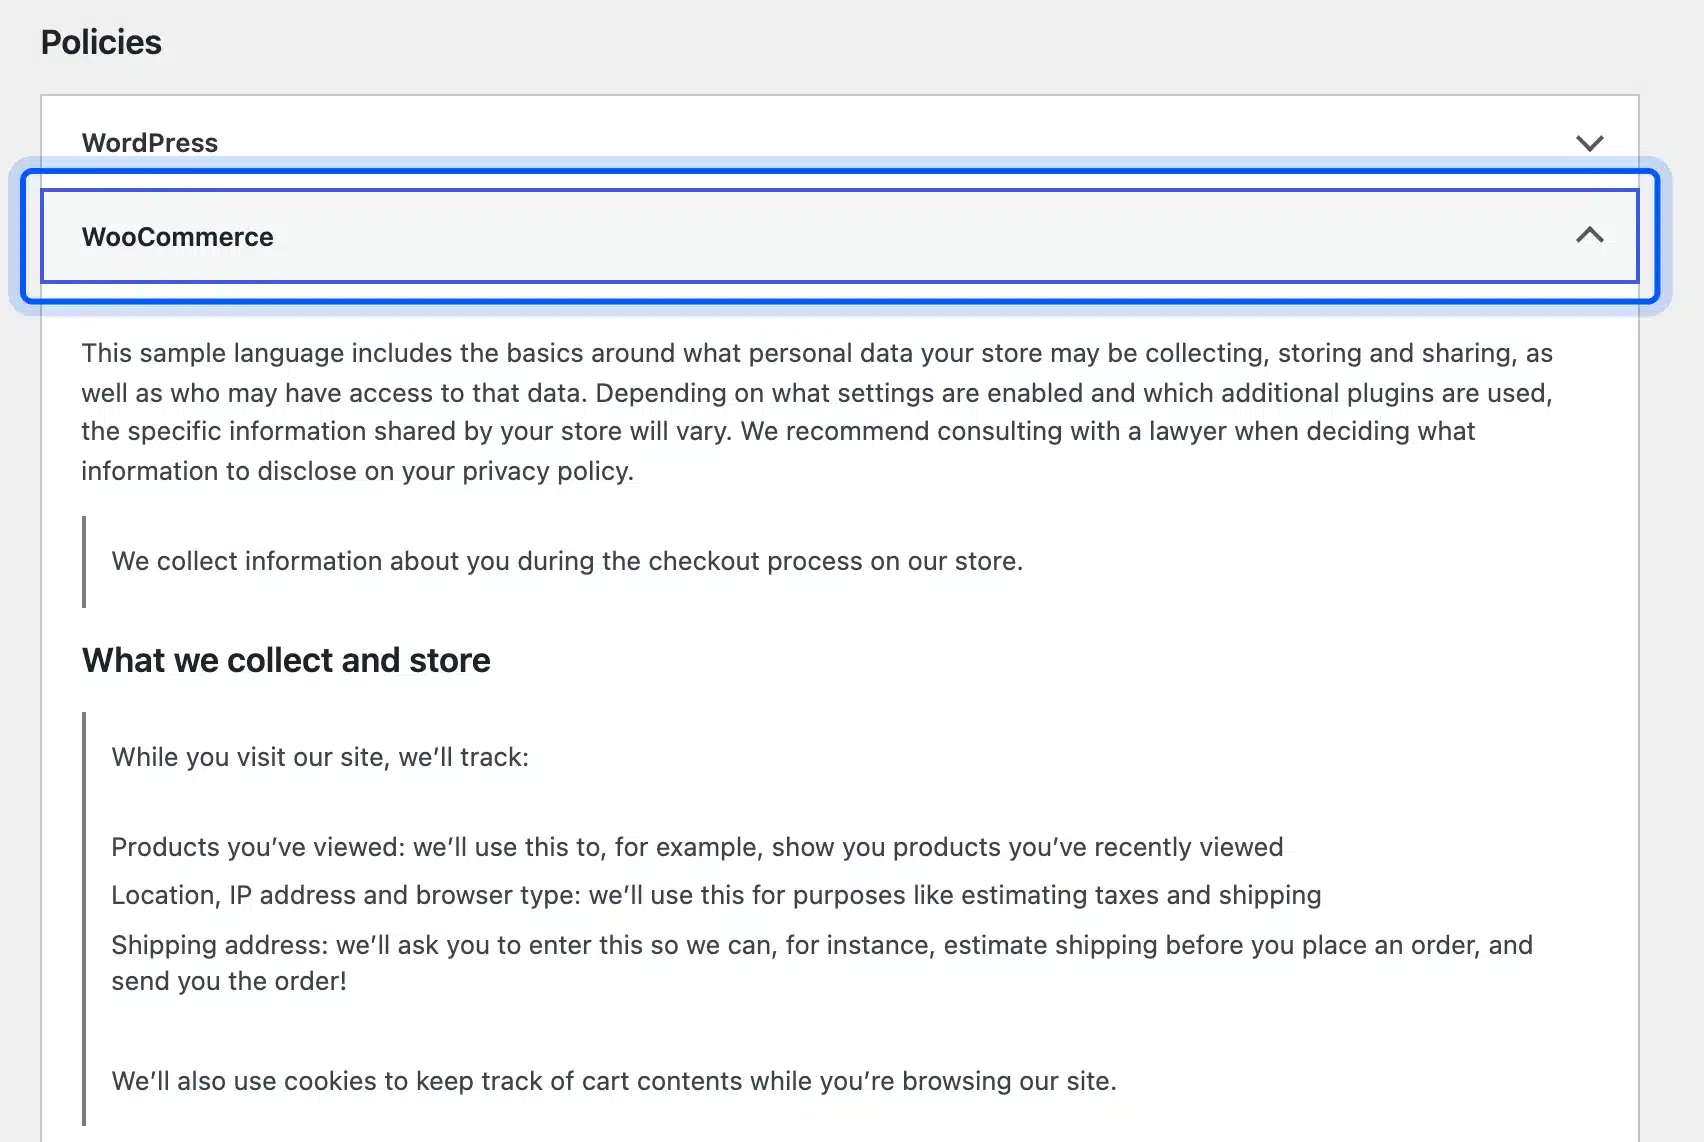
On our test site the guide listed WordPress, WooCommerce and Complianz. The documentation says the tool only collects text from WordPress and participating plugins.
Email services, analytics providers and similar tools are not covered. Add them yourself.
Services that handle data for you act as processors. Article 28 expects a written contract with each one. Check each vendor’s legal page or account settings for its data processing agreement.
Health records bring a similar contract duty called the business associate agreement, covered under HIPAA compliant WordPress hosting.
What to Do After a Data Breach
Under Article 33 you must tell your supervisory authority about a personal data breach where feasible within 72 hours of becoming aware of it. The duty applies unless the breach is unlikely to put people at risk. Prepare the contacts and a short plan before anything happens.
Decide who makes the call before a breach. Name one person who checks the facts and one who contacts customers. Store your authority’s contact details where you can reach them offline.
A checklist cannot prove your store is secure. Keep WordPress and WooCommerce updated and test your backups. A valid certificate protects data in transit, and our guide covers how to fix common SSL issues in WordPress.
If you want help hardening the store, see our WordPress security services.
Mistakes That Undo Your Setup
Most WooCommerce GDPR problems come from skipped follow-up and not from missing settings. These five mistakes are easy to make after a first setup and each one can undo the work in the eight steps above. Check your store against the list below.
- Consent for everything: Orders rest on the contract. Keep consent boxes for optional extras.
- Blank retention fields: A blank field keeps data forever.
- Unchanged template text: The WordPress documentation states that writing a complete privacy policy is your responsibility.
- Leftover user accounts: Erasure leaves the WordPress user in place.
- Old backups: Honor earlier erasures when you restore one.
Review this list twice a year. New plugins and new marketing tools add data flows you may not notice. A short audit after each change keeps the privacy page honest.
Conclusion
WooCommerce GDPR setup is mostly settings you already have. Publish the privacy page, set retention periods and choose what erasure removes. Handle customer requests from the Tools menu.
Our tests showed two traps. The WordPress user survives an erasure request, and Consent Mode v2 was locked in the free plugin we tried. Revisit these settings whenever you add a plugin that touches customer data.
Marketing emails need an unsubscribe route too. Our guide shows how to set up an unsubscribe link in WooCommerce.
Frequently Asked Questions (FAQs)
Q1. Does GDPR apply to my WooCommerce store if I am outside the EU?
Yes when you offer goods to people in the EU. Article 3(2) covers businesses outside the Union that do this. Your server location and company address do not change that.
Q2. Is WooCommerce GDPR compliant out of the box?
No. WooCommerce provides settings and the WordPress privacy tools. On our fresh test store the retention fields were empty and the privacy page was a draft.
Q3. Do I need a GDPR checkbox at checkout?
Not to process the order. The order rests on the contract and the default checkout text is a notice with a link. Use a checkbox for optional extras such as a newsletter.
Q4. How long can I keep WooCommerce order data?
GDPR gives no single number. Tax and accounting law in your country sets the period for sales records. Set the completed orders field to that period and WooCommerce anonymizes older orders.
Q5. Do I need a cookie banner for my WooCommerce store?
You need one when the store sets cookies that are not strictly necessary, such as analytics or ad pixels. A consent plugin can scan the store and list its cookies. Ask a lawyer about your exact setup.
Q6. Do I need Google Consent Mode v2?
It matters when you use Google Ads or Google Analytics for EU visitors. Google’s documentation says version 2 adds the ad_user_data and ad_personalization signals. Check that your consent plugin supports all four.