How to Set Up WooCommerce on WordPress: Step-by-Step Guide
If you’re excited about starting your online store adventure and want to make the most of your business online, you’re in the right place. In this easy-to-follow tutorial, we’ll go through the essential steps to help you seamlessly set up WooCommerce on the WordPress website.
We’ve got you covered, from getting started to making your online store look how you want. By the end, you’ll have WooCommerce up and running and ready to shine as a successful digital shop. Let’s start turning your WordPress site into a fantastic online store!
Table of Contents
Why is WooCommerce so Trendy?

WooCommerce is super popular because it works well with WordPress, making it easy for people to run online stores. It’s not expensive, and you can make your store look and function just how you want.
Whether you’re a small business or a big one, WooCommerce grows with you. It has many useful features; you can add even more through extensions.
People like it because it’s easy to use, friendly to search engines, and works great on phones. Plus, a helpful community of users is always ready to assist. That’s why WooCommerce is a fantastic choice for online businesses.
If you want to set up WooCommerce on WordPress, you can boost your WordPress with WooCommerce extensions. These extensions elevate your online store with enhanced user experience, streamlined checkout, and customizable designs. These plugins cater to your needs, whether advanced marketing or secure payments.
Why Choose WooCommerce with WordPress?
Deciding to set up WooCommerce on WordPress is like teaming up superheroes for your online journey. WooCommerce, the eCommerce champion, smoothly combines forces with WordPress, the easy-to-use website manager.
Whether you’re a small business or looking into eCommerce for distributors, this dynamic duo provides everything you need to scale efficiently.
Key Benefits
- Easy Online Store Setup: Choosing to set up WooCommerce on WordPress makes your website a fantastic online store, blending advanced features with the simplicity of WordPress.
- Simple Store Management: Thanks to WordPress’s easy content management and WooCommerce’s help, running your online store is easy. You can update products and take care of your site without any trouble.
- Customize Your Store: Using WooCommerce and WordPress, you can make your online store look and work just how you want. It’s like giving your store its unique style.
- Add Cool Features: You can add many extra features by setting up WooCommerce on WordPress. You’ve got everything from easy payment options to ensuring more people find your store with SEO tips and tools.
- Accessible for Everyone: WordPress is known for being easy to use, and when you mix it with WooCommerce, everyone can manage their online store, even if you’re not a tech pro.
- Get Help from Others: When you set up WooCommerce on WordPress, you join a community ready to help. You can chat with others, find guides, and get tips on fixing issues.
- Grow Your Store Smoothly: Whether you’re just starting or planning to go big, setting up WooCommerce on WordPress lets your online store grow without any problems.
Learning how to set up WooCommerce on WordPress is like giving your online store the best tools. It combines the strengths of a robust eCommerce platform with the simplicity and friendliness of a leading content management system, making it a perfect start for a successful online business.
How to Set Up WooCommerce on WordPress
If you want to set up WooCommerce on WordPress, following the steps below will be very helpful in guiding you throughout the setup process.
For various reasons, setting up WooCommerce on WordPress is essential to enhance user shopping experience, increase your brand marketing with our WooCommerce Affiliates plugin, and improve eCommerce sales.
Step 1: Install WordPress
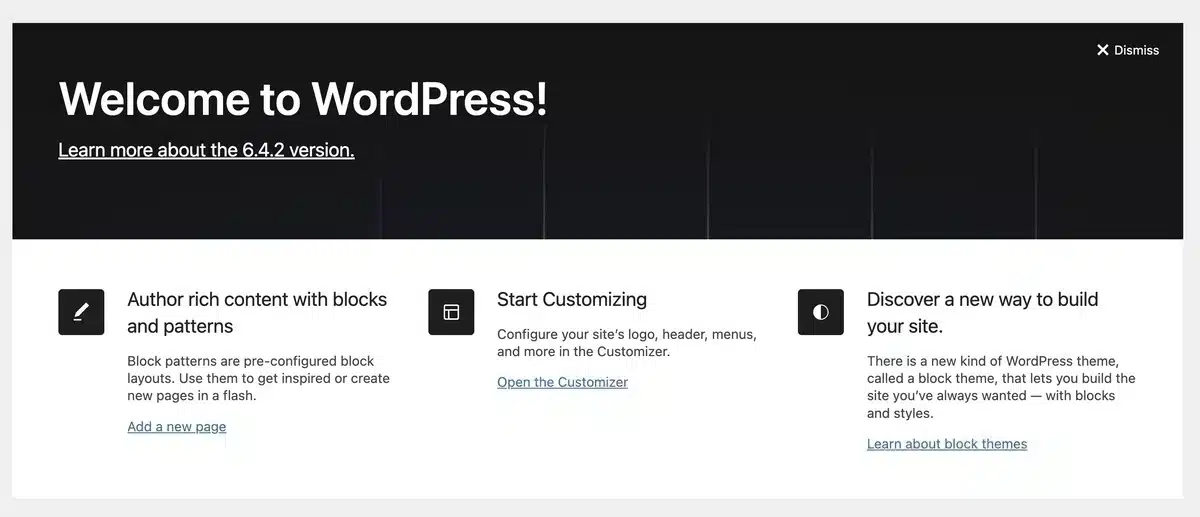
Proceed by installing WordPress on your chosen hosting platform with a simple one-click installation process. This initial step is crucial because it establishes the groundwork for setting up WooCommerce on WordPress.
Step 2: Choose a WordPress Theme
Choose a WordPress theme that fits the style and functionality of your online store. While WooCommerce collaborates well with most themes, choosing one designed for eCommerce might improve the overall shopping experience when installing WooCommerce on WordPress.
Step 3: Install and Activate WooCommerce
1. Navigate to your WordPress admin dashboard.
2. Head to the Plugins section.
3. Select Add New Plugin to begin the procedure.
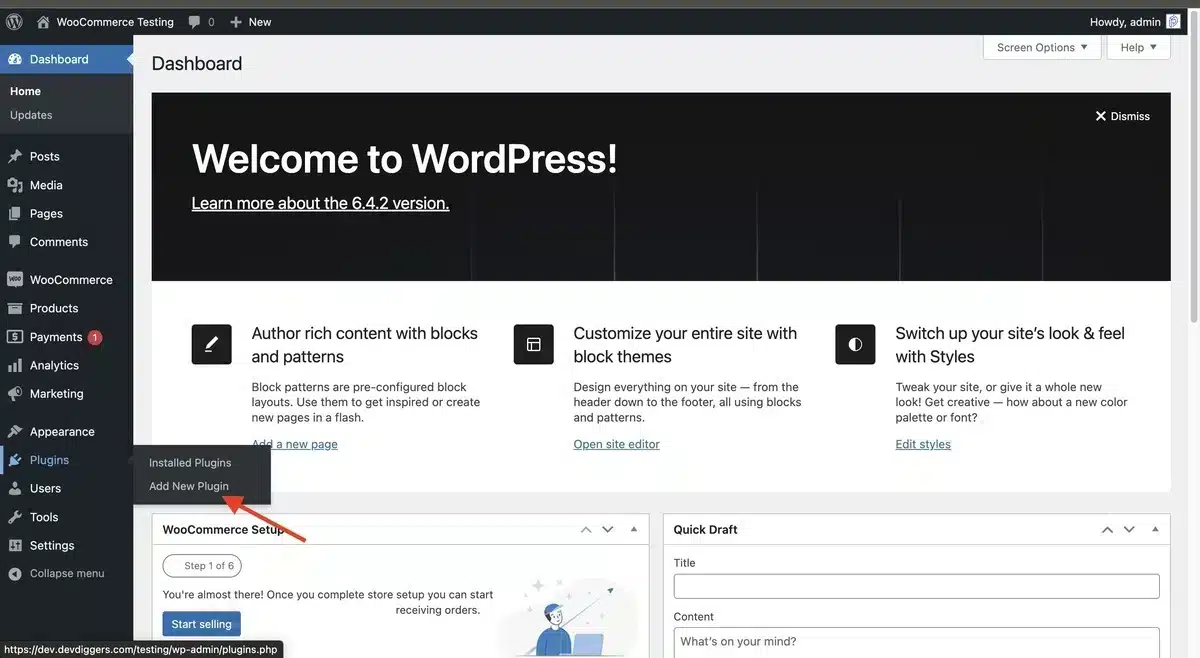
4. Look for WooCommerce then install and activate it.
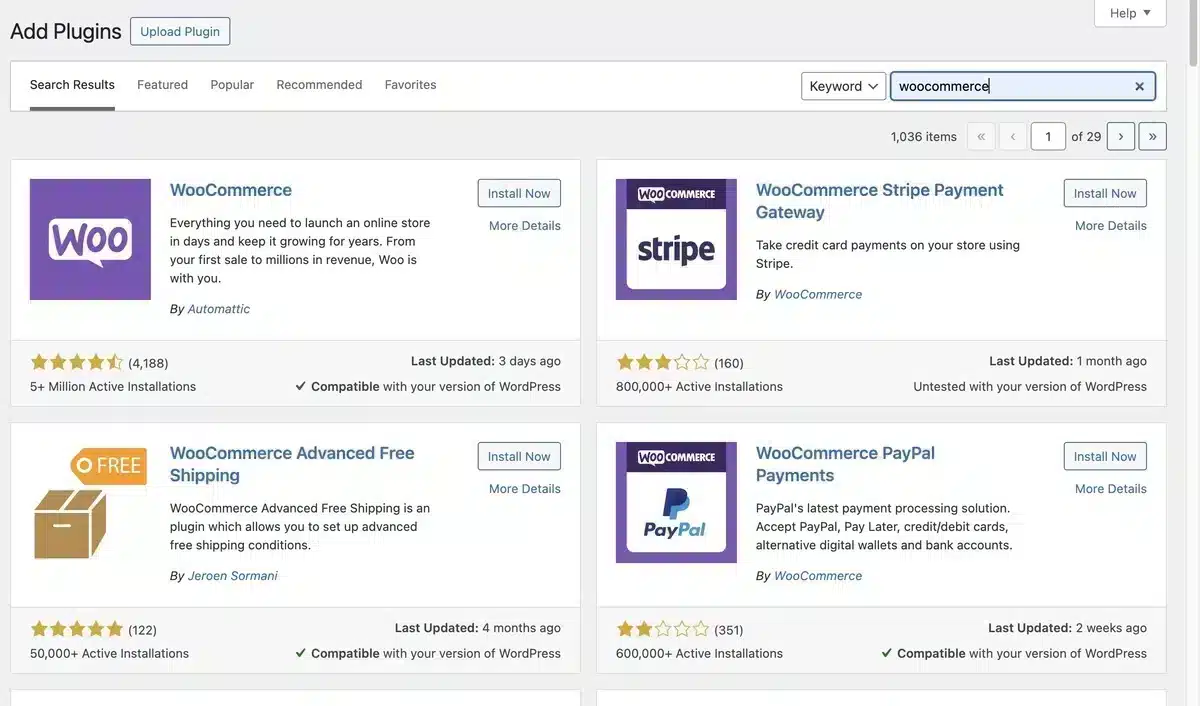
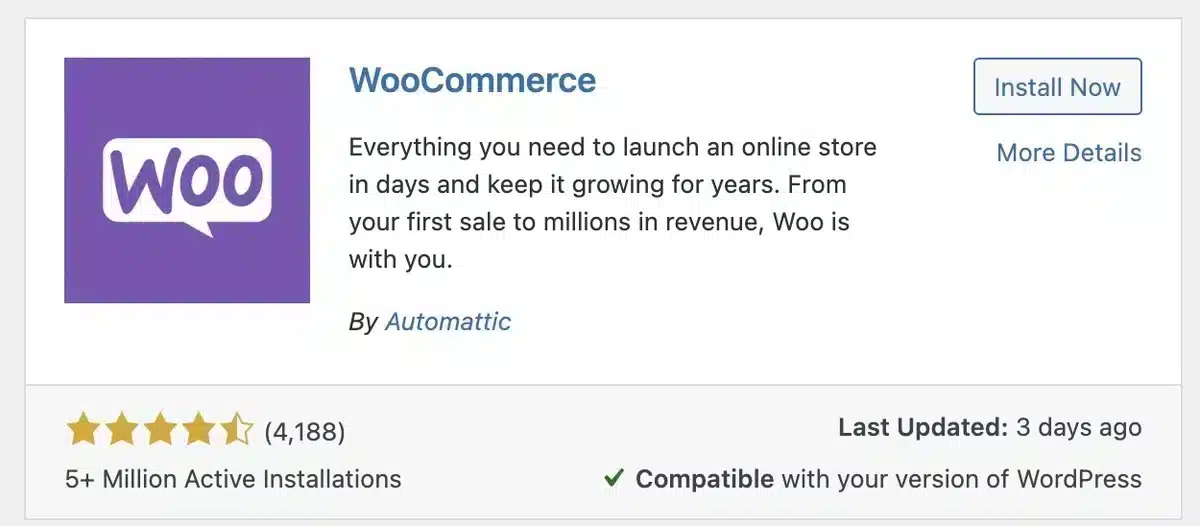
5. Select the first option for Installing WooCommerce and click the Install Now button.
How to Set up WooCommerce Wizard
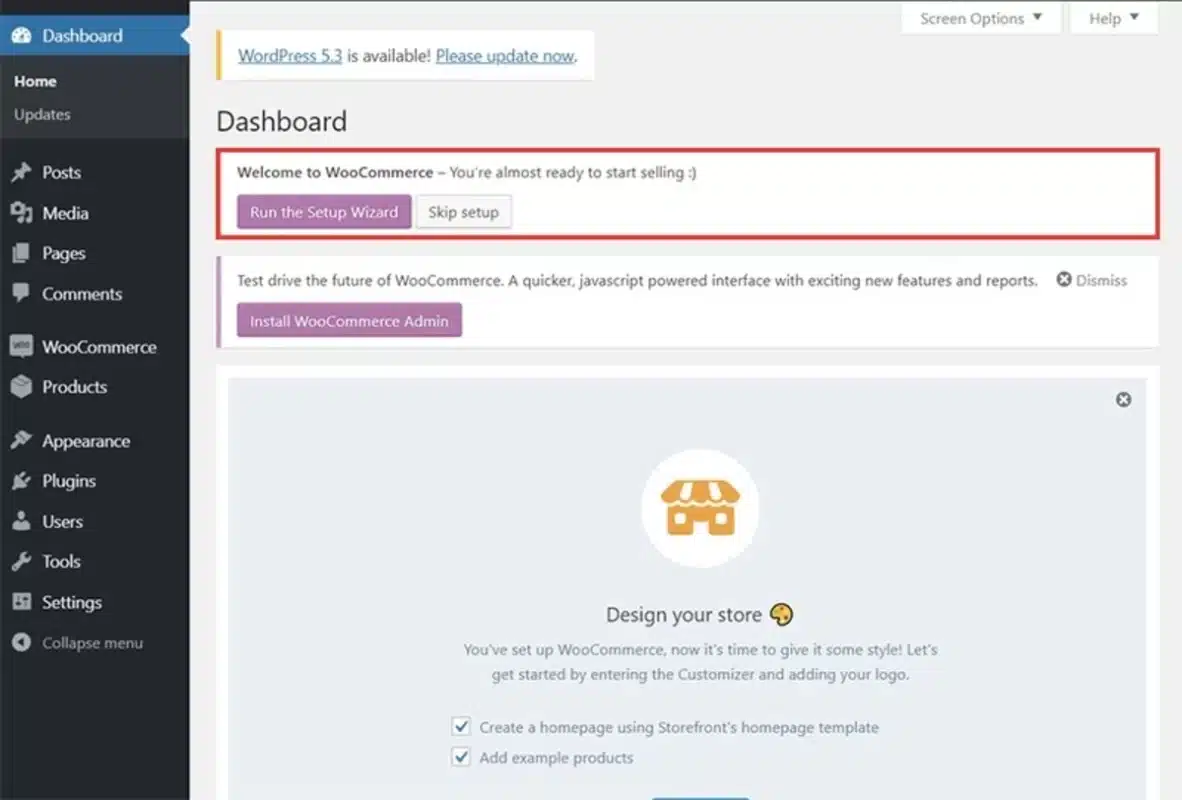
After installing the WooCommerce plugin, you need to set up WooCommerces on WordPress; a setup wizard will need to be completed next. Though it’s not essential, it’s recommended to go through it to adjust a few important options.
Note: Whatever you select here (or across the setup process) can be changed later in your WooCommerce settings if needed.
Step 1: The WooCommerce setup wizard’s initial page should look like this.
Step 2: WooCommerce asks you to provide a few essential details about your store, such as its location.
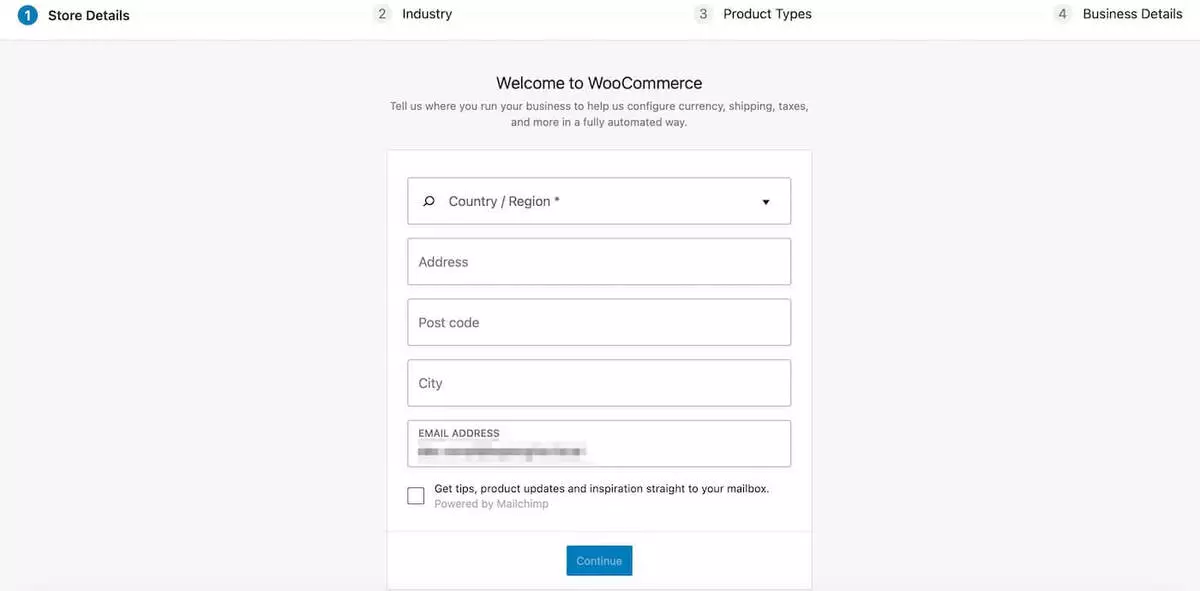
Step 3: After filling out these fields, click Continue.
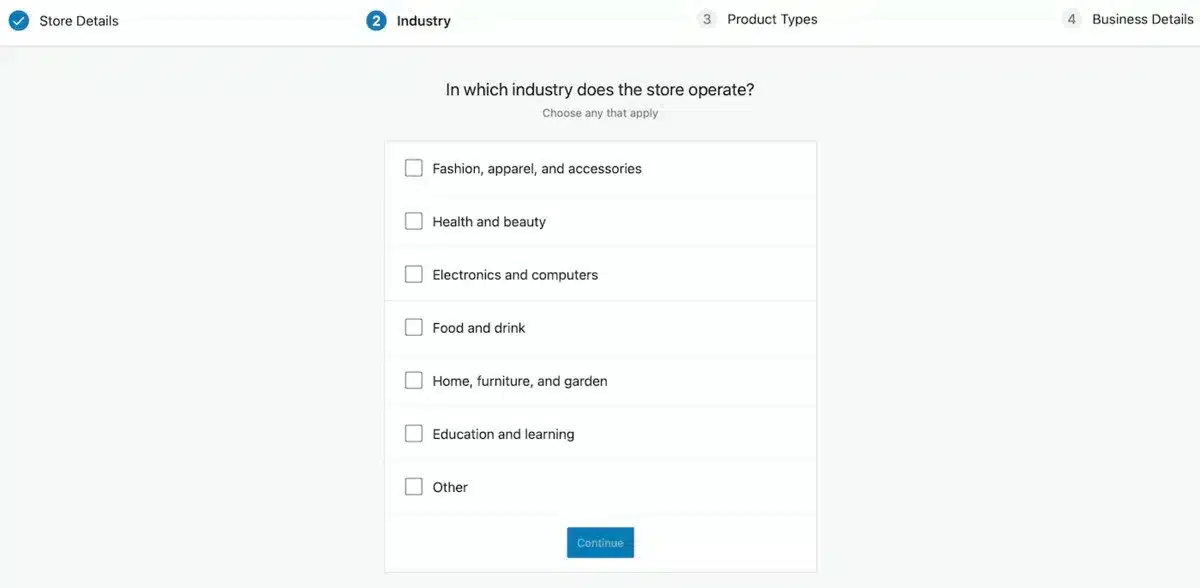
Step 4: After that, you’ll be asked about the industry in which your store operates.
Step 5: Check the boxes following the options related to your business. Then click Continue.
Step 6: As you can see, continuing with physical goods or digital downloads is free. You will be charged a small monthly fee if you plan on selling subscriptions, memberships, bookings, or more.
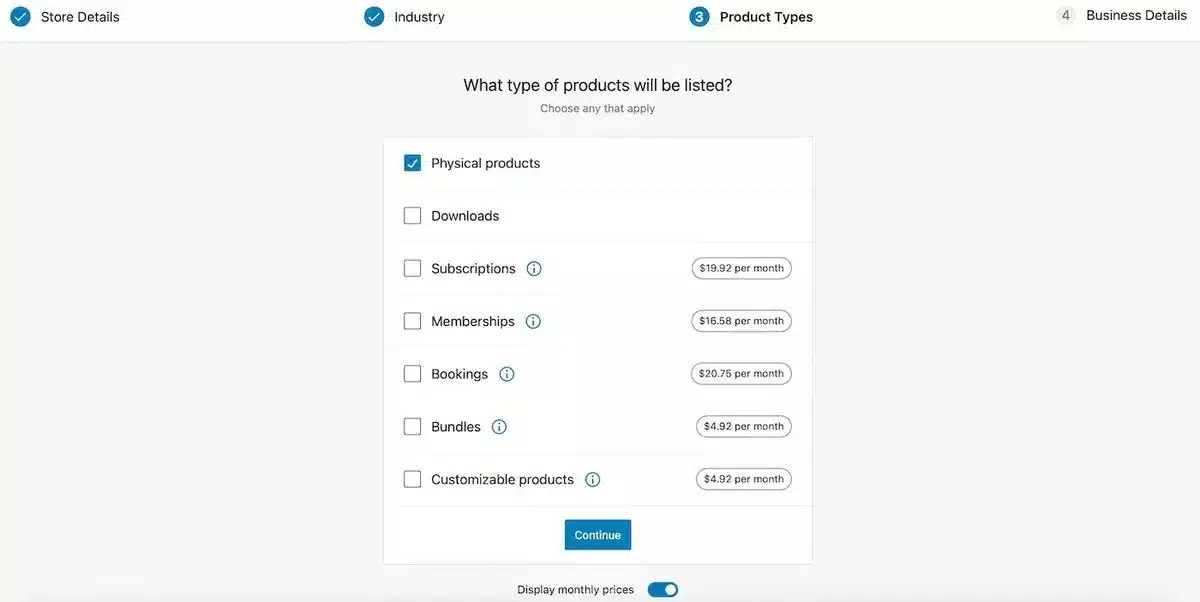
As you can see, continuing with physical goods or digital downloads is free. You will be charged a small monthly fee if you plan on selling subscriptions, memberships, bookings, or more.
Step 7: At the end of the WooCommerce setup procedure, you must confirm various business facts, such as the number of products you wish to display and whether you sell elsewhere.
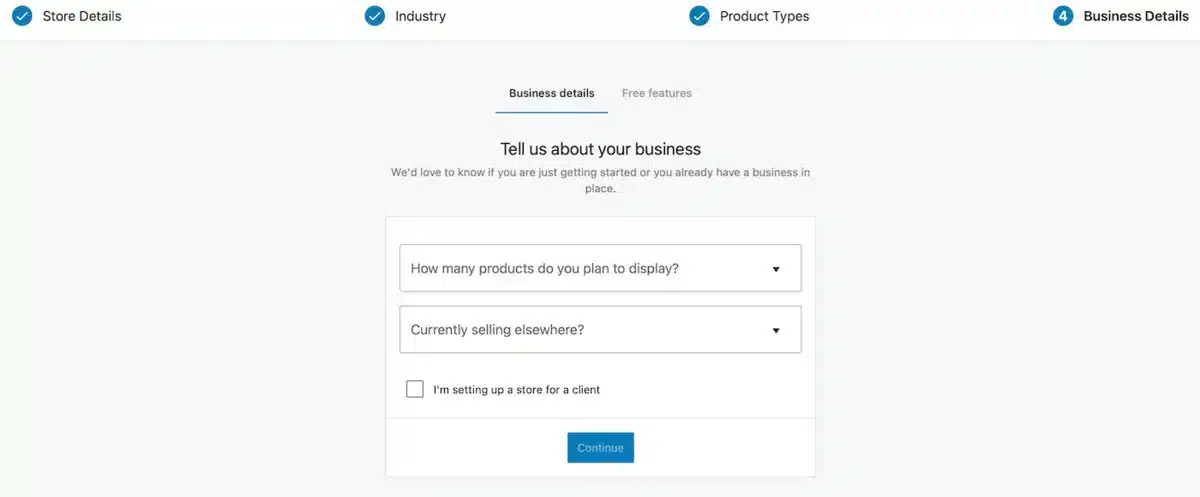
Step 8: Make your options using the dropdown menus. Then press the Continue button.
Step 9: You will now be routed to the Free Features tab.
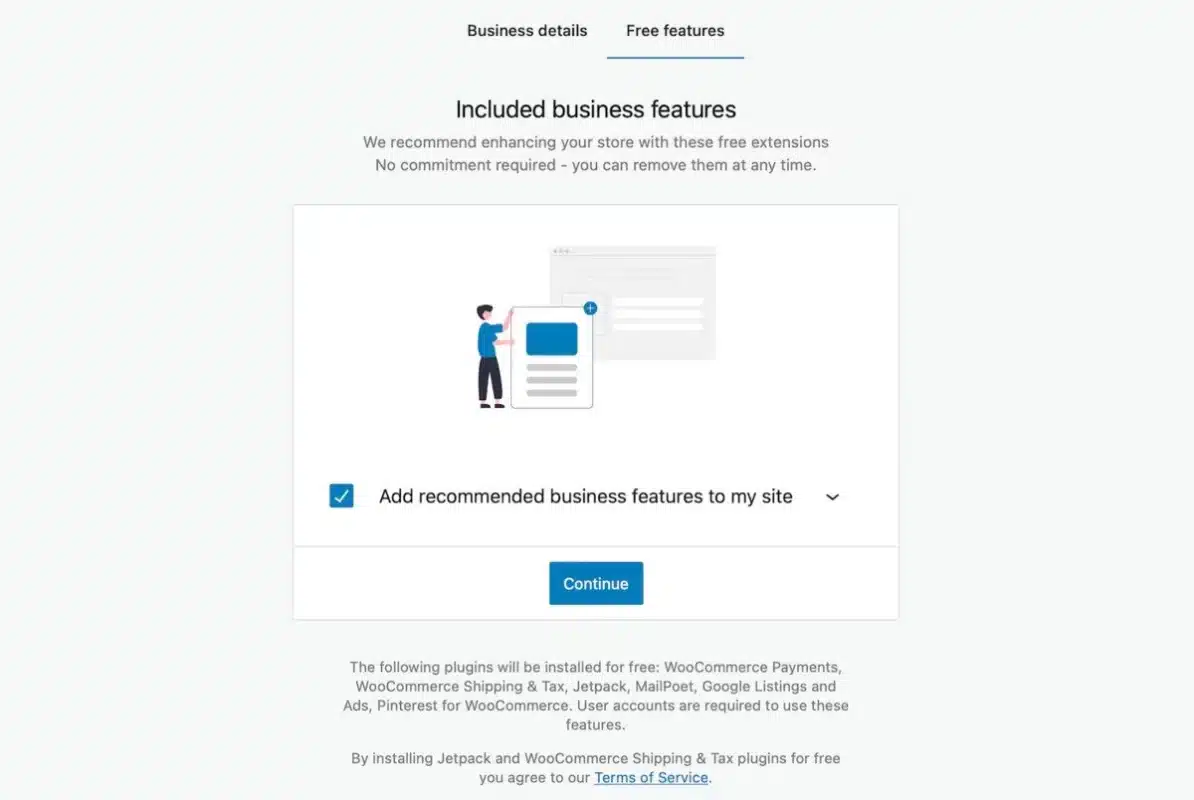
Step 10: You can select to upgrade your store with some free extensions from this page.
When you click the dropdown arrow, you’ll see the extensions automatically installed when you finish the setup process, such as WooCommerce Payments and Google Listings and Ads.
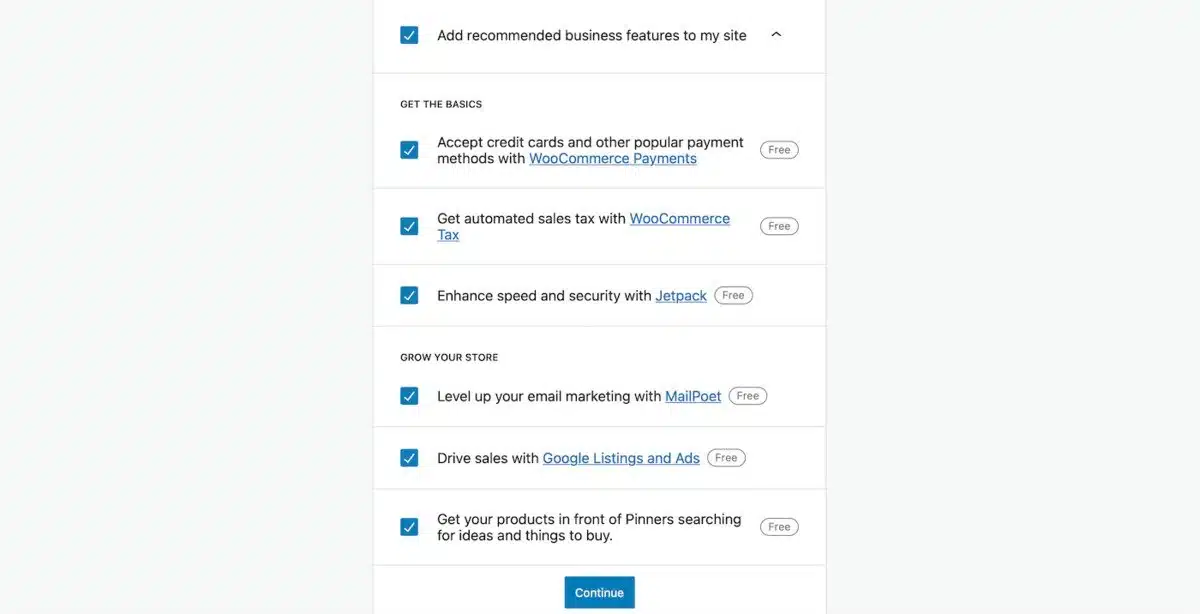
However, you can uncheck the associated boxes to delete any options. When you’re done, press the Continue button to wrap up the installation.
Setting Up Your WooCommerce Store on WordPress
There are additional setups that you can conduct further, such as:
- Add Products
- Choose Your Theme
- Set up WooCommerce Payments
- Add Tax Rates
- Add Shipping Cost
- Setting Up Marketing
Let’s understand these setups more clearly to understand how to set up WooCommerce on WordPress.
1. Add Products
After you have completed the WooCommerce Wizard Setup, you may proceed to Adding Products to your website. To accomplish this, follow the instructions below:
Step 1: Proceed to WooCommerce >> Home page to view the setup list.
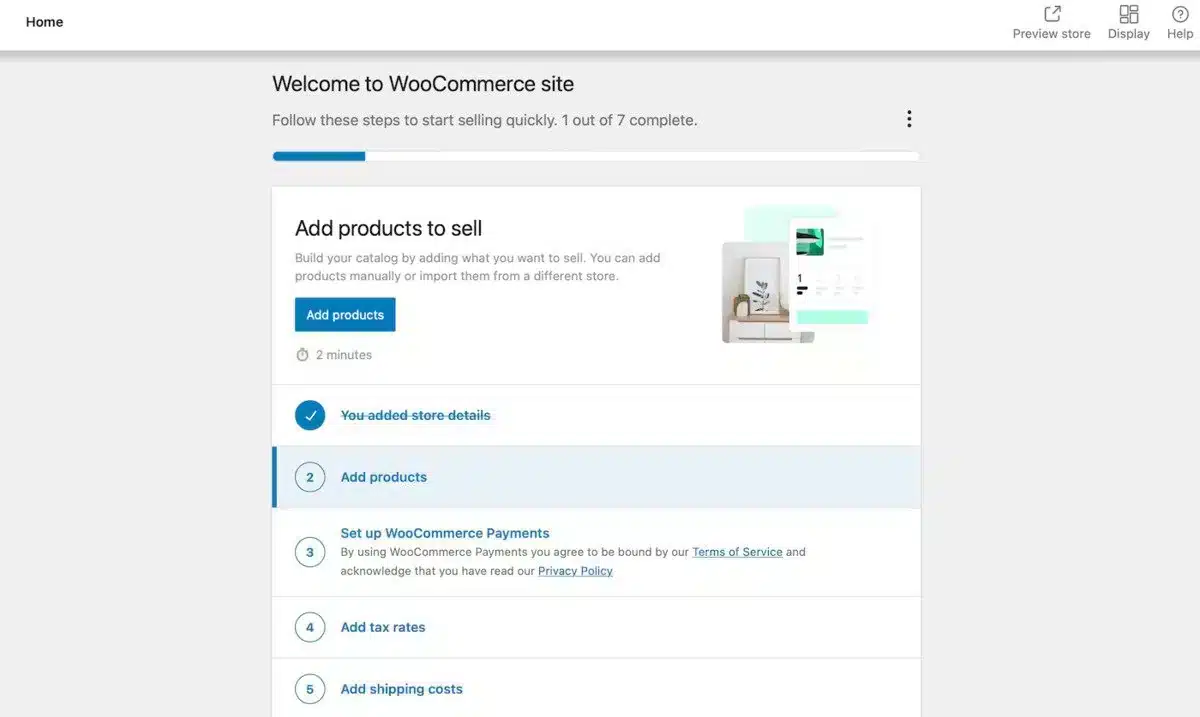
Step 2: On the setup screen, click Add Products.
Step 3: You will be asked to select the product you wish to create from a list of options.
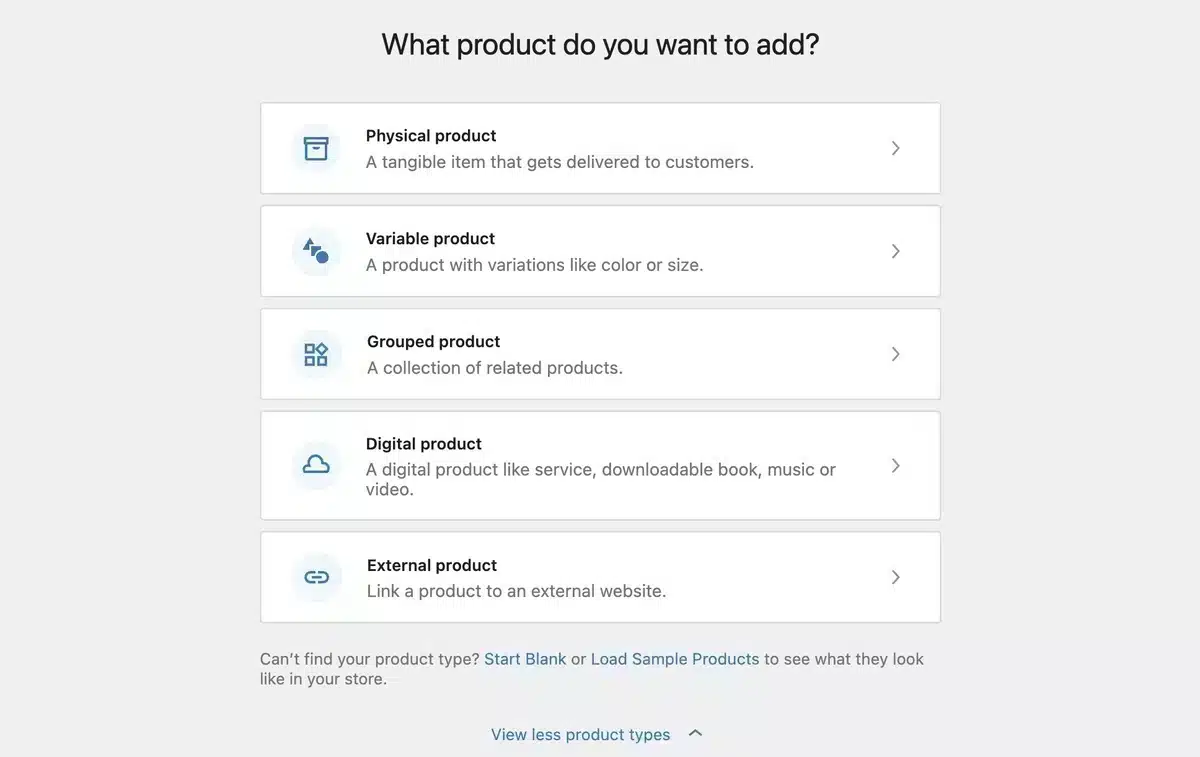
Step 4: Choose the Product type from the option list.
Step 5: After selecting, you will be sent to the Edit product page.
Step 6: Next, create a title and a brief product description.
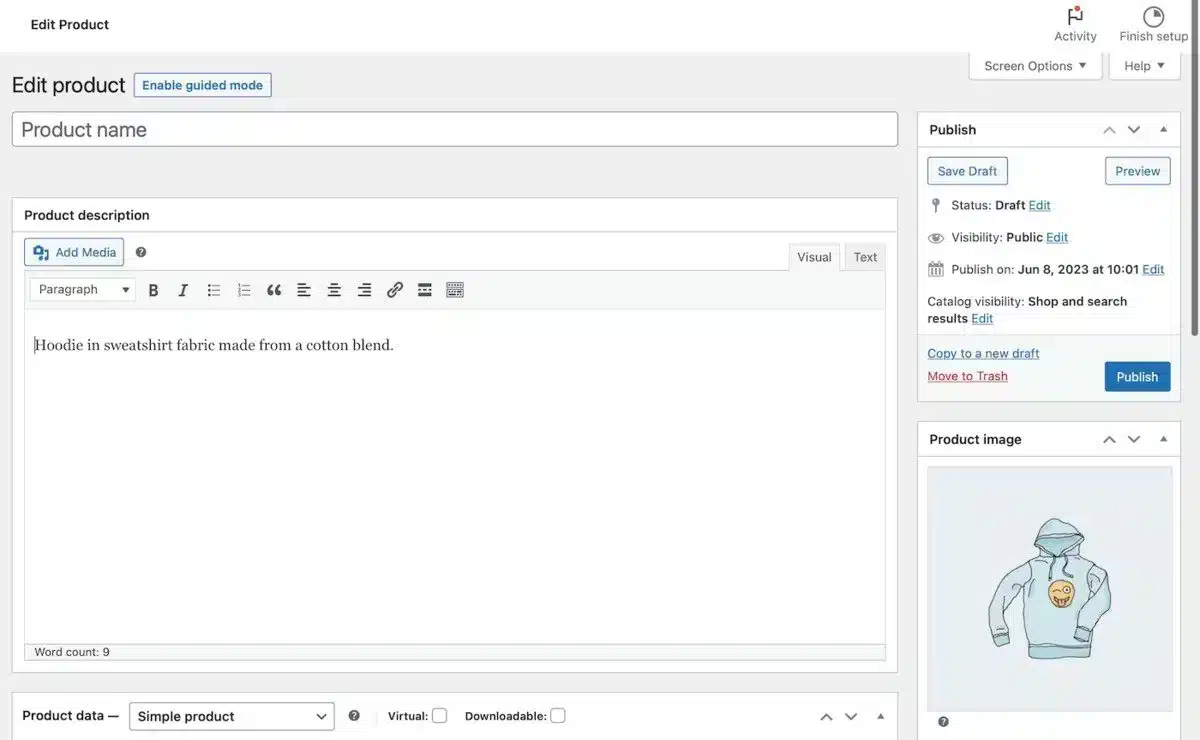
Step 7: Click Save Draft from the upper left tab, and a Preview product link will appear beside it.
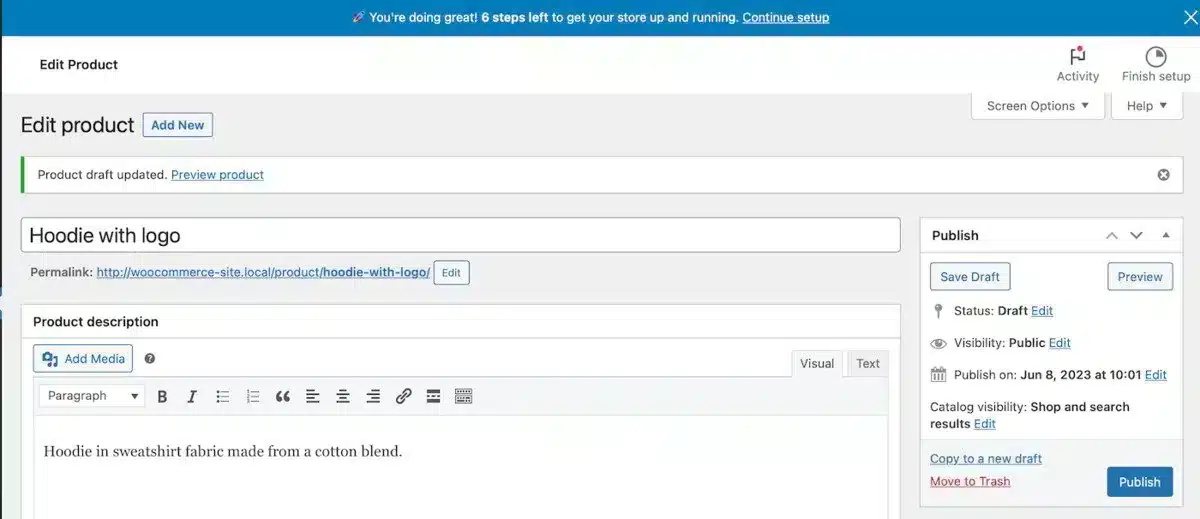
Step 8: Finally, you can get a live preview of your new product.

2. Choose Your Theme
The next step when you want to set up WooCommerce on WordPress is choosing a website theme.
Step 1: Return to the WooCommerce >> Home page to view the WooCommerce setup list.
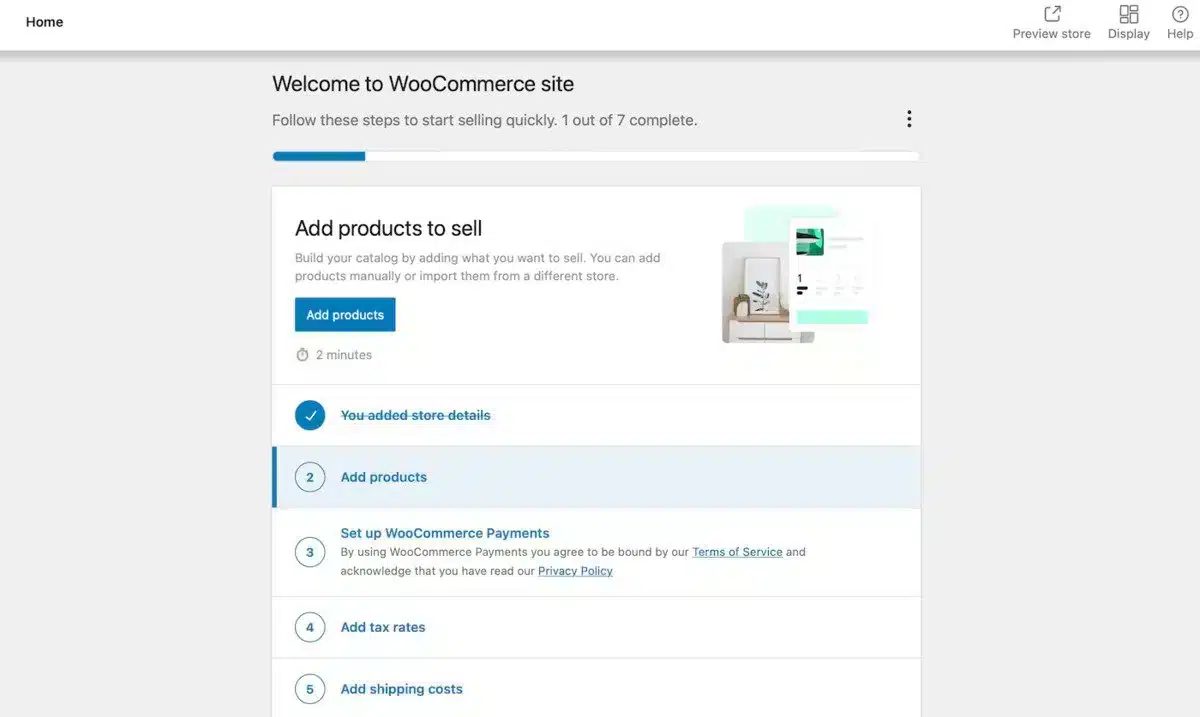
Step 2: Next, choose the second option Choose your theme.
Step 3: After selecting it, you will be presented with several different themes for your website from which to choose.

Step 4: Select the most appropriate theme for your website and click the Install button.

Step 5: After the installation, you can Activate or Customize the theme.

3. Set up WooCommerce Payments
Next, you must include payment alternatives so buyers can purchase your stuff online.
Step 1: Return to the WooCommerce >> Home page to view the WooCommerce installation checklist.

Step 2: Select the third option Set up WooCommerce Payments from the list.
Step 3: Next, it will open up a page with a list of payment services to which you can connect.
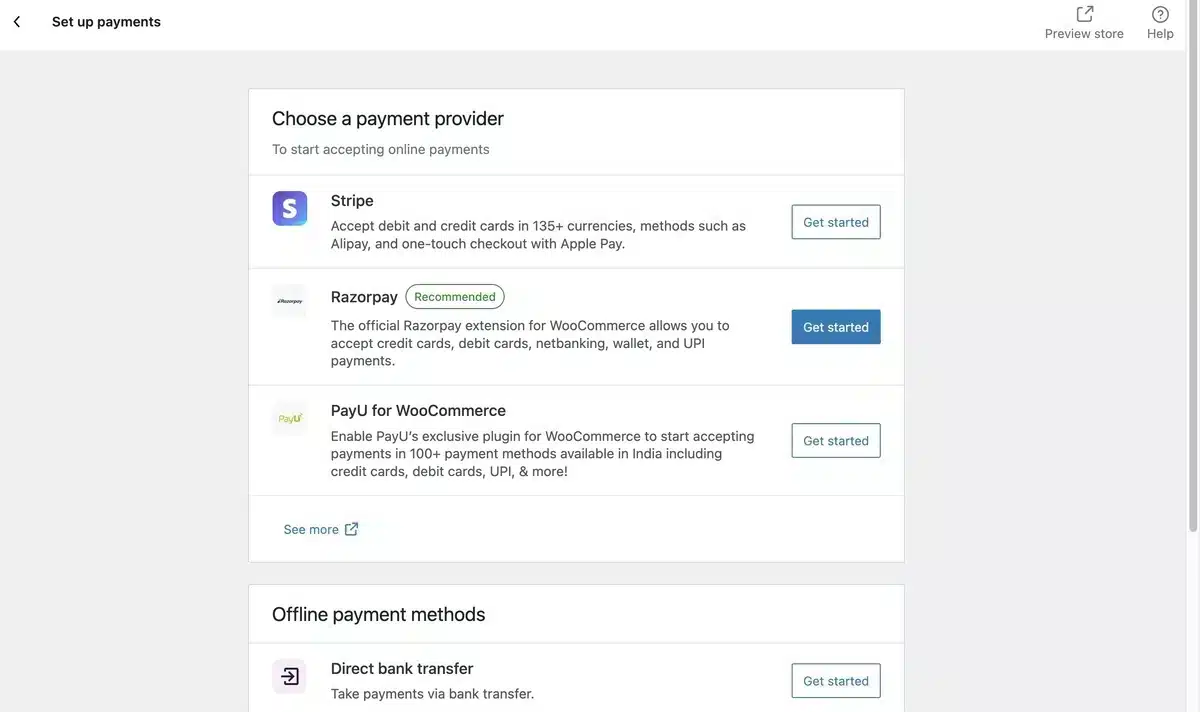
Step 4: You have the choice of using Stripe, PayPal, RazorPay, or PayU, or even direct bank transfers, cash on delivery, or a WooCommerce Wallet.
Step 5: Choose one and follow the simple instructions on the screen to configure the payment gateway.
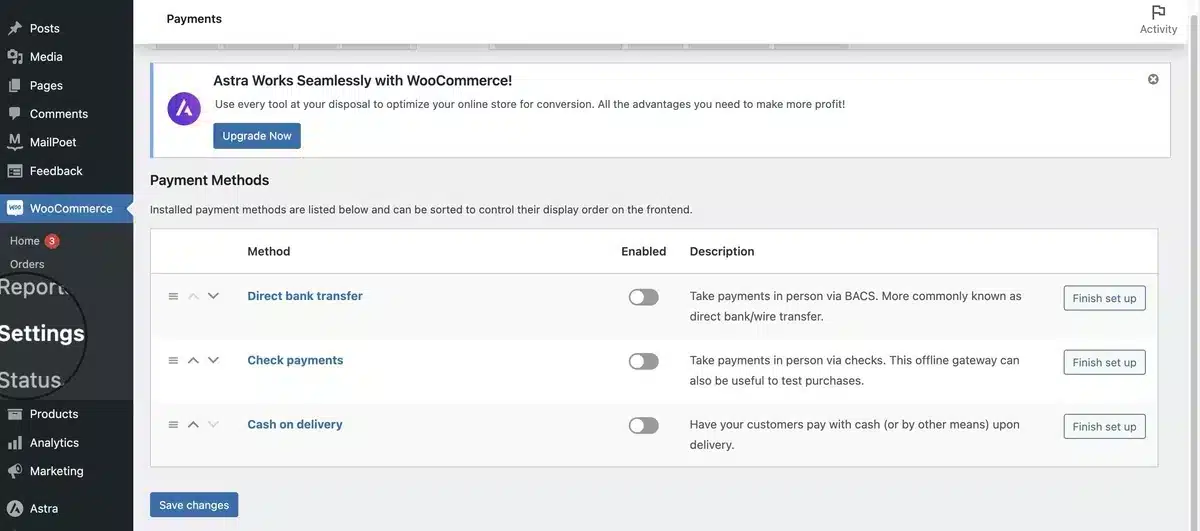
In the future, you can add a new payment method by going to the WooCommerce » Settings » Payments tab.
4. Add Tax Rates
The next step when you want to set up WooCommerce on WordPress is adding tax rates.

Step 1: Return to the WooCommerce >> Home page to view the WooCommerce installation checklist.
Step 2: Select the 4th option Add Tax Rates.
Step 3: Next, enter your store location with your country name, address, city, and pin code.
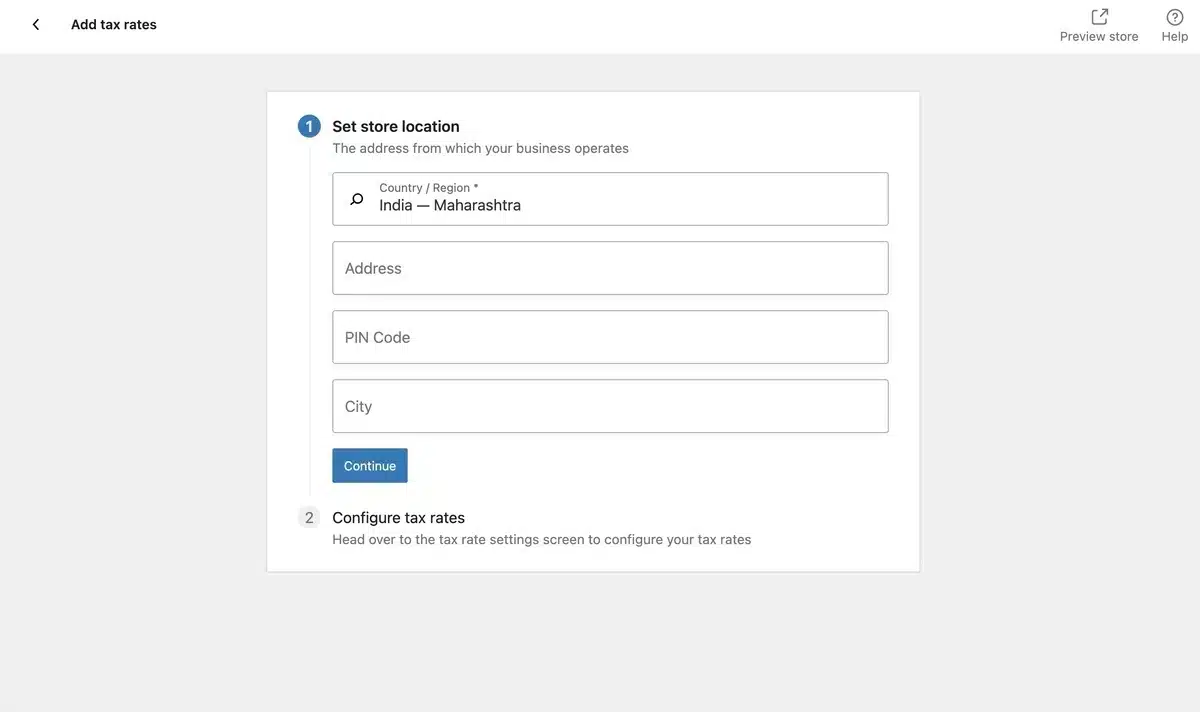
Step 4: Click the Configure option for tax rates later.
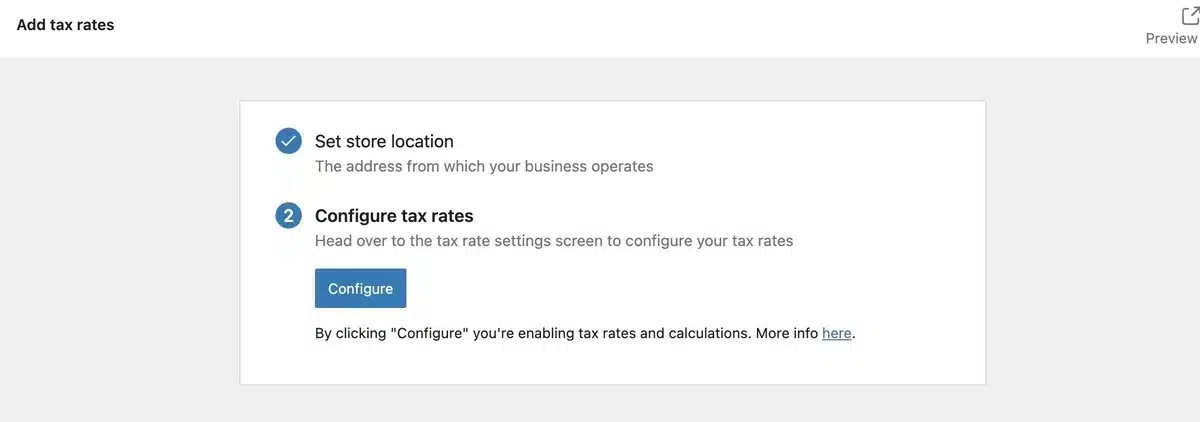
Step 5: Next, you’ll be taken to the WooCommerce » Settings » Tax menu.
Step 6: Enter your tax information, such as your nation, state, city, and postal code. Then, input the tax rate and name, such as sales tax or GST.

Step 7: Don’t forget to save your tax information by clicking Save changes.
5. Add Shipping Cost
When you aim to set up WooCommerce on WordPress, the next task involves the addition of shipping.
Step 1: Return to the WooCommerce >> Home page setup instructions and click on the Set up shipping task to add shipping selections.

Step 2: On the next page, you can set store location, set shipping costs, and perform various multiple shipping setups.
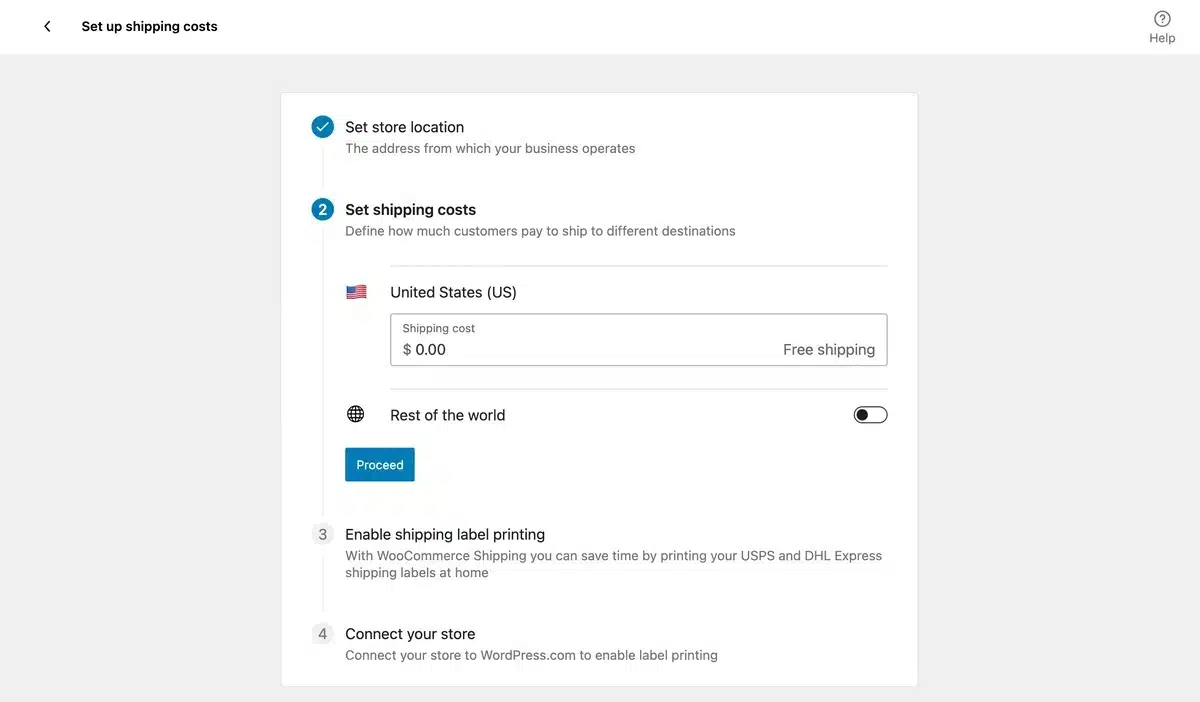
Step 3: If you haven’t previously added or confirmed your store location, you can do so now.
Step 4: In the next step, the shipping charges to and from your country and for countries across the globe can also be customized or disabled.
Step 5: On the following line, you can turn off the addition of the shipping fee for the rest of the world.
Step 6: To allow label printing from home, install WooCommerce Shipping and link your store to wordpress.com if your store is located in the US.
If you want to offer free shipping to your store, then WooCommerce allows that, with options to specify the order value at which customers will be eligible for free shipping. When doing so, consider using a plugin to show a bar for the amount left for free shipping, indicating how much more customers need to add to their cart for free shipping. That plugin by WPFactory also comes with a free version if you want to test it before purchasing.
6. Setting up Marketing
Let’s understand a simple procedure: Select Google Listings & Ads as a marketing extension for your site when you want to set up WooCommerce on WordPress.
Step 1: Click on the Manage option beside the extension that you want to go for.
Step 2: On this page, you’ll see many extensions for marketing or advertising your WooCommerce store.
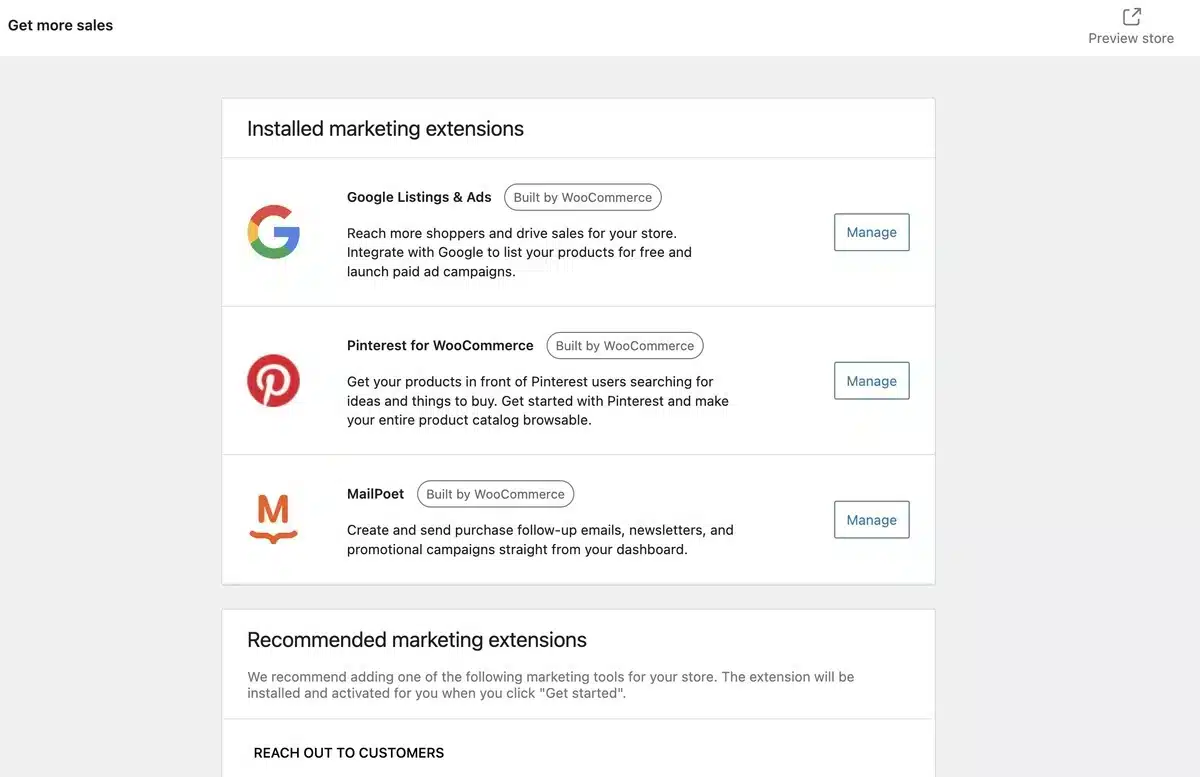
Step 3: Select an option from the choice according to your Marketing preference.
Step 4: Next, you’ll see a brief overview of Google Listings & Ads with a tutorial video and an option below to Start listing products.
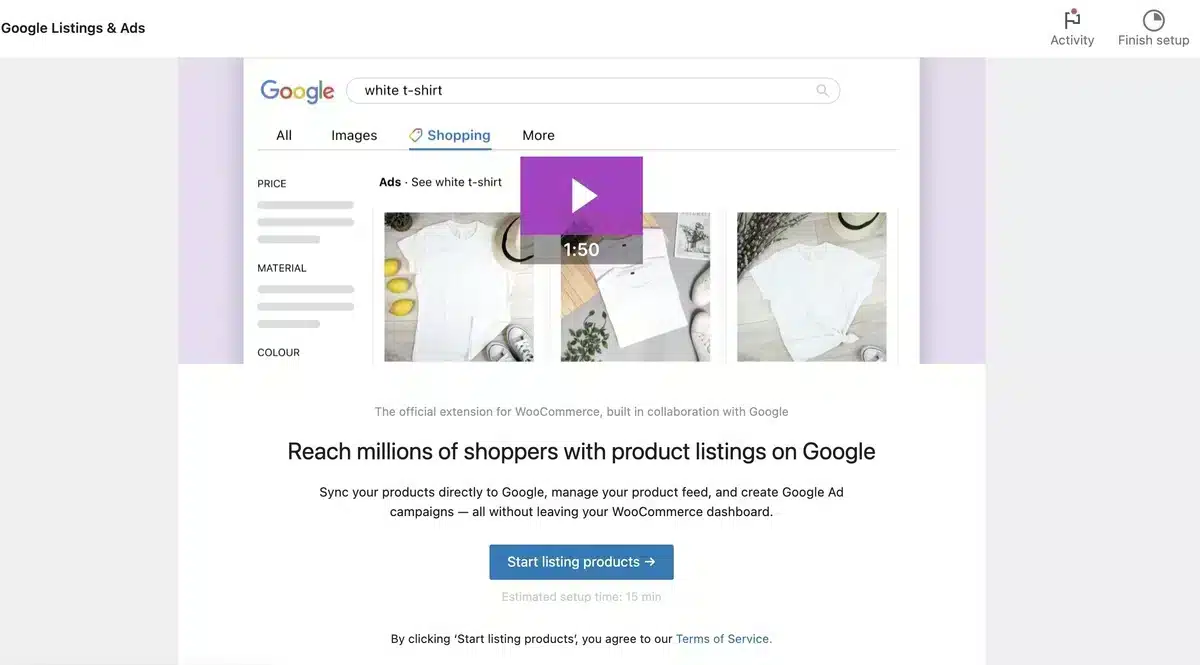
Step 5: Click on Start listing products below to continue.
Step 6: Next, you will be taken to the Google Listings & Ads setup procedure to carry forward with it.
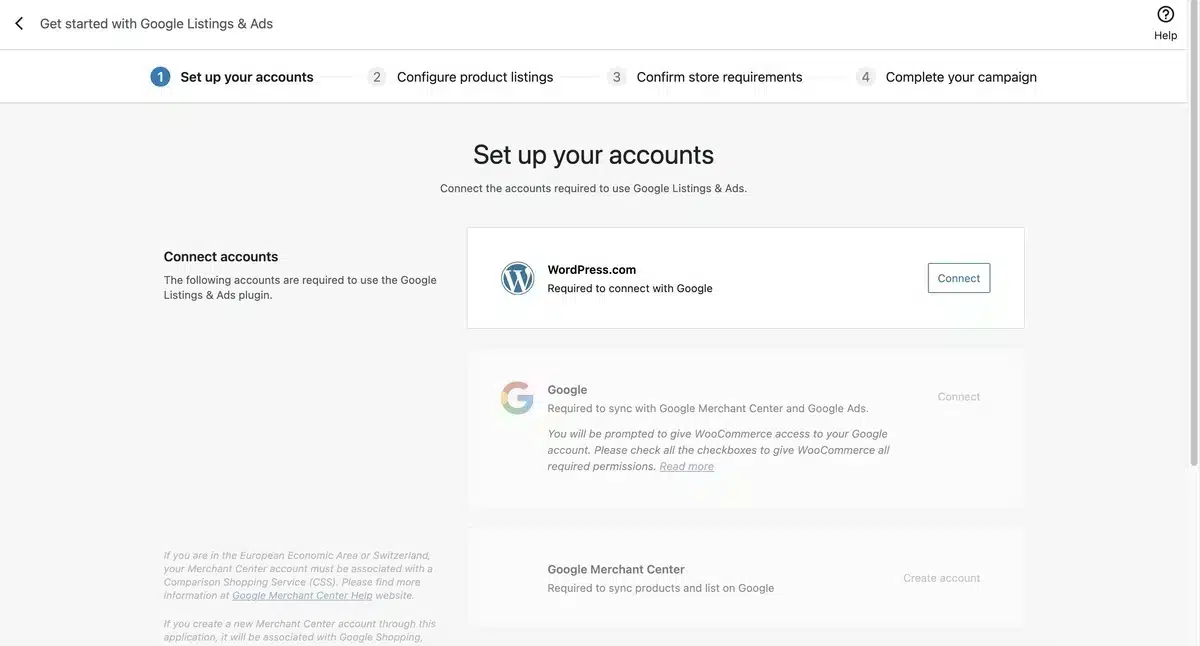
Step 7: To start with the first step of the setup procedure, click on the Connect option after WordPress.com to connect with it.
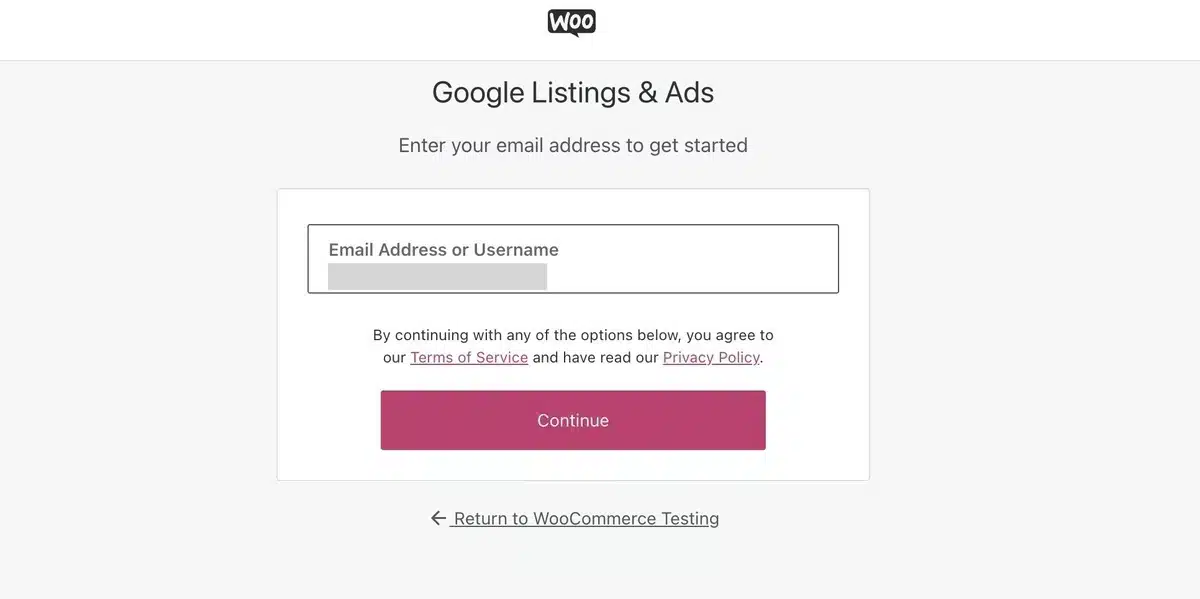
Step 8: Enter your email ID to log in to Google Listings & Ads after connecting.
Step 9: Next, you’ll receive an email to continue setup with a connect option.
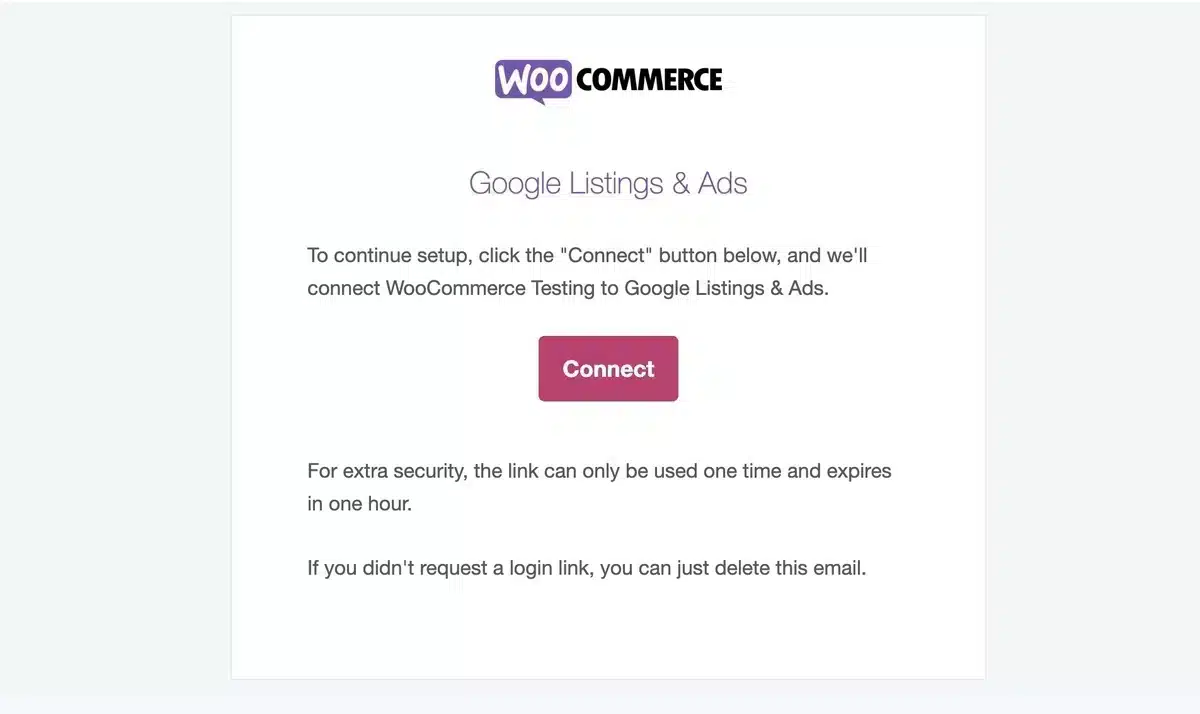
Step 10: Click on the Connect option.
Step 11: Once you set up your account, the next step is to sync it with Google Merchant Center and Google Ads.
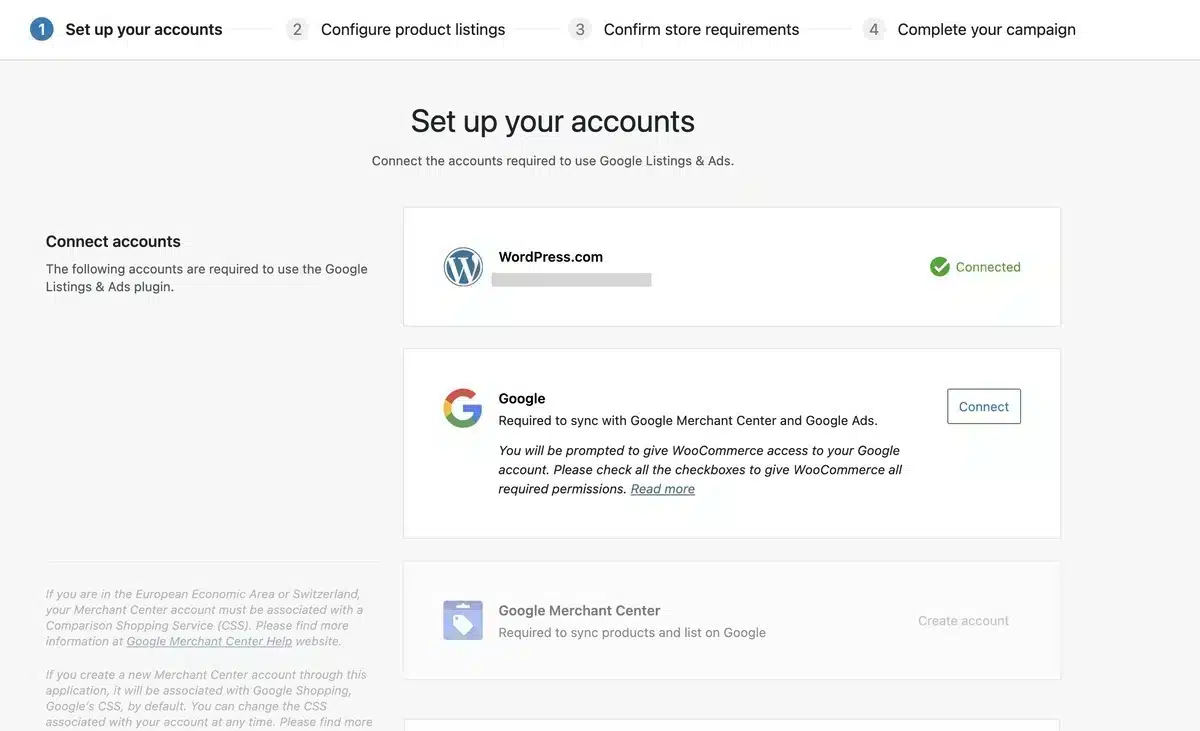
Step 12: To do this, click on the Connect option after it.
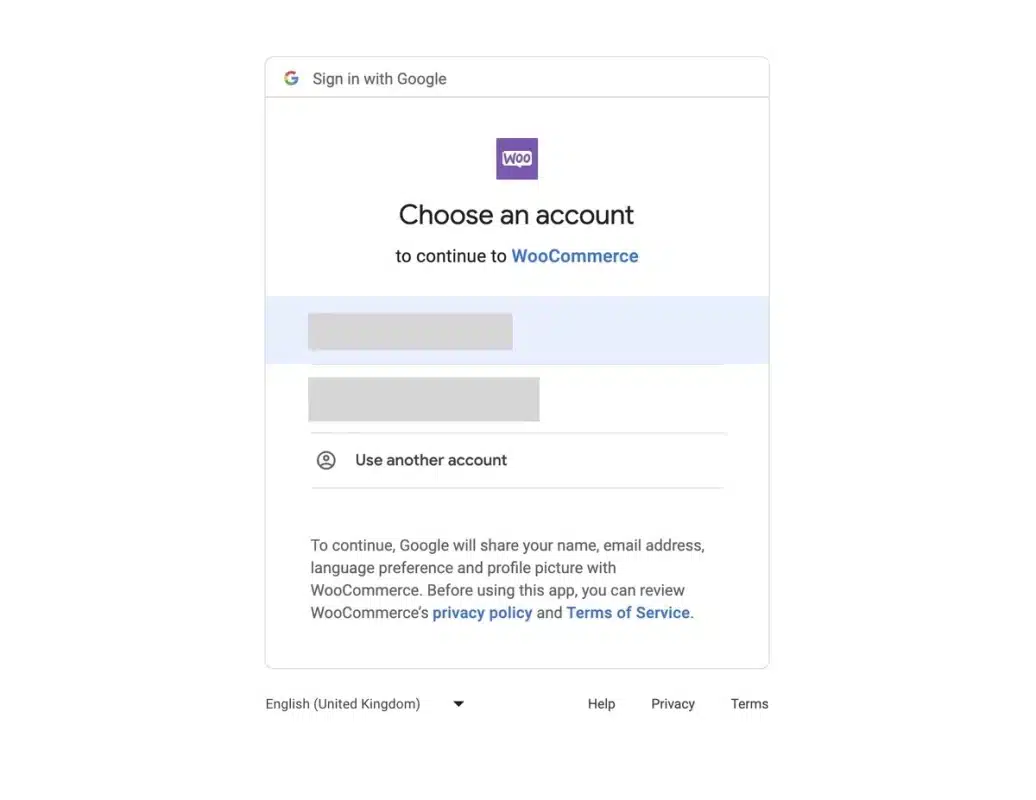
Step 13: Choose the email account you want to carry forward with.
Step 14: Once completed, you must create an account in Google Merchant Center using the previous steps.
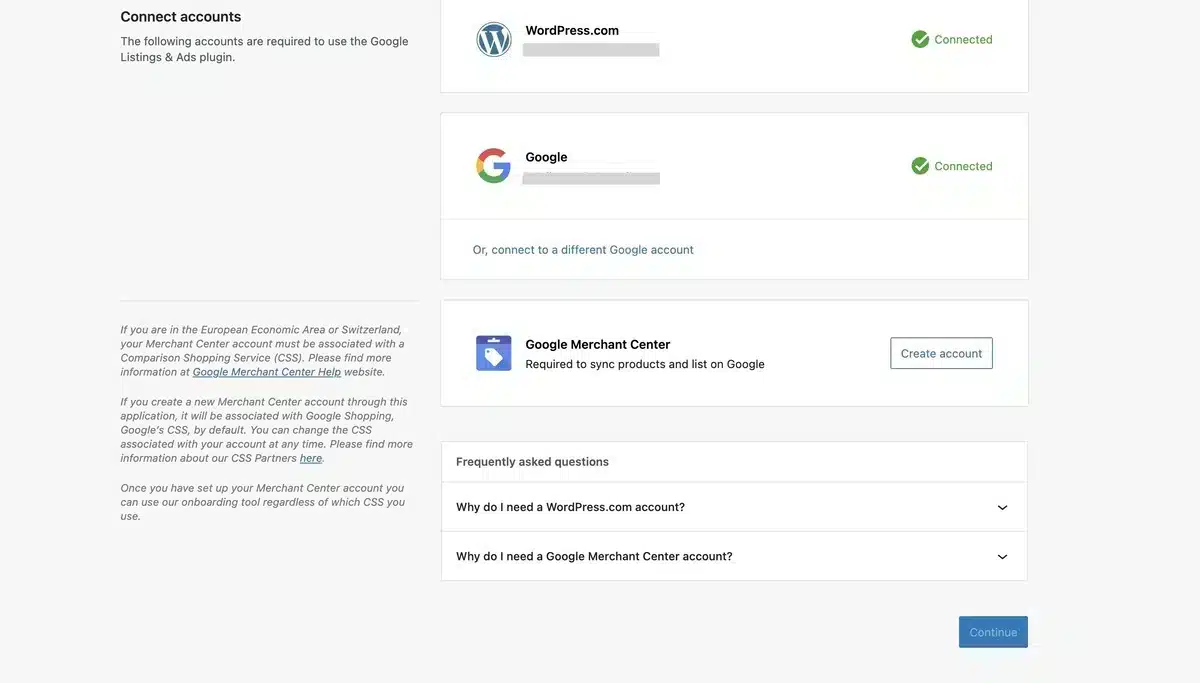
Step 15: Once done with it, you can finally select the continue option below and start with your Product/Store Marketing.
Note that the process is the same for other marketing extensions. You need to set up your account and connect it with WordPress by following more manageable steps.
Conclusion: How to Set Up WooCommerce on WordPress
In summary, learning how to set up WooCommerce on WordPress is an easy and powerful way to create an online store. This blog has shown you the essential steps, from installing the plugin to making your store look how you want.
You can ensure your store stays competitive and user-friendly by keeping things up to date and making improvements.
Whether you’re a small business or just starting, using WooCommerce on WordPress is a flexible and practical way to sell things online. Give it a try and enjoy successful selling!

Apakah blogger bisa untuk wooocommerce,??
Yes, if they want to sell anything on the site.
This is a fantastic guide on how to set up WooCommerce on WordPress! The step-by-step instructions make it super easy to follow. Thanks for sharing these tips—can’t wait to get started!