FCSO WordPress: How to Build a Fully Customizable SEO Setup

Fully customizable SEO in WordPress or FCSO is something you can set up in an afternoon, and most of it requires no code. What confuses people isn’t the technical complexity.
It’s that they install an SEO plugin, fill in a few fields, and assume the job is done. It isn’t. A plugin gives you the controls. You still have to use them.
This guide walks you through every major step: choosing the right permalink structure, writing custom meta tags, handling schema markup, fixing Core Web Vitals, and keeping your WooCommerce product pages competitive. By the end, you’ll have a full FCSO setup running, not just a plugin installed.
What Is FCSO in WordPress?
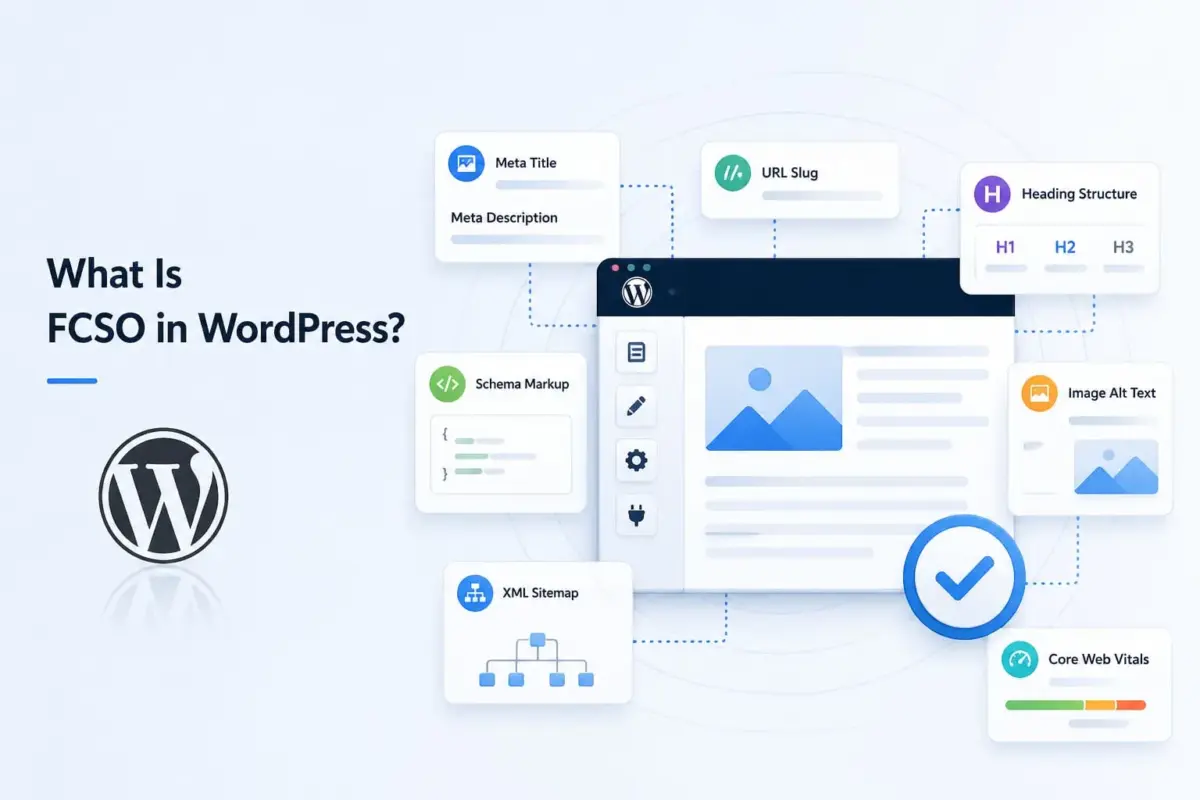
Fully customizable SEO in WordPress means having direct control over every element that affects how your site ranks and appears in search results.
This includes meta titles, meta descriptions, URL slugs, heading structure, image alt text, schema markup, XML sitemaps, and technical performance signals like Core Web Vitals. Unlike a default WordPress install, which handles almost none of this out of the box. FCSO gives you the ability to tailor each of these elements per page, per post type, and per audience.
Worth knowing before you go further: FCSO is not a product or a single plugin. It’s an approach. The goal is full, intentional control over your WordPress on-page SEO rather than relying on auto-generated defaults.
How to Set Up Fully Customizable SEO in WordPress (Step-by-Step)
Before you start, keep our on-page SEO checklist handy. It works well alongside these steps.
The full process takes about two to three hours for a new site. For an existing site with published content, budget more time for the meta tag audit.
Step 1: Install and Configure Your SEO Plugin Correctly
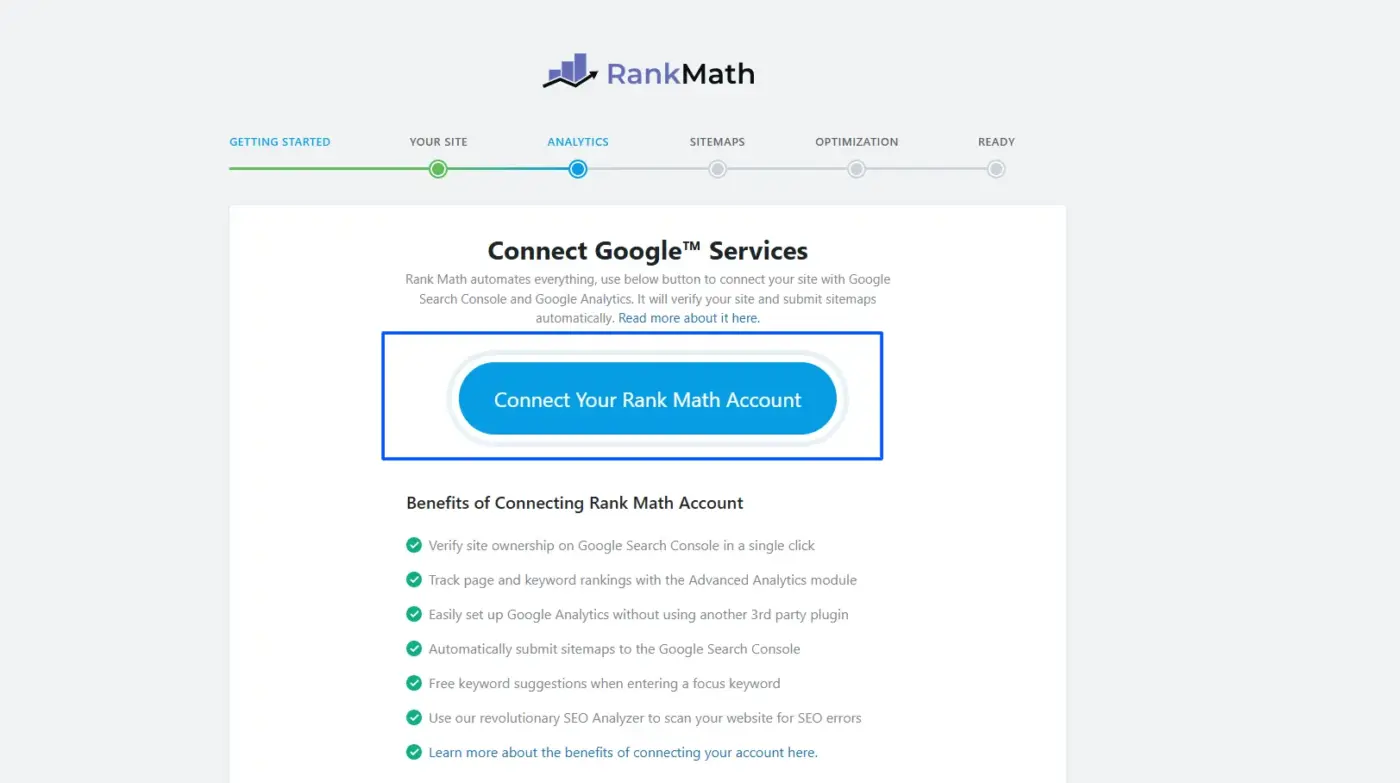
Pick one plugin. Rank Math and Yoast SEO are the two main choices. Install it, run the setup wizard, and connect it to Google Search Console during setup if the option appears. The setup wizard sets your site type (blog, eCommerce, news), which controls which schema types are added automatically.
One thing most guides skip: after the wizard, go into the plugin’s global settings and check the title separator, site name format, and default meta description template. These control what Google sees on every page that doesn’t have a custom meta tag written. Getting these right saves you from cleaning up hundreds of auto-generated titles later.
Step 2: Set Your WordPress Permalink Settings for SEO
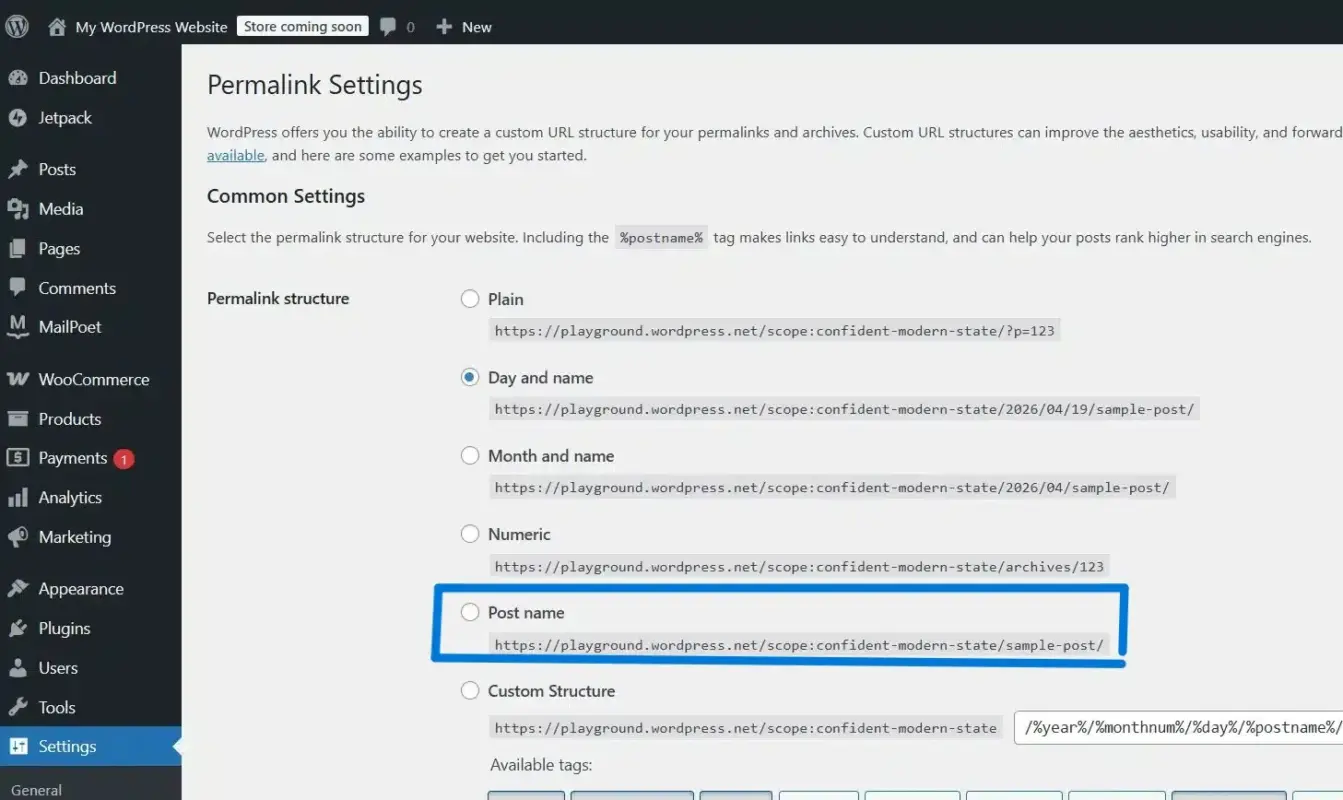
Go to Settings → Permalinks in your WordPress dashboard. Select Post name. This gives you URLs like /how-to-set-up-fcso-wordpress/ instead of /?p=123. Do this before you publish content. Changing the permalink structure after you have indexed pages requires 301 redirects, or you’ll lose your existing rankings.
Step 3: Customize Meta Titles and Descriptions for Every Page
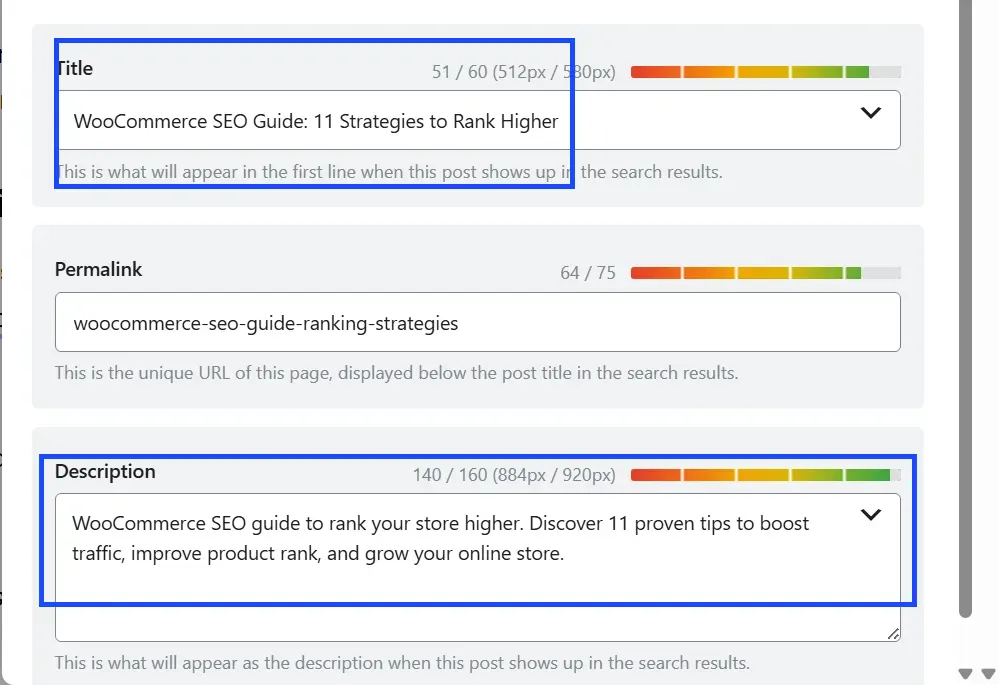
Open any page or post in the editor. Scroll to the SEO plugin panel at the bottom (Classic Editor) or find it in the right sidebar (Block Editor). Click Edit Snippet. Write a custom title under 60 characters with your primary keyword near the front. Write a meta description of 150 to 160 characters that includes the keyword within the first 120 characters and ends with a clear action.
Do this for your homepage, key service pages, and your highest-traffic posts first. The rest can follow. Don’t leave any important page running on the auto-generated title.
Step 4: Use Proper Your Heading Structure

Every page needs exactly one H1. It should contain the primary keyword and match the topic of the page closely. Use H2s for main sections and H3s for subsections within those. Don’t skip heading levels. Jumping from H2 to H4 confuses search engine crawlers and hurts readability.
Most WordPress themes set the page title as the H1 automatically. Check your source code to confirm this is actually happening on your site. In some older themes, the page title renders as a <div> or <p> tag instead.
Step 5: Add ALT Text to Every Image
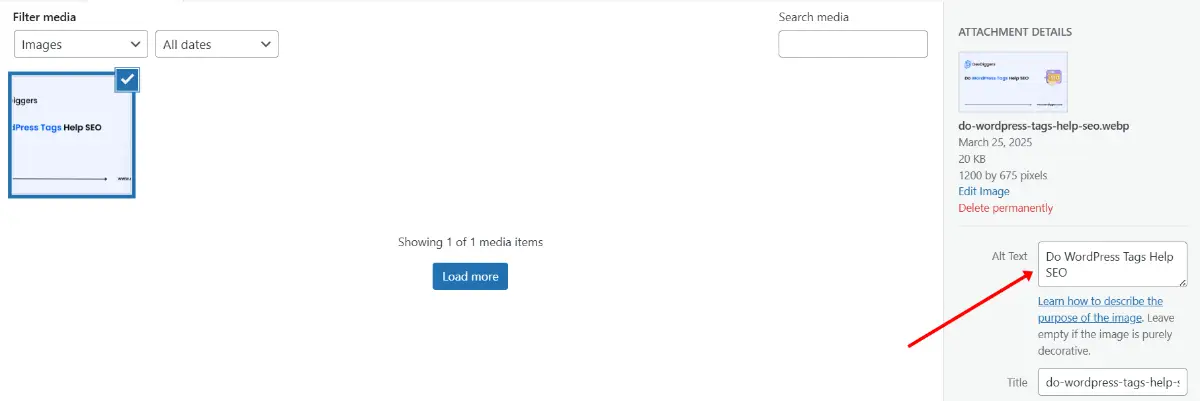
In the WordPress media library or the block editor, every image has an alt text field. Fill it in. Describe what the image shows using natural language. Where it fits naturally, include the page’s primary keyword. Avoid keyword stuffing.
Alt text matters for two reasons. Google uses it to understand image content for image search. Screen readers use it for accessibility. Both matter for ranking.
Step 6: Submit Your XML Sitemap to Google Search Console
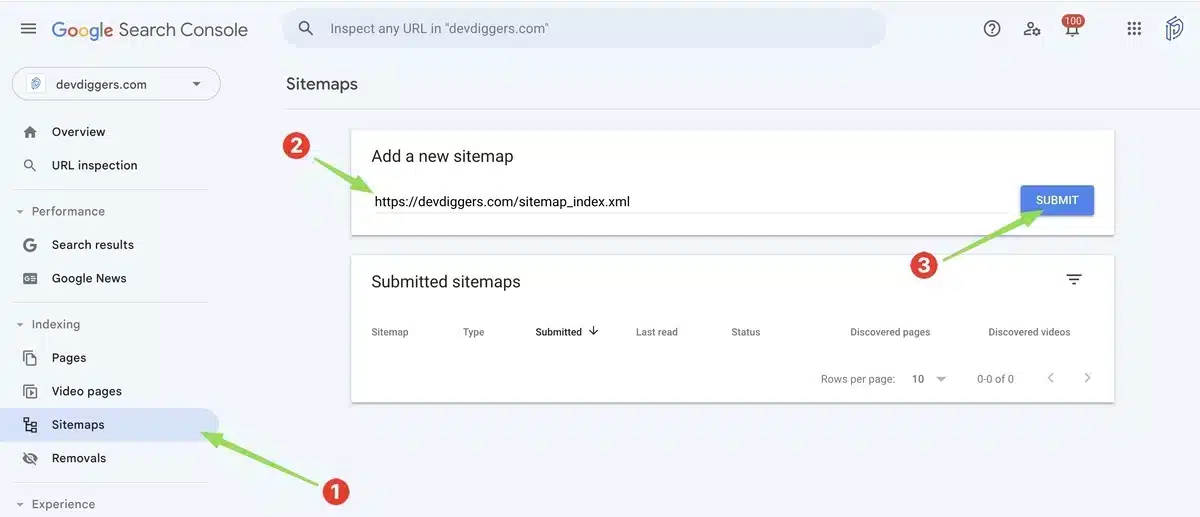
Your SEO plugin generates an XML sitemap automatically. In Rank Math, find it at yourdomain.com/sitemap_index.xml. In Yoast, it’s at yourdomain.com/sitemap_index.xml too. Go to Google Search Console → Sitemaps → paste the URL → Submit. If you haven’t connected your site to Search Console yet, read how to submit your site to Google Search Console first.
Check back in a few days. The sitemap report tells you how many URLs Google has found and flagged any crawl errors.
Step 7: Set Canonical Tags to Prevent Duplicate Content
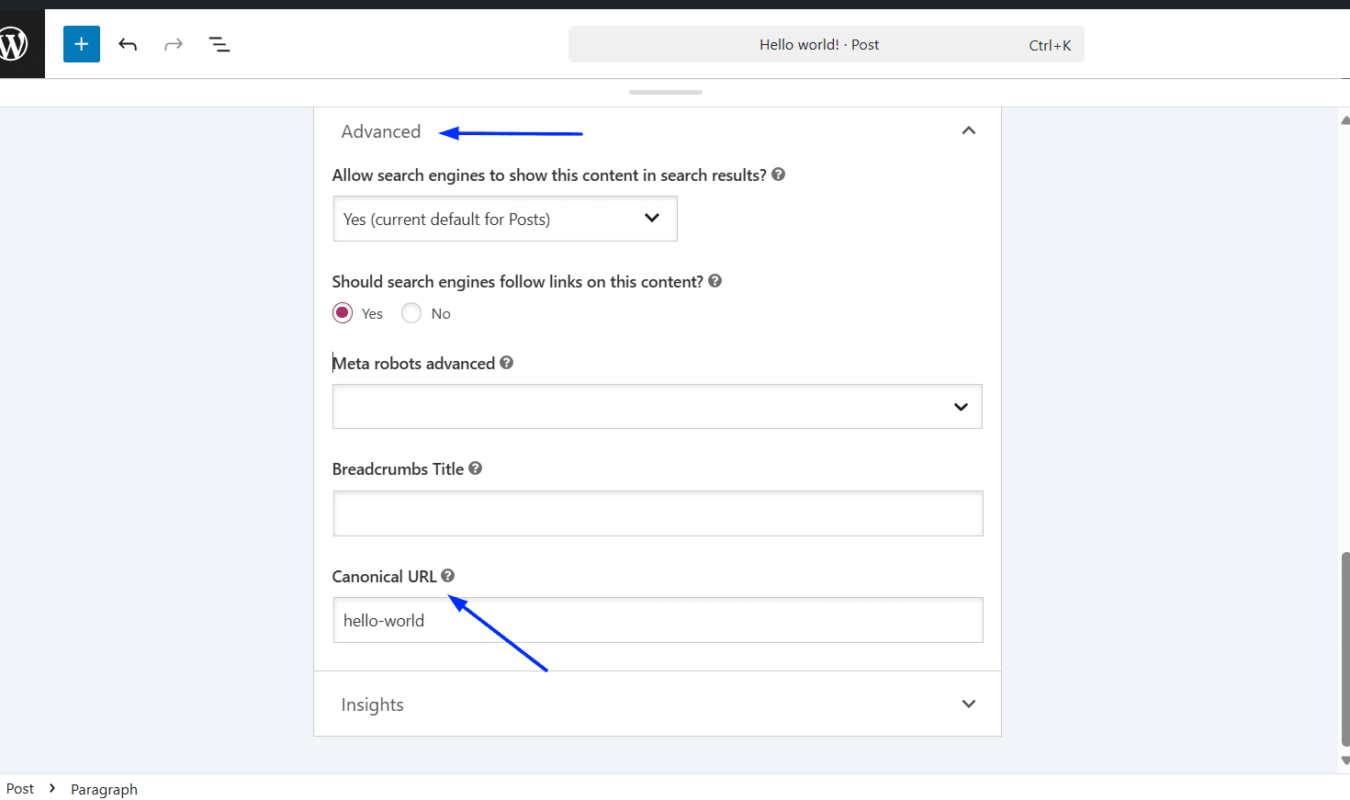
A canonical tag tells Google which version of a page is the “real” one. This matters most when the same content is accessible at multiple URLs: for example, a product page accessible via two different category paths in WooCommerce, or paginated archive pages.
Both Rank Math and Yoast set canonical tags automatically. The setting you need to check is whether tag pages, author pages, and date archives are set to noindex. These pages typically add no unique value and waste your crawl budget. In Rank Math: Titles and Meta → Authors / Tags / Dates → set to noindex. In Yoast: Search Appearance → Taxonomies → set to Off.
Technical SEO and Core Web Vitals
Here’s what most FCSO guides quietly skip: your meta tags mean nothing if Google finds your site slow and unstable. Technical SEO and Core Web Vitals are part of FCSO.
What Core Web Vitals Actually Measure in 2026
Google uses three metrics. Largest Contentful Paint (LCP) measures how fast the largest visible element loads, aiming for under 2.5 seconds. Interaction to Next Paint (INP) measures how quickly your page responds after a user clicks or taps, aiming for under 200 milliseconds. INP replaced First Input Delay in September 2024, so any guide still referencing FID is out of date. Cumulative Layout Shift (CLS) measures how much the page visually jumps while loading, keep it under 0.1.
The numbers aren’t great across WordPress right now. Industry data from Search Engine Journal shows only about 43% of WordPress sites pass Core Web Vitals benchmarks. That’s a meaningful opportunity if you get yours in order.
How to Check Your Scores
Run your URL through Google PageSpeed Insights. Check both mobile and desktop. The mobile score is almost always lower and matters more for rankings. Google Search Console also has a dedicated Core Web Vitals report under Experience → Core Web Vitals, which shows real user data across your whole site, not just a single URL.
WordPress-Specific Fixes
LCP issues usually come from unoptimized images. Compress images before uploading using the WebP format. Enable lazy loading for images that appear below the fold. For LCP specifically, the opposite applies: do not lazy-load the hero image or the first visible image on any page.
INP issues often come from too many JavaScript files loading on page init. A plugin like Perfmatters lets you disable scripts on pages that don’t need them. Heavy page builders (older versions of Elementor, Divi) can also raise INP scores significantly.
CLS issues usually mean your images have no defined width and height attributes. Add them. Also, check fonts. If you’re loading a custom font from Google Fonts, use font-display: swap to prevent layout shifts during font loading.
For caching, WP Rocket or LiteSpeed Cache handles 80% of performance fixes with minimal setup. Pair either with a CDN, and your LCP will improve measurably.
Schema Markup in WordPress: What It Is and How to Add It
Schema markup in WordPress is structured data you add to your pages so Google understands what the content is about, not just what it says. It powers rich results: star ratings, FAQs in search, product prices, breadcrumbs, and more.
Google’s preferred format is JSON-LD, and both Rank Math and Yoast inject it automatically based on your page type. But “automatically” only goes so far.
The Three Schema Types that Matter Most for FCSO

The Article schema is added automatically by your SEO plugin for posts. Check that the author name and publication date are being pulled correctly. If your theme doesn’t expose a proper author field in the markup, the schema may show incorrect data.
The FAQ schema is the one most people miss. If you add a FAQ section to a post or page, go into Rank Math’s Schema tab → Add Schema → FAQ Page → map your questions and answers. This adds your FAQ to the structured data and gives Google the information needed to show your questions in the People Also Ask results.
Product schema is critical for WooCommerce. Rank Math automatically adds product schema to WooCommerce product pages when WooCommerce is detected. Check that it includes price, availability, and review data. To verify: use Google’s Rich Results Test, paste your product URL, and check what schema Google actually reads.
Version note: Rank Math’s schema module works from version 1.0.x onward, but the GUI-based schema builder (with drag-and-drop fields) became stable in version 1.0.40. If you’re on an older install, update before configuring the schema.
FCSO WordPress for WooCommerce Sites
WooCommerce stores have FCSO requirements that plain WordPress blogs don’t. Most guides ignore this. Here’s what actually matters.
Product Page SEO
Each product needs its own custom meta title and description. Don’t rely on auto-generated titles pulled from the product name. Write titles that include the product name, a key benefit or attribute, and your brand name at the end, all under 60 characters. The meta description should mention price range, shipping, or a trust signal if space allows.
Product schema is set up automatically by Rank Math when WooCommerce is active, but check that price and availability fields are populating correctly.
Variable products sometimes show a price range instead of a single price; that’s fine, but make sure it’s accurate. We’ve seen stores where the schema was showing a stale price after a sale ended because the cache hadn’t cleared. Always recheck after pricing changes.
Category Page SEO
This is where most WooCommerce stores leave serious traffic on the table. Category pages often rank higher than individual product pages for broad terms. Yet most stores leave the category description blank and the meta tags auto-generated.
For each WooCommerce category: go to Products → Categories → Edit and add a custom description of 100 to 200 words covering what the category contains, who it’s for, and what makes your selection worth browsing. Then set a custom meta title and description via your SEO plugin’s category settings.
For a deeper look at WooCommerce SEO beyond on-page basics, see our SEO guide on WooCommerce.
WooCommerce Permalink Settings
Go to WooCommerce → Settings → Products → Permalinks. Set the product base to something short. Avoid the default /product/ in the URL only if your site is purely a store, and a shorter base makes more sense. Don’t change this after your products are indexed without setting up 301 redirects for every product URL.
The Mistakes That Break Your FCSO Setup
Here’s where most FCSO guides stop short. They tell you what to do. They don’t tell you what breaks it.
Running Two SEO Plugins at Once
This is one of the most common issues we see in support. Running Rank Math and Yoast simultaneously creates duplicate meta tags in the <head> of every page. Google sees two title tags and two description tags. CTR drops. Indexing gets confused.
Deactivate every SEO plugin except one. If you need to migrate from one to the other, both Rank Math and Yoast have built-in import tools that carry your existing metadata across.
For a step-by-step fix for this specific problem, read how to fix duplicate title tags in WordPress.
Leaving the Global Title Template Untouched
Most sites have 80% of their pages running on the auto-generated title template: Post Title - Site Name. This is fine as a fallback. It becomes a problem when your site name is long, when your post titles are already 55+ characters, or when the auto-generated title doesn’t match search intent.
Audit your top 20 pages in Google Search Console and check what title Google is actually displaying. If it’s rewriting your title, that’s a signal that the title is too long or doesn’t match the content.
Ignoring noindex on Low-Value Pages
Tag pages, author archives, and date-based archives rarely offer unique content. Leaving them indexable wastes crawl budget and can create thin content issues.
Set them to noindex in your SEO plugin’s global settings. The one exception: author archives on multi-author sites where each author has a real bio and a meaningful body of work.
Setting up a schema once and never auditing it
Schema breaks quietly. A plugin update, a WooCommerce update, or a theme change can disrupt the structured data on your pages without throwing any visible error.
Run a Rich Results Test on your top 10 pages every quarter. Check Google Search Console’s Enhancements section for any schema errors flagged at scale.
Wrapping Up
Fully customizable SEO in WordPress isn’t one setting or one plugin. It’s a combination of getting the basics right: permalink structure, meta tags, image alt text, sitemaps, and then going further with technical performance and structured data. Most WordPress sites do step one and stop. The gap is in steps two through seven.
Three things to take away: set your permalink structure before you publish anything, noindex your low-value archive pages immediately, and run a Rich Results Test on your product or key pages this week. Those three fixes alone move you ahead of most WordPress sites.
If you want help building a custom WordPress setup that handles FCSO from the ground up, take a look at our WordPress development services.
Frequently Asked Questions
Q1. What does FCSO stand for in WordPress?
FCSO stands for Fully Customizable SEO. In a WordPress context, it refers to the practice of manually controlling every SEO element on your site’s meta titles, descriptions, URL structure, schema markup, Core Web Vitals, and more, rather than relying on default plugin settings or auto-generated values.
Q2. Do I need coding skills to set up fully customizable SEO in WordPress?
No. The core FCSO setup described in this guide requires no coding. An SEO plugin like Rank Math or Yoast handles meta tags, schema, sitemaps, and canonical tags through a settings interface. Code-level customization is only needed for advanced scenarios like dynamic title generation based on custom fields or server-level performance tuning.
Q3. What happens if I run two SEO plugins at the same time in WordPress?
Running two SEO plugins simultaneously creates duplicate meta tags in your page’s HTML header. Google sees two title tags and two description tags, which can suppress click-through rates and confuse indexing. Deactivate all but one SEO plugin. Use the built-in import tool in your chosen plugin to migrate any existing metadata from the previous plugin before deactivating it.
Q4. Is FCSO different for WooCommerce stores than for regular WordPress sites?
Yes. WooCommerce stores need product schema, custom meta tags per product, and optimized category pages in addition to the standard FCSO setup. Category pages in particular are often ignored and represent one of the largest untapped SEO opportunities in most WooCommerce stores.
Q5. How long does it take to set up FCSO on a WordPress site?
For a new site with no existing content, the full setup: plugin configuration, permalink settings, homepage meta tags, sitemap submission, and schema, takes about two to three hours. For an existing site with published posts and products, budget additional time to audit and update meta tags across existing content.
Ekta Lamba
Ekta Lamba is a tech writer at DevDiggers focused on making WordPress and WooCommerce straightforward for non-developers. She covers plugin errors, platform updates, and WordPress basics, written so readers can follow along without a second tab open to translate the jargon.
Join thousands of readers getting smarter every week.
Leave a Reply