WooCommerce Wallet Management Plugin Documentation

The WooCommerce Wallet Management plugin is created to offer customers a virtual wallet for storing funds and making purchases on your WooCommerce store. This plugin provides a simple and efficient method for clients to make purchases without repeatedly inputting their payment details.
Customers can use the plugin to deposit money into their wallets through various payment methods, such as credit cards, PayPal, and other well-known payment gateways. After a customer has deposited monies into their purse, they can utilize those funds to buy items from your store without requiring an additional payment procedure.
One significant advantage of utilizing WooCommerce Wallet Management is its simplicity to clients. Customers may efficiently monitor their funds and make purchases without the need to repeatedly input their payment information by using a virtual wallet. Enhancing the checkout process can boost customer satisfaction and increase sales for your online store.
Another advantage of utilizing this plugin is its enhanced client protection. Using a virtual wallet allows users to avoid inputting their payment details on several websites, minimizing the potential for fraud and identity theft. The plugin offers clients a secure and dependable method to store and handle their payments.
The plugin offers various adjustable options for organizations to personalize the wallet management system according to their specific requirements. This involves setting minimum and maximum wallet balances and providing users with discounts or prizes for depositing monies to their wallets.
WooCommerce Wallet Management offers enterprises reporting and analytics solutions to enhance their understanding of consumer behavior and optimize wallet management tactics. The system provides comprehensive data on customer wallet activities, allowing users to monitor wallet balances and transaction histories.
Why choose our plugin?
Our products stick to WordPress’s quality requirements in security, quality, performance, and contemporary coding standards. Envato has given us a WP Requirements Compliant Badge for our CodeCanyon Profile.
Installation
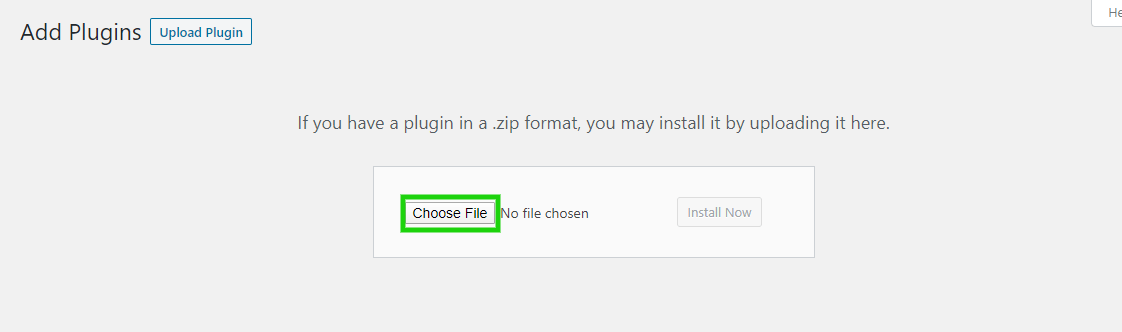
To access the Add New submenu in the admin section of WordPress, the user needs to hover the cursor over the Plugins menu to see the submenu and then click on Add New.

Next, the user must click the Upload Plugin button to upload the plugin zip file.

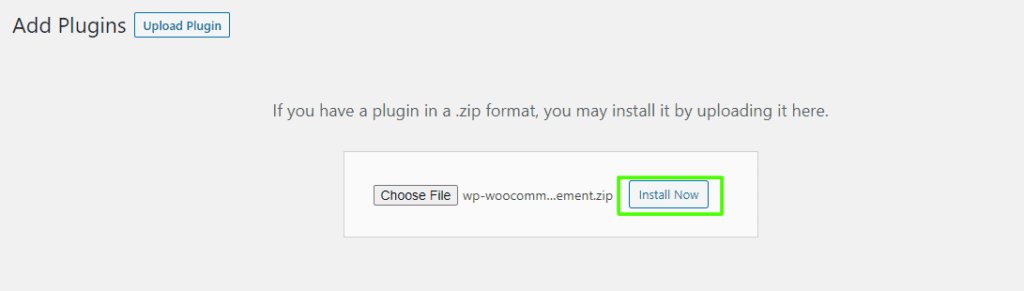
You will see the image below after clicking the Upload Plugin button. Next, select the Choose File button to locate the plugin.
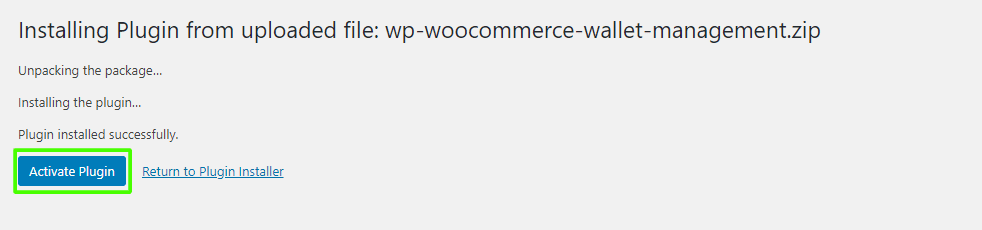
Once you choose the WooCommerce Wallet Management plugin zip file, it will be displayed below. Click the Install Now button to complete the plugin installation.
Once the plugin is installed, select Activate Plugin to enable it.
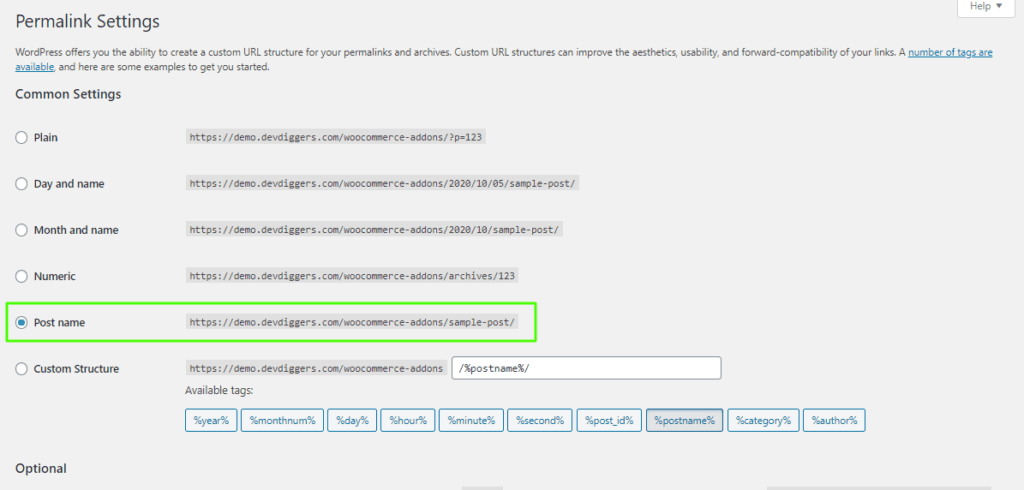
Permalinks
Admin must refresh the permalinks by going to Settings > Permalinks. The admin must then save the post name permalinks.
Admin End
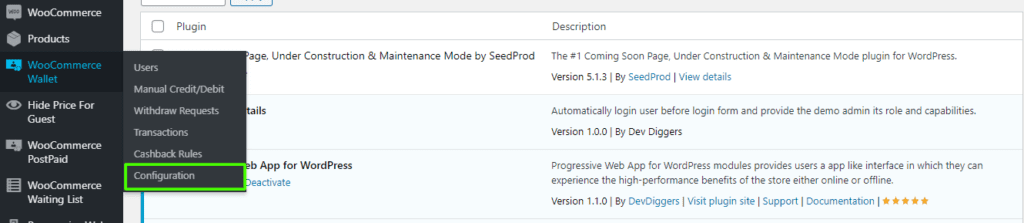
Click on Configuration to access the plugin’s configuration page. Hover over the WooCommerce Wallet admin menu to view six submenus: Users, Manual Credit/Debit, Withdraw Requests, Transactions, Cashback Rules, and Configuration. Click on the Configuration to access the configuration page.

The admin can view the configuration page.
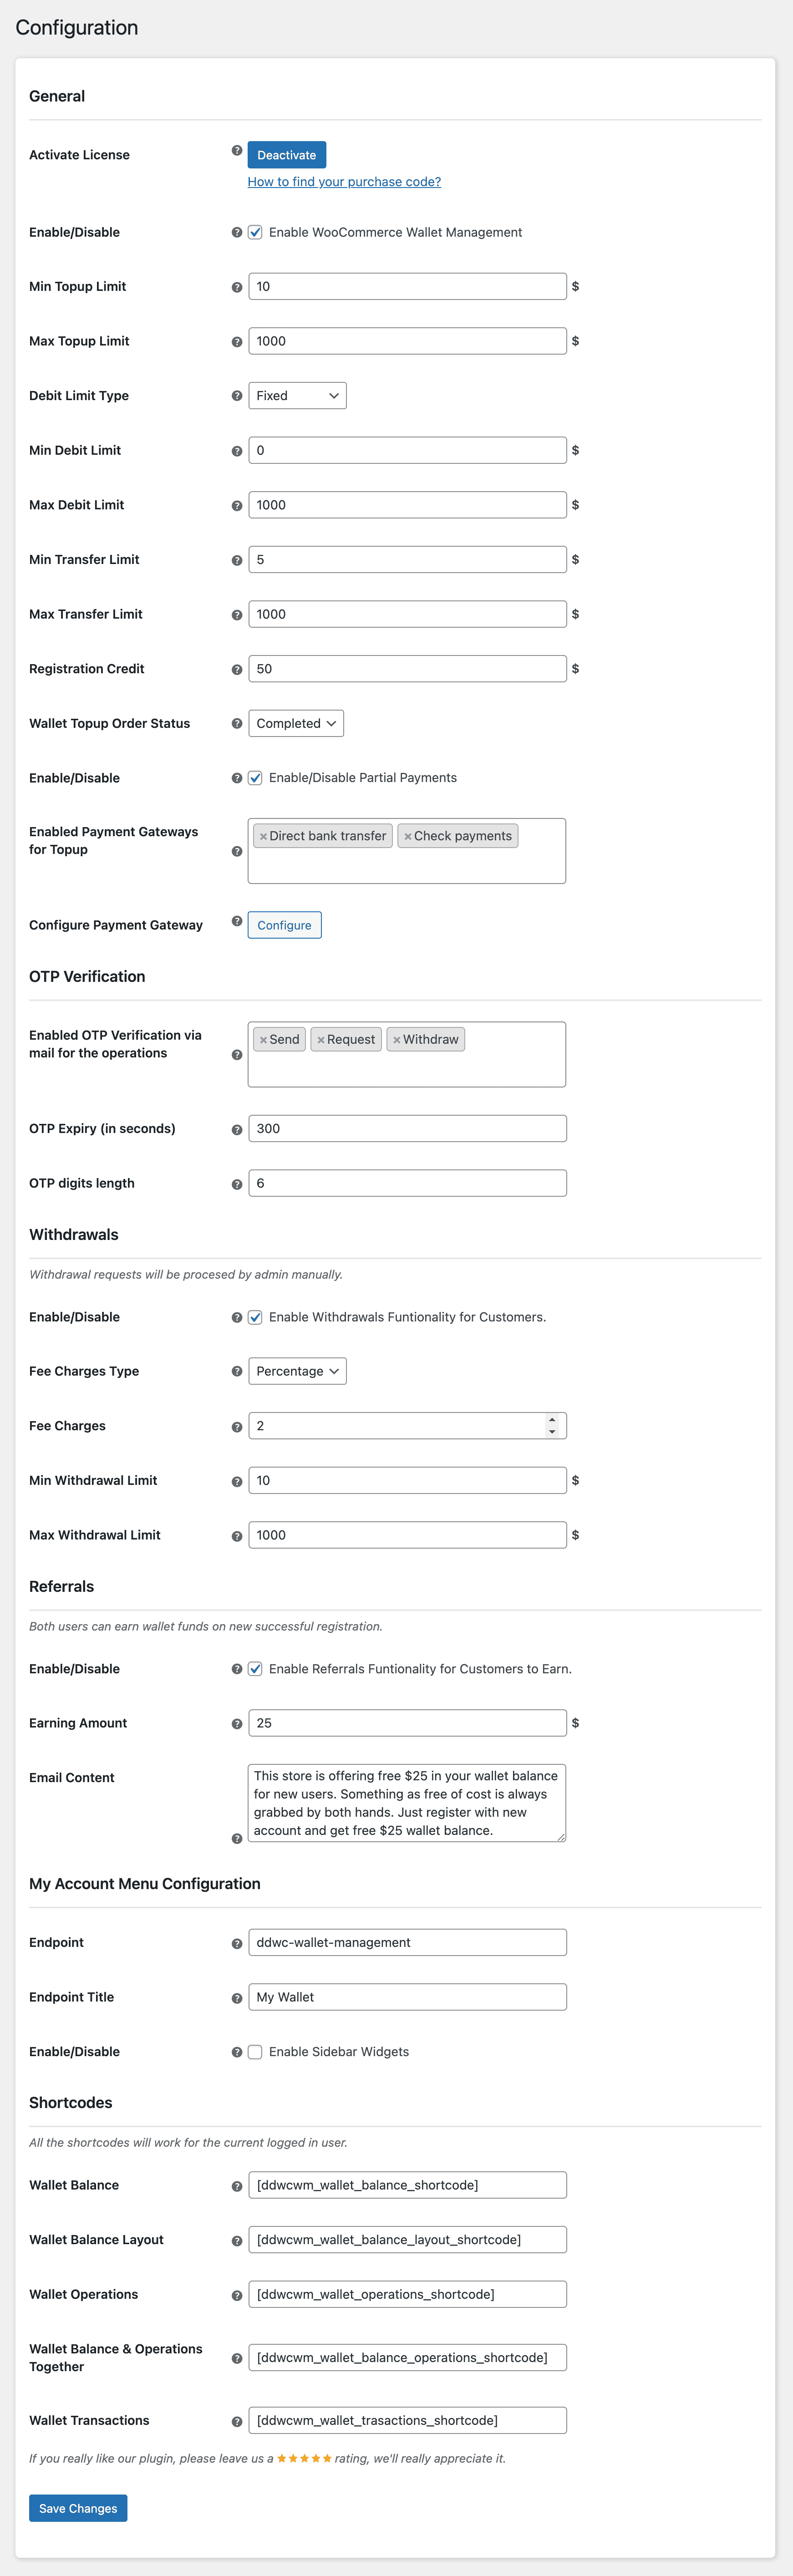
Activate License
You must input the purchase code to activate your license to use this plugin.
Enable/Disable:
The admin can activate or deactivate the Wallet System features for consumers.
Min Topup Limit
The Admin can establish the minimum limit for the wallet top-up amount customers can utilize. If not specified, there will be no restriction.
Max Topup Limit
The admin can establish the maximum limit for the wallet top-up amount customers can use. If left blank, there will be no restriction.
Debit Limit Type
The Admin can choose between a fixed or % debit limit type. Fixed debit limits will employ a set amount, whereas percentage debit limits will be determined based on the order total, including minimum and maximum values.
Min Debit Limit
The Admin can establish the minimum debit limit for the wallet, which customers will utilize when making purchases at the store. If left blank, there will be no restriction.
Max Debit Limit
An admin can establish the maximum debit limit for the wallet, which customers can utilize when purchasing at the store. If left blank, there will be no restriction.
Min Transfer Limit
The Admin can establish the minimum limit for wallet transfers, which customers must stick to while sending or requesting money. If left blank, there will be no restriction.
Max Transfer Limit
Admin can establish the maximum limit for wallet transfers, which customers must stick to while sending or requesting money. If left blank, there will be no restriction.
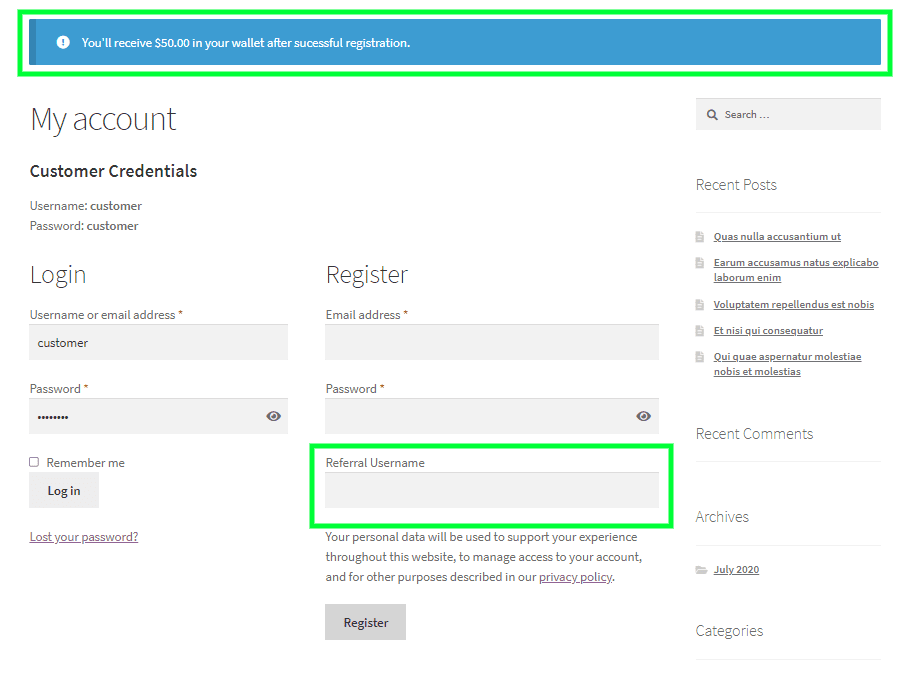
Registration Credit
The Admin can establish the registration credit for the wallet. This credit will be given to new customers upon successfully registering the business. Please enter to ensure registration credits are added to the wallet.
Wallet Topup Order Status
The Admin can set the wallet top-up order status as either default or completed.
Enable/Disable partial payments.
The Admin can activate or deactivate partial payments using wallets for their store.
Enabled Payment Gateways for Topup
The admin can choose the payment channels from the available options for adding funds to the wallet.
Configure Payment Gateway:
The Admin can set up the Wallet Payment Gateway for customers to use during checkout if they have sufficient funds. Clicking the configure button will redirect the admin to the payment gateway configuration page.
Enable OTP Verification via the operations.
The Admin can choose the wallet operations with OTP verification through email enabled.
OTP Expiry (in seconds)
The Admin can specify the duration of the OTP code in seconds. Once this time expires, the OTP code will become invalid, and you can request a new OTP code.
OTP digits length
The admin can determine the length of the OTP code digits here. If no input is provided, a six-digit OTP will be created.
Enable/Disable withdrawal functionality for Customers.
The Admin can activate or deactivate the withdrawal functionality for consumers.
Fee Charges Type
If the withdrawal feature is activated for customers, the admin can deduct a withdrawal fee from the wallet to their payment source. The Fee Charges type might be either fixed or %.
Fee Charges
The admin can establish the fee charges customers will incur while making withdrawals. The calculation will be based on the type of fee charged.
Min Withdrawal Limit
An admin can establish the minimum limit for wallet withdrawals, which customers must stick to while taking funds from their wallet. If left blank, there will be no restriction.
Max Withdrawal Limit
The admin can establish the maximum limit for wallet withdrawals, which customers will stick to while withdrawing funds from their wallet. If left blank, there will be no restriction.
Wallet Balance – Shortcode
The admin can establish the shortcode to display the wallet balance, as shown below.

Wallet Balance Layout – Shortcode
Here, Admin can set the shortcode to display the wallet balance layout as shown below.
Wallet Operations – Shortcode
The wallet operations layout can be displayed when the admin sets this shortcode.
Wallet Balance & Operations Together – Shortcode
The admin can configure the shortcode to display the operations layout and wallet balance, as seen below.
Wallet Transactions – Shortcode
The layout of wallet transactions can be displayed as follows when the admin sets this shortcode.
Wallet Payment Gateway
The Wallet System payment gateway configuration is done here by the admin.
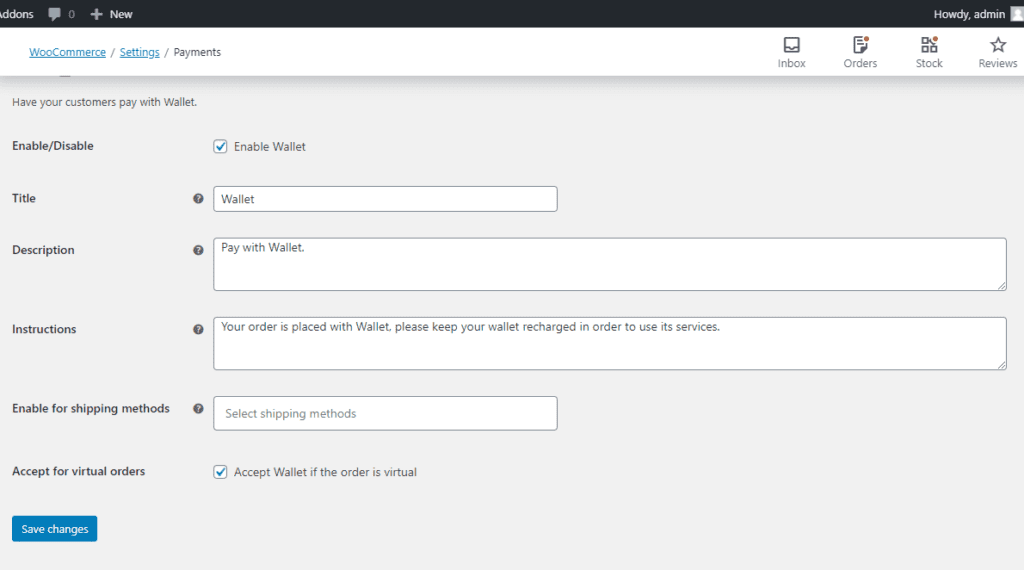
Enable/Disable:
Enabling and disabling the Wallet system payment gateway at checkout is up to the admin.
Title:
The admin can change the title of the payment gateway that will be displayed at checkout.
Description:
The payment gateway’s description, which appears at checkout, can be customized here by the admin.
Instructions:
The admin can set up the payment gateway’s instructions here, which will appear on the thank-you page.
Enable for shipping methods:
This is where the admin can set up the shipping options this payment gateway will accept at checkout.
Accept for virtual orders:
Admin can activate or deactivate the virtual order payment gateway here.
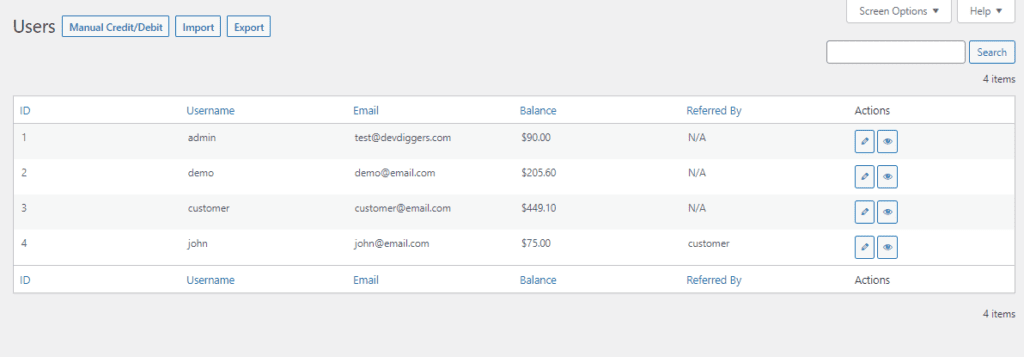
Users
Upon accessing the Users submenu, the admin will be presented with a user list that includes user details such as ID, username, email, wallet balance, and actions.
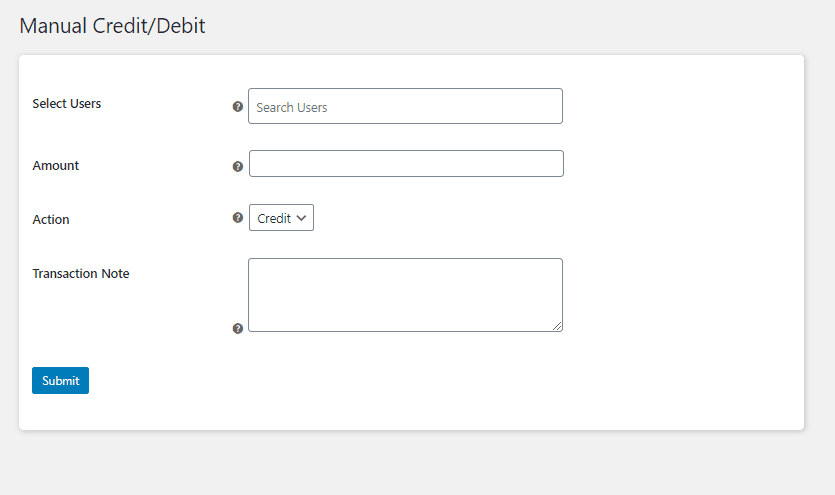
Manual Credit/Debit
The admin can manually credit or debit the Wallet system for the selected users by going to the Manual Credit/Debit submenu.
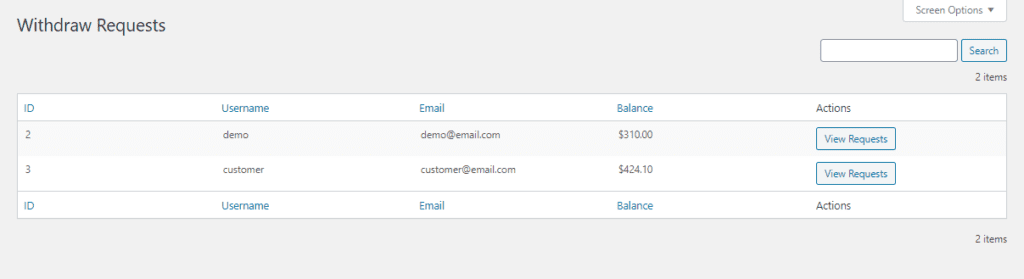
Withdrawal Requests
Admin can view the active withdrawal requests by heading to the Withdraw Requests submenu. The admin personally processes every withdrawal request in the wallet system.
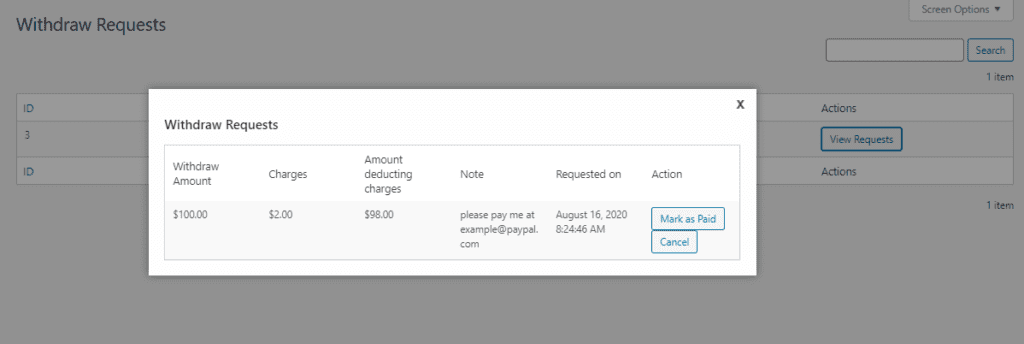
When the admin clicks on view requests, a popup window will appear. From there, the admin may choose to Mark as Paid or Cancel, which will cause the wallet system to generate transactions for the withdrawal requests.
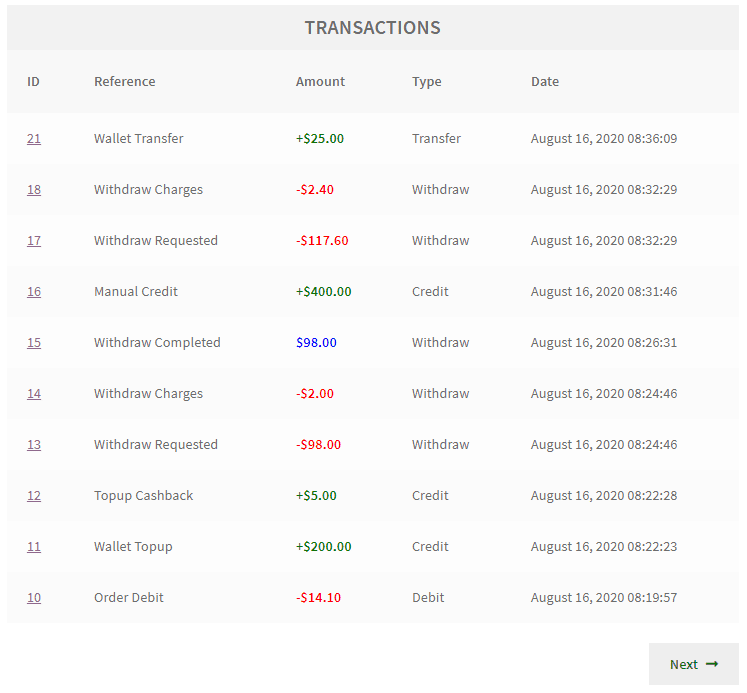
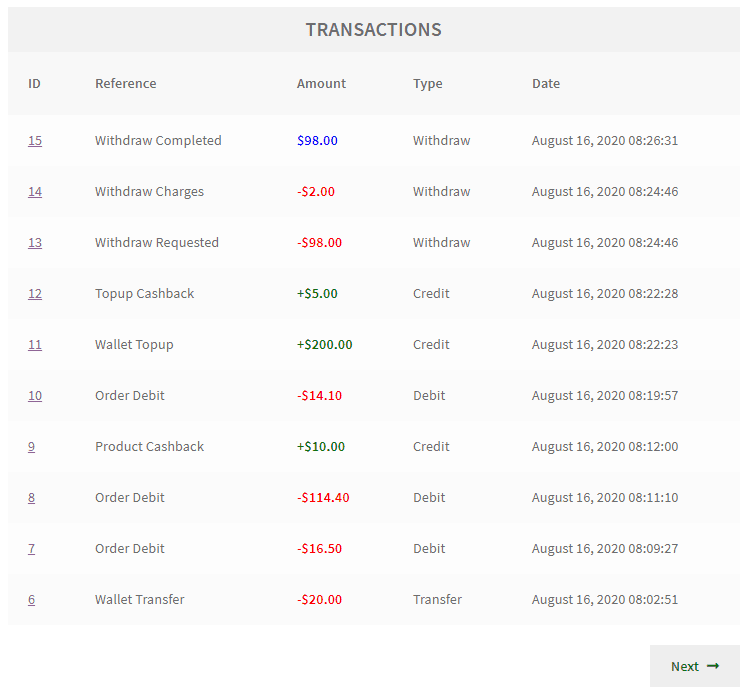
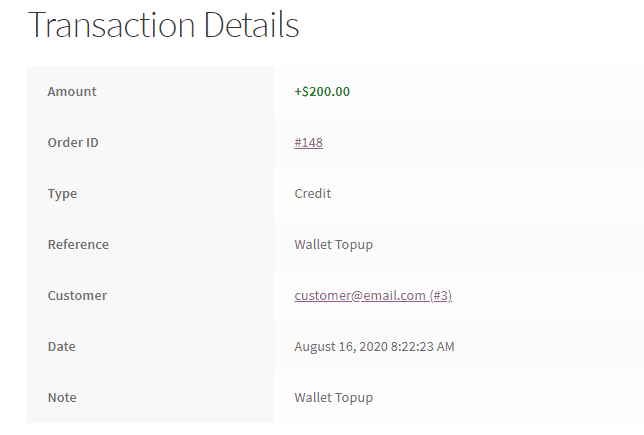
Transactions
Admin can check out wallet-related transactions by navigating to the transactions submenu. The admin can view any specific transaction in the wallet system for extra information. The admin can delete transactions from rows and bulk actions in the wallet system.
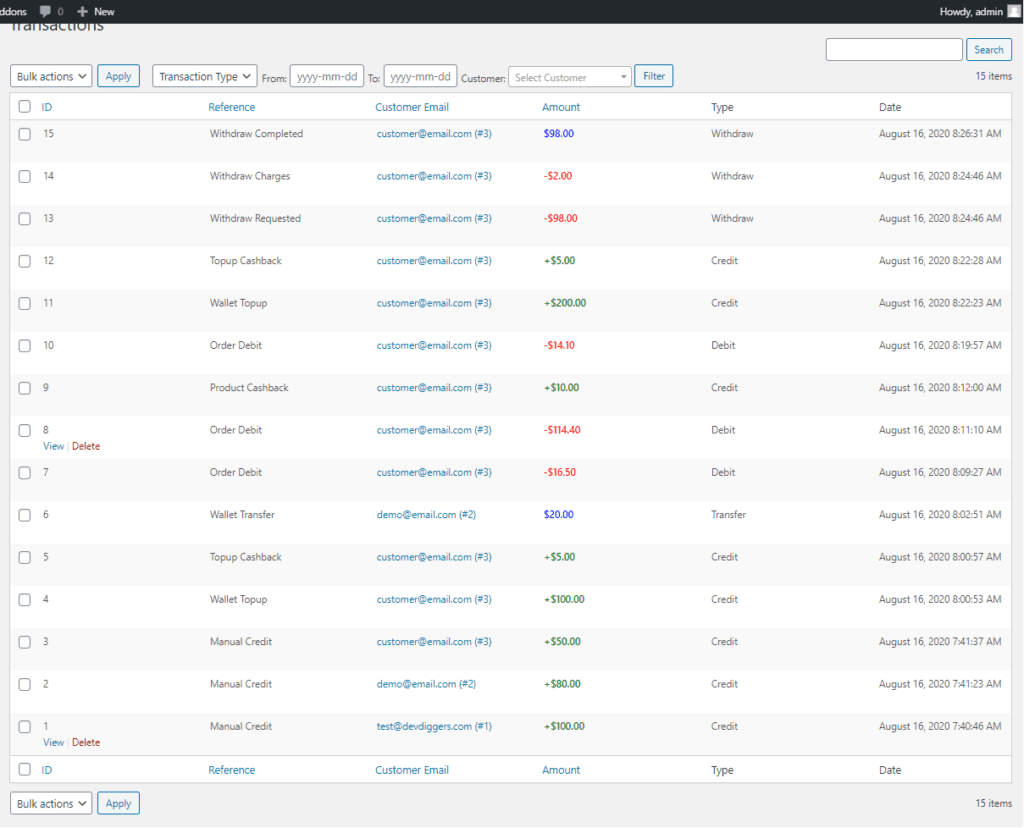
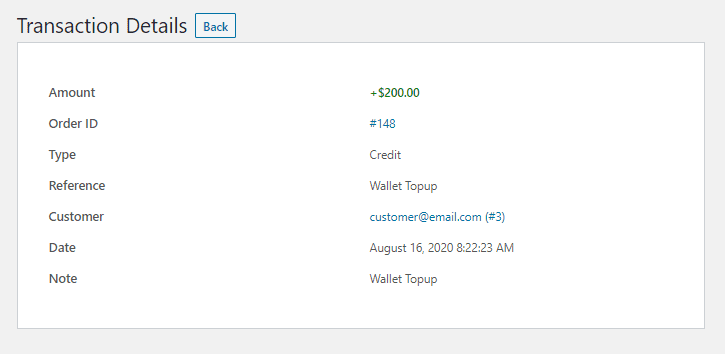
The admin must click on any transaction ID to view the complete transaction data in the wallet system.
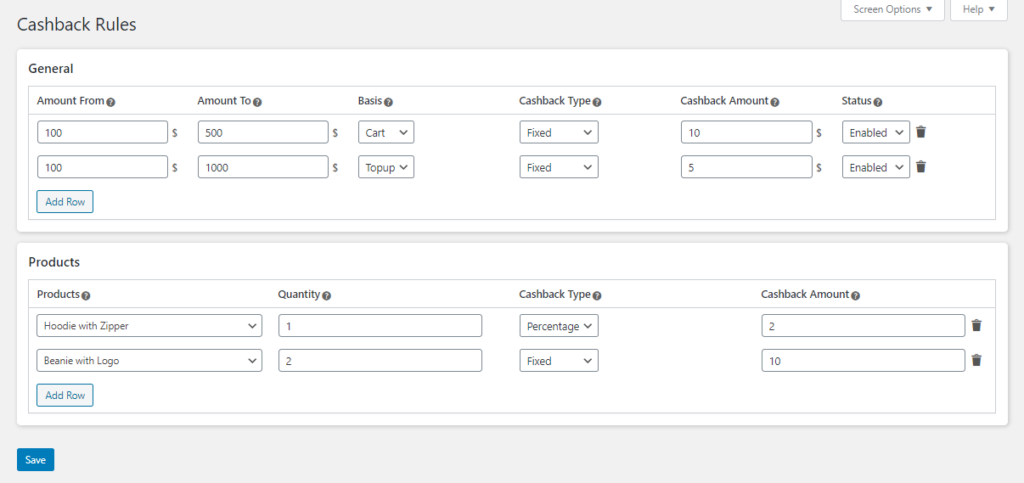
Cashback Rules
The admin can add different types of cashback to their wallet, such as a cart, top-up, items, etc., by going to the Cashback Rules submenu. Cashbacks will be computed based on the type of wallet system, either fixed or %.
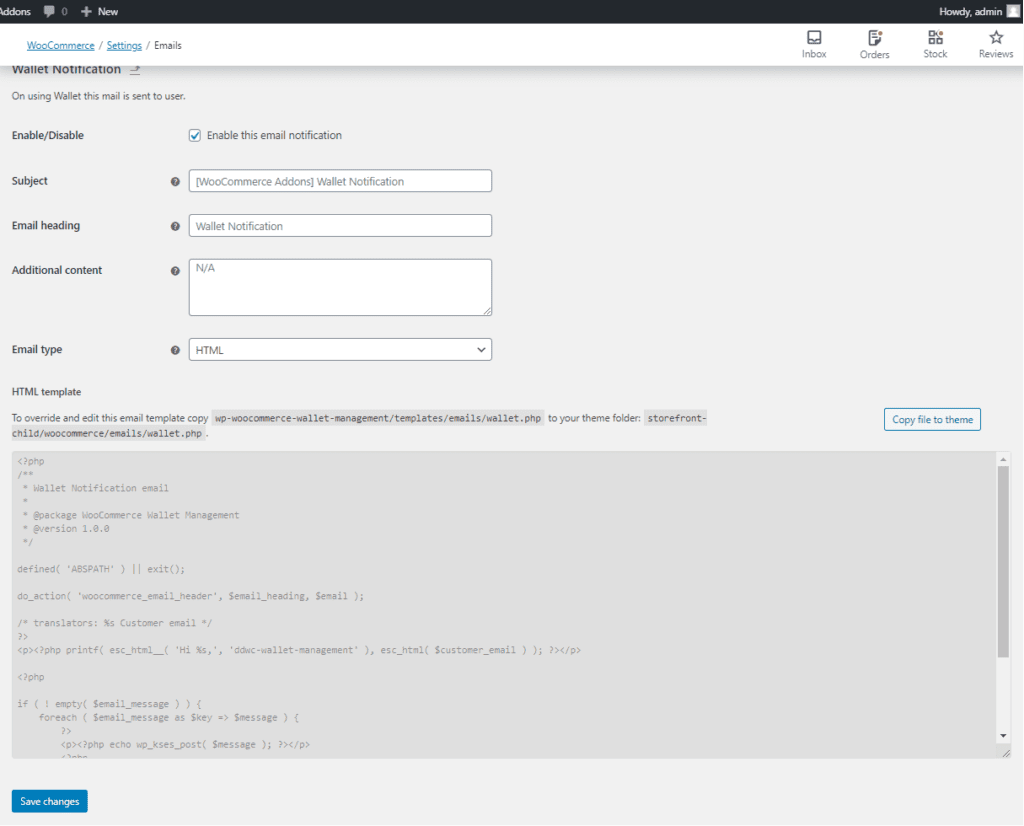
WooCommerce Email Template
The admin can configure email templates for the Wallet system messages that are being distributed to clients.
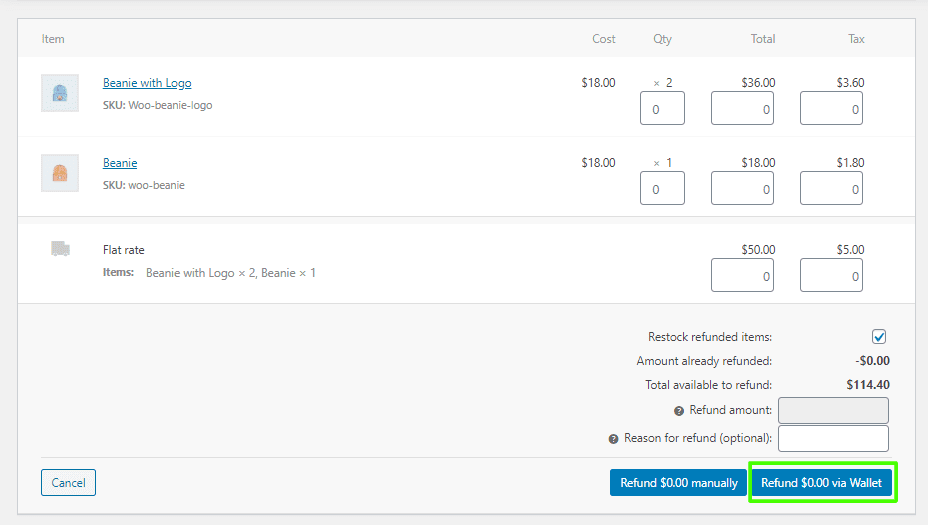
Refunds
Refunds are supported by the wallet payment gateway as well. The admin can return the money entirely or partially when using the Wallet payment gateway for an order.
Customer End
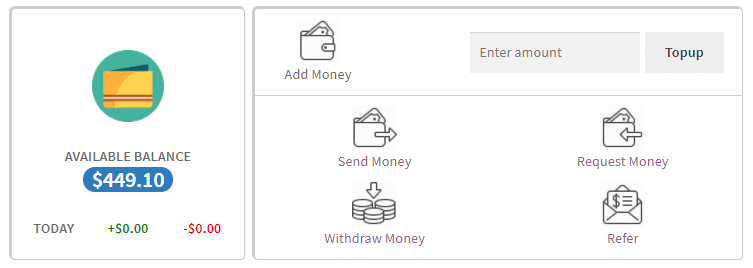
Customers can use the WooCommerce My Account page‘s My Wallet menu. Customers can view all of the Wallet system data here.
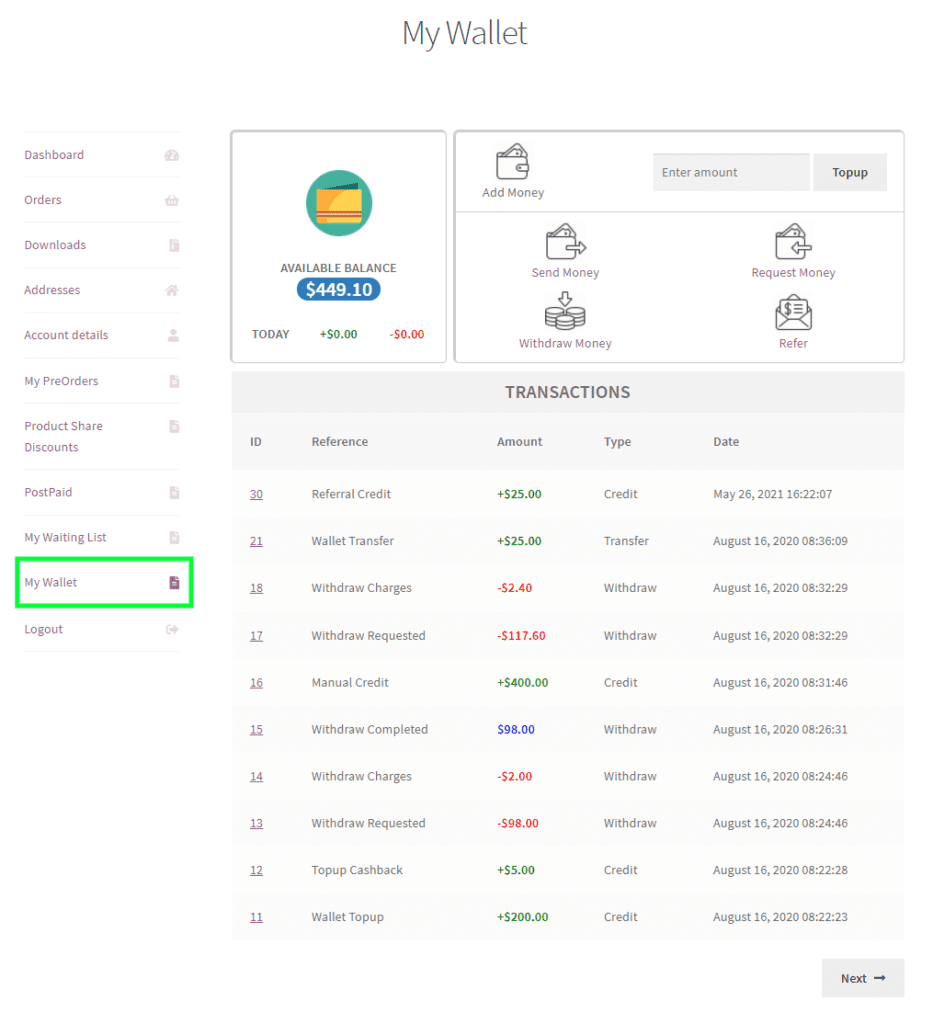
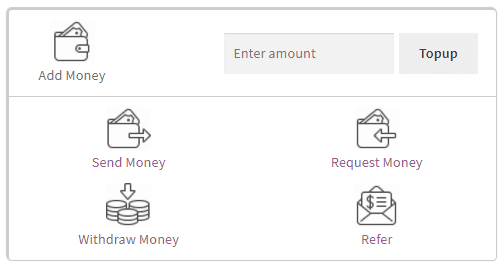
Customers can add, send, request, and withdraw money using this wallet system’s many functionalities. To earn extra, customers can also recommend the store to other users.
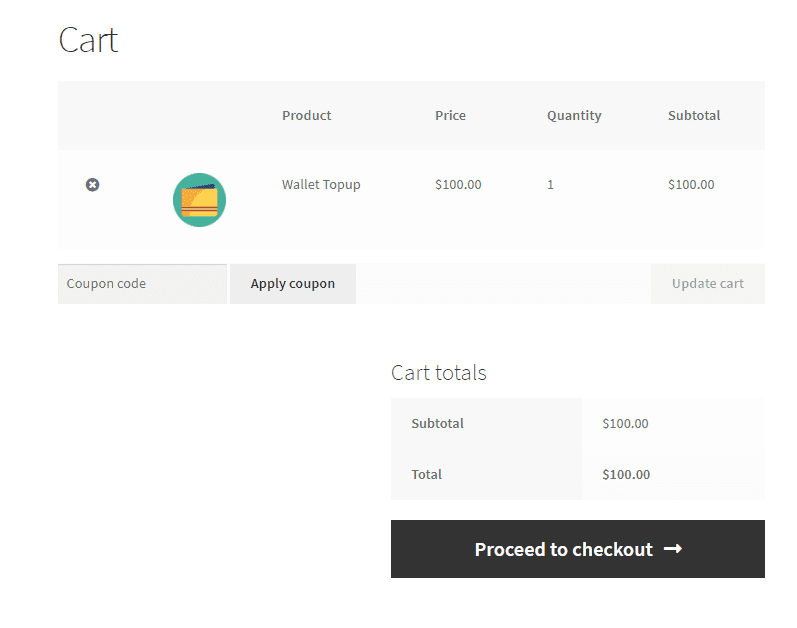
Add or Topup money
When a customer enters the amount for a top-up, a Wallet Topup product with the same amount is added to their cart. They must then purchase it to add the money to their wallet. The amount will be added to the customer’s wallet after the admin has completed the order and verified the payment.
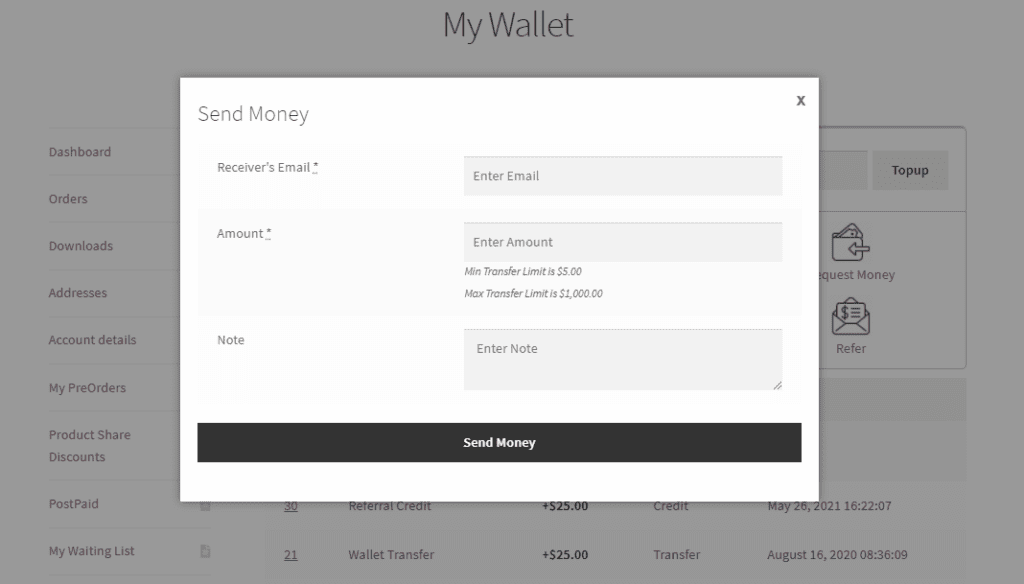
Send Money
When a customer clicks the Send Money icon, a popup window will open, asking them to transfer money through the wallet system by entering the recipient’s email address, the amount, and a note.
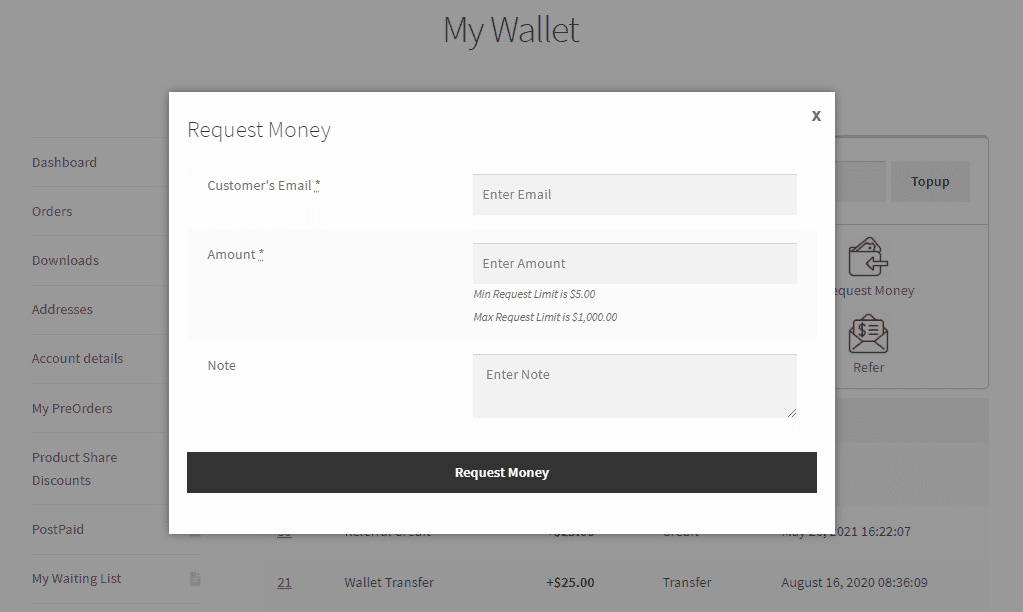
Request Money
Customers must input their email address, the desired amount, and a note in the pop-up box after clicking the Request Money icon to make a money request using the wallet system.
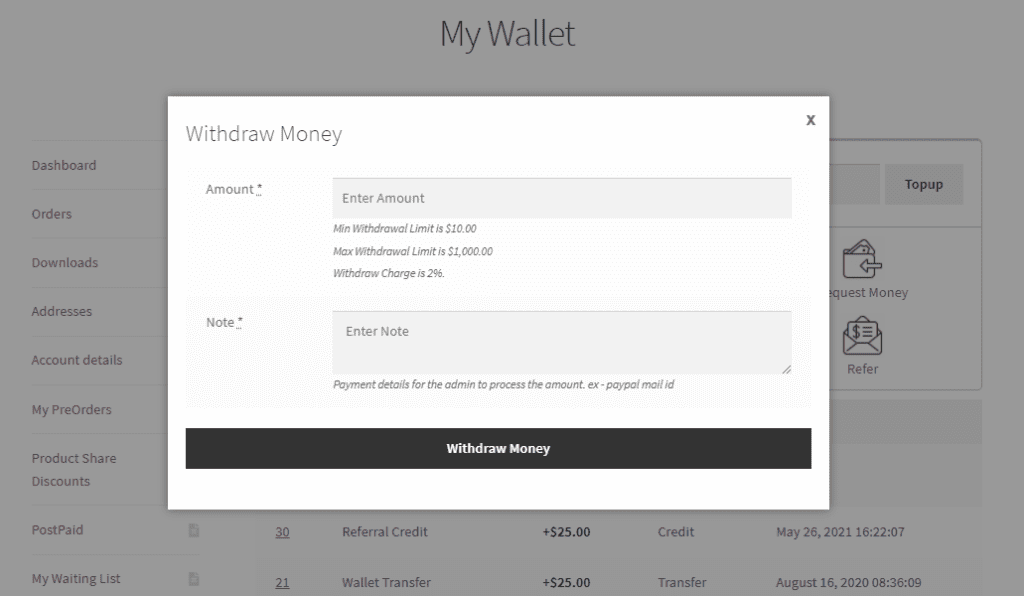
Withdraw Money
When a customer clicks the Withdraw Money icon, a popup window will emerge, asking them to enter the amount and a note with their payment information so they can withdraw money from the wallet system.
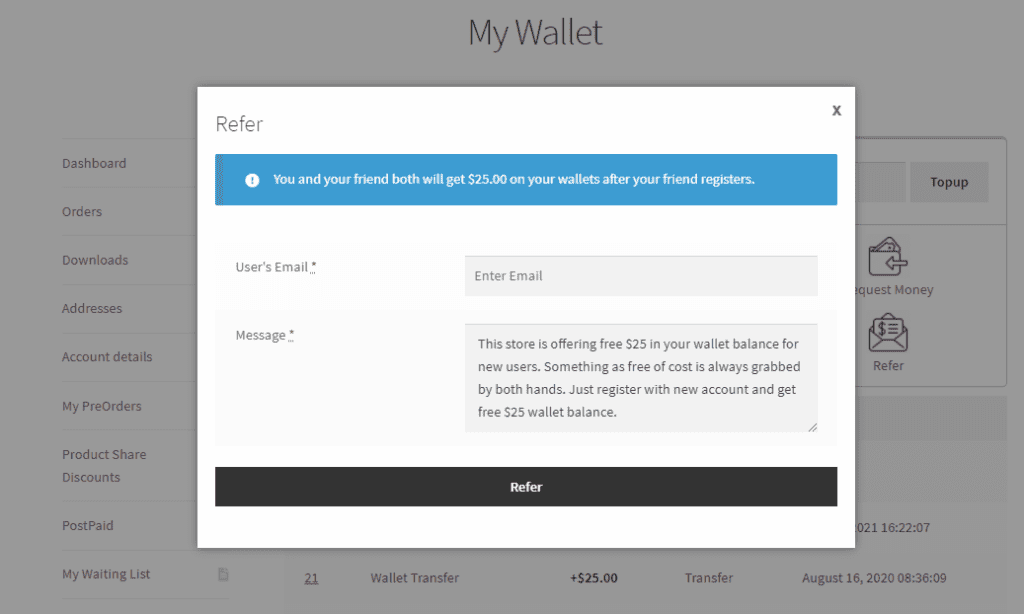
Refer
When the refer icon is clicked, a popup window will open, asking users to enter the new user’s email address and a message for him. New and existing users will receive the earning amount in their wallets following a successful registration.
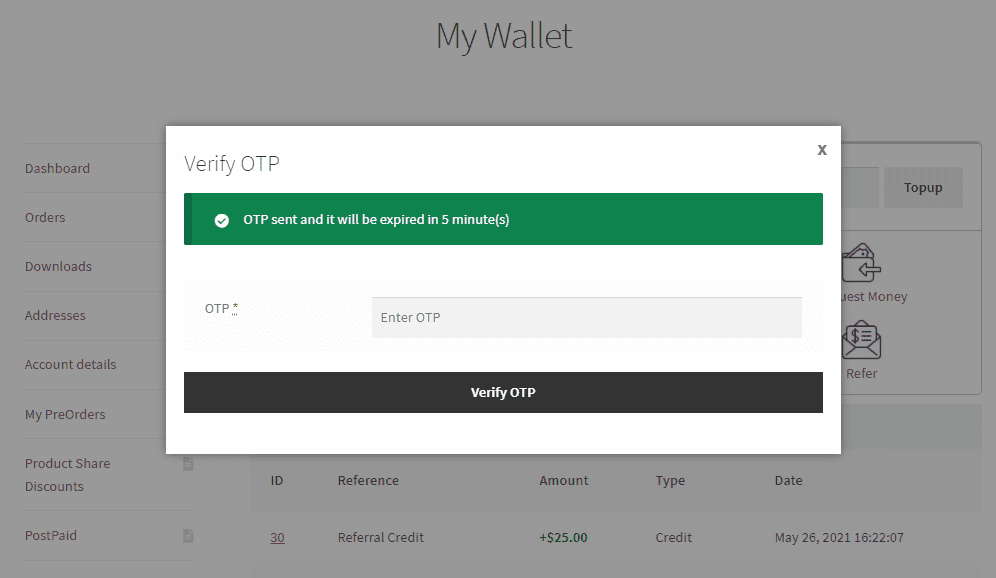
OTP Verification
If OTP Verification is enabled, the customer must validate the OTP to process the operation.
Customers at Checkout Page
Customers can use wallet as a partial or full payment method.
Partial Payment
Customers can use their wallet to make a partial payment and use any other payment method for the remaining amount if they don’t have enough money or if the maximum debit amount is less than the whole amount in their basket.
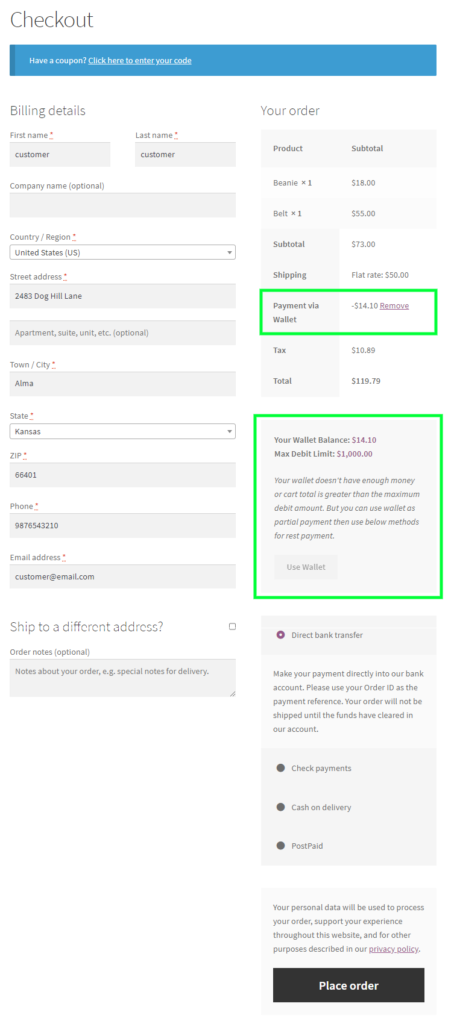
Full Payment
Customers can utilize Wallet as a payment method to make a full payment if they have enough money in their wallet.

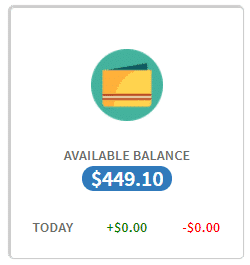
The My Accounts page’s My Wallet tab lets customers view the wallet system’s transactions.
The customer can view additional transaction data by clicking on any transaction ID.
Non-Registered Customers
Upon successful registration, customers can earn wallet money if the admin has set the registration credit amount and referral earning amount. The customer and the referral user will receive the referral earning amount in their wallet balance.
Multilingual
The admin can translate the plugin using the .pot file in the plugin’s languages folder.
Support
If you have any concerns, need assistance with our WooCommerce extensions, or want customizations, contact us through our contact page or support@devdiggers.com, our support email address. We will do our best to provide immediate assistance.
Kartika Musle
Kartika Musle is a tech writer at DevDiggers covering WooCommerce features, web design, and development security. Her articles translate technically dense subjects into guides that a non-developer can follow without losing the detail that matters, drawing on a background that touches both design and development.
Join thousands of readers getting smarter every week.
30 responses
-
Hola quisiera comprar pero necesito saber si puedo ponerla en español, dado que mis clientes hablan español y no hablan ingles.
-

Yes, you can translate the plugin into any language you want.
-
-
I want to use it I am having concern about cash back. If customer received a cash back from the order and when he cancels the order does this plugin remove the cash back received by the customer?
-
Yes, cashback will be removed on order cancelled or refunded.
-
-
One more question, is it possible that we can give delay of 8-10 days for cash back to add in user ?
-
Right now, this is not possible with the default features of the plugin but we can achieve this through customization. Kindly contact us at support@devdiggers.com for further discussion regarding it.
-
-
Hi, Just check if this Woocommerce Wallet plugin might suit my E commerce website.
1. May I know the Woocommerce Wallet plugin allows me to set the fixed amount money (For example 88 dollar and 160 dollar) that only allow my customer to top up?
2. Can Woocommerce Wallet plugin allow me to set the discount with different package they top up?( For example allowing me to set if they top up 88 dollar they can enjoy a 10% discount with every item they purchase from my website, other than that, they enjoy 20% when they top up 160 dollar to the wallet.)
Thanks for your time, hope you can see my message and reply to me as soon as possible.-
Thanks for showing interest in our plugin. Kindly find our answers to your queries below.
1. No, right now you can only set the maximum top up amount for the customers but we can add this feature through customization.
2. Yes, you can add the cashback rules for that and customers will get the cashback in the wallet on successful top up.
Regards-
ok, Thanks for your respond
-
-
-
Salve, il menù wallet può essere messo tramite shortcode in una pagina diversa da quella del mio account woocommerce?
-
Yes, you can use shortcodes to display all the wallet content anywhere you want with the plugin.
-
-
in my checkout page if the user wants to use the wallet balance then i want the user to pay certain percentage from wallet and can pay the rest by COD or payment gateway. please suggest me.
-
For now, you can set the max fixed debit amount from the wallet configuration and if you want to set it as percentage then we can do this through customization.
-
-
Hi, I am considering purchasing this plugin. I’ve seen that the cashback can be activated on purchase and topup, but I don’t see if it can be applied also on fund transfers between users.
Then another question about fee charges for withdrawals: is it possible or do you plan to differentiate them based on the payment method chosen? For example: bank transfer fee of € 0,90, PayPal free.
Thanks-
We can achieve your mentioned requirements through customization. Kindly contact us at support@devdiggers.com for further assistance.
-
-
Hello, i just want to know this widthrawal percentage it will go directly to admin balance? And how can i widthraw that..
-
No, withdrawal charges will be deducted from the customer’s wallet and as it is a virtual money so there is no need to credit it in admin’s wallet. Admin already received the actual money when customer had topup their wallet using actual money.
-
-
Where do the funds from the sale of products go to ? The wallet or to my paypal account
-
If customer is paying from his wallet then the order amount gets debit from customer’s wallet and admin didn’t receive anything that time. But, when customer so top-up his wallet for using it on your store then he need to pay the amount with any other payment gateway like PayPal so then the amount directly comes to your PayPal account.
For ex – Customer top-up his wallet with $100 using PayPal then admin gets $100 in his PayPal account.
Then, when customer place an order of amount $100 using his wallet then it just gets debited from his wallet because admin already received it when he has done his top-up. Now, customer’s wallet balance will be 0 and he needs to do the top-up again.
Hope you understand now.
-
-
1) can there be automatical triggers as per periods like date and time in the wallet?lets say admin set auto wallet top up, fund-reqest on user to another or sets or all user to another (roles), within a specific time?
-
We can achieve this through customization, kindly contact us at support@devdiggers.com for further assistance.
-
-
do you provide a formet to import csv to make multipale tenzetion at a time
-
You can find the sample csv file in the Wallet import csv page.
-
can you tell me how can i show wallet icon and balance in top menu
-
We have provided 4 shortcodes in the plugin which you can use.
-
-
-
-
Good morning, how can I send the customer’s money via withdrawal to his bank account as PayPal? and prove to the customer that their real money actually arrived in their bank account?
-
You need to send the money manually or externally the system to the customer’s bank account or PayPal then mark the withdrawal request as “Paid” from the backend so customer gets notified regarding it.
-
How to show cashback amount on product page and checkout page? Currently rules are defined but it’s not working on frontend
-
As per the plugin’s current functionalities, there is no way to show them right now, but we will add this in future updates.
-
you don’t understand ! The plugin is not applying cashback on checkout and not showing amount of cashback
-
-
Leave a Reply