How to Change Line Spacing in WordPress


Line spacing plays a critical role in how readable and engaging your website content is. Whether you’re writing a blog post, designing a landing page, or formatting your website’s text, proper line spacing can make a world of difference.
If you’re wondering how to change line spacing in WordPress, you’re not alone. Many WordPress users are unsure about how to adjust this setting because WordPress doesn’t offer a direct built-in option for modifying line spacing.
In this comprehensive guide, we’ll walk you through several ways to change line spacing in WordPress, from using the Gutenberg block editor and Classic editor to custom CSS and plugins.
Why Should You Change Line Spacing in WordPress?
Before explaining how to change line spacing in WordPress, it is first important to understand why you want to do that.
- Improved Readability: The close lines of text make reading cumbersome for your visitors. In that case, proper line spacing ensures readers will easily glimpse at your content without having a struggle, leading to an improved user experience.
- Better Aesthetics: Changing line spacing in WordPress enhances the aesthetic nature of your website. Properly written text will ensure that your content is cleaner, professional, and balanced in terms of looks.
- Increased Engagement: It means people will spend more time on your site, engage more with your content, and discover parts of your website.
- Better User Experience: The space between lines of text reduces eye strain and enables the users to read through more comfortably.
- More Organized Content: Proper spacing can also help focus on distinctions between different sections, making content more readable and organized.
Having understood why altering line spacing is so vital, let’s now look at how changes in line spacing could be made in WordPress.
How to Change Line Spacing in WordPress Using the Gutenberg Editor
The Gutenberg block editor is the default editor on the WordPress website. While it doesn’t provide an explicit setting for line spacing, there are a few workarounds you can use to change line spacing in WordPress within this editor.
1. Adjusting Paragraph Spacing with Gutenberg
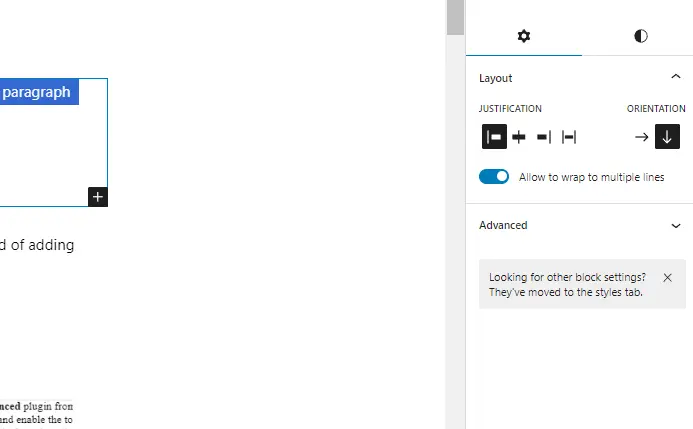
Although Gutenberg does not offer specific line spacing controls, you can still change the paragraph spacing. This has to do with the block settings of the editor.
- Select the Paragraph block you want to adjust.
- In the right sidebar, under Block Settings, find the Spacing options.
- Use the margin or padding settings to control the spacing between paragraphs.
Although this does not add a WordPress line spacing updater, it is worthwhile as a method of adding space around paragraphs to create improved readability as well as a cleaner appearance.
2. Using Spacer Blocks
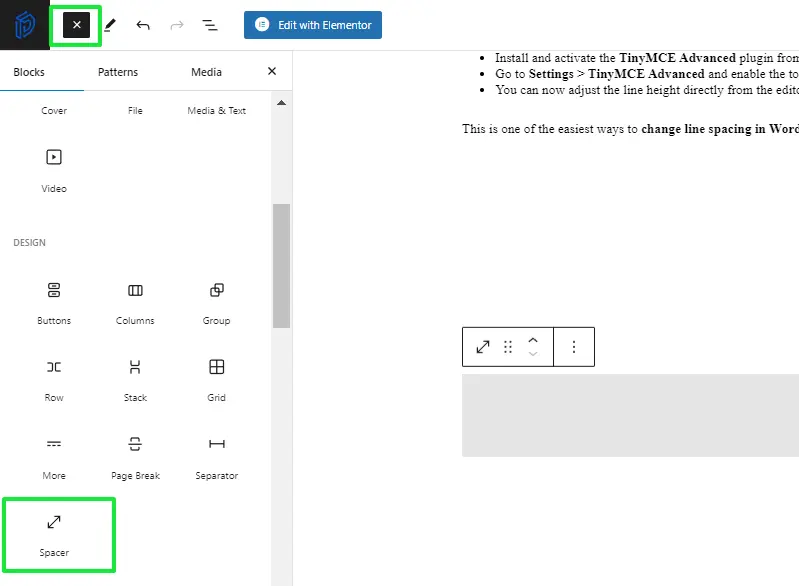
Another easy way to change the presentation of line spacing is through Spacer blocks between paragraphs or content sections. Although this does not adjust the line spacing of paragraphs, it may generate useful graphic breaks and improve the design.
- Insert a Spacer block by clicking the + icon on the left top side.
- Adjust the height of the Spacer block to control the space between blocks of content.
It’s an indirect method of changing the line spacing in WordPress while working with the Gutenberg editor.
3. Custom CSS in Gutenberg
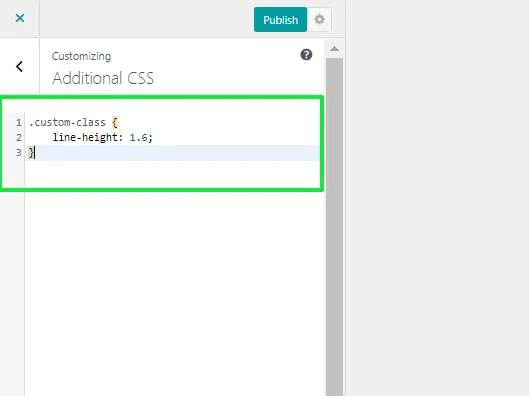
The most effective way for those who want to exercise control over the line spacing is by applying customized CSS. You can directly apply customized CSS to blocks in Gutenberg so that it will establish the specific line heights for several different elements.
Here’s how to apply custom CSS to change line spacing in Gutenberg:
- Select the block where you want to adjust line spacing.
- In the Block Settings panel, scroll to Advanced and add a custom CSS class.
- Go to Appearance → Customize → Additional CSS in your WordPress dashboard and add the following code:
.custom-class {
    line-height: 1.6;
}
This method provides complete control over how to change line spacing in WordPress for specific content blocks.
How to Change Line Spacing in WordPress Using the Classic Editor
If you’re still using the Classic Editor, you’ll have to do things slightly differently if you want to alter line spacing in WordPress. Now, there isn’t a special line spacing tool on the Classic Editor, but there are ways to do this.
1. Manual Line Breaks (Shift + Enter)
In Classic Editor, the Enter would create a new paragraph, automatically leaving some white space between the lines. However, if you want to reduce white space between lines, then you can hold the Shift key with the Enter key. This will give you a single-line break without any extra white space.
The above is a manual solution, where WordPress line spacing does not need a change of settings or the addition of a plugin.
2. Custom CSS for the Classic Editor
To make more global changes to line spacing across your website, you can use custom CSS. Here’s a simple way to adjust line spacing in the Classic Editor:
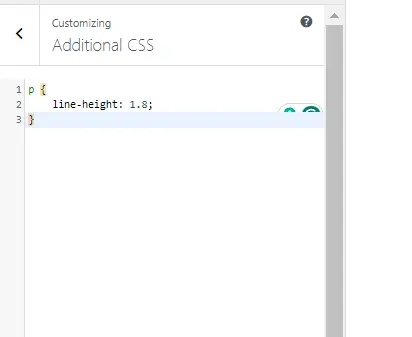
- Navigate to Appearance → Customize and click on Additional CSS.
- Enter the Following CSS Code:
p {
    line-height: 1.8;
}
This CSS will change the line height for all paragraphs across your site. Adjust the number (e.g., 1.8) to increase or decrease line spacing as needed.
How to Change Line Spacing in WordPress Using Plugins
If you’re uncomfortable using CSS or want a more user-friendly way to change line spacing in WordPress, several plugins are designed to help you do just that. Plugins can simplify the process and provide more customization options.
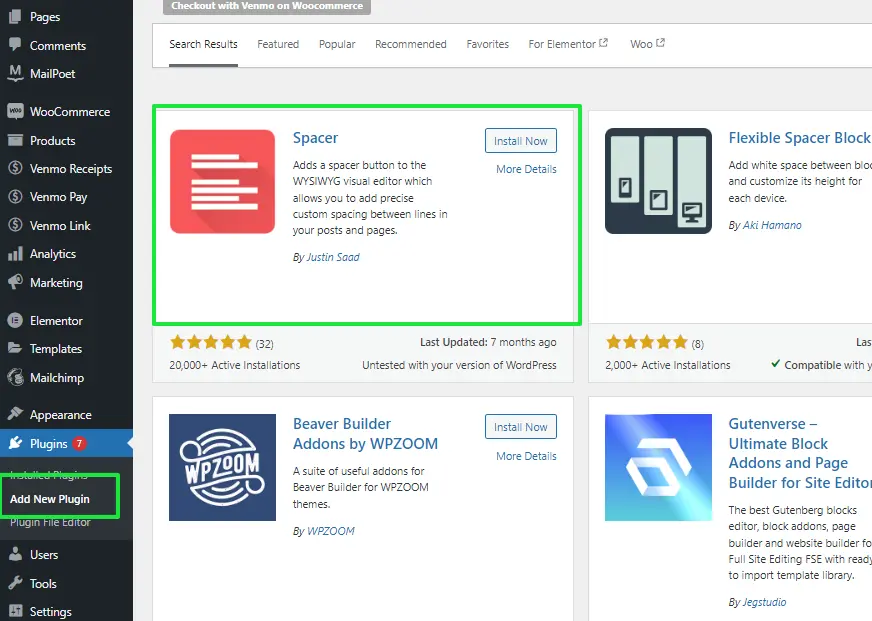
1. Spacer Plugin
The Spacer Plugin is an intuitive tool for managing the space between elements in your WordPress pages, including text blocks, images, and more.
- Install and Activate the Spacer Plugin:
- Go to Plugins → Add New in your WordPress dashboard.
- Search for Spacer Plugin and click Install Now.
- After installation, click Activate to enable the plugin.
- Add Spacer Blocks in the Block Editor:
- Create or edit a post or page in the WordPress Block Editor (Gutenberg).
- Click the Add Block button (the plus sign), and search for the Spacer Block.
- Adjust the Spacing:
- Once the Spacer block is added, you can adjust the space by dragging the slider to control the height or manually inputting a value.
- This allows you to create custom spacing between paragraphs, images, or content blocks.
- Save and Preview Changes:
- Once you’ve added the desired spacing, click Save Draft or Publish to see the changes live.
Plugins are a simple way to adjust line spacing in WordPress. For example, TinyMCE Advanced and Spacer allow easy modifications without coding.
How to Change Line Spacing in WordPress Using Custom CSS Site-Wide
If you want to apply a global line spacing adjustment across your entire site, custom CSS is the best solution. By adding some CSS code, you can modify the line height for all content, ensuring consistent spacing across pages and posts.
1. Global Line Spacing with CSS
To change line spacing site-wide:
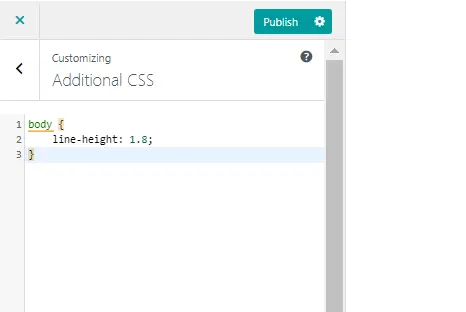
- Go to Appearance → Customize → Additional CSS.
- Add the following code to modify line spacing for the entire site:
body {
    line-height: 1.8;
}
This will apply the specified line spacing to all body text across your website. Feel free to tweak the 1.8 value to adjust the line spacing to your preference.
2. Target Specific Elements for Line Spacing
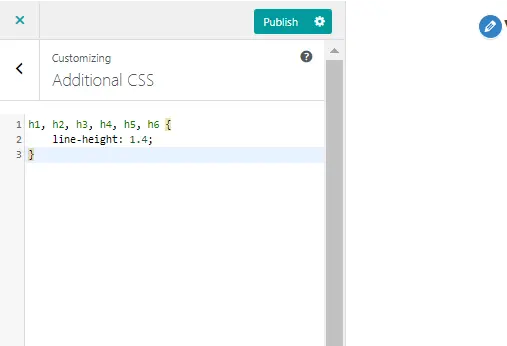
If you want to change the line spacing for specific content types (like headings or paragraphs), you can target them with CSS. For example, to adjust the line spacing of your headings, you can use:
h1, h2, h3, h4, h5, h6 {
    line-height: 1.4;
}
This method allows you to fine-tune line spacing in WordPress for specific elements, ensuring a more tailored look for your content.
Best Practices for Changing Line Spacing in WordPress
When you change the line spacing in WordPress, it must follow some guidelines to ensure your website appears professional and not messy.
- Keep Consistency: In this case, it is imperative to use the selected line spacing in all aspects of your website. Inconsistent spacings confuse visitors and make content appear amateur.
- Avoid overcrowding: Do not set line spacing too tight to affect readability. The general guidelines dictate that one may set the line height between 1.5 and 1.8 for the body text.
- Test for Mobile Responsiveness: Always test your site’s line spacing on different devices. What looks good on a desktop might not translate well to mobile. Make sure that your changes make sense for all screen sizes.
- Balance Aesthetics with Readability: Implement the appropriate line spacing to create white space that is both aesthetically pleasing and works well for readability.
- Optimize based on Content-Type: Each type of material deserves the correct line spacing. Use tighter spacing for headings and looser spacing for body text, for instance.
Conclusion
This knowledge of how to change the line spacing in WordPress undoubtedly improves the look and feel of your website. The text will be more readable and provide a good user experience.
This is accomplished using Gutenberg, Classic Editor, plugins, and custom CSS, and there are many ways to change the line spacing according to one’s needs.
So, by following the tips and methods presented above, changing line spacing in WordPress would no longer be problematic; your website would become balanced and easier on the eyes.
So go ahead and experiment with different line spacing settings, and enjoy what they can help you achieve for your content.
FAQs
How do I change line spacing in WordPress without coding?
You can adjust line spacing using the Gutenberg block editor or plugins without needing any coding skills.
Can I change the line spacing in the Classic Editor?
Yes, but you’ll need to use custom HTML or plugins, as the Classic Editor doesn’t offer built-in line spacing controls.
What is the ideal line spacing for readability?
A line height of 1.5 to 1.8 is generally considered ideal for readability in body text.
Will changing line spacing affect my site’s mobile view?
It can. Always check mobile responsiveness after making changes to ensure readability on all devices.
Can I customize line spacing for different sections of my site?
Yes, you can use custom CSS to adjust line spacing for specific sections, such as headers, paragraphs, or lists.
Abhijit Sarkar
Abhijit Sarkar is a content writer at DevDiggers covering WordPress setup, platform migration, and site security. He works through each process himself before writing about it, so his guides on topics like migrating from Blogger or locking down WordPress reflect what actually happens on screen, not just what the documentation describes.
Join thousands of readers getting smarter every week.
Leave a Reply