
You can add a search bar in WordPress in minutes using the built-in Search block, the widget panel, or a plugin, with no coding needed. For most sites, the fastest path is the Gutenberg Search block or the widget area. If you want a search icon in your navigation menu or need AJAX live search for a WooCommerce store, a plugin is the better choice.
The original post covered four methods. This updated version adds a fifth to the WordPress Site Editor path for block themes and goes deeper on what the default WordPress search actually does (and where it falls short). You will also find a section on where to place your search bar by site type, plus tips for WooCommerce stores where product search makes or breaks the shopping experience.
Here is what this guide covers: all five methods step by step, how to choose the right one for your site, best practices for placement and styling, and how to fix the most common search problems.
Why You Should Add a Search Bar in WordPress?
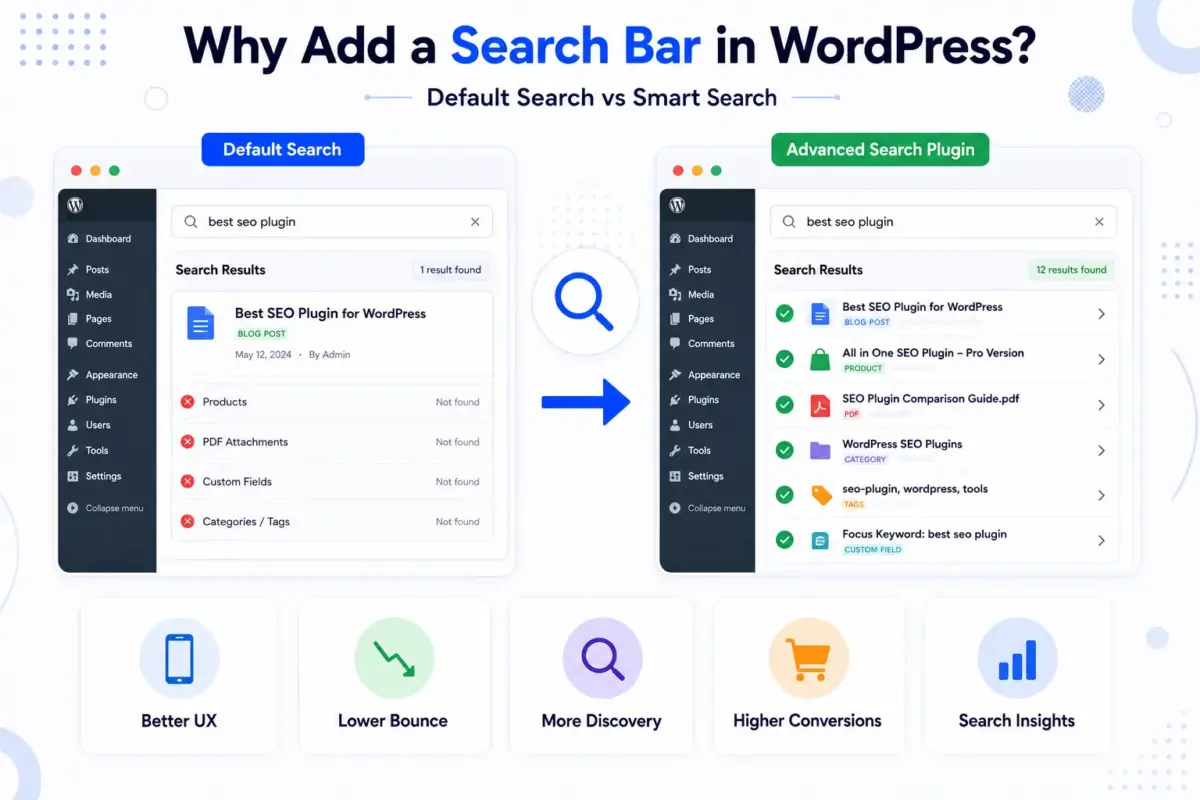
A search bar is one of the fastest wins available to any WordPress site owner. If visitors cannot find content quickly, they leave. A well-placed search bar keeps them on the site.
The three-click rule has been a UX standard for years: the idea that visitors should reach any content within three clicks. A search bar is the shortcut that gets them there faster than any menu can.
According to Forrester Research, site visitors who use search are up to 5 times more likely to convert than those who do not.
Here are the specific gains a search bar delivers:
- Better user experience: Visitors find what they need without hunting through pages and menus. That is especially true on mobile, where tapping through a multi-level menu is genuinely frustrating.
- Lower bounce rates: Studies show that effective site search can reduce bounce rates by up to 15%. Visitors who search tend to stay longer.
- More content discovery: Older posts, deeper product pages, and documentation search surfaces content that navigation menus never will.
- Higher conversion rates: On a WooCommerce store, a visitor who searches for a product has buying intent. Getting them to the right product fast is directly tied to revenue.
- Audience insights: Search query data tells you exactly what visitors want and cannot find. That is free content research.
The default WordPress search is basic. It matches keywords against post titles and body content only. It does not search custom fields, product metadata, tags, categories, PDF attachments, or WooCommerce order data.
For anything more complex, a growing shop, a knowledge base, or a portfolio with custom fields, you will need a plugin to fill the gaps.
How to Add a Search Bar in WordPress: 5 Methods
The five methods below are sorted from simplest to most advanced. Pick the one that matches your site type and skill level.
Method 1: Add a Search Bar Using the WordPress Widget Panel
This is the fastest way to add a WordPress search widget to any classic theme. It takes under two minutes and requires zero code.
Works best for: Sites using classic themes (not block themes), adding search to a sidebar or footer.
Step 1: Change default theme
- Log in to your WordPress dashboard.
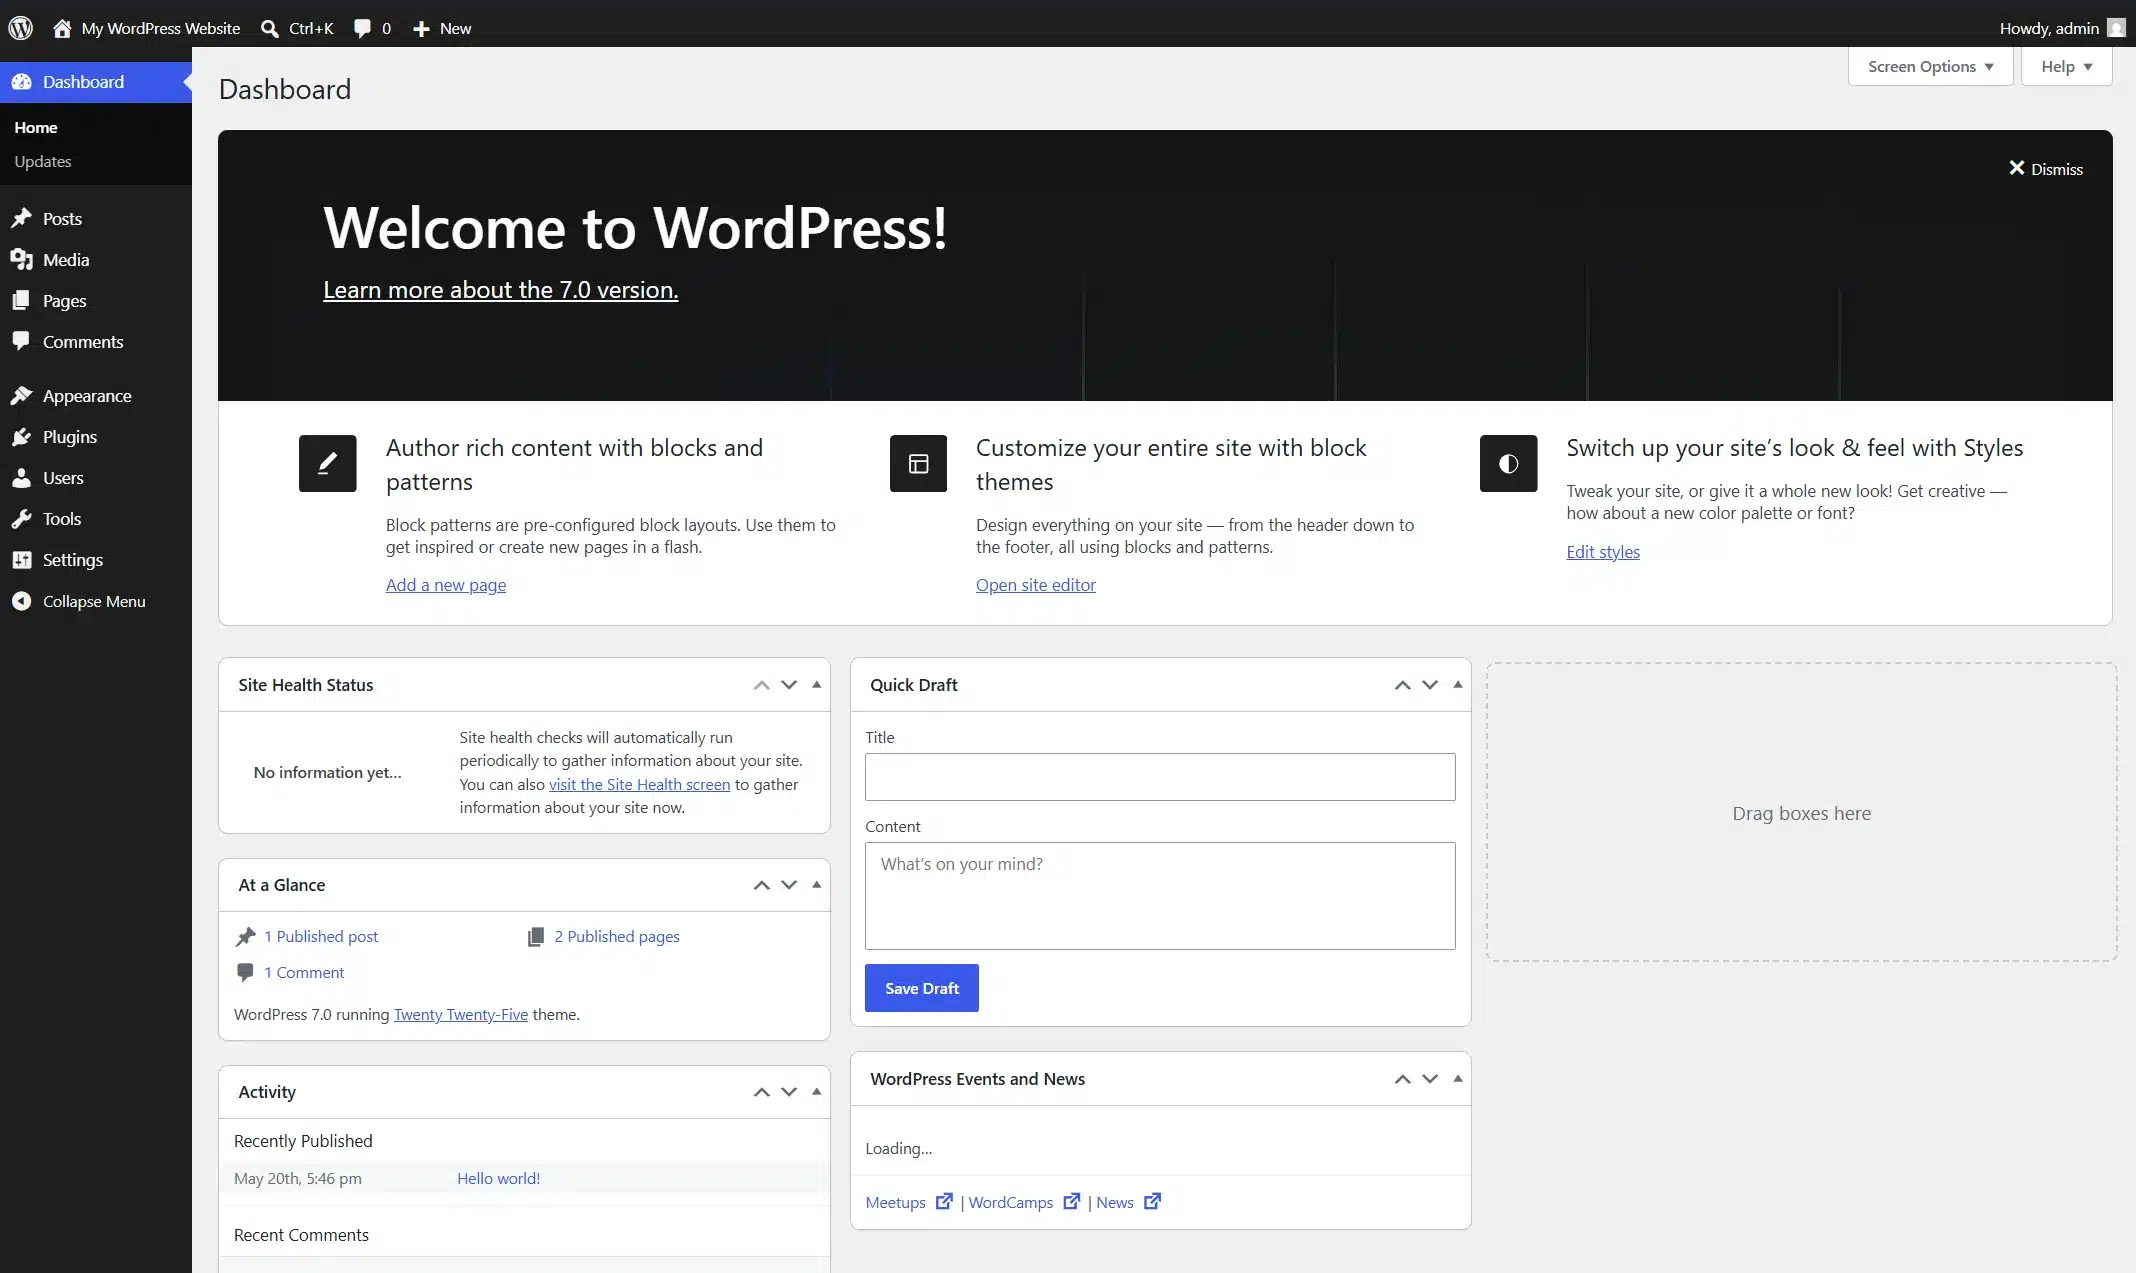
- Go to Appearance → Themes.
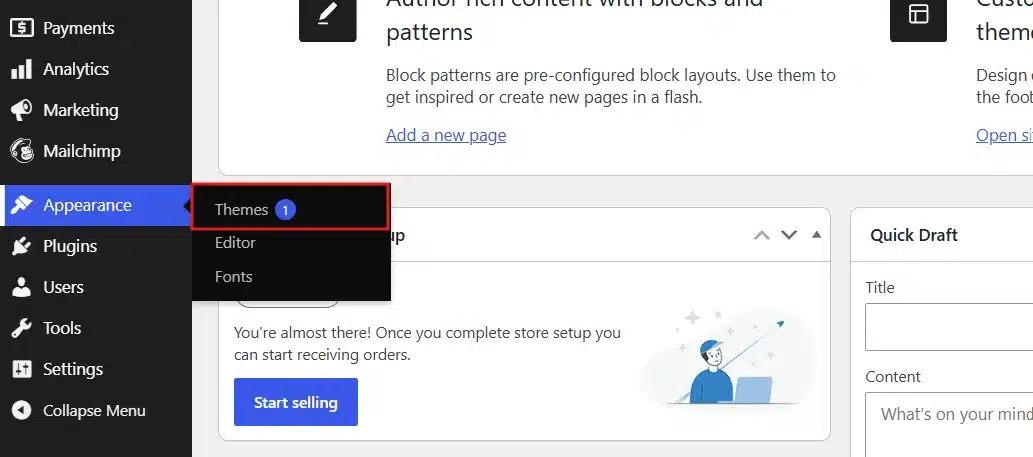
- Click Install and activate any Classic theme (e.g., Astra theme).
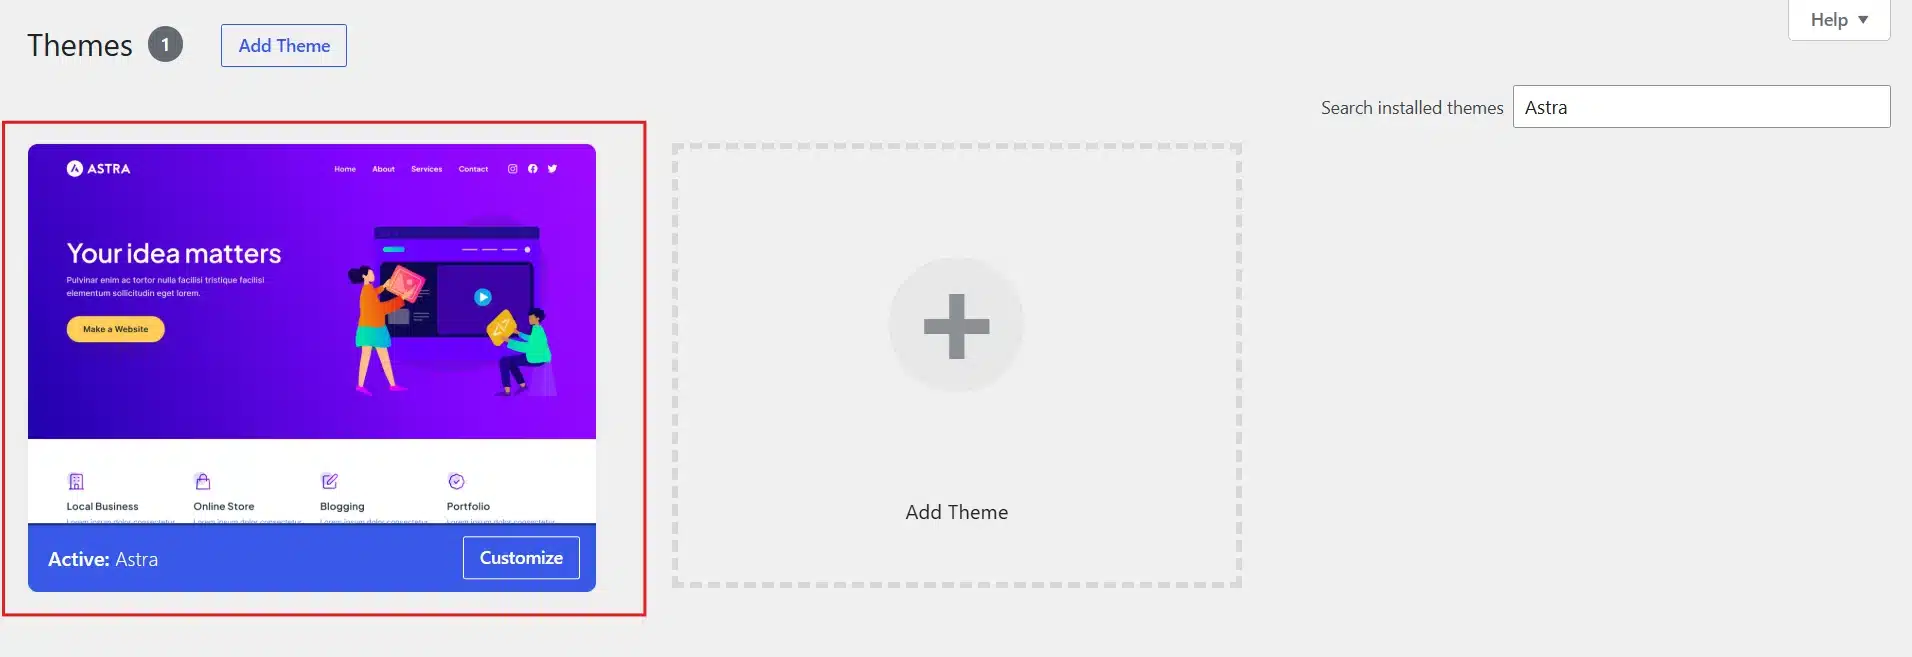
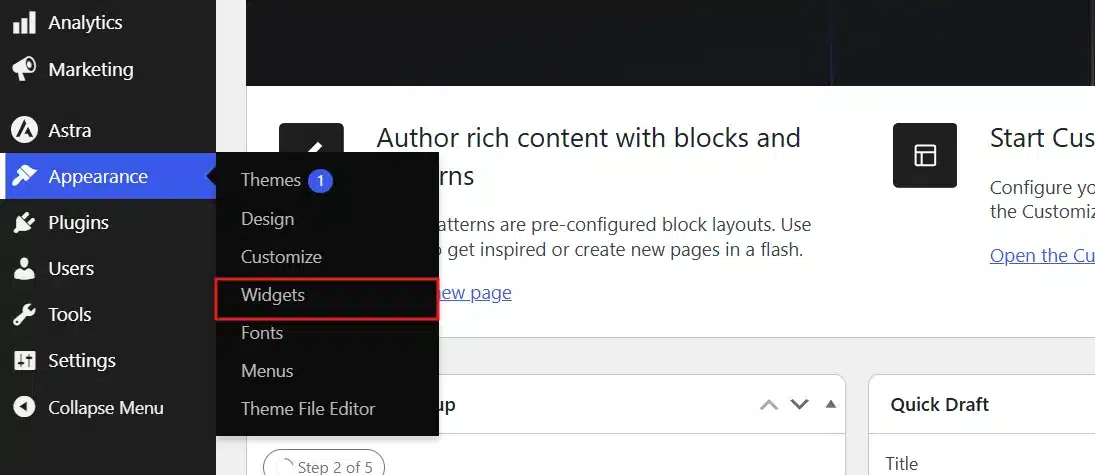
- Navigate to Appearance → Widgets.
- Now, you will see a panel with available widget blocks.
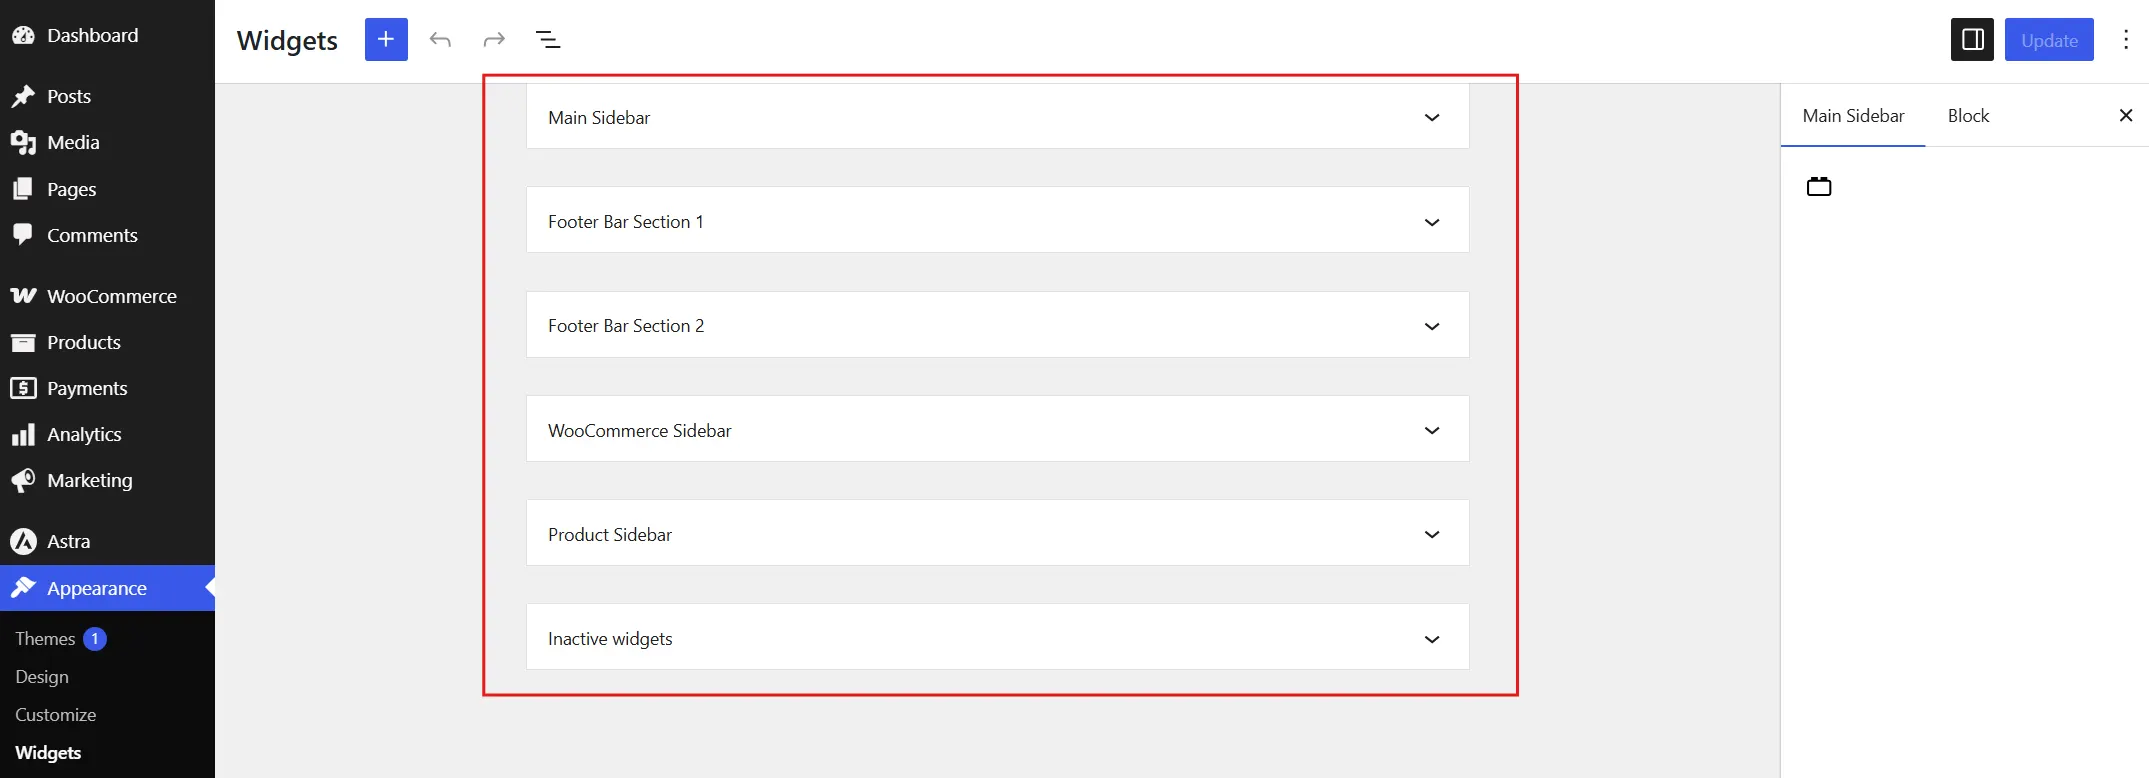
Note: The Widgets option is not available for default WordPress themes like Twenty Twenty-One, Twenty Twenty-Three, etc. It is recommended to switch to any classic theme, which fully supports the traditional Widgets panel.
Step 2: Add the Search Widget
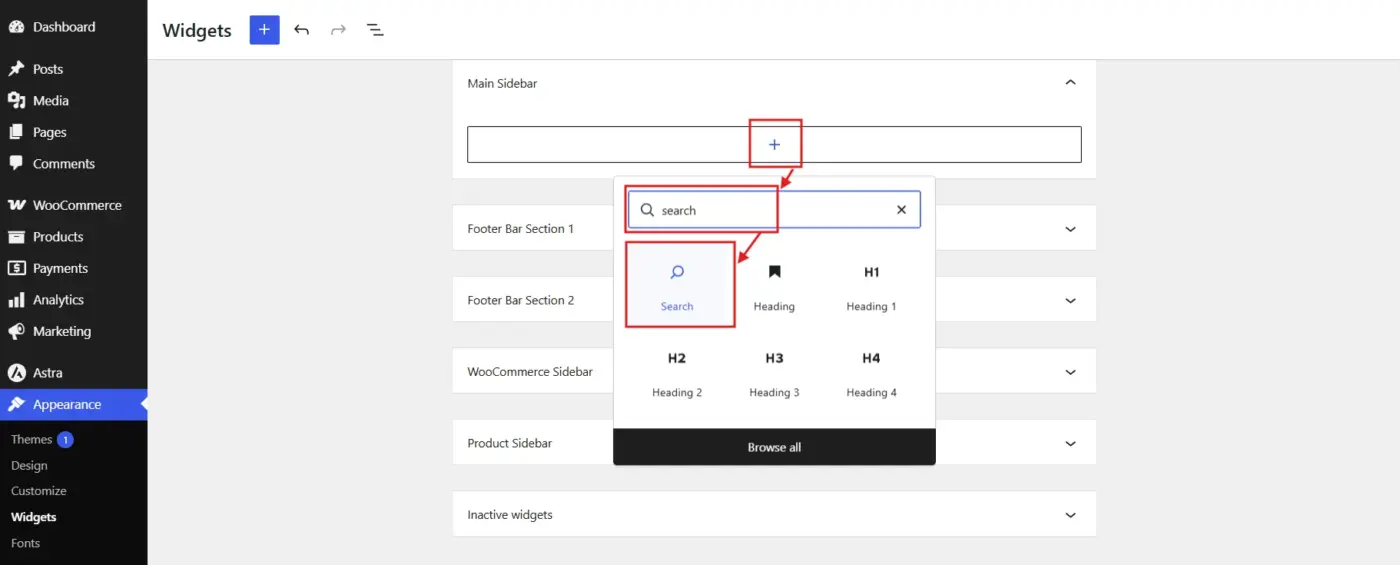
Click the + icon inside the widget area where you want the search bar. Type “Search” in the and select the Search block.
Step 3: Customise and Save
- You can set a custom label, adjust button text, and toggle the button position, then click Update to save.
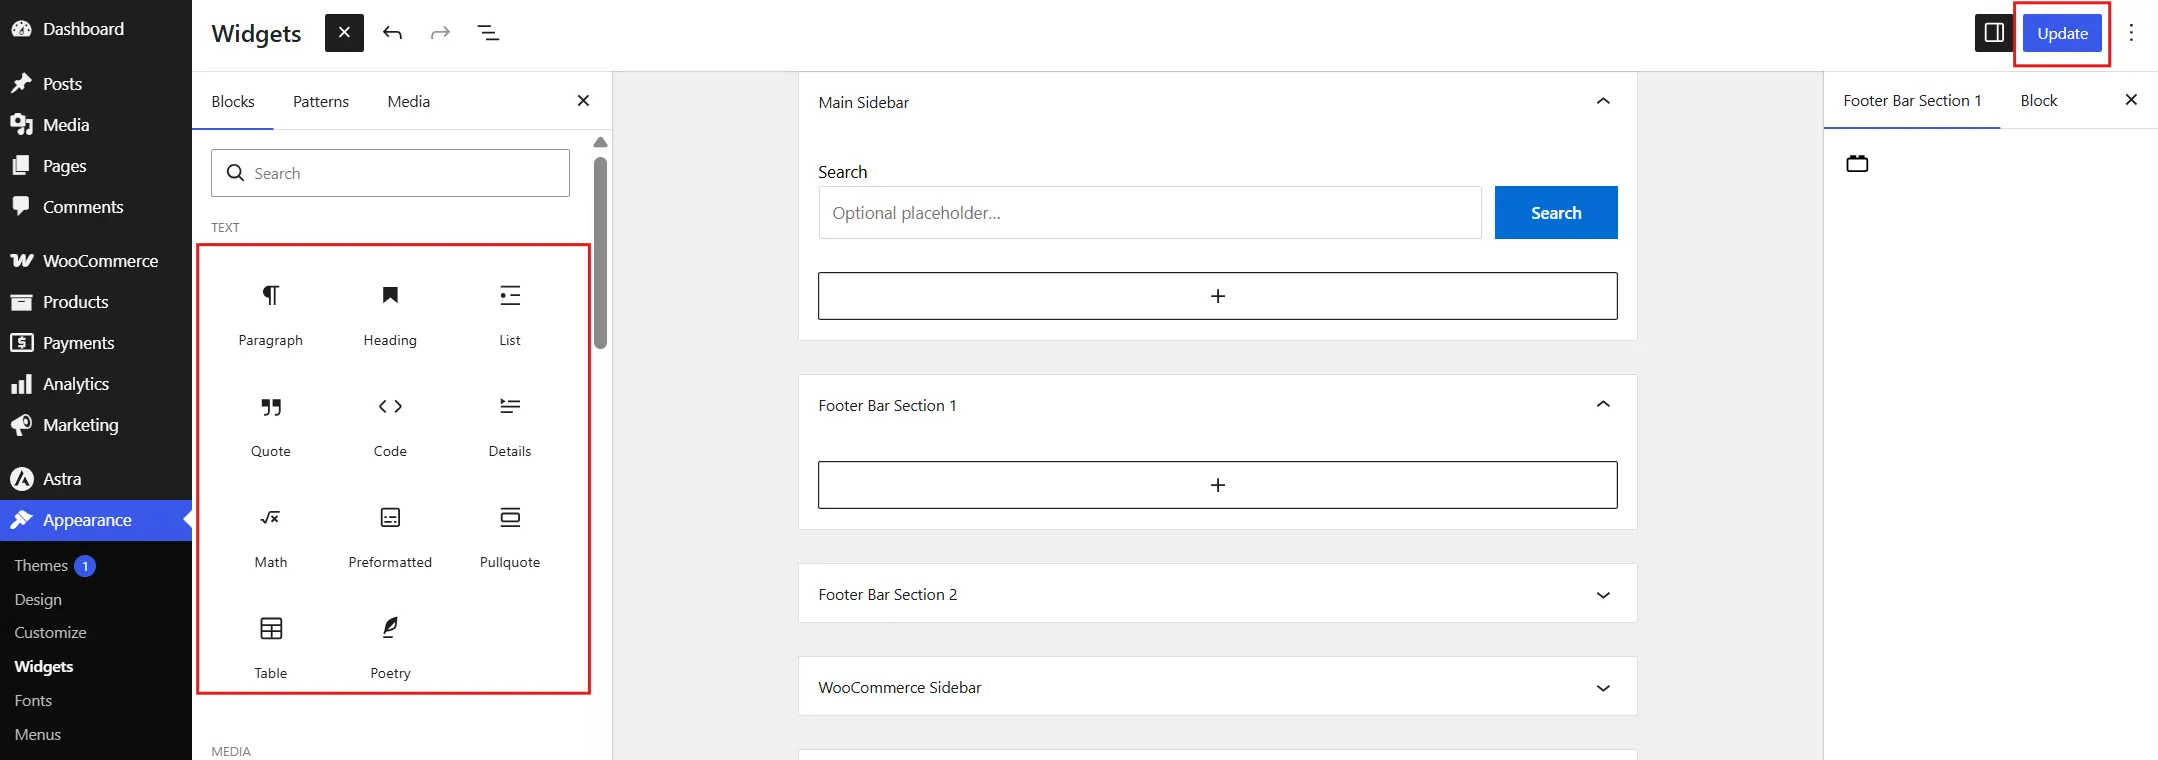
- Check your live site to confirm the search bar appears where you expect it.
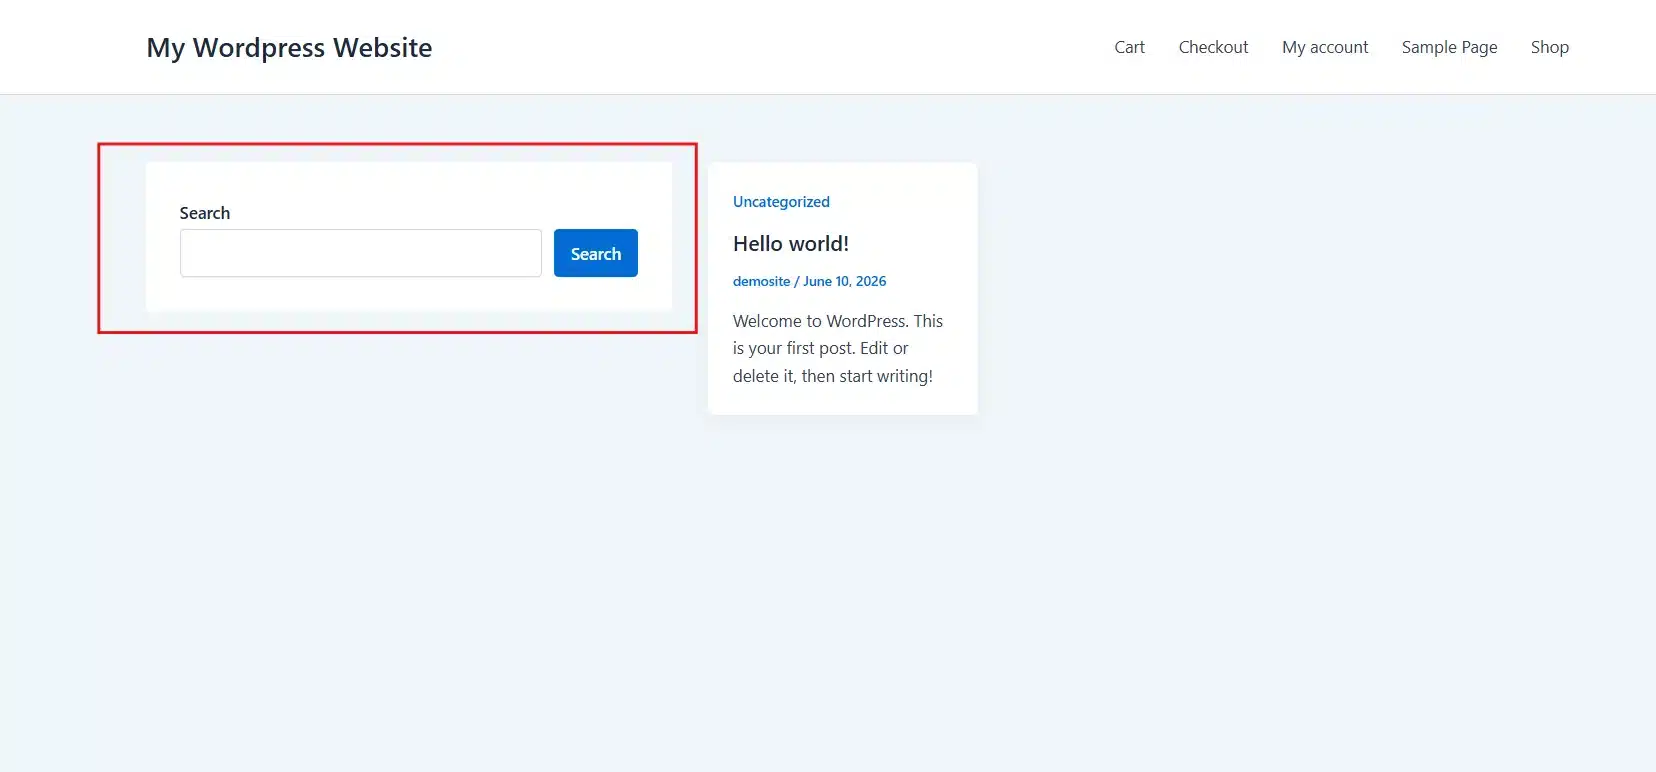
Method 2: Add a Search Bar Using the Gutenberg Block Editor
The Gutenberg Search block lets you drop a search bar anywhere on a page or post. This is the right method if you want a search bar on your homepage, a landing page, or inside specific content.
Works best for: Adding search to a specific page or post. Blogs that want a search bar after a featured article.
Step 1: Open the Page or Post
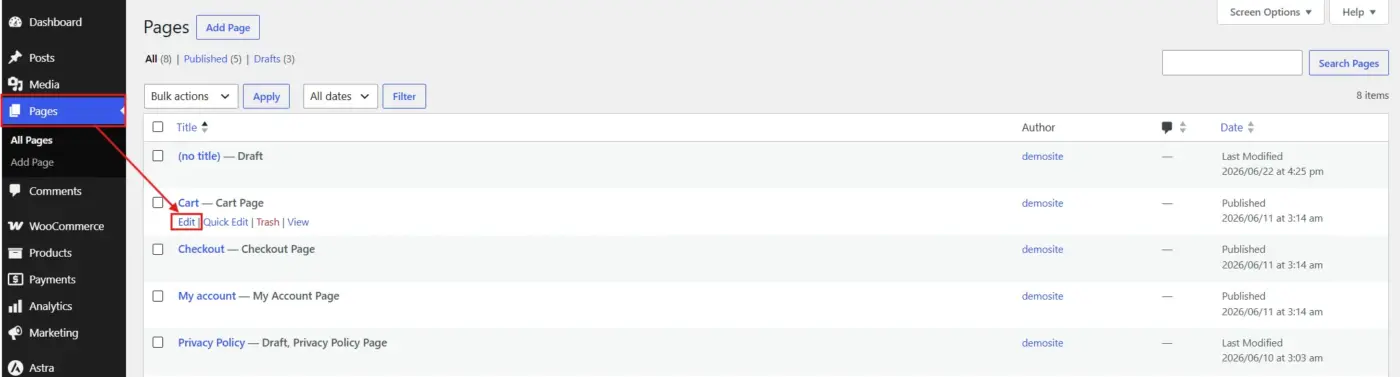
Go to Pages or Posts in your WordPress dashboard. Open the page you want to edit, or create a new one.
Step 2: Insert the Search Block
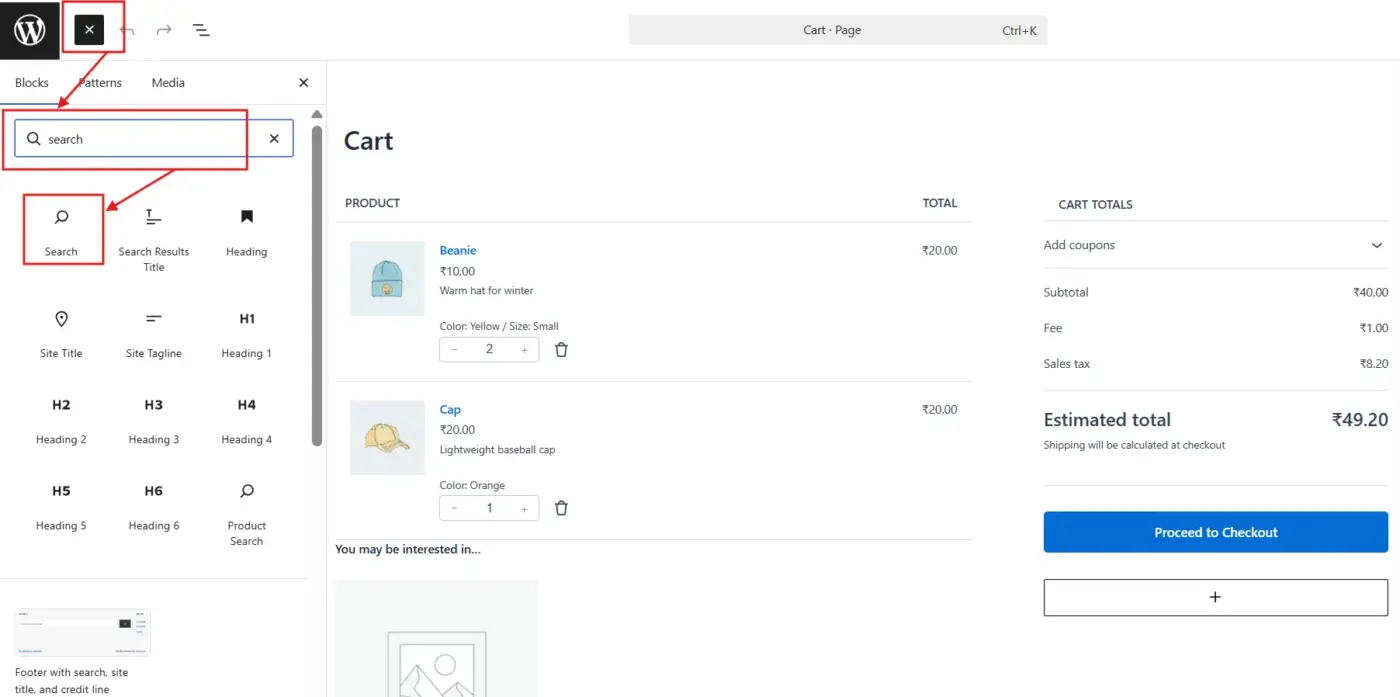
Click the + icon to add a new block. Type “Search” and select the Search block from the results.
Step 3: Configure the Block
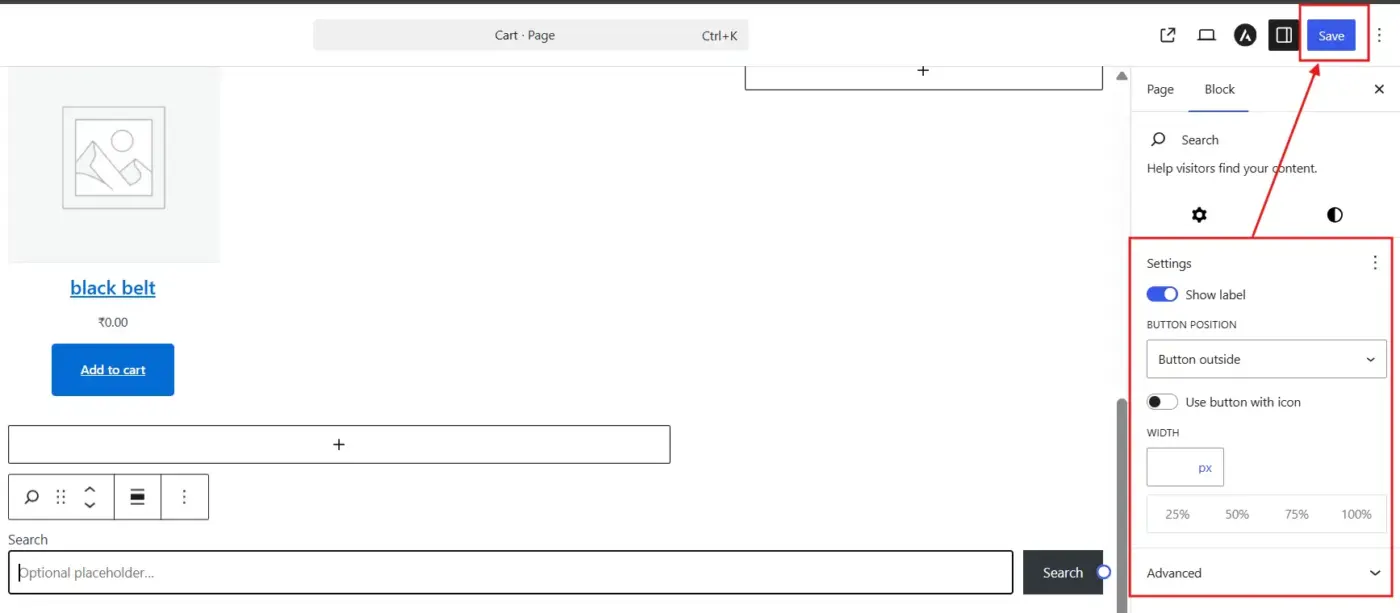
In the block toolbar and settings panel on the right, you can:
- Set the button position (inline or below)
- Switch between a text button and a search icon
- Adjust the block width
- Change button label text and placeholder text
Click Publish or Update when done.
Method 3: Add a Search Bar Using the WordPress Site Editor (Block Themes)
If you are using a block theme (Twenty Twenty-Four, Twenty Twenty-Five, Kadence, or similar), the Site Editor is how you add a search bar to your header so it appears across every page automatically.
This is the method most guides skip. It is worth knowing because block themes are now the default direction WordPress is heading, and the widget panel approach does not work the same way with them.
Works best for: Block theme users who want a persistent search bar in the header or footer across all pages.
Step 1: Open the Site Editor
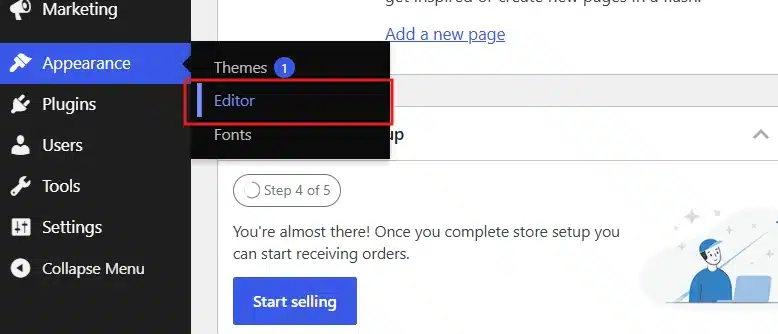
In your WordPress dashboard, go to Appearance → Editor. This opens the full Site Editor.
Step 2: Edit the Header Template Part
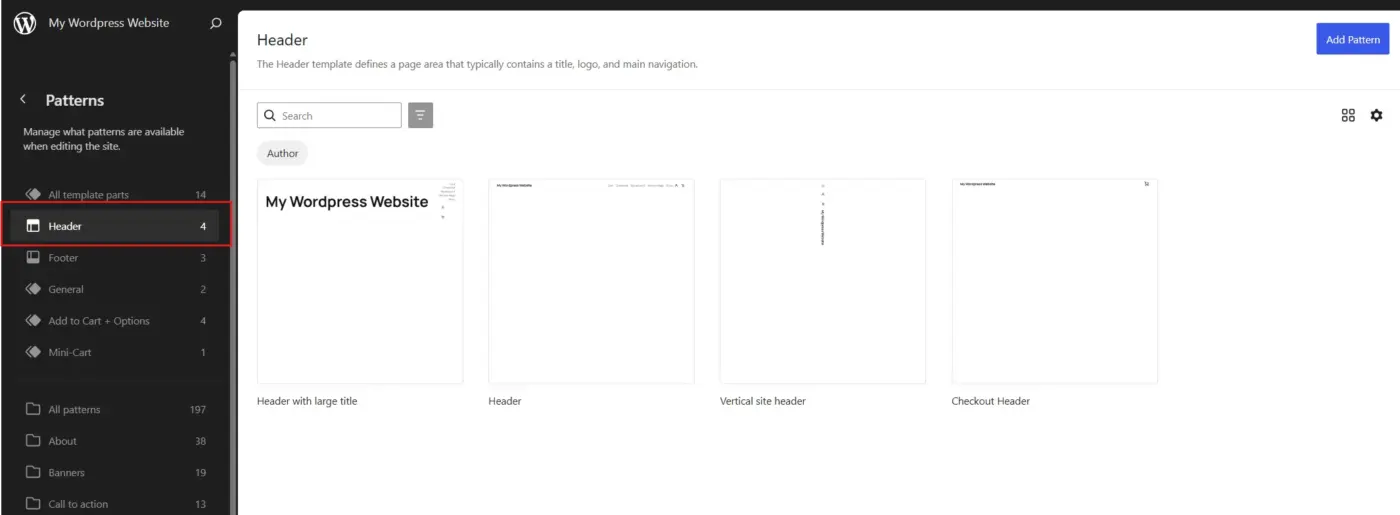
In the left panel, click Patterns, then select Header. Click the pencil icon to enter edit mode.
Step 3: Add the Search Block to the Header
- Select any specific Header Format.
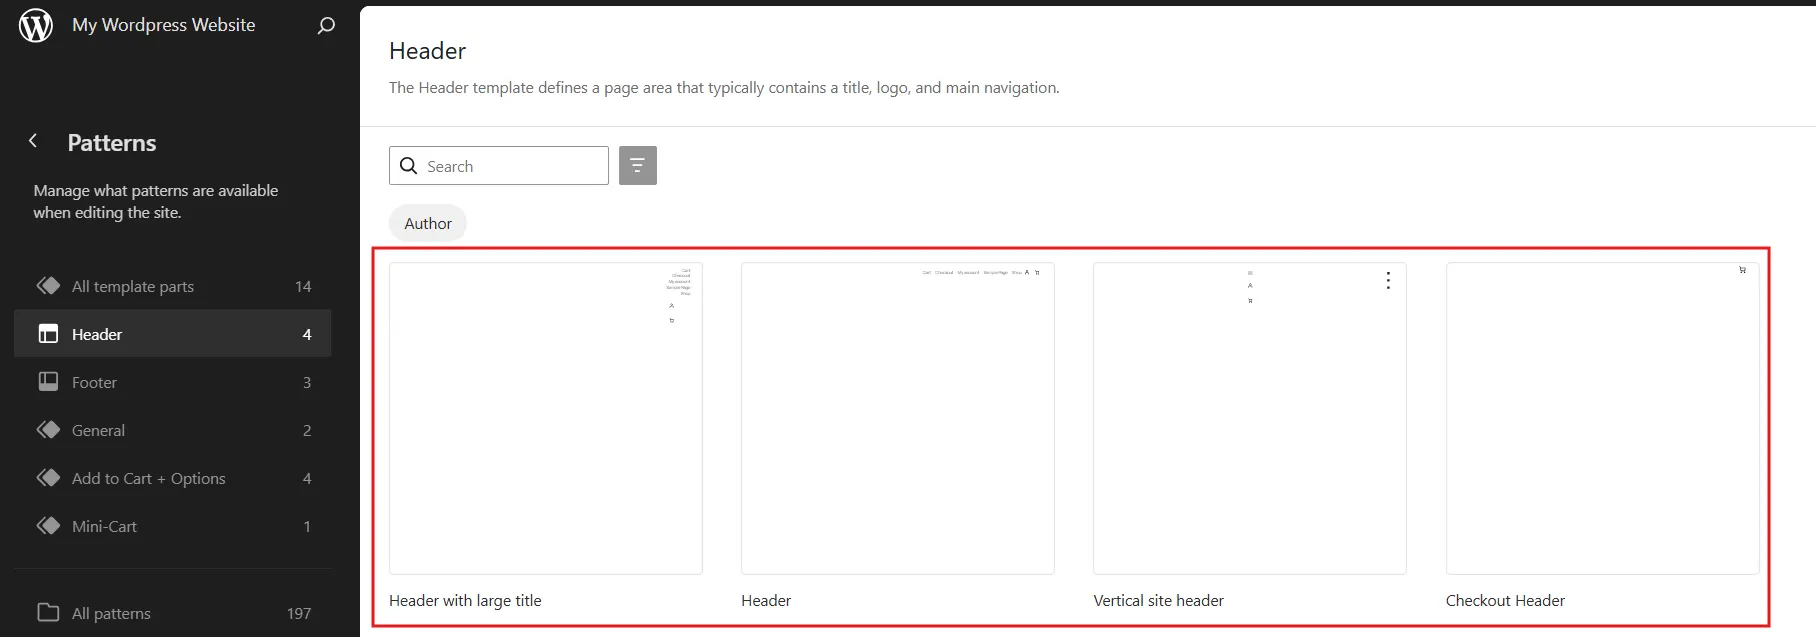
- Click the + icon in the header editing area. Search for “Search” and add the block.
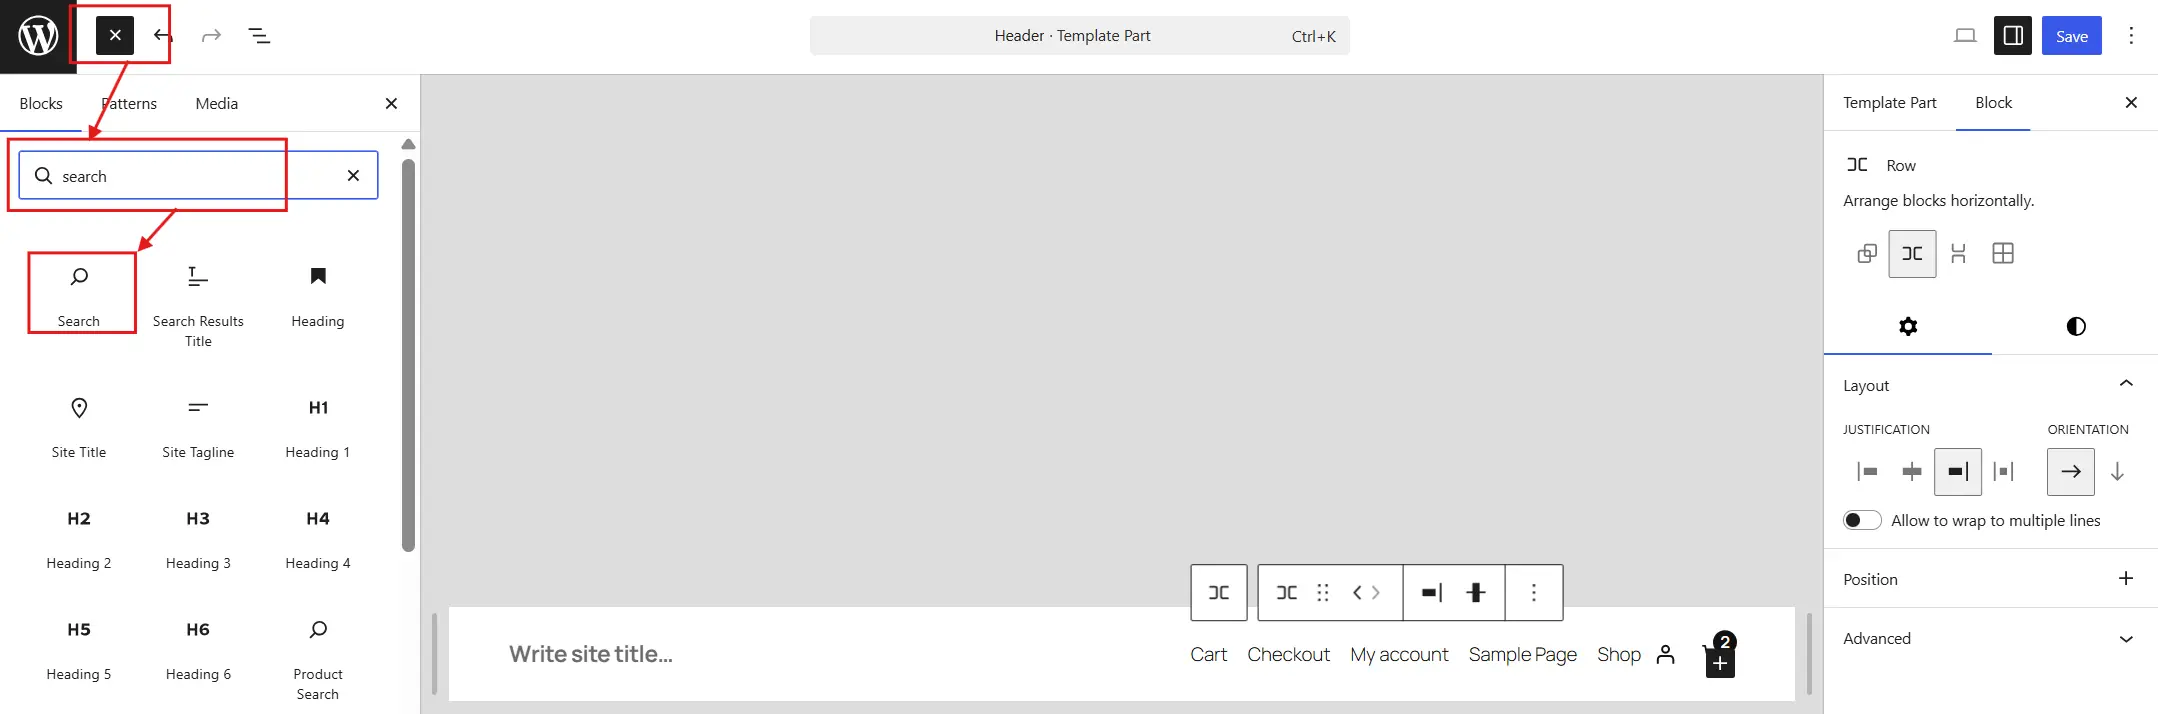
- Adjust width, colours, and button style in the block settings panel. Click Save when done.
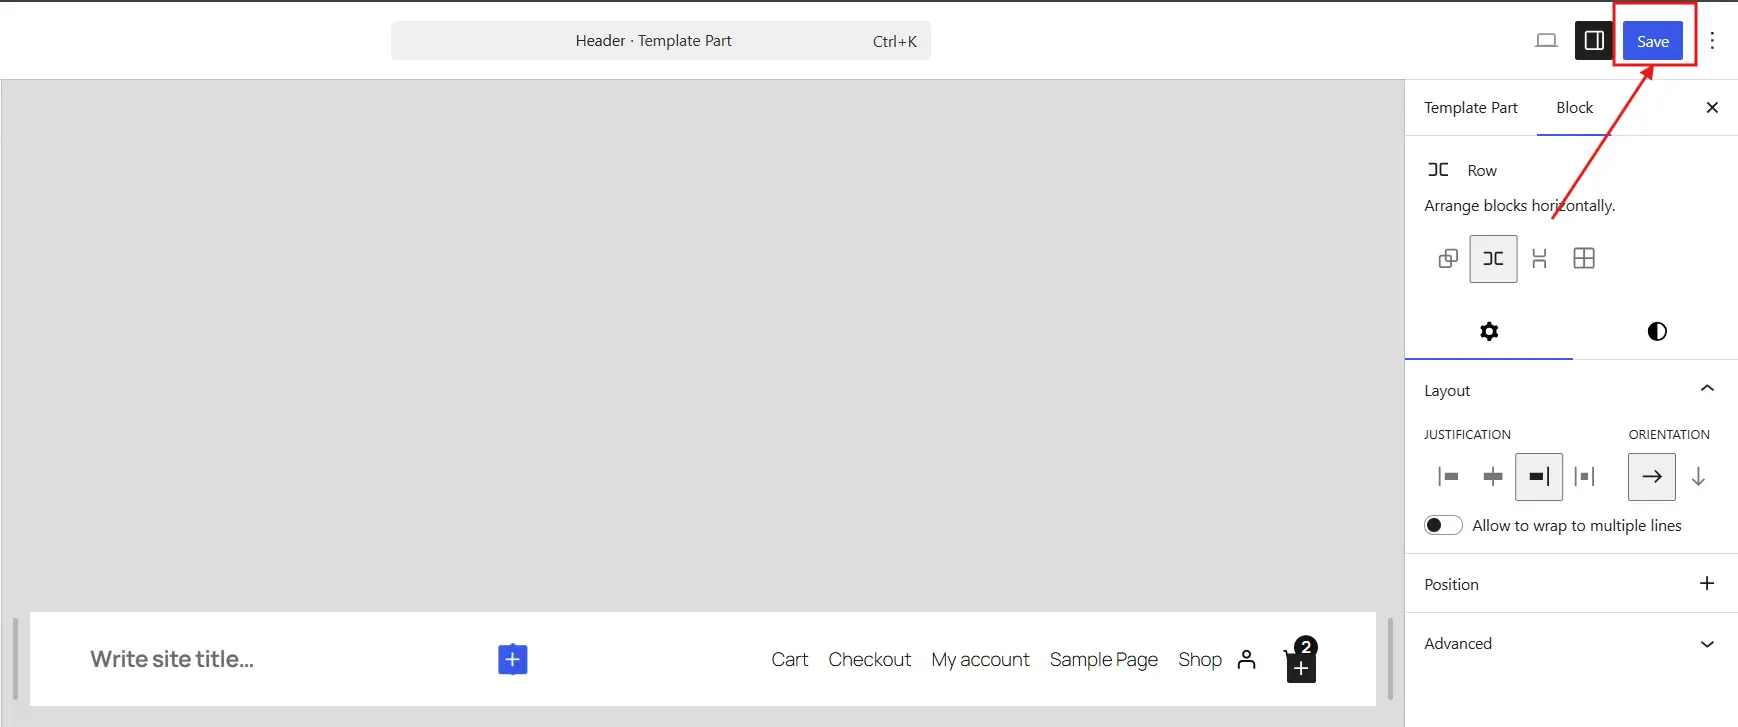
Note: Some block themes have the Search block already built into their header template. Before following these steps, check your existing header first; you might only need to toggle it on rather than add it from scratch.
Method 4: Add a Search Bar in WordPress Using a Plugin
Plugins are the right choice when you need more than the default search can deliver. Live AJAX search (results appear as you type), WooCommerce product search, search analytics, and full control over which content types get indexed; none of that is available out of the box.
Works best for: WooCommerce stores, content-heavy sites, sites that need AJAX live search, or anyone who wants search analytics.
Step 1: Choose and Install a Plugin
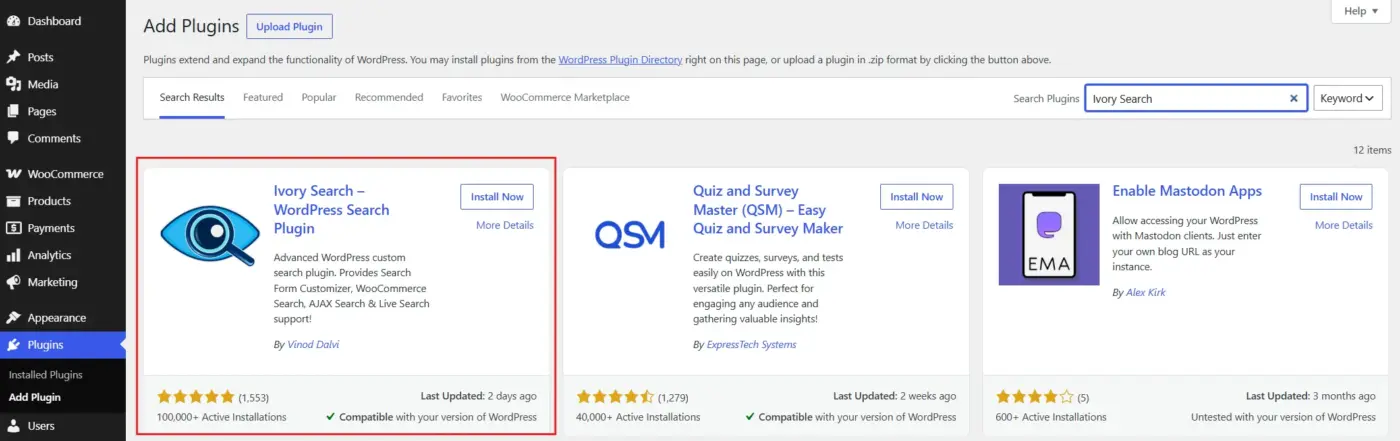
Go to Plugins → Add New in your dashboard. Here are the most relevant options:
- Ivory Search is free and reliable. It lets you add a search bar to your navigation menu, create custom search forms, and include AJAX live search. Good starting point for most sites.
- Relevanssi replaces the default search algorithm. Searches custom fields, tags, and taxonomies. Returns results by relevance rather than date. Free version handles most needs.
- SearchWP Live Ajax Search adds real-time search to existing forms. Lightweight. Works alongside your current search setup.
For WooCommerce stores specifically, Relevanssi is worth installing even if you do not change the search bar placement, because it extends WordPress search to cover product meta, attributes, and tags, all of which are invisible to the default search.
Step 2: Activate and Configure
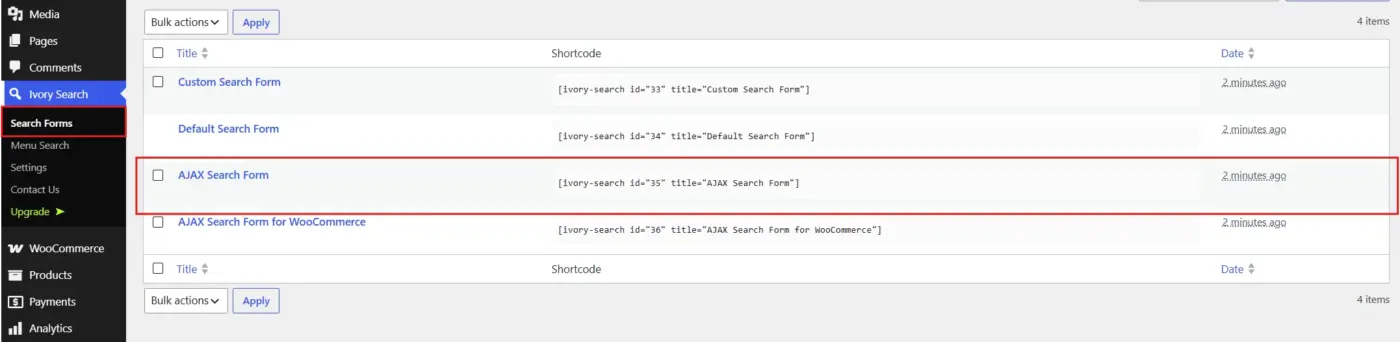
After installing, activate the plugin and follow its setup wizard or settings screen. Most plugins let you create a custom search form and generate a shortcode to place anywhere on your site.
For Ivory Search, go to Ivory Search → Search Forms in your dashboard to create a new search form. Set which content types to include, enable AJAX if you want live results, and copy the shortcode.
Step 3: Add the Search Form to Your Site
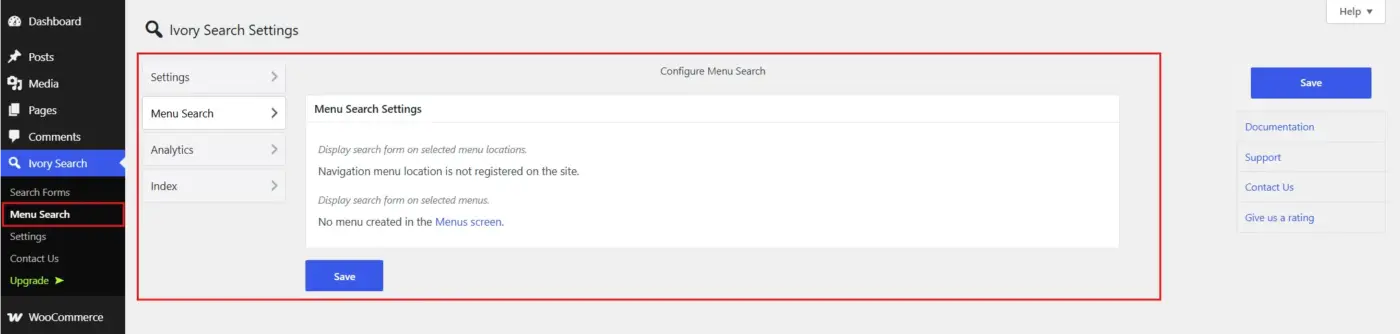
You can paste the shortcode into any page, post, widget area, or even your theme’s header. For menu placement, Ivory Search has a dedicated Menu Search tab in its settings. Choose the menu, select your form, and save.
Method 5: Add a Custom Search Bar Using Code
This method is for developers who need full control over markup, accessibility attributes, or search behaviour. It is not the right starting point for most users, but if you are building a custom theme or need a specific HTML structure, here is how it works.
Works best for: Developers building custom themes. Sites with specific accessibility requirements. Cases where no plugin fits the needed output.
Step 1: Create a Child Theme First
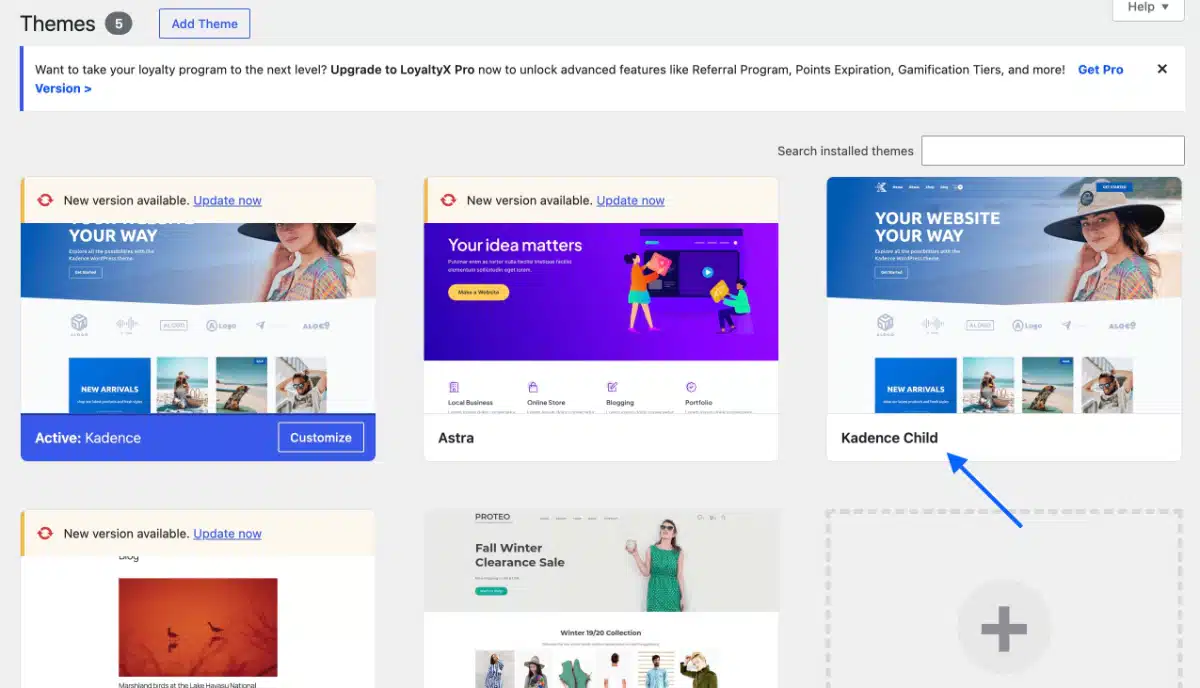
Never edit a parent theme directly. Create a child theme first so your changes survive theme updates. This applies any time you are modifying PHP or CSS files.
Step 2: Add the Search Form Function
In the correct template file for your theme (typically header.php or sidebar.php), add this WordPress function:
<?php get_search_form(); ?>
This calls WordPress’s built-in search form template. If your theme does not include a searchform.php file, WordPress generates a default one automatically.
Step 3: Create a Custom Search Form Template (Optional)
For full control over markup and accessibility, create a searchform.php file in your child theme directory:
<?php
/**
 * Custom search form template.
 */
?>
<form role="search" method="get" class="site-search" action="<?php echo esc_url( home_url( '/' ) ); ?>">
  <label class="screen-reader-text" for="site-search-input">Search this site</label>
  <input id="site-search-input" type="search" class="site-search__input"
         placeholder="Search..." value="<?php echo get_search_query(); ?>" name="s" />
  <button type="submit" class="site-search__button">Search</button>
</form>
Note the screen-reader-text label on the input. Screen readers need this to announce the field to users who rely on support tools. It is hidden visually but present in the DOM. This is the accessible way to build a search form.
Step 4: Style with CSS
Add custom styles in your child theme style.css or via the WordPress Customizer’s Additional CSS panel:
.site-search {
    display: flex;
    max-width: 400px;
}
.site-search__input {
    flex-grow: 1;
    padding: 10px 14px;
    border: 1px solid #ddd;
    border-radius: 4px 0 0 4px;
    font-size: 16px;
}
.site-search__button {
    padding: 10px 16px;
    background-color: #0073aa;
    color: #fff;
    border: none;
    border-radius: 0 4px 4px 0;
    cursor: pointer;
}
.site-search__button:hover {
    background-color: #005177;
}
Where to Place Your WordPress Search Bar
The method you choose matters less than where you put the search bar. A search form buried in the footer gets ignored. Here is where to place it by site type:
- Blogs and content sites: The header is the strongest placement. Most readers look for the search at the top right of the page. A secondary placement in the sidebar (for classic themes) supports visitors who scroll down without finding what they need.
- WooCommerce stores: The header is non-negotiable. Online shoppers expect to search from wherever they land. An always visible header search bar, ideally with AJAX live results, is standard on any eCommerce site. Consider adding a second, larger search bar on your shop page above the product grid. This improves the eCommerce user experience significantly, particularly on mobile.
- Service and portfolio sites: Navigation menus are usually short enough that visitors can browse. A header search icon (a magnifier that expands on click) keeps the design clean while still offering search as an option.
- Knowledge bases and documentation sites: Search is the primary navigation for these site types. Put it front and centre, ideally at the top of every page and clearly on the homepage. A plugin with AJAX live search and content-type filtering is worth the extra setup here.
Practical note: on mobile, a full-width search bar takes up a lot of real estate. An expandable search icon that expands to a full-width field on tap is the cleaner approach for mobile-first designs.
How to Improve Default WordPress Search
The default WordPress search does one thing: it matches text in post titles and post content. That is it. No custom fields, no product meta, no tags, no categories, no document attachments.
For a blog with 20 posts, this is fine. For anything larger, here is what falls through the cracks:
- WooCommerce products: Product SKUs, attributes, and custom fields are not indexed. A search for a product’s technical spec or model number returns nothing.
- Custom post types: Portfolio items, customer reviews, team members, events. None of these appears in default WordPress search results unless you explicitly include them.
- Tags and categories: A visitor searching for “tutorial” will not find posts tagged “tutorial” unless that word also appears in the post title or body.
- Spelling mistakes: Default search is an exact match. Type “WordPress” and you get no results.
The fix for all of the above is Relevanssi (free) or SearchWP (premium). Both replace the default search query with an extended one that covers custom post types, taxonomies, metadata, and similar word matching. Install either plugin and your existing search bar immediately becomes more capable, with no UI changes needed.
For WooCommerce stores, this matters a lot. Visitors searching for products are buyers. If your search returns nothing because the product SKU is in a custom field, you have lost that sale. Getting WooCommerce product search right is one of the higher-ROI technical improvements available to any store owner. If you need help with WordPress speed optimization alongside search improvements, DevDiggers handles both.
Best Practices for WordPress Search Bars
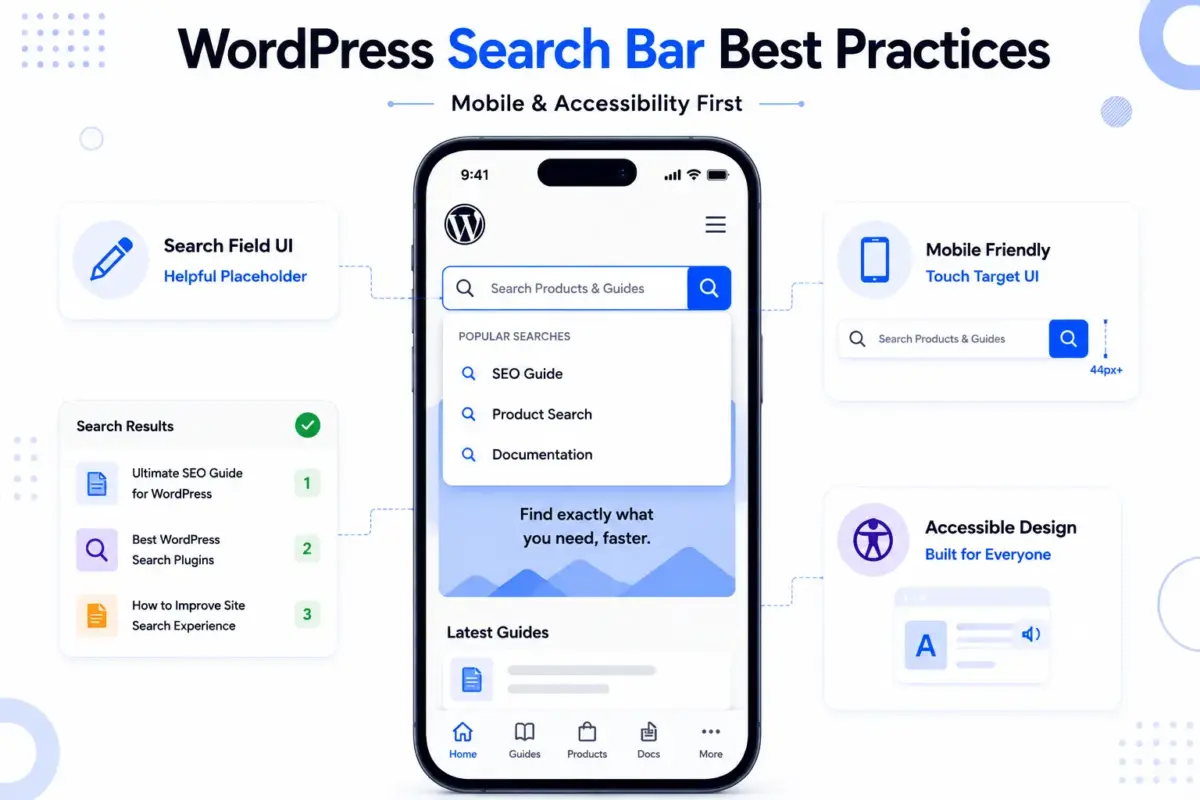
A few habits that separate a good search implementation from an average one:
- Use a placeholder that helps: “Search…” tells the visitor nothing. “Search products, guides, or docs…” tells them exactly what they can find. Pick a placeholder that reflects your actual content.
- Handle zero results gracefully: The default “No results found” page is a dead end. Customise it to offer suggestions: popular posts, a link to your homepage, or a prompt to try a different search term. Edit the
search.phptemplate in your child theme to control this output. - Track what visitors search for: WordPress does not show search query data by default, but Google Analytics (with site search tracking enabled) does. Set it up in your GA4 property under Reports → Site Search. After two or three weeks, the data tells you what content gaps exist and what your visitors cannot find. That is free content planning.
- Test on mobile before calling it done: A search bar that looks good on a desktop can be nearly impossible to tap on a small screen. Check button size (at least 44px tap targets), input field width, and keyboard behaviour on iOS and Android.
- Keep it accessible: Screen readers need labelled inputs. If you are using the built-in WordPress Search block, accessibility attributes are included automatically. If you are coding a custom form, include an
forattribute on your label andidon your input. The custom form template in Method 5 above shows the correct pattern.
Troubleshooting Common WordPress Search Problems
- Search returns no results for content you know exists: The most likely cause is that the content is a custom post type that the default WordPress search does not include. Install Relevanssi and check its settings to include the right post types.
- Search bar styling does not match the theme: The Search block inherits your theme’s styles, but sometimes the button or input colours conflict. Add specific CSS to your Additional CSS panel, targeting
.wp-block-search__inputand.wp-block-search__buttonto override defaults. - The widget search bar disappeared after switching themes: Classic theme widget areas differ between themes. After a theme switch, go to Appearance → Widgets and re-add the Search widget to the widget areas your new theme supports.
- The search bar is present, but submits to the wrong page: Check that the form
actionURL points to your home URL. Custom search form code sometimes uses a hardcoded URL instead ofhome_url('/'). Fix it to use the WordPress function so it works regardless of where the site is hosted. - Plugin search is slow: AJAX search queries run on your server. If your hosting plan has limited resources, AJAX search can add noticeable latency. Check with your host about server resources, or consider a cloud-based search plugin that offloads the query processing. You can also reduce query load by limiting the number of indexed post types in the plugin settings.
If site speed is a broader concern, creating a searchable database in WordPress correctly and pairing it with a caching layer reduces the load significantly.
Which Method Should You Use?
| Use Case | Method |
|---|---|
| Classic theme, sidebar or footer | Use the widget (Method 1) |
| Any theme, specific page | Use the Gutenberg block (Method 2) |
| Block theme, site-wide header | Use the Site Editor (Method 3) |
| WooCommerce store, AJAX live search, menu search | Use a plugin (Method 4) |
| Custom theme, developer building from scratch | Use code (Method 5) |
| GetSnap | GetSnap AI |
| WooCommerce Product Search (itthinx) | None (text search) |
The display method and the search engine underneath it are two separate things. You can use the default WordPress Search block as the display layer while letting Relevanssi handle the query logic. They work together.
Conclusion
Adding a search bar in WordPress is one of those small improvements with an outsized effect on how visitors experience your site. Five minutes of setup can mean the difference between a visitor finding what they need and bouncing.
The method you pick depends on your theme type and what you need the search to do. Block theme users get the cleanest path through the Site Editor. Classic theme users reach for the widget or a plugin. And anyone running a WooCommerce store or a larger content site should pair a display method with a plugin that extends what the default WordPress search can index.
Set it up, test it on mobile, and then check your search query data after a few weeks. What visitors are searching for and not finding is one of the most useful signals available to any site owner.
Frequently Asked Questions (FAQs)
Q1. How do I add a search bar to my WordPress header without a plugin?
If you are using a block theme, go to Appearance → Editor, open the header template part, and add a Search block directly inside it. Save, and the search bar appears in the header across all pages. For classic themes without a widget area in the header, you would need to modify the header.php file in a child theme or use a plugin like Ivory Search, which handles header placement without code.
Q2. Does a search bar slow down my WordPress site?
A basic search bar using the built-in WordPress Search block or widget adds no meaningful load to your site. The search query only runs when a visitor submits a search. AJAX plugins that display live results as visitors type do run server-side queries on each keystroke, which can add load under high traffic. If performance is a concern, choose a plugin that caches results or offloads queries to a cloud index.
Q3. Can I add multiple search bars with different settings on the same site?
Yes. Using a plugin like Ivory Search, you can create multiple search forms, one for blog posts, one for WooCommerce products, one for documentation, each with its own content scope and AJAX settings. Display them in different locations using shortcodes or widget areas.
Q4. How do I make my WordPress search bar only search WooCommerce products?
Install Ivory Search or Relevanssi. In the plugin settings, create a custom search form and limit the included post types to Products only. Exclude posts, pages, and other content types. Place this product-specific search form on your shop page or in the header, and it will return only product results when visitors search.
Q5. How do I change the placeholder text in the WordPress search bar?
For the Gutenberg Search block, click the block and look for the Label and Button Text settings in the block toolbar. For the widget, the settings appear in the widget panel. For a custom-coded form, edit the placeholder attribute in the input tag directly. For plugin-generated forms, the placeholder is usually configurable in the plugin’s form settings.
Q6. Why is my WordPress search not finding all my content?
Default WordPress search only indexes post titles and post body content. It does not search tags, categories, custom fields, WooCommerce product attributes, or custom post types. Install Relevanssi to extend the search index to cover all of these. After activation, go to Relevanssi → Indexing and rebuild the index so existing content is included.
Q7. Can I track what visitors are searching for on my WordPress site?
Yes. Connect your site to Google Analytics 4 and enable site search tracking in your GA4 property under Admin → Data Streams → Web Stream → Enhanced Measurement. Once active, the Reports section shows the exact terms visitors search for. This data is useful for finding content gaps and improving your navigation.