An order bump is a small, one-click offer you show shoppers right before they pay, and it’s one of the fastest ways to raise your average order value without spending a cent on ads.
If you run a WooCommerce store, you can create order bump for WooCommerce in one of two ways: a free plugin or a bit of custom code.
Each one fits a different kind of store owner. This guide walks through both so you can pick the one that fits yours. Before you get into the setup steps, it helps to know what you’re building and why it works.
What Is an Order Bump?
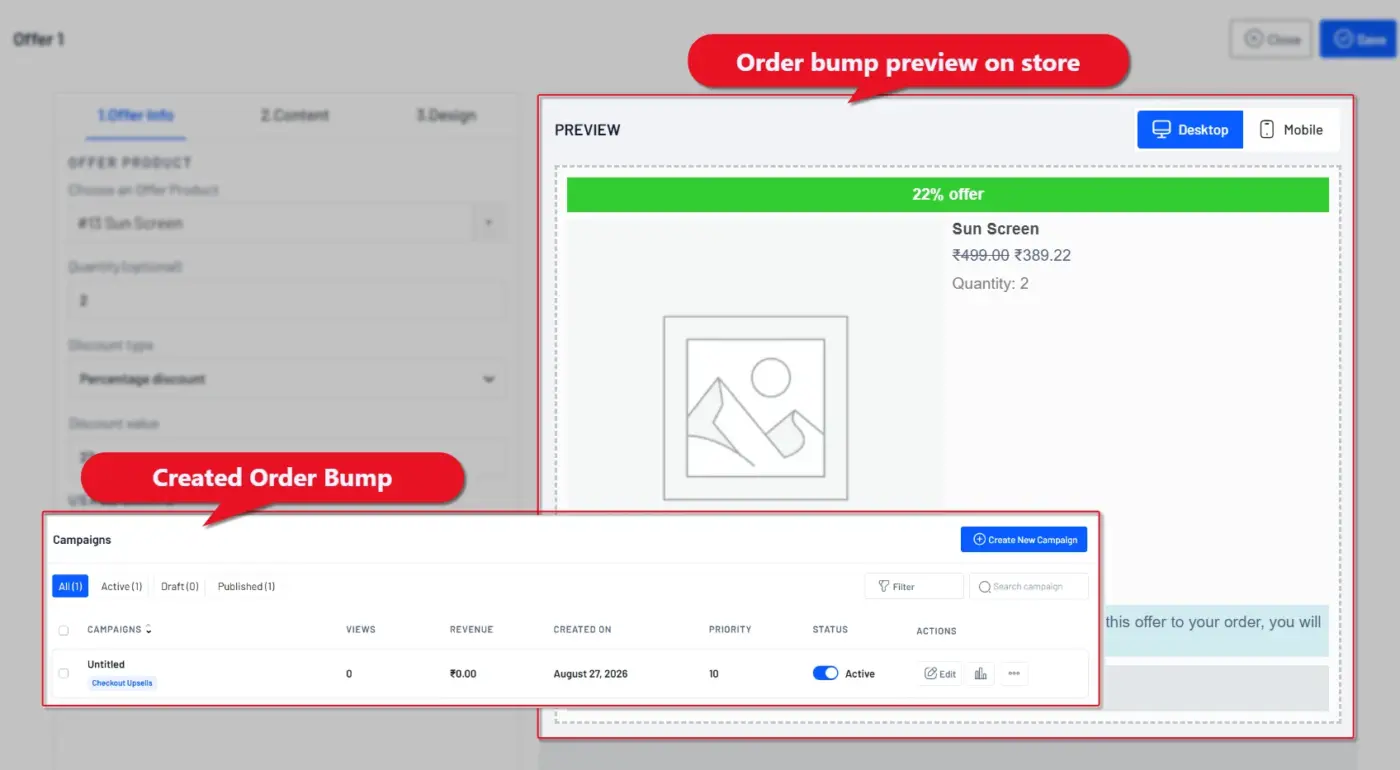
An order bump is a marketing term for a small add-on offer you show a customer at checkout, right before they hit the pay button. It’s usually a related product, priced lower than the main item, and it takes one click to add.
Think about the last time you bought something online and saw a line that said: “Add this for just $5 more.” That’s an order bump.
It sits between the customer’s decision to buy and the moment they actually pay, which is exactly why it converts so well. The customer has already committed. Adding one more small item feels easy, not pushy.
That’s different from an order bump vs upsell, which usually offers a more expensive upgrade after checkout, not a cheap add-on during it. If a customer buys running shoes, an order bump might offer socks or a shoe cleaning kit at a discount. Small, related, easy yes.
Why Add an Order Bump to Your WooCommerce Store?
You don’t need more traffic to make more money. You need to get more value out of the traffic you already have, and that’s exactly what an order bump does.
Here’s what it actually gets you:
- Higher average order value: Every accepted bump adds a few dollars to the order. Do that across hundreds of orders a month, and it adds up fast.
- A better shopping experience, if you do it right: A relevant order bump feels like a helpful suggestion, not a sales pitch. Customers often say “oh, good idea” more than they say “no thanks.”
- A non-annoying sale: Nobody has to sit through a pop-up. It’s just a line item they can tick or skip.
- Higher conversion on the add-on itself: Order bumps convert far better than product page upsells because the customer has already decided to buy something. You’re just adding to a decision they’ve made, not asking them to make a new one.
- More repeat purchases over time: A well-chosen bump, like a refill pack or a companion product, builds customer lifetime value. It does more than increase one order.
Some store owners report accepted bump rates near 30-50%, though your real number depends on how relevant the offer is. A bump that has nothing to do with the cart won’t convert no matter how good the design looks.
How to Create Order Bump for WooCommerce
There are three ways to do this. Pick the one that matches your situation from the section above. Or read through all three. Plenty of store owners end up using more than one.
Method 1: Using a Free Plugin
If a paid plugin isn’t in the budget right now, this method gets you a working order bump for free, and unlike Buying process-based tools, it doesn’t require building a checkout flow just to reach the bump feature.
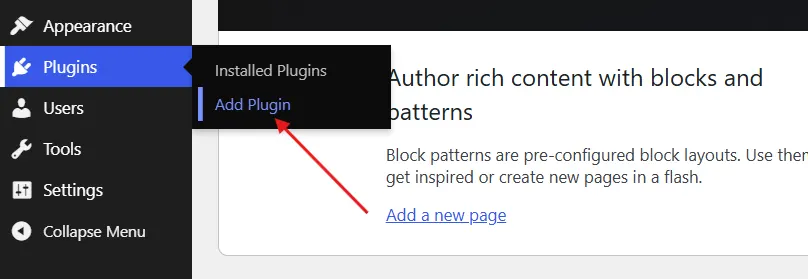
- Go to Plugins → Add Plugin in your WordPress Dashboard.
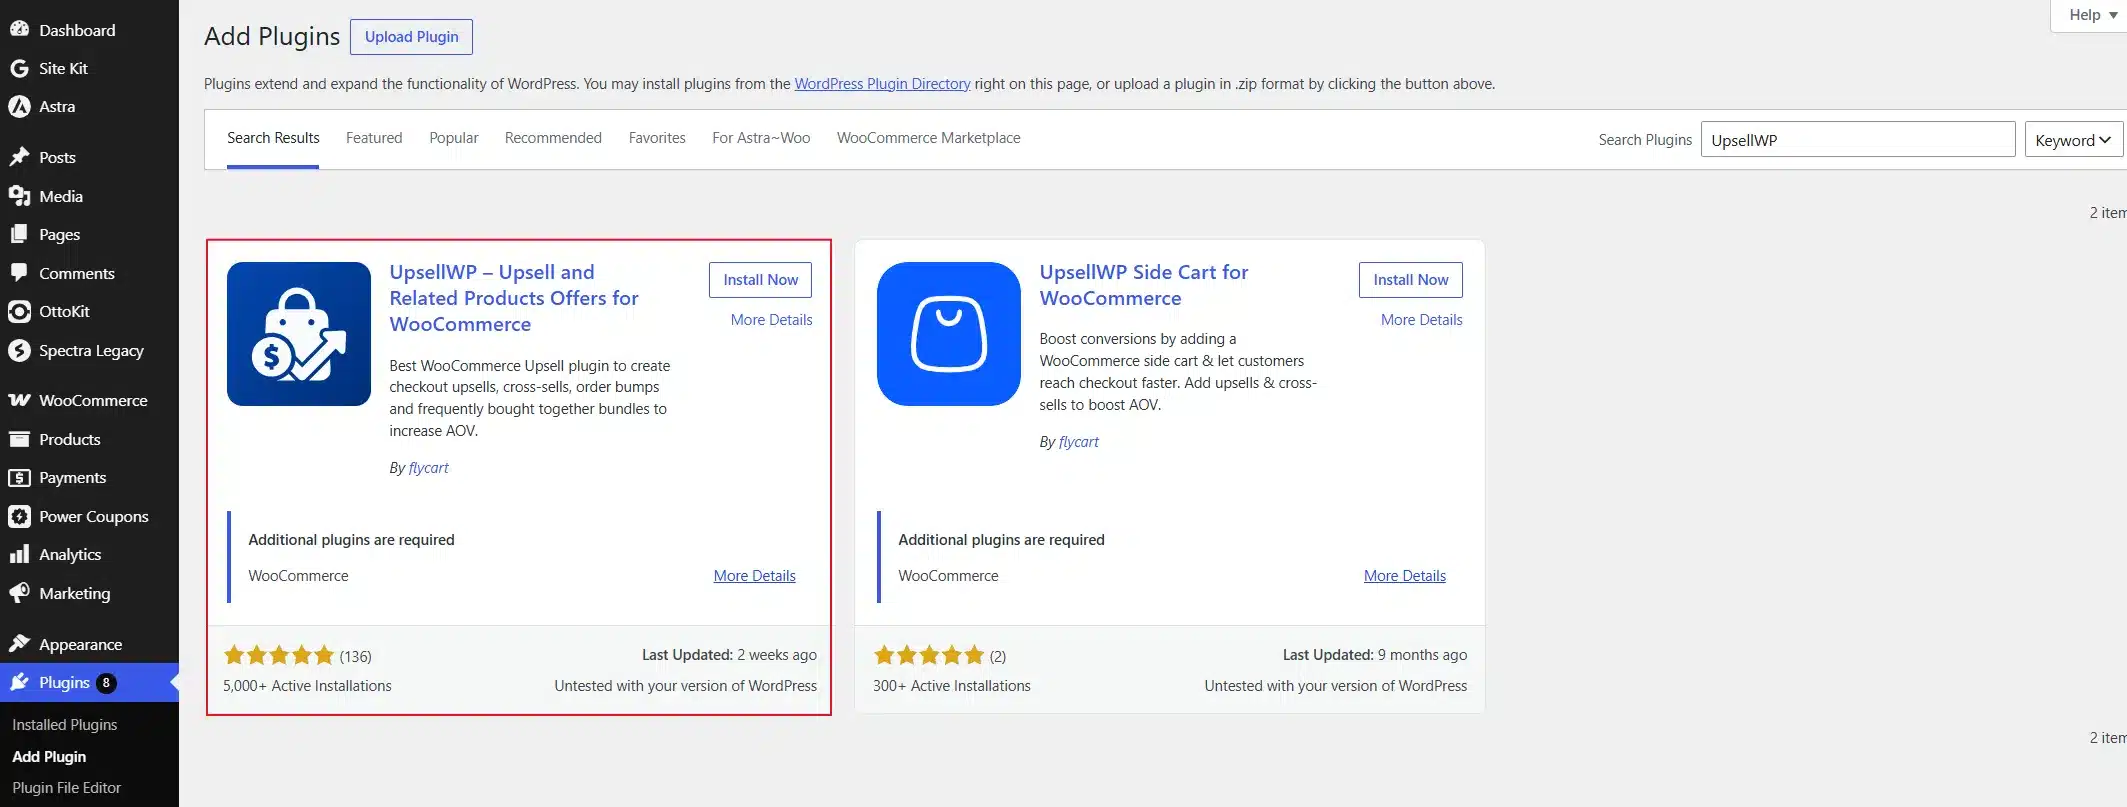
- Install and activate the UpsellWP plugin from the WordPress directory.
- Once installed, go to UpsellWP → Campaigns.
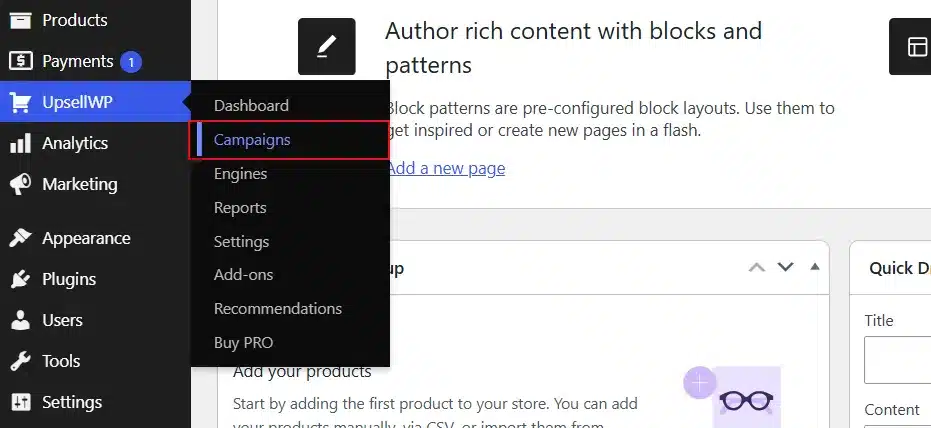
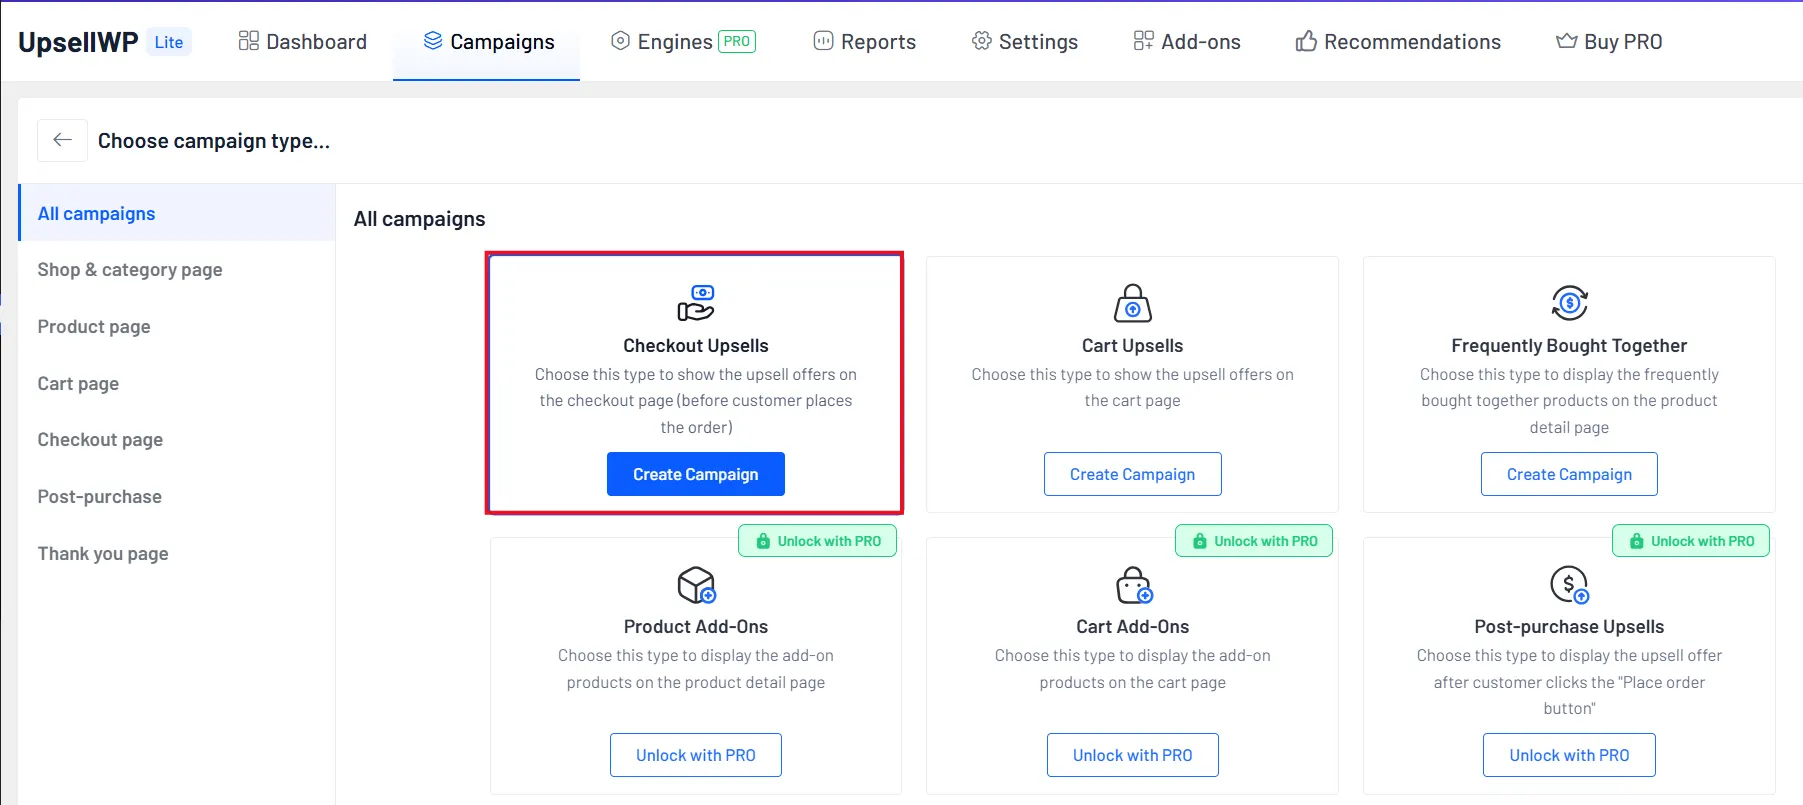
- Inside the Campaigns tab, click Create New Campaign.

- Then choose Checkout Upsell as the campaign type.
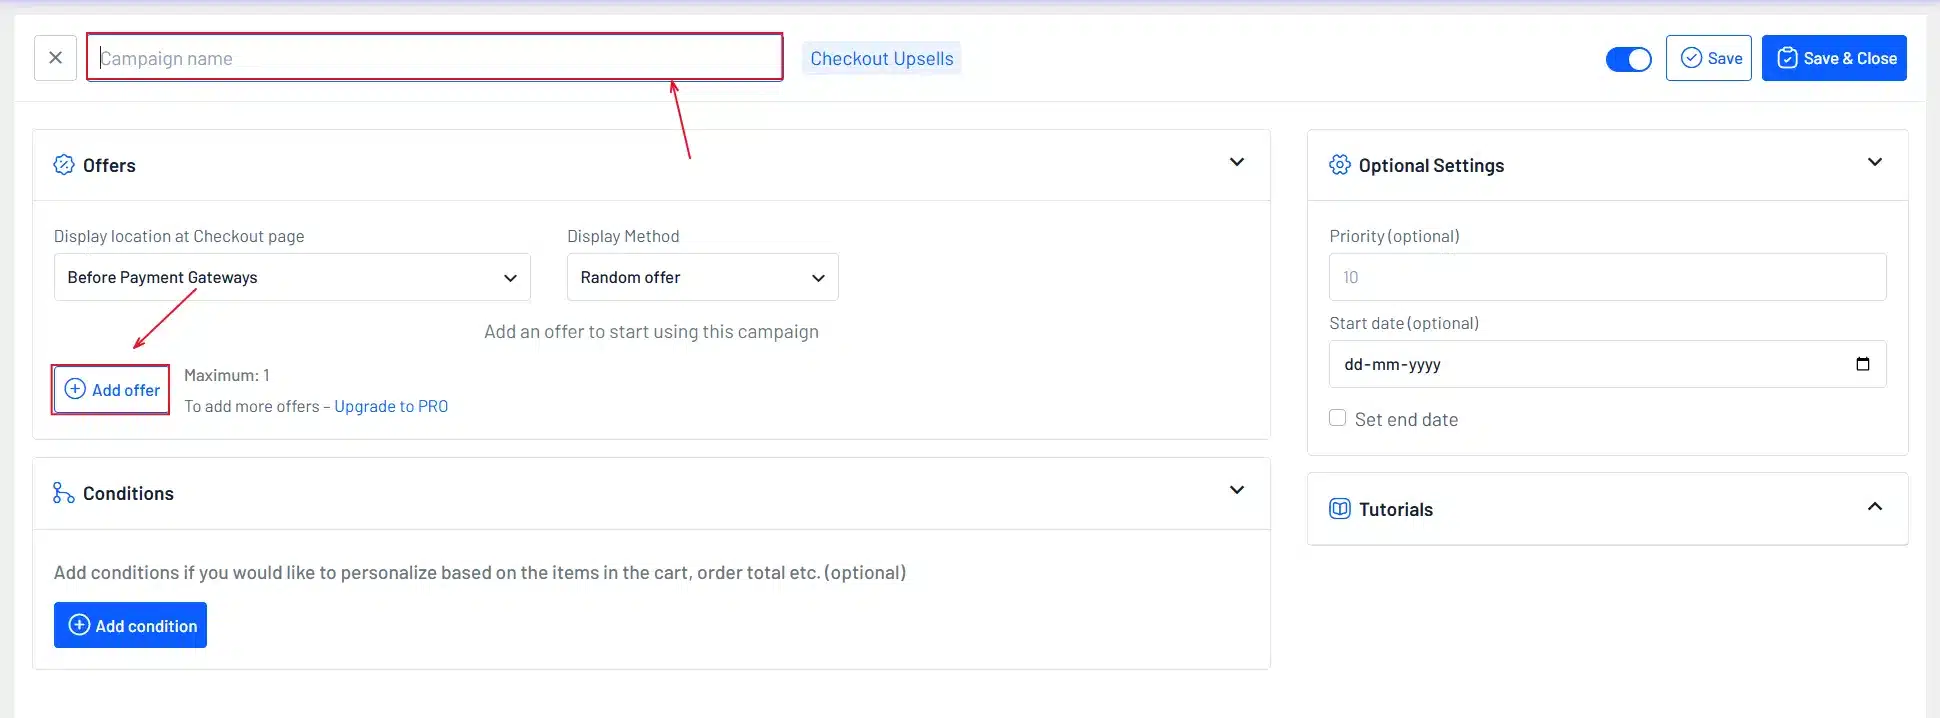
- Give the campaign a name and select Add Offer.
- Select the product you want to offer as the order bump.
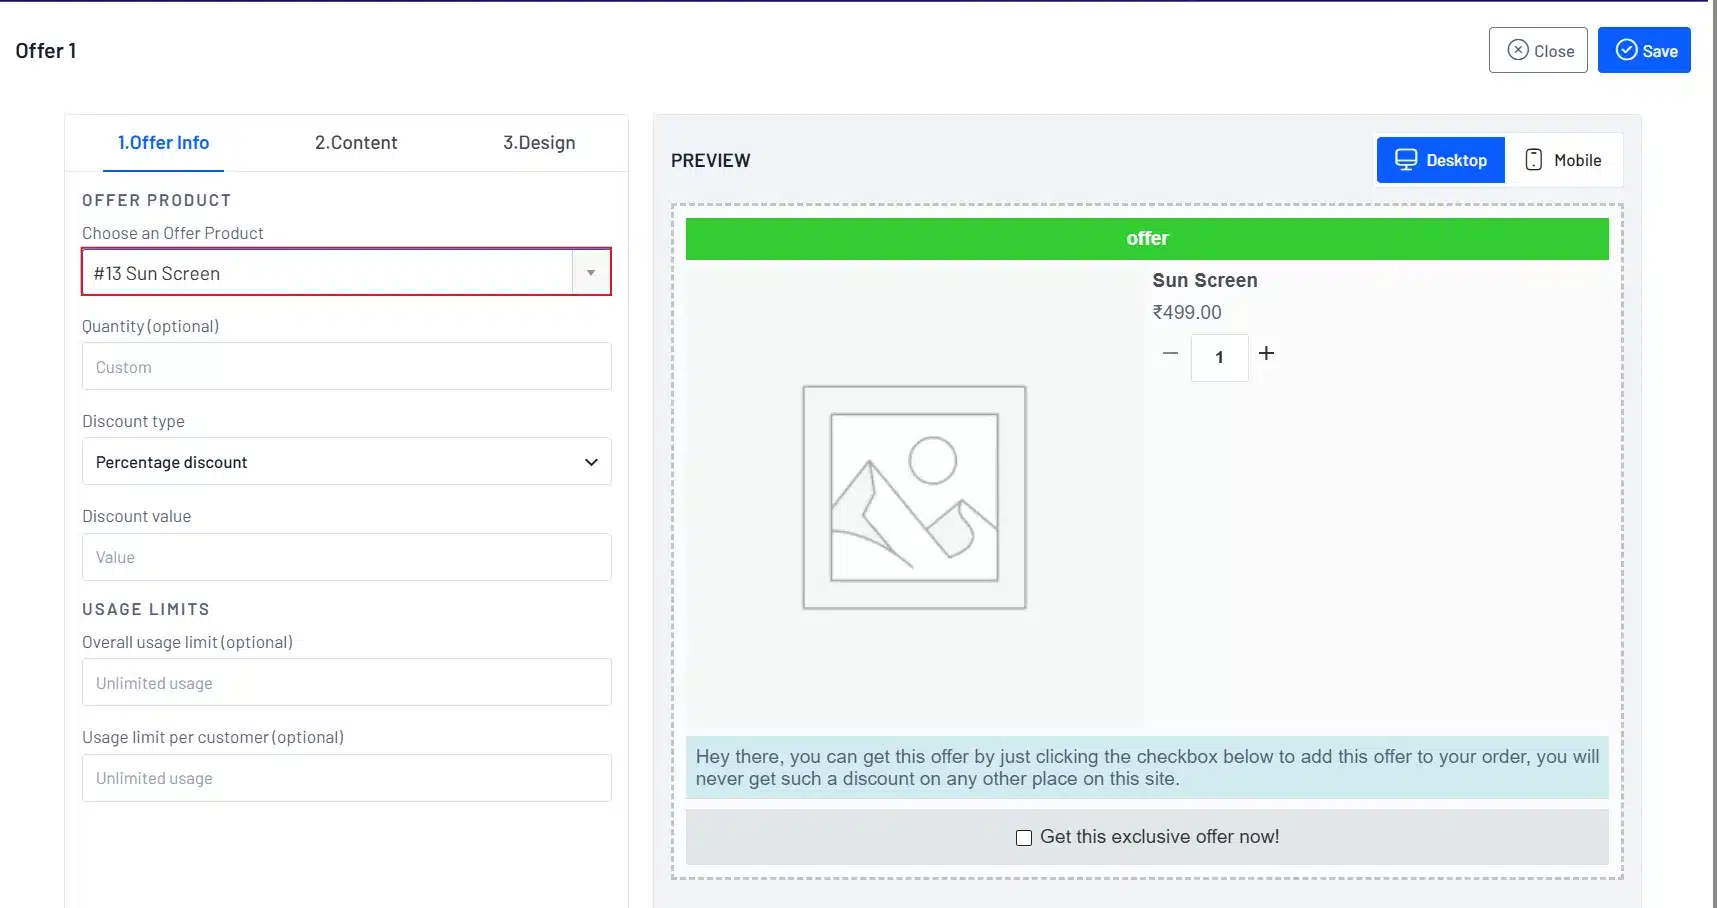
- Customize the display text, discount, and styling for the offer, and set any purchase conditions if you only want the bump to show for specific products or cart totals.
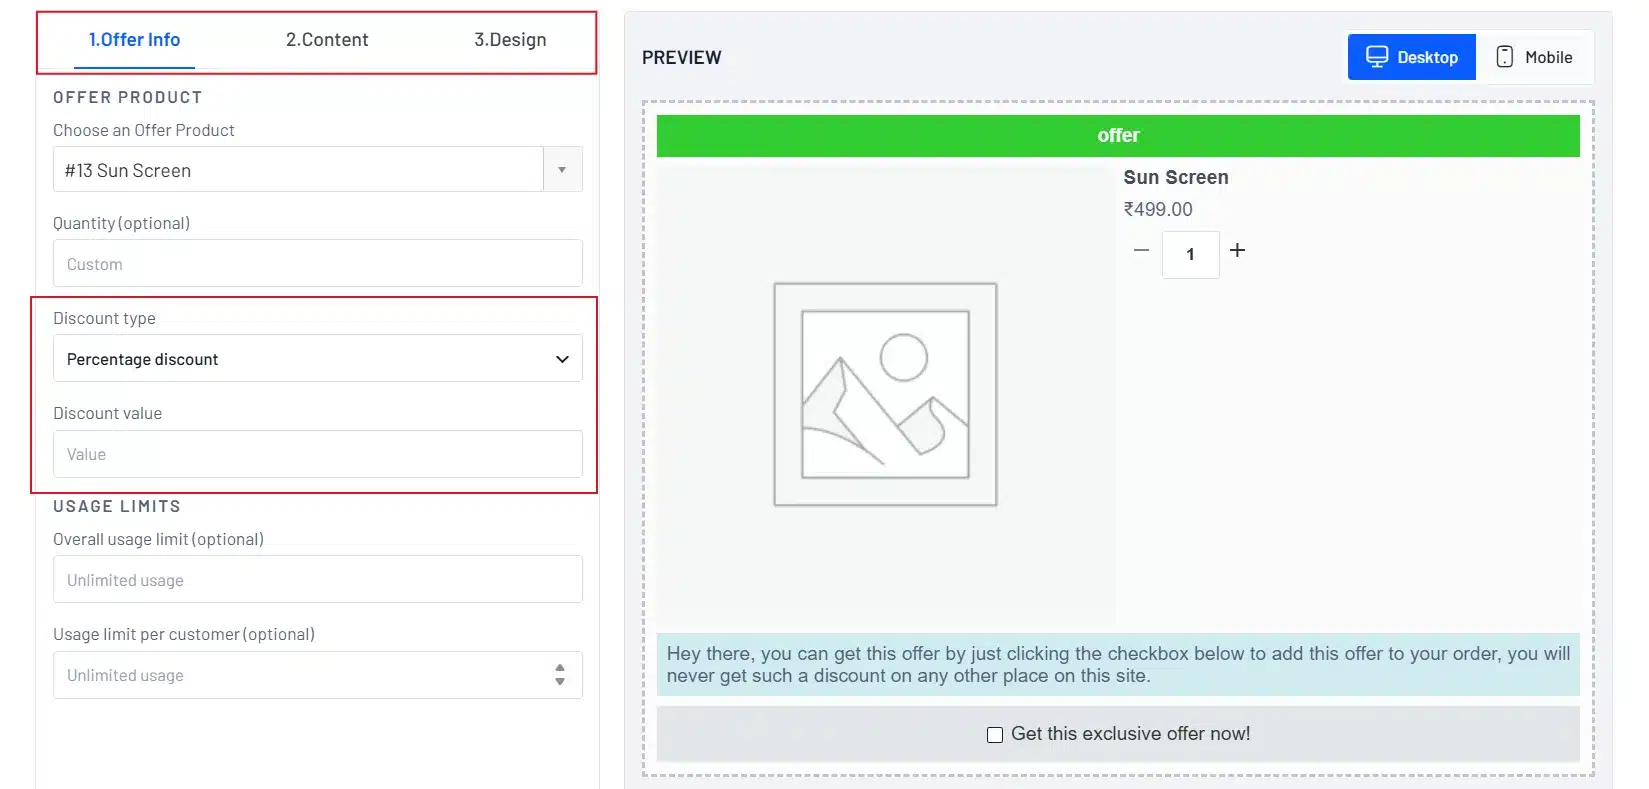
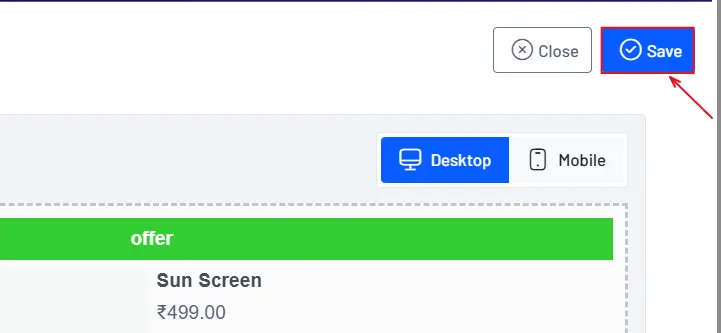
- Click Save to confirm the changes.
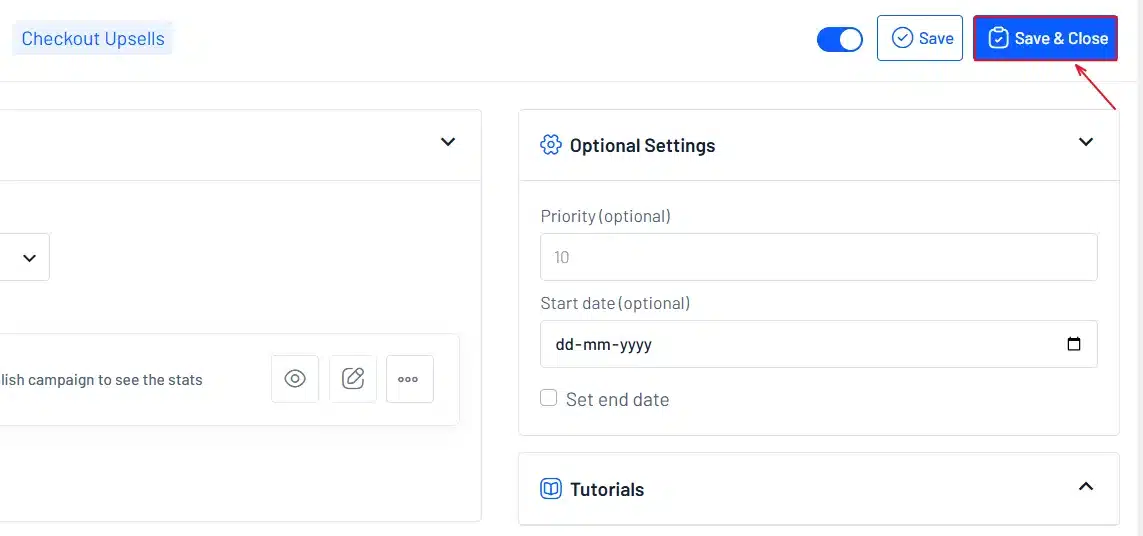
- At last, click Save & Close to activate the campaign.
UpsellWP works well here because the order bump is its own dedicated campaign type, not a feature buried inside a Buying process builder. If all you want is a bump without touching anything else on checkout, this is close to a no-brainer.
Method 2: Using Custom Code (PHP & CSS)
If you’re comfortable in a functions.php file, or you have a developer who is, custom code gives you complete control over how the bump looks and behaves. No plugin dependency, no license to renew.
Example 1: A simple order bump message on checkout
function custom_order_bump() {
    echo '<div class="order-bump">Add a protective case for just $9.99!</div>';
}
add_action( 'woocommerce_review_order_before_submit', 'custom_order_bump' );
Example 2: A discounted order bump message
function add_discounted_order_bump() {
    echo '<div class="order-bump">Get a premium warranty for only $19.99 (Save 30%)</div>';
}
add_action( 'woocommerce_checkout_before_order_review', 'add_discounted_order_bump' );
Example 3: Automatically adding a bump product
function add_bump_product_to_cart() {
    if ( is_checkout() && ! WC()->cart->find_product_in_cart( 123 ) ) {
        WC()->cart->add_to_cart(123);
    }
}
add_action( 'template_redirect', 'add_bump_product_to_cart' );
Swap in your own product ID and messaging. This method takes longer to set up than either plugin, but nothing beats it for control, and there’s no ongoing plugin cost either.
If writing PHP isn’t something you or your team want to take on, that’s fine too. DevDiggers’ WooCommerce development service can build a custom order bump to your exact spec.
Which Method Should You Use?
Here’s the part most guides skip. There isn’t one “best” way to add an order bump. There’s a best way for your store. It comes down to three things: your budget, your comfort with code, and how much control you want over the offer.
- Pick UpsellWP (free): if your budget is tight. The order bump is a standalone campaign type, so there’s no Buying process to build first, and it costs nothing.
- Pick custom code: if you have a developer on hand, or if you want a bump that does something no plugin offers out of the box.
Most stores start with a plugin. Developers, or store owners with very specific requirements, tend to land on custom code eventually anyway.
Is Your Order Bump HPOS Ready?
Quick gut check before you launch: is your store running WooCommerce’s High Performance Order Storage (HPOS)? If so, confirm your chosen order bump plugin or custom code declares HPOS compatibility. Most current plugins do, but older or less maintained ones sometimes don’t, and that mismatch can cause checkout errors that are hard to trace back to the actual cause.
Custom code built directly against WC()->cart and standard checkout hooks, like the examples above, work fine under HPOS. If you’re extending or modifying the examples, it’s worth reading guide on making a WooCommerce plugin HPOS compatible first.
Getting the Offer and Price Right
A technically perfect order bump still won’t convert if the offer itself is off. Two things matter more than the plugin you pick.
- Price it right: A rule of thumb you’ll hear often from eCommerce consultants: keep the bump price under about 20% of the main cart total. Above that, it stops feeling like a small add. It starts feeling like a second purchase decision, and that’s exactly what you don’t want at checkout.
- Make it relevant: The single biggest factor in whether a bump converts is how well it matches what’s already in the cart. A phone case shown to someone buying a phone converts. The same case shown to someone buying a kettle doesn’t, no matter how good the discount is.
Monitor Performance and Adjust
Once your order bump for WooCommerce is live, don’t just leave it running. Check in on it regularly and tune it based on what you see.
Watch these numbers:
- Acceptance rate: What percent of customers add the bump?
- Extra revenue: How much is the bump adding to your monthly total?
- Complaints or confusion: Support tickets mentioning the checkout are a signal something’s off.
If your acceptance rate stalls under 10%, the offer is probably wrong, not the placement. Swap the product before you touch anything else.
Conclusion
That’s the whole process to create an order bump for WooCommerce, whichever method you choose. Pick the paid plugin if you want speed and polish. Pick UpsellWP if budget matters more than convenience. Pick custom code if you want full control or already have the technical skill within your own team.
Whichever path you take, start with one relevant, well-priced offer, watch the numbers for a few weeks, and adjust from there. That’s really the whole game.
Frequently Asked Questions (FAQs)
Q1. What is an order bump in WooCommerce?
An order bump is a small, related product offer shown to a customer during WooCommerce checkout, added to their order with a single click.
Q2. Why use an order bump for my store?
It raises average order value and adds a relevant, low-friction option right when the customer has already decided to buy.
Q3. What is the best plugin to make order bumps for WooCommerce?
There’s no single best option. Order Bump for WooCommerce and CartFlows are both solid, one paid and one free, and the right pick depends on your budget and setup.
Q4. How do I select the right product for an order bump?
Choose something that complements the main purchase directly, like a case for a phone or a cleaning kit for shoes. Unrelated products rarely convert.
Q5. Can I customize the design of an order bump?
Yes. Both plugin options let you adjust text, layout, colors, and the call to action. Custom code gives you full control over every part of it.
Q6. Does adding an order bump slow down my checkout?
Not if it’s built correctly. A well-coded plugin or custom function adds almost no load time at all, a few milliseconds at most. The bigger risk is an outdated plugin that isn’t HPOS compatible, which can cause checkout errors instead of slowdowns.
Q7. How many order bumps should I show at checkout?
Stick to one. A single, relevant offer keeps the decision easy. Stacking two or three bumps slows the customer down and tends to hurt acceptance on all of them.
Q8. Where on the checkout page should the order bump go?
Right above the payment button usually performs best, since it’s the last thing a customer sees before they commit. Still, it’s worth testing a couple of positions on your own store, since audiences don’t all behave the same way.
Q9. Do I need coding skills to add an order bump?
No, not if you go the plugin route. UpsellWP and other plugins work entirely through the WordPress dashboard. Coding only comes into play if you want the custom PHP method or need behavior a plugin doesn’t offer out of the box.
Q10. What’s a realistic order bump acceptance rate to expect?
It varies by store, but many stores see somewhere in the 10-30% range, with especially relevant offers reaching higher. If yours stalls under 10%, treat that as a sign to change the offer, not the plugin.