
Nginx WordPress security starts at the login page. Nginx can block wp-login.php and /wp-admin/ for every IP except yours, ask for a password before WordPress even loads and slow down repeated login attempts.
Locking the login page helps more once you know how hackers find admin email addresses on WordPress sites.
I tested each rule in October 2026 with Nginx 1.31.6 in front of a WordPress 7.1.3 site running PHP-FPM. I sent real requests from an allowed IP and from a second IP on the same network and then recorded every status code.
This guide gives you the exact config blocks, the test results and the one exception that keeps your site working. It also covers Cloudflare, because a proxy changes which IP address Nginx sees.
Why Protect the WordPress Admin URL?
Every WordPress site uses the same login address, /wp-login.php. Bots try it on every site they find. Each attempt runs PHP and a database query, even when the password is wrong. Blocking those requests in Nginx stops them before WordPress does any work.
The admin area has two entry points. /wp-login.php handles the login form, and /wp-admin/ holds the dashboard behind it.
/xmlrpc.php is a third door. It accepts logins through an old remote publishing API, and many attacks use it because one request can try several passwords.
WordPress’s own hardening guide recommends limiting access to these files at the server level. Nginx is a good place to do it, because its rules run before PHP starts.
How Nginx WordPress Security Rules Work
Nginx WordPress security rules sit in location blocks that match the login and admin URLs. Inside each block, a directive decides what happens: allow and deny filter by IP, auth_basic asks for a password and limit_req caps the request rate. Nginx answers blocked requests with an error code and never calls PHP.
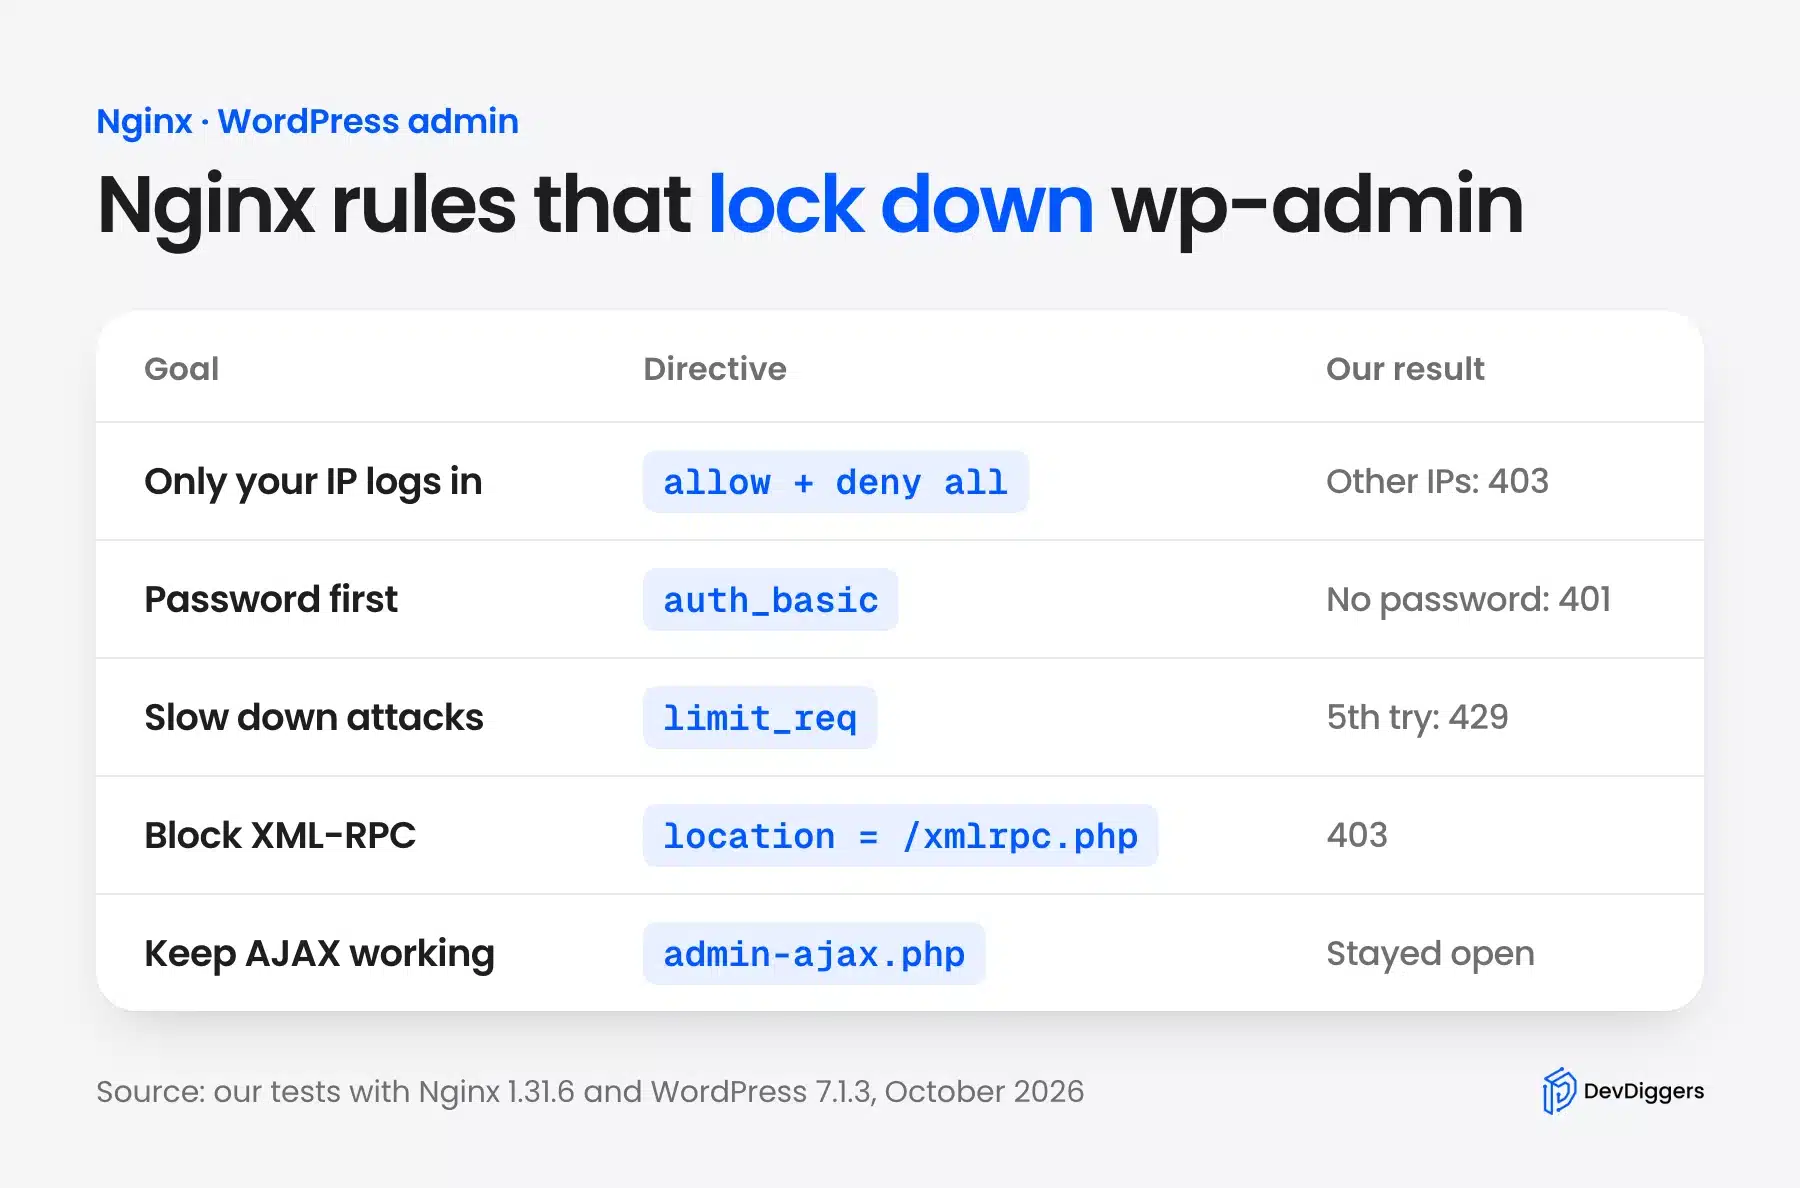
Here is what each rule returned in my test:
- IP allow-list: Other IPs got 403 Forbidden on the login and the dashboard.
- Password prompt: Requests without the password got 401.
- Rate limit: The 5th fast login attempt got 429.
- XML-RPC block: Every request got 403.
- AJAX exception:
admin-ajax.phpstayed open. The front end kept working.
You can use one rule or combine all of them. The sections below show each block and then a full combined config.
How to Protect the WordPress Admin URL in Nginx
To protect the WordPress admin URL in Nginx, add seven rules to your server block in order. Find the config file, allow your IP, keep admin-ajax.php open and add a password prompt. Then rate limit logins, block xmlrpc.php, and test before you reload.
Step 1: Find Your Nginx Configuration File
The WordPress site’s server block is usually in /etc/nginx/sites-available/ on Ubuntu and Debian, or /etc/nginx/conf.d/ on other systems. Open the file that holds your domain’s server_name in a text editor over SSH. Back it up first, because one typo stops Nginx from reloading.
Run these commands to find and copy it:
grep -rl "server_name example.com" /etc/nginx/
sudo cp /etc/nginx/sites-available/example.com /etc/nginx/sites-available/example.com.bak
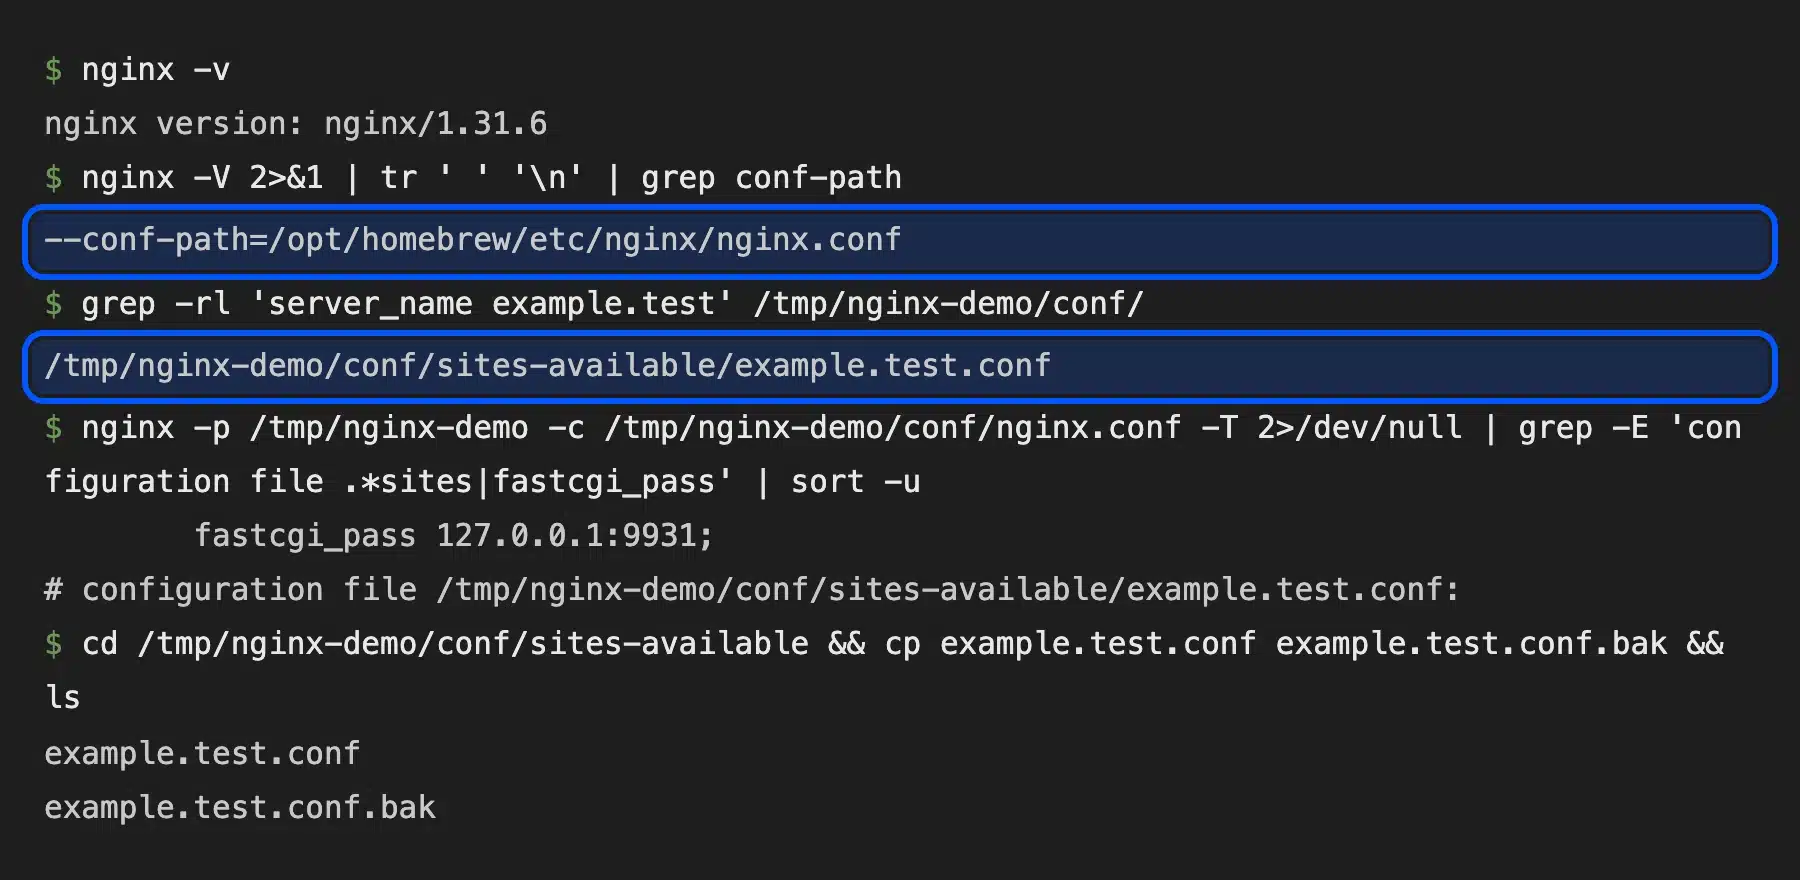
Look for the location ~ \.php$ block inside the server block. It holds the fastcgi_pass line that sends PHP to PHP-FPM, and you will copy that line into the new blocks.
Some hosts keep one big nginx.conf with every site inside it. In that case, find the server block for your domain in that file, and add the new blocks there.
The socket path differs between servers. It may be unix:/run/php/php8.3-fpm.sock or an address like 127.0.0.1:9000. Copy yours exactly. The WordPress Nginx documentation shows a complete base config.
Step 2: Allow Only Your IP to Reach wp-login.php
To allow only your IP, add allow with your address and deny all to a block that matches the login page and one that matches the admin folder. Everyone else gets 403 Forbidden. Keep the fastcgi_pass lines inside the blocks, or allowed users get a download instead of the page.
Add these blocks above your main PHP block:
location = /wp-login.php {
    allow 203.0.113.10;
    deny all;
    include fastcgi_params;
    fastcgi_param SCRIPT_FILENAME $document_root$fastcgi_script_name;
    fastcgi_pass unix:/run/php/php8.3-fpm.sock;
}

location ^~ /wp-admin/ {
    allow 203.0.113.10;
    deny all;
    location ~ \.php$ {
        include fastcgi_params;
        fastcgi_param SCRIPT_FILENAME $document_root$fastcgi_script_name;
        fastcgi_pass unix:/run/php/php8.3-fpm.sock;
    }
}
Replace 203.0.113.10 with your own public IP. Add one allow line for each office or teammate.
In my test, the allowed IP got the login page with status 200. A second machine on the same network got this:

The ^~ prefix matters. It tells Nginx to use this block for everything under /wp-admin/ and to skip the regular expression blocks below it. The access module documentation explains how allow and deny are checked in order.
Step 3: Keep admin-ajax.php Open
Many themes and plugins call /wp-admin/admin-ajax.php from the public site, for forms, filters and carts. If the admin block denies it, those features fail for every visitor. Add an exact match for that file to let it skip the IP rule.
location = /wp-admin/admin-ajax.php {
    include fastcgi_params;
    fastcgi_param SCRIPT_FILENAME $document_root$fastcgi_script_name;
    fastcgi_pass unix:/run/php/php8.3-fpm.sock;
}
I tested both versions. Without this block, a request to admin-ajax.php from a blocked IP got 403. With it, the same request reached WordPress, which answered 400 because the test sent no action, exactly as it should.
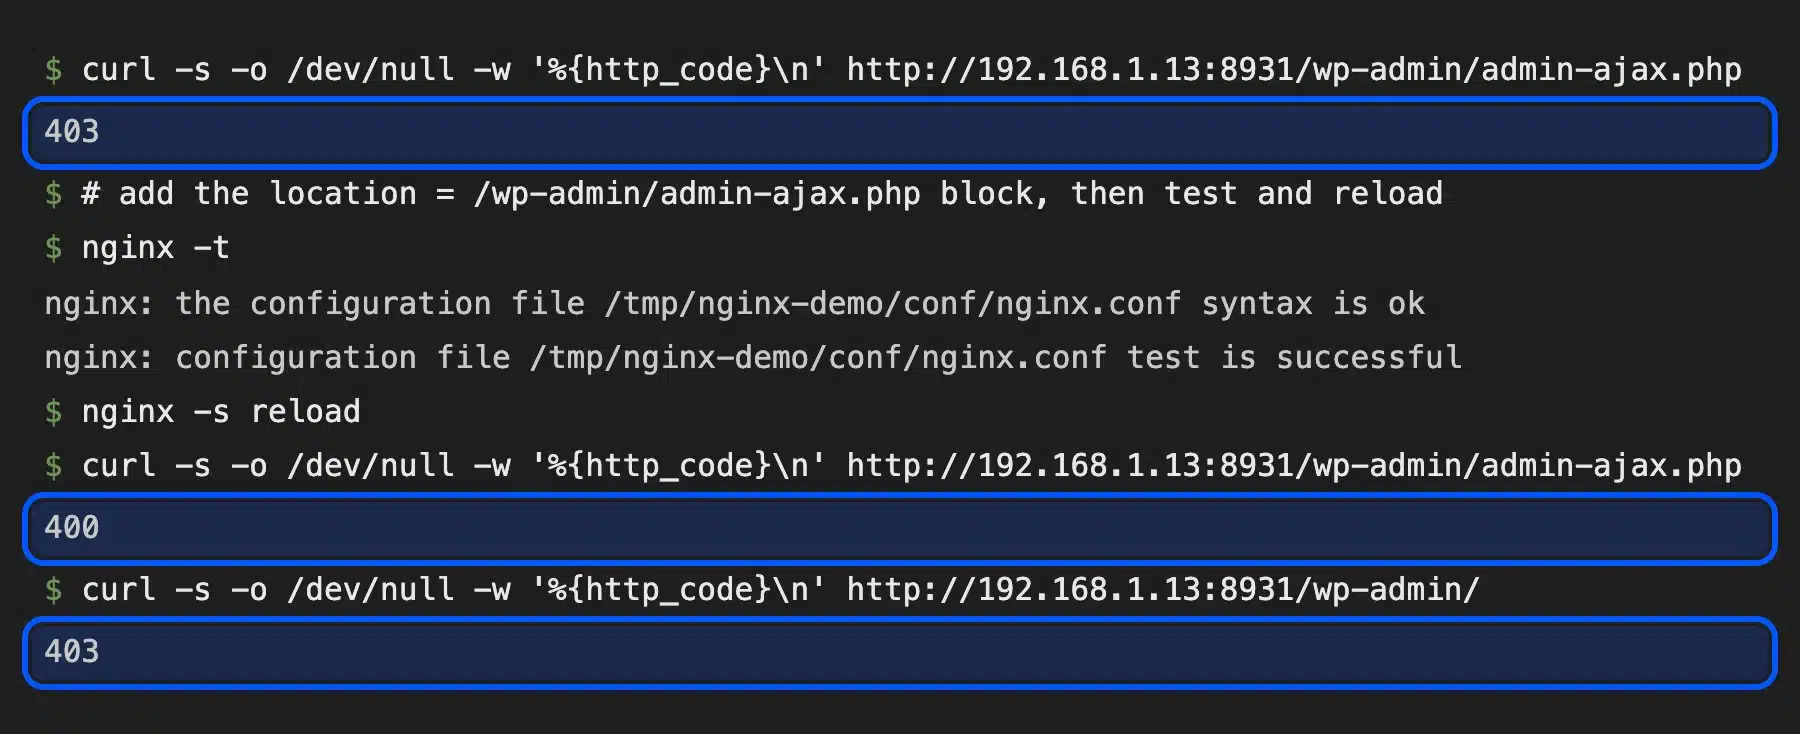
An exact location = match always wins over a prefix match in Nginx. So this block works even though it sits inside the /wp-admin/ path.
Leave the REST API at /wp-json/ alone too. It lives outside /wp-admin/. These rules do not touch it.
Step 4: Add a Password Prompt With auth_basic
HTTP basic auth adds a second password that the browser asks for before WordPress loads. Bots that guess WordPress passwords never reach the login form. Create a password file with htpasswd and point auth_basic_user_file at it inside the login and admin blocks.
Create the file with one user:
sudo apt install apache2-utils
sudo htpasswd -c /etc/nginx/.htpasswd yourname
Then add two lines to the wp-login.php block and the /wp-admin/ block:
auth_basic "Restricted";
auth_basic_user_file /etc/nginx/.htpasswd;
My requests without the password got 401 Unauthorized, and requests with it got 200. The browser shows a small sign in box, and it remembers the password for the session.
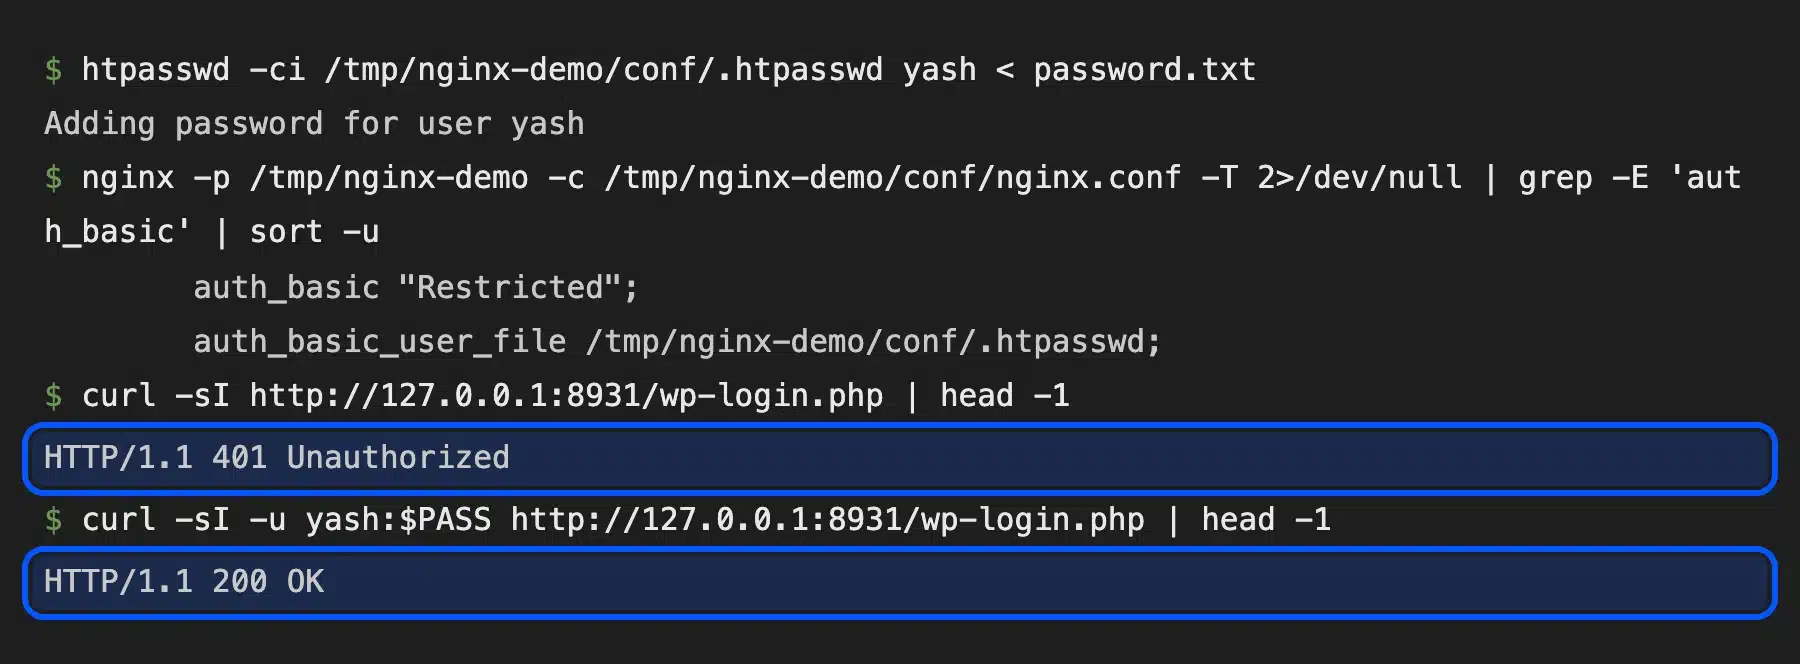
Use a different password from your WordPress one. The auth_basic documentation covers the file format. Basic auth only stays private over HTTPS. Make sure the site redirects all traffic to HTTPS first.
Step 5: Rate Limit Login Attempts With limit_req
A rate limit lets real users log in while stopping a bot that tries hundreds of passwords a minute. Define a zone in the http block and apply it to wp-login.php. Nginx rejects extra requests from the same IP with the status code you choose.
Add this to the http block in nginx.conf:
limit_req_zone $binary_remote_addr zone=login:10m rate=5r/m;
limit_req_status 429;
Then add this line to the wp-login.php block:
limit_req zone=login burst=3 nodelay;
I sent 10 failed logins in under a second. The first 4 got through, which is the 1 allowed request plus the burst of 3. The next 6 were rejected with 429.

The 10 MB zone holds about 160,000 IP addresses, according to the limit_req documentation. Five requests a minute is plenty for a person. Raise it only if your team shares one office IP.
Step 6: Block xmlrpc.php
Block xmlrpc.php unless you use the WordPress mobile app or an old publishing tool that needs it. One line in its own location block returns 403 to every request. Jetpack and some apps still use it. Check your plugins before you turn it off.
location = /xmlrpc.php {
    deny all;
}
My POST request to xmlrpc.php returned 403 with this block, and 200 without it. Nothing else on the test site changed.
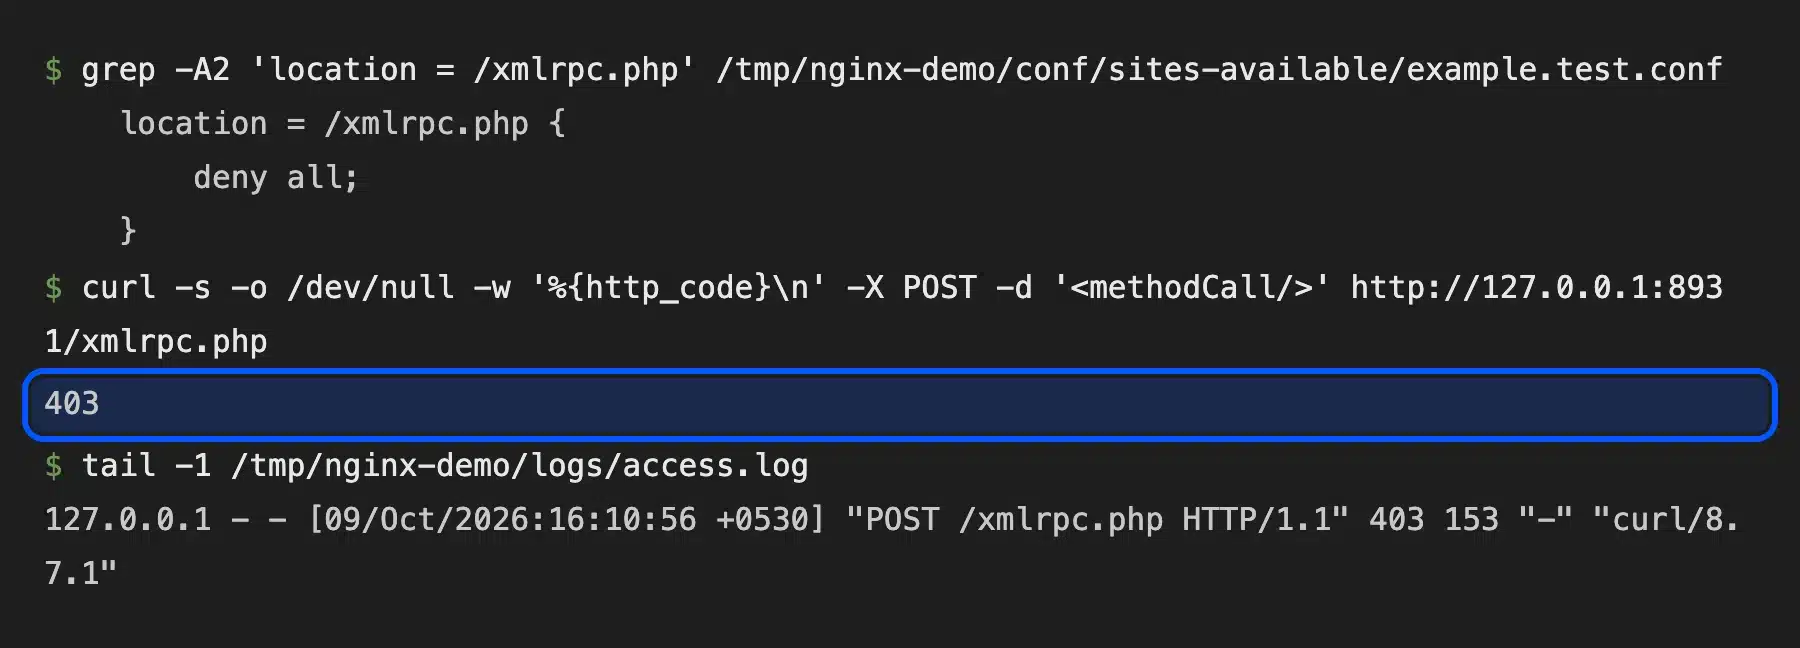
To check whether anything still uses it, search your access log before you block it. Run grep xmlrpc.php /var/log/nginx/access.log | tail and look at the addresses. A long list of unknown IPs sending POST requests is a sign of attacks, while one steady address may be a service you use.
If you need XML-RPC for one service, add that service’s IP with an allow line above deny all.
Step 7: Test the Config and Reload Nginx
Always run nginx -t before you reload the server. It checks the whole config for errors and names the file and the line of any mistake. Reload only after it prints “test is successful”. This way a typo never takes the site offline.
sudo nginx -t
sudo systemctl reload nginx
Then test each rule from outside your allowed IP, such as a phone on mobile data. Here are all my results in one place:
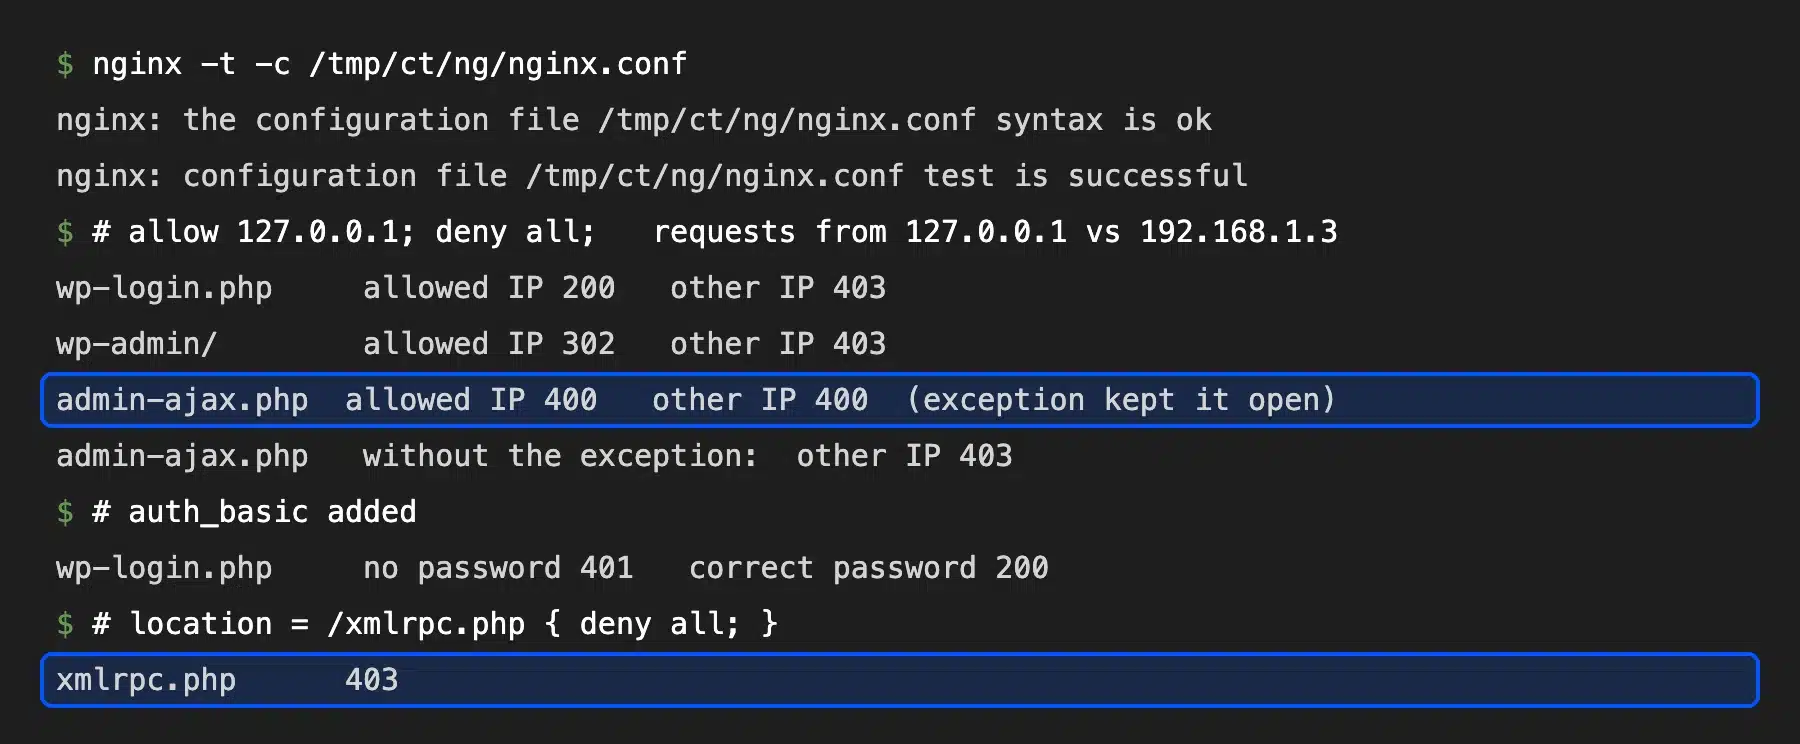
The 403 page also printed the Nginx version, which tells attackers what to target. Add server_tokens off; to the http block, and the page and the Server header then said only “nginx” in my test.
How to Use These Rules Behind Cloudflare
Behind Cloudflare or any proxy, Nginx sees the proxy’s IP instead of the visitor’s. An allow-list then blocks you, or lets everyone in if you allowed the proxy. Turn on the realip module with Cloudflare’s IP ranges. Nginx then reads the real address from the CF-Connecting-IP header.
Add this to the http block with one set_real_ip_from line per Cloudflare range:
set_real_ip_from 173.245.48.0/20;
set_real_ip_from 103.21.244.0/22;
real_ip_header CF-Connecting-IP;
Copy the full and current list of ranges from Cloudflare’s guide to restoring visitor IPs. The ranges change from time to time. Update them when Cloudflare does.
Test it after the reload. Your access log should now show your own public IP instead of a Cloudflare address, and the allow-list should let you in.
The realip module documentation explains the directives. The rate limit needs the same fix, or every visitor shares one limit and real users get 429.
Nginx Admin URL Changes vs Login Plugins
Changing the nginx admin URL with a rewrite looks simple but often breaks password resets, logouts and plugin redirects. A plugin that moves the login page handles those links inside WordPress. The Nginx rules above protect the real files no matter what address the login uses.
You can still restyle the login and reset screens without moving the URL if you customize the WordPress reset password page.
A safe order to follow:
- First: Add the IP allow-list or basic auth in Nginx.
- Second: Add the rate limit and block
xmlrpc.php. - Third: Move the login address with a plugin if you still want to.
- Always: Use strong passwords and two factor login for every admin account.
Server rules do not replace updates and backups. If you would rather hand this off, our WordPress security services cover server hardening, monitoring and cleanup.
Common Mistakes to Avoid
Most broken setups come from four mistakes. People deny admin-ajax.php, forget fastcgi_pass in a new block, ignore the real IP behind a proxy or reload without nginx -t. Each one either locks you out or breaks the public site, and the checks below catch all four.
Watch for these:
- Login page downloads as a file: The new block has no
fastcgi_pass. Nginx sends the PHP source. - Front end forms stop working:
admin-ajax.phpis denied with the rest of/wp-admin/. - You are locked out: Your IP changed. Edit the config over SSH and add the new address.
- Everyone gets 429: The rate limit sees the proxy IP. Set up
realipfirst. - Nginx will not reload: A missing semicolon or brace. Run
nginx -tand fix the line it names.
Keep SSH access working before you add any of this. If the allow-list ever locks you out of WordPress, SSH is how you fix it.
Conclusion
Nginx WordPress security for the admin URL comes down to a few blocks. Allow only your IP on wp-login.php and /wp-admin/, add a basic auth password and rate limit the login page.
Keep admin-ajax.php open, block xmlrpc.php if you do not use it and turn off server_tokens. In my tests, each rule returned the expected 403, 401 or 429 while the public site kept working.
Behind Cloudflare, set up the realip module first. Then run nginx -t before every reload and test from an outside connection.
Frequently Asked Questions (FAQs)
Q1. How do I allow only my IP into wp-admin with Nginx?
Add allow with your IP and deny all inside a location = /wp-login.php block and a location ^~ /wp-admin/ block. Keep the fastcgi_pass lines in both. Then run nginx -t and reload.
Q2. Does password protecting wp-admin break AJAX?
It can. Many themes and plugins call /wp-admin/admin-ajax.php from the public site. Add an exact location = /wp-admin/admin-ajax.php block without the IP or password rules to keep it open.
Q3. How do I rate limit wp-login.php in Nginx?
Define limit_req_zone $binary_remote_addr zone=login:10m rate=5r/m; in the http block. Then add limit_req zone=login burst=3 nodelay; to the wp-login.php block.
Q4. Should I block xmlrpc.php?
Yes, unless a plugin or app needs it. Jetpack and the WordPress mobile app may use it. A location = /xmlrpc.php { deny all; } block returns 403 to every request.
Q5. Can I change the WordPress admin URL in Nginx?
You can rewrite it, but password resets, logouts and plugin redirects often break. Use a plugin to move the login page, and protect the real files with the Nginx rules in this guide.
Q6. Why does my Nginx allow-list block me behind Cloudflare?
Nginx sees Cloudflare’s IP instead of yours. Set up the realip module with Cloudflare’s IP ranges and real_ip_header CF-Connecting-IP. Nginx then checks your real address.