To set up WooCommerce shipping zones, go to WooCommerce, then Settings, then Shipping. Click Add zone, name it, pick its regions, and add a shipping method such as flat rate. Save, and shoppers in that region see only that zone’s rates.
A zone is a set of places you ship to, and each zone gets its own methods and prices. Without zones, every shopper would see the same shipping cost, whether they live next door or on another continent.
This WooCommerce shipping zone setup guide walks through every step, from the first zone to a cart test. Every screenshot comes from a fresh WooCommerce 11.1.2 test store, checked in September 2026.
What Are WooCommerce Shipping Zones?
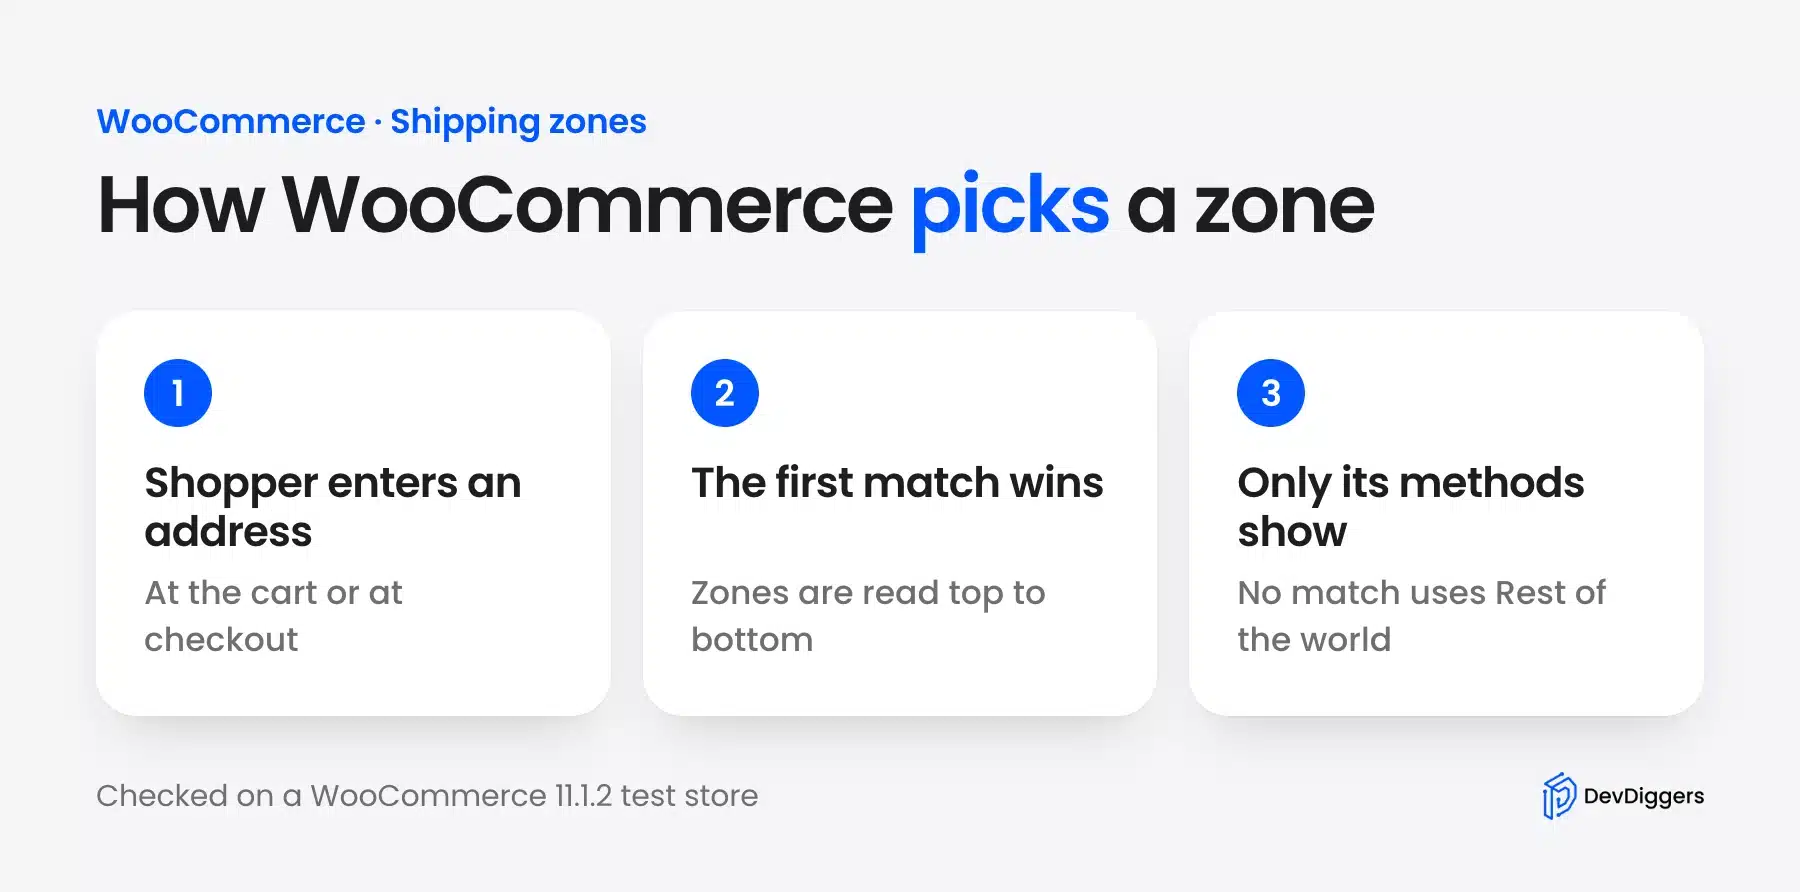
WooCommerce shipping zones are geographic areas, such as a state, a country or a group of postcodes, that each have their own shipping methods. WooCommerce compares the shopper’s address with your zones and picks one. It then shows only the methods that belong to that zone.
Zones answer one question, which is where the order is going. Shipping classes answer a different one, which is what you are shipping. We cover classes later in this guide.
The official WooCommerce docs say a shopper matches one zone only. If two zones both cover the address, the zone higher in your list wins.
How to Set Up WooCommerce Shipping Zones Step by Step
Open WooCommerce, then Settings, then Shipping, where the first tab lists every zone you have. Click Add zone, name it, choose the regions it covers, then add at least one shipping method, and save your changes before you test it.
Here is the short version.
- Open the screen: In the dashboard, go to WooCommerce, then Settings, then Shipping.
- Add a zone: On the Shipping zones tab, click Add zone.
- Name and regions: Type a zone name and pick the regions it covers.
- Add a method: Click Add shipping method and choose one.
- Save: Click Save changes.
The Shipping tab has four sub-tabs on our test store: Shipping zones, Shipping settings, Classes and Local pickup. If you do not see the Shipping tab at all, check that shipping is not disabled under WooCommerce, Settings, General.
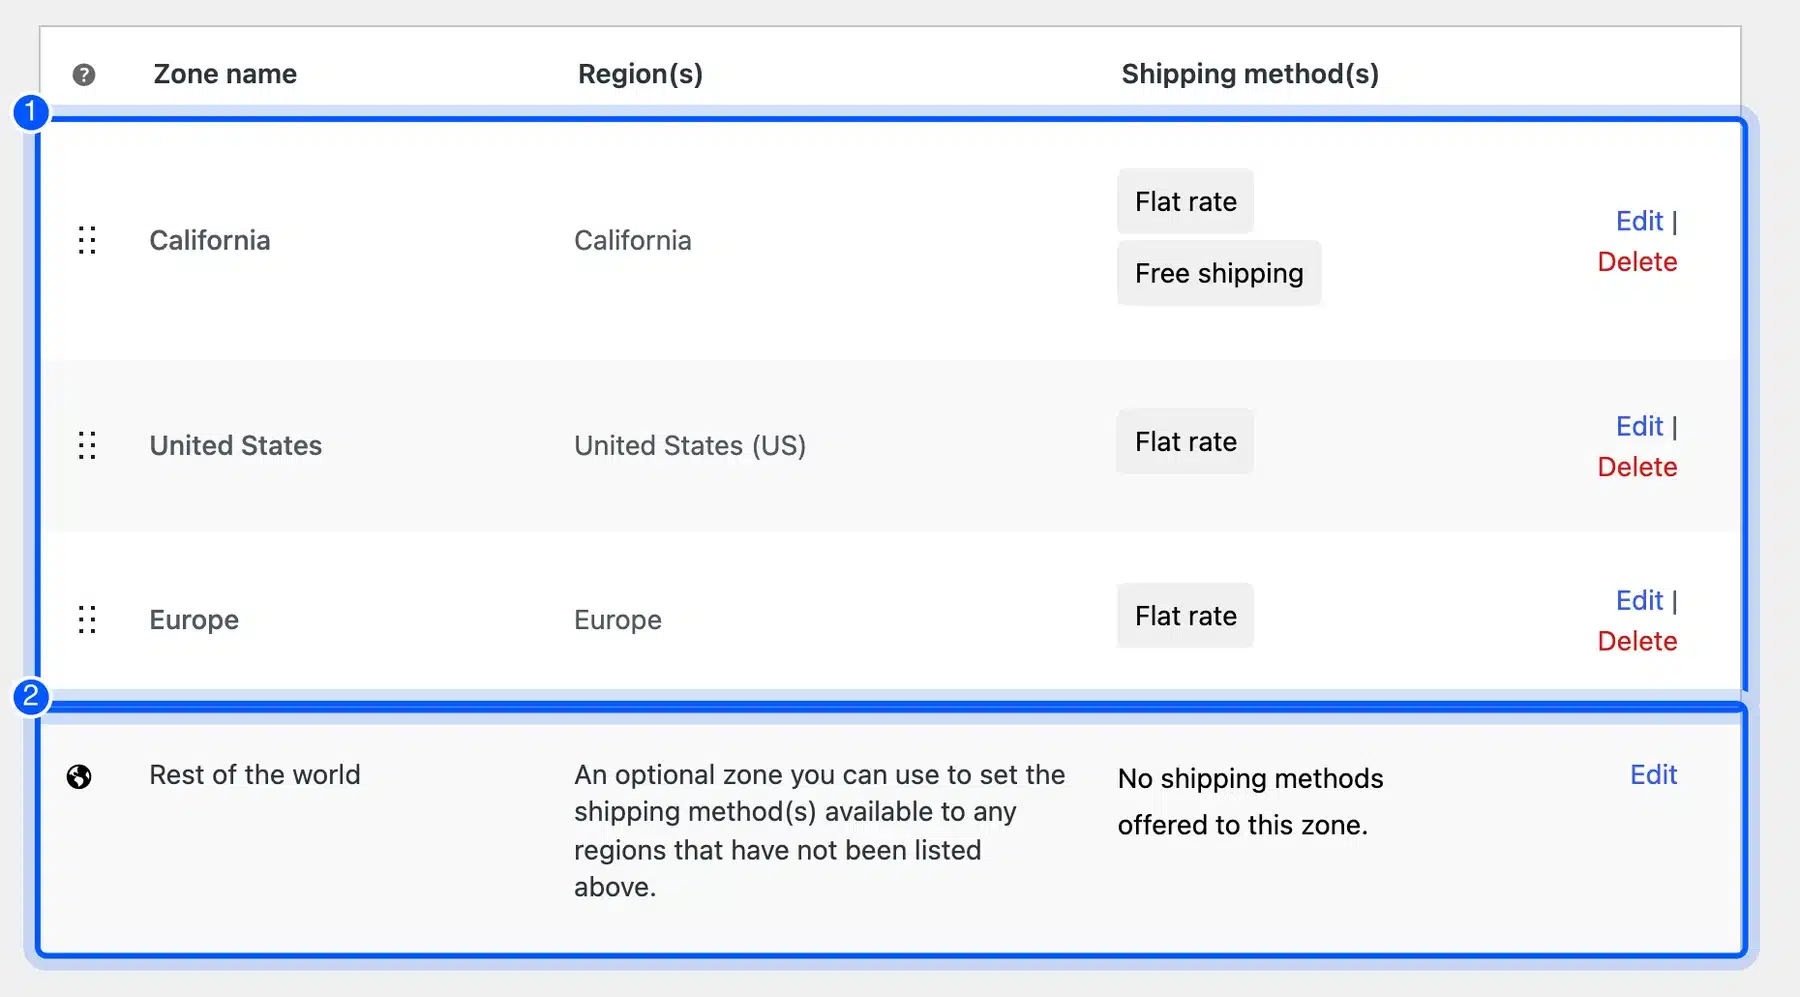
Our test list has California, United States and Europe, with the Rest of the world row at the bottom. Every store has that last row. It covers any address your other zones miss.
Name a Zone and Choose Its Regions
Give the zone a plain name that you will recognize later, like California or Europe. Customers never see this name, so keep it short. Then type into the Zone regions box and pick the countries, states or continents that the zone should cover.
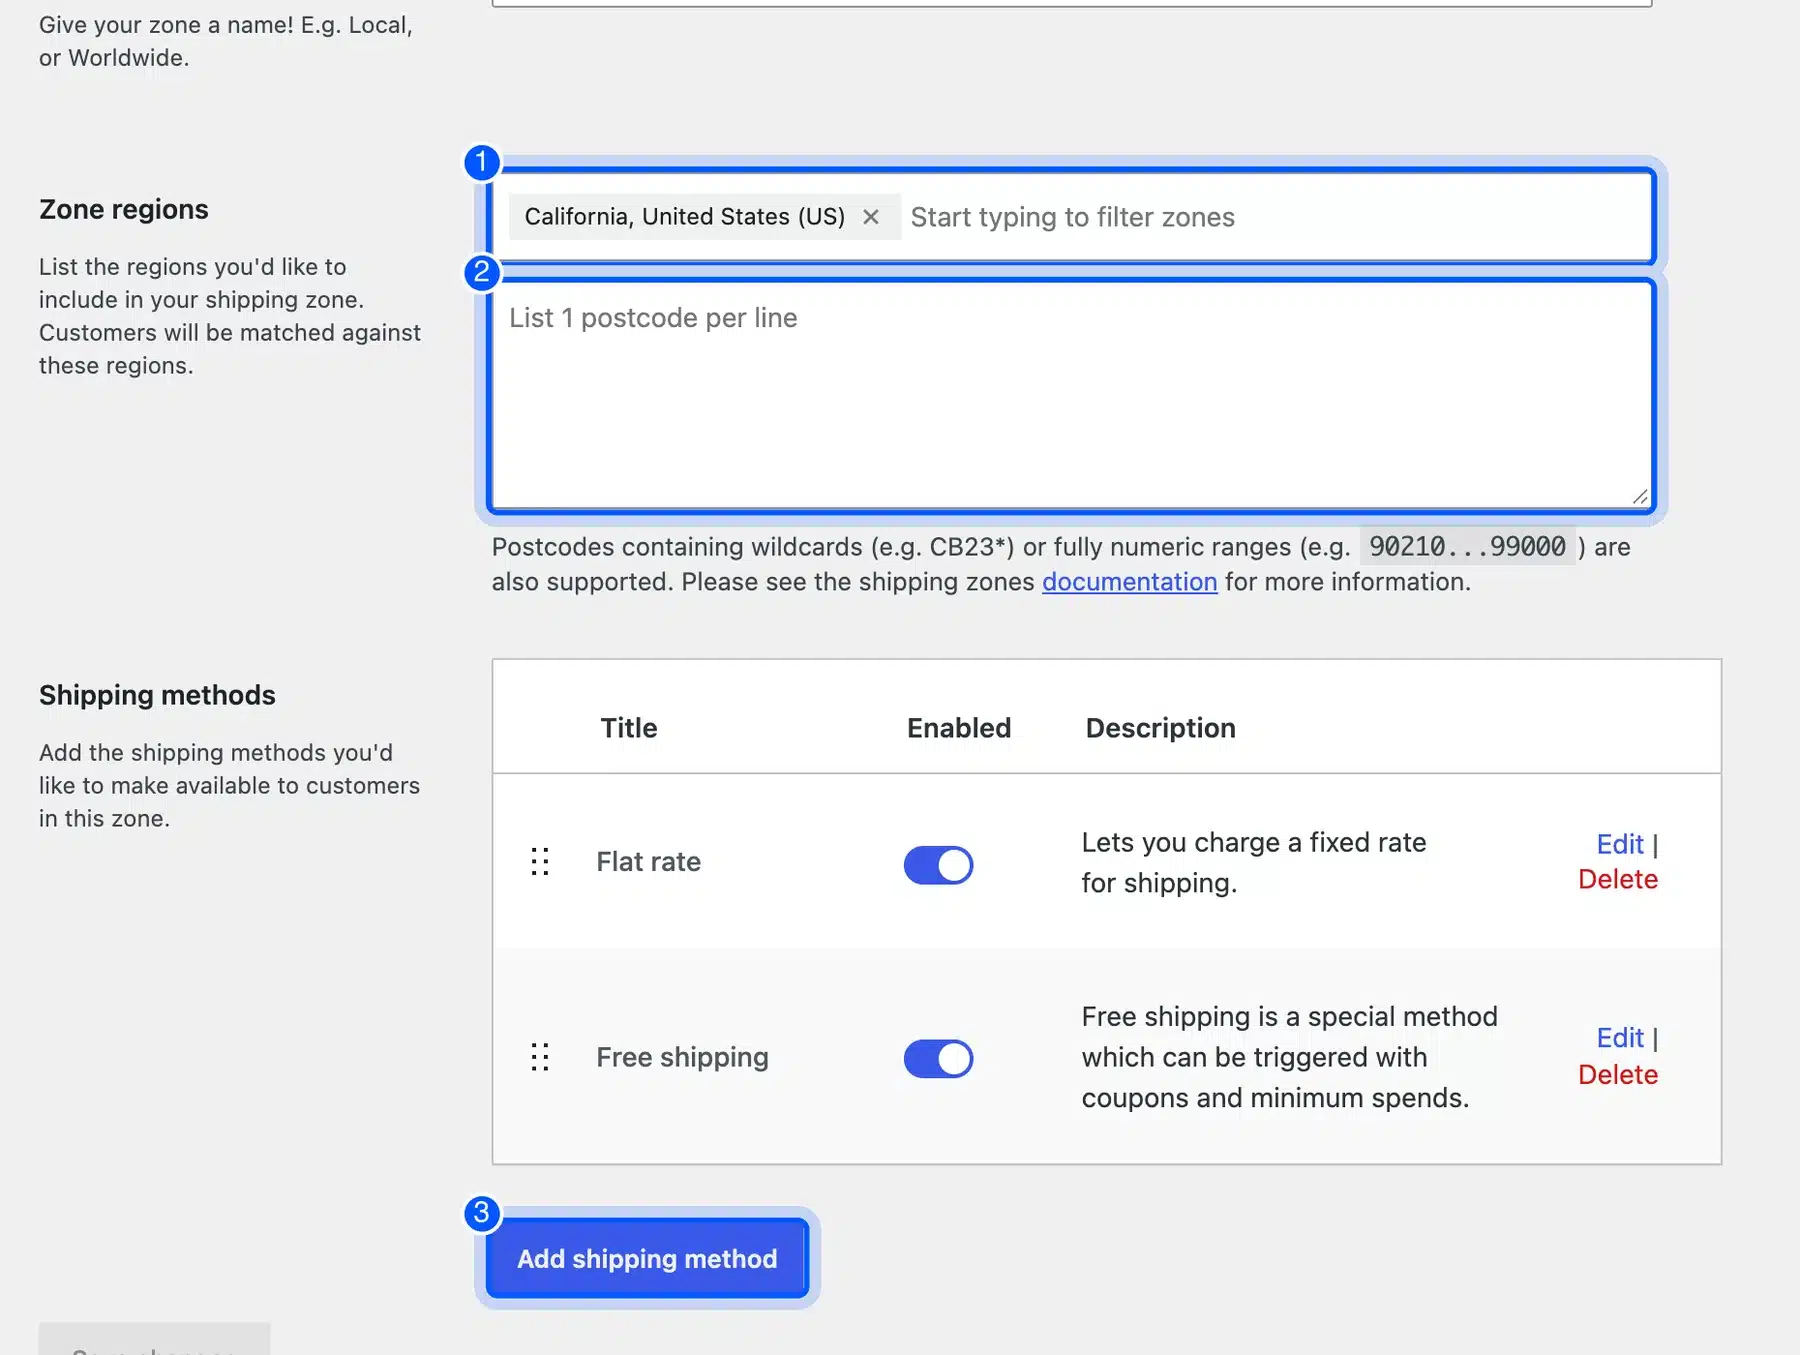
The field says Start typing to filter zones, so you can type the first letters of a place. On our test store, we typed California and picked California, United States (US).
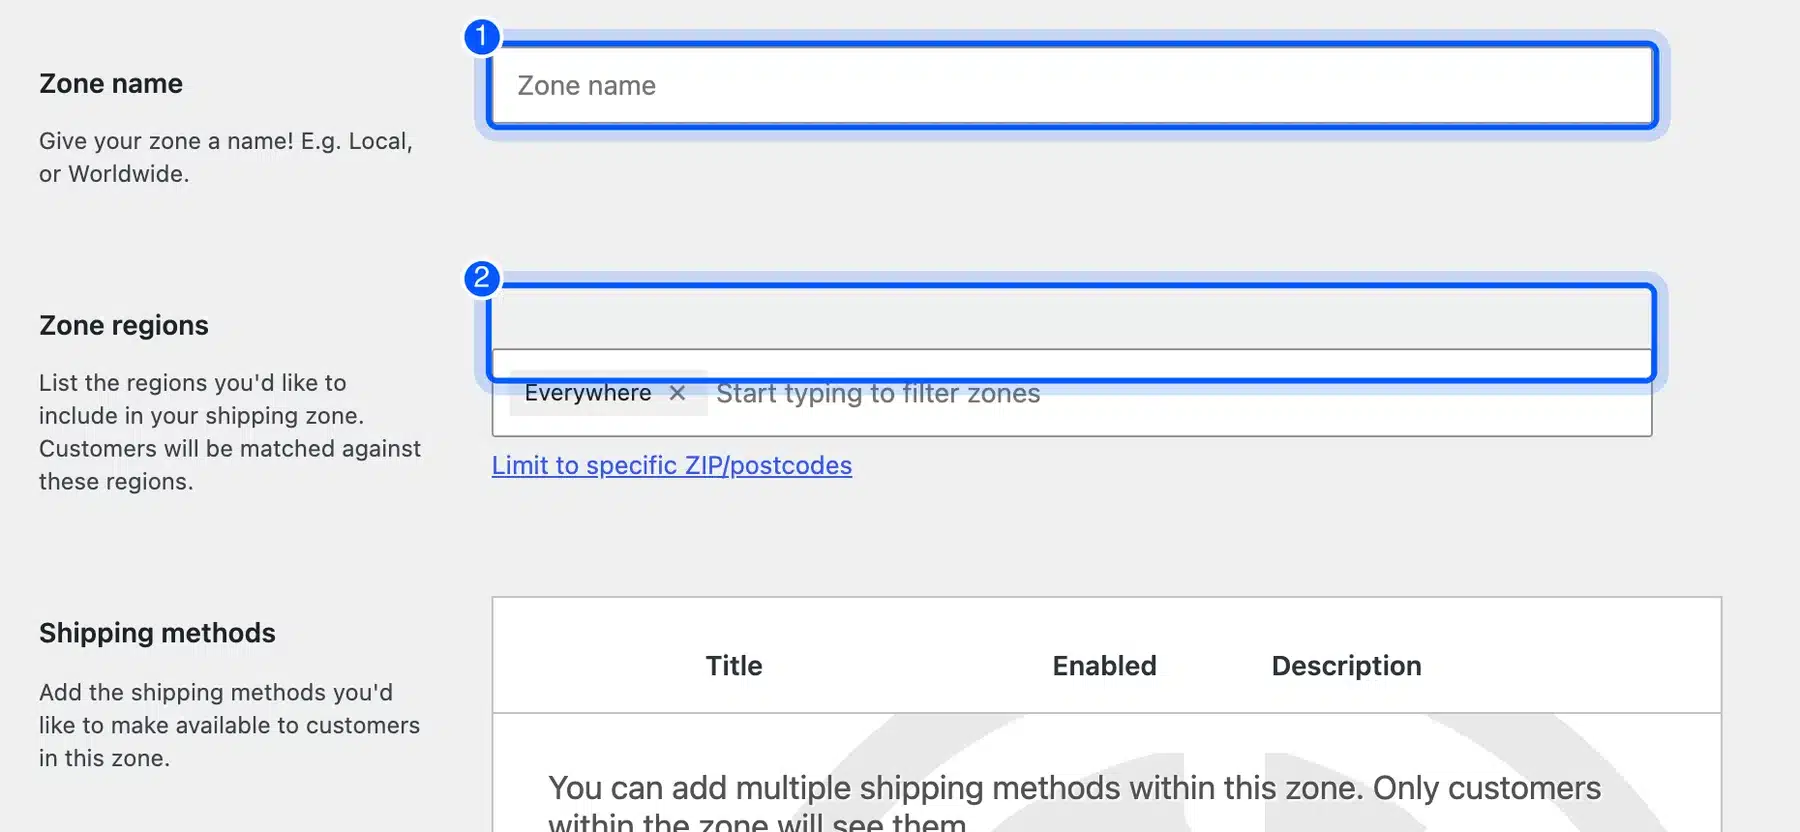
You can mix regions in one zone. A zone can hold a whole continent, a few countries or one state.
Limit a Zone to Specific Postcodes
Under the regions box, click Limit to specific ZIP/postcodes. A box opens with the hint List 1 postcode per line. Use it when a zone should cover a small area, such as one city or a set of local codes.
WooCommerce also supports wildcards like CB23* and numeric ranges like 90210...99000. The screen itself shows both examples under the box.
Add a Shipping Method to the Zone
Click Add shipping method in the zone editor. A window called Create shipping method opens with Free shipping and Flat rate as choices. Pick one and click Continue, then fill in its settings and save the method before you leave.
A zone with no method shows no rates. Shoppers in that zone would see no shipping option at checkout, so never leave a zone empty.
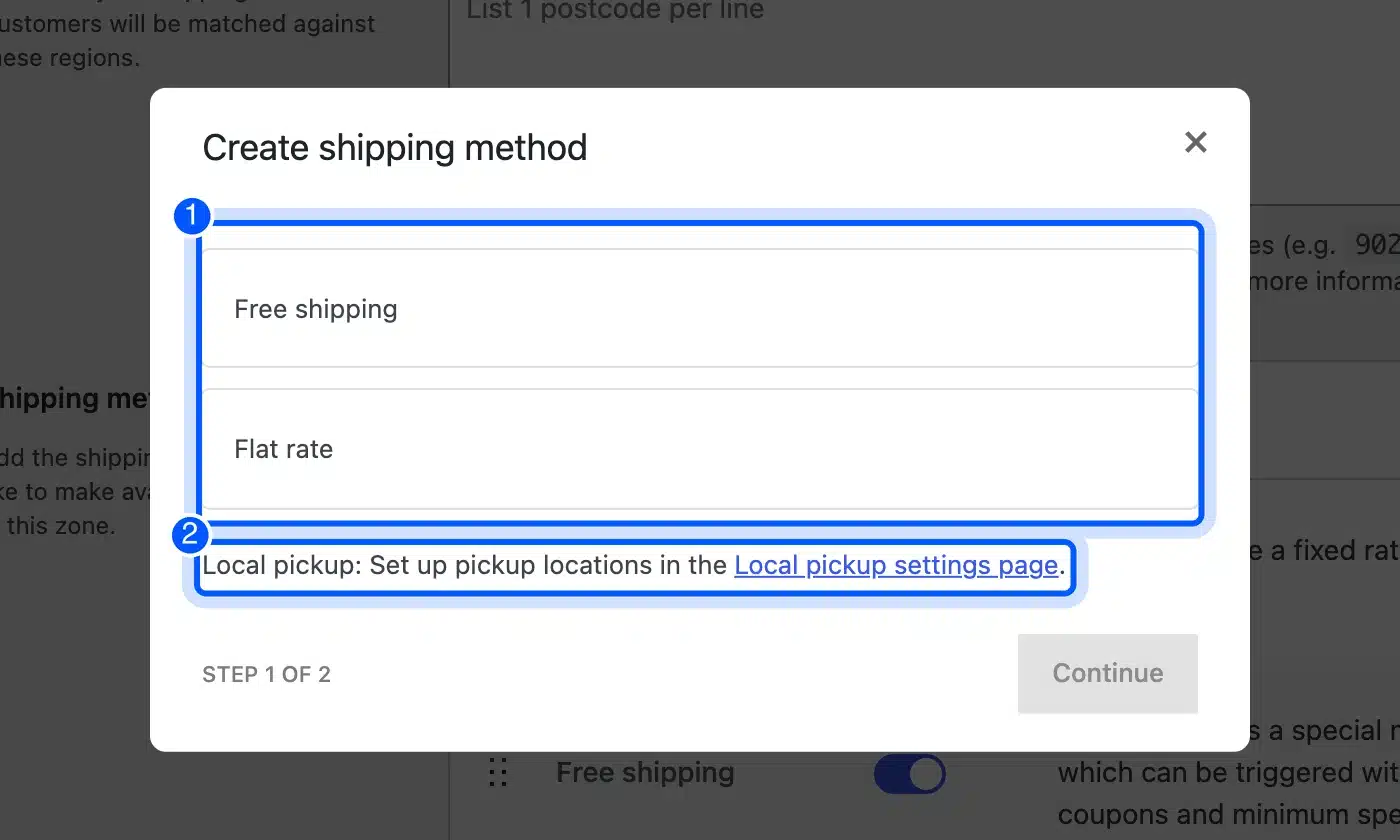
Local pickup is not in that list. The window points to the Local pickup settings page instead, where you set up pickup locations once for the whole store.
You can add more than one method to a zone. Shoppers then choose between them at checkout, and each method has its own Enabled toggle.
Which Shipping Method Should You Pick?
Flat rate charges one fixed cost, while free shipping charges nothing and can require a minimum order or a coupon. Local pickup lets shoppers collect the order themselves. Most stores combine flat rate with free shipping above a set spend.
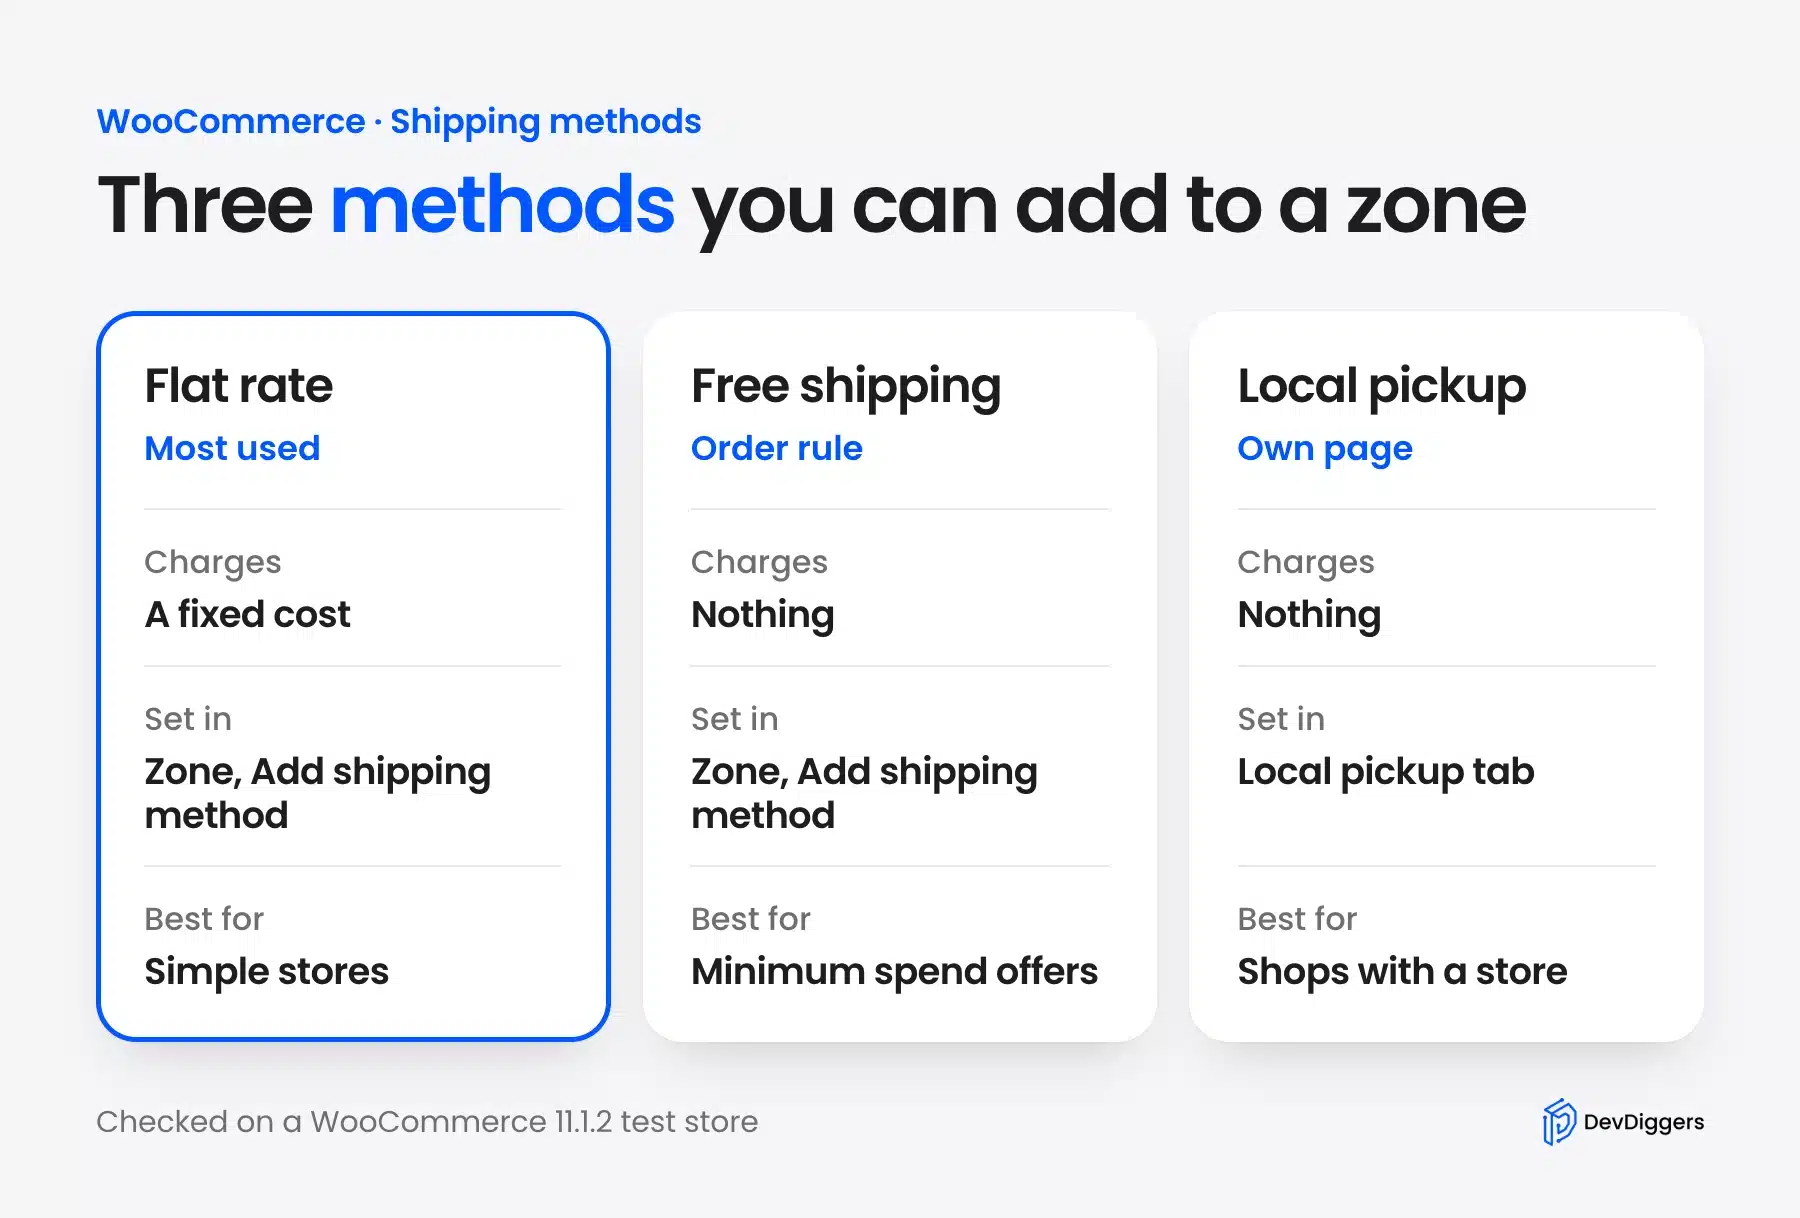
The WooCommerce flat rate shipping guide covers the full option list. We focus on the settings you will use first.
Set Up WooCommerce Flat Rate Shipping
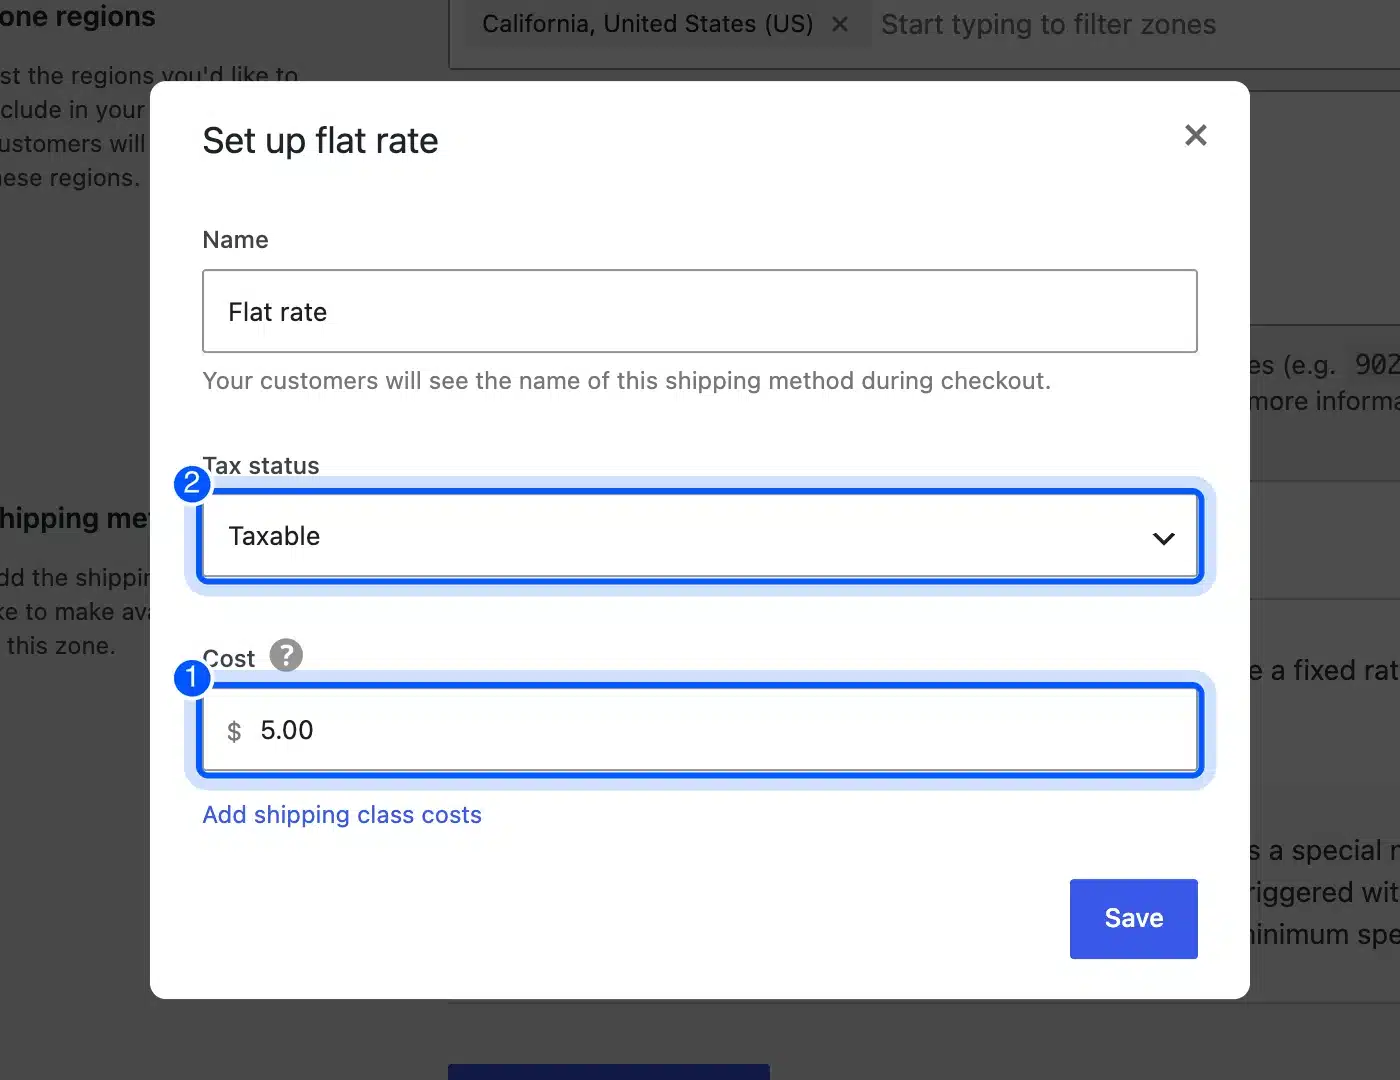
Flat rate asks for three things: a name, a tax status and a cost. Type the cost as a plain number, such as 5.00, and every order in the zone pays that amount. Customers see the name at checkout.
On our test store we left the name as Flat rate and set the cost to 5.00. Tax status was Taxable, which is the default.
The Cost field also accepts formulas. Use [qty] for the item count, so 5 + (2 * [qty]) charges a $5 base plus $2 per item. Use [fee percent="10" min_fee="5"] to charge 10% of the order, with a $5 minimum.
Below the cost, the link Add shipping class costs lets you charge extra for heavy or bulky products. See the section on shipping classes below.
Set Up Free Shipping
Free shipping has one main setting, called Free shipping requires. Choose No requirement to give everyone free shipping. Choose A minimum order amount to offer it above a set spend, or use a coupon, or combine both rules.
Our test store offered five choices. They were no requirement, a coupon, a minimum order amount, an amount OR a coupon, and an amount AND a coupon.
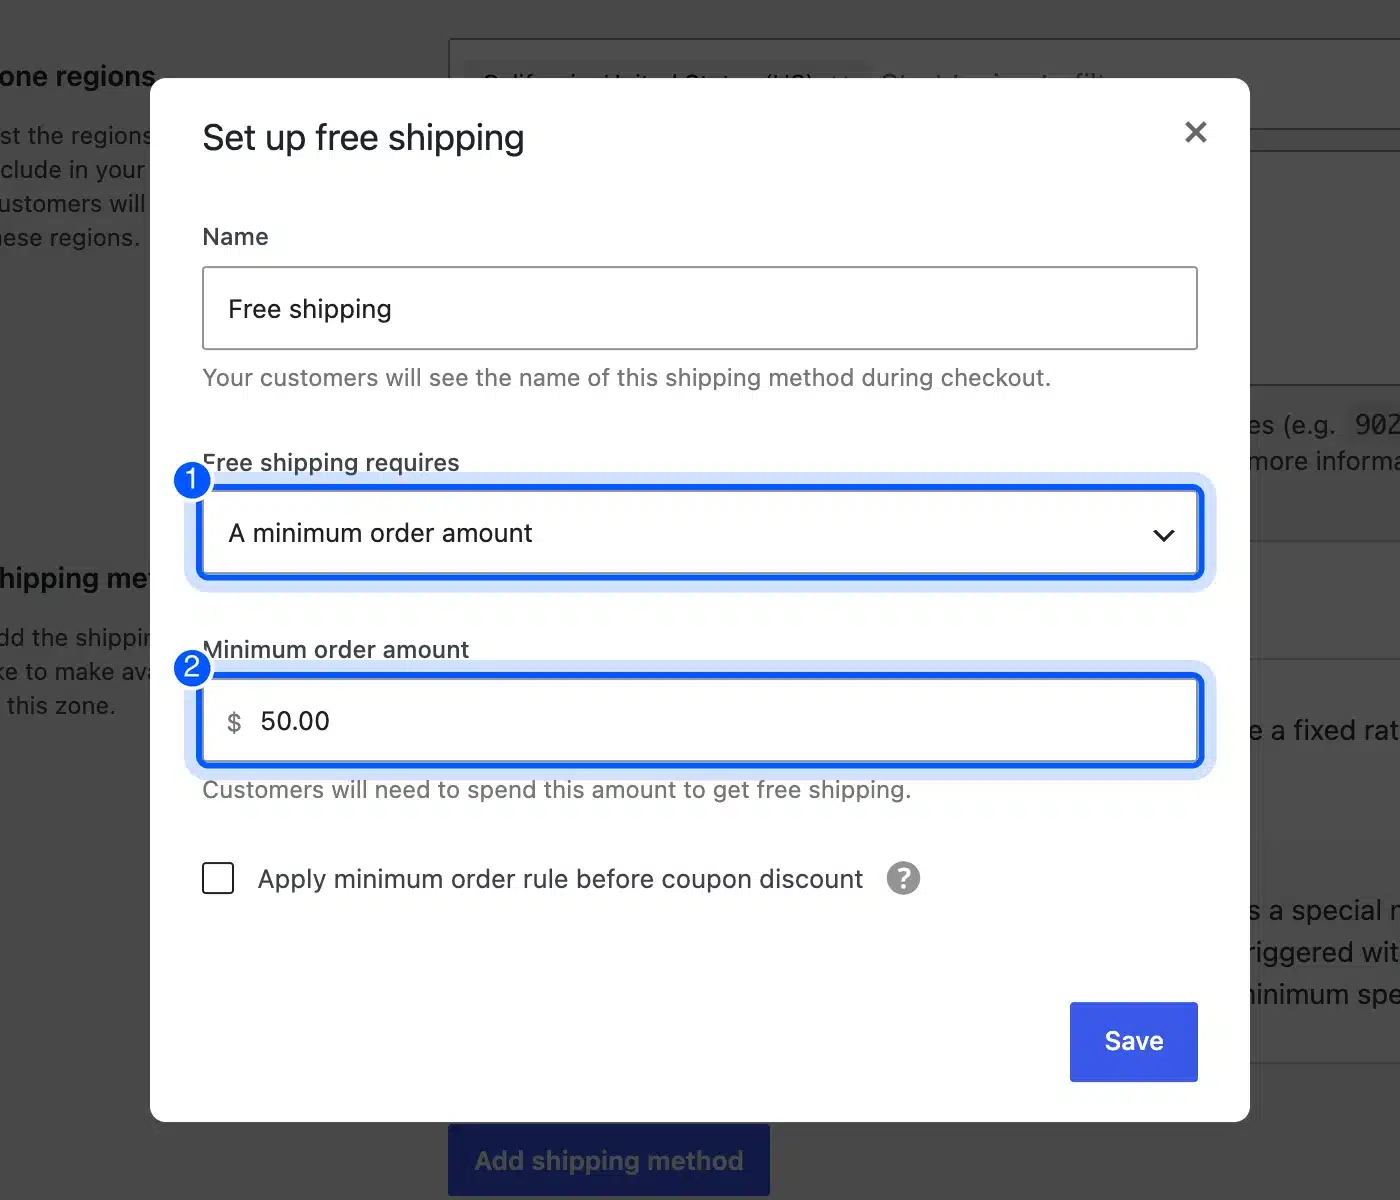
We picked A minimum order amount and typed 50.00. The window then asked whether the rule should apply before the coupon discount, which is a checkbox that is off by default.
Set Up Local Pickup
Local pickup has its own tab, next to Shipping zones, Shipping settings and Classes. Open it, turn local pickup on and add your pickup locations. Shoppers then see a pickup option beside the delivery options at checkout.
Read the official local pickup guide for the current fields. We did not configure pickup on our test store, so we only confirm where it lives.
Charge More for Heavy Items With Shipping Classes
Shipping classes group products that cost more to ship, such as heavy or fragile items. Create a class under the Classes tab and assign products to it. Then set an extra cost for that class inside your flat rate method.
Go to WooCommerce, then Settings, then Shipping, then Classes, and click Add shipping class. Name it, save it, then open each product and pick the class on its Shipping tab.
After that, open your flat rate method and click Add shipping class costs. You will get a cost field for each class. The shipping classes guide explains the calculation types in detail.
Why WooCommerce Shows the Wrong Shipping Rate
The most common cause is zone order. WooCommerce reads your zones from top to bottom and stops at the first match. A broad zone above a narrow one always wins, so the narrow zone never applies to any shopper at all.
Put your most specific zones first. On our test store, California sits above United States, so a California shopper sees the California methods.
If a shopper sees no shipping options, check three things:
- Coverage: Does the zone include the shopper’s region or postcode?
- Order: Is a broader zone sitting above it in the list?
- Method: Does the zone have at least one method that is enabled?
Drag the handle on the left of a row to reorder zones. The zones list on our test store shows those handles beside every zone.
How to Test Your WooCommerce Shipping Zones
Add a product to the cart, then set a shipping address inside one of your zones. Check that the right method and price show up. Repeat this for an address in each zone, and for one outside all of them.
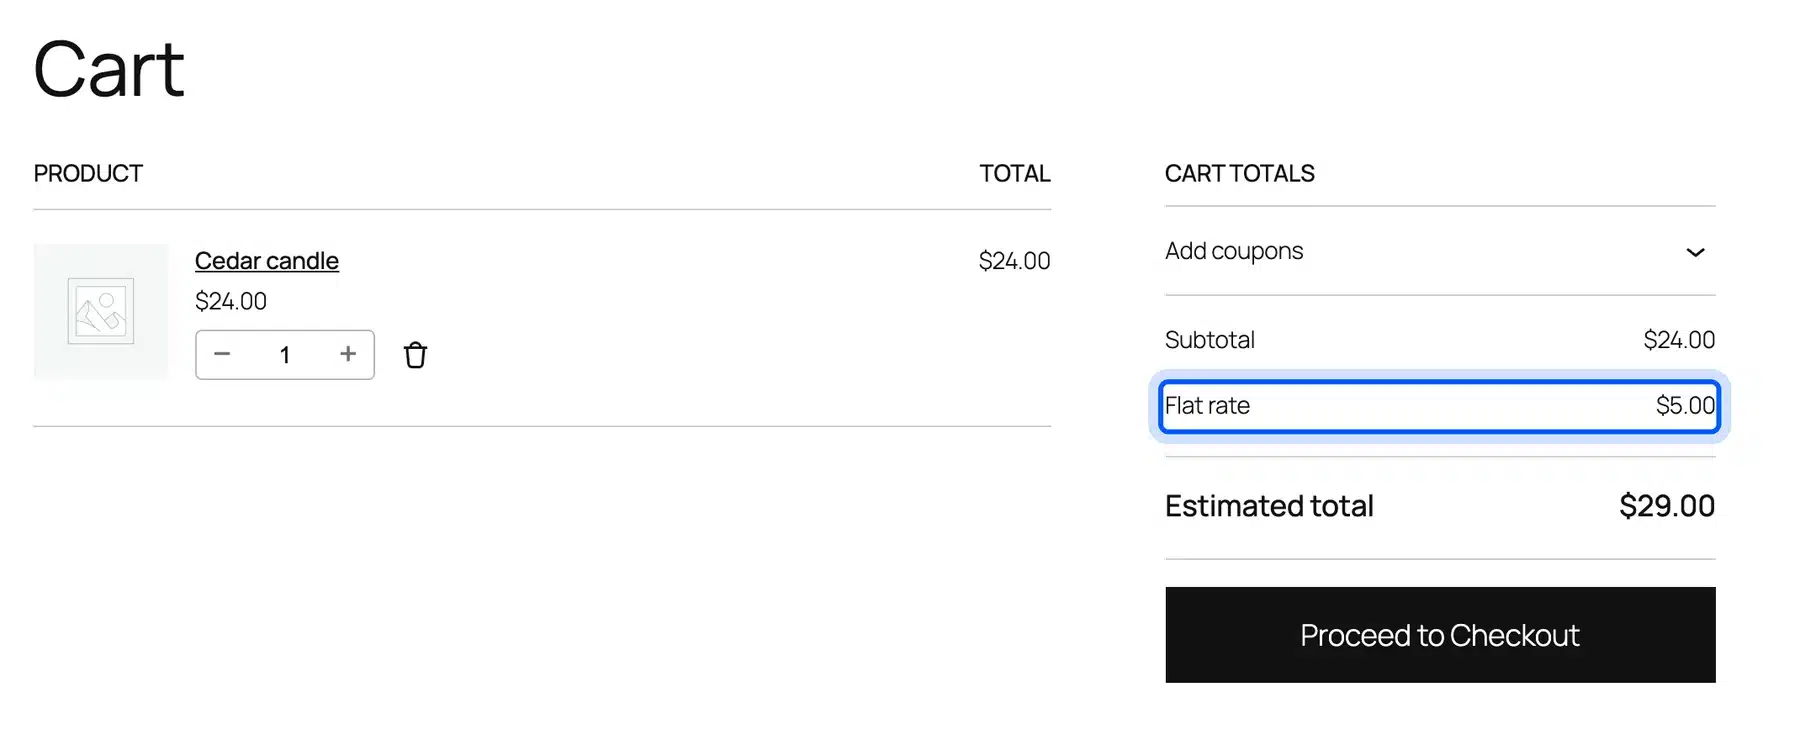
We tested with a $24.00 Cedar candle and a California address. The cart showed Flat rate at $5.00 and an estimated total of $29.00.
WooCommerce also has a built-in helper for this. Under Shipping settings, tick Enable debug mode. The screen says it shows matching shipping zones and bypasses the shipping rate cache, which helps when a change does not appear.
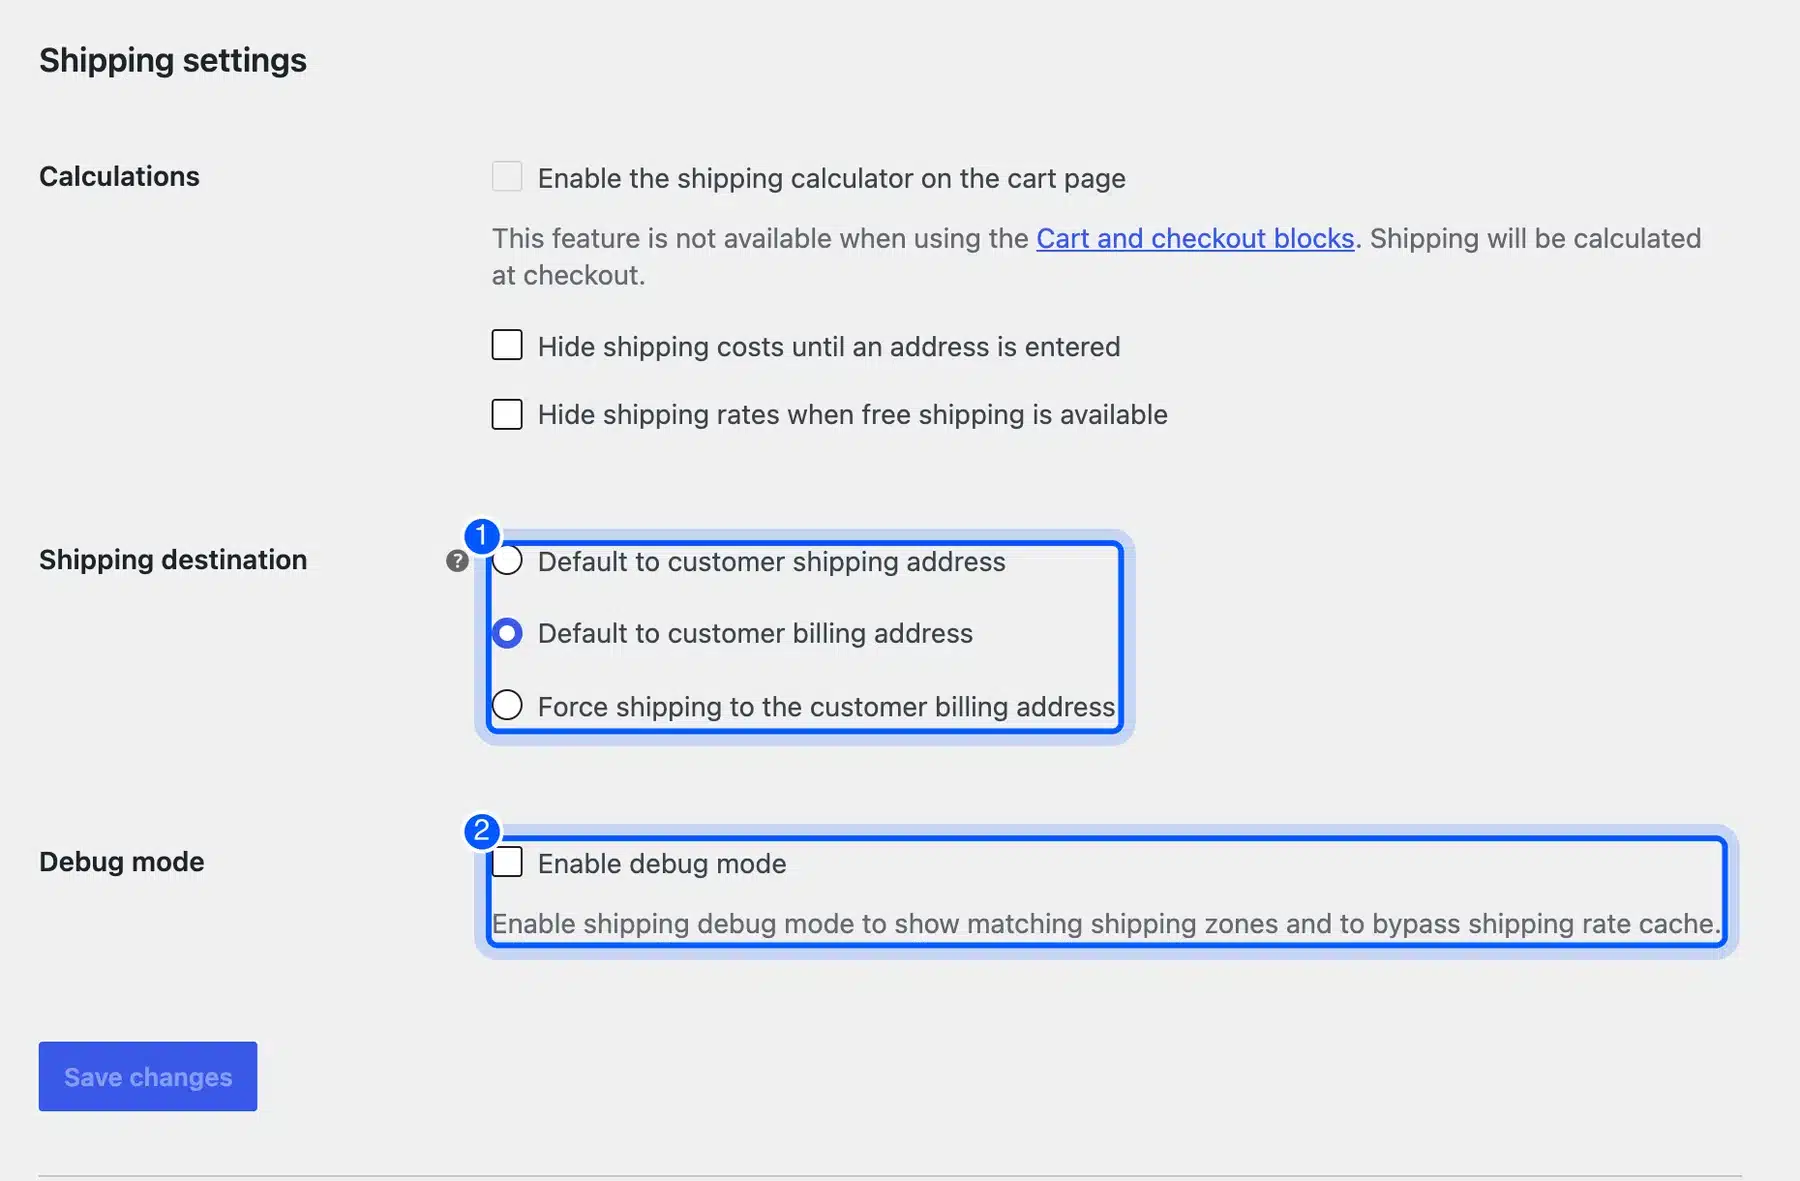
Turn debug mode off before you go live. Also note that the cart shipping calculator is unavailable when you use the Cart and Checkout blocks. The screen says shipping is calculated at checkout instead.
Shipping Settings Worth Checking
The Shipping settings tab controls how zones are matched and shown. Three options matter most. They hide costs until an address is entered, hide other rates when free shipping applies, and choose which address decides the zone for each order.
On our test store, Default to customer billing address was the selected destination. Check yours, because it decides which address WooCommerce compares with your zones.
| Setting | What it does |
|---|---|
| Hide shipping costs until an address is entered | Shows costs only after the shopper gives an address |
| Hide shipping rates when free shipping is available | Shows only free shipping when it applies |
| Shipping destination | Picks the shipping or billing address for zone matching |
| Enable debug mode | Shows matching zones and skips the rate cache |
Test one order after each change, because these options change what shoppers see at checkout.
Conclusion
To set up WooCommerce shipping zones, create a zone, choose its regions, and add at least one method. Order your zones from most specific to broadest, and keep the Rest of the world row in mind for everything else.
Then test each zone with a real cart before launch. If you need custom rates, rules by product or a checkout that fits your store, our WooCommerce development services team can build it.
Frequently Asked Questions (FAQs)
Q1. What are WooCommerce shipping zones?
Shipping zones are geographic areas, each with its own shipping methods and prices. WooCommerce matches the shopper’s address to one zone and shows only that zone’s methods. A zone can cover a continent, a country, a state or a set of postcodes.
Q2. Where do I find shipping zones in WooCommerce?
Go to WooCommerce, then Settings, then Shipping. The Shipping zones tab lists every zone and has the Add zone button. If the Shipping tab is missing, check that shipping is not disabled in the General settings.
Q3. Can a customer match more than one shipping zone?
No. WooCommerce matches one zone per shopper and stops at the first match, reading your list from top to bottom. Keep specific zones above broad ones.
Q4. What is the Rest of the world zone?
It is a built-in fallback that covers any address your other zones miss. On a new store it has no shipping methods. Add one if you want to ship to every place, or leave it empty to block those orders.
Q5. How do I limit a zone to certain postcodes?
In the zone editor, click Limit to specific ZIP/postcodes and list one code per line. WooCommerce supports wildcards like CB23* and numeric ranges like 90210...99000.
Q6. How do I offer free shipping above a minimum order?
Add the Free shipping method to the zone. Set Free shipping requires to A minimum order amount, then type the amount. Save the method, and free shipping appears once the cart passes that total.
Q7. Why do my customers see no shipping options?
Usually the zone does not cover their address, a broader zone sits above the right one, or the zone has no enabled method. Fix the order, add a method and test again with debug mode on.
Q8. Do I need shipping classes?
Only if some products cost more to ship than others. Classes let you add an extra cost inside flat rate for heavy or fragile items. A store with one similar product type can skip them.