Yes, you can install applications on WordPress, but the process looks nothing like installing an app on your phone. It takes about five minutes once you know where to click.
Most guides skip the one thing that trips people up the most: whether you’re on WordPress.com or WordPress.org changes your entire answer. So does your account’s user role.
This guide covers both platforms and walks through the exact dashboard steps for plugins and themes, with screenshot-ready stops along the way. It also shows what to check before you install anything, so your site doesn’t slow down or break.
What Does “Installing an Application” Mean on WordPress?
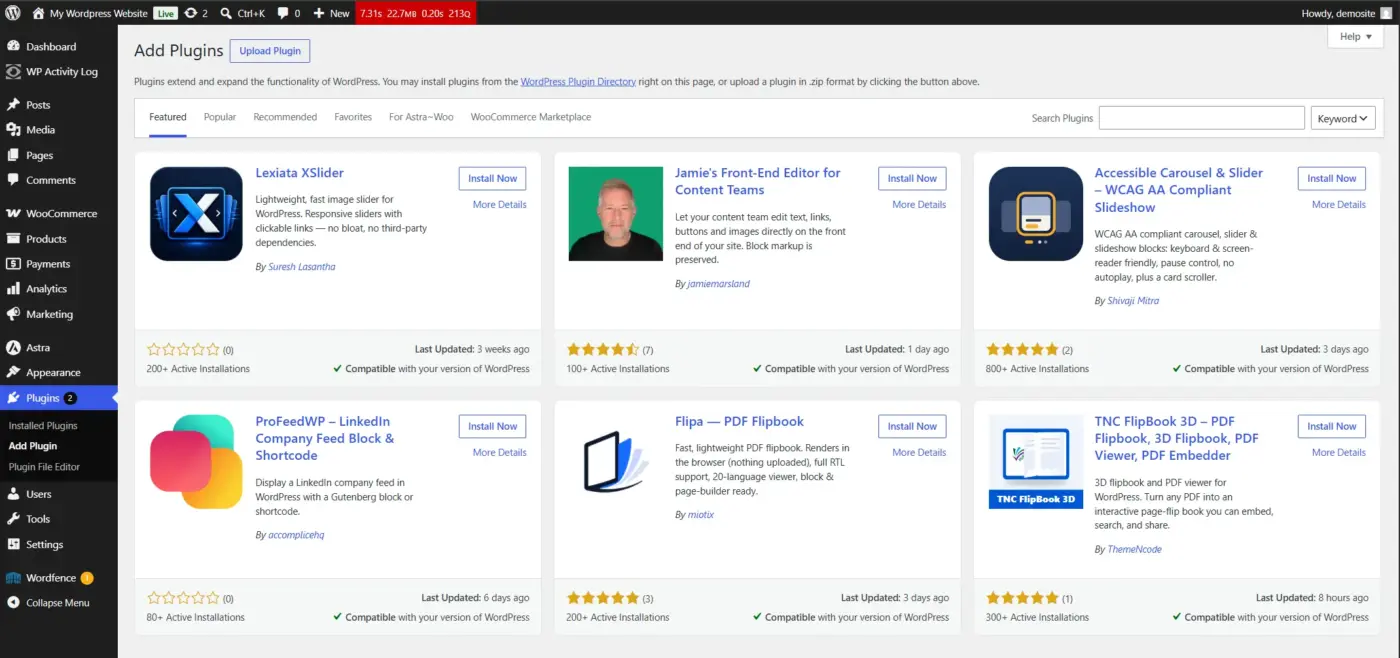
WordPress doesn’t run apps the way your phone does. There’s no App Store icon to tap. Instead, it uses plugins and themes, and together they do the same job an app would on other platforms.
A plugin is a small piece of software that adds a feature to your site. Want a contact form, an SEO tool, or a full online store? There’s a plugin for that. A theme, on the other hand, controls how your site looks rather than what it does.
Neither one installs the way a desktop program does. You won’t download an .exe file. You’ll add plugins and themes straight from your WordPress dashboard. The WordPress Plugin Directory alone lists tens of thousands of free options to choose from.
Standalone software, like a video editor or an accounting app, doesn’t belong inside WordPress at all. Those run on your computer or your hosting server, completely separate from your website’s dashboard.
Types of Third-Party Applications You Can Install on WordPress
Once you know plugins and themes are the vehicle, the next question is what you can add through them. The range is wider than most beginners expect.
- SEO tools: Plugins like Yoast SEO or Rank Math handle meta tags, sitemaps, and readability checks without touching any code.
- Security applications: Wordfence and similar tools scan for malware, block brute-force login attempts, and alert you to suspicious file changes.
- Ecommerce systems: WooCommerce turns a standard WordPress site into a full online store, handling products, payments, and shipping.
- Social integrations: These connect your site to Facebook, Instagram, or X, letting you display feeds or add one-click sharing buttons.
- Analytics tools: MonsterInsights and similar plugins pull your Google Analytics data straight into the WordPress dashboard.
Short version: if you can name a website feature, there’s a strong chance a plugin already exists for it. The skill isn’t finding one. It’s picking the right one, which the later sections in this guide cover.
WordPress.com vs WordPress.org: Why It Changes Your Answer
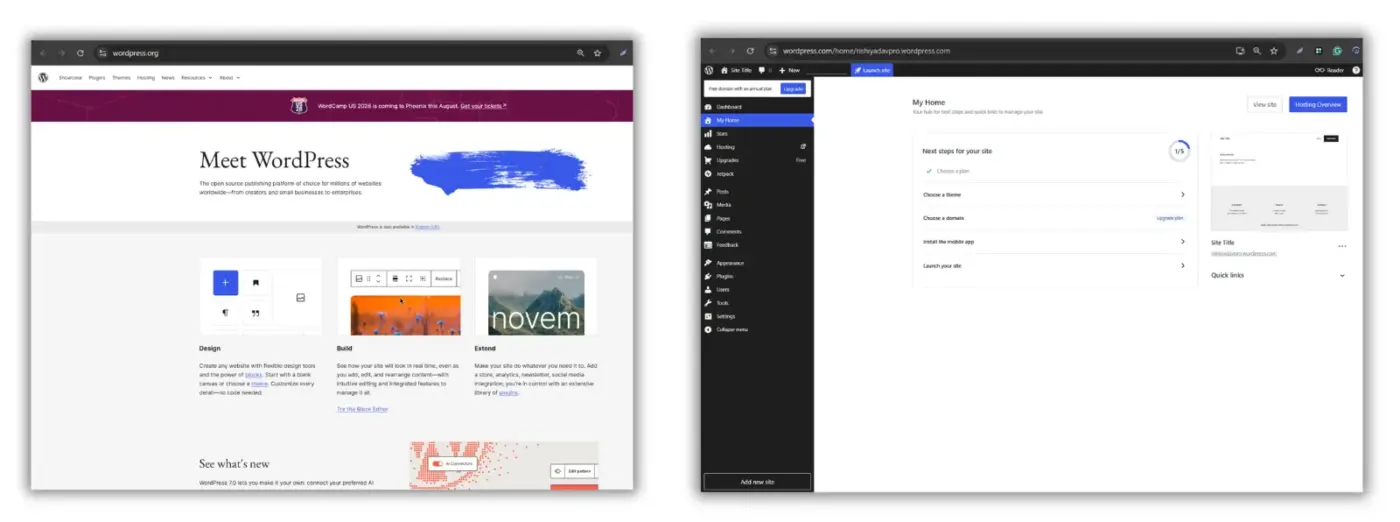
This is the part almost every other guide skips, and it’s the reason two people can ask the same question and get two different answers.
WordPress.org is the free, self-hosted software. You install it on your own hosting account, and you get full access to install any plugin or theme, including custom ones you build yourself.
WordPress.com is a hosted service, and your plugin access depends on your plan. Free and Personal plans block custom plugin installs completely. Business and Commerce plans open up the full plugin library, similar to what a self-hosted site gets.
Here’s a quick way to check which one you’re on. Log into your dashboard. If you see a full “Plugins” menu with an “Add New” option, you’re either on WordPress.org or a WordPress.com Business plan or higher.
If that menu is missing or greyed out, you’re on a lower WordPress.com tier. You’ll need to upgrade before you can add applications beyond what’s built in.
A quick breakdown of what each WordPress.com tier allows:
- Free and Personal: No custom plugins or themes. You’re limited to built-in blocks and a small set of free themes.
- Premium: Still no plugin installs, but you gain access to more premium themes and design tools.
- Business: Full plugin and theme installation, including uploads from outside the directory.
- Commerce: Everything in Business, plus WooCommerce and store-specific tools pre-integrated.
Building a store, a membership site, or anything beyond a basic blog? WordPress.org or a WordPress.com Business plan is usually the better starting point.
Who Is Allowed to Install Applications on WordPress?
Not every account on a WordPress site can install plugins or themes, even on a self-hosted setup. This comes down to user roles, and it catches a lot of beginners off guard.
WordPress ships with five default roles: Administrator, Editor, Author, Contributor, and Subscriber. According to the official WordPress.org documentation, only the Administrator role includes the capability to install and activate plugins or themes.
- Administrator: Full access, including installing and deleting applications.
- Editor: Can manage content but cannot install anything.
- Author, Contributor, Subscriber: No install access at all.
If you’re logged in and can’t find the option to add a plugin, check your role first. This is the most common reason the install screen seems to disappear entirely.
Note: we see this constantly in support. A client hands off a site to a freelancer, sets them up as an Editor to be safe, then can’t figure out why that person can’t add the SEO plugin they were asked to install.
How to Install a Plugin on WordPress (Step by Step)
This is the core of installing applications on WordPress for most people. There are four ways to do it, and which one you need depends on where the plugin came from.
Say you’re setting up a bakery site and need a contact form so customers can ask about custom cake orders. That’s a perfect case for Method 1 below. Every step maps to one screen, so it’s easy to screenshot as you go.
Method 1: Search and Install From the Dashboard
This is the fastest method, and it works for any free plugin listed in the official directory.
- Log in to your WordPress dashboard.
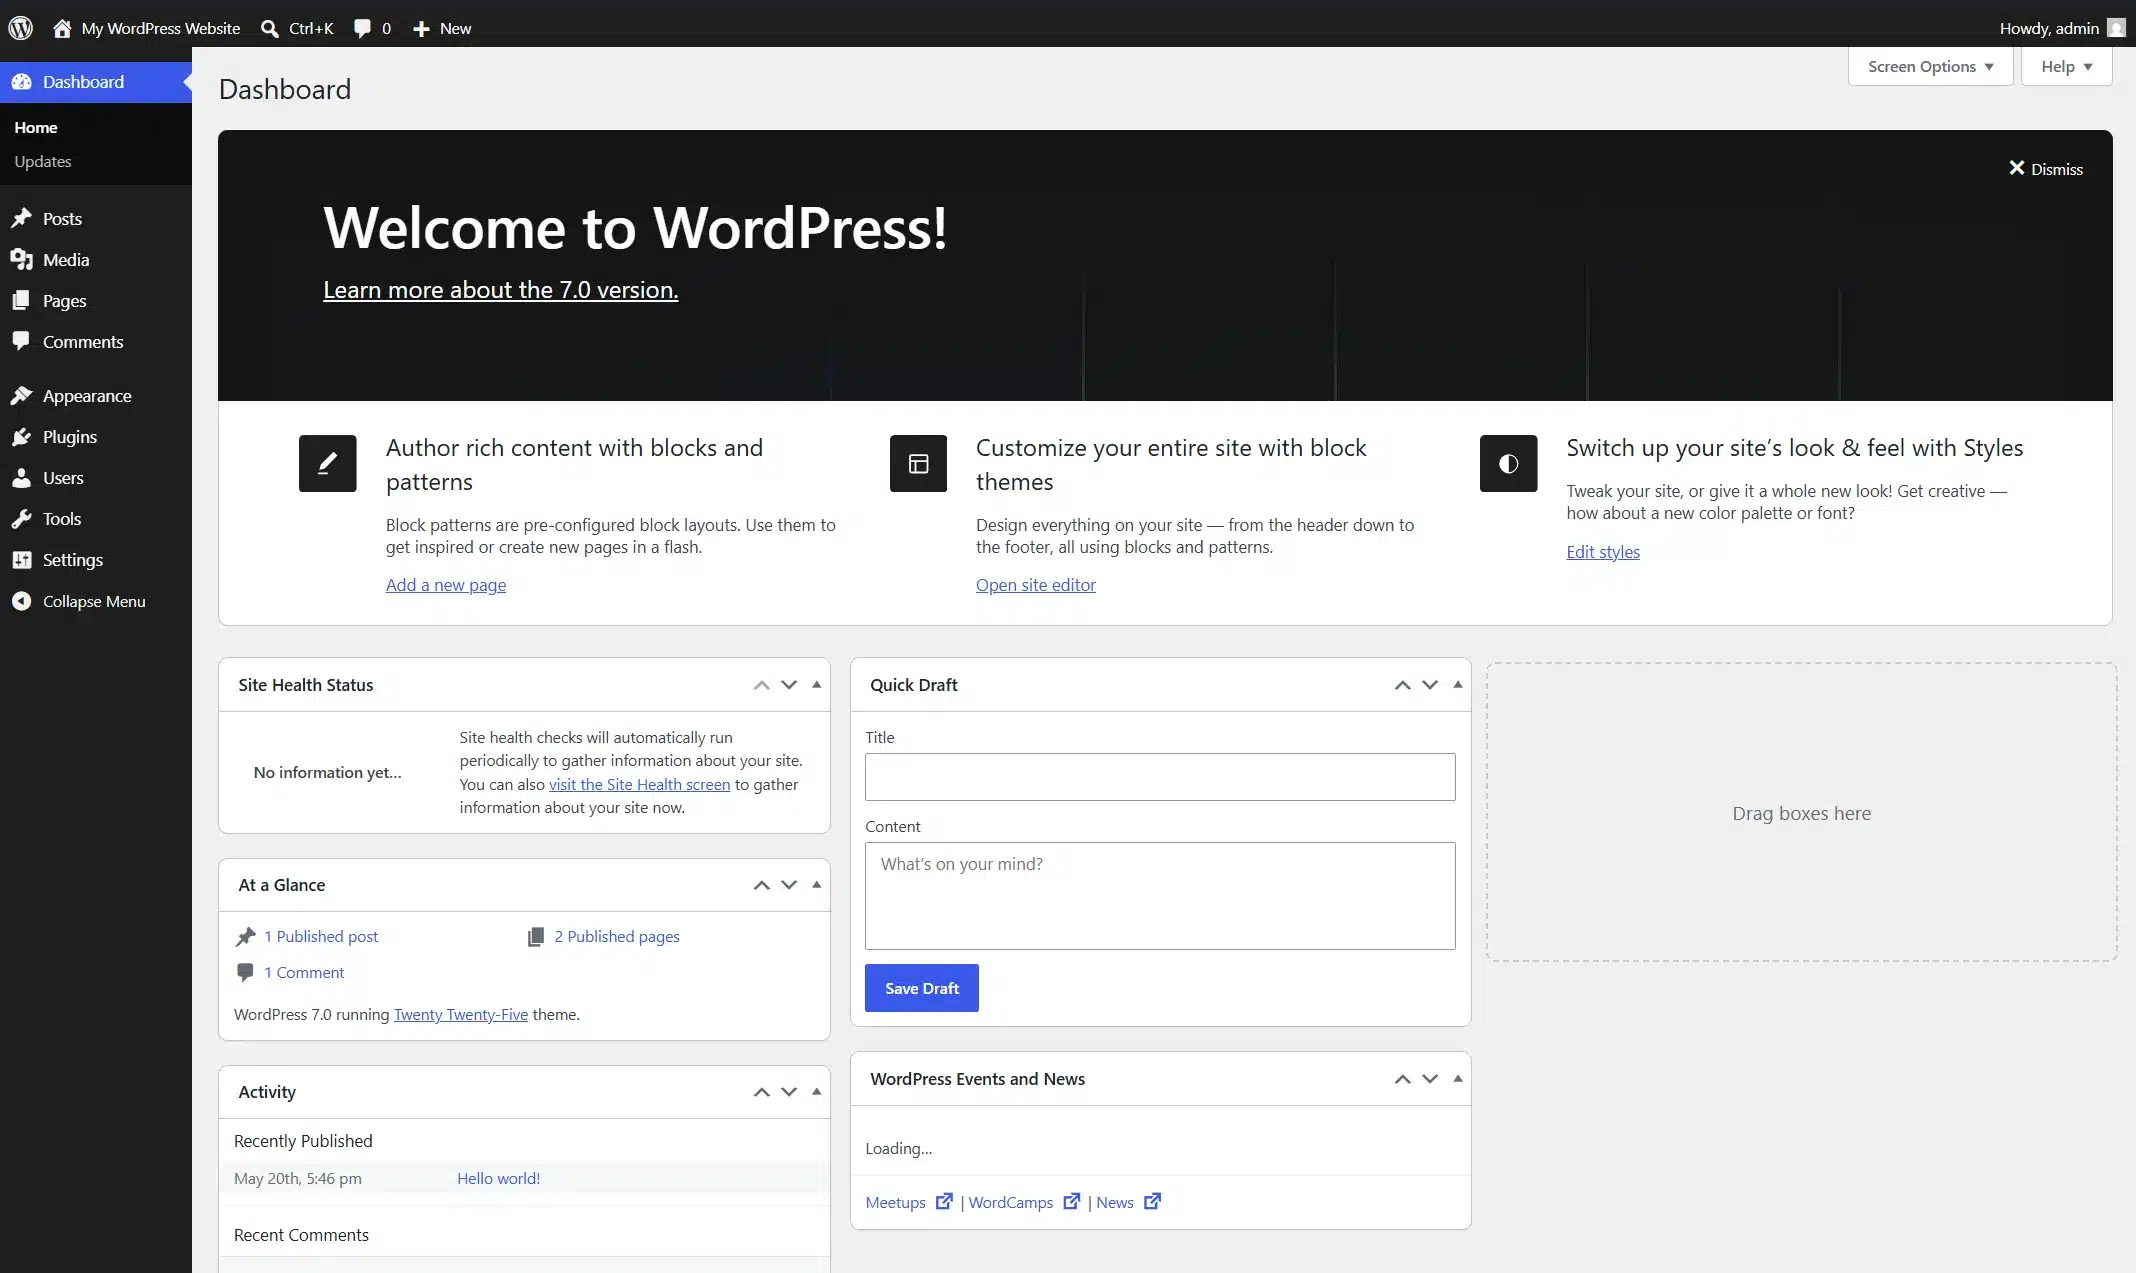
- In the left sidebar, hover over Plugins, then click Add New Plugin.
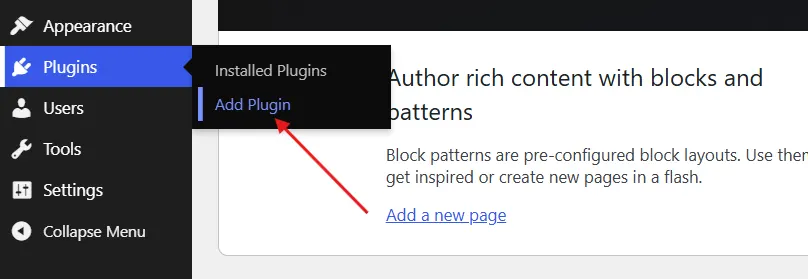
- Type what you’re looking for into the search bar in the top right. For example, “SEO” or “contact form.”
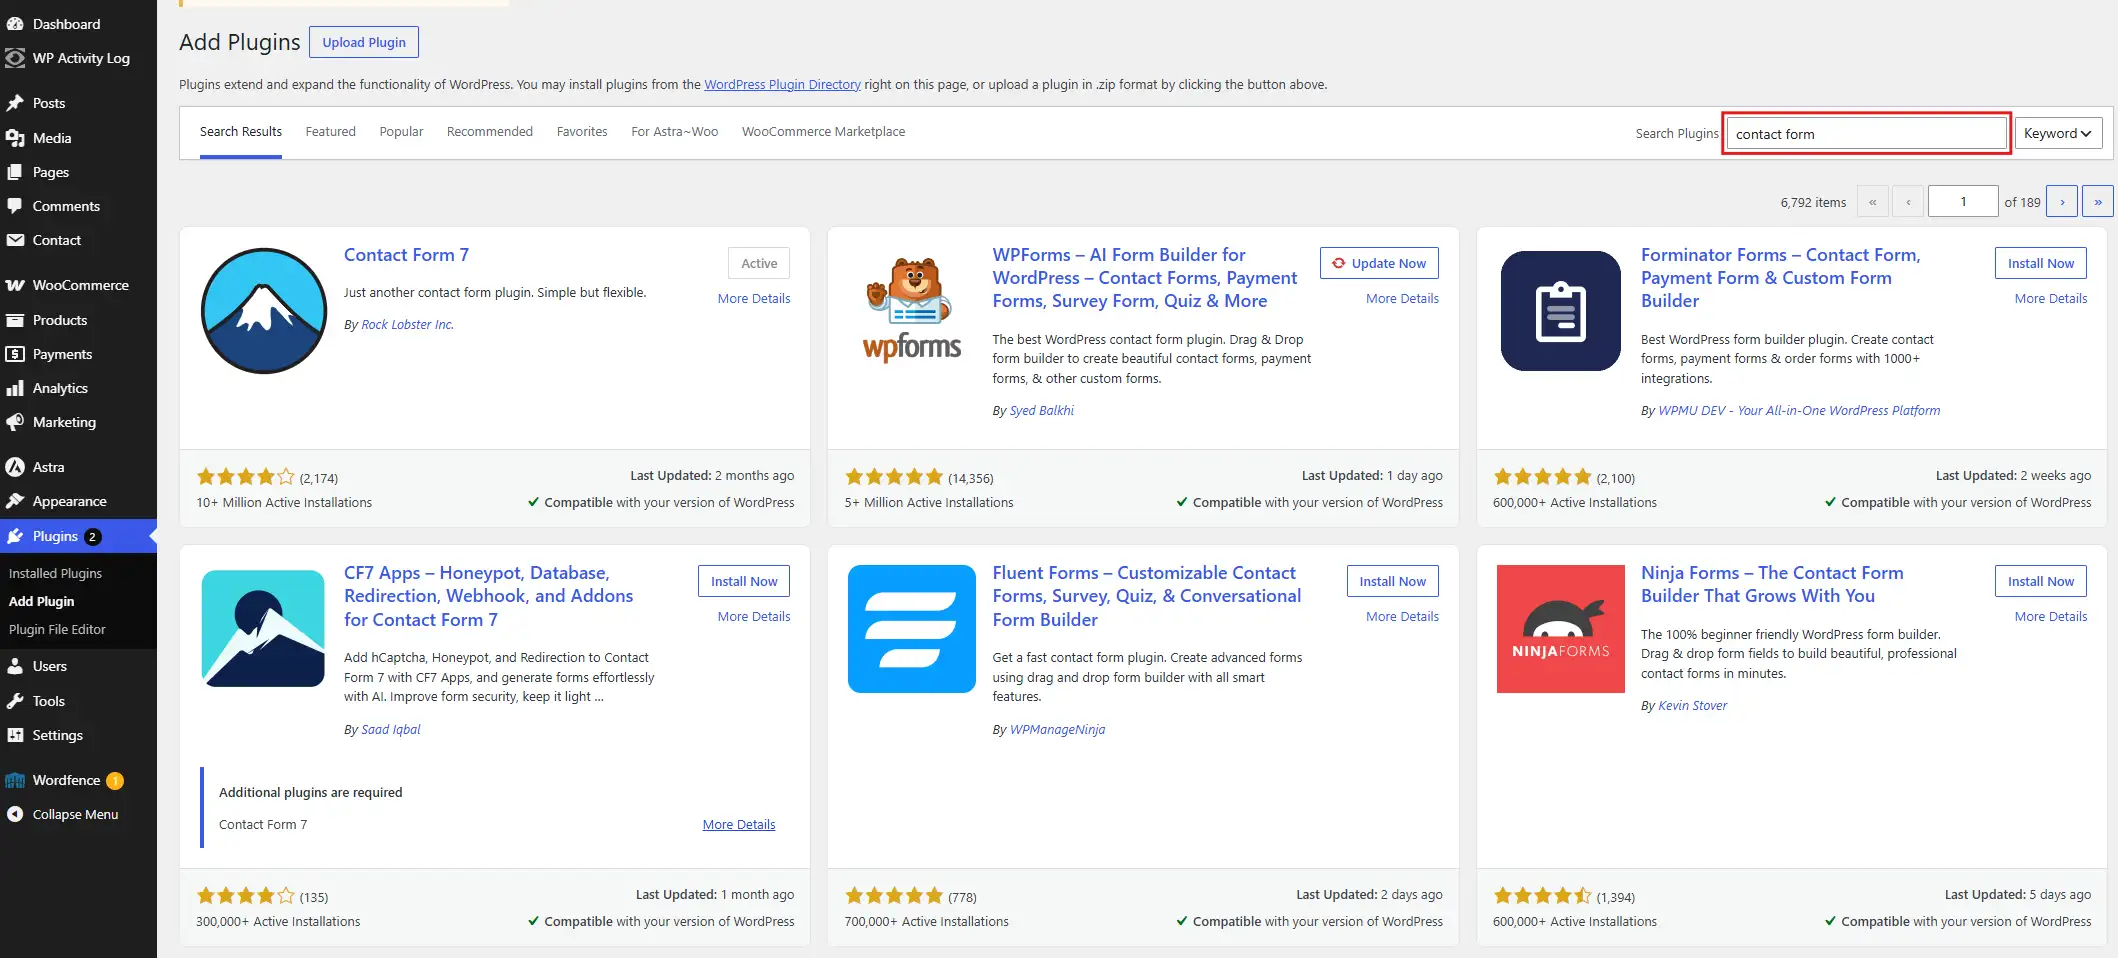
- Browse the results. Each card shows a rating, an install count, and a “last updated” date.
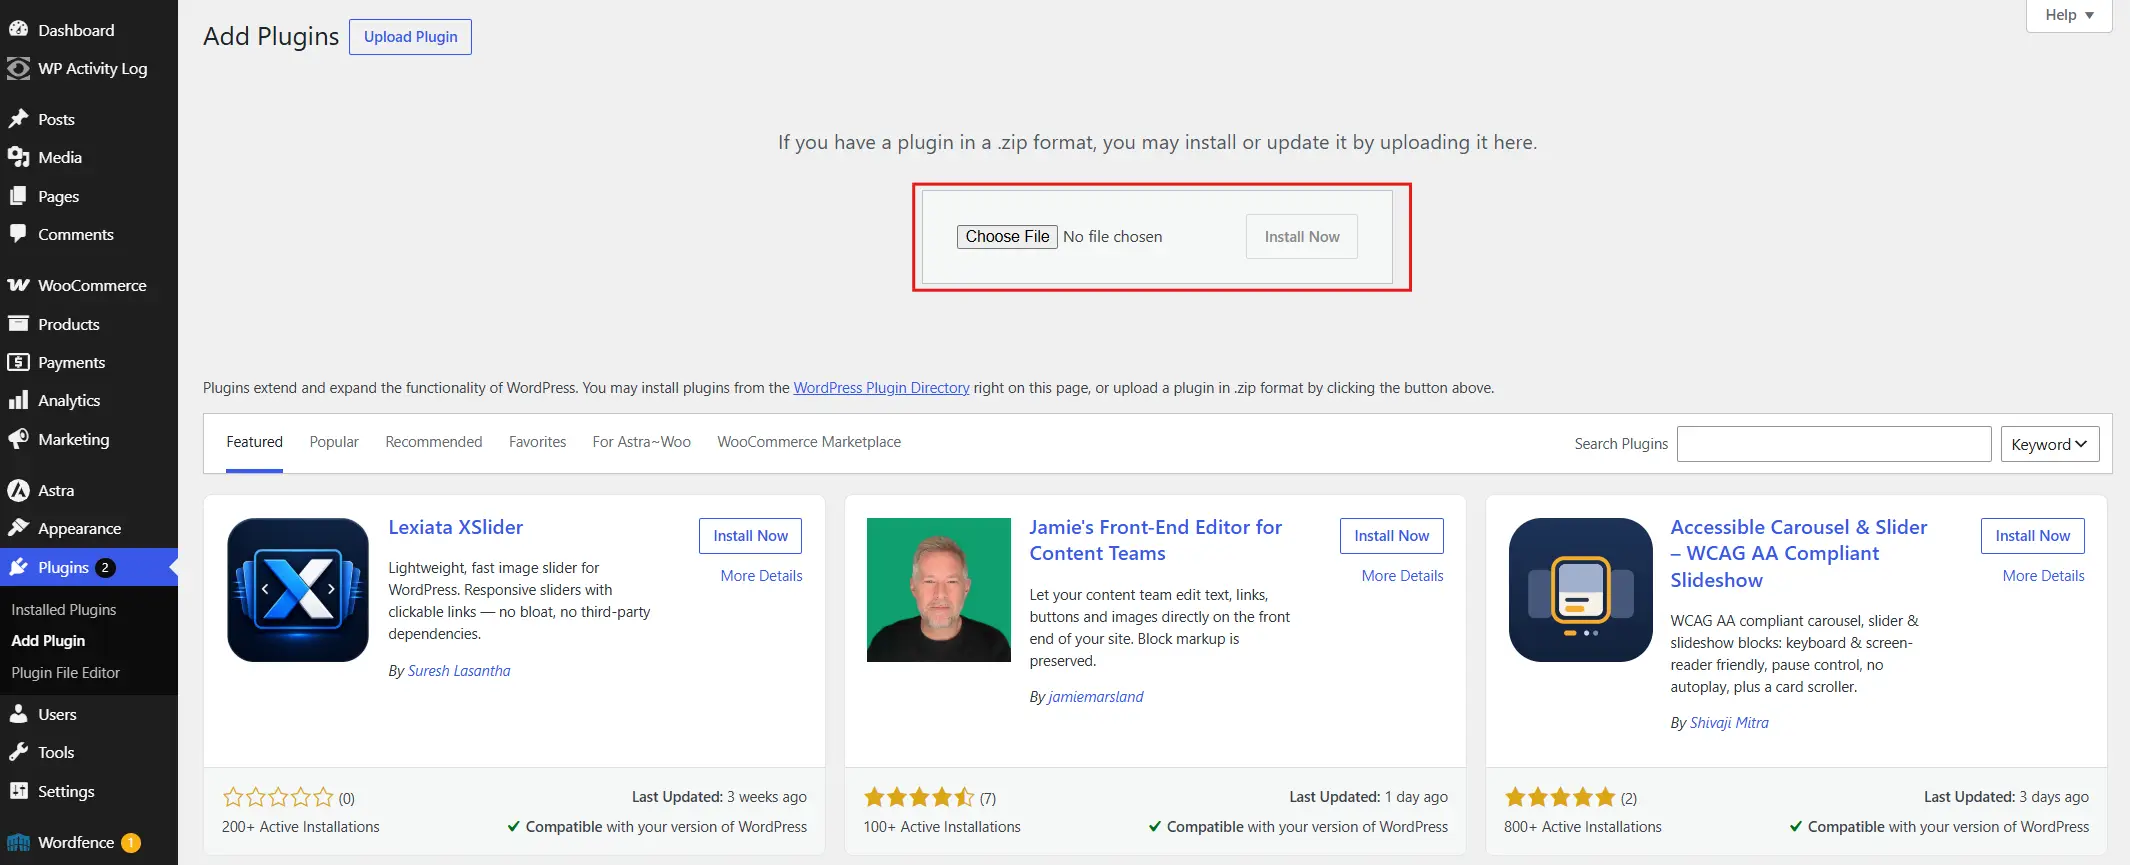
- Click Install Now, then activate the plugin you want.
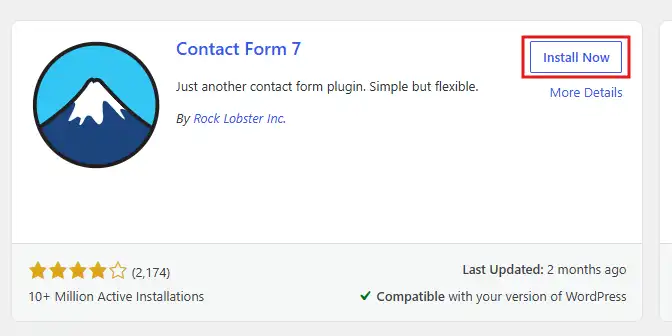
That’s it. The plugin is live on your site and ready to be configured. For a simple contact form plugin, this whole process takes under two minutes.
Method 2: Upload a Plugin ZIP File
Premium plugins, or ones from a marketplace outside the official directory, usually arrive as a .zip file instead of showing up in search. If you’re installing premium plugins from a marketplace like CodeCanyon, this is the method you’ll use every time.
- Go to Plugins > Add New Plugin.
- Click the Upload Plugin button near the top of the page.
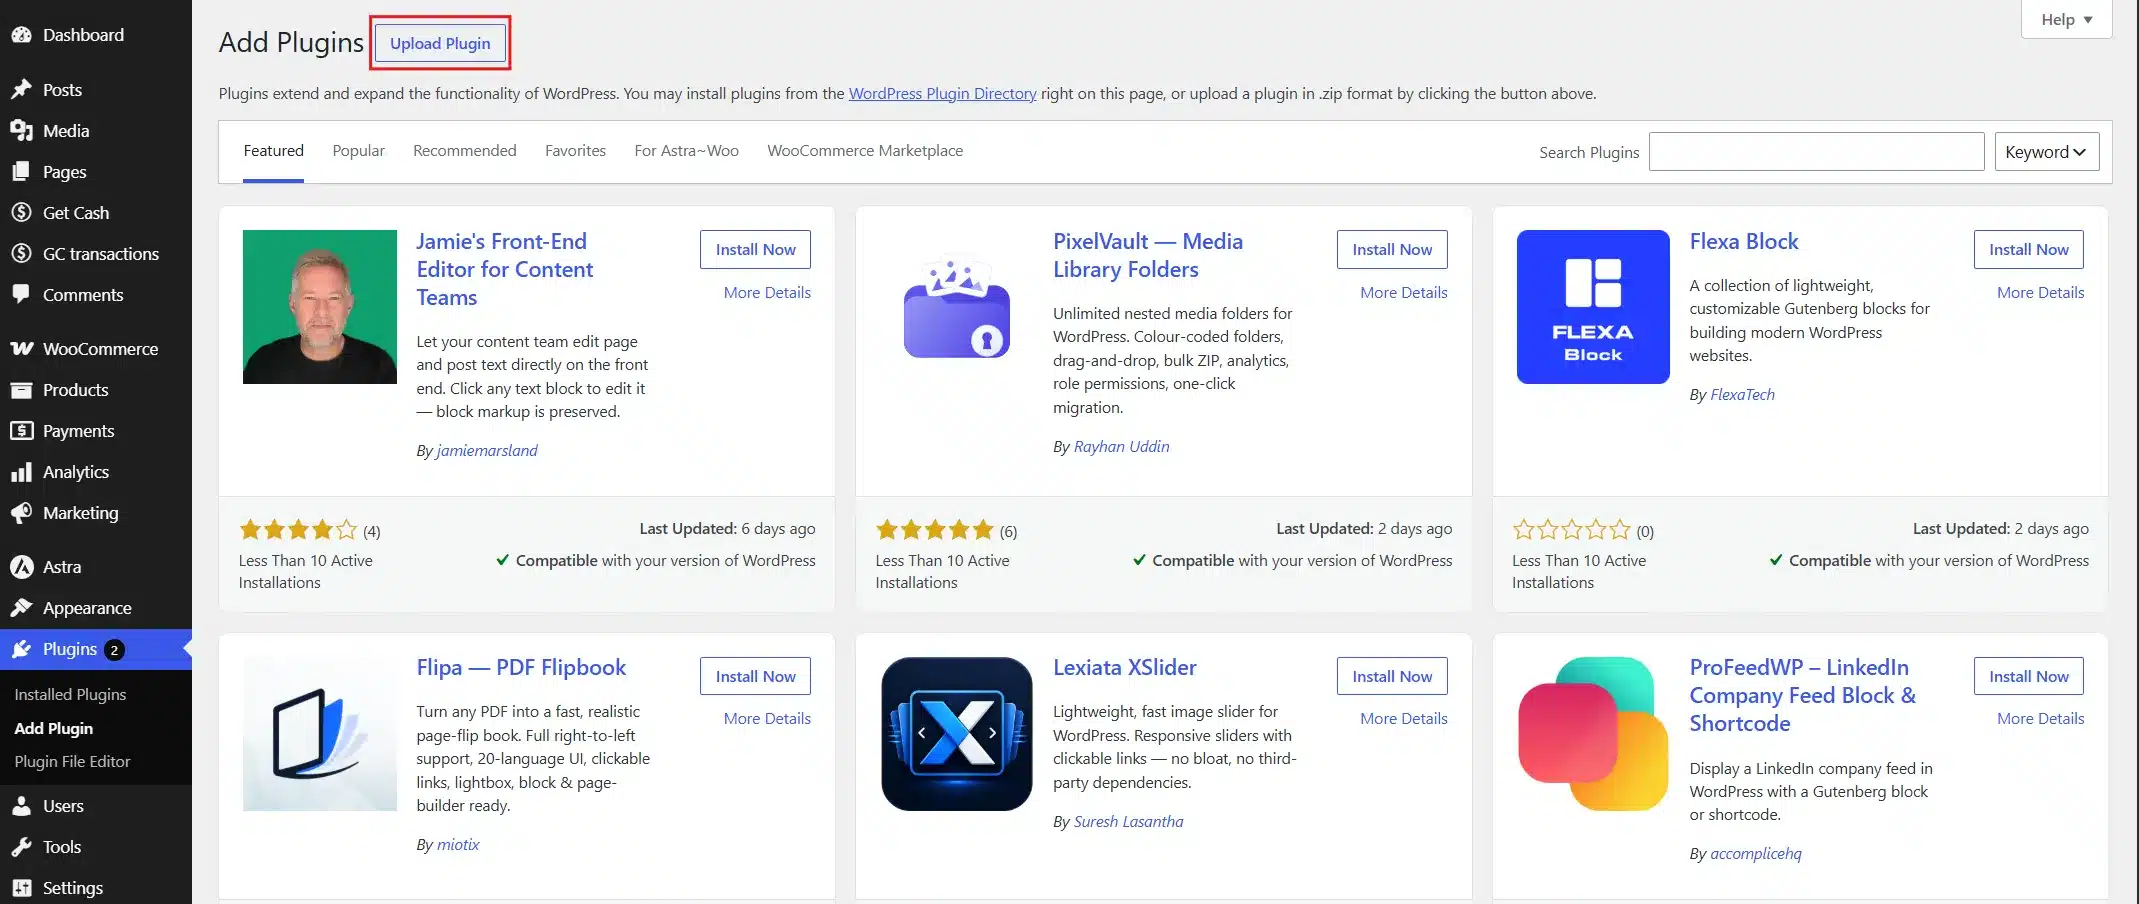
- Click Choose File and select the
.zipFile from your computer. - Click Install Now.
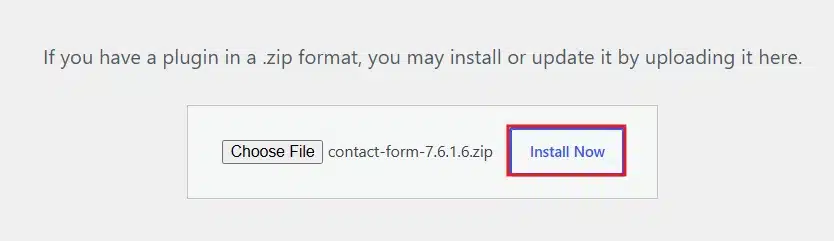
- Wait for the upload to finish, then click Activate. If the plugin is already installed, click Replace current with uploaded.
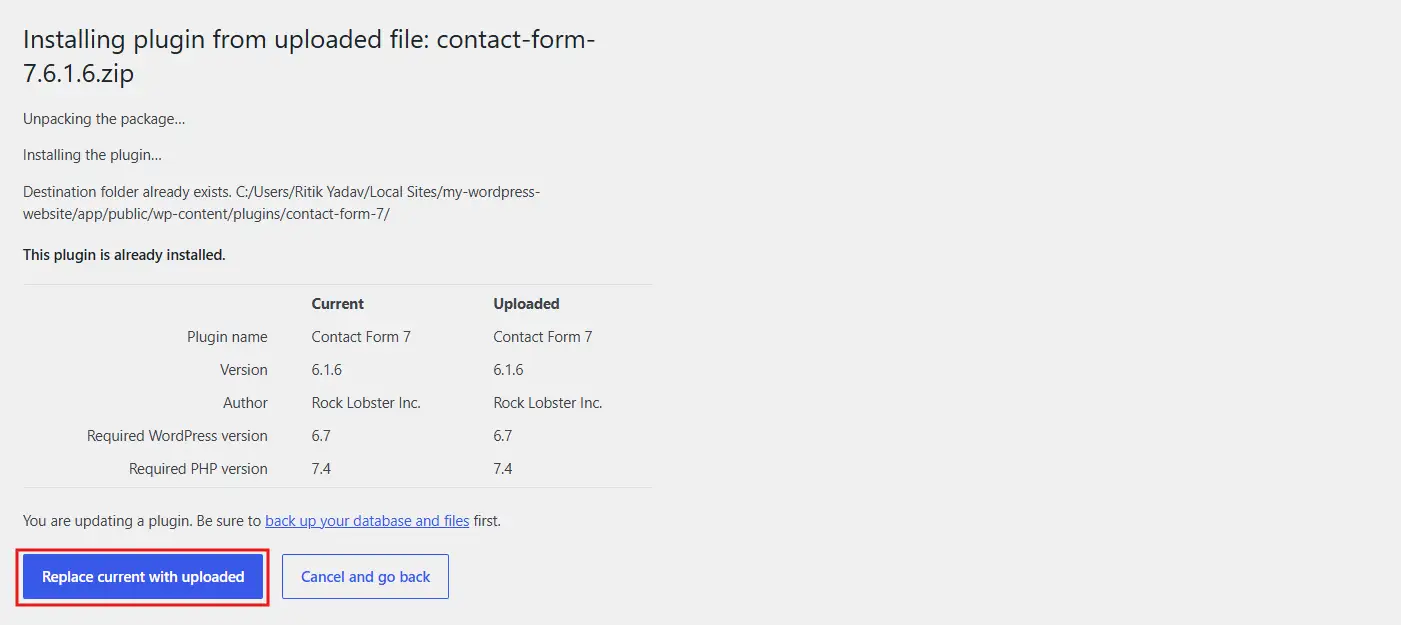
Keep the original .zip File somewhere safe. You’ll need it again if you ever want to reinstall or roll back a version.
Method 3: Install a Plugin via FTP
Some hosting providers restrict uploads through the dashboard for security reasons. When that happens, FTP is your fallback.
- Connect to your server using an FTP client or go to the site’s folder in your file Manager.
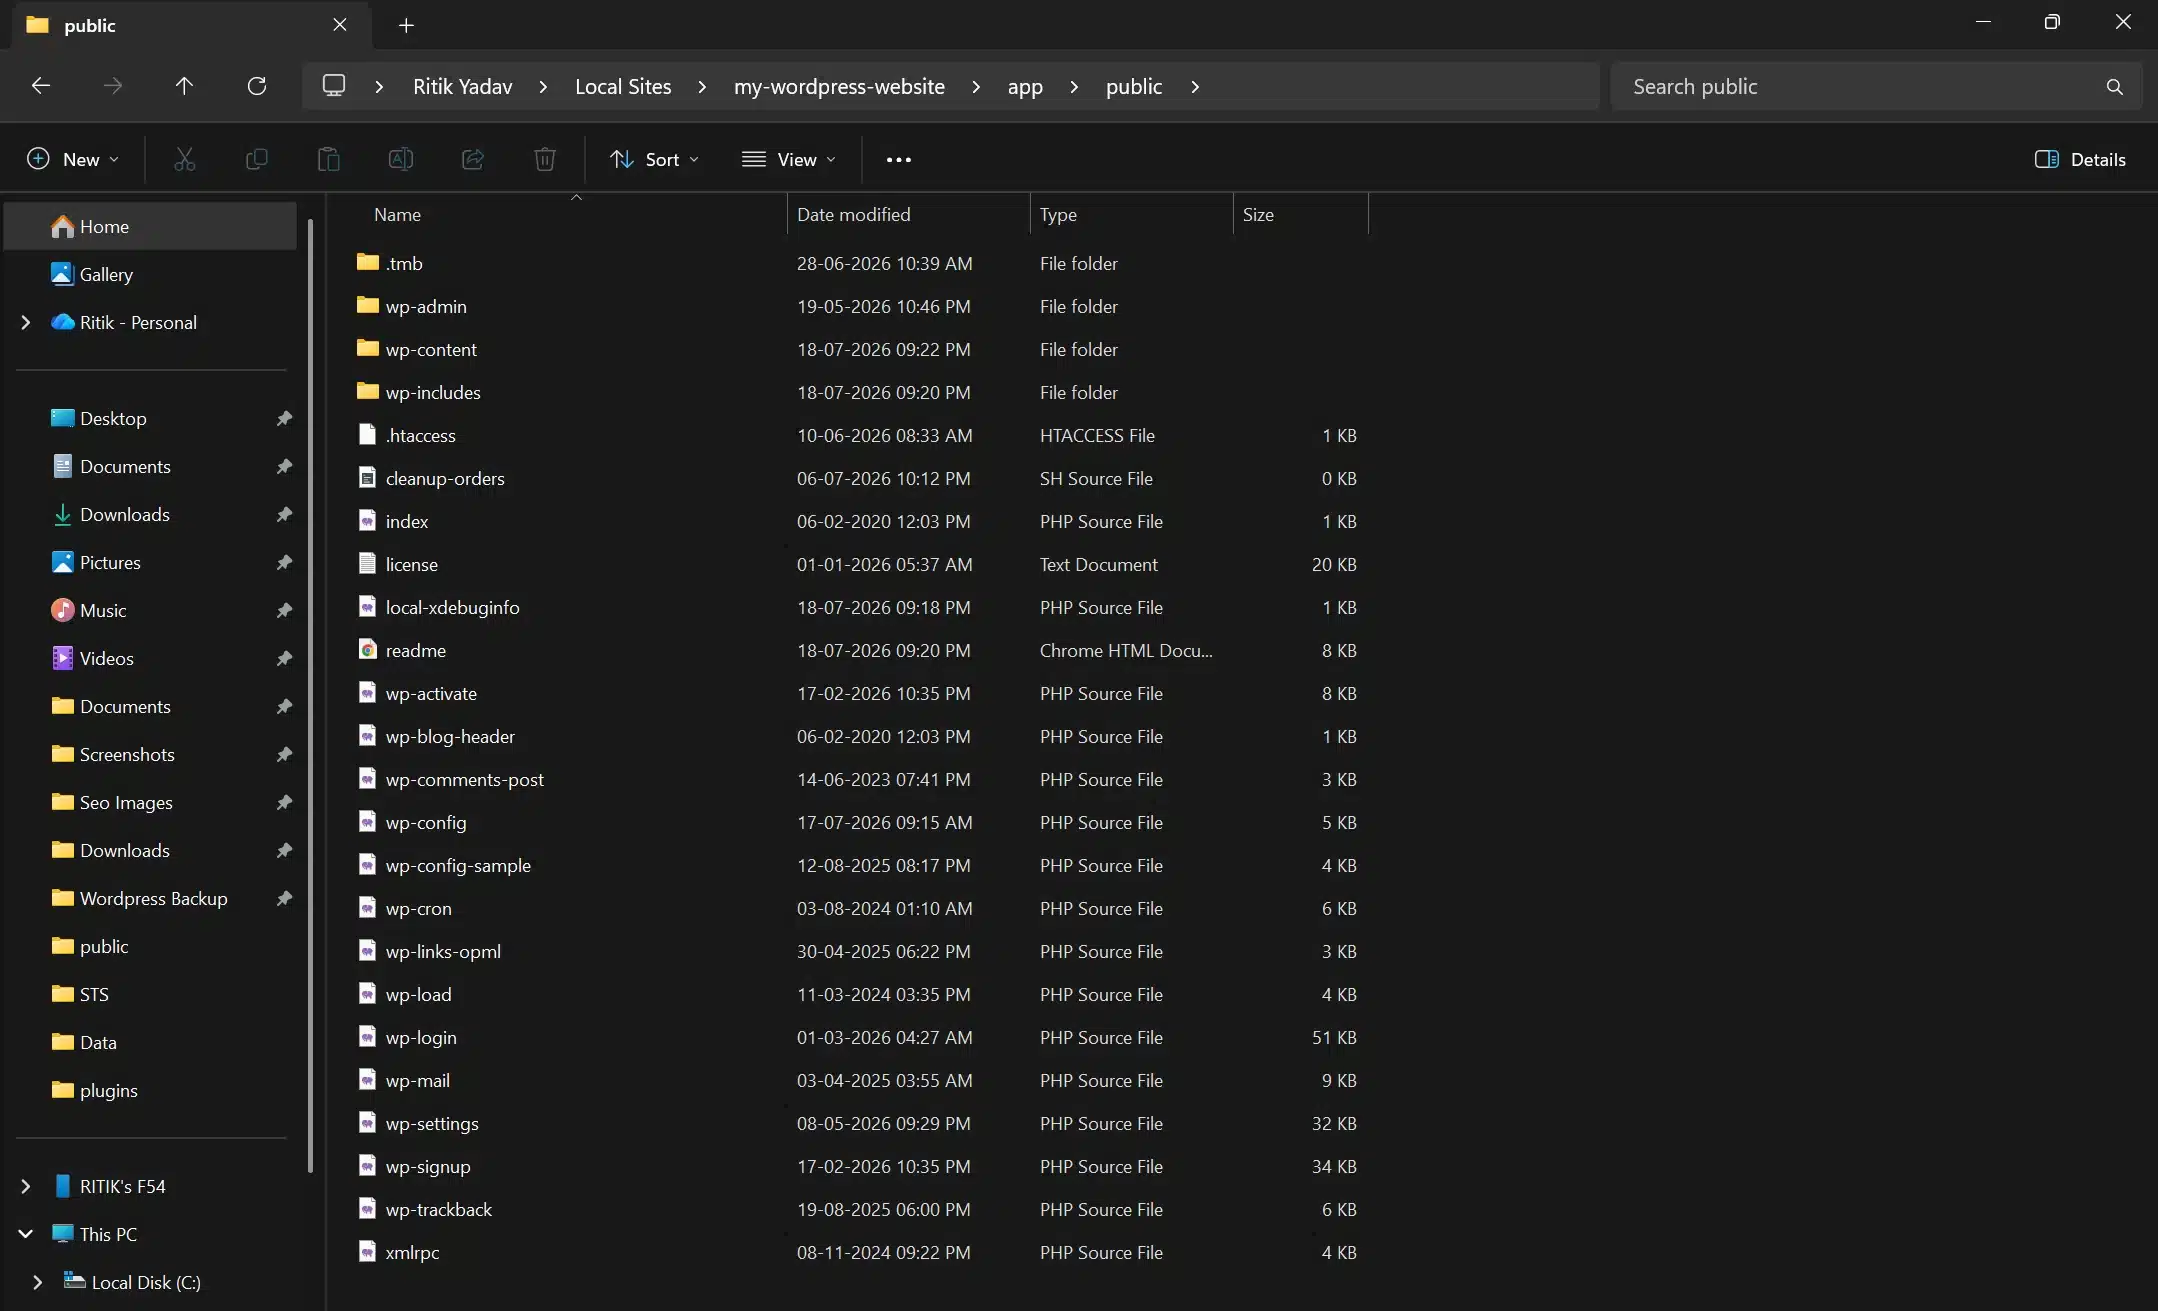
- Download and extract the plugin’s .zip file on your computer.
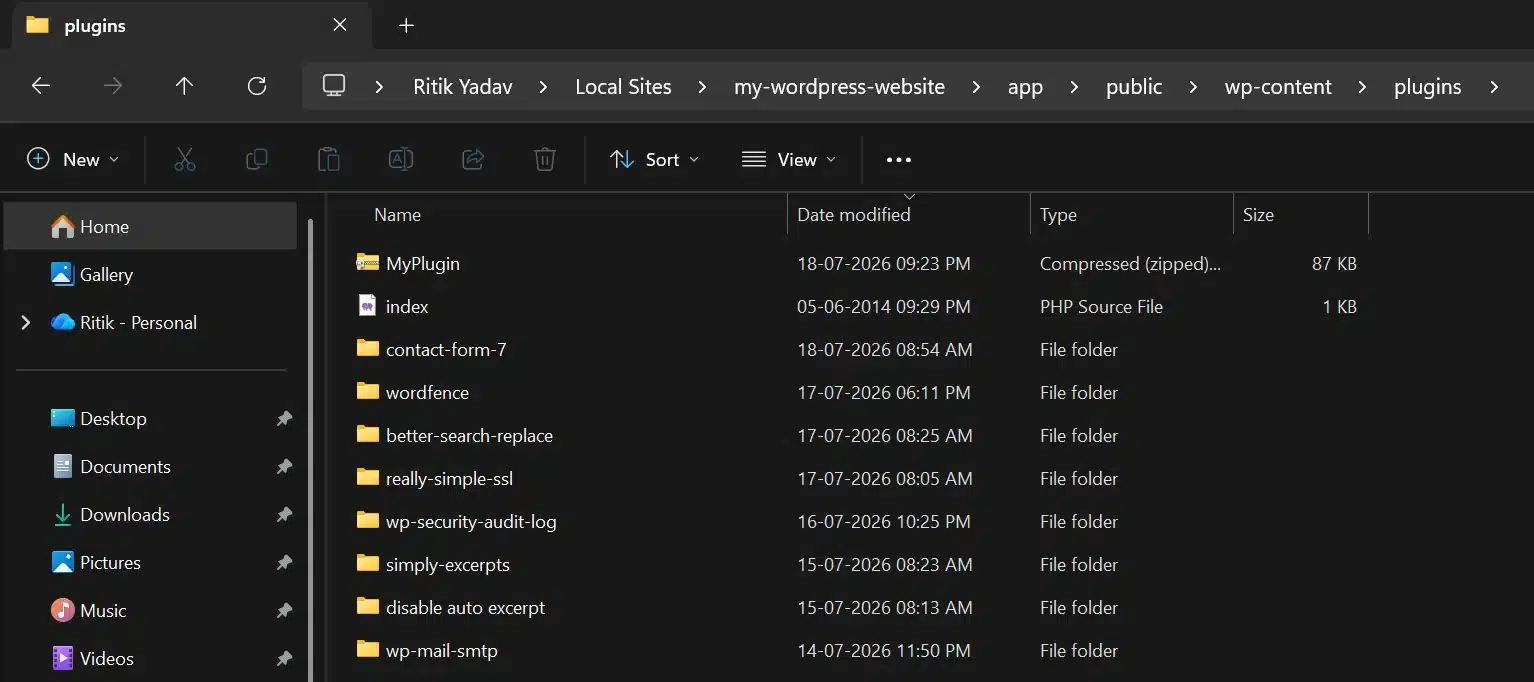
- Navigate to
/wp-content/plugins/.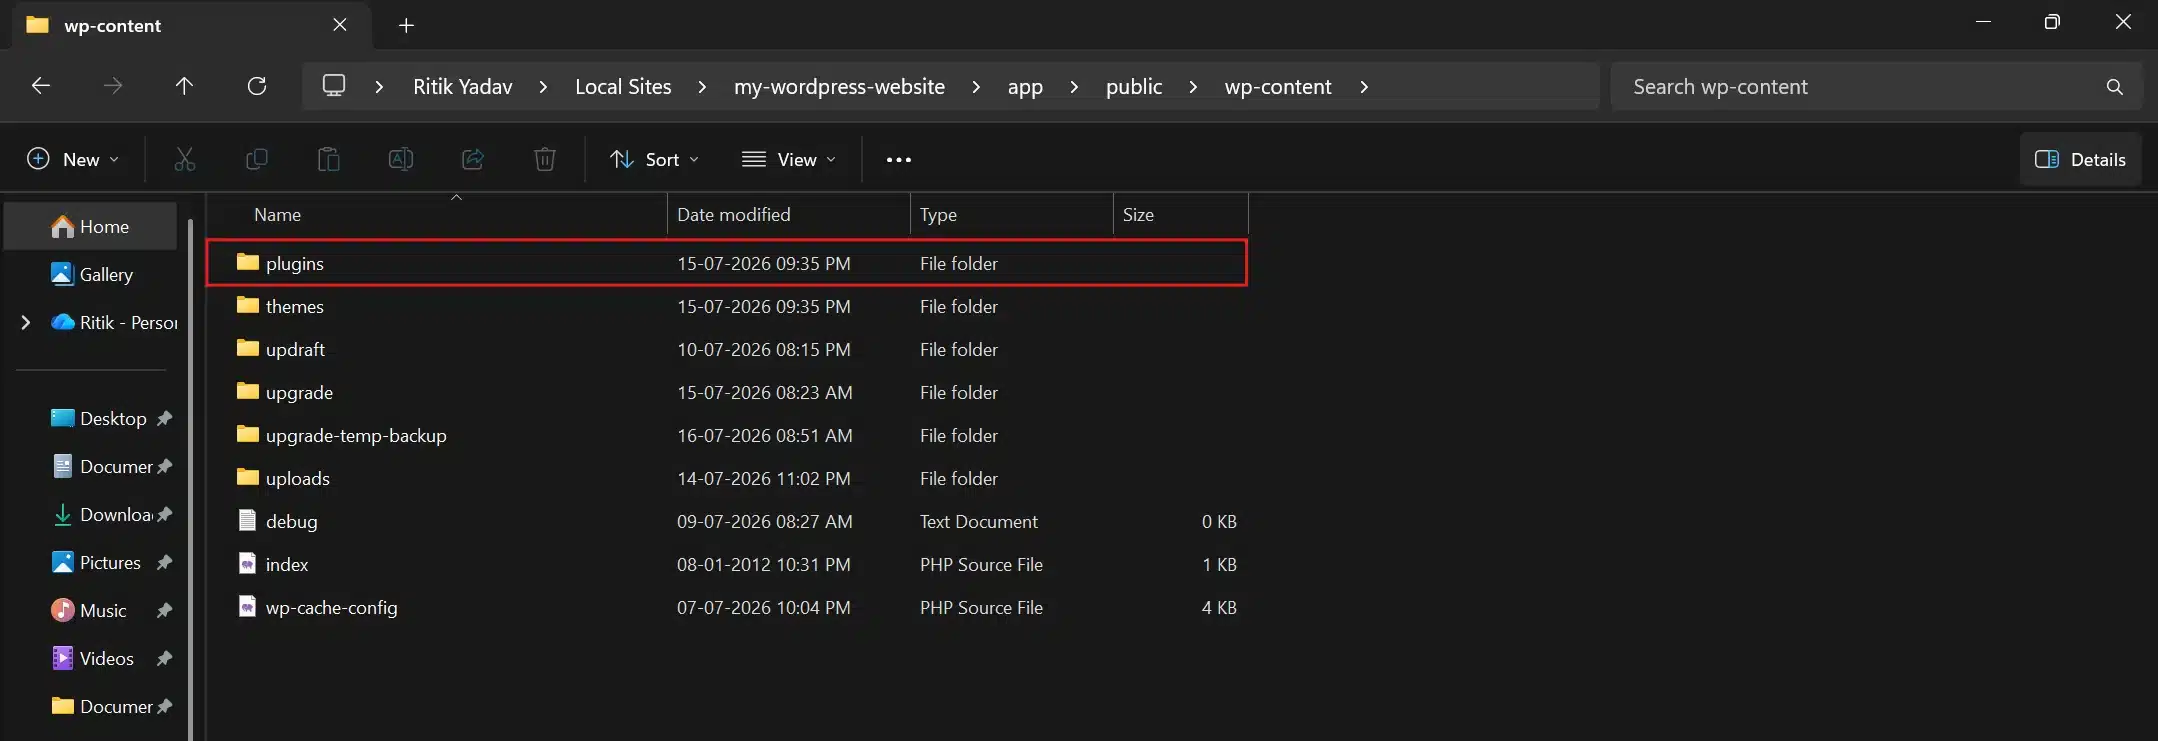
- Extract the plugin
.zipFile into that directory.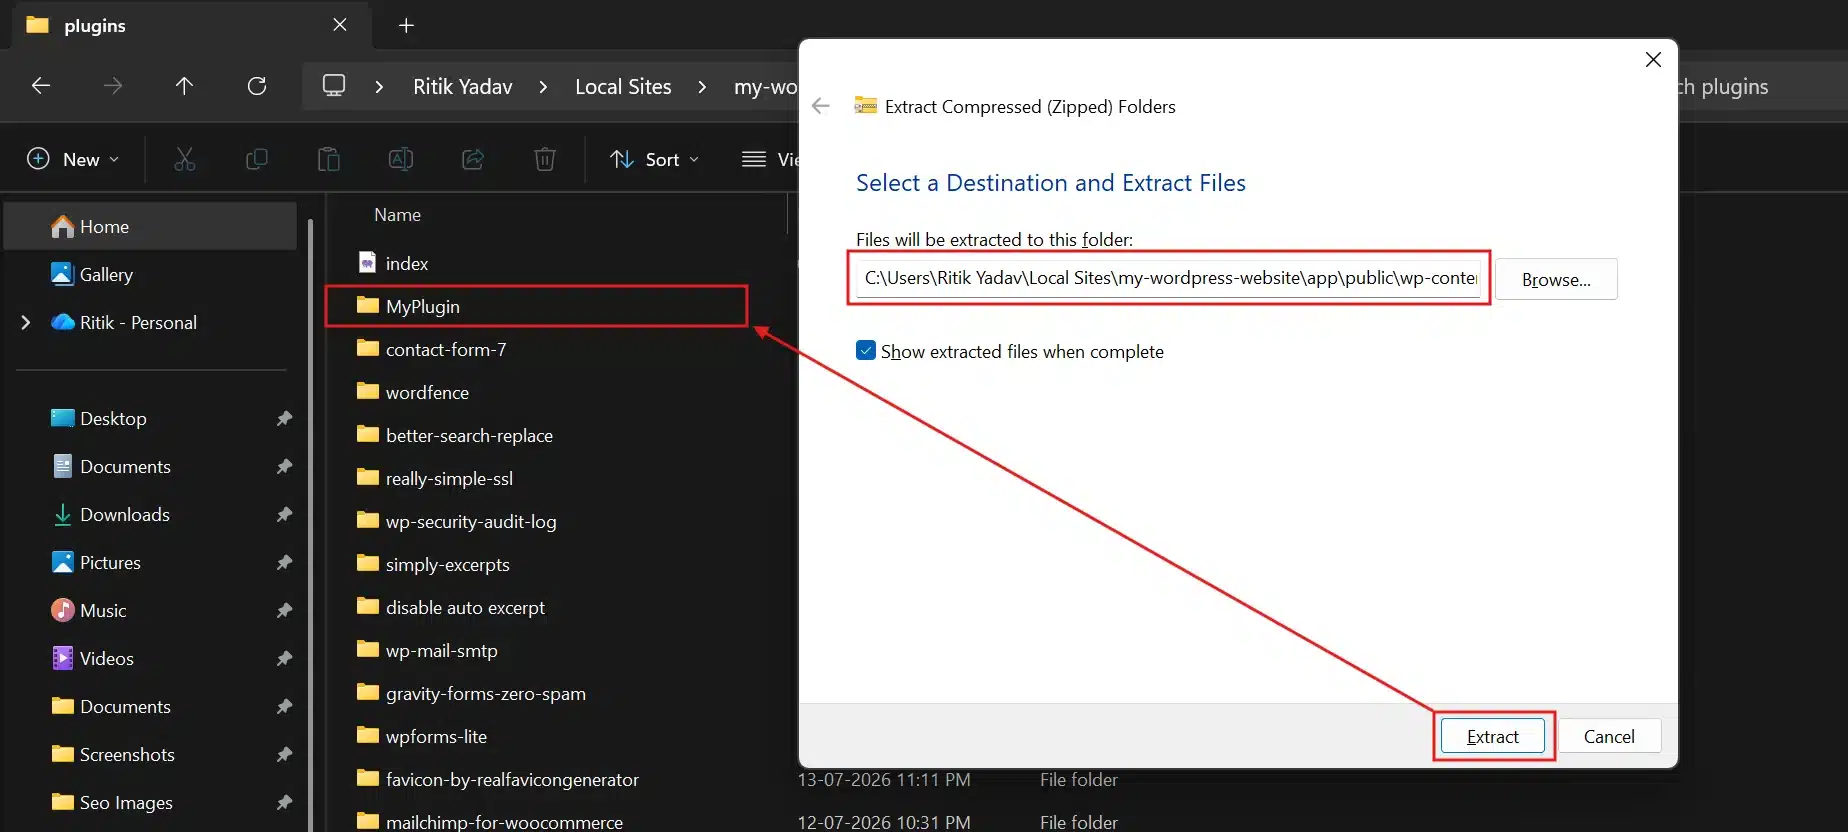
- Log back into your dashboard, go to Plugins > Installed Plugins, find the plugin, and click Activate.
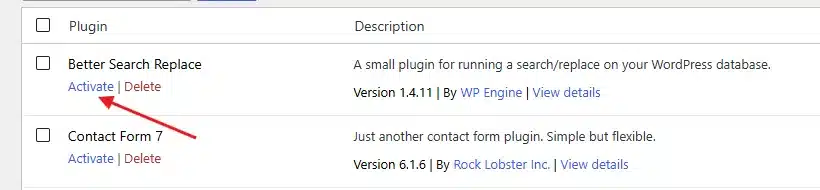
This method takes longer, but it works even when the upload option is disabled on your hosting account.
Method 4: Install a Plugin With WP-CLI
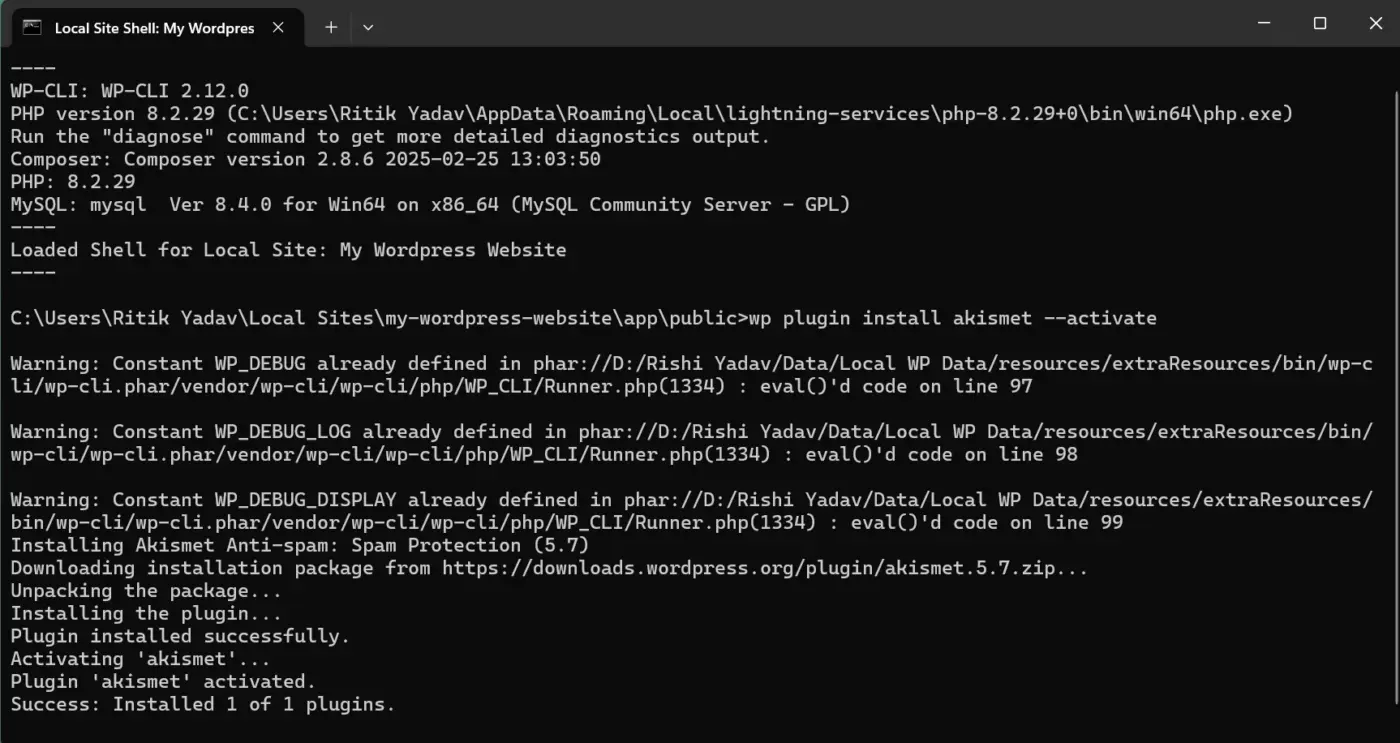
If you’re comfortable with the command line and have SSH access, WP-CLI installs and activates a plugin in a single command. It’s built for developers managing several sites at once, so most beginners can skip this method entirely.
How to Install a Theme on WordPress: Step by Step
Installing a theme follows almost the same pattern as a plugin, just in a different menu. According to the official WordPress.org theme documentation, the process takes just a few clicks once you’re on the right screen.
- In your dashboard sidebar, go to Appearance > Themes.
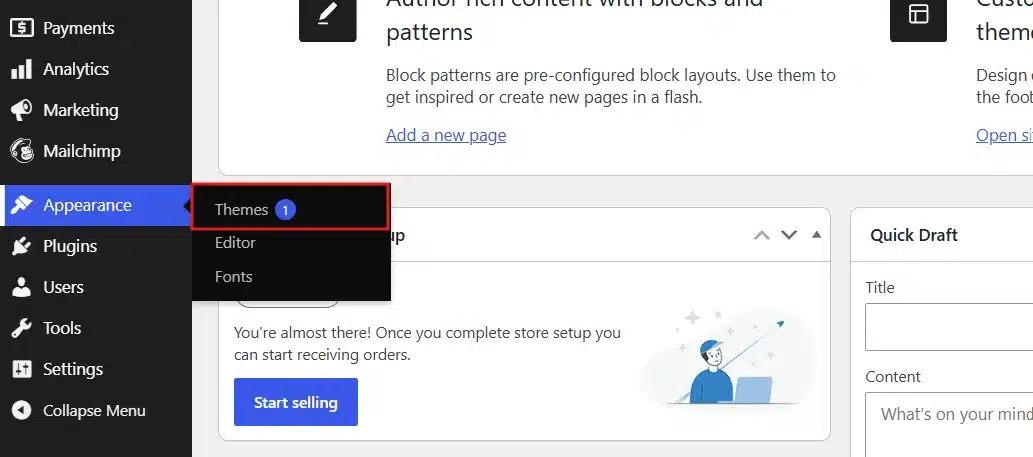
- Click Add Theme at the top of the page.
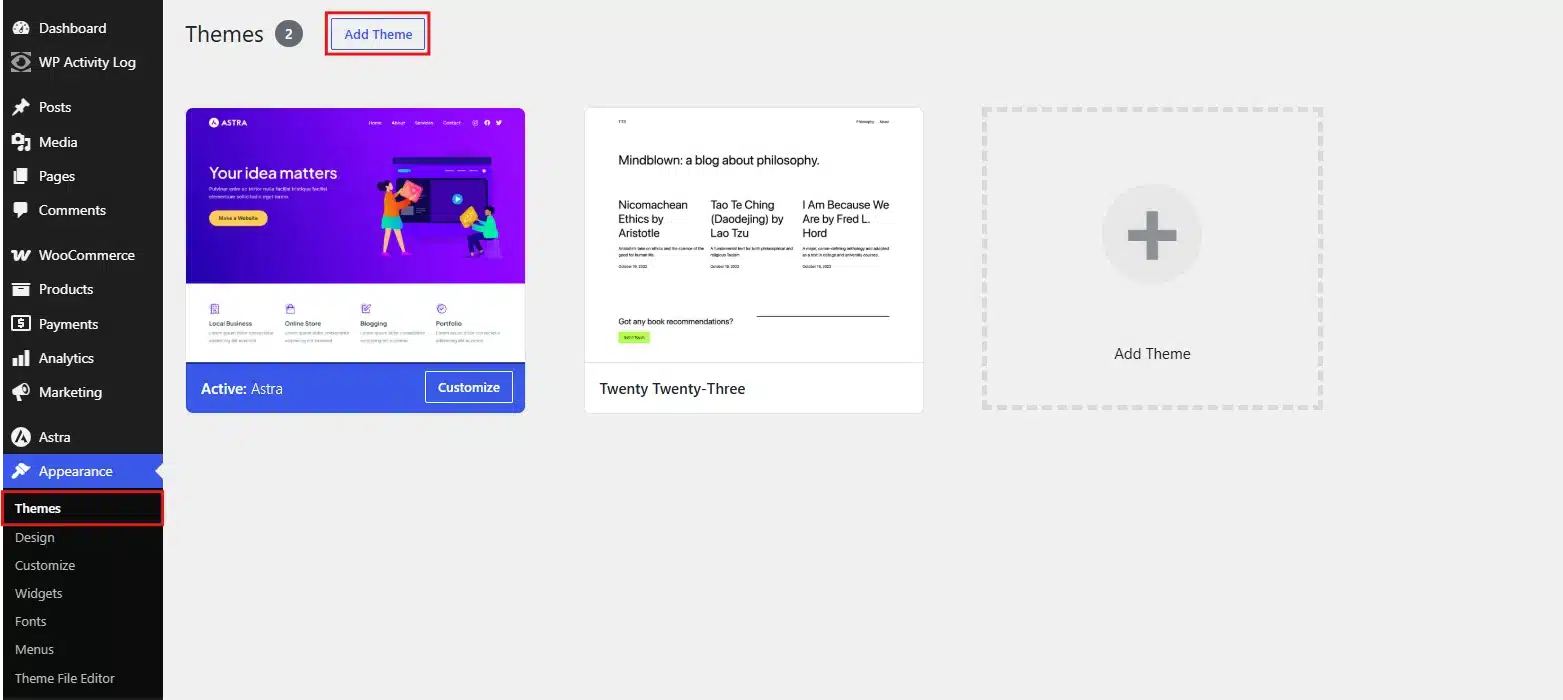
- Hover over a theme and click Install.
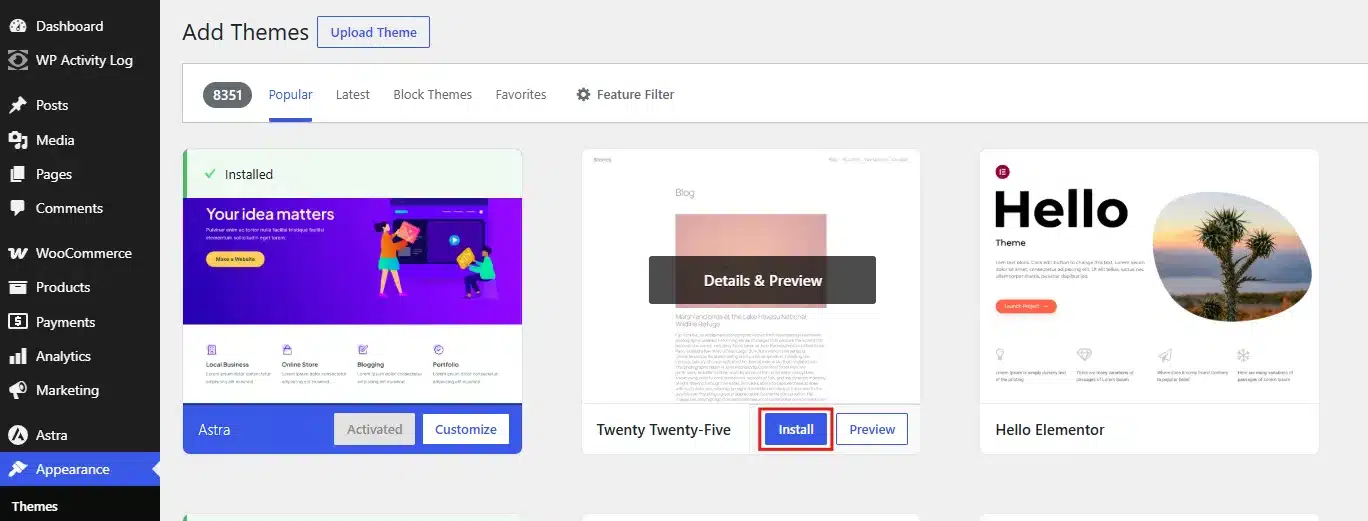
- Once installed, click Activate to apply it to your live site.
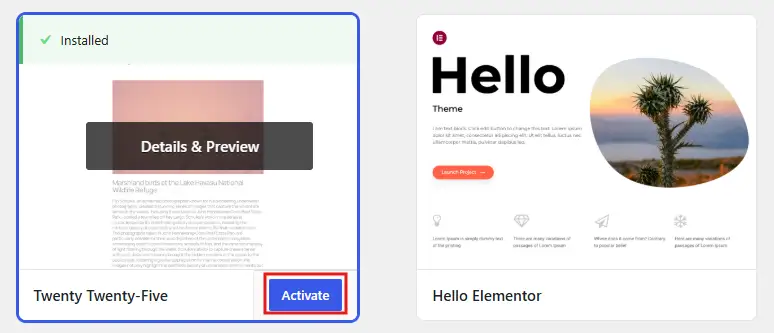
Have a custom or purchased theme file instead? Click Upload Theme on that same screen, choose your .zip file and hit Install Now.
WordPress.com users follow a nearly identical flow. The WordPress.com support docs confirm the same “Install new theme” and upload options exist there, limited by plan level.
One thing worth flagging before you activate anything new: if the theme preview looks blank or broken, stop. Don’t activate it on your live site until you’ve checked whether the file uploaded correctly.
What Happens If You Can’t See the Install Options?
A few things usually explain this, and running through them in order saves a lot of guessing.
First, check your user role. If you’re not an Administrator, the option won’t appear no matter what platform you’re on.
Second, check your WordPress.com plan. Free and Personal tiers hide the plugin menu completely, not just the install button.
Third, ask your host. Some shared hosting plans disable file uploads through wp-admin for security. Your host’s support team can confirm this in minutes.
Fourth, check for a plugin conflict. A blank screen or error right after an install is rarely a missing permission. Checking for plugin conflicts on WordPress is the fastest way to isolate which one caused it.
Choosing Safe Applications: What to Check Before You Click Install
Not every plugin or theme deserves a spot on your site. With over 60,000 plugins in the official directory, quality varies a lot. Picking the wrong one can slow your site down or open a security hole.
Before installing anything, check three things.
- Last updated date: A plugin that hasn’t been touched in two years is a risk. Compatibility with the current WordPress version isn’t guaranteed.
- Active install count and rating: A plugin with 4+ stars and a large install base has been tested by a lot of real sites already.
- Support activity: Open the plugin’s support tab. If recent questions go unanswered for months, that’s a sign the developer has moved on.
Trade-off: newer plugins sometimes offer better features but lack a track record. Weigh that against how critical the feature is to your site.
Here’s a quick example. Say you’re comparing two form-builder plugins. One has 2 million active installs, a 4.7-star rating, and was updated last week. The other has 4,000 installs, no rating history, and hasn’t been touched in eight months. For anything customer-facing, the first plugin is the safer bet even if the second one looks flashier in its screenshots.
Common Mistakes That Slow Down or Break Your Site
A few habits show up again and again, and they cause most of the problems people blame on WordPress itself.
- Installing too many plugins: Every plugin adds code that has to load. Ten well-chosen plugins usually beat thirty overlapping ones.
- Skipping compatibility checks: Installing something that hasn’t been tested against your current WordPress version is asking for a broken page.
- Ignoring updates: Outdated plugins and themes are the single biggest source of WordPress security issues. A proper WordPress security checklist covers this in more depth if you want the full picture.
- Activating before testing: Jumping straight to a live site instead of a test site copy means visitors see the mistake before you do.
- Installing from unverified sources: A plugin downloaded from a random blog instead of the official directory or a known marketplace is a common source of hidden malware.
Here’s something we see often in support: A client installs three plugins in one sitting. Something breaks, and nobody knows which one caused it. Install and test one at a time. It takes longer, but it saves hours of guessing later.
Best Practices After You Install an Application
Getting the install right is only half the job. What you do next determines whether it stays stable.
- Back up first, every time: Before installing anything new, run a backup. If something breaks, you want a clean copy to restore.
- Test on the testing site when you can: Most hosts offer a testing environment. Try the plugin there before touching your live site.
- Watch site speed afterwards: Run a quick speed check right after activating anything new. A sudden drop usually points straight back to what you just installed.
- Update on a schedule: Set aside time weekly or monthly to review and update every installed plugin and theme.
- Remove what you don’t use: A deactivated plugin still sits on your server and can still be a target. If you’re not using it, delete it rather than just switching it off.
If you’re running a store, this is also where a lot of the real functionality lives. WooCommerce plugins and extensions cover everything from payment options to shipping rules, and picking the right ones matters more than picking a lot of them.
Conclusion
Yes, users can install applications on WordPress, and for most people, it comes down to a handful of clicks in the Plugins or Appearance menu. The real variables are your platform (WordPress.com or WordPress.org), your user role, and how carefully you check what you’re adding.
Stick to the official directory or trusted marketplaces, back up before every install, and check compatibility before you activate. Get those three habits right, and installing applications on WordPress stops being a question and just becomes routine maintenance.
Frequently Asked Questions (FAQs)
Q1. Can I install applications on WordPress without any coding knowledge?
Yes. Installing plugins and themes through the dashboard search or upload tools requires no code at all. Coding only becomes relevant if you’re customising a plugin’s behaviour afterwards.
Q2. Why does my new plugin show a fatal error right after activation?
This usually means a compatibility conflict with another plugin, your theme, or your PHP version. Deactivate the new plugin first, confirm the site recovers, then check its listed requirements against your setup.
Q3. Is it safe to install plugins from outside the WordPress.org directory?
It can be, but the risk is higher. Only download from marketplaces with reviews and active support, and always scan the files before uploading them to a live site.
Q4. How many plugins are too many for a WordPress site?
There’s no fixed number. What matters is code quality and whether each plugin is actively doing something useful. A well-coded 25-plugin site can outperform a poorly chosen 10-plugin one.
Q5. Can a non-admin user ever get permission to install plugins?
Yes, by changing their role to Administrator or using a role-management plugin to grant that specific capability. Be cautious with this since it also grants broader control over the site.