
How to clear WordPress cache depends on which cache is holding the old page: your caching plugin, your browser, the object cache or a CDN. Most of the time one click on the plugin’s Delete Cache or Purge All button fixes it in under a minute.
We tested this on our own WordPress 7.1.3 test site in October 2026, running on an Apache server with WooCommerce 11.2. We installed four free caching plugins one at a time: WP Super Cache, W3 Total Cache, LiteSpeed Cache and WP Fastest Cache. Then we watched the cached file appear and vanish on disk, and timed the page before and after each purge.
This guide starts with the five cache layers and how to clear each one. Then it shows every plugin’s purge button and a quick way to prove the cache really cleared. It ends with the cases where clearing it does more harm than good.
How to Clear WordPress Cache: Five Layers to Check
Here is how to clear WordPress cache properly: purge the caching plugin, flush the object cache and purge the CDN, then hard reload. Each layer stores its own copy of your pages. An old copy in any one of them keeps showing after the others are clean.
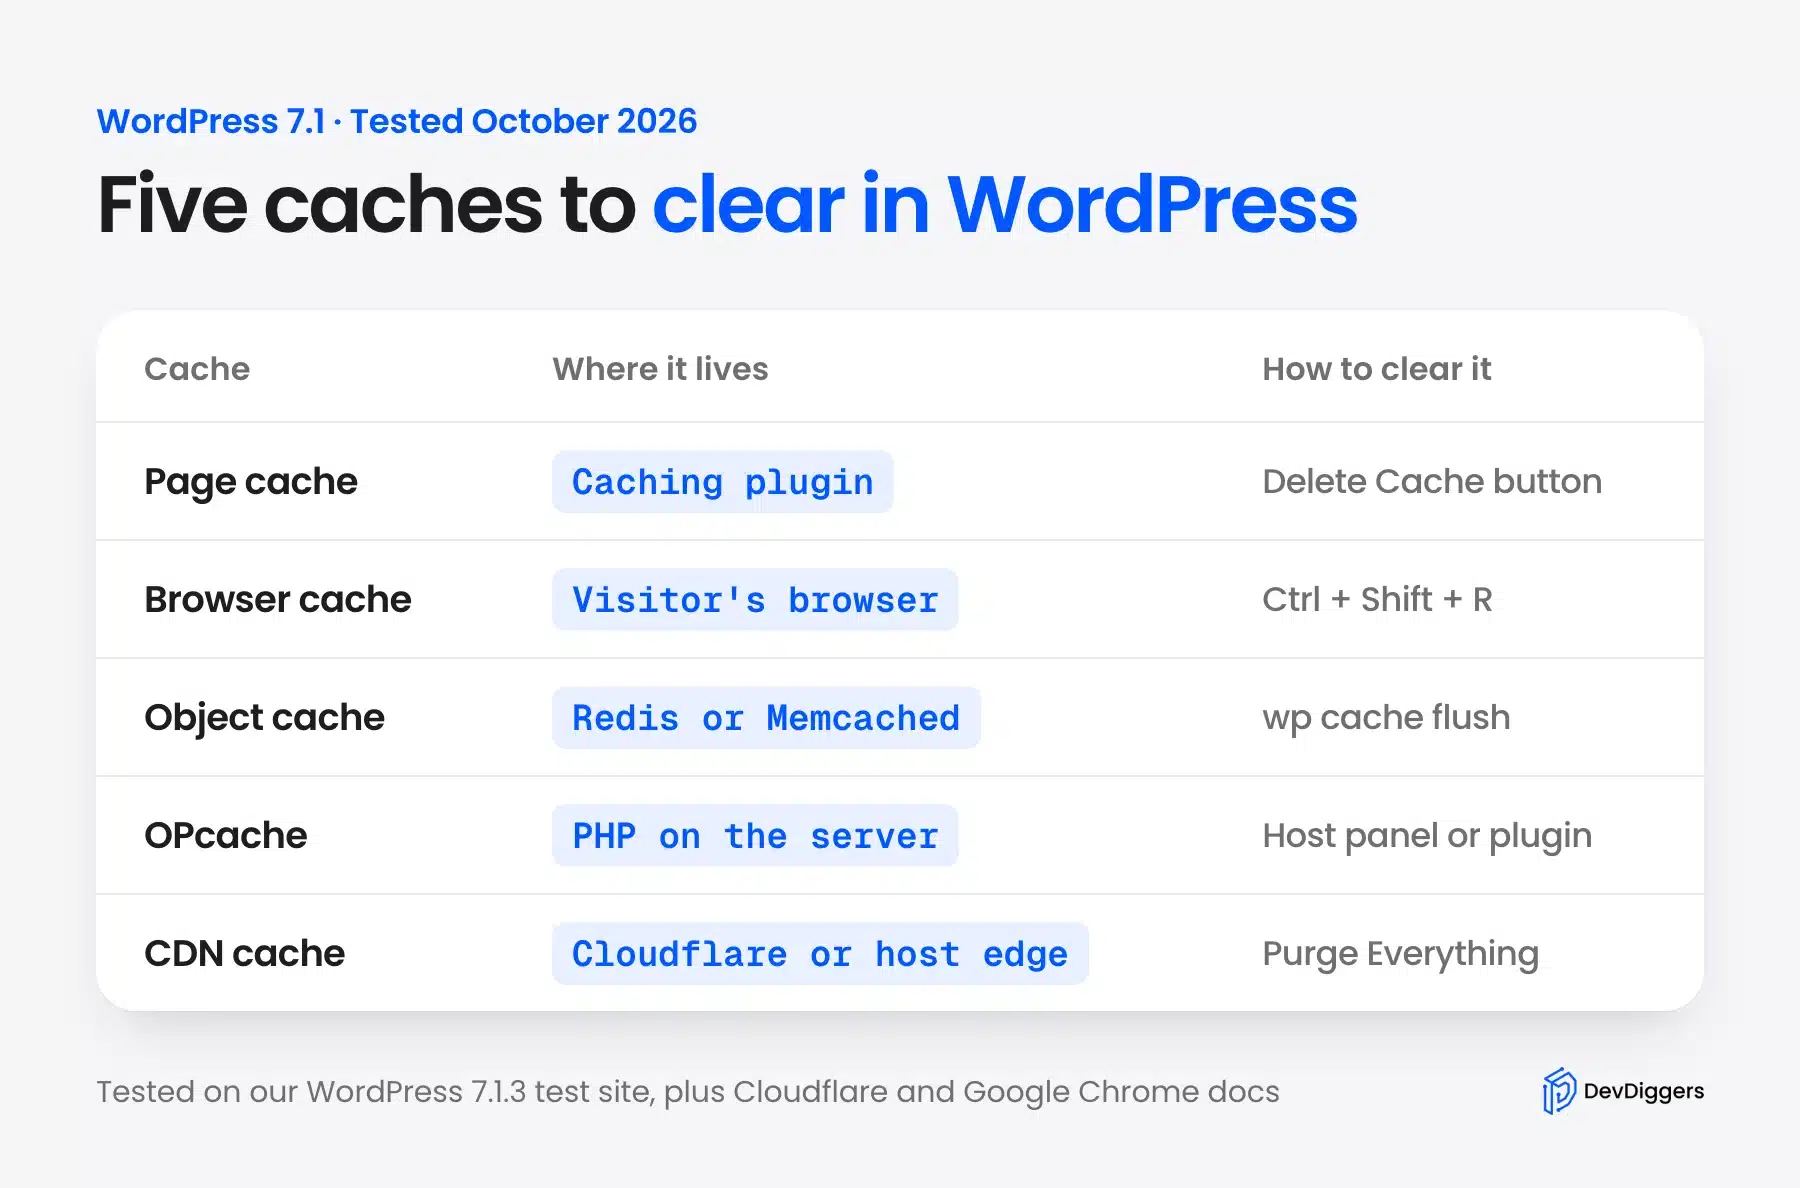
The page cache is the one people mean most often. A caching plugin saves each page as a finished HTML file. The next visitor gets that file instead of a fresh page built by PHP and the database.
The other four sit around it. Your browser keeps images, CSS and scripts, while an object cache keeps database results in memory. OPcache keeps compiled PHP code, and a CDN keeps copies of your files in data centers near your visitors.
You rarely need to clear all five. Changed a post and see the old version? That is almost always the page cache or your browser.
The order matters more than people think. Clear the browser first and the server still hands back the old page, so you reload again and decide nothing worked. Purge from the server outward and each step builds on a clean layer behind it.
A quick way to tell the layers apart is to ask who sees the old page. If only you see it, the copy sits in your browser. If every visitor sees it, the copy sits on the server, in the plugin, the host cache or the CDN.
How to Purge Cache in WordPress With a Caching Plugin
Here is how to purge cache WordPress plugins store: open the plugin’s admin bar menu and click Delete Cache, Purge All or Clear All Cache. All four free plugins we tested had one. The label and the place changed from plugin to plugin.
We ran each plugin alone on the same test site, because two page caching plugins at once fight over the same files. If you see odd behavior after adding a second one, our guide to checking for plugin conflicts on WordPress shows how to find the cause.
Not sure which plugin you have, or which one to pick? Our round up of the best WordPress caching plugins compares them in more depth.
WP Super Cache
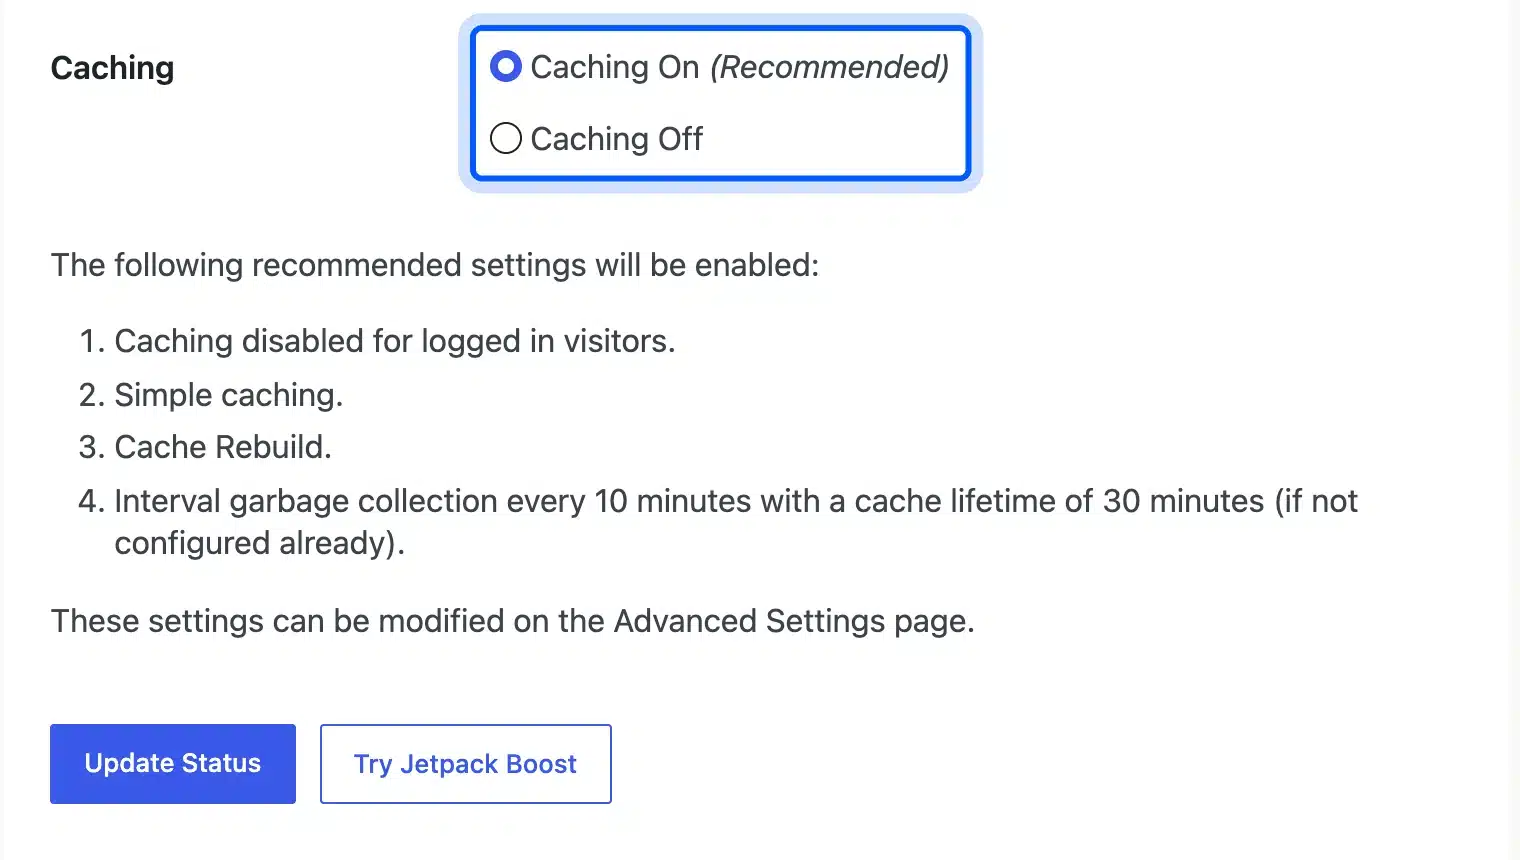
WP Super Cache 3.1.4 is off right after you install it. Go to Settings, then WP Super Cache, pick Caching On on the Easy tab and click Update Status. The Easy tab then lists the defaults it turns on, including no caching for logged in visitors.
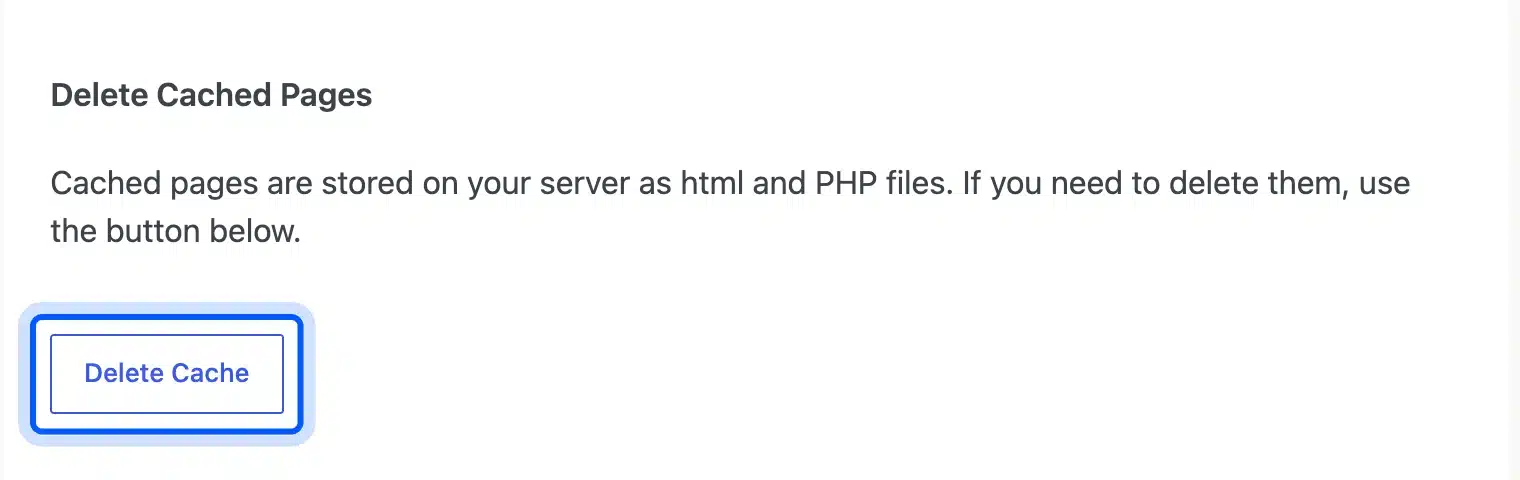
To clear the cache, scroll down the same Easy tab to Delete Cached Pages and click Delete Cache. The plugin’s own text says cached pages are stored on your server as HTML and PHP files.
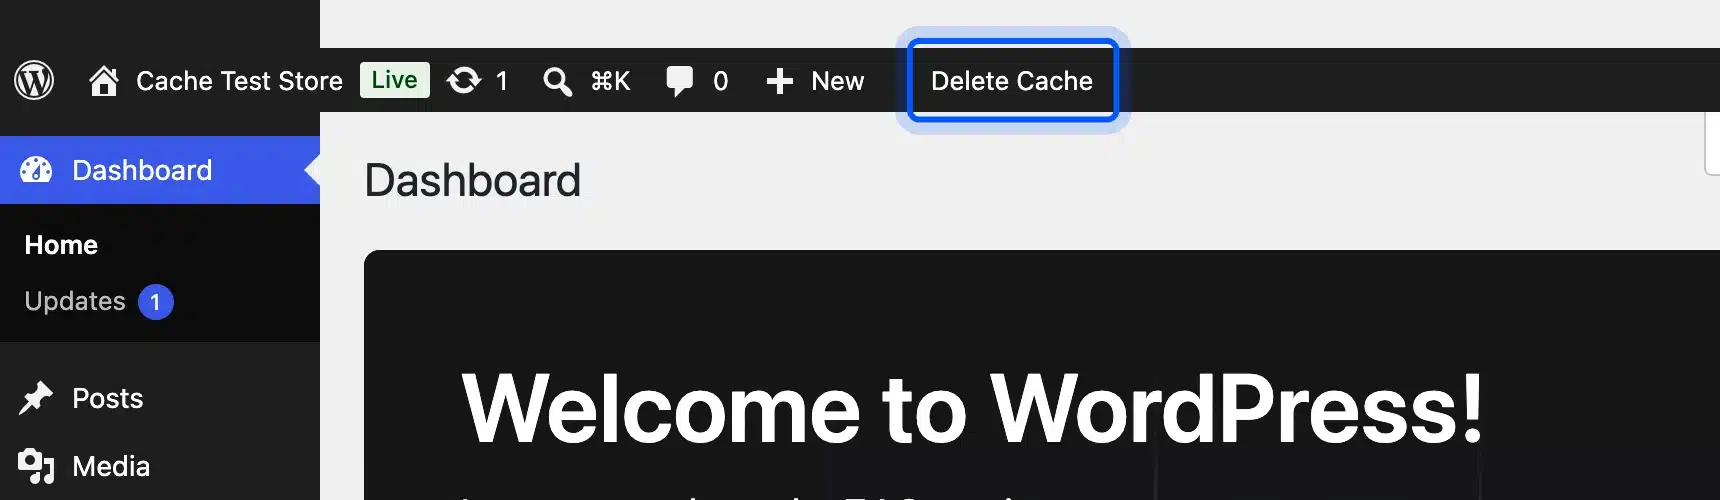
There is a faster way once caching is on. WP Super Cache adds a Delete Cache link to the black admin bar at the top of every screen. You can purge from wherever you are.
W3 Total Cache
W3 Total Cache 2.10.7 puts its purge button at the top of Performance, then Dashboard. Click Empty All Caches next to “Flush caches with” and every cache the plugin controls is cleared at once.
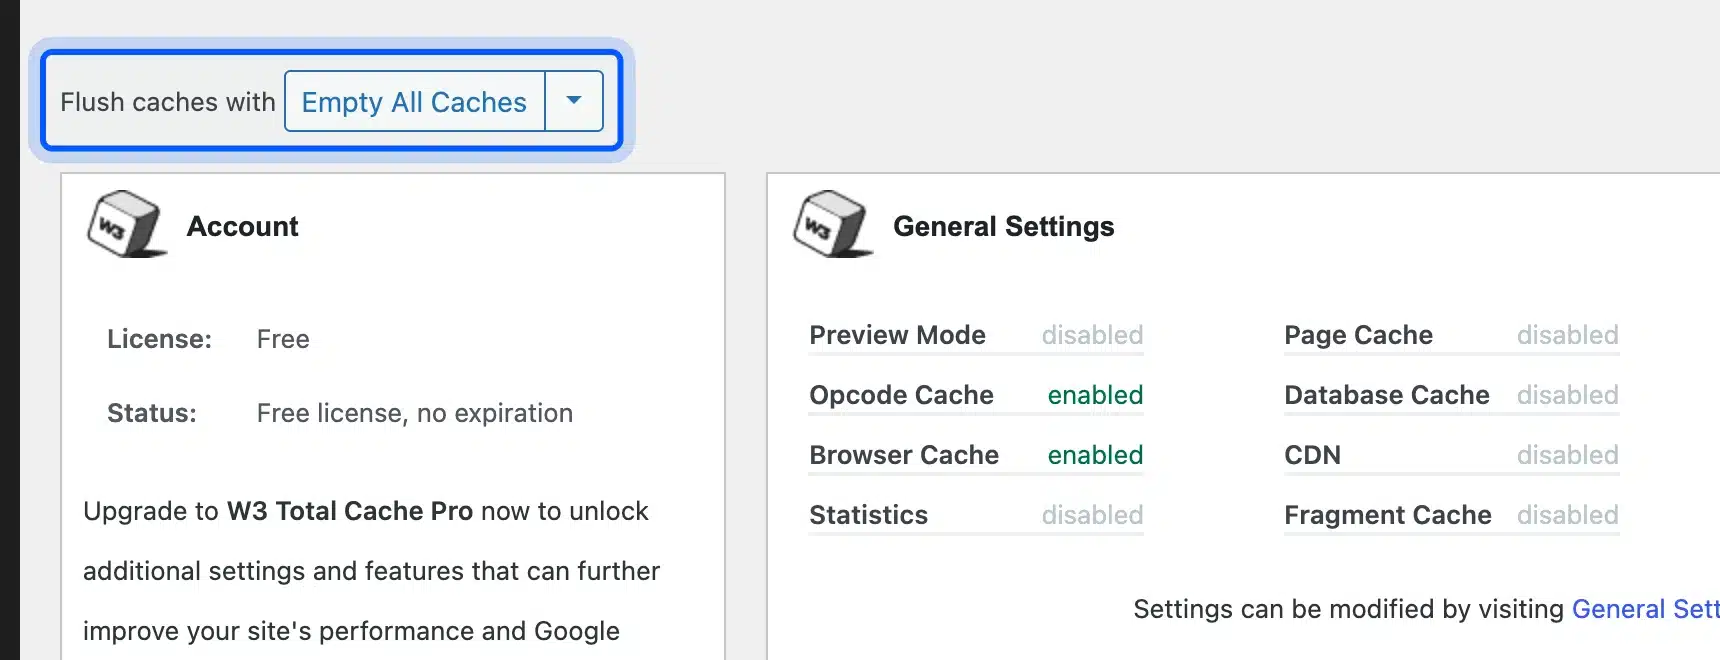
The same dashboard showed us something worth knowing. Straight after install, Page Cache was disabled while Opcode Cache and Browser Cache were enabled. So on a fresh W3 Total Cache install, purging may clear less than you expect until you switch Page Cache on under General Settings.
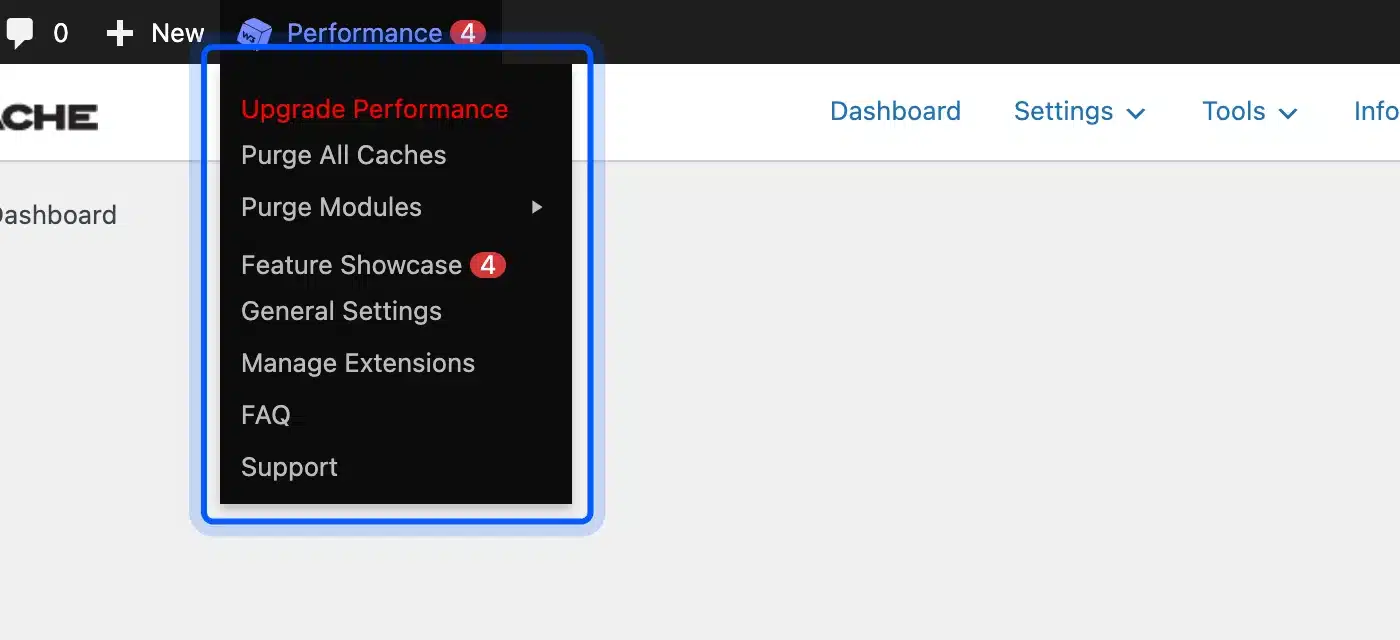
From any screen, hover over Performance in the admin bar and click Purge All Caches. Purge Modules in the same menu clears one type of cache at a time.
LiteSpeed Cache
LiteSpeed Cache 7.9.1 keeps all of its purge buttons under LiteSpeed Cache, then Toolbox, on the Purge tab. Purge All clears what the plugin created.
Empty Entire Cache also clears entries from other web apps on the same server. The plugin itself warns to use it only when things are cached wrongly.
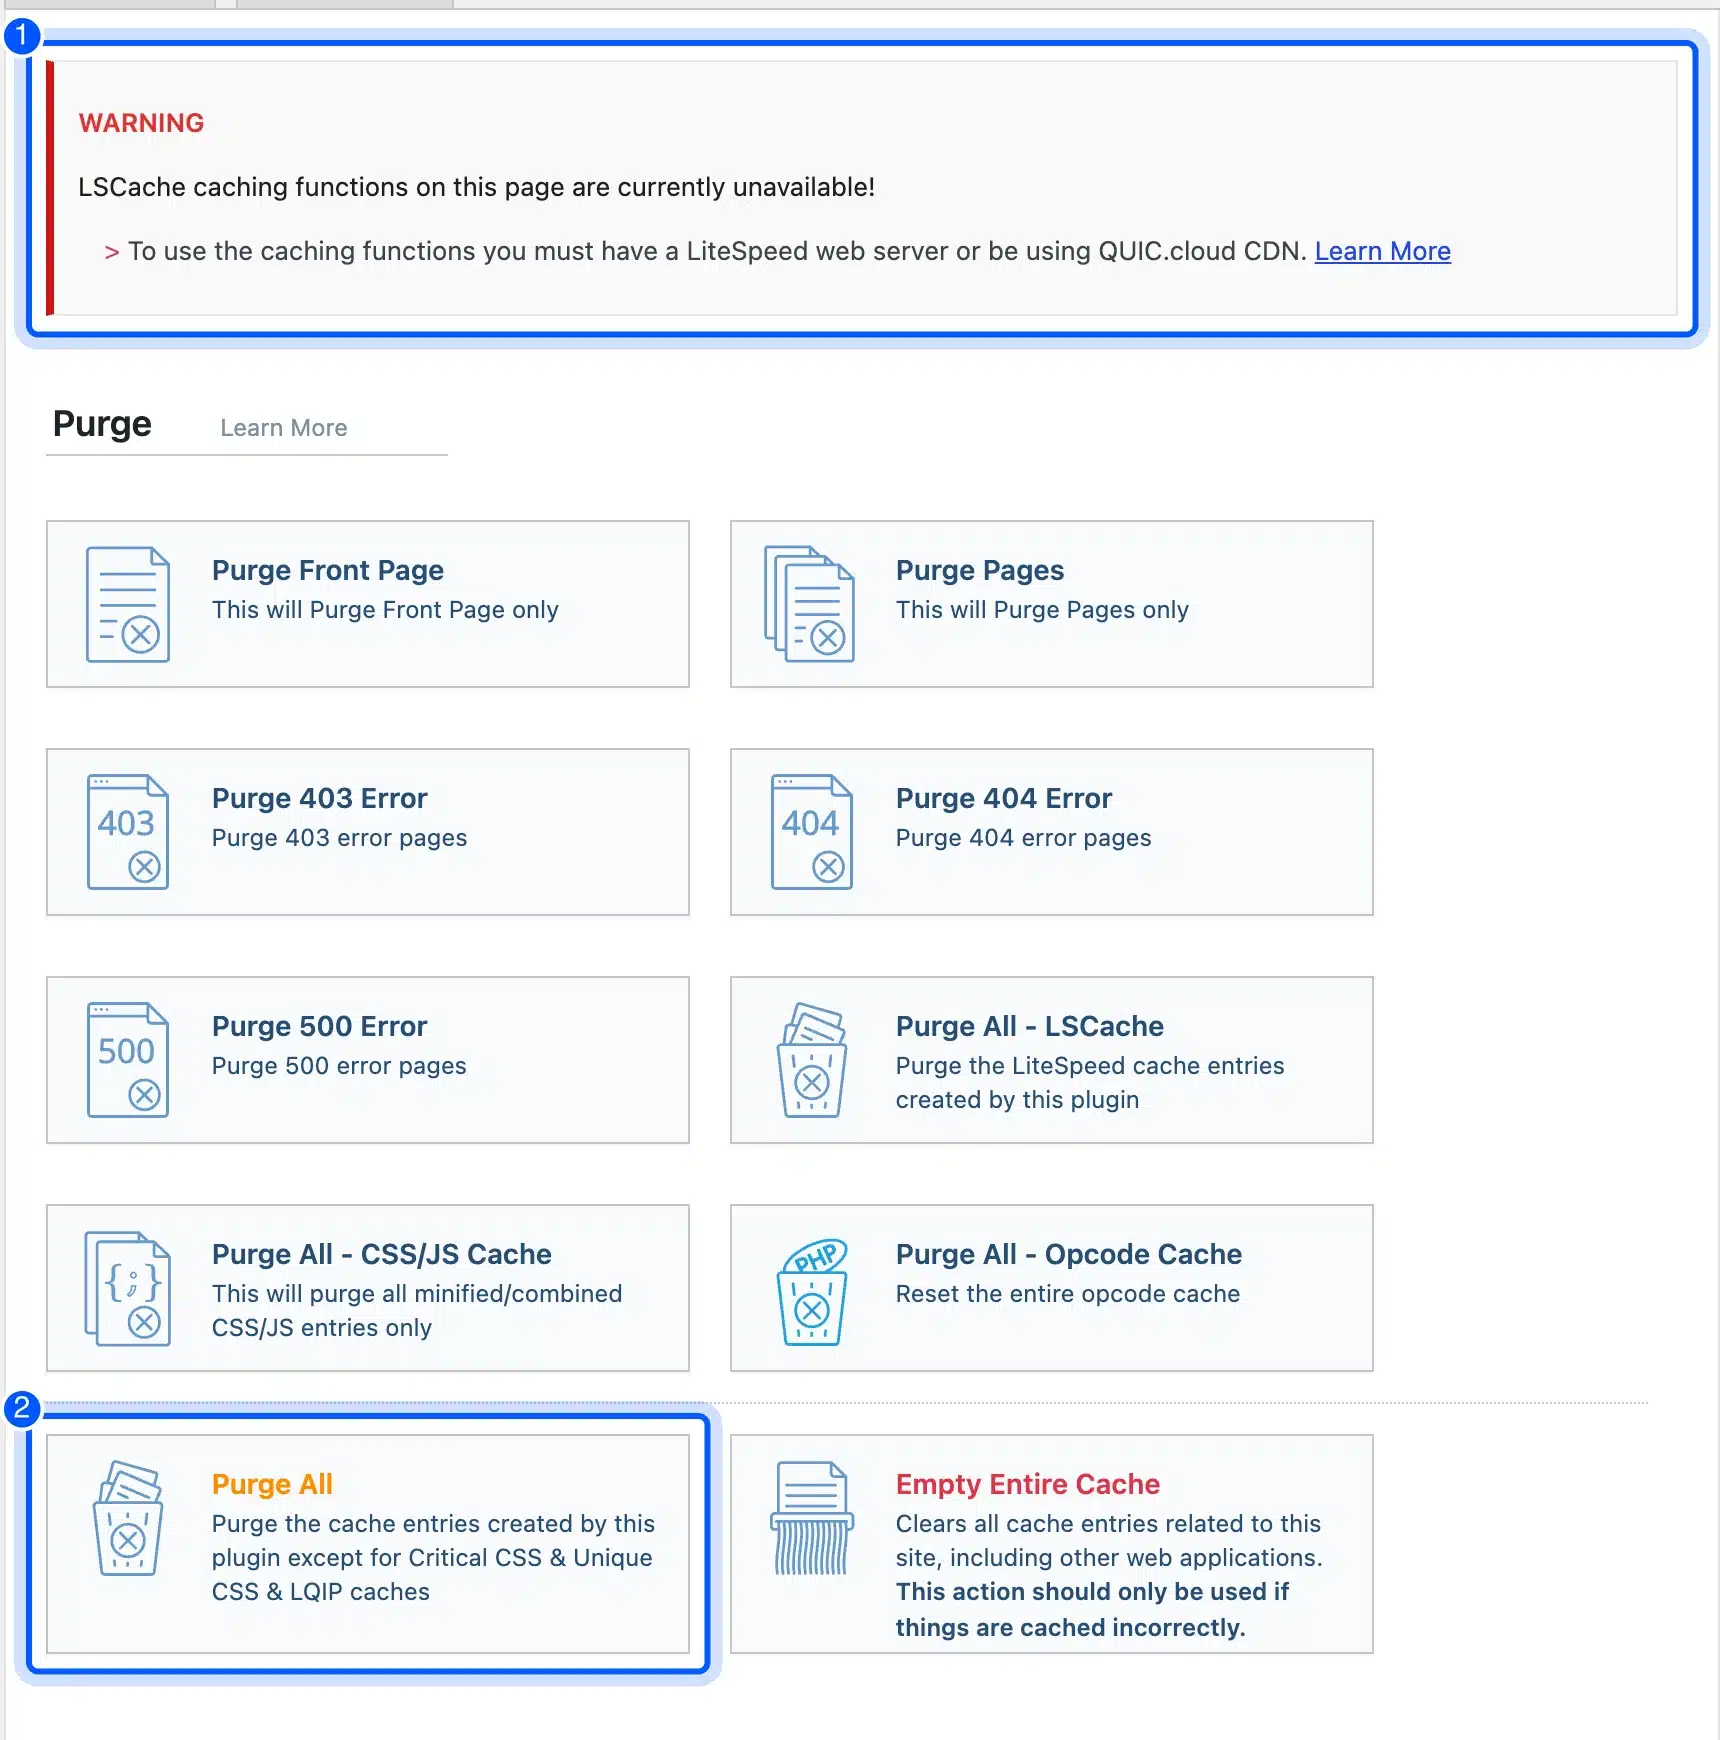
Our test site runs Apache, and LiteSpeed Cache told us so plainly. The Toolbox showed “LSCache caching functions on this page are currently unavailable!” because page caching needs a LiteSpeed web server or the QUIC.cloud CDN.
The dashboard still listed Public Cache as ON, which is misleading on Apache. Our response headers carried no LiteSpeed cache header at all, so no page was being cached. If your host does not run LiteSpeed, pick a different page caching plugin.
WP Fastest Cache
WP Fastest Cache adds its own WP Fastest Cache menu to the admin bar. Hover over it and click Clear All Cache, or use Clear Cache and Minified CSS/JS when you changed a stylesheet as well.
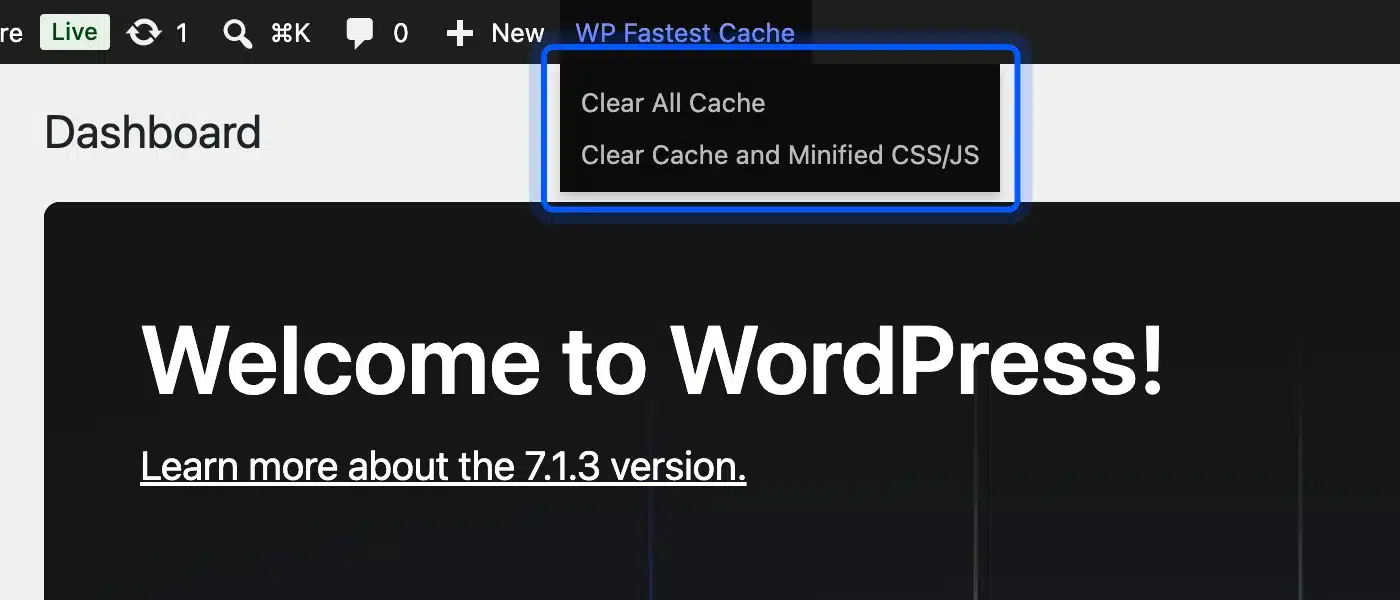
On our site, the first visit after enabling it took 0.094 seconds and created a cached file of 88.4 KB. The second visit took 0.0007 seconds, served straight from that file. The Cache Statistics panel on its Clear Cache tab is a Premium feature, so the free version cannot show you how much it stores.
Note: WP Rocket is a popular caching plugin too, but it is paid only, so we left it out of this hands-on test. Look for its purge option in the admin bar menu it adds.
How to Check That the Cache Really Cleared
The surest way to check that the WordPress cache cleared is to look for the cached file and time the page. A cached page loads in a few milliseconds and carries the plugin’s marker in its HTML. A freshly cleared page takes longer on the first visit while the plugin builds a new copy.
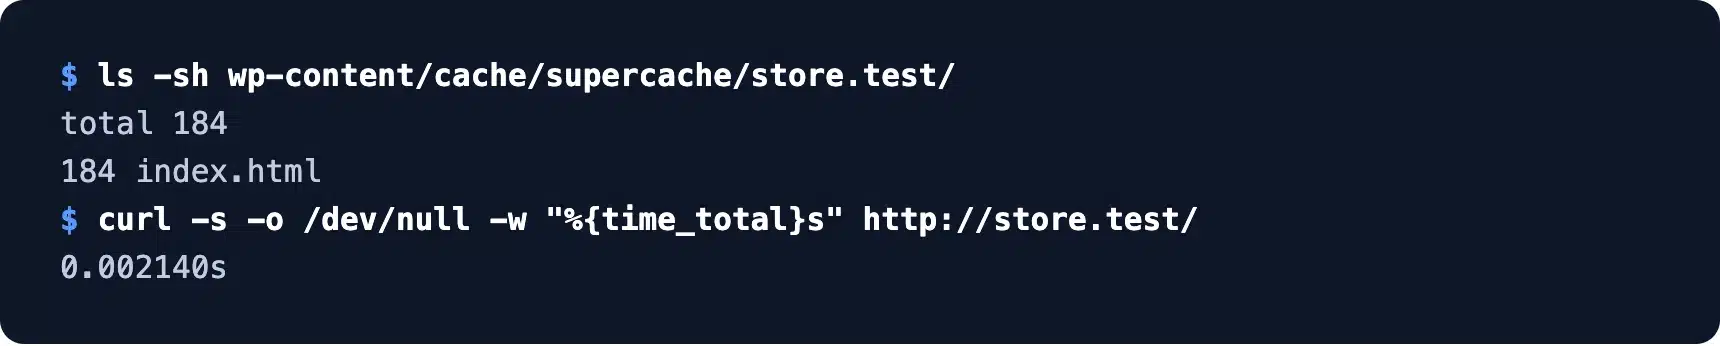
We ran this check with WP Super Cache. Before the purge, the cache folder held one index.html file for the home page, and the page came back in 0.002 seconds:
Then we clicked Delete Cache. The folder was empty, the next visit took 0.057 seconds while WordPress built the page again, and a new index.html appeared right after:
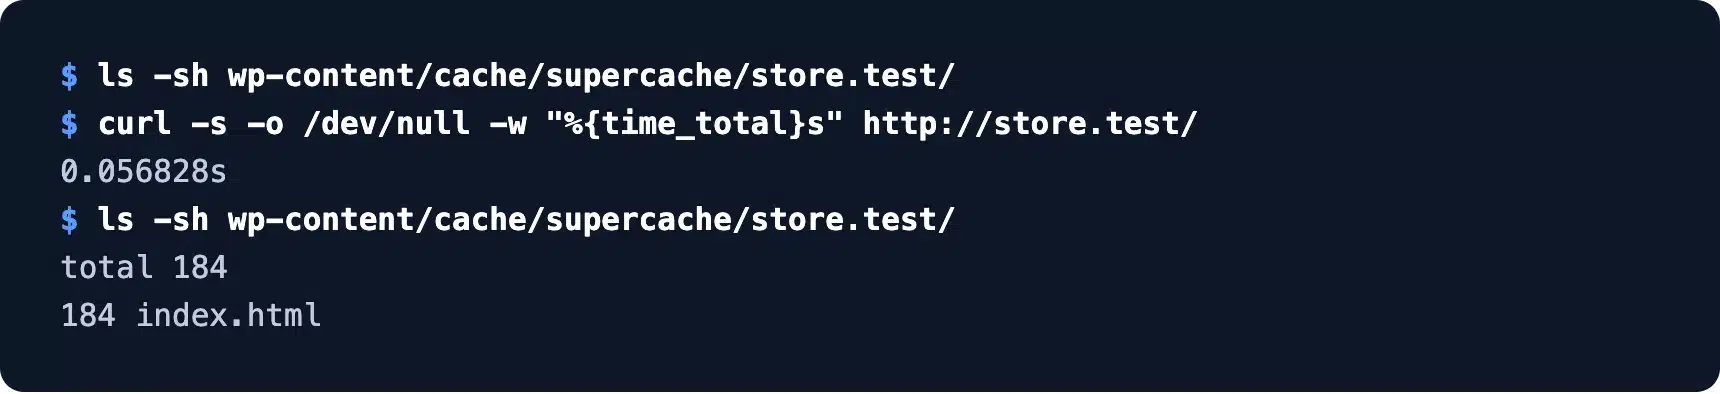
That jump from 2 to 57 milliseconds is the cost of a cleared cache on one page of a small store. On a busy site the first visitor to each page pays that cost. That is why you clear the cache when you need to and never by habit.
You do not need a terminal to see the marker. Open your home page in a private window, view the page source and scroll to the very bottom. WP Super Cache writes two comments there: when the page was generated, and when the cached copy was made.
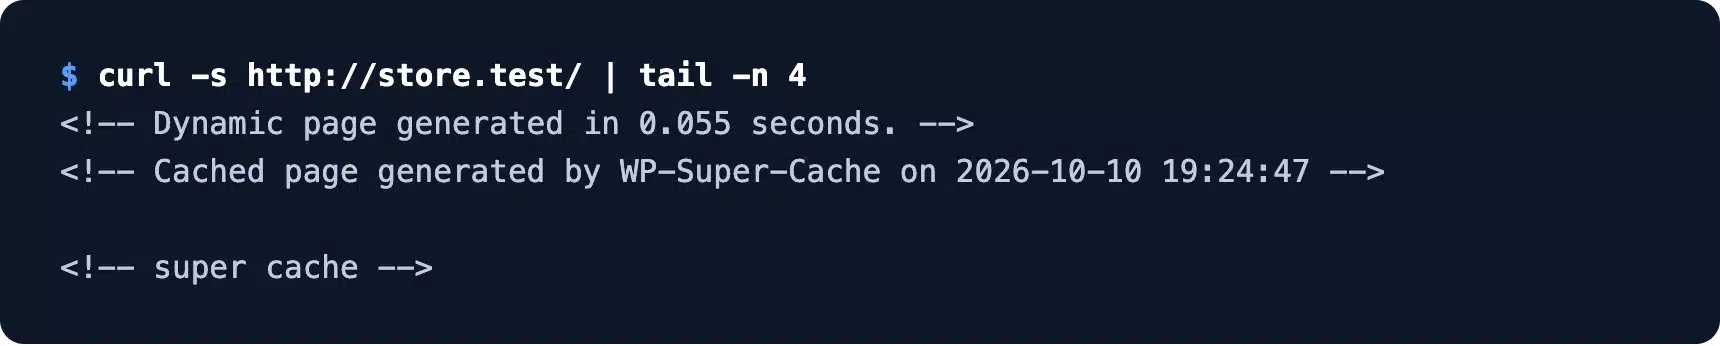
A private window matters here. Most caching plugins skip the cache for logged in users, so you never see the cached page while you are signed in to WordPress.
How to Clear Cache on WordPress in Your Browser
To clear cache on WordPress in your browser, hard reload: Ctrl+Shift+R on Windows, Cmd+Shift+R on a Mac. That reload skips the files your browser saved, such as images, CSS and scripts. It clears nothing on the server, so other visitors are not affected.
Google lists the exact keys on its Chrome keyboard shortcuts page as “Reload the current page, ignoring cached content”. Shift + F5 does the same on Windows.
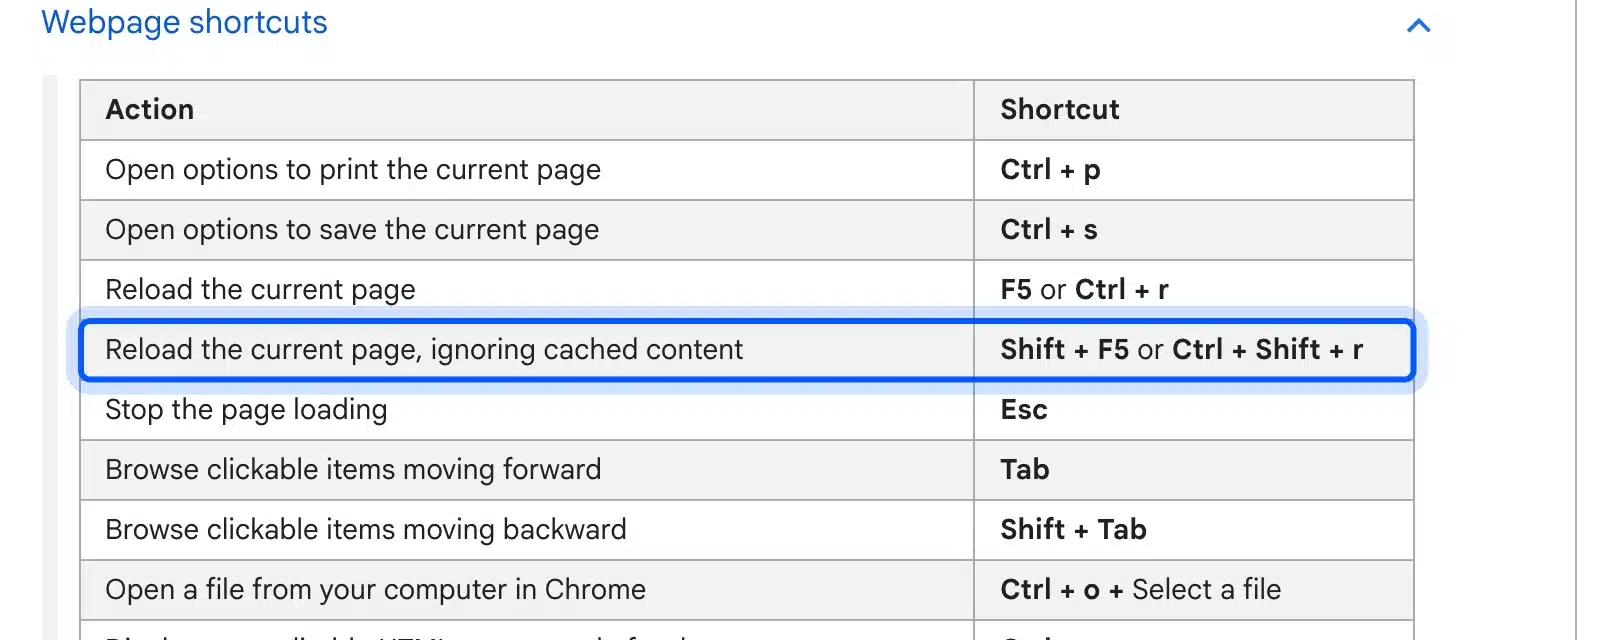
If a hard reload still shows the old page, the copy is coming from the server, a CDN or your caching plugin. Purge those first, then reload again.
A hard reload only covers the page you are on. When a change touches a stylesheet used across the whole site, a full clear is quicker. In Chrome, open Delete browsing data from the menu, tick Cached images and files and leave cookies unticked so you stay signed in.
Your visitors’ browsers are a separate problem, since you cannot clear them for anyone. That is why theme and plugin files carry a version number in their URL, so a new version loads as a new file.
Tip: Test in a private window as well. It starts with an empty browser cache and no login cookie, so you see the page exactly as a new visitor does.
How to Flush the WordPress Object Cache
To flush the WordPress object cache, run wp cache flush with WP-CLI, or use the Flush button in your Redis or Memcached plugin. The object cache holds database query results in memory. It only lasts between page loads when a persistent backend such as Redis is installed.
WordPress’s object cache reference explains that the default object cache is not persistent. So on most small sites there is nothing stored to clear. Our test site proved it: wp cache type answered Default, meaning no Redis or Memcached.
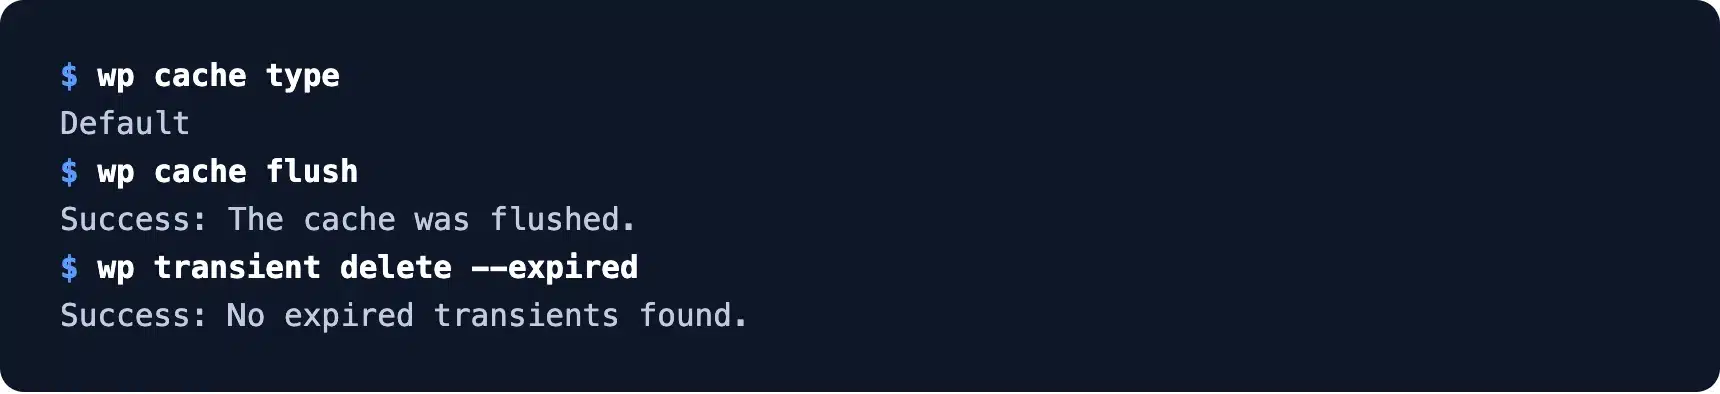
The wp cache flush command printed “Success: The cache was flushed.” anyway. That message appears with or without a persistent cache, so check wp cache type first if you want to know whether the flush did anything.
On a site that does run Redis, the flush matters more.
A plugin or an import can leave stale prices or options in memory. The page then keeps showing them after every page cache purge. Flushing the object cache is the step that clears those values.
Most Redis plugins add their own Flush Cache button to their settings screen. It runs the same flush as WP-CLI, so use whichever one you can reach.
OPcache is a different layer again. It keeps PHP files compiled in server memory, and PHP’s own opcache_reset documentation describes the reset that clears it.
You rarely need it, since PHP notices changed files by default. Some hosts and the LiteSpeed Cache button Purge All – Opcode Cache still offer a reset.
How to Purge Your CDN or Host Cache
To purge a CDN cache, open your CDN’s dashboard and use its purge option. In Cloudflare that is the Configuration page under Caching, where Purge Everything removes every cached file for your domain. Many managed WordPress hosts add a similar purge button to the WordPress admin bar or their control panel.
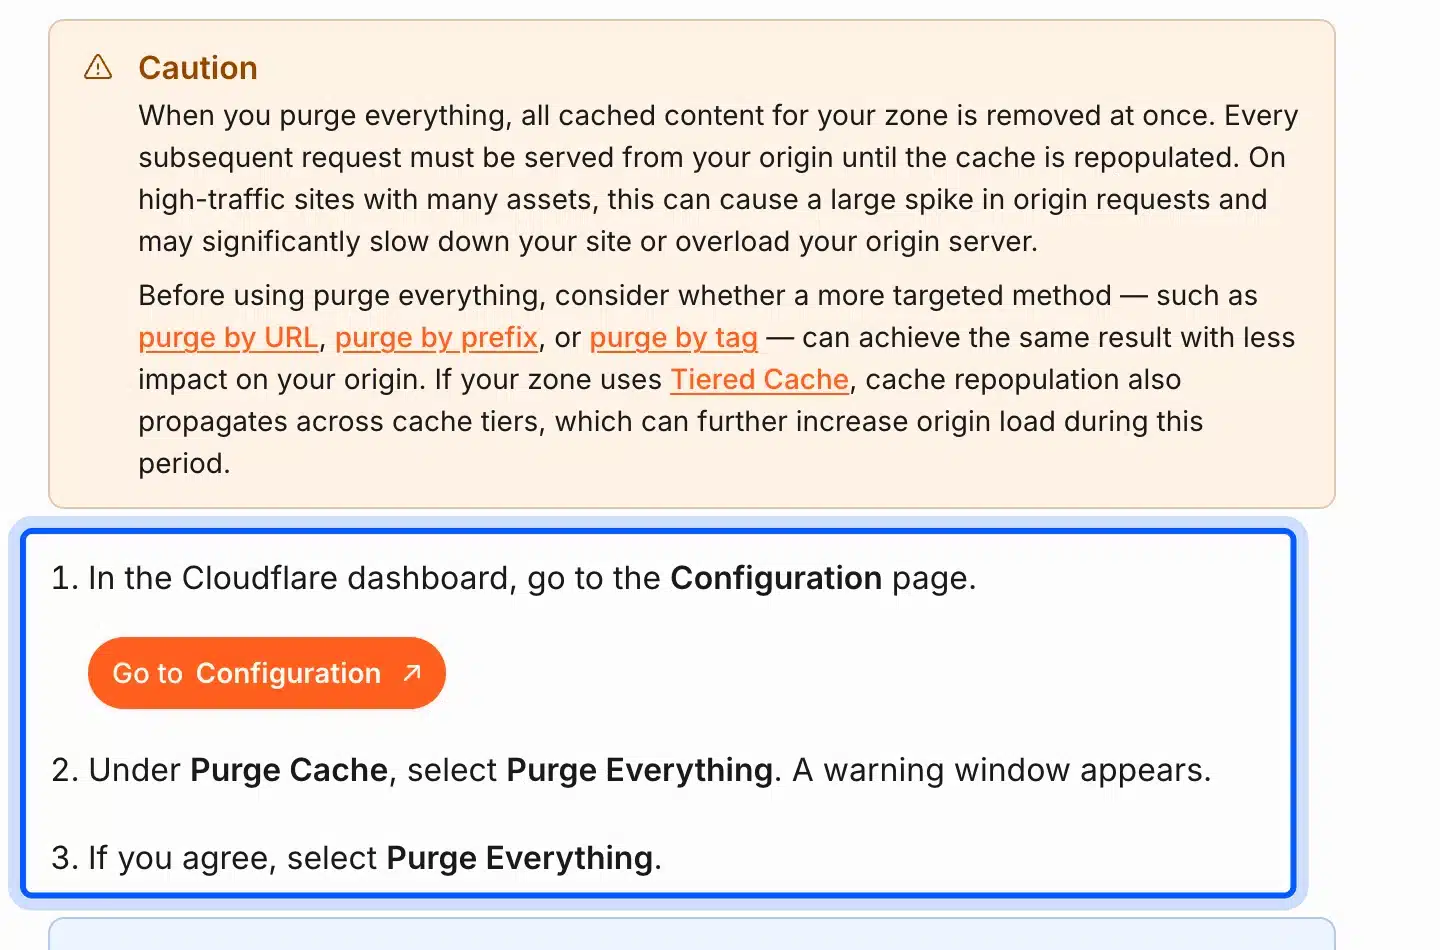
Cloudflare’s Purge Everything guide warns that every request then has to reach your origin server until the cache fills again. On a busy store that means a sudden load spike, so Cloudflare suggests purging by URL, prefix or tag instead.
We did not purge a live Cloudflare zone for this guide, because our test site sits behind no CDN. The steps above come from Cloudflare’s documentation as of October 2026.
Host caches work the same way as plugin caches, only on the server itself. If you cleared your plugin and your browser and still see the old page, look for a Cache or Performance section in your hosting panel.
Some hosts run their own page cache in front of WordPress and add a purge button to the admin bar. If you see a second purge button you did not install, that is your host’s cache, and it needs clearing as well.
A CDN also keeps images and CSS for a long time on purpose. So after you replace an image under the same file name, purge that one URL. Otherwise the old picture can stay for days.
When You Should Clear the Cache and When to Leave It
Clear the cache after you change a theme, edit CSS or update a front end plugin, and when an edit is not showing. Leave it alone the rest of the time. Every purge makes the next visitors wait for fresh pages, as our 2 to 57 millisecond test showed.
These are the habits that save the most time:
- One cache at a time: Purge the plugin first, check the page, then move to the CDN. You learn which layer held the old copy.
- Private window checks: Always check in a private window, since you never see the cached page while signed in.
- No stacked caching plugins: Run one page caching plugin only. Two of them fight over the same files and make purges unpredictable.
- Targeted CDN purges: Purge one URL in your CDN when only one page changed, instead of everything.
Most caching plugins also clear the cache for a post on their own when you update it. WP Fastest Cache, for example, had “Clear cache files when a post or page is published” ticked by default on our site.
That automatic purge is narrow on purpose, and that catches people out.
It clears the page you edited. A change to a menu, a widget or the footer can still show the old version on other pages. A full purge is the right tool for those site wide edits.
If pages are still slow even with caching on, the problem usually sits further back, in the server’s response time. Our guides to reducing TTFB in WordPress and fixing slow website loading cover those causes.
Some stores need caching, a CDN and a working checkout all at once. Our WordPress speed optimization services team can set that up and test it for you.
Conclusion
Knowing how to clear WordPress cache mostly means knowing which layer holds the old page. Start with your caching plugin’s Delete Cache or Purge All button, then hard reload in a private window.
Only move on to the object cache, OPcache or your CDN when the first two do not fix it. Then check the result instead of guessing. A cached file on disk, a marker in the page source or a quick timing test tells you in seconds.
Frequently Asked Questions (FAQs)
Q1. How often should I clear my WordPress cache?
Only when a change you made is not showing up. Most caching plugins already clear a post’s cache when you update it, so clearing everything on a schedule just makes visitors wait for fresh pages.
Q2. Does clearing the cache delete any content?
No. It deletes only the saved copies of your pages and files. Your posts, products, orders and settings stay in the database, and the cache rebuilds itself on the next visits.
Q3. Can I clear the WordPress cache without a plugin?
Yes. A hard reload clears your own browser copy, wp cache flush clears the object cache, and your host or CDN dashboard clears their caches. The page cache itself only exists when a plugin or your host creates it.
Q4. Why do I still see the old page after clearing the cache?
Another layer is still serving it, most often your browser, a CDN or your host’s server cache. Check in a private window, then purge the CDN and the host cache one at a time.
Q5. Will clearing the cache log out my customers?
No. Logins and WooCommerce carts live in cookies and sessions that the page cache never stores. Customers stay signed in and their carts stay full after a purge.
Q6. What is the difference between purging and clearing the cache?
There is none in practice. Plugins use purge, clear, delete and empty for the same action: removing the saved copies so fresh ones get built.