
How to install WordPress plugins comes down to one menu: go to Plugins, click Add Plugin, search, then click Install Now and Activate. Free plugins take under a minute that way, and a premium plugin takes about the same once you have its ZIP file.
We tested every method on our own WordPress 7.1.3 test site in October 2026, with WooCommerce 11.2 active. We installed Query Monitor from the directory, uploaded Classic Editor as a ZIP and added Health Check with WP-CLI. We also copied a plugin into the folder by hand and uploaded a broken ZIP on purpose to record the real error.
This guide walks through the four install methods with the exact screens WordPress 7.1 shows. Then it covers auto-updates, WooCommerce extensions and the three install errors you are most likely to meet.
How to Install WordPress Plugins: The Four Methods
Here is how to install WordPress plugins: search the plugin directory, upload a ZIP, run WP-CLI or copy the folder over SFTP. All four end with the same plugin folder inside wp-content/plugins. Pick the one that matches where your plugin comes from and what access you have.
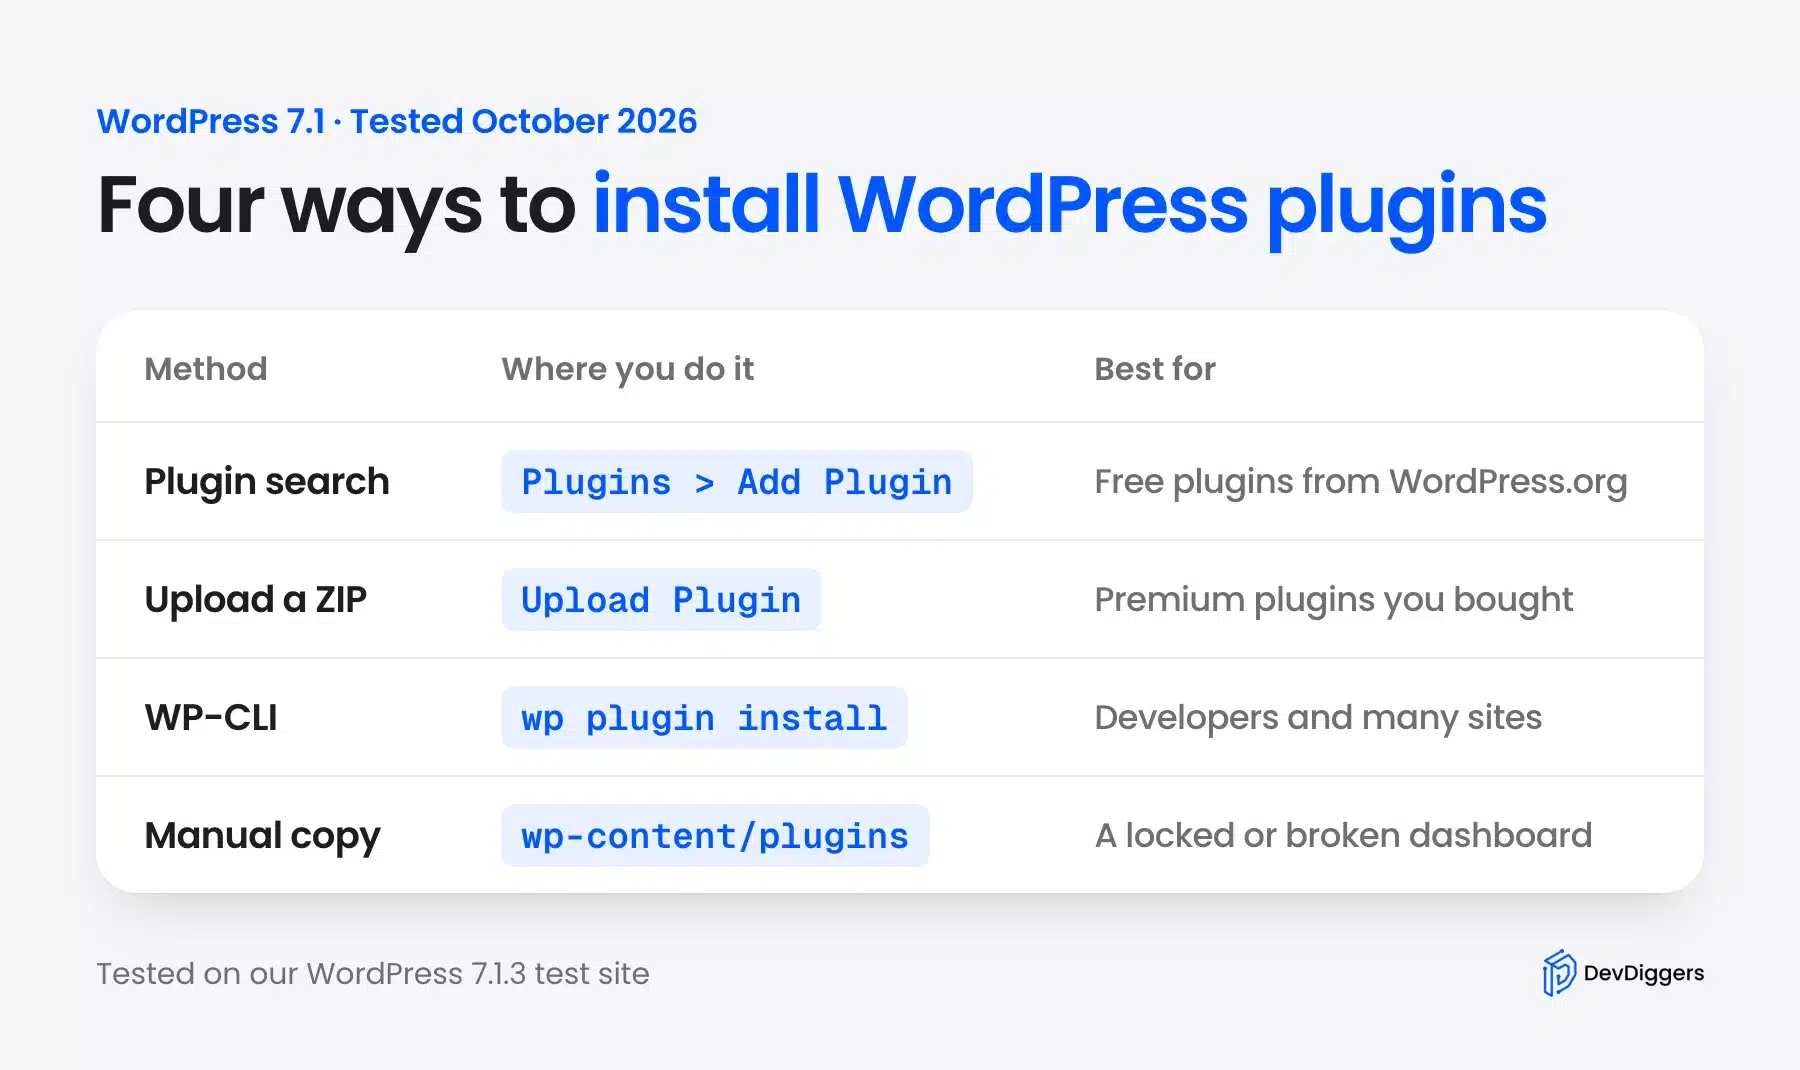
WordPress’s own Manage Plugins guide lists three of these methods: the built in installer, the ZIP upload and a manual SFTP transfer. WP-CLI is the fourth, and it suits developers who look after more than one site.
Installing and activating are two separate steps. Installing copies the plugin files to your server, while activating switches the plugin on so its code runs. An installed but inactive plugin does nothing, so check that first when a new plugin seems to have no effect.
One limit before you start: this guide is for self hosted WordPress. WordPress.com limits plugin installs by plan, so check your plan there if you do not see the Add Plugin button.
Method 1: Install a Plugin From the Plugin Directory
The plugin directory method installs any free plugin listed on WordPress.org without leaving your dashboard. You search by name, check the plugin’s details, click Install Now and then Activate. It is the fastest route and it needs no file downloads, so start here for any free plugin.
We used it to install Query Monitor 4.0.7, a free debugging plugin, and these are the screens we saw:
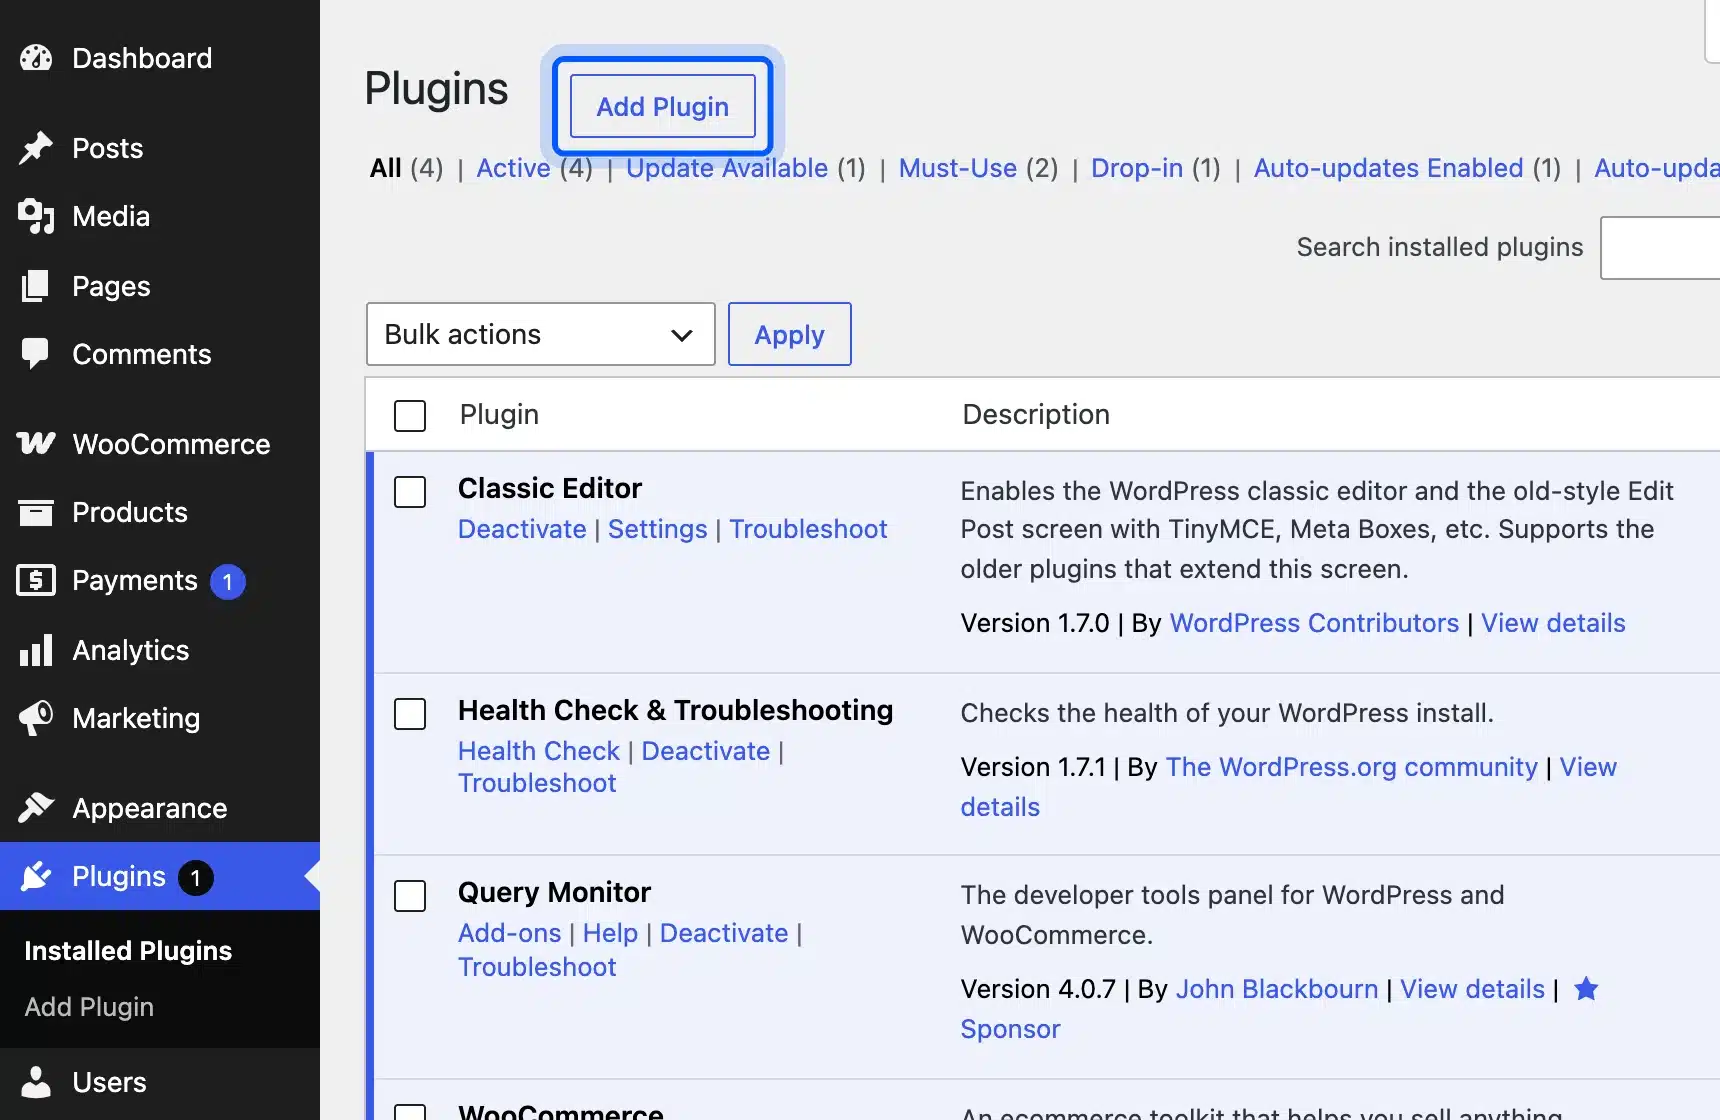
- Open the installer: New to how to install plugins in WordPress? Go to Plugins in the left menu and click the Add Plugin button at the top. WordPress 7.1 calls it Add Plugin, while older guides and the official docs still say Add New.
- Search for the plugin: Type the plugin name into the Search Plugins box and wait for the results. Each card shows the rating, the number of active installations, the last update and a compatibility line.
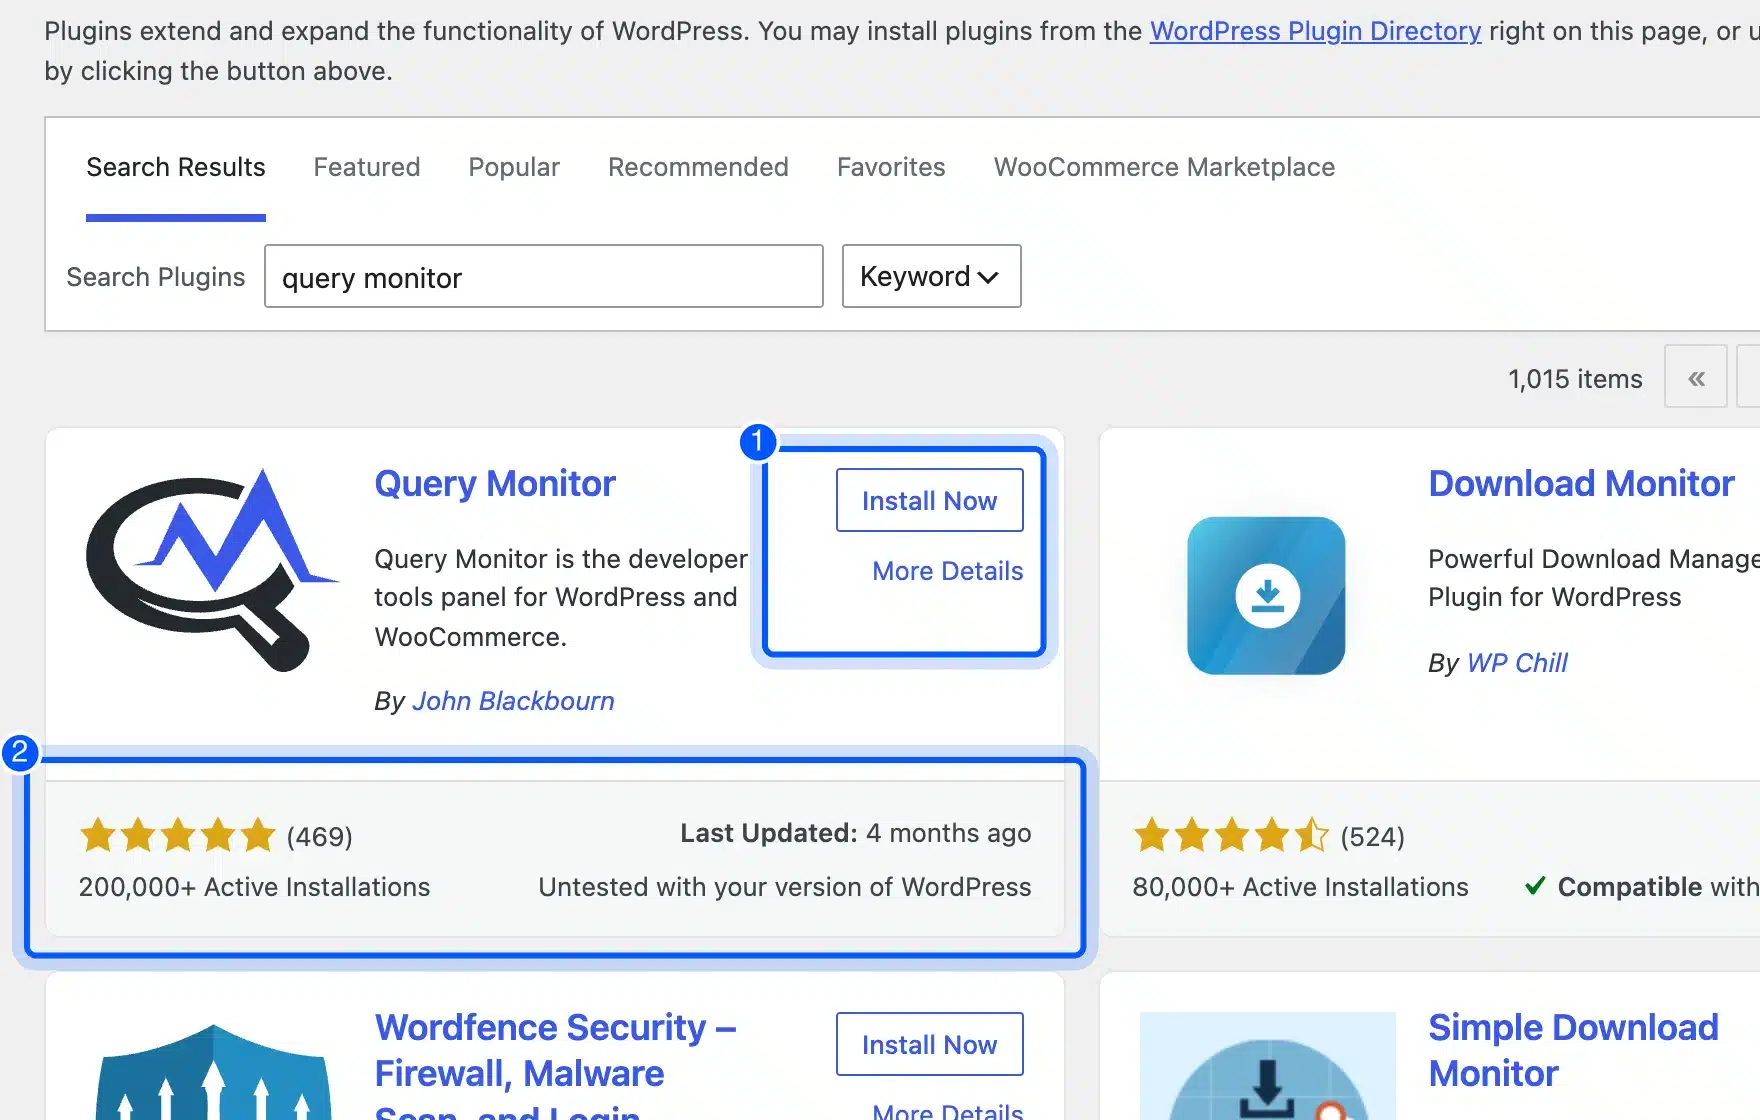
- Click Install Now: WordPress downloads the plugin and unpacks it in a few seconds. The button then turns into a blue Activate button on the same card.
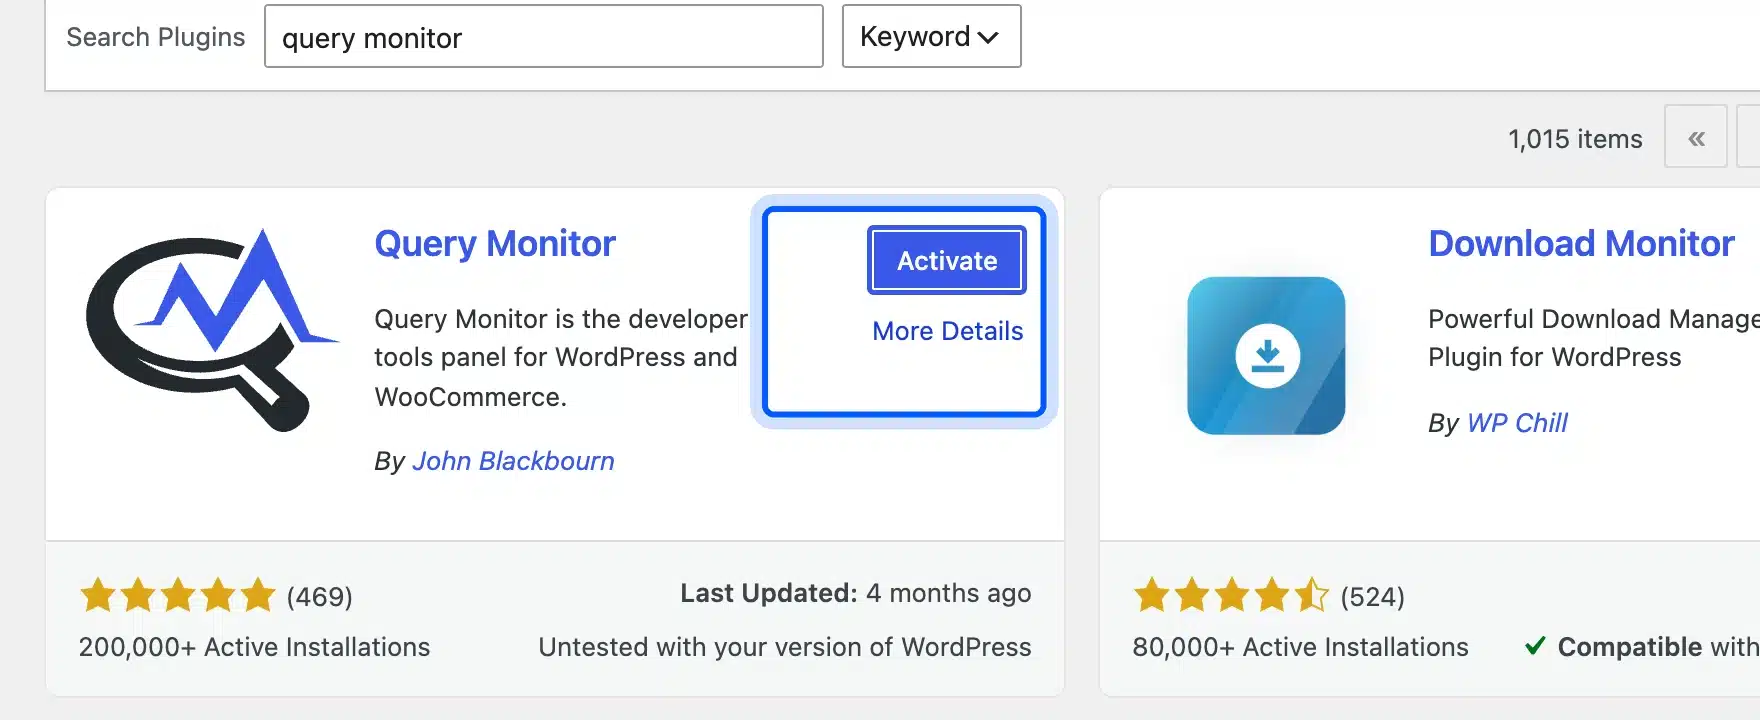
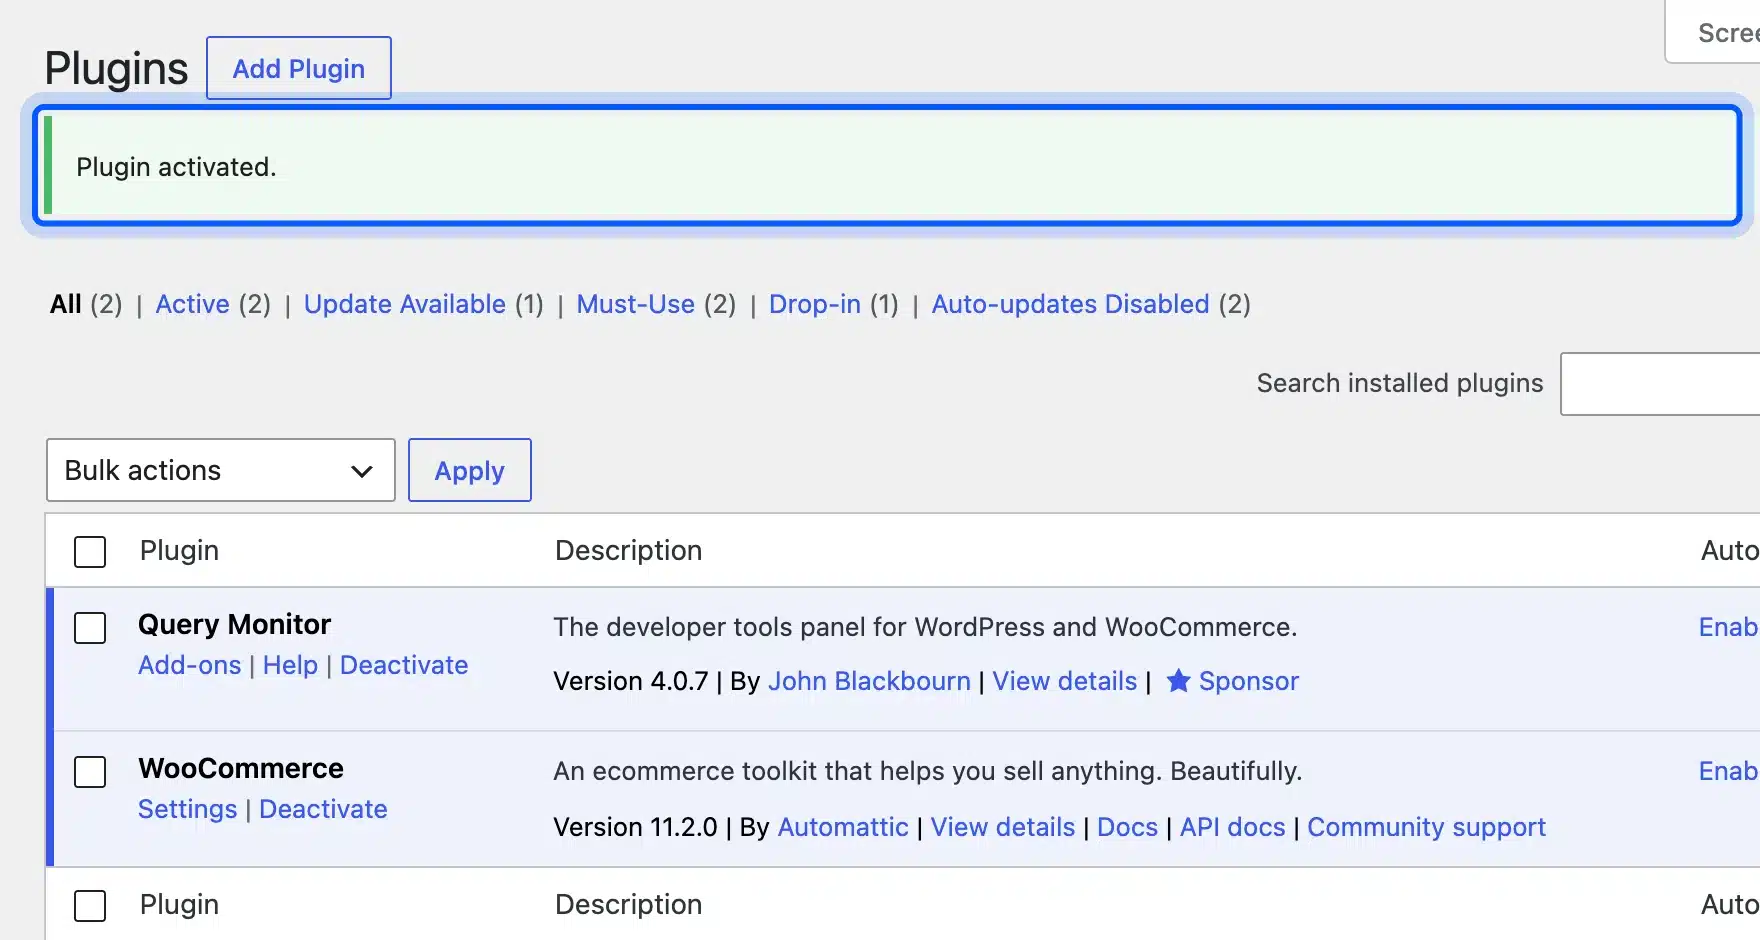
- Click Activate: WordPress sends you to the Plugins screen with a Plugin activated notice, and the plugin now appears in bold with a Deactivate link.
Query Monitor’s card said “Untested with your version of WordPress” on our 7.1.3 site, yet it installed and ran fine. The plugin compatibility notes explain that this line means the compatibility is simply unknown.
Tip: Click More Details before you install. The panel shows the WordPress and PHP versions the plugin needs, so you can rule out a mismatch before anything touches your site.
Method 2: Upload a Plugin ZIP File
The upload method installs a plugin from a ZIP file on your computer, which is how most premium plugins arrive after you buy them. You open Add Plugin, click Upload Plugin, choose the file and click Install Now. WordPress unpacks it into the plugins folder exactly as the directory method does.
We downloaded Classic Editor 1.7.0 from WordPress.org as a ZIP and uploaded it through the dashboard. The steps match the official upload instructions:
- Open Upload Plugin: Go to Plugins, click Add Plugin, then click the Upload Plugin button next to the page title. An upload box slides open above the plugin list.
- Choose the ZIP file: Click Choose file and pick the plugin ZIP you downloaded. Do not unzip it first, because WordPress expects the archive as it is.
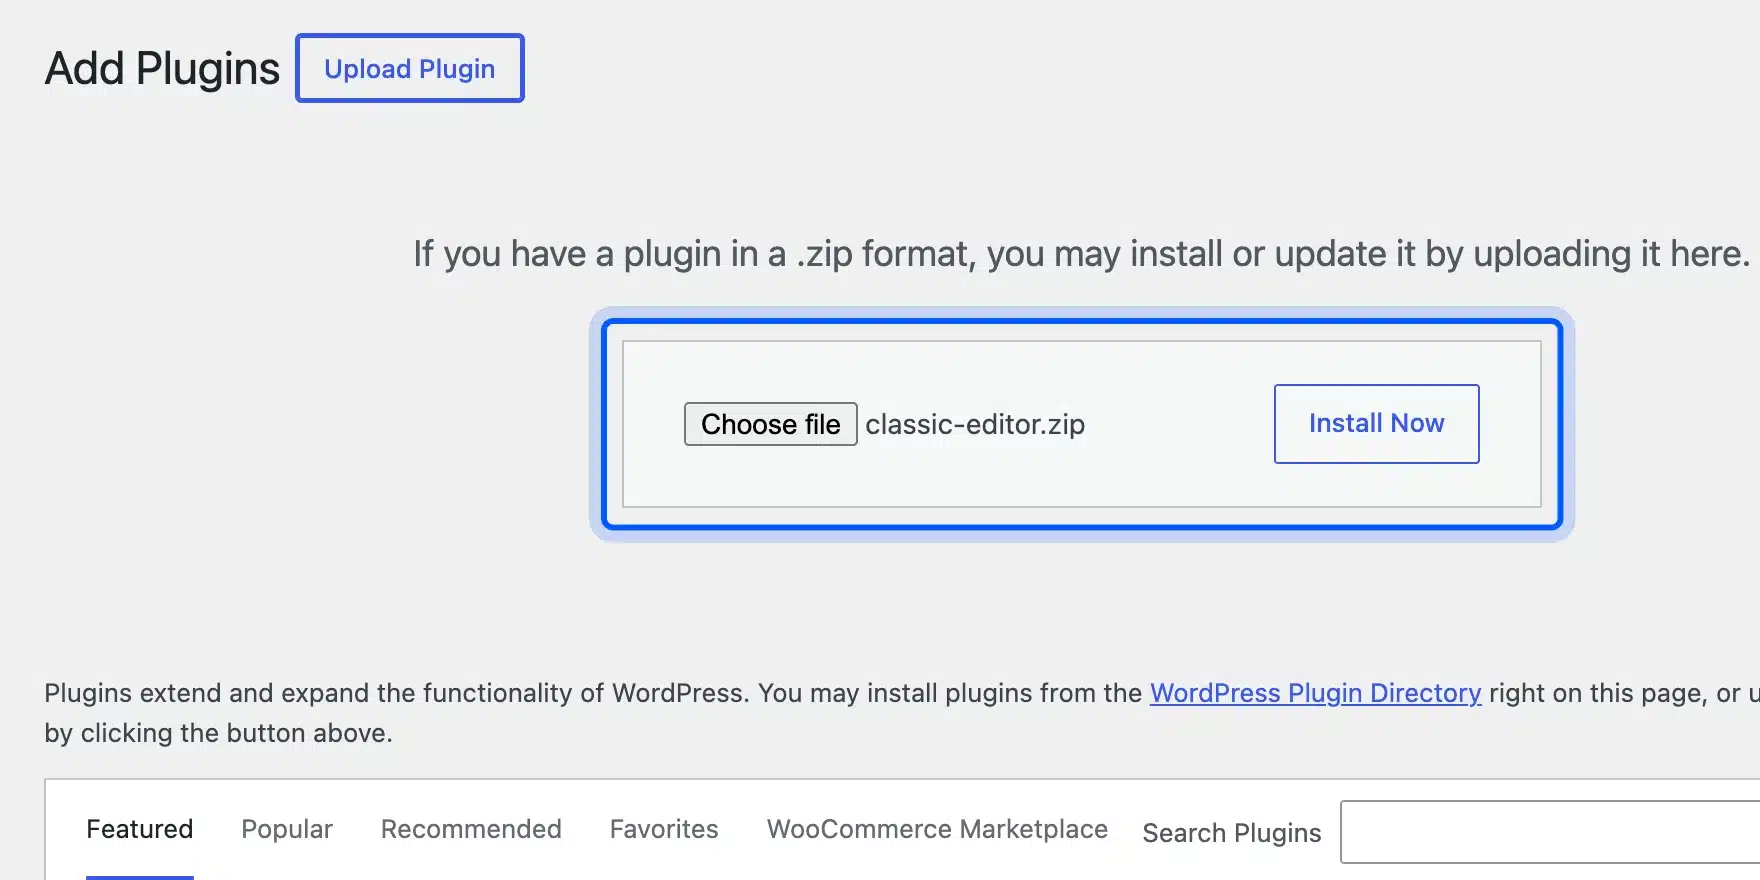
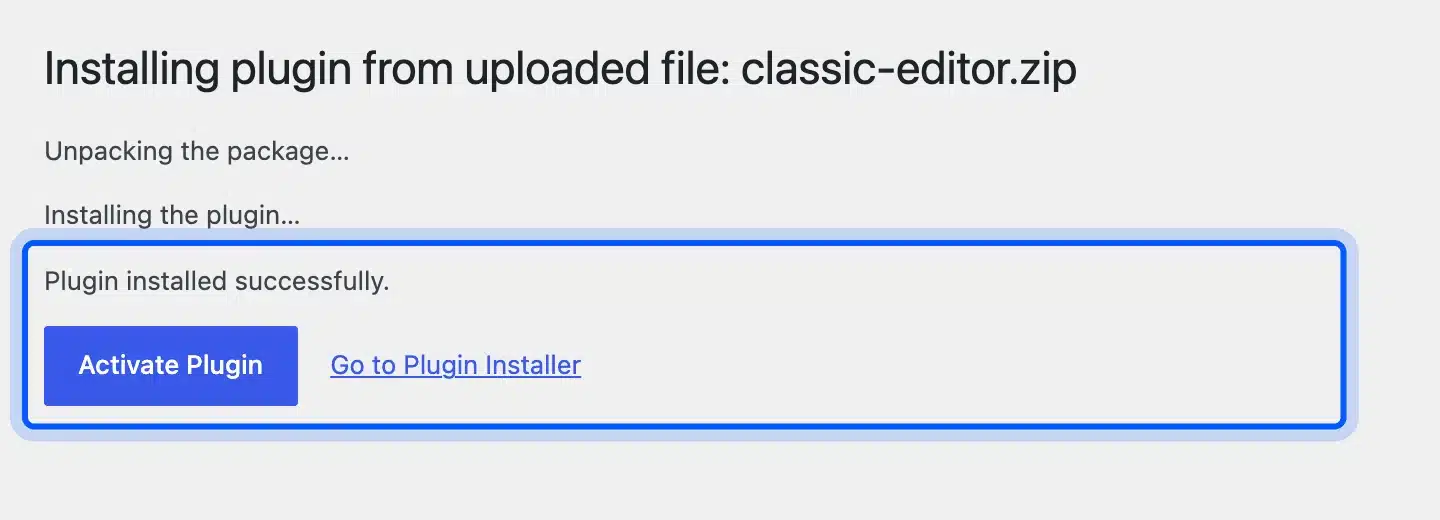
- Click Install Now: WordPress shows each stage of the install, from unpacking the package to the final result line.
- Click Activate Plugin: The result page ends with “Plugin installed successfully.” and an Activate Plugin button. One click switches the plugin on.
Uploading a ZIP is also how you update a premium plugin by hand. WordPress compares the two versions and asks before it replaces anything, which we cover in the errors section below.
If your plugin came from CodeCanyon, the download holds more than the plugin itself. Our guide on installing or updating CodeCanyon WordPress plugins shows how to find the installable ZIP inside that package.
Method 3: Install Plugins With WP-CLI
WP-CLI installs a plugin with one command typed in your server’s terminal: wp plugin install followed by the plugin’s slug. Add the --activate flag and it switches the plugin on in the same step. It is the quickest method when you manage several sites or work over SSH.
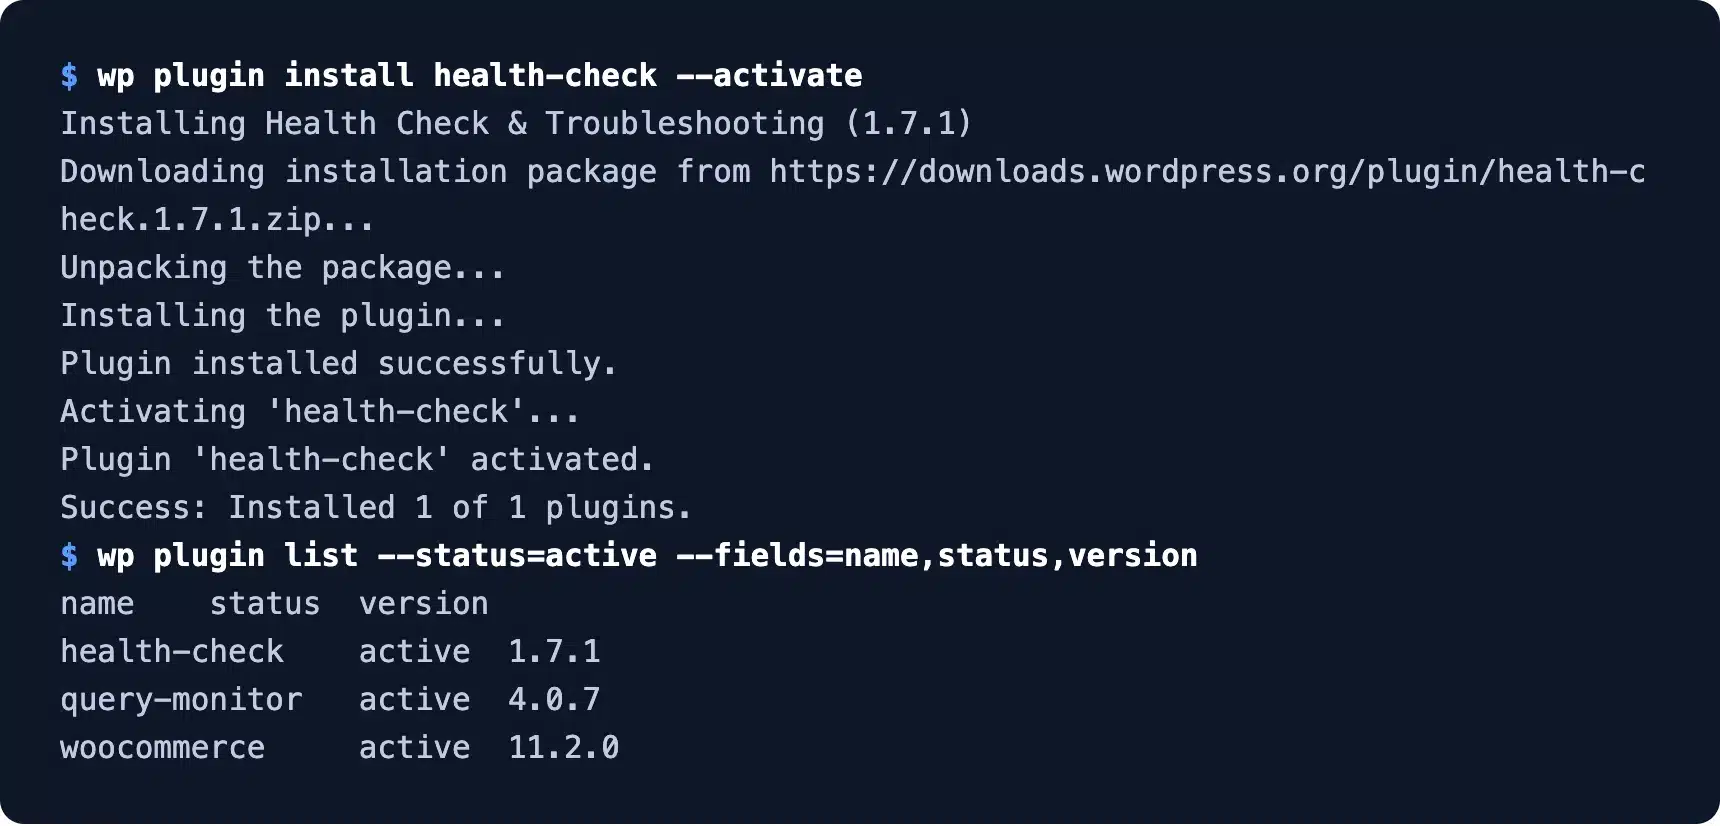
The wp plugin install command accepts a slug from WordPress.org, a ZIP file path or a URL. This is the exact command we ran:
wp plugin install health-check --activate
WP-CLI printed every stage, the same ones the dashboard shows, and finished with “Success: Installed 1 of 1 plugins.” The second command lists the active plugins so you can confirm the result.
To install a premium plugin, point the same command at its ZIP file instead of a slug. A ZIP that holds no plugin fails here too, with the same message the dashboard gives:
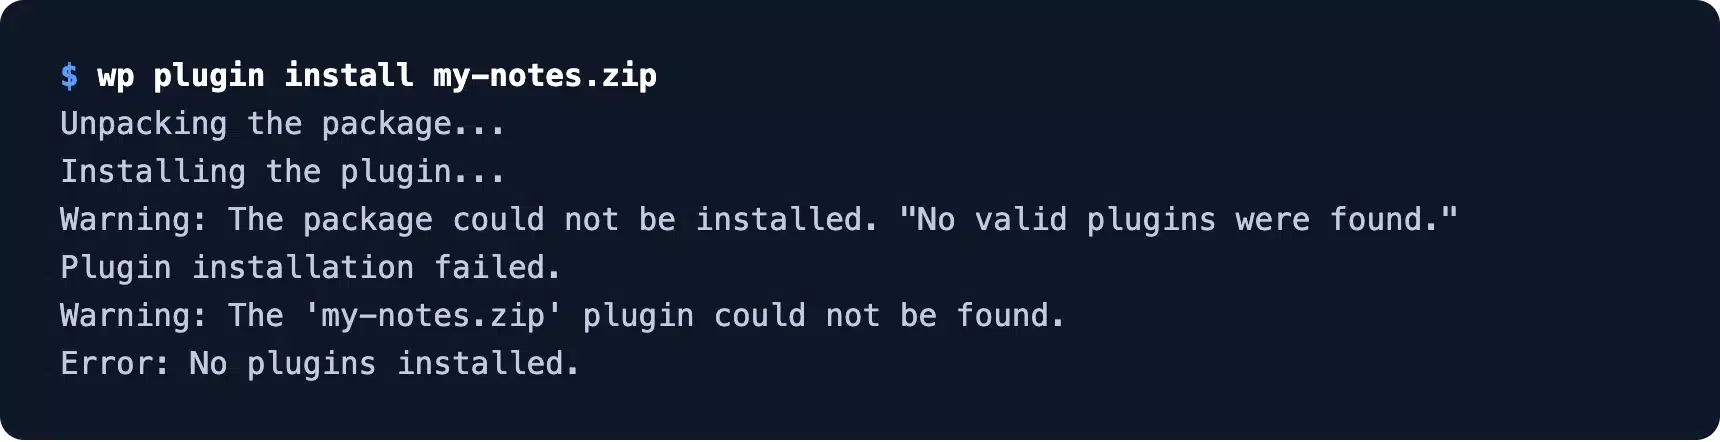
Notice that WP-CLI ends a failed run with “Error: No plugins installed.” That line makes failures easy to catch in a deploy script.
Method 4: Install a Plugin Manually Over SFTP
The manual method copies the unzipped plugin folder straight into wp-content/plugins on your server, using SFTP or your host’s file manager. You then activate it from the Plugins screen. Use it when the dashboard installer is blocked or your admin area is down.
WordPress calls this method rare and for advanced users, and the reason is simple: one wrong folder level and WordPress cannot see the plugin. These are the steps we followed:
- Unzip the plugin on your computer: Extract the ZIP so you get one folder named after the plugin, such as classic-editor.
- Copy the folder into wp-content/plugins: Connect with SFTP or open your host’s file manager, then upload the whole folder into that directory.
- Check the folder level: The main PHP file must sit one level down, at wp-content/plugins/classic-editor/classic-editor.php. A folder inside a folder hides the plugin.
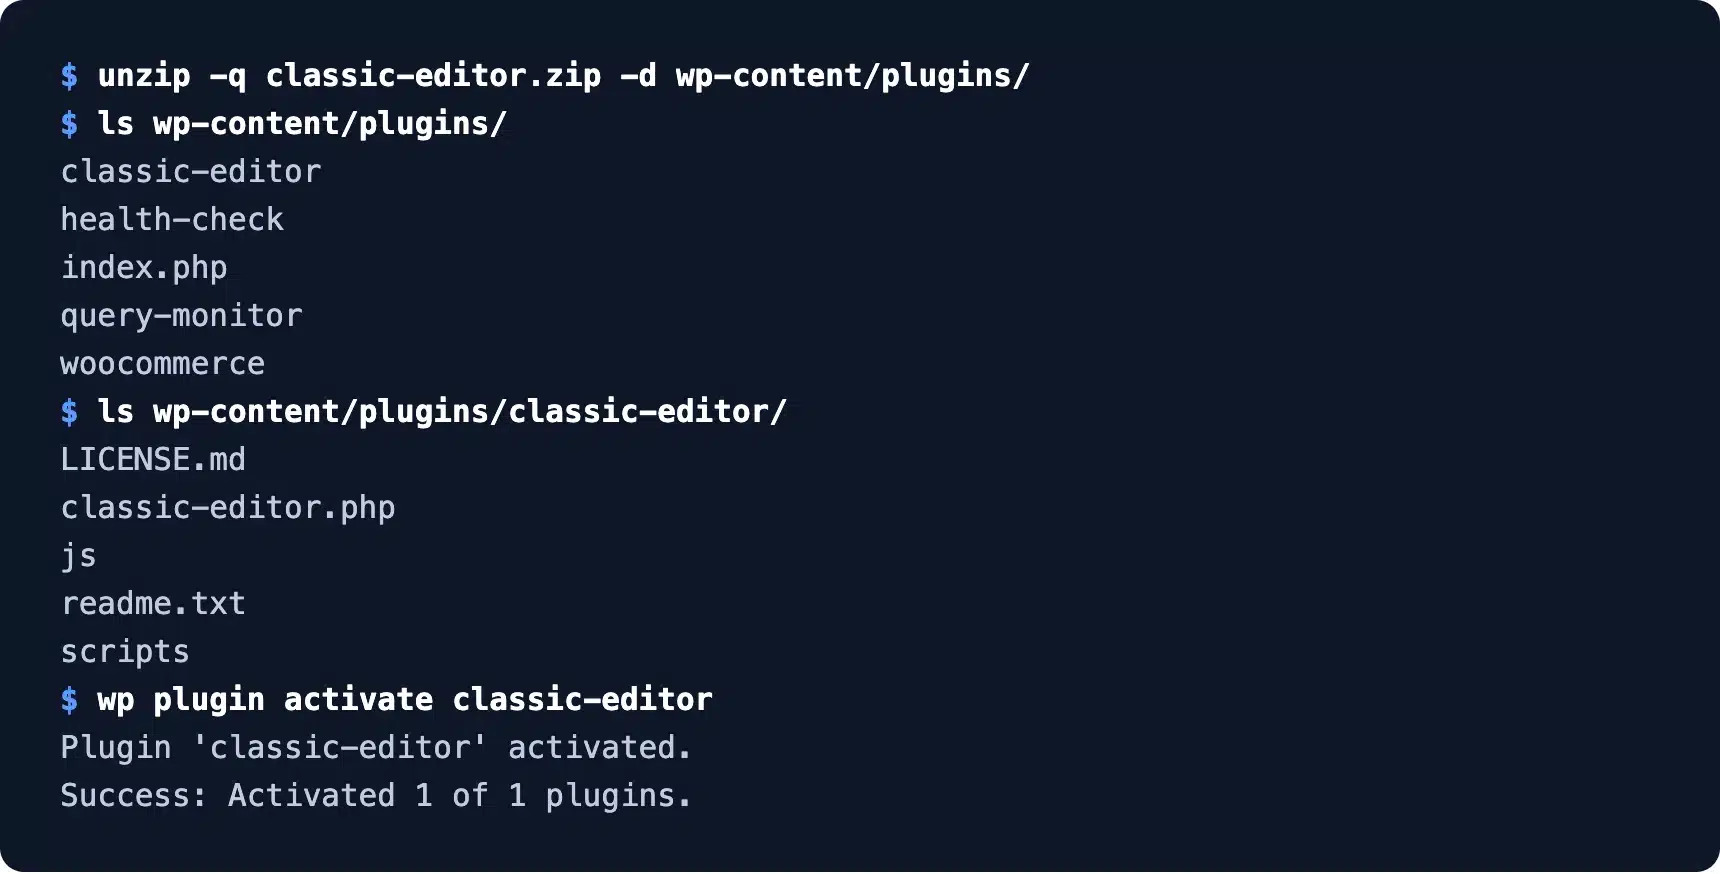
- Activate it: Go to Plugins, find the new plugin in the list and click Activate. We ran
wp plugin activate classic-editorinstead, which does the same job.
This FTP install route is also handy when the dashboard installer is switched off. Hosts that block automatic installs still let you upload files through their own file manager.
All four methods take a few minutes for one plugin. Setting up and testing twenty plugins across a store is a different job. Our WordPress development services team can handle it if you would rather not do it by hand.
How to Turn On Auto-Updates for a Plugin
Plugin auto-updates have been built into WordPress since version 5.5, and they are off by default for every plugin you install. You turn them on per plugin with the Enable auto-updates link in the Automatic Updates column of the Plugins screen. WordPress then installs each new version for you.
On our test site, all four plugins showed “Enable auto-updates” right after install. Clicking the link flips it to “Disable auto-updates”, as the Health Check row shows below.
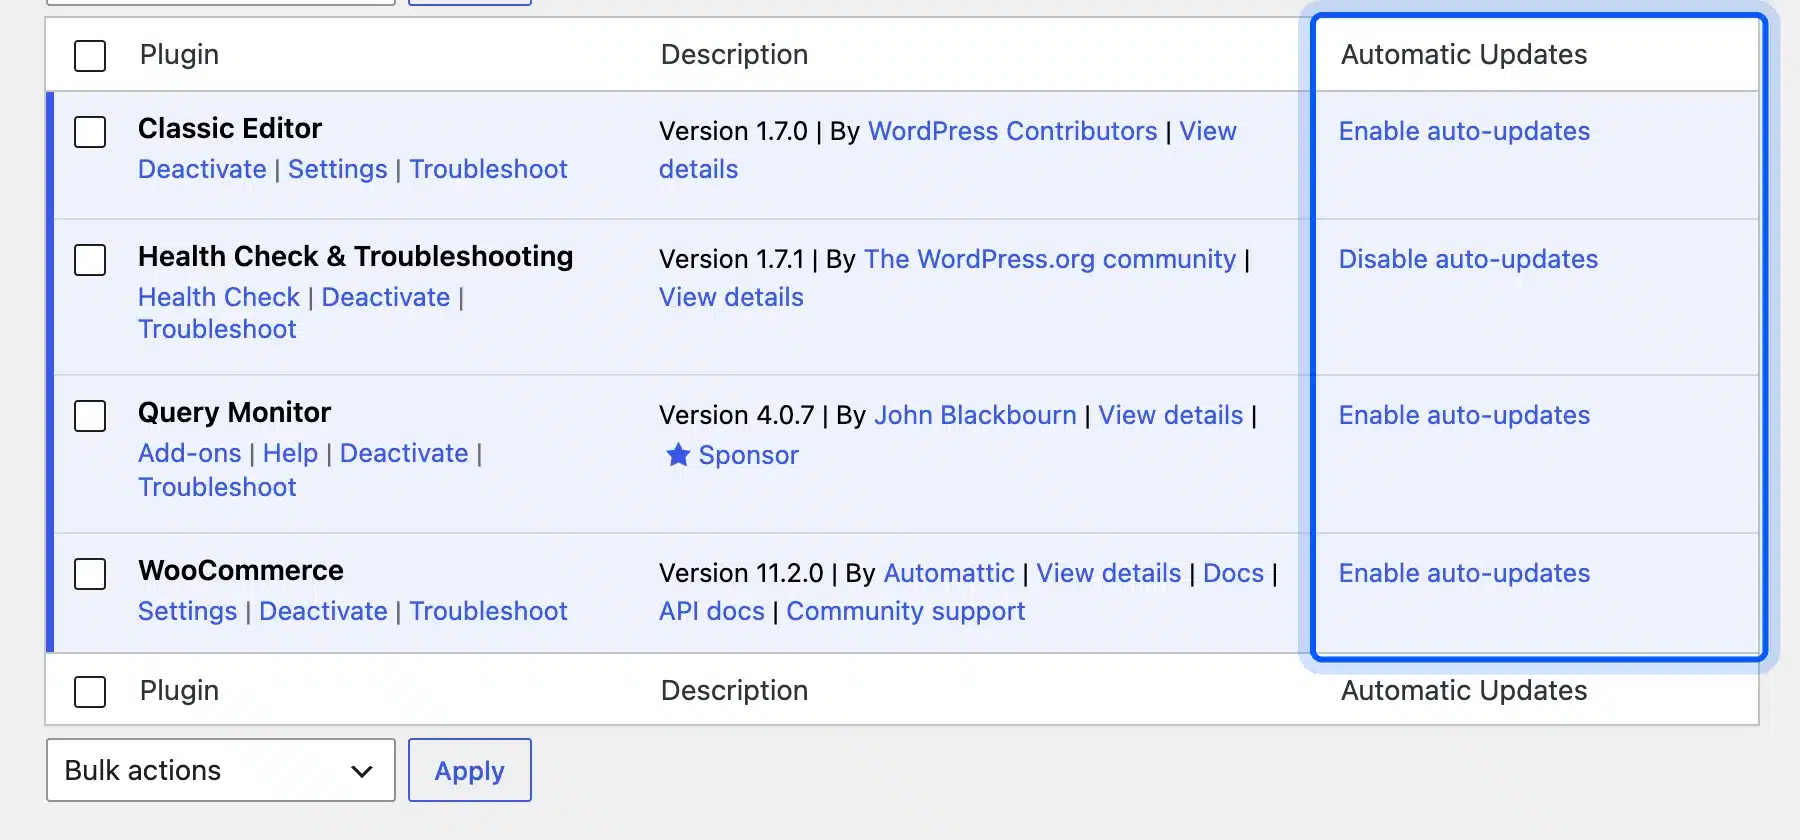
WordPress’s auto-updates documentation explains the same switch for themes. From the terminal, the wp plugin auto-updates command does it in one line:
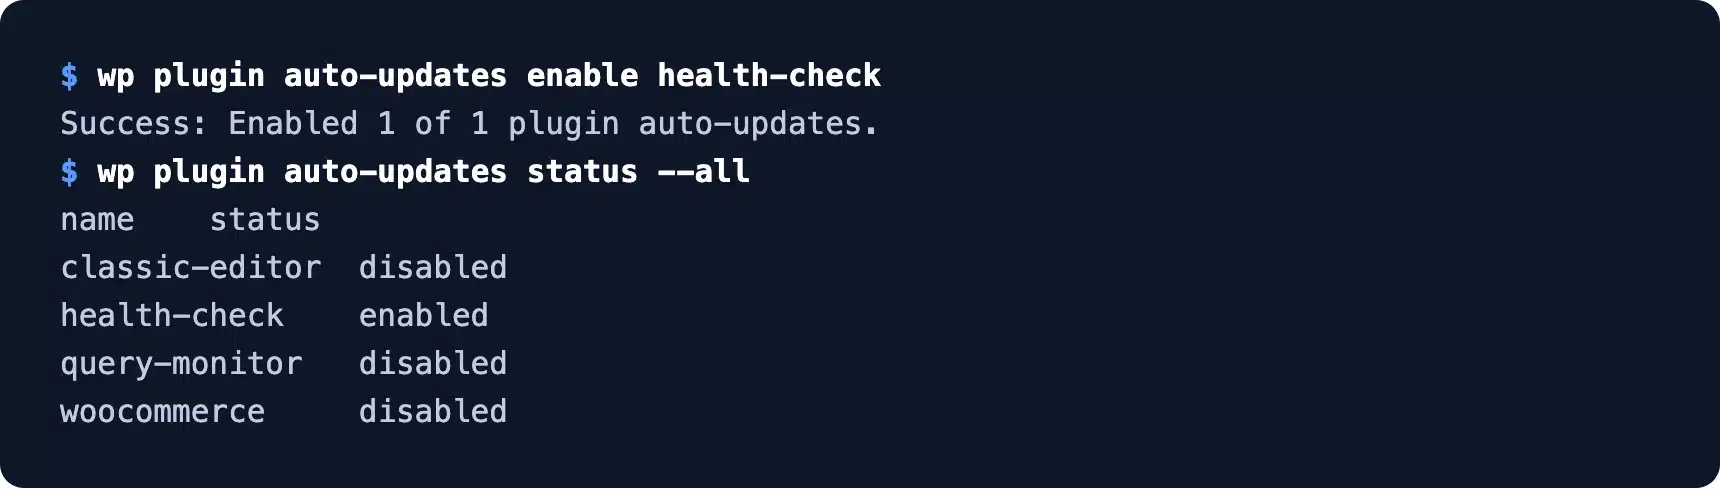
Worth knowing: Turn auto-updates on for small, well kept plugins and leave them off for anything your checkout depends on. Update those by hand after a backup, so a bad release never reaches customers unseen.
How to Install a WooCommerce Plugin in WordPress
To install a WooCommerce plugin in WordPress, use the same Add Plugin screen. Free WooCommerce extensions install with Install Now, and paid ones arrive as a ZIP you upload. WooCommerce 11.2 also adds a WooCommerce Marketplace tab that opens the extension store inside your dashboard.
WooCommerce itself is a free plugin, so you install it with Method 1 by searching for WooCommerce. Paid extensions bought on WooCommerce.com work differently. WooCommerce’s subscription management guide says you link your store through the WooCommerce.com Update Manager, then install the purchase automatically or from a ZIP file.
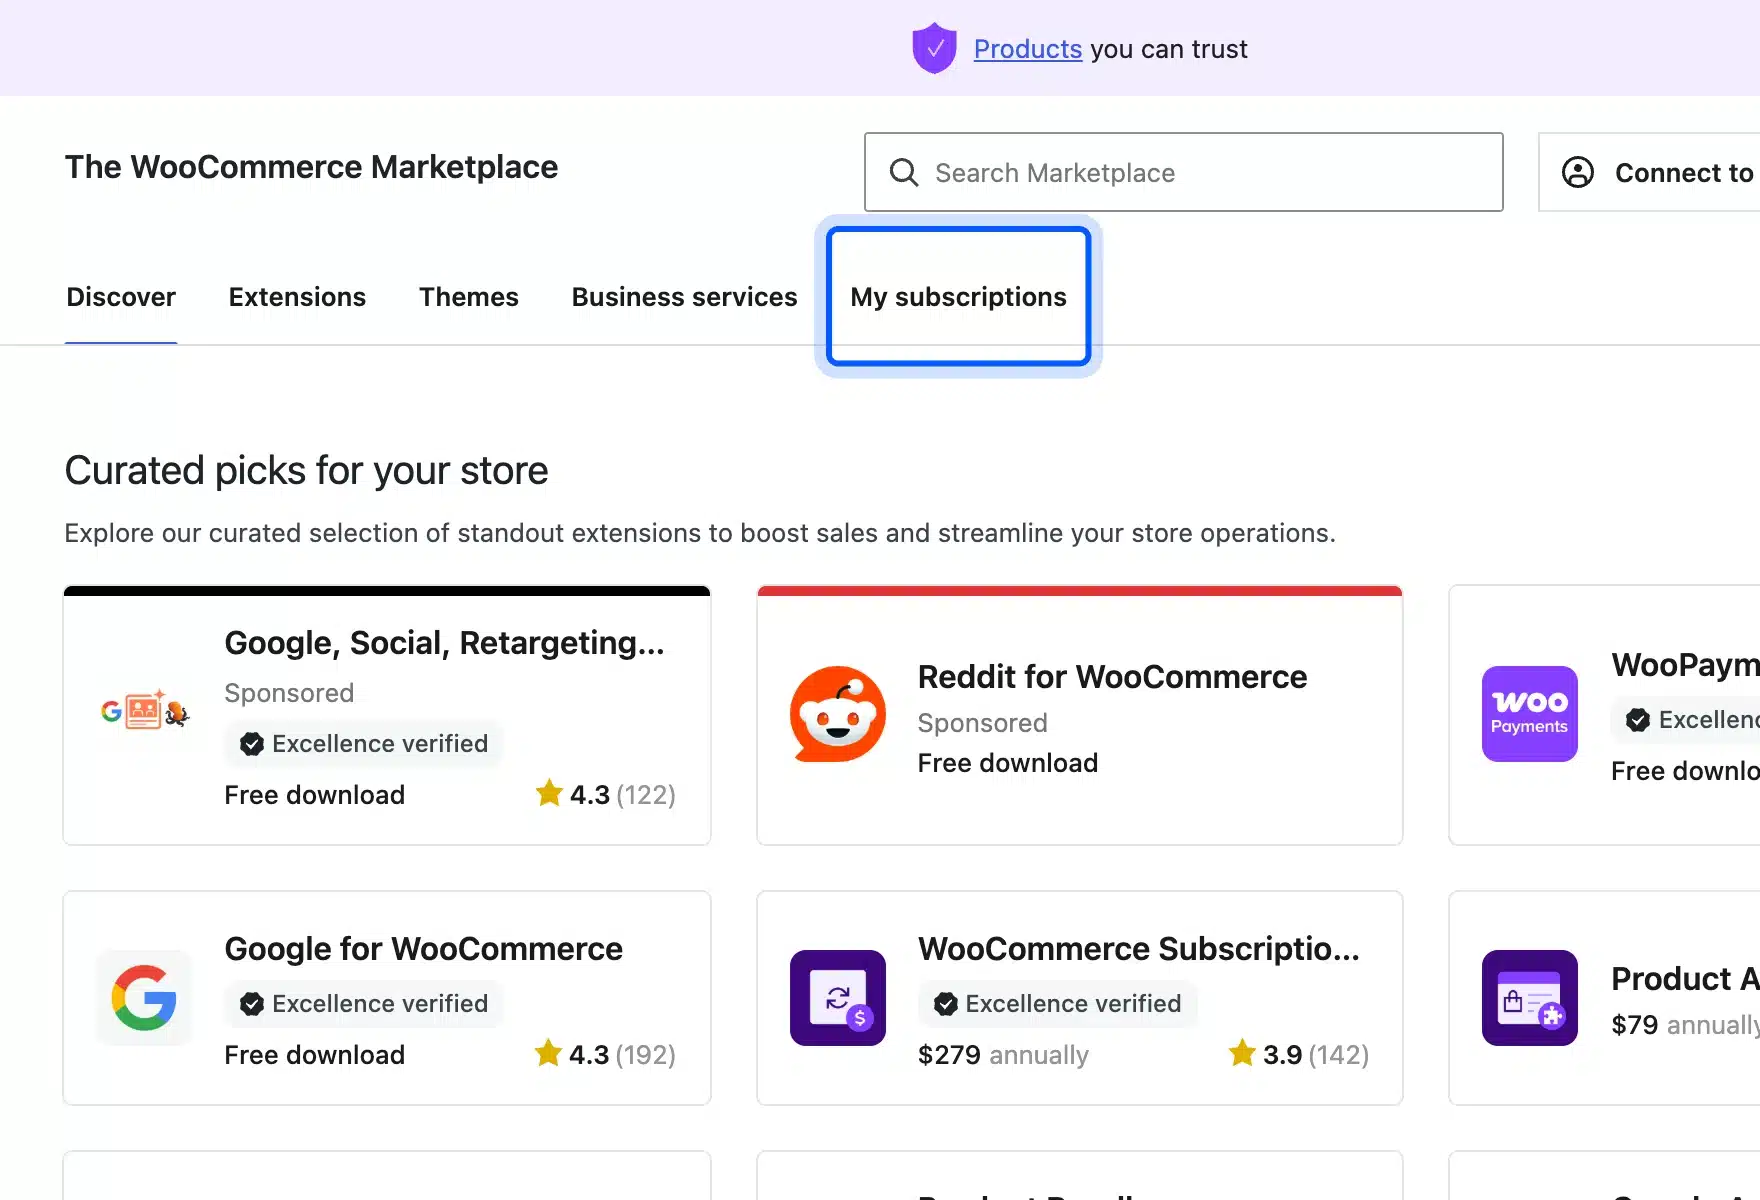
If you wonder how to add WordPress plugins for WooCommerce that cost nothing, they need no account at all. Search the name on the Add Plugin screen, install and activate, exactly as in Method 1.
Every extra plugin adds code to each page load, so a store gains nothing from piling them up. If you are wondering where the limit sits, read our look at whether 50 plugins are too much for a WordPress store.
Why a Plugin Install Fails and How to Fix It
Most failed plugin installs come down to three causes. The ZIP is not a plugin, the folder already exists, or the plugin needs newer WordPress or PHP, and each prints a clear message. We triggered all three on our test site to record the exact wording.
The Package Could Not Be Installed
This error means WordPress opened your ZIP and found no plugin header inside. We built a ZIP holding only a text file and uploaded it, and WordPress replied “The package could not be installed. No valid plugins were found.” followed by “Plugin installation failed.”
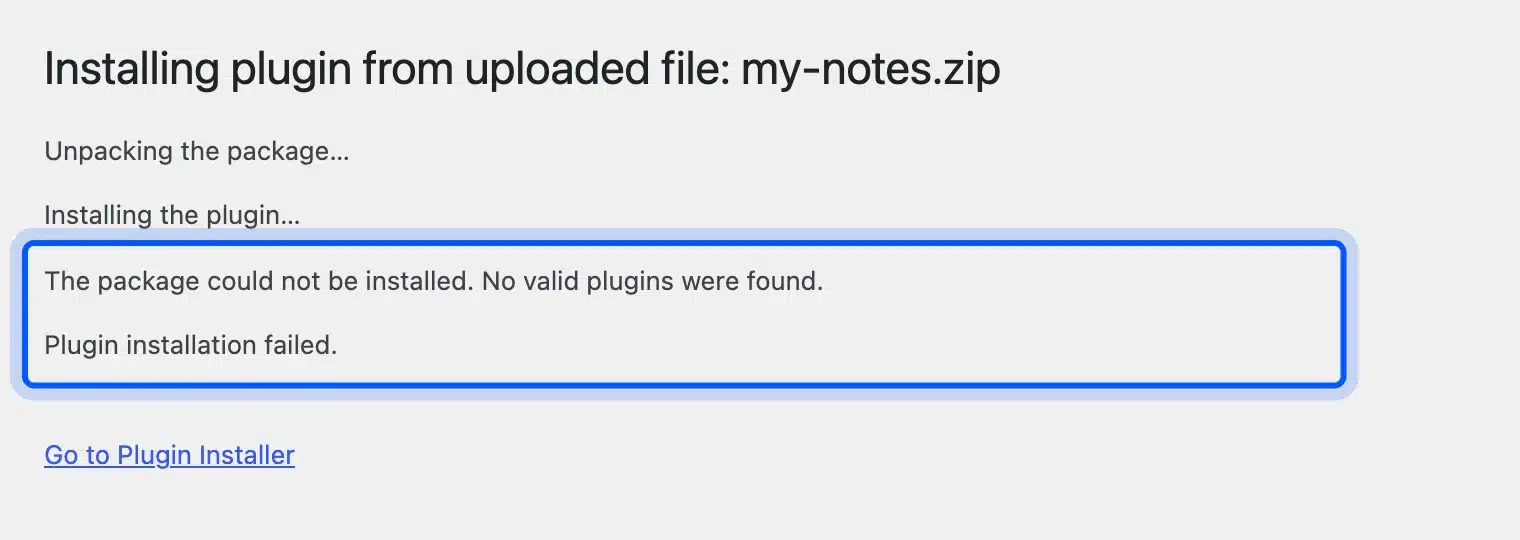
The usual cause is uploading the whole download from a marketplace instead of the plugin ZIP inside it. Unzip the download on your computer, find the ZIP named after the plugin and upload that one.
Destination Folder Already Exists
WordPress shows this message when a plugin with the same folder name is already installed. Since WordPress 5.5 it no longer simply stops: it shows “This plugin is already installed” with a table that compares the current and uploaded versions.
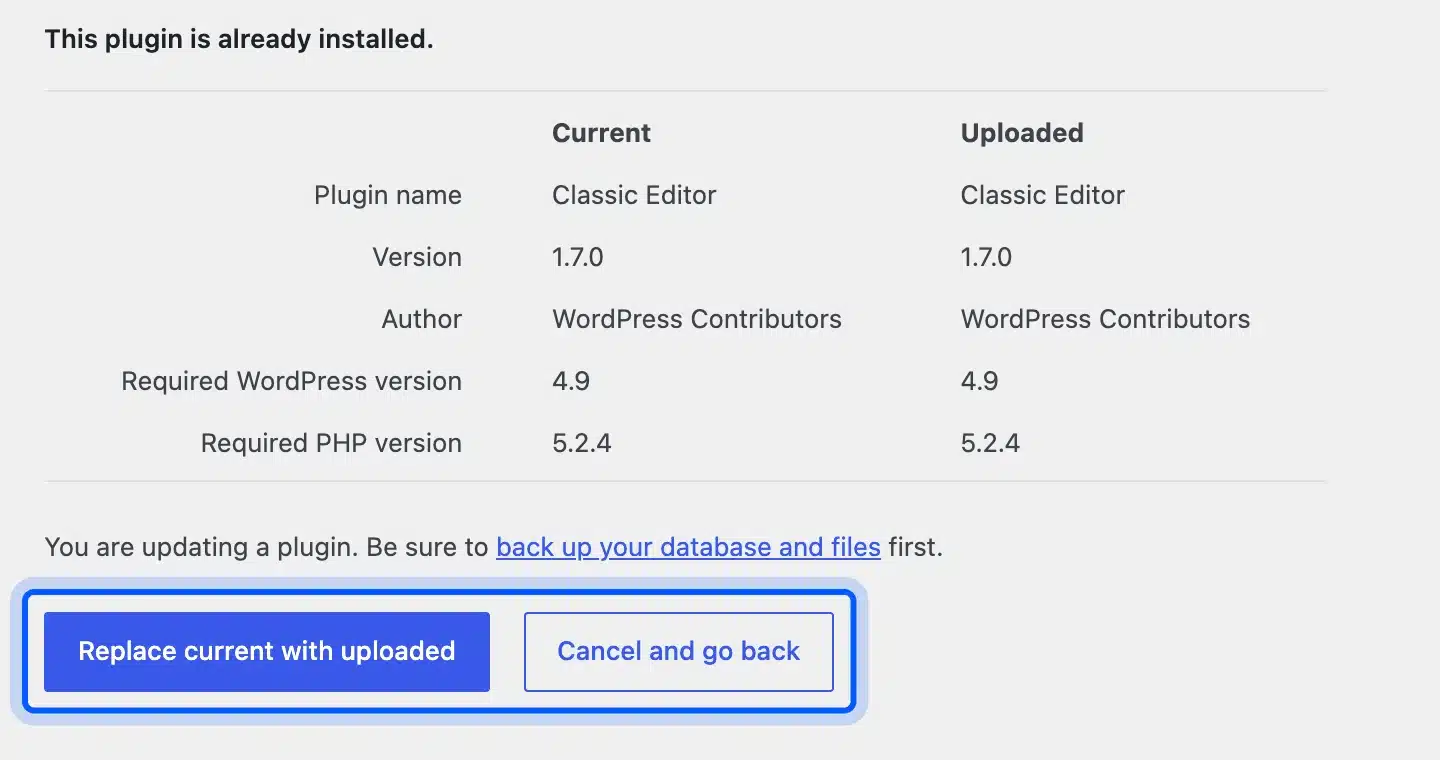
Click Replace current with uploaded to update the plugin, or Cancel and go back to leave it alone. Back up your site first, as the screen itself reminds you.
The Plugin Needs a Newer WordPress or PHP Version
A plugin can declare the lowest WordPress and PHP versions it supports, and WordPress refuses to activate it on anything older. The plugin’s details panel lists those numbers before you install, next to a warning when the plugin has not been tested with your release.
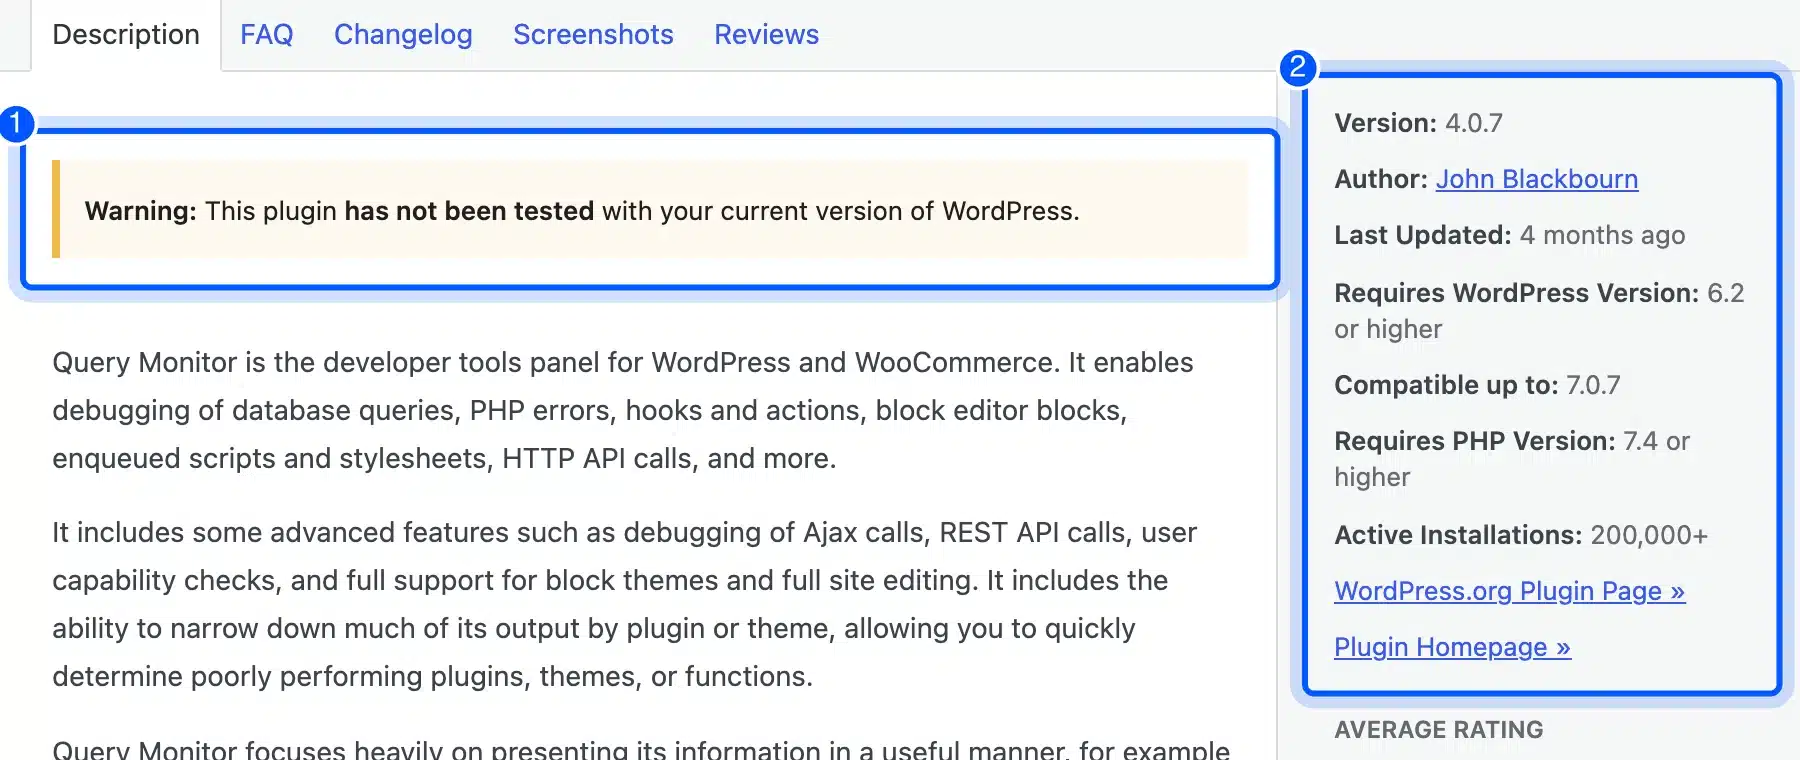
Query Monitor asks for WordPress 6.2 and PHP 7.4, and it lists compatibility up to 7.0.7. So the warning appeared on our 7.1.3 site, but the install and activation both worked.
If a plugin installs but breaks something after activation, the cause is often a clash with another plugin. Our guide to checking for plugin conflicts on WordPress walks through finding the culprit one plugin at a time.
Conclusion
Learning how to install WordPress plugins takes five minutes, and the dashboard search covers most of your needs. Use the ZIP upload for premium plugins, WP-CLI when you work in a terminal, and a manual copy only when the dashboard cannot help.
Two habits save the most trouble. Check the requirements in More Details before you install, and back up before you replace a plugin that is already there.
If you want a safe place to try a new plugin first, WordPress Playground runs a throwaway site in your browser. And if you are still building the site itself, our guide to creating a WordPress site from scratch covers the steps before this one.
Frequently Asked Questions (FAQs)
Q1. What is the difference between installing and activating a plugin?
Installing copies the plugin’s files to wp-content/plugins on your server. Activating switches the plugin on so its code runs on your site, and an installed but inactive plugin does nothing.
Q2. Can I install WordPress plugins without FTP?
Yes. The dashboard search, the ZIP upload and WP-CLI all install plugins without an FTP client. Even the manual method works through your host’s file manager if FTP is not available.
Q3. Are WordPress plugins free?
Every plugin in the WordPress.org directory is free to download and use. Premium plugins are sold by their developers, often with a free version on WordPress.org and paid features on top.
Q4. Why can’t I see the Add Plugin button?
Only administrators can install plugins, so check your user role first. On WordPress.com the button depends on your plan, and some managed hosts also switch off plugin installs on purpose.
Q5. Is it safe to install plugins from outside WordPress.org?
It is safe when you buy from the developer or a trusted marketplace. Never install a “free” copy of a paid plugin from a random site, because those files often carry hidden code.
Q6. How do I uninstall a WordPress plugin?
Go to Plugins, click Deactivate under the plugin, then click Delete. WordPress’s plugin guide also covers removing the folder by hand when the dashboard is not available.