
WordPress local development means running a full copy of WordPress on your own computer. You can build and break things there without touching the live site. A free tool sets it up in a few minutes, and the site loads only for you.
We tested the free options on a Mac in October 2026: Local 10.1.2 and WordPress Playground CLI 3.1.57 with WordPress 7.1.3. We also checked the Docker route that wp-env needs. We timed every boot, ran WP-CLI against a real Local site and hit the database socket error that catches most people on day one.
Below you get a comparison of five local WordPress setup options, a step by step localhost install and the socket fix. Then come the two wp-config.php settings every local site needs and a safe way to move the finished work to staging and live.
What Is WordPress Local Development?
WordPress local development is the practice of building a WordPress site on your own machine before it goes online. A local tool bundles a web server, PHP and a database, so WordPress runs at an address only you can open. Changes stay private and cost nothing until you deploy them.
The live site keeps serving visitors while you work. You can update plugins, rewrite a theme or test a new PHP version, and a fatal error only breaks your copy.
It also works offline. On a train or a slow hotel connection, a local copy still loads fast, because every request stays on your own computer.
Under the hood every tool runs the same three parts. A web server like nginx or Apache answers the request, PHP runs WordPress, and a database stores the content.
The tools only differ in how they package those parts. Some install them as native apps, some run them in Docker containers, and Playground runs PHP inside Node.js with SQLite as the database.
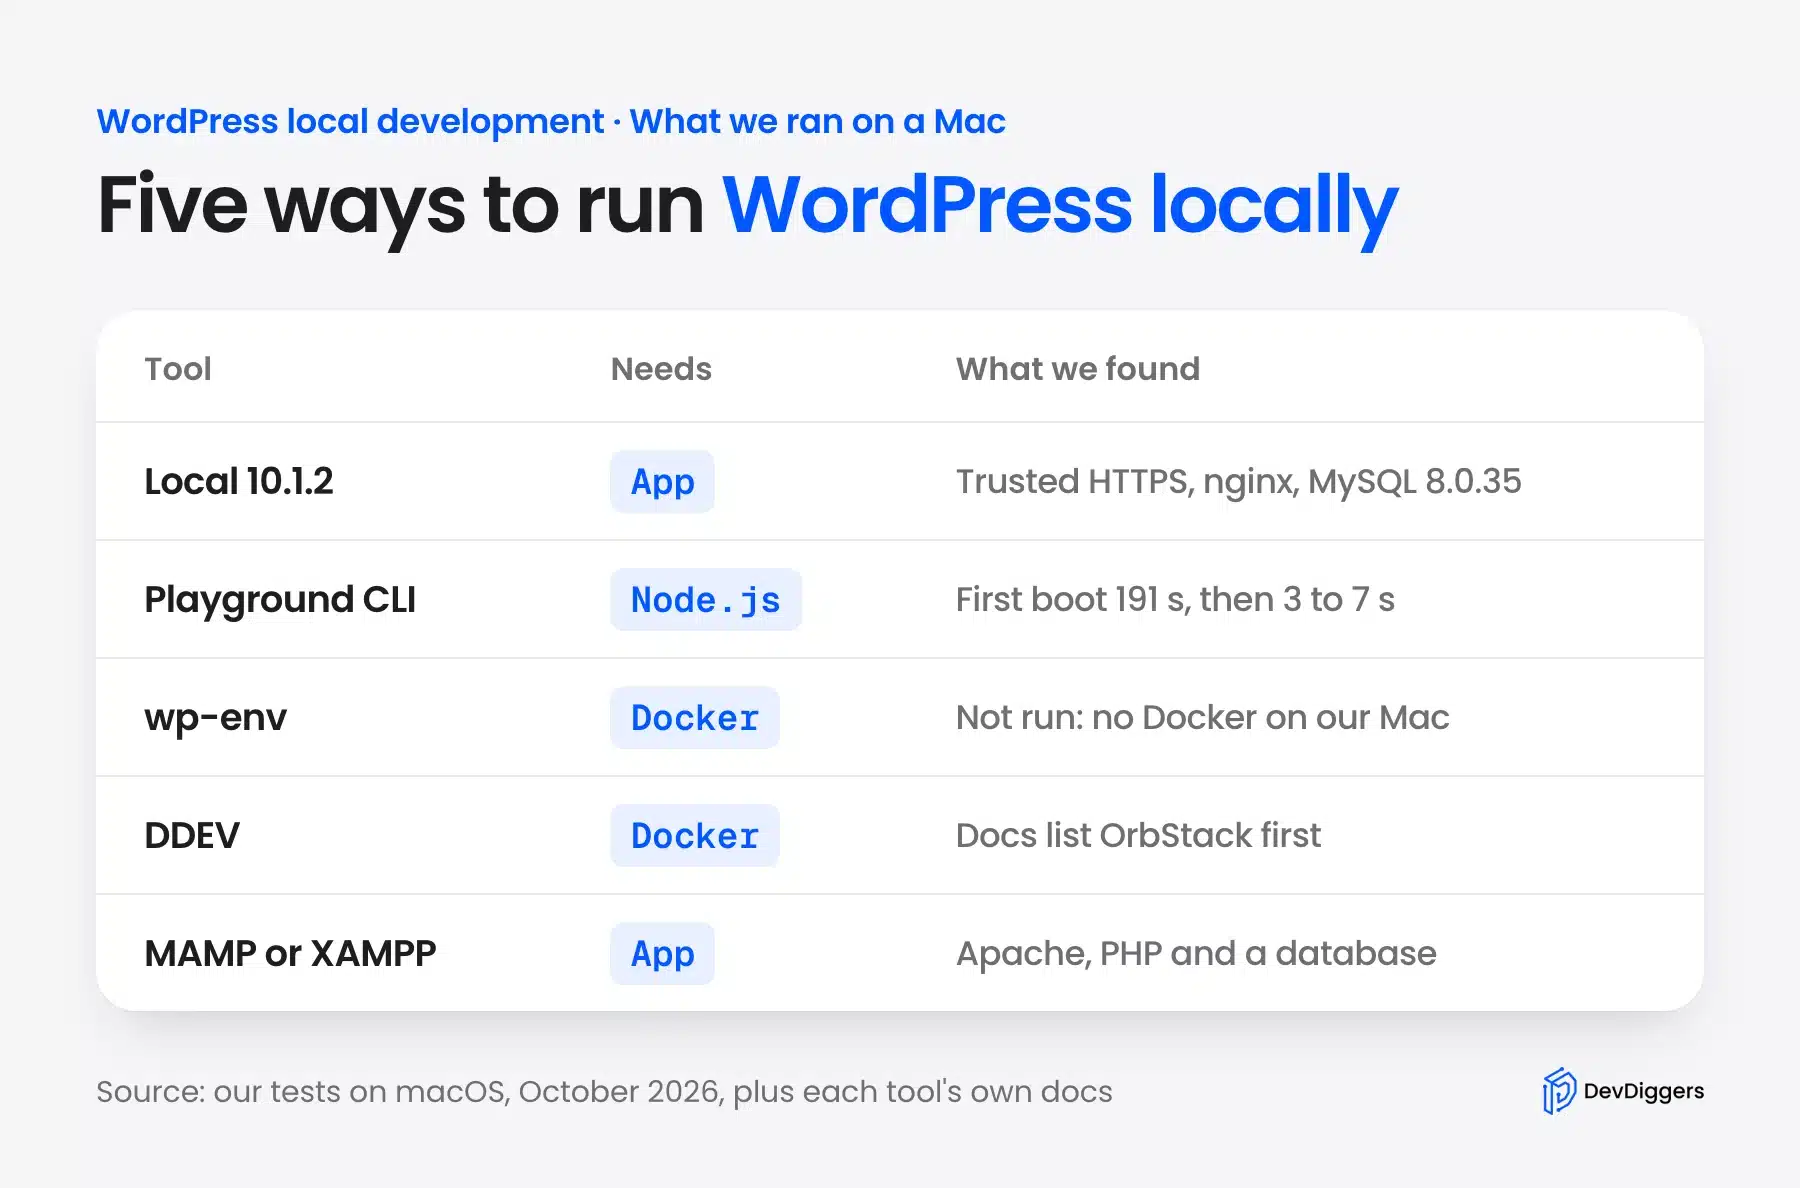
The tools differ in what they ask of your computer. Local is a desktop app, Playground CLI needs only Node.js, and wp-env and DDEV both need Docker. MAMP and XAMPP install the classic Apache, PHP and database stack directly.
Store owners use it too, and not only developers. A WooCommerce shop can test a major plugin update on a local copy first, with a real product catalog and no risk to real orders.
There is no single right pick, but the trade offs are easy to see once you list them. The next section walks through each one with what we found when we ran it.
Which Local WordPress Setup Should You Pick?
Pick Local if you want a desktop app with trusted HTTPS and no terminal. Pick WordPress Playground CLI if you build plugins or themes and already have Node.js. Pick wp-env or DDEV when your team runs Docker, and MAMP or XAMPP when you want a classic stack.
We ran the first two for real and checked the Docker tools against our own machine. The sections below say which result came from a test and which came from the vendor’s docs.
Local
Local is a free desktop app from WP Engine that creates a WordPress site with nginx or Apache, PHP and MySQL in a few clicks. Each site gets its own domain, such as devdiggers.local, plus a trusted SSL certificate. That means HTTPS locally works without browser warnings.
Our Local 10.1.2 site runs PHP 8.2.27, nginx and MySQL 8.0.35, and the Overview tab shows all of it on one screen. The SSL row reads “Trusted”, which matters when you test anything that needs HTTPS, like secure cookies or payment scripts.
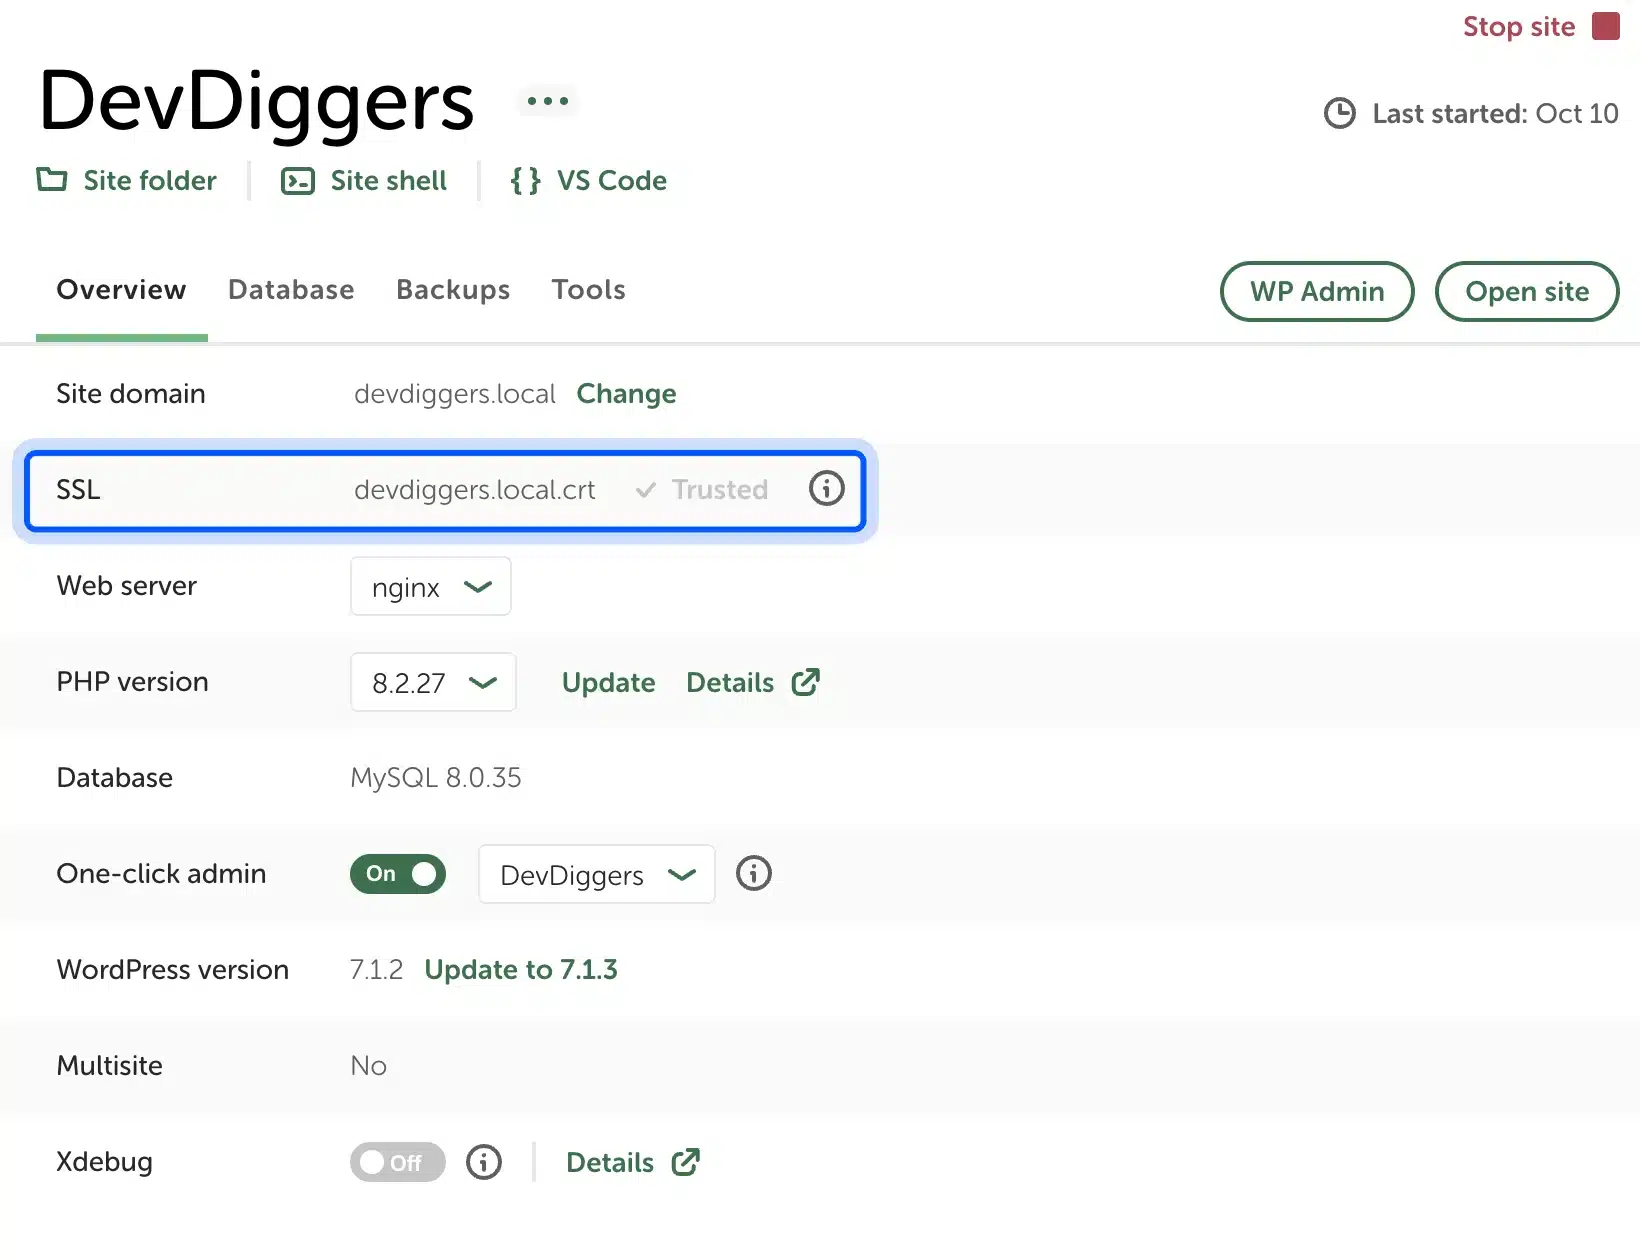
Local also has a Site shell button, one click to open a terminal with WP-CLI wired to that site’s database. That button turns out to matter more than it looks, as the socket section below shows.
The trade off is weight. Each site runs its own PHP and MySQL processes, and our two running sites keep them alive even when no browser tab is open. If you need a dozen sites, stop the ones you are not using.
Each Local site on our Mac also ran a Mailpit service next to PHP, nginx and MySQL. Mailpit catches every email the site sends, so order emails and password resets land in a local inbox and never reach a real person.
The Pull and Push buttons at the bottom of the Overview tab connect to WP Engine and Flywheel hosting. If your host is somewhere else, you move the site with WP-CLI or a migration plugin, which the last section covers.
We already wrote a full walkthrough of the app itself. Read our guide to setting up WordPress using Local WP for the click by click version.
WordPress Playground CLI
WordPress Playground CLI runs WordPress from one npx command, with PHP compiled to run inside Node.js and SQLite in place of MySQL. You need Node.js 20 or newer and nothing else. It suits plugin and theme work, since it mounts your folder straight into the site.
The Playground CLI documentation lists two commands, and they behave very differently. We tested both with version 3.1.57.
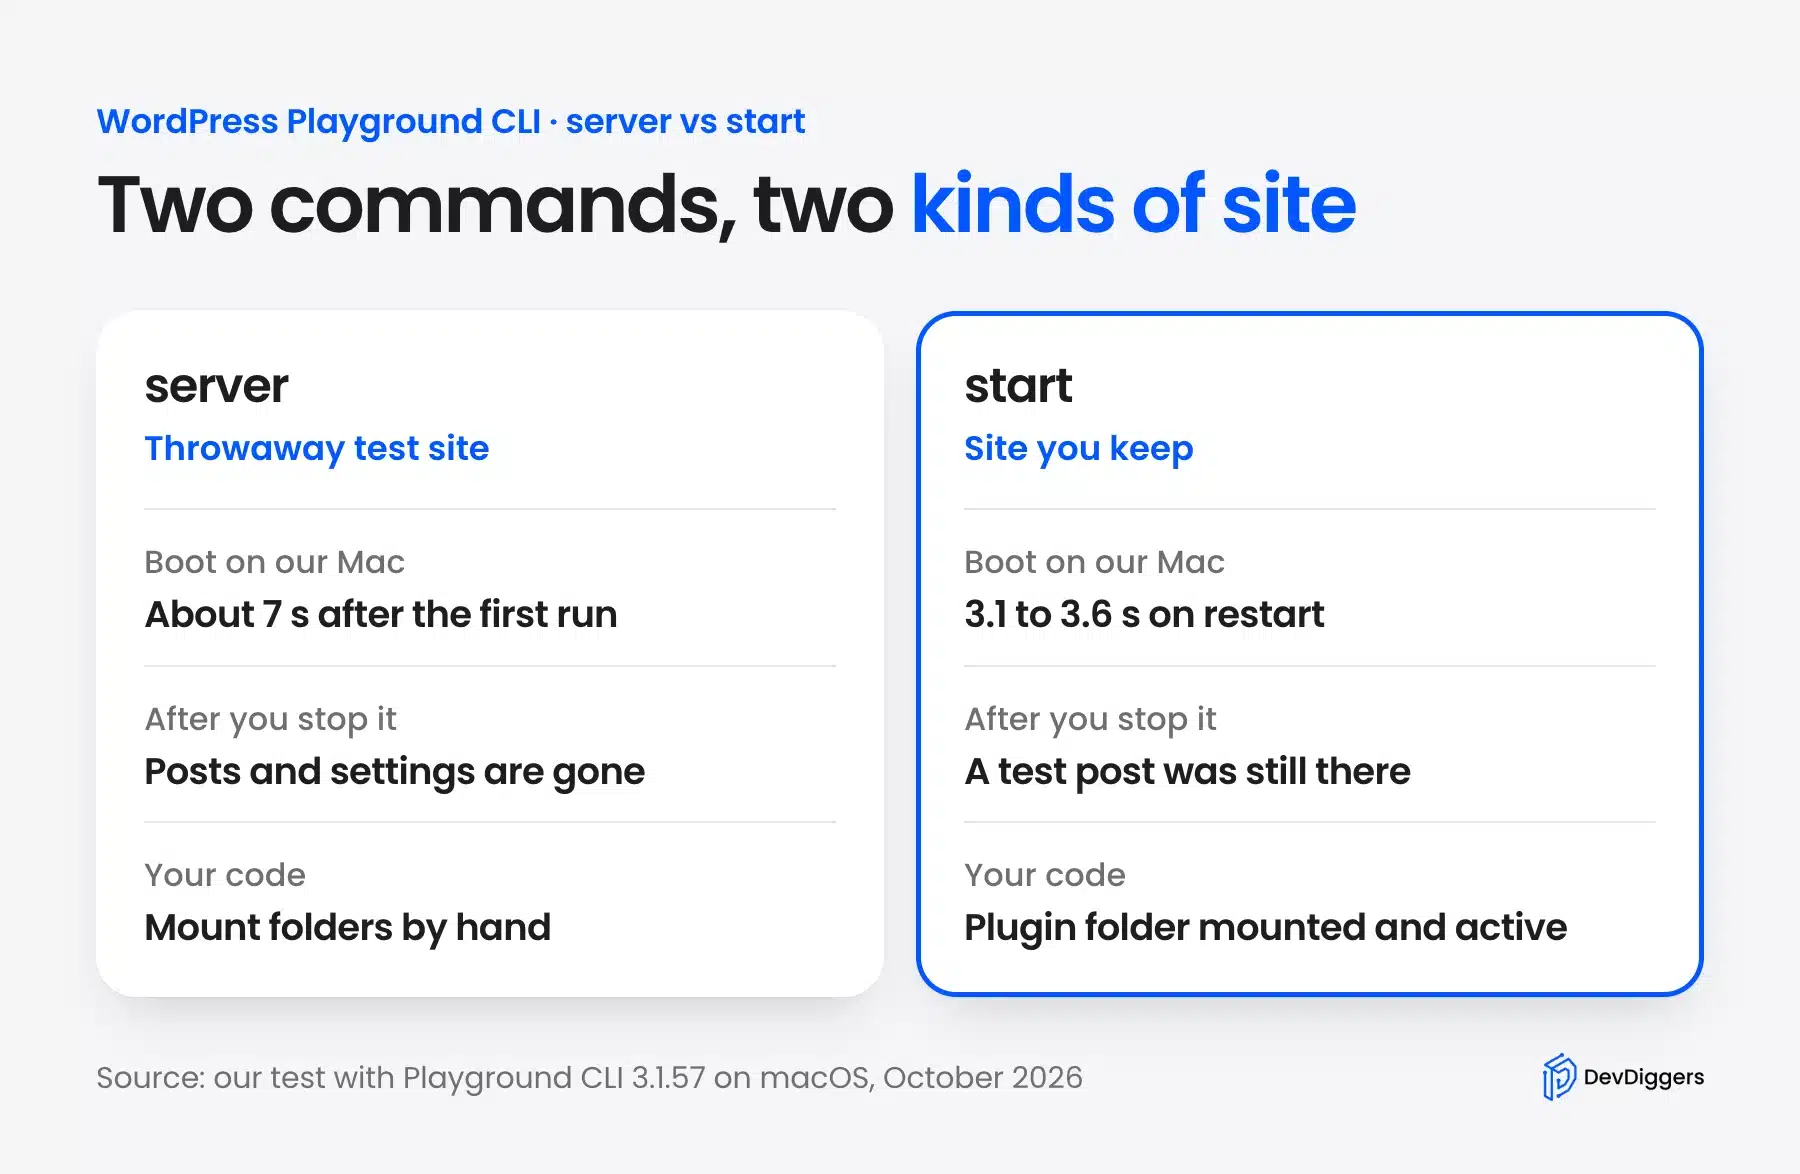
The first run of server took 191 seconds on our Mac before WordPress answered. Later boots took 6.7 to 7.7 seconds, but every stop wiped the site: four test posts we had created were gone after a restart.
The start command keeps the site in a folder under your home directory. Our restarts took 3.1 to 3.6 seconds, and a post saved before the restart was still there afterwards.
The catch is SQLite. Most live hosts run MySQL or MariaDB, so a plugin with raw SQL queries can pass here and fail on the server. Use it for fast checks, then test database heavy code on a MySQL copy.
The command has more switches than the docs page shows at first glance. Running server --help on 3.1.57 listed --php for versions 7.4 to 8.5, --wp for a WordPress version, --xdebug and a --phpmyadmin option.
Those make it handy for one quick check, like testing a plugin on PHP 7.4 before a release. You change one flag and run it again without any install or config file.
If you want the browser version too, our WordPress Playground guide covers the in-browser editor and Blueprints.
wp-env and WordPress Docker
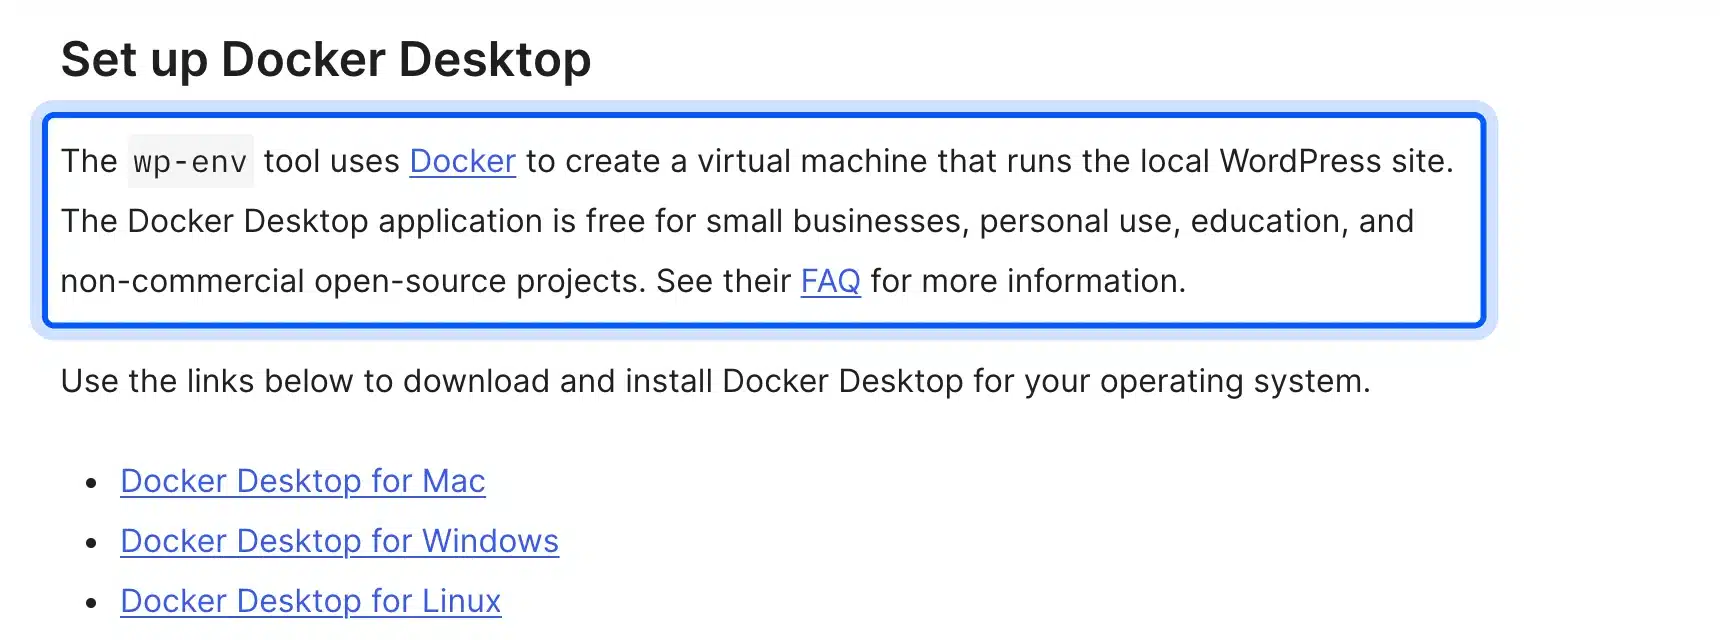
wp-env is the official WordPress Docker tool, installed with npm -g install @wordpress/env and started with wp-env start. It needs Docker running on your computer, and the WordPress developer docs say Docker Desktop is the way to get it. Without Docker, wp-env cannot start at all.
The wp-env guide states it plainly: the tool uses Docker to create a virtual machine that runs the site. The same page notes Docker Desktop is free for small businesses, personal use, education and non-commercial open source projects.
Our Mac had no Docker installed, so docker info failed with “command not found”. We did not install Docker Desktop for this test, which means we cannot give you a wp-env boot time of our own.

Docker is also the reason teams like wp-env. Every developer gets the same PHP and MySQL versions from one config file, so a bug on one laptop shows up on every laptop.
That result is the honest headline for wp-env. It is a solid choice for teams that already live in Docker, and a heavy first install for everyone else. The docs list Error while running docker-compose command as the common error, and the fix is to start Docker Desktop first.
DDEV, MAMP and XAMPP
DDEV, MAMP and XAMPP are the other free ways to run WordPress on localhost. DDEV is a Docker based tool with a WordPress project type, while MAMP and XAMPP install Apache, PHP and a database as one app. We checked all three against their official docs and did not install them on our Mac.
DDEV needs a Docker provider first. Its Docker installation docs list OrbStack, Lima, Docker Desktop, Rancher Desktop and Colima for macOS, and they call OrbStack the easiest and fastest.
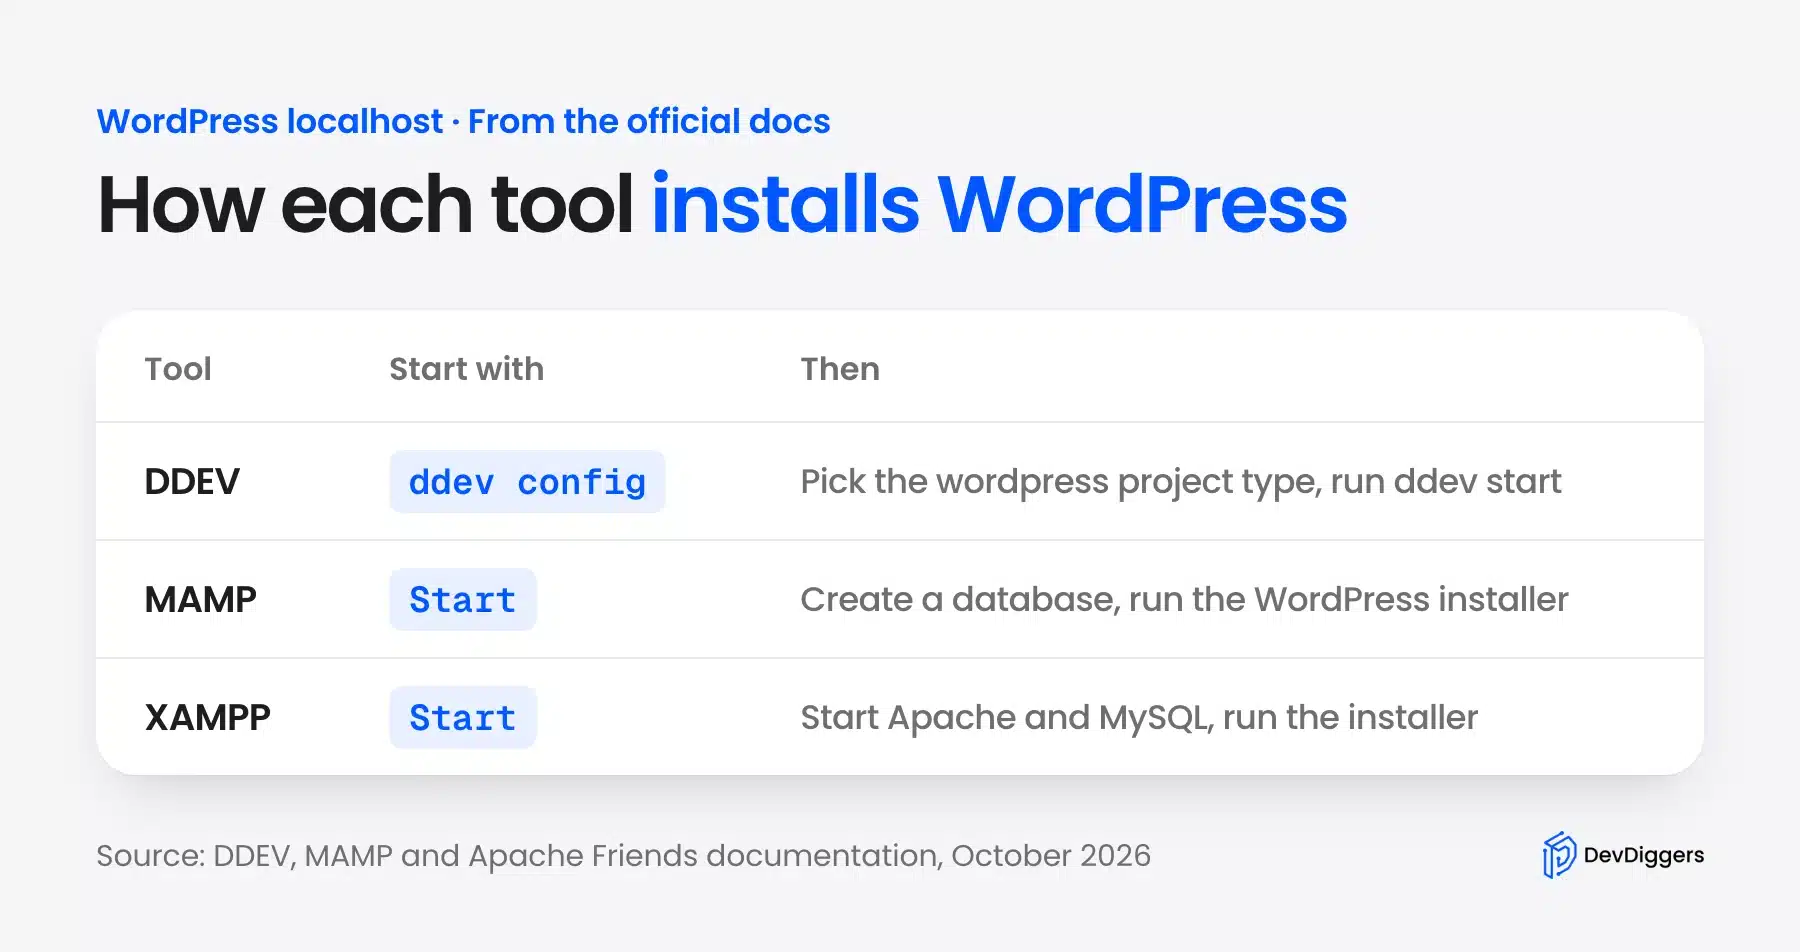
MAMP and XAMPP take the older route. You start the servers from the control panel, create an empty database and run the normal WordPress installer in the browser.
XAMPP bundles Apache, MariaDB, PHP and Perl, and the Apache Friends project offers it for Windows, Linux and macOS. MAMP has a free version and a paid MAMP PRO edition with extra hosts and one click installs.
These stacks are easy to understand, and that is their strength. Their weakness is that one shared PHP and database setup serves every project, so two sites that need different PHP versions get awkward.
They also leave the WordPress localhost address plain. A MAMP or XAMPP site usually lives at a URL with a folder name after localhost. HTTPS takes extra certificate work that Local does for you.
How to Set Up WordPress on Localhost
To set up WordPress on localhost, install Node.js and run the Playground CLI start command inside your plugin or theme folder. Log in, confirm your code is active, then turn on WP_DEBUG. Stop and restart the site to check that your work survives.
We picked this route for the walkthrough because it needs the fewest installs and every step ran on our Mac. The same flow works with Local if you prefer an app.
Step 1: Install Node.js
Install Node.js 20 or newer from nodejs.org, then check the version in a terminal. The Playground CLI runs on Node.js and pulls everything else on the first run. Our Mac reported Node.js 20.20.2 and npm 10.8.2, which is enough.

If node -v prints nothing, the install did not finish or your terminal needs a restart. Fix that first, because every later step depends on it.
Step 2: Start a Site From Your Project Folder
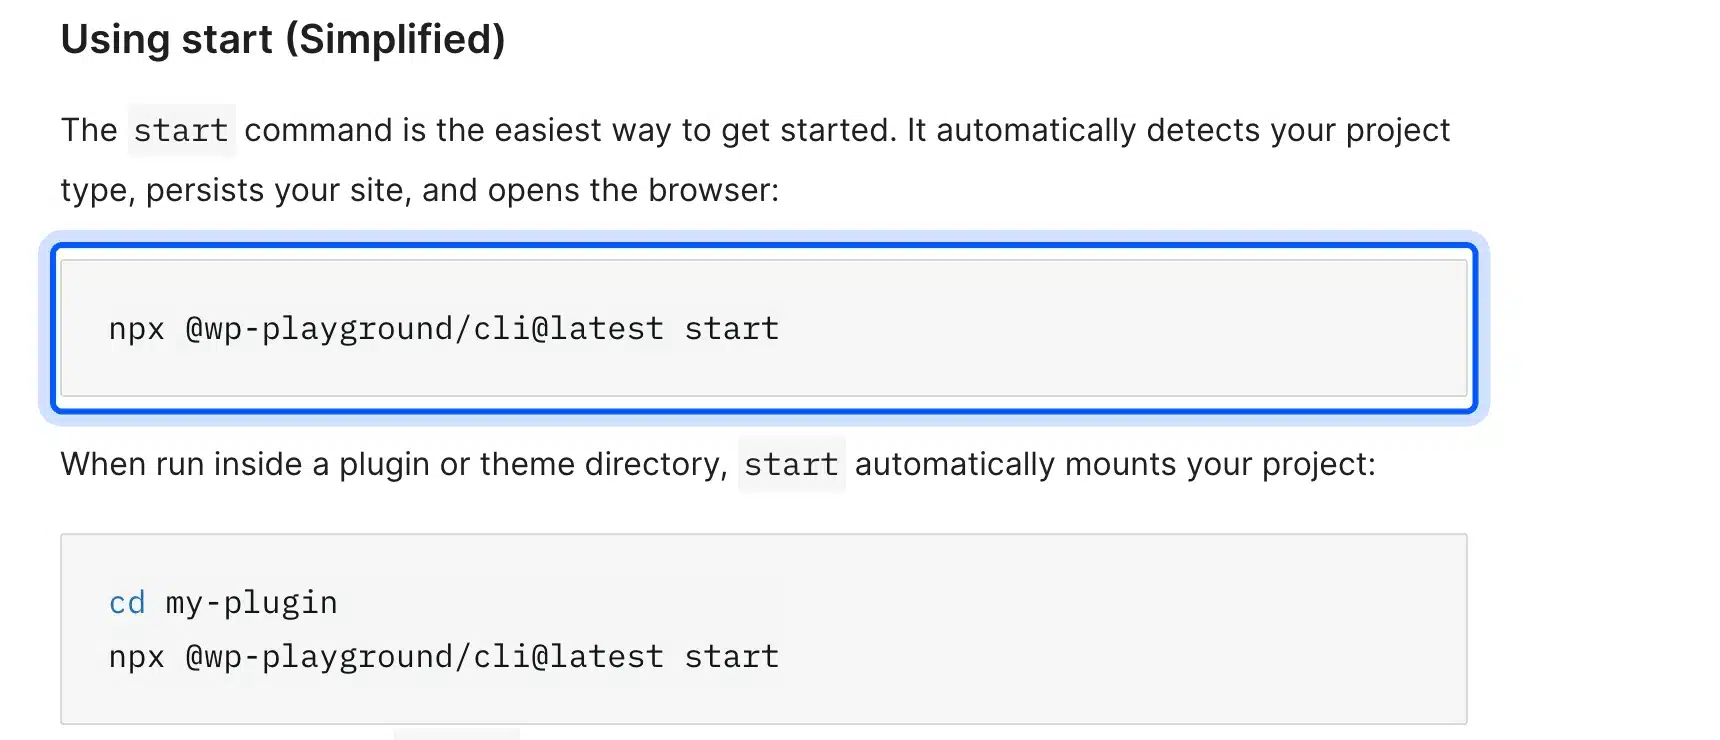
Open a terminal inside your plugin or theme folder and run the start command below. It finds the project type, mounts the folder into a fresh WordPress install and saves the site between runs. Add --skip-browser if you do not want a new browser tab each time.
cd my-plugin
npx @wp-playground/cli@latest start --skip-browser
The command prints the folder where it stores the site files. On our Mac that was a hashed folder under ~/.wordpress-playground/sites/, so each project keeps its own database.
Need a clean slate later? The --reset switch deletes the stored site folder and builds a fresh install, which is quicker than hunting down what a test plugin changed.
The first run is the slow one. Ours took 191 seconds with the server command while WordPress and its SQLite setup were prepared, and later runs dropped to a few seconds.
Step 3: Log In and Check Your Code Is Active
Open the site address the command prints and go to the Plugins screen. The start command logs you in as an admin by default, so there is no password step. Your mounted plugin should already show as active in the list.
Ours did. A one-file test plugin called Demo Plugin appeared as active on the first load. There was no upload and no activation click.
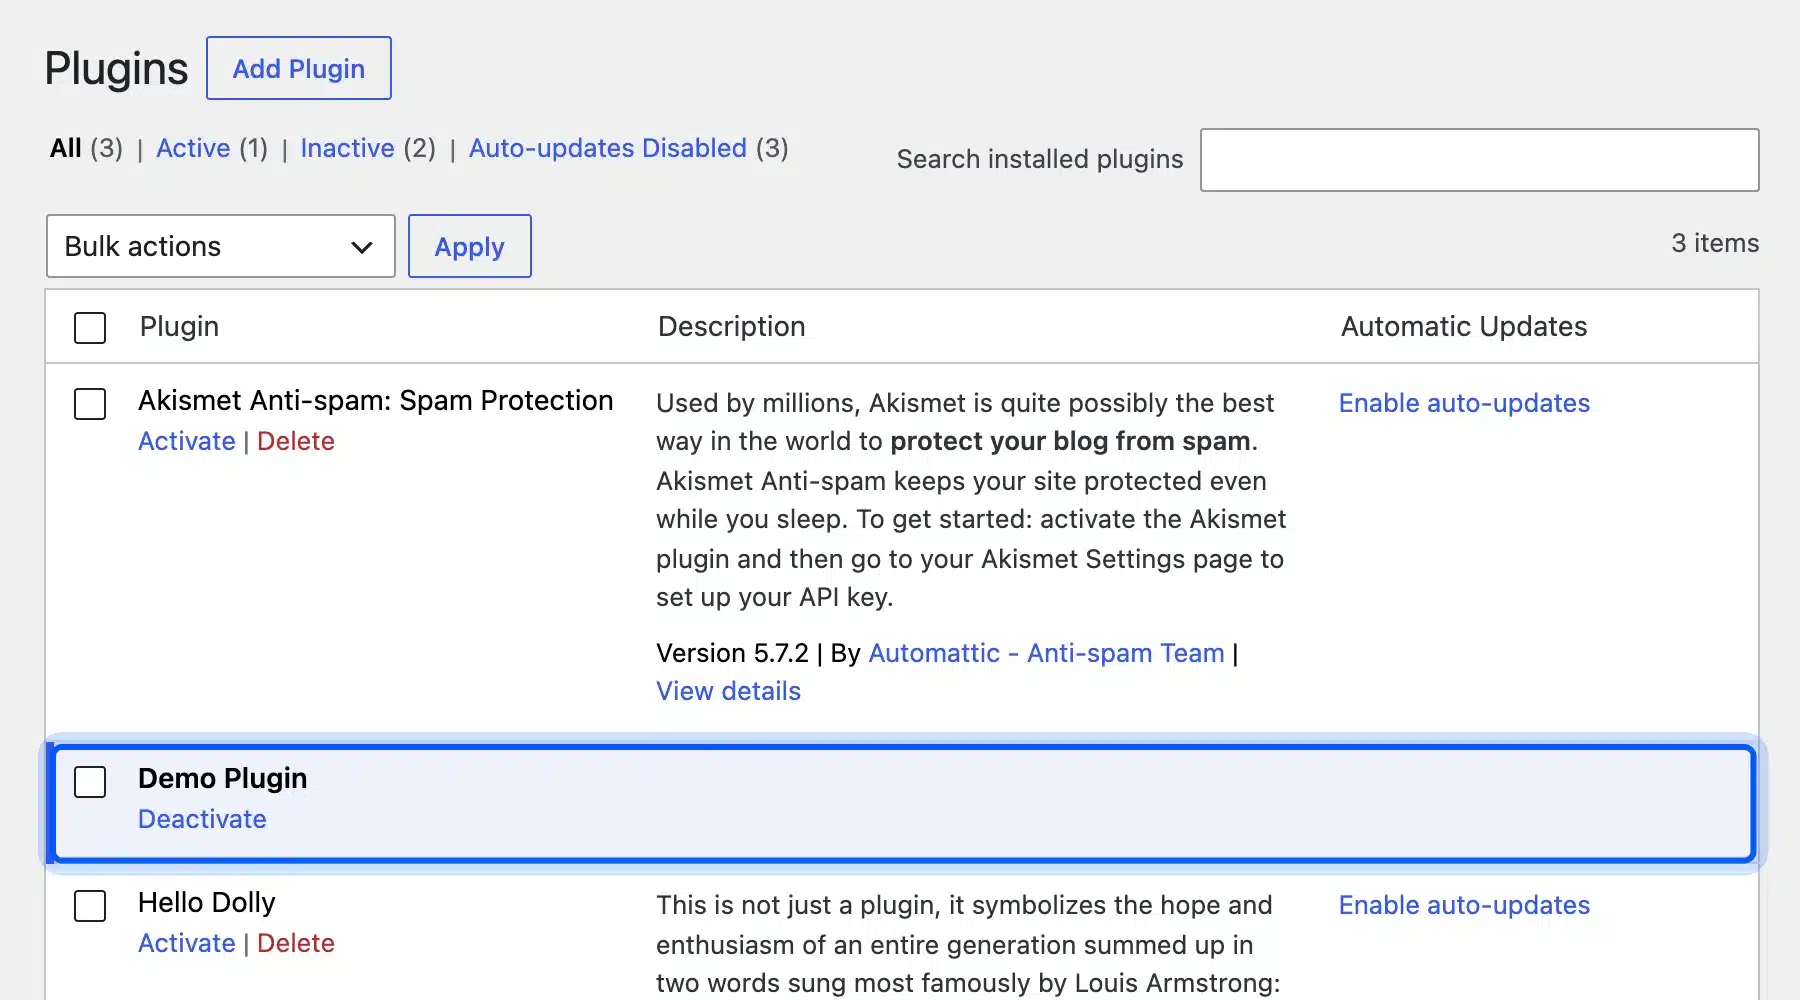
Edit a file in your folder and reload the page to see the change. There is no build or sync step for PHP files, which is what makes this route quick for plugin work.
Step 4: Turn On Debugging
Turn on WP_DEBUG so PHP notices and warnings show up while you build. Then open Tools, Site Health, Info and expand WordPress Constants to confirm what the site is using. Our test site showed WP_DEBUG enabled and WP_ENVIRONMENT_TYPE set to local.
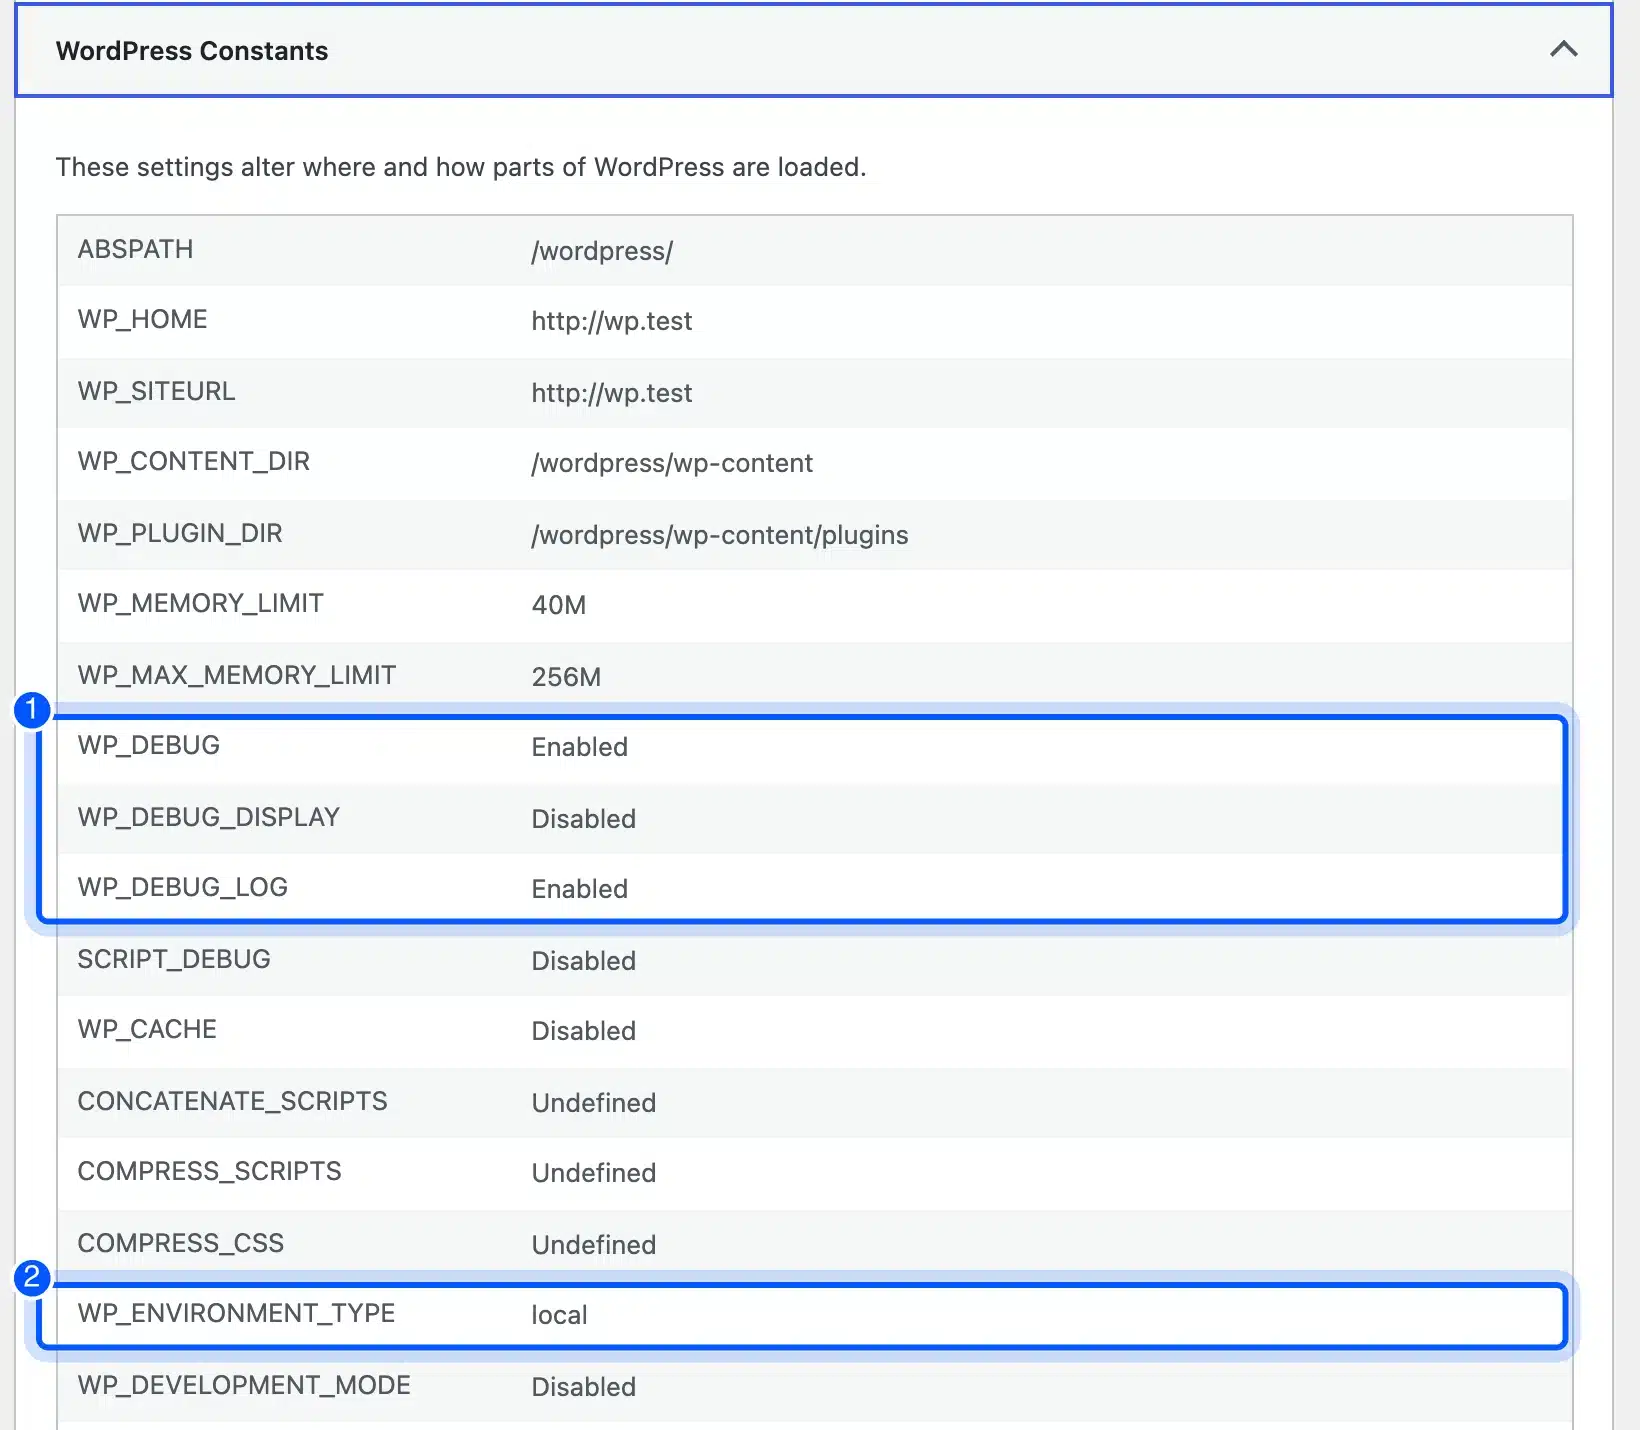
The same screen showed WP_DEBUG_DISPLAY disabled and WP_DEBUG_LOG enabled. So errors went to a log file and not onto the page, which is a sensible default even locally.
Step 5: Restart and Confirm Your Work Is Saved
Stop the site with Ctrl+C, run the same start command again and reload the Posts screen. Anything you created before the restart should still be there. We saved a post called “Saved before restart”, restarted three times and found it each time.
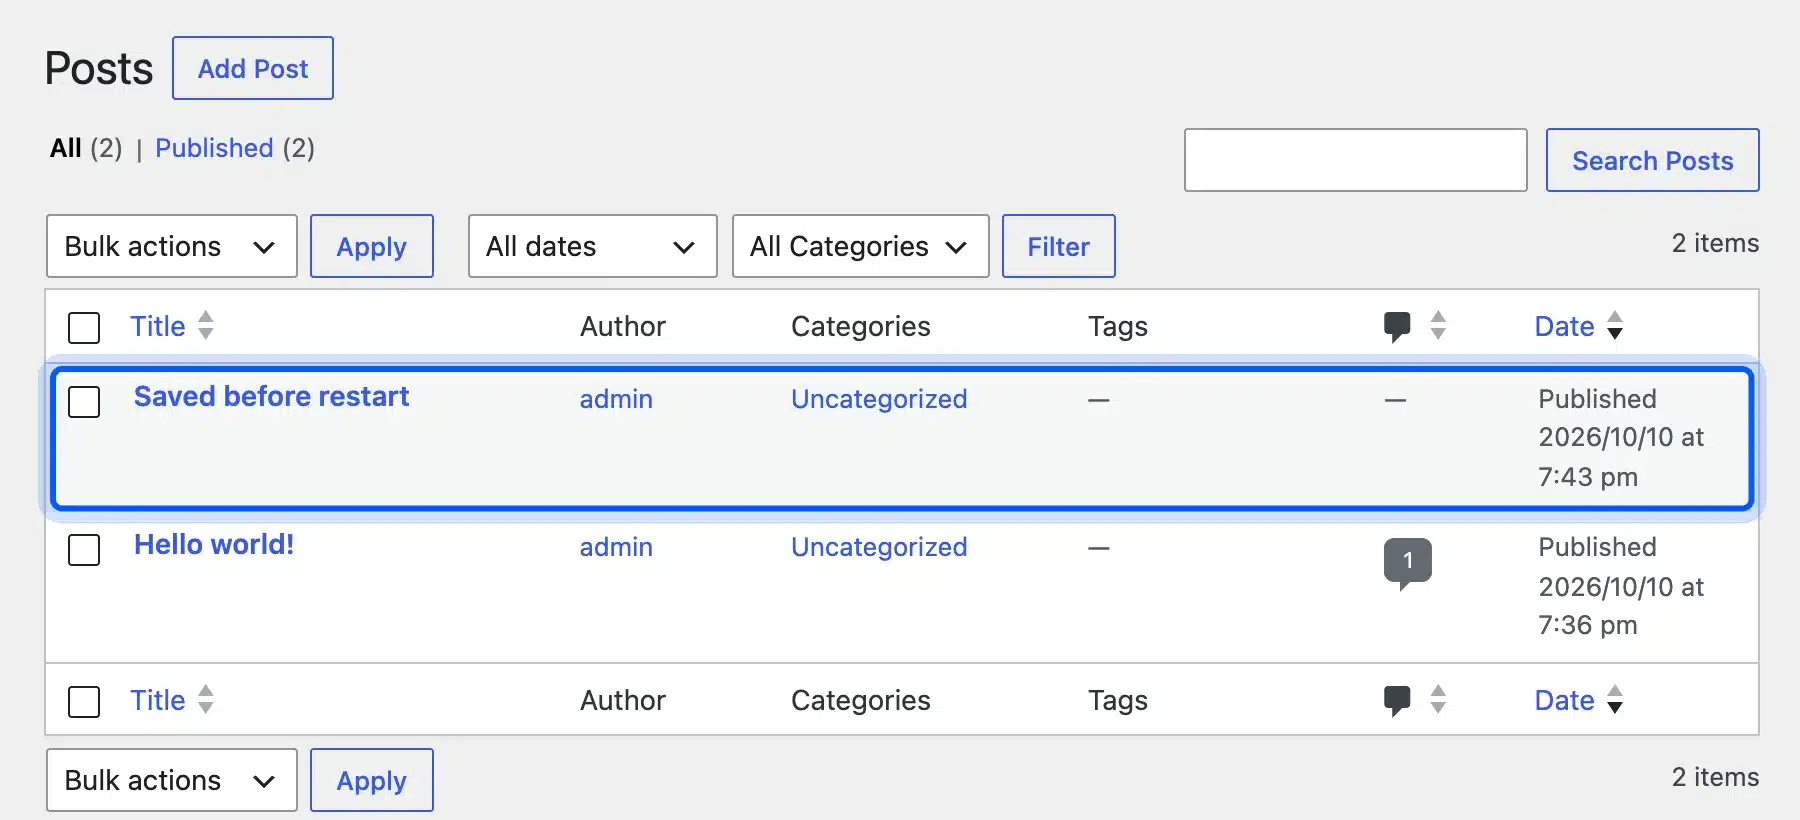
Stored sites add up over time, since every project folder gets its own copy of WordPress. Delete the folders under ~/.wordpress-playground/sites/ for projects you have finished.
This is the check that catches the wrong command. With server, the same test lost every post, so a day of content work would vanish on the next stop.
That covers a working local WordPress setup. Some projects need a custom theme or plugin built from scratch. Our WordPress plugin development team can build it and hand it over ready for staging and live.
How to Fix the Database Socket Error in Local
Fix the database socket error by running WP-CLI from Local’s Site shell, or by pointing PHP at the site’s MySQL socket. Local’s MySQL listens on a socket inside its own run folder instead of the default path. A plain terminal therefore reports “Error establishing a database connection” even though the site works.
We hit it on our Local site straight away. The browser loaded every page, but wp option get home in a normal terminal failed on the database.

The cause is in wp-config.php. Local sets DB_HOST to localhost, and PHP then looks for MySQL at its default socket path, where nothing is listening.
Local keeps the real socket at a path like this, with your own site ID in it:
~/Library/Application Support/Local/run/<site-id>/mysql/mysqld.sock
The quick fix is the Site shell button on the site’s Overview tab, which opens a terminal with the right settings. For your own terminal, pass the socket to PHP, as in this command we ran:
php -d mysqli.default_socket="$HOME/Library/Application Support/Local/run/<site-id>/mysql/mysqld.sock" $(which wp) option get home
Finding the site ID is the only fiddly part. It is the folder name inside Local’s run folder, and each running site has one, so ls that folder and match it to the site you started.
An alias saves typing it every time. We set one for the dry run later in this guide, and every WP-CLI command after it worked against the Local database.
That printed https://devdiggers.local at once. The same error text shows up for other reasons too, like a stopped MySQL service. If the socket path is right, our guide to fixing MySQL error 2003 is the next stop.
Worth knowing: Our WP-CLI 2.5.0 on PHP 8.5 also printed a wall of deprecation notices before the error. They are noise from the older WP-CLI build, not the cause, so read the last line first.
How to Set WP_ENVIRONMENT_TYPE and WP_DEBUG
Set WP_ENVIRONMENT_TYPE to local and turn on WP_DEBUG in wp-config.php, above the line that says to stop editing. The first tells plugins and themes this is not production. The second shows PHP problems while you build, and both stay out of the live config.
WordPress reads the environment type through wp_get_environment_type(). The function reference lists four values: local, development, staging and production, with production as the default.
Here is the block we use on local sites:
define( 'WP_ENVIRONMENT_TYPE', 'local' );
define( 'WP_DEBUG', true );
define( 'WP_DEBUG_LOG', true );
define( 'WP_DEBUG_DISPLAY', false );
With WP_DEBUG_LOG on, WordPress writes errors to wp-content/debug.log. The debugging guide covers each constant and the SCRIPT_DEBUG option for unminified core scripts.

Our Local site already had WP_ENVIRONMENT_TYPE set to local, which Local adds for you. Its debug lines were commented out, so debugging was off until we changed them.
The environment type does real work. On our test site, WordPress only offered Application Passwords over plain HTTP because the type was local. Without it, the same request returned “Application passwords are not available.”
Your own code can use it too. A small check stops a local copy from sending real emails or calling a live payment API:
if ( 'local' === wp_get_environment_type() ) {
	add_filter( 'pre_wp_mail', '__return_false' );
}
That one filter tells wp_mail() to stop before it sends anything. Put it in a must-use plugin on the local copy, and real customers never get a test order email from your laptop.
Tip: Keep wp-config.php out of Git. Each copy of the site sets its own environment type, so the local, staging and live files should never overwrite each other.
How to Move a Local WordPress Site to Live
Move a local WordPress site to live by deploying the code through Git and moving the database only when content changed locally. Export the database, import it on the server and run a search and replace for the old URL. Always test on staging first and back up live before the import.
Most local work is code: a theme, a plugin, a few template changes. That part goes through Git and never needs a database copy.
Content is different. If you wrote pages or changed settings locally, you need a database import on the server, and that import replaces whatever the live site holds.
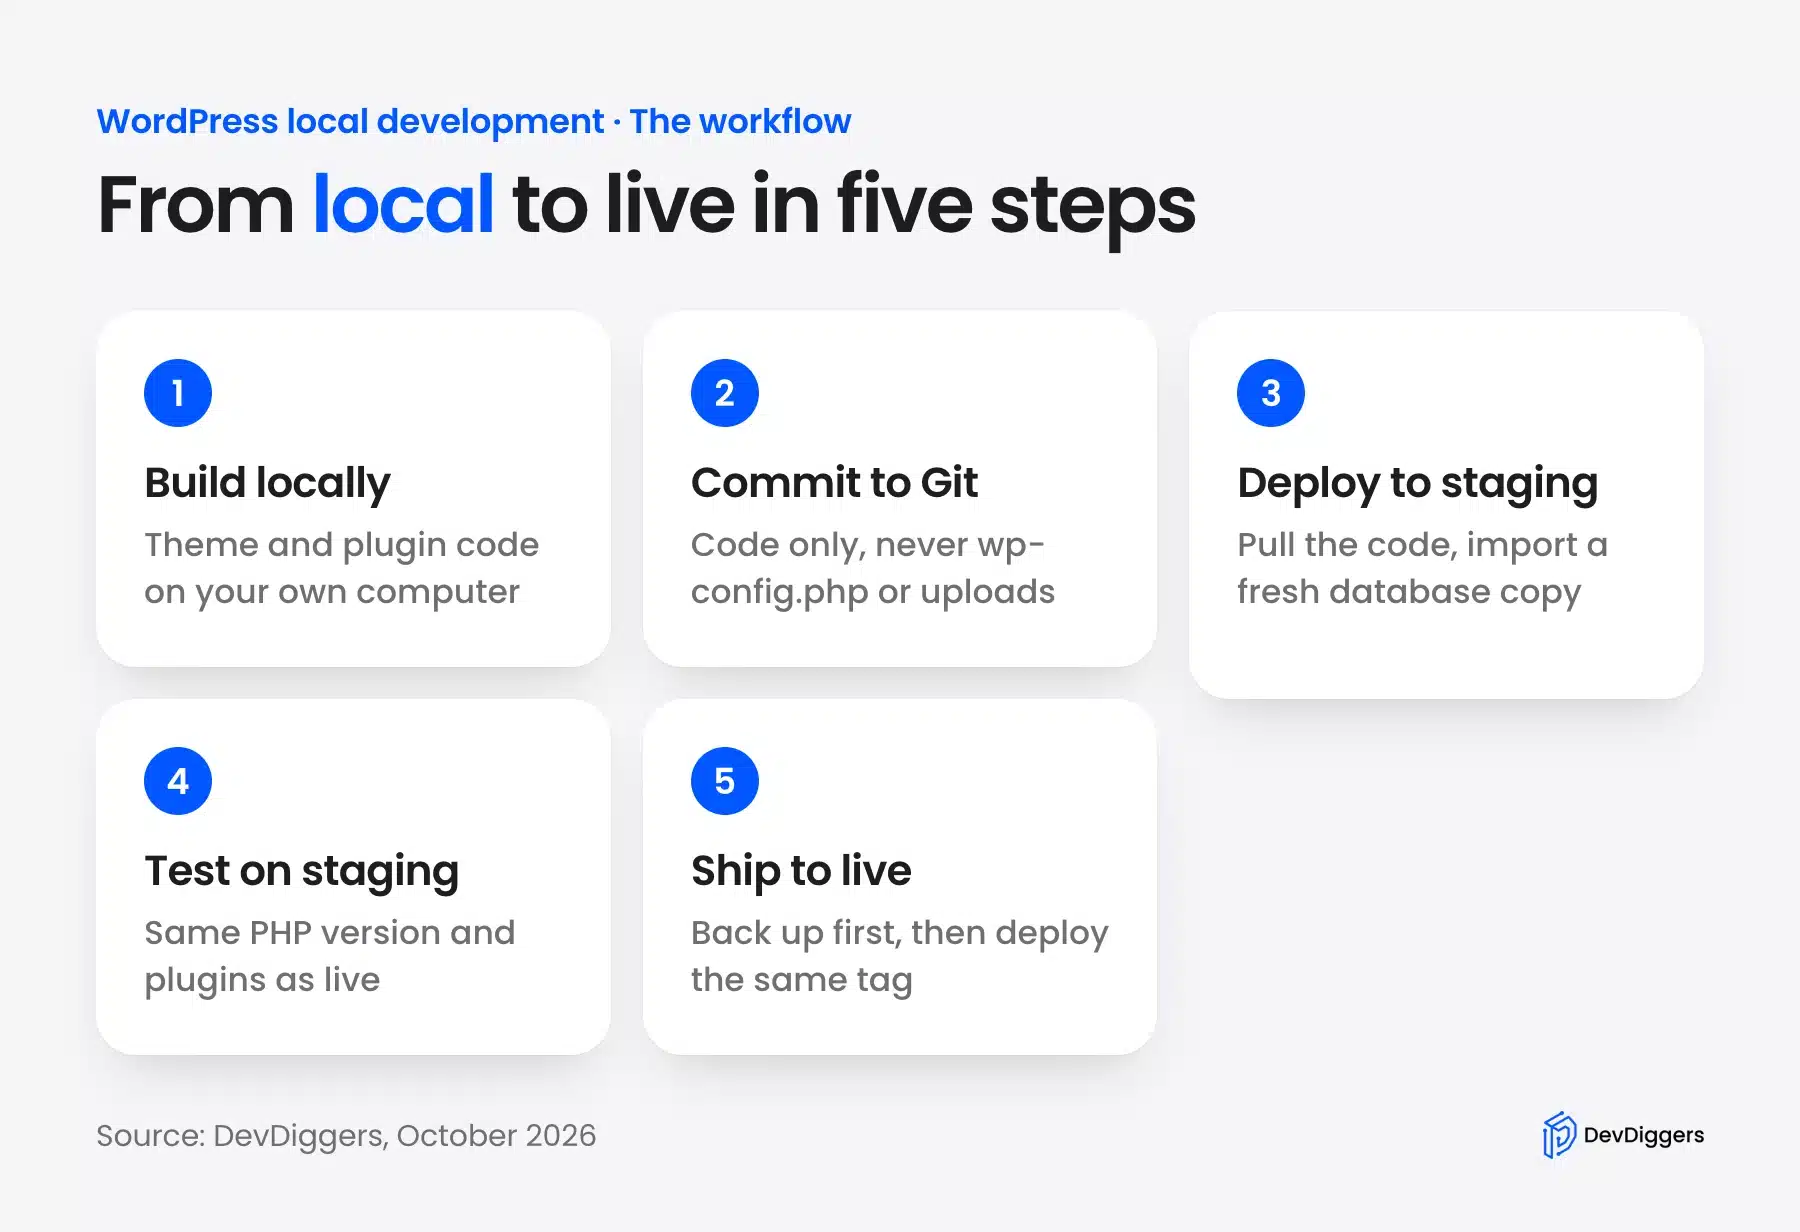
The database is the risky part, since a local copy holds the local domain in thousands of places. WP-CLI’s search-replace command rewrites them and handles PHP serialized data safely.
We ran a dry run on our Local site to see the size of the job. It changed nothing, and it reported every table that would change:
wp search-replace "https://devdiggers.local" "https://staging.example.com" --dry-run --skip-columns=guid --report-changed-only
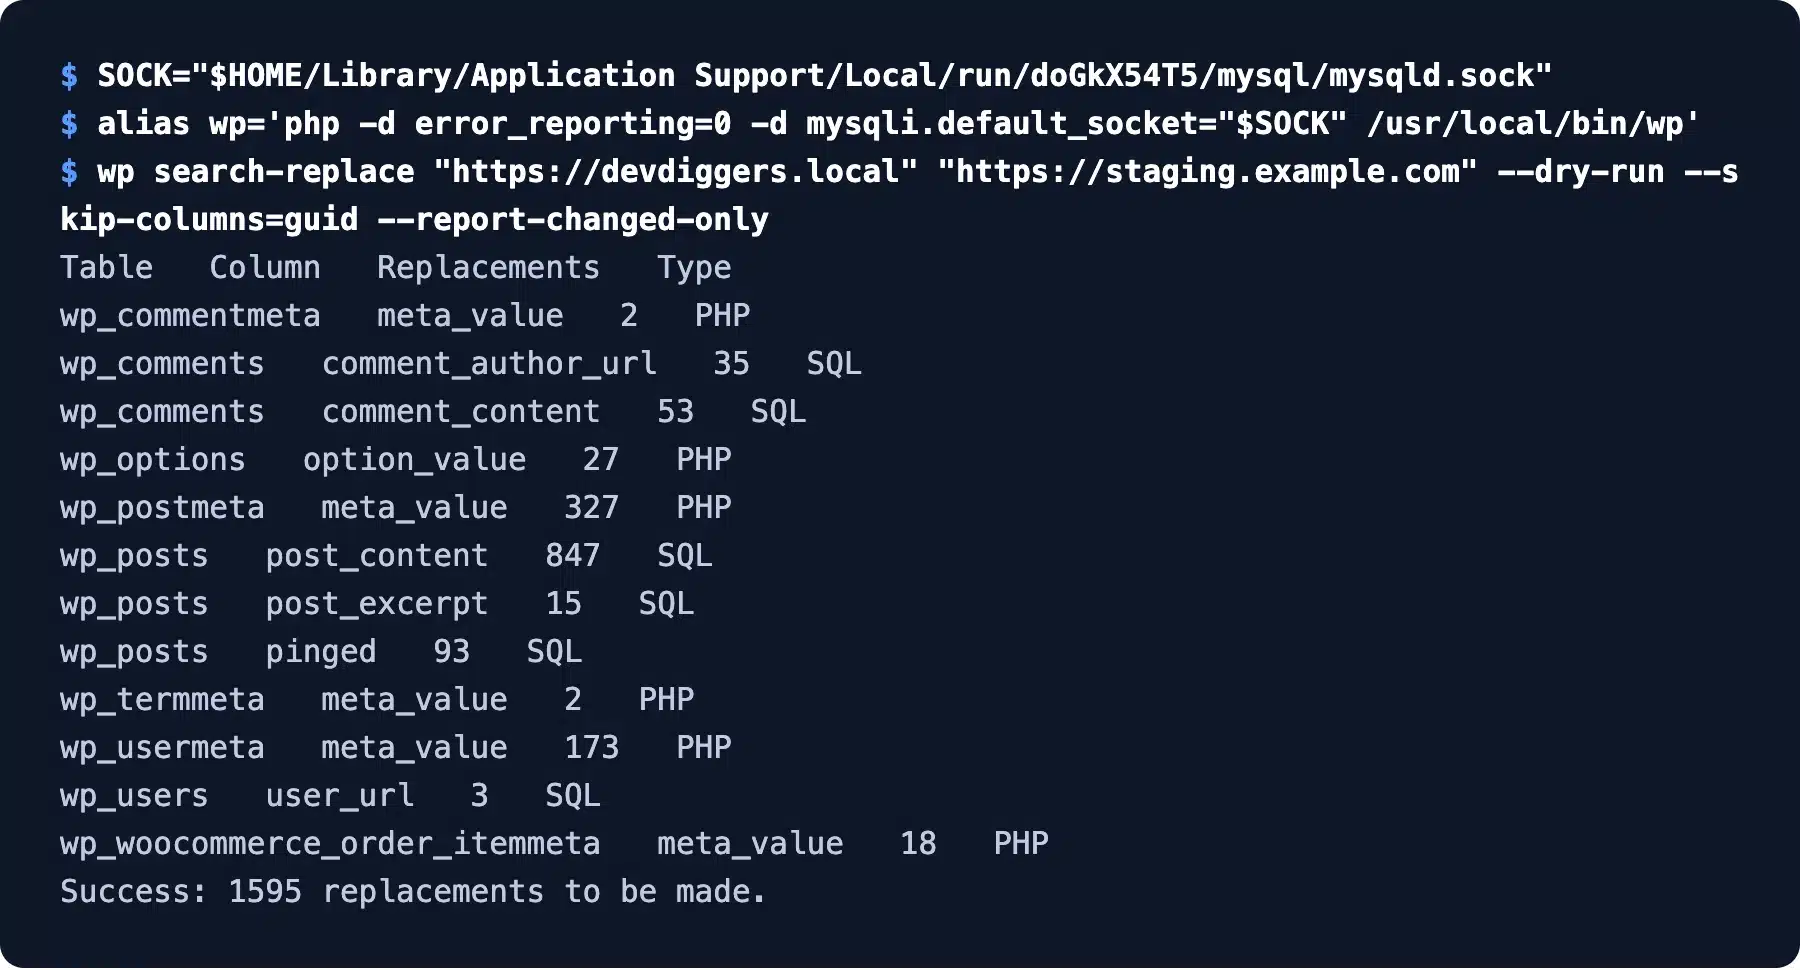
The answer was 1,595 replacements across 12 table columns, with 847 in post content alone. Without --skip-columns=guid the total jumped to 7,789, because 6,194 of them sat in the guid column, which is an ID and should not change.
Staging comes first for a reason. A staging copy on your real host runs the same PHP build, caching and server rules as live. Problems that never appear locally show up there.
The full order for a database move looks like this:
- Back up live: Take a full backup of files and database on the server before anything else.
- Export locally: Run
wp db export local.sqlfrom the Site shell or with the socket fix. - Import on staging: Run
wp db import local.sqlon the staging copy first. - Replace the URL: Run the search-replace command above without
--dry-run. - Check and flush: Open key pages, then run
wp cache flushand resave permalinks.
The same command matters when a site changes address later. Our guide to moving a WordPress site to a new domain covers the redirects that go with it.
A local copy is also the safe place to test changes that reach Google, like adding local business schema to WordPress. You can check the output before it touches the live site.
Mistakes That Break a Local Setup
Most broken local setups come from a few habits, like copying the live database without a URL swap or editing a parent theme. Each one works for a day and then fails on deploy, and all of them are cheap to avoid.
These are the ones our own tests above ran into or came close to:
- Editing a parent theme: A theme update wipes your changes, so put them in a WordPress child theme from the first day.
- Live keys on a local copy: Payment and email plugins copied from live can charge real cards or email real customers, so switch them to test mode right after an import.
- Different PHP versions: Our Local site ran PHP 8.2.27 and the Playground site ran PHP 8.3, so match the version your host uses before you trust a result.
- SQLite only: Code that writes raw SQL can pass on Playground and fail on MySQL, so run one last test on a MySQL copy.
- Uploads left behind: A database import brings the image records but not the files, so copy
wp-content/uploadstoo or every image shows as broken. - Debug on in production: The debug block belongs in the local
wp-config.phponly, because a live site showing PHP notices leaks file paths to visitors.
The last one is the easiest to miss, since the setting looks harmless on your own machine. Check the live file once after every launch.
One more habit saves time on teams. Write the PHP version, the database engine and the tool you used into the project README. The next developer then builds the same stack on day one.
Conclusion
WordPress local development pays for itself the first time a plugin update breaks your copy instead of your live site. On our Mac, Local gave the smoothest app experience with trusted HTTPS. Playground CLI gave the fastest code loop at 3 to 4 seconds per restart.
Whichever tool you pick, keep the two habits that matter most. Set WP_ENVIRONMENT_TYPE to local, and move the database with a dry run first. Our test showed 1,595 URL replacements in a mid sized site, which is far too many to fix by hand.
Frequently Asked Questions (FAQs)
Q1. How do I install WordPress on localhost?
Install a local tool such as Local, MAMP or the Playground CLI, then create a site from it. The tool sets up the web server, PHP and database, and runs the normal WordPress installer for you. Our first Playground CLI site took about three minutes, mostly one-time setup.
Q2. Is local WordPress development free?
Yes. Local, Playground CLI, wp-env, DDEV, XAMPP and the free MAMP edition all cost nothing to download and use. Docker Desktop, which wp-env needs, is free for personal use and small businesses, while MAMP PRO is a paid upgrade.
Q3. How do I create multiple WordPress sites locally?
Create a new site in your tool for each project, since each one gets its own folder and database. In Local, our two sites ran side by side with their own domains. With Playground CLI, each project folder you run start in keeps its own stored site.
Q4. How do I install WordPress Multisite locally?
Choose the multisite option when you create the site, if your tool offers one. Local has a Multisite setting for subdirectory or subdomain networks at site creation. On a plain install you can also add WP_ALLOW_MULTISITE to wp-config.php and run Tools, Network Setup.
Q5. What is the difference between a local site and a staging site?
A local site runs on your own computer and only you can see it. A staging site runs on a real server, usually your host, with the same PHP version and settings as live. Build locally, then test on staging before anything goes live.
Q6. Can I use Docker for WordPress development?
Yes, wp-env and DDEV both run WordPress inside Docker containers. They give every developer on a team the same versions of PHP and MySQL. You need a Docker provider installed first, and the first image download takes a while.
Q7. Do I need Docker for WordPress local development?
No. Local, MAMP, XAMPP and Playground CLI all run without Docker, and our Mac had none installed. You only need Docker for container tools such as wp-env and DDEV.
Q8. Can other people see my local WordPress site?
Not by default, because the site only answers on your own machine. Local has a Live Link feature that shares a temporary public address for client reviews. Turn it off when the review is done, since anyone with the link can open the site.