
Here is how to create a blog in WordPress: set a posts page, clean up permalinks and categories, then write and publish your first post. On a fresh install the whole setup takes about an hour.
We ran every step on a fresh WordPress 7.1.3 test site in October 2026, with the default Twenty Twenty-Five theme and Yoast SEO 28.6. That test showed five defaults worth changing before the first post goes live, including permalinks and comments.
Below you get what to decide first, nine tested steps from settings to scheduling, and a simple editorial calendar. Then come the mistakes that slow new blogs down, plus answers to the questions people ask most.
What You Need Before You Create a Blog in WordPress
You need a working WordPress site and an admin login before you create a blog in WordPress. The blog itself is a set of settings, a posts page and a few templates on top of that site. If WordPress is not installed yet, set it up first and come back.
Our guide to create a WordPress site from scratch covers hosting, the domain and the install itself. This post starts where that one ends, with an empty dashboard.
Then pick a topic you can write about for a year. A blog with a clear focus, such as hiking for beginners, is easier to plan than a general diary.
You also need to pick the type of WordPress. A self-hosted WordPress.org site gives you plugins, themes and your own domain. A free WordPress.com plan works for a hobby blog, but it uses a WordPress.com subdomain, shows WordPress.com ads and allows no plugin installs.
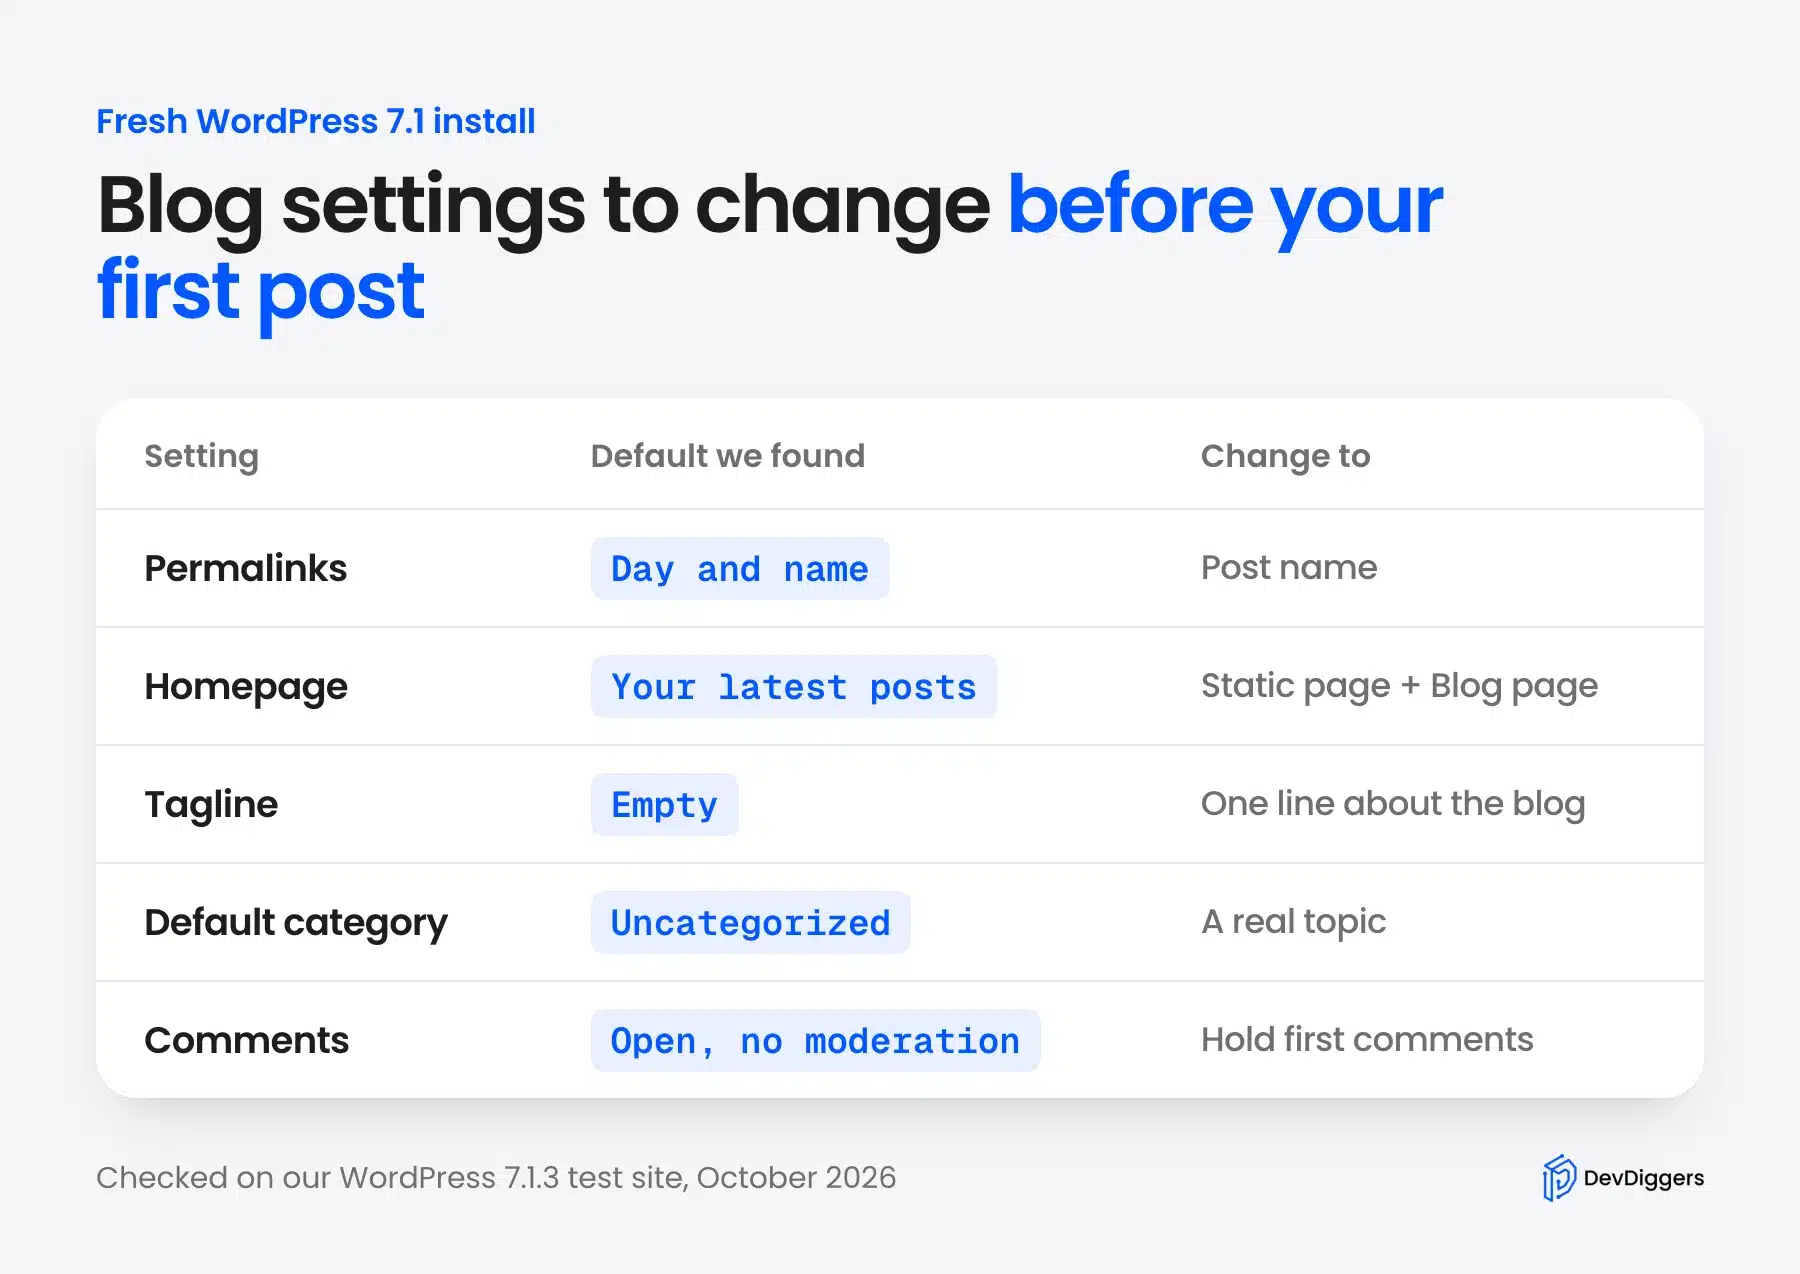
On our test install, five defaults stood out for a blog:
- Permalinks: WordPress set Day and name, so posts got dates in their URLs.
- Homepage: The front page showed Your latest posts, and there was no separate Blog page.
- Tagline: The field was empty, so the site had no one line description.
- Default category: Every post without a category lands in Uncategorized.
- Comments: Comments were open on new posts, and the first comment did not need approval.
How to Create a Blog in WordPress
Here is how to create a blog in WordPress in nine steps. Set the title and permalinks, create a Blog page, then add categories and tags. Write the first post, add a featured image, adjust the blog templates, set comment rules, add an SEO plugin and publish.
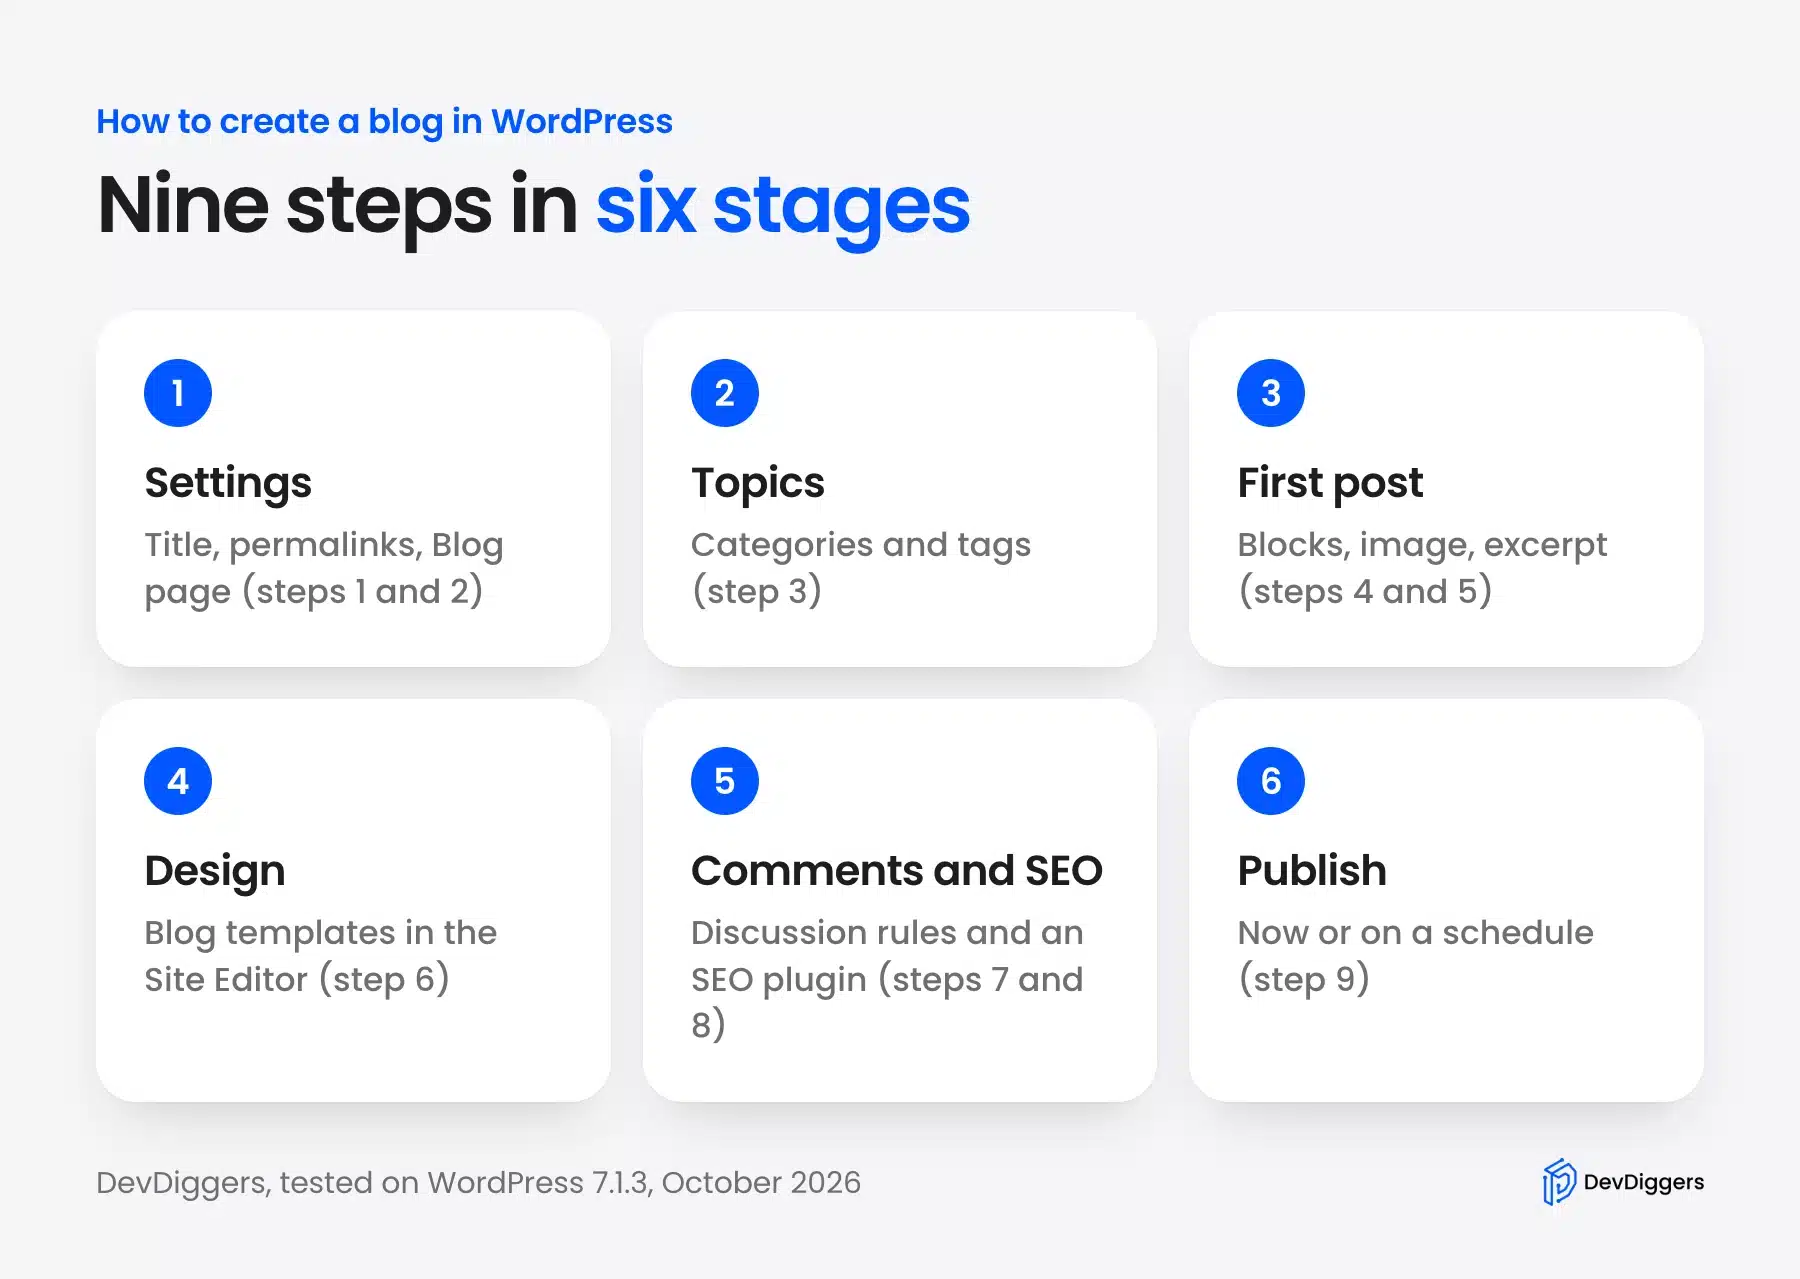
Each step below shows the exact screen on our test site. The sample blog is called Trail Notes, and every post in it is example content.
Step 1: Set the Blog Title and Permalinks
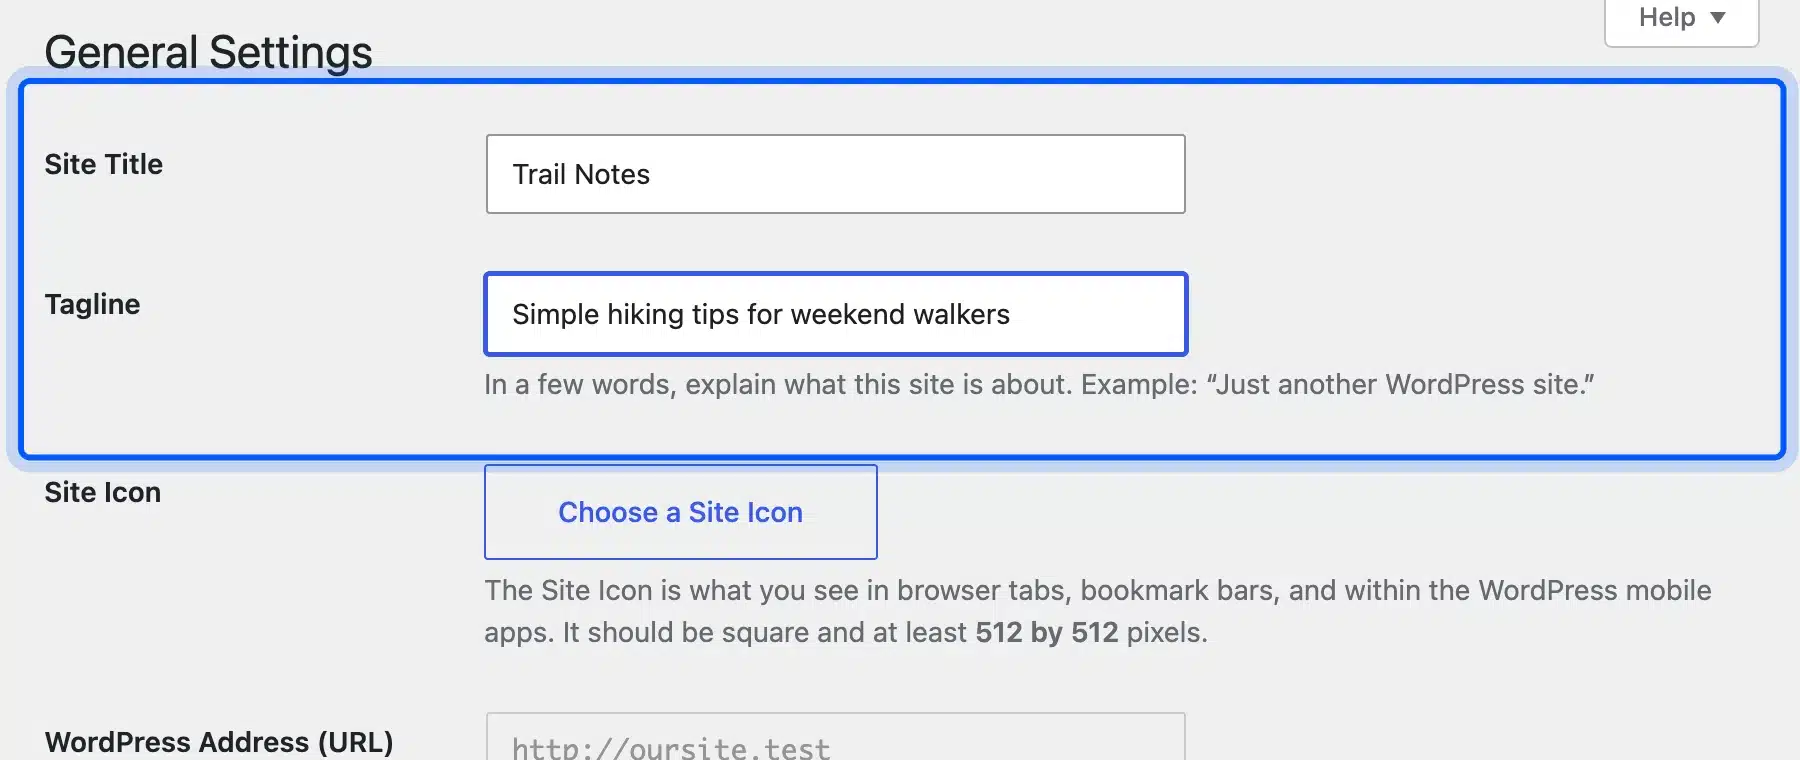
The site title and tagline show in browser tabs, search results and your header. Permalinks decide what each post URL looks like, so set them before you publish anything.
- Name the blog: Go to Settings, then General, and fill in Site Title and Tagline, then click Save Changes.
- Open permalinks: Go to Settings, then Permalinks.
- Pick Post name: Select Post name and click Save Changes.
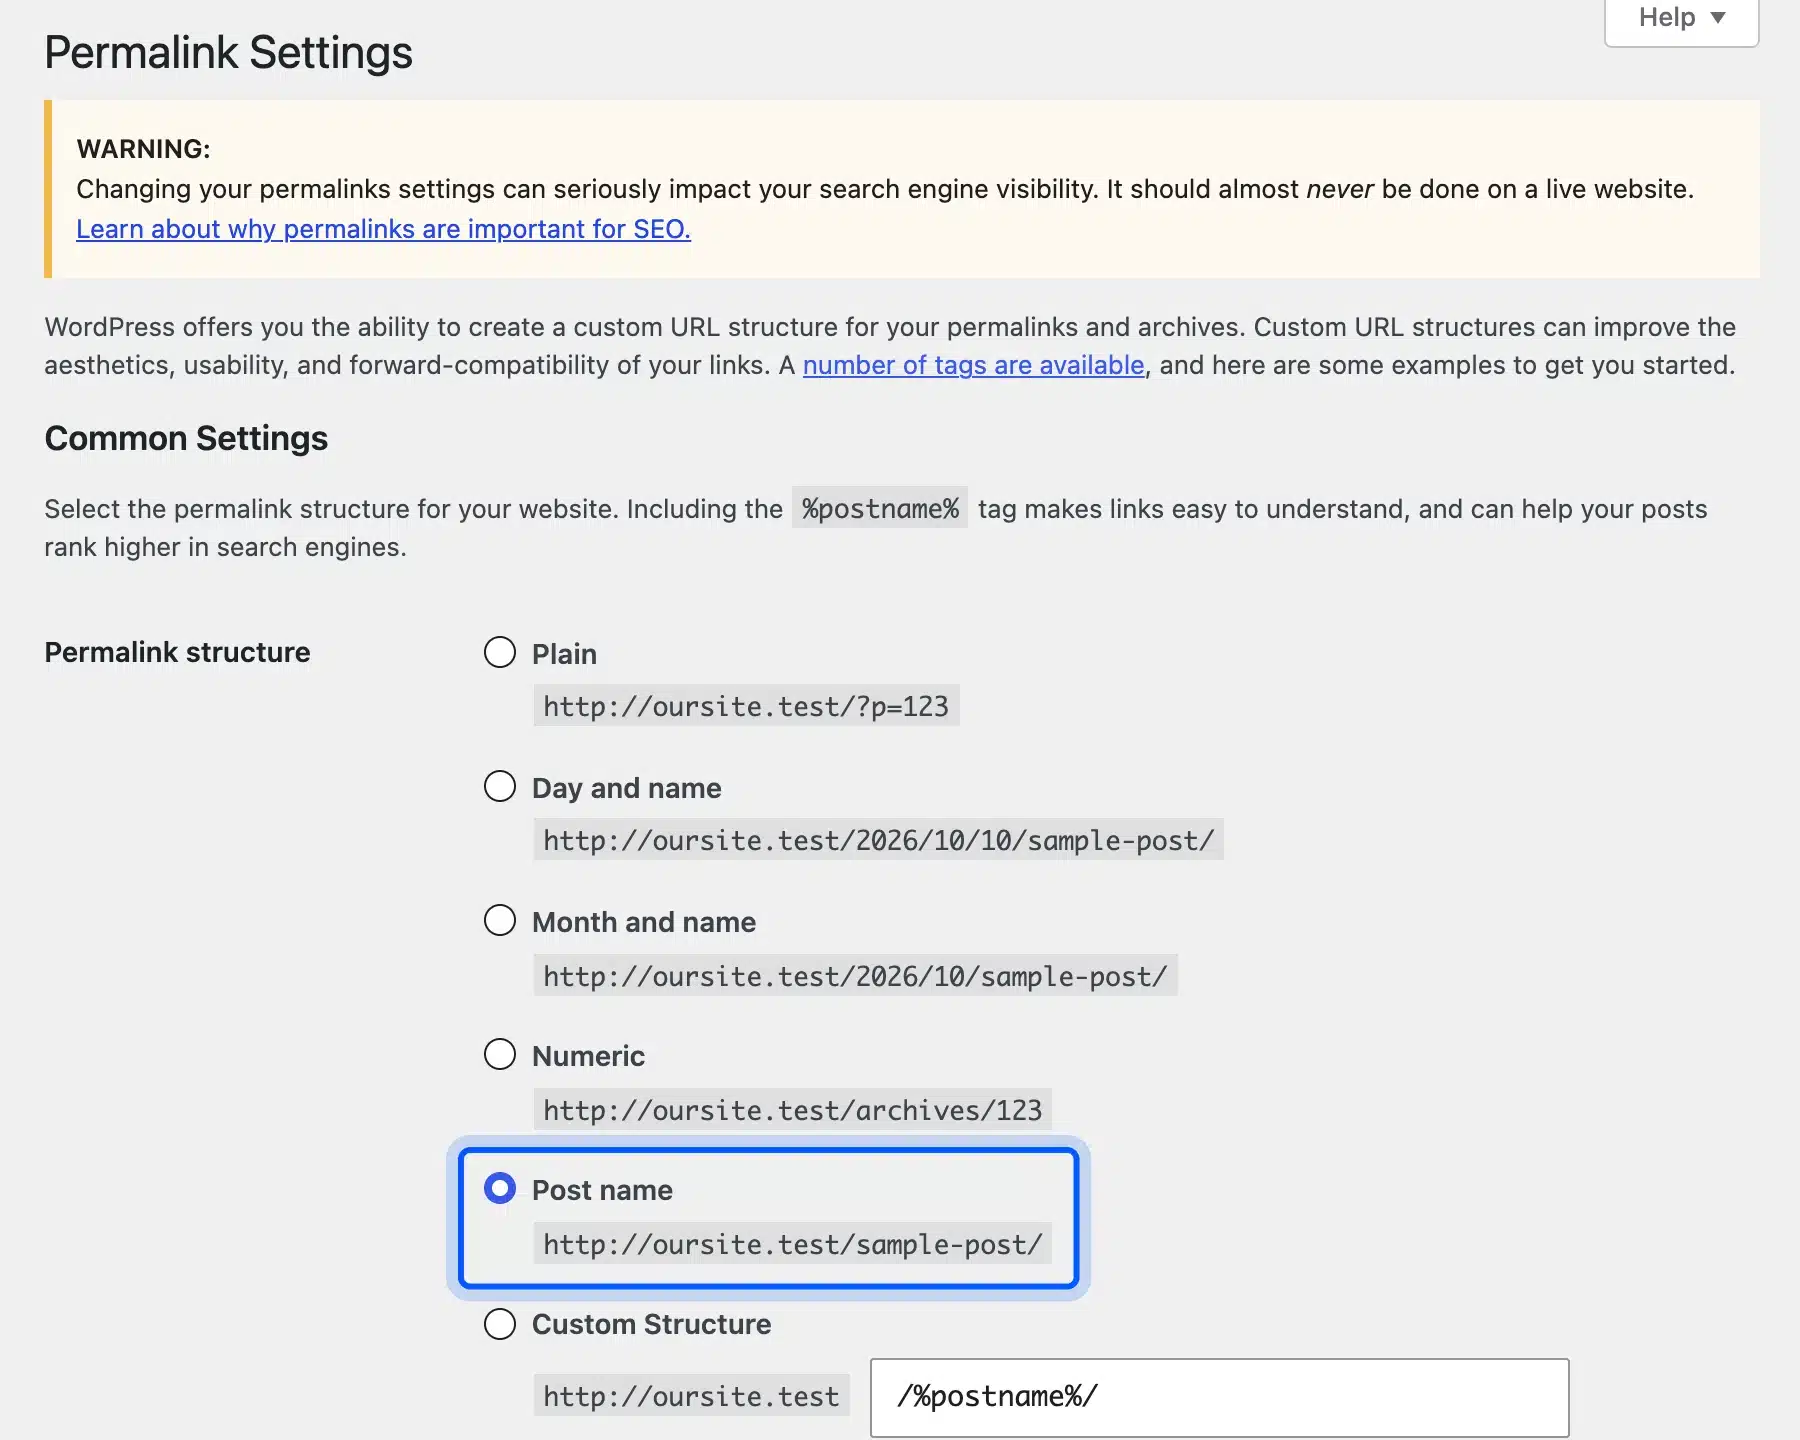
Post name turns a URL like /2026/10/10/sample-post/ into /sample-post/, which stays short and never looks dated. The Permalinks settings screen doc lists every option. Our guide to setting up pretty permalinks in WordPress covers custom structures.
With Yoast SEO active, this screen also shows a warning that permalink changes can hurt search visibility on a live site. On a new blog with no posts yet, there is nothing to break.
Step 2: Create a Blog Page for Your Posts
A blog page is a normal page that WordPress fills with your latest posts. You create it empty, then point the Reading settings at it, which lets you keep a separate home page.
- Create two pages: Go to Pages, then Add Page, and publish an empty page called “Blog”. Publish a second page called “Home”.
- Open Reading settings: Go to Settings, then Reading.
- Assign the pages: Choose A static page, set Homepage to Home and Posts page to Blog, then click Save Changes.
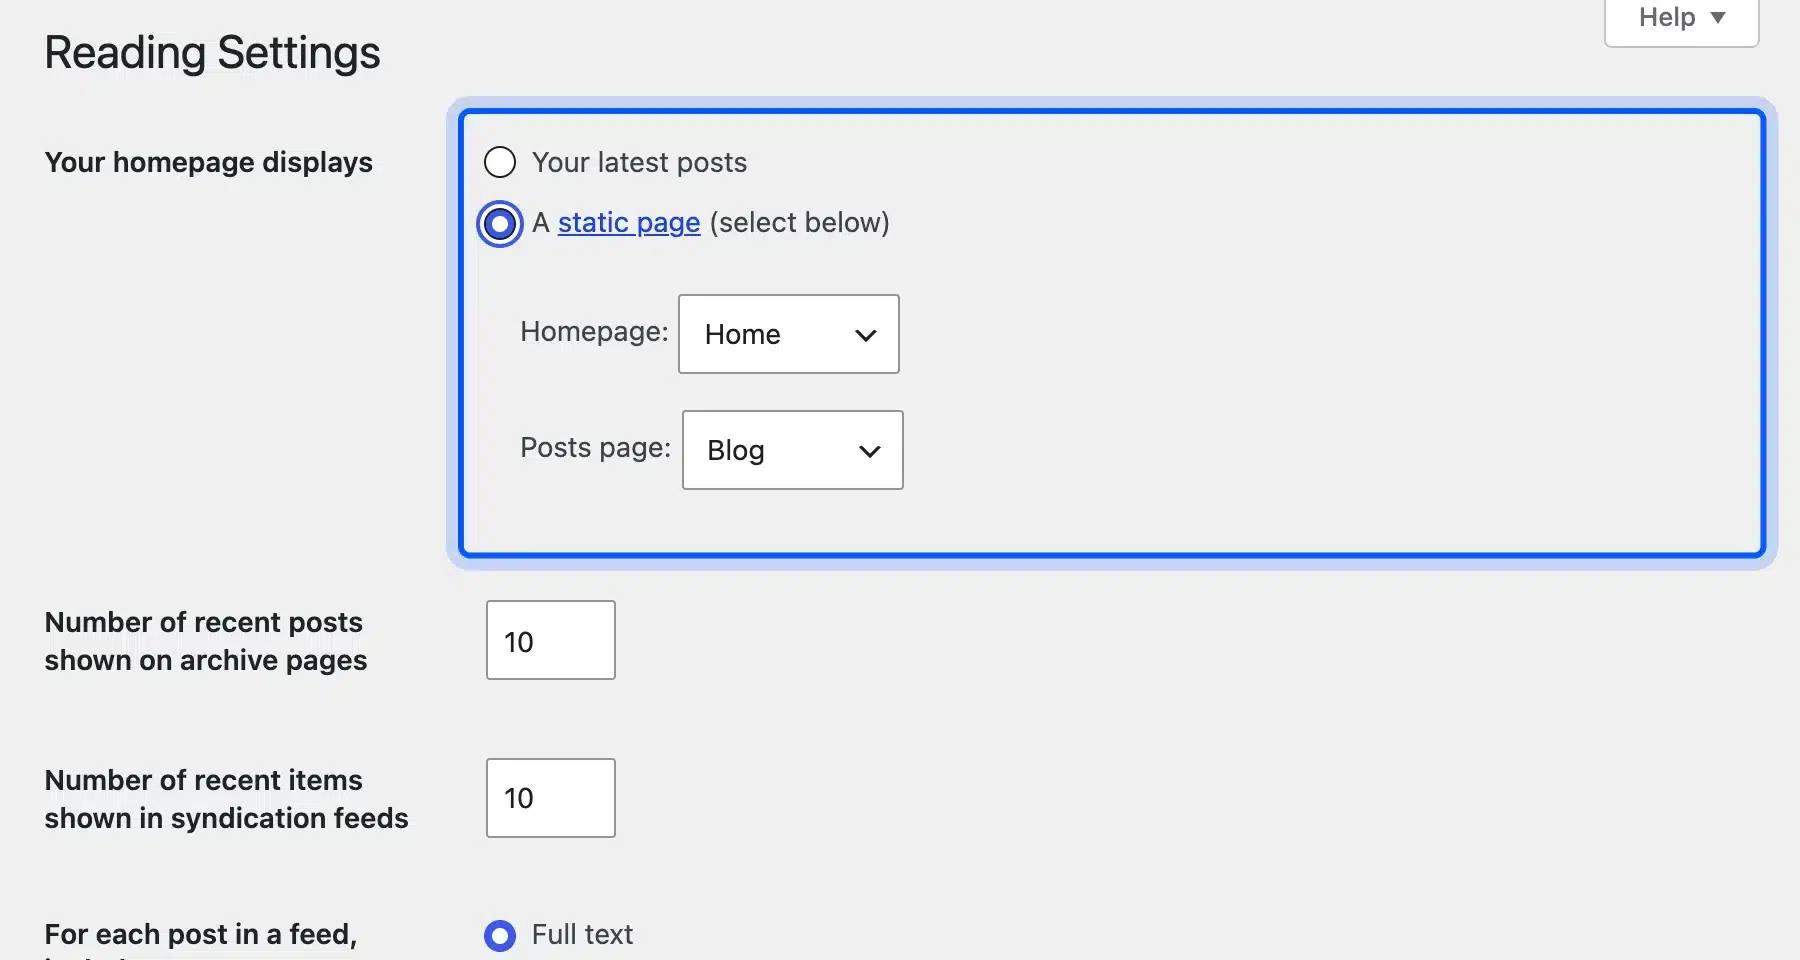
The Reading settings screen doc explains both fields. Skip this step if you want the blog to be the whole site: the default Your latest posts already shows posts on the front page.
Step 3: Set Up Categories and Tags
Categories are the main topics of your blog, and tags are the small details inside them. Set up three to six categories now, so the first posts land in the right place.
- Add categories: Go to Posts, then Categories, type a name such as “Trail Guides” and click Add Category.
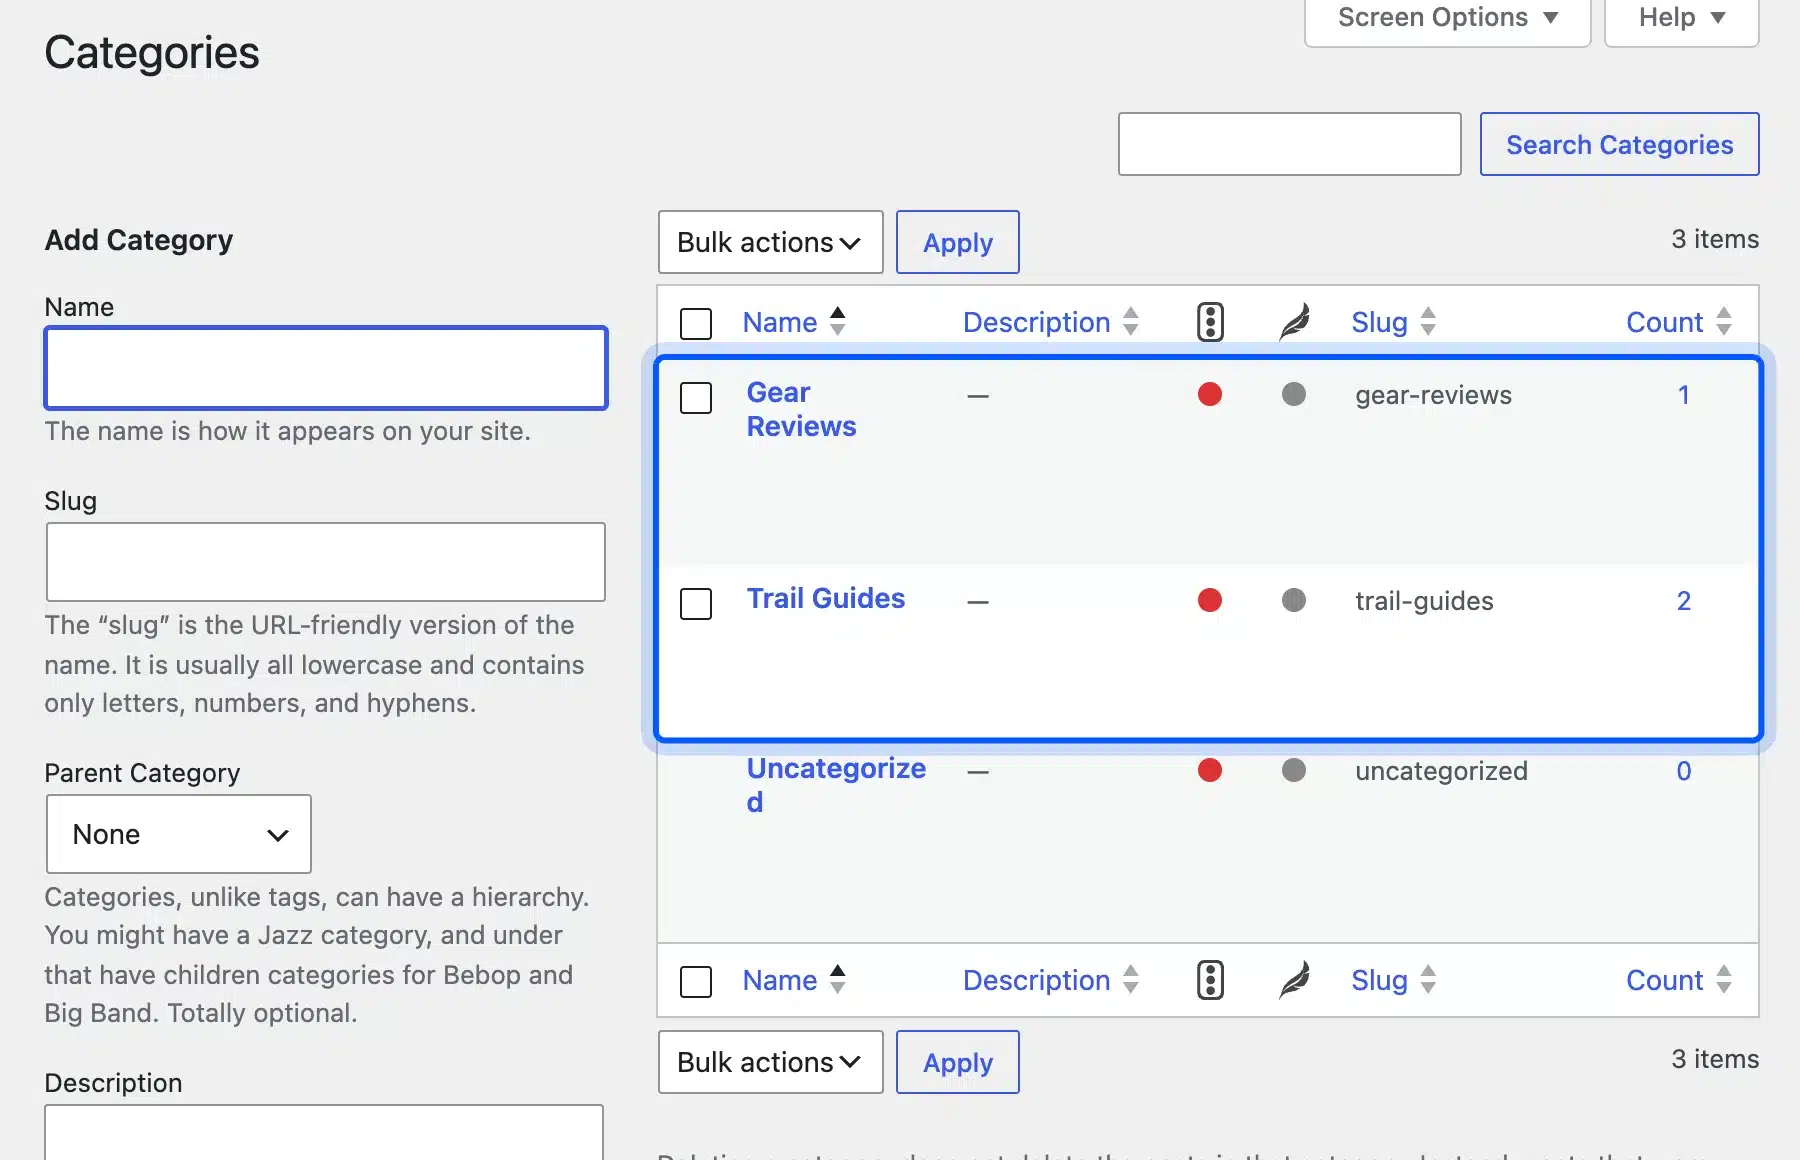
- Add tags as you write: Tags can be added on the Posts, then Tags screen, or straight from the post sidebar.
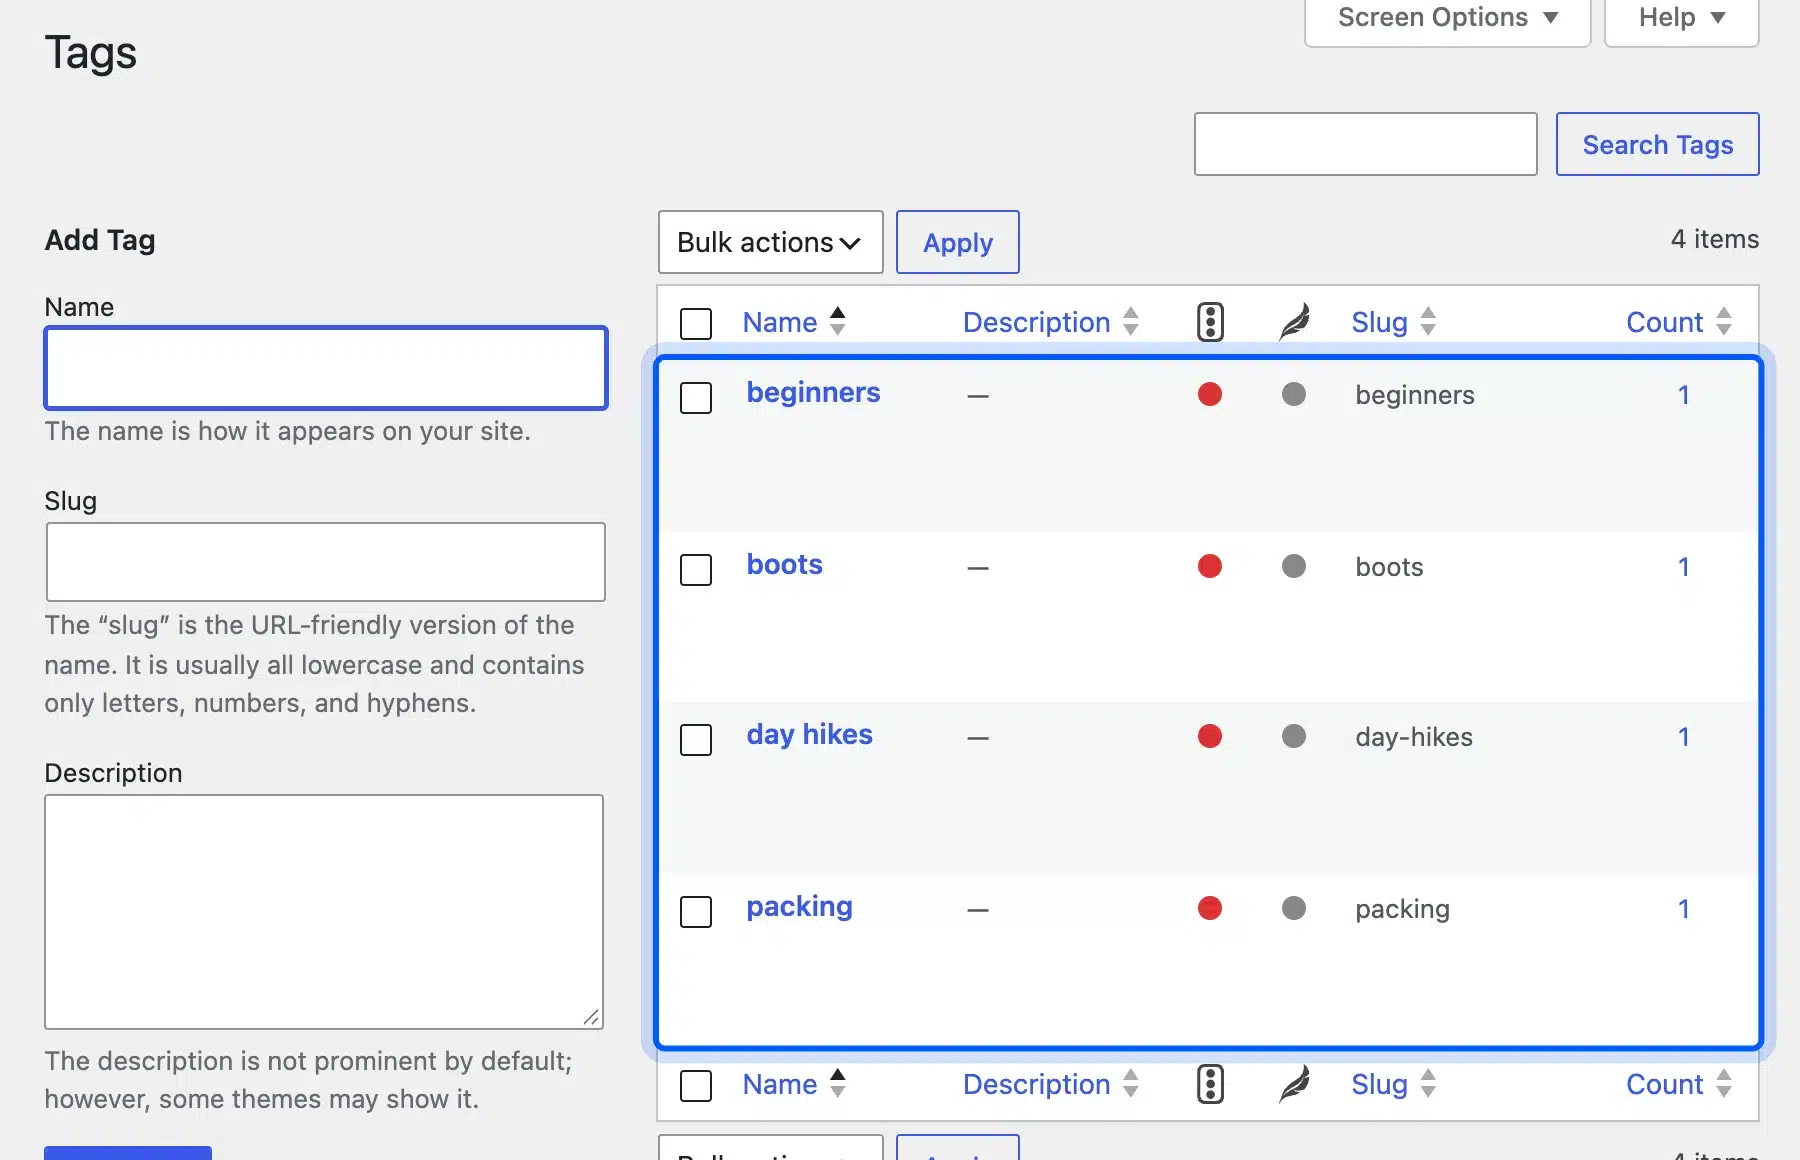
Rename Uncategorized to a real topic on the same screen, since WordPress will not let you delete the default category. Our guides to adding categories in WordPress and whether WordPress tags help SEO go deeper on both.
Step 4: Write Your First Blog Post in the Block Editor
Every paragraph, heading, image and list in a post is a block. You add them with the plus button or by typing a slash, and you rearrange them by dragging.
- Start the post: Go to Posts, then Add Post, and type your title at the top.
- Add blocks: Click the plus button at the top left, search for a block such as Heading or Image, and click it to add it.
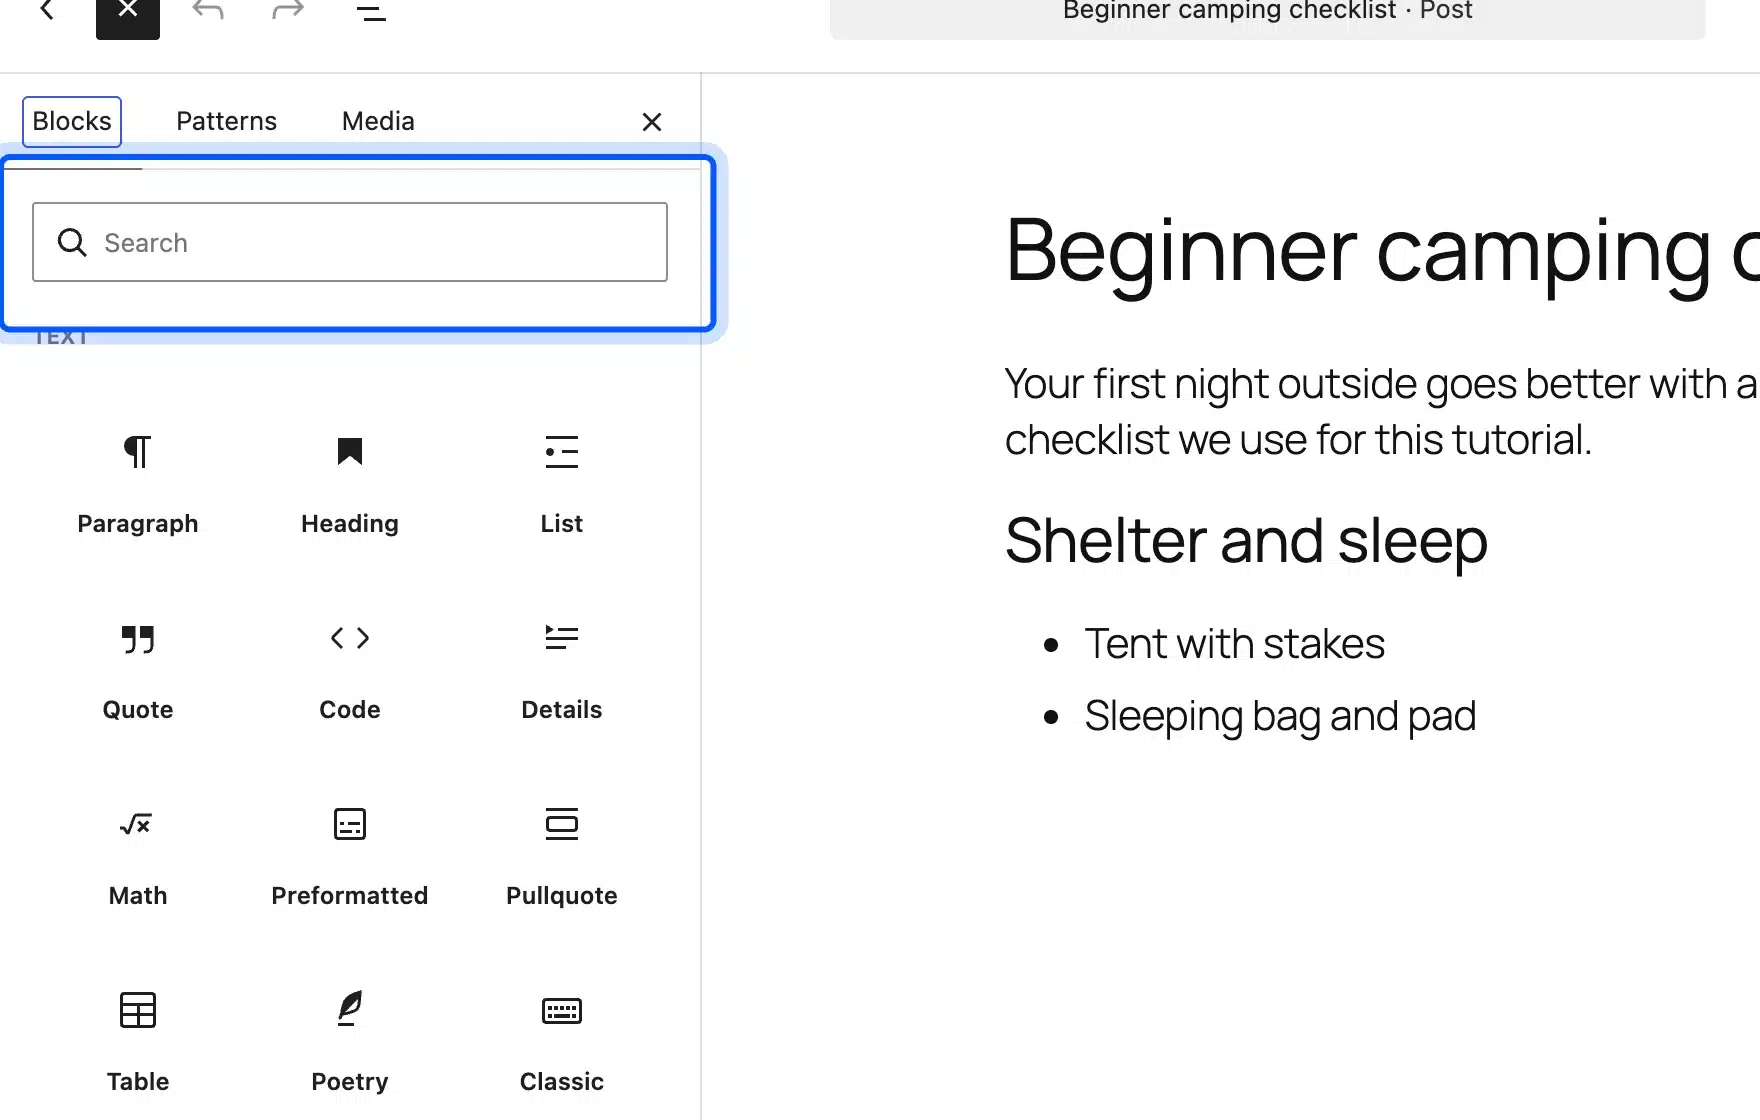
- Save as you go: Click Save draft every few minutes until the post is ready.
These are the blocks most first posts need:
- Paragraph: The default block, created every time you press Enter.
- Heading: Use H2 for main sections and H3 inside them, so readers can scan.
- Image: Upload a picture and fill in its alternative text in the block sidebar.
- List: Turns steps or tips into bullets or numbers.
Plan the headings before you type the first paragraph. Our guide on how to write a blog post outline walks through that part.
Step 5: Add a Featured Image and Excerpt
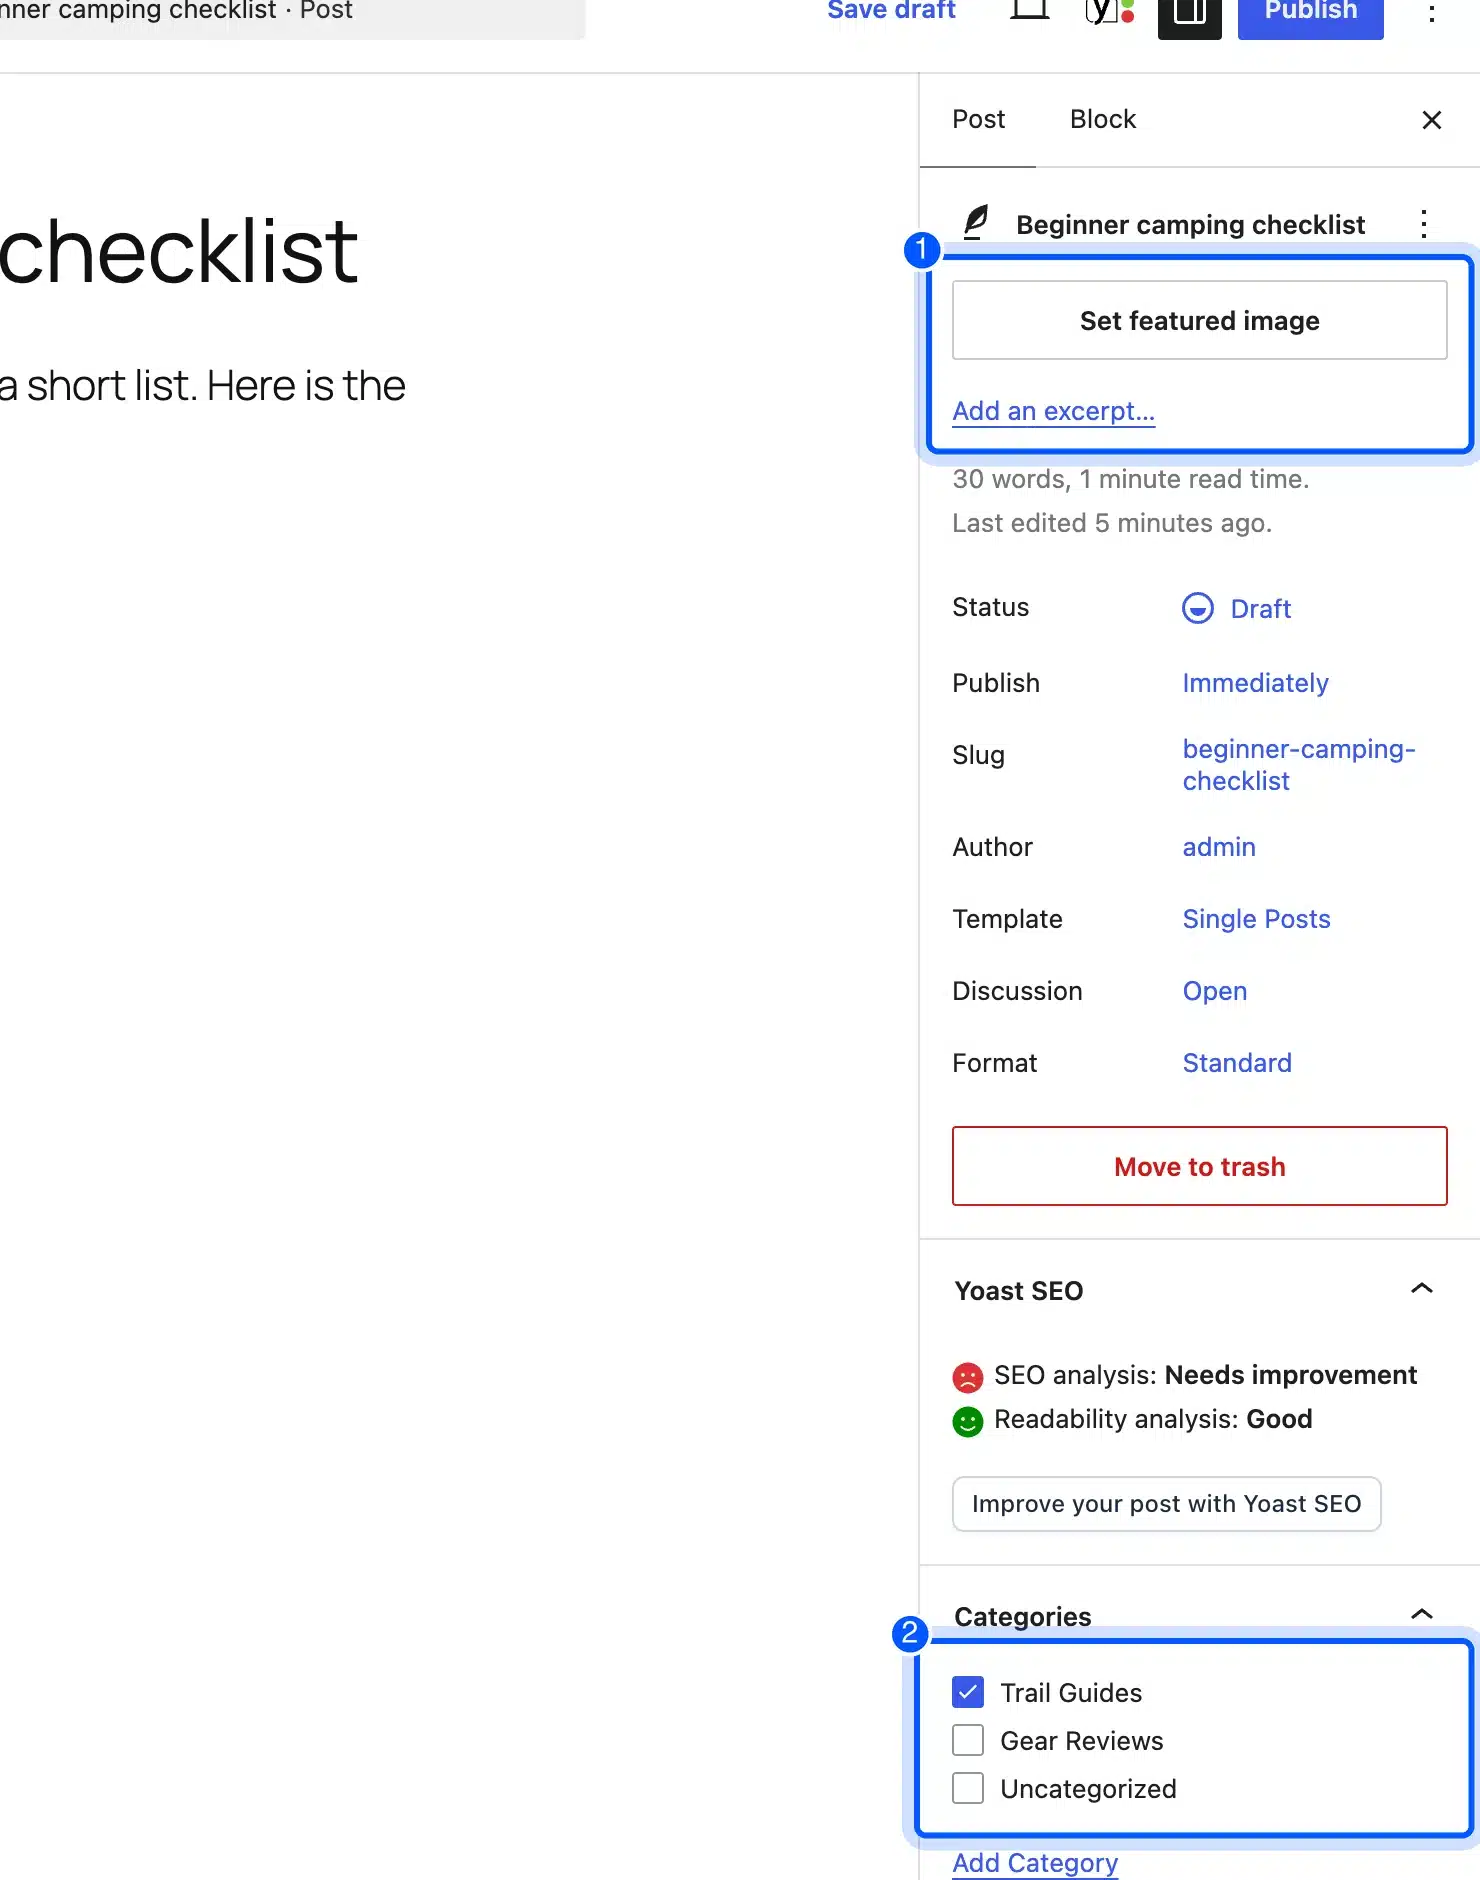
The featured image is the picture that shows on your blog page, in social shares and often in search. The excerpt is the short summary that some themes print under each post title.
- Open the Post tab: Click the sidebar icon at the top right and choose the Post tab.
- Set the image: Click Set featured image and pick or upload a picture.
- Write the excerpt: Click Add an excerpt and write one or two sentences.
- Tick a category: In the Categories panel, tick the category the post belongs to.
Upload images at about 1600 px wide. Large camera files slow the blog page down because it loads several featured images at once.
Step 6: Customize the Blog Templates in the Site Editor
Block themes build the blog page from templates you edit in the Site Editor. Twenty Twenty-Five uses a Blog Home template for the posts page and Single Posts for each post.
- Open templates: Go to Appearance, then Editor, then Templates.
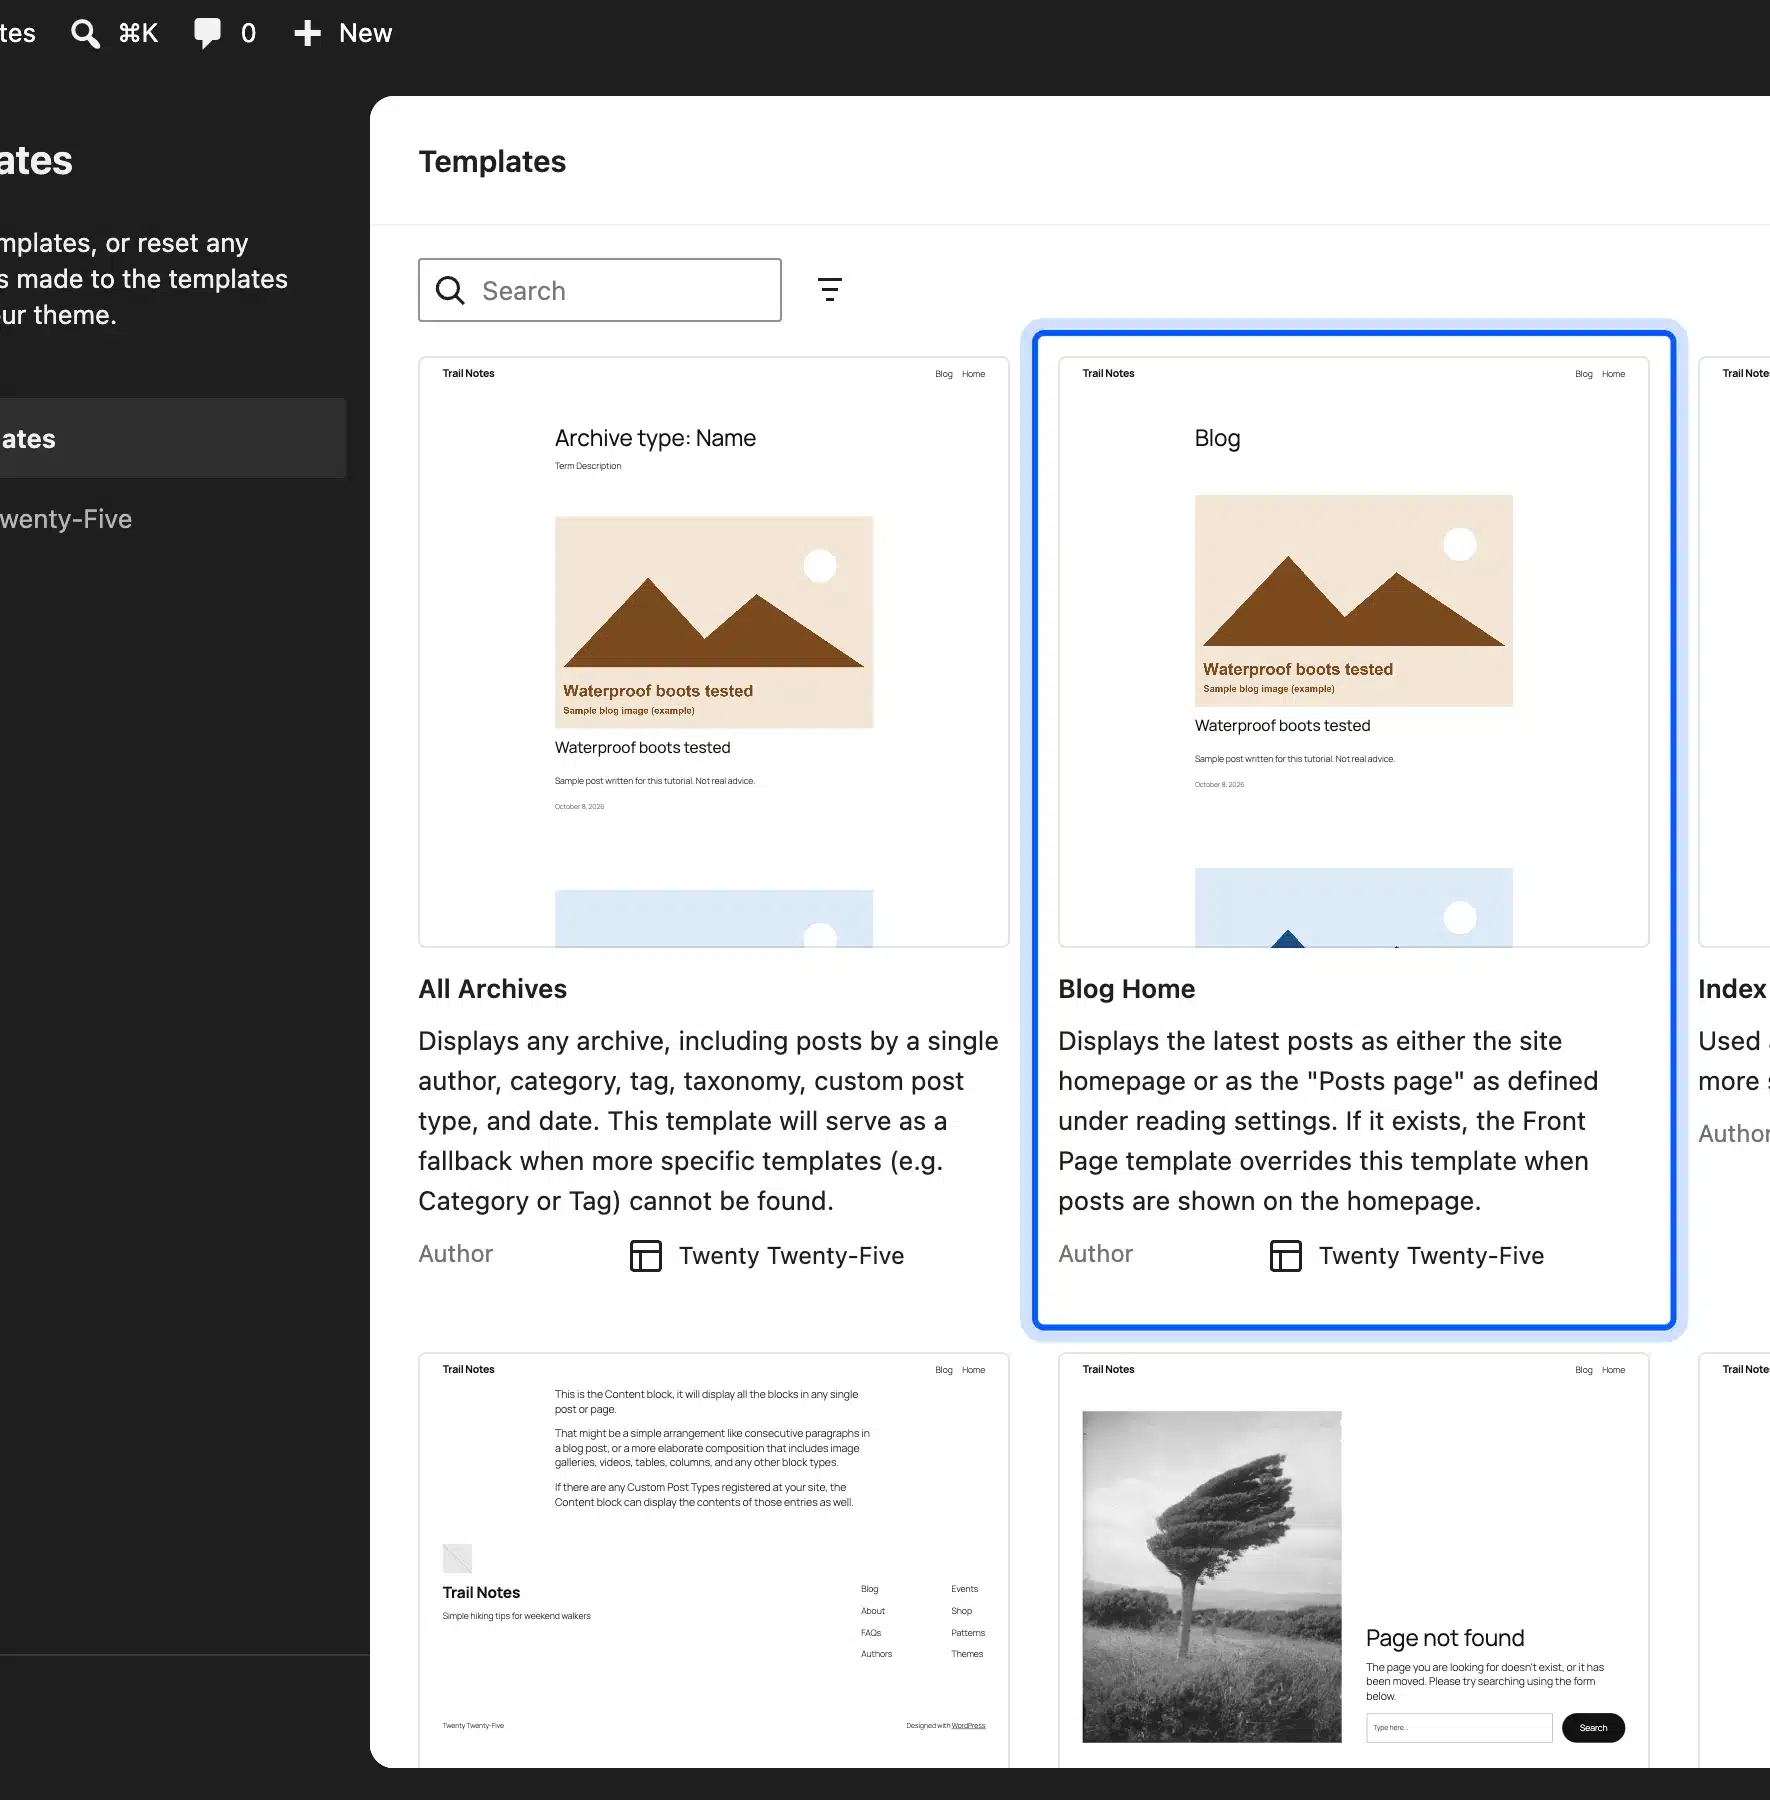
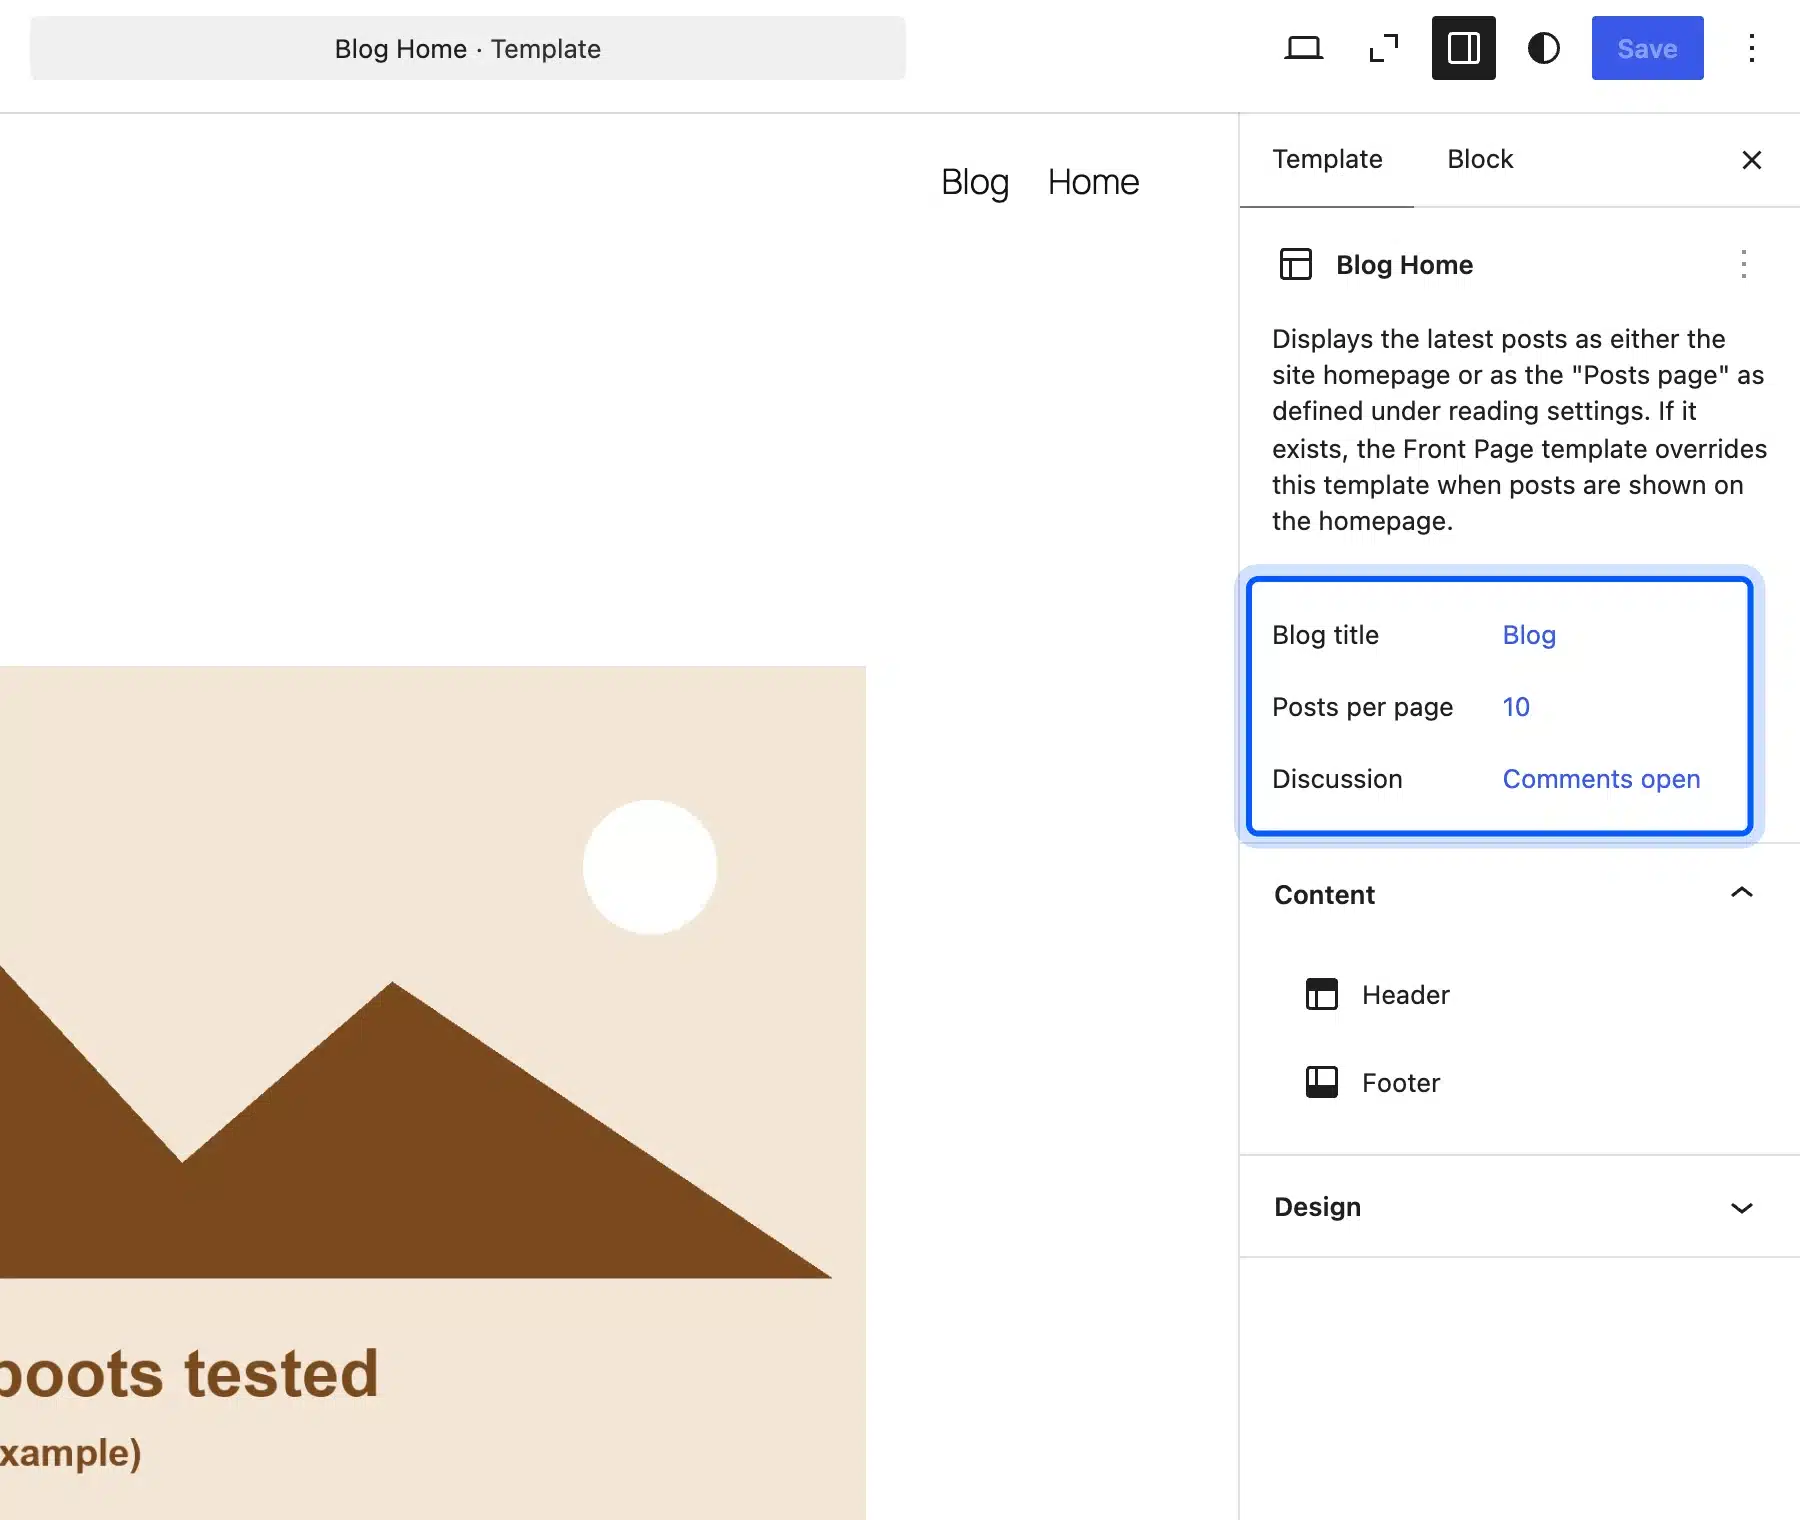
- Edit Blog Home: Click Blog Home. The Template sidebar shows the blog title, posts per page and the discussion setting.
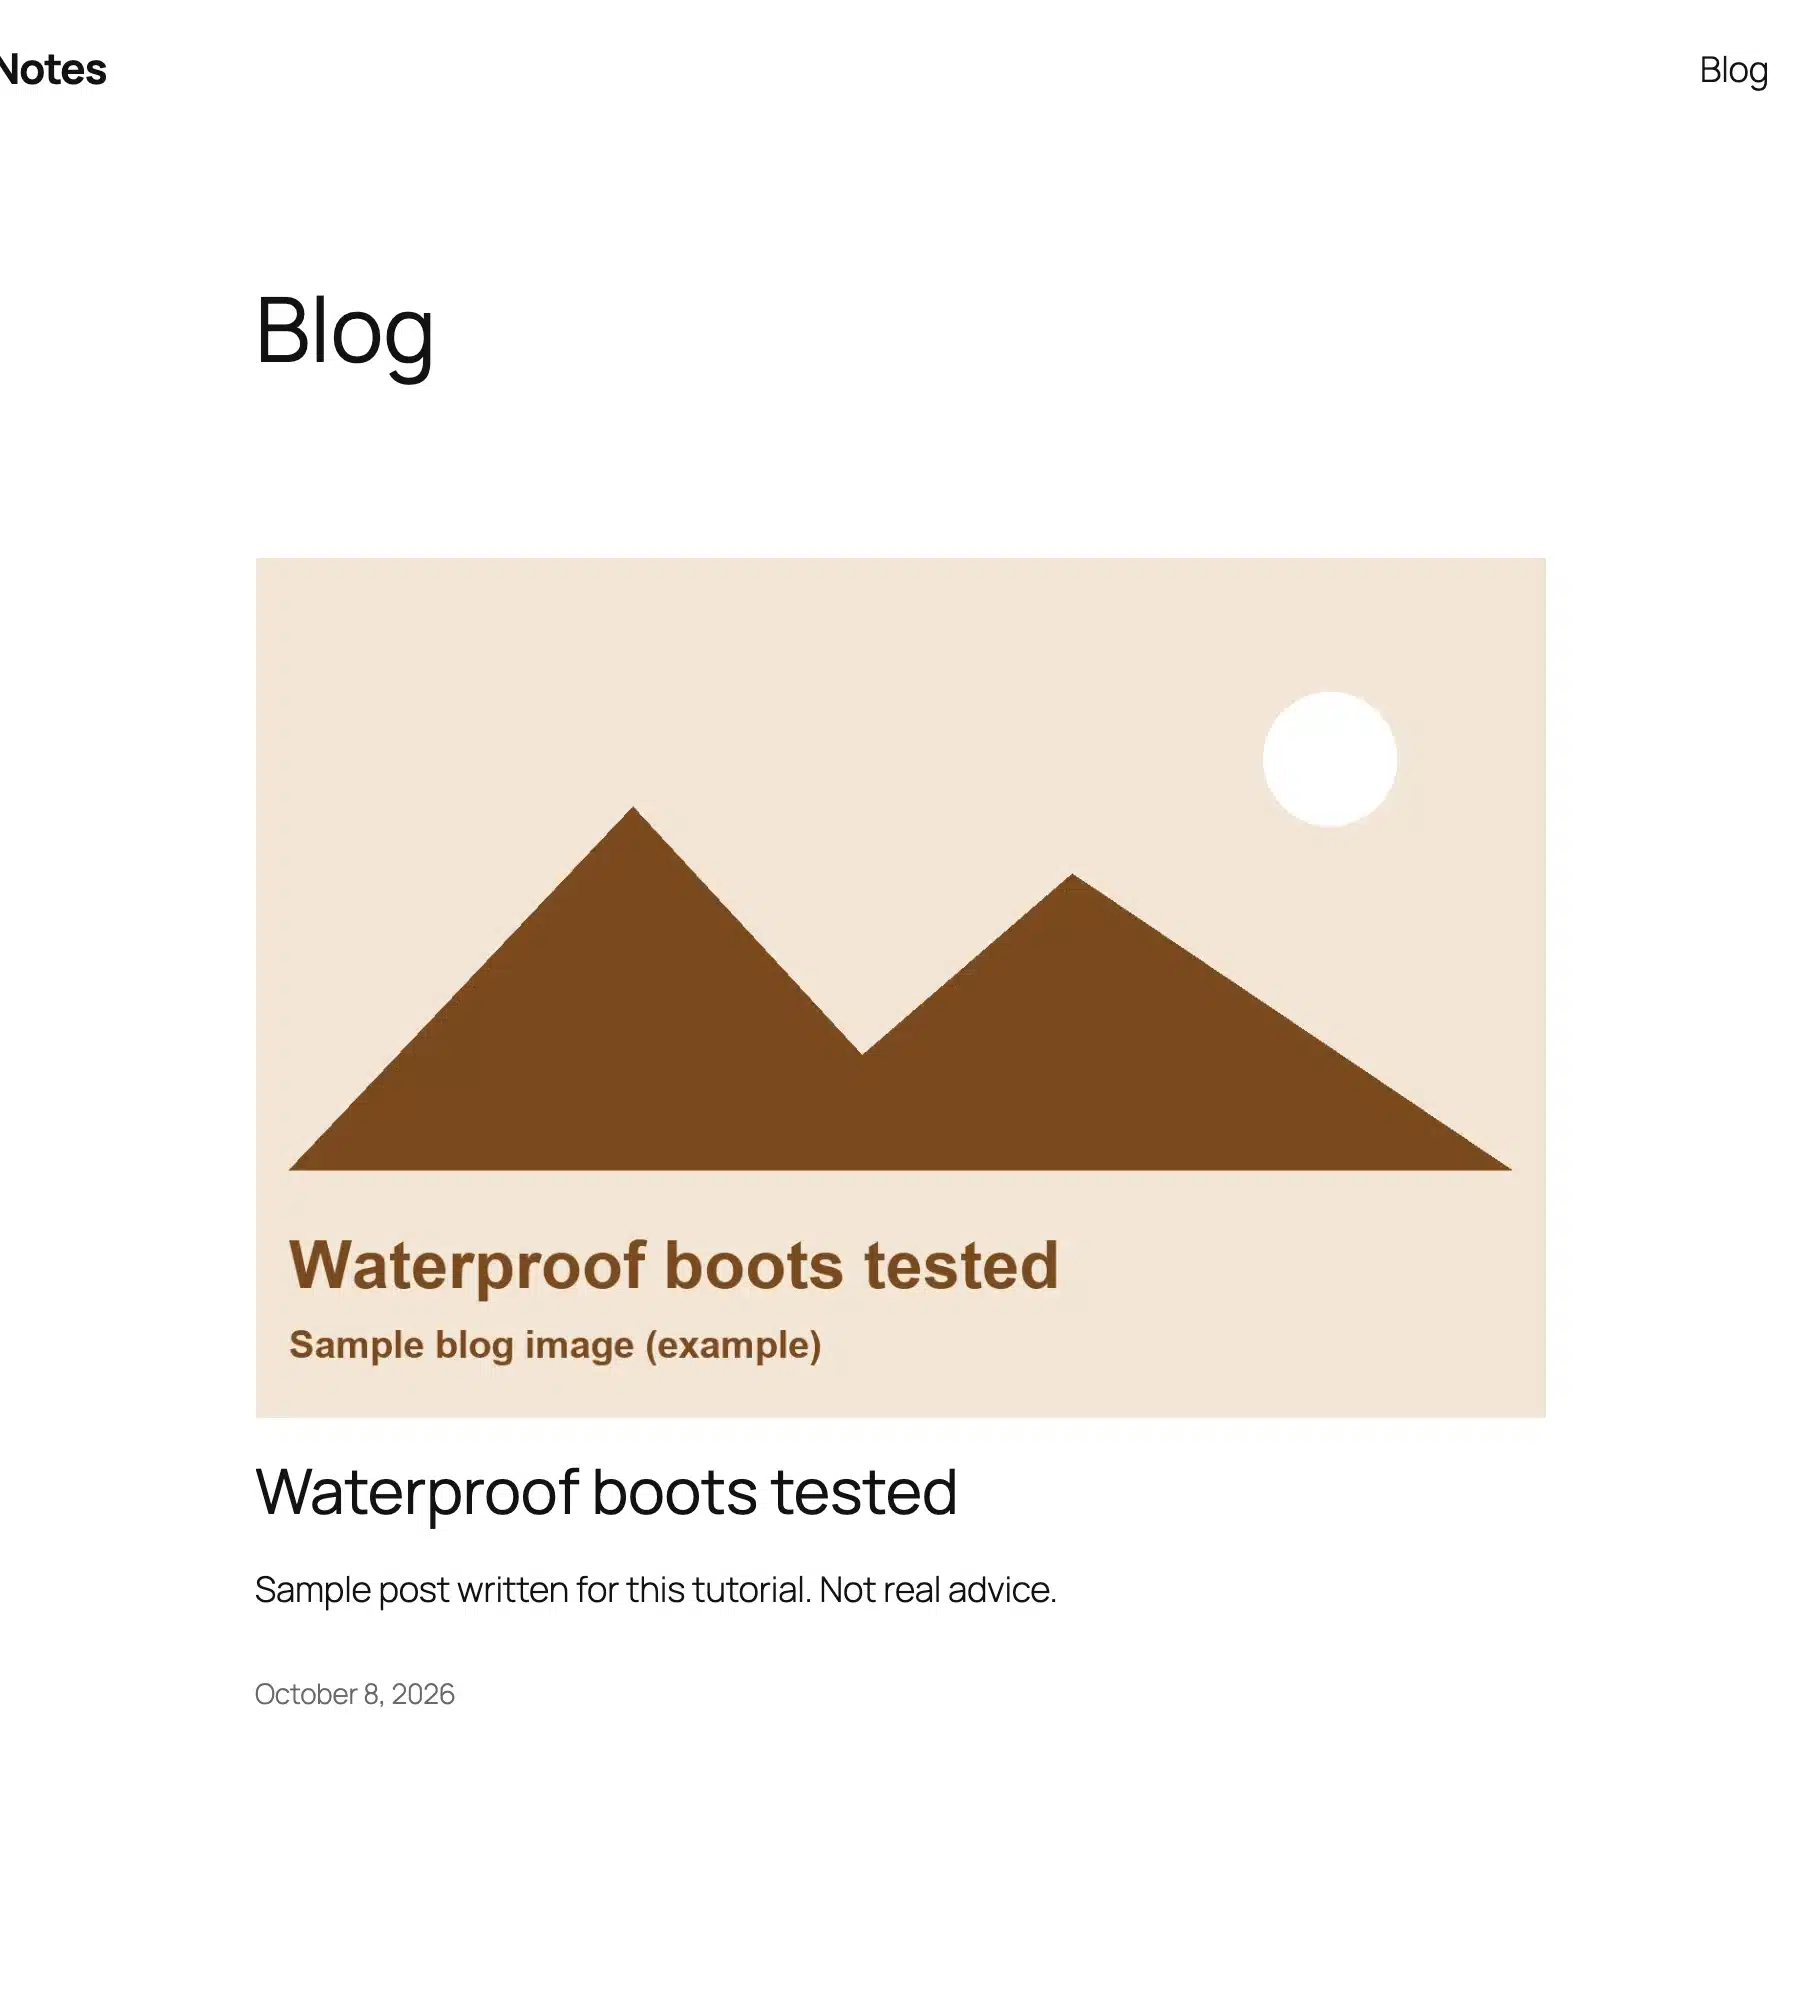
- Change the layout: Select the Query Loop on the canvas to switch between a list and a grid, then click Save.
The Template sidebar showed 10 posts per page, the same number as the Reading settings default. Change it in one place and the other follows.
Step 7: Choose Your Comment Settings
Comment settings decide who can comment and whether you see comments before they go live. The defaults on our test site were open comments with no manual approval, which invites spam on a new blog.
- Open Discussion settings: Go to Settings, then Discussion.
- Review the defaults: Keep or untick Allow people to submit comments on new posts in Default post settings.
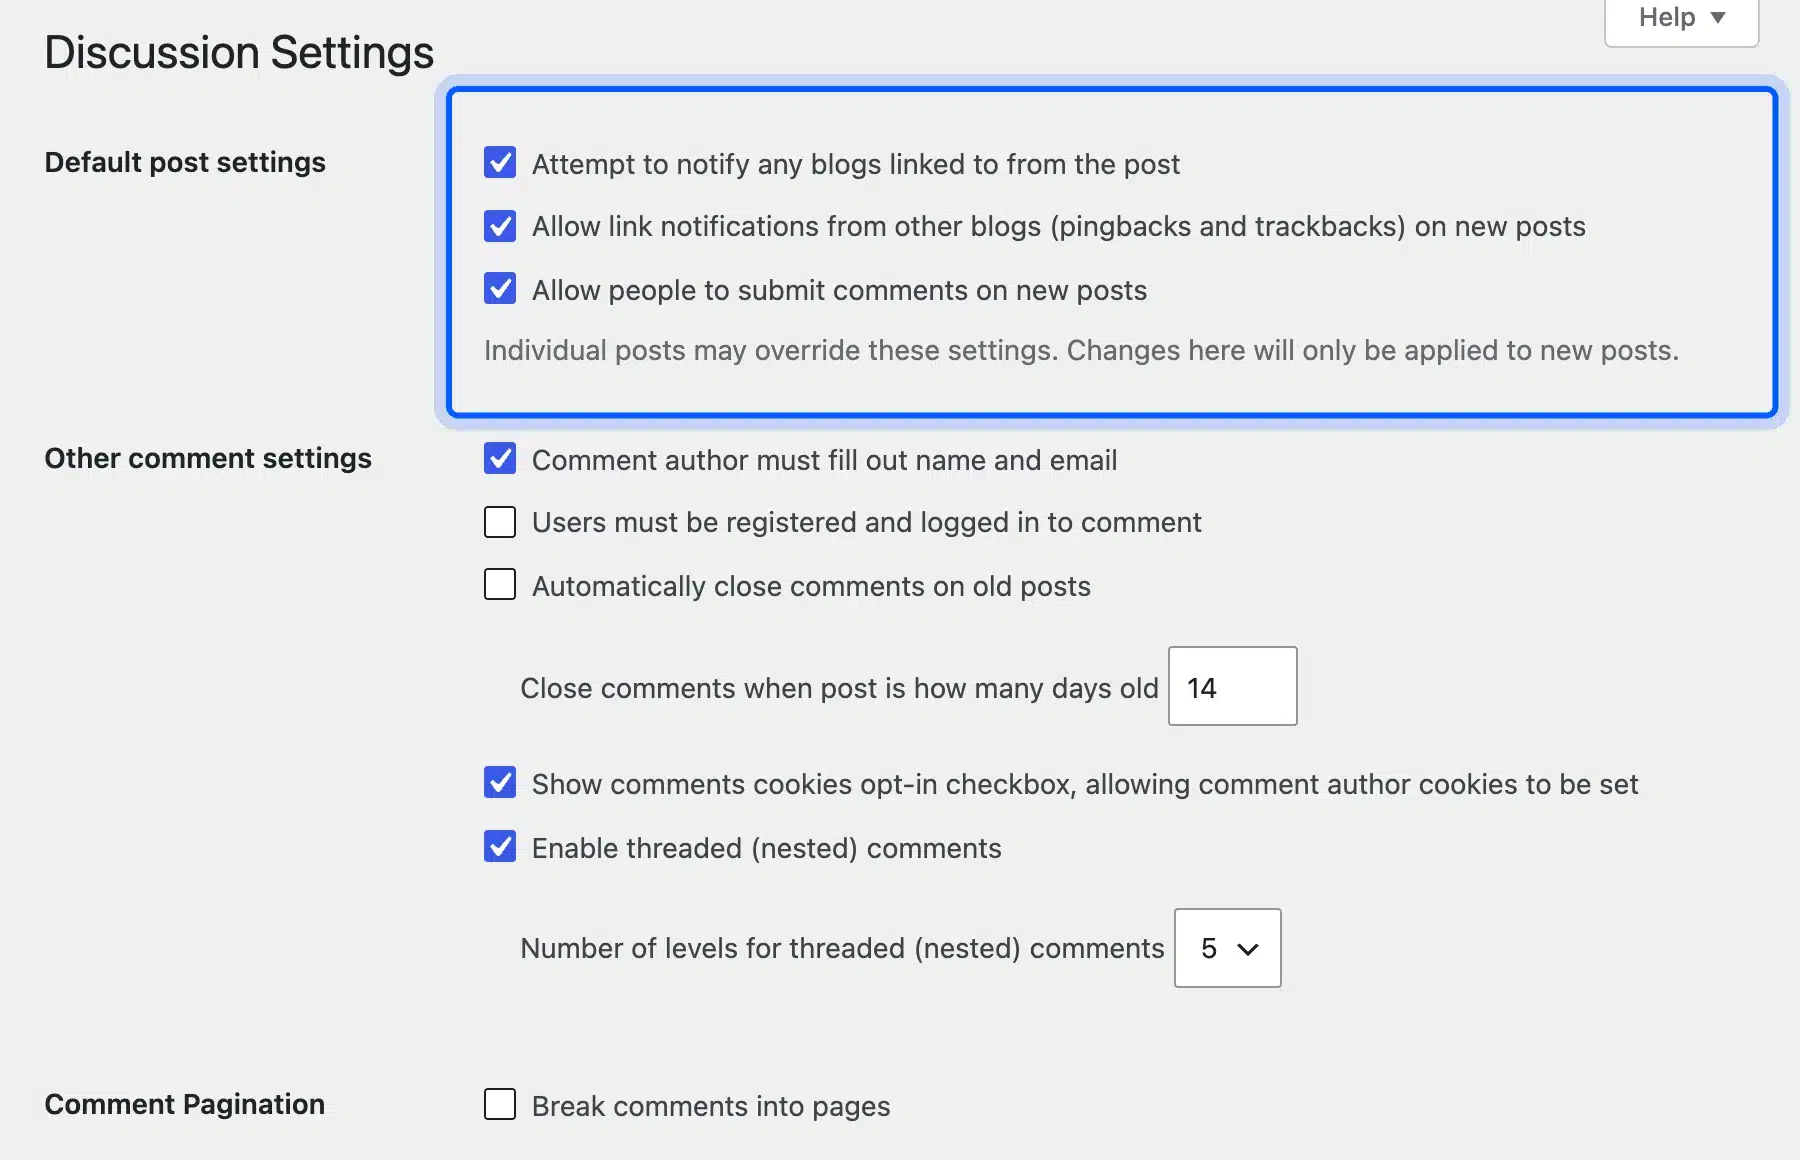
- Hold new comments: Further down, tick Comment must be manually approved, or keep Comment author must have a previously approved comment.
The Discussion settings screen doc explains each box. If you want threaded replies or spam filters beyond these, compare the best WordPress comment plugins first.
Step 8: Install an SEO Plugin
WordPress has no built-in field for a search title, meta description or focus keyword. An SEO plugin adds them, and it also builds an XML sitemap for search engines.
- Install the plugin: Go to Plugins, then Add Plugin, search “Yoast SEO”, then install and activate it. The Yoast SEO listing shows 10 million+ active installs.
- Set a focus keyphrase: Open a post, click the Yoast icon at the top right and type the phrase the post should rank for.
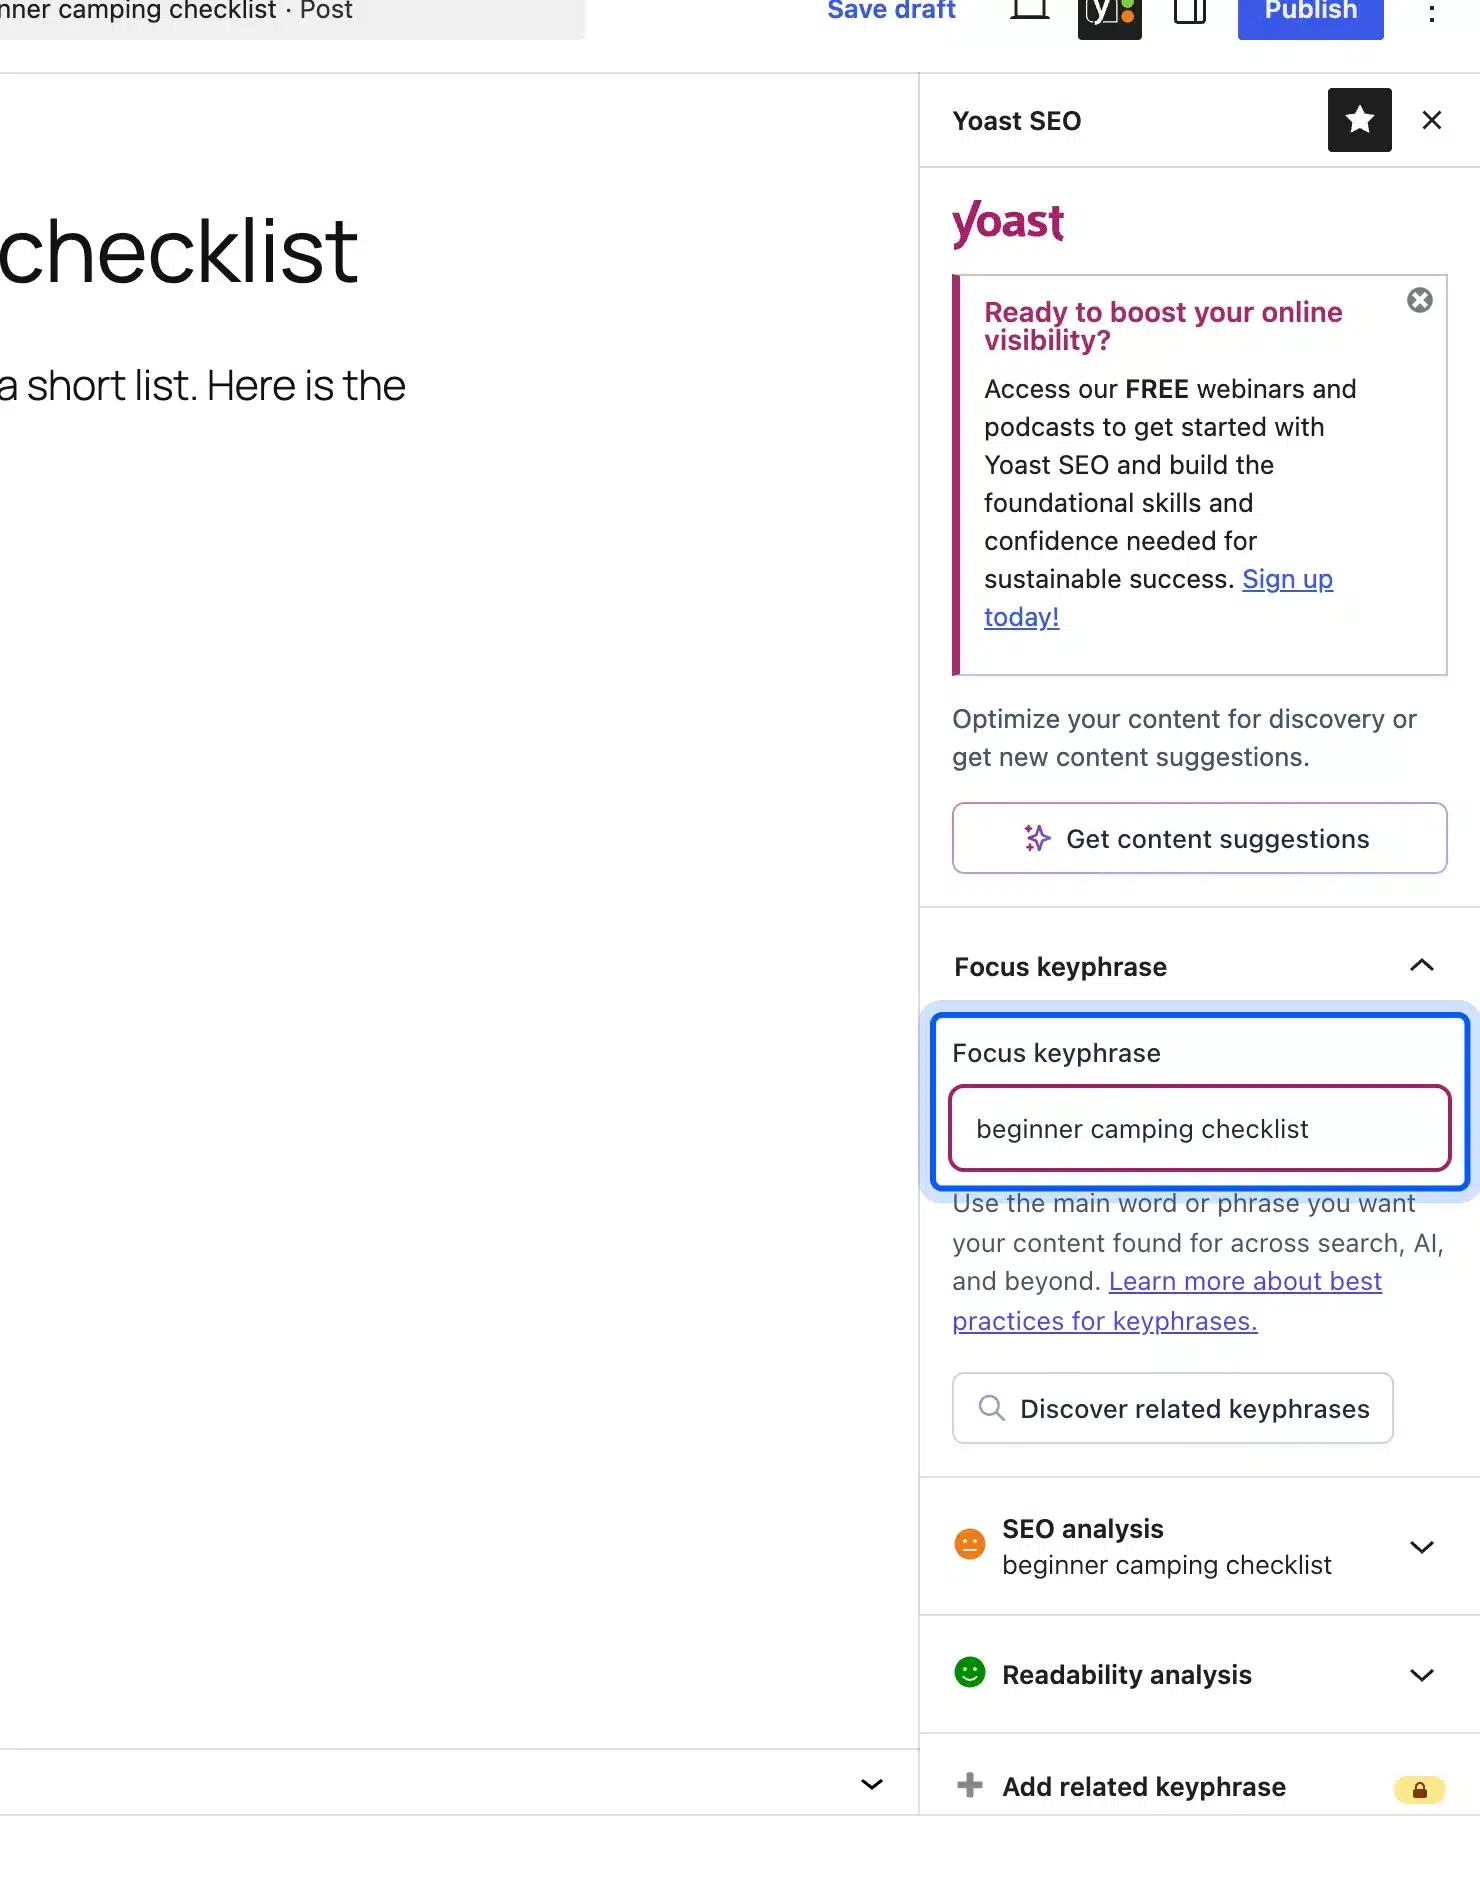
On our draft, the Yoast panel read “SEO analysis: Needs improvement” with no keyphrase set. After we typed one, it changed to “SEO analysis: OK”. Rank Math does the same job, so pick one plugin and never run both.
Step 9: Publish or Schedule the Post
Publishing makes the post live right away. Scheduling sets a future date and time, and WordPress publishes the post by itself at that moment.
- Open the date picker: In the Post tab, click the date next to Publish, which reads Immediately on a new post.
- Pick a date and time: Choose the day and time, then close the picker.
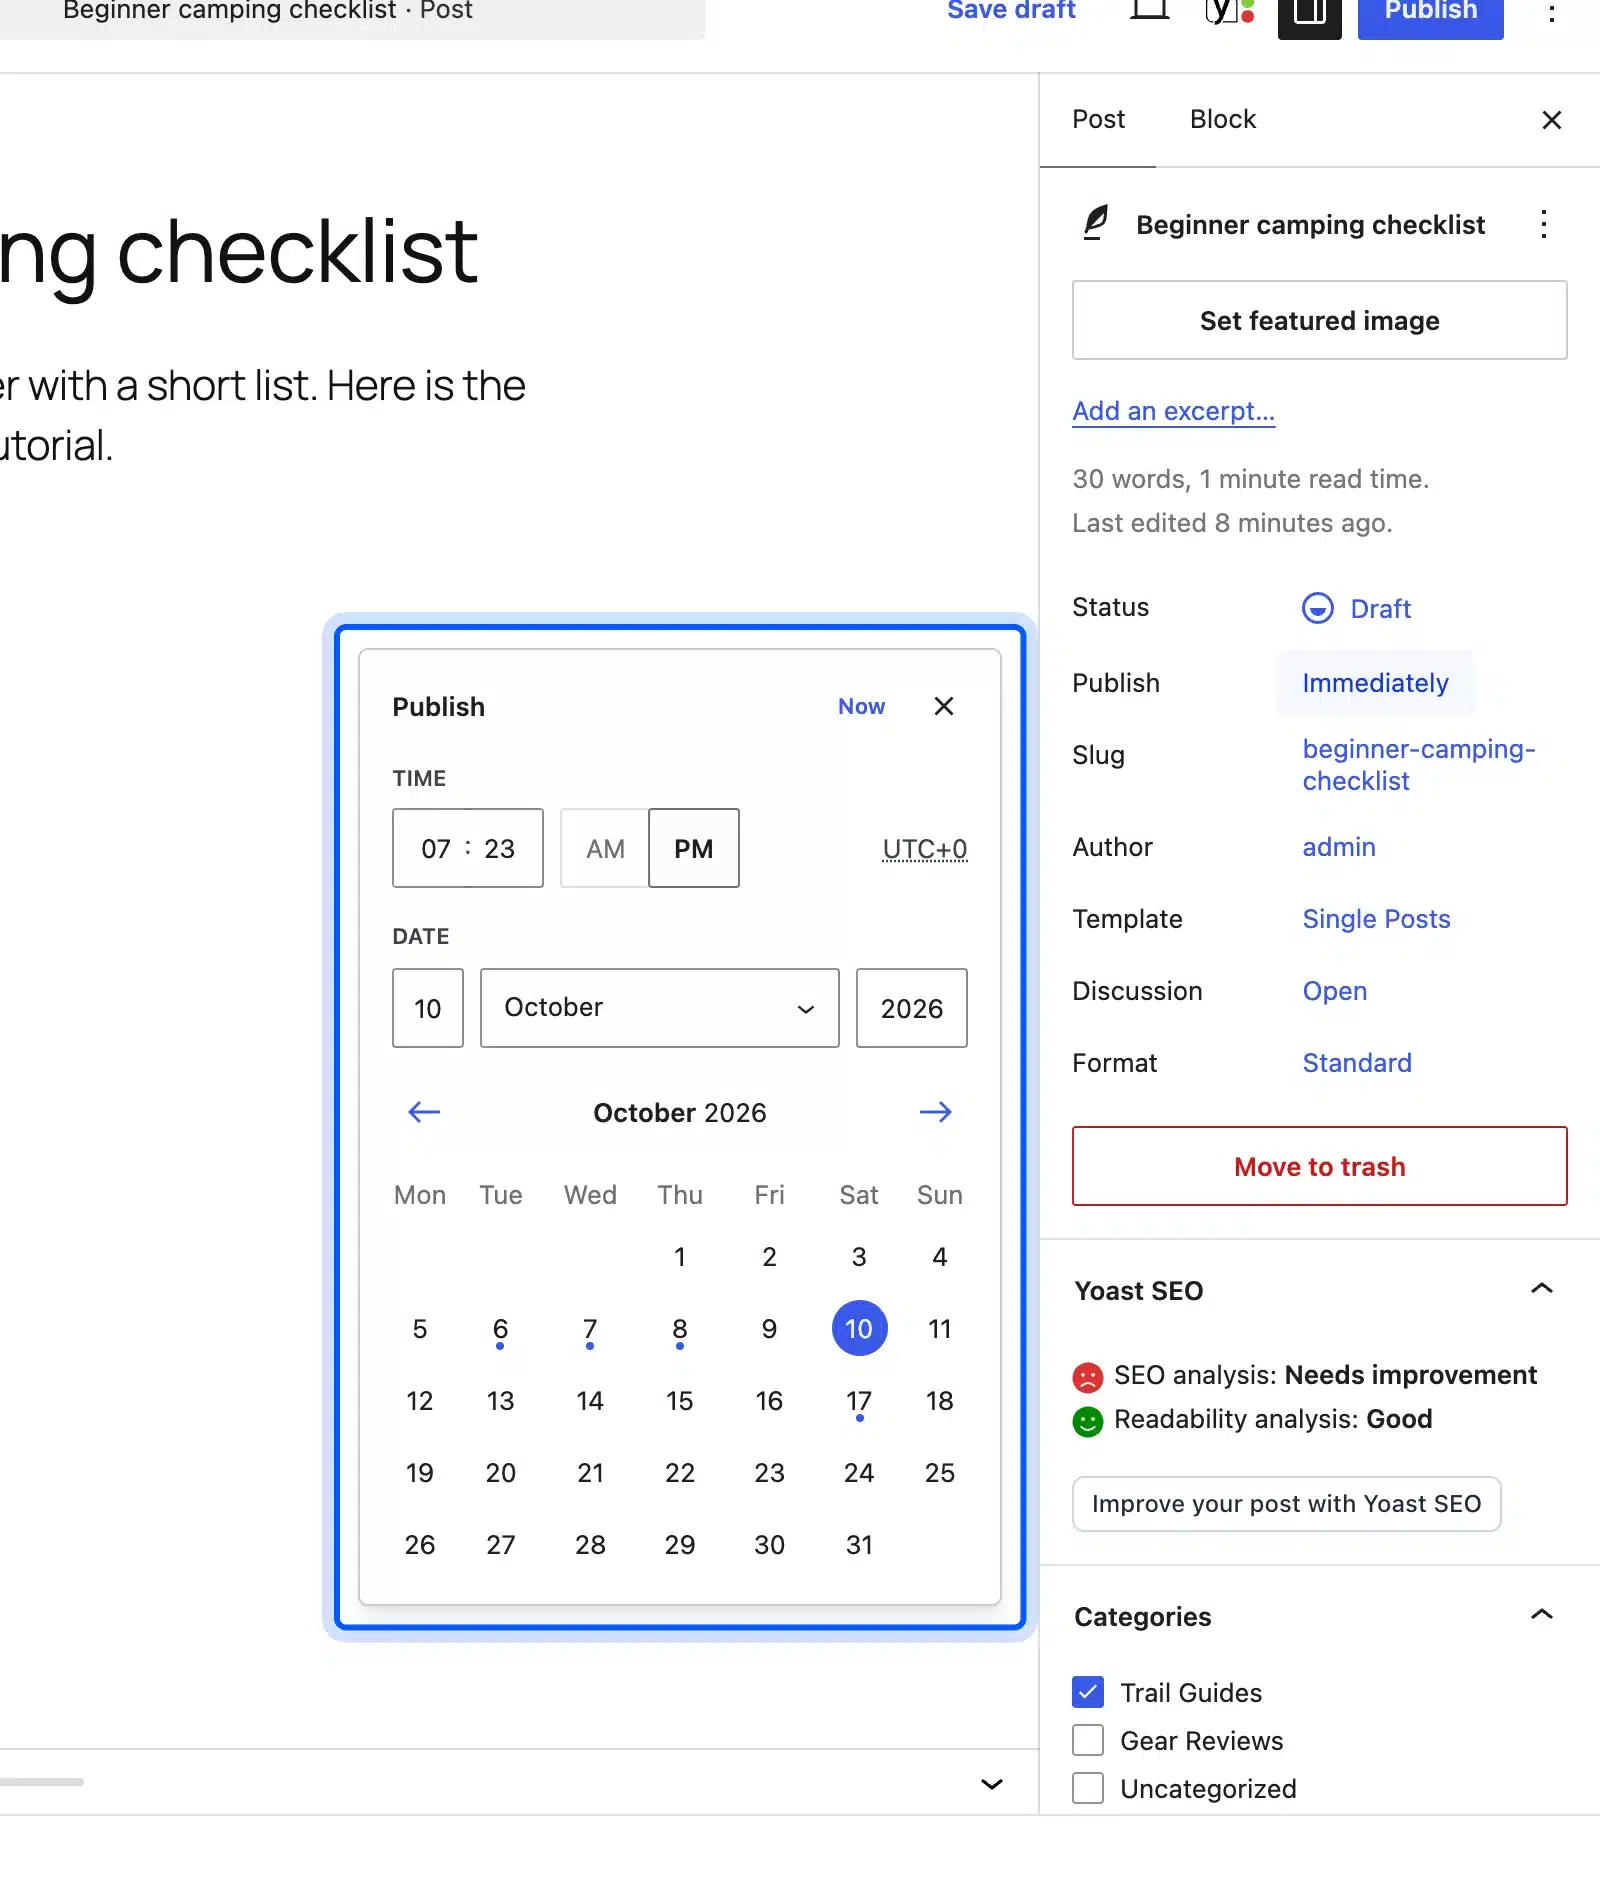
- Confirm: Click Schedule, or Publish if you left the date on Immediately.
A scheduled post gets the Scheduled status described in the post status doc. Check the time zone under Settings, then General first. Our test site sat on UTC+0, so a 9:00 am slot meant 9:00 am UTC.
Those nine steps give you a working blog. Custom templates, a move from another platform or speed work on a big archive take longer. Our WordPress developers can take that part.
How to Plan an Editorial Calendar in WordPress
An editorial calendar is a list of planned posts with a topic, a status and a publish date for each one. WordPress can hold that list for you with drafts and scheduled posts. A steady schedule, such as one post a week, beats a burst of ten posts followed by silence.
The Posts screen already works as a simple calendar. On our test site it showed All (5), Published (3), Scheduled (1) and Draft (1), with the scheduled post’s date in the Date column.
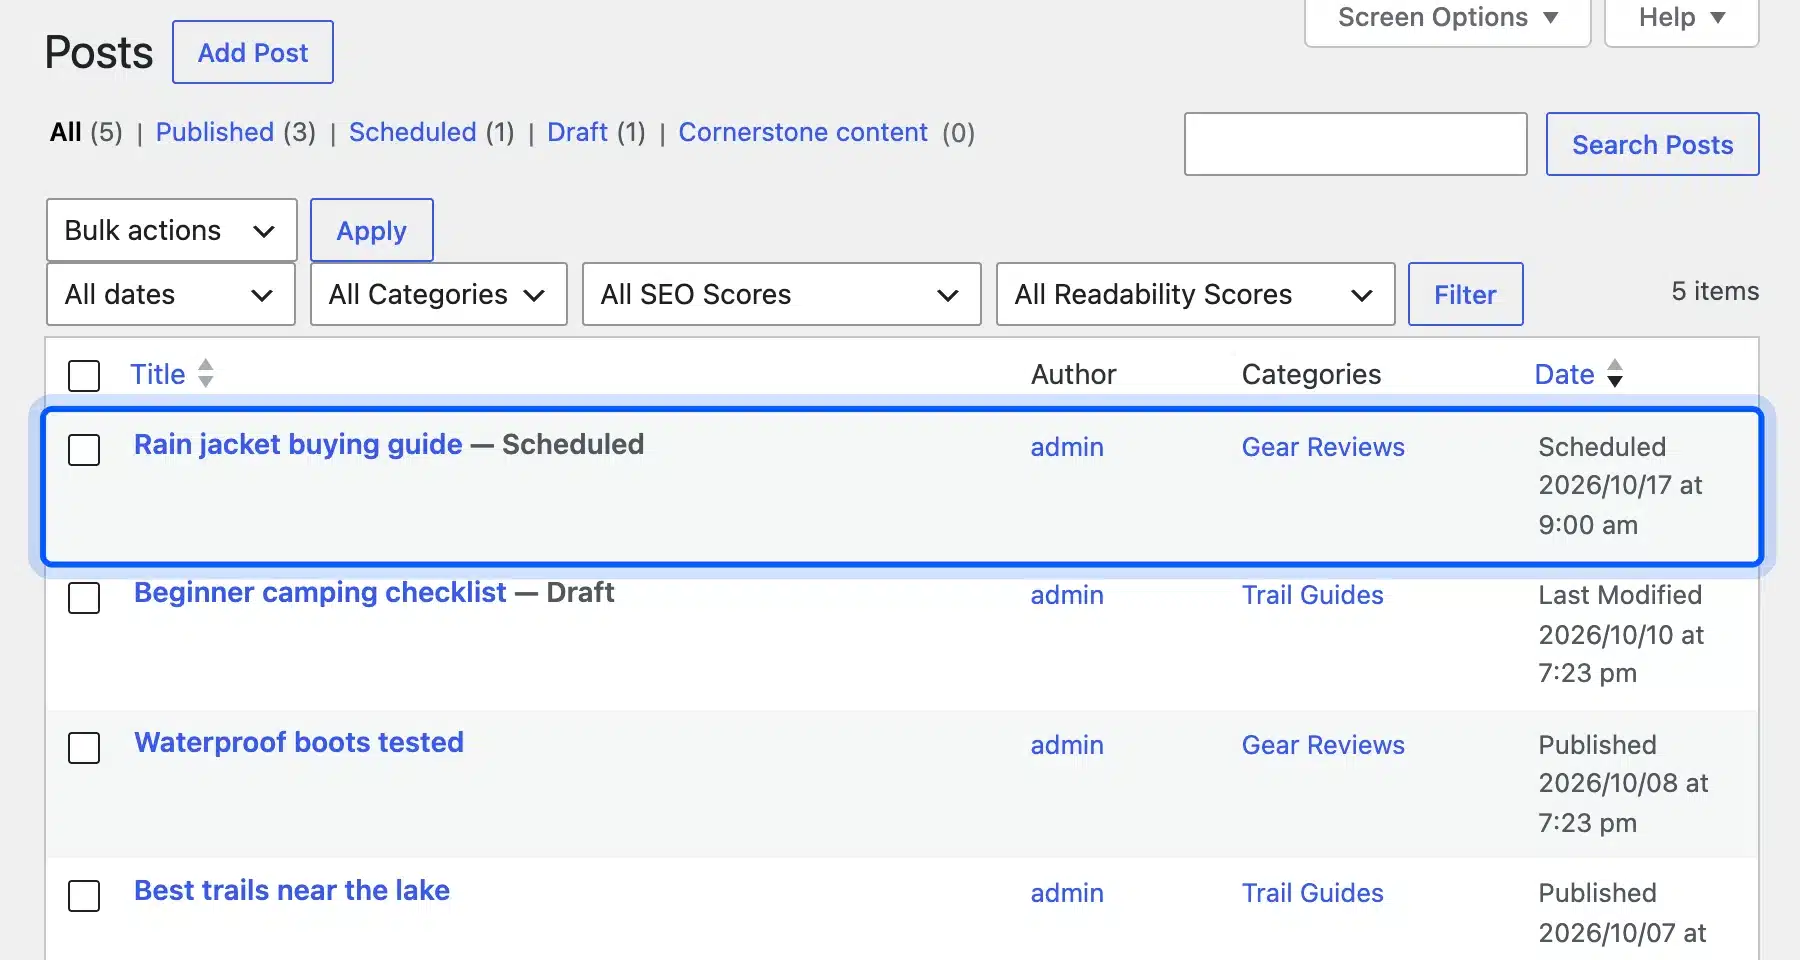
Here is a simple routine that works with core WordPress alone:
- Keep a topic list: Save each idea as a draft with only a title and one line of notes.
- Write two posts ahead: Finish posts before their week arrives, so a busy week does not break the schedule.
- Schedule on one fixed day: Pick a day and time, such as Tuesday at 9:00 am, and schedule every finished post for it.
- Review the Scheduled view: Once a week, click Scheduled on the Posts screen and check what goes out next.
Most guides on how to make a blog in WordPress stop at the first post. The calendar is what keeps the second, tenth and fiftieth post coming.
Mix the posts you plan. Pair a long how-to with a short list post, and keep one slot a month for updating an older post with new screenshots or numbers.
A calendar plugin adds drag and drop dates, but the Draft and Scheduled filters cover a one person blog well. Start there and add a plugin only when several writers share the schedule.
Mistakes That Slow Down a New WordPress Blog
Most new blogs lose time to a handful of setup mistakes rather than to writing. Each one below is easy to avoid on day one and slow to fix after a hundred posts. We hit or checked every one of them on our test site.
Here are the ones to watch:
- Changing permalinks later: Every old URL breaks unless you add redirects. Pick Post name before the first post.
- Leaving Uncategorized: A post saved without a category lands there and shows “Uncategorized” on the live page.
- Too many categories: Ten categories with one post each look empty. Start with three to six and grow from there.
- Open comments on day one: With no approval step, spam comments go live on your posts the moment they arrive.
- Skipping the featured image: Twenty Twenty-Five’s blog page leads with the image, so a post without one looks broken in the list.
- Two SEO plugins at once: Yoast and Rank Math both manage titles, meta descriptions and sitemaps. Pick one and leave the other uninstalled.
- No About page: New readers check who is behind a blog before they trust its advice. A short About page with your name and photo answers that.
- Ignoring mobile: Many readers will open your blog on a phone. Preview each post with the device switcher at the top of the editor before you publish.
None of these needs a plugin to fix. They need ten minutes of settings work before the first post, which is far less than cleaning up a live archive.
Tip: Write the first three posts before you share the blog. Visitors who land on a blog with one post rarely come back to check for a second.
Conclusion
Learning how to create a blog in WordPress is mostly about getting a few settings right before the first post. Post name permalinks, a dedicated Blog page, real categories and held comments fix most of the problems new blogs run into later.
After that, the block editor, a featured image and an SEO plugin cover the writing side. Schedule posts on one fixed day, keep two drafts ahead, and let the Posts screen work as your editorial calendar.
Frequently Asked Questions (FAQs)
Q1. Can I create a blog in WordPress for free?
Yes. A WordPress.com free plan costs nothing but uses a WordPress.com subdomain, shows ads and allows no plugins. WordPress.org software is free too, though a self-hosted blog still needs paid hosting and a domain.
Q2. How do you create a blog site in WordPress from scratch?
Install WordPress on a host, then follow the nine steps in this guide. The install covers the site itself, and the blog is the settings, pages and templates you add on top. Most people finish both parts in an afternoon.
Q3. How do I create a self-hosted WordPress blog?
Buy hosting and a domain, install WordPress from your host’s panel, then set up the blog as shown above. Our self-hosted WordPress guide compares it with WordPress.com. Self-hosting gives you full plugin and theme choice.
Q4. What is the difference between a blog post and a page?
Posts are dated, sorted into categories and tags, and listed on your blog page. Pages are standalone, like About or Contact, and never show in the post list. Use posts for articles and pages for anything that does not change often.
Q5. How many categories should a new blog have?
Three to six is a good start for most blogs. Each one should be broad enough to hold at least five posts over time. You can add more later, but merging empty categories is extra work.
Q6. Do I need a theme made for blogging?
No. Default block themes like Twenty Twenty-Five already include Blog Home and Single Posts templates. A dedicated blog theme only helps if you want a very different layout from the defaults.
Q7. Is it hard to learn how to start a blog in WordPress?
No. The steps above need no code, and every setting sits on a screen in the dashboard. The writing takes longer to learn than the setup does.
Q8. How often should I publish new posts?
Pick a pace you can keep for six months, such as one post a week. A steady schedule is easier to plan than bursts of posts followed by long gaps. Scheduling posts ahead in WordPress makes that pace easier to hold.